Появление сообщения об ошибке 401 Unauthorized Error («отказ в доступе») при открытии страницы сайта означает неверную авторизацию или аутентификацию пользователя на стороне сервера при обращении к определенному url-адресу. Чаще всего она возникает при ошибочном вводе имени и/или пароля посетителем ресурса при входе в свой аккаунт. Другой причиной являются неправильные настройки, допущенные при администрировании web-ресурса. Данная ошибка отображается в браузере в виде отдельной страницы с соответствующим описанием. Некоторые разработчики интернет-ресурсов, в особенности крупных порталов, вводят собственную дополнительную кодировку данного сбоя:
- 401 Unauthorized;
- Authorization Required;
- HTTP Error 401 – Ошибка авторизации.
Попробуем разобраться с наиболее распространенными причинами возникновения данной ошибки кода HTTP-соединения и обсудим способы их решения.
Причины появления ошибки сервера 401 и способы ее устранения на стороне пользователя
При доступе к некоторым сайтам (или отдельным страницам этих сайтов), посетитель должен пройти определенные этапы получения прав:
- Идентификация – получение вашей учетной записи («identity») по username/login или email.
- Аутентификация («authentic») – проверка того, что вы знаете пароль от этой учетной записи.
- Авторизация – проверка вашей роли (статуса) в системе и решение о предоставлении доступа к запрошенной странице или ресурсу на определенных условиях.
Большинство пользователей сохраняют свои данные по умолчанию в истории браузеров, что позволяет быстро идентифицироваться на наиболее часто посещаемых страницах и синхронизировать настройки между устройствами. Данный способ удобен для серфинга в интернете, но может привести к проблемам с безопасностью доступа к конфиденциальной информации. При наличии большого количества авторизованных регистрационных данных к различным сайтам используйте надежный мастер-пароль, который закрывает доступ к сохраненной в браузере информации.
Наиболее распространенной причиной появления ошибки с кодом 401 для рядового пользователя является ввод неверных данных при посещении определенного ресурса. В этом и других случаях нужно попробовать сделать следующее:
- Проверьте в адресной строке правильность написания URL. Особенно это касается перехода на подстраницы сайта, требующие авторизации. Введите правильный адрес. Если переход на страницу осуществлялся после входа в аккаунт, разлогинитесь, вернитесь на главную страницу и произведите повторный вход с правильными учетными данными.
- При осуществлении входа с сохраненными данными пользователя и появлении ошибки сервера 401 проверьте их корректность в соответствующих настройках данного браузера. Возможно, авторизационные данные были вами изменены в другом браузере. Также можно очистить кэш, удалить cookies и повторить попытку входа. При удалении истории браузера или очистке кэша потребуется ручное введение логина и пароля для получения доступа. Если вы не помните пароль, пройдите процедуру восстановления, следуя инструкциям.
- Если вы считаете, что вводите правильные регистрационные данные, но не можете получить доступ к сайту, обратитесь к администратору ресурса. В этом случае лучше всего сделать скриншот проблемной страницы.
- Иногда блокировка происходит на стороне провайдера, что тоже приводит к отказу в доступе и появлению сообщения с кодировкой 401. Для проверки можно попробовать авторизоваться на том же ресурсе с альтернативного ip-адреса (например, используя VPN). При подтверждении блокировки трафика свяжитесь с провайдером и следуйте его инструкциям.
Некоторые крупные интернет-ресурсы с большим количеством подписчиков используют дополнительные настройки для обеспечения безопасности доступа. К примеру, ваш аккаунт может быть заблокирован при многократных попытках неудачной авторизации. Слишком частые попытки законнектиться могут быть восприняты как действия бота. В этом случае вы увидите соответствующее сообщение, но можете быть просто переадресованы на страницу с кодом 401. Свяжитесь с администратором сайта и решите проблему.
Иногда простая перезагрузка проблемной страницы, выход из текущей сессии или использование другого веб-браузера полностью решают проблему с 401 ошибкой авторизации.
Устранение ошибки 401 администратором веб-ресурса
Для владельцев сайтов, столкнувшихся с появлением ошибки отказа доступа 401, решить ее порою намного сложнее, чем обычному посетителю ресурса. Есть несколько рекомендаций, которые помогут в этом:
- Обращение в службу поддержки хостинга сайта. Как и в случае возникновения проблем с провайдером, лучше всего подробно описать последовательность действий, приведших к появлению ошибки 401, приложить скриншот.
- При отсутствии проблем на стороне хостинг-провайдера можно внести следующие изменения в настройки сайта с помощью строки Disallow:/адрес проблемной страницы. Запретить индексацию страницам с ошибкой в «rоbоts.txt», после чего добавить в файл «.htассеss» строку такого типа:
Redirect 301 /oldpage.html http://site.com/newpage.html.
Где в поле /oldpage.html прописывается адрес проблемной страницы, а в http://site.com/newpage.html адрес страницы авторизации.
Таким образом вы перенаправите пользователей со всех страниц, которые выдают ошибку 401, на страницу начальной авторизации.
- Если после выполнения предыдущих рекомендаций пользователи при попытках авторизации все равно видят ошибку 401, то найдите на сервере файл «php.ini» и увеличьте время жизни сессии, изменив значения следующих параметров: «session.gc_maxlifetime» и «session.cookie_lifetime» на 1440 и 0 соответственно.
- Разработчики веб-ресурсов могут использовать более сложные методы авторизации и аутентификации доступа для создания дополнительной защиты по протоколу HTTP. Если устранить сбой простыми методами администрирования не удается, следует обратиться к специалистам, создававшим сайт, для внесения соответствующих изменений в код.
Хотя ошибка 401 и является проблемой на стороне клиента, ошибка пользователя на стороне сервера может привести к ложному требованию входа в систему. К примеру, сетевой администратор разрешит аутентификацию входа в систему всем пользователям, даже если это не требуется. В таком случае сообщение о несанкционированном доступе будет отображаться для всех, кто посещает сайт. Баг устраняется внесением соответствующих изменений в настройки.
Дополнительная информация об ошибке с кодом 401
Веб-серверы под управлением Microsoft IIS могут предоставить дополнительные данные об ошибке 401 Unauthorized в виде второго ряда цифр:
- 401, 1 – войти не удалось;
- 401, 2 – ошибка входа в систему из-за конфигурации сервера;
- 401, 3 – несанкционированный доступ из-за ACL на ресурс;
- 401, 501 – доступ запрещен: слишком много запросов с одного и того же клиентского IP; ограничение динамического IP-адреса – достигнут предел одновременных запросов и т.д.
Более подробную информацию об ошибке сервера 401 при использовании обычной проверки подлинности для подключения к веб-узлу, который размещен в службе MS IIS, смотрите здесь.
Следующие сообщения также являются ошибками на стороне клиента и относятся к 401 ошибке:
- 400 Bad Request;
- 403 Forbidden;
- 404 Not Found;
- 408 Request Timeout.
Как видим, появление ошибки авторизации 401 Unauthorized не является критичным для рядового посетителя сайта и чаще всего устраняется самыми простыми способами. В более сложной ситуации оказываются администраторы и владельцы интернет-ресурсов, но и они в 100% случаев разберутся с данным багом путем изменения настроек или корректировки html-кода с привлечением разработчика сайта.
Trying to access a site and being met with an error page is at best inconvenient, whether that site is yours or someone else’s. As with many HTTP response codes, part of what makes a 401 error so frustrating is the lack of information it offers for diagnosing and resolving the issue.
The 401 error can happen with any browser, so it’s a pretty common issue people face. In most cases, this problem is relatively simple and straightforward to fix.
In this post, we’ll explain what 401 error messages are and why they happen. Then, we’ll walk you through five methods you can use to fix them.
Let’s get started!
What is the 401 Error Code?
The Internet Engineering Task Force (IETF) defines the error 401 Unauthorized as:
The 401 (Unauthorized) status code indicates that the request has not been applied because it lacks valid authentication credentials for the target resource. The server generating a 401 response MUST send a WWW-Authenticate header field containing at least one challenge applicable to the target resource.
An Introduction to the 401 Error Code
HTTP 400 status codes are encountered when there is a problem making a request. A 401 error, in particular, happens when your browser denies you access to the page you’re trying to visit.
As a result, instead of loading the web page, the browser will load an error message. 401 errors can happen within any browser so the message appearing may differ.
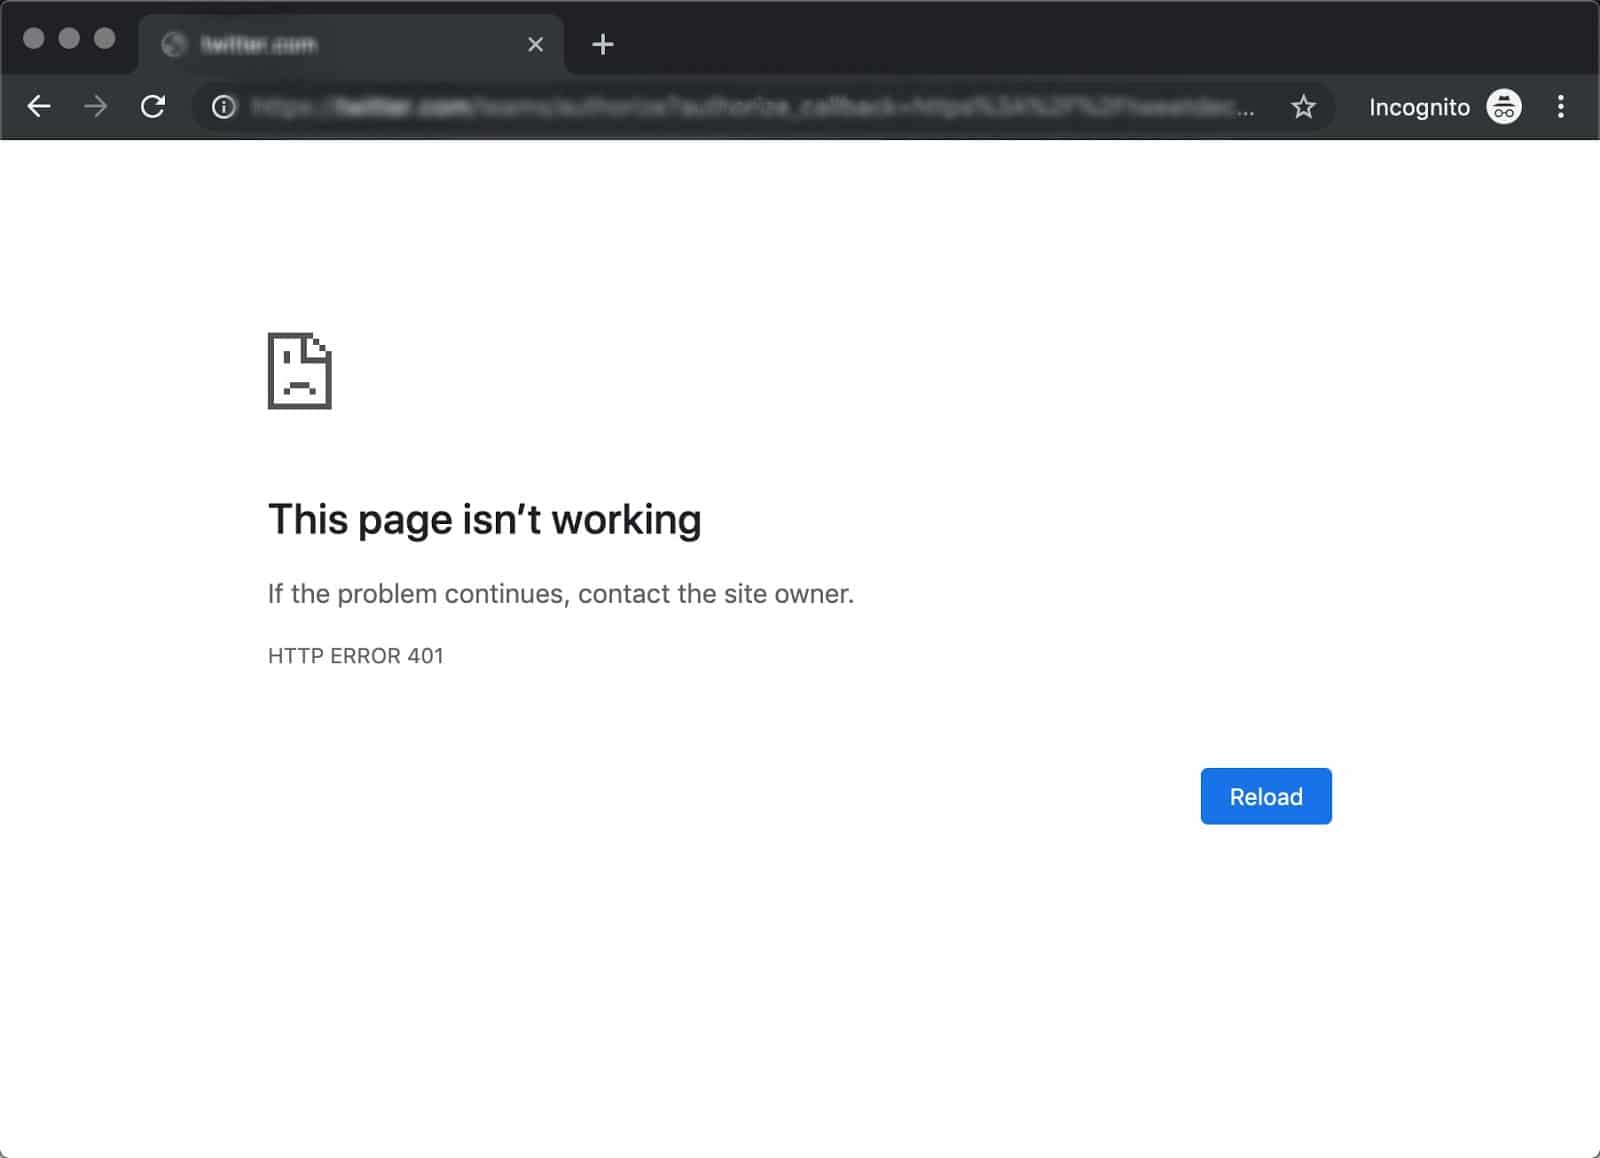
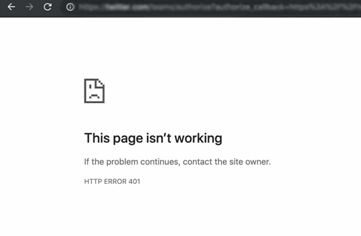
For example, in Chrome or Edge, you’ll likely see a paper icon along with a simple message telling you that the page in question isn’t working. It will include the phrase “HTTP Error 401” at the bottom, and instruct you to contact the site’s owner if the problem persists:
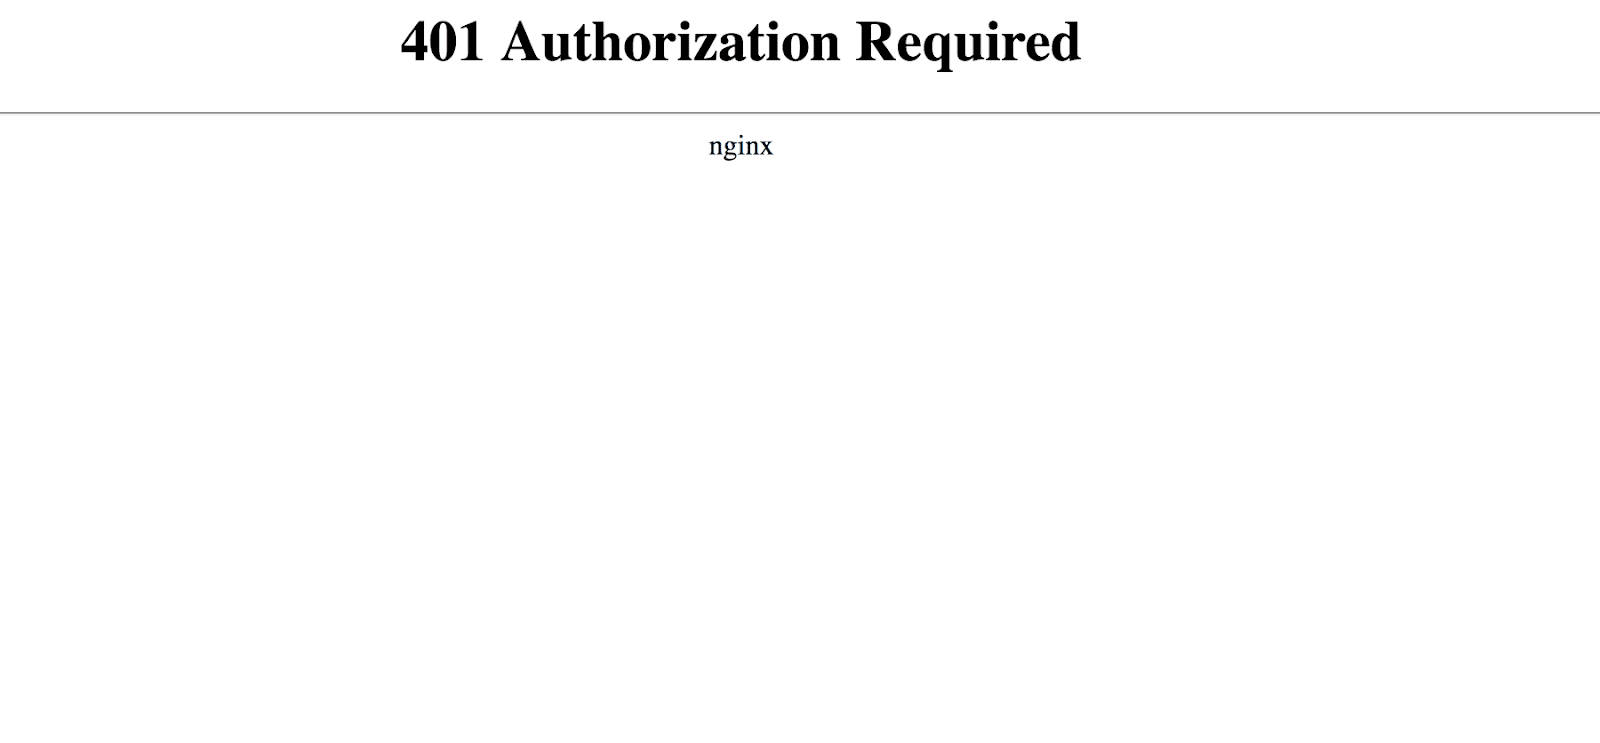
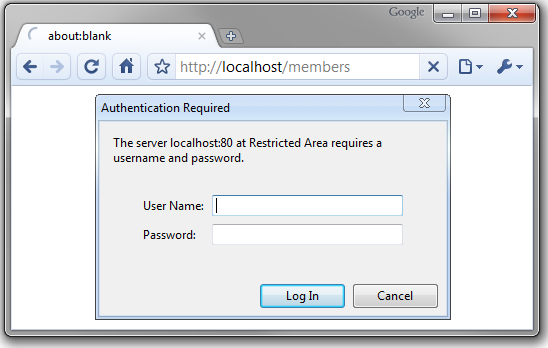
At other times and in other browsers, you might get a slightly less friendly warning that’s just a blank page with a “401 Authorization Required” message:
Other variations include:
- “HTTP 401 Error – Unauthorized”
- “401 Unauthorized”
- “Access Denied”
These errors occur on websites that require a login in order to access them. In most cases, it means that something is either wrong with the credentials or with the browser’s ability to read them as valid.
This is similar to HTTP 403 Forbidden Error, in that access isn’t permitted to the user. However, unlike with the 403 error, the 401 error message indicates that the authentication process failed.
The code is sent via the WWW-Authenticate header, which is responsible for identifying the authentication method used for granting access to a web page or resource.
| Error Code | HTTP 401 Unauthorized Error |
| Error Type | Commonly a client-side error |
| Error Variations | 401 Authorization Required 401 Unauthorized HTTP 401 Error – Unauthorized Access Denied |
| Error Causes | Outdated Browser Cache and Cookies Plugin Incompatibility Incorrect URL or Outdated Link |
The HTTP 401 error is all too common 🤦♀️ — and this guide will give you everything you need to fix it the next time you see that message showing up ✅Click to Tweet
What Causes a 401 Error?
If you encounter an error code in the 400s, you know you’re dealing with a client-side (or browser-side) issue. While the problem may be happening within your browser, however, it doesn’t necessarily always mean that’s the culprit, which we’ll explain in more detail later.
401 errors occur on restricted resources, such as password-protected pages of your WordPress site. So it’s safe to assume that the cause of the problem has something to do with the authentication credentials.
Outdated Browser Cache and Cookies
One of the most common reasons you might experience a 401 error is that your browser’s cache and cookies are out of date, preventing the authorization from successfully going through. If your browser isn’t using the valid authentication credentials (or any at all), the server will reject the request.
Plugin Incompatibility
At other times, this error is caused by a plugin incompatibility or error. For example, a firewall or security plugin can mistake your login attempt as malicious activity, and return a 401 error to protect the page.
Incorrect URL or Outdated Link
It’s also possible that the source of the problem can be attributed to a minor mistake. Common culprits in this category include an incorrectly-typed URL or an outdated link.
How to Fix the 401 Error?
Now that we’ve gone through a bit of background on the 401 error, it’s time to discuss how you can resolve it.
Let’s take a look at five methods you can use:
1. Look for Errors in the URL
We’ll start off with the easiest potential fix: making sure you used the correct URL. This may sound simple, but 401 errors can sometimes appear if the URL wasn’t correctly entered in.
Another possibility is that the link you used to visit the page in question points to the wrong URL. For example, it might be outdated, or leading to a page that no longer exists (and no redirects are in place).
Therefore, it’s worth double-checking the URL you used. If you typed it in yourself, verify that you spelled everything correctly. If you clicked on a link, confirm that it’s pointing to the page you’re trying to access (or try to visit that page directly through the website).
2. Clear Your Browser’s Cache
Your browser’s cache is designed to improve your online experience, by reducing page loading times. Unfortunately, sometimes it can also cause unwanted interruptions.
As we mentioned earlier, one of the common causes of the 401 error is outdated or incorrect cache data or cookies. Therefore, if you don’t notice any issues with the page’s URL, the next step is to clear your browser’s cache.
This will clean out any invalid information that’s locally stored in your browser, which could be interrupting the authentication process. Similarly, your browser’s cookies might contain authentication data that simply needs to be refreshed.
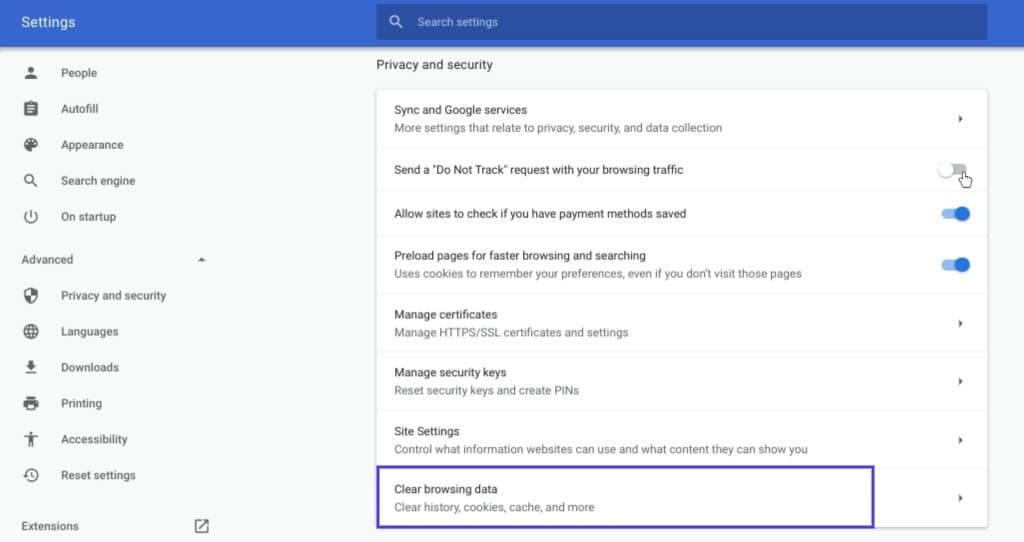
If you’re a Google Chrome user, you can do this by clicking on the menu icon in the top-right corner of the browser, and then going to Settings. Under the Privacy and security section, click on Clear browsing data:
A new window will open. Under the Basic tab, make sure all three boxes are selected, and then select Clear data:

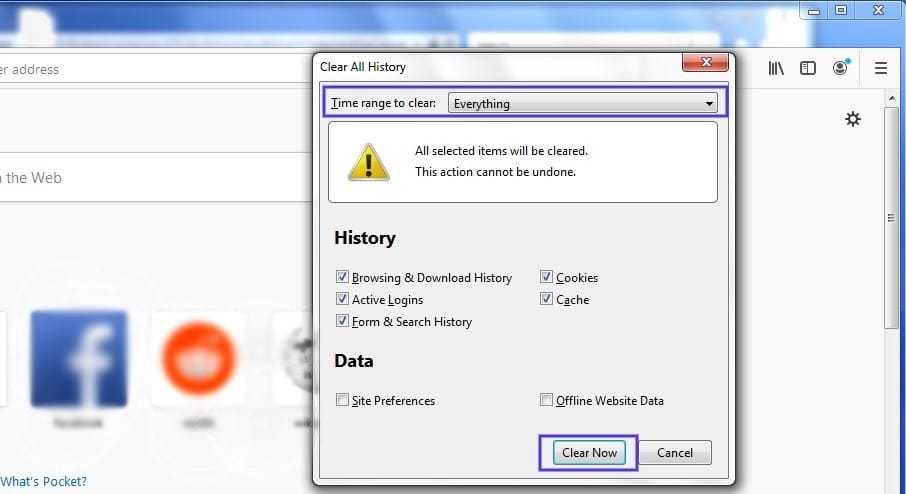
This process will look a little different in other browsers. For example, in Mozilla Firefox, you would click on the library icon in the top-right corner of the browser, followed by History > Clear Recent History:
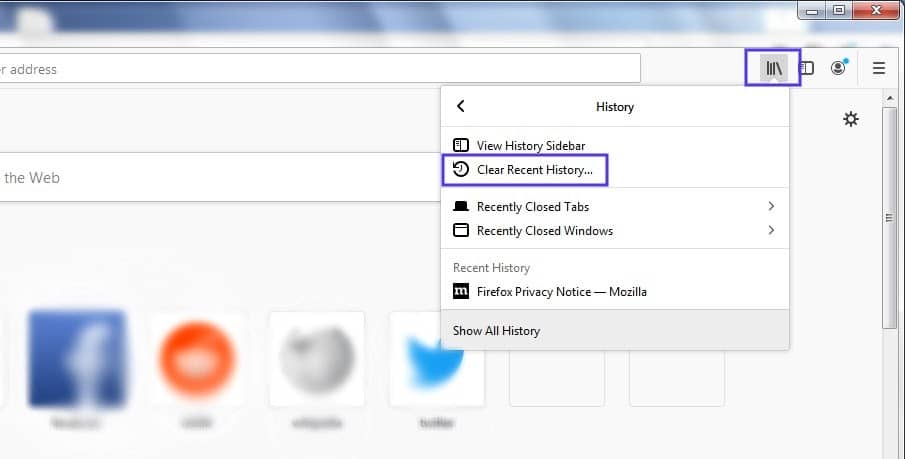
In the panel that opens next, select Everything in the drop-down menu at the top, make sure “Cache” is selected, and then click on the Clear Now button:
If you’re using a different browser, please refer to this guide for clearing the cache
3. Flush Your DNS
Another method you can try to resolve the 401 error is flushing your Domain Name Server (DNS). While this is a rarer issue, it can be a possible cause, so it’s worth giving it a try if the first two solutions don’t work.
To do this in Windows, click on the Start button and type cmd into the search bar. Hit Enter, and the Command Prompt will open. Copy and paste the command ipconfig/flushdns, and then hit Enter again:

On a Mac, you can do this by going to Finder > Applications > Utilities > Terminal:
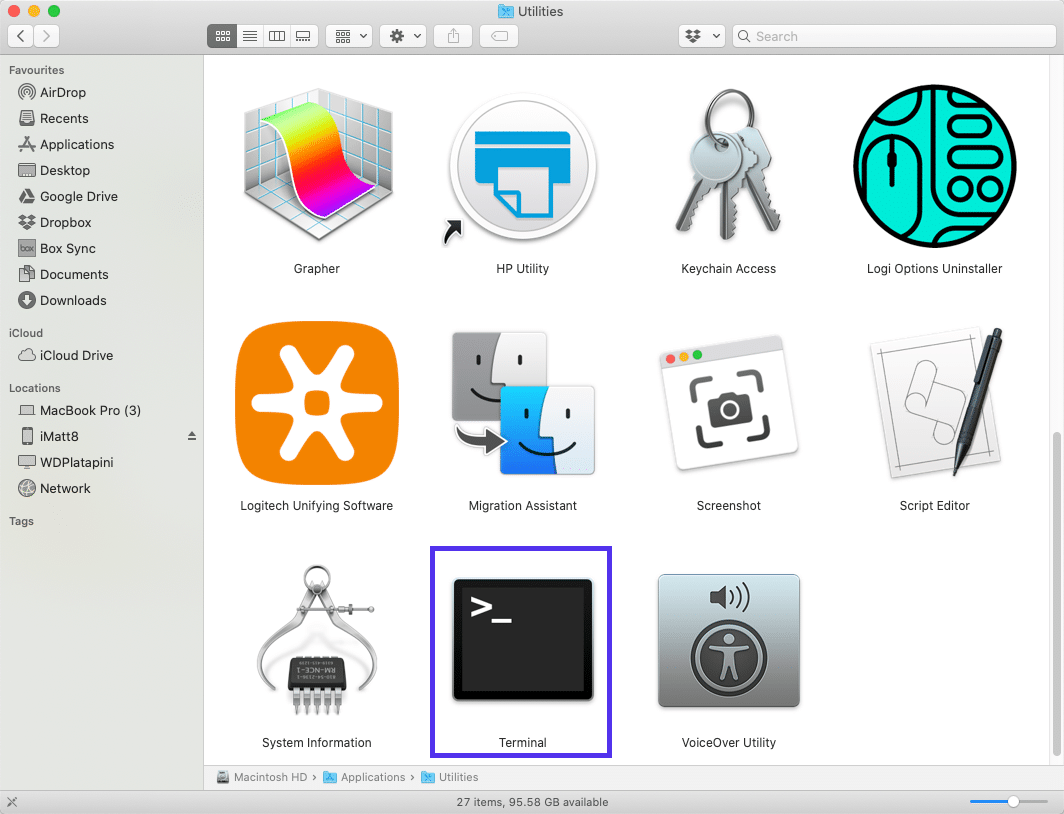
Input the command line sudo killall -HUP mDNSResponder and press Enter. Then, you can try refreshing the page you were trying to visit, to see if the 401 error has been resolved.
4. Deactivate Your WordPress Plugins
The problem causing your 401 error might not be due to your browser. If you’re having trouble accessing your WordPress site, it’s also possible that one or more plugins are to blame.
Some plugins, especially security-focused plugins, are configured to show a 401 error when they suspect suspicious login activity that might indicate an attack. Others might just be suffering from compatibility issues. Therefore, it’s a good idea to deactivate all of your WordPress plugins and see if that resolves the issue.
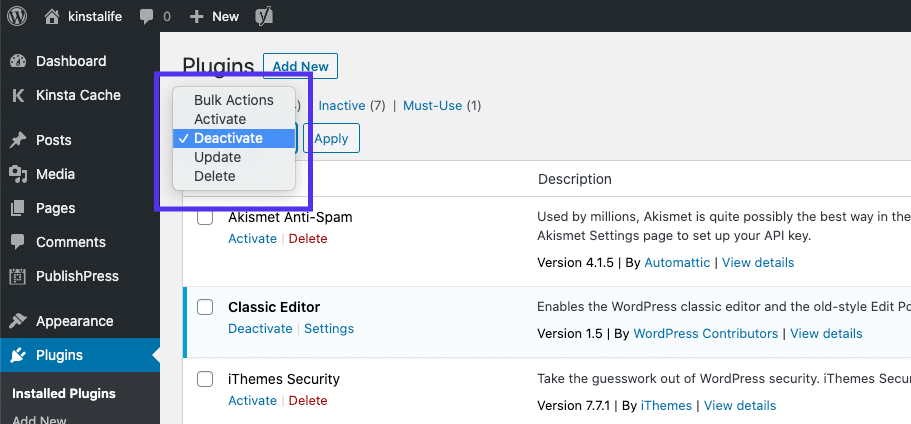
You can deactivate your plugins all at the same time in your dashboard, by going to Plugins > Installed Plugins. Check the box at the top to select all of them. Then under the Bulk Actions drop-down menu, select Deactivate and click on the Apply button:
After that, try reloading the page that returned the 401 error to see if this has resolved the issue. If it has, you can manually activate each plugin one at a time, in order to determine which one is causing the problem.
Then you can remove that plugin, replace it with a new one, or contact its developer for assistance.
5. Check the WWW-Authenticate Header Response
At this point, if the issue hasn’t been fixed, it may be caused by a server-side problem. This means our last fix will be a bit more involved.
As we saw earlier, the 401 response is sent through the WWW-Authenticate header, which appears as “WWW-Authenticate: <type> realm=<realm>”. It includes ‘challenges’, or strings of data that indicate what type of authentication is required in order for access to be granted.
In a nutshell, you’ll want to check and see if the header response was sent, and more specifically, what authentication scheme was used. At the very least, this can help narrow down the cause of the problem, and bring you one step closer to a solution.
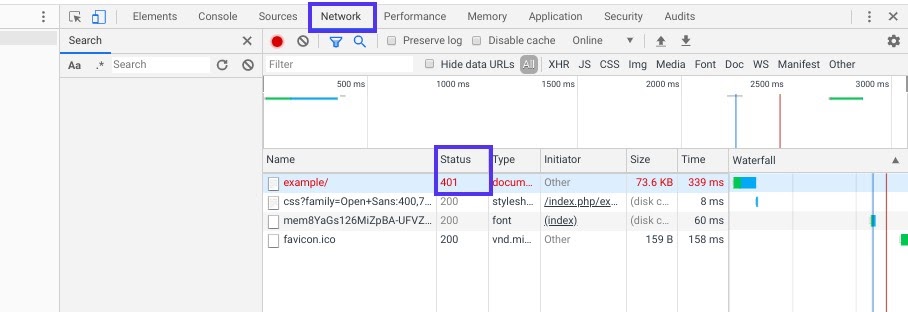
To do this, go to the web page that’s displaying the 401 error, and access the developer console in Chrome. You can right-click on the page and select Inspect, or use Ctrl+Shift+J.
Next, click on the Network tab and reload the page. This will generate a list of resources. Select the Status header to sort the table and locate the 401 status code:
Select that entry, and then click on the Headers tab. Under Response Headers, locate the WWW-Authenticate header:
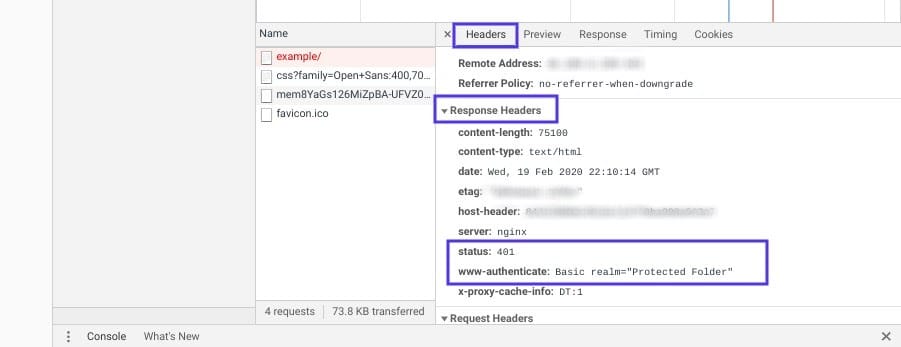
The information that is present in the response header, particularly the authentication schemes, can give you more information about what’s happening and point you towards a solution. It can help you understand what type of authentication the server is expecting.
For example, in the above example, we can see that the authentication scheme is “Basic”. This means the authentication request should only require an ID and password. For more detailed information and instructions on how to use this information, we recommend referring to the HTTP Authentication Scheme Registry.
HTTP 401 errors, begone! 🧙♂️ 5 ways to stop those pesky messages (no magic required) ✨Click to Tweet
Summary
When your browser and server have trouble communicating or authenticating requests, you’re sometimes forced to deal with errors such as the 401 error. While this problem is irritating, the message is usually temporary and fixable.
Here are five methods you can use to fix the 401 error:
- Look for errors in the URL.
- Clear your browser’s cache.
- Flush your DNS.
- Deactivate your WordPress plugins.
- Check the WWW-Authenticate header response.
Что значит код ошибки 401?
Код ошибки 401 — Unauthorized в переводе с английского «неавторизованный».
Код ошибки сообщает о том, что для доступа к информации нужно быть авторизованным на данном сайте. Данная ошибка обычно возникает при некорректной работе сайта или скрипта, которые отвечают за авторизацию пользователей на сайте или если клиент вводит неверные пароль или логин.
Некоторые администраторы сайтов специально ставят запрет доступа к ресурсу, путем создания пароля ограничивается доступ к какой-либо папке. Как запретить доступ к сайту и отдельной странице, читайте в нашей статье.
Ошибка авторизации 401 отображается внутри окна веб-браузера, как обычная веб-страница. Как и большинство подобных ошибок, Вы можете столкнуться с ошибкой входа 401 во всех браузерах, работающих на любой операционной системе.
После ввода некорректных данных открывается страница ошибки 401.
Как исправить ошибку 401 Unauthorized:
1. Первым делом необходимо проверить URL на наличие ошибок. Ошибка 401 Unauthorized при входе на сайт может возникнуть из-за неправильно введенного URL-адреса. Возможно данная ссылка указывает на страницу, предназначенную исключительно для авторизованных пользователей.
2. Если ссылка рабочая, то перейдите на главную страницу сайта и найдите ссылку с надписью «Логин» или «Безопасный доступ». Далее введите свои учетные данные в соответствующие поля и повторите попытку.
Если у Вас нет учетных данных или Вы потеряли свои, следуйте инструкциям на сайте для создания учетной записи или восстановления старой.
Рекомендуем хранить все свои данные для входа в диспетчере паролей, это очень удобно так как нужно будет запомнить только один пароль.
3. Простой способ — перезагрузить веб-страницу. Если ошибка 401 вызвана ошибочно загруженной страницей, перезагрузка может вполне решить проблему.
4. Очистите кэш браузера. Возможно браузер хранит неверные данные для входа поэтому при посещении страницы возникает ошибка 401. После удаления кэша, страница будет загружать свежие файлы. Читайте, как очистить кэш браузера в нашей статье.
5. Если страница не нуждается в авторизации, то ошибка 401 Unauthorized может быть общей ошибкой. Значит лучше оповестить администраторов сайта о возникшей неполадке. Возможно руководство сайта решило ввести изменения и ограничить доступ с помощью авторизации.
Практически каждый сталкивался с ситуацией, когда в ответ на попытку открыть сайт, загрузить файл или приложение браузер выдает ошибку, например, 404 – Not Found. Каждая ошибка имеет свой код – трехзначное число, по которому можно определить, что именно произошло с запросом.
На самом деле веб-сервер высылает трехзначные коды в ответ на любое обращение браузера к нему, даже если запрос обработан успешно. Но обычный пользователь сталкивается только с кодами, обозначающими ошибку обработки запроса, а успешные и информационные ответы сервера остаются для него невидимыми.
В этой статье мы разберем, какие виды ошибок зашифрованы в ответах и почему эти ошибки возникают.
Ошибки 4xx (400-414)
Ответы с кодами от 400 до 414 называют «ошибками на стороне клиента». Сервер дает понять, что что-то не так с самим запросом. Несмотря на классификацию, такие ошибки часто необходимо исправлять вебмастеру, а не пользователю. Их причиной могу быть неправильные настройки веб-сервера, скриптов сайта и т. п.
Ошибка 400

Расшифровывается как «неверный запрос». Код ошибки 400 говорит о том, что запрос составлен неправильно, и сервер не может его понять. Если вы формируете запрос вручную, то, возможно, указали неверный URL. Но чаще всего запрос повреждается в результате технического сбоя или искажения данных при передаче. Это может произойти по нескольким причинам:
- передача данных блокируется антивирусом или брандмауэром Windows;
- данные искажаются при нестабильном соединении;
- клиент (браузер или приложение) пытается загрузить слишком большой файл;
- повреждены или устарели куки на стороне пользователя.
Ошибка 401

Пояснение – «не авторизовано». Код ошибки 401 означает, что запрос направлен к защищенным ресурсам, для которых требуется аутентификация. Сервер ожидает получить логин и пароль, но в запросе их нет.
Ошибка 403

Ответ означает «Запрещено». У пользователя нет прав на доступ к файлам или папкам по ссылке. Чаще всего вебмастеру исправлять ничего не нужно, все настроено верно. А вот пользователю необходимо проверить, правильно ли он указал адрес страницы. Иногда из-за опечатки ссылка ведет в запрещенную для просмотра папку, а не на страницу сайта.
Если же пользователь не может попасть на страницу, которая должна быть разрешена к просмотру, то, возможно, в настройках сайта или внутренних ссылках есть ошибки, которые нужно исправить разработчику.
Ошибка 404

Самый популярный код ошибки – 404. Переводится как «не найдено». Такой ответ сервер отсылает, если не находит документ, файл или страницу по указанному пользователем адресу. Возможные причины:
- страница, которая ранее размещалась по этой ссылке, перемещена или удалена навсегда. В этом случае для SEO-продвижения будет лучше, чтобы сервер отдавал ответы с кодами 410 или 301, а не обрабатывал запрос как 404 ошибку. Вебмастеру нужно об этом позаботиться;
- страница недоступна временно из-за технических сбоев. В этом случае ничего делать не нужно за исключением устранения самих сбоев;
- пользователь опечатался и ввел неправильный адрес страницы. Предпринимать ничего не нужно, 404 ответ в этом случае является корректным.
Страницу, на которой посетитель видит код ошибки 404, рекомендуется оформить с пользой: дать ссылки на главную страницу сайта и популярные разделы, объяснить, почему пользователь видит эту ошибку. На многих сайтах на 404 странице можно увидеть креативное оформление, забавные анимации и т. п.
Ошибка 405

Расшифровка – «метод не поддерживается». Для каждого типа операций (загрузка, передача данных) http-протокол предусматривает использование своего метода (GET, POST и т. д.). Ошибка означает, что запрос на сервер выполнен с использованием неправильного метода. От клиента здесь мало что зависит, причины – в настройках веб-сервера. Например:
- происходит попытка обработки файлов с помощью метода POST, тогда как файлы этого формата должны обрабатываться непосредственно сервером Apache;
- PHP-скрипт не справляется с большим объемом импорта данных, такую операцию лучше проводить другими способами. Время, отведенное на работу скрипта, превышается, и возникает ошибка 405;
- некорректно настроено взаимодействие метода POST и модуля FastCGI.
Ошибка 406
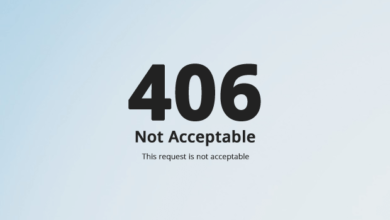
Расшифровывается как «неприемлемо». Достаточно редкий ответ. Возникает, если сервер отдает информацию в виде, который не может распознать клиент (ваш браузер, или поисковый робот – если ошибка появляется при индексации страниц сайта). Чаще всего контент не распознается из-за сжатия или неподдерживаемого формата, иногда – неправильной кодировки.
Причина может быть в:
- установленном на хостинге брандмауэре ModSecurity. Он блокирует запросы, которые считает зловредными. Иногда «под раздачу» попадают и вполне безобидные обращения. Часто ошибка 406 появляется после установки плагинов, кодов рекламных баннеров;
- неверных заголовках Content-Type или Content-Encoding;
- отправке в ответ на запрос поискового робота сжатого контента, тогда как требуются данные без сжатия.
Ошибка 407
Пояснение переводится как «нужна аутентификация прокси». Возникает, если доступ в сеть или к определенным сайтам осуществляется через прокси-сервер, но в запросе нет данных для авторизации на нем. Пользователю нужно пройти аутентификацию. Обычно в тексте ответа с кодом 407 содержатся подсказки – как это сделать.
Ошибка 408

Переводится как «истекло время запроса». Может возникнуть при передаче больших файлов, временного сбоя интернет-подключения, перегрузке сервера в данный момент и т. д. Чаще всего никаких действий от вебмастера не требуется, за исключением случаев, когда 408 ошибка появляется часто и есть подозрение, что сервер не справляется с текущей нагрузкой. Тогда стоит подумать об аренде дополнительных ресурсов хостинга или переходе на более подходящий тарифный план.
Со стороны пользователя чаще всего устранить проблему можно простой перезагрузкой страницы. Также можно попробовать зайти на сайт позже или проверить стабильность интернет-соединения.
Ошибка 409
Произошел конфликт запроса и данных на сервере. Например, пользователь загружает файл устаревшей версии, в то время как аналогичный файл на сервере – более новый.
В некоторых случаях причиной может быть:
- конфликт обращений между файлами на самом сервере, тогда действия пользователя здесь ни при чем;
- конфликт с прокси, через которые идет обращение к серверу;
- вирусное ПО на компьютере пользователя;
- сбой в работе браузера.
Чаще всего ошибку можно устранить, просто загрузив корректный файл.
Ошибка 410

Страница или документ, к которому обращается запрос, недоступен. Ошибка 410 похожа на 404 с той лишь разницей, что она выдается, если данные по ссылке удалены навсегда.
Исправлять чаще всего ничего не нужно. Наоборот, рекомендуется прописывать код ответа 410 для документов или страниц, которые были удалены, чтобы поисковые роботы не тратили на них лимит сканирования при переобходе сайта.
Ошибка 411

Расшифровывается как «требуется длина». Такая ситуация может возникнуть при передаче файлов определенными методами и выставленных ограничениях на передаваемый объем. В этих случаях серверу нужен параметр Content-Length, и он ожидает увидеть его в запросе.
Ошибка 412

Расшифровывается как «предварительное условие не выполнено». Причину ошибки нужно искать в заголовках запроса. Иногда там прописываются различные условия, и сервер обязан проверить их соблюдение перед обработкой запроса. Если при проверке сервер выявляет, что условия не могут быть выполнены, не соблюдаются, он отклоняет запрос и высылает ответ с кодом 412.
Самая простая причина – проблема в браузере пользователя. Достаточно почистить кеш и куки, чтобы ошибка исчезла.
Также проблема может возникнуть после установки на сайте новых тем, плагинов или некорректного изменения кода.
Ошибка 413
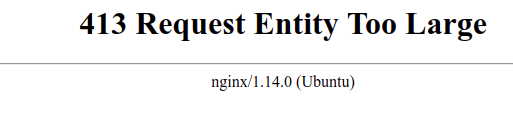
Означает «слишком большое тело запроса». Объем запроса больше, чем веб-сервер может обработать. Чаще всего возникает при загрузке слишком большого файла. Ограничения по объему файлов могут быть выставлены по умолчанию (например, в Nginx это 1 МБ) или веб-мастером. Чтобы увеличить допустимый объем, измените настройки веб-сервера, директивы .htaccess или скрипты php, которые отвечают за загрузку.
Если ограничения выставлены корректно, то пользователю нужно порекомендовать:
- загрузить файл меньшего размера (сжать изображение или видео);
- архивировать загружаемый файл (при архивации будет применено сжатие и размер файла уменьшится);
- не загружать несколько файлов одновременно.
Ошибка 414
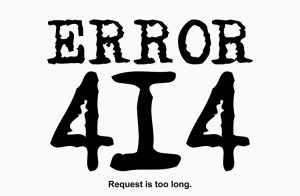
Перевод пояснения – «URL слишком длинный». Сервер не может взять в обработку слишком длинный веб-адрес, и поэтому отклоняет запрос.
Ошибка может возникнуть, например, при некорректно настроенном коде CMS, когда при каждом переходе со страницы на страницу в административной панели сайта к URL дописывается фрагмент с параметрами. Таким образом ссылка становится все длиннее и длиннее, пока не превышает лимит.
Часто наличие таких ошибок и переходов по длинным URL свидетельствуют о попытках взломать сайт.
Ошибки на стороне сервера 5xx
Следующая категория ошибок – на стороне сервера (с 500 по 560). Ответ с таким кодом говорит, что запрос корректный, и отвечает всем требованиям сервера, но сам сервер по своим причинам не может его обработать. Разберем коротко каждую из ошибок.
Ошибка 500

Перевод пояснения – «внутренняя ошибка сервера». Ответ с кодом 500 выдается в том случае, когда ошибку нельзя отнести ни к каким другим типам – сервер не может определить, в чем проблема. Часто причина в неверных настройках .htaccess.
Ошибка 501

Означает «не реализовано». Сервер не понимает метод запроса, или не имеет функциональности для его обработки. Не стоит путать с 405 ошибкой – в ее случае метод просто используется неправильно (не к тем данным или неправильным способом), однако сервер его знает.
Ошибка 502

Означает «ошибка шлюза». Если запрос проходит через несколько серверов (через прокси), и какой-то из них не может обработать запрос, то первый сервер отдает такую ошибку. Возможные причины:
- блокировка запроса файерволом сервера;
- нет связи между какими-то участками в пути следования запроса;
- имеет место неправильная настройка сервера- «виновника» или конфликт настроек между серверами;
- сервер неисправен и т. п.
Ошибка 503

Пояснение переводится как как «сервис недоступен». Возможные причины:
- к серверу одновременно поступило большое количество обращений пользователей, и у него не хватает мощности их все обработать;
- на сервере стоит ограничение на максимальное одновременное подключение пользователей, и оно превышено;
- на сервере проводятся технические работы.
Ошибка 503 может быть связана с DDoS-атакой или просто перегрузкой сервера из-за несоответствия нагрузки на сайт и выделенных под него на хостинге мощностей. В последнем случае, возможно, стоит перейти на тарифный план уровнем выше.
Ошибка 504
Означает, что «время прохождения через шлюз истекло». Возникает, если запрос проходит через один или несколько шлюзов-серверов, и один из них не укладывается в отведенный таймаут. Причинами могут быть слишком короткий таймаут в настройках, перегрузка сервера запросами, медленное или нестабильное интернет-соединение между серверами и т. п.
Ошибка 505
Означает «версия http не поддерживается». Здесь причина понятна из названия ошибки. Такой ответ можно получить, если на сервере или клиенте работает устаревшее программное обеспечение, а также из-за некорректных настроек обработки запросов на стороне сервера.
Ошибка 506
Можно расшифровать как «сервер подвергается цензуре». Сервер, к которому отправлен запрос, запрещен для доступа из-за цензурных ограничений.
The proper 401 Error meaning is an HTTP status code that indicates the request lacks valid authentication credentials for the requested resource. It means that the server knows about the client but the client doesn’t have sufficient permissions to access the resource and is not authorized to do so without proper authentication.
If you are a web developer, admin, or regular user, knowing the importance of the 401 Error is crucial because it helps you diagnose and troubleshoot issues related to authentication and access control.
For example, if you are an administrator, it will help you implement effective security measures. Meanwhile, for regular users, it will be beneficial for them to understand the reason behind denied access to certain resources.

401 Error variations
Here are some of the 401 error variations which indicate the same:
- HTTP Error 401
- Access denied
- 401 Unauthorized Error
- 401 Authorization Required
- 401 Unauthorized
Understanding HTTP Status codes
If you are a non-techie and don’t know exactly what are HTTP status codes, they can be understood as a set of standardized three-digit numbers used by web servers to communicate the outcome of a client’s request.
This means they provide you with the status or information about the success redirection, type of errors, and other states of the request-response cycle.
These status codes play a crucial role in web communication as they provide important feedback, indicating whether a request was successful or encountered any problems. With the assistance of these codes, one can readily take appropriate actions based on the response received from the server.
Now, when discussing the 4xx series status codes, such as 401 errors, they are typically classified as client error codes. This series indicates that the client’s request has failed or is invalid due to certain reasons. These error codes generally represent the issues or errors caused by the client’s request or a lack of proper authentication.
Some examples of 4xx Series error codes
As we have already discussed, the 4xx series is called client-side errors which includes some of the popular error codes that you might have familiar with.
- 400 (Bad Request Error)
- 403 (Forbidden)
- 404 (Not Found)
Now, let us focus on 401 Error. This error is specifically used when the client is unable to provide valid authentication credentials to access a resource. Its main purpose is to show the client that the requested resources require valid credentials to proceed further.
What causes 401 Error?
Some of the most common scenarios when you might face a 401 Error message:
- Missing or invalid credentials: If you are unable to provide authentic credentials due to any reasons or provide incurred or expired credentials, a 401 error will be triggered.
- Unauthorized access attempt: When you try to access a resource that requires authentication, but the provided credentials do not grant sufficient permission, a 401 Error will be returned.
- Revoked or Expired tokens: If you use an expired or outdated authentication token, the server may respond with a 401 error.
- Corrupt or outdated Browser cache and cookies: If you ever see a 401 error, it’s usually because your browser’s cache and cookies are outdated or corrupted. This can cause trouble with authorization. If your browser doesn’t have the correct authentication credentials (or any at all), the server won’t accept your request. Just remember to keep your browser’s cache and cookies up to date to avoid running into these kinds of errors.
- Incorrect or Outdated URL: Sometimes, in a rush, you might mistakenly enter the wrong URL or encounter a situation where the URL has been changed. This can trigger a 401 error as a result.
- Plugin conflicts: Sometimes, a 401 error can happen because of a plugin issue. For example, if you are using a firewall or security plugin that might mistakenly think your login attempt is suspicious and block access with a 401 error to keep the page safe.
How a 401 Error affects the user experience?
The 401 Error code can have various impacts on the user experience. It typically results in the user being denied access to the requested resource or receiving an error page instead. The error message associated with the 401 Error should provide guidance on how to resolve the issue or provide appropriate instructions.
Now that you have obtained a solid understanding of the 401 unauthorized error and its background, let’s delve into the methods to resolve and fix this issue.
- Ensure the URL is correct
- Check Authentic credentials
- Clear your browser cache and cookies
- Flush Your DNS cache
- Disable WordPress Plugins
- Check out your website’s .htaccess file
- Check the WWW-Authenticate header
1. Ensure the URL is correct
One of the most common mistakes that many users make is typing an incorrect URL in the browser’s address bar. Therefore, it’s important to take a moment and carefully enter the correct URL, ensuring that there are no misspelled or outdated entries.
If you happen to enter a wrong, outdated, or misspelled URL, you might encounter an “Error code 401” message. But there’s no need to worry! This error simply indicates that the URL you were trying to access doesn’t exist, resulting in a “401 unauthorized access” response from the server.
Let us understand it with an example, Suppose you have bookmarked a page or saved its address in your browsers, but things can change over time. The page’s address might have been updated or even deleted.
To investigate it further, you can try going to the website’s homepage and looking for a link to the page that is causing the “Unauthorized 401” error. If the page opens correctly through that link, make sure to compare the URL of the page with the one that initially gave you the error.
2. Ensure correct Authentication credentials
Sometimes, you might come across the frustrating 401 Error code when you’re trying to access a locked resource, such as a password-protected page. It basically means that your authentication credentials are not valid, and as a result, you’re denied access to the page you’re trying to open.
Here’s what you can do to tackle this issue. Take your time to double-check if you are logged in with the correct login credentials such as the user ID and password or not.
If you’re confident that you’ve entered the details correctly, you might want to consider changing your password. This could help ensure that you have the right credentials to access the resource without any hiccups.
However, in case you are unable to access your password-protected website, Check out our complete guide on “How To Easily Reset WordPress & Start Over?“.
3. Clear your browser cache and cookies
Without a doubt, browser cache and cookies are intended to enhance your online experience by speeding up website loading. However, there are occasions when they can also be the culprit behind triggering errors.
Specifically, corrupted or outdated cache files and cookies can result in unexpected interruptions or browsing issues. To resolve this, the best course of action is to completely clear your browser’s cache and cookies.
If you are using Chrome browser, follow the steps given below:
Read: 🚩 Browser Market Share & Usage Statistics
Step 1: Depending on your browser, Go to the settings menu.
In Google Chrome, for example, you can find the settings menu by clicking on the three vertical dots located in the upper right corner of the window.
Step 2: To proceed, select “More tools” and then click on “Clear browsing data”.

Step 3: A pop-up window will be displayed, and you can choose all three options located under the “Basic” section as depicted in the picture below. These options consist of “Browsing history,” “Cookies and other site data,” and “Cached images and files.
Step 4: Click on “Clear data” to initiate the process.

By doing so, any corrupt or invalid information stored locally in your browser will be completely erased. This ensures that if it was causing the authentication issue, it won’t occur again.
4. Flush your DNS Cache
Similar to your browser cache and cookies, the DNS cache is also stored locally on your computer. Although it is uncommon for a DNS cache to trigger a 401 error, it is worth giving it a try as a troubleshooting step.
For Windows 10 and Windows 11 users:
Step 1: Open the Run command by pressing the Windows key and R. Alternatively, you can search for it in the Start menu.
Step 2: Type “cmd” and hit Enter to open the Command Prompt.

Step 3: Once the Command Prompt window is open, type “ipconfig/release” to release your current IP address.

Step 4: Next, type “ipconfig/flushdns” to release the DNS cache.
Step 5: Type “ipconfig /renew” to obtain a new IP address.

Step 6: Type “netsh int ip set dns” and hit Enter to reset your IP settings.
Step 7: Finally, type “netsh winsock reset” to restore the Winsock Catalog.

Step 8: After completing these steps, restart your computer to ensure the changes take effect.
For MacOS users:
Step 1: First of all, open the system preference options on your Mac. If you have Gas Mask installed, it can make searching for system-related tasks easier.
Step 2: Next, navigate to the Ethernet tab and click on the advanced options.
Step 3: Under the TCP/IP tab, you will find the option to release a DHCP lease. Clicking on this option will allow you to clear out the local DNS on your Mac.

Step 4: Go to Utilities > Terminal and enter the command to clear the local DNS cache.
Step 5: The command for flushing the local DNS cache is “dscacheutil -flushcache”.
Step 6: Once you have entered the command, there will be no separate success or failure message that pops up. However, in most cases, the cache will be cleared without any major issues.
5. Disable WordPress Plugins
It is important to note that the cause of the 401 error may not always lie with your browser, but rather with your WordPress plugins. If you are experiencing difficulties accessing your WordPress site, it is possible that certain plugin(s) are responsible for this issue.
Especially, security plugins have a reputation for causing these types of problems. These plugins are designed to block access and return a 401 error message if they detect any suspicious activity.
Another possibility is that there may be compatibility issues with certain plugins. Some plugins can conflict with your website and trigger such issues. In such cases, the best course of action is to disable all the installed WordPress plugins and check if this resolves the issue.
Step 1: Log in to your WordPress admin dashboard
Step 2: Navigate to the “Plugins” menu option on the left-hand side of the dashboard.
Step 3: A list of installed plugins will be displayed. Take note of the currently active plugins or make a list if needed.
Step 4: Select all the plugins by ticking the checkboxes next to their names or use the “Bulk Actions” dropdown menu to select all.
Step 5: From the “Bulk Actions” dropdown menu, choose “Deactivate” and click the “Apply” button. This will deactivate all the selected plugins simultaneously.

Step 6: Once the deactivation process is complete, try accessing your website and check if the 401 error is resolved.
If the error is no longer occurring, it indicates that one or more of the plugins were causing the issue. You can then proceed with identifying the conflicting or incompatible plugins by reactivating them one by one and testing the website after each activation until the error reappears. This way, you can pinpoint the specific plugin causing the conflict.
If you find the defective plugin, consider either updating it to a newer version or reaching out to the plugin developer for support. Alternatively, you may need to find an alternative plugin that serves a similar purpose but does not cause conflicts.
6. Check out your website’s .htaccess file
You might be surprised to learn, especially if you are not aware of it, that the hosting panel is not the only place where you can set a password for your website. Another method is by configuring the code in the .htaccess file.
If you have previously set a password through the .htaccess file but have either forgotten about it or it was added through a plugin, it’s essential to check or examine your website’s .htaccess file to determine if it is causing the issue.
Let us see how you can proceed.
If your web hosting provider offers you cPanel accessibility, it will become easy for you to locate WordPress .htaccess files without using an FTP client.
1. To do this, first, you need to login into your cPanel as shown below:

2. Lookout for the Files section and click on the File Manager option as shown.

3. Now you will be able to see a list of all the core files displayed on your screen. Select and click on the public_html folder to open.

4. Now if you have an existing .htacess file available, it will reflect in the public_html or htdocs folder, if not then either it is hidden or doesn’t exist yet.

However, if your WordPress .htaccess file is hidden, you can unhide it by simply going to the Settings section located at the top right corner of the “files manager window” as shown in the image below:

A preferences window will pop out as shown in the picture below:

Now simply, check the ” Show Hidden Files (dotfiles)” box and click on Save. All the hidden files will start reflecting on your file manager window.
Read: 🚩 WordPress .htaccess File: How to Create And Edit it?
Now when you right-click on the .htaccess file and select the edit option, Its content should look similar to this:
AuthType Basic
AuthName "Permission required"
AuthUserFile ../../.htpasswd
require valid-user
The login credentials for the protection are stored in a file called “.htpasswd.” This file contains the encrypted password and the associated username.
If you no longer require the protection, you can remove the corresponding code from the .htaccess file and save the changes to confirm.
If the above troubleshooting methods don’t work, this means the issue is from the server side.
The “WWW-Authenticate” header is an HTTP response header that is used to indicate the type of authentication required for accessing a resource on a web server. When a server sends a “401 Unauthorized” status code, it includes the “WWW-Authenticate” header to specify the authentication scheme that the client needs to use in order to access the requested resource.
This header provides information to the client about the authentication method that should be used, such as Basic Authentication or Digest Authentication. It typically includes a challenge, which is a value that the client needs to include in subsequent requests to authenticate itself.
To check the “WWW-Authenticate” header, you can follow these steps:
Step 1: Open your web browser and navigate to the desired web page that generates a 401 error code.
Step 2: Right-click anywhere on the page and select “Inspect” or “Inspect Element” from the context menu. This will open the browser’s developer tools.
Step 3: In the developer tools, navigate to the “Network” tab.

Step 4: Refresh the page by pressing the “F5” key or clicking the refresh button in the browser.
Step 5: Look for the request corresponding to the resource you want to check in the list of network requests. It should have a “401 Unauthorized” status code.
Step 6: Click on the request to view its details.
Step 7: In the headers section, locate the “WWW-Authenticate” header. This header will provide information about the authentication scheme required for accessing the resource.

Step 8: The value of the “WWW-Authenticate” header will indicate the authentication method to be used, such as “Basic”, “Digest”, or others.
You can also refer to HTTP Authentication Scheme Registry for more information about page authentication methods.
Comparison: 401 vs 403 Error
The 401 Error differentiates itself by focusing specifically on the lack of valid authentication credentials. It indicates that the client needs to provide proper authentication to gain access to the resource, while the 400 and 403 errors highlight other issues, such as invalid requests or insufficient permissions.
Here is a comparison table between a 401 error and a 403 error:
| Error Code | Error Name | Meaning or authentication information |
|---|---|---|
| 401 | Unauthorized | Indicates the need for authentication. |
| The client lacks valid credentials |
| Error Code | Error Name | Meaning of authentication information. |
|---|---|---|
| 403 | Forbidden | Indicates that the client is authenticated, but lacks the necessary permissions to access the requested resource |
In summary, a 401 error signifies the need for authentication, while a 403 error indicates that the client is authenticated but lacks the necessary permissions to access the requested resource.
Real-world Examples of 401 Errors
Examples from popular websites or web applications
- Social media platform: If a user attempts to access a private profile or restricted content without logging in or providing valid credentials, a 401 Error may be returned.
- Cause: The user attempts to view a private post without logging in or providing valid credentials.
- Resolution: The platform returns a 401 Error and prompts the user to log in or create an account to gain access to the restricted content.
- Online banking: When a client tries to access account information or perform financial transactions without proper authentication, a 401 Error can occur.
- Cause: The user tries to access account details or perform financial transactions without providing the correct authentication credentials.
- Resolution: The banking system returns a 401 Error and directs the user to enter valid login credentials to access their account securely.
By analyzing real-world examples of 401 Errors, it becomes evident that these errors occur when accessing sensitive or restricted resources, emphasizing the importance of proper authentication and authorization.
Conclusion
A “401 Error” is triggered when the client lacks or is unable to provide valid authentication credentials to access a password-protected resource. Additionally, you may have noticed that this error is primarily caused by the client side, making it easily fixable. However, it can also be triggered from the server side, although this is rare.
So, in this post, we have compiled some of the best 7 troubleshooting methods that you can try to fix 401 errors.
- Ensure the URL is correct
- Check Authentic credentials
- Clear your browser cache and cookies
- Flush Your DNS cache
- Disable WordPress Plugins
- Check out your website’s .htaccess file
- Check the WWW-Authenticate header
We hope the methods mentioned above will help you fix the 401 error and resolve your issues. If you have any queries or would like to suggest any additional methods, please let us know in the comment section below.
Frequently Asked Questions
How do I fix a 401 error?
You can fix a 401 error by following these methods:
1. Ensure the URL is correct
2. Check Authentic credentials
3. Clear your browser cache and cookies
4. Flush Your DNS cache
5. Disable WordPress Plugins
6. Check out your website’s .htaccess file
7. Check the WWW-Authenticate header
What is the reason for 401 unauthorized error?
The reason for the 401 unauthorized error are:
1. Missing or invalid credentials
2. Unauthorized access attempt
3. Revoked or Expired tokens
4. Corrupt or outdated Browser cache and cookies
5. Incorrect or Outdated URL
6. Plugin conflicts
What is an example of a 401 error?
An example of a 401 error is If a user attempts to access a private profile or restricted content on a social media platform without logging in or providing valid credentials, a 401 Error may be returned.