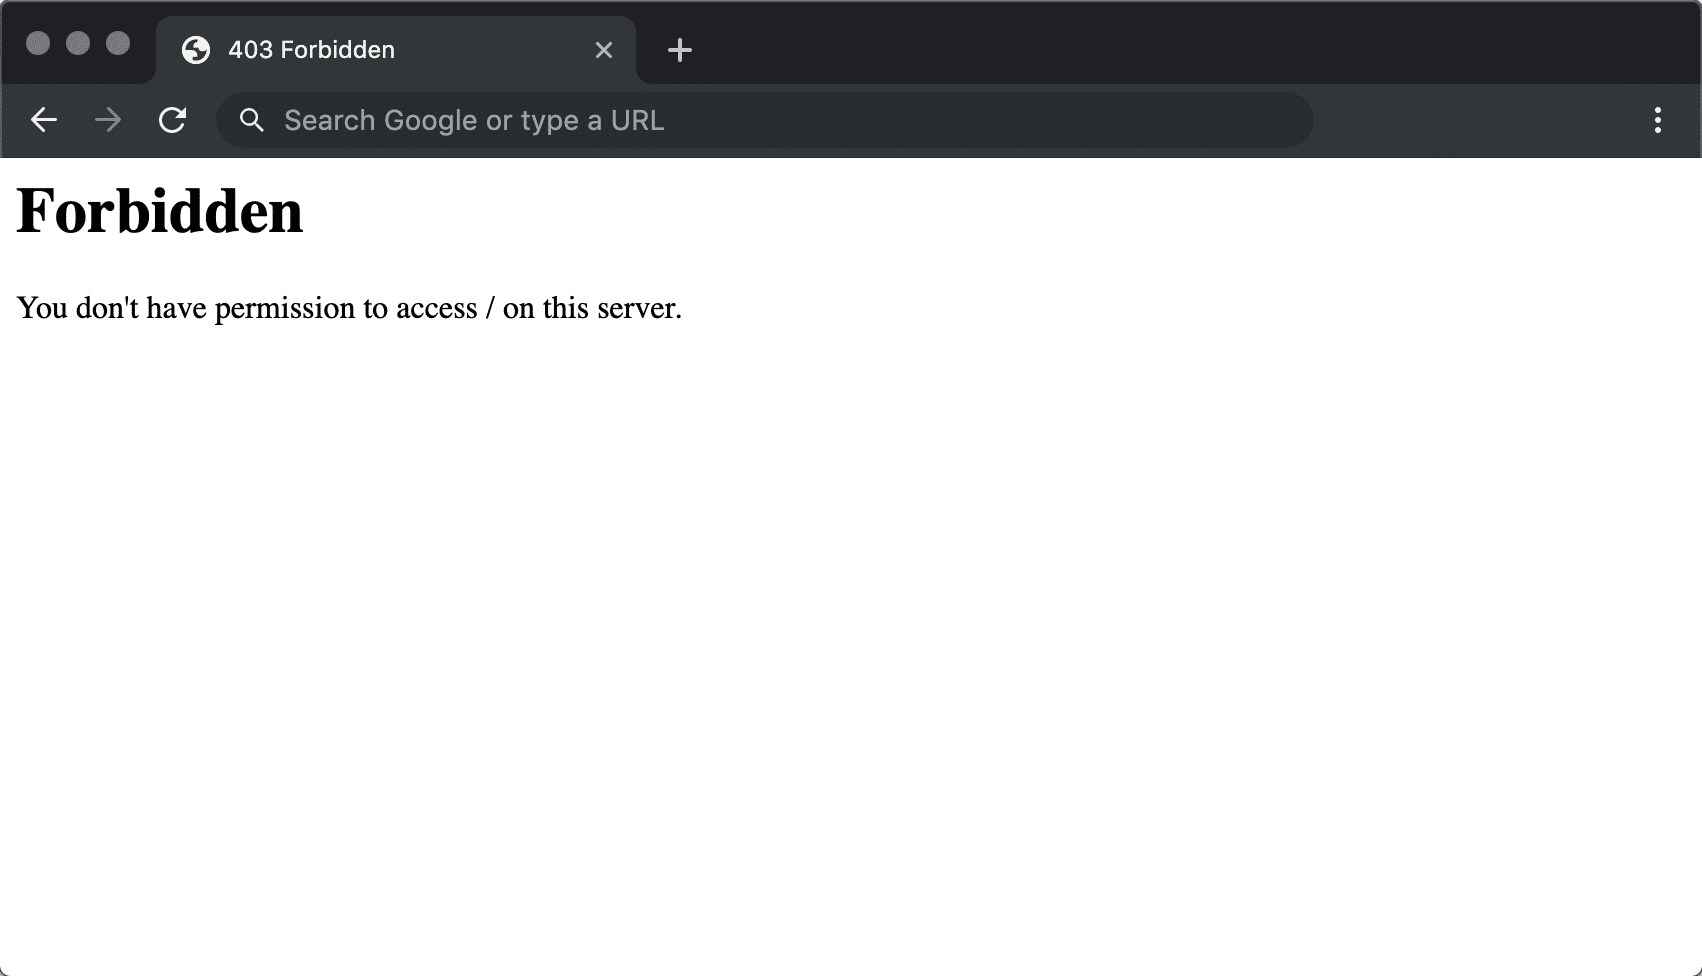
Did you just try to access your WordPress site only to be hit by some message telling you something is “Forbidden” or that you don’t have permission to access something on your site? If so, you’ve likely run into the 403 Forbidden error on WordPress.
Seeing an error on your WordPress site can be frustrating and deflating, which is why we’ve created this detailed guide to help you fix the 403 Forbidden Error on WordPress and get your site functioning again as quickly as possible.
Let’s get started without any further introduction because we’re sure you just want to fix your site!
Prefer the video version?
What is the 403 Forbidden Error?
The Internet Engineering Task Force (IETF) defines the error 403 Forbidden as:
The 403 (Forbidden) status code indicates that the server understood the request but refuses to authorize it. A server that wishes to make public why the request has been forbidden can describe that reason in the response payload (if any).
| Error Code | 403 |
| Error Type | Authentication error |
| Error Variations | Forbidden – You don’t have permission to access / on this server
403 – Forbidden: Access is denied Error 403 – Forbidden 403 – Forbidden Error – You are not allowed to access this address 403 Forbidden – nginx HTTP Error 403 – Forbidden – You do not have permission to access the document or program you requested 403 Forbidden – Access to this resource on the server is denied 403. That’s an error. Your client does not have permission to get URL / from this server You are not authorized to view this page It appears you don’t have permission to access this page |
| Error Causes | Corrupt .htaccess file
Incorrect file permissions Plugin issues |
Like many other common WordPress errors, the 403 Forbidden error is an HTTP status code that a web server uses to communicate with your web browser.
Quick background on HTTP status codes – whenever you connect to a website with your browser, the web server responds with something called an HTTP header. Usually, this all happens behind the scenes because everything is working normally (that’s a 200 status code, in case you were wondering).
However, if something goes wrong, the server will respond back with a different numbered HTTP status code. While these numbers are frustrating to encounter, they’re actually quite important because they help you diagnose exactly what’s going wrong on your site.
The 403 Forbidden error means that your web server understands the request that the client (i.e. your browser) is making, but the server will not fulfill it.
In more human-friendly terms, it basically means that your server knows exactly what you want to do, it just won’t let you do it because you don’t have the proper permissions for some reason. It’s kind of like you’re trying to get into a private event, but your name got accidentally removed from the guestlist for some reason.
Other HTTP status codes mean different things. We’ve written guides on fixing issues with 404 not found errors, 500 internal server errors, 502 bad gateway errors, and 504 gateway timeout errors.
What Causes the 403 Forbidden Error on WordPress?
The two most likely causes of the 403 Forbidden Error on WordPress are:
- Corrupt
.htaccessfile - Incorrect file permissions
It’s also possible that you’re seeing the error because of an issue with a plugin that you’re using at your site. In this article, we’ll show you how to troubleshoot all of these potential issues.
403 Forbidden Error Variations
Like many other HTTP status codes, there are a lot of different variations for how this error code presents itself.
Here are some common variations that you might come across:
- “Forbidden – You don’t have permission to access / on this server”
- “403 – Forbidden: Access is denied”
- “Error 403 – Forbidden”
- “403 – Forbidden Error – You are not allowed to access this address”
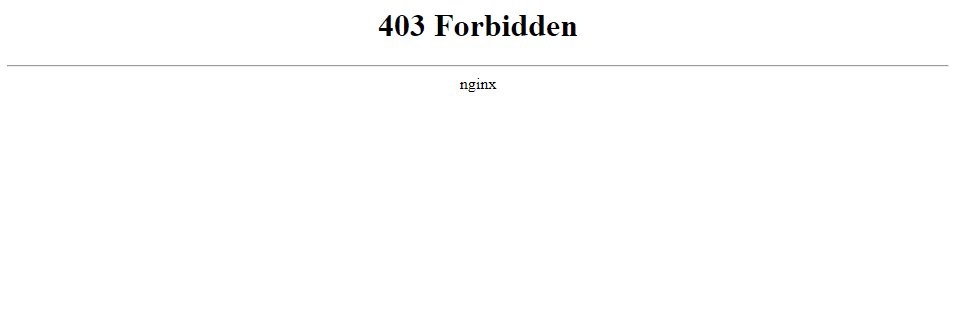
- “403 Forbidden – nginx”
- “HTTP Error 403 – Forbidden – You do not have permission to access the document or program you requested”
- “403 Forbidden – Access to this resource on the server is denied”
- “403. That’s an error. Your client does not have permission to get URL / from this server”
- “You are not authorized to view this page”
- “It appears you don’t have permission to access this page.”
If you’re on an Nginx server, it will look like this below. Basically, if you see any mention of “forbidden” or “not allowed to access”, you’re probably dealing with a 403 Forbidden error.
How to Fix 403 Forbidden Error on WordPress
To help you fix the 403 Forbidden Error on your WordPress site, we’ll cover five separate troubleshooting steps in detail:
- File permissions
- .htaccess file
- Plugin issues
- CDN issues
- Hotlink protection
1. Modify Your File Permissions
Each folder and file on your WordPress site’s server has its own unique file permissions that control who can:
- Read – see the data in the file/view the contents of a folder.
- Write – modify the file/add or delete files inside a folder
- Execute – run the file and/or execute it as a script/access a folder and perform functions and commands.
These permissions are indicated by a 3-digit number, with each digit indicating the level of permission for each of the 3 categories above.
Normally, these permissions just “work” for your WordPress site. However, if something gets messed up with the file permissions at your WordPress site, it can cause the 403 Forbidden error.
To view and modify your site’s file permissions, you’ll need to connect via FTP/SFTP. Here’s how to use SFTP if you’re hosting at Kinsta.
For the screenshots in the tutorial below, we’ll be using the free FileZilla FTP program. The basic principles will apply to any FTP program, though – you’ll just need to apply them to a different interface.
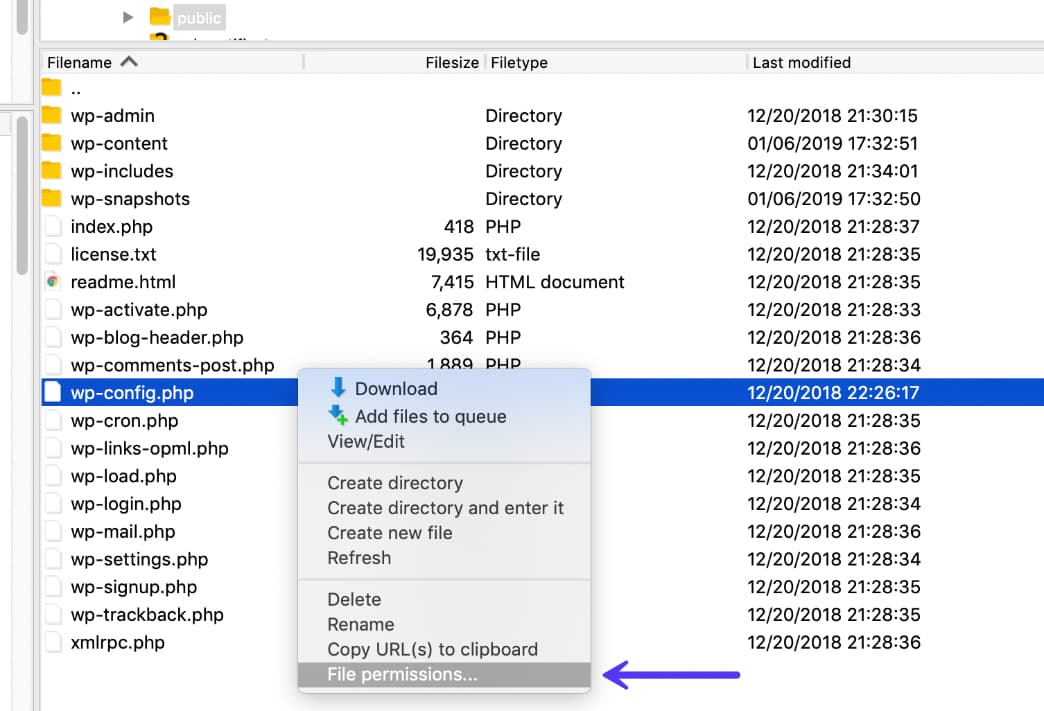
Once you’re connected to your server, you can view a file or folder’s permissions by right-clicking on it:
Of course, manually checking the permissions for each file or folder isn’t really an option. Instead, you can automatically apply file permissions to all the files or folders inside of a folder.
According to the WordPress Codex, the ideal file permissions for WordPress are:
- Files – 644 or 640
- Directories – 755 or 750
One exception is that your wp-config.php file should be 440 or 400.
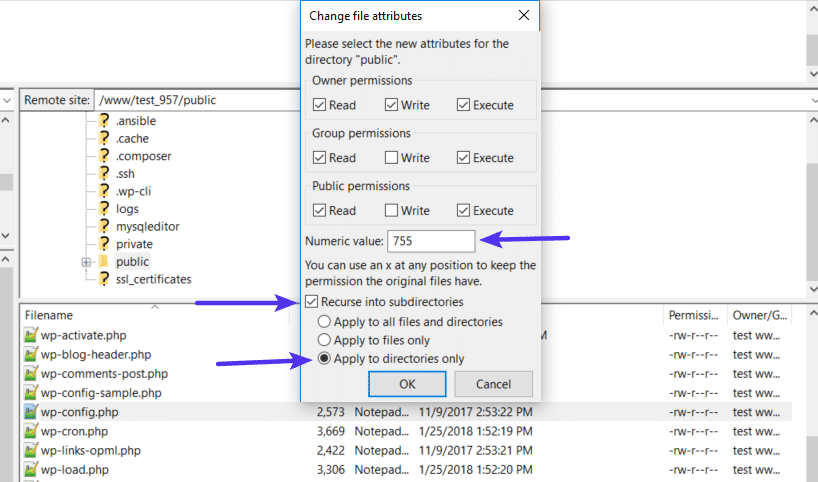
To set these permissions, right-click on the folder that contains your WordPress site (the folder name is public at Kinsta). Then, choose File Attributes:
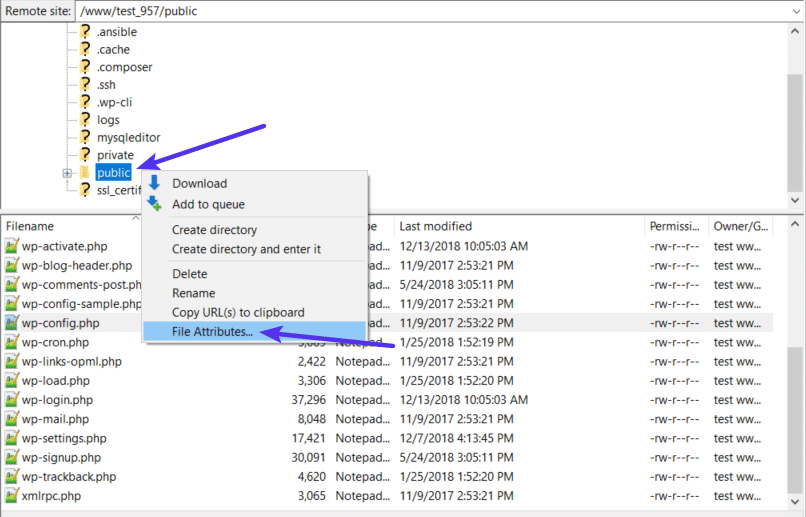
Enter 755 or 750 in the Numeric value box. Then, choose Recurse into subdirectories and Apply to directories only:
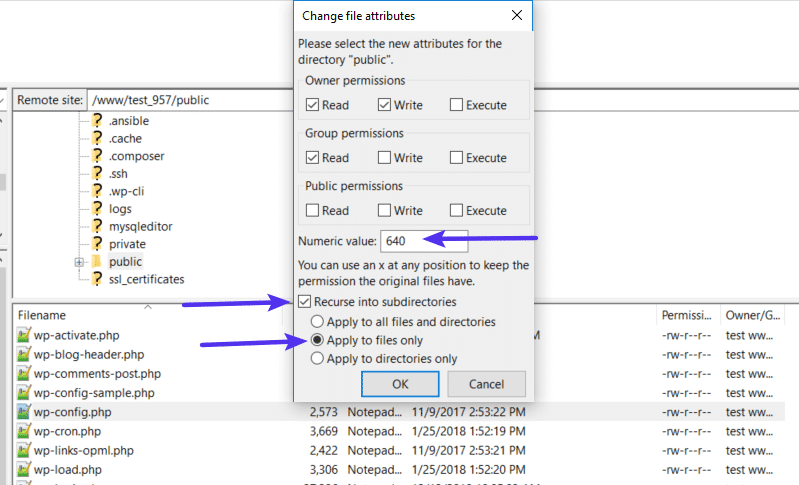
Once you’ve applied the correct permissions for directories, you’ll repeat the process for files. Only this time:
- Enter 644 or 640 in the Numeric value box
- Choose Recurse into subdirectories
- Choose Apply to files only
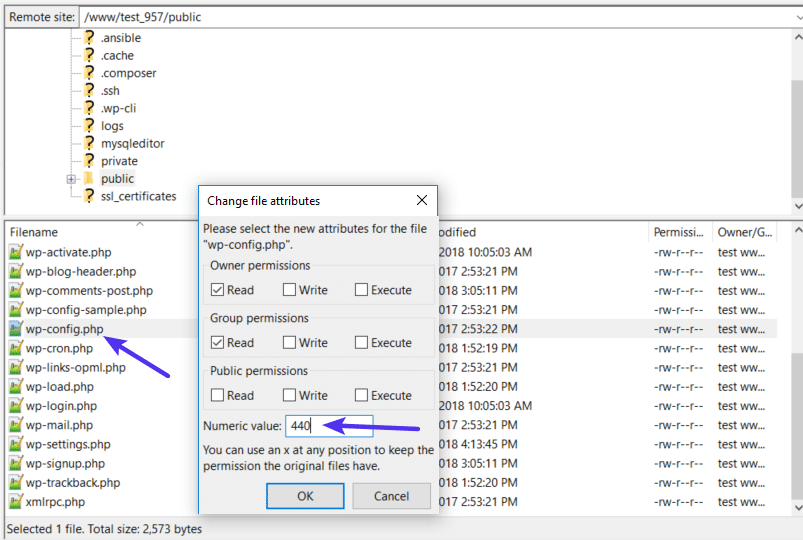
To finish the process, you just need to manually adjust the permissions for your wp-config.php file to make them 440 or 400:
If file permissions issues were causing the 403 Forbidden Error, your site should now start working again.
2. Delete and Restore the .htaccess File
Kinsta uses the NGINX web server, so this potential issue doesn’t apply if you’re hosting your site at Kinsta because Kinsta sites do not have a .htaccess file.
However, if you’re hosting elsewhere and your host uses the Apache web server, one common cause of the 403 Forbidden error is a problem in your site’s .htaccess file.
The .htaccess file is a basic configuration file used by the Apache web server. You can use it to set up redirects, restrict access to all or some of your site, etc.
Because it’s so powerful, even if a little mistake can cause a big issue, like the 403 Forbidden error.
Rather than trying to troubleshoot the .htaccess file itself, a simpler solution is to just force WordPress to generate a new, clean .htaccess file.
To do that:
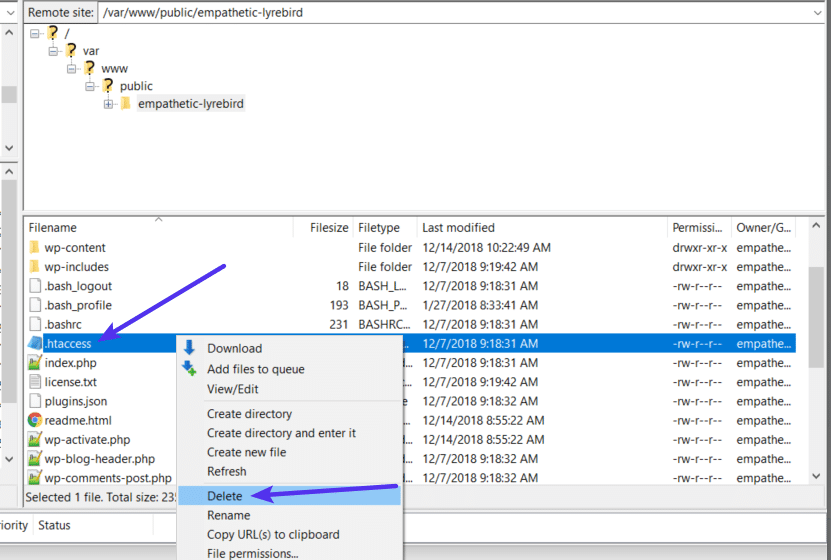
- Connect to your server via FTP
- Find the
.htaccessfile in your root folder - Download a copy of the file to your computer (it’s always a good idea to have a backup just in case)
- Delete the
.htaccessfile from your server after you have a safe backup copy on your local computer
Now, you should be able to access your WordPress site if your .htaccess file was the issue.
To force WordPress to generate a new, clean .htaccess file:
- Go to Settings → Permalinks in your WordPress dashboard
- Click Save Changes at the bottom of the page (you do not need to make any changes – just click the button)
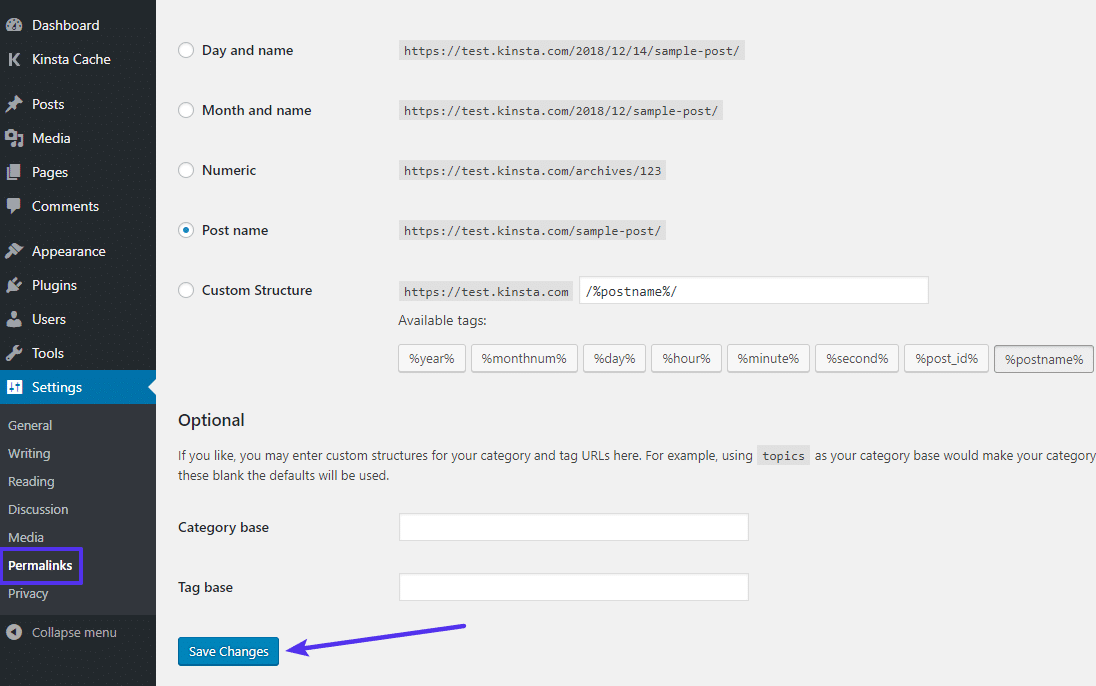
And that’s it – WordPress will now generate a new .htaccess file for you.
3. Deactivate and then Reactivate Your Plugins
If neither your site’s file permissions nor .htaccess file are the problems, the next place to look is your plugins. It could be a bug in a plugin or a compatibility issue between different plugins.
No matter what the issue is, the easiest way to find the problematic plugin is with a little trial and error. Specifically, you’ll need to deactivate all of your plugins and then reactivate them one by one until you find the culprit.
If you can still access your WordPress dashboard, you can perform this process from the normal Plugins area.
If you cannot access your WordPress dashboard, you’ll instead need to connect to your WordPress site’s server via FTP/SFTP (here’s how to connect via SFTP at Kinsta).
Once you’re connected to your server via FTP:
- Browse to the wp-content folder
- Find the plugins folder inside of the wp-content folder
- Right-click on the plugins folder and choose Rename
- Change the name of the folder. You can name it anything different, but we recommend something like plugins-disabled to make it easy to remember.
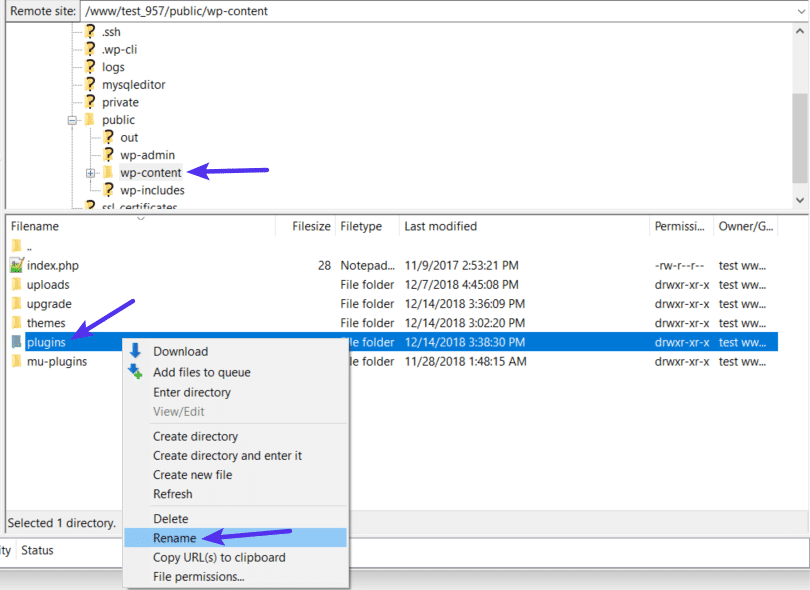
By renaming the folder, you’ve effectively disabled all the plugins at your site.
Now, try accessing your site again. If your site is working, you know that one of your plugins is causing the 403 Forbidden error.
To find the culprit, reactivate your plugins one-by-one until you find which plugin is causing the issue.
After changing the file name of the plugins folder, you should see a number of errors that say plugin file does not exist when you go to the Plugins area on your site:
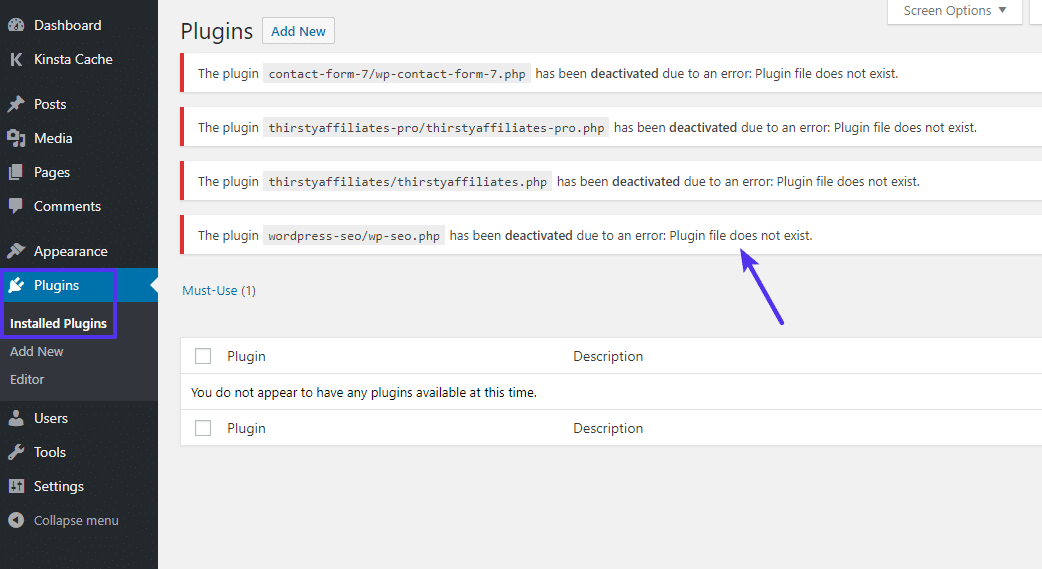
To fix this issue and regain the ability to manage your plugins, use your FTP program to change the name of the folder back to plugins. So, if you renamed it to plugins-disabled, just change it back to plugins.
Once you do that, you’ll see the full list of all your plugins again. Only now, they’ll all be deactivated:
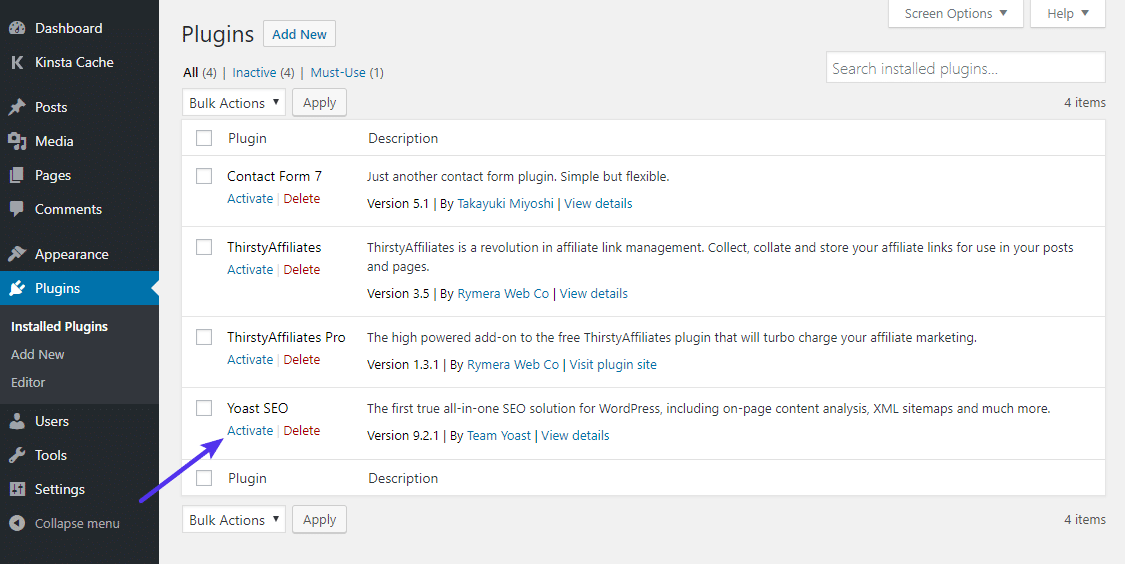
Use the Activate button to reactivate them one-by-one.
Once you find the plugin that’s causing the issue, you can either reach out to the plugin’s developer for help or choose an alternate plugin that accomplishes the same thing (we’ve collected the best WordPress plugins here).
4. Deactivate CDN Temporarily
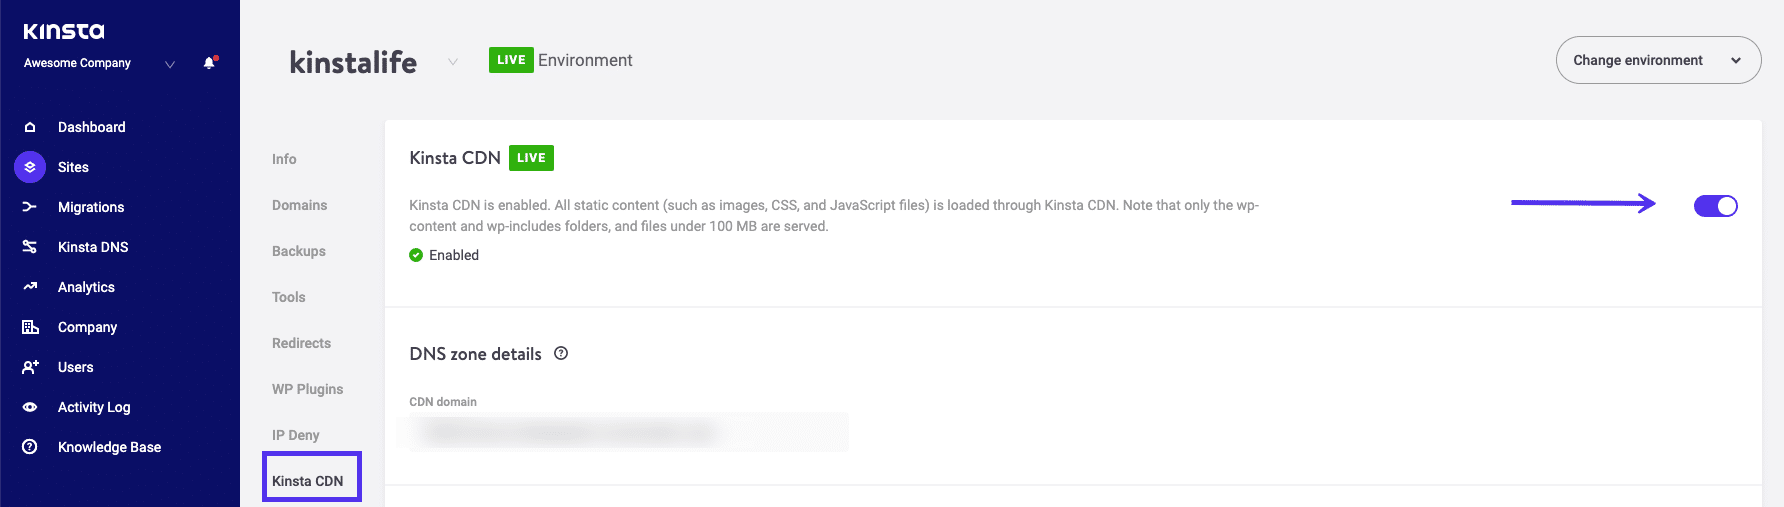
If you’re getting 403 forbidden errors on your assets (images, JavaScript, CSS), it could be a problem with your content delivery network (CDN). In this case, we recommend temporarily disabling your CDN and then checking your site to see if it works. If you’re a Kinsta client, click into your site and then on the “Kinsta CDN” tab. Once there, toggle the “Kinsta CDN” button off.
5. Check to See If Hotlink Protection Is Misconfigured
Hotlinking is when someone adds an image to their site, but the hosted link is still pointed to someone else’s site. To prevent this, some will set up what is called “hotlink protection” with their WordPress host or CDN provider.
When hotlink protection is enabled, it will typically return a 403 forbidden error. This is normal. However, if you’re seeing a 403 forbidden error on something you shouldn’t be, check to make sure hotlink protection is configured properly.
Still Having Issues? Reach Out to Your Hosting Provider
If none of the above solutions worked for you, then we recommend reaching out to your hosting provider. They can most likely help you pinpoint the issue and get you back up and running. If you’re a Kinsta client, open up a support ticket with our team. We are available 24/7.
Summary
The 403 Forbidden error means that your server is working, but you no longer have permission to view all or some of your site for some reason.
The two most likely causes of this error are issues with your WordPress site’s file permissions or .htaccess file. Beyond that, some plugin issues might also cause the 403 Forbidden error. Or it could be that something is misconfigured with hotlink protection or your CDN.
By following the troubleshooting steps in this guide, you should be able to get your site back to working in no time.
Get all your applications, databases and WordPress sites online and under one roof. Our feature-packed, high-performance cloud platform includes:
- Easy setup and management in the MyKinsta dashboard
- 24/7 expert support
- The best Google Cloud Platform hardware and network, powered by Kubernetes for maximum scalability
- An enterprise-level Cloudflare integration for speed and security
- Global audience reach with up to 35 data centers and 275+ PoPs worldwide
Test it yourself with $20 off your first month of Application Hosting or Database Hosting. Explore our plans or talk to sales to find your best fit.
Did you just try to access your WordPress site only to be hit by some message telling you something is “Forbidden” or that you don’t have permission to access something on your site? If so, you’ve likely run into the 403 Forbidden error on WordPress.
Seeing an error on your WordPress site can be frustrating and deflating, which is why we’ve created this detailed guide to help you fix the 403 Forbidden Error on WordPress and get your site functioning again as quickly as possible.
Let’s get started without any further introduction because we’re sure you just want to fix your site!
Prefer the video version?
What is the 403 Forbidden Error?
The Internet Engineering Task Force (IETF) defines the error 403 Forbidden as:
The 403 (Forbidden) status code indicates that the server understood the request but refuses to authorize it. A server that wishes to make public why the request has been forbidden can describe that reason in the response payload (if any).
| Error Code | 403 |
| Error Type | Authentication error |
| Error Variations | Forbidden – You don’t have permission to access / on this server
403 – Forbidden: Access is denied Error 403 – Forbidden 403 – Forbidden Error – You are not allowed to access this address 403 Forbidden – nginx HTTP Error 403 – Forbidden – You do not have permission to access the document or program you requested 403 Forbidden – Access to this resource on the server is denied 403. That’s an error. Your client does not have permission to get URL / from this server You are not authorized to view this page It appears you don’t have permission to access this page |
| Error Causes | Corrupt .htaccess file
Incorrect file permissions Plugin issues |
Like many other common WordPress errors, the 403 Forbidden error is an HTTP status code that a web server uses to communicate with your web browser.
Quick background on HTTP status codes – whenever you connect to a website with your browser, the web server responds with something called an HTTP header. Usually, this all happens behind the scenes because everything is working normally (that’s a 200 status code, in case you were wondering).
However, if something goes wrong, the server will respond back with a different numbered HTTP status code. While these numbers are frustrating to encounter, they’re actually quite important because they help you diagnose exactly what’s going wrong on your site.
The 403 Forbidden error means that your web server understands the request that the client (i.e. your browser) is making, but the server will not fulfill it.
In more human-friendly terms, it basically means that your server knows exactly what you want to do, it just won’t let you do it because you don’t have the proper permissions for some reason. It’s kind of like you’re trying to get into a private event, but your name got accidentally removed from the guestlist for some reason.
Other HTTP status codes mean different things. We’ve written guides on fixing issues with 404 not found errors, 500 internal server errors, 502 bad gateway errors, and 504 gateway timeout errors.
What Causes the 403 Forbidden Error on WordPress?
The two most likely causes of the 403 Forbidden Error on WordPress are:
- Corrupt
.htaccessfile - Incorrect file permissions
It’s also possible that you’re seeing the error because of an issue with a plugin that you’re using at your site. In this article, we’ll show you how to troubleshoot all of these potential issues.
403 Forbidden Error Variations
Like many other HTTP status codes, there are a lot of different variations for how this error code presents itself.
Here are some common variations that you might come across:
- “Forbidden – You don’t have permission to access / on this server”
- “403 – Forbidden: Access is denied”
- “Error 403 – Forbidden”
- “403 – Forbidden Error – You are not allowed to access this address”
- “403 Forbidden – nginx”
- “HTTP Error 403 – Forbidden – You do not have permission to access the document or program you requested”
- “403 Forbidden – Access to this resource on the server is denied”
- “403. That’s an error. Your client does not have permission to get URL / from this server”
- “You are not authorized to view this page”
- “It appears you don’t have permission to access this page.”
If you’re on an Nginx server, it will look like this below. Basically, if you see any mention of “forbidden” or “not allowed to access”, you’re probably dealing with a 403 Forbidden error.
How to Fix 403 Forbidden Error on WordPress
To help you fix the 403 Forbidden Error on your WordPress site, we’ll cover five separate troubleshooting steps in detail:
- File permissions
- .htaccess file
- Plugin issues
- CDN issues
- Hotlink protection
1. Modify Your File Permissions
Each folder and file on your WordPress site’s server has its own unique file permissions that control who can:
- Read – see the data in the file/view the contents of a folder.
- Write – modify the file/add or delete files inside a folder
- Execute – run the file and/or execute it as a script/access a folder and perform functions and commands.
These permissions are indicated by a 3-digit number, with each digit indicating the level of permission for each of the 3 categories above.
Normally, these permissions just “work” for your WordPress site. However, if something gets messed up with the file permissions at your WordPress site, it can cause the 403 Forbidden error.
To view and modify your site’s file permissions, you’ll need to connect via FTP/SFTP. Here’s how to use SFTP if you’re hosting at Kinsta.
For the screenshots in the tutorial below, we’ll be using the free FileZilla FTP program. The basic principles will apply to any FTP program, though – you’ll just need to apply them to a different interface.
Once you’re connected to your server, you can view a file or folder’s permissions by right-clicking on it:
Of course, manually checking the permissions for each file or folder isn’t really an option. Instead, you can automatically apply file permissions to all the files or folders inside of a folder.
According to the WordPress Codex, the ideal file permissions for WordPress are:
- Files – 644 or 640
- Directories – 755 or 750
One exception is that your wp-config.php file should be 440 or 400.
To set these permissions, right-click on the folder that contains your WordPress site (the folder name is public at Kinsta). Then, choose File Attributes:
Enter 755 or 750 in the Numeric value box. Then, choose Recurse into subdirectories and Apply to directories only:
Once you’ve applied the correct permissions for directories, you’ll repeat the process for files. Only this time:
- Enter 644 or 640 in the Numeric value box
- Choose Recurse into subdirectories
- Choose Apply to files only
To finish the process, you just need to manually adjust the permissions for your wp-config.php file to make them 440 or 400:
If file permissions issues were causing the 403 Forbidden Error, your site should now start working again.
2. Delete and Restore the .htaccess File
Kinsta uses the NGINX web server, so this potential issue doesn’t apply if you’re hosting your site at Kinsta because Kinsta sites do not have a .htaccess file.
However, if you’re hosting elsewhere and your host uses the Apache web server, one common cause of the 403 Forbidden error is a problem in your site’s .htaccess file.
The .htaccess file is a basic configuration file used by the Apache web server. You can use it to set up redirects, restrict access to all or some of your site, etc.
Because it’s so powerful, even if a little mistake can cause a big issue, like the 403 Forbidden error.
Rather than trying to troubleshoot the .htaccess file itself, a simpler solution is to just force WordPress to generate a new, clean .htaccess file.
To do that:
- Connect to your server via FTP
- Find the
.htaccessfile in your root folder - Download a copy of the file to your computer (it’s always a good idea to have a backup just in case)
- Delete the
.htaccessfile from your server after you have a safe backup copy on your local computer
Now, you should be able to access your WordPress site if your .htaccess file was the issue.
To force WordPress to generate a new, clean .htaccess file:
- Go to Settings → Permalinks in your WordPress dashboard
- Click Save Changes at the bottom of the page (you do not need to make any changes – just click the button)
And that’s it – WordPress will now generate a new .htaccess file for you.
3. Deactivate and then Reactivate Your Plugins
If neither your site’s file permissions nor .htaccess file are the problems, the next place to look is your plugins. It could be a bug in a plugin or a compatibility issue between different plugins.
No matter what the issue is, the easiest way to find the problematic plugin is with a little trial and error. Specifically, you’ll need to deactivate all of your plugins and then reactivate them one by one until you find the culprit.
If you can still access your WordPress dashboard, you can perform this process from the normal Plugins area.
If you cannot access your WordPress dashboard, you’ll instead need to connect to your WordPress site’s server via FTP/SFTP (here’s how to connect via SFTP at Kinsta).
Once you’re connected to your server via FTP:
- Browse to the wp-content folder
- Find the plugins folder inside of the wp-content folder
- Right-click on the plugins folder and choose Rename
- Change the name of the folder. You can name it anything different, but we recommend something like plugins-disabled to make it easy to remember.
By renaming the folder, you’ve effectively disabled all the plugins at your site.
Now, try accessing your site again. If your site is working, you know that one of your plugins is causing the 403 Forbidden error.
To find the culprit, reactivate your plugins one-by-one until you find which plugin is causing the issue.
After changing the file name of the plugins folder, you should see a number of errors that say plugin file does not exist when you go to the Plugins area on your site:
To fix this issue and regain the ability to manage your plugins, use your FTP program to change the name of the folder back to plugins. So, if you renamed it to plugins-disabled, just change it back to plugins.
Once you do that, you’ll see the full list of all your plugins again. Only now, they’ll all be deactivated:
Use the Activate button to reactivate them one-by-one.
Once you find the plugin that’s causing the issue, you can either reach out to the plugin’s developer for help or choose an alternate plugin that accomplishes the same thing (we’ve collected the best WordPress plugins here).
4. Deactivate CDN Temporarily
If you’re getting 403 forbidden errors on your assets (images, JavaScript, CSS), it could be a problem with your content delivery network (CDN). In this case, we recommend temporarily disabling your CDN and then checking your site to see if it works. If you’re a Kinsta client, click into your site and then on the “Kinsta CDN” tab. Once there, toggle the “Kinsta CDN” button off.
5. Check to See If Hotlink Protection Is Misconfigured
Hotlinking is when someone adds an image to their site, but the hosted link is still pointed to someone else’s site. To prevent this, some will set up what is called “hotlink protection” with their WordPress host or CDN provider.
When hotlink protection is enabled, it will typically return a 403 forbidden error. This is normal. However, if you’re seeing a 403 forbidden error on something you shouldn’t be, check to make sure hotlink protection is configured properly.
Still Having Issues? Reach Out to Your Hosting Provider
If none of the above solutions worked for you, then we recommend reaching out to your hosting provider. They can most likely help you pinpoint the issue and get you back up and running. If you’re a Kinsta client, open up a support ticket with our team. We are available 24/7.
Summary
The 403 Forbidden error means that your server is working, but you no longer have permission to view all or some of your site for some reason.
The two most likely causes of this error are issues with your WordPress site’s file permissions or .htaccess file. Beyond that, some plugin issues might also cause the 403 Forbidden error. Or it could be that something is misconfigured with hotlink protection or your CDN.
By following the troubleshooting steps in this guide, you should be able to get your site back to working in no time.
Get all your applications, databases and WordPress sites online and under one roof. Our feature-packed, high-performance cloud platform includes:
- Easy setup and management in the MyKinsta dashboard
- 24/7 expert support
- The best Google Cloud Platform hardware and network, powered by Kubernetes for maximum scalability
- An enterprise-level Cloudflare integration for speed and security
- Global audience reach with up to 35 data centers and 275+ PoPs worldwide
Test it yourself with $20 off your first month of Application Hosting or Database Hosting. Explore our plans or talk to sales to find your best fit.

Ошибка сервера 403 (Forbidden Error) означает, что вам запрещен доступ к странице, файлу или папке, URL которых вы ввели в адресной строке. Причин может быть много:
- сайт заблокирован хостингом;
- на сайте есть ошибки конфигурации и настроек (неправильное расположение файлов, некорректные права доступа и так далее);
- на вас распространяются правила блокировки (по IP, географическому положению, отсутствию авторизации), выставленные на сайте;
- сайт запрещен в вашей стране и т. д.
Точно определить, что именно вызывает ошибку, сложно — в сообщении о ней обычно нет никакой полезной информации. Ниже мы описываем, что можно сделать для устранения ошибки 403 Forbidden в наиболее распространенных случаях.
Если вам поступают жалобы от посетителей сайта о 403 ошибке, прежде всего убедитесь, что ее причина не на стороне пользователя. Возможно, посетитель написал URL с ошибкой или находится в стране, в которой запрещен ваш сайт. Полный перечень причин смотрите в разделе «Что делать пользователю при появлении 403 ошибки».
Если причина все-таки в сайте, последовательно проверьте пункты ниже.
Расположение и имя индексного файла
Индексный файл открывается первым при обращении к сайту, и если сервер его не находит — выдается ошибка 403 forbidden. Проверьте, чтобы:
- файл назывался правильно. В зависимости от CMS это может быть index.php, index.html или index.htm;
- файл лежал в корневом каталоге или, если речь о поддомене — в корневом каталоге поддомена.
Права доступа
Если вы выставили неправильные права доступа на папку или файл, например, вместо «4» (чтение) поставили «0» (запрет доступа), то посетителю будет выдаваться ошибка сервера 403 Forbidden. Проверьте, какие права стоят в админке сайта:
- на папки стандартно должен быть доступ вида 755;
- на файлы — 644.
Уточните у разработчика сайта, какие права нужны для той папки или файла, по которой выдается 403 ошибка.

Плагины WordPress
На сайтах с CMS WordPress причиной ошибки с кодом 403 могут стать некорректно работающие плагины. Чтобы быстро проверить, в этом ли причина, сделайте следующее:
- С помощью панели управления хостингом или FTP найдите раздел wp-content.
- В нем вам понадобится директория plugins. Переименуйте папку, но так, чтобы вы потом могли найти ее и восстановить прежнее название.
- После переименования все плагины wordpress перестанут работать.
- Теперь откройте страницу, на которой появлялось сообщение о 403 ошибке. Если страница теперь нормально загружается, причина, скорее всего, в одном из плагинов.
- Переименуйте папку с плагинами обратно, после чего последовательно отключайте плагины по одному (можно таким же способом, как выше — переименовывая его папку) и проверяйте, исчезла ли после этого ошибка.
После того, как вы найдете плагин-виновник ошибки, попробуйте обновить его до последней версии. Если не поможет, придется его отключить или заменить другим
Другие причины ошибки 403
Иногда причиной появления ошибки сервера 403 может стать:
- Неправильное расположение файлов сайта. Например, вы могли при работе с FTP случайно перенести файлы из корневой папки во вложенную директорию. Проверьте, чтобы файлы располагались так, как требует CMS и структура хостинга.
- Неправильные настройки .htaccess (если на хостинге используется Apache-сервер). Переименуйте файл .htaccess, например, в .htaccess-старый, и он перестанет восприниматься сервером. Если после этого ошибка исчезла или изменился ее код — дело в директивах, прописанных в .htaccess. Исправить их поможет разработчик сайта или другой веб-программист.
- Блокировка сайта на уровне хостинга. Хостинг-провайдер может заблокировать сайт из-за нарушений договора, превышения ограничений по тарифу и других причин. Проверьте, получали ли вы соответствующее уведомление на почту.
- Блокировка по IP. Возможно, IP-адрес посетителя находится в списке заблокированных или не добавлен в список разрешенных для подключения. Такие ограничения обычно ставят на доступ к страницам админки сайта. Проверьте настройки доступа.
- Блокировка брандмауэром ModSecurity. Это ПО блокирует действия пользователей, которые считает вредоносными, и выдает в ответ на них 403 ошибку. Иногда ModSecurity ошибается и блокирует вполне добропорядочных посетителей. Добавьте в него исключение, если у вас VPS или выделенный сервер, или обратитесь с этой просьбой к хостеру, если сайт на виртуальном хостинге.
Что делать пользователю при появлении 403 ошибки?
Причина проблемы может находиться на стороне посетителя, а не сайта. Что может сделать пользователь, чтобы исправить ошибку сервера 403 forbidden:
- Проверить правильность URL. Причина может быть в элементарной опечатке.
- Обновить страницу с помощью Ctrl F5. Это действие — универсальная первая помощь при любых проблемах с отображением сайта в браузере. Возможно, какие-то неверные данные закешировались, а при обновлении по Ctrl F5 вы игнорируете кэш браузера и загружаете страницу с сайта напрямую. Можно также почистить кэш.
- Почистить cookie. В куках могут храниться устаревшие данные авторизации, которые сервер не принимает и отвечает ошибкой.
- Залогиниться на сайте. Возможно, папка или файл, которые вы хотите открыть, доступны только авторизованным пользователям, поэтому вам выдается ошибка 403 forbidden (нет доступа).
- Попробовать зайти через VPN. Ваш IP может быть заблокирован на сайте по какой-то причине. Блокировка может стоять и на все посещения из вашей страны или региона. Попробуйте зайти на сайт с IP-адресом другой страны.
- Проверить с другого устройства. Если на другом компьютере при попытке зайти на эту страницу вы также получаете ошибку с кодом 403 — скорее всего, проблема на самом сайте. Обратитесь к его владельцу.
- Отключите экономию трафика, если Error 403 появляется только на мобильном устройстве. Из-за этой функции сайт может не получать нужных для предоставления доступа данных, например, о вашем местоположении.
- Подождать и попробовать позже. Бывает, что сайт только что «переехал» на другой хостинг и настройки DNS просто не успели обновиться.
- Обратиться к провайдеру. Ошибка может быть связана с неверной конфигурацией его оборудования, внесением сайта в «черные списки» или выполнением запрещающих директив государственных органов.
Если вы попробовали все способы исправления, а ошибка 403 forbidden не исчезла, то ситуация, скорее всего, нетипичная. Обратитесь за помощью к техподдержке хостинг-провайдера или разработчику сайта.
I want to get the web search results in XML or JSON format, so I’m trying Custom Search Engine to do this using REST API, but when put any URL with different parameters like cx, api key, query, scope. I get always the same error:
Your client does not have permission to get URL /search?q=socer&hl=en&start=10&num=10&output=xml&client=950599431012-4mdbg8eqvb30cf6hamamq8sfihn71qku.apps.googleusercontent.com&cx=006664130785464139277:u_p0bwcuncc from this server. (Client IP address: 105.190.4.82)
If there are other solution for my prob please show it to me.
![]()
halfer
19.8k17 gold badges99 silver badges185 bronze badges
asked Jan 12, 2017 at 12:03
![]()
3
Because ‘Firebase’ sanctioned some country like(Iran) this error responds to users.
answered Mar 14, 2020 at 9:02
![]()
2
Seems like your IP is blocked by Google.
Using vpn or a proxy should solve the problem.
![]()
Dinkheller
4,6155 gold badges38 silver badges67 bronze badges
answered Dec 15, 2019 at 8:38
![]()
Javad.mrzJavad.mrz
1971 silver badge5 bronze badges
2
In my case I had a vpn extension turned on by mistake in Google Chrome.
answered Sep 3, 2021 at 9:41
1
Well it’s a hit-or-miss situation. Many users have faced this type of issue.
Please try a few solutions from below:
-
Clearing your browser history.
-
Try using a tool for cleaning up malwares.
![]()
Eric Aya
69.4k35 gold badges181 silver badges252 bronze badges
answered Jan 12, 2017 at 12:16
![]()
Same happened to me. I think cause was during execution of firebase deploy command I closed the terminal and command couldn’t be completed. Probably firebase adjusts permissions during deploy command function creation and when command breaks permissions could not be executed.
So you can try to delete the function and deploy it again.
answered Mar 25 at 7:00
Gökçer GökdalGökçer Gökdal
9401 gold badge11 silver badges18 bronze badges
Автор:
Janice Evans
Дата создания:
3 Июль 2021
Дата обновления:
14 Июнь 2023

Люди, использующие Google Chrome, могли столкнуться с ошибкой «Ваш клиент не имеет разрешения на получение URL» в какой-то момент, когда они воздерживаются от использования поисковой системы. Обычно это происходит, когда выполняется слишком много поисков за очень короткий период времени.

Каждый раз, когда вы выполняете поиск, запрос пересылается на сервер Google, который, в свою очередь, выполняет поиск по миллионам сайтов и возвращает вам результат за несколько миллисекунд. Все эти вычисления могут показаться легкими, но они потребляют много энергии. Чтобы противодействовать тому, чтобы люди атаковали веб-сайт с помощью DDOS или создавали большую нагрузку на серверы, Google имеет механизм, который автоматически блокирует ваш доступ к поисковой системе, когда вы выполняете много запросов за очень короткое время.
Если вы не сделали последнего, это, вероятно, означает, что либо ваш кеш поврежден, либо вы используете VPN. Если вы используете VPN-соединение или прокси-сервер, включите его и попробуйте снова получить доступ к Google.
Решение 1. Ожидание
Как упоминалось ранее, эта ошибка обычно возникает, когда вы выполняете большое количество запросов в течение короткого периода времени. Если вы исчерпали свой временной лимит, рекомендуется немного подождать и не используйте гугл пока жду. Было немного отчетов, в которых пользователи указывали, что даже один раз доступ к Google во время ожидания обновлял таймер, и им приходилось ждать снова.
Выждав около 20–30 минут, попробуйте снова войти в Google и отправить запрос. Надеюсь, проблема будет решена, и у вас будет полный доступ без каких-либо проблем.
Решение 2. Очистка кеша и файлов cookie
Ваш браузер может содержать неисправные файлы, из-за которых Chrome снова и снова блокирует ваш доступ. Когда мы очищаем данные браузера, все сбрасывается, и браузер ведет себя так, как будто вы посещаете веб-сайты и просматриваете их впервые.
Примечание: Следуя этому решению, вы удалите все ваши данные о просмотре, кеш, пароли и т. Д. Перед тем, как продолжить работу с этим решением, убедитесь, что у вас есть резервные копии всех этих данных.
- Тип «chrome: // настройки»В адресной строке Google Chrome и нажмите Enter. Откроются настройки браузера.

- Перейдите в нижнюю часть страницы и нажмите «Продвинутый”.

- После того, как расширенное меню расширилось, в разделе «Конфиденциальность и безопасность«, нажмите на «Очистить данные просмотра”.

- Появится другое меню, подтверждающее элементы, которые вы хотите очистить, вместе с датой. Выбрать «Все время», Отметьте все параметры и нажмите«Очистить данные просмотра”.

- После выполнения всех операций перезапустите браузер и проверьте, решена ли проблема. Сначала вы можете попробовать только очистить кеш и файлы cookie. Если это не сработает, вы можете сбросить все настройки и попробовать еще раз.
Решение 3. Переустановите Chrome или используйте другой браузер
Если оба вышеперечисленных метода не работают, вам следует переустановить браузер Chrome и посмотреть, решит ли использование новой версии проблему. Существуют сотни случаев, когда некоторые модули браузера могут быть повреждены или неправильно настроены. Повторная установка решит эту проблему за вас.
- Нажмите Windows + R, введите «appwiz.cpl”В диалоговом окне и нажмите ввод.
- Здесь будут перечислены все приложения, установленные на вашем компьютере. Щелкните правой кнопкой мыши Google Chrome и выберите Удалить. После удаления приложения перейдите на официальный сайт Google Chrome с помощью другого браузера или устройства и установите его.

Если это не сработает, вы можете попробовать другой альтернативный браузер. Попробуйте такие браузеры, как Firefox, Opera и т. Д.

Примечание: Вам также следует попробовать изменить свою сеть и повторить попытку. Во многих случаях проблема заключается в сети, а не в браузере на вашем компьютере.
Содержание:
- Решение 1: Подождать
- Решение 2: Очистка кэша и файлов cookie
- Решение 3: Переустановка Chrome или использование другого браузера
Люди, использующие Google Chrome, возможно, сталкивались с ошибкой «У вашего клиента нет разрешения на получение URL» в какой-то момент, когда они воздерживались от использования поисковой системы. Обычно это происходит, когда выполняется слишком много запросов за очень короткий промежуток времени.

Когда вы выполняете поиск, запрос направляется на сервер Google, который в свою очередь ищет запрос на миллионах сайтов и возвращает вам результат через несколько миллисекунд. Все эти вычисления могут показаться легкими, но они потребляют много энергии. Чтобы предотвратить атаки на сайт с помощью DDOS или большую нагрузку на серверы, Google использует механизм, который автоматически блокирует доступ к поисковой системе, когда вы делаете много запросов за очень короткое время.
Если вы не сделали последнее, это означает, что либо ваш кэш поврежден, либо вы используете VPN. Если вы используете VPN-соединение или прокси-сервер, отключите его и попробуйте зайти в Google снова.
Решение 1: Подождать
Как уже упоминалось ранее, эта ошибка обычно возникает, когда вы выполняете большое количество запросов в течение короткого периода времени. Если вы исчерпали лимит времени, рекомендуется подождать некоторое время и не используйте Google во время ожидания. Было несколько сообщений, в которых пользователи указывали, что даже однократный доступ к Google во время ожидания обновлял таймер, и им приходилось ждать заново.
Подождав около 20-30 минут, попробуйте снова зайти в Google и отправить запрос. Надеюсь, проблема будет решена, и вы получите полный доступ без каких-либо проблем.
Решение 2: Очистка кэша и файлов cookie
Ваш браузер может содержать ошибочные файлы, которые могут заставлять Chrome снова и снова блокировать доступ. Когда мы очищаем данные браузера, все сбрасывается, и браузер ведет себя так, как будто вы впервые посещаете сайты и просматриваете веб-страницы.
Примечание: Следуя этому решению, вы удалите все данные браузера, кэш, пароли и т.д. Убедитесь, что вы сохранили все эти данные, прежде чем приступать к выполнению этого решения.
- Выберите «chrome://settings» в адресной строке Google Chrome и нажмите Enter. Откроются настройки браузера.

- Перейдите в нижнюю часть страницы и нажмите на кнопку «Расширенный«.

- После того как расширится меню «Дополнительно», в разделе «Конфиденциальность и безопасность«, нажмите на «Очистить данные просмотра«.

- Появится еще одно меню, в котором будут указаны элементы, которые вы хотите очистить, а также дата. Выберите «Все время«, отметьте все опции и нажмите кнопку «Очистить данные просмотра«.

- Перезапустите браузер после выполнения всех операций и проверьте, решилась ли проблема. Сначала вы можете попробовать очистить только кэш и файлы cookie. Если это не сработает, вы можете сбросить все настройки и попробовать снова.
Решение 3: Переустановка Chrome или использование другого браузера
Если оба вышеуказанных способа не сработали, вам следует переустановить браузер Chrome и посмотреть, устранит ли новая версия проблему. Существуют сотни случаев, когда некоторые модули браузера могут быть повреждены или неправильно настроены. Переустановка устранит эту проблему.
- Нажмите Windows + R, введите «appwiz.cpl» в диалоговом окне и нажмите ввод.
- Здесь будут перечислены все приложения, установленные на вашем компьютере. Щелкните правой кнопкой мыши на ‘Google Chrome’ и выберите Удалите. Когда приложение будет удалено, перейдите на официальный сайт Google Chrome с помощью другого браузера браузер или устройство, и установите его.

Если это не сработает, вы можете попробовать следующее альтернативный браузер. Попробуйте использовать такие браузеры, как Firefox, Opera и т.д.

Примечание: Вы также должны попробовать сменить сеть и попробовать снова. Существует множество случаев, когда проблема кроется в сети, а не в браузере на вашем компьютере.
Cправка — Gmail
Войти
Справка Google
- Справочный центр
- Сообщество
- Gmail
- Политика конфиденциальности
- Условия предоставления услуг
- Отправить отзыв
Тема отзыва
Информация в текущем разделе Справочного центра
Общие впечатления о Справочном центре Google
- Справочный центр
- Сообщество
- Раньше не работали с интегрированным сервисом Gmail?
Gmail