Подключенный USB-накопитель несовместим с консолью PlayStation®4.
- Убедитесь, что USB-накопитель соответствует следующим требованиям.
- Емкость от 250 Гб до 8 Тб.
- Отформатировано в FAT или exFAT.
- USB 3.0 или более новой версии.
- Если USB-накопитель отвечает этим требованиям, попробуйте подключить его к другому разъему USB консоли PS4™.
- Попробуйте использовать другой кабель USB, если он у вас есть.
- Подключайте USB-накопитель быстро и надежно.
Слишком медленное подключение может помешать распознаванию USB-накопителя.
В тексте сообщения к ошибке CE-41902-6 указано: «Ошибка внешнего жесткого диска. Неподдерживаемый диск». К сожалению, это правда, проблема действительно кроется во внешнем HDD. Правда, это не всегда означает, что ваш накопитель поломан, нередко сбой легко исправить буквально за несколько секунд. Если же не повезет, придется менять жесткий диск, но надеемся, что до этого не дойдет.
Что нужно сделать?
Хоть это и банально, но вам следует попробовать поправить разъем. Нужно удостовериться, что USB-штекер плотно установлен в разъеме и нет постороннего люфта. Еще один подобный подход – переключить внешний жесткий диск на другой порт. Приблизительно в половине случаев подобная простая тактика срабатывает.
Если накопитель подключен хорошо, но все равно показывает ошибку CE-41902-6, на нем могут быть битые сектора. Рекомендуем подключить жесткий диск к компьютеру и провести его сканирование. Существует много программ, которые выполняют анализ Smart части накопителя и даже позволяют исправить некоторые поломки. К примеру, можно отключить использование битых секторов и продолжить пользоваться HDD еще довольно долгое время. Можете попробовать Victoria, HDD Health, HDDLife, но часто лучший результат дают фирменные программы от производителя жесткого диска. Дополнительно рекомендуем выполнить форматирование.
Если ничего не поможет, останется только замена жесткого диска. Мы сталкивались, когда новый HDD провоцировал подобную ошибку. Он был довольно дешев и после разбора оказалось, что внутри просто флешка и пару плит с песком для веса. Старый диск, скорее всего, уже просто отжил свое и пора его заменить. Благо, проверить теорию просто, подключив другой накопитель.
The error codes CE-41902-6, CE-41901-5, and CE-41899-1 all refer to the same error message. The difference in code number is due to the difference of reasons why this message appears, as you’ll learn below. But, in general, this message is usually known with the error code CE-41902-6.
The content of the message is:
- USB 3.0 or later
- 250 GB minimum, 8 TB maximum capacity
- Directly connected to the PS4
This is one of the most common, and simultaneously the most annoying error that occurs while using an external hard drive on PS4. The real problem is that in most cases the external hard drive connected to PS4 already meets these standards. It supports USB 3.0 and its storage capacity is within the range 250gb to 8tb.
So, what’s the matter?
Official Error Fix
Searching on the official website of PlayStation, Sony offers the following fixes for each error.
Error Code (CE-41902-6)

The PlayStation official website suggests the following solutions for this error (source):
- USB 3.0 or later
- If your HDD is definitely USB 3.0, connecting it too slowly might cause this error message. Connect the USB External Storage Device quickly and firmly, but carefully.
Error Code (CE-41899-1)

The PlayStation official website suggests the following solutions for this error (source):
Connect the USB External Storage Device directly to the PS4.
Error Code (CE-41901-5)

The PlayStation official website suggests the following solutions for this error (source):
To some users, these quick fixes worked pretty well, and the errors were finally fixed. But, on the other hand, a wide variety of users find the suggested fixes useless and the problem with their PS4 still persists. So, what’s the workaround for this situation?
Ideal Solution
There’s a consensus among PS4 experts that this error is mainly related to the USB connectivity. There’s something that prevents PS4 console from enabling USB 3.0 connectivity with the connected external hard drive. But, at the same time, it recognizes it as a USB 2.0 external hard drive that can be used as a backup storage only on PS4.
So, the actual diagnose of the problem is that PS4 system properly recognizes the connecting external hard drive, but due to USB 3.0 connectivity deficiency, it enables the USB 2.0 connectivity instead, and thinks that your external hard drive is not suitable as an extended storage device.
You can follow these simple steps in order to fix these three error codes: CE-41902-6, CE-41899-1, and CE-41901-5.
Step 1 Clean USB ports and Connector
Sometimes the error is caused because of dirt/dust in the PS4 USB ports or inside the USB connector head of your external HDD. So, it’s a good idea to clean both of them before the start. A small dental floss wrapped with a bit of a clean tissue can do the job perfectly.
Step 2 Firmly Plug the USB connector into PS4
Due to a sort of connection loose between the cable and the port, this problem may occur. Make sure you firmly plug the external hard drive cable into the PS4 USB port. Just as the official error fix suggests. If this doesn’t work still, try to use the other USB port.
Step 3 Plug in and Plug out Several times
Pushing the USB connector and pulling it out from the PS4 USB port can fix this issue. Do it several times (3-5 times only, not more). Each time try to clean both, the USB connector head and the USB port.
Step 4 Connect to a USB 3.0 Computer
Connecting your external hard drive to a PC and enabling USB 3.0 connectivity may resolve the problem, especially with brand new external hard drives.
Simply, all what you have to do is connecting the external hard drive to a PC while it’s turned off. Now, turn it on and let the OS recognize your external hard drive. Try now to have some activities on the external hard drive, something like copying a large file to it (minimum 1gb) then delete it. Afterwards, safely remove the external hard drive and connect it again to PS4 and see whether it works or not.
Step 5 Disable USB 2.0 Specification
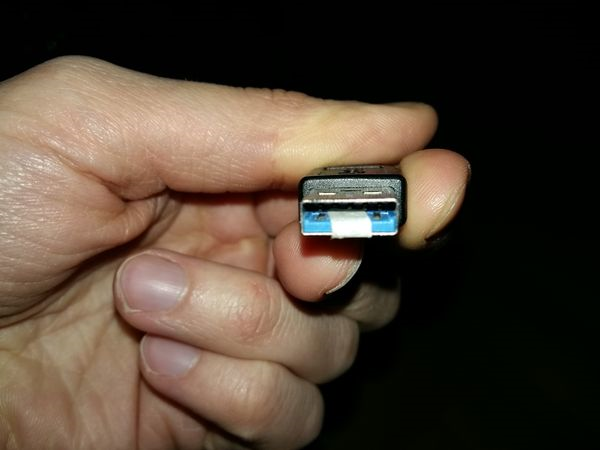
Some users suggested that if you cover and block the middle two pins of the USB connector head of your external hard drive, this will force PS4 system to enable the USB 3.0 connectivity with the connected drive. Several users found that helpful and it fixed the error.
A user with the name sam6862 on the PlayStation community posted his own fix for this error and said:
![[ce-41902-6] error fix](https://i2.wp. com/i. imgur. com/Kc82JMI. png? ssl=1)
Step 6 Check it on another PS4 Console
If none works, check your external hard drive on another PS4 console if possible. This is in order to determine whether the problem is with your PS4 USB ports or with the external hard drive USB connector.
If the external hard drive doesn’t work on the other PS4, the USB cable is the main culprit and it must be replaced with a new one. Otherwise, if the other console has no problem with your external hard drive, the problem is with your console’s USB ports. You better visit a technician for this.
Step 7 Change the USB cable
Ok, this is the last option that we all try to avoid. But really, if none works, it will be the only way to go.
Conclusion
PS4 Error Codes CE-41902-6, CE-41899-1, and CE-41901-5. are solely related to the state of connection between your console and the external storage device. The reason in almost all situations is the same: PS4 cannot enable USB 3.0 connectivity with the external storage device. In most cases, the external hard drive USB cable is the main reason. But before taking the final step of replacing it, try the different solutions laid out in this quick guide in order to precisely determine the real culprit.
Ошибка CE-43461-8 на PlayStation 4 — способы исправить
PlayStation 4 — одна из самых рейтинговых консолей, которая составляет конкуренцию своему огромному рыночному конкуренту Xbox. После того, как 7 семи из них были в бизнесе, он стал огромным и очень мощным. Можно сказать, что ему просто не хватает некоторых графических деталей и некоторых более мощных игр.
Таким образом, PS4 всегда будет в сердцах миллионов геймеров, даже несмотря на то, что консоль следующего поколения была представлена Sony, как недавно выпущенная PS5.
Как и некоторые из ошибок, с которыми сталкиваются игроки PS4, ошибка ce-43461-8 встречается у некоторых пользователей. Ошибка мешает установке некоторых новых прошивок на PS4. Более того, как сообщается, ошибка возникает в конце процесса обновления и связана с какой-либо проблемой с внутренним жестким диском.
Некоторые возможные причины ошибки CE-43461-8
Некоторые из причин этой ошибки в основном связаны с поврежденными элементами базы данных и системными файлами, некоторыми сбоями при обновлении или несоответствиями с HDD / SDD. Например, неожиданное прерывание системы, когда система готовилась к установке обновления, несоответствие с устройством хранения и т. Д.
Некоторые исправления ошибки CE-43461-8
Решение 1. Удаление уведомлений в очереди
Если есть какие-то сбои с обновлениями или очередью уведомлений, возможно, вы столкнулись с прерыванием системы во время подготовки и установки обновлений. Таким образом, удаление обновления уведомлений может решить эту проблему.
Чтобы удалить уведомление об обновлении, сначала выберите панель уведомлений в главном меню / на панели управления PS4. На этой панели уведомлений вы должны нажать треугольную кнопку, чтобы перейти в режим удаления, выбрать соответствующую запись обновления и нажать X. Вы можете выбрать несколько уведомлений, просто нажав «Выбрать все функции».

При следующем запросе подтвердите операцию и убедитесь, что на панели уведомлений нет упоминаний об ожидающем обновлении прошивки.
Атласт, перезапустите консоль и посмотрите, решила ли она проблему.
Решение 2. Переустановка / повторная установка жесткого диска
Внутренний жесткий диск также может вызывать эту ошибку, поэтому вытаскивание жесткого диска и повторная установка может решить эту проблему, но вы должны быть осторожны при прохождении этого процесса
Для этого сначала полностью выключите консоль и извлеките жесткий диск. Но инструкции могут отличаться в зависимости от используемой версии.
После повторной установки жесткого диска проверьте, установив ожидающее обновление, исчезла ли ошибка.
Решение 3. Повторная установка обновлений вручную
Иногда установку ожидающего обновления прошивки нужно выполнять вручную. Для этого требуются некоторые дополнительные аксессуары, например компьютер и многое другое. Следуйте инструкциям ниже, чтобы сделать это успешно.
Подключите совместимый флеш-накопитель USB к вашему ПК или Mac и запустите эту операцию, отформатировав его в FAT32. Вы можете легко сделать это, щелкнув правой кнопкой мыши по его записи в «Мой компьютер» (этот компьютер) и выбрав «Форматировать» в контекстном меню.
В меню просто измените имя на PS4 с помощью функции «Переименовать», затем установите для файловой системы значение Fat32. Что касается остальных параметров, оставьте размер единицы распределения по умолчанию, затем установите флажок, связанный с Выполнить быстрое форматирование, и нажмите ОК, чтобы начать процесс.
Примечание: Когда вас попросят подтвердить операцию, сделайте это, затем дождитесь завершения операции.
После успешного форматирования флешки в FAT32 откройте флешку, создайте новую папку и назовите ее UPDATE.
Зайдите на официальный сайт и в последней прошивке PS4 щелкните файл обновления системы PS4.
Загрузите этот файл в указанную выше папку, подключите к консоли PS4.

Перейдите в безопасный режим вашей консоли. Подключите контроллер и совместимый кабель USB-A и начните процесс сопряжения. Последовательно выберите «Обновить системное программное обеспечение» и «Обновить с USB-накопителя».
Перезагрузите консоль и дайте ей полностью загрузиться.
Узнайте больше о: Как включить функцию RTX
Заключение
Это некоторые из проверенных и проверенных несколькими пользователями исправлений, дающих хорошие результаты. Вы должны попробовать любой из них, или вам, возможно, придется попробовать их все.
Источники:
https://www. ps4storage. com/fixing-error-codes-ce-41902-6-and-ce-41899-1-and-ce-41901-5/
https://xperimentalhamid. com/ru/gaming/error-ce-43461-8/
Today we’ll fix the PS4 Error CE-41902-6 with the best methods. Normally the error CE-41902-6 is about a Hard Disk Drive problem. The PS4 is one of the most widely available consoles in the world right now. Sony estimates a total of 120 million PS4 consoles (the fat version, the slim version, and the Pro) are in the hands of gamers. So, there are a lot of units where different types of errors can or will occur at some point. Today we are going to be fixing one such hardware error. There are multiple fixes so, we will be going all-in on this error.

What is the CE-41902-6 Error?
The CE-41902-6 is a hard disk error that comes when you plug in an external hard disk to the PS4 console. The PS4 will not identify your hard disk or flash this error on the screen. In both cases, you will not be able to open and play your games stored in the external hard disk. So, fixing this problem is very important.
Why do you need an external hard disk in a PS4?
While the PS4 does come with it’s own internal hard disk, it is not always enough. Game sizes these days have begin to cross 100 GB so, using an external hard disk becomes pretty important.
What are the different situations of the CE-41902-6 error?
There are two situations where the CE-41902-6 error can occur. Some users say that the external hard disk hasn’t worked on their PlayStation 4 from the start. Other users have said that the hard disks have stopped working suddenly. Both of these situations need their respective solutions and our goal is to provide you both sets of solutions in this article. So without any further delay, let us start!
You may also like:
[Solved] PS4 Error WC 36547 5 – Best Bethod [Updated]
First Case: External Hard Disk doesn’t work with the PS4 from the Start

If an external hard disk hasn’t worked in your PS4 since you have bought it then the solutions we are trying to provide you may help you out. But before going into the technical solutions, you must first try out some of the simple solutions. Often times simple solutions can fix these problems. You can find a shortcut way to fix this solution on the PlayStation site but never find any full guide from them.
The first simple solution is to make sure that the external hard disk has a wired connection. Wireless hard disks are not supported by the PS4. USB wired hard disk is needed. Make sure the USB cable you are using works properly and then connect your hard disk.
We know there are multiple USB ports in the PS4. Sometimes one port may fail to recognize the hard disk. In this situation, you need to connect an external hard disk to another USB port. Ports can malfunction all the time so, something as simple as changing the port can help you out.
Check the compatibility of your hard disk. There is an only a certain hard disk that works with the PS4. Yes, not all USB hard disks work with it. But how do you know if your hard disk is supported or not? Easy! Just go to the PS4’s official website and check the requirements to determine compatibility.
You should never connect two external storage device to your PS4. The PS4 is designed to identify one one external storage device at a time. If you have already connected a hard disk then your another hard disk might not be recognized.
These were the simple fixes. If these fixes don’t work then, follow the technical fixes given below:
Method 1: Check if the Hard Disk Drive isn’t Damaged
Often times, the hard disk could be the problem and not the console. The external hard disk can get damaged and in such conditions, it may not be recognized by your PS4. But how do you check a hard disk for damage? Just connect your hard disk to a computer or a laptop. When you connect your hard disk to a computer, you will get a prompt saying that your device is ready to use.
You get this prompt when the hard disk is healthy. If you do not see this prompt. Go to disk management and use some disk repair options to fix some issues. Virus, Malware, and other software issues can be fixed with a clean format. But if there is hardware damage to the hard disk, your hard disk will not be recognized by your computer as well. And this means that the actual fault is with the hard disk and not the PS4.
Method 2: PS4 System Software Update

If your hard disk doesn’t have hardware damage and it is perfectly-recognized by computers and even other PS4 systems. Then, the actual problem resides with your PS4. It could have something to do with the system software. Maybe you haven’t updated the software and the older version might not work with the external hard disk.
To update the system software on a PS4, follow these steps:
- First, make sure your PS4 is connected to the screen. Now go to the home screen
- Go to the settings and choose the system software update.
- If your PS4 detects any update, click next and follow the on-screen prompts to download the update.
- When your update downloads, select the downloads to tap to install all the updates that the system has downloaded.
- When you are done, connect the external hard disk and check if it works
You may also like:
[Solved] PS4 Error CE-42747-4 – Best Method [Update]
Second Case: External Hard Disk Stopped Working Suddenly on a PS4
The second case is that your external hard disk stops suddenly. Just like the first case, your external hard disk can be faulty here too. So, follow the same troubleshooting process to check if there is a hardware problem with your hard disk. If the hard disk works fine then, you can move on to apply the solutions.
Method 1: Restart your PS4
The most important rule in Information Technology is, “if it doesn’t work, restart it.” So, do restart your PS4 once. Just turn off the PS4 and switch off the power to your PS4. Let it be turned off for five minutes. Disconnect the hard disk after it is turned off. Now without any external disks connected to your system. Turn on the PS4. Turn the PS4 off again. Now connect the external hard disk and turn your console ON. If this method hasn’t fixed your issue, move on to the next fix.
Method 2: PS4 Database Rebuild

This feature can allow you to rebuild the database in your PS4. It is like a firmware fix. The PS4 will create a new database of all your PS4 content. This feature is helpful for solving corrupted data issues but it can also fix your external hard disk issue. To use this feature, you need to first start the PS4 in the safe mode. Follow the following instructions:
- Turn off your PS4. Once it is turned off, press and hold the power button till it beeps two times.
- Now connect your controller to the console via a USB cable and press the PS button. Your PS4 has now successfully booted in Safe mode.
- The final thing to do is to just select the Rebuild Database option. Press X to confirm the choice and there you are. Problem Solved!
- Wait for a while until the process is complete. Now restart your PS4 normally and see if the problem is fixed.
Method 3: Reinstall the System Software

If every other fix did not work then this will be your last resort. You can try initialize your PS4 to it’s initial state. But this will delete all your data so, to avoid any data loss do keep a backup of your data. It will wipe your PS4’s internal hard disk. The first step for this fix is to boot the PS4 on safe mode. When you have done that, simply choose the Initialize PS4 option and that’s it. Very Easy.
Conclusion
This is how you can fix the CE-41902-6 error. This error is common when your console starts to age. There are multiple reasons for it as we have explained. Most of the times it’s either the software update (i.e. your PS4 isn’t up to date) or it’s cos your hard disk has hardware damage. It can be a few other reasons as well. Just follow this guide from top to bottom and maybe you will be able to find the issue and fix it (if it’s not a hardware damage).
You may also like:
PS4 Error NP-31980-1 Fixed | Best Updated Method 2020
FAQs on PS4 Error CE-41902-6
1. How do I fix error CE 41902 6?
You must need to follow the above method to fix the error CE-41902-6.
2. Is the error CE-41902-6 is a Hard Disk Problem?
In the most cases the error CE-41902-6 is Hard Dis problem.
3. Does USB 2.0 work with PS4?
Yes, of course, USB 2.0 still perfectly work with PS4.
4. What does USB 3.0 or later mean?
The USB 3.0 is upgraded from USB 2.0 version of port. It is faster than USB 2.0, its data transfer rate is much higher than USB 2.0.
5. Will any USB 3.0 work with PS4?
Yes, of course USB 3.0 work with PS4.
You may alslo like:
PS4 Error CE-37857-0 Fixed Best Method [Updated]
Best Working Free & Fast DNS Servers For PS4 2020 [Latest Update]
Возможные ошибки из-за внешнего накопителя на PlayStation 4
Большое количество пользователей PlayStation 4 рано или поздно сталкиваются с проблемой нехватки места в системе. Не мудрено, ведь в наше время игры занимают уже достаточно внушительное пространство и если вы хотите играть во все новинки, то у вас есть два варианта: или покупать консоль сразу с максимальным объемом памяти или использовать внешний жесткий диск. И, если вы выбрали 2 вариант, то при подключении диска к PlayStation 4 вы можете столкнуться с целым рядом ошибок, таких как CE-37857-0, CE-41902-6, CE-41901-5, CE-41899-1. Давайте посмотрим, из-за чего ошибки возникают и как с ними бороться.
Причина появления.
Несмотря на то, что коды ошибок разные, все они обозначают определенного рода несоответствия требованиям для работы с PS 4. Диск может не подходить по объему, интерфейсу подключения и самой файловой системе. Также Sony предупреждает, что не дает никаких гарантий на совместимость того или иного накопителя с PlayStation 4.
Как исправить ошибки?
Итак давайте отдельно остановимся на каждом требовании к накопителю и системе:
- Единственный нюанс, кроющийся в самой системе, это то, что внешние накопители начали поддерживаться начиная с версии ПО 4.50. Если у вас более ранняя версия то вам нужно перейти в [Настройки] – [Обновление системного программного обеспечения] – [Далее], если система найдет более свежую версию прошивки, она найдет ее автоматически скачает и установит. Разумеется, консоль в этот момент должна быть подключена к интернету.
Касаемо требований к самому жесткому диску:
- Объем жесткого диска должен находиться в пределах от 250 Гб до 8 Тб, то есть если он больше или меньше, то единственным вариантом является замена на новый, объем которого находится в рамках допуска. Но стоит сказать, что рамки довольно большие и в наше время сожно найти жесткий диск, не входящий в них, поэтому, скорей всего, ваша проблема кроется не в этом.
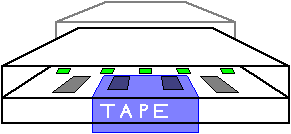
- Также важен интерфейс подключения, он должен быть USB 3.0. Соотвественно, ваш накопитель должен поддерживать этот интерфейс. Но если верить форумам и некоторым испытаниям пользователей, при обычном подключении приоритетом PlayStation 4 считает не USB 3.0, а именно USB 2.0. Поэтому ваш накопитель может не определяться. Выходом из данной ситуации может стать заклеивание контактов D+ и D- (см. фото ниже). Те фактически, таким образом, принудительно переводите провод в режим Only USB 3.0 без обратной совместимости с USB 2.0.
- Ну и, как уже говорилось, проблема может заключаться в неправильном форматировании жесткого диска. Дело в том, что накопитель должен быть отформатирован в файловой системе FAT или exFAT. Решений тут может быть масса. Для начала разберем официальный метод, предлагаемый самой Sony. Он заключается в форматировании внешнего жесткого диска с использованием вашей PlayStation 4. Порядок действий:
- Открыть «Настройки».
- Перейти в «Устройства».
- Открыть «Накопители USB».
- Выбрать подключенный накопитель.
- Нажать «Форматировать как внешнее устройство» и далее делать все согласно инструкции.
- По окончании форматирования у вас появится внешний накопитель для установки на него приложений.
- Если проблема не ушла то попробуйте переподключить накопитель, для этого:
Выберите в быстром меню пункты [Звук/устройства] > [Прекратить использование расширенного хранилища], отсоедините накопитель от порта USB, а затем снова подключите его. Удостоверьтесь, что устройство надежно подключено.
- Следующим способом могут воспользоваться те, у кого есть возможность подключить жесткий диск к системе PlayStation 3. Само форматирование происходит также, как на PlayStation 4, но приятным бонусом станет то, что диск форматируется как просто накопитель, который вы сможете использовать не только для хранения игр и приложений, но и для ваших личных файлов.
- Еще один способ – предварительное форматирование через ПК. Для этого:
- Подключаем накопитель к компьютеру на Windows и ждем, пока он определится.
- В системе жмем кнопку со значком Windows и R.
- В открывшемся окошке пишем: cmd и Enter.
- Открывается окно командной строки, в котором нужно написать “diskpart” и нажать Enter.
- Делаем все как на скриншоте ниже, только вместо “format fs=ntfs” пишем “format fs=exfat”.
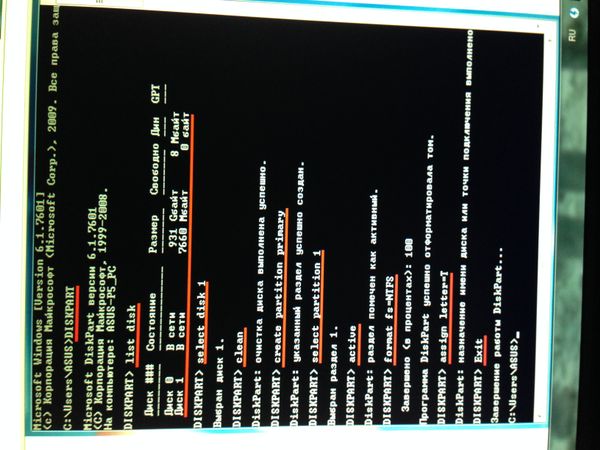
- Стоит предупредить, что процесс форматирования займет довольно много времени.
- После всех этих процедур подключаем жесткий диск к вашей PS 4 и форматируем повторно на ней, как это уже было описано ранее.
- Если ни одна из вышеупомянутых операций не помогла, то, вероятней всего, проблема непосредственно в самом жестком диске. Попробуйте заменить его на новый и провести все те же манипуляции уже с ним. Если в итоге он будет определяться как внешнее хранилище, то проблема станет очевидной.
Надеемся, с помощью нашей статьи вам удалось увеличить объем вашего хранилища на PlayStation 4 и поиграть во все интересующие вас игры.