An operating system user that is still a learner in the OS world can never escape the challenges the current elite users have overcome. The user impact of such challenges depends on the operating system flavor or distribution you are under.
For Linux users, you might think you are facing an impossible challenge only to realize that there are multiple valid solutions for every single OS problem faced.
[ You might also like: How to Backup Linux Filesystem Using dump Command ]
The Linux file system is a maze that most users hesitate to enter. It is because this file system is responsible for the performance consistency of your Linux operating system and any slight modification to its hierarchy or file system structure can be a nightmare for any user.
The FSCK Linux Command
The Linux operating system handles file system issues through the fsck command-line utility. It is a prepackaged file system check toolkit that interactively checks and repairs corrupted files that might affect the performance of your operating system.
$ man fsck
Most of the time, it is these corrupt files that are responsible for failed system boots and partition mounts.
FSCK Command Usage
The standard syntax for fsck command-line utility is as follows:
# fsck [OPTIONS] [FILESYSTEM]
You need to be a sudoer user or have sudo privileges to effectively use the FSCK tool.
FSCK adheres to some predefined rules.
- It references the /etc/fstab file when a user does not provide
[FILESYSTEM]as a command argument.

The <pass> column for the <mount point> (/) and <type> (ext4) is set to 1 because its file system checks and repair are prioritized.
It is not recommended to use the fsck command with mounted partitions as there is a high likelihood of permanent file system damage.
Repairing A Corrupted Linux File System
The first step is to identify the device partition that holds the Linux file system you would like to check and repair.
$ sudo fdisk -l

The second step is to unmount the device whose file system you want to check and repair. e.g.
$ sudo umount /dev/sda5
The third step is to check and possibly repair the device’s file system using FSCK.
$ sudo fsck -p /dev/sda5
The -p command option is for automatic repair without any user intervention.
The final step is to re-mount your device once the fsck file system check and repair is complete.
$ sudo mount /dev/sda5
Repairing Linux File System on Boot-Time
On a running machine, it is not possible to simultaneously check and repair your Linux file system while using the OS. In this case, we have the options of using a live CD/bootable usb drive or checking and repairing the Linux file system on boot (For installed Linux systems).
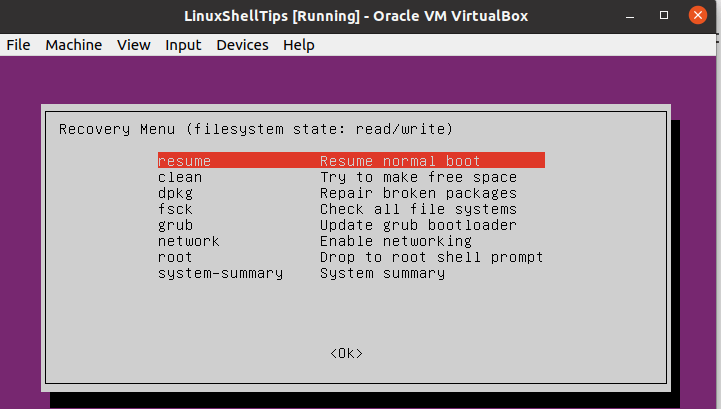
Linux File System Repair on Boot
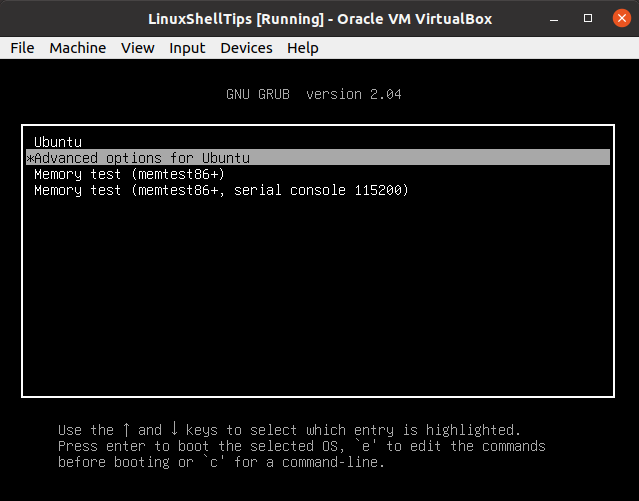
1. Restart your machine, press [Esc] or [Shift] and select Advanced Options on the resulting boot menu.
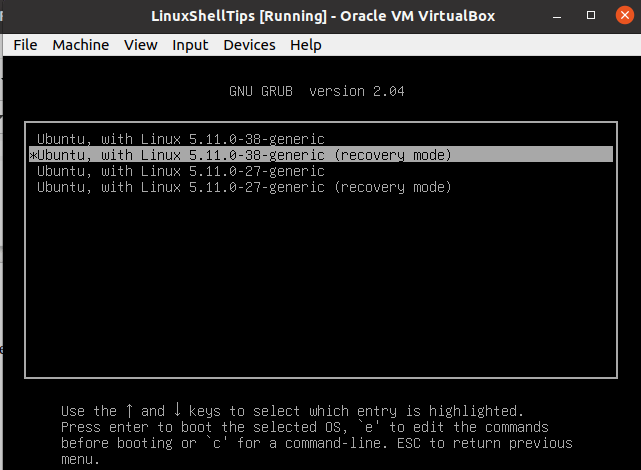
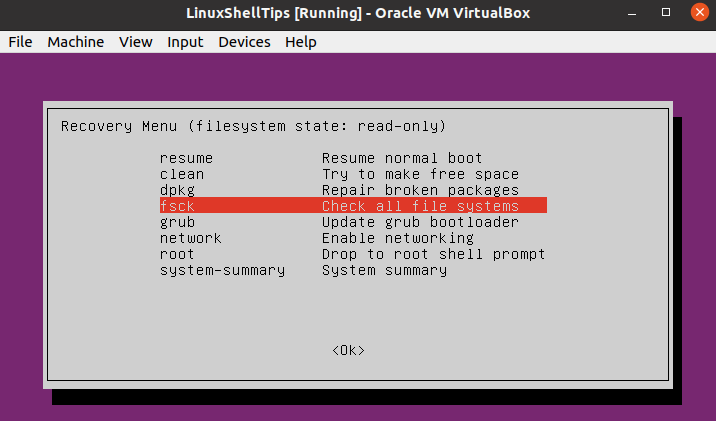
2. Select Recovery Mode and choose the fsck option from the resulting list of menu options.
3. Hit [Enter] and choose the fsck menu option.
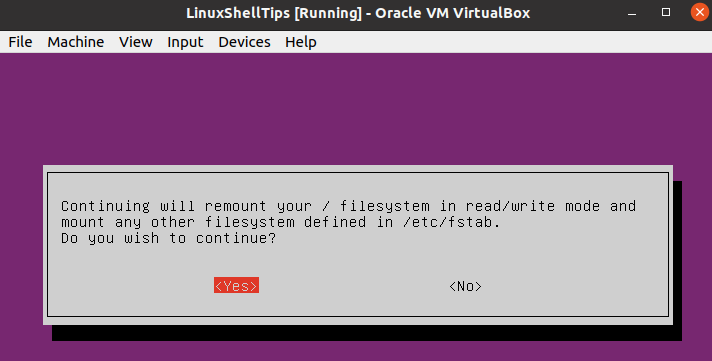
4. Choose Yes when asked whether to remount your OS root file system.
5. Once the file system check and repair is complete, direct your system to resume normal boot.
Live CD/USB File System Repair
- Boot into your machine from the live distribution (CD or USB).
- Open the Linux terminal and use
sudo fdisk -lcommand to find the targeted Linux root partition name. - If the root partition is identified by a name like /dev/sda1, running the following command will check and possibly repair its associated file system.
$ sudo fsck -p /dev/sda1
FSCK is a very effective tool to get you started on understanding the nature and performance of your Linux system. The man fsck command has more options on using the FSCK utility to check and optionally repair broken or corrupt Linux file systems.

I am an Experienced GNU/Linux expert and a full-stack software developer with over a decade in the field of Linux and Open Source technologies.
Founder of TecMint.com, LinuxShellTips.com, and Fossmint.com. Over 150+ million people visited my websites.
Each tutorial at LinuxShellTips is created by a team of experienced writers so that it meets our high-quality standards.
Was this article helpful? Please add a comment to show your appreciation and support.
FSCK – очень важная утилита для Linux / Unix, она используется для проверки и исправления ошибок в файловой системе.
Она похоже на утилиту «chkdsk» в операционных системах Windows.
Она также доступна для операционных систем Linux, MacOS, FreeBSD.
FSCK означает «File System Consistency Check», и в большинстве случаев он запускается во время загрузки, но может также запускаться суперпользователем вручную, если возникнет такая необходимость.
Может использоваться с 3 режимами работы,
1- Проверка наличия ошибок и позволить пользователю решить, что делать с каждой ошибкой,
2- Проверка на наличие ошибок и возможность сделать фикс автоматически, или,
3- Проверка наличия ошибок и возможность отобразить ошибку, но не выполнять фикс.
Содержание
- Синтаксис использования команды FSCK
- Команда Fsck с примерами
- Выполним проверку на ошибки в одном разделе
- Проверьте файловую систему на ошибки и исправьте их автоматически
- Проверьте файловую систему на наличие ошибок, но не исправляйте их
- Выполним проверку на ошибки на всех разделах
- Проверим раздел с указанной файловой системой
- Выполнять проверку только на несмонтированных дисках
Синтаксис использования команды FSCK
$ fsck options drives
Опции, которые можно использовать с командой fsck:
- -p Автоматический фикс (без вопросов)
- -n не вносить изменений в файловую систему
- -у принять «yes» на все вопросы
- -c Проверить наличие плохих блоков и добавить их в список.
- -f Принудительная проверка, даже если файловая система помечена как чистая
- -v подробный режим
- -b использование альтернативного суперблока
- -B blocksize Принудительный размер блоков при поиске суперблока
- -j external_journal Установить местоположение внешнего журнала
- -l bad_blocks_file Добавить в список плохих блоков
- -L bad_blocks_file Установить список плохих блоков
Мы можем использовать любую из этих опций, в зависимости от операции, которую нам нужно выполнить.
Давайте обсудим некоторые варианты команды fsck с примерами.
Команда Fsck с примерами
Примечание: – Прежде чем обсуждать какие-либо примеры, прочтите это. Мы не должны использовать FSCK на смонтированных дисках, так как высока вероятность того, что fsck на смонтированном диске повредит диск навсегда.
Поэтому перед выполнением fsck мы должны отмонтировать диск с помощью следующей команды:
$ umount drivename
Например:
$ umount /dev/sdb1
Вы можете проверить номер раздела с помощью следующей команды:
$ fdisk -l
Также при запуске fsck мы можем получить некоторые коды ошибок.
Ниже приведен список кодов ошибок, которые мы могли бы получить при выполнении команды вместе с их значениями:
- 0 – нет ошибок
- 1 – исправлены ошибки файловой системы
- 2 – система должна быть перезагружена
- 4 – Ошибки файловой системы оставлены без исправлений
- 8 – Операционная ошибка
- 16 – ошибка использования или синтаксиса
- 32 – Fsck отменен по запросу пользователя
- 128 – Ошибка общей библиотеки
Теперь давайте обсудим использование команды fsck с примерами в системах Linux.
Выполним проверку на ошибки в одном разделе
Чтобы выполнить проверку на одном разделе, выполните следующую команду из терминала:
$ umount /dev/sdb1

$ fsck /dev/sdb1
Проверьте файловую систему на ошибки и исправьте их автоматически
Запустите команду fsck с параметром «a» для проверки целостности и автоматического восстановления, выполните следующую команду.
Мы также можем использовать опцию «у» вместо опции «а».
$ fsck -a /dev/sdb1
Проверьте файловую систему на наличие ошибок, но не исправляйте их
В случае, если нам нужно только увидеть ошибки, которые происходят в нашей файловой системе, и не нужно их исправлять, тогда мы должны запустить fsck с опцией “n”,
$ fsck -n /dev/sdb1
Выполним проверку на ошибки на всех разделах
Чтобы выполнить проверку файловой системы для всех разделов за один раз, используйте fsck с опцией «A»
$ fsck -A
Чтобы отключить проверку корневой файловой системы, мы будем использовать опцию «R»
$ fsck -AR
Проверим раздел с указанной файловой системой
Чтобы запустить fsck на всех разделах с указанным типом файловой системы, например, «ext4», используйте fsck с опцией «t», а затем тип файловой системы,
$ fsck -t ext4 /dev/sdb1
или
$ fsck -t -A ext4
Выполнять проверку только на несмонтированных дисках
Чтобы убедиться, что fsck выполняется только на несмонтированных дисках, мы будем использовать опцию «M» при запуске fsck,
$ fsck -AM
Вот наше короткое руководство по команде fsck с примерами.
Пожалуйста, не стесняйтесь присылать нам свои вопросы, используя поле для комментариев ниже.
Earlier with CentOS/RHEL 5 and 6 we used to use tune2fs to force file system check on boot and repair file system. There we used to change maximum mount count using tune2fs -c 4 /dev/disk-name command and then creating an empty file forcefsck under the file system to be checked. Now starting with CentOS/RHEL 7 those methods are not supported. Hence creating /forcefsck will not force file system check on boot with RHEL/CentOS 7/8 Linux.
Lab Environment
I have created a Virtual Machine using Oracle VirtualBox installed on Linux server. I have installed CentOS 8 on this virtual machine but the same steps will work on RHEL 7/8 or CentOS 7.
In this article we will cover below topics:
- Creating the files /forcefsck and /fsckoptions doesn’t work on CentOS/RHEL 7/8 Linux.
- How to perform filesystem check on next reboot at startup stage and repair file system, using systemd-fsck?
- How to perform non-interactive force fsck during reboot stage to repair file system, as by default the fsck will await user input for every error?
Step 1: Update GRUB2 to force file system check on boot
With systemd-219-19.el7 the kernel command line option of fsck.repair= and fsck.mode= was added in RHEL 7.2.
ALSO READ: How to restrict IP Address to use postfix smtp relay
So we can use fsck.mode=force to perform and force file system check on boot (next reboot). This can be combined with fsck.repair=yes to answer yes to fsck command out (if any errors found). So with this fsck will perform necessary correction in the file system at boot stage without any manual intervention.
Next append fsck.mode=force and fsck.repair=yes under GRUB_CMDLINE_LINUX in /etc/sysconfig/grub file as shown below
[root@centos-8 ~]# cat /etc/sysconfig/grub
GRUB_TIMEOUT=5
GRUB_DISTRIBUTOR="$(sed 's, release .*$,,g' /etc/system-release)"
GRUB_DEFAULT=saved
GRUB_DISABLE_SUBMENU=true
GRUB_TERMINAL_OUTPUT="console"
GRUB_CMDLINE_LINUX="crashkernel=auto resume=/dev/mapper/rhel-swap rd.lvm.lv=rhel/root rd.lvm.lv=rhel/swap rhgb quiet fsck.mode=force fsck.repair=yes"
GRUB_DISABLE_RECOVERY="true"
GRUB_ENABLE_BLSCFG=true
From man page of systemd-fsck
KERNEL COMMAND LINE
       systemd-fsck understands one kernel command line parameter:

fsck.mode=
           One of "auto", "force", "skip". Controls the mode of operation. The default is "auto", and ensures that
           file system checks are done when the file system checker deems them necessary.  "force" unconditionally
           results in full file system checks.  "skip" skips any file system checks.

fsck.repair=
           One of "preen", "yes", "no". Controls the mode of operation. The default is " preen", and will
           automatically repair problems that can be safely fixed.  "yes " will answer yes to all questions by fsck
           and "no" will answer no to all questions.
Step 2: Rebuild GRUB2 in CentOS/RHEL 7/8
HINT:
Below command is for legacy BIOS, on UEFI-based machines: ~]# grub2-mkconfig -o /boot/efi/EFI/redhat/grub.cfg
[root@centos-8 ~]# grub2-mkconfig -o /boot/grub2/grub.cfg
Generating grub configuration file ...
done
We are all done here to force file system check on boot (next reboot) using systemd-fsck. Next reboot your CentOS/RHEL 7/8 Linux host to verify the steps
ALSO READ: How to boot Linux host from LVM snapshot using BOOM (CentOS/RHEL 
Step 3: Verify the configuration
Post reboot connect to your Linux host using putty or any other CLI tool. You need to check the boot logs which you can either check using dmesg or journalctl -b or journalctl --boot
[root@centos-8 ~]# journalctl --boot

Jan 17 03:11:55 centos-8.example.com dracut-cmdline[195]: Using kernel command line parameters: BOOT_IMAGE=(hd0,msdos1)/vmlinuz-4.18.0-80.11.2.el8_0.x86_64 root=/dev/mapper/rhel-root ro crashkernel=auto resume=/dev/mapper/rhel-swap rd.lvm.lv=rhel/root rd.lvm.lv=rhel/swap rhgb quiet fsck.mode=force fsck.repair=yes

<Output trimmed>

Jan 17 03:11:57 centos-8.example.com systemd[1]: Starting File System Check on /dev/mapper/rhel-root...
Jan 17 03:11:57 centos-8.example.com systemd[1]: Reached target Remote File Systems (Pre).
Jan 17 03:11:57 centos-8.example.com systemd[1]: Reached target Remote File Systems.
Jan 17 03:11:57 centos-8.example.com systemd-fsck[485]: e2fsck 1.44.3 (10-July-2018)
Jan 17 03:11:57 centos-8.example.com systemd-fsck[485]: Pass 1: Checking inodes, blocks, and sizes
Jan 17 03:11:57 centos-8.example.com systemd-fsck[485]: Pass 2: Checking directory structure
Jan 17 03:11:58 centos-8.example.com kernel: random: crng init done
Jan 17 03:11:58 centos-8.example.com kernel: random: 7 urandom warning(s) missed due to ratelimiting
Jan 17 03:11:58 centos-8.example.com systemd-fsck[485]: Pass 3: Checking directory connectivity
Jan 17 03:11:58 centos-8.example.com systemd-fsck[485]: Pass 4: Checking reference counts
Jan 17 03:11:58 centos-8.example.com systemd-fsck[485]: Pass 5: Checking group summary information
Jan 17 03:11:58 centos-8.example.com systemd-fsck[485]: /dev/mapper/rhel-root: 199444/889440 files (0.1% non-contiguous), 1190592/3555328 blocks
Jan 17 03:11:58 centos-8.example.com systemd[1]: Mounting /sysroot...

<Output trimmed>
Here as you see systemd-fsck was called at called to force file system check at boot stage. Here since there were no errors the fsck check went on smoothly.
ALSO READ: Linux show hidden files and folders with simple commands
Lastly I hope the steps from the article to force file system check on boot (next reboot) in RHEL/CentOS 7/8 Linux was helpful. So, let me know your suggestions and feedback using the comment section.
References:
How to force fsck during the boot in RHEL7?
Related Searches: linux file system check on boot. disk check runs at every startup. Creating the files /forcefsck and /fsckoptions doesn’t work on CentOS/RHEL 7/8 Linux. How to force filesystem check during boot time, using systemd? How to answer yes, to all questions by fsck automatically during boot time? shutdown force fsck in CentOS/RHEL 7/8. How to repair file system on next reboot in Linux.
Didn’t find what you were looking for? Perform a quick search across GoLinuxCloud
Чтобы Linux выполнил проверку дисков (fsck) при следующей перезагрузке, нужно создать пустой файл forcefsck в корневом каталоге:
cd /
touch forcefsck
reboot
Тот же эффект даст следующая команда:
shutdown -rF now
Для того, чтобы fsck самостоятельно устраняла ошибки без ручного подтверждения запросов, в загрузочных параметрах требуется включить опцию автоматического подтверждения всех запросов.
CentOS, Fedora, RedHat
В конфигурационном файле /etc/sysconfig/autofsck добавляем значение -y переменной AUTOFSCK_OPT:
AUTOFSCK_OPT="$AUTOFSCK_OPT -y"
Debian, Ubuntu
В конфигурационном файле /etc/default/rcS присвоить переменной FSCKFIX значение yes:
FSCKFIX=yes
FreeBSD
В конфигурационном файле /etc/rc.conf присвоить переменной fsck_y_enable значение YES:
fsck_y_enable="YES"

In this article, you will learn how to repair Linux disk errors by using fsck and xfs_repair commands.
Table of Contents:
- What is FSCK?
- List Linux Disk Partitions and Types
- Get Last Scanned Time of a Linux Disk
- Scan & Repair a Ext4 Type Disk Partition
- Enable Scanning of Ext4 Disk Partitions at Linux Startup
- What is XFS_REPAIR?
- Scan & Repair a XFS Type Disk Partition
- Enable Scanning of XFS Disk Partitions at Linux Startup
- Conclusion
What is FSCK?:
The system utility fsck (file system consistency check) is a tool for checking the consistency of a file system in Unix and Unix-like operating systems, such as Linux, macOS, and FreeBSD.
Generally, fsck is run either automatically at boot time, or manually by the system administrator. The command works directly on data structures stored on disk, which are internal and specific to the particular file system in use — so an fsck command tailored to the file system is generally required. The exact behaviors of various fsck implementations vary, but they typically follow a common order of internal operations and provide a common command-line interface to the user. (Source: Wikipedia)

List Linux Disk Partitions and Types:
First of all you need to identify the disk partitions in your Linux server, their respective file systems and the path where they are being mounted.
If you are not used to Linux commandline then we recommend that you should attend online training Linux Command Line: From novice to wizard
By using a console or a ssh client, connect with your Linux server as root user.
You can execute the lsblk command with following switches at the Linux bash prompt to list the required information.
# lsblk -o NAME,FSTYPE,MOUNTPOINT
NAME        FSTYPE      MOUNTPOINT
sda
├─sda1      ext4        /boot
└─sda2      LVM2_member
  ├─cl-root xfs         /
  ├─cl-swap swap        [SWAP]
  └─cl-home xfs         /home
sr0
Get Last Scanned Time of a Linux Disk:
You can find the last scan time for Linux Ext4 type partitions with the help of following command.
# tune2fs -l /dev/sda1 | grep checked
Last checked:             Sun Sep 29 20:03:14 2019
Scan & Repair a Ext4 Type Disk Partition:
To scan a Linux disk partition, you can use fsck (File System Consistency Check) command. But you are required to unmount that partition before checking and repairing it.
# umount /dev/sda1
After successful unmount, execute fsck command at Linux bash prompt.
# fsck.ext4 /dev/sda1
e2fsck 1.45.6 (20-Mar-2020)
/dev/sda1: clean, 320/65536 files, 61787/262144 blocks
After checking and repairing your Linux disk, mount the partition again at its respective mountpoint.
For this purpose, execute following Linux command to mount all the disk partitions listed in /etc/fstab file.
# mount -a
Enable Scanning of Ext4 Disk Partitions at Linux Startup:
To enable disk checking at the time of Linux startup. You have to modify the Mount Count parameter for that disk partition.
# tune2fs -c 1 /dev/sda1
tune2fs 1.45.6 (20-Mar-2020)
Setting maximal mount count to 1
Reboot your Linux server now.
# reboot
Linux command fsck is now check your Ext4 disk partition on startup.
After reboot, get the Last Checked value for your disk partition, now it will show you the time of last Linux startup.
# tune2fs -l /dev/sda1 | grep checked
Last checked:             Sun Aug  1 22:50:46 2021
Set back the Mount Count parameter, or it will keep performing disk scans on each Linux boot.
# tune2fs -c -1 /dev/sda1
tune2fs 1.45.6 (20-Mar-2020)
Setting maximal mount count to -1
What is XFS_REPAIR?:
XFS is a high-performance 64-bit journaling file system created by Silicon Graphics, Inc (SGI) in 1993. It was the default file system in SGI’s IRIX operating system starting with its version 5.3. XFS was ported to the Linux kernel in 2001; as of June 2014, XFS is supported by most Linux distributions, some of which use it as the default file system.
The xfs_repair utility is highly scalable and is designed to repair even very large file systems with many inodes efficiently. Unlike other Linux file systems, xfs_repair does not run at boot time, even when an XFS file system was not cleanly unmounted. In the event of an unclean unmount, xfs_repair simply replays the log at mount time, ensuring a consistent file system.
Scan & Repair a XFS Type Disk Partition:
XFS type disk partitions have their own set of commands, that are a little bit different from Ext4.
You must unmount a XFS disk partition before checking it for consistency.
# umount /dev/mapper/cl-home
We have xfs_repair command for checking and repairing the disk errors.
In some Linux distros, you may also find xfs_check command. This command only perform scanning of XFS type disk partitions and do not perform any repair.
But xfs_check command is not available in all Linux distros.
Alternatively, you can use xfs_repair command with -n switch to get the same functionality as of xfs_check.
# xfs_repair -n /dev/mapper/cl-home
Phase 1 - find and verify superblock...
Phase 2 - using internal log
        - zero log...
        - scan filesystem freespace and inode maps...
        - found root inode chunk
Phase 3 - for each AG...
        - scan (but don't clear) agi unlinked lists...
        - process known inodes and perform inode discovery...
        - agno = 0
        - agno = 1
        - agno = 2
        - agno = 3
        - process newly discovered inodes...
Phase 4 - check for duplicate blocks...
        - setting up duplicate extent list...
        - check for inodes claiming duplicate blocks...
        - agno = 0
        - agno = 1
        - agno = 2
        - agno = 3
No modify flag set, skipping phase 5
Phase 6 - check inode connectivity...
        - traversing filesystem ...
        - traversal finished ...
        - moving disconnected inodes to lost+found ...
Phase 7 - verify link counts...
No modify flag set, skipping filesystem flush and exiting.
The above command only perform disk checking and do not try to repair any error.
Now, execute the xfs_repair command without -n switch and it will perform scanning and repairing of Linux disk partitions.
# xfs_repair /dev/mapper/cl-home
Phase 1 - find and verify superblock...
Phase 2 - using internal log
        - zero log...
        - scan filesystem freespace and inode maps...
        - found root inode chunk
Phase 3 - for each AG...
        - scan and clear agi unlinked lists...
        - process known inodes and perform inode discovery...
        - agno = 0
        - agno = 1
        - agno = 2
        - agno = 3
        - process newly discovered inodes...
Phase 4 - check for duplicate blocks...
        - setting up duplicate extent list...
        - check for inodes claiming duplicate blocks...
        - agno = 0
        - agno = 1
        - agno = 2
        - agno = 3
Phase 5 - rebuild AG headers and trees...
        - reset superblock...
Phase 6 - check inode connectivity...
        - resetting contents of realtime bitmap and summary inodes
        - traversing filesystem ...
        - traversal finished ...
        - moving disconnected inodes to lost+found ...
Phase 7 - verify and correct link counts...
done
Remount the XFS partition at its original mountpoint as listed in /etc/fstab file.
# mount -a
Enable Scanning of XFS Disk Partitions at Linux Startup:
In some scenarios you cannot unmount a disk partition, if the disk is in use by the Linux operating system. For this reason you may have to defer the disk checking until next system boot.
To enable xfs_repair command to run on Linux startup, add «fsck.mode=force fsck.repair=yes» at the end of GRUB menu kernel command.
You can refer to our previous post about Editing GRUB menu.
After Linux startup, check the system log to verify the execution of disk repair command.
# journalctl | grep systemd-fsck
To permanently enable disk checking at startup, you have to add «fsck.mode=force fsck.repair=yes» in GRUB configuration files.
Edit grub configuration file in vim text editor.
# vi /etc/default/grub
Locate GRUB_CMDLINE_LINUX parameter and append «fsck.mode=force fsck.repair=yes» at the end of line.
GRUB_CMDLINE_LINUX="resume=/dev/mapper/cl-swap rd.lvm.lv=cl/root rd.lvm.lv=cl/swap rhgb quiet fsck.mode=force fsck.repair=yes"
Regenerate GRUB menu configurations based on new parameters.
# grub2-mkconfig
Reboot your Linux operating system to verify the new settings.
# reboot
Conclusion:
You have successfully performed scanning and repairing of Linux Disk partitions of Ext4 and XFS types. If you feel any difficulty understanding this Linux tutorial, we suggest that you should read The Linux Command Line, 2nd Edition by William Shotts.