hp-concentra-wrapper-portlet
![]()
Actions
Issue
An ‘Out of paper‘ message displays on the control panel, and the printer does not pick up or feed paper. The printer might make noises as though it is printing, but no paper moves through it.
Experiencing frequent or recurring paper feed issues?
Follow these guidelines to help prevent paper feed issues:
-
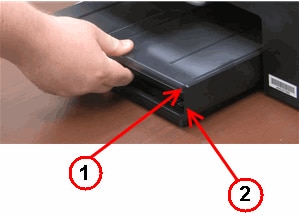
Make sure to push the paper tray into the product until it stops.
-
Load at least 10 sheets of paper into the tray, but do not overload the tray.
-
Do not push the paper too far into the tray.
-
Load only one type of paper at a time into the tray.
-
Use only clean unused paper in the tray.
-
Store paper in a cool dry place.
-
Reload paper that has been in the tray for a while. Avoid printing on paper that is dusty.
-
Wait for the product to complete a print job or to display an ‘Out of paper‘ message before reloading the tray.
Causes
Any of the following issues can cause paper feed issues:
-
The paper tray is not pushed into the product until it stops.
-
The paper tray is overloaded.
-
The paper is curled.
-
The print side or shiny side of the paper is not loaded face down in the tray.
-
The paper width guides are too tight against the paper stack.
-
The paper feed rollers are coated with dust.
-
Debris such a as paper clips or bits of paper might have fallen into the paper path.
Important: You must follow these solutions in the order presented to resolve the issue.
Main tray
Solution one: Reset the All-in-One
Sometimes, resetting the printer can clear a paper feed issue. Follow these steps to perform a reset, and then print a Printer Status Report.
Step one: Perform a power reset
Follow these steps to perform a power reset.
-
With the printer turned on, disconnect the power cord from the rear of the printer.
-
Unplug the power cord from the wall outlet.
-
Wait at least 15 seconds.
-
Plug the power cord back into the wall outlet.
-
Reconnect the power cord to the printer.
-
Turn the printer on.
Step two: Print a Printer Status Report
Follow these steps to print a test page.
-
Load plain white U.S. letter or A4 size paper in the tray, if it is not already loaded.
-
On the product control panel, touch the Settings icon (
 ), and then touch Tools.
 -
Touch Printer Status Report. The product prints the test page.
-
If these steps resolved the issue, you do not need to continue troubleshooting.
-
If the issue persists, continue to the next solution.
Solution two: Check the paper, and then reload it
Paper feed issues might result from using ripped, dusty, curled, wrinkled, or bent paper. The quality of the paper can also make a difference. Use these guidelines to help avoid the issue.
-
Use only good quality paper that meets printer specifications.
-
Store all paper in a dry, cool place. Paper feed issues occur more often in humid environments.
-
Do not print on paper that is already printed. The dampness of the ink can cause the paper to stick together.
-
Wait for the printer to complete a job or for an Out of paper or Load Paper message to display before you reload the paper.
Step one: Check the condition of the paper
Follow these steps to check the condition of the paper.
-
Remove the stack of paper from the tray.
-
Check for obstructions inside the tray. Use a flashlight to view the mechanism inside the tray to make sure that nothing blocks the paper from engaging with the rollers. Even small pieces of paper can cause paper feed issues.
note:
If you find obstructions in the paper path, skip to the section on cleaning the rollers.
-
Examine the condition of the paper, and then replace any ripped, dusty, curled, wrinkled, or bent paper.
-
Make sure that all the paper in the stack is the same size and type. Never load mixed types of paper in the tray. The product can only process one type of paper at a time.
-
Tap the stack of paper on a flat surface to align the edges.
-
Make sure that the stack of paper contains no fewer than 10 sheets and no more than 25 sheets of paper.
note:
You need to use 10 to 25 sheets of paper only for purposes of these troubleshooting steps. When the issue is resolved, you can resume loading paper according to the paper tray capacity specifications for your product.
Step two: Reload the paper
Follow these steps to load U.S. letter or A4 size paper in the printer.
-
Raise the photo tray.
-
Slide the paper width guides to their outermost positions.
Figure : Slide paper width guides to their outermost positions

-
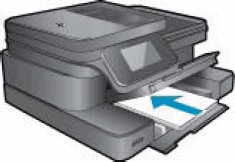
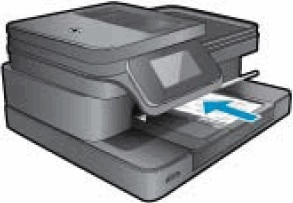
Load a stack of plain paper into the tray with the short edge facing toward the product and the print side down (if the paper has a print side). Push the stack into the tray until it stops.
Figure : Load paper into the tray
-
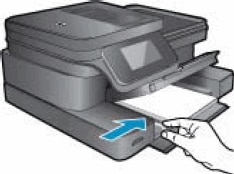
Slide the paper width guides until they rest against the edges of the paper.
Figure : Slide the paper width guides against the edges of the paper
-
Close the photo tray and the paper tray, pull the tray extender toward you, and then extend the paper catch until it is fully extended.
Step three: Print a Printer Status Report
Print a test page to make sure the hardware functions correctly.
How to print a Printer Status Report
Follow these steps to print a test page.
-
Load plain white U.S. letter or A4 size paper in the tray, if it is not already loaded.
-
On the product control panel, touch the Settings icon (
), and then touch Tools. -
Touch Printer Status Report. The product prints the test page.
If the issue is not resolved, try loading different brands of paper and different types of paper, one type at a time. Then try printing the test page again.
-
If these steps resolved the issue, you do not need to continue troubleshooting.
-
If the issue persists, continue to the next solution.
Solution three: Clean the paper feed rollers
Dust, paper fiber, and other debris might accumulate on the paper feed rollers and cause paper feed issues. Follow these steps to clean the paper feed rollers.
Step one: Clean the paper feed rollers
Follow these steps to clean the paper feed rollers.
-
Gather the following materials:
-
A clean, lint-free cloth, or any cloth that does not come apart or leave fibers
-
Distilled, filtered, or bottled water (tap water might damage the printer)
-
-
Disconnect the USB cable from the rear of the printer if your printer is connected with a USB cable.
-
Press the Power button (
 ) to turn off the printer.
 -
Disconnect the power cord from the rear of the printer.
-
Remove the two-sided printing accessory (duplexer) from the rear of the printer. Push the right side of the duplexer to the left, and then pull out the duplexer to remove it. Set the duplexer aside.
-
Push the duplexer to the left
-
Pull out the duplexer
Figure : Remove the duplexer

-
-
Lightly dampen a clean, lint-free cloth with bottled or distilled water, and then squeeze any excess liquid from the cloth.
-
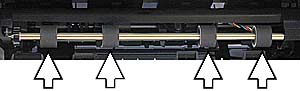
Press the cloth against the rollers, and then rotate the rollers upward with your fingers. Apply a moderate amount of pressure to remove any dust or dirt buildup.
Figure : Clean the rollers in the rear of the printer
-
Allow the rollers to dry for 10 or 15 minutes.
-
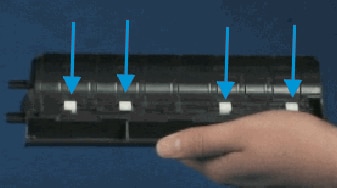
Check the rollers on the duplexer. Make sure that the rollers are not missing, that they turn easily, and that they are springy when you press them. If the rollers are damaged, replace the duplexer.
Figure : Check the rollers on the duplexer
-
Reattach the duplexer to the rear of the printer. Insert the two pegs on the left side of the duplexer into the left side of the printer, and then gently push the duplexer into place. Make sure that the duplexer is firmly attached.
Figure : Reattach the duplexer
-
Reconnect the power cord to the rear of the printer.
-
If the printer does not turn on automatically, press the Power button (
) to turn it on.
Step two: Print a Printer Status Report
Print a test page to make sure that the hardware functions correctly.
How to print a Printer Status Report
Follow these steps to print a test page.
-
Load plain white U.S. letter or A4 size paper in the tray, if it is not already loaded.
-
On the product control panel, touch the Settings icon (
), and then touch Tools. -
Touch Printer Status Report. The product prints the test page.
-
If the test page prints, try printing the original document again. If the issue is resolved, there is no need to continue troubleshooting.
-
If the test page prints, but the original document does not, continue with the next solution.
-
If the test page does not print, try printing the report again. Listen for the rubber paper rollers; you should be able to hear them rotating. Then try to slowly push the paper farther into the tray until the rollers pick up the paper. Be careful not to push the paper in too far, which can cause a paper jam.
-
If the test page prints when you slowly push the paper farther in, try printing the original document again. The paper might not have been loaded far enough into the printer. If the issue is resolved, there is no need to continue troubleshooting.
-
If the test page does not print when you slowly push the paper farther in, repeat the previous steps to clean the rollers again. If the issue continues after repeated cleaning, continue with next solution.
-
If the paper feeds through the printer only when you slowly push it farther in, repeat the previous steps to clean the rollers again. If the issue continues after repeated cleaning, continue with the next solution.
-
Solution four: Adjust the paper settings in the print driver
The printer might not pick up paper if the paper size and type in the paper tray do not match the size and type settings in the print driver.
-
Reload the paper you were using when the issue occurred.
-
Return to the document you were trying to print when the issue occurred.
-
Click File or click the Microsoft Office Button (
 ), and then click Print. The Print dialog box opens.
 -
Select your printer, and then click Properties or Preferences. The Properties or Preferences dialog box opens.
-
Click the Paper/Quality tab.
-
From the Paper Size drop-down, make sure that the selected option matches your paper size. For example, if you have legal paper loaded in your printer, select Legal.
-
From the Media drop-down, select the paper type that matches the paper you have loaded in the printer.
-
Click OK to apply the settings.
-
Click OK from the Print dialog box to start the print job.
-
If the document prints, the issue is resolved, and there is no need to continue troubleshooting.
-
If the document prints on plain white paper, but not a special paper type, there is no need to continue troubleshooting. The problem is probably related to the paper that you tried to print on, or possibly a connectivity problem. Review the ‘Cause’ and ‘Experiencing frequent or recurring paper feed issues?’ sections at the beginning of this document to check other possibilities.
-
If the document does not print, continue to the solution to service the printer.
-
Photo Tray
Solution one: Reset the All-in-One
Sometimes, resetting the printer can clear a paper feed issue. Follow these steps to perform a reset, and then try printing the photo again.
Step one: Perform a power reset
Follow these steps to perform a power reset.
-
With the printer turned on, disconnect the power cord from the rear of the printer.
-
Unplug the power cord from the wall outlet.
-
Wait at least 15 seconds.
-
Plug the power cord back into the wall outlet.
-
Reconnect the power cord to the printer.
-
Turn the printer on.
Step two: Print the photo again
Try printing the photo again.
-
If these steps resolved the issue, you do not need to continue troubleshooting.
-
If the issue persists, continue to the next solution.
Solution two: Check the condition of the paper, check the photo tray, and then reload the paper
Paper feed issues might result from dusty, torn, wrinkled, wet, or folded paper in the photo tray. The quality of the paper can also make a difference. Use only good quality paper that meets product specifications. Follow these steps to check the condition of the paper.
Step one: Check the condition of the photo paper
Follow these steps to check the condition of the photo paper.
-
Remove the photo paper from the photo tray.
-
Check for obstructions inside the tray. Use a flashlight to view the mechanism inside the tray to make sure that nothing blocks the photo paper from engaging with the rollers. Even small pieces of photo paper can cause paper feed issues.
note:
If you find obstructions in the paper path, skip to the section on cleaning the paper rollers.
-
Examine the condition of the photo paper, and then replace any ripped, dusty, curled, wrinkled, or bent photo paper.
-
Make sure that all the photo paper in the stack is the same size and type. Never load mixed types of photo paper in the photo tray. The printer can process only one type of photo paper at a time.
-
Tap the stack of photo paper on a flat surface to align the edges.
-
Make sure that the stack of photo paper contains 5 or more sheets of photo paper.
note:
You need to use 5 sheets or more of photo paper only for purposes of these troubleshooting steps. When the issue is resolved, you can resume loading photo paper according to the paper tray capacity specifications for your printer.
Step two: Check the photo tray
Follow these steps to make sure that the photo tray fits in the printer correctly.
-
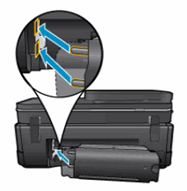
Grasp the photo tray, tilt it upward, and then pull it away from the printer to remove it.
Figure : Grasp the photo tray
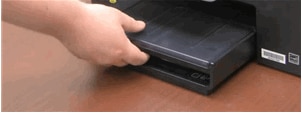
Figure : Tilt the tray upward and pull it away from the printer
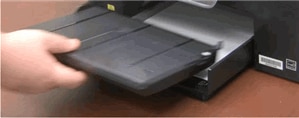
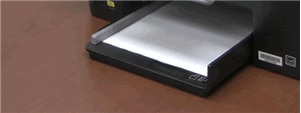
Figure : The main tray with the photo tray removed
-
Slide the photo tray back into place at a slight upward angle until it stops, and then press the photo tray down and in to seat it correctly.
Figure : Reinsert the photo tray

-
Make sure that the front of the photo tray aligns with the end of the main tray. If the front of the photo tray does not line up with the end of the main tray, lift the photo tray at a slight upward angle, and then press the photo tray all the way into the printer.
-
Front of the photo tray
-
End of the main tray
Figure : Align the front of the photo tray with the end of the main tray
-
Step three: Reload the paper
Follow these steps to load photo paper into the printer’s photo tray.
-
Open the photo tray, and then slide the paper width guides to their outermost positions.
-
Load a stack of photo paper into the tray, with the short edge facing toward the product and the print side down. Push the stack into the tray until it stops.
Figure : Load photo paper into the tray
-
Slide the paper width guides in until they rest against the edges of the paper.
Figure : Slide the paper width guides until they rest against the edges of the paper

-
Close the photo tray.
Step three: Print the photo again
Try printing the photo again.
-
If these steps resolved the issue, you do not need to continue troubleshooting.
-
If the issue persists, continue to the next solution.
Solution three: Clean the paper feed rollers
Dust, paper fiber, and other debris might accumulate on the paper feed rollers and cause paper feed issues. Follow these steps to clean the paper feed rollers.
Step one: Clean the paper feed rollers
Follow these steps to clean the paper feed rollers.
-
Gather the following materials:
-
A clean, lint-free cloth, or any cloth that does not come apart or leave fibers
-
Distilled, filtered, or bottled water (tap water might damage the printer)
-
-
Disconnect the USB cable from the rear of the printer if your printer is connected with a USB cable.
-
Press the Power button (
) to turn off the printer. -
Disconnect the power cord from the rear of the printer.
-
Remove the two-sided printing accessory (duplexer) from the rear of the printer. Push the right side of the duplexer to the left, and then pull out the duplexer to remove it. Set the duplexer aside.
-
Push the duplexer to the left
-
Pull out the duplexer
Figure : Remove the duplexer
-
-
Lightly dampen a clean, lint-free cloth with bottled or distilled water, and then squeeze any excess liquid from the cloth.
-
Press the cloth against the rollers, and then rotate the rollers upward with your fingers. Apply a moderate amount of pressure to remove any dust or dirt buildup.
Figure : Clean the rollers in the rear of the printer
-
Allow the rollers to dry for 10 or 15 minutes.
-
Check the rollers on the duplexer. Make sure that the rollers are not missing, that they turn easily, and that they are springy when you press them. If the rollers are damaged, replace the duplexer.
Figure : Check the rollers on the duplexer
-
Reattach the duplexer to the rear of the printer. Insert the two pegs on the left side of the duplexer into the left side of the printer, and then gently push the duplexer into place. Make sure that the duplexer is firmly attached.
Figure : Reattach the duplexer
-
Reconnect the power cord to the rear of the printer.
-
If the printer does not turn on automatically, press the Power button (
) to turn it on.
Step two: Print the photo again
Try printing the photo again.
-
If these steps resolved he issue, you do not need to continue troubleshooting.
-
If the issue persists, continue to the next solution.
Solution four: Adjust the paper settings in the print driver
The printer might not pick up paper if the paper size and type in the paper tray do not match the size and type settings in the print driver.
-
Return to the photo you were trying to print when the issue occurred.
-
Click File or click the Microsoft Office Button (
), and then click Print. The Print dialog box opens. -
Select your printer, and then click Properties or Preferences. The Properties or Preferences dialog box opens.
-
Click the Paper/Quality tab.
-
From the Paper Size drop-down, make sure that the selected option matches the size of the photo paper in the photo tray.
note:
The photo tray supports up to 101.6 x 152.4 mm (4 x 6 in.) photo paper. Do not select a size larger than 101.6 x 152.4 mm (4 x 6 in.).
-
From the Paper Source drop-down list, select Photo Tray if it is not already selected.
note:
If the photo tray is not available in the Paper Source drop-down list, the paper size selected is likely too large for the photo tray. Select a paper size no larger than 101.6 x 152.4 mm (4 x 6 in.) to use the photo tray.
-
From the Media drop-down, select the paper type that matches the paper you have loaded in the printer.
-
Click OK to apply the settings.
-
Click OK from the Print dialog box to start the print job.
-
If the photo prints, the issue is resolved, and there is no need to continue troubleshooting.
-
If the photo does not print, continue to the next solution.
-
Solution five: Try to print a photo from the main tray
You can print photos from the main tray if the photo tray does not feed photo paper. Follow these steps to print photos from the main tray.
Step one: Load photo paper in the main tray
Follow these steps to load photo paper in the main tray.
-
Raise the photo tray lid.
-
Slide the photo paper width guide to its outermost position.
-
Remove the photo paper from the photo tray, and then lower the photo tray lid.
-
Lift the output tray, and then slide the paper width guide to its outermost position.
Figure : Slide the paper width guide to its outermost position
-
Gather 5 sheets of photo paper, and then tap the edges of the stack of photo paper on a flat surface to make sure that all the edges are even.
-
Load the photo paper into the tray with the short edge forward and the glossy side down. Slide the stack forward until it stops.
note:
Make sure that all the photo paper in the stack is the same size and type and is free from rips, dust, wrinkles, and curled or bent edges.
-
Slide the paper width guide inward until it stops at the edge of the photo paper. Do not push the guide in so tightly that it binds against the photo paper.
Figure : Slide the paper width guide inward until it stops at the edge of the photo paper
-
Lower the output tray.
Step two: Change the print settings
Follow these steps to change the print settings.
-
Return to the photo you were trying to print when the issue occurred.
-
Click File or click the Microsoft Office Button (
), and then click Print. The Print dialog box opens. -
Select your printer, and then click Properties or Preferences. The Properties or Preferences dialog box opens.
-
Click the Paper/Quality tab.
-
From the Paper Size drop-down, make sure that the selected option matches the size of the photo paper in the photo tray.
note:
The photo tray supports up to 101.6 x 152.4 mm (4 x 6 in.) photo paper. Do not select a size larger than 101.6 x 152.4 mm (4 x 6 in.).
-
From the Paper Source drop-down list, select Photo Tray if it is not already selected.
note:
If the photo tray is not available in the Paper Source drop-down list, the paper size selected is likely too large for the photo tray. Select a paper size no larger than 101.6 x 152.4 mm (4 x 6 in.) to use the photo tray.
-
From the Media drop-down, select the paper type that matches the paper you have loaded in the printer.
-
Click OK to apply the settings.
-
Click OK from the Print dialog box to start the print job.
-
If the photo prints, the issue is resolved, and there is no need to continue troubleshooting.
-
If the photo does not print, continue to the solution to service the printer.
-
Service the All-in-One
 Important: Service the printer only if you have tried all of the previous solutions and the printer will not print a test page or photo.
Service or replace your HP product if the issue persists after completing all the preceding steps.
Go to Contact HP Customer Support to schedule a product repair or replacement. If you are in Asia Pacific, you will be directed to a local service center in your area.
To confirm your warranty status, go to HP Product Warranty Check. Repair fees might apply for out-of-warranty products.
Interpret control-panel messages, status-alert messages and event code errors
The control-panel messages and event code errors indicate the current product status or situations that might require action.
NOTE: Event log errors do not appear on the control-panel display. Access the event log to view or print the event log errors.
Control-panel messages appear temporarily and might require that you acknowledge the message by pressing the OK button to resume printing or by pressing the Stop button to cancel the job. With certain messages, the job might not finish printing or the print quality might be affected. If the message is related to printing and the auto-continue feature is on, the product will attempt to resume printing after the message has appeared for 10 seconds without acknowledgement.
For some messages, restarting the product might fix the problem. If a critical error persists, the product might require service.
___________________________________________________________________________
10.00.33
Description A used supply is in use (end of life).
Recommended action No action necessary.
10.00.35
Description An incompatible supply is in use.
Recommended action Install the correct HP print cartridge for this product (CE390A or CE390X).
NOTE: The CE390X cartridge is not compatible with the HP LaserJet Enterprise 600 M601.
10.00.60
Description The black cartridge is low.
Recommended action If print quality is no longer acceptable, replace the print cartridge.
TIP: Advise the customer that HP recommends that they have replacement supplies available to install when the print quality is no longer acceptable.
10.00.69
Description The black cartridge is very low.
Recommended action If print quality is no longer acceptable, replace the print cartridge.
TIP: Advise the customer that HP recommends that they have replacement supplies available to install when the print quality is no longer acceptable.
10.00.91
Description Cartridge motor stall.
Recommended action Replace the print cartridge.
10.0X.Y0 Supply memory error
Description The product cannot read or write to at least one print cartridge memory tag or a memory tag is missing from the print cartridge.
Memory error (Y = 0)
10.00.00 (event code) Black print cartridge
Memory tag missing (Y = 1)
10.00.10 (event code) Black print cartridge
Recommended action
Remove, and then reinstall the indicated print cartridge.
- If the error reappears, turn the power off, and then on.
- Check the cartridge memory tag. If it is damaged, replace the cartridge.
- If the error persists, replace the indicated print cartridge.
10.23.35
Description An incompatible fuser is in use.
Recommended action Replace the fuser.
TIP: Advise the customer that HP recommends that they have replacement supplies available to install when the print quality is no longer acceptable.
10.23.50
Description The fuser kit life was reset above the order threshold.
Recommended action No action necessary.
10.23.51
Description The fuser kit life was reset above the replace threshold.
Recommended action No action necessary.
10.23.52
Description The fuser kit life was reset above the reset threshold.
Recommended action No action necessary.
10.23.60
Description The product indicates when fuser kit is very low. The actual remaining fuse kit life might vary. You do not need to replace the fuser kit at this time unless print quality is no longer acceptable.
NOTE: After an HP supply has reached the very low threshold, the HP premium protection warranty ends.
Recommended action If print quality is no longer acceptable, replace the fuser kit. See the parts chapter in the service manual for the fuser kit part number.
TIP: Advise the customer that HP recommends that they have replacement supplies available to install when the print quality is no longer acceptable.
10.23.70 Printing Past Very Low
Description The product indicates when the fuser kit is very low. The actual remaining fuse kit life might vary. You do not need to replace the fuser kit at this time unless print quality is no longer acceptable.
NOTE: After an HP supply has reached the very low threshold, the HP premium protection warranty ends.
Recommended action If print quality is no longer acceptable, replace the fuser kit. See the parts chapter in the service manual for the fuser kit part number.
TIP: Advise the customer that HP recommends that they have replacement supplies available to install when the print quality is no longer acceptable.
10.26.15
Description The product indicates when the maintenance might need to be replaced.
Recommended action If print quality is no longer acceptable, replace the maintenance kit. See the parts chapter in the service manual for the maintenance kit part number.
TIP: Advise the customer that HP recommends that they have replacement supplies available to install when the print quality is no longer acceptable.
10.26.50
Description The maintenance kit was reset.
Recommended action No action required.
10.26.60
Description The product indicates when the maintenance kit is very low. The actual remaining maintenance kit life might vary. You do not need to replace the maintenance kit at this time unless print quality is no longer acceptable.
NOTE: After an HP supply has reached the very low threshold, the HP premium protection warranty ends.
Recommended action
If print quality is no longer acceptable, replace the maintenance kit. See the parts chapter in the service manual for the maintenance kit part number.
TIP: Advise the customer that HP recommends that they have replacement supplies available to install when the print quality is no longer acceptable.
10.XX.34 Used Supply In Use
Description The print cartridge is used.
10.00.34 (event code) Black print cartridge
Recommended action If you believe this is a genuine HP supply, go to http://www.hp.com/go/anticounterfeit.
NOTE: Removing a cartridge from one product and then installing it in a different product (for testing functionality) will cause this event code.
10.XX.40 Genuine HP Supplies Installed
Description A genuine HP print cartridge has been installed.
10.00.40 (event code) Black print cartridge
Recommended action No action necessary.
10.XX.41 Unsupported Supply In Use
Description The installed print cartridge is for a different product.
10.00.41 (event code) Black print cartridge
Recommended action Remove the print cartridge, and then install the correct cartridge for this product.
TIP: See the parts chapter in the service manual for the correct cartridge part number.
10.XX.70 Printing past very low
Description The product indicates when a supply level is very low. The actual remaining print cartridge life might vary. You do not need to replace the print cartridge at this time unless print quality is no longer acceptable.
NOTE: After an HP supply has reached the very low threshold, the HP premium protection warranty ends.
10.00.70 (event code) Black print cartridge
Recommended action If print quality is no longer acceptable, replace the print cartridge. See the parts chapter in the service manual for the correct cartridge part number.
TIP: Advise the customer that HP recommends that they have replacement supplies available to install when the print quality is no longer acceptable.
10.YY.15 Install <supply>
Description The indicated supply has been removed or installed incorrectly.
10.00.15 (event code) Black print cartridge
10.23.15 Fuser kit
Recommended action Replace or install the indicated supply. See the parts chapter in the service manual for the correct supply or kit part number.
10.YY.35 Incompatible <supply>
Description The indicated supply is not compatible with this product.
10.00.35 (event code) Black print cartridge
10.23.35 (event code) Fuser
Recommended action CAUTION: The fuser might be hot. Be careful when removing the fuser. Install a supply that is designed for this product. See the parts chapter in the service manual for the correct supply part number.
11.00.YY Internal clock error
Description The product real time clock has experienced an error.
◦ 01=dead clock
◦ 02=dead real time clock
Recommended action Whenever the product is turned off and then turned on again, set the time and date at the control panel. If the error persists, you might need to replace the formatter.
13.00.00
Description Generic jam event code.
Recommended action Check the product for a jam. See the clear jams section in the service manual.
13.00.EE
Description Unknown door open
Recommended action make sure that all of the doors and covers are closed.
13.A3.FF
Description Power on jam at the Tray 3 feed sensor.
Recommended action Check the product for a jam. See the clear jams section in the service manual.
13.D3.DZ
Description Late to duplex re-feed jam
◦ 13.D3.D1 (event code)
◦ 13.D3.D2 (event code)
◦ 13.D3.D3 (event code)
◦ 13.D3.D4 (event code)
◦ 13.D3.D5 (event code)
◦ 13.D3.D6 (event code)
◦ 13.D3.DD (event code)
◦ 13.D3.DE (event code)
Recommended action Check the product for a jam. See the clear jams section in the service manual.
13.E5.FF
Description A power on jam has occurred.
Recommended action Check the product for a jam. See the clear jams section in the service manual.
13.EA.EE
Description A door jam has occurred.
Recommended action Check the product for a jam. See the clear jams section in the service manual. Use the component test to isolate a faulty door switch or sensor.
13.EE.FF
Description A power on jam has occurred.
Recommended action Check the product for a jam. See the clear jams section in the service manual.
13.FF.EE
Description A door jam has occurred.
Recommended action Check the product for a jam. See the clear jams section in the service manual. Use the Manual sensors test or Tray/Bin manual sensors test to isolate a faulty door switch or sensor.
13.FF.FF
Description A power on residual paper jam has occurred (sensor).
Recommended action Check the product for a jam. See the clear jams section in the service manual. Use the Manual sensors test or Tray/Bin manual sensors test to isolate a faulty door switch or sensor.
13.WX.EE
Description This jam occurs when a door is opened during printing.
Recommended action Make sure that the doors are fully closed.
13.WX.FF
Description Power on residual paper jam This jam occurs when the paper exists at any of the paper path jam sensors at power on or door close. Due to the current FW timing requirements, the displayed jam code is always 13.FF.FF, only the event log will have 13.WX.FF
Recommended action Clear the jam. See the clear jams section in the service manual.
13.WX.YZ Fuser Area Jam
Description A jam in the fuser area has occurred.
Recommended action Clear the jam. See the clear jams section in the service manual. Make sure media is within specifications, check for obstructions in the fuser, check that the T2 roller is installed properly.
13.WX.YZ Fuser wrap jam
Description Recommended action Clear the jam. See the clear jams section in the service manual.
13.WX.YZ Jam below control panel
Description
13.B2.9Z (event code)
Page at duplex switchback jam.
Z = the source tray number
Recommended action Check the product for a jam. See the clear jams section in the service manual.
13.WX.YZ Jam in Tray 1
Description
13.B2.D1 (event code)
Late to registration jam, from Tray 1
This jam occurs when the paper does not reach the TOP sensor in designated amount of time from the start of paper pickup at printing from Tray 1 and duplex printing.
Recommended action Clear the jam. See the clear jams section in the service manual.
13.B2.D2 Late to registration jam, Tray 2
13.B2.D3 Late to registration jam, Tray 3
Note: Same as above.
13.WX.YZ Jam in Tray <X>
Description A misfeed jam has occurred.
Recommended action Clear the jam. See the clear jams section in the service manual.
13.WX.YZ Jam inside envelope feeder
Description A jam exists inside the envelope feeder.
Recommended action Clear the jam. See the clear jams section in the service manual.
13.WX.YZ Jam inside top cover
Description A jam exists inside the top cover.
Recommended action Clear the jam. See the clear jams section in the service manual.
14.00.XX
Description A feed roller error has occurred.
◦ 14.00.01 (event code)
◦ 14.00.02 (event code)
◦ 14.00.03 (event code)
◦ 14.00.04 (event code)
◦ 14.00.05 (event code)
◦ 14.00.06 (event code)
Recommended action Check the product and accessories feed rollers for dirt or damage. Clean or replace the rollers as necessary.
20.00.00 Insufficient memory: <Device> To continue, touch “OK”
Description The product has experienced a memory error. You might have tried to transfer too many fonts or macros.
Recommended action Touch the OK button to print the transferred data (some data might be lost), and then simplify the print job or install additional memory.
21.00.00 Page Too Complex
Description The page decompression process was too slow for the printer.
Recommended action Touch the OK button to continue printing (some data might be lost).
32.08.AX
Description
◦ 32.08.A1 (event code)
Shutdown event
◦ 32.08.A2 (event code)
Boot from normal shutdown event
◦ 32.08.A3 (event code)
Boot from abnormal shutdown event
Recommended action No action necessary.
32.1C.XX
Description
◦ 32.1C.01 (event code)
NVRAM backup/restore service backup started
◦ 32.1C.02 (event code)
NVRAM backup/restore service restore started
◦ 32.1C.03 (event code)
NVRAM backup/restore administrator backup started
◦ 32.1C.04 (event code)
NVRAM backup/restore administrator restore started
◦ 32.1C.05 (event code)
Backup/restore complete
◦ 32.1C.06 (event code)
Data model failed to clone job ticket
◦ 32.1C.07 (event code)
Backup restore permissions error
◦ 32.1C.08 (event code)
Not enough disk space to perform backup/restore or network share issue
◦ 32.1C.09 (event code)
Tried to restore a backup file that was not valid for this product
◦ 32.1C.0A (event code)
Backup file is invalid
◦ 32.1C.0B (event code)
Backup is from newer version of FW than what is currently on the product
◦ 32.1C.0C (event code)
Backup cancelled from the HP Embedded Web Server
◦ 32.1C.0D (event code)
Backup/restore failed, auto-reboot failed, or the product might be busy
◦ 32.1C.0E (event code)
Backup/restore timeout while communicating with the formatter
◦ 32.1C.0F (event code)
Backup/restore timeout while communicating with the finisher firmware
◦ 32.1C.10 (event code)
Backup/restore timeout while communicating with the scanner firmware
◦ 32.1C.11 (event code)
Backup/restore timeout while communicating with the engine
◦ 32.1C.12 (event code)
Backup/restore timeout while communicating with the disk
◦ 32.1C.13 (event code)
Scheduled backup failure
◦ 32.1C.14 (event code)
NVRAM restore timeout while communicating with the formatter
◦ 32.1C.15 (event code)
NVRAM restore timeout while communicating with the finisher firmware
◦ 32.1C.16 (event code)
NVRAM restore timeout while communicating with the scanner firmware
◦ 32.1C.17 (event code)
NVRAM restore timeout while communicating with the engine
◦ 32.1C.18 (event code)
Backup of copy subsystem failed
◦ 32.1C.19 (event code)
Backup of fax subsystem failed
◦ 32.1C.1A (event code)
Backup of digital send subsystem failed
◦ 32.1C.1B (event code)
Backup of print subsystem failed
◦ 32.1C.1C (event code)
Backup of networking subsystem failed
◦ 32.1C.1D (event code)
Backup of finishing subsystem failed
◦ 32.1C.1E (event code)
Restore of copy subsystem failed
◦ 32.1C.1F (event code)
Restore of fax subsystem failed
◦ 32.1C.20 (event code)
Restore of digital send subsystem failed
◦ 32.1C.21 (event code)
Restore of print subsystem failed
◦ 32.1C.22 (event code)
Restore of networking subsystem failed
◦ 32.1C.24 (event code)
NVRAM backup/restore successful
◦ 32.1C.25 (event code)
Reset of copy subsystem failed
◦ 32.1C.26 (event code)
Reset of fax subsystem failed
◦ 32.1C.27 (event code)
Reset of digital send subsystem failed
◦ 32.1C.28 (event code)
Reset of print subsystem failed
◦ 32.1C.29 (event code)
Reset of networking subsystem failed
◦ 32.1C.2A (event code)
Reset of finishing subsystem failed
◦ 32.1C.2B (event code)
Reset formatter timeout
◦ 32.1C.2C (event code)
Reset finisher timeout
◦ 32.1C.2D (event code)
Reset scanner timeout
◦ 32.1C.2E (event code)
Reset engine timeout
◦ 32.1C.2F (event code)
Reset failure
Recommended action
◦ 32.1C.01 (event code)
No action necessary
◦ 32.1C.02 (event code)
No action necessary
◦ 32.1C.03 (event code)
No action necessary
◦ 32.1C.04 (event code)
No action necessary
◦ 32.1C.05 (event code)
No action necessary
◦ 32.1C.06 (event code)
Retry
◦ 32.1C.07 (event code)
Retry
◦ 32.1C.08 (event code)
Remove stored jobs and retry
Use larger capacity storage device
Check network share
◦ 32.1C.09 (event code)
Use a valid backup file
◦ 32.1C.0A (event code)
Use a valid backup file
Reboot and observe state of product
Do a partition clean using the Preboot menu.
◦ 32.1C.0B (event code)
Use a valid backup file or put correct firmware version on the product.
◦ 32.1C.0C (event code)
No action necessary
◦ 32.1C.0D (event code)
Reboot and then retry the backup/restore
◦ 32.1C.0E (event code)
Turn the product off then on and retry
◦ 32.1C.0F (event code)
Turn the product off then on and retry
◦ 32.1C.10 (event code)
Turn the product off then on and retry
◦ 32.1C.11 (event code)
Turn the product off then on and retry
◦ 32.1C.12 (event code)
Turn the product off then on and retry
◦ 32.1C.13 (event code)
Turn the product off then on and retry
◦ 32.1C.14 (event code)
Turn the product off then on and retry
◦ 32.1C.15 (event code)
Turn the product off then on and retry
◦ 32.1C.16 (event code)
Turn the product off then on and retry
◦ 32.1C.17 (event code)
Turn the product off then on and retry
◦ 32.1C.18 (event code)
Turn the product off then on and retry
◦ 32.1C.19 (event code)
Turn the product off then on and retry
◦ 32.1C.1A (event code)
Turn the product off then on and retry
◦ 32.1C.1B (event code)
Turn the product off then on and retry
◦ 32.1C.1C (event code)
Turn the product off then on and retry
◦ 32.1C.1D (event code)
Turn the product off then on and retry
◦ 32.1C.1E (event code)
Turn the product off then on and retry
If the error persists, clear the firmware image from the active partition by using the Partial Clean item in the Preboot menu.
◦ 32.1C.1F (event code)
Turn the product off then on and retry
If the error persists, clear the firmware image from the active partition by using the Partial Clean item in the Preboot menu.
◦ 32.1C.20 (event code)
Turn the product off then on and retry
If the error persists, clear the firmware image from the active partition by using the Partial Clean item in the Preboot menu.
◦ 32.1C.21 (event code)
Turn the product off then on and retry
If the error persists, clear the firmware image from the active partition by using the Partial Clean item in the Preboot menu.
◦ 32.1C.22 (event code)
Turn the product off then on and retry
If the error persists, clear the firmware image from the active partition by using the Partial Clean item in the Preboot menu.
◦ 32.1C.24 (event code)
Turn the product off then on and retry.
◦ 32.1C.25 (event code)
Turn the product off then on and retry.
◦ 32.1C.26 (event code)
Turn the product off then on and retry.
◦ 32.1C.27 (event code)
Turn the product off then on and retry.
◦ 32.1C.28 (event code)
Turn the product off then on and retry.
◦ 32.1C.29 (event code)
Turn the product off then on and retry.
◦ 32.1C.2A (event code)
Turn the product off then on and retry.
◦ 32.1C.2B (event code)
Turn the product off then on and retry.
◦ 32.1C.2C (event code)
Turn the product off then on and retry.
◦ 32.1C.2D (event code)
Turn the product off then on and retry.
◦ 32.1C.2E (event code)
Turn the product off then on and retry.
◦ 32.1C.2f (event code)
Turn the product off then on and retry.
32.21.00
Description Corrupt firmware in external accessory
Recommended action Turn the product off, then on, and retry.
If the error persists, clear the firmware image from the active partition by using the Partial Clean item in the Preboot menu
33.01.XX
Description
◦ 33.01.01 (event code)
A restore process has occurred.
◦ 33.01.02 (event code)
A save process has occurred.
Recommended action No action necessary.
33.XX.YY Used board/disk
Description An encrypted board or disk with existing data previously locked to a different product has replaced the original. If you continue, data is permanently lost.
Recommended action To save the data on the board or disk, turn the product off. Replace the board or disk with another board or disk.
To delete the data on the board or disk and continue, touch the OK button.
40.00.01 USB I/O buffer overflow To continue, touch “OK”
Description The USB buffer has overflowed.
Recommended action Touch the OK button to print the transferred data (some data might be lost). Check the host configuration.
40.00.02 Embedded I/O buffer overflow To continue, touch “OK”
Description The product has experienced a JetDirect buffer overflow.
Recommended action Touch the OK button to print the transferred data (some data might be lost). Check the host configuration.
40.00.05 Embedded I/O bad transmission To continue, touch “OK”
Description The USB device has been removed.
Recommended action Touch the OK button to clear the error message. (Data will be lost.) Install the USB device.
41.02.00 Error
Description A beam detected misprint error.
Recommended action Turn the product off, and then on. If the error persists, replace the laser/scanner assembly.
41.03.YZ Unexpected size in envelope feeder To use another tray, touch “Options”
Description The product detected a different paper size than expected.
◦ Y = 0
Size mismatch. Detected media is longer or shorter than expected.
◦ Y = A
Size mismatch. Detected media too long.
◦ Y = B
Size mismatch. Detected media too short.
◦ Y = C
Size mismatch. Inter-page gap error.
◦ Z = D
Source is duplexer
◦ Z = E
Source is envelope feeder
◦ Z = 2
◦ Z = 3
Source is Tray 3
◦ Z = 4
Source is Tray 4
◦ Z = 5
Source is Tray 5
Recommended action Make sure that the feeder is loaded with the correct paper size and that the sliding paper guides are correctly adjusted. Use the Tray/Bin manual sensor test to verify that the envelope feeder paper sensor (PS1802) is correctly functioning.
If the error persists, replace the envelope feeder.
41.03.YZ Unexpected size in tray <X>
Description The product detected a different paper size than expected.
◦ Y = 0
Size mismatch. Detected media is longer or shorter than expected.
◦ Y = A
Size mismatch. Detected media too long.
◦ Y = B
Size mismatch. Detected media too short.
◦ Y = C
Size mismatch. Inter-page gap error.
◦ Z = D
Source is duplexer
◦ Z = E
Source is envelope feeder
◦ Z = 1
Source is Tray 1
Z = 2
Source is Tray 2
◦ Z = 3
Source is Tray 3
◦ Z = 4
Source is Tray 4
◦ Z = 5
Source is Tray 5
Recommended action Make sure that the tray is loaded with the correct paper size and that the sliding paper guides are correctly adjusted. Use the Tray/Bin manual sensor test to verify that the cassette media switch is correctly functioning. If the error persists, replace the lifter assembly.
41.05.YZ Unexpected type in tray <X>
Description The product detected a different paper type than expected.
◦ Y = 0 (expected type)
Unknown
◦ Y = 1 (expected type)
Normal media
◦ Y = 3 (expected type)
LBP OHT
◦ Y = 6 (expected type)
Non-assured OHT
◦ Y = 7 (expected type)
Heavy media
◦ Y = 8 (expected type)
Light media
◦ Y = 9 (expected type)
Rough media
◦ Y = C (expected type)
Heavy media 3
◦ Y = D (expected type)
Heavy media 2
◦ Z = 1 (detected type)
Normal media
◦ Z = 3 (detected type)
LBP OHT
◦ Z = 6 (detected type)
Non-assured OHT
◦ Z = 7 (detected type)
Heavy media
◦ Z = 8 (detected type)
Light media
◦ Z = 9 (detected type)
Rough media
◦ Z = B (detected type)
Heavy glossy media (glossy media 2)
◦ Z = C (detected type)
Heavy media 3
◦ Z = D (detected type)
Heavy media 2
Recommended action Load the tray with the size and type of paper indicated, or use another tray if available. If this message appears and the tray is loaded with the correct paper type, check the print driver settings to make sure they match the tray type settings.
Clean the Media Sensor. If the error persists, replace the paper pickup assembly.
41.XX.YZ Error To continue, touch “OK”
Description A product error has occurred.
◦ XX = error type
◦ Y = fuser mode
◦ Z = input tray
◦ XX = 02
Beam detect misprint
◦ XX = 09
Sub thermistor abnormally high
◦ XX = 18
Scan line inclination adjustment
◦ XX = 20
Image drum HV
◦ Y = 2
Normal typed (not AutoSense)
◦ Y = 3)
Light media 1, 2, 3: typed or AutoSense
◦ Y = 4
Heavy media 1: typed or AutoSense
◦ Z = 0
Envelope feeder
◦ Z = 1
Tray 1
◦ Z = 2
Tray 2
◦ Z = 3
Tray 3
◦ Z = 4
Tray 4
◦ Z = 5
Tray 5
◦ Z = 6
Tray 6
◦ Z = D
Duplexer
Recommended action Turn the product off, and then on.
If the error persists, replace the DC controller PCA.
42.XX.YY
Description Internal system failure
Recommended action Turn the product of,f then on, and retry.
If the error persists, clear the firmware image from the active partition by using the Partial Clean item in the Preboot menu.
47.00.XX
Description Back channel internal error
Recommended action Turn the product off, and then on again. Resend the print job. If the error persists, execute the Partial Clean item in the Preboot menu.
47.01.XX
Description Image transformer internal error
Recommended action Turn the product off, and then on again. Resend the print job. If the error persists, execute the Partial Clean item in the Preboot menu.
47.02.XX
Description Job parser internal error
Recommended action Turn the product off, and then on again. Resend the print job. If the error persists, execute the Partial Clean item in the Preboot menu.
47.03.XX
Description Print job internal error
Recommended action Turn the product off, and then on again. Resend the print job. If the error persists, execute the Partial Clean item in the Preboot menu.
47.04.XX
Description Print spooler 9100 internal error
Recommended action Turn the product off, and then on again. Resend the print job. If the error persists, execute the Partial Clean item in the Preboot menu.
47.05.00
Description Print spooler framework internal error
Recommended action Turn the product off, and then on again. Resend the print job. If the error persists, execute the Partial Clean item in the Preboot menu.
47.06.XX
Description Print App internal error
Recommended action Turn the product off, and then on again. Resend the print job. If the error persists, execute the Partial Clean item in the Preboot menu.
47.WX.YZ Printer Calibration Failed To continue, touch “OK”
Description The device is unable to access or implement one of the image patterns files.
Y = calibration type, Z = event
◦ 47.FC.20 (event code)
Error Diffusion Image not found at system initialization
◦ 47.FC.21 (event code)
Error Diffusion Store image failure
◦ 47.FC.22 (event code)
Error Diffusion Image not found
◦ 47.FC.23
Error Diffusion Print engine execution failure
◦ 47.FC.300 (event code)
Drum Speed Adjustment Image not found at system initialization
◦ 47.FC.31 (event code)Drum Speed Adjustment Store image failure
◦ 47.FC.32 (event code)
Drum Speed Adjustment Image not found
◦ 47.FC.33 (event code)
Drum Speed Adjustment Print engine execution failure
◦ 47.FC.40 (event code)
Pulse Width Modulation Image not found at system initializatione
◦ 47.FC.41 (event code)
Pulse Width Modulation Store image failure
◦ 47.FC.42 (event code)
Pulse Width Modulation Image not found
◦ 47.FC.43 (event code)
Pulse Width Modulation Print engine execution failure
Recommended action Turn the product off, and then on. If the error persists, reload the firmware.
49.XX.YY To continue turn off then on
Description A firmware error has occurred.
Recommended action
- Turn the product off, and then on.
- If the error returns, check the following:
- The error might be caused by a network connectivity problem.
- Damaged interface cable
- Damaged USB port
- Invalid network configuration setting
- The error might be caused by the print job.
- Invalid printer driver
- Problem with the software application
- Problem with the file
- If the error persists, perform a firmware upgrade.
50.WX.YZ Fuser error To continue turn off then on
Description
The fuser has experienced an error.
W = fuser error code, X = fuser mode, Y = previous printer sleep state, Z = next printer sleep state
Recommended action
W = 2
Fuser warm up failure
- Reconnect the connector (J128) between the fuser and the DC controller PCA.
- Turn the product off. Remove the fuser and then reinstall it. If the error persist, replace the fuser.
- If the error persists, replace the low-voltage power supply.
W = 3
Low temperature thermistor 1
- Reinstall the fuser. Check the connector (J128) between the fuser and the product. If it is damaged, replace the fuser.
- Reconnect the connector (J82) on the DC controller PCA.
- Replace the fuser.
- W = 2: Reconnect the connector (J62) on the low-voltage power supply PCA.
- If the error persists, replace the low-voltage power supply.
W = 4
High temperature thermistor 1
- Reinstall the fuser. Check the connector (J128) between the fuser and the product. If it is damaged,
replace the fuser.
- Reconnect the connector (J82) on the DC controller PCA.
- Replace the fuser.
- If the error persists, replace the low-voltage power supply.
W = 6
Drive circuit fault
- Check the power source. Make sure the power source meets product requirements.
NOTE: If the power source does not meet the power frequency requirement of 40 to 70Hz, the
fuser temperature control does not work properly and causes this error.
- Reconnect connectors J51, J52, J53, and J162 and DC controller PCA connectors J85, J95, and J96.
- If the error persists, replace the low-voltage power supply.
W = 10
Low temperature thermistor 2
- Reinstall the fuser. Check the connector (J128) between the fuser and the product. If it is damaged,
replace the fuser.
- Reconnect the connector (J62) on the low-voltage power supply PCA.
- If the error persists, replace the low-voltage power supply.
W = 11
High temperature thermistor 2
- Reinstall the fuser. Check the connector (J128) between the fuser and the product. If it is damaged,
replace the fuser.
- Reconnect the connector (J62) on the low-voltage power supply PCA.
- If the error persists, replace the low-voltage power supply.
W = 12
Fuser pressure release mechanism failure
- Reconnect the fuser connector (J128) and the DC controller PCA connector (J62).
- Check the fuser pressure release sensor flag. If the flag is damaged or not properly working, replace the fuser.
- Reconnect the fuser motor connector (J221) and the DC controller PCA connector (J89).
- Use the Component Test item in the Troubleshooting menu to test the fuser motor. If the motor fails the test, replace the fuser motor.
- If the error persists replace the fuser.
50.22.xx See This article for troubleshooting steps
51.00.YY Error
Description Laser/scanner error
◦ YY = 20
Black laser/scanner error
Recommended action
- Reconnect connector (J145) on the laser/scanner.
- Reconnect connectors (J86 and J93) on the DC controller.
- If the error persists, replace the laser/scanner.
52.XX.00 Error To continue turn off then on
Description Laser/scanner error
◦ XX = 00
laser/scanner motor startup error
◦ XX = 20
Laser/scanner rotation error
Recommended action
- Reconnect connector (J145) on the laser/scanner.
- Reconnect connectors (J86 and J93) on the DC controller.
- Use the scanner motor (M108) drive test in the component test to verify that the scanner motor is properly functioning. If it is not, replace the laser/scanner.
NOTE: Listen for a high pitched whine from the motor.
- If the error persists, replace the laser/scanner.
54.XX.YY Error
Description
A sensor error has occurred.
Recommended action
54.00.03
Environmental sensor (TH3) failure
- Turn the product off, and then reconnect the connector (J63) on the DC controller PCA. Turn the
product on.
- If the environment sensor has been removed or replaced, check the connector (J199) on the
environment sensor and the connector (J63) on the DC controller PCA.
- If the error persists, replace the environment sensor assembly.
54.06.21
Primary laser/scanner beam detect abnormality
- Turn the product off, and then on.
- If the product has had parts removed or replace, check the connector (J93) on the DC controller PCA.
- If the error persists, replace the laser/scanner assembly.
55.00.YY DC controller error To continue turn off then on
Description DC controller PCA error
◦ 55.00.01 (event code)
DC controller memory error
◦ 55.00.03 (event code
DC controller no engine response
◦ 55.00.04 (event code
DC controller communications timeout
Recommended action Turn the product off, and then on. If the error persists, replace the DC controller PCA.
55.0X.YY DC controller error To continue turn off then on
Description DC controller PCA error
◦ 55.01.06 (event code)
NVRAM memory data error warning
◦ 55.02.06 (event code)
NVRAM memory access error warning
Recommended action Turn the product off, and then on.
If the error persists, replace the DC controller PCA.
56.00.YY Error To continue turn off then on
Description Optional paper trays communication error
Recommended action Turn the product off, and then on. If the error persists, reseat the optional paper trays (1 x 500-sheet feeder and/or 3 x 500-sheet feeder). Check the input connectors for damage. If a connector is damaged, replace the connector.
57.00.0Y Error To continue turn off then on
Description Fan error
Recommended action
57.00.03
Main fan (FN101) failure
- Turn the product off, and then on. Listen for fan noise at the back corner of the product. If no noise is heard, replace the power supply fan (FN101).
- If the fan has been removed or replaced, check the connector (J64) on the DC controller PCA.
- If the error persists, replace the main fan (FN101).
57.00.04
Laser/scanner fan (FN102) failure
- If this part has been removed or replace, check the connector (J75) on the DC controller PCA.
- If the error persists, replace the laser/scanner fan (FN102).
57.00.06
Cartridge fan (FN301) failure
- If this part has been removed or replace, check the connector (J95) on the DC controller PCA.
- If the fan has been removed or replaced, check the connector (J66) on the DC controller PCA.
- If the error persists, replace the cartridge fan (FN301).
57.00.05
Cartridge front-side fan (FN103) failure
- Turn the product off, and then on. Listen for fan noise at the middle back of the product. If no noise
is heard, replace the cartridge front-side fan (FN103).
- If the fan has been removed or replaced, check the connector (J79) on the DC controller PCA.
- If the error persists, replace the cartridge front-side fan (FN103).
57.00.07
Duplex fan (FN107) failure
- Turn the product off, and then on. Listen for fan noise at the left side of the product. If no noise is
heard, replace the duplex fan (FN107).
- If the fan has been removed or replaced, check the connector (J64) on the DC controller PCA.
- If the error persists, replace the duplexer.
58.00.0Y Error To continue turn off then on
Description A sensor error has occurred.
Recommended action
58.00.05
Environmental sensor (TH3) failure
- Turn the product off.
- If this part has been removed or replace, check the connector (J63) on the DC controller PCA.
- If the error persists, replace the environmental sensor (TH3).
58.00.03
DC controller CPU failure
- Turn the product off.
- Check all of the connectors on the DC controller PCA.
- If the error persists, replace the DC controller PCA.
58.00.04
LVPS failure
- Turn the product off.
- If this part has been removed or replace, check the connector (J50) on the LVPS, and then check
the connector (J85 and J95) on the DC controller PCA.
- If the error persists, replace the LVPS.
59.00.YY error To continue turn off then on
Description A motor error has occurred.
◦ YY = 00
Paper path malfunction
Recommended action
59.00.20 or 59.00.30
Feed motor (M101) failure (start-up or rotational)
- Reconnect the connector (J191) on the feed motor and the connector (J91) on the DC controller PCA.
- Use the feed motor (M101) drive test in the Component test to verify that the motor is properly functioning. If is not, replace the feed motor (M101).
59.00.40 or 59.00.50
Fuser motor (M299) failure (start-up or rotational)
- Reconnect the connector (J221) on the feed motor and the connector (J89) on the DC controller PCA.
- Use the fuser motor (M299) drive test in the Component test to verify that the motor is properly functioning. If it is not, replace the fuser motor (M299).
59.00.60 or 59.00.70
Drum motor (M102) failure (start-up or rotational)
- Reconnect the connector (J187) on the drum motor and the connector (J87) on the DC controller PCA.
- Use the drum motor (M102) drive test in the Component test to verify that the motor is properly functioning. If it is not, replace the drum motor (M102).
59.A2.0x Error
Description A product error has occurred.
Recommended action
59.A2.02 or 59.A2.11
Lifter driver assembly Tray 2 failure
- Use the Tray/Bin manual sensor test to verify that the Tray 2 paper (PS107 and PS907) surface sensors are properly functioning.
- If this part has been removed or replace, check the connector (J73 and J94) on the on the DC controller PCA.
- Check the media stack surface sensor lever and place it in the correct position to move smoothly. Replace the media stack surface sensor lever if it is damaged.
- If the error persists, replace the lifter drive assembly (Tray 2).
59.A2.12 to 59.A2.15
Lifter driver assembly Tray 3 to 6 motor failure
- Reconnect the connectors (J1605 and J1608) on the paper feeder drive PCA.
- Reconnect the connectors (J1703 and J1707) on the paper cassette drive PCA.
- Replace the sheet feeder media stack surface sensor.
- If the error persists, replace the lifter motor for the specific sheet feeder.
60.00.0Y Tray <Y> lifting error
Description A tray lift motor error has occurred.
Recommended action
60.00.02
Lifter driver assembly Tray 2 failure
- Use the Tray/Bin manual sensor test to verify that the Tray 2 paper (PS107 and PS907) surface sensors are properly functioning.
- If this part has been removed or replace, check the connector (J73 and J94) on the on the DC controller PCA.
- Check the media stack surface sensor level and place it in the correct position to move smoothly.
Replace the sensor lever if it is damaged.
- Replace the media stack surface sensor.
- If the error persists, replace the lifter drive assembly (Tray 2).
60.00.12 to 60.00.15
Lifter driver assembly Tray 3 failure
- Use the Tray/Bin manual sensor test to verify that the Tray 3 paper (SR1 and SR2) surface sensors
are properly functioning.
- If this part has been removed or replace, check the connector (1605 and 1608) on the on the
paper feeder controller PCA.
- Reconnect the connectors (J1703 and J1707) on the sheet feeder PCA.
- Replace the sheet feeder media stack surface sensor.
- If the error persists, replace the lifter drive assembly (Tray 3-6).
62.00.00 No system To continue turn off then on
Description Internal system failure
Recommended action Turn the product off, and then on.
If the error persists, reload the firmware. If the error still persists, perform a firmware upgrade.
If the firmware upgrade does not resolve the problem, replace the hard disk.
65.X0.A1 Output accessory disconnected
Description
An external paper handling accessory connection has been interrupted.
Recommended action
- Turn the product off.
- Make sure that all packing materials have been removed from the paper handling accessory.
- Check the paper path for obstructions, or jammed paper.
- Check the accessory cable connection.
- Turn the product on. If the error persists, replace the accessory.
66.80.YY Stapler/Stacker failure
Description An external paper handling accessory error has occurred.
◦ 66.80.01 (event code)
Y-align malfunction
◦ 66.80.02 (event code)
Jogger malfunction
◦ 66.80.03 (event code)
Stapler malfunction
◦ 66.80.21 (event code)
Lift up malfunction
◦ 66.80.22 (event code)
Lift down malfunction
◦ 66.80.23 (event code)
Lift sensor malfunction
◦ 66.80.33 (event code)
Output roller malfunction
◦ 66.80.35 (event code)
Self priming malfunction
◦ 66.80.51 (event code)
System error (FW error)
◦ 66.80.55 (event code)
System error 5 (FW error)
◦ 66.80.56 (event code)
System error 6 (FW error)
◦ 66.80.57 (event code)
System error 7 (FW error)
◦ 66.80.58 (event code)
System error 8 (FW error)
◦ 66.80.59 (event code)
System error 9 (FW error)
◦ 66.80.60 (event code)
System error 10 (inter-page delay mismatch)
◦ 66.80.61 (event code)
System error 11 (lifter task trouble)
◦ 66.80.62 (event code)
System error 12 (inter-page delay mismatch)
◦ 66.80.63 (event code)
System error 13 (FW error)
◦ 66.80.64 (event code)
System error 14 (FW error)
◦ 66.80.65 (event code)
System error 15 (FW error)
◦ 66.80.70 (event code)
Page-info in flush
◦ 66.80.71 (event code)
Flush request in PDLV
◦ 66.80.72 (event code)
Delivery notice error
◦ 66.80.73 (event code)
Flush request in checking paper path
◦ 66.80.74 (event code)
Checking paper path start in PDLV
◦ 66.80.75 (event code)
Flush request in flush
◦ 66.80.76 (event code)
Non-flush complete
Recommended action
Turn the product off, and then on.
If the error persists, replace the paper handling device.
69.11.YY Error To continue turn off then on
Description Duplexer error
Recommended action
Turn the product off, and then on.
If the error persists, replace the duplexer.
70.00.00 Error To continue turn off then on
Description DC controller failure
Recommended action Turn the product off, and then on. If the error persists, replace the DC controller.
79.XX.YY Error To continue turn off then on
Description
This error can be caused by corrupted print jobs, software application issues, non-product specific
printer drivers, poor-quality USB or network cables, bad network connections or incorrect network
configurations, invalid firmware operations, or unsupported accessories.
Recommended action
- Turn the product off, and then on.
- If the error persists, check the following:
- The error might be caused by a network connectivity problem, such as a bad interface cable,
a bad USB port, or an invalid network configuration setting.
- The error might be caused by the print job, an invalid print driver, a problem with the
software application, or a problem with the file you are printing.
Make sure you are using the correct printer driver. Try printing using a different software
application. Try printing a different file or print job.
- Upgrading the product firmware might resolve the problem.
80.0X.YY Embedded JetDirect error
Description Embedded HP JetDirect print server critical error
◦ 80.01.80 (event code)
No heartbeat
◦ 80.01.81 (event code)
Reclaim timeout
◦ 80.01.82 (event code)
Invalid data length
◦ 80.01.8B (event code)
Invalid max outstanding packet header field
◦ 80.01.8C (event code)
Invalid channel mapping response
◦ 80.03.01 (event code)
No PGP buffers
◦ 80.03.02 (event code)
Channel table full
◦ 80.03.03 (event code)
Producer index not reset
◦ 80.03.04 (event code)
Consumer index not reset
◦ 80.03.05 (event code)
Queue position size too small
◦ 80.03.06 (event code)
Transport overflow
◦ 80.03.07 (event code)
No overflow packets
◦ 80.03.08 (event code)
Invalid identify response
◦ 80.03.09 (event code)
Invalid channel map return status
◦ 80.03.1080.03.10 (event code)
Invalid reclaim return status
◦ 80.03.12 (event code)
Datagram invalid buffer
◦ 80.03.13 (event code)
Max stream channels
◦ 80.03.14 (event code)
Max datagram channels
◦ 80.03.15 (event code)
Card reset failed
◦ 80.03.16 (event code)
Self test failure
◦ 80.03.17 (event code)
Unknown PGP packet
◦ 80.03.18 (event code)
Duplicate I/O channel.
Recommended action
Turn the product off, and then on.
If the error persists, replace the formatter.
81.YY.ZZ EIO-1 Card Failure
Description An EIO error has occurred.
◦ 81.01.80 (event code)
No heartbeat
◦ 81.01.81 (event code)
Reclaim timeout
◦ 81.01.82 (event code)
Invalid data length
◦ 81.01.8B (event code)
Invalid max outstanding
◦ 81.01.8C (event code)
Invalid channel mapping
◦ 81.03.01 (event code)
No PGP buffers
◦ 81.03.02 (event code)
Channel table full
◦ 81.03.03 (event code)
Producer index not reset
◦ 81.03.04 (event code)
Consumer index not reset
◦ 81.03.05 (event code)
Queue position size
◦ 81.03.06 (event code)
Transport overflow
◦ 81.03.07 (event code)
No overflow packets
◦ 81.03.08 (event code)
Invalid identify response
◦ 81.03.09 (event code)
Invalid channel map return
◦ 81.03.10 (event code)
Invalid reclaim return status
◦ 81.03.12 (event code)
Datagram invalid buffer
◦ 81.03.13 (event code)
Max stream channels
◦ 81.03.14 (event code)
Max datagram channels
◦ 81.03.15 (event code)
Card reset failed
◦ 81.03.16 (event code)
Self test failure
◦ 81.03.17 (event code)
Unknown PGP packet
◦ 81.03.18 (event code)
Duplicate I/O channel
Recommended action
Turn the product off, and then on.
If the error persists, replace the EIO device..
82.73.46 OR 82.73.47
Description A hard disk or compact flash disk cleaning failed. Usually caused by a failure of the disk hardware.
Recommended action
- Turn the product off, and then on.
- Use the Clean Disk item in the Preboot menu.
- Reload the firmware.
98.00.01 Corrupt data in firmware volume
Description
Data corruption has occurred in the firmware volume
Recommended action
Turn the product off, and then on.
Use the Clean Disk item in the Preboot menu.
Reload the firmware.
98.00.02 Corrupt data in solutions volume
Description Data corruption has occurred in the solutions volume
Recommended action Turn the product off, and then on. Use the Clean Disk item in the Preboot menu. Reload the firmware.
98.00.03 Corrupt data in configuration volume
Description
Data corruption has occurred in the configuration volume
Recommended action Turn the product off, and then on.
Use the Clean Disk item in the Preboot menu.
Reload the firmware.
98.00.04 Corrupt data in job data volume
Description Data corruption has occurred in the job data volume
Recommended action Turn the product off, and then on. Rerun the file erase function.
99.00.01 Upgrade not performed file is corrupt
Description A remote firmware upgrade (RFU) was not performed. CRC error in the firmware image (bad image).
Recommended action Download the RFU file and attempt the upgrade again.
99.00.02 Upgrade not performed timeout during receive
Description A remote firmware upgrade (RFU) was not performed. I/O timeout when reading header number and size. Indicates a problem with the network environment, not the device.
Recommended action The most common cause is an issue with the network environment. Make sure that there is a good connection to the device and attempt the upgrade again, or upgrade using the USB walk-up port.
99.00.03 Upgrade not performed error writing to disk
Description A remote firmware upgrade (RFU) was not performed.
Disk error. May indicate a problem or a hard disk failure. It might be necessary to check the connection to the hard disk or replace the hard disk.
Recommended action
- Download the RFU file and attempt the upgrade again.
- If the error persists, perform the Clean Disk process. You will then need to download firmware
from the Preboot menu.
- If the error persists, replace the hard disk.
99.00.04 Upgrade not performed timeout during receive
Description A remote firmware upgrade (RFU) was not performed. I/O timeout when reading rest of header.
Recommended action The most common cause is an issue with the network environment. Make sure that there is a good connection to the device and attempt the upgrade again, or upgrade using the USB walk-up port.
99.00.05 Upgrade not performed timeout during receive
Description A remote firmware upgrade (RFU) was not performed.
I/O timeout when reading image data.
Recommended action The most common cause is an issue with the network environment. Make sure that there is a good connection to the device and attempt the upgrade again, or upgrade using the USB walk-up port.
99.00.06 Upgrade not performed error reading upgrade
Description A remote firmware upgrade (RFU) was not performed.
Unexpected read error when reading header number and size.
Recommended action Download the RFU file and attempt the upgrade again.
- If the error persists, replace the hard disk.
99.00.07 Upgrade not performed error reading upgrade
Description A remote firmware upgrade (RFU) was not performed. Unexpected read error when reading rest of header.
Recommended action
- Download the RFU file and attempt the upgrade again.
- If the error persists, replace the hard disk.
99.00.08 Upgrade not performed error reading upgrade
Description A remote firmware upgrade (RFU) was not performed. Unexpected read error when reading image data.
Recommended action
- Download the RFU file and attempt the upgrade again.
- If the error persists, replace the hard disk.
99.00.09 Upgrade canceled by user
Description A remote firmware upgrade (RFU) was not performed. The RFU was canceled by the user.
Recommended action Resend the RFU.
99.00.10 Upgrade canceled by user
Description A remote firmware upgrade (RFU) was not performed. Job canceled when reading header number and size.
Recommended action Resend the RFU.
99.00.11 Upgrade canceled by user
Description A remote firmware upgrade (RFU) was not performed. Job canceled when reading rest of header.
Recommended action Resend the RFU.
99.00.12 Upgrade not performed the file is invalid
Description A remote firmware upgrade (RFU) was not performed. Header number is 1 but header size doesn’t match version 1 size.
Recommended action Download the RFU file again. Make sure that you download the file for the correct product model. Resend the RFU.
99.00.13 Upgrade not performed the file is invalid
Description A remote firmware upgrade (RFU) was not performed.
Header number is 2 but header size doesn’t match version 2 size.
Recommended action Download the RFU file again. Make sure that you download the file for the correct product model. Resend the RFU.
99.00.14 Upgrade not performed the file is invalid
Description A remote firmware upgrade (RFU) was not performed. The file is invalid.
Recommended action Download the RFU file again. Make sure that you download the file for the correct product model. Resend the RFU.
99.00.2X
Description
◦ 99.00.20 (event log)
The bundle is not for this product
◦ 99.00.21 (event log)
The bundle is not signed with the correct signature, or the signature is invalid
◦ 99.00.22 (event log)
The bundle header version is not supported by this firmware
◦ 99.00.23 (event log)
The package header version is not supported by this firmware
◦ 99.00.24 (event log)
◦ The format of the bundle is invalid
◦ 99.00.25 (event log)
The format of the package is invalid
◦ 99.00.26 (event log)
A CRC32 check did not pass
◦ 99.00.27 (event log)
An I/O error occurred while downloading the bundle
Recommended action Download the correct firmware file from http://www.hp.com/go/lj600Series_firmware, and then resend the firmware upgrade.
99.00.27 only: Turn the product off, and then on again. Resend the firware upgrade. If the error persists, try the sending the upgrade by another method (USB or Embedded Web Server).
99.09.60 Unsupported disk
Description Preboot menu error.
The hard disk currently installed is not recognized or supported by the product.
Recommended action Install the correct hard disk for this product.
99.09.61 Unsupported disk
Description Preboot menu error.
The installed disk is installed in a product configured for a encrypted hard disk.
Recommended action Access the Preboot menu and then select Lock Disk to lock the disk.
99.09.62 Unknown disk
Description Preboot menu error. The installed disk was previously locked in another product.
Recommended action Install a new disk or use the Preboot menu to unlock this disk. If the disk is to be reused in a different product, execute the Clean Disk procedure from the Preboot menu, then reload firmware and lock the disk.
99.09.63 Incorrect disk
Description A new or blank disk has been installed in a device which previously had an encrypted disk.
Recommended action Follow the procedure to load firmware on a new hard disk and then lock it to this product.
99.09.64 Disk malfunction
Description A fatal hard disk failure has occurred.
Recommended action Replace the hard disk drive.
99.09.65 Disk data error
Description Disk data corruption has occurred.
Recommended action Execute the Clean Disk procedure from the Preboot menu, and then resend the RFU.
99.09.66 No disk installed
Description A disk drive is not installed in the product.
Recommended action Install a compatible hard disk drive.
99.09.67 Disk is not bootable please download firmware
Description The product has a non-secure disk (solid state disk) installed as the boot disk, and it has been replaced with a new service part. A new firmware image needs to be downloaded to the device.
Recommended action
- Press any key to continue to the main Preboot menu.
- Press the Help button to see the help text for the error.
- Select the Administrator menu.
NOTE: If there is a password assigned to the Administrator, a prompt to enter the password displays.
- Select the Download item.
- The user can now download a new firmware bundle to the product.
99.XX.YY
Description Firmware installation error
Recommended action Reload the firmware.
<binname> full Remove all paper from bin
Description The specified output bin is full.
Recommended action Empty the bin to continue printing.
Error Message List
Wait a moment. Network initializing .
The network is being initialized.
Wait for a while until the machine connects to the network.
Checking File System
File system in the hard disk is being checked. Wait for a while.
Inspection is required. PU Flash Error
Turn the machine off, and then back on. If the same error occurs, contact your dealer.
Inspection is required. PU Communication Error
Turn the machine off, and then back on. If the same error occurs, contact your dealer.
Offline Mode
The machine is offline. Press the Online button to set it to [Online].
Data present.
Data remains unprinted.
Deleting data.
The job was cancelled or user is unauthorized.
Warming up.
The machine is adjusting the temperature of the fuser unit. Wait for a while.
Preparing .
Color registration and density are being adjusted. Wait for a while.
Updating firmware. Do not turn OFF the power.
The programs on the machine are being updated.
Do not turn the machine off until the update completes.
The machine automatically restarts after the update completes.
Toner Low.
The toner indicated on the screen is low. Have a new toner cartridge ready.
Waste Toner Full Replace with new Toner Cartridge.
Waste toner is full. Replace the toner cartridge with a new one.
C: Cyan (blue), M: Magenta (red)
C Non Recommended Toner.
An optimum C (Cyan, blue) toner cartridge is not installed.
Use a toner cartridge that matches your machine.
M Non Recommended Toner.
An optimum M (Magenta, red) toner cartridge is not installed.
Use a toner cartridge that matches your machine.
Y Non Recommended Toner.
An optimum Y (Yellow) toner cartridge is not installed.
Use a toner cartridge that matches your machine.
K Non Recommended Toner.
An optimum K (Black) toner cartridge is not installed.
Use a toner cartridge that matches your machine.
Error Postscript
A postscript error has occurred.
Image Drum Near Life.
The image drum indicated on the screen is near life. Have a new image drum ready.
C: Cyan (blue), M: Magenta (red), Y: Yellow, K: Black
Fuser Near Life.
The fuser unit is near life. Have a new fuser unit ready.
Belt Unit Near Life.
The belt unit is near life. Have a new belt unit ready.
Fuser Unit Life. Install New Fuser Unit.
The fuser unit reaches its lifetime.
Replace the fuser unit with a new one.
Belt Unit Life. Install New Belt Unit.
The belt unit reaches its lifetime.
Replace the belt unit with a new one.
Toner empty. Replace with new Toner Cartridge.
The toner indicated on the screen is empty. Replace the empty toner cartridge with a new one.
C: Cyan (blue), M: Magenta (red), Y: Yellow, K: Black
Toner cartridge not installed.
A color toner cartridge indicated on the screen is not installed.
Install the toner cartridge.
C: Cyan (blue), M: Magenta (red), Y: Yellow, K: Black
Image Drum Life. Please install new Image Drum Unit.
The image drum indicated on the screen reaches its lifetime.
Replace the image drum with a new one.
C: Cyan (blue), M: Magenta (red), Y: Yellow, K: Black
TRAY is empty.
No paper is loaded in the tray. Load paper.
File System is full.
Memory in the file system is full.
Delete unnecessary files.
The File System is write-protected.
The file you are trying to write is write-protected.
Check the file name.
Insufficient page memory to collate.
Insufficient memory error has occurred during collate printing.
Reduce the number of pages to print.
Insufficient memory. Error: 014
Memory full error has occurred during PC Fax reception. Press [Close].
Unauthorized user, job cancelled.
Unauthorized job was sent or unauthorized user attempted to print or send a fax. Data was deleted. Contact your administrator to use this machine.
File erasing .
Files stored for authentication print are being deleted.
Wait for a while.
Deleting encrypted authentication print data.
Files stored for encrypted authentication print are being deleted. Wait for a while.
Erased Data Full
Files supposed to be deleted are full. Erase the files.
Secure job storage period exceeded.
Files whose authentication print data storage period expired were automatically deleted.
Disk Read/Write Error
An error has occurred in the file system. Press [Close].
Flash Error
An error has occurred when firmware was being updated.
Contact the administrator.
Invalid print data received.
Invalid print data or PC fax data was received. To erase the message, press [Close].
If you performed authentication printing, the data was deleted because it was incomplete. Print again.
Received data has been discarded because Job Type is restricted.
Data whose job type is not defined in the acceptable job type settings was received. The data was discarded without being processed.
Select a job type defined in the acceptable job type settings for [Job Type] of the printer driver and print again.
Manual Request. Error : 500
Print on paper fed manually. Load paper in the MP tray.
Please change [MEDIA_SIZE] [MEDIA_TYPE] in [TRAY]. Error: 461, 462, 463, 464
The size and type of fed paper do not match those indicated on the screen. Use the same size and type of paper selected on the application.
Please change [MEDIA_SIZE] [MEDIA_TYPE] in MP Tray Error: 460
The size and type of paper loaded in the MP tray do not match those indicated on the screen. Make sure that the size and type of paper loaded in the MP tray match those selected on the application.
Wait a moment. Message Data processing .
Messages to be displayed on the machine are being updated. Wait for a while.
Wait a moment. Message Data writing .
Messages to be displayed on the machine are being updated. Wait for a while.
Restart the machine. Writing message data has been complete.
Messages to be displayed on the machine are now updated.
Turn the machine off, and then back on.
Wait for a while.
Please check data. Message Data Write Error
Updating messages to be displayed on the machine failed.
Make sure that you use right data for this machine.
Wait a moment. Network Configuration writing .
Network settings for this machine is changed. The new settings are being stored. Wait for a while.
Wait a moment. Network initializing .
Network settings for this machine are initializing.
Paper [TRAY] is empty Set [MEDIA_SIZE] Error: 490, 491, 492, 493, 494
No paper is loaded in the indicated tray. Load paper of the displayed size.
[TRAY] cassette is missing. Open and Close the indicated cassette. Error: 440, 441, 442, 430, 431, 432, 433
The tray is not installed. Install the cassette. If the cassette is already inserted, pull it out, and then insert it again.
Insufficient memory. Error: 420
Data is too complicated. Memory full error has occurred during processing. Reduce the volume of the print data.
Waste Toner Full Replace with new Toner Cartridge. Error: 414, 415, 416, 417
Waste toner of the toner cartridge is full. Opening and closing the front cover can resume printing for a while, but it may damage the image drum. Replace the toner cartridge with a new one as soon as possible.
C: Cyan (blue), M: Magenta (red)
Toner empty. Replace with new Toner Cartridge. Error: 410, 411, 412, 413
The indicated cartridge ran out of toner.
Opening and closing the front cover can resume printing for a while, but it may damage the image drum. Replace the toner cartridge with a new one as soon as possible.
C: Cyan (blue), M: Magenta (red), Y: Yellow, K: Black
Incompatible C Toner. Error: 552, 556, 616, 622
The installed C (Cyan, blue) toner cartridge is not optimum.
We recommend using an optimum toner cartridge.
Incompatible M Toner. Error: 551, 555, 615, 621
The installed M (Magenta, red) toner cartridge is not optimum.
We recommend using an optimum toner cartridge.
Incompatible Y Toner. Error: 550, 554, 614, 620
The installed Y (Yellow) toner cartridge is not optimum.
We recommend using an optimum toner cartridge.
Incompatible K Toner. Error: 553, 557, 617, 623
The installed K (Black) toner cartridge is not optimum.
We recommend using an optimum toner cartridge.
Toner Not Installed. Error: 610, 611, 612, 613
A color toner cartridge indicated on the screen is not installed.
Install the toner cartridge.
C: Cyan (blue), M: Magenta (red), Y: Yellow, K: Black
Image Drum Sensor Error Check Image Drum. Error: 540, 541, 542, 543
The sensor error has occurred in the image drum indicated on the screen.
Uninstall the image drum, and then install it again.
If the message persists, uninstall the toner cartridge and install it again.
If the toner cartridge is not installed, install it.
C: Cyan (blue), M: Magenta (red), Y: Yellow, K: Black
Multiple sheets of paper have been fed. Reset Paper in [TRAY]. Error: 401
The indicated tray fed multiple sheets of paper at a time.
Remove the cassette from the tray, and then load paper again.
Paper Size Error. Reset Paper in [TRAY]. Error: 400
Paper size error has occurred in the indicated tray. Make sure that the size made by paper loaded in the tray matches the setting made by the paper size dial in the paper cassette. Load paper according to the paper size and direction set for the paper size dial.
If the setting made by the paper size dial is wrong, cancel printing first, set the paper size dial, and then print again.
Make sure that the cassette does not feed multiple sheets of paper at a time after starting printing. If it happens, remove paper, and then load paper correctly.
Paper jam has occurred. Open the front cover and remove the paper. Error: 390
Paper jammed via the paper feed path from the MP tray.
If the edge of the jammed paper is not visible, open the front cover and remove the paper.
Paper jam has occurred. Pull out the [TRAY] cassette and then remove the paper. Error: 391, 392, 393, 394
A paper jammed via the paper feed path from the indicated tray.
Pull out the cassette, and then remove paper. If multiple sheets of paper are fed at a time, remove paper and reload paper.
Make sure that the paper stoppers are set in the right position.
Paper jam has occurred. Open the front cover and remove the paper. Error: 372, 380
Paper jammed in the paper feed path of the machine. Open the front cover and remove the jammed paper.
A paper jam has occurred under the image drum or around the fuser unit. Please remove paper. Error: 381, 382, 383, 348, 389
A paper jam has occurred inside the machine.
Open the cover and remove jammed paper.
A Paper Jam has occurred and paper remains near the Duplex Unit. Please remove paper. Error: 370, 371, 373
Paper jammed near the duplex printing unit.
Pull out the duplex unit on the back of the machine, and then remove jammed paper.
The 2-Sided Printing unit is not set correctly. Error: 360
The duplex unit is not properly installed. Install the duplex unit.
Image Drum Life. Please install new Image Drum Unit. Error: 350, 351, 352, 353
The image drum indicated on the screen reaches its lifetime.
Replace the image drum with a new one.
Opening and closing the cover can resume printing for a while. Replace with a new one as soon as possible, however.
C: Cyan (blue), M: Magenta (red), Y: Yellow, K: Black
Image Drum Life. Please install new Image Drum Unit. Error: 560, 561, 562, 563, 564, 565, 566, 567
The image drum indicated on the screen reaches its lifetime.
Replace the image drum with a new one.
C: Cyan (blue), M: Magenta (red), Y: Yellow, K: Black
Image Drum Life. Please install new Image Drum Unit. Error: 680, 681, 682, 683
Printing has stopped because the image drum indicated on the screen reached its lifetime. Replace with a new image drum to print.
C: Cyan (blue), M: Magenta (red), Y: Yellow, K: Black
Fuser Unit Life. Install New Fuser Unit. Error: 354
The fuser unit reaches its lifetime.
Replace the fuser unit with a new one.
Opening and closing the cover can resume printing for a while. Replace with a new one as soon as possible for maintaining the print quality.
Belt Unit Life. Install New Belt Unit. Error: 355
The belt unit reaches its lifetime.
Replace the belt unit with a new one.
Opening and closing the cover can resume printing for a while. Replace with a new one as soon as possible for maintaining the print quality.
The Fuser Unit is not installed correctly. Reset Fuser Unit. Error: 348
The fuser unit is not properly installed. Remove and re-install the fuser unit. If the error persists after re-installing, replace the fuser unit with a new one.
Waste Toner Full. Install New Belt Unit. Error: 356
Waste toner of the belt unit is full. Replace the belt unit with a new one. Opening and closing the cover can resume printing. Printing stops after 500 sheets are printed.
Toner cartridge not properly installed. Error: 544, 545, 546, 547
A color toner cartridge indicated on the screen is not installed.
Make sure that the lever on the toner cartridge is fully turned and the protective tape is removed.
C: Cyan (blue), M: Magenta (red), Y: Yellow, K: Black
Image Drum not properly installed. Check Image Drum. Error: 340, 341,342, 343
The indicated image drum is not installed correctly.
Remove and re-install the image drum.
C: Cyan (blue), M: Magenta (red), Y: Yellow, K: Black
The Fuser Unit is not installed correctly. Reset Fuser Unit. Error: 320
The fuser unit is not properly installed. Remove and re-install the fuser unit.
Belt Unit not installed correctly. Re-set the Belt Unit. Error: 330
The belt unit is not properly installed. Remove and re-install the belt unit.
[COVER] Open. Error: 310, 311, 587
Indicated cover is open. Close the cover.
Error: 310 The output tray, 311 The front cover, 587 The upper output tray
Please check data. Program Data Write Error
An error occurred when firmware was being updated.
Use a correct update file.
Power OFF/ON
Turn the machine off, and then back on.
If the same error occurs, contact your dealer.
Inspection is required.
Turn the machine off, and then back on.
If the same error occurs, contact your dealer.
Cancelling .
The cancel button was pressed while copying. The copy job is being cancelled. Wait for a while.
Automatic document feeder (ADF) cover is open.
The ADF cover of the scanner is open. Close the cover.
Document jam has occurred. Open the automatic document feeder (ADF) cover on the scanner to check.
Paper jammed in the ADF of the scanner.
Open the ADF cover and remove jammed paper.
Multiple sheets of document have been fed. Open the automatic document feeder (ADF) cover on the scanner to check.
Multiple sheets of document have been fed. Fan a stack of the paper well and place them on the automatic document feeder (ADF). Use the document glass if a tag or label is affixed to the document.
Scanner lamp error check the lamp.
Light volume of the scanner is low. Contact your dealer.
Power OFF/ON Carriage Error
An error has occurred on the carriage of the scanner. Turn the machine off, and then back on.
If the same error occurs, contact your dealer.
USB Memory Full
Scan To USB Memory was cancelled because the USB Memory is full.
Check the free space in the USB Memory.
Writing to USB memory failed.
The USB Memory is write-protected. Unlock the protection.
USB Memory disconnected.
The USB Memory was removed while performing Scan To USB Memory.
Connect to PC failed.
No destination computer was found for Scan to Computer. Make sure that your computer is turned on and recordable.
To erase the message, press [Close].
Insufficient memory occurred during Rx.
Memory full error has occurred during fax reception. Ensure available memory.
Communication Error
An error has occurred during fax transmission or fax reception.
Telephone
The external phone is in use.
File Transmission Error
An error such as a malfunction of the server or disconnection of a network cable has occurred while performing Scan To shared folder.
Check the network connection.
To erase the message, press [Close].
E-mail Transmission Error
An error such as a malfunction of the server or disconnection of a network cable has occurred while performing Scan To E-mail. Check the network connection.
To erase the message, press [Close].
Please check SMTP settings.
Cannot connect to the SMTP server. Check the network settings.
Please check POP3 settings.
Cannot connect to the POP3 server. Check the network settings.
SMTP Login failed.
An attempt to log into the SMTP server ended up an authentication error.
Check the network settings.
SMTP Auth. Unsupported
The SMTP server does not support the authentication system.
Check the network settings.
POP3 Login failed.
An attempt to log into the POP3 server ended up an authentication error.
Check the network settings.
Getting target IP failed. Please Check DHCP settings.
The DHCP server cannot be detected. Check the network connection.
Please check DNS settings.
Cannot connect to the DNS server. Check the network connection.
Please check Server settings.
Cannot connect to the file server. Check the network settings.
Server Login failed.
Logging into the file server failed. Check the server settings.
Entering directory failed.
Connecting to the directory of the FTP server failed. Check the server settings.
Changing data Transfer Type failed.
File transmission failed because the file transfer type was not accepted by the FTP server. Change the FTP transfer type to «binary».
File writing failed.
Files sent using Scan To shared folder could not be written. Check the access rights for the shared folder.
FTP destination Full.
Memory in the FTP server is low. Delete unnecessary files and ensure the free space.
Please change File Name.
The specified file name is not acceptable. Check the FTP server settings and change the file name.
Device communication protocol not supported.
The server does not support CIFS or FTP. Check the server settings.
Please check Network Share Name.
The name of the network shared folder is not correct. Check the folder name.
Please check data. Program Data Write Error
An error has occurred when program was being updated.
Please insert USB Memory.
Scan To USB Memory or print from USB Memory with USB Memory not inserted was attempted.
Insert USB Memory.
[TRAY] cassette missing.
The cassette in the indicated tray is pulled out.
Install the cassette.
Access Limitation Error Monochrome printing was performed due to the color printing limitation.
A color print job was converted to a mono print job due to an unauthorized user. Contact your administrator for color printing.
Access Limitation Error Data was deleted due to the color printing limitation.
A color print job was deleted due to an unauthorized user. Contact your administrator for color printing.
Restricted access error Data deleted due to printing restrictions.
A print job was deleted due to an unauthorized user. Contact your administrator for printing.
Incompatible USB device connected. Remove the connected USB device.
An unsupported USB device is connected. Remove the USB device.
Please remove the connected USB device. USB device has not been recognized.
The connected USB device was not recognized. Remove the USB device.
Please remove the USB Hub. USB Hub is connected.
A USB hub is connected. Remove the USB hub. This machine does not support USB hub.
Inspection is required. SIP Error
Turn the machine off, and then back on. If the same error occurs, contact your dealer.
Please call service. Scanner unit failed to detect printer unit.
Turn the machine off, and then back on. If the same error occurs, contact your dealer.
HDD Error 0
While initializing this machine, a hard disk which needs formatting was detected.
HDD Error 250
While initializing this machine, a damaged file for encrypted authentication printing was found. Format the hard disk again.
Accounting Log buffer is near full.
The accounting log buffer is almost full.
Acquire the log and free the buffer.
Accounting Log Writing Error
An accounting log writing error has occurred.
To erase the message, press [Close].
Job Log Database Error
A data base access error has occurred while writing or reading the job log. Turning the machine off and on may resolve the problem.
To erase the message, press [Close].
Accounting Log Buffer Full (Delete old logs)
Old logs were deleted, because accounting log buffer was full. Acquire the log and free the buffer.
Power OFF/ON
Turn the machine off, and then back on. If the same error occurs, contact your dealer.
A decoding error occurred. Check the image data.
An error has occurred in the image data sent to this machine. Check the image data.
Process has been canceled as there is no space on the device. Please free up enough memory space by reducing usage and try again.
Processing data was cancelled due to memory full.
Reduce the usage on the device to ensure available memory, and then retry.
Process has been canceled by a device error. After maintenance or change of the device, please try again.
Processing data was cancelled because an error occurred on the device.
Repair or replace the device, and then retry.
Access denied to PC. Please check PC.
Connecting to a computer failed when performing Scan to Computer. Check the settings on the computer.
Deleting data.
This machine ran out of color toner. Color print data is being deleted.
Error PDF
The PDF file is damaged.
This PDF file is password protected.
This PDF file is password protected. Enter a password to print.
Valid password required to print document.
This PDF needs authentication. Enter a password to print.
No communication with the SNTP server.
Obtaining current time from the SNTP server failed. Check the server.
USB Memory disconnected.
The USB Memory was removed while printing from USB Memory. Do not remove USB Memory while printing is in progress.
Cannot open the file.
The specified file could not be Opened. Check the file.
Cannot read the file.
Files could not be read. Check the device where the files are stored.
File loading from USB.
Data is being read from USB Memory.
Press the Stop button to cancel reading.
An error occurred. Scanning is pending.
Printing has stopped due to an error.
Image Drum Sensor Error.
The toner sensor error has occurred in the image drum indicated on the screen.
Printing was stopped. Rear Output Tray was opened during printing. Open the Output Tray. Error code: 409
The rear output tray was moved while printing.
Place the rear output tray in the correct position, and then open and close the output tray.
Toner empty. Replace with new Toner Cartridge.
The indicated cartridge ran out of toner.
Replace the empty toner cartridge with a new one.
Wait Timeout in menu is disabled. Printing is disabled except by USB. Clear page buffer and enable time out in menu.
Wait Timeout is disabled.
Insufficient memory occurred during Fax Tx reservation.
Insufficient memory error has occurred during Scan To fax.
Insufficient memory.
Insufficient memory error has occurred during fax reception.
E-mail receiving has been cancelled.
E-mail reception was cancelled.
Check the file format and size of the attached file.
Wireless settings are incomplete.
Wrong values are set or items remain unset in the wireless LAN settings. Check the wireless settings.
Not connected to wireless access point.
No wireless LAN access points are found.
Make sure that the access point is turned on.
Disconnect and re-connect to wireless LAN.
Wireless startup failed.
Restart the machine. If the error persists, contact your dealer.
Firmware Update Error Please try again. If network doesn’t work, please try firmware update over USB.
Updating the firmware failed. Update again.
Registering with Google Cloud Print. Don’t turn off the power until registration is complete.
This machine is being registered to the Google Cloud Print service. Wait for a while.
Deleting from Google Cloud Print.
This machine is being removed from the Google Cloud Print service. Wait for a while.
Caution, unknown Consumable detected Go to User Manual «Trouble Shooting» to restore operation Error 709
You can use any consumables in your product, but you must accept the risks of using non-genuine consumables.
If the use of non-genuine consumables causes damage to the product or results in your product not functioning to its full specification, then such damage or effect on the product is not covered by warranty.
To accept these risks and to restore function;
Turn off the machine.
Holding the [CLEAR] button, turn on the machine.
Release the [CLEAR] button when «RAM CHECK 100%» is displayed.
This operation log is recorded in the product.
If you have any questions, contact your dealer.
Replace the image drum. [PAGES] Pages Left.
The image drum indicated on the screen reaches its lifetime.
Replace the image drum with a new one.
C: Cyan (blue), M: Magenta (red), Y: Yellow, K: Black
Replace the image drum. Print Quality Not Guaranteed.
The image drum indicated on the screen reaches its lifetime.
Replace the image drum with a new one.
C: Cyan (blue), M: Magenta (red), Y: Yellow, K: Black
Receiving data timeout.
Data could not received within a certain period of time.
IPv4 address is conflicted. Please change IPv4 address.
The IP address assigned to this machine is duplicated with that of another device.
Check the IP addresses, and then assign another IP address.
Incompatible [COLOR] Image Drum. Error: 984, 685, 686, 687, 690, 691, 692, 693, 700, 701, 702, 703, 704, 705, 706, 707
Non-optimum image drum is installed.
C: Cyan (blue), M: Magenta (red), Y: Yellow, K: Black
C Image Drum Not Installed. Error: 696
Cyan (blue) image drum is not installed.
Install the image drum.
M Image Drum Not Installed. Error: 695
Magenta (red) image drum is not installed.
Install the image drum.
Y Image Drum Not Installed. Error: 694
Yellow image drum is not installed.
Install the image drum.
K Image Drum Not Installed. Error: 697
Black image drum is not installed.
Install the image drum.
Blank pages were detected on all pages. Please check how the document was set.
Scanned pages are all blank. Turn over the document.
In order to set paper that cannot be output to the Upper Output Tray, the paper was output from Output Tray. To turn off this display, press the [Close] button.
Check the type of the specified paper.
Simplex printing was performed as the paper setting did not allow duplex printing.
Duplex printing is not available on the specified paper.
Check the size and thickness of paper.
Multi-purpose tray has not been set to be used as the tray, so multiple copies have been printed. Please verify multi-purpose tray settings. Press [Close] button to remove this dialog
MP tray setting is set to [Do Not Use]. Change the MP tray setting.
Output Paper Full. Remove the paper on [TRAY]. Error: 480, 485
Paper in the output tray is full.
Remove the handout.
Changing Language. Panel operation is disabled.
Display language is being changed.
Wait for a while.
Language Change Failed. Error num: %CODE%
Switching display languages failed. Press the power button to turn the machine off, and then back on.
Detected an abnormality of internal database. The data must be deleted. After pressing [Format], the data will be deleted, and then reboot.
Data base is beyond restoration.
To delete the data base, press [Format].
Cannot print because your Summary Account balance is 0. User name for Printing: [USERNAME] Summary Account Name for Insufficient Balance: [ACCOUNTNAME] To continue the print job, increase the balance and select [Start]. To increase the balance, please contact the device administr. To cancel the print job, select [Cancel].
The number of print jobs excesses the limit. No more print jobs are authorized. Contact your administrator.
Copyright © 2015 Oki Electric Industry Co., Ltd. All rights reserved.
Источник
BEFORE USING THE MACHINE
Envelopes
Do not use the following envelopes, as misfeeds will occur.
• Envelopes with metal tabs, clasps, strings, holes, or windows.
• Envelopes with rough fibres, carbon paper, or glossy surfaces.
• Envelopes with two or more flaps.
• Envelopes with tape, film, or paper attached to the flap.
• Envelopes with a fold in the flap.
• Envelopes with glue on the flap to be moistened for sealing.
• Envelopes with labels or stamps.
• Envelopes that are slightly inflated with air.
• Envelopes with glue protruding from the seal area.
• Envelopes with part of the seal area peeled off.
Follow these steps to change a tray’s paper size setting.
• The paper size setting cannot be changed when the machine has stopped temporarily due to running out of
Note
paper or a misfeed, or during interrupt copying.
• During printing (even in copy mode), the paper size setting cannot be changed.
• A5 size paper can only be selected in upper paper tray.
• Do not load paper that is a different size than the paper size setting. Copying will not be possible.
1
Hold down the [TRAY SETTING] key
(
) for more than 5 seconds to set
the selected paper size.
12
The currently selected
paper feed location
indicator will blink and the
corresponding paper size
(which is currently set)
indicator will light steadily.
All other indicators will go
out.
2
If the machine has two or more paper
trays, use the [PAPER SELECT] key
(
) to select the paper tray for which
you wish to change the paper size
setting.
Each time the [PAPER
SELECT] key (
) is
pressed, a paper tray will
be indicated with a
blinking paper feed
location indicator.
-
Page 1: Operation Guide
MODEL: AR-5516 AR-5520 AR-5516D AR-5520D DIGITAL MULTIFUNCTIONAL SYSTEM OPERATION GUIDE…
-
Page 3: Table Of Contents
CONTENTS BEFORE USING THE MACHINE PRINTER FUNCTIONS PART NAMES AND FUNCTIONS ….. 4 BASIC PRINTING ……….35 ● OPERATION PANEL ……..6 ● OPENING THE PRINTER DRIVER FROM THE «Start» BUTTON ……….36 POWER ON AND OFF……..8 ● POWER ON …………8 PRINTER DRIVER SETTING SCREEN ..
- Page 4
USER SETTINGS PERIPHERAL DEVICES AND SUPPLIES ADJUSTING THE AUTOMATIC EXPOSURE PERIPHERAL DEVICES ……… 85 ● SINGLE PASS FEEDER/REVERSING SINGLE LEVEL ………….. 55 PASS FEEDER ……….86 CUSTOMISING SETTINGS (System Settings)..56 ● 250-SHEET PAPER FEED UNIT/2 X 250- ● SYSTEM SETTINGS ……..56 SHEET PAPER FEED UNIT …… - Page 5
INTRODUCTION This manual describes the copier, printer, and scanner functions of the AR-5516/AR-5520 and AR-5516D/AR-5520D digital multifunctional system. • Where «AR-XXXX» appears in this manual, please substitute the name of your model for «XXXX». For the name of your model, see «DIFFERENCES BETWEEN MODELS» in the Start Guide. -
Page 6: Before Using The Machine
Chapter 1 BEFORE USING THE MACHINE This chapter contains basic information that should be read before using the machine. PART NAMES AND FUNCTIONS Glass cleaner (when the SPF/RSPF is installed) Paper trays Use to clean the original scanning glass. (p.83) Each tray holds 250 sheets of paper.
- Page 7
BEFORE USING THE MACHINE Document feeder tray (when the SPF/RSPF is Fusing unit release levers installed) To remove a paper misfeed from the fusing unit, push Place the original(s) that you wish to scan face up down on these levers and remove the paper. (p.76) here. -
Page 8: Operation Panel
BEFORE USING THE MACHINE OPERATION PANEL 6 7 8 9 10 SCAN MENU key SORT/GROUP key ( ) / indicators Use to scan by means of the provided Button Press to select the «SORT» or «GROUP» mode. (p.29) Manager software. (p.48) 2 IN 1 / 4 IN 1 key ( ) / indicators…
- Page 9
BEFORE USING THE MACHINE 29 30 31 When there are two or more paper trays Display PRESET RATIO selector keys ( indicators Shows the set number of copies, as well as the copy ratio, system setting function or setting code, or an Use to select preset reduction/enlargement copy error code when an error occurs. -
Page 10: Power On And Off
POWER ON AND OFF The power switch is located on the left side of the machine. POWER ON POWER OFF Make sure that the machine is not in Turn the power switch to the «ON» operation and then turn the power switch position.
-
Page 11: Loading Paper
● There are many varieties of special paper available on the market, and some cannot be used with this machine. Before using special paper, contact your authorised service representative. ● Before using other than SHARP recommended paper, make a test copy to see if the paper is suitable.
-
Page 12: Loading Paper
BEFORE USING THE MACHINE LOADING PAPER Make sure that the machine is not copying or printing, and then follow these steps to load paper. Loading the paper tray Gently lift and pull out the paper tray Gently push the paper tray into the until it stops.
-
Page 13: Loading The Bypass Tray
• When loading envelopes, make sure that they are straight and flat and do not have loosely glued construction flaps (not the closure flap). • Special papers except SHARP recommended transparency film, labels, and envelopes must be fed one sheet at a time through the bypass tray.
-
Page 14: Changing A Tray’s Paper Size Setting
BEFORE USING THE MACHINE Envelopes Do not use the following envelopes, as misfeeds will occur. • Envelopes with metal tabs, clasps, strings, holes, or windows. • Envelopes with rough fibres, carbon paper, or glossy surfaces. • Envelopes with two or more flaps. •…
- Page 15
BEFORE USING THE MACHINE Use the [ORIGINAL] key ( ) to Squeeze the lock lever of the front select the paper size. guide and slide the front guide to match the width of the paper, and The indicator of the move the left guide to the appropriate selected paper size lights slot as marked on the tray. -
Page 16: Operation In Copy, Printer, And Scanner Modes
OPERATION IN COPY, PRINTER, AND SCANNER MODES Some operations cannot be performed simultaneously when the machine is being used in printer mode, copy mode, or scanner mode. Scanning from Scanning from Modes Copying Printing a computer the machine Copy key input Copy During copying Printer…
-
Page 17: Copy Functions
Chapter 2 COPY FUNCTIONS This chapter explains how to use the copy functions. NORMAL COPYING This section explains how to make a regular copy. If «Auditing mode» has been enabled (p.60), enter your 3-digit account number. Copying from the document glass Open the document cover/SPF/RSPF, Press the [ORIGINAL] key ( ) and…
- Page 18
COPY FUNCTIONS Copying from the SPF/RSPF Make sure that an original has not Press the [START] key ( ) to begin been left on the document glass. copying. Close the SPF/RSPF. The copy is delivered to the paper output tray. Adjust the original guides to the size The default output mode for copying from the… - Page 19
COPY FUNCTIONS Auto paper select mode (when there are two or more paper trays) When the AUTO PAPER SELECT indicator ( ) lights up, «Auto paper select mode» is enabled. This function AUTO automatically selects the paper that is the same size as the original A5, B5, B5R, A4, A4R, B4, A3 paper. «Auto paper select mode»… -
Page 20: Making A Copy Darker Or Lighter
COPY FUNCTIONS MAKING A COPY DARKER OR LIGHTER Automatic exposure adjustment is initially enabled. This function automatically adjusts the copy image according to the original being copied. If you wish to select the exposure level yourself, follow the steps below. (Select from two original types and five exposure levels for each original type.) The exposure level used in automatic exposure adjustment can also be changed.
-
Page 21: Setting The Number Of Copies
COPY FUNCTIONS SETTING THE NUMBER OF COPIES Press the numeric keys to set the number of copies. Important note when making a large number of copies When the maximum number of pages (about 250 pages) that can be held in the paper output tray are output, copying will temporarily stop.
-
Page 22: Manual Ratio Selection
COPY FUNCTIONS Press the [AUTO IMAGE] key ( Set the number of copies and other AUTO % copy settings, and then press the [START] key ( The AUTO IMAGE indicator ( ) lights The copy will be delivered to the paper output AUTO % up and the appropriate tray.
-
Page 23: Selecting The Vertical And Horizontal Copy Ratios Separately (Xy Zoom Copying)
COPY FUNCTIONS SELECTING THE VERTICAL AND HORIZONTAL COPY RATIOS SEPARATELY (XY ZOOM Copying) The XY ZOOM feature allows the horizontal and vertical copy ratios to be changed independently. Example: Reduction only in the horizontal direction. Original Copy • This feature cannot be used with the 2 IN 1 or 4 IN 1 feature. (p.31) Note •…
- Page 24
COPY FUNCTIONS Use the [PRESET RATIO] selector keys ( ) and [Zoom] keys ( ) to change the copy ratio in the horizontal direction. Press the [PRESET RATIO] selector keys ( ) to select a ratio close to the desired ratio, and then press the [Zoom] keys ( ) to adjust the ratio in increments of 1%. -
Page 25: Automatic Two-Sided Copying (Ar-5516D/Ar-5520D)
AUTOMATIC TWO-SIDED COPYING (AR-5516D/AR-5520D) Two originals placed on the document glass can be copied onto each side of a single sheet of paper. In addition, an RSPF can be used to copy two originals onto one sheet of paper, or one two-sided original onto two sheets of paper, or one two-sided original onto each side of one sheet of paper.
-
Page 26: Using The Rspf
COPY FUNCTIONS Using the document glass Using the RSPF Place the original that you wish to Place originals in the RSPF. (p.16) copy onto the front side of the paper on the document glass and close the If you place an odd number of originals for one-sided to two-sided copying, the last page will document cover.
-
Page 27: Image Rotation In Duplex Copying
COPY FUNCTIONS IMAGE ROTATION IN DUPLEX COPYING This function is used to invert the top and bottom of the image on the front side of the paper during two-sided copying. Hold down the [ORIGINAL TO COPY] key until the indicator blinks. The currently set setting code blinks in the first digit of the number of…
-
Page 28: Two-Sided Copying Using The Bypass Tray
TWO-SIDED COPYING USING THE BYPASS TRAY To perform manual two-sided copying, follow these steps. Example: Copying originals A and B onto each side of one sheet of paper Copy Original A Original B Copy original A. Turn the copy of original A over, and without changing the position of the edge closest to you, insert it in the bypass tray.
-
Page 29: Dual Page Copying
DUAL PAGE COPYING A dual page original can be automatically separated into two pages during copying. This feature is convenient for making copies of books and other dual page originals on individual sheets of paper. Copy Original • A4 paper is used for dual page copying. Note •…
-
Page 30: Interrupting A Copy Run (Interrupt Copying)
INTERRUPTING A COPY RUN (Interrupt Copying) A copy run can be temporarily interrupted to allow another copy job to be performed. When the other job is finished, the copy run will resume using the original copy settings. Interrupt copying is not possible when sort/group copying, 2 IN 1 / 4 IN 1 copying, or two-sided copying is being Note performed.
-
Page 31: Convenient Copy Functions
CONVENIENT COPY FUNCTIONS This section explains major convenient copy functions. ROTATING THE IMAGE 90 DEGREES (Rotation Copy) When «Auto paper select mode» or «automatic ratio selection» are in operation and the original is placed in a different orientation (vertical or horizontal) than the paper, the original image will be automatically rotated 90 degrees to enable correct copying onto the paper.
-
Page 32: Using The Document Glass
COPY FUNCTIONS Using the document glass Using the SPF/RSPF Place the first original. (p.15) Place the originals. (p.16) Sort mode is normally the default output mode, Select the original size. (p.15) and thus the SPF/RSPF and SORT indicators light up. •…
-
Page 33: Copying Multiple Originals Onto A Single Sheet Of Paper
COPY FUNCTIONS COPYING MULTIPLE ORIGINALS ONTO A SINGLE SHEET OF PAPER (2 IN 1 / 4 IN 1 Copy) Multiple originals can be copied onto a single sheet of paper in a selected layout pattern. This function is convenient for compiling multi-page reference materials into a compact format, or for providing an overview of all pages of a document on a single page.
-
Page 34: Setting The Layout Pattern
COPY FUNCTIONS Using the SPF/RSPF Place the originals. (p.16) • To cancel 2 IN 1 / 4 IN 1 copying, press the Note [CLEAR] key • To cancel 2 IN 1 / 4 IN 1 copy mode, press Press the [2 IN 1 / 4 IN 1] key the [2 IN 1 / 4 IN 1] key ( repeatedly until the 2 IN 1 / 4 IN 1 indicators ) to select the mode.
-
Page 35: Creating Margins When Copying (Margin Shift)
COPY FUNCTIONS CREATING MARGINS WHEN COPYING (Margin Shift) The MARGIN SHIFT feature, in its initial setting, automatically shifts the text or image to increase the margin by approximately 10mm. The location of the margin to be increased can be selected to be either at the left edge or the top of the page (AR-5516D/5520D only).
-
Page 36: Erasing Shadows Around The Edges Of Acopy
COPY FUNCTIONS ERASING SHADOWS AROUND THE EDGES OF A COPY (Erase Copy) ● This feature is used to erase shadows that appear around the edges of copies of books and other thick originals. (EDGE ERASE) ● The feature can also erase the shadow that appears down the centre of books and other originals that open up. (CENTRE ERASE) ●…
-
Page 37: Printer Functions
Before printing, make sure that the correct size of paper for your document has been loaded in the machine. Make sure that the ON LINE indicator Make sure that «SHARP AR-XXXX» is on the operation panel is lit. selected as the printer.
-
Page 38: Opening The Printer Driver From The «Start» Button
Click the «Start» button and select Click the «SHARP AR-XXXX» printer «Control Panel» and then select driver icon.
-
Page 39: Printer Driver Setting Screen
PRINTER DRIVER SETTING SCREEN Some restrictions exist on the combinations of settings that can be selected in the printer driver setup screen. When a restriction is in effect, an information icon ( ) will appear next to the setting. Click the icon to view an explanation of the restriction.
-
Page 40: Setting Advanced Print Functions
SETTING ADVANCED PRINT FUNCTIONS This section explains major advanced print functions. The explanations assume that the paper size and other basic settings have already been selected. For the basic procedure for printing and the steps for opening the printer driver, see «BASIC PRINTING»…
-
Page 41: Fitting The Printed Image To The Paper (Fit To Paper Size)
PRINTER FUNCTIONS FITTING THE PRINTED IMAGE TO THE PAPER (Fit To Paper Size) The printer driver can adjust the size of the printed image to match the size of the paper loaded in the machine. Follow the steps shown below to use this function. The explanation below assumes that you intend to print an A3 size document on A4 size paper.
-
Page 42: Enlarging/Reducing The Print Image (Zoom)
PRINTER FUNCTIONS ENLARGING/REDUCING THE PRINT IMAGE (Zoom) This function is used to enlarge or reduce the image to a selected percentage. This allows you to enlarge a small image or add margins to the paper by slightly reducing an image. Note The «Zoom»…
-
Page 43: Adjusting The Brightness And Contrast Of The Image (Image Adjustment)
PRINTER FUNCTIONS ADJUSTING THE BRIGHTNESS AND CONTRAST OF THE IMAGE (Image Adjustment) The brightness and contrast can be adjusted in the print settings when printing a photo or other image. These settings can be used for simple corrections when you do not have image editing software installed on your computer.
-
Page 44: Two-Sided Printing (Ar-5516D/Ar-5520D)
PRINTER FUNCTIONS TWO-SIDED PRINTING (AR-5516D/AR-5520D) The machine can print on both sides of the paper. This function is useful for many purposes, and is particularly convenient when you want to create a simple pamphlet. Two-sided printing also helps conserve paper. Note When using two-sided printing, select a source other than «Bypass Tray»…
-
Page 45: Saving Frequently Used Print Settings
SAVING FREQUENTLY USED PRINT SETTINGS Settings configured on each of the tabs at the time of printing can be saved as user settings. Saving frequently used settings or complex colour settings under an assigned name makes it easy to select those settings the next time you need to use them.
-
Page 46: Outline Of The Print Status Window
OUTLINE OF THE PRINT STATUS WINDOW When printing begins, the Print Status Window automatically opens. The Print Status Window is a utility that monitors the machine and shows the name of the document being printed and any error messages that occur. Status window Provides information on the current status of the Click a tab to bring it to the front.
-
Page 47: Scanner Functions
Chapter 4 SCANNER FUNCTIONS This chapter explains how to use the scanner functions. • Scan jobs received while the machine is copying or printing will be stored in memory. When the copy job is Note finished, the scan jobs will begin. •…
-
Page 48: Scanning Using The Keys On The Machine
SCANNING USING THE KEYS ON THE MACHINE When scanning is performed by this method, the application that has been set in Button Manager will automatically start and the scanned image will be pasted into the application. For the steps to allocate applications using the Button Manager or other settings, see «BUTTON MANAGER SETTINGS»…
-
Page 49: Outline Of Button Manager
SCANNER FUNCTIONS OUTLINE OF BUTTON MANAGER Button Manager is a software utility that allows you to use the scanner function at the machine. Button Manager allows you to configure six sets of scanning settings as a scan menu on the machine. To view Help for a setting, click the button in the upper right-hand corner of the window and then click the setting.
-
Page 50: Button Manager Settings
If the Button Manager icon does not appear Note on the task bar, click the «Start» button, select «All Programs» («Programs» in Windows 2000), select «Sharp Button Manager U», and then click «Button Manager» to start Button Manager. Click the tab of the scan menu that you want to set up.
-
Page 51: Scanning From Your Computer
Windows Help. SCANNING FROM A TWAIN-COMPLIANT APPLICATION The SHARP scanner driver is compatible with the TWAIN standard, allowing it to be used with a variety of TWAIN-compliant applications. Place the original(s) that you wish to In the «Scanning Source»…
- Page 52
SCANNER FUNCTIONS Specify the scanning area and set the scan preferences. For information on specifying the scan area and setting the scan preferences, see scanner driver Help. «Scanner driver settings» (p.51) Scanning a large area at high resolution results in a large quantity of data and a Caution prolonged scanning time. -
Page 53: Scanner Driver Settings
SCANNER FUNCTIONS Scanner driver settings The scanner driver setup screen consists of the «Set-up screen», which lets you select scan settings, and the «Preview screen», which shows the scanned image. For details on the scan settings, click the «Help» button in the preview screen to display Help.
- Page 54
SCANNER FUNCTIONS Preview screen Preview screen «Auto Scan Area Judgement» button Click the «Preview» button in the Set-up screen to Click when the preview screen is displayed to display the scanned image. You can specify the automatically set the scanning area to the entire scanning area by dragging the mouse inside the preview image. -
Page 55: Scanning From A Wia-Compliant Application (Windows Xp/Vista)
• In Windows XP, you can view Help for a installed in your computer, the «Select Device» setting. Click the button in the upper screen will open. Select «SHARP AR-XXXX» right-hand corner of the window and then and click the «OK» button. click the setting.
-
Page 56: Scanning From The «Scanner And Camera Wizard» (Windows Xp)
To begin Hardware», and then click «Scanners scanning, click the «Next» and Cameras». button. Click the «SHARP AR-XXXX» icon and then click «Get pictures» in «Imaging Tasks». The «Scanner and When scanning ends, the following Camera Wizard» will screen will appear.
-
Page 57: User Settings
Chapter 5 USER SETTINGS This chapter explains how to set the automatic exposure level and the system settings, which are custom settings that control fine points of the machine’s operation. ADJUSTING THE AUTOMATIC EXPOSURE LEVEL The exposure level used in automatic exposure adjustment, which automatically adjusts the copy exposure according to the original, can be adjusted.
-
Page 58: Customising Settings (System Settings)
CUSTOMISING SETTINGS (System Settings) The system settings allow you to customise the machine to match your needs. SYSTEM SETTINGS Setting codes Program Program name (factory default setting Explanation number appears in bold) 1: OFF • «Auto clear time» automatically returns the 2: 10 sec.
- Page 59
USER SETTINGS Setting codes Program Program name (factory default setting Explanation number appears in bold) • When the auto paper select function is enabled and there is no paper that is the same size as the original and loaded in the same orientation, this function will automatically select paper of the same size that is loaded in the opposite orientation, and rotate the image… - Page 60
SPF/RSPF. 3: Group When the SPF/RSPF is installed. AR-5516/AR-5516D is as follows: 1: Upper tray (factory default), 2: 250-sheet paper feed unit/Upper paper tray of 2 x 250-sheet paper feed unit, 3: Lower paper tray of 2 x 250-sheet paper feed unit,… -
Page 61: Setting
USER SETTINGS SELECTING A SETTING FOR A SYSTEM SETTING Hold down the [Light] key ( ) until Enter the desired setting code by the alarm indicators ( , pressing a numeric key. ) blink. • For the setting codes, «SYSTEM The display shows «- -«…
-
Page 62: Settings For Auditing Mode
SETTINGS FOR AUDITING MODE AUDITING MODE When «Auditing mode» is enabled, a count is kept of the number of copies made by each account (up to 20 accounts can be established), and the counts can be displayed and totalled as necessary. In «Auditing mode», the display shows «- — -«, and this indicates that a 3-digit account number must be entered in order to use the machine for copying.
-
Page 63: Selecting Auditing Mode Settings
USER SETTINGS SELECTING AUDITING MODE SETTINGS Hold down the [Light] key ( ) until Press the [Light] key ( ) to complete the alarm indicators ( , the settings. ) blink. The alarm indicators ( , ) go off and the display returns to the number of The display shows «- -«…
- Page 64
USER SETTINGS Auditing mode Account number deletion (program No.10) (program No.13) 1 Press the [1] key to enable «Auditing Use this procedure to delete account numbers. A mode» or the [0] key to disable it, and then single account number can be deleted, or all account press the [START] key ( numbers at once. -
Page 65: Resetting Account
USER SETTINGS Resetting account Copying when «Auditing mode» is enabled (program No.15) The copy count of a single account or all accounts can When «Auditing mode» is enabled, «- — -» appears in the be reset to 0. If no account numbers have been display.
-
Page 66: Troubleshooting
Chapter 6 TROUBLESHOOTING This chapter describes troubleshooting and misfeed removal. TROUBLESHOOTING If you experience difficulty using the machine, check the following troubleshooting guide before calling for service. Many problems can be easily resolved by the user. If you are unable to solve the problem using the troubleshooting guide, turn off the power switch and unplug the machine, and contact your authorised service representative.
-
Page 67: Machine/Copying Problems
TROUBLESHOOTING MACHINE/COPYING PROBLEMS The following problems are related to the general operation of the machine and copying. Problem Cause and solution Page The machine is not plugged into a power outlet. – → Plug the machine into a grounded outlet. Power switch OFF.
-
Page 68: Paper Misfeed
TROUBLESHOOTING Problem Cause and solution Page Misfeed occurs. → To remove the misfeed, see «MISFEED REMOVAL». The paper is outside of the specified size and weight range. → Use copy paper within the specified range. Paper curled or damp. → Do not use curled or crimped paper. Replace with dry copy paper. –…
-
Page 69: Copies Are Smudged Or Dirty
TROUBLESHOOTING Problem Cause and solution Page The document glass or the underside of the document cover/SPF/RSPF is dirty. → Clean regularly. Copies are smudged or dirty. Original smudged or blotchy. – → Use a clean original. The scanner glass for the SPF/RSPF is dirty. →…
-
Page 70: Printing And Scanning Problems
In Windows 2000, click the «Start» button, select «Settings» and then click «Printers». 2 If the «SHARP AR-XXXX» printer driver icon is shown but you still cannot print, the printer driver may not have been installed correctly. In this case, delete the software and then reinstall it.
-
Page 71: A Notice Page (Np-001) Has Been Printed, But The Print Data Has Not Been Printed Completely
TROUBLESHOOTING Problem Cause and solution Page A print job containing more data than can be held in the print memory is sent to the machine. A Notice Page (NP-001) has been → Disable the ROPM function on the «Configuration» tab of the printed, but the print data has not printer driver setup screen.
-
Page 72: Poor Scanning Quality
TROUBLESHOOTING Problem Cause and solution Page The document glass or the underside of the document cover/SPF/RSPF is dirty. → Clean regularly. Original smudged or blotchy. – → Use a clean original. You have not specified a suitable resolution. → Make sure that the resolution setting in the scanner driver is –…
-
Page 73: Unable To Scan The Image
TROUBLESHOOTING Problem Cause and solution Page If scanning is not possible, shut down your computer, turn off the machine’s power switch, and unplug the machine’s power cord. Next, start your computer, restore – power to the machine, and try scanning again. If scanning is still not possible, check the following items.
-
Page 74: Indicators And Display Messages
Paper required indicator Developer replacement Misfeed indicator required indicator Display Indication Cause and solution Page Maintenance Steadily Service by an authorised SHARP service technician is – indicator required. Developer Steadily Developer is required. Contact your authorised service replacement – representative.
-
Page 75: Misfeed Removal
MISFEED REMOVAL When a misfeed occurs, the misfeed indicator ( ) and a misfeed location indicator ( ) will blink and the machine will automatically stop. Check the blinking misfeed location indicator to identify the location of the misfeed and remove it. The paper may tear when you remove a misfeed.
-
Page 76: Misfeed In The Bypass Tray
TROUBLESHOOTING Return the originals indicated by the Section C Remove the misfed original from the exit area. minus number in the display to the document feeder tray and press the [START] key ( Copying will resume from the originals that still remained when the misfeed occurred.
-
Page 77: Misfeed In The Machine
TROUBLESHOOTING MISFEED IN THE MACHINE Open the bypass tray and the side Check the misfeed location. Remove cover. the misfed paper following the instructions for each location in the illustration below. If paper is misfed here, go to «B. Misfeed in the fusing area».
- Page 78
TROUBLESHOOTING B. Misfeed in the fusing area Push gently on both ends of the front Lift the fusing unit release levers, to cover and open it. return them to their operating positions. Turn the roller rotating knob in the direction of the arrow. Close the front cover and side cover. - Page 79
TROUBLESHOOTING C. Misfeed in the transport area Open the fusing paper guide by pressing down the green-labeled projection on the guide and remove the misfed paper. Be careful not to tear the misfed paper during removal. The fusing unit is hot. Do not touch Warning the fusing unit when removing misfed paper. -
Page 80: Misfeed In The Upper Paper Tray
TROUBLESHOOTING MISFEED IN THE UPPER PAPER TRAY Note Make sure that there is no misfed paper in the tray before pulling it out. (p.75) Lift and pull out the upper paper tray and remove the misfed paper. Be careful not to tear the misfed paper during removal.
-
Page 81: Misfeed In The Lower Paper Tray
TROUBLESHOOTING MISFEED IN THE LOWER PAPER TRAY • Make sure that there is no misfed paper in the tray before pulling it out. (p.75) Note • Use the following procedure to remove misfeeds that occur in the 250-sheet paper feed unit/2 x 250-sheet paper feed unit.
-
Page 82: Replacing The Toner Cartridge
REPLACING THE TONER CARTRIDGE When the toner cartridge replacement required indicator ( ) lights up, the toner cartridge will need replacement soon. Obtain a new cartridge. When the toner cartridge replacement required indicator ( ) blinks, the toner cartridge must be replaced before copying can be resumed. Replace the toner cartridge by following the procedure below.
-
Page 83: Routine Maintenance
Chapter 7 ROUTINE MAINTENANCE This chapter explains how to keep the machine operating smoothly, including viewing copy count, and scan count, the toner level indicator, and cleaning the machine. CHECKING THE TOTAL OUTPUT COUNT AND TONER LEVEL CHECKING THE TOTAL OUTPUT COUNT When «Auditing mode»…
-
Page 84: Checking The Toner Level
ROUTINE MAINTENANCE CHECKING THE TONER LEVEL The toner level is indicated by a 6-level display. Use it as a guideline for replacing the toner cartridge. Hold down the [Light] key ( ) until Hold down the [Copy ratio display] key the alarm indicators ( , ) for more than 5 seconds.
-
Page 85: Routine Maintenance
ROUTINE MAINTENANCE CLEANING THE DOCUMENT GLASS AND SPF/RSPF/DOCUMENT COVER If the document glass, underside of the document cover/SPF/RSPF, or the scanner for originals coming from the SPF/RSPF (the long narrow glass surface on the right side of the document glass) become dirty, the dirt may appear on copies.
-
Page 86: Cleaning The Bypass Tray Paper Feed Roller
ROUTINE MAINTENANCE CLEANING THE BYPASS TRAY PAPER FEED ROLLER If misfeeds occur frequently when feeding envelopes, thick paper, etc. through the bypass tray, wipe the paper feed roller at the feed slot of the bypass tray with a soft, clean cloth dampened with alcohol or water. Paper feed roller CLEANING THE TRANSFER CHARGER If copies start becoming streaky or blotchy, the transfer charger may be dirty.
-
Page 87: Peripheral Devices
PERIPHERAL DEVICES As a part of our policy of continuous improvement, SHARP reserves the right to make design and specification Note changes for product improvement without prior notice. The performance specification figures indicated are nominal values of production units.
-
Page 88: Single Pass Feeder/Reversing Single Pass Feeder
PERIPHERAL DEVICES AND SUPPLIES SINGLE PASS FEEDER/REVERSING SINGLE PASS FEEDER For the names of the parts of the SPF/RSPF, see «PART NAMES AND FUNCTIONS» (p.4). Specifications AR-RP10 (Reversing single pass AR-SP10 (Single pass feeder) feeder) 56 g/m to 90 g/m Weight Acceptable Size…
-
Page 89: Storage Of Supplies
STORAGE OF SUPPLIES Standard supplies for this product that are to be replaced by the user are paper and toner cartridge. For best copying results, be sure to use only SHARP products. Only genuine SHARP consumables carry the Genuine Supplies label.
- Page 90
OPERATION GUIDE AR5520D-GB3…
При использовании любой техники время от времени могут возникать неполадки. Так, например, при использовании копиров, принтеров и МФУ Sharpмогут появляться различные ошибки, вызванные различными причинами. Об их возникновении пользователь информируется с помощью кода, которые выводится на дисплее принтера или другого используемого устройства. Коды ошибок Sharp вы можете идентифицировать с помощью приведенной ниже таблицы. Выяснив причину сбоя в работе устройства, вы сможете устранить ее самостоятельно (например, если произошло замятие бумаги, отсутствует бумага в лотке) либо обратиться в сервисный центр по обслуживанию и ремонту Sharp, если код ошибки сообщает о серьезной поломке.
Sharp AL-840
| Код ошибки | Подкод | Описание |
|---|---|---|
| L1 | 00 | Неисправность при движении сканирующего устройства |
| L3 | 00 | Неисправность сканирующего устройства при возвращении в начальное положение |
| Е7 | 03 | Неисправность, связанная с яркостью свечения лазера |
| 04 | Ошибка при определении уровня белого при выполнении штриховки | |
| 05 | Ошибка при определении уровня черного при выполнении штриховки | |
| 12 | Ошибка уровня выходного сигнала при выполнении штриховки | |
| 14 | Сбой ASIC (MCU PWB) | |
| 15 | Неисправность копировальной лампы | |
| H2 | 00 | Неисправность термодатчика |
| H3 | 00 | Температура вала узла закрепления превысила норму |
| H4 | 00 | Температура вала узла закрепления опустилась ниже положенного уровня |
| U2 | 01 | Неисправность EEPROM (MCU PWB) (ошибка данных счетчика) |
| 04 | Неисправность EEPROM (MCU PWB) (ошибка записи/чтения) | |
| 05 | Неисправность EEPROM (MCU PWB) | |
| 06 | Неисправность ROM (MCU PWB) | |
| C1 | Неисправность, обнаруженная выключателем передней панели (блока питания) | |
| CH | Отсутствует тонер-картридж | |
| E1 | Замятие бумаги при подаче из лотка | |
| E2 | Замятие бумаги | |
| E3 | Замятие бумаги на выходе узла закрепления | |
| P | Отсутствие бумаги в лотке |
Sharp AL-1000
| Код ошибки | Подкод | Описание |
|---|---|---|
| E7 | 03 | Неисправность блока лазера, связанная с излучающим диодом и его цепями |
| 04 | Ошибка при определении уровня белого при выполнении штриховки | |
| 05 | Ошибка при определении уровня черного при выполнении штриховки | |
| 12 | Ошибка уровня выходного сигнала при выполнении штриховки | |
| 14 | Сбой ASIC (MCU PWB) | |
| 15 | Неисправность копировальной лампы | |
| L1 | 00 | Неисправность при движении сканирующего устройства (датчик начального положения сканирующего устройства не видит движения зеркал) |
| L3 | 00 | Неисправность сканирующего устройства при возвращении в начальное положение (сканер не успел вернутся в начальное положение за определенное время) |
| L4 | 01 | Main motor drive overloaded |
| L6 | 10 | Неисправность двигателя многогранника блока лазера (полигон-мотор) |
| H2 | 00 | Неисправность термодатчика |
| H3 | 00 | Температура вала узла закрепления превысила норму |
| H4 | 00 | Температура вала узла закрепления опустилась ниже положенного уровня |
| U2 | 01 | Неисправность EEPROM (MCU PWB) (ошибка данных счетчика) |
| 04 | Неисправность EEPROM (MCU PWB) (ошибка записи/чтения) | |
| CH | Отсутствует тонер-картридж |
Sharp AL-1010
| Код ошибки | Подкод | Описание |
|---|---|---|
| E7 | 03 | Scanner position error |
| 04 | Exposure lamp blown | |
| 05 | CCD calibration error | |
| 12 | White level calibration error | |
| 14 | Main board malfunction | |
| 15 | Exposure lamp blown | |
| L1 | 00 | Scanner position error |
| L3 | 00 | Scanner position error |
| L4 | 01 | Main motor drive overloaded |
| L6 | 10 | Polygon mirror motor not up to speed |
| H2 | 00 | Fusing unit temperature error |
| H3 | 00 | Overheated fusing unit |
| H4 | 00 | The fusing unit doesn’t heat up |
| U2 | 01 | Counter error |
| 04 | EPROM error | |
| CH blinking | Dev unit is not properly installed |
Sharp AR-160 / 161
| Код ошибки | Подкод | Описание |
|---|---|---|
| CC | Original not detected | |
| E1 | 00 | Lost communication with the Sorter |
| 10 | Lost communication with the Sorter | |
| 11 | ASIC error | |
| 12 | Image Processing Unit error | |
| 13 | ROM error | |
| 14 | NVRAM error | |
| 15 | Page memory fault | |
| 16 | SIMM not present or installed incorectly | |
| 17 | Page rotation error in RAM | |
| 80 | Electronic sort board error | |
| 81 | ||
| 82 | ||
| 84 | ||
| 88 | ||
| E7 | 03 | Lens position error |
| 04 | White level calibration error | |
| 05 | Black level calibration error | |
| 12 | CCD calibration error | |
| F1 | 06 | Shift sort motor overloaded |
| F5 | 02 | Exposure lamp blown |
| F6 | 00 | Fax board problems |
| 10 | ||
| 80 | ||
| 81 | ||
| 82 | ||
| 84 | ||
| 88 | ||
| F9 | 00 | Printer board problems |
| 10 | ||
| 80 | ||
| 81 | ||
| 82 | ||
| 84 | ||
| 88 | ||
| H2 | 00 | Fusing unit temperature error |
| H3 | 00 | Overheated fusing unit |
| H4 | 00 | The fusing unit doesn’t heat up |
| L1 | 00 | Scanner position error |
| L3 | 00 | Scanner position error |
| L4 | 01 | Main motor drive overloaded |
| 10 | Separation motor overloaded | |
| L6 | 10 | Polygon mirror motor not up to speed |
| L8 | 01 | Zero cross signal error |
| U2 | 04 | EPROM error |
| 11 | Main counter error | |
| 12 | EPROM error | |
| U3 | 29 | Mirror position error |
| U9 | 00 | Op panel problem |
| 81 | ||
| 82 | ||
| 84 | ||
| 88 | ||
| U95 | Firmware error |
Sharp AR-163 / 201 / 206 / 5015 / 5020
| Код ошибки | Подкод | Описание |
|---|---|---|
| E1 | 00 | Неисправность связи с платой электронного сортировщика |
| 10 | Неисправность платы электронного сортировщика | |
| 11 | Ошибка ASIC электронного сортировщика | |
| 12 | Ошибка CODEC электронного сортировщика | |
| 13 | Ошибка очистки (сброса) ROM электронного сортировщика | |
| 14 | Ошибка RAM электронного сортировщика | |
| 15 | Ошибка сохранения страницы в памяти электронного сортировщика | |
| 16 | Ошибка SIMM электронного сортировщика | |
| 17 | Ошибка RAM | |
| 80 | Неисправность связи с платой электронного сортировщика (PROTOCOL) | |
| 81 | Неисправность связи с платой электронного сортировщика (PARITY) | |
| 82 | Неисправность связи с платой электронного сортировщика (OVERRUN) | |
| 84 | Неисправность связи с платой электронного сортировщика (FRAMING) | |
| 88 | Неисправность связи с платой электронного сортировщика (TIME-OUT) | |
| E7 | 03 | Неисправность блока лазера |
| 04 | Ошибка определения уровня белого CCD | |
| 05 | Ошибка при определении уровня черного CCD | |
| F1 | 06 | Неисправность Shifter (двигателя сдвига копии) |
| F2 | 04 | Ошибка чтения данных CRUM (чипа тонер-картриджа) |
| F5 | 02 | Неисправность копировальной лампы |
| F6 | 00 | Ошибка связи с платой факса |
| 10 | Неисправность платы факса | |
| 80 | Ошибка связи с платой факса (PROTOCOL) | |
| 81 | Ошибка связи с платой факса (PARITY) | |
| 82 | Ошибка связи с платой факса (OVERRUN) | |
| 84 | Ошибка связи с платой факса (FRAMING) | |
| 88 | Ошибка связи с платой факса (TIME-OUT) | |
| F9 | 00 | Ошибка связи с платой принтера |
| 10 | Неисправность платы принтера | |
| 80 | Ошибка связи с платой принтера (PROTOCOL) | |
| 81 | Ошибка связи с платой принтера (PARITY) | |
| 82 | Ошибка связи с платой принтера (OVERRUN) | |
| 84 | Ошибка связи с платой принтера (FRAMING) | |
| 88 | Ошибка связи с платой принтера (TIME-OUT) | |
| H2 | 00 | Неисправность термодатчика |
| H3 | 00 | Температура вала узла закрепления превысила норму |
| H4 | 00 | Температура вала узла закрепления опустилась ниже положенного уровня |
| L1 | 00 | Обнаружена неисправность при определении начального положения сканирующей каретки |
| L3 | 00 | Обнаружена неисправность при обратном ходе сканирующей каретки |
| L4 | 01 | Неисправность главного двигателя |
| 10 | Неисправность двигателя сепаратора | |
| L6 | 10 | Неисправность двигателя многогранника блока лазера (полигон-мотор) |
| L8 | 01 | Ошибка сигнала пересечения нуля |
| U2 | 04 | EEPROM serial communication error |
| 11 | counter check sum error | |
| 12 | adjustment value check sum error(EEPROM) | |
| 40 | CRUM communication error | |
| U3 | 29 | Ошибка в определении начального положения зеркал |
| U9 | 00 | Ошибка связи с панелью управления (PROTOCOL) |
| 80 | Ошибка связи с панелью управления (PARITY) | |
| 82 | Ошибка связи с панелью управления (OVERRUN) | |
| 84 | Ошибка связи с панелью управления (FRAMING) | |
| 88 | Ошибка связи с панелью управления (TIME-OUT) | |
| U95 | Неисправность соединения платы управления | |
| U99 |
Sharp AR-405
| Код ошибки | Подкод | Описание |
|---|---|---|
| C1 | 00 | MC unit malfunction |
| C2 | 00 | TC unit malfunction |
| E7 | 00 | Image Processing Unit error |
| 01 | Memory back-up battery dead | |
| 02 | Laser unit problem | |
| 03 | HDD defective | |
| 10 | black level calibration error | |
| 11 | white level calibration error | |
| 13 | CCD calibration error | |
| 90 | Image Processing Unit error | |
| F1 | 00 | Lost communication with the Sorter |
| 01 | Sorter registration problem | |
| 02 | Paper transport motor overloaded in sorter | |
| 04 | Bin position error in sorter | |
| 05 | Bin position error in sorter | |
| 06 | Shift sort motor overloaded | |
| 08 | Stapler position error | |
| 08 | Stapler overloaded | |
| 11 | Sorter problems | |
| 14 | Second shift tray jammed | |
| 15 | Sorter drive problems | |
| 50 | Sorter not installed properly | |
| 80 | No powerin sorter | |
| F2 | 00 | ID pattern reading error |
| 02 | Toner add mechanism malfunction | |
| 31 | ID pattern reading error | |
| 32 | ID pattern reading error | |
| 39 | Drum thermistor error | |
| F3 | 12 | Paper does not lift in the tray |
| 22 | Paper does not lift in the tray | |
| F9 | 00 | Printer board problems |
| 01 | Printer board problems | |
| 02 | Printer board problems | |
| 03 | Network card error | |
| 04 | Firmware error | |
| 05 | Not enough memory | |
| 10 | Printer board problems | |
| 90 | Printer board problems | |
| H2 | 00 | Fusing unit temperature error |
| 01 | Fusing unit temperature error | |
| H3 | 00 | Overheated fusing unit |
| 01 | Overheated fusing unit | |
| H4 | 00 | The fusing unit doesn’t heat up |
| 01 | The fusing unit doesn’t heat up | |
| H5 | 01 | Papersensordefective in the fusing unit |
| 02 | Fusing unit temperature error | |
| L1 | 00 | Scanner position error |
| L3 | 00 | Scanner position error |
| L4 | 01 | Main motor drive overloaded |
| L6 | 10 | Polygon mirror motor not up to speed |
| L8 | 01 | Zero cross signal error |
| 02 | Zero cross signal error | |
| U2 | 00 | EPROM error |
| 11 | EPROM error | |
| U4 | 02 | Duplex not working properly |
| 03 | Duplex problems | |
| U5 | 00 | Communication with the ADF is lost |
| 01 | Registration sensor problem in ADF | |
| 02 | Exit sensor error in ADF | |
| 03 | Timing sensor problems in ADF | |
| 11 | Paper feed drive overloaded in ADF | |
| U6 | 01 | Paper lift problem in 1’st optional tray |
| 02 | Paper lift problem in 2’nd optional tray | |
| 08 | Paper feed unit without power | |
| 10 | PFU paper transport motor overloaded | |
| 22 | Paper feed unit without power | |
| 50 | Paper feed unit not installed properly | |
| 51 | LCT not installed properly | |
| U7 | 00 | Main board malfunction |
| U9 | 00 | Op panel problem |
| 90 | Op panel problem | |
| EE | EU | Low toner density in the developer |
| EE | EL | High toner density in the developer |
| FA | 01 | Memory back-up battery dead |
| PC | Key counter not installed |
If one of the following error codes appears in the display at communication error when sending the scanned image, take corresponding solution as mentioned below.
| Error Codes | Solutions |
|---|---|
| E7-03 | HSYNC cannot be detected. LSU (laser diode, reception element, APC circuit) trouble. LSU drive circuit (ASIC) trouble. |
| E7-04 | CCD white level trouble. CCD drive circuit (CCD PWB, ASIC harness) trouble. Copy lamp lighting trouble (Copy lamp, invertor PWB). |
| E7-05 | CD black level trouble. CCD drive circuit (CCD PWB, ASIC, harness) trouble. |
| E7-12 | Shading trouble (white correction). Dirt on white plate for scanning white level. |
| E7-14 | ASIC connection trouble. Improper connection between CPU and ASIC (pattern cut, improper connection of lead pin). |
| E7-15 | Copy lamp OFF trouble. Copy lamp or copy lamp drive circuit (invertor PWB) trouble Copy lamp disconnection. |
| L1-00 | Feed is not completed within the specified time. When the mirror base is returned for the specified time (6 sec) in mirror initializing after turning on the power, the mirror home position sensor (MHPS) does not turn OFF. Or when the mirror base is fed for the specified time (about 6 sec) after start of copy return, the mirror home position sensor (MHPS) does not turn OFF. |
| L3-00 | Return is not completed within the specified time. When the mirror base is returned for the specified time (6 sec) in mirror initializing after turning on the power, the mirror home position sensor (MHPS) does not turn ON.Or when the mirror base is returned for the specified time (about 6 sec) after start of copy return, the mirror home position sensor (MHPS) does not turn ON. |
| L4-01 | Main motor lock. When the main motor encoder pulse is not detected for 100msec. |
| L6-10 | Polygon motor lock. The lock signal (specified rpm signal) does not ret. |
| H2-00 | Thermistor open detection. The fusing thermistor is open. |
| H3-00 | Heat roller abnormally high temperature. The fusing temperature rises above 240°C. |
| H4-00 | Heat roller abnormally low temperature. The fusing temperature does not reach 185°C within 27 sec of turning on the power, or the fusing temperature keeps at 140°C. |
| U2-01 | Counter sum check error. When the counter check sum value stored in the EEPROM is abnormal. |
| U2-04 | EEPROM serial communication error. When a communication trouble occurs with the EEPROM. |
| CH (Blinking) | TD cartridge not installed. Check if TD cartridge is installed. |
| L5-02 | Lens drive motor trouble. |
| L8-01 | Power frequency abnormality. |
| L8-03 | During execution of simulation 47, the AE sensor output does not change according to change in the copy lamp voltage. |
| U5-05 | Abnormally high temperature on the original glass when using the SPF. |
| EE-EU | Toner density initial setting trouble (undertoner). |
| EE-EL | Toner density initial setting trouble (overtoner). |
| CE-00 | Turn off the power and then turn it back on. Consult with your network administrator to make sure that no problems exist on the network or in the server. If the error is not cleared after turning the power off and on, turn off the power and contact your dealer. |
| CE-01 | Turn off the power and then turn it back on. Consult with your network administrator to make sure that no problems exist on the network or in the server. If the error is not cleared after turning the power off and on, turn off the power and contact your dealer. |
| CE-02 | The scanned image was not sent because a connection to the server could not be established. Make sure that the SMTP server settings or Scan to FTP destination settings in the Web page are correct. The procedure for configuring the SMTP server is explained in «Configuring SMTP, DNS and LDAP server settings», and the procedure for editing Scan to FTP destination information is explained in «Editing and deleting programmed transmission destinations». |
| CE-04 | The scanned image was not sent because a connection to the server could not be established. Make sure that the SMTP server settings or Scan to FTP destination settings in the Web page are correct. The procedure for configuring the SMTP server is explained in «Configuring SMTP, DNS and LDAP server settings», and the procedure for editing Scan to FTP destination information is explained in «Editing and deleting programmed transmission destinations». |
| CE-03 | The scanned image was not sent because the server was busy or there was too much traffic on line. Wait briefly and then try again. |
| CE-05 | The scanned image was not sent because the directory of the destination FTP server was not correct. Make sure that the correct FTP server information is configured in the Web page. |
| CE-06 | Scan data cannot be sent as E-mail address that is stored in the Destination List is not adequate. Check if the stored destination information is correct. |
| CE-09 | The size of the scanned image file exceeds the limit set in «Maximum Size of E-mail attachments» in the Web page. Reduce the number of original pages scanned into the file, or change the limit set in «Maximum Size of E-mail attachments». Or it may exceed the limit of the file size at the mail server. Reduce the volume of the original, otherwise change the resolution or the colour mode to make the scanned file size smaller. |
| CE-11 | The memory became full during scanning. Scan less pages, lower the resolution, or change the colour mode so that the file size is smaller, and try scanning again. |
| CE-12 | The maximum number of destinations of a global address search has been exceeded. Increase the number of search characters to narrow the range of the global address search. |
| CE-14 | Check if the USB flash memory is not set to write-protect. |
| CE-15 | Check that the USB flash memory has enough free space to accept the data size to be scanned. |
| CE-16 | Check that the USB flash memory has no problem |
| CE-17 | Check that the file names in the USB flash memory do not exceed 256 characters per file, or check that the USB flash memory has no problem. |

Sharp Printer Error Messages
If one of the following messages appears in the display, take prompt action as instructed by the message.
| Error Massage | Meaning |
|---|---|
| REMOVE ORIGINAL (S) | Document is stuck at the auto-feeder |
| NO PAPER (TRAY) | No recording paper on the tray. |
| NO PAPER (UPPER) | No recording paper in the upper cassette. |
| NO PAPER (LOWER) | No recording paper in the lower cassette. |
| NO PAPER (BOTH CASS.) | No recording paper in either cassette. |
| NO PAPER (TRAY, UPPER) | No recording paper in the tray nor in the upper cassette. |
| NO PAPER (TRAY, LOWER) | No recording paper in the tray nor in the lower cassette. |
| NO PAPER | No recording paper anywhere. |
| SIZE ERROR | The size of the recording paper is wrong. |
| LASER ERROR | The laser unit abnormal. |
| POLYGON ERROR | The polygon motor abnormal. |
| FAN MOTOR ERROR | The fan motor abnormal. |
| CHECK UPPER CASSETTE | The upper cassette is not set properly. |
| CHECK LOWER CASSETTE | The lower cassette is not set properly |
| CHECK BOTH CASSETTES | Neither cassette is set properly |
| TONER EMPTY | There is no toner left. |
| PCU COMM. ERROR | No data communication between the PCU and the control PWB. |
| RX DOCUMENT TRAY OFF | The document-receiving tray is not set properly. |
| HIGH VOLTAGE ERROR | Abnormality with the high-voltage portion. |
| HEATER LOW ERROR | Heater temperature is too low. |
| HEATER HIGH ERROR | Heater temperature is too high. |
| WARMING UP ERROR | Warming up is not done properly. |
| CHECK COVER OR DRUM | Printer cover may be open, or the drum cartridge may not be set properly. |
| DRUM LIFE OVER | Drum life is over. |
| PAPER JAM | Recording paper is stuck inside. |
Sharp printer icon indicating the status of the machine
![]()
Sharp Printer Troubleshooting
This chapter describes troubleshooting and misfeed removal. If you encounter a problem when using the machine, check the following troubleshooting guide before calling for service. If you cannot resolve the problem using the troubleshooting guide, turn off the main switch, disconnect the power cord from the power outlet, and contact your dealer.
| Trouble | Cause and Solution |
|---|---|
| The power is on, but copying does not take place. | Press the [COPY] key to select copy mode. |
| The text is blurred when I make a copy. | Select a suitable exposure for the original in the copy exposure screen. Change the exposure to «Text» with the [EXPOSURE] key. |
| Blank copies. | The original is not placed face up in the document feeder or face down on the document glass. Place the original face up in the document feeder or face down on the document glass. |
| White or black lines appear on copies. | The scanner glass for the document feeder is dirty. Clean the long, narrow scanning glass. |
| Printing is slow. | Simultaneous use of two or more application software programs. Start printing after quitting all unused application software programs. |
| The printed image is light and uneven. | The paper is loaded so that printing takes place on the back side of the paper. Some paper types have a front and back side. If the paper is loaded so that printing takes place on the back side, toner will not adhere well to the paper and a good image will not be obtained. |
| Transmission takes a long time. | When there is a large amount of image information, the data file is also large and transmission takes a long time. |
| The [START] indicator is not lit in the USB Memory Scan mode. | The USB flash memory is not recognized or not inserted, or any device other than USB flash memory is inserted in the USB port. Check the USB port. |
| «Check the USB memory.» appears in the display during USB Memory Scan. | Any device other than USB flash memory is inserted in the USB port, the USB flash memory is write-protected, or it was taken off during USB Memory Scan. Check your USB flash memory and use it properly. |
| «Memory is full. Job is cancelled.» appears in the display during USB Memory Scan. | The memory of the USB flash memory became full. Use the USB flash memory with sufficient memory. |
| White or black lines appear in the transmitted image. | Is the document glass or the scanning glass for the document feeder (the long, narrow glass) dirty? Clean the document glass or the scanning glass for the document feeder. |
| Transmission does not take place at the specified time. | Is the machine’s clock set to the correct time? Set the clock to the correct time. |
| A received fax prints out blank. | Was the wrong side of the original scanned in the transmitting machine? Check with the operator of the transmitting machine. |
| The received image is faint. | Is the original faint? Ask the other party to re-send the fax using a suitable exposure setting. |
| The received image is distorted. | Were line conditions poor due to thunder or another reason? Ask the other party to send the fax again. |
Sharp Printer User Manual PDF – MX-B350WMX-B450W
Sharp Printer Service Manual PDF – FO4400
Sharp Printer Service Manual PDF – SF2014,2114,2214
- Author
- Recent Posts

FindErrorCode.com is a reputable error code provider firm. The main challenges are fault code and a problem-solving blog. We’ve written articles to address your concerns. Appliance Expert contact: dylanjoseph@finderrorcode.com
BEFORE USING THE MACHINE
Envelopes
Do not use the following envelopes, as misfeeds will occur.
• Envelopes with metal tabs, clasps, strings, holes, or windows.
• Envelopes with rough fibres, carbon paper, or glossy surfaces.
• Envelopes with two or more flaps.
• Envelopes with tape, film, or paper attached to the flap.
• Envelopes with a fold in the flap.
• Envelopes with glue on the flap to be moistened for sealing.
• Envelopes with labels or stamps.
• Envelopes that are slightly inflated with air.
• Envelopes with glue protruding from the seal area.
• Envelopes with part of the seal area peeled off.
Follow these steps to change a tray’s paper size setting.
• The paper size setting cannot be changed when the machine has stopped temporarily due to running out of
Note
paper or a misfeed, or during interrupt copying.
• During printing (even in copy mode), the paper size setting cannot be changed.
• A5 (5-1/2″ x 8-1/2″) size paper can only be selected in upper paper tray.
• Do not load paper that is a different size than the paper size setting. Copying will not be possible.
1
Hold down the [TRAY SETTING] key
(
) for more than 5 seconds to set
the selected paper size.
24
The currently selected
paper feed location
indicator will blink and the
corresponding paper size
(which is currently set)
indicator will light steadily.
All other indicators will go
out.
2
If the machine has two or more paper
trays, use the [PAPER SELECT] key
(
) to select the paper tray for which
you wish to change the paper size
setting.
Each time the [PAPER
SELECT] key (
) is
pressed, a paper tray will
be indicated with a
blinking paper feed
location indicator.
Содержание
- Сообщения об ошибках на ЖК-дисплее на принтере Epson Stylus Pro 7890/9890
- Сообщения об ошибках, связанных с бумагой
- Сообщения об ошибках и состоянии принтера
- Cancel All Print Job (Отмена всех заданий на печать)
- Cancel Print Job (Отмена задания на печать)
- Can’t Print (Печать невозможна)
- Can’t Print Duplex (Не может печатать с двух сторон)
- Cart Near Expiry (Картридж почти пуст)
- Check Duplex P-Size (Проверьте размер бумаги блока двусторонней печати)
- Check Paper Size (Проверьте размер бумаги)
- Check Paper Type (Проверьте тип бумаги)
- Collate Disabled (Подбор невозможен)
- Cooling Down (Охлаждение)
- DM Error 001 (Ошибка DM 001)
- Duplex Mem Overflow (Переполнение буфера данных в режиме двусторонней печати)
- Face-down Full (Переполнен нижнелицевой лоток)
- Face-up Path Selected (Выбран верхнелицевой выходной лоток)
- Form Data Canceled (Отменены данные шаблона)
- Form Feed (Перевод страницы)
- Formatting HDD (Форматирование HDD)
- Hard Disk Full (Жесткий диск переполнен)
- HDD Check (Проверка HDD)
- Image Cart ID Error (Ошибка ID картриджа изображения)
- Image Optimum (Оптимальное Изображение)
- Install Imaging Cart (Установите картридж изображения)
- Invalid AUX I/F Card (Ошибка дополнительной интерфейсной карты)
- Invalid HDD (Ошибка HDD)
- Invalid N/W Module (Ошибка сетевого модуля)
- Invalid PS3 (Ошибка модуля PostScript)
- Jam XXX (Замятие ХХХ)
- Manual Feed xxx (Ручная подача ххх)
- Mem Overflow (Переполнение памяти)
- Menus Locked (Меню заблокированы)
- Need Memory (Требуется память)
- Non Genuine Toner (Неоригинальный тонер)
- Offline (Автономный)
- WWWW Open (Крышка WWWW открыта)
- Optional RAM Error (Ошибка дополнительного ОЗУ)
- Outbin Select Error (Ошибка выборанног выходного лотка)
- Paper Out XXX YYY (Нет бумаги XXX YYY)
- Paper Set XXX YYY (Настройки бумаги XXX YYY)
- Print Overrun (Переполнение печати)
- PS3 Hard Disk full (Область для PS3 на жестком диске заполнена)
- RAM Check (Проверка ОЗУ)
- Ready (Готов)
- Replace Toner (Замените тонер)
- Reserve JobCanceled (Резервное задание отменено)
- Reset (Сброс)
- Reset All (Сбросить все)
- Reset to Save (Сброс для сохранения)
- ROM Check (Проверка ПЗУ)
- Self Test (Автотест)
- Service Req xyyy (Сервисная ошибка xyyy)
- Stacker Error 002 (Ошибка выходного лотка 002)
- Stacker Full (Дополнительный выходной лоток полон)
- Status Sheet (Тестовая страница)
- Sleep (Спящий режим)
- Toner Low (Заканчивается тонер)
- Unable Clear Error (Невозможно сбросить ошибку)
- Warming Up (Прогрев)
- Worn Fuser (Изношен блок термозакрепления)
- Write Error ROM P (Ошибка записи ПЗУ P)
- Writing ROM Р (Запись ПЗУ Р)
Сообщения об ошибках на ЖК-дисплее на принтере Epson Stylus Pro 7890/9890
Сообщения об ошибках, связанных с бумагой
Сообщения об ошибках
PAPER OUT LOAD PAPER
В принтере кончилась бумага.
Правильно загрузите бумагу.
Кнопка была нажата, когда в принтер не была загружена бумага.
Нажмите на кнопку,. чтобы разблокировать прижимной ролик, и загрузите бумагу.
Бумага закончилась во время печати.
Нажмите на кнопку, чтобы разблокировать прижимной ролик, и затем достаньте бумагу. Загрузите новую бумагу.
PAPER RELEASED LOAD PAPER
Прижимной валик разблокирован.
Загрузите бумагу и нажмите на кнопку %.
PAPER SKEW LOAD PAPER PROPERLY
Бумага загружена неровно.
Печать может выйти за область печати. Проверьте результаты печати.
Нажмите на кнопку, чтобы разблокировать прижимной ролик, и ровно загрузите бумагу.
PAPER SETTING ERROR CHECK THE PAPER SOURCE IN THE DRIVER SETTINGS AND LOAD PAPER CORRECTLY
Источники бумаги, выбранные в драйвере принтера и на панели управления, не совпадают.
Проверьте параметр Source (Источник бумаги) в драйвере принтера и на панели управления и загрузите бумагу правильно.
Сообщения об ошибках
PAPER CUT ERROR REMOVE UNCUT PAPER
Бумага обрезается неправильно.
Нажмите на кнопку, чтобы разблокировать прижимной ролик, и откройте переднюю крышку. Достаньте неразрезанную бумагу.
Возможно, нож для бумаги затупился. Замените нож для бумаги.
CUTTER UNIT NEARING END OF SERVICE LIFE. RECOMMEND REPLACING THE CUTTER UNIT
Возможно, нож для бумаги затупился.
Замените нож для бумаги.
PAPER ERROR LOAD PAPER CORRECTLY REFER TO THE MANUAL
Бумага загружена неправильно.
Нажмите на кнопку, чтобы разблокировать прижимной ролик, и достаньте бумагу. Затем правильно загрузите бумагу.
PAPER SENSOR ERROR PRESS THE BUTTON LOAD DIFFERENT PAPER
Штрих-код считы вается некорректно.
Нажмите на кнопку, чтобы сбросить ошибку, либо на кнопку, чтобы разблокировать прижимной валик для загрузки другой бумаги.
Рулонная бумага заканчивается.
Замените рулон бумаги на новый.
Сообщения об ошибках
BORDERLESS ERROR LOAD A SUPPORTED PAPER SIZE OR LOAD PAPER CORRECTLY
Установленная бумага не может быть использована для печати без полей.
Нажмите на кнопку, чтобы отменить задания печати, и затем выведите бумагу. Загрузите бумагу другого размера.
Размер форматных листов невозможно распознать правильно.
Принтер не может правильно распознать размер бумаги, если она покоробилась или погнулась. В этом случае распрямите бумагу перед загрузкой в принтер.
Бумага загружена неправильно.
Правильно установите бумагу в принтере.
PAPER EJECT ERROR REMOVE PAPER FROM PRINTER
Рулонная бумага используется в режиме печати на листах.
Нажмите на кнопку, чтобы разблокировать прижимной ролик, и затем достаньте бумагу.
PAPER SIZE ERROR LOAD CORRECT PAPER SIZE
Размер загруженной бумаги не соответствует размеру данных.
Загрузите бумагу, размер которой соответствует размеру данных.
Источник
Сообщения об ошибках и состоянии принтера
В этом разделе содержится список ошибок, которые появляются на ЖК-дисплее, с кратким описанием каждого сообщения и рекомендациями, как решить проблему.
Не каждое сообщение, отображенное на ЖК-дисплее, означает возникновение проблемы. Появление стрелок  с левой стороны предупреждения, означает возникновение нескольких предупреждений. Для просмотра всех предупреждений, нажмите кнопку
  Down (Вниз) для появления меню Status (Состояние), затем нажмите кнопку
  Enter (Ввод).
Cancel All Print Job (Отмена всех заданий на печать)
Принтер отменяет все задания печати в своей памяти, в том числе задания, принимаемые или печатаемые в данный момент. Это сообщение появляется, когда кнопка  Cancel Job (Отмена печати) была нажата более двух секунд.
Cancel Print Job (Отмена задания на печать)
Принтер отменяет текущее задание печати. Это сообщение появляется, когда кнопка Cancel Job (Отмена печати) была нажата не более двух секунд.
Can’t Print (Печать невозможна)
Задание на печать удалено.
Убедитесь, что установлен соответствующий размер бумаги и используемый драйвер годится для EPSON EPL-N3000.
Can’t Print Duplex (Не может печатать с двух сторон)
Принтер столкнулся с проблемами во время двусторонней печати. Проверьте, установлены ли правильные тип и размер бумаги для параметра Duplex Print Unit (Блок двусторонней печати). Проблема могла также возникнуть из-за неправильной настройки источника бумаги, который вы используете. После нажатия кнопки  Start/Stop (Старт/Стоп) будет отпечатана остальная часть задания печати, но только с одной стороны бумаги. Нажмите кнопку
  Cancel Job (Отмена печати), чтобы отменить текущее задание на печать.
Cart Near Expiry (Картридж почти пуст)
Ресурс картриджа изображения подходит к концу. Приготовьте новый картридж изображения для замены.
Check Duplex P-Size (Проверьте размер бумаги блока двусторонней печати)
Загруженная бумага не поддерживается блоком двусторонней печати. Загрузите бумагу соответствующего размера и нажмите на кнопку Start/Stop (Старт/Стоп), чтобы возобнить печать.
Check Paper Size (Проверьте размер бумаги)
Установка размера бумаги отличается от действительного размера бумаги, заложенной в принтер. Убедитесь в том, что бумага правильного размера заложена в используемый источник подачи бумаги.
Чтобы снять это предупреждение об ошибке, выберите пункт Clear Warning (Удалить предупреждение) в меню Reset (Сброс) у панели управления. Смотрите раздел Как получить доступ к меню панели управления для получения дополнительной информации.
Check Paper Type (Проверьте тип бумаги)
Носитель, заложенный в принтер, не соответствует установке типа бумаги в драйвере принтера. Только носитель, соответствующий установке типа бумаги, будет использован для печати.
Чтобы снять это предупреждение об ошибке, выберите пункт Clear Warning (Удалить предупреждение) в меню Reset (Сброс) у панели управления. Смотрите раздел Как получить доступ к меню панели управления для получения дополнительной информации.
Collate Disabled (Подбор невозможен)
Печать заданного числа копий больше невозможна из-за недостатка памяти принтера или свободного пространства на диске дополнительного накопителя на жестком диске. При появлении этой ошибки печатайте только оду копию за один раз.
Чтобы удалить это предупреждение об ошибке, выберите пункт Clear Warning (Удалить предупреждения) в меню Reset (Сброс) на панели управления. Смотрите раздел Как получить доступ к меню панели управления для получения дополнительной информации.
Cooling Down (Охлаждение)
Принтер понижает температуру для оптимизации фиксации тонера. Подождите, пока на ЖК-дисплее не появится сообщение Ready (Готов).
DM Error 001 (Ошибка DM 001)
Блок двусторонней печати отключен от принтера. Выключите принтер, переустановите блок двусторонней печати, и затем включите принтер.
Duplex Mem Overflow (Переполнение буфера данных в режиме двусторонней печати)
Недостаточно памяти для двусторонней печати. Принтер печатает только на одной стороне листа и затем прогоняет его. Для устранения этой ошибки следуйте нижеприведенным инструкциям.
Если установлено значение Off (Выкл.) для параметра Auto Cont (Автопродолжение) в меню Setup (Настройка) панели управления, нажмите кнопку Start/Stop (Старт/Стоп) для печати на обороте следующего листа, либо нажмите кнопку Cancel Job (Отмена печати) для отмены задания на печать.
Если установлено значение On (Вкл.) для параметра Auto Cont (Автопродолжение) в меню Setup (Настройка) панели управления, печать продолжится автоматически через некоторое время.
Face-down Full (Переполнен нижнелицевой лоток)
Нижнелицевой выходной лоток заполнен отпечатками. Удалите отпечатки из выходного лотка и нажмите на кнопку Start/Stop (Старт/Стоп) для возобновления печати.
Face-up Path Selected (Выбран верхнелицевой выходной лоток)
Даже если двусторонняя печать началась или дополнительный выходной лоток выбран в драйвере принтера в качестве основного выходного лотка, рычаг пути протяжки бумаги все еще установлен в положение для верхнелицевой печати. Установите рычаг пути протяжки бумаги в положение для нижнелицевой печати, или нажмите на кнопку Start/Stop (Старт/Стоп) или кнопку Cancel Job (Отмена задания).
Form Data Canceled (Отменены данные шаблона)
Невозможно сохранение данных шаблона на дополнительном жестком диске принтера. Либо переполнен диск, либо достигнуто максимальное число шаблонов. Удалите шаблоны, которые вам больше не нужны, затем снова попытайтесь сохранить новый шаблон.
Чтобы удалить это предупреждение об ошибке, выберите пункт Clear Warning (Удалить предупреждения) в меню Reset (Сброс) на панели управления. Смотрите раздел Как получить доступ к меню панели управления для получения дополнительной информации.
Form Feed (Перевод страницы)
Принтер выгружает бумагу по запросу пользователя. Когда принтер находится в автономном режиме, нажмите на кнопку Start/Stop (Старт/Стоп) и затем удерживайте кнопку Start/Stop (Старт/Стоп) не менее двух секунд, чтобы допечатать данные, оставшиеся в памяти принтера.
Formatting HDD (Форматирование HDD)
Происходит процедура форматирования жесткого диска.
Hard Disk Full (Жесткий диск переполнен)
Накопитель на жестком диске переполнен и не может сохранить новые данные. Удалите ненужные данные с накопителя на жестком диске. Чтобы удалить это предупреждение об ошибке, выберите пункт Clear Warning (Удалить предупреждения) в меню Reset (Сброс) на панели управления. Смотрите раздел Как получить доступ к меню панели управления для получения дополнительной информации.
HDD Check (Проверка HDD)
Принтер проверяет накопитель на жестком диске.
Image Cart ID Error (Ошибка ID картриджа изображения)
Установленный картридж изображения не может быть использован. Замените картридж изображения. Для получения дополнительной информации смотрите раздел Замена картриджа изображения.
Image Optimum (Оптимальное Изображение)
У принтера недостаточно памяти, чтобы отпечатать страницу с заданным качеством. Принтер понижает качество автоматически и тогда он может продолжать печатать. Если вас не устраивает качество отпечатка, попытайтесь упростить страницу, сократив количество графического материала или уменьшив число и размеры шрифтов.
Чтобы удалить это предупреждение об ошибке, выберите пункт Clear Warning (Удалить предупреждения) в меню Reset (Сброс) на панели управления. Смотрите раздел Как получить доступ к меню панели управления для получения дополнительной информации.
Выключите установку Image Optimum (Оптимальное изображение) в Printing Menu (меню Печать), если вы не хотите, чтобы принтер автоматически понижал качество печати, чтобы продолжать печатать.
Вам может потребоваться увеличение объема памяти принтера, чтобы печатать ваш документ с желаемым качеством. Для получения более подробной информации по расширению памяти, смотрите раздел Модули памяти.
Install Imaging Cart (Установите картридж изображения)
Картридж изображения не установлен в принтер.
Установите картридж изображения. Смотрите раздел Замена картриджа изображения.
Invalid AUX I/F Card (Ошибка дополнительной интерфейсной карты)
Сообщение означает, что принтер не может установить связь с установленной дополнительной интерфейсной картой. Выключите принтер, удалите карту, затем установите ее снова.
Invalid HDD (Ошибка HDD)
Дополнительный накопитель на жестком диске либо поврежден, либо не может быть использован с данным принтером. Выключите принтер и удалите накопитель на жестком диске.
Invalid N/W Module (Ошибка сетевого модуля)
Отсутствует сетевая программа или сетевая программа не может быть использована с EPL-N3000. Обновите программу.
Invalid PS3 (Ошибка модуля PostScript)
Программа отсутствует в модуле PostScript3 или модуль PostScript 3 не может быть использован с данным принтером. Вам необходимо заменить модуль.
Jam XXX (Замятие ХХХ)
Бумага замялась в узле принтера, обозначенном как ХХХ.
Если бумага заминается одновременно в двух или более узлах, они указываются оба.
Jam A (Замятие А)
Бумага застряла под крышкой A. Для получения информации об удалении бумаги застрявшей под крышкой A, смотрите раздел Jam A (Замятие А (Крышка А)).
Jam A B (Замятие А В)
Бумага застряла под крышкой выхода бумаги (крышка A или B) или в блоке термозакрепления. Для получения информации об удалении застрявшей бумаги из-под крышки выхода бумаги или из блока термозакрепления, смотрите раздел Jam A B (Замятие А С (Крышка C)).
Jam MP A (Замятие в многоцелевом лотке А)
Jam C1 A (Замятие кассета 1 А)
Jam C2 A (Замятие кассета 2 А)
Jam C3 A (Замятие кассета 3 А)
Бумага застряла в дополнительной нижней кассете. Для получения информации об удалении застрявшей бумаги из дополнительной нижней кассеты, смотрите раздел Jam MP A (Замятие в многоцелевом лотке А), Jam C1 A (Замятие кассета 1 А), Jam C2 A (Замятие кассета 2 А), Jam C3 A (Замятие кассета 3 А) (Все кассеты для бумаги и крышка A).
Jam DM (Замятие DM)
Бумага застряла в блоке двусторонней печати или под его крышкой (крышка DM). Для получения информации об удалении застрявшей бумаги из блока двусторонней печати, смотрите раздел Jam DM (Замятие DM) (Крышка блока двусторонней печати).
Jam STK (Замятие STK)
Бумага застряла внутри дополнительного выходного лотка или под его крышки (крышка xx). Для получения информации об удалении застрявшей бумаги из дополнительного выходного лотка, смотрите раздел Jam STK (Замятие STK).
Manual Feed xxx (Ручная подача ххх)
Для текущего задания печати задан режим ручной подачи. Убедитесь в том, что размер загруженной бумаги соответствует указанному, затем нажмите кнопку Start/Stop (Старт/Стоп).
О получения более подробной информации о ручном режиме подачи, смотрите раздел Ручная подача бумаги.
Mem Overflow (Переполнение памяти)
У принтера недостаточно памяти, чтобы выполнить текущую задачу. Нажмите кнопку Start/Stop (Старт/Стоп) на панели управления для продолжения печати. Либо нажмите кнопку Cancel Job (Отмена задания), чтобы отменить задание печати.
Это сообщение появляется, если вы пытаетесь изменить установки принтера через панель управления, когда ее кнопки заблокированы. Их можно разблокировать с помощью утилиты EPSON WinAssist или EPSON WebAssist. За дополнительной информацией обращайтесь к Сетевому руководству.
Need Memory (Требуется память)
У принтера недостаточно памяти, чтобы выполнить текущее задание.
Чтобы эта проблема не возникала вновь, увеличьте объем памяти на своем принтере, как описано в разделе Модули памяти или снизьте разрешение печатаемого изображения.
Non Genuine Toner (Неоригинальный тонер)
Установленный тонер-картридж содержит не оригинальный тонер. EPSON рекомендует использовать оригинальные расходные материалы. Использование неоригинального картриджа изображения может стать причиной снижения качества печати. Компания EPSON не несет ответственности за любые повреждения или убытки причиненные в результате использования неоригинальных расходных материалов.
Установите оригинальный картридж EPSON, или выберите пункт Clear Warning (Сбросить предупреждение) или Clear All Warnings (Сбросить все предупреждения) в меню Reset (Сброс) на панели управления. Смотрите раздел Замена картриджа изображения для получения информации о замене картриджа изображения.
Нажмите кнопку Start/Stop (Старт/Стоп) на панели управления, чтобы возобновить печать.
Offline (Автономный)
Принтер не готов к печати. Нажмите кнопку Start/Stop (Старт/Стоп) . В этом режиме, индикация количества тонера в картриджах, отображается справа от сообщения.
WWWW Open (Крышка WWWW открыта)
Крышка обозначенная как ( WWWW ) закрыта ненадежно. Откройте крышку, и затем закройте ее снова.
Optional RAM Error (Ошибка дополнительного ОЗУ)
Установленный модуль несовместимый, либо поврежден. Замените его на новый.
Outbin Select Error (Ошибка выборанног выходного лотка)
Бумага установленного размера или типа не может быть использована для выгрузки с помощью верхнелицевого лотка. Измените размер или тип бумаги, или для выгрузки бумаги используйте нижнелицевой лоток.
Paper Out XXX YYY (Нет бумаги XXX YYY)
Нет бумаги в указанном источнике бумаги ( XXX ). Загрузите бумагу указанного размера ( YYY ) в источник бумаги.
Paper Set XXX YYY (Настройки бумаги XXX YYY)
Бумага, загруженная в указанный источник ( XXX ), не соответствует требуемому размеру бумаги ( YYY ). Замените заложенную бумагу бумагой правильного размера и нажмите кнопку Start/Stop (Старт/Стоп), чтобы возобновить печать. Либо нажмите кнопку Cancel Job (Отмена задания), чтобы отменить задание на печать.
Если нажать кнопку Start/Stop (Старт/Стоп) не поменяв бумагу, принтер будет печатать на загруженной бумаге, хотя она и не соответствует заявленному размеру.
Print Overrun (Переполнение печати)
Время, необходимое для обработки данных печати, превышает скорость печатающего механизма из-за чрезмерной сложности текущей страницы. Нажмите кнопку Start/Stop (Старт/Стоп) , чтобы возобновить печать. Либо нажмите кнопку Cancel Job (Отмена задания), чтобы отменить задание печати. Если это сообщение появится вновь, выберите On (Вкл.) в качестве значения параметра Page Protect (Защита страницы) в меню Setup (Настройка) панели управления.
Если вы продолжаете получать это сообщение, когда печатаете определенную страницу, попытайтесь упростить эту страницу, ограничив количество графического материала или сократив количество и размер шрифтов.
Также вы можете увеличить объем памяти принтера, как описано в разделе Модули памяти.
PS3 Hard Disk full (Область для PS3 на жестком диске заполнена)
Область памяти, выделенная для записи команд PostScript 3 на дополнительном накопителе на жестком диске, заполнена.
Чтобы удалить это предупреждение об ошибке, выберите пункт Clear Warning (Удалить предупреждения) в меню Reset (Сброс) на панели управления, или удалите загруженные PostScript шрифты с накопителя на жестком диске. Смотрите раздел Как получить доступ к меню панели управления для получения дополнительной информации.
RAM Check (Проверка ОЗУ)
Принтер проверяет оперативную память.
Ready (Готов)
Принтер готов принимать данные и печатать. С правой стороны этого сообщения показывается уровень оставшегося тонера.
Replace Toner (Замените тонер)
В картридже изображения закончился тонер и он должен быть заменен.
Для получения инструкций смотрите раздел Замена картриджа изображения.
Reserve JobCanceled (Резервное задание отменено)
Принтер не может сохранить данные задания на печать, используя функцию Резервное задание. Превышено максимальное число заданий, которые могут быть сохранены на жестком диске, или на диске больше нет свободного места для сохранения задания. Для сохранения нового задания на печать, удалите предыдущие сохраненные задания на печать. Также, если на диске сохранены конфиденциальные задания, напечатайте их, чтобы освободить дисковое пространство.
Чтобы снять это предупреждение об ошибке, выберите пункт Clear Warning (Удалить предупреждение) в меню Reset (Сброс) у панели управления. Смотрите раздел Как получить доступ к меню панели управления для получения дополнительной информации.
Reset (Сброс)
Настройки текущего интерфейса принтера сброшены, и буфер очищен от данных. Однако, другие интерфейсы все еще активны и сохраняют свои настройки и данные.
Reset All (Сбросить все)
Все установки принтера возвращены к настройкам по умолчанию, либо к последним сохраненным настройкам.
Reset to Save (Сброс для сохранения)
Установка в меню панели управления была изменена, пока принтер печатал. Нажмите кнопку Start/Stop (Старт/Стоп), чтобы снять это сообщение. Установка станет действительной после окончания печати.
Также, вы можете сбросить это сообщение, выполнив команду Reset (Сброс) или Reset All (Сбросить все) с помощью панели управления принтера. Однако, в этом случае, данные печати будут удалены.
ROM Check (Проверка ПЗУ)
Принтер тестирует ПЗУ.
Self Test (Автотест)
Принтер производит внутренний тест и инициализацию.
Service Req xyyy (Сервисная ошибка xyyy)
Обнаружена ошибка контроллера или механизма принтера. Выключите принтер. Подождите не менее пяти секунд и, затем, снова включите принтер. Если сообщение об ошибке появилось снова, запишите номер ошибки, обозначенный на ЖК-дисплее (xyyy) и выключите принтер, отключите кабель питания и обратитесь в авторизированный сервисный центр.
Stacker Error 002 (Ошибка выходного лотка 002)
Дополнительный выходной лоток был удален при включенном питании. Выключите питание, переустановите выходной лоток, затем включите питание снова.
Stacker Full (Дополнительный выходной лоток полон)
Дополнительный выходной лоток заполнен отпечатками. Удалите отпечатки из выходного лотка и нажмите на кнопку Start/Stop (Старт/Стоп), чтобы возобновить печать.
Status Sheet (Тестовая страница)
Принтер печатает тестовую страницу.
Sleep (Спящий режим)
Принтер находится в спящем режиме. Принтер выходит из этого режима, если он получает данные или если нажата кнопка Reset (Сброс).
Toner Low (Заканчивается тонер)
В картридже изображения осталось менее 10% тонера и он нуждается в замене.
Смотрите раздел Замена картриджа изображения для получения информации о замене картриджа изображения.
Если параметра TonerOut (Закончился тонер) установлено значение Stop (Стоп) в меню Setup (Настройка), вы продолжать печать пока не появится сообщение Replace Toner (Замените тонер). Мы рекомендуем не заменять картридж, когда в нем мало тонера, а ждать до появления сообщения о замене, потому что тонер может просыпаться из старого картриджа во время замены, если он в нем остался. Если отпечатки станут бледными, смотрите раздел Замена картриджа изображения для получения информации о замене картриджа изображения.
 |
Примечание: |
 |
Замена картриджа изображения не обязательна при появлении сообщения Toner Low (Заканчивается тонер). Тонер, оставшийся в картридже изображения, при появлении этого сообщения, может просыпаться при его замене. Замените картридж изображения, когда появится сообщение Replace Toner (Замените тонер). |
Unable Clear Error (Невозможно сбросить ошибку)
Принтер не может сбросить ошибку из-за того, что она все еще присутствует. Попытайтесь решить проблему еще раз.
Warming Up (Прогрев)
Принтер разогревается перед печатью.
Worn Fuser (Изношен блок термозакрепления)
Это сообщение означает, что ресурс блока термозакрепления закончился. Подготовьте новый блок термозакрепления для замены.
Смотрите раздел Замена блока термозакрепления для получения дополнительной информации.
Write Error ROM P (Ошибка записи ПЗУ P)
Принтер не может правильно записать данные в модуль ПЗУ. Вы не можете удалить модуль ПЗУ P, поскольку этот модуль содержит программу принтера. Обратитесь в авторизованный сервисный центр.
Writing ROM Р (Запись ПЗУ Р)
Принтер записывает данные в модуль ПЗУ, установленный в слот Р.
Источник
Коды ошибок, актуальные для Canon imagePROGRAF iPF670, iPF605, iPF770, iPF750, iPF710, iPF650, iPF700, iPF785, iPF610, iPF765, iPF680, iPF760, iPF510, iPF780, iPF600, iPF500, iPF685, iPF720, iPF670e, iPF671, iPF671e (для картриджей PFI-102, PFI-104, PFI-107).
Группы ошибок
| Code | Diagnosis | Что значит |
| 0181xxxx-xxxx | Ink warning | Некритичная ошибка чернил |
| 0180xxxx-xxxx | Printhead warning | Некритичная ошибка печатающей головки |
| 0184xxxx-xxxx | Maintenance cartridge warning | Некритичная ошибка картриджа |
| 0134xxxx-xxxx | GARO warning | Некритичная ошибка растрового драйвера |
| 0303xxxx-xxxx | Cover error | Ошибка крышки принтера |
| 0301xxxx-xxxx 0306xxxx-xxxx 0386xxxx-xxxx |
Media error | Ошибки загрузки носителя (например, бумаги) |
| 0313xxxx-xxxx | Sensors, fans, motors error | Ошибки датчиков, моторов и вентиляторов |
| 0380xxxx-xxxx | Printhead error | Ошибки печатающей головки |
| 0381xxxx-xxxx 0383xxxx-xxxx |
Ink error | Ошибки чернил |
| 0384xxxx-xxxx | Maintenance cartridge error | Ошибки картриджа отработки |
| 0387xxxx-xxxx | Cutter unit error | Ошибки резака |
| 0389xxxx-xxxx | Media take-up unit error | Ошибки устройства приёма носителя |
| 0390xxxx-xxxx | Firmware error | Ошибки прошивки |
| Exxx-xxxx | Service call error | Ошибки сервисного режима |
Ошибки с кодами и расшифровкой
| Сообщение на экране | Код ошибки | Проблема | Способ устранения проблемы |
| Ink Level: Check | 0180104-1000 | BK ink tank near-empty | Замените картриджи. |
| Ink Level: Check | 0180101-1001 | Y ink tank near-empty | |
| Ink Level: Check | 0180102-1002 | M ink tank near-empty | |
| Ink Level: Check | 0180103-1003 | C ink tank near-empty | |
| Ink Level: Check | 0180106-1006 | MBK ink tank near-empty | |
| Ink Level: Check | 0180106-1007 | MBK2 ink tank near-empty | |
| Problem with Printhead. Check printing results |
01800500-1010 | Number of non-discharging nozzles in printhead: Warning level | Очистите печатающие головки. Замените печатающие головки. Проверьте датчики печатающих головок. |
| Prepare for maint cart replacement. | 01841001-281A | Maintenance cartridge near-full | Замените картридж обслуживания. |
| Prepare for parts replacement. Call for service. |
Parts counter W1 level | Проверьте датчик деталей в меню обслуживания. | |
| Parts replacement time has passed. Call for service. |
Parts counter W2 level | After checking the parts counter in service mode, replace any part whose counter is nearing the error value. После проверки датчика деталей в сервисном меню, замените деталь, указанную в ошибке. |
|
| GARO W1221 | 01341221-1030 | GARO (image mode): Unknown command | Verify the transmitted data before reprinting. Проверьте загруженные данные перед повтором печати. |
| GARO W1222 | 01341222-1031 | GARO (image mode): Invalid parameter count (no parameters) | |
| GARO W1223 | 01341223-1032 | GARO (image mode): Required parameter missing | |
| GARO W1225 | 01341225-1034 | GARO (image mode): Other warning | |
| GARO W1226 | 01341226-103A | GARO (image mode): Image processing table error | |
| GARO W1231 | 01341231-1035 | GARO (setup): Unknown command | |
| GARO W1232 | 01341232-1036 | GARO (setup): Invalid parameter count | |
| GARO W1233 | 01341233-1037 | GARO (setup): Required parameter missing | |
| GARO W1234 | 01341234-1038 | GARO (setup): Data out of bounds | |
| GARO W1235 | 01341235-1039 | GARO (setup): Other warning | |
| End of paper feed. Cannot feed paper more. | Forced feed limit | Check the remaining quantity of roll media. Проверьте количество бумаги. |
|
| This type of paper is not compatible with HP-GL/2. | 01860006-1015 | Non-support paper of HP-GL/2 | Замените бумагу на совместимую. Exchange for the compatible paper to HP-GL/2. |
| GL2:W0501 The memory is full. |
01340501-1040 | Memory full (HP-GL/2) | Проверьте, нет ли области печати без изображения. Проверьте загруженные данные перед повтором запуска печати. Check if there is the non-image area of the print. Verify the transmitted data before reprinting. |
| GL2:W0904 The memory is full. |
01340904-1048 | Overflow of Polygon buffer (HP-GL/2) | |
| GL2:W0903 The memory is full. |
01340903-1047 | Overflow of replot buffer (HP-GL/2) | |
| GL2:W0502 The parameter is out of range. |
01340502-1041 | Invalid parameter (HP-GL/2) | Проверьте загруженные данные перед повтором печати. Verify the transmitted data before reprinting. |
| GL2:W0504 This command is not supported. |
01340504-1043 | Invalid command (HP-GL/2) | |
| Mail box nearly full. Delete unwanted data |
011A1001-2901 | The free hard disk space left for Personal Boxes in the printer’s hard disk does not have more than 1 GB, combined. | Удалите ненужные задания в личных блоках заданий. Delete unneeded jobs stored in Personal Boxes. |
| Mail box full. Now printing without saving data. |
01861003-2902 | 100 jobs are stored in the Personal Box. | Удалите ненужные задания в личных блоках заданий. Delete unneeded jobs stored in Personal Boxs. |
| Not much ink is left. Prepare to replace the ink. |
01810103-1003 | C ink tank near-empty | Замените синий картридж. Renew the C ink tank |
| Not much ink is left. Prepare to replace the ink. |
01810102-1002 | M ink tank near-empty | Замените пурпурный картридж Renew the M ink tank. |
| Not much ink is left. Prepare to replace the ink. |
01810101-1001 | Y ink tank near-empty | Замените желтый картридж. Renew the Y ink tank. |
| Not much ink is left. Prepare to replace the ink. |
01810106-1006 | MBK ink tank near-empty | Замените матовый черный картридж. Renew the MBK ink tank. |
| Not much ink is left. Prepare to replace the ink. |
01810104-1000 | BK ink tank near-empty | Замените фото-черный картридж. Renew the BK ink tank. |
| Ink tank is empty. Replace the ink tank. |
01810303-1403 | C ink tank empty | Замените синий картридж. Renew the C ink tank. |
| Ink tank is empty. Replace the ink tank. |
01810302-1402 | M ink tank empty | Замените пурпурный картридж. Renew the M ink tank. |
| Ink tank is empty. Replace the ink tank. |
01810301-1401 | Y ink tank empty | Замените желтый картридж. Renew the Y ink tank. |
| Ink tank is empty. Replace the ink tank. |
01810306-1406 | MBK ink tank empty | Замените матовый черный картридж. Renew the MBK ink tank. |
| Ink tank is empty. Replace the ink tank. |
01810304-1400 | BK ink tank empty | Замените фото-черный картридж. Renew the BK ink tank. |
| No ink tank loaded. Check ink tank. |
01810103-1413 | C ink tank removal | Вставьте синий картридж. Attach the C ink tank. |
| No ink tank loaded. Check ink tank. |
01810102-1412 | M ink tank removal | Вставьте пурпурный картридж. Attach the M ink tank. |
| No ink tank loaded. Check ink tank. |
01810101-1411 | Y ink tank removal | Вставьте желтый картридж. Attach the Y ink tank. |
| No ink tank loaded. Check ink tank. |
01810106-1416 | MBK ink tank removal | Вставьте матовый черный картридж. Attach the MBK ink tank. |
| No ink tank loaded. Check ink tank. |
01810104-1410 | BK ink tank removal | Вставьте фото-черный картридж. Attach the BK ink tank. |
| The paper is too small. | 013200D2-1051 | Size clip error | Проверьте формат загруженной бумаги. Замените бумагу. Check the media size check. Change the media size. |
| Maximum jobs stored. Delete unwanted data. |
011A1006-2907 | Saved jobs exceed the Personal Box capacity. | Нажмите кнопку “стоп” чтобы отменить задание. Удалите задания из очереди. Удалите ненужные задания, хранящиеся на жестком диске. Press the stop button to cancel the print job. Delete print jobs from the queue. Delete unneeded jobs stored on the hard disk. |
| PHead needs cleaning. Press Online to clear error. |
03800500-280C | Printhead found to have many non-discharging nozzles during a non-discharging inspection (printing paused) | Очистите печатающую головку. Проверьте состояние дюз через сервисное меню. Замение печатающую головку. Clean the printhead. Identify the nozzles in a nozzle check pattern. Replace the printhead. |
| Paper size not detected. Lift the release lever and reload the paper. |
03010000-200C | Unable to detect the leading end of paper | Проверьте край бумаги. Перезагрузите бумагу. Check the leading end of paper. Reload the paper. |
| Leading edge detection error. Lift the release lever and align leading edge with orange line. |
03010000-200D | Unable to detect the trailing end of cut sheet | Проверьте длину листа. Проверьте, нет ли замятия. Check the sheet length. Check to see if paper has not jammed. |
| Paper size not detected. Lift the release lever and reload the paper. |
03010000-2017 | Paper (right) edge detection error | Проверьте правый край бумаги. Выберите верный тип бумаги. Check the right edge of paper. Check the paper type. |
| Paper size not detected. Lift the release lever and reload the paper. |
03010000-2018 | Paper (left) edge detection error | Проверьте левый край бумаги. Выберите правильный тип бумаги. Check the left edge of paper. Check the paper type. |
| Cannot adjust printhead. Press Online to clear the error and readjust printhead. |
03863000-2820 | Printhead registration unadjustable | Проверьте бумагу на отсутствие пятен. Проверьте, нет попадает ли солнечный свет на отпечаток. Прочистите печатающую головку. Check the paper on which a pattern is printed for smears. Check the environment for interferences from outside light. Clean the printhead. |
| Cannot adjust printhead. Press Online to clear the error and readjust printhead. |
03863000-2821 | LF unadjustable | Проверьте бумагу на отсутствие пятен. Проверьте, нет попадает ли солнечный свет на отпечаток. Прочистите печатающую головку. Check the paper on which a pattern is printed for smears. Check the environment for interferences from outside light. Clean the printhead. |
| Cannot print as specified. Lift the release lever and replace paper with A4/ LTR (vertical) or larger. |
03010000-2E1F | Undersized paper loaded for internal printing (A4 or larger) | Замените бумагу на формат A4/Letter или любую большего формата. Replace with A4/Letter or any larger-sized paper. |
| Cannot print as specified. Lift the release lever and replace paper with A3/ Ledger (vertical) or larger. |
03010000-2E1F | Undersized paper loaded for internal printing (A3 or larger) | Замените бумагу на формат A3/11″x17″ или любую большего формата. Replace with A3/11″x17″ or any larger-sized paper. |
| Cannot print as specified. Lift the release lever and replace roll with 10 in. wide or larger roll. |
03010000-2E1F | Undersized paper loaded for internal printing (roll media) | Замените бумагу на рулон шириной не меньше 10 дюймов. Replace with roll media at least 10 inches in width. |
| Cannot detect paper Remove paper and press Load/Eject. |
03010000-2E25 | Paper jam while feeding/ejecting/printing | Устраните замятие и перезагрузите бумагу. Remove the paper jam and reload the paper. |
| Cannot feed paper Lift the release lever and reload paper. |
03010000-2E27 | Paper jam during feeding/printing/ejection | Перезагрузите бумагу. Reload the paper. |
| This paper cannot be used. Check supported paper sizes. |
03010000-200E | Undersized paper (cut sheets/roll media) | Замените бумагу на больший формат. Replace with larger-sized paper. |
| This paper cannot be used. Check supported paper sizes. |
03010000-200F | Oversized paper (cut sheets/roll media) | Замените бумагу на меньший формат. Replace with smaller-sized paper. |
| Use another paper. Press Online to clear the error. |
03010000-2F33 | Unadjustable because of transparent media | Замените бумагу на совместимую. Replace with adjustable media. |
| Paper loaded askew. Lift the release lever. |
03016000-2010 | Skew | Исправьте наклон бумаги и перезагрузите ее. Correct the skew in the paper and reload it. |
| Paper size not detected. Reload paper. |
03010000-200A | Unable to detect the paper width (Paper loaded at an improper position) | Перезагрузите бумагу. Reload the paper |
| Paper jam. Press Load/Eject and reload the paper. |
03010000-2E27 | Paper jam during feeding/printing/ejection | Перезагрузите бумагу. Reload the paper |
| Paper size not detected. Lift the release lever and reload the paper. |
03010000-200C | Roll media loading size detection failure | Перезагрузите рулонный носитель. Reload the roll media. |
| Cannot adjust eccentric. Press Online to clear the error. |
03863000-2822 | Eccentricity correction disabled | Проверьте, нет ли замятия бумаги. Check to see if paper has not jammed. |
| Sheet printing is selected. Press Load/Eject and load sheets. |
03860002-2E02 | Data with a cut sheet specification has been received but no cut sheets are loaded. | Загрузите листы бумаги в лоток. Load cut sheets at the paper tray port. |
| Roll printing is selected, but sheets are loaded. Press OK, remove the sheets, and load a roll. |
03860002-2E0A | Data with a roll media specification has been received when a cut sheet tray is loaded. | Замените рулонный носитель. Replace with roll media. |
| Roll printing is selected. Press Load/Eject and load a roll. |
03060A00-2E00 | Data with a roll media specification has been received but no roll media are loaded. | Загрузите рулонный носитель. Load roll media. |
| No Roll Feed Unit. Turn printer off and install roll feed unit. |
03060A00-2E0E | Roll media unit not installed | Загрузите рулонный носитель. Install the roll media unit. |
| The roll is empty. Lift the release lever and replace the roll. |
03060A00-2E1B | Roll media end | Загрузите новый рулон. Renew the supply of roll media. |
| Wrong paper feed slot for this paper type. Press Load/Eject and reload the paper. |
03061000-2E15 | Paper type mismatch | Проверьте тип бумаги и перезагрузите ее. Check the type of paper that can be fed and reload the paper. |
| Manual printing is selected, but a roll is loaded. Press Load/Eject and remove the roll. |
03860001-2E0C | Data with a cut sheet specification has been received when roll media are loaded. | Загрузите листы бумаги в лоток. Load cut sheets at the paper tray port. |
| Hardware error. 03130031-2E23 Turn off printer, wait, then turn on again. |
03130031-2E23 | Cutter unit failure | Проверьте резак. Check the cutter unit. |
| Hardware error. 03130031-2E14 Turn off printer, wait, then turn on again. |
03130031-2F14 | Writing to the ASIC register disabled | Замените главную плату контроллера. Replace the main controller PCB |
| Hardware error. 03130031-2E16 Turn off printer, wait, then turn on again. |
03130031-2F16 | Mist fan error | Проверьте вентилятор. Check the mist fan. |
| Hardware error. 03130031-2E17 Turn off printer, wait, then turn on again. |
03130031-2F17 | Suction fan lock detection error | Проверьте всасывающий вентилятор. Check the suction fan. |
| Hardware error. 03130031-2E20 Turn off printer, wait, then turn on again. |
03130031-2F20 | Purge motor cam position error | Проверьте блок очистки. Check the purge unit. |
| Hardware error. 03130031-2E22 Turn off printer, wait, then turn on again. |
03130031-2F22 | Pump travel timeout | Проверьте блок очистки. Check the purge unit. |
| Hardware error. 03130031-2E23 Turn off printer, wait, then turn on again. |
03130031-2F23 | Purge motor error Pump inoperable | Проверьте блок очистки. Check the purge unit. |
| Hardware error. 03130031-2E25 Turn off printer, wait, then turn on again. |
03130031-2F25 | Unable to detect the carriage motor home position | Проверьте каретку. Проверьте датчики на наличие пятен. Check the carriage unit. Check the linear encoder for smears. |
| Hardware error. 03130031-2E26 Turn off printer, wait, then turn on again. |
03130031-2F26 | Carriage inoperable | Проверьте каретку и окружающие ее части. Check the carriage unit and surrounding parts. |
| Hardware error. 03130031-2E27 Turn off printer, wait, then turn on again. |
03130031-2F27 | Carriage travel timeout | Проверьте каретку и окружающие ее части. Check the carriage unit and surrounding parts. |
| Hardware error. 03130031-2E1F Turn off printer, wait, then turn on again. |
03130031-2F1F | Pump cam sensor error | Проверьте блок очистки. Check the purge unit. |
| Hardware error. 03130031-2E2A Turn off printer, wait, then turn on again. |
03130031-2F2A | Unable to detect the feed roller home position | Проверьте датчики ролика подачи бумаги и окружающие его части. Проверьте, не замята ли бумага. Check the feed roller encoder and surrounding part. Check to see if paper has not jammed. |
| Hardware error. 03130031-2E29 Turn off printer, wait, then turn on again. |
03010000-2F29 | Feed motor timeout (Roll media) | Проверьте ролик подачи бумаги. Проверьте рулон бумаги. Проверьте, нет ли замятия бумаги. Check the roll feed unit. Check roll media. Check to see if paper has not jammed in the printer. |
| Hardware error. 03130031-2E2E Turn off printer, wait, then turn on again. |
03130031-2F2E | Roll travel timeout | Проверьте ролик подачи бумаги. Check the roll feed unit. |
| Hardware error. 03130031-4027 Turn off printer, wait, then turn on again. |
03130031-4027 | Lift travel timeout error | Проверьте каретку и окружающие ее части. Check the carriage unit and surrounding parts. |
| Hardware error. 03130031-2E13 Turn off printer, wait, then turn on again. |
03130031-2F13 | A/D converter external trigger output stop detection hardware error 1 | Попробуйте очистить ленту энкодера, а также очистите направляющую каретки. Эта ошибка распространена на широкоформатных принтерах Canon и обычно устраняется путем очистки направляющей и ленты. Направляющая каретки (рельс) должен быть сухим.Если это не поможет – нужно менять печатающую голову. |
| Hardware error. 03130031-2F32 Turn off printer, wait, then turn on again. |
03130031-2F32 | Multi sensor error | Проверьте, не попадает ли свет на устройство. Замените мультисенсорный блок. Check the environment for interferences from outside light. Replace the multi sensor unit. |
| Hardware error. 03130031-2F3A Turn off printer, wait, then turn on again. |
03130031-2F3A | Valve motor error | Проверьте блок подачи чернил. Check the ink supply unit. |
| Hardware error. 03130031-2F3B Turn off printer, wait, then turn on again. |
03130031-2F3B | CS communication error | Вытащите чернильные картриджи, затем снова вставьте их. Проверьте главную плату контроллера. Remove the ink tanks and then reload them. Check the main controller PCB. |
| Hardware error. 03130031-2F70 Turn off printer, wait, then turn on again. |
03130031-2F70 | Ошибка заполнения промежуточных чернильных ёмкостей. | Как устранить |
| Hardware error. 03130031-2F71 Turn off printer, wait, then turn on again. |
03130031-2F71 | Ошибка заполнения промежуточной чернильной ёмкости (левой). | Как устранить |
| Hardware error. 03130031-2F72 Turn off printer, wait, then turn on again. |
03130031-2F72 | Ошибка заполнения промежуточной чернильной ёмкости (правой). | Как устранить |
| Hardware error. 03130031-260E Turn off printer, wait, then turn on again. |
03130031-260E | Gap detection error | Проверьте каретку и окружающие ее части. Замените главную плату контроллера. Check the carriage unit and surrounding parts. Replace the main controller PCB. |
| Hardware error. 03130031-2618 Turn off printer, wait, then turn on again. |
03130031-2618 | VH voltage error | Проверьте блок питания. Check the power supply unit. |
| Hardware error. 03130031-260F Turn off printer, wait, then turn on again. |
03130031-260F | Gap reference surface error | Replace the reference surface sheet. |
| Roll feed unit error Turn off printer and check roll feed unit |
03060B00-2E24 | Roll feed unit failure | Замените блок подачи рулона. Replace the roll feed unit. |
| Unknown file. Check file format. Turn off printer, wait a while, then turn it on again. |
03900001-4049 | ROM data for another model has been transferred. | Загрузите верные данные. Transmit valid ROM data. |
| Unknown file. Check file format. Turn off printer, wait a while, then turn it on again. |
03900001-4042 | MIT data transfer failure | Проверьте данные перед загрузкой. Verify the validity of MID data before transferring it. |
| Hardware error. 03130031-2F2B Turn off printer, wait, then turn on again. |
03130031-2F2B | LF operation failure | Проверьте, не застряла ли бумага. Проверьте двигатель подачи и ролик подачи.Check to see if paper has not jammed. Check the feed motor and feed roller. |
| Printhead error Open top cover and replace the printhead. |
03800200-2802 | Invalid printhead installed | Замените печатающую головку. Replace printhead |
| Printhead error Open top cover and replace the right printhead. |
03800300-2801 | Printhead DI compensation failure | Замените печатающую головку. Replace printhead |
| Printhead error Open top cover and replace the right printhead. |
03800400-2803 | Printhead EEPROM error | Замените печатающую головку. Replace printhead |
| Hardware error. 03800500-2F40 Turn off printer, wait, then turn on again. |
03800500-2F40 | The non-discharge of all colors and chips(A/B, EVEN/ODD) and nozzles is detected (проблема с поступлением чернил в/из печатающей головки.) | Проверьте трубки для чернил и окружающие детали. Проверьте блок очистки печатающей головки и окружающие детали. Проверьте датчик управления головкой и окружающие детали. Убедитесь, что печатающая головка установлена правильно. Если визуально все чисто и корректно подключено, нужно пробовать: Заменить датчик управления головкой. Заменить главную плату контроллера. Замените печатающую головку. Замените каретку. |
| Hardware error. 03800500-2F2F Turn off printer, wait, then turn on again. |
03800500-2F2F | Non-discharging error | Проверьте датчик управления печатающей головкой. Замените датчик управления печатающей головкой. Замените печатающую головку. Identify the head management sensor unit Replace the head management sensor unit Replace the printhead |
| Hardware error. 03800500-2F30 Turn off printer, wait, then turn on again. |
03800500-2F30 | Non-discharging position adjustment error | Проверьте датчик управления печатающей головкой. Замените датчик управления печатающей головкой. Замените печатающую головку. Identify the head management sensor unit Replace the head management sensor unit Replace the printhead |
| Ink tank is empty. Press OK and replace ink tank. |
03810104-2500 | Bk ink tank empty | Замените картридж BK Renew the Bk ink tank |
| Ink tank is empty. Press OK and replace ink tank. |
03810101-2501 | Y ink tank empty | Замените картридж Y. Renew the Y ink tank |
| Ink tank is empty. Press OK and replace ink tank. |
03810102-2502 | M ink tank empty | Замените картридж M. Renew the M ink tank |
| Ink tank is empty. Press OK and replace ink tank. |
03810103-2503 | C ink tank empty | Замените картридж C. Renew the C ink tank |
| Ink tank is empty. Press OK and replace ink tank. |
03810106-2506 | MBk ink tank empty | Замените картридж MBK. Renew the MBk ink tank |
| Ink tank is empty. Press OK and replace ink tank. |
03810106-2507 | MBk2 ink tank empty | Замените картридж MBK. Renew the MBk ink tank |
| Ink insufficient. Press OK and replace ink tank. |
03810204-2580 | Low on the Bk ink tank (as during cleaning) | Замените на заполненный картридж BK Replace with a fully replenished Bk ink tank |
| Ink insufficient. Press OK and replace ink tank. |
03810201-2581 | Low on the Y ink tank (as during cleaning) | Замените на заполненный картридж Y Replace with a fully replenished Y ink tank |
| Ink insufficient. Press OK and replace ink tank. |
03810202-2582 | Low on the M ink tank (as during cleaning) | Замените на заполненный картридж M Replace with a fully replenished M ink tank |
| Ink insufficient. Press OK and replace ink tank. |
03810203-2583 | Low on the C ink tank (as during cleaning) | Замените на заполненный картридж C Replace with a fully replenished C ink tank |
| Ink insufficient. Press OK and replace ink tank. |
03810206-2586 | Low on the MBk ink tank (as during cleaning) | Замените на заполненный картридж MBK Replace with a fully replenished MBk ink tank |
| Ink insufficient. Press OK and replace ink tank. |
03810204-2590 | Low on the Bk ink tank (during pre-printing checks) | Замените на заполненный картридж BK Replace with a fully replenished Bk ink tank |
| Ink insufficient. Press OK and replace ink tank. |
03810201-2591 | Low on the Y ink tank (during pre-printing checks) | Замените на заполненный картридж Y Replace with a fully replenished Y ink tank |
| Ink insufficient. Press OK and replace ink tank. |
03810202-2592 | Low on the M ink tank (during pre-printing checks) | Замените на заполненный картридж M Replace with a fully replenished M ink tank |
| Ink insufficient. Press OK and replace ink tank. |
03810203-2593 | Low on the C ink tank (during pre-printing checks) | Замените на заполненный картридж C Replace with a fully replenished C ink tank |
| Ink insufficient. Press OK and replace ink tank. |
03810206-2596 | Low on the MBk ink tank (during pre-printing checks) | Замените на заполненный картридж MBK Replace with a fully replenished MBk ink tank |
| Ink tank error. Press OK and replace ink tank. |
03830204-2540 | Bk ink tank ID error | Замените картридж BK на подходящий. Replace with a valid Bk ink tank |
| Ink tank error. Press OK and replace ink tank. |
03830201-2541 | Y ink tank ID error | Замените картридж Y на подходящий. Replace with a valid Y ink tank |
| Ink tank error. Press OK and replace ink tank. |
03830202-2542 | M ink tank ID error | Замените картридж M на подходящий Replace with a valid M ink tank |
| Ink tank error. Press OK and replace ink tank. |
03830203-2543 | C ink tank ID error | Замените картридж C на подходящий. Replace with a valid C ink tank |
| Ink tank error. Press OK and replace ink tank. |
03830206-2546 | MBk ink tank ID error | Замените картридж MBK на подходящий. Replace with a valid MBk ink tank |
| Ink tank error. Press OK and replace ink tank. |
03830206-2547 | MBk2 ink tank ID error | Замените картридж MBK на подходящий. Replace with a valid MBk ink tank |
| No ink tank loaded. Press OK and check ink tank. |
03830104-2520 | BK ink tank not installed | Установите картридж BK. Install a Bk ink tank |
| No ink tank loaded. Press OK and check ink tank. |
03830101-2521 | Y ink tank not installed | Установите картридж Y. Install a Y ink tank |
| No ink tank loaded. Press OK and check ink tank. |
03830102-2522 | M ink tank not installed | Установите картридж M. Install a M ink tank |
| No ink tank loaded. Press OK and check ink tank. |
03830103-2523 | C ink tank not installed | Установить картридж C. Install a C ink tank |
| No ink tank loaded. Press OK and check ink tank. |
03830106-2526 | MBK ink tank not installed | Установите картридж MBK. Install a MBk ink tank |
| No ink tank loaded. Press OK and check ink tank. |
03830106-2527 | MBK2 ink tank not installed | Установите картридж MBK. Install a MBk ink tank |
| Top cover is open. Turn off printer, wait a while, and turn it on again. |
03031000-2F38 | Top cover abnormally open | Закройте верхнюю крышку и включите принтер заново. Close the top cover and turn on the printer again. |
| Ink tank cover is open. Turn off printer, wait a while, and turn it on again. |
03031000-2E10 | Ink tank cover abnormally open | Закройте крышку картриджного отсека и заново включите принтер. Close the ink tank cover and turn on the printer again. |
| Maintenance cartridge full. Replace the maintenance cartridge. |
03841001-2819 | Maintenance cartridge full | Замените картридж обслуживания. Renew the maintenance cartridge. |
| No Maintenance Cartridge capacity. Replace the maintenance cartridge. |
03841001-281B | Not enough space in the maintenance cartridge prior to cleaning | Замените картридж обслуживания. Replace the maintenance cartridge. |
| Maintenance cartridge problem. Replace the maintenance cartridge. |
03841201-2816 | Maintenance cartridge EEPROM error | Замените картридж обслуживания. Renew the maintenance cartridge. |
| Maintenance cartridge problem. Replace the maintenance cartridge. |
03841201-2817 | Maintenance cartridge ID error | Замените картридж обслуживания. Renew the maintenance cartridge. |
| Borderless printng not possible. Check roll position. Online: Print Load/Eject: Change Paper |
03861001-2405 | Paper loaded at a position inaccessible for borderless printing | Проверьте, установлен ли ограничитель для печати без полей. Перезагрузите бумагу. Check to see if a borderless printing spacer is installed. Reload the paper. |
| Borderless printng not possible. Check paper size setting. Online: Print Load/Eject: Change Paper |
03861001-2406 | Data unfit for borderless printing | Проверьте размер бумаги. Замените бумагу. Check the paper size. Change the paper size. |
| Insufficient paper for job Online: Print Stop: Stop Printing Load/Eject: Change Paper |
03862000-2E09 | Not enough roll media on remaining roll media quantity detection | Возобновите подачу бумаги. Renew the supply of roll media. |
| Cannot cut paper. Lift the release lever and reload the paper. |
03870001-2015 | Cutting failure | Отрежьте бумагу вручную. Проверьте нож. Cut paper manually. Check the cutter. |
| Cannot adjust optic axis. Press Online to clear the error. |
03863000-2824 | Optical axis error | Проверьте мультидатчик. Проверьте датчик управления печатающей головкой. Check the multi sensor. Check the head management sensor. |
| This type of paper is not compatible with HP-GL/ 2. Online: Print Stop: Stop Printing Load/Eject: Change Paper |
03061000-2E15 | Non-support media of HP-GL/2 | Замените бумагу на совместимую с HP-GL/2. Exchange for the compatible paper to HP-GL/2 before reprinting. |
| Mail box full. Delete unwanted data on your computer to resume printing. Press Stop to cancel printing. |
031A1001-2905 | The job store executed when the free hard disk space left for Personal Boxes in the printer’s hard disk is full. | Удалите ненужные задачи из личного блока заданий. Delete unneeded jobs stored in Personal Boxes. |
| Mail box full. Cannot save. Delete unwanted data on your computer to resume printing. Press Stop to cancel printing. |
031A1006-2906 | The store executed when 32 jobs are stored in the Personal Box. | Удалите ненужные задачи из личного блока заданий. Delete unneeded jobs stored in Personal Boxes. |
| Hard disk error. Press OK to reformat |
031A1002-2908 | Hard disk format error | Нажмите кнопку ОК для форматирования жесткого диска. Когда форматирование будет завершено, принтер автоматически перезагрузится. Press the [OK] button to start reformatting the hard disk. When formatting is finished, the printer automatically restarts. |
| File read error. Turn off printer, wait a while, and turn it on again. Invalid files will be deleted. |
031A1002-2909 | Hard disk file error | Перезагрузите принтер. Только поврежденные файлы будут удалены, и принтер перезагрузится. Restart the printer. Only the corrupted files will be deleted, and the printer will restart. |
| Hardware error. 03800500-2F31 Turn off printer, wait, then turn on again. |
03800500-2F31 | Non-discharge detection optical axis error | Проверьте датчик управления печатающей головкой. Замените датчик управления печатающей головкой. Замените печатающую головку. Check the head management sensor. Replace the head management sensor. Replace the printhead. |
| Hardware error. 03130031-2F3C Turn off printer, wait, then turn on again. |
03130031-2F3C | LF pressure error | Проверьте прижимной ролик и окружающие его части. Замените узел привода прижимного ролика. Check the pinch roller and surrounding part. Replace the pinch roller pressure drive unit. |
| No printhead Install printhead. |
03800100-2800 | Printhead not installed | Установите печатающую головку. Install the printhead. |
| Wrong printhead. Open top cover and replace the printhead. | 03800200-2811 | Printhead version error | Замените печатающую головку. Replace the printhead. |
| No maintenance cartridge. Check the maintenance cartridge. |
03841101-2818 | Mauntenance cartridge not installed | Установите картридж обслуживания. Install the maintenance cartridge. |
| This type of media is not compatible with HP-GL/ 2. | 03860006-2825 | Paper type mismatch at HP-GL/2 printing | Замените бумагу на совместимую с HP-GL2 перед возобновлением печати. Exchange for the compatible paper to HP-GL/2 before reprinting. |
| Cannot cut paper. Lift the release lever and reload the paper. |
03870001-2019 | Cut failure (during jam occure) | Проверьте резак и окружающие его части. Замените резак. Check the cutter unit and surrounding part. Replace the cutter. |
| Insufficient paper for job | 03862001-2E31 | Not enough roll media | Возобновите подачу бумаги. Renew the supply of roll media. |
| Paper jam. Manually rewind roll all the way and press OK. |
03010000-2E3A | Madia load failure | Проверьте блок захвата и подачи бумаги. Проверьте, нет ли замятия бумаги. Check the pick-up unit and roll media. Check to see if paper has not jammed. |
| Sheet printing is selected. Press Load/Eject and load sheets. | 03060100-2E02 | Cut sheet in not set | Загрузите листы бумаги в лоток. Load cut sheets at the paper tray port. |
| Borderless printng not possible. Check supported paper. | 03861001-2408 | Borderless printing disabled (unsupported size) | Проверьте размер носителя. Check the media size. Change the media size. |
| Borderless printng not possible. Paper stretched or shrank. Confirm usage cond. of the paper. |
03861001-2407 | Borderless printing disabled (engine detection) | Перезагрузите бумагу. Reload the paper. |
| Roll printing is selected. Press Load/Eject and load a roll. | 03060A00-2E35 | Roll media is not loaded for internal printing. | Перезагрузите рулог бумаги. Reload the roll media. |
Ошибки в сервисном режиме
| Code | Description | Action |
| E141-4046 | Number of recovery rotations reaching 50,000 or more | Замените комплект очистки, затем обновите счетчик деталей в сервисном режиме. Replace the purge kit, and then clear the parts counter in the service mode. |
| E146-4001 | Borderless/flow idle ejection/mist recovery count error | Замените блок для отработанных чернил или вентилятор тумана или поглотитель отработанных чернил или мультисенсор, а затем обновите счетчик запчастей в сервисном режиме. Replace the waste ink tank unit or mist fan or waste ink absorber or multi sensor reference, and then clear the parts counter in the service mode. |
| E161-403E | Abnormal temperature rise in printhead | Замените печатающую головку. Replace the printhead. |
| E194-404A | Non-discharging nozzle count error | Замените блок датчика управления головкой, а затем очистите счетчик деталей в сервисном режиме.Replace the head management sensor unit, and then clear the parts counter in the service mode. |
| E196-4040 | Checksum error | Замените главную плату контроллера. Replace the main controller PCB. |
| E196-4041 | Flash memory erase error | Замените главную плату контроллера. Replace the main controller PCB. |
| E196-4042 | Flash memory write error | Замените главную плату контроллера Replace the main controller PCB. |
| E196-4045 | EEPROM write error | Замените главную плату контроллера. Replace the main controller PCB. |
| E196-404C | Serial number mismatch between boards | Execute PCB replacement mode or replace the main controller PCB. |
| E196-404D | Machine ID mismatch between boards | Замените главную плату контроллера Replace the main controller PCB. |
| E196-404E | EEPROM read error | Замените главную плату контроллера. Replace the main controller PCB. |
| E198-401C | RTC error | Замените литиевую батарею или замените главную плату контроллера.Replace the lithium battery or replace the main controller PCB. |
| E198-401D | RTC low battery error | Замените литиевую батарею или замените главную плату контроллера.Replace the lithium battery or replace the main controller PCB. |
| E198-401E | RTC clock stop | Замените литиевую батарею или замените главную плату контроллера.Replace the lithium battery or replace the main controller PCB. |
| E199-404B | Temperature/humidity sensor board connector out of position | Проверьте разъем платы датчика температуры / влажности или замените плату.Check the temperature/humidity sensor board connector or replace the board. |
| E602-401A | HDD failure | Замените жесткий диск. Replace the HDD unit. |
| E602-401B | HDD connection error | Проверьте разъем жесткого диска. Замените жесткий диск. Check the HDD connector/Replace the HDD unit. |
| E144-4047 | Number of carrriage scan operation is full | Замените рулонный блок, затем обновите счетчик деталей в сервисном меню. Replace the tube unit, and then clear the parts counter in the service mode. |
| E144-4048 | Printhead ink filling failure | Замените печатающую головку. Replace the printhead. |
| E196-4043 | Memory error | Выполните обновление прошивки или замените главную плату контроллера.Execute firmware update or replace the main controller PCB. |
| E196-4044 | Firmware size error | Выполните обновление прошивки или замените главную плату контроллера.Execute firmware update or replace the main controller PCB. |
Сообщение на экране Код ошибки Проблема Способ устранения проблемы Ink Level: Check 0180104-1000 BK ink tank near-empty Renew the ink tanks. Ink Level: Check 0180101-1001 Y ink tank near-empty Ink Level: Check 0180102-1002 M ink tank near-empty Ink Level: Check 0180103-1003 C ink tank near-empty Ink Level: Check 0180106-1006 MBK ink tank near-empty Ink Level: Check 0180106-1007 MBK2 ink tank near-empty Problem with Printhead.
Check printing results 01800500-1010 Number of non-discharging nozzles in printhead: Warning level Clean the printheads. Renew the printheads. Identify the head management sensor unit. Prepare for maint cart replacement. 01841001-281A Maintenance cartridge near-full Replace the maintenance cartridge. Prepare for parts replacement.
Call for service. Parts counter W1 level Check the parts counter in service mode. Parts replacement time has passed.
Call for service. Parts counter W2 level After checking the parts counter in service mode, replace any part whose counter is nearing the error value. GARO W1221 01341221-1030 GARO (image mode): Unknown command Verify the transmitted data before reprinting. GARO W1222 01341222-1031 GARO (image mode): Invalid parameter count (no parameters) GARO W1223 01341223-1032 GARO (image mode): Required parameter missing GARO W1225 01341225-1034 GARO (image mode): Other warning GARO W1226 01341226-103A GARO (image mode): Image processing table error GARO W1231 01341231-1035 GARO (setup): Unknown command GARO W1232 01341232-1036 GARO (setup): Invalid parameter count GARO W1233 01341233-1037 GARO (setup): Required parameter missing GARO W1234 01341234-1038 GARO (setup): Data out of bounds GARO W1235 01341235-1039 GARO (setup): Other warning End of paper feed. Cannot feed paper more. Forced feed limit Check the remaining quantity of roll media. This type of paper is not compatible with HP-GL/2. 01860006-1015 Non-support paper of HP-GL/2 Exchange for the compatible paper to HP-GL/2. GL2:W0501
The memory is full. 01340501-1040 Memory full (HP-GL/2) Check if there is the non-image area of the print. Verify the transmitted data before reprinting. GL2:W0904
The memory is full. 01340904-1048 Overflow of Polygon buffer (HP-GL/2) GL2:W0903
The memory is full. 01340903-1047 Overflow of replot buffer (HP-GL/2) GL2:W0502
The parameter is out of range. 01340502-1041 Invalid parameter (HP-GL/2) Verify the transmitted data before reprinting. GL2:W0504
This command is not supported. 01340504-1043 Invalid command (HP-GL/2) Mail box nearly full.
Delete unwanted data 011A1001-2901 The free hard disk space left for Personal Boxes in the printer’s hard disk does not have more than 1 GB, combined. Delete unneeded jobs stored in Personal Boxes. Mail box full.
Now printing without saving data. 01861003-2902 100 jobs are stored in the Personal Box. Delete unneeded jobs stored in Personal Boxs. Not much ink is left.
Prepare to replace the ink. 01810103-1003 C ink tank near-empty Renew the C ink tank. Not much ink is left.
Prepare to replace the ink. 01810102-1002 M ink tank near-empty Renew the M ink tank. Not much ink is left.
Prepare to replace the ink. 01810101-1001 Y ink tank near-empty Renew the Y ink tank. Not much ink is left.
Prepare to replace the ink. 01810106-1006 MBK ink tank near-empty Renew the MBK ink tank. Not much ink is left.
Prepare to replace the ink. 01810104-1000 BK ink tank near-empty Renew the BK ink tank. Ink tank is empty.
Replace the ink tank. 01810303-1403 C ink tank empty Renew the C ink tank. Ink tank is empty.
Replace the ink tank. 01810302-1402 M ink tank empty Renew the M ink tank. Ink tank is empty.
Replace the ink tank. 01810301-1401 Y ink tank empty Renew the Y ink tank. Ink tank is empty.
Replace the ink tank. 01810306-1406 MBK ink tank empty Renew the MBK ink tank. Ink tank is empty.
Replace the ink tank. 01810304-1400 BK ink tank empty Renew the BK ink tank. No ink tank loaded.
Check ink tank. 01810103-1413 C ink tank removal Attach the C ink tank. No ink tank loaded.
Check ink tank. 01810102-1412 M ink tank removal Attach the M ink tank. No ink tank loaded.
Check ink tank. 01810101-1411 Y ink tank removal Attach the Y ink tank. No ink tank loaded.
Check ink tank. 01810106-1416 MBK ink tank removal Attach the MBK ink tank. No ink tank loaded.
Check ink tank. 01810104-1410 BK ink tank removal Attach the BK ink tank. The paper is too small. 013200D2-1051 Size clip error Check the media size check. Change the media size. Maximum jobs stored.
Delete unwanted data. 011A1006-2907 Saved jobs exceed the Personal Box capacity. Press the stop button to cancel the print job. Delete print jobs from the queue.
Delete unneeded jobs stored on the hard disk. PHead needs cleaning.
Press Online to clear error. 03800500-280C Printhead found to have many non-discharging nozzles during a non-discharging inspection (printing paused) Clean the printhead. Identify the nozzles in a nozzle check pattern. Replace the printhead. Paper size not detected.
Lift the release lever and reload the paper. 03010000-200C Unable to detect the leading end of paper Check the leading end of paper. Reload the paper. Leading edge detection error.
Lift the release lever and align leading edge with orange line. 03010000-200D Unable to detect the trailing end of cut sheet Check the sheet length. Check to see if paper has not jammed. Paper size not detected.
Lift the release lever and reload the paper. 03010000-2017 Paper (right) edge detection error Check the right edge of paper. Check the paper type. Paper size not detected.
Lift the release lever and reload the paper. 03010000-2018 Paper (left) edge detection error Check the left edge of paper.
Check the paper type. Cannot adjust printhead.
Press Online to clear the error and readjust printhead. 03863000-2820 Printhead registration unadjustable Check the paper on which a pattern is printed for smears. Check the environment for interferences from outside light.
Clean the printhead. Cannot adjust printhead.
Press Online to clear the error and readjust printhead. 03863000-2821 LF unadjustable Check the paper on which a pattern is printed for smears. Check the environment for interferences from outside light.
Clean the printhead. Cannot print as specified.
Lift the release lever and replace paper with A4/ LTR (vertical) or larger. 03010000-2E1F Undersized paper loaded for internal printing (A4 or larger) Replace with A4/Letter or any larger-sized paper. Cannot print as specified.
Lift the release lever and replace paper with A3/ Ledger (vertical) or larger. 03010000-2E1F Undersized paper loaded for internal printing (A3 or larger) Replace with A3/11″x17″ or any larger-sized paper. Cannot print as specified.
Lift the release lever and replace roll with 10 in. wide or larger roll. 03010000-2E1F Undersized paper loaded for internal printing (roll media) Replace with roll media at least 10 inches in width. Cannot detect paper
Remove paper and press Load/Eject. 03010000-2E25 Paper jam while feeding/ejecting/printing Remove the paper jam and reload the paper. Cannot feed paper
Lift the release lever and reload paper. 03010000-2E27 Paper jam during feeding/printing/ejection Reload the paper. This paper cannot be used.
Check supported paper sizes. 03010000-200E Undersized paper (cut sheets/roll media) Replace with larger-sized paper. This paper cannot be used.
Check supported paper sizes. 03010000-200F Oversized paper (cut sheets/roll media) Replace with smaller-sized paper. Use another paper.
Press Online to clear the error. 03010000-2F33 Unadjustable because of transparent media Replace with adjustable media. Paper loaded askew.
Lift the release lever. 03016000-2010 Skew Correct the skew in the paper and reload it. Paper size not detected.
Reload paper. 03010000-200A Unable to detect the paper width (Paper loaded at an improper position) Reload the paper Paper jam.
Press Load/Eject and reload the paper. 03010000-2E27 Paper jam during feeding/printing/ejection Reload the paper Paper size not detected.
Lift the release lever and reload the paper. 03010000-200C Roll media loading size detection failure Reload the roll media. Cannot adjust eccentric.
Press Online to clear the error. 03863000-2822 Eccentricity correction disabled Check to see if paper has not jammed. Sheet printing is selected.
Press Load/Eject and load sheets. 03860002-2E02 Data with a cut sheet specification has been received but no cut sheets are loaded. Load cut sheets at the paper tray port. Roll printing is selected, but sheets are loaded.
Press OK, remove the sheets, and load a roll. 03860002-2E0A Data with a roll media specification has been received when a cut sheet tray is loaded. Replace with roll media. Roll printing is selected.
Press Load/Eject and load a roll. 03060A00-2E00 Data with a roll media specification has been received but no roll media are loaded. Load roll media. No Roll Feed Unit.
Turn printer off and install roll feed unit. 03060A00-2E0E Roll media unit not installed Install the roll media unit. The roll is empty.
Lift the release lever and replace the roll. 03060A00-2E1B Roll media end Renew the supply of roll media. Wrong paper feed slot for this paper type.
Press Load/Eject and reload the paper. 03061000-2E15 Paper type mismatch Check the type of paper that can be fed and reload the paper. Manual printing is selected, but a roll is loaded.
Press Load/Eject and remove the roll. 03860001-2E0C Data with a cut sheet specification has been received when roll media are loaded. Load cut sheets at the paper tray port. Hardware error.
03130031-2E23
Turn off printer, wait, then turn on again. 03130031-2E23 Cutter unit failure Check the cutter unit. Hardware error.
03130031-2E14
Turn off printer, wait, then turn on again. 03130031-2F14 Writing to the ASIC register disabled Replace the main controller PCB Hardware error.
03130031-2E16
Turn off printer, wait, then turn on again. 03130031-2F16 Mist fan error Check the mist fan. Hardware error.
03130031-2E17
Turn off printer, wait, then turn on again. 03130031-2F17 Suction fan lock detection error Check the suction fan. Hardware error.
03130031-2E20
Turn off printer, wait, then turn on again. 03130031-2F20 Purge motor cam position error Check the purge unit. Hardware error.
03130031-2E22
Turn off printer, wait, then turn on again. 03130031-2F22 Pump travel timeout Check the purge unit. Hardware error.
03130031-2E23
Turn off printer, wait, then turn on again. 03130031-2F23 Purge motor error Pump inoperable Check the purge unit. Hardware error.
03130031-2E25
Turn off printer, wait, then turn on again. 03130031-2F25 Unable to detect the carriage motor home position Check the carriage unit. Check the linear encoder for smears. Hardware error.
03130031-2E26
Turn off printer, wait, then turn on again. 03130031-2F26 Carriage inoperable Check the carriage unit and surrounding parts. Hardware error.
03130031-2E27
Turn off printer, wait, then turn on again. 03130031-2F27 Carriage travel timeout Check the carriage unit and surrounding parts. Hardware error.
03130031-2E1F
Turn off printer, wait, then turn on again. 03130031-2F1F Pump cam sensor error Check the purge unit. Hardware error.
03130031-2E2A
Turn off printer, wait, then turn on again. 03130031-2F2A Unable to detect the feed roller home position Check the feed roller encoder and surrounding part. Check to see if paper has not jammed. Hardware error.
03130031-2E29
Turn off printer, wait, then turn on again. 03010000-2F29 Feed motor timeout (Roll media) Check the roll feed unit. Check roll media. Check to see if paper has not jammed in the printer. Hardware error.
03130031-2E2E
Turn off printer, wait, then turn on again. 03130031-2F2E Roll travel timeout Check the roll feed unit. Hardware error.
03130031-4027
Turn off printer, wait, then turn on again. 03130031-4027 Lift travel timeout error Check the carriage unit and surrounding parts. Hardware error.
03130031-2E13
Turn off printer, wait, then turn on again. 03130031-2F13 A/D converter external trigger output stop detection hardware error 1 Replace the new printhead. Hardware error.
03130031-2F32
Turn off printer, wait, then turn on again. 03130031-2F32 Multi sensor error Check the environment for interferences from outside light.
Replace the multi sensor unit. Hardware error.
03130031-2F3A
Turn off printer, wait, then turn on again. 03130031-2F3A Valve motor error Check the ink supply unit. Hardware error.
03130031-2F3B
Turn off printer, wait, then turn on again. 03130031-2F3B CS communication error Remove the ink tanks and then reload them. Check the main controller PCB. Hardware error.
03130031-260E
Turn off printer, wait, then turn on again. 03130031-260E Gap detection error Check the carriage unit and surrounding parts. Replace the main controller PCB. Hardware error.
03130031-2618
Turn off printer, wait, then turn on again. 03130031-2618 VH voltage error Check the power supply unit. Hardware error.
03130031-260F
Turn off printer, wait, then turn on again. 03130031-260F Gap reference surface error Replace the reference surface sheet. Roll feed unit error
Turn off printer and check roll feed unit 03060B00-2E24 Roll feed unit failure Replace the roll feed unit. Unknown file. Check file format.
Turn off printer, wait a while, then turn it on again. 03900001-4049 ROM data for another model has been transferred. Transmit valid ROM data. Unknown file. Check file format.
Turn off printer, wait a while, then turn it on again. 03900001-4042 MIT data transfer failure Verify the validity of MID data before transferring it. Hardware error.
03130031-2F2B
Turn off printer, wait, then turn on again. 03130031-2F2B LF operation failure Check to see if paper has not jammed. Check the feed motor and feed roller. Printhead error
Open top cover and replace the printhead. 03800200-2802 Invalid printhead installed Replace printhead Printhead error
Open top cover and replace the right printhead. 03800300-2801 Printhead DI compensation failure Replace printhead Printhead error
Open top cover and replace the right printhead. 03800400-2803 Printhead EEPROM error Replace printhead Hardware error.
03800500-2F2F
Turn off printer, wait, then turn on again. 03800500-2F2F Non-discharging error Identify the head management sensor unit
Replace the head management sensor unit
Replace the printhead Hardware error.
03800500-2F30
Turn off printer, wait, then turn on again. 03800500-2F30 Non-discharging position adjustment error Identify the head management sensor unit
Replace the head management sensor unit
Replace the printhead Ink tank is empty.
Press OK and replace ink tank. 03810104-2500 Bk ink tank empty Renew the Bk ink tank Ink tank is empty.
Press OK and replace ink tank. 03810101-2501 Y ink tank empty Renew the Y ink tank Ink tank is empty.
Press OK and replace ink tank. 03810102-2502 M ink tank empty Renew the M ink tank Ink tank is empty.
Press OK and replace ink tank. 03810103-2503 C ink tank empty Renew the C ink tank Ink tank is empty.
Press OK and replace ink tank. 03810106-2506 MBk ink tank empty Renew the MBk ink tank Ink tank is empty.
Press OK and replace ink tank. 03810106-2507 MBk2 ink tank empty Renew the MBk ink tank Ink insufficient.
Press OK and replace ink tank. 03810204-2580 Low on the Bk ink tank (as during cleaning) Replace with a fully replenished Bk ink tank Ink insufficient.
Press OK and replace ink tank. 03810201-2581 Low on the Y ink tank (as during cleaning) Replace with a fully replenished Y ink tank Ink insufficient.
Press OK and replace ink tank. 03810202-2582 Low on the M ink tank (as during cleaning) Replace with a fully replenished M ink tank Ink insufficient.
Press OK and replace ink tank. 03810203-2583 Low on the C ink tank (as during cleaning) Replace with a fully replenished C ink tank Ink insufficient.
Press OK and replace ink tank. 03810206-2586 Low on the MBk ink tank (as during cleaning) Replace with a fully replenished MBk ink tank Ink insufficient.
Press OK and replace ink tank. 03810204-2590 Low on the Bk ink tank (during pre-printing checks) Replace with a fully replenished Bk ink tank Ink insufficient.
Press OK and replace ink tank. 03810201-2591 Low on the Y ink tank (during pre-printing checks) Replace with a fully replenished Y ink tank Ink insufficient.
Press OK and replace ink tank. 03810202-2592 Low on the M ink tank (during pre-printing checks) Replace with a fully replenished M ink tank Ink insufficient.
Press OK and replace ink tank. 03810203-2593 Low on the C ink tank (during pre-printing checks) Replace with a fully replenished C ink tank Ink insufficient.
Press OK and replace ink tank. 03810206-2596 Low on the MBk ink tank (during pre-printing checks) Replace with a fully replenished MBk ink tank Ink tank error.
Press OK and replace ink tank. 03830204-2540 Bk ink tank ID error Replace with a valid Bk ink tank Ink tank error.
Press OK and replace ink tank. 03830201-2541 Y ink tank ID error Replace with a valid Y ink tank Ink tank error.
Press OK and replace ink tank. 03830202-2542 M ink tank ID error Replace with a valid M ink tank Ink tank error.
Press OK and replace ink tank. 03830203-2543 C ink tank ID error Replace with a valid C ink tank Ink tank error.
Press OK and replace ink tank. 03830206-2546 MBk ink tank ID error Replace with a valid MBk ink tank Ink tank error.
Press OK and replace ink tank. 03830206-2547 MBk2 ink tank ID error Replace with a valid MBk ink tank No ink tank loaded.
Press OK and check ink tank. 03830104-2520 BK ink tank not installed Install a Bk ink tank No ink tank loaded.
Press OK and check ink tank. 03830101-2521 Y ink tank not installed Install a Y ink tank No ink tank loaded.
Press OK and check ink tank. 03830102-2522 M ink tank not installed Install a M ink tank No ink tank loaded.
Press OK and check ink tank. 03830103-2523 C ink tank not installed Install a C ink tank No ink tank loaded.
Press OK and check ink tank. 03830106-2526 MBK ink tank not installed Install a MBk ink tank No ink tank loaded.
Press OK and check ink tank. 03830106-2527 MBK2 ink tank not installed Install a MBk ink tank Top cover is open.
Turn off printer, wait a while, and turn it on again. 03031000-2F38 Top cover abnormally open Close the top cover and turn on the printer again. Ink tank cover is open.
Turn off printer, wait a while, and turn it on again. 03031000-2E10 Ink tank cover abnormally open Close the ink tank cover and turn on the printer again. Maintenance cartridge full.
Replace the maintenance cartridge. 03841001-2819 Maintenance cartridge full Renew the maintenance cartridge. No Maintenance
Cartridge capacity.
Replace the maintenance cartridge. 03841001-281B Not enough space in the maintenance cartridge prior to cleaning Replace the maintenance cartridge. Maintenance cartridge problem.
Replace the maintenance cartridge. 03841201-2816 Maintenance cartridge EEPROM error Renew the maintenance cartridge. Maintenance cartridge problem.
Replace the maintenance cartridge. 03841201-2817 Maintenance cartridge ID error Renew the maintenance cartridge. Borderless printng not possible.
Check roll position.
Online: Print Load/Eject:
Change Paper 03861001-2405 Paper loaded at a position inaccessible for borderless printing Check to see if a borderless printing spacer is installed. Reload the paper. Borderless printng not possible.
Check paper size setting.
Online: Print
Load/Eject: Change Paper 03861001-2406 Data unfit for borderless printing Check the paper size. Change the paper size. Insufficient paper for job
Online: Print
Stop: Stop Printing
Load/Eject: Change Paper 03862000-2E09 Not enough roll media on remaining roll media quantity detection Renew the supply of roll media. Cannot cut paper.
Lift the release lever and reload the paper. 03870001-2015 Cutting failure Cut paper manually. Check the cutter. Cannot adjust optic axis.
Press Online to clear the error. 03863000-2824 Optical axis error Check the multi sensor.
Check the head management sensor. This type of paper is not compatible with HP-GL/ 2.
Online: Print
Stop: Stop Printing
Load/Eject: Change Paper 03061000-2E15 Non-support media of HP-GL/2 Exchange for the compatible paper to HP-GL/2 before reprinting. Mail box full.
Delete unwanted data on your computer to resume printing.
Press Stop to cancel printing. 031A1001-2905 The job store executed when the free hard disk space left for Personal Boxes in the printer’s hard disk is full. Delete unneeded jobs stored in Personal Boxes. Mail box full.
Cannot save. Delete unwanted data on your computer to resume printing.
Press Stop to cancel printing. 031A1006-2906 The store executed when 32 jobs are stored in the Personal Box. Delete unneeded jobs stored in Personal Boxes. Hard disk error.
Press OK to reformat 031A1002-2908 Hard disk format error Press the [OK] button to start reformatting the hard disk. When formatting is finished, the printer automatically restarts. File read error.
Turn off printer, wait a while, and turn it on again.
Invalid files will be deleted. 031A1002-2909 Hard disk file error Restart the printer. Only the corrupted files will be deleted, and the printer will restart. Hardware error. 03800500-2F31
Turn off printer, wait, then turn on again. 03800500-2F31 Non-discharge detection optical axis error Check the head management sensor. Replace the head management sensor. Replace the printhead. Hardware error. 03130031-2F3C
Turn off printer, wait, then turn on again. 03130031-2F3C LF pressure error Check the pinch roller and surrounding part. Replace the pinch roller pressure drive unit. No printhead
Install printhead. 03800100-2800 Printhead not installed Install the printhead. Wrong printhead. Open top cover and replace the printhead. 03800200-2811 Printhead version error Replace the printhead. No maintenance cartridge.
Check the maintenance cartridge. 03841101-2818 Mauntenance cartridge not installed Install the maintenance cartridge. This type of media is not compatible with HP-GL/ 2. 03860006-2825 Paper type mismatch at HP-GL/2 printing Exchange for the compatible paper to HP-GL/2 before reprinting. Cannot cut paper.
Lift the release lever and reload the paper. 03870001-2019 Cut failure (during jam occure) Check the cutter unit and surrounding part. Replace the cutter. Insufficient paper for job 03862001-2E31 Not enough roll media Renew the supply of roll media. Paper jam.
Manually rewind roll all the way and press OK. 03010000-2E3A Madia load failure Check the pick-up unit and roll media. Check to see if paper has not jammed. Sheet printing is selected. Press Load/Eject and load sheets. 03060100-2E02 Cut sheet in not set Load cut sheets at the paper tray port. Borderless printng not possible. Check supported paper. 03861001-2408 Borderless printing disabled (unsupported size) Check the media size. Change the media size. Borderless printng not possible. Paper stretched or shrank.
Confirm usage cond. of the paper. 03861001-2407 Borderless printing disabled (engine detection) Reload the paper. Roll printing is selected. Press Load/Eject and load a roll. 03060A00-2E35 Roll media is not loaded for internal printing. Reload the roll media.
hp-concentra-wrapper-portlet
![]()
Actions
After sending a print job, a Paper Mismatch or Paper Size Mismatch message displays on the printer control panel or computer when the print job paper settings do not match what is loaded in
the printer.
Troubleshoot a ‘Paper Mismatch’ message (Windows)
Identify and resolve incorrect or mismatched paper size issues on a Windows computer.

Perform the following tasks in the order given. Use the printer after each task to see if the issue is resolved.
Check the paper size and source settings (Windows)
Check the paper size and source settings for your print job in Windows.
-
In the program you are trying to print from, click File, and then click Print.
-
Make sure your printer is selected, and then open the Properties dialog box.
Depending on the software program, the button might be Properties, Options, Printer Setup, Printer, or Preferences.
-
For most HP printers, click the Paper/Quality tab, and then continue with these steps.
-
For HP Laser printers, click the Paper tab, click the Original Size drop-down, and then make sure the paper size matches the type of paper loaded into the printer. Click the Output Size drop-down, select Same as Original Size, and then click OK.
-
-
Click Paper Source, and then confirm the correct paper tray is selected.
-
Click Advanced, and then click the Paper Size drop-down.
-
Make sure the paper size matches the type of paper loaded into the printer.
Note:
If the exact paper size is missing from the list, select the size closest to the paper loaded into the tray.
-
Click OK.
Reset the printer
Reset the printer to recover from printer errors or failures.
-
If your printer has a rechargeable battery, remove it.
-
With the printer turned on, disconnect the power cord from the printer.
-
Unplug the power cord from the power source.
-
Wait 60 seconds.
-
Reconnect the power cord to a wall outlet and to the printer.
Note:
HP recommends plugging the printer directly into a wall outlet.
-
Turn on the printer to complete the reset.
Update the printer firmware
HP regularly releases new firmware versions with printer enhancements or issue fixes. Update firmware on a regular basis to
make sure you are getting the most out of your printer.
-
Update from the printer control panel: Many HP printers with touchscreens or menus can connect directly to HP to find and
install updates. Make sure the printer is on a network with an active Internet connection. If the printer is connected with
a USB cable, use one of the other options.On the printer, locate the Product Update or Check for Updates menu by pressing the HP ePrint icon or button (
or
). Or open the Setup, Service, or Settings menu, select Preferences, Printer Maintenance, or Tools, and then select Web Services, Printer Update, or LaserJet Update.
-
Download updates from HP Customer Support: With the printer turned on and connected to the computer or a network, go to HP Software and Driver Downloads to check for and install available updates listed under Firmware.
-
Install updates through the HP Smart app: Open the HP Smart app, and then create an account or sign in. If you do not have HP Smart, download it from 123.hp.com or your app store. After adding the printer, click the printer image, click Printer Home Page (EWS) or Advanced Settings, click Tools or Web Services, and then click Printer Updates.
Uninstall HP print driver and use HP Smart (Windows)
Uninstall the HP print driver and install and use HP Smart on a Windows computer.
-
Disconnect any USB cables from the printer.
-
In Windows, search for and open Add or remove programs.
-
Look for your HP printer name in the list of programs.
-
If you find your printer, click the printer name, and then click Uninstall.
-
If you do not find your printer, search for and open Printers & scanners, click your printer, and then click Remove device.
-
-
If a User Account Control message displays, click Yes.
-
Follow the instructions to complete the software removal, and then restart the computer.
-
Go to 123.hp.com to download and install HP Smart.
Troubleshoot a ‘Paper Mismatch’ message (Mac)
Identify and resolve incorrect or mismatched paper size issues on a Mac.
Perform the following tasks in the order given. Use the printer after each task to see if the issue is resolved.
Check the paper size and source settings (Mac)
Check the correct paper size and source settings in macOS.
-
Open the item you want to print, and then open the print job settings.
-
Documents and photos: Click the Spotlight icon
to search for and open Preview. Click to open the item, and then click .
-
Webpages: Open the page you want to print, and then click .
-
-
Select your printer, and then click Show Details if the button displays.
-
Select Paper Type/Quality or Media & Quality, and then click Feed From or Source to select the tray the paper is loaded in.
-
Select the paper you are using from the Paper Size menu.
If the Paper Size menu is not listed, click to access the menu.
Note:
If the exact paper size is not in the list, select the size closest to the paper you are printing on.
-
Click Print.
Reset the printer
Reset the printer to recover from printer errors or failures.
-
If your printer has a rechargeable battery, remove it.
-
With the printer turned on, disconnect the power cord from the printer.
-
Unplug the power cord from the power source.
-
Wait 60 seconds.
-
Reconnect the power cord to a wall outlet and to the printer.
Note:
HP recommends plugging the printer directly into a wall outlet.
-
Turn on the printer to complete the reset.
Update the printer firmware
HP regularly releases new firmware versions with printer enhancements or issue fixes. Update firmware on a regular basis to
make sure you are getting the most out of your printer.
-
Update from the printer control panel: Many HP printers with touchscreens or menus can connect directly to HP to find and
install updates. Make sure the printer is on a network with an active Internet connection. If the printer is connected with
a USB cable, use one of the other options.On the printer, locate the Product Update or Check for Updates menu by pressing the HP ePrint icon or button (
-
Download updates from HP Customer Support: With the printer turned on and connected to the computer or a network, go to HP Software and Driver Downloads to check for and install available updates listed under Firmware.
-
Install updates through the HP Smart app: Open the HP Smart app, and then create an account or sign in. If you do not have HP Smart, download it from 123.hp.com or your app store. After adding the printer, click the printer image, click Printer Home Page (EWS) or Advanced Settings, click Tools or Web Services, and then click Printer Updates.
Uninstall the HP software and use HP Smart (Mac)
Uninstall the HP print driver and then install the HP Smart app to set up and use the printer.
-
Download and install HP Easy Start from 123.hp.com/setup.
-
From the HP Easy Start drop-down menu, select Uninstall HP Software.
-
Follow the steps to uninstall all HP software.
-
Go to HP Smart — Mac App Store to download and install HP Smart.
- Sign up
- Sign in
- HP Community
- Printers
- Printer Paper Jams & Feed Issues
- Change paper tray
![]()

Create an account on the HP Community to personalize your profile and ask a question
Your account also allows you to connect with HP support faster, access a personal dashboard to manage all of your devices in one place, view warranty information, case status and more.

03-24-2021
10:39 AM

HP Recommended
- Mark as New
- Bookmark
- Subscribe
- Permalink
- Flag Post
Product: Clare Laser jet Pro MFP M283fdw
Operating System: macOS 10.15 Catalina
Hi — my default paper tray has changed from 2 to 1 and I need it back on 2, but cannot see how to do this in the menus. Thanks
1 ACCEPTED SOLUTION
03-24-2021
07:43 PM
HP Recommended
- Mark as New
- Bookmark
- Subscribe
- Permalink
- Flag Post
Make sure that your tray 2 is set properly for size and type. If you print any reports from the control panel of the printer do they come out properly? If yes then it may be that your driver on your computer has been changed to default to tray 1.
If you find the information provided useful or solves your problems, help other users find the solution easier by giving kudos and marking my post as an accepted solution.
I am a volunteer, offering my knowledge to support fellow users, I do not work for HP nor speak for HP.


Was this reply helpful?
Yes
No
1 REPLY 1
03-24-2021
07:43 PM
HP Recommended
- Mark as New
- Bookmark
- Subscribe
- Permalink
- Flag Post
Make sure that your tray 2 is set properly for size and type. If you print any reports from the control panel of the printer do they come out properly? If yes then it may be that your driver on your computer has been changed to default to tray 1.
If you find the information provided useful or solves your problems, help other users find the solution easier by giving kudos and marking my post as an accepted solution.
I am a volunteer, offering my knowledge to support fellow users, I do not work for HP nor speak for HP.
Was this reply helpful?
Yes
No
![]()
Be alert for scammers posting fake support phone numbers and/or email addresses on the community.
If you think you have received a fake HP Support message, please report it to us by clicking on «Flag Post».
† The opinions expressed above are the personal opinions of the authors, not of HP. By using this site, you accept the Terms of Use and Rules of Participation.

-
English
Open Menu

† The opinions expressed above are the personal opinions of the authors, not of HP. By using this site, you accept the <a href=»https://www8.hp.com/us/en/terms-of-use.html» class=»udrlinesmall»>Terms of Use</a> and <a href=»/t5/custom/page/page-id/hp.rulespage» class=»udrlinesmall»> Rules of Participation</a>.