hp-concentra-wrapper-portlet
![]()
Actions
Issue
The error message ‘Clear carriage jam and press OK to continue’ displays on the control panel while printing.
The following symptoms might also accompany the error message:
-
The product does not print.
-
The carriage is stuck and does not move.
-
The product makes loud grinding noises.
How to use the solutions in this document
To resolve the issue, try each solution in this document in the order presented.
 IMPORTANT: Each time you try a solution, try to print a self-test report to determine if the hardware is functioning correctly. To print a self-test report, use the steps in the following table.
|
How to print a self-test report |
|
note:
Refer back to the steps in this table after attempting each solution.
Solution one: Turn the All-in-One off and on again
Follow these steps to turn the product on, and then off again, to reset the print mechanism.
-
Press the Power button (
 ) to turn off the product.
 -
Wait 15 seconds.
-
Press the Power button (
) to turn the product on again.note:
The product might go through a warm-up period of up to two minutes. The product lights might flash and the carriage might move. Wait until the warm-up period is complete before proceeding.
-
Try to print a self-test report. See the steps on how to print a self-test report at the top of this document.
-
If these steps resolved the issue, and the test page prints, there is no need to continue troubleshooting. Reconnect the USB cable, and then try to print again.
-
If the issue persists, continue with the next solution.
-
If the test page does not print, continue with the next solution.
Solution two: Clear any paper jam
Jammed paper can cause the carriage to stall. Follow these steps to clear any jammed paper.
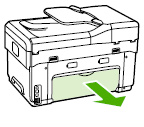
Step one: Remove any loose paper
Remove any loose paper from the input tray and output tray.
caution:Do not remove jammed paper at this stage. Trying to clear a paper jam from the front of the product can damage the print mechanism.
Step two: Clear the paper jam from the back of the All-in-One
Use the following steps to clear a paper jam from the back of the product. If the two-sided printing accessory (duplexer) is not installed on the back of the product, skip to the next section to clear the jam through the rear access door.
Clear the paper jam from the two-sided printing accessory (duplexer)
-
Press the Power button (
) to turn off the product. -
Disconnect the USB or Ethernet cable from the back of the product.
-
Disconnect the power cord from the back of the product.
-
Remove the two-sided printing accessory (duplexer) from the back of the product. Press the buttons on each side of the duplexer, and then pull it toward you.
Figure : Remove the duplexer
-
Gently remove any jammed paper from the rollers, inside the product.
caution:If the paper tears while you are removing it from the rollers, check the rollers for torn pieces of paper that might remain inside the product. If any torn pieces of paper remain inside the product, more paper jams are likely to occur.
-
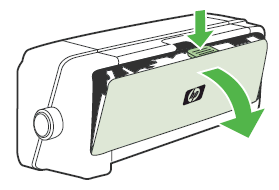
Push down the latch on the top of the duplexer, and then lower its cover.
Figure : Open the cover of the duplexer
-
Gently remove any jammed paper from the duplexer.
-
Reattach the duplexer to the back of the product.
-
Reconnect the power cord to the back of the product.
-
Press the Power button (
) to turn on the product.
Clear the paper jam through the rear access door
-
Press the Power button (
) to turn off the product. -
Disconnect the power cord from the back of the product.
-
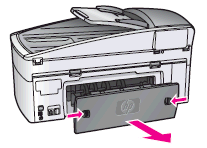
Remove the rear access door. Press in the tabs on the rear access door, and then pull it away from the product.
Figure : Remove the rear access door
-
Gently pull the paper out of the rollers.
caution:If the paper tears while you are removing it from the rollers, check the rollers for torn pieces of paper that might remain inside the product. If any torn pieces of paper remain inside the product, more paper jams are likely to occur.
If you are printing labels, see if any are missing from the label sheet. If any labels are missing, locate them inside the product, and then remove them carefully.
-
Reattach the rear access door.
Step three: Clear the paper jam from the front of the All-in-One
If you cannot remove the paper jam from the back of the product, follow these steps to remove the paper jam from the front.
-
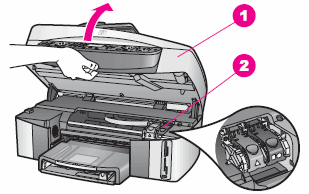
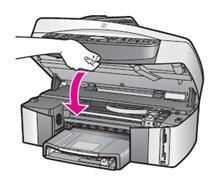
Open the carriage access door.
-
Carriage access door
-
Carriage
Figure : Open the carriage access door
-
-
Gently pull the paper out of the rollers.
note:
Remove paper from the front of the product as carefully as possible. If any torn pieces of paper remain inside the product, more paper jams are likely to occur, and this could damage the print mechanism.
-
Close the carriage access door.
Figure : Close the carriage access door
-
Reconnect the power cord to the back of the product.
-
Press the Power button (
) to turn on the product. -
Try to print a self-test report. See the steps on how to print a self-test report at the top of this document.
-
If these steps resolved the issue, and the test page prints, there is no need to continue troubleshooting. Reconnect the USB cable, and then try to print again.
-
If the issue persists, continue with the next solution.
-
If the test page does not print, continue with the next solution.
Solution three: Make sure that the carriage moves freely
Use the following steps to make sure that the carriage moves freely.
-
Press the Power button (
) to turn on the product. -
Open the carriage access door. The carriage might try to move into the access area. If so, allow it to move to that position.
-
Carriage access door
-
Carriage
Figure : Open the carriage access door
-
-
Without turning off the product, disconnect the power cord from the back of the product.
caution:You must disconnect the power cord to move parts by hand without the risk of an electrical shock.
-
Disconnect the power cord from the wall outlet.
-
Look inside the product to see where the carriage is stuck, and then check for any torn paper or other objects that might be restricting the carriage.
note:
You might need a flashlight to illuminate areas for proper viewing.
-
Reach inside the product through the cartridge door, and then manually move the carriage.
-
If the carriage is stuck on the right side of the product, move the carriage to the left side of the product.
-
If the carriage is stuck on the left side of the product, move the carriage to the right side of the product.
-
If the carriage is stuck in the middle of the product, move the carriage to the right side of the product.
-
-
Remove any loose paper or obstructions found.
-
Make sure that the carriage can move freely across the width of the product by gently pushing the carriage to the left and then to the right.
-
Close the carriage access door.
Figure : Close the carriage access door
-
Reconnect the power cord to the back of the product.
-
Reconnect the power cord to the wall outlet.
-
Press the Power button (
) to turn on the product.note:
The product might go through a warm-up period of up to two minutes. The product lights might flash and the carriage might move. Wait until the warm-up period is complete before proceeding.
-
Try to print a self-test report. See the steps on how to print a self-test report at the top of this document.
-
If these steps resolved the issue, and the test page prints, there is no need to continue troubleshooting. Reconnect the USB cable, and then try to print again.
-
If the issue persists, continue with the next solution.
-
If the test page does not print, continue with the next solution.
Solution four: Remove and reinstall the cartridges
Improper placement or incorrect installation of the cartridges might cause the carriage stall error. Follow these steps to remove and then reinstall the cartridges.
Step one: Remove the cartridges
-
Press the Power button (
) to turn on the product. -
Open the cartridge access door, and then wait until the carriage is idle and silent.
-
Carriage access door
-
Carriage
Figure : Open the carriage access door
-
-
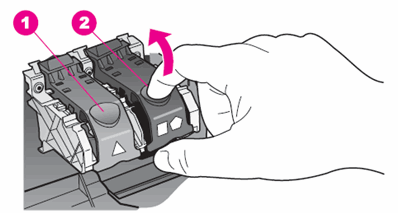
Raise each of the cartridge latches.
Press down on the top of the latch, and then pull out the bottom of the latch to release it.
-
Cartridge latch for the tri-color cartridge
-
Cartridge latch for the black, photo, and gray photo cartridges
Figure : Press down on the cartridge latch
-
-
Push down on the cartridge to release it, and then pull it toward you out of its
slot.Figure : Remove the cartridge
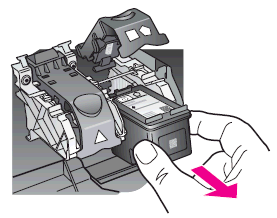
caution:Do not touch the copper-colored contacts or ink nozzles.
Touching these parts can result in clogs, ink failure, and bad electrical
connections.Figure : Do not touch the contacts or ink nozzles

-
Check for obstructions under and around the carriage. Remove any obstructions.
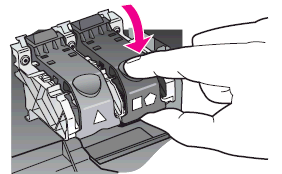
Step two: Reinstall the cartridges
-
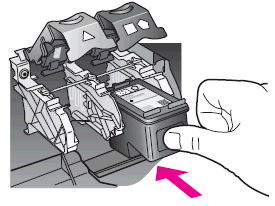
Hold the cartridge so that the nozzles face down and the contacts face toward the carriage.
-
Slide the cartridge at a slight upward angle into the empty slot, and then gently push it forward until it snaps into place.
Figure : Slide the cartridge into the empty slot
-
Press down on the cartridge snaps into place.
Figure : Press down on the cartridge latch
-
Repeat these steps for the other cartridge.
-
Close the carriage access door.
Figure : Close the carriage access door
-
Try to print a self-test report. See the steps on how to print a self-test report at the top of this document.
-
If these steps resolved the issue, and the test page prints, there is no need to continue troubleshooting. Reconnect the USB cable, and then try to print again.
-
If the issue persists, continue with the next solution.
-
If the test page does not print, continue with the next solution.
Solution five: Plug the product directly into a wall outlet
Plug the product directly into a wall outlet to make sure the power source is functioning correctly.
-
Disconnect the power cord from the back of the product.
-
Disconnect the power cord from any power strip or surge suppressor, and then plug it directly into the wall outlet.
-
Reconnect the power cord to the back of the product.
-
Press the Power button (
) to turn on the product. -
Try to print a self-test report. See the steps on how to print a self-test report at the top of this document.
note:
If the product prints when plugged directly into a wall outlet, the power strip or surge suppressor might not be allowing enough voltage to reach the product.
-
If these steps resolved the issue, and the test page prints, there is no need to continue troubleshooting. Reconnect the USB cable, and then try to print again.
-
If the issue persists, continue with the next solution.
-
If the test page does not print, continue with the next solution.
Solution six: Perform a power reset
Use the following steps to perform a reset.
-
Press the Power button (
) to turn on the product. -
Disconnect the power cord from the back of the product.
-
Disconnect the power cord from the electrical outlet.
-
Wait 15 seconds.
-
Reconnect the power cord to the electrical outlet.
-
Reconnect the power cord to the back of the product.
-
Press the Power button (
) to turn on the product. -
Try to print a self-test report. See the steps on how to print a self-test report at the top of this document.
-
If these steps resolved the issue, and the test page prints, there is no need to continue troubleshooting. Reconnect the USB cable, and then try to print again.
-
If the test page prints successfully, but you experience a different issue with your printer, go to HP Product Support Home Page, and then search for another document that relates to the issue you are experiencing.
note:
If the page displays in the wrong region or language, click the Region — Language link in the upper right corner of your browser. Then you can select the correct region and language.
-
If the product does not print a test page, there is an issue with the product hardware. Continue to the next solution.
Solution seven: Service the product
Service or replace your HP product if the issue persists after completing all the preceding steps.
Go to Contact HP Customer Support to schedule a product repair or replacement. If you are in Asia Pacific, you will be directed to a local service center in your area.
To confirm your warranty status, go to HP Product Warranty Check. Repair fees might apply for out-of-warranty products.
In this article, we will look at several HP printer jam issues and provides solutions to each issue.

Locations of HP Printer Jams [Quick Guide]
The following are the 5 major areas where paper jams occur on HP printers:
i. Output bin.
ii. Tray 1 area.
iii. Tray 2 (Optional Tray 3, Tray 4, and Tray 5).
iv. Right door.
v. Lower-right door.
In this article, we will look at how to clear a paper jam in these locations mentioned on different HP printer models.
Types of HP Printer Jam [Quick Guide]
The following are the paper jam types that affect HP printers:
i. Stay Jam: This type of jam happens when a paper remains in your printer’s sensor area longer than it is supposed to.
ii. Delay Jam: You will experience this kind of jam when the loaded paper fails to get to the printer’s sensor at the time it is supposed to.
iii. Fuser Wrap Jam: This occurs when your printer’s fuser senses the loaded paper’s foremost edge but does not detect the rearmost paper edge.
iv. Residual Jam: You will get a residual jam on your HP printer when your printer notices a paper jam in its sensor when you turn on the device or close the printer door. This is the hardest jam type to clear because it is hard to detect since the paper is usually not visible at once.
We decided to explain these jam types because we will encounter them as we go further.
In this section, we will quickly discuss some of the commonest causes of HP printer jams. We will also provide you with solutions to each cause to enable you to prevent jams in the future.
1. The paper in use doesn’t meet the requirements and specifications
Not all papers can be used on certain HP printers; some printers are designed to use only some kinds of paper. Therefore, when a paper that doesn’t meet the requirements and specifications is used, it could lead to a jam.
Hence, to avoid this, you need to check the paper specifications that can be used on your particular printer model. Once you get the specifications, ensure that you only use those kinds of papers.
2. Reuse of already used paper (copied or printed on)
Many folks do not know that using a paper that has been copied or printed on already for the second time can lead to a paper jam.
Hence, if you are in the habit of reusing paper in this manner, you need to desist as it might be the reason you’ve been experiencing paper jams.
3. Skewed paper
If the loaded paper is lopsided and not aligned properly in the print tray, then it could lead to a jam.
To fix this, ensure that you use the tray guides to adjust and align the paper stack correctly. The paper should be held in place by the guides, but they shouldn’t squeeze or bend the stack.
4. Paper is sticking or binding together
When the papers in the stack are sticking or binding together, the printer might pick more than one paper at a time. This, in turn, can lead to a jam in your HP printer.
Therefore, to avoid this, take out the stack and then flex it, flip it, or rotate it completely to the other end. After that, load the paper again carefully into the print tray.
5. Poor paper condition
This could be a result of different issues such as a tear, wrinkle, dirt, etc. Whatever the case may be, once the paper condition is poor, it could lead to jam issues.
Hence, once you notice such conditions, you need to change the paper and use one that is in pristine condition.
6. Paper is taken out in haste from the printer’s output bin
Many folks make this simple mistake and it is one of the reasons for HP printer jam. Once the paper comes out through the output bin, it is expected that you allow the paper to settle before removing it.
If this is the cause of your HP printer jam, you can fix it by resetting your printer. After that, wait for the paper to settle completely before you remove it from your printer’s output bin.
7. The edges of the paper are jagged or rough
If the paper you loaded has jagged or rough edges, it will cause the paper to be stuck in the printer.
Therefore, to avoid paper jam, always inspect the edges of your paper. If you discover that they are jagged or rough, change the paper.
8. Embossed or perforated paper
When you try to load an embossed or perforated paper stack into your printer, you are bound to get a jam. The reason this happens is that these paper types cannot separate easily.
So, when you use these paper types, feed them individually into your printer instead of loading a stack. Also, use Tray 1 instead of other input trays when loading these paper types.
9. Paper was incorrectly stored
The way you store your paper also affects its performance when loaded into your printer’s input tray. When you store your paper incorrectly, it could lead to an HP printer jam.
If you didn’t store your paper in its original packaging, then the entire stack might be compromised. In such a case, you will need to change the stack in your printer’s input tray.
10. Incorrect component installation
If components such as the transfer belt and transfer roller aren’t installed correctly, it could lead to a jam in your HP printer.
Hence, you need to confirm that all the components are correctly installed if your HP printer jams every time.
11. Incorrect input tray loading
If you load paper incorrectly into any of your input trays, it can cause an HP printer jam in the tray. Therefore, you need to ensure that you load the paper correctly.
To do this, ensure that you don’t load more than the maximum number of papers into the tray. Hence, check the stack and confirm that it isn’t above the tray’s maximum height mark. If the stack exceeds the mark, you need to remove excess paper.
12. During double-sided printing, the paper was taken out before the other side of the original was printed
This is another simple mistake that slips the mind of HP printer users when performing double-sided printing.
If this happens to you, you can resolve the issue by resetting your printer. After that, reprint the document. Wait for the paper to settle completely before taking it out of your printer’s output bin.
13. Internal tray rollers fail to pick up a paper
When this happens, it is usually because the loaded paper is heavier than the specified paper weight that your printer supports. In most cases, a paper that is above the 220 g/m2 weight won’t be picked by a good number of HP printers. Therefore, you need to ensure that the loaded paper isn’t heavier than the specified paper weight.
Apart from the paper weight that could lead to a jam, the rollers themselves might also be a problem. Therefore, you need to check them for wear and damage. If you find that they are worn out or damaged, then you should replace them.
14. The packing material wasn’t completely removed
If there are still packing materials in your printer, they could obstruct the free movement of components within your printer and then lead to a jam.
Hence, you need to examine your printer for packing materials such as plastic shipping locks, packing tape, and cardboard. Ensure that all these materials are removed.
15. 10 x 15 cm (4 x 6 in) paper is used but the HP postcard media insert isn’t installed in your printer’s Tray 2 OR 10 x 15 cm (4 x 6 in) isn’t used but the HP postcard media insert is installed in your printer’s Tray 2
Whenever you are using 10 x 15 cm (4 x 6 in) paper, ensure that you install the HP postcard media insert into your printer’s Tray 2. However, when you print on other paper sizes, remove the HP postcard media insert.
How Do I Fix A Carriage Jam On My HP Printer? [Solutions]
To fix an HP printer carriage jam, there are certain solutions you can try out. These solutions have been carefully discussed here: Clear HP Printer – How to Clear HP Printer Carriage Jam. Therefore, we recommend that you click on the link to find out how to fix a carriage jam on an HP printer.
If your HP printer is displaying a carriage jam or e3 error message, then you can use the solutions in the article we just linked. You can also check HP Printer Flashing E Error Codes – How to Fix HP Printer Flashing E3 if you need more information on how to clear the HP printer carriage jam error.
HP printer carriage jam but no paper and HP c5280 printer carriage jam issues can also be fixed using the solutions in the links we just shared.
To read more awesome articles, click any of the links below…
Your HP Printer Copying Problems Fixed
How to Reset HP Printer [Detailed Guide]
Clear HP Printer…[How To/Issues & Solutions]
Scan with HP Printer [How To/Issues & Solutions]
How to Turn On HP Printer [Detailed Guide]
HP Printer Won’t Turn On/Off [Solutions]
How to Add HP Printer [Detailed Guide]
Why Does My HP Printer Keep Jamming? [Answered]
If your HP printer keeps jamming every time, then it could due to several reasons which we list below:
Reasons Why Your HP Printer is Always Jamming
The following are the reasons why your HP printer is jamming:
i. The paper was loaded wrongly into the input tray.
ii. The printer paper rollers are either dirty or damaged.
iii. Damp, wrinkled, or torn paper is lodged in the input tray or output tray.
iv. You are trying to use more than one paper type or size at a time.
v. There is a paper jam in your printer in an area that isn’t visible.
vi. The printer’s paper path is obstructed by foreign material.
vii. The printer still has torn paper pieces inside it from an earlier paper jam.
viii. The input tray is overloaded with paper.
If you are wondering “why does my HP printer keep jamming paper?” the reasons we just shared are what you are looking for.
How to Fix an HP Printer That Keeps Jamming
To fix an HP printer that keeps jamming, do the following:
i. Ensure that you load the paper correctly into the input tray.
ii. Clean dirty paper rollers and replace the ones that are damaged.
iii. Remove any damp, wrinkled, or torn paper from the input and output tray.
iv. Use the same paper type and size at a time.
v. Check the insides of your printer for any paper jam that isn’t easily visible.
vi. Check for foreign material in the paper path.
vii. Remove torn paper pieces inside your printer.
viii. Do not overload the input tray with excess paper.
The following solutions will work for the following printers that keep jamming: HP 8720, HP 3830, HP 6968, HP 9015, HP LaserJet 1320, HP LaserJet 1200, HP Envy, Deskjet, and Photosmart printers.
How Do I Clear A Cartridge Jam On My HP Printer? [Solved]
To fix the HP cartridge jam error, we recommend that you click on this link: HP Printer Errors and Solutions – HP Printer Cartridge Jam Error, and read the instructions carefully to learn how to fix a cartridge jam in an HP printer.
The instructions in the link will also guide you on how to fix HP 4250 paper jam under the cartridge.
HP Printer Says Jam in Cartridge Area [How to Fix]
To fix the HP printer jam in the cartridge area, click this link: HP Printer Error E4 – How to Clear Paper Jam from the Cartridge Access Area, and then read the instructions under the “How to Clear Paper Jam from the Cartridge Access Area” section.
The instructions shared in that subsection will also help you fix the jam in the cartridge area for HP LaserJet 1536 and HP LaserJet 400.
How to Fix HP Printer Jam in Fuser Area
To fix the HP printer fuser area jam, do the following steps:
Step 1: Turn off your HP printer.
Warning: Wait for about 30 minutes to allow the fuser to cool to prevent minor burns as you work on the printer.
Step 2: Turn your HP printer to allow the rear cover to face you.
Step 3: Detach the dust cover of Tray 2.
Step 3: Unplug your printer’s power cable from your printer.
Step 4: Open your printer’s rear output bin before pulling out the extension.
Step 5: Detach your printer’s rear output bin as well as its extension from your printer by bending the bin in the middle slightly, and then free tab 1 followed by tab 2.
Step 6: Rotate the blue levers to release the fuser.
Step 7: Pull out the fuser from your printer. Ensure you hold the printer at the back while you pull out the fuser. You shouldn’t pull the black plastic flapper.
Step 8: Take out the jammed paper.
Caution: Don’t remove the jammed paper with any sharp item; doing so could destroy the fuser.
Step 9: Put the fuser back into the printer with the left side going in first. Ensure that the fuser is firmly set in place inside your printer.
Step 10: Rotate the blue levers horizontally to fasten the fuser in its position.
Step 11: Reattach the rear output bin to your printer with the left side going in first.
Step 12: Connect the power cable to your HP printer.
Step 13: Reattach the dust cover of Tray 2.
Step 14: Turn on your HP printer.
If the HP paper jam in the fuser error message is still displaying, then you need to check other parts of your printer for a paper jam.
If you’ve confirmed that there is no paper jam in other locations, then you need to service your HP printer. Contact HP for further assistance and repair.
You can try the above HP printer fuser wrap jam solutions for your HP 1020 and HP p3015 printers if you have the same fuser jam issue.
How to Fix HP Printer Jam in Fuser Area for HP LaserJet Pro 400 Printer M401 (And Similar Models)
To fix HP printer jam in fuser area for HP LaserJet Pro 400 Printer M401 and similar models, do the steps below:
Step 1: Open your printer’s rear door.
Step 2: Pull out the jammed paper.
Note: In case the paper gets torn, ensure that you remove all the pieces before you continue printing.
Caution: Don’t clear the jam until the fuser area cools down.
Step 3: Close your printer’s rear door.
How to Fix HP Printer Jam in Fuser Area HP LaserJet M9050 MFP and M9040 MFP (And Similar Models)
To fix HP printer jam in fuser area for HP LaserJet M9050 MFP and M9040 MFP and similar models, do the steps below:
Step 1: Remove the output device from your HP MFP printer to enable you to access your printer’s left door.
Step 2: Open your printer’s left door.
Notice: Do not touch the fusing area adjacent to the door to avoid burns in case it is hot.
Step 3: Check the area for any jammed paper and pull it out from your printer.
Step 4: Press the green tab down and then look for jammed paper. Ensure that you remove all including the torn pieces.
Step 5: Close your printer’s left door.
Step 6: Return the output device to its original position.
How to Fix HP CP4525 Paper Jam in Right Door
To fix the HP CP4525 paper jam in the right door, do the steps below:
Step 1: Open your printer’s right door.
Step 2: Pull the jammed paper gently out of your printer’s pickup area.
Step 3: If the paper got stuck as it went into the fuser’s bottom area, gently pull down on the paper to take it out.
Caution: Ensure that you don’t touch those rollers found on the printer’s transfer roller. If contaminants are on the rollers, it could lead to a decline in print quality.
Step 4: If the paper got stuck as it went into the output bin, pull down gently on the paper to take it out.
Important: You might need to take out the fuser from your printer to clear the paper jam.
Step 5: Take out the fuser and then look for any paper jam that isn’t visible.
Caution: Your printer’s fuser might be hot especially if your printer was just in use. Hence, to avoid burns, allow the fuser to get cool before touching it.
i. Grab the fuser by its handles, and then lift it a little. Afterward, pull the fuser straight out of your printer.
ii. Open your printer’s jam-access door.
Caution: Don’t touch the fuser rollers as they might still be hot even though the fuser itself has cooled. Wait until they cool down before touching the rollers.
iii. If there is a paper jam in the fuser, pull it out gently from the fuser. Also, look for any paper pieces and remove them.
iv. Close your printer’s jam-access door; after that return the fuser into your printer.
Step 6: Ensure that you close the cover for the pick roller.
Note: Sometimes your HP printer will show this error message “13.20.00 Jam in right door” on its display when it powers up even though there is no jammed paper in that area. The reason for this error message is due to a pick roller cover that is misplaced in your printer’s right door. Hence, if the cover of the pick roller is displaced, it will affect a sensor movement which in turn will lead to the error being displayed.
i. Confirm that the cover of the pick roller is closed.
ii. If it is open, close it and ensure it snaps into its place.
Step 7: Close your printer’s right door.
How to Fix HP Printer Jam in Output Bin
To fix the HP printer jam in the output bin, use any of the solutions below that best suit your printer model.
1. How to Fix HP Printer Jam in Output Bin for HP LaserJet Pro MFP M202 and M201 Series (And Similar Models)
To fix HP printer jam in output bin for HP LaserJet Pro M202 and M201 and similar models, do the steps below:
Step 1: Open your printer’s top cover.
Step 2: Free the printer’s jam access cover by pulling the green tab out.
Step 3: Take out the jammed paper by pulling it gently.
Step 4: Close your printer’s jam access cover.
Step 5: Close your printer’s top cover.
Step 6: If you still see the error message, clear it by pressing “OK”.
You can try these steps to fix HP LaserJet 3055 and HP LaserJet 3050 jam in the output bin.
2. How to Fix HP Printer Jam in Output Bin for HP LaserJet Pro MFP M501 (And Similar Models)
To fix the HP printer jam in the output bin for HP LaserJet Pro M501 and similar models, simply grab the jammed paper with both hands and pull it out gently from the output bin. Be careful while you do this to prevent the paper from tearing.
This solution works best for printers with a flat and open output bin and the jammed paper can be seen.
3. How to Fix HP Printer Jam in Output Bin for HP LaserJet Pro MFP M403 and M402 (And Similar Models)
To fix HP printer jam in output bin for HP LaserJet Pro M403 and M402 and similar models, do the steps below:
Step 1: If you can see the jammed paper in your printer’s output bin, grab it with both hands and pull it out gently. Be careful while you do this to prevent the paper from tearing.
Step 2: Open your printer’s rear door.
Step 3: Check the printer’s rear door area for jammed paper and remove them if you found.
Step 4: Close the printer’s rear door.
4. How to Fix HP Printer Jam in Output Bin for HP LaserJet P2050 and P2030 Series (And Similar Models)
To fix the HP printer jam in the output bin for HP LaserJet P2050 and P2030 series and similar models, do the steps below.
Note: The instructions below will fix a paper jam in the output bin that occurred as a result of using paper size 8.5” x 13.0” when performing duplex printing.
Step 1: Open the printer’s rear door.
Step 2: Remove any jammed paper in the area.
Step 3: Ensure that the media you want to print on is not damaged, folded, or wrinkled.
Step 4: Set your printer’s paper width guide to suit the paper width in use.
Step 5: Check the back of your printer for the duplex jam release door and lift it.
Step 6: Also find the paper-width selection lever and then push it in for Legal or Letter size paper or pull it out for A4.
You can try these steps to fix the HP LaserJet p2055dn jam in the output bin.
5. How to Fix HP Printer Jam in Output Bin for HP OfficeJet Pro X Series, HP PageWide 500, 400, and 300 Series (And Similar Models)
To fix HP printer jam in output bin for HP OfficeJet Pro X series, HP PageWide 500, 400, and 300 series, and similar models, do the steps below:
Note: Ensure that the printer’s output eject flap is correctly installed and working properly. If the flap is broken or missing, then you need to replace it.
Step 1: Check the output bin area for jammed paper.
Step 2: Pull out any jammed paper that you can see.
Note: In case the paper gets torn, ensure that you remove all the pieces before you try to print again.
Step 3: Open the printer left door and then close it again. This simple action should clear the error message.
6. How to Fix HP Printer Jam in Output Bin for HP LaserJet Pro 400 Printer M401 (And Similar Models)
To fix HP printer jam in output bin for HP LaserJet Pro 400 Printer M401 and similar models, do the steps below:
Caution: Don’t use sharp items to pull the jammed paper out of your printer. Such objects might likely damage your printer and your warranty doesn’t cover such damages.
Step 1: Grab the jammed paper with both hands. Using both hands reduces the possibility of the paper tearing.
Step 2: Gently pull the paper out of your printer.
7. How to Fix HP Printer Jam in Output Bin for HP Color LaserJet Enterprise CP4525, CP4025 (And Similar Models)
To fix HP printer jam in output bin for HP Color LaserJet Enterprise CP4525, CP4025, and similar models, do the steps below:
Step 1: Grab the jammed paper in your printer’s output bin and pull it out gently. Ensure that you do this carefully to avoid the paper from tearing.
How to Fix HP 8500 Paper Jam Broken Gear
To fix HP 8500 paper jam broken gear, we recommend you contact HP Customer Support to schedule a repair since the problem is damaged hardware. If your printer is still under warranty, the repair will be done without you paying any repair fee. However, if your printer is no longer under warranty, you will need to pay for the repair.
The video below is NOT a way to fix HP 8500 paper jam broken gear.
HP Printer Print Bar Jam
To fix the HP print bar jam, try any of the solutions below:
Open and then Close the Printer Cover – Solution 1
In most cases, opening and then closing the cover of your HP printer will resolve the issue and cause your printer to resume printing.
The problem with this solution as reported by most users is that the problem resurfaces after some time. When that happens, you can still open and then close your printer cover to fix the issue.
Check for Obstructions in the Cartridge Access Door – Solution 2
This problem can also be caused as a result of obstructions in the ink cartridge access door. Therefore, you need to open your printer’s cartridge access door and check for obstructions. If you find any foreign object, remove it and check if the error message is cleared.
Run all the Clean Printhead Tasks on your Printer – Solution 3
Most HP printers come with automated tools for cleaning the printhead. Hence, you can use all the clean printhead tasks on your printer to fix the HP printer print bar jam issue.
To do this, you need to consult your printer user manual on how to run these tasks. Ensure that you run all the tasks. For most HP OfficeJet Pro X series, there are three of these tasks.
Turn off your Printer when Not in Use – Solution 4
If you are in the habit of putting your printer to sleep instead of powering it off, we recommend that you desist. When your HP printer isn’t in use, turn it off completely. This is especially important if your printer is connected to a wireless network.
Service your Printer – Solution 5
If none of the solutions above resolves the issue, then you need to contact HP Customer Support. A date will be scheduled for your printer repair. In case the printer cannot be repaired, you will get a replacement if your product is still under warranty.
Please note that you will be charged a repair fee if your HP printer is no longer under warranty. Also, if it needs to be replaced, you will need to get a new one yourself.
HP Printer Says Jam in Rear Door [How to Fix]
To fix the HP printer rear door jam, use any of the solutions below that best suit your printer model.
1. How to Fix HP Printer Jam inside Rear Door for HP LaserJet Pro M501 and Similar Models
To fix the HP printer paper jam in the rear door for HP LaserJet Pro M501 and similar models, do the steps below:
Step 1: Open your printer’s rear door.
Step 2: Take out any paper that is jammed inside your printer’s rear door.
Step 3: Close your printer’s rear door.
The simple steps above will fix the HP m452dn paper jam in the rear door issue.
2. How to Fix HP Printer Jam inside Rear Door for HP LaserJet Pro M477, M377, and Similar Models
To fix the HP printer paper jam in the rear door for HP LaserJet Pro M477, M377, and similar models, do the steps below:
Step 1: Open your printer’s rear door.
Step 2: Gently remove any paper that is jammed from the rear door rollers.
Step 3: Close your printer’s rear door.
Step 4: If the steps above fail to resolve the issue, check these:
i. Make sure that you are using paper that meets the specifications in terms of quality and type as set by HP for the product
ii. Make sure that the printer is not out of a location that meets the product’s environmental specifications. If you didn’t know, certain printers are not designed to function in certain environments and locations. Therefore, if you use such printers in a location they weren’t designed for, you might encounter different kinds of errors and issues.
iii. Make sure that the printer’s tray length and width guides are correctly adjusted to fit the paper size in use.
Step 5: If none of the checks above fixes the error, then you should visit this site http://www.hp.com/go/contactHP to contact HP.
Note: The jam is likely a result of a paper piece stuck inside your printer’s fuser. If this is the case, the only solution is to service the printer which can only be done by a qualified technician.
3. How to Fix HP Printer Jam inside Rear Door for HP LaserJet Pro M452, M454, and Similar Models
To fix the HP printer paper jam in the rear door for HP LaserJet Pro M452, M454, and similar models, do the steps below:
Step 1: Open your printer’s rear door.
Step 2: Gently remove any paper that is jammed from the rear door rollers.
Step 3: Close your printer’s rear door.
Step 4: If the error remains unresolved, contact HP.
4. How to Fix HP Printer Jam in Standard Rear Door for HP 9020 Printers
To fix the HP printer jam in the standard rear door for HP 9020 printers, do the steps below:
Step 1: Turn your HP printer off.
Step 2: Unplug the printer’s power cable as well as other cables such as USB or Ethernet cable from your printer.
Step 3: Make the rear door of your printer face you.
Step 4: Press the rear door’s tab to release the door.
Step 5: Open the printer’s rear door.
Step 6: Pull out the jammed paper carefully.
Step 7: Close the printer’s standard rear door.
Step 8: If the printer still displays the error, service your printer by contacting HP Customer Support.
You can try any of the solutions above to fix the paper jam in the rear door error for your HP LaserJet 4250, HP LaserJet 4050, HP LaserJet 4200, HP LaserJet 2420, or HP M477fdw printer.
How to Fix HP Printer Jam in Duplexer
To fix the HP printer jam in the duplexer, try any of the solutions below that best suit your printer model.
1. How to Fix HP Printer Jam in Duplexer for HP LaserJet Pro M501dn (And Similar Models)
To fix HP printer jam in duplexer for HP LaserJet Pro M501dn and similar models, do the steps below:
Step 1: Open your printer’s Tray 2.
Step 2: Take out Tray 2 from your printer.
Step 3: Free the duplex pan by pulling forward the green tab within the printer’s tray area.
Step 4: Remove the paper jam in the printer’s duplex area.
Step 5: Close the printer’s duplex pan.
Step 6: Reinsert Tray 2 into your printer and close it.
Step 7: Open your printer’s rear door.
Step 8: Remove the paper jam in the rear door area.
Step 9: Close your printer’s rear door.
Step 10: Press the button on your printer’s left side to release the top cover.
Step 11: Open the printer’s front door.
Step 12: Take out the toner cartridge from your printer.
Step 13: Lift the printer’s jam-access cover.
Step 14: Carefully pull out the paper stuck in this area.
Step 15: Insert the toner cartridge back into your printer.
Step 16: Close your printer’s front door.
2. How to Fix HP Printer Jam in Duplexer for HP LaserJet Pro M403 and M402 (And Similar Models)
To fix HP printer jam in duplexer for HP LaserJet Pro M403 and M402 and similar models, do the steps below:
Step 1: Open your printer’s Tray 2.
Step 2: Take out Tray 2 from your printer.
Step 3: Free the duplex pan by pushing the green button.
Step 4: Remove the paper jam in the printer’s duplex area.
Step 5: Close the printer’s duplex pan.
Step 6: Insert Tray 2 back into your printer.
Use the steps above to fix HP LaserJet 4250 jam inside the duplexer problem.
3. How to Fix HP Printer Jam in Duplexer for HP LaserJet P3010 (And Similar Models)
To fix HP printer jam in duplexer for HP LaserJet P3010 and similar models, do the steps below:
Step 1: Take out Tray 2 from your printer.
Step 2: Free the duplex pan by pushing the green button.
Step 3: Remove the paper jam in the printer’s duplex area.
Step 4: Close the printer’s duplex pan.
Step 5: Insert Tray 2 back into your printer.
Step 6: Open the printer’s rear door. Ensure that you push it down completely until it is at a 90-degree angle as this is the only position that allows you to clear the paper jam. The other position which is a 45-degree angle is to allow access into the rear output bin.
Step 7: Remove the paper jam in this printer area.
Step 8: Press the button on the left side to release the top cover.
Step 9: Open your printer’s top cover.
Step 10: Close your printer’s rear door.
Step 11: Take out the toner cartridge from your printer.
Step 12: Remove any paper jam in the area.
Step 13: Insert the toner cartridge back into your printer.
Step 14: Close your printer’s top cover.
4. How to Fix HP Printer Jam in Duplexer for HP LaserJet Pro 400 Printer M401 (And Similar Models)
To fix HP printer jam in duplexer for HP LaserJet Pro 400 Printer M401 and similar models, do the steps below:
Step 1: Open your printer’s rear door.
Step 2: Pull out the jammed paper.
Note: In case the paper gets torn, ensure that you remove all the pieces before you continue printing.
Caution: Don’t clear the jam until the fuser area cools down.
Step 3: Close your printer’s rear door.
5. How to Fix HP Printer Jam in Duplexer for HP LaserJet M9050 MFP and M9040 MFP (And Similar Models)
To fix HP printer jam in duplexer for HP LaserJet M9050 MFP and M9040 MFP and similar models, do the steps below:
Step 1: Remove the output device from your HP MFP printer to enable you to gain access to the printer’s left door.
Step 2: Open your printer’s left door.
Step 3: Gently pull out jammed paper in the area.
Warning: Do not touch the fusing area adjacent to the door to avoid burns in case it is hot.
Step 3: Press the green lever and then pull out the duplexer unit from your printer until it can’t move further.
Step 4: Lift the two green levels found in the duplex printing accessory to enable you to remove jammed paper.
Step 5: Open your printer’s front door.
Step 6: Check the printer’s duplex printing accessory area for any jammed paper and remove them. When pulling out the paper, do it carefully to avoid it getting torn.
Step 7: Slide the duplex printing accessory back into your printer to lock it in place.
Step 8: Shut all the printer’s open doors.
Step 9: Return the output device to its original position.
How to Fix HP Printer Jam in Top Cover Area
To fix the HP printer jam in the top cover area, try any of the solutions below that best suit your printer model.
1. How to Fix HP Printer Jam in Top Cover Area for HP LaserJet Enterprise MFP M630 (And Similar Models)
To fix the HP printer jam in the top cover area for HP LaserJet Enterprise MFP M630 and similar models, do the steps below:
Step 1: Open your printer’s Tray 1.
Step 2: Remove the cover of the envelope feeder if it is installed.
Step 3: Lift the top cover latch.
Step 4: Open your printer’s top cover.
Step 5: Take out the toner cartridge from your printer.
Step 6: Lift the little green tab that is just before the registration roller. When you do this, the plastic roller shield will be raised.
Step 7: Gently pull out any paper stuck in the printer. Ensure that you pull it straight out.
Step 8: Elevate the metal shield using the larger green tab behind the roller.
Step 9: Gently pull out any paper stuck in the printer. Ensure that you pull it straight out.
Step 10: Install the toner cartridge back into your printer.
Step 11: Close your printer’s top cover.
Step 12: Install the cover of the envelope feeder back into your printer if you took it out in step 2.
2. How to Fix HP Printer Jam in Top Cover Area for HP LaserJet 600 M603, M602, M601 (And Similar Models)
To fix the HP printer jam in the top cover area for HP LaserJet 600 M603, M602, M601, and similar models, do the steps below:
Step 1: Open your printer’s top cover.
Step 2: Take out the toner cartridge from your printer.
Caution: To ensure that your toner cartridge doesn’t get damaged, you shouldn’t allow light to touch it for a long period. Hence, it is recommended that you wrap the cartridge with paper when it is out of your printer.
Step 3: Raise the paper access plate by lifting the green handle.
Step 4: Pull out the jammed sheet slowly from your printer to prevent it from tearing.
In case pulling the paper out is proving difficult, you should try to pull it out from the printer’s tray area.
Step 5: Open your printer’s Tray 1.
Step 6: Take out the cover of the envelope accessory from your printer. Remove any paper present in that area.
Step 7: Rotate your printer’s paper guide to give you access to the underside of the printer.
Step 8: Look for and remove any jammed paper in this area.
Step 9: Return the cover of the envelope accessory to your printer.
Step 10: Close your printer’s Tray 1.
Step 11: Install the toner cartridge back into the printer.
Step 12: Close your printer’s top cover.
3. How to Fix HP Printer Jam in Top Cover Area for HP LaserJet P3010 (And Similar Models)
To fix the HP printer jam in the top cover area for HP LaserJet P3010 and similar models, do the steps below:
Step 1: Press your printer’s release button for the top cover.
Step 2: Open your printer’s top cover.
The steps above are an easy guide on how to open the top cover of most HP printers.
Step 3: Take out the toner cartridge from your printer.
Step 4: Take out any paper stuck in your printer.
Step 5: Insert the toner cartridge back into your printer.
Step 6: Close your printer’s top cover.
You can use the steps above to fix HP LaserJet 2420 and LaserJet 4250 jam in top cover area issues.
4. How to Fix HP Printer Jam in Top Cover Area for HP LaserJet 5100 Printer Series (And Similar Models)
To fix the HP printer jam in the top cover area for HP LaserJet 5100 printer series and similar models, do the steps below:
Step 1: Open your printer’s top cover.
Step 2: Take out your toner cartridge.
Caution: To ensure that your toner cartridge doesn’t get damaged, you shouldn’t allow light to touch it for a long period. Hence, it is recommended that you wrap the cartridge with paper when it is out of your printer.
Step 3: Raise the paper access plates by lifting the green handles.
Step 4: Pull out the jammed sheet slowly from your printer to prevent it from tearing.
Note: Do your best not to spill the toner. If there is any spilled toner in the printer, gently wipe it with a dry fluff-free fabric. Loose toner in your printer can affect the print quality of the printer temporarily. Such an issue will clear after some pages have been printed.
If loose toner spills on your cloth, use a dry fabric to clean it and then wash your cloth using cold water. Do not use hot water as it will cause the toner to set into your cloth.
Step 5: Close your printer’s paper access plates.
Step 6: Install the toner cartridge back into your printer.
Step 7: Close your printer’s top cover.
You can use the steps above to fix HP LaserJet 5200 jam inside the top cover issue.
How to Fix HP LaserJet 9050 Jam in Input Accessory
How to Fix HP LaserJet 9050 Jam in Input Accessory 13.11.05 Error
The 13.11.05 error jam in the input accessory occurs when the registration area of your HP LaserJet 9050 has a pickup delay jam.
To fix this error, do the following:
i. Check the registration area for any jammed paper and remove it carefully. Ensure that you remove any torn paper pieces in your printer.
ii. Close your printer’s door. This action will cause your HP printer to attempt clearing the jam error.
iii. Perform a paper path test on your printer.
iv. Change your printer’s paper pickup assembly.
How to Fix Jam in Input Accessory 13.11.07 Error
The 13.11.07 error jam in the input accessory occurs when there is a jammed paper in either your printer’s right door or registration area.
To fix this error, do the following:
i. Remove any jammed paper in the right door or registration area.
ii. Close your printer’s door to enable your device to clear the print paper path.
iii. Change your printer’s vertical transfer unit.
How to Fix Jam in Input Accessory 13.11.XY Error
The 13.11.XY error jam in input accessory occurs when the paper in Tray 4 is fed late to your printer.
To fix this error, do the following:
i. Check for and remove any jammed paper in your printer’s bottom right door and Tray 4.
ii. Examine the paper path movement between your printer’s print engine and Tray 4.
iii. Ensure that you set the tray paper size guides correctly.
iv. Examine your printer’s pickup and feed rollers for wear and replace them where necessary.
HP LaserJet P2015 Paper Jam Light Stays On [How to Fix]
If your HP LaserJet p2015 jam light stays on, you can fix it by doing the following:
Perform a printer reset via the Super NVRAM initialization.
To perform a printer reset via the Super NVRAM initialization on your HP LaserJet P2015, do the following steps:
Step 1: Turn off your HP printer.
Step 2: Press down the button labeled “GO” on your printer’s control panel.
Step 3: Turn on your HP printer while pressing down the button labeled “GO” for about 50 seconds. While you do this, the GO, Ready, and Attention LED indicators will light up at the same time. After that, the Ready and Attention LED indicators will go off while the GO LED indicator will remain lit.
Step 4: Let go of the button labeled “GO”. This action will cause the GO, Ready, and Attention LED indicators to turn on.
Step 5: Press down the button labeled “GO”. When you do this, all the LED indicators will turn off, and then after 3 seconds, the GO LED indicator will light up followed by the Ready LED indicator and then the Attention LED indicator. Each one will light up after the other within just one second.
Step 6: Let go of the button labeled “GO” to begin the Super NVRAM initialization. The LED indicators on your control panel will begin to cycle starting from the front to the back. Once the initialization is complete, your printer will go back to Ready state.
Step 7: Unplug your printer’s power cable from your printer while it is turned on.
Step 8: Wait for about 10 seconds before plugging the power cable back into the printer.
Step 9: Turn on your HP printer.
If your HP p2015 paper jam light stays on after doing the above, then it could be that there is a paper jam sensor with jammed paper. Hence, you will need to locate the jam and remove it.
HP LaserJet P2015 Jam and Toner Light On [How to Fix]
If your HP LaserJet P2015 jam and toner lights are on, then it is an indication that your formatter board has failed. Hence, to fix this problem, you need to replace the formatter board. We will guide you on how to do that below.
How to Replace Formatter Board on HP LaserJet P2015
To replace the formatter board on your HP LaserJet P2015, follow the steps below:
Important: There are 2 formatter board versions; hence, you need to ensure that you get the formatter board Q7804-69003 as it is compatible with HP LaserJet P2015 and P2015D.
You can get the formatter board Q7805-69003 if you own an HP LaserJet P2015N or P2015DN.
Step 1: Open your printer’s cartridge access door.
Step 2: Go to the back area of your printer and release the 2 tabs holding the rear cover with the aid of a flat blade.
Step 3: Raise the left side cover away from your printer.
Step 4: Disconnect the cable at the upper area of the formatter board.
Step 5: Disconnect the flat ribbons cable at the upper area of the formatter board.
Step 6: Disconnect the flat ribbon cable at the lower area of the formatter board.
Step 7: Disconnect the cable at the lower area of the formatter board.
Step 8: Remove the four screws that are fastening the formatter board to the printer.
Step 9: Take out the formatter from your printer.
Step 10: Install the new formatter you just bought into the printer. Ensure that you reconnect the cables in the manner you disconnected them. Don’t forget to fasten the screws as well.
Step 11: Reinstall the printer’s left side cover.
How to Fix HP LaserJet P2035 Jam Light
If your HP LaserJet P2035 jam light is on, then it is an indication that there is a paper jam in your printer. Hence, you need to locate the jammed paper and take it out. Most of the instructions we have shared so far in this article can be used to remove jammed paper from your HP LaserJet P2035. Therefore, we recommend you try them out.
HP Printer Jams When Printing Double Sided [How to Fix]
To fix your HP printer jam when printing double-sided, try any of the solutions below:
1. Look for a Paper Jam in the Printer
In most cases, a paper jam that isn’t visible within your printer is usually the cause of a jam whenever you try to print double-sided. Therefore, check the internal parts of your printer for any paper jam.
2. Use the Right Paper
If the weight of the paper is heavier than the weight supported by your printer, then it could cause a paper jam when you try to print double-sided. Hence, you need to confirm what is the maximum paper weight your printer supports and don’t exceed it.
It is important to mention that the supported weight when printing in duplex mode is different from printing in single mode. Hence, you should check the supported paper weight when printing in duplex mode.
3. Change the Media Type
Sometimes, the media type in use can cause the paper jam. Therefore, you should go to your Printer Web Settings and change the media type default to “Plain”. When you do this, your printer will know the amount of pressure that is required to pick the sheet without leading to a jam.
After you do this, you need to delete the print job in the queue and then turn off your printer. This will ensure that your printer’s memory is cleared to enable the new settings to take effect when next you print.
How to Fix HP Printer Jams with Cardstock
If your HP printer jams with cardstock, it could be due to the following reasons:
i. Your HP printer is not designed to print on cardstock.
ii. The printer tray is not well adjusted.
iii. The printer settings are not well set.
Therefore, to fix this issue, do the following:
1. Confirm that your Printer Supports Cardstock
If your printer does not support printing on cardstock, trying to do so might damage your printer. Therefore, if you have been experiencing printer jams whenever you try to print with cardstock, then you need to confirm if your printer supports this paper type.
To do this, simply read your printer’s user manual. In it, you should be able to find out if your printer supports cardstock or not. In most cases, HP OfficeJet and LaserJet printers support cardstock printing; however, not all HP Deskjet printers do.
Another way to find out if your printer supports printing on cardstock is to check the datasheet of your printer. In the sheet, look for “Media Weight” where the paper weight your printer supports will be displayed. Once you have gotten that information, compare it to the weight of the cardstock that you want to use. If the cardstock you intend to use is heavier, then you need to buy the recommended paper weight.
2. Adjust your Printer Tray
Once you are certain that your printer supports cardstock printing and that you have the right paper weight, the next thing to do is to adjust your printer tray.
There will be more details on your user manual, but the general steps are like the following:
Step 1: From the control panel of your printer, click on “Select”. This action will open the menu.
Step 2: Choose “Paper Handling”.
Step 3: Scroll to and select “Tray”.
Step 4: Select “Card Stock” or “Heavy”.
Step 5: Press “Resume” to close the printer menu.
Note: The steps above may vary depending on the printer model; nevertheless, your focus should be on selecting either the “Card Stock” or “Heavy” option.
3. Change the Printer Settings via Windows Computer
Adjusting the tray settings is not enough if you want to avoid jams when printing with cardstock, you also need to change your printer settings on your computer.
To do this, follow the steps below:
Step 1: Open the program you want to print from.
Step 2: Click on “File”.
Step 3: Click on “Print”.
Step 4: Click on “Properties”.
Step 5: Click on “Paper Quality” or “Paper”.
Step 6: Click on “Card Stock”. Alternatively, you can select the exact weight of the paper you want to use.
Step 7: Click on “OK”.
4. Feed Paper into your Printer
Certain HP printers will permit you to load several cardstock papers into the print tray at once. However, to ensure you don’t experience any jams, it is best that you load the paper manually.
Before you load the cardstock, confirm that it is not nicked, curled, wrinkled, or damaged in any way. Any sort of damage may lead to a misfeed which could, in turn, lead to a jam.
Also, you need to consult your printer’s user manual to confirm which tray is designed for cardstock. This is important because not all trays are designed on certain printers to load this paper type. For instance, you need to use Tray 1 when you want to print on cardstock on HP LaserJet 9500, 4300, and 4200 series.
Once you are certain that the paper isn’t damaged, and the tray to use, hand-feed the paper into the print tray. If it prints, examine the print quality. If you are satisfied, load some pieces of cardstock paper into the tray and then print again.
If there are no issues, continue printing this way. However, if you encounter an issue, take out the cardstock papers and feed them individually into the tray.
How to Fix HP Printer Jams with Photo Paper
If your HP printer jams with photo paper, it could be that you didn’t comply with the usage and handling guidelines for photo papers. Also, you might not have made the right printer setting selection that will enable you to print with photo paper.
Therefore, we will first of all list the usage and handling guidelines for photo papers to enable you to determine which of them you’ve neglected. After that, we will guide you on how to adjust the printer settings to enable you to print with photo paper.
Guidelines for Handling and Using Photo Paper
The following are the guidelines for using and handling photo paper:
i. Do not scratch or touch the printable (glossy) paper side.
ii. Store the paper in an environment with a temperature of 5˚C – 30˚C (41˚F – 86˚F).
iii. Print in a room that has a relative humidity of 20% – 80%, and a temperature of 5˚C – 30˚C (41˚F – 86˚F).
iv. The photo paper should be kept in its factory packaging and on an even surface.
How to Change HP Printer Settings to Enable Printing on Photo Paper
To change your HP printer settings to enable printing on photo paper, do the steps below:
Step 1: Put the photo paper into your printer’s input tray. If you don’t know how to do this, refer to your printer’s user manual to get specific instructions for your printer model.
Step 2: On your computer, open the picture you intend to print.
Step 3: Click on “File”.
Step 4: Click on “Print”. A dialog box will open.
Step 5: Click on the drop-down arrow under the section for “Printer/Name”.
Step 6: Click on the name of your HP printer.
Step 7: Click on “Properties”, “Preferences”, “Options”, “Printer”, or “Printer Setup” depending on the program in use.
Step 8: Go to the menu for “Paper Size” and choose the size of paper that you loaded into the print tray in step 1.
Step 9: From the menu for “Paper Type”, choose “HP Advanced Photo Paper”. HP Advanced Photo Paper is the photo paper recommended by HP for all its printers that support photo paper printing.
Step 10: Click on “Best” underneath “Print Quality”.
This option is the recommendation from HP whenever you print using the HP Advanced Photo Paper.
Step 11: Click on “OK”. This will apply your new settings.
Step 12: Click on “OK” or “Print”. Your HP printer should now print your photo without any jam incident.
The article above covers HP printer jam solutions for the following HP printer models:
HP 5610, HP 8500, HP Deskjet 1112, HP Deskjet 2600, HP Deskjet 3835, HP Deskjet 2130, HP p3015, HP 6500, HP 6975, HP 8600, HP c4480, HP LaserJet p2015, HP LaserJet p1108, HP LaserJet p1102, HP m1005, HP 5510, HP LaserJet 1020, HP 2700, HP 2515, HP Deskjet 3630, HP 3830, HP 319, HP LaserJet 400, HP 5200, HP 515, HP 5660, HP 5255, HP 5820, HP 5740, HP 6978, HP 6968, HP 7740, HP envy 7640, HP 7612, HP 7510, HP 7855, HP 7500a, HP 8710, HP 8025, HP 8610, HP 8620, HP 8715, HP 9015, HP 9010, HP 9018, HP 9020, HP 4729, HP 2135, and HP Laser 108w.
HP Printer Jam [Other Locations & Error Codes]
Earlier in the article, we mentioned certain locations where printer jam occurs on HP printers. While we have treated some of these locations already, we have created independent articles for others. The reason we did so is to ensure that we provide more detailed solutions than we would have done if we included them here. Furthermore, we have also written another article for HP printer jam error codes.
The links to these articles are provided below:
HP Printer ADF Jam [How to Fix]
HP Printer Jam in Tray 1 [How to Fix]
HP Printer Jam in Tray 2 [How to Fix]
HP Printer Jam in Tray 3 [How to Fix]
HP Paper Jam Error Codes [How to Fix]
Prices pulled from the Amazon Product Advertising API on:
Product prices and availability are accurate as of the date/time indicated and are subject to change. Any price and availability information displayed on [relevant Amazon Site(s), as applicable] at the time of purchase will apply to the purchase of this product.
Страницы 1
Чтобы отправить ответ, вы должны войти или зарегистрироваться
RSS
Сообщений [ 20 ] Просмотров: 5 994 [Закрыто]
1 17.09.2013 18:43:48 (9 лет 9 месяцев назад)

- Ganz
- Заблокирован / 17.09.2017
- Автор темы
- Неактивен
- Откуда: «КЛЁН»
- Стаж: 11 лет 4 месяца
- Сообщений: 1 731
- Репутация : [ 62 | 1 ]
Тема: Принтер выдаёт ошибку!
HP C4283
carriage jam clear carriage jam
ПОДСКАЖИТЕ КАК ЛЕЧИТСЯ?
Тема закрыта и находится в архиве, не беспокойте автора без особой необходимости!
2 Ответ от Evgenzag 17.09.2013 18:47:48 (9 лет 9 месяцев назад)
- Evgenzag
- Участник
- Неактивен
- Стаж: 15 лет 6 месяцев
- Сообщений: 3 269
- Репутация : [ 133 | 6 ]
Re: Принтер выдаёт ошибку!
3 Ответ от TraktorisT 17.09.2013 18:48:37 (9 лет 9 месяцев назад)
- TraktorisT
- Всем Добра!
- Неактивен
- Стаж: 11 лет 12 месяцев
- Сообщений: 4 462
- Репутация : [ 111 | 1 ]
Re: Принтер выдаёт ошибку!
4 Ответ от Ganz 17.09.2013 19:37:09 (9 лет 9 месяцев назад)
- Ganz
- Заблокирован / 17.09.2017
- Автор темы
- Неактивен
- Откуда: «КЛЁН»
- Стаж: 11 лет 4 месяца
- Сообщений: 1 731
- Репутация : [ 62 | 1 ]
Re: Принтер выдаёт ошибку!
все операции уже проводил и не помогает даже self test не печатает
up
Отредактировано (18.09.2013 16:02:53, 9 лет 9 месяцев назад)
Тема закрыта и находится в архиве, не беспокойте автора без особой необходимости!
5 Ответ от bis 18.09.2013 16:09:51 (9 лет 9 месяцев назад)
- bis
- Участник
- Неактивен
- Откуда: Барнаул — столица мира
- Стаж: 10 лет 10 месяцев
- Сообщений: 30 093
- Репутация : [ 762 | 0 ]
Re: Принтер выдаёт ошибку!
А в тракте подачи бумаги точно ничего не осталось? Ни одного клочка, даже мелкого, не осталось?
6 Ответ от poluhinmihail 18.09.2013 16:15:35 (9 лет 9 месяцев назад)
- poluhinmihail
- Принтер струйный-струя 3 метра!
- Неактивен
- Откуда: Столица Мира
- Стаж: 10 лет 11 месяцев
- Сообщений: 1 907
- Репутация : [ 31 | 1 ]
Re: Принтер выдаёт ошибку!
Ganz пишет:
HP C4283
carriage jam clear carriage jam
ПОДСКАЖИТЕ КАК ЛЕЧИТСЯ?
Глазик на каретке протри и проверь контакт
ленту энкодера просмотри-риски стерлись, либо не работает оптопара энкодера.
Проверь работу энкодера.
bis пишет:
А в тракте подачи бумаги точно ничего не осталось? Ни одного клочка, даже мелкого, не осталось?
При чем тут carriage jam и тракт подачи бумаги?
Отредактировано poluhinmihail (18.09.2013 16:17:53, 9 лет 9 месяцев назад)
7 Ответ от zau$b 18.09.2013 16:23:35 (9 лет 9 месяцев назад)
- zau$b
- Участник
- Неактивен
- Откуда: Центр
- Стаж: 14 лет 4 месяца
- Сообщений: 2 003
- Репутация : [ 12 | 0 ]
Re: Принтер выдаёт ошибку!
poluhinmihail пишет:
Ganz пишет:
HP C4283
carriage jam clear carriage jam
ПОДСКАЖИТЕ КАК ЛЕЧИТСЯ?Глазик на каретке протри и проверь контакт
ленту энкодера просмотри-риски стерлись, либо не работает оптопара энкодера.
Проверь работу энкодера.bis пишет:
А в тракте подачи бумаги точно ничего не осталось? Ни одного клочка, даже мелкого, не осталось?
При чем тут carriage jam и тракт подачи бумаги?
потому что jam это замятие , значит где то осталось
8 Ответ от Девочка гадЯ 18.09.2013 16:27:24 (9 лет 9 месяцев назад)

- Девочка гадЯ
- Маэстро на связи
- Неактивен
- Стаж: 10 лет 11 месяцев
- Сообщений: 18 371
- Репутация : [ 266 | 7 ]
Re: Принтер выдаёт ошибку!
zau$b пишет:
poluhinmihail пишет:
Ganz пишет:
HP C4283
carriage jam clear carriage jam
ПОДСКАЖИТЕ КАК ЛЕЧИТСЯ?Глазик на каретке протри и проверь контакт
ленту энкодера просмотри-риски стерлись, либо не работает оптопара энкодера.
Проверь работу энкодера.bis пишет:
А в тракте подачи бумаги точно ничего не осталось? Ни одного клочка, даже мелкого, не осталось?
При чем тут carriage jam и тракт подачи бумаги?
потому что jam это замятие , значит где то осталось
один знает как лечить
другой знает как называется![]()
так и живем
9 Ответ от poluhinmihail 18.09.2013 16:39:46 (9 лет 9 месяцев назад)
- poluhinmihail
- Принтер струйный-струя 3 метра!
- Неактивен
- Откуда: Столица Мира
- Стаж: 10 лет 11 месяцев
- Сообщений: 1 907
- Репутация : [ 31 | 1 ]
Re: Принтер выдаёт ошибку!
zau$b пишет:
poluhinmihail пишет:
Ganz пишет:
HP C4283
carriage jam clear carriage jam
ПОДСКАЖИТЕ КАК ЛЕЧИТСЯ?Глазик на каретке протри и проверь контакт
ленту энкодера просмотри-риски стерлись, либо не работает оптопара энкодера.
Проверь работу энкодера.bis пишет:
А в тракте подачи бумаги точно ничего не осталось? Ни одного клочка, даже мелкого, не осталось?
При чем тут carriage jam и тракт подачи бумаги?
потому что jam это замятие , значит где то осталось
А что означает carriage? Вот-вот, сбой позиционирования-от сюда и пляшем!
10 Ответ от zau$b 18.09.2013 16:41:52 (9 лет 9 месяцев назад)
- zau$b
- Участник
- Неактивен
- Откуда: Центр
- Стаж: 14 лет 4 месяца
- Сообщений: 2 003
- Репутация : [ 12 | 0 ]
Re: Принтер выдаёт ошибку!
poluhinmihail пишет:
zau$b пишет:
poluhinmihail пишет:
Ganz пишет:
HP C4283
carriage jam clear carriage jam
ПОДСКАЖИТЕ КАК ЛЕЧИТСЯ?Глазик на каретке протри и проверь контакт
ленту энкодера просмотри-риски стерлись, либо не работает оптопара энкодера.
Проверь работу энкодера.bis пишет:
А в тракте подачи бумаги точно ничего не осталось? Ни одного клочка, даже мелкого, не осталось?
При чем тут carriage jam и тракт подачи бумаги?
потому что jam это замятие , значит где то осталось
А что означает carriage? Вот-вот, сбой позиционирования-от сюда и пляшем!
вообще то в контексте с принтером это означает транспорт если разговор идет именно про принтер!
Отредактировано zau$b (18.09.2013 16:44:23, 9 лет 9 месяцев назад)
11 Ответ от poluhinmihail 18.09.2013 16:48:28 (9 лет 9 месяцев назад)
- poluhinmihail
- Принтер струйный-струя 3 метра!
- Неактивен
- Откуда: Столица Мира
- Стаж: 10 лет 11 месяцев
- Сообщений: 1 907
- Репутация : [ 31 | 1 ]
Re: Принтер выдаёт ошибку!
zau$b пишет:
poluhinmihail пишет:
zau$b пишет:
poluhinmihail пишет:
Ganz пишет:
HP C4283
carriage jam clear carriage jam
ПОДСКАЖИТЕ КАК ЛЕЧИТСЯ?Глазик на каретке протри и проверь контакт
ленту энкодера просмотри-риски стерлись, либо не работает оптопара энкодера.
Проверь работу энкодера.bis пишет:
А в тракте подачи бумаги точно ничего не осталось? Ни одного клочка, даже мелкого, не осталось?
При чем тут carriage jam и тракт подачи бумаги?
потому что jam это замятие , значит где то осталось
А что означает carriage? Вот-вот, сбой позиционирования-от сюда и пляшем!
вообще то в контексте с принтером это означает транспорт если разговор идет именно про принтер!
так вот, уважаемый, на будущее знайте-что если речь идет именно о принтере-то это каретка!
12 Ответ от bis 18.09.2013 17:02:16 (9 лет 9 месяцев назад)
- bis
- Участник
- Неактивен
- Откуда: Барнаул — столица мира
- Стаж: 10 лет 10 месяцев
- Сообщений: 30 093
- Репутация : [ 762 | 0 ]
Re: Принтер выдаёт ошибку!
poluhinmihail пишет:
zau$b пишет:
poluhinmihail пишет:
zau$b пишет:
poluhinmihail пишет:
Глазик на каретке протри и проверь контакт
ленту энкодера просмотри-риски стерлись, либо не работает оптопара энкодера.
Проверь работу энкодера.При чем тут carriage jam и тракт подачи бумаги?
потому что jam это замятие , значит где то осталось
А что означает carriage? Вот-вот, сбой позиционирования-от сюда и пляшем!
вообще то в контексте с принтером это означает транспорт если разговор идет именно про принтер!
так вот, уважаемый, на будущее знайте-что если речь идет именно о принтере-то это каретка!
Вообще «carriage jam clear» применительно к принтерам означает «устраните замятие/застревание в каретке». По факту это может означать как наличие постороннего предмета в каретке, так и сбой в ее работе из-за выхода из строя отдельных узлов. Так что если все чисто в каретке — гоу в сервисный центр ![]()
13 Ответ от poluhinmihail 18.09.2013 17:13:00 (9 лет 9 месяцев назад)
- poluhinmihail
- Принтер струйный-струя 3 метра!
- Неактивен
- Откуда: Столица Мира
- Стаж: 10 лет 11 месяцев
- Сообщений: 1 907
- Репутация : [ 31 | 1 ]
Re: Принтер выдаёт ошибку!
bis пишет:
poluhinmihail пишет:
zau$b пишет:
poluhinmihail пишет:
zau$b пишет:
потому что jam это замятие , значит где то осталось
А что означает carriage? Вот-вот, сбой позиционирования-от сюда и пляшем!
вообще то в контексте с принтером это означает транспорт если разговор идет именно про принтер!
так вот, уважаемый, на будущее знайте-что если речь идет именно о принтере-то это каретка!
Вообще «carriage jam clear» применительно к принтерам означает «устраните замятие/застревание в каретке». По факту это может означать как наличие постороннего предмета в каретке, так и сбой в ее работе из-за выхода из строя отдельных узлов. Так что если все чисто в каретке — гоу в сервисный центр
а, так тс просто рядовой юзер ![]() ну тады да-гоу в сц
ну тады да-гоу в сц ![]()
![]()
![]()
![]()
14 Ответ от Михаил V 18.09.2013 17:15:54 (9 лет 9 месяцев назад)

- Михаил V
- Инженегр
- Неактивен
- Откуда: Барнаул
- Стаж: 10 лет 7 месяцев
- Сообщений: 1 080
- Репутация : [ 58 | 0 ]
Re: Принтер выдаёт ошибку!
Ganz пишет:
HP C4283
carriage jam clear carriage jam
ПОДСКАЖИТЕ КАК ЛЕЧИТСЯ
что то подобное было на др HP
решалось сбросом настроек…….
15 Ответ от zau$b 18.09.2013 17:17:11 (9 лет 9 месяцев назад)
- zau$b
- Участник
- Неактивен
- Откуда: Центр
- Стаж: 14 лет 4 месяца
- Сообщений: 2 003
- Репутация : [ 12 | 0 ]
Re: Принтер выдаёт ошибку!
poluhinmihail пишет:
zau$b пишет:
poluhinmihail пишет:
zau$b пишет:
poluhinmihail пишет:
Глазик на каретке протри и проверь контакт
ленту энкодера просмотри-риски стерлись, либо не работает оптопара энкодера.
Проверь работу энкодера.При чем тут carriage jam и тракт подачи бумаги?
потому что jam это замятие , значит где то осталось
А что означает carriage? Вот-вот, сбой позиционирования-от сюда и пляшем!
вообще то в контексте с принтером это означает транспорт если разговор идет именно про принтер!
так вот, уважаемый, на будущее знайте-что если речь идет именно о принтере-то это каретка!
ладно спорить не буду но останусь при своем мнении, у тебя ведь даже на аве принтер это уже о чем то говорит ![]()
16 Ответ от Ganz 18.09.2013 21:24:00 (9 лет 9 месяцев назад)
- Ganz
- Заблокирован / 17.09.2017
- Автор темы
- Неактивен
- Откуда: «КЛЁН»
- Стаж: 11 лет 4 месяца
- Сообщений: 1 731
- Репутация : [ 62 | 1 ]
Re: Принтер выдаёт ошибку!
проблема возникла после установки нового цветного картриджа! установился вроде коректно и тестовую страницу напечатал затем при попытки печати фото на плотной бумаге она на прошла и шестерёнки захрустели! коретка двигается свободно!
Тема закрыта и находится в архиве, не беспокойте автора без особой необходимости!
17 Ответ от poluhinmihail 18.09.2013 21:49:20 (9 лет 9 месяцев назад)
- poluhinmihail
- Принтер струйный-струя 3 метра!
- Неактивен
- Откуда: Столица Мира
- Стаж: 10 лет 11 месяцев
- Сообщений: 1 907
- Репутация : [ 31 | 1 ]
Re: Принтер выдаёт ошибку!
Ganz пишет:
проблема возникла после установки нового цветного картриджа! установился вроде коректно и тестовую страницу напечатал затем при попытки печати фото на плотной бумаге она на прошла и шестерёнки захрустели! коретка двигается свободно!
Ни чего больше не скажу ![]() Тут цепляются за компетентность
Тут цепляются за компетентность ![]()
18 Ответ от bis 18.09.2013 22:14:26 (9 лет 9 месяцев назад)
- bis
- Участник
- Неактивен
- Откуда: Барнаул — столица мира
- Стаж: 10 лет 10 месяцев
- Сообщений: 30 093
- Репутация : [ 762 | 0 ]
Re: Принтер выдаёт ошибку!
Ganz пишет:
проблема возникла после установки нового цветного картриджа! установился вроде коректно и тестовую страницу напечатал затем при попытки печати фото на плотной бумаге она на прошла и шестерёнки захрустели! коретка двигается свободно!
Т.е. хруст шестеренок для тебя это нормально? ![]() Вези в сервис, ну или на мусорку, сам скорее всего ничего не сделаешь. Только в сервисе перед тем как делать цену уточни, вероятность мусорки может остаться высокой
Вези в сервис, ну или на мусорку, сам скорее всего ничего не сделаешь. Только в сервисе перед тем как делать цену уточни, вероятность мусорки может остаться высокой
19 Ответ от Ganz 18.09.2013 22:36:39 (9 лет 9 месяцев назад)
- Ganz
- Заблокирован / 17.09.2017
- Автор темы
- Неактивен
- Откуда: «КЛЁН»
- Стаж: 11 лет 4 месяца
- Сообщений: 1 731
- Репутация : [ 62 | 1 ]
Re: Принтер выдаёт ошибку!
bis пишет:
Ganz пишет:
проблема возникла после установки нового цветного картриджа! установился вроде коректно и тестовую страницу напечатал затем при попытки печати фото на плотной бумаге она на прошла и шестерёнки захрустели! коретка двигается свободно!
Т.е. хруст шестеренок для тебя это нормально?
Вези в сервис, ну или на мусорку, сам скорее всего ничего не сделаешь. Только в сервисе перед тем как делать цену уточни, вероятность мусорки может остаться высокой
хрустнуло только пару раз при печати и больше хруста не было! коретка движется при работе без постароннего шума!
Тема закрыта и находится в архиве, не беспокойте автора без особой необходимости!
20 Ответ от bis 18.09.2013 22:41:22 (9 лет 9 месяцев назад)
- bis
- Участник
- Неактивен
- Откуда: Барнаул — столица мира
- Стаж: 10 лет 10 месяцев
- Сообщений: 30 093
- Репутация : [ 762 | 0 ]
Re: Принтер выдаёт ошибку!
Ganz пишет:
bis пишет:
Ganz пишет:
проблема возникла после установки нового цветного картриджа! установился вроде коректно и тестовую страницу напечатал затем при попытки печати фото на плотной бумаге она на прошла и шестерёнки захрустели! коретка двигается свободно!
Т.е. хруст шестеренок для тебя это нормально?
хрустнуло только пару раз при печати и больше хруста не было! коретка движется при работе без постароннего шума!
![]()
![]()
![]() Я вот тоже натяжку ремня ГРМ прозевал проверить, хрястнуло один раз, а потом движок совсем без постороннего шума крутился, правда уже бестолку
Я вот тоже натяжку ремня ГРМ прозевал проверить, хрястнуло один раз, а потом движок совсем без постороннего шума крутился, правда уже бестолку ![]()
Просматривают тему: 1 гость, 0 пользователей
Страницы 1
Чтобы отправить ответ, вы должны войти или зарегистрироваться
Slide
HP DeskJet Printer

Slide
HP LaserJet Printer Setup

Slide
HP Envy Printer Setup

Ways To Resolve HP Printer Carriage Jam Error
HP Printer Carriage Jam Issues & Its Fixes
This article explains the reason for HP printer carriage jam error along with its fix. The cartridge jam error may erupt due to many reasons such as-
- Paper jam in the rear access door of the printer.
- The presence of torn pieces of paper being stuck in the roller

- Due to the possibility of a foreign object hindering the cartridge path
- And lastly due to the need of computer system and printer rebooting.
For easy and cost-effective HP printer cartridge jam error troubleshooting read on to the next section.
Fixing a Carriage Jam in HP Printer — Just Have a Look
All in One Solution to Fix HP Printer Carriage Jam Error
Look For Any Stuck Paper or Object on The Cartridge Path :
Now for the next step to troubleshoot HP printer carriage jam error is to check the printer for any stuck paper or any foreign object obstructing the path of the hp printer cartridge.
- Firstly , turn on HP printer.
- Unplug the power cord from the HP printer & remove the plug from the power source.

- Make Sure that all connected cables are removed.
- Open printer lid to reveal cartridge carriage.
- Ensure that carriage should be at the right side of the printer. If not then manually move the carriage to the right.
- If the carriage does not move, you must look for any object or particle obstructing the movement.

- Next, You have to remove paper jam or foreign objects.

- Then move the cartridge carriage manually to the left side. Repeat same kind of checking & remove any obstruction and return the carriage to the right side.

- Make sure that there is no obstruction and close the printer lid.
- Re plugin the power cord & other used cables. Connect the printer power cord as well.
- Finally, Turn on the printer & wait for it to warm up.
- Run a test of any print.
If still facing carriage jam error move on to the next step.
Gently Move Cartridge & Clear HP Printer Cartridge Printheads:
- Slowly and carefully move the cartridge back and forth without being too harsh to its movement to ensure that the print heads are clean and in good working condition.
- In case if it’s not clean, use a soft dry cloth to clean it gently.

- Thereafter plug the printer back to power and perform a print check.
- If all is ok that mean problem will resolver either move on next steps.
Plug The System Directly To Wall Socket:
- Unplug the printing system from the existing operational power strips and plug the power cord directly to an electrical outlet.

- Try re-connecting the power cord to the rear of the HP printer and turn on the printer.
- Now the HP printer carriage jam error must have been possibly gone for you to work on it efficiently.
Try Rebooting The Printing System:
- Whenever you come across the message of “HP printer cartridge jam error” on the printing system, try rebooting the printer and you computer.

- In many cases, this trick works as the system gets refreshed and automatically solves the issue and you get to work from a clean slate.
Do A Keen Visual Inspection:
After restarting the device if still your HP printer cartridge jam error persists, follow the below steps-
- Turn the printer off to perform a visual inspection for any jammed paper.
- Remove the rear access door by lifting the left and right tabs.
- Carefully remove any jammed paper or pieces of torn paper if any from the rollers and replace the rear access door.
- And Push out the paper tray check the paper is properly inserted and put it again.
- Now Start again the HP printer and test a print hopefully this Carriage jam error in hp printer will resolved.
Time To Seek HP Printer Technical Support:
If all of the above tricks didn’t work for you then it becomes imperative to seek professional help for the good and long functioning of your printer .HP provides an assistant software application know as ‘HP smart app’ which can help you in identifying the root cause of the problem. This application is available for both Windows and Mac operating system and can be downloaded HP’s website.
Conclusion:
Hope the article helped you in correctly identifying the issue for the HP printer cartridge problem and thereby assisted you in troubleshooting the same. However if you still not able to fix this error, you can reach us by calling on our helpline number.
For Information and Reference Link: Click Here…
Remarks– This is not HP official page and information provided here is for your knowledge purpose only. For our complete disclaimer ‘click here‘
Still Not able to resolve the issue, run our Diagnostic Tool for Printer Check Up
Choose Your Model for Setup, Driver Download or Troubleshooting

HP Envy Printers
Our Technician can solve your all HP Envy Printer issue. Call Us Now to get your issue resolve today.

HP OfficeJet Pro Printers
To find a solution for your HP OfficeJet Printer, Call Us right away to resolve all the issues facing today.

HP DeskJet Ink Printers
To find a solution for your HP DeskJet Printers, Call our expert and get your issues fix today.

HP LaserJet Printers
Looking for guidance on your HP Laserjet Printers, Get your all issues fixed on a call with our experts.
If you own an HP OfficeJet Pro 9025 or any other HP printer model, you may have encountered the dreaded «carriage jam» error. This error can be frustrating and time-consuming, especially if you’re in the middle of an important print job. In this article, we’ll discuss what causes carriage jams and how to fix them.
What is a Carriage Jam?
A carriage jam occurs when the carriage, which holds the ink cartridges, is stuck or blocked and cannot move. This can happen for various reasons, such as a piece of paper getting stuck in the printer or a problem with the paper feed gear.
What Causes Carriage Jams?
There are several reasons why your HP printer’s carriage may be jammed. The most common causes include:
- Paper Jams: If a piece of paper gets stuck in the printer, it can block the carriage’s movement.
- Paper Feed Gear Problem: The paper feed gear is responsible for feeding the paper into the printer. If there is a problem with this gear, it can cause the carriage to jam.
- Cartridge Carriage Stalled: If the cartridge carriage is stalled, it can cause the printer’s carriage to become stuck.
Fortunately, most carriage jam issues can be resolved quickly and easily. In this article, we’ll cover common HP printer carriage jam issues, including the HP 9018 printer problem, HP 9010 carriage error, and HP 9015 carriage problem. We’ll also provide step-by-step instructions on how to fix carriage jam issues and clear any paper feed gear blockages.
Before we get started, it’s essential to note that HP printers are designed to automatically stop printing when a carriage jam is detected. If you see the «carriage jam» error message on your printer, follow the instructions provided in the message. If you’re unsure how to proceed, consult your printer’s manual or watch our video for details on how to clear carriage jam issues.
Mar 23rd 2023 Kevin Day