Обновлено Июнь 2023: перестаньте получать сообщения об ошибках и замедлите работу вашей системы с помощью нашего инструмента оптимизации. Получить сейчас в эту ссылку
- Скачайте и установите инструмент для ремонта здесь.
- Пусть он просканирует ваш компьютер.
- Затем инструмент почини свой компьютер.
DISM — это инструмент Windows, используемый ИТ-специалистами для монтирования образа рабочего стола Windows и для изменения функций и настроек Windows. Это означает управление развертыванием образов и обслуживанием (DISM). Этот инструмент используется для исправления таких проблем, как системные несоответствия, неработоспособный образ Windows, проблемы, вызванные обновлениями или изменениями, а также такие ошибки, как ошибка DISM 87, 112, 11, 50, 2, 3, 87,1726, 1393, 0x800f081f.
Средство устранения неполадок запускает этот инструмент в командной строке, введя DISM.exe и строку операторов или переключателя.
Вот список сообщений об ошибках, которые приходят с каждым кодом ошибки:
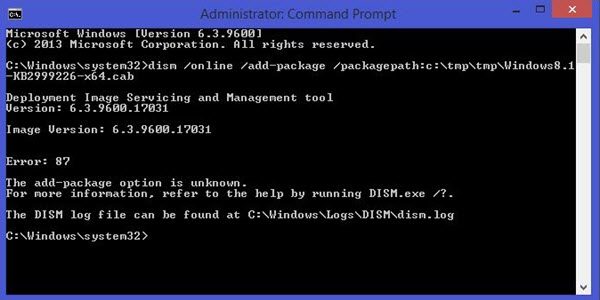
Ошибка DISM 87 — Параметр задан неверно.
Ошибка DISM 112 — Существует не хватает места на диске.
Ошибка DISM 11 — Была предпринята попытка загрузить программу с неверным форматом.
Ошибка DISM 50 — Запрос не поддерживается.
Ошибка DISM 2 — Система не может найти указанный файл.
Ошибка DISM 3 — Система не может найти указанный путь.
Ошибка DISM 1726 – Вызов удаленной процедуры не удался.
Ошибка DISM 1393 — Структура диска повреждена и нечитаема.
Обновление за июнь 2023 г .:
Теперь вы можете предотвратить проблемы с ПК с помощью этого инструмента, например, защитить вас от потери файлов и вредоносных программ. Кроме того, это отличный способ оптимизировать ваш компьютер для достижения максимальной производительности. Программа с легкостью исправляет типичные ошибки, которые могут возникнуть в системах Windows — нет необходимости часами искать и устранять неполадки, если у вас под рукой есть идеальное решение:
- Шаг 1: Скачать PC Repair & Optimizer Tool (Windows 10, 8, 7, XP, Vista — Microsoft Gold Certified).
- Шаг 2: Нажмите «Начать сканирование”, Чтобы найти проблемы реестра Windows, которые могут вызывать проблемы с ПК.
- Шаг 3: Нажмите «Починить все», Чтобы исправить все проблемы.

Когда вы получаете эти сообщения об ошибках, вы запускаете инструмент DISM, используя функцию очистки. Вы запустите серию команд DISM, чтобы сначала отменить все ожидающие обновления, затем очистите хранилище компонентов и, наконец, проверьте систему перед окончательной перезагрузкой. Чтобы показать вам, как это делается, читайте дальше.
Исправление ошибки DISM
- Запустите командную строку с повышенными правами и введите следующую команду:
dism.exe / image: C: / cleanup-image / revertpendingactions
- Затем перезагрузите компьютер в автономном режиме и снова запустите командную строку, чтобы выполнить следующую команду:
dism.exe / online / Cleanup-Image / StartComponentCleanup
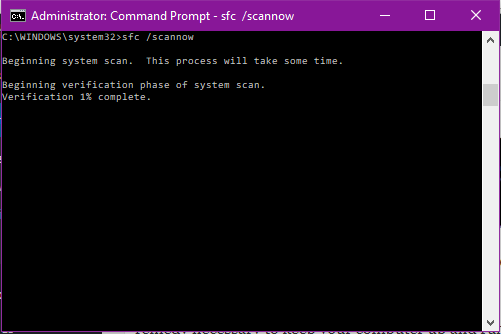
- Перезагрузитесь в безопасном режиме и затем запустите ПФС / SCANNOW.
- Перезагрузите систему и выполните следующую команду:
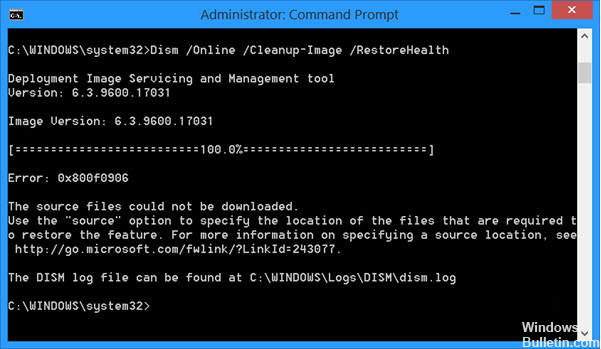
dism.exe / online / Cleanup-Image / RestoreHealth
После завершения последней команды, пусть ваш компьютер загружается нормально. Это должно исправить проблему с вашим компьютером.
Совет экспертов: Этот инструмент восстановления сканирует репозитории и заменяет поврежденные или отсутствующие файлы, если ни один из этих методов не сработал. Это хорошо работает в большинстве случаев, когда проблема связана с повреждением системы. Этот инструмент также оптимизирует вашу систему, чтобы максимизировать производительность. Его можно скачать по Щелчок Здесь
Сообщение Просмотров: 701
Download Windows Repair & Speedup Tool to fix errors automatically
In today’s post, we will attempt to resolve the issue of NTFS compression in WinPE 10 using all available disk space on your Windows computer. Using NTFS compression involves a trade-off between CPU time and disk activity. Compression will work better in certain types of situations and with certain types of files.
NTFS compression in WinPE 10 uses all available disk space

The NTFS file system used by Windows has a built-in compression feature known as NTFS compression. With a few clicks, you can compress files, making them take up less space on your hard drive. Best of all, you can still access the files normally.
Windows PE or WinPE is a small operating system used to install, deploy, and repair Windows 10 for desktop editions (Home, Pro, Enterprise, and Education), Windows Server, and other Windows operating systems.
You may face this issue if you try to create a partition on a system and then try to format the partition by using the /C switch to enable NTFS compression.
Now when you create a bootable USB key in WinPE 10 x64 and copy the “test” WIM files to the USB key, boot into WinPE on the test system and try to run the following command:
dism /apply-image /imagefile:d:test.swm /swmfile:d:test*.swm /index:1 /applydir:c:
The DISM command is likely to fail with error 112.
Here, he partition on the test system is drive C, and the USB key is drive D.
Even if you use WinPE 5 x64 in this scenario, you may experience the same issue. The WIM file is split to fit on a FAT32 system. The log files are in the wpe5 and wpe10 subfolders.
To work around this issue, Microsoft recommends that you do not format the volume by using NTFS compression and instead use WOF compression by specifying /compact to dism when you apply these images.
WOF stands for Windows Overlay Filter. Unlike native NTFS file compression, the Windows Overlay Filter supports only read operations. This means that it doesn’t need to sector-align each compressed chunk, so the compressed data can be packed more tightly together. If you open the file for writing, the Windows Overlay Filter just decompresses the entire file, turning it back into a plain file.
The Windows Overlay Filter can take advantage of newer compression algorithms developed over the past 20 years, algorithms that produce better compression ratios can be run in parallel on multiple cores, and which require less CPU and memory for decompression.
This mitigates the issue and also makes the system runs faster by using a more efficient compression algorithm.
Obinna has completed B.Tech in Information & Communication Technology. He has worked as a System Support Engineer, primarily on User Endpoint Administration, as well as a Technical Analyst, primarily on Server/System Administration. He also has experience as a Network and Communications Officer. He has been a Windows Insider MVP (2020) and currently owns and runs a Computer Clinic.
Download Windows Repair & Speedup Tool to fix errors automatically
If when you run the built-in Windows 11/10 DISM tool, you receive error message codes like 87, 112, 11, 50, 3, 87,1726, 1392, 1393, 1910, etc, then these general troubleshooting suggestions may help you fix the problem. The error code may be accompanied by a message :
- If the accompanying message is – The restore health option is not recognized in this context, or An error occurred while processing the command, it could indicate that the DISM command you uses is not supported by the operating system version.
- If the accompanying message is – The add-package option is unknown, it could indicate that the option you use is not supported by the operating system version.
If a Windows image becomes unserviceable, you can use the Deployment Imaging and Servicing Management (DISM) tool to update the files and correct the problem. In the case of system inconsistencies and corruptions, corrupted Windows Update files, etc., you can run the DISM tool by using the Cleanup-Image functionality along with the available switches.
But if the effort fails, you may need to find out why this happened. Such errors are usually faced when you use the /restorehealth parameter – but could appear when you use other parameters as well.
What does DISM stand for?
DISM stands for Deployment Image Servicing and Management. It is a command-line tool that helps users service a Windows image or prepare a Windows Pre-installation Environment (Windows PE). The DISM tool is also helpful when the System File Checker stops working or the Windows image becomes unserviceable.
Fix DISM Error on Windows 11/10
1] Run offline ChkDsk scan
In an elevated CMD execute the following command:
chkdsk /offlinescanandfix
Restart Windows and proceed to the next action.
Read: System error 5 has occurred, Access is denied
2] Revert Pending Actions
Open an elevated command prompt window and execute the following command to refresh the DISM tool:
dism.exe /image:C: /cleanup-image /revertpendingactions
This will revert all pending tasks including Windows Updates. It is recommended that you boot offline and then run it a recovery command prompt.
Related: The WOF Driver encountered a corruption in the compressed file’s Resource Table – DISM error.
3] Start Component Cleanup
Next, execute the following command:
dism.exe /online /Cleanup-Image /StartComponentCleanup
This will clean up the component store so that everything can run properly again.
Read: DISM /Apply-Image command fails with Error Code 5
4] Restore Health
Restart and then Run sfc /scannow in Safe Mode.
Restart your system and see if you can run the following command now:
dism.exe /online /Cleanup-Image /RestoreHealth
How do you read DISM logs?
Windows saves the DISM logs inside the DISM folder on the C drive. The DISM folder is located at the following location:
c:windowslogsdism
On opening the DIS folder, you will see a text file with the name dism. Open this file to read the DISM logs.
This should help!
RELATED READS:
- Fix DISM Error 0x800f0906
- DISM Unable to access the Image Error 2
- Fix DISM Error 0x800f081f or 0x800f0906
- DISM Error 1009: The configuration registry database is corrupt
- Error 50, DISM does not support servicing Windows PE with the online option.
Anand Khanse is the Admin of TheWindowsClub.com, a 10-year Microsoft MVP (2006-16) & a Windows Insider MVP (2016-2022). Please read the entire post & the comments first, create a System Restore Point before making any changes to your system & be careful about any 3rd-party offers while installing freeware.
Если при запуске встроенного инструмента DISM в Windows 10 вы получаете коды сообщений об ошибках, например 87, 112, 11, 50, 2, 3, 87,1726, 1392, 1393, 1910, 0x800f081f, то эти общие предложения по устранению неполадок могут помочь. вы устраняете проблему. Код ошибки может сопровождаться сообщением:
- Если сопроводительное сообщение — Параметр восстановления работоспособности не распознается в этом контексте, или же Произошла ошибка при обработке команды, это может означать, что используемая вами команда DISM не поддерживается версией операционной системы.
- Если сопроводительное сообщение — Опция add-package неизвестна, это может означать, что используемый вами параметр не поддерживается версией операционной системы.
Если образ Windows становится неработоспособным, вы можете использовать средство управления развертыванием образов и обслуживанием (DISM) для обновления файлов и устранения проблемы. В случае системных несоответствий и повреждений, поврежденных файлов Центра обновления Windows и т. Д. Вы можете запустить инструмент DISM, используя функцию Cleanup-Image вместе с доступными переключателями.
Но если усилия не увенчаются успехом, возможно, вам потребуется выяснить, почему это произошло. С такими ошибками обычно сталкиваются при использовании /restorehealth параметр — но может появиться и при использовании других параметров.
1]Запустить автономное сканирование ChkDsk
В CMD с повышенными привилегиями выполните следующую команду:
chkdsk /offlinescanandfix
Перезагрузите Windows 10 и перейдите к следующему действию.
2]Отменить ожидающие действия
Откройте окно командной строки с повышенными привилегиями и выполните следующую команду, чтобы обновить инструмент DISM:
dism.exe /image:C: /cleanup-image /revertpendingactions
Это вернет все незавершенные задачи, включая обновления Windows. Рекомендуется загрузиться в автономном режиме, а затем запустить его из командной строки восстановления.
3]Запустить очистку компонентов
Затем выполните следующую команду:
dism.exe /online /Cleanup-Image /StartComponentCleanup
Это очистит хранилище компонентов, чтобы все снова могло работать правильно.
4]Восстановить здоровье
Перезагрузите, а затем запустите sfc / scannow в безопасном режиме.
Перезагрузите систему и посмотрите, сможете ли вы сейчас выполнить следующую команду:
dism.exe /online /Cleanup-Image /RestoreHealth
Это должно помочь!
СВЯЗАННЫЕ ЧТЕНИЯ:
- Исправить ошибку DISM 0x800f0906
- Ошибка DISM 1009: база данных реестра конфигурации повреждена
- Ошибка 50, DISM не поддерживает обслуживание Windows PE в интерактивном режиме.
- DISM не работает в Windows 10, исходные файлы не могут быть найдены.