Обновлено Июнь 2023: перестаньте получать сообщения об ошибках и замедлите работу вашей системы с помощью нашего инструмента оптимизации. Получить сейчас в эту ссылку
- Скачайте и установите инструмент для ремонта здесь.
- Пусть он просканирует ваш компьютер.
- Затем инструмент почини свой компьютер.

Ошибка DISM 1910 «Указанный объект экспорта не найден». может возникнуть после выполнения команды «DISM / Online / Cleanup-Image / RestoreHealth» на компьютере под управлением Windows 10 при попытке восстановить образ Windows.
В моем случае ошибка 1910 произошла, когда я использовал DISM с параметром «/ Source», чтобы указать другое местоположение в качестве источника затронутых файлов.
В этом руководстве приведены подробные инструкции по исправлению ошибки 1910 при запуске команды DISM в Windows 10.
Что вызывает код ошибки DISM Error 1910?
По словам нескольких затронутых пользователей, эта проблема может возникнуть, когда Средство обслуживания и управления образами развертывания (DISM) не работает должным образом. Иногда утилита DISM повреждается из-за поврежденного системного файла.
Если проблема возникает после установки нового обновления Windows, обновления драйвера или установки стороннего программного обеспечения, вы можете использовать функцию восстановления системы, чтобы вернуть систему в предыдущее состояние, в котором проблемы не было.
В некоторых ситуациях вы можете обнаружить, что проблема вызвана повреждением нескольких файлов в вашей операционной системе.
Как устранить ошибку «DISM 1910 Error»?
Обновление за июнь 2023 г .:
Теперь вы можете предотвратить проблемы с ПК с помощью этого инструмента, например, защитить вас от потери файлов и вредоносных программ. Кроме того, это отличный способ оптимизировать ваш компьютер для достижения максимальной производительности. Программа с легкостью исправляет типичные ошибки, которые могут возникнуть в системах Windows — нет необходимости часами искать и устранять неполадки, если у вас под рукой есть идеальное решение:
- Шаг 1: Скачать PC Repair & Optimizer Tool (Windows 10, 8, 7, XP, Vista — Microsoft Gold Certified).
- Шаг 2: Нажмите «Начать сканирование”, Чтобы найти проблемы реестра Windows, которые могут вызывать проблемы с ПК.
- Шаг 3: Нажмите «Починить все», Чтобы исправить все проблемы.


Выполнить сканирование SFC
- Введите cmd в строке поиска и щелкните Запуск от имени администратора, чтобы запустить расширенную командную строку.
- В окне командной строки введите команду ниже и нажмите Enter, чтобы запустить ее.
ПФС / SCANNOW - После завершения сканирования перезагрузите компьютер и попробуйте снова использовать DISM.
Средство проверки системных файлов (SFC) — это расширенный инструмент, специально разработанный для сканирования и устранения неполадок защищенных системных файлов. Поэтому, если проблема на вашем компьютере вызвана повреждением системного файла, сканирование SFC должно помочь.
Выполните обновление для ремонта на месте
В вашей операционной системе может быть поврежденная ошибка, которую нельзя исправить обычными методами устранения неполадок.
- Загрузите инструмент создания медиа.
- После успешной установки откройте приложение и нажмите «Обновить этот компьютер сейчас».
- Следуйте инструкциям на экране.
- В окне «Все готово к установке» выберите элементы, которые вы хотите сохранить на вашем компьютере после установки.
- Нажмите Далее и следуйте инструкциям на экране, чтобы начать установку Windows.
В этой ситуации лучше всего выполнить обновление на месте, так как это решит проблемы Windows, не повредив ваши данные.
Выполните восстановление системы
Для восстановления системы снимки Windows обычно делаются перед применением критических обновлений и установкой важных программ. Несколько пользователей успешно решили эту проблему с помощью восстановления системы. Поэтому рекомендуем попробовать этот метод. Однако этот метод работает только для пользователей, операционная система которых создала точки восстановления.
Совет экспертов: Этот инструмент восстановления сканирует репозитории и заменяет поврежденные или отсутствующие файлы, если ни один из этих методов не сработал. Это хорошо работает в большинстве случаев, когда проблема связана с повреждением системы. Этот инструмент также оптимизирует вашу систему, чтобы максимизировать производительность. Его можно скачать по Щелчок Здесь
Часто задаваемые вопросы
- Откройте «Старт».
- Найдите командную строку, щелкните правой кнопкой мыши первый результат и выберите Запуск от имени администратора.
- Введите следующую команду, чтобы восстановить образ Windows 10, и нажмите Enter: DISM / Online / Cleanup-Image / RestoreHealth.
Обслуживание образов развертывания и управление ими (DISM.exe) — это инструмент командной строки, который можно использовать для обслуживания и подготовки образов Windows, включая те, которые используются для Windows PE, среды восстановления Windows (Windows RE) и установки Windows. DISM можно использовать для обслуживания образа Windows или виртуального жесткого диска.
В хороших условиях это займет около 10-20 минут, но в зависимости от обстоятельств может потребоваться и более часа.
Разверните каталог в разделе «Образ Windows», затем разверните «Пакеты». Разверните Foundation и щелкните правой кнопкой мыши Microsoft-Windows-Foundation-Package. Щелкните Добавить в файл ответов. Щелкните Включено или Отключено рядом с функциями, которые нужно включить или отключить.
Сообщение Просмотров: 453
Ошибка DISM 1910 «Указанный экспортер объекта не найден.» Может появиться после выполнения команды «DISM / Online / Cleanup-Image / RestoreHealth» в вычислениях на основе Windows 10 при каждой попытке восстановления образа Windows.
В моем случае ошибка 1910 произошла при использовании DISM с параметром «/ Source», чтобы указать другое местоположение в качестве источника соответствующих файлов:
- DISM / Online / Cleanup-Image / RestoreHealth /Source:WIM:X:sourcesinstall.wim file: 1 / LimitAccess

Средство обслуживания образов развертывания и управления ими
Версия: 10.0.14393.0
Версия изображения: 10.0.14393.0
Ошибка: 1910
Указанный экспортер объекта не найден.
Файл журнала DISM находится по адресу C: WINDOWS Logs DISM dism.log «
В этом руководстве вы найдете подробные инструкции по устранению ошибки 1910 (указанный экспортер объектов не найден) при запуске команды DISM в Windows 10.
Как исправить ошибку DISM 1910: указанный экспортер объекта не найден.
Метод 1. Запустите DISM с / StartComponentCleanup / AnalyzeComponentStore.
1. Щелкните правой кнопкой мыши на Начало меню ![]() и выберите Командная строка (Admin).
и выберите Командная строка (Admin).
2. Введите следующую команду и нажмите Войти*
- DISM / Online / Cleanup-Image / StartComponentCleanup
* Заметка: Если вы получили «Ошибка: 2, система не может найти указанный файл». после выполнения вышеуказанной команды, затем:
1. Тип SFC / SCANNOW и нажмите Войти.
2. После SFC снова запустите указанную команду.

3. Когда процесс «StartComponentCleanup» будет завершен, выполните следующую команду:
- SFC / SCANNOW

4. Когда SFC завершен, введите следующую команду (и нажмите Войти).
- DISM / Online / Cleanup-Image / AnalyzeComponentStore

5. После завершения процесса AnalyzeComponentStore введите команду sfc / scannow (снова) и нажмите Войти:
- SFC / SCANNOW
6. После сканирования SFC, перезапуск твой компьютер.
7. После перезагрузки запустите DISM с ключом «/ RestoreHealth», чтобы восстановить образ Windows:
- DISM / Online / Cleanup-Image / RestoreHealth
Кратко описанные выше шаги: Перед запуском команды «DISM / Online / Cleanup-Image / RestoreHealth» выполните следующие команды, чтобы исправить ошибку 1910 DISM:
-
- DISM / Online / Cleanup-Image / StartComponentCleanup
- SFC / SCANNOW
- DISM / Online / Cleanup-Image / AnalyzeComponentStore
- SFC / SCANNOW
- DISM / Online / Cleanup-Image / RestoreHealth
Способ 2. Исправьте ошибку DISM 0x800f081f с помощью Repair Upgrade.
Другой способ исправить ошибку 1910 DISM / RestoreHealth — выполнить обновление восстановления Windows 10.
Шаг 1. Обновите Windows 10 с помощью Media Creation Tool.
1. Скачайте и запустите инструмент для создания медиа в соответствии с вашей версией ОС.
- Скачать Windows 10
- Загрузить Windows 8.1
2. принимать Условия лицензии.
3. Выберите опцию Обновите этот компьютер сейчас и нажмите Следующий.

4. Дождитесь завершения обновления Windows и перейдите к шагу 2.
Шаг 2. Используйте инструменты DISM и SFC для завершения ремонта.
— После обновления Windows:
1. Щелкните правой кнопкой мыши на Начало меню ![]() и выберите Командная строка (Admin).
и выберите Командная строка (Admin).
2. В окне командной строки введите следующую команду для завершения ремонта:
- DISM / Online / Cleanup-Image / StartComponentCleanup
- Dism / Онлайн / Очистка-Image / RestoreHealth
- SFC / SCANNOW
Удачи! Дайте мне знать, если это руководство помогло вам, оставив свой комментарий о вашем опыте. Пожалуйста, любите и делитесь этим руководством, чтобы помочь другим.
Ошибка DISM 1910 «Указанный экспортер объекта не найден.» Может возникнуть после запуска «DISM / Online. / Cleanup-Image / RestoreHealth «на компьютере под управлением Windows 10 всякий раз, когда вы пытаетесь восстановить Windows изображение.
В моем случае ошибка 1910 произошла при использовании DISM с параметром «/ Source», чтобы указать другое местоположение в качестве источника соответствующих файлов:
- DISM / Online / Cleanup-Image / RestoreHealth / Источник: WIM:Икс: файл sources install.wim:1 / LimitAccess

Инструмент обслуживания образов развертывания и управления ими
Версия: 10.0.14393.0
Версия изображения: 10.0.14393.0
Ошибка: 1910
Указанный экспортер объекта не найден.
Файл журнала DISM находится по адресу C: WINDOWS Logs DISM DISM.log «
В этом руководстве вы найдете подробные инструкции по устранению ошибки 1910 (указанный экспортер объектов не найден) при запуске команды DISM в Windows 10.
Как исправить ошибку DISM 1910: указанный экспортер объектов не найден.
Способ 1. Запустите DISM с помощью / StartComponentCleanup и / AnalyzeComponentStore.
1. Щелкните правой кнопкой мыши на Начинать меню  и выберите Командная строка (администратор).
2. Введите следующую команду и нажмите Входить: *
- DISM / Онлайн / Очистка-Образ / StartComponentCleanup
* Примечание: Если вы получите «Ошибка: 2, система не может найти указанный файл. «после выполнения указанной выше команды, затем:
1. Тип sfc / scannow и нажмите Входить.
2. После SFC снова запустите указанную выше команду.

3. Когда процесс «StartComponentCleanup» завершится, выполните следующую команду:
- SFC / SCANNOW

4. Когда SFC будет завершена, дайте следующую команду (и нажмите Входить).
- DISM / Онлайн / Очистить-Изображение / AnalyzeComponentStore

5. Когда процесс «AnalyzeComponentStore» будет завершен, введите команду sfc / scannow (еще раз) и нажмите Входить:
- SFC / SCANNOW
6. После сканирования SFC, начать сначала твой компьютер.
7. После перезагрузки запустите DISM с переключателем «/ RestoreHealth», чтобы восстановить образ Windows:
- DISM / Онлайн / Очистка-Образ / RestoreHealth
Вкратце описанные выше шаги: Перед запуском команды «DISM / Online / Cleanup-Image / RestoreHealth» выполните следующие команды, чтобы исправить ошибку DISM 1910:
-
- DISM / Онлайн / Очистка-Образ / StartComponentCleanup
- SFC / SCANNOW
- DISM / Онлайн / Очистить-Изображение / AnalyzeComponentStore
- SFC / SCANNOW
- DISM / Онлайн / Очистка-Образ / RestoreHealth
Способ 2. Исправьте ошибку DISM 0x800f081f с помощью Repair Upgrade.
Другой способ исправить ошибку DISM / RestoreHealth 1910 — выполнить ремонтное обновление Windows 10.
Шаг 1. Обновите Windows 10 с помощью Media Creation Tool.
1. Загрузите и запустите средство создания мультимедиа в соответствии с версией вашей ОС.
- Скачать Windows 10
- Скачать Windows 8.1
2.Принимать Условия лицензии.
3. Выберите вариант Обновите этот компьютер сейчас и нажмите Следующий.

4. Дождитесь завершения обновления Windows и перейдите к шагу 2.
Шаг 2. Для завершения ремонта используйте инструменты DISM и SFC.
— После обновления Windows:
1. Щелкните правой кнопкой мыши на Начинать меню и выберите Командная строка (администратор).
2. В окне командной строки введите следующую команду для завершения ремонта:
- DISM / Онлайн / Очистка-Образ / StartComponentCleanup
- Dism / Online / Cleanup-Image / RestoreHealth
- sfc / scannow
Удачи! Сообщите мне, помогло ли вам это руководство, оставив свой комментарий о своем опыте. Пожалуйста, поставьте лайк и поделитесь этим руководством, чтобы помочь другим.
The DISM error 1910 «The object exporter specified was not found.», may occur after running the «DISM /Online /Cleanup-Image /RestoreHealth» command on a Windows 10 based compute whenever you try to repair the Windows image.
In my case the error 1910 occurred when using DISM with the «/Source» option, in order to specify another location as the source of the appropriate files:
- DISM /Online /Cleanup-Image /RestoreHealth /Source:WIM:X:sourcesinstall.wim file:1 /LimitAccess

Deployment Image Servicing and Management tool
Version: 10.0.14393.0
Image Version: 10.0.14393.0
Error: 1910
The object exporter specified was not found.
The DISM log file can be found at C:WINDOWSLogsDISMdism.log»
In this tutorial you will find detailed instructions to resolve the error 1910 (The object exporter specified was not found) when running the DISM command on Windows 10.
How to Fix DISM Error 1910: The object exporter specified was not found.
Method 1. Run DISM with /StartComponentCleanup & /AnalyzeComponentStore.
1. Right click at Start menu ![]() and select Command Prompt (Admin).
and select Command Prompt (Admin).
2. Type the following command and press Enter: *
- DISM /Online /Cleanup-Image /StartComponentCleanup
* Note: If your receive «Error: 2, The system cannot find the file specified.» after running the above command, then:
1. Type sfc /scannow and press Enter.
2. After SFC, run the above command again.

3. When the «StartComponentCleanup» process is completed run the following command:
- SFC /SCANNOW

4. When SFC is completed, give the following command (and press Enter).
- DISM /Online /Cleanup-Image /AnalyzeComponentStore

5. When the «AnalyzeComponentStore» process is completed, type the sfc /scannow command (again) and press Enter:
- SFC /SCANNOW
6. After SFC scan, restart your computer.
7. After restart, run DISM with the «/RestoreHealth» switch to repair the Windows image:
- DISM /Online /Cleanup-Image /RestoreHealth
The above steps in short: Before running the «DISM /Online /Cleanup-Image /RestoreHealth» command run the following commands in order to fix DISM Error 1910:
-
- DISM /Online /Cleanup-Image /StartComponentCleanup
- SFC /SCANNOW
- DISM /Online /Cleanup-Image /AnalyzeComponentStore
- SFC /SCANNOW
- DISM /Online /Cleanup-Image /RestoreHealth
Method 2. Fix DISM Error 0x800f081f with Repair Upgrade.
The other method to fix DISM /RestoreHealth error 1910 is to perform a repair upgrade of Windows 10.
Step 1. Upgrade Windows 10 using the Media Creation Tool.
1. Download and run the media creation tool according your OS Version.
- Download Windows 10
- Download Windows 8.1
2. Accept the License Terms.
3. Choose the option Upgrade this PC now and press Next.

4. Wait until Windows Upgrade is completed and then continue to step-2.
Step 2. Use DISM and SFC tools to complete repairs.
– After Windows upgrade:
1. Right click at Start menu ![]() and select Command Prompt (Admin).
and select Command Prompt (Admin).
2. At the command prompt window give the following command in order to complete the repairs:
- DISM /Online /Cleanup-Image /StartComponentCleanup
- Dism /Online /Cleanup-Image /RestoreHealth
- sfc /scannow
Good luck! Let me know if this guide has helped you by leaving your comment about your experience. Please like and share this guide to help others.
If this article was useful for you, please consider supporting us by making a donation. Even $1 can a make a huge difference for us in our effort to continue to help others while keeping this site free:

If you want to stay constantly protected from malware threats, existing and future ones, we recommend that you install Malwarebytes Anti-Malware PRO by clicking below (we
do earn a commision from sales generated from this link, but at no additional cost to you. We have experience with this software and we recommend it because it is helpful and useful):
Full household PC Protection — Protect up to 3 PCs with NEW Malwarebytes Anti-Malware Premium!
Certain Windows users receive the DISM error 1910 code when running a DISM scan. When we run the “DISM /Online /Cleanup-Image /RestoreHealth” command on a Windows 10 computer and attempt to repair the Windows image, we may receive the DISM error 1910 “The object exporter specified was not found.”
Most of the time, this issue is discovered in the scan logs file rather than at the end of the operation. This DISM error 1910 has been observed in versions of Windows 7, Windows 8.1, and Windows 10.
This guide will show you how to resolve the 1910 (The object exporter specified was not found) error when using the DISM command on Windows 10.
If you are still using genuine versions of Windows 7 or 8, you are encouraged to upgrade to Windows 10 for free.
Related: How to Resolve the Windows 10 System Service Exception Error?
Why Does the DISM Error 1910 Occur?
Following a thorough investigation, it was discovered that this error code could be caused by a variety of different circumstances. Here’s a list of potential suspects:
- According to several concerned users, this problem may occur if the DISM tool (Deployment Image Servicing and Management tool) is not working properly. Sometimes the DISM utility is corrupted due to system file corruption
2. If the problem arises after installing a new Windows update, a driver update, or third-party software installation, you may be able to use the System Restore feature to restore your system to a previous state when the problem did not exist.
3. In certain situations, you may discover that this issue is caused by corruption in your operating system’s multiple files.
Now that you’ve narrowed down every probable source of the problem. As a result, the remedy is solely dependent on the cause of the issue.
If the problem is caused by a DISM tool error, we may resolve it by executing an SFC command. An SFC scan may be able to repair it when the DISM utility is corrupted due to system file corruption,
If the error arises as a result of upgrading Windows, any drivers, or any software, a system restores instance will resolve the issue.
If neither method works, we can try a Windows reset, Windows repair, or a clean reinstallation of Windows 10. Resetting every Windows component using methods such as resetting, repair installation, and clean installation may be able to resolve the issue.
However, we are unable to determine the precise cause of the issue from the Windows log file. As a result, it is only prudent to implement the solutions one at a time.
Here is a list of ways that other DISM users who have experienced the error 1910 have found to be effective:
1. Confirm the Error
Before attempting to resolve DISM Error 1910, you must first determine whether the problem is recurring.
To confirm, right-click on the Start menu icon and choose Windows Powershell (Admin).
You may also execute all of the commands listed below on the Command Prompt window by searching for cmd in the Windows search bar and running as an administrator.
After typing the following command, press Enter.:
DISM /Online /Cleanup-Image /StartComponentCleanup
If you get the message “Error: 2, The system cannot find the file specified,” it implies that the system is unable to locate the file.
Following the execution of the above command, you should proceed with the following solution approaches.
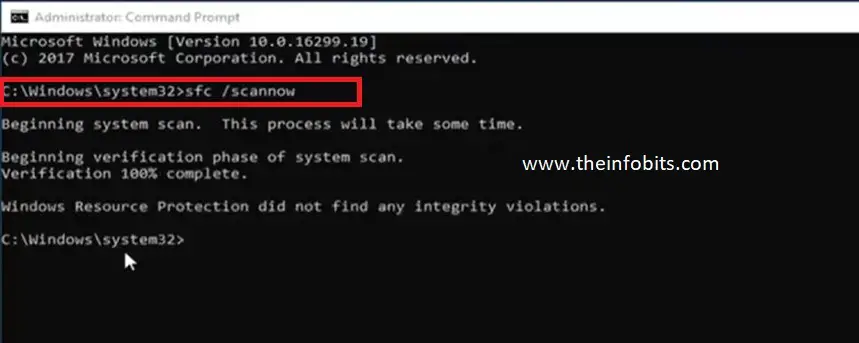
2. Performing an SFC Scan
If you see this error when doing a DISM scan, you may be able to address the damaged dependence by scanning your system files using a System File Checker (SFC).
Some impacted customers reported that using this type of scan allowed them to restore every instance of a damaged system file – and that the DISM scan did not return the same 1910 error thereafter.
If you haven’t already, do an SFC scan to resolve the 1910 DISM issue by following the instructions below:
To open the Run dialogue box, hit the Windows key + R.
Then, in an elevated Command Prompt, type ‘cmd’ in the text box.
When the UAC (User Account Control) box displays, click Yes to provide admin access.
You may also access the command prompt using the Windows search bar.
To do an SFC scan, open a command prompt window and type the following command.
sfc /scannow
Once you’ve begun this procedure, be patient and wait until the SFC scan is finished.
Closing this window or stopping the process before it is completed may result in logical inconsistencies in your system, which may result in additional problems.
After the operation is completed, you may securely close the command prompt window and restart your computer.
Start afresh DISM scan by typing the following command into the prompt and check whether you still receive the DISM 1910 error.
DISM /Online /Cleanup-Image /RestoreHealth
If the problem persists, proceed to the next possible solution listed below.
3. Performing a System Restore
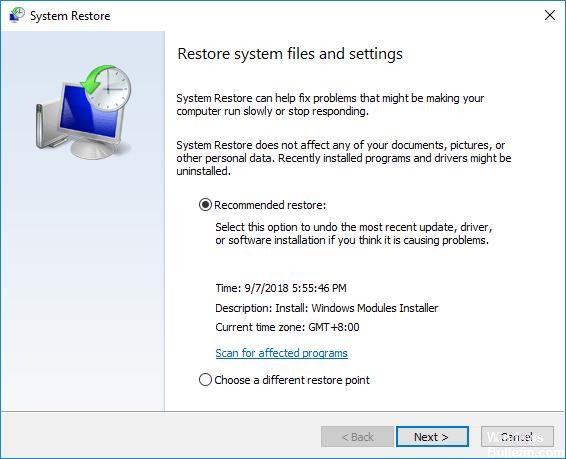
If this problem arose as a result of a recent system update (a new Windows Update, a new application installation, a new driver installation or update, etc. ), you should be able to repair it by using the System Restore feature to restore your machine to a prior state where this problem did not exist.
The majority of the time, this issue is caused by a discrepancy brought about by a recent Windows Update.
System Restore generally takes a system snapshot of Windows before running critical updates or installing critical apps.
Several individuals have said that System Restore assisted them in resolving the issue, therefore we recommend that you try it.
However, keep in mind that using a System Restore snapshot essentially restores your system to an earlier point in time. As a result, every installed application, driver, and Windows update will be undone.
If you do a System Restore, any programs and software installed after the specified time of the restore point will be immediately removed. However, the change will not affect your files or folders.
This method, however, is only applicable to users who have created restore points in their operating systems. If it hasn’t, proceed to the next method of troubleshooting listed below.
If you understand how the System Restore software works and want to proceed with this operation, follow the instructions below to begin a System Restore procedure.
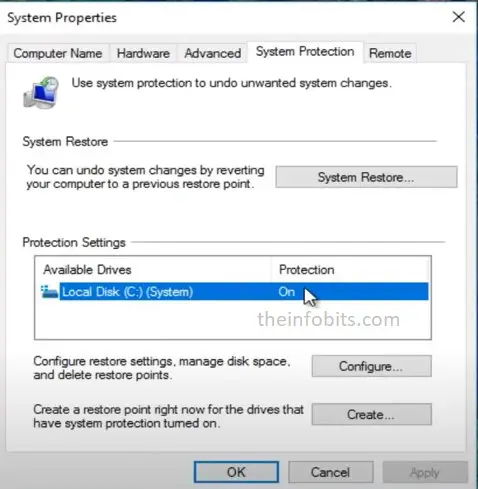
- In the Windows 10 search box, type System Restore.
- Open the ‘Create restore point‘ option
- Then you will get a System Properties windows
- Navigate to Protection Settings and then to the System Restore tab beneath it in the System Properties box.
- On the next step, click Next, and then choose a restore point when the ‘DISM Error 1910′ was not present.
- To finish the procedure, click Next and then follow the on-screen instructions.
If you find and successfully use a compatible system restoration snapshot, restart your computer to see if the DISM problem has been repaired.
If you can’t find a working system restore point, proceed to the next step below.
4. Performing a Repair / Clean Installation
If none of the above-mentioned solutions have worked for you, you can try refreshing every OS element to ensure that no corrupted system files are causing the DISM problem.
The most elegant method for achieving this is to use a repair installation.
You can also attempt the Windows 10 reset feature on your PC before proceeding with the repair process. It aided several users in resolving the DISM error 1910.
However, keep in mind that to do an in-place repair, you will need to input proper installation media.
It is simple to construct a bootable Windows 10 USB stick. Simply go to Microsoft’s official website and download the media creation tool.
To obtain Windows 10 installation media, use the creation tool and follow the suggested steps.
Allow your PC to boot from the installation media after creating the bootable drive.
Then, from the opening window, choose “Repair your computer.” Then, select “Troubleshoot” and follow the on-screen instructions.
This is a time-consuming process, but it will allow you to finish the operation without losing any data on the operating system drive. This means you’ll be able to keep all of your data, games, applications, and even specific user preferences.
You may also do a clean install, which is a simpler procedure that can be initiated directly from the Windows 10 installation GUI by booting the PC from the proper installation disc.
The main disadvantage is that you will lose all of your data that is currently saved on the hard disc unless you first back it up.
Conclusion
This brings us to the end of our guide on how to fix the DISM Problem 1910 problem code on Windows 10.
We made every effort to walk you through each step in detail, and we hope that one of the options listed above worked for you.
Please let us know in the comments section below if you have any queries about the procedures!
We hope you found this article helpful, and do like and follow us on Facebook and Twitter for regular updates.
Sign up for our free newsletter as well to receive fresh information right in your inbox and stay informed technically.
You May Be Interested to Read:
- Why Is “Your Location Is Currently in Use” Displayed on Windows?
- How to Address [pii_email_a427253221614b6547d5] Error Code in Outlook Mail?
- Why Does the Mic Keep Cutting Out in Windows 10? [Simple Fixes]
- Fixing the Windows Unexpected Kernel Mode Trap Error in 15 Easy Steps
- Easy Fix for Windows 10 Action Center Not Opening Problem