Ошибка DNS PROBE FINISHED NXDOMAIN может появиться в браузере Google Chrome, Mozilla Firefox, Safari или Microsoft Edge. Она носит «кроссплатформенный» характер и отображается на Windows 7, 10, 11, macOS, ChromeOS и на телефоне Android. Некоторые пользователи отмечают, что видят подобную проблему во многих дистрибутивах Linux.
Сообщения браузеров при этом выглядят так:
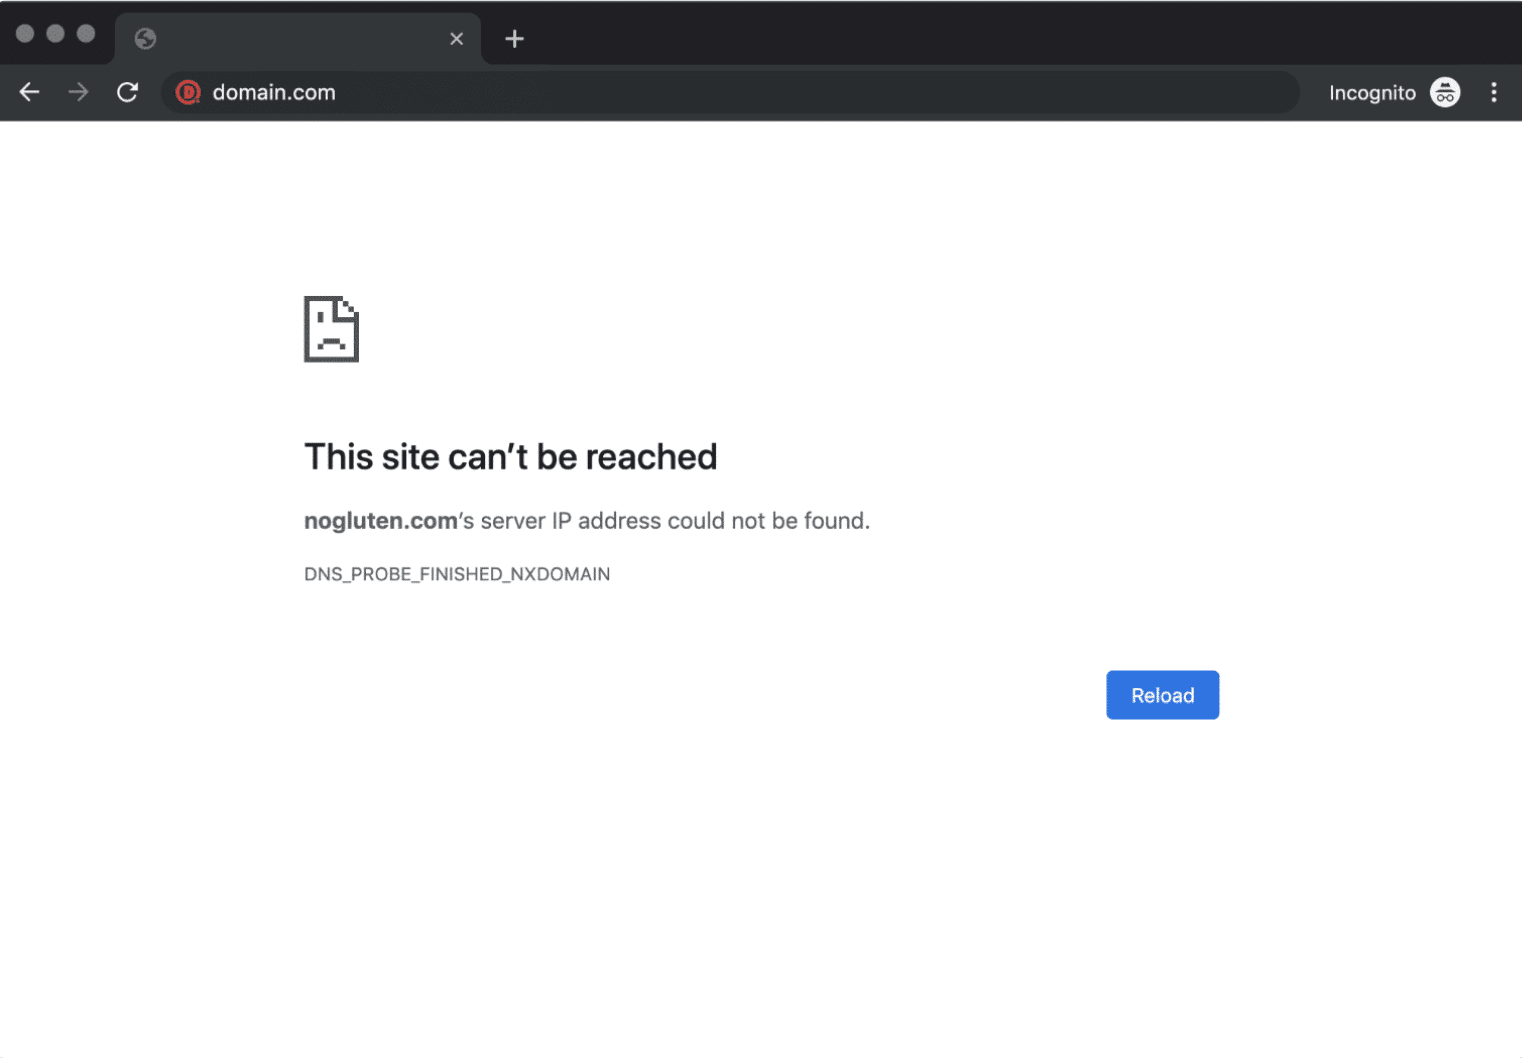
- Google Chrome — Не удаётся получить доступ к сайту. В английской версии «This site can’t be reached».
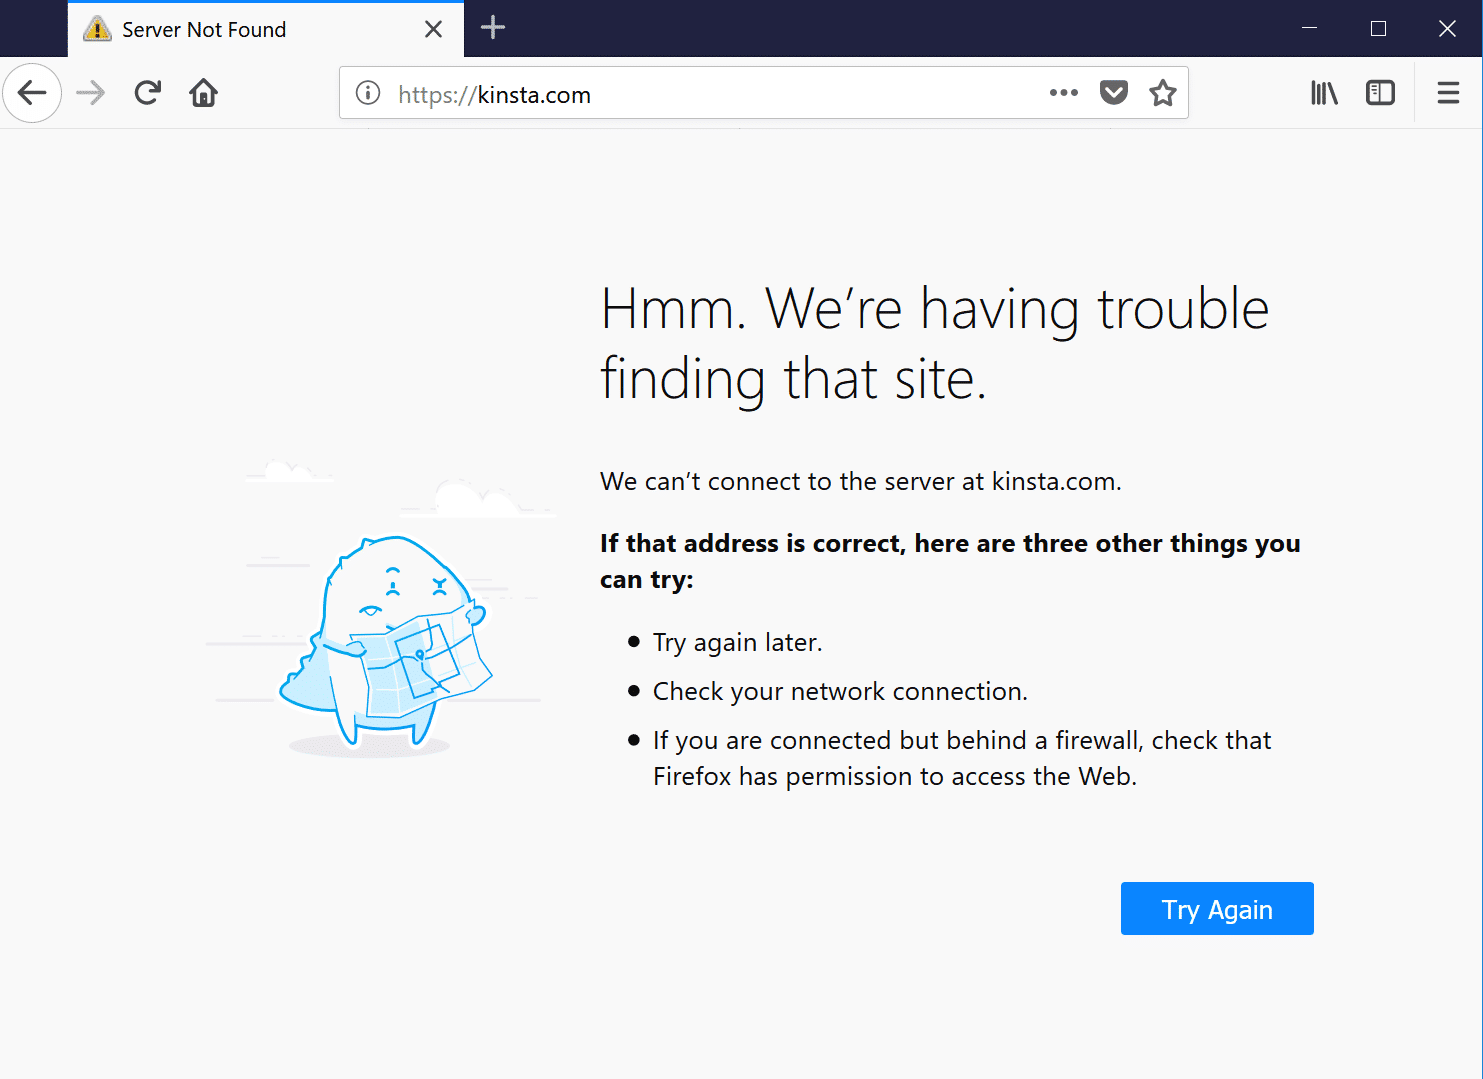
- Mozilla Firefox — Хмм. Нам не удаётся найти этот сайт. В переводе на английский «Hmm. We’re having trouble finding that site».
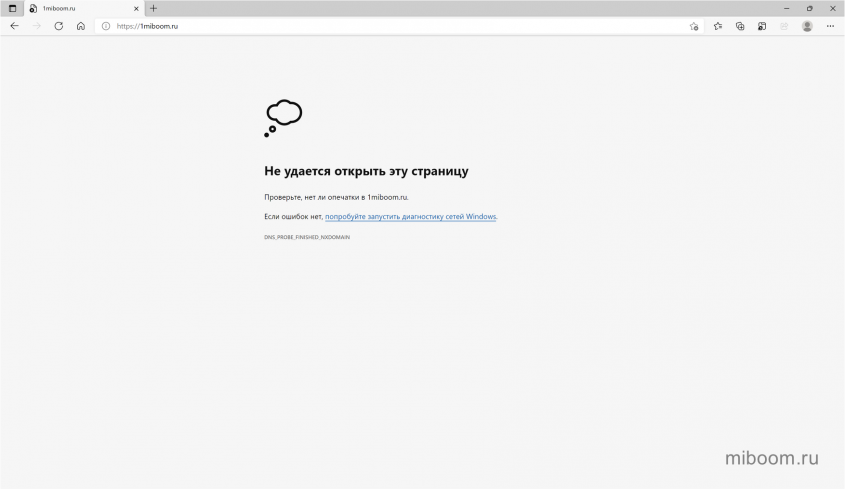
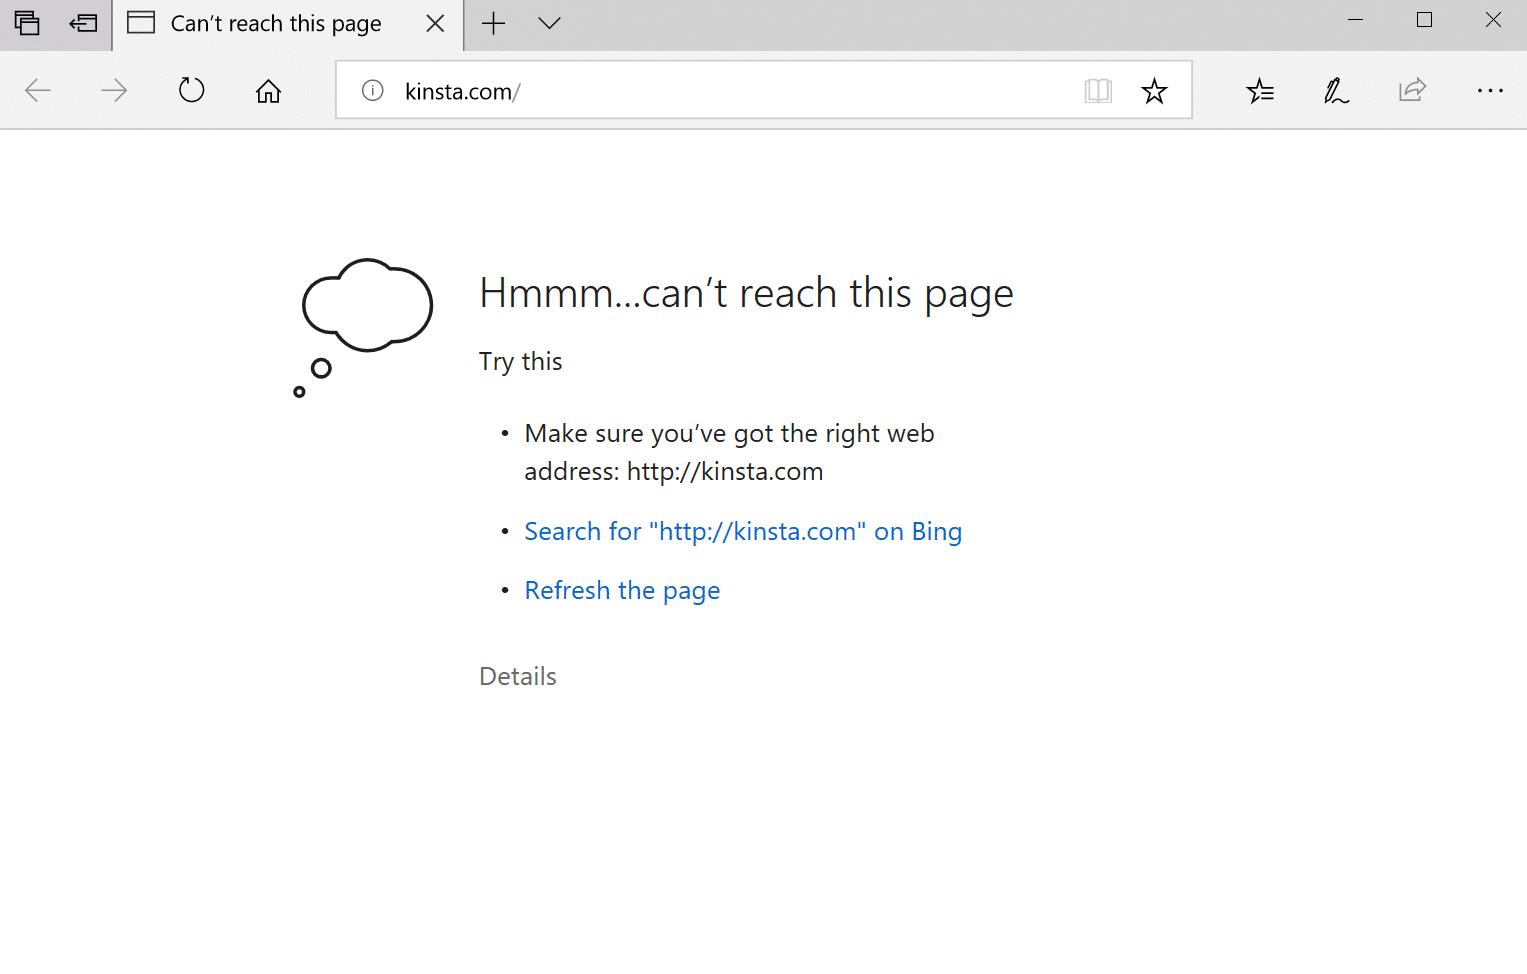
- Microsoft Edge — Не удаётся открыть эту страницу (Hmm… can’t reach this page).
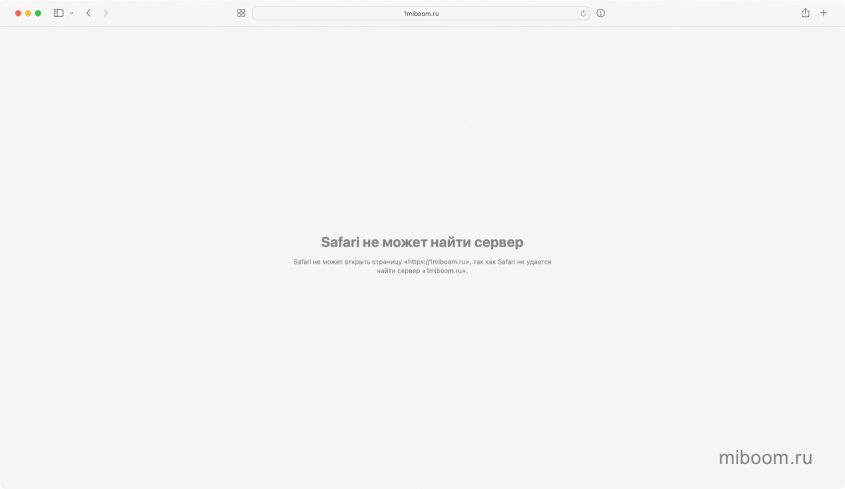
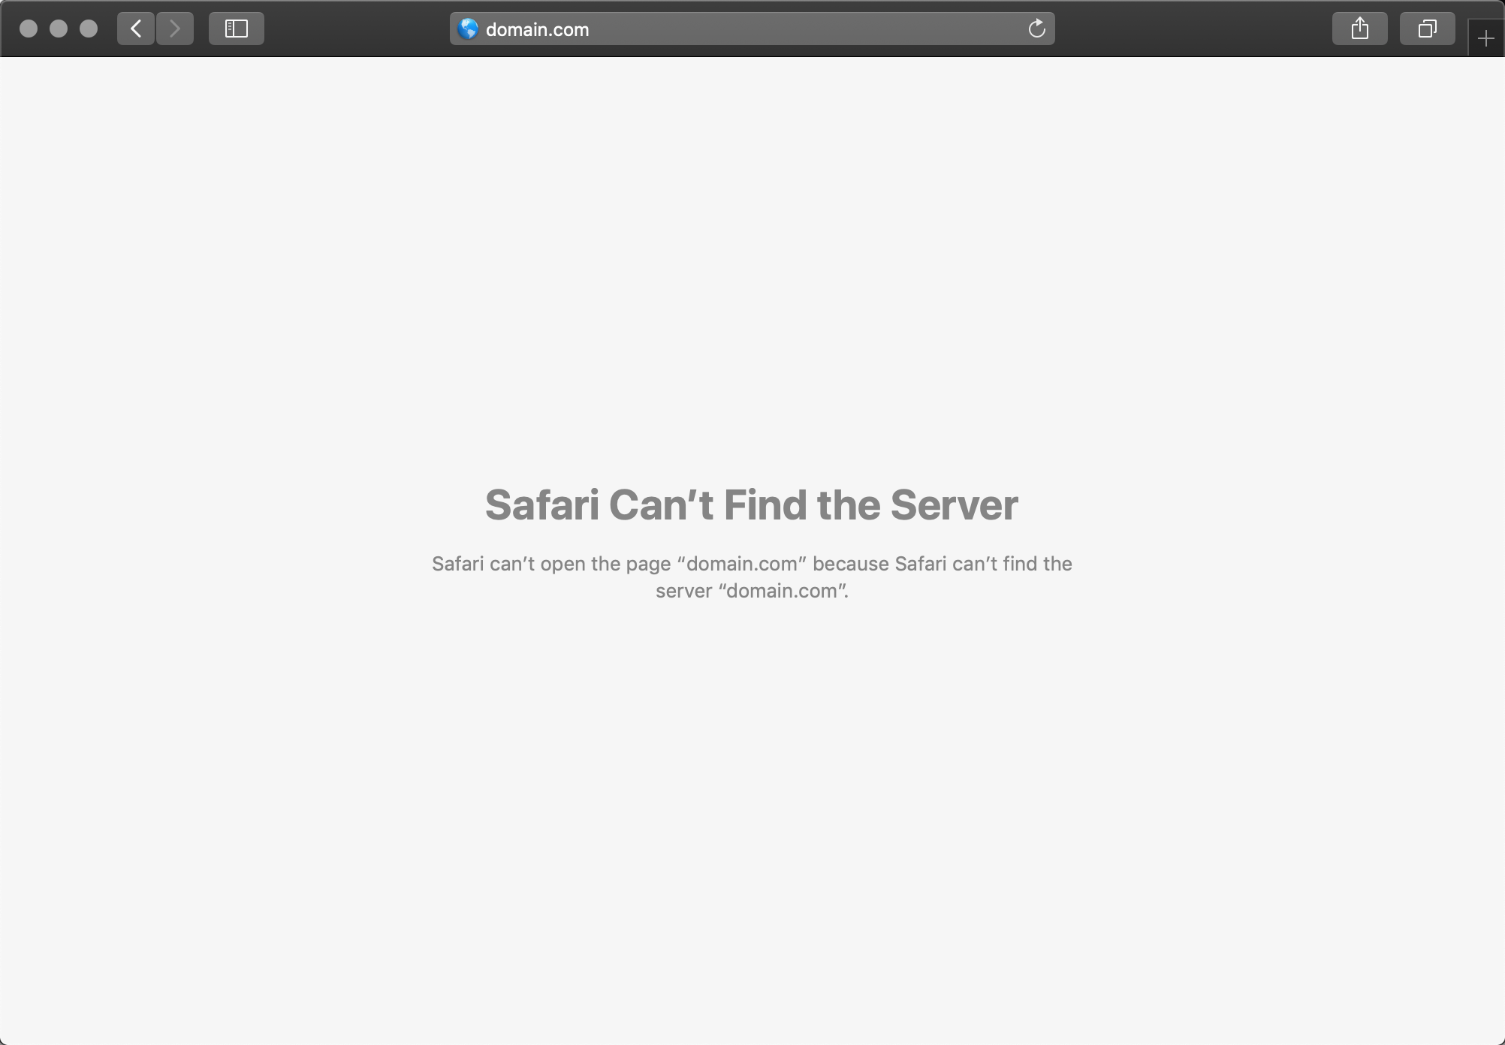
- Safari — Сафари не может найти сервер (Safari Can’t Find the Server).
При всей непонятности ситуации есть чёткие инструкции, как исправить DNS_PROBE_FINISHED_NXDOMAIN. Мы собрали все имеющиеся решения и разделили их на проблемы с самим сайтом, сбросом ошибки в рамках браузера и её исправление через настройки операционной системы.
Содержание
- Что это значит
- Причины ошибки NXDOMAIN
- Проверка активности домена
- Как исправить ошибку на Windows 7, 8, 10, 11
- Решение проблемы NXDOMAIN в macOS
- Исправление проблемы в ChromeOS
- Google Chrome Flags
- Как исправить ошибку на Android
- Альтернативные способы исправления NXDOMAIN
- Microsoft Edge, Mozilla Firefox и Safari
- Коротко о главном
Что это значит
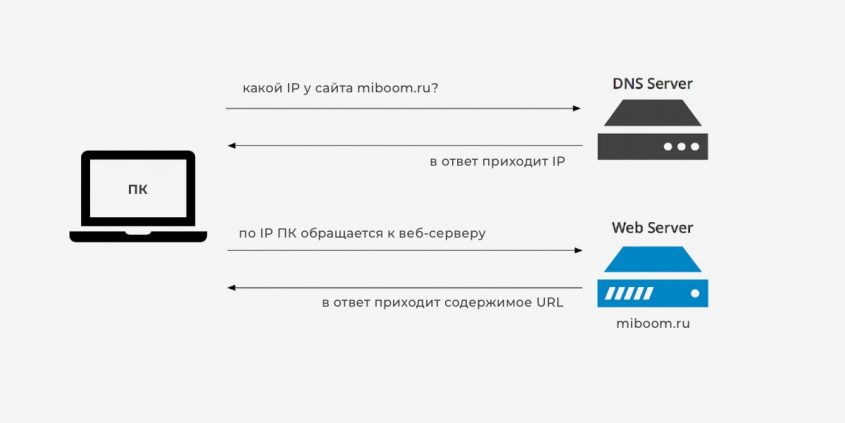
DNS PROBE FINISHED NXDOMAIN — это ошибка вызванная невозможностью системы доменных имён (Domain Name System, DNS) преобразовать URL-адрес сайта в IP-адрес, что не даёт браузеру связаться с ним.
NXDOMAIN в тексте ошибки расшифровывается как Non-Existing Domain и переводится как «несуществующий домен». Перевод всей фразы можно озвучить как «DNS опрос завершён, домен не существует”. Простым языком это означает, что на сервере ДНС отсутствуют данные о домене. Из-за этого сайт, который пытается загрузить пользователь не открывается.
Когда вы вводите в адресную строку браузера URL, преобразователь доменных имён обращается к DNS-серверу. В ответ браузер получает IP-адрес сайта и запрашивает ответ у сервера, на котором расположен сайт, по указанному вами URL.
С этой ошибкой сталкиваются как пользователи самого популярного браузера Google Chrome, так и его аналогов на движке Chromium (Microsoft Edge, Yandex Browser и другие). Владельцы Mozilla Firefox и Safari видят ошибку ненамного реже.
Проблема в том, что причина ошибки далеко не всегда зависит от ответа сервера DNS, и может находиться как на стороне сайта, так и на вашем компьютере.
Причины ошибки NXDOMAIN
Все причины появления DNS_PROBE_FINISHED_NXDOMAIN известны, но с ходу определить, что именно произошло не получится. Поэтому приходится перебирать все возможные варианты в надежде на то, что какой-нибудь из них поможет решить проблему.
Причины возникновения ошибки:
- Неправильный ввод адреса. Как бы это смешно ни звучало, но иногда пользователи делают ошибку при вводе адреса сайта и даже не замечают этого.
- Сайт недоступен из-за проблем на сервере. В этом случае исправить что-либо самостоятельно нельзя, остаётся только подождать и зайти на сайт позже.
- Блокировка ресурса на уровне провайдера. Такое случается, например, если пользователь пытается перейти на сайт, заблокированный по требованию Роскомнадзора. Проверить доступность сайта можно при помощи любого VPN сервиса.
- Переполнен кэш DNS в ОС или браузере. Чаще всего проблема наблюдается именно в Windows: если кэш DNS переполняется, некоторые сайты отказываются грузиться.
- Неправильные настройки ipconfig. Часто из-за сбитых настроек ipconfig в Windows появляется проблема на сайте с DNS_PROBE_FINISHED_NXDOMAIN.
- Недоступен конкретный DNS-сервер. Обычно операционная система выбирает сервер автоматически, но иногда с этим возникают проблемы, что и становится причиной проблемы.
- Блокировка на системном уровне (hosts). В файл с именем hosts вписываются домены и адреса сайтов, к которым необходимо заблокировать доступ на системном уровне. Если сайт есть в списке, то появится ошибка DNS_PROBE_FINISHED_NXDOMAIN (их туда часто записывают вирусы).
- Блокировка штатным антивирусом или настроенным VPN. Если по каким-то причинам сайт попал в чёрный список антивируса или фаервола, то он не загрузится. Стоит проверить настройки штатного антивирусного ПО, брандмауэра или VPN-сервиса.
Кроме того, достаточно распространённой причиной появления данной ошибки является банальный сбой браузера. Нужно просто переустановить его, и тогда всё может вернуться на круги своя. Однако не всегда дело только в вышеперечисленных причинах. Иногда сайт недоступен просто потому, что перестал существовать.
Проверка активности домена
Часто ошибка DNS_PROBE_FINISHED_NXDOMAIN возникает из-за проблемы с доменным именем сайта. Например, вы неправильно ввели URL сайта в адресной строке браузера, из-за чего он не может найти IP-адрес в системе доменных имён (DNS).
Также сайт может быть отключён от DNS намеренно или по ошибке владельца. Один из способов проверить активен ли домен — это перейти на сайт REG.RU, вести URL-адрес сайта и посмотреть ответ утилиты DIG. На примере несуществующего домена 1miboom.ru и реального адреса нашего сайта miboom.ru, ответ выглядит так:
Для зарубежных доменов можно использовать инструмент поиска регистрационных данных ICANN (эта корпорация управляет доменными именами и IP-адресами) и посмотреть, есть ли адрес сайта в их базе.
Что делать: попытайтесь открыть другие сайты в браузере. Если они работают, а только один сайт выдаёт DNS_PROBE_FINISHED_NXDOMAIN, проблема может быть в нём. В этом случае можно подождать и повторить попытку позже.
Если вы владелец сайта убедитесь, что ошибка DNS_PROBE_FINISHED_NXDOMAIN на сайте не возникает с вашей стороны:
- Проверьте не находится ли домен в периоде clientHold, serverHold, redemptionPeriod или других состояниях, во время которых он не работает.
- Используйте DNS, предоставляемые хостинг-провайдером, чтобы домен указывал на нужный сайт. Например, если регистратор домена и хостинг Beget, убедитесь в правильности указанных DNS от Бегет.
- Проверьте DNS-записи домена. A — является адресной записью и задаёт преобразование имени в IPv4-адрес. Адресная запись AAAA задаёт преобразование в IPv6-адрес.
- Если прошло менее 24 часов с момента регистрации домена или добавления адресных записей, информация могла не успеть обновиться в системе DNS. Надо подождать.
- Убедитесь, что вы не забыли продлить домен. Возможно он уже удалён из реестра.
Как исправить ошибку на Windows 7, 8, 10, 11
Для Windows больше всего вариантов, позволяющих исправить ситуацию, так как по сравнению с той же macOS система более открыта к действиям пользователя. Но в некоторых случаях даже в Windows 10 приходится работать с терминалом (командной строкой) для достижения необходимых результатов.
Сброс параметров Winsock и настроек протокола TCP/IP
Часто бывает так, что в сетевых настройках Windows произошёл сбой, и поэтому браузер не может загрузить один сайт (остальные при этом могут работать нормально). Если наблюдается такая ситуация, то стоит сбросить настройки спецификации Winsock (Windows Sockets API (WSA)), а заодно и параметры протокола TCP/IP. Для этого можно использовать командную строку.
Как сбросить Winsock и TCP/IP в Windows 10:
- Щёлкните по кнопке «Пуск», найдите Terminal и кликните по нему правой кнопкой мыши.
- В появившемся меню выберите «Запуск от имени администратора».
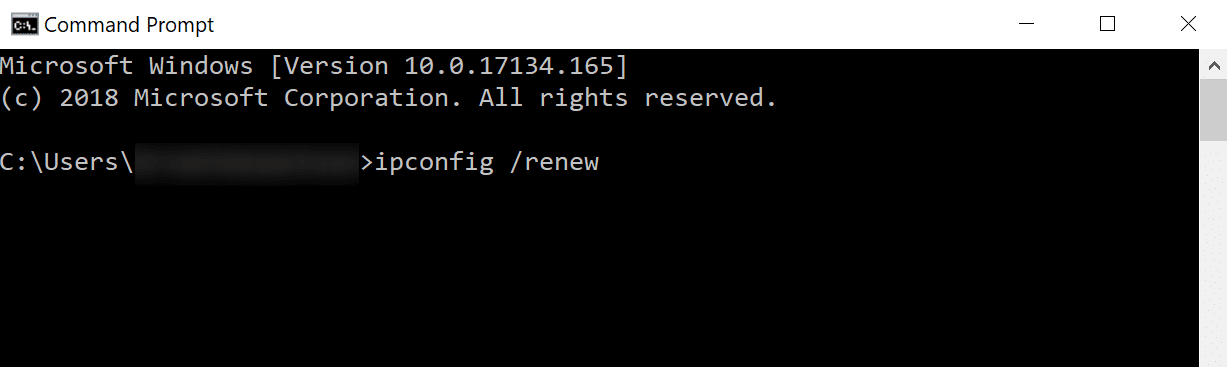
- Последовательно введите команды ipconfig /release, ipconfig /renew, netsh winsock reset, нажимая после каждой Enter.
- Затем введите netshintipreset и снова нажмите Enter.
После выполнения последней команды необходимо перезагрузить компьютер для того, чтобы все сделанные изменения были учтены. После рестарта можно запускать Google Chrome (или другой браузер) и проверять работоспособность сайта. Если ничего не изменилось, значит причина в другом.
Восстановление файлов Windows
Если на Windows были обнаружены вирусы или другое вредоносное ПО, вполне вероятно, что они повредили системные файлы, ответственные за работу сети. Если это действительно так, то в Windows имеется встроенный механизм для восстановления системных файлов.
Как восстановить системные файлы Windows:
- Нажмите кнопку «Пуск» и найдите в списке программ Terminal.
- Кликните правой кнопкой мыши по значку терминала и выберите «Запуск от имени администратора».
- В консоли введите команду sfc/ scannow и нажмите Enter.
Эта команда запускает сканирование системных файлов и проверку их целостности. Если будут найдены повреждённые объекты, Windows их восстановит. Сама операция может занять до 5 минут, а по её завершении будет необходимо перезагрузить компьютер.
Если восстановить файлы таким способом не удастся, придётся использовать накопитель с записанным образом операционной системы.
Использование альтернативного DNS-сервера
Иногда по причине сбоя автоматически выбранный системой сервер DNS оказывается недоступным. В этом случае можно попробовать прописать в настройках альтернативный DNS. Есть определённое количество публичных серверов, которые предоставляют пользователям бесплатный доступ.
Настройка альтернативного DNS в Windows:
- Нажмите Win+R, в строке введите control и нажмите ОК или Enter.
- В панели выберите «Центр управления сетями и общим доступом».
- В левом столбце щёлкните «Изменение параметров адаптера».
- Выберите активное подключение, кликните по нему правой кнопкой мыши и нажмите «Свойства».
- В списке выберите «IP версии 4 (TCP/IPv4)» и щёлкните кнопку «Свойства».
- Отметьте пункт «Использовать следующие адреса DNS-серверов».
- В строку «Предпочитаемый DNS-сервер» введите 8.8.8.8, а в «Альтернативный DNS-сервер» — 8.8.4.4. Если настраивать IPv6, то в указанные строки нужно вводить 2001:4860:4860::8888 и 2001:4860:4860::8844 соответственно.
- По завершении редактирования нажмите ОК.

После того как был введён альтернативный DNS-сервер, нужно выполнить переподключение к сети и проверить функционирование проблемных ресурсов.
Перезапуск DNS-сервера
Иногда возникают сбои в DNS самой операционной системы. Исправить их вручную могут только программисты определённого профиля, а обычным пользователям можно попробовать перезапустить DNS-сервер.
Как перезапустить DNS-сервер Windows:
- Нажмите Win+R, в строке введите services.msc, а затем нажмите ОК или Enter.
- В списке служб кликните правой кнопкой мыши по пункту «DNS-клиент» и выберите «Перезапустить».
- Если пункт «Перезапустить» неактивен, то запустите терминал от имени администратора по уже знакомому алгоритму и последовательно введите команды net stop dnscache и net start dnscache, нажимая после каждой Enter.
После перезапуска DNS-сервиса нужно отключиться от интернета и подключиться заново, только тогда сделанные изменения будут учтены. После переподключения проверьте наличие ошибки dns probe finished nxdomain на сайте.
Проверка файла hosts
В файле hosts находится информация о сопоставлении сайтов и IP-адресах на уровне операционной системы. Нужно проверить записи в файле и в случае необходимости убрать сайт из списка блокируемых. Для этого понадобится простой блокнот.
Как открыть файл hosts:
- Кликните по кнопке «Пуск» и выберите «Все приложения».
- Найдите в списке «Блокнот», щёлкните по нему правой кнопкой мыши, выберите «Дополнительно» и затем «Запуск от имени администратора».
- В самом блокноте щёлкните пункт «Файл» и выберите «Открыть».
- Перейдите по пути C:WindowsSystem32driversetc, выберите файл hosts и нажмите «Открыть».
- Найдите в списке необходимые домены и удалите их.
- Снова щёлкните «Файл» и выберите «Сохранить».
После этой процедуры не нужно перезагружать компьютер – можно сразу приступать к проверке работоспособности сайта в браузере.
Решение проблемы NXDOMAIN в macOS
Система macOS, которая используется на компьютерах Apple, не даёт пользователю возможность быстро получить доступ к серьёзным настройкам. Это своеобразная «защита от дурака». Но и для этой операционки есть свои способы решения проблемы.
Смена DNS сервера
Чтобы исправить ошибку DNS PROBE FINISHED NXDOMAIN в macOS, как и в Windows, можно сменить штатный DNS-сервер на альтернативный. Но сам процесс смены существенно отличается, так как в данной операционной системе настройки находятся в другом месте.
Как изменить DNS-сервер на macOS:
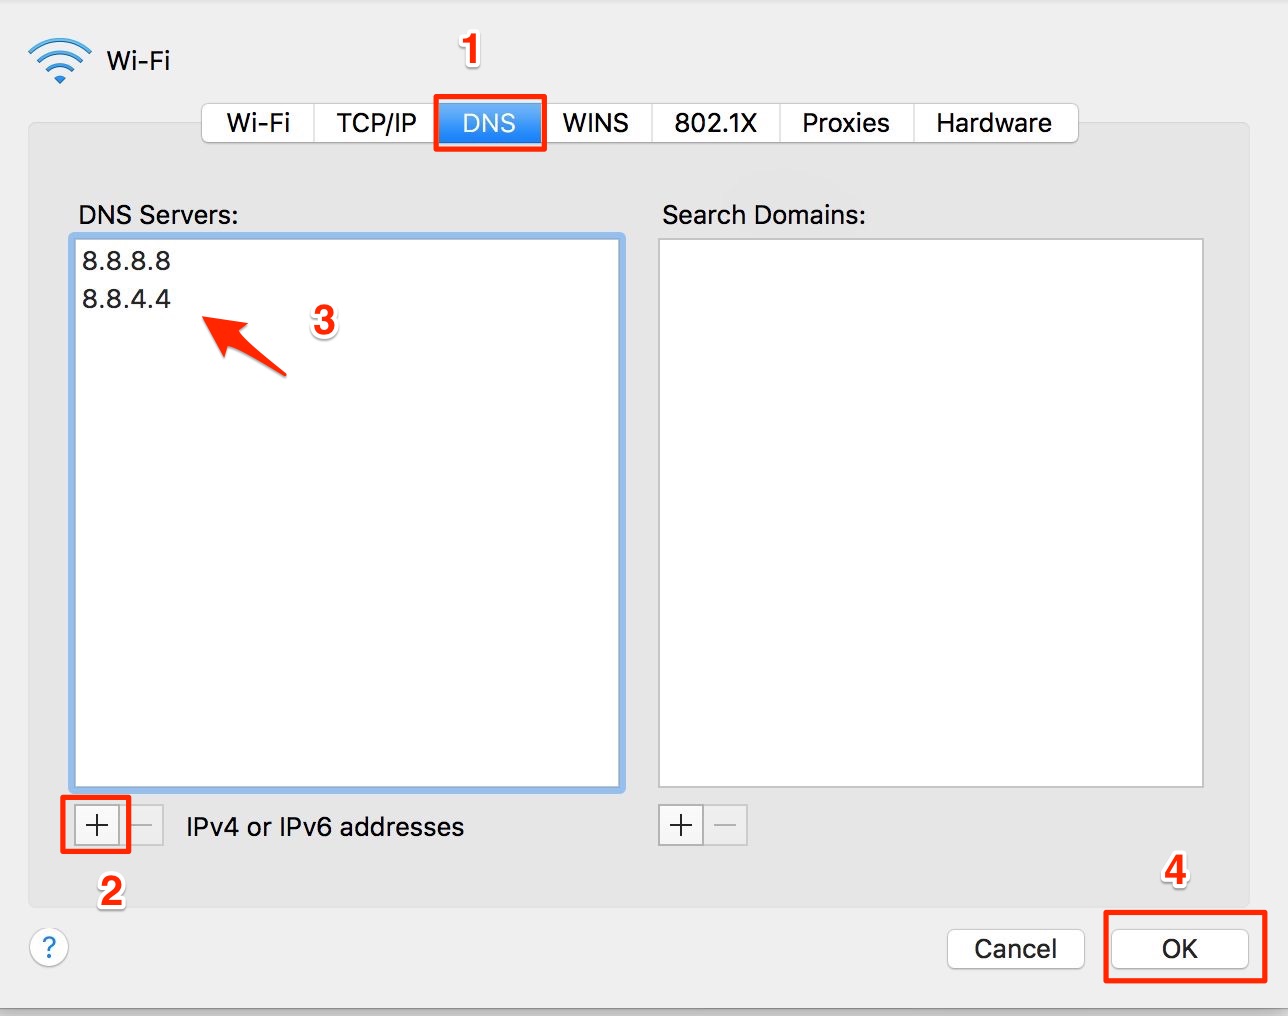
- Перейдите в «Системные настройки», выберите «Сеть».
- Выберите нужное подключение в левой части окна, нажмите кнопку «Дополнительно», перейдите на вкладку DNS.
- Нажмите кнопку плюс +, чтобы добавить адрес DNS-сервера.
- Появится новый сервер DNS с нулями вместо чисел.
- Введите туда 8.8.8.8, затем щёлкните по плюсу ещё раз и впишите 8.8.4.4.
- После этого кликните ОК.
Теперь macOS будет использовать альтернативный DNS-сервер. Для проверки работоспособности сайта понадобится сначала переподключиться к сети и только потом запустить Google Chrome, Safari или другой браузер для проверки.
Сброс кэша DNS
Иногда после установки альтернативного DNS-сервера на macOS приходится дополнительно сбрасывать кэш DNS. Для этого придётся использовать терминал, поскольку в графической оболочке нет подобных функций.
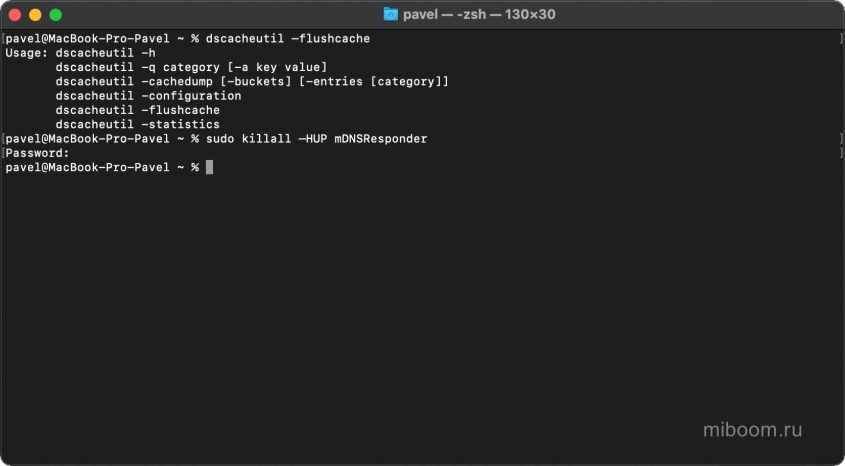
Как сбросить кэш DNS в macOS:
- Откройте приложение Terminal.
- Введите команду dscacheutil –flushcache, укажите пароль и нажмите Ввод.
- Введите команду sudo killall –HUP mDNSResponder, укажите пароль и нажмите Ввод.
После выполнения всех этих действий рекомендуется переподключить интернет. Только после этого можно заняться проверкой доступности ресурсов.
Исправление файла hosts
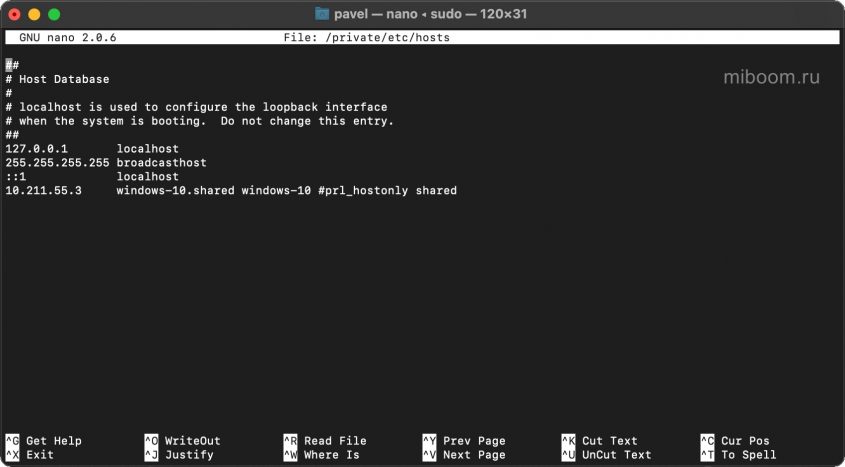
macOS хранит в файле hosts информацию о сопоставлении сайтов и IP-адресов. Для редактирования файла необходимо использовать терминал и специальный консольный редактор (как в Linux).
Редактирование hosts в macOS:
- Запустите Терминал.
- В консоли введите sudo nano /etc /hosts, нажмите Ввод.
- Введите пароль администратора и подтвердите его кнопкой Ввод.
- Уберите ненужные записи из списка простым удалением.
- Нажмите Control+O для сохранения изменений.
- Примените сочетание клавиш Control+X для выхода из редактора.
- В консоли введите dscacheutil –flushcache и sudo killall –HUP mDNSResponder, нажимая после каждой Ввод для сброса кэша DNS.
Теперь после нового подключения к интернету ошибка DNS_PROBE_FINISHED_NXDOMAIN на сайте должна исчезнуть. Сбрасывать кэш после редактирования файла hosts обязательно, так как система может взять данные из кэша, в котором блокировка будет всё ещё прописана.
Исправление проблемы в ChromeOS
В ChromeOS доступных настроек сети не так много, поэтому здесь есть возможность только использовать альтернативный сервер DNS. В большинстве случаев данная процедура поможет устранить ошибку DNS_PROBE_FINISHED_NXDOMAIN на Хромбуках.
Смена DNS на ChromeOS:
- Щёлкните по панели с часами в нижнем правом углу экрана.
- Выберите активное подключение из предложенных.
- Щёлкните «Сеть».
- Отметьте пункт «Сервер определяет Google» и нажмите «Закрыть».
После выполнения этих действий рекомендуется перезагрузить Хромбук для применения всех сделанных изменений. После этого можно запускать Chrome и проверять работоспособность проблемного сайта.
Google Chrome Flags
Флаги Google Chrome (Chrome flags) — это экспериментальные функции браузера, которых нет в стандартном интерфейсе, но они доступны для тестирования. Некоторые из них могут быть неправильно настроены и вызывать ошибку DNS_PROBE_FINISHED_NXDOMAIN в Chrome.
Чтобы отключить флаги Chrome, введите в адресной строке браузера chrome://flags.
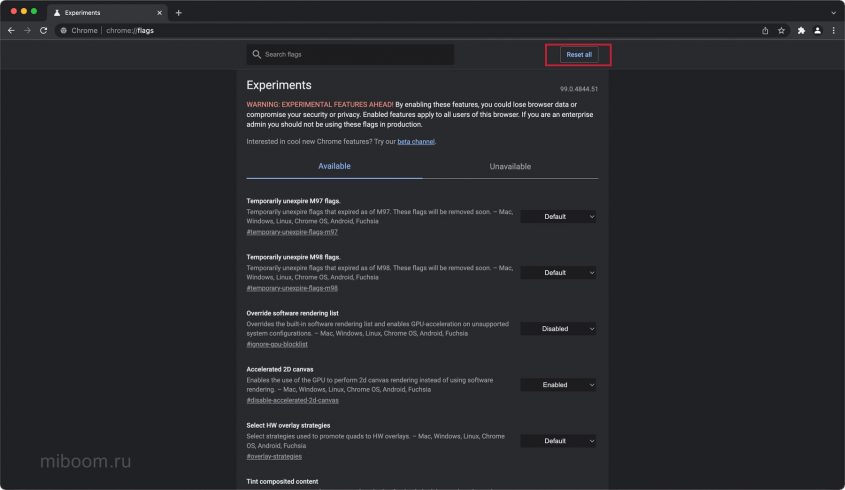
Часть функций будет активна (статус Enabled). Измените их статус на Disabled или нажмите Reset All в правой верхней части экрана, чтобы восстановить настройки по умолчанию. После этого закройте и снова откройте браузер.
Как исправить ошибку на Android
Ошибку DNS_PROBE_FINISHED_NXDOMAIN на Android можно увидеть в любом браузере. Решение в этом случае такое же, как и в случае с Хромбуком – нужно просто настроить альтернативный DNS-сервер.
Как сменить DNS на Android:
- Запустите настройки при помощи соответствующего ярлыка.
- Перейдите в раздел «Подключения».
- Тапните по пункту «Приватный DNS-сервер».
- Выберите «Задать вручную».
- В соответствующем поле введите адрес dns.google и нажмите «Сохранить».
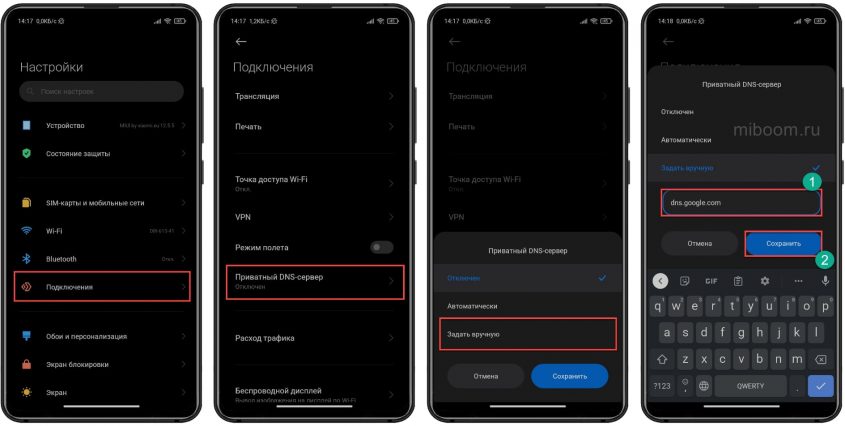
После этого останется только перезапустить беспроводное соединение и запустить проверку ранее не работающего ресурса.
Данная инструкция актуальна для любой версии Андроид, начиная с Android 9 Pie. Если у вас Android 8.1 или 8.0, то нужные пункты меню будут незначительно отличаться, однако настройка сервера будет выполняться точно так же.
Альтернативные способы исправления NXDOMAIN
Помимо всех перечисленных выше способов устранения ошибки DNS_PROBE_FINISHED_NXDOMAIN есть альтернативные решения, которые нет смысла описывать в виде отдельных инструкций. Достаточно упомянуть о них и оформить самые действенные решения в виде списка.
Альтернативные способы устранения ошибки:
- Использование антивируса. Некоторые типы вирусов могут блокировать файлы ОС, необходимые для нормальной работы сети. Лучшим вариантом будет проверить ПК на вирусы с помощью специального ПО и затем восстановить системные файлы при помощи терминала и команды sfc/ scannow.
- Отключение VPN и прокси. Если на ПК используется подключение через прокси или VPN, стоит на время отключить его. Возможно, проблема кроется как раз в использовании этих опций. После проверки можно будет всё вернуть.
- Откат Windows. Поможет только в случае, если ранее были созданы точки восстановления ОС. Откат позволяет восстановить раннее состояние системы, при котором всё работало нормально. Но все программы, установленные после создания контрольной точки, будут удалены.
- Удаление и переустановка драйвера сетевого адаптера. Нужно нажать Win+R, ввести devmgmt.msc, выбрать «Действие», а затем «Обновить конфигурацию оборудования». После переустановки драйвера сетевого адаптера ошибка может исчезнуть.
- Временное отключение брандмауэра. Иногда штатный брандмауэр Windows может блокировать доступ к некоторым ресурсам. Проще всего – выключить соответствующую службу. Нажмите Win+R, введите services.msc, найдите «Брандмауэр Windows», щёлкните по нему два раза и выберите «Остановить».
- Переустановка Windows. Этот вариант нужно использовать только в том случае, когда ничего больше не помогает. Возможно системные файлы настолько повреждены, что восстановить их не представляется возможным. В этом случае помогает только полная переустановка системы.
Важно помнить: частая причина возникновения ошибки DNS_PROBE_FINISHED_NXDOMAIN кроется в проблемах самого сайта. Обязательно проверьте его доступность по инструкции в начале статьи.
Microsoft Edge, Mozilla Firefox и Safari
Код ошибки DNS_PROBE_FINISHED_NXDOMAIN чаще видят в Google Chrome по причине того, что это самый популярный браузер в мире. Эта же проблема может возникнуть по аналогичным причинам в других браузерах. Однако сообщение об ошибке будет выглядеть по-другому.
Microsoft Edge
Как и Google Chrome, Microsoft Edge отображает код ошибки DNS_PROBE_FINISHED_NXDOMAIN.
- Не удаётся открыть эту страницу;
- В английской версии: Hmm… can’t reach this page.
Safari
В отличие от Google Chrome, Safari не использует уникальный код ошибки, а только сообщает о невозможности найти сервер сайта.
Текст ошибки:
- Сафари не может найти сервер;
- В английской версии: Safari Can’t Find the Server.
Mozilla Firefox
Как и Safari, сообщение об ошибке Mozilla просто говорит о том, что браузер не может подключиться к серверу, где расположен сайт. Пользователю предлагается посетить сайт в другой раз, проверить сетевое подключение или заглянуть в настройки брандмауэра.
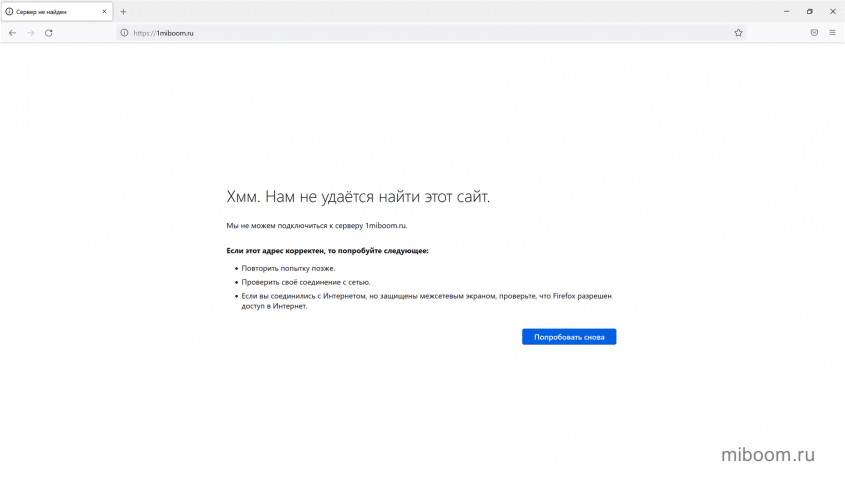
Текст ошибки:
- Хмм. Нам не удаётся найти этот сайт;
- В английской версии: Hmm. We’re having trouble finding that site.
Коротко о главном
- Ошибка DNS_PROBE_FINISHED_NXDOMAIN возникает, когда браузер не может найти соответствующий IP-адрес домена. Проблема может возникнуть из-за сервера, браузера клиента или сетевого подключения.
- Если причина кроется не в самом сайте, решить её на Windows, macOS, ChromeOS и Android можно программным способом.
- Иногда ошибка возникает по вине сервера, к которому подключается ПК, и здесь придётся ждать, пока проблему устранят администраторы сайта.
- Появление NXDOMAIN может быть результатом работы вирусов или другого вредоносного ПО.
- Если ничего не сработало, свяжитесь со своим интернет-провайдером и опишите ситуацию. Владельцам неработающего сайта необходимо проконсультироваться с технической поддержкой хостинга или регистратором домена, чтобы они помогли разобраться в проблеме.
Если вы знаете другие методы исправления ошибки DNS_PROBE_FINISHED_NXDOMAIN, напишите об этом в комментариях.
«DNS_PROBE_FINISHED_NXDOMAIN‘Это глупая, но раздражающая ошибка в Google Chrome, которая не позволяет вам получить доступ к вашим любимым веб-сайтам, таким как YouTube, Facebook, Gmail, Twitter, Reddit и многие другие. Вы должны быть удивлены, что в мире DNS-зонд закончил NXDOMAIN значит, и почему Chrome показывает это каждый раз, когда я пытаюсь получить доступ к веб-сайтам. Ну, как следует из названия, ошибка связана с DNS, и когда поиск DNS не удался, Chrome отображает эту ошибку. Хотя проблема может показаться пугающей, ее легко решить, если внимательно следовать нашему руководству.

Для этого конкретного кода ошибки DNS_PROBE_FINISHED_NXDOMAIN, в большинстве случаев вы увидите два условия ошибки, первая и частая ошибка говорит: «Эта страница недоступна«В то время как другой говорит:«Этот сайт не может быть достигнут«. В этом руководстве мы расскажем, как исправить эту ошибку DNS на Android, Windows ПК, а также макинтош,
Как исправить DNS_PROBE_FINISHED_NXDOMAIN на Android
Если вы столкнулись с тем, что эта веб-страница недоступна или на этом сайте не удалось найти ошибку на Android, следуйте приведенным ниже решениям, чтобы исправить ее раз и навсегда.
Очистить Chrome Cache на Android
Первое решение для исправления предметной ошибки на Android включает очистку кеша браузера. Следуйте инструкциям ниже.
Шаг 1: Откройте Chrome. Нажмите на три точки в правом верхнем углу.
Шаг 2: Откройте историю из выпадающих опций.

Шаг 3: Нажмите «Очистить данные браузера»

Шаг 4: Выберите все параметры (история просмотра, кэшированные данные, файлы cookie) и нажмите «Очистить данные».

Очистить кэш DNS на Android
Если очистка кэша не помогла, вы можете сбросить DNS на своем смартфоне Android. Это должно исправить DNS_PROBE_FINISHED_NXDOMAIN на Android для большинства пользователей. Если вы используете смартфон со съемным аккумулятором, выньте его и подождите 30 секунд. Вставьте аккумулятор обратно в телефон и включите его. Кэш DNS должен быть очищен на вашем смартфоне Android.
Если вы используете смартфон Android с несъемным аккумулятором, выполните следующие действия, чтобы очистить DNS.
Шаг 1: Открыть хром. Тип хром: // нетто-Внутренности / # DNS в адресной строке.
Шаг 2: Теперь нажмите «Очистить кэш хоста»

Шаг 3: Нажми на Черная стрелка указывая вниз в правом верхнем углу экрана. Теперь выберите «Очистить кэш» и «Очистить сокеты» из выпадающих опций.

Шаг 4: Перезапустите приложение Chrome на Android.
Если очистка кеша DNS также не устранила ошибку, попробуйте следующее решение.
Переустановите приложение Chrome на Android
Для переустановки приложения Chrome на Android не требуется никаких технических знаний. Просто зайдите в Play Store, выполните поиск в Chrome, а затем нажмите «Удалить». Теперь, когда вы удалили приложение, снова выполните поиск «Chrome» в Play Store, а затем нажмите «Установить». Вот и все.
К настоящему времени одно из решений должно исправить ошибку DNS PROBE FINISHED NXDOMAIN Chrome на Android. В редких случаях, если он все еще виден, вы можете попробовать еще одно решение.
Изменить DNS-адрес на Android
Выполните следующие шаги, чтобы изменить адрес DNS-сервера на Android.
Шаг 1: Перейдите в Настройки> WiFI.
Шаг 2: Откройте сеть WiFi, которую вы используете для Интернета, на своем смартфоне Android.

Шаг 3: Включите «Статический IP», а затем введите адрес DNS вручную следующим образом:
DNS 1: 8.8.8.8
DNS 2: 8.8.4.4
 Мы надеемся, что одно из решений, упомянутых выше, исправило DNS_PROBE_FINISHED_NXDOMAIN на Android,
Давайте приступим к Windows Пользователи ПК сейчас.
Как исправить DNS_PROBE_FINISHED_NXDOMAIN на Windows 10
Воспользуйтесь следующими решениями для исправления. Эта веб-страница недоступна или недоступен этот сайт. DNS PROBE FINISHED NXDOMAIN Ошибка Chrome on Windows 10, 7, 8 или другие версии. Исправления одинаковы для всех Windows версии, однако, может быть небольшая разница в шагах. Мы используем Windows 10 при выполнении решений ниже.
Изменить DNS-сервер в Windows ПК
Мы были свидетелями того, что в 90% случаев ошибка DNS_PROBE_FINISHED_NXDOMAIN исправляется путем изменения адреса DNS-сервера. Если вы не знаете, как изменить адрес DNS в Windows 10, просто следуйте нашей пошаговой инструкции ниже.
Шаг 1: Посмотрите на правый нижний лоток на вашем ПК, где указаны значки батареи, громкости и сети. Теперь щелкните правой кнопкой мыши значок сети и нажмите «Открытый центр сети и обмена«.

Шаг 2: В центре управления сетями и общим доступом найдите и нажмите «Смените настройки адаптера”В верхней левой части экрана.

Шаг 3: Здесь вы увидите список ваших сетей. Щелкните правой кнопкой мыши на вашем активном соединении и затем нажмите «свойства»(Последний вариант в выпадающем списке).

Шаг 4: Как показано на рисунке ниже, нажмите «Интернет-протокол версии 4 (TCP / IPv4)А затем нажмите «свойства«.

Шаг 5: В большинстве случаев настройкой по умолчанию является «Получить адрес DNS-сервера автоматически.”Просто измените его на ручной, как показано на рисунке ниже, добавьте следующий адрес DNS-сервера и нажмите OK.
Предпочитаемый DNS-сервер: 8.8.8.8
Альтернативный DNS-сервер: 8.8.4.4

Очистить кэш DNS в Windows ПК
Если изменение DNS-сервера не помогло вам, а Chrome по-прежнему показывает «DNS PROBE FINISHED NXDOMAIN», мы рекомендуем вам попробовать очистить кэш DNS с помощью командной строки (CMD). Следуйте инструкциям ниже.
Шаг 1: Запустите командную строку (CMD) от имени администратора.

Шаг 2: Запустите команду ipconfig / flushdns. Если вы выполните команду правильно, вы увидите сообщение «Windows Конфигурация IP успешно сброшена в кэш DNS Resolver«.

Шаг 3: Перезагрузите компьютер, чтобы изменения вступили в силу.
Сбросить Chrome до значения по умолчанию
Многие пользователи сообщают, что исправили ошибку DNS_PROBE_FINISHED_NXDOMAIN, сбросив все настройки по умолчанию на экспериментальной странице Chrome. Шаги для сброса Chrome одинаковы для обоих Windows а также MacBook.
Шаг 1: Вставьте chrome: // flags / в адресную строку Chrome и нажмите кнопку Enter на клавиатуре. Вы должны увидеть страницу, показанную на картинке ниже.
Шаг 2: Нажмите на «Сбросить все по умолчанию«.

Шаг 3: Полностью закройте браузер Chrome и снова откройте его.
Это должно исправить ошибку в браузере Chrome, и вы сможете снова получить доступ к избранным сайтам.
Как исправить DNS_PROBE_FINISHED_NXDOMAIN на Mac
Решения похожи на Windows ПК, однако, шаги разные для Mac. Следуйте приведенным ниже пошаговым инструкциям, чтобы исправить DNS_PROBE_FINISHED_NXDOMAIN в Mac OS.
Изменить DNS-сервер в Mac OS
Выполните следующие шаги, чтобы изменить DNS-сервер на MacBook Pro, Air или iMac. Мы выполняем эти шаги, используя MacBook Pro.
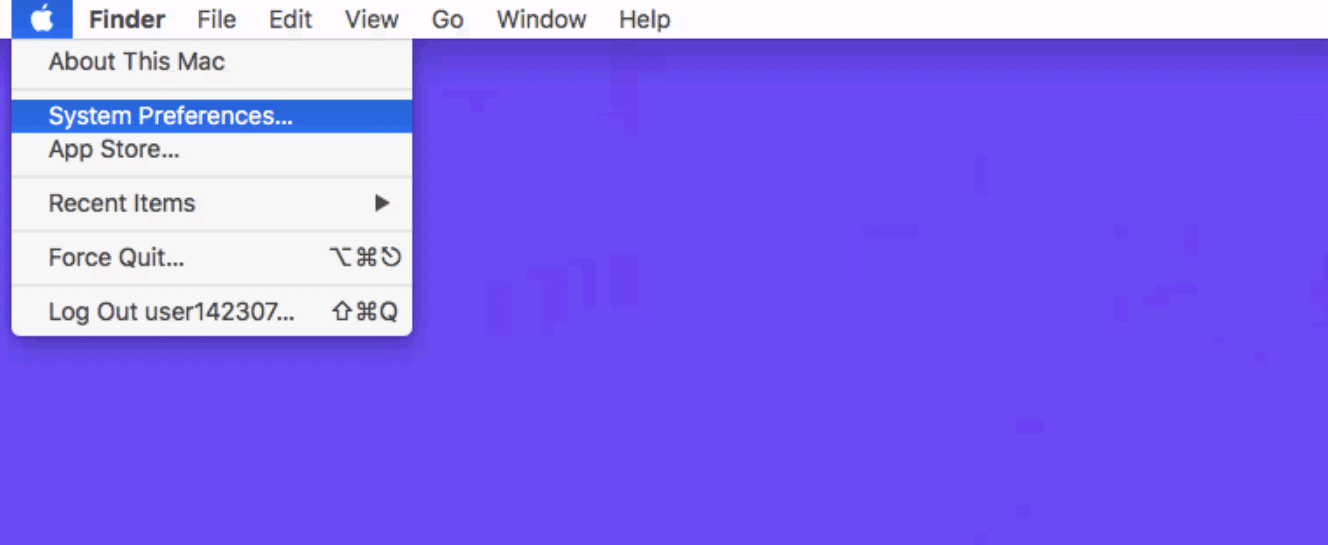
Шаг 1: Идти к Apple Логотип (вверху слева на экране Mac) и затем нажмите «Системные настройки«.

Шаг 2: Двойной клик по сеть,

Шаг 3: Теперь выберите ваше активное интернет-соединение из списка сетей и нажмите «продвинутый«.

Шаг 4: Нажмите на «DNS”В пунктах меню, а затем нажмите‘+‘Значок, чтобы добавить новый адрес DNS, как показано на рисунке ниже. После того, как вы добавили следующие адреса DNS, нажмите Хорошо и перезагрузите ваш Mac.
Предпочитаемый DNS-сервер: 8.8.8.8
Альтернативный DNS-сервер: 8.8.4.4
Этот метод должен исправить ошибку в большинстве случаев. Однако, если ваш случай отличается, и ошибка все еще появляется, пожалуйста, позвольте нам предоставить другое решение.
Проверьте также: Лучшие расширения Chrome
Очистить кэш DNS в Mac OS
Чтобы очистить кэш DNS в OS X Yosemite и Mac OS X El Capitan, выполните следующие действия.
Шаг 1: Идти к Finder> Приложения> Утилиты> Терминал,

Шаг 2: После того, как Терминал открыт, выполните следующую команду.
sudo dscacheutil -flushcache; sudo killall -HUP mDNSResponder; скажем кеш очищен

Шаг 3: Перезагрузите Mac, чтобы изменения могли произойти.
Если это также не исправило ошибку DNS_PROBE_FINISHED_NXDOMAIN, проверьте наше следующее решение.
Исправить также: эта копия Windows не подлинный
Сбросить Chrome до значения по умолчанию
Вы можете сбросить Google Chrome по умолчанию. Typechrome: // flags / в адресной строке браузера Chrome. Нажмите на Сбросить все по умолчанию и перезапустите Chrome.
Chrome теперь должен работать без ошибок.
Исправление также: 100% использование диска в Windows 10
Заключение
DNS_PROBE_FINISHED_NXDOMAIN является распространенной ошибкой для пользователей Google Chrome и легко исправима. Мы уверены, что одно из решений, упомянутых выше, исправит ошибку для всех пользователей. По каким-либо причинам, если вы все еще видите ‘Эта веб-страница недоступна. DNS PROBE FINISHED NXDOMAIN‘, поделитесь своей проблемой в разделе комментариев ниже, и мы поможем вам.
Исправить также: DNS_PROBE_FINISHED_BAD_CONFIG
For those of you working with websites on a regular basis, errors specific to the CMS such as the white screen of death or database connection errors are somewhat common occurrences. But another subset of errors you will probably stumble upon are those tied to your internet connection and DNS.
A very common error that Google Chrome users get when trying to browse to a web page is “This site can’t be reached – Server IP address could not be found,” together with DNS_PROBE_FINISHED_NXDOMAIN. This can be downright frustrating as suddenly you can’t browse to your website or perhaps even anywhere at all. 😫
If you’re seeing this error while trying to get to your site, don’t worry, this is fairly easy to fix. Check out the recommendations below on how to get connected again. This can also work for other browsers, such as Firefox, Edge, etc.
Check Out Our Video Guide To Fixing The DNS_PROBE_FINISHED_NXDOMAIN Error
What Is DNS_PROBE_FINISHED_NXDOMAIN?
The reason for DNS_PROBE_FINISHED_NXDOMAIN is typically due to a misconfiguration or problem with your DNS. DNS is short for Domain Name System, which helps direct traffic on the internet by connecting domain names with actual web servers. Essentially, it takes a human-friendly request – a domain name like kinsta.com – and translates it into a computer-friendly server IP address – like 216.3.128.12.
When a user enters a URL in their web browser, DNS gets to work to connect that URL to the IP address of the actual server. This is called DNS name resolution and involves a DNS recursor querying various nameservers to figure out the actual IP address of a server.
If DNS fails to resolve the domain name or address then you might receive the DNS_PROBE_FINISHED_NXDOMAIN error. The NXDOMAIN part stand stands for Non-Existent Domain. Read more about DNS and how it works.
DNS_PROBE_FINISHED_NXDOMAIN Error
DNS_PROBE_FINISHED_NXDOMAIN is an error that occurs when your DNS fails to resolve the domain name or address. It happens when the Domain Name System (DNS) fails to connect domain names with actual web servers. The NXDOMAIN part stands for Non-Existent Domain.
| Error Code | DNS_PROBE_FINISHED_NXDOMAIN |
| Error Type | DNS error |
| Error Variations | This site can’t be reached Hmm. We’re having trouble finding that site Hmmm… can’t reach this page Safari Can’t Find the Server |
| Error Causes | Internet connection error Firewall is blocking access DNS misconfiguration DNS not yet propagated Unresponsive server |
What Does the DNS_PROBE_FINISHED_NXDOMAIN Error Look Like on Browsers?
There are a couple different variations of this error depending upon the browser you’re running.
Google Chrome
In Google Chrome this error will show as DNS_PROBE_FINISHED_NXDOMAIN (as seen below), highlighting that this site can’t be reached, followed by server IP address could not be found.
This site can’t be reached or This webpage is not available.
Mozilla Firefox
In Mozilla Firefox it will simply show as Hmm. We’re having trouble finding that site (as seen below).
We can’t connect to the server at domain.com.
Microsoft Edge
In Microsoft Edge, it will simply show as Hmmm… can’t reach this page (as seen below). Which isn’t very helpful.
Make sure you’ve got the right web address: domain.com.
Safari
In Safari, it will simply show as Safari Can’t Find the Server (as seen below).
Safari can’t open the page “domain.com” because Safari can’t find the server “domain.com”.
Main Causes of the DNS_PROBE_FINISHED_NXDOMAIN Error
As mentioned, this error happens when the Domain Name System cannot resolve a website’s URL into an IP address. The causes for this could be:
- You typed the site name incorrectly into the search bar.
- There is an internet connection error preventing your access.
- Your firewall is blocking access to the website.
- An antivirus or a VPN is interfering with your network settings.
- The domain has expired or is not registered.
- Your DNS settings are not configured the right way.
How to Fix DNS_PROBE_FINISHED_NXDOMAIN on Desktop
Here are some recommendations and things to check to fix the error (sorted in order by most common reasons we see):
1. Release and Renew IP Address
Due to the fact that this is usually a client-side DNS issue, the very first thing you should do is try releasing and renewing the IP address on your computer. This also includes flushing your local DNS cache, which is similar to browser cache.
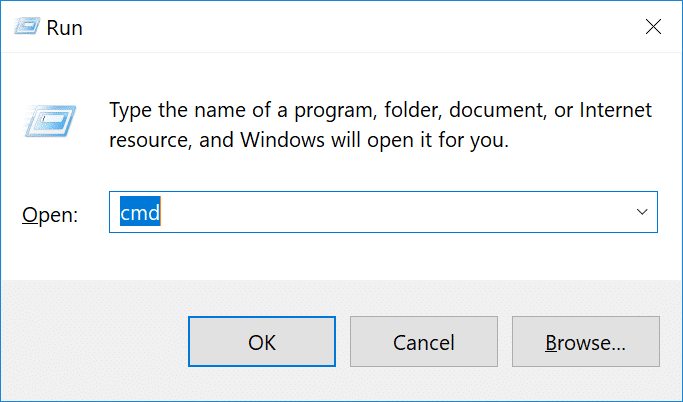
Windows
In Windows simply open up Command Prompt by pressing the Windows logo key and R. Then type “cmd” and hit Enter.
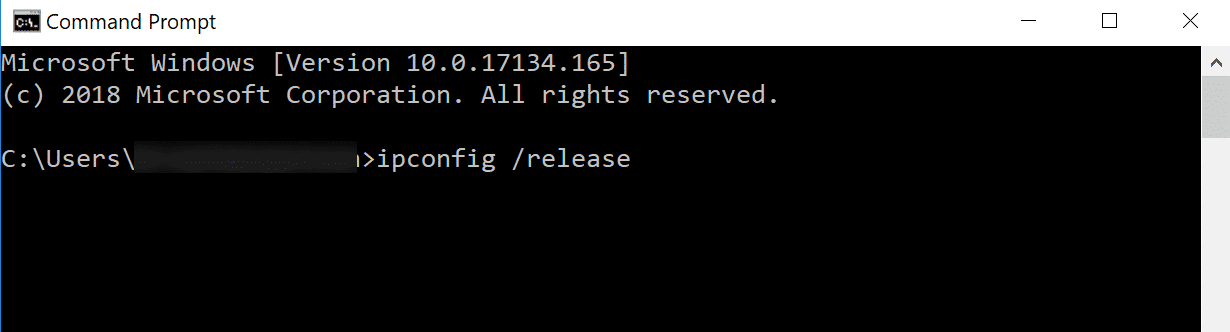
Type in ipconfig /release and hit Enter. This will release your current IP address.
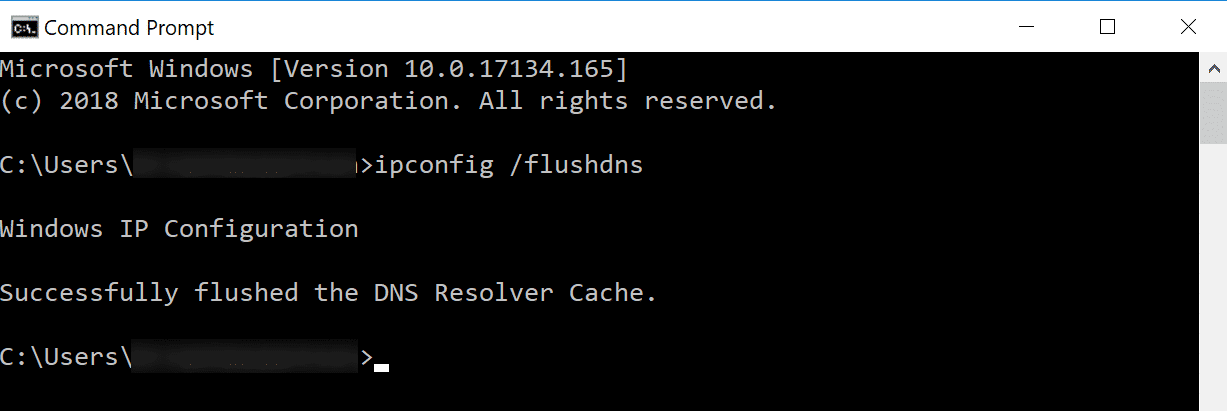
Then type in ipconfig /flushdns and hit Enter. This will flush your local DNS cache. You should see a “Successfully flushed the DNS resolver Cache” if it worked.
Then type in ipconfig /renew and hit Enter. This will renew your IP address.
You might also try resetting your IP settings and Winsock catalog with the following commands: netsh int ip set dns and netsh winsock reset.
An alternative way to flush and renew your DNS is simply by disabling your network adapter and re-enabling it.
Mac
To release and renew your IP address on a Mac, go to System Preferences…
Click on the network icon and then click “Advanced.”

Click the TCP/IP tab heading if you aren’t already in there. Then click on the “Renew DHCP” lease button.
Just like we did above in Windows, Mac users can also clear their local DNS cache. Although this is done in a different place. Go to Utilities and then click on “Terminal.”

Enter in the following command:
dscacheutil -flushcache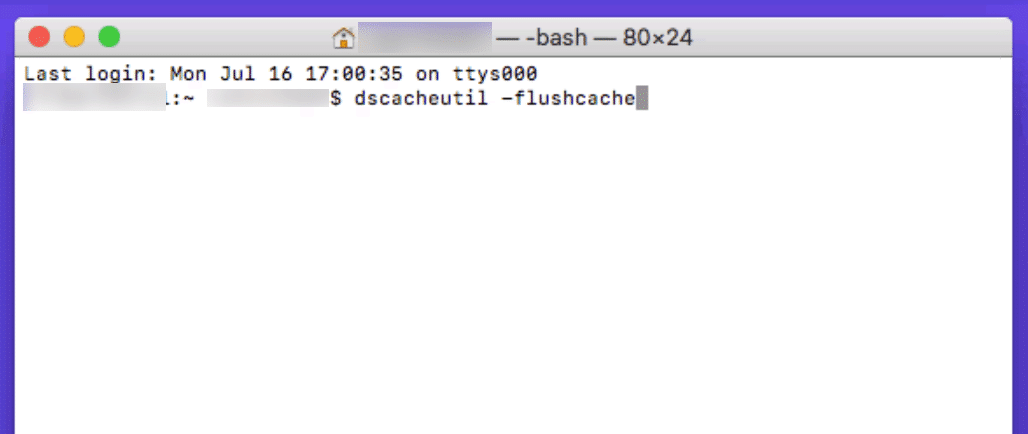
Note: There is no success message on Macs.
2. Restart DNS Client Service
If you’re running Windows you can try restarting the DNS client services which resolves and caches DNS domain names.
Simply open up Command Prompt by pressing the Windows logo key and R. Then type “services.msc” and hit Enter.
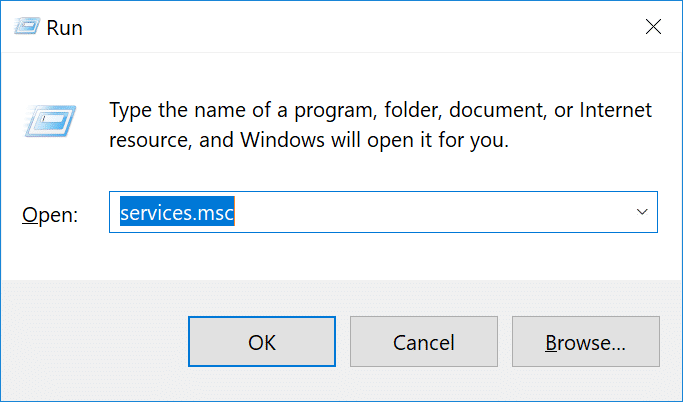
Scroll down to “DNS Client,” right click on it, and select “Restart.”
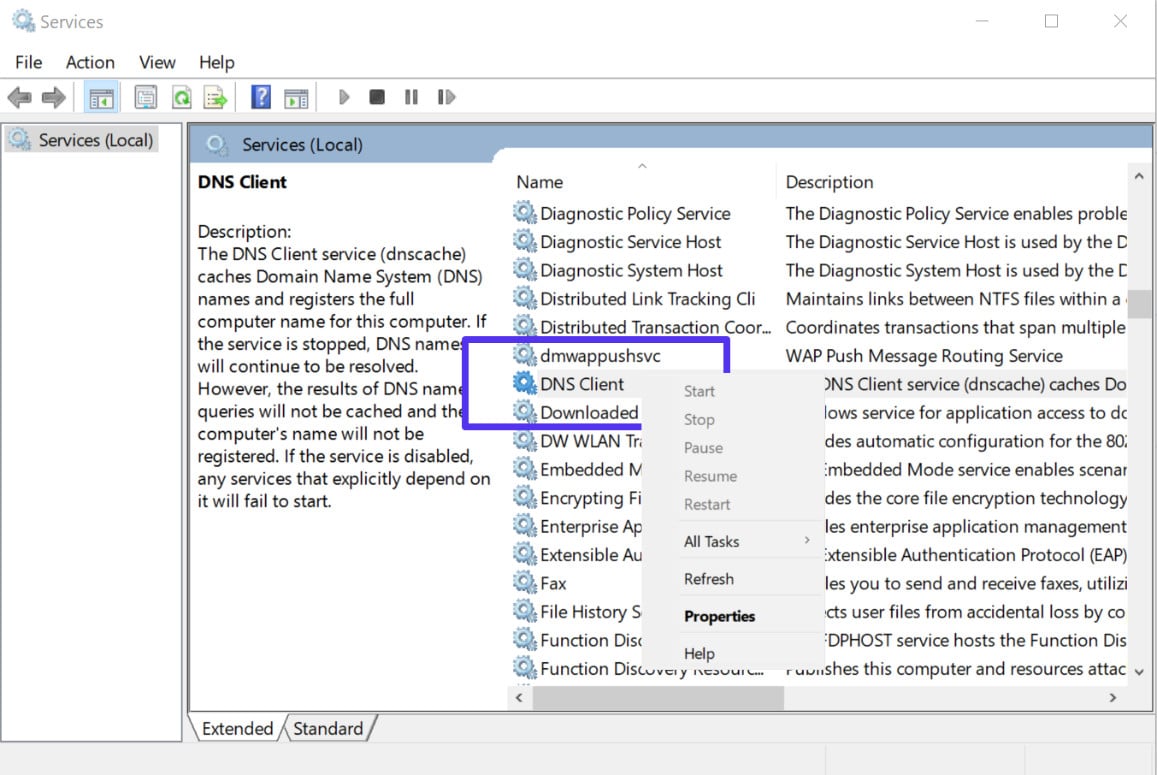
If the restart option is greyed out for you (as it was for us), an alternative way to do it is via the command prompt.
Open up Command Prompt by pressing the Windows logo key and R. Then type “cmd” and hit Enter.
Then enter the following commands:
net stop dnscache
net start dnscache
Depending on the version of Windows you’re running you might get an error saying:
The requested pause, continue, or stop is not valid for this service.
This is most likely because you need to run CMD as a network service to issue the command. If you’re running into this error, we suggest trying the other alternatives below first.
3. Change DNS Servers
The next thing you can try is changing your DNS servers. By default, DNS servers are automatically assigned by your ISP. But you could try temporarily changing these to a public DNS server, such as Google or Cloudflare.
- Some prefer to use Google’s public DNS (8.8.8.8 and 8.8.4.4) long-term due to them sometimes being more reliable.
- Cloudflare also just launched their new secure and blazing fast free DNS (1.1.1.1 and 1.0.0.1) which we will be using in this example. If you want to use Google’s the steps are the same, you simply replace the DNS server addresses with Googles.
Tip: If you’re already using a free DNS server and having issues, removing it and defaulting back to your ISP’s DNS servers also sometimes fix things. Google and Cloudflare aren’t perfect 100% of the time and there have been a few instances where we’ve noticed switching back has resolved the issue.
Windows
In Windows simply open up Command Prompt by pressing the Windows logo key and R. Then type “control panel” and hit Enter.
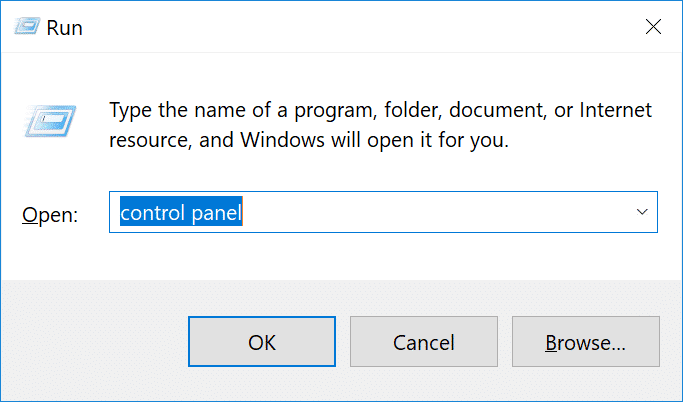
Click on “Network and Internet” and then “Network and Sharing Center.” On the left-hand side, click on “Change Adapter Settings.”

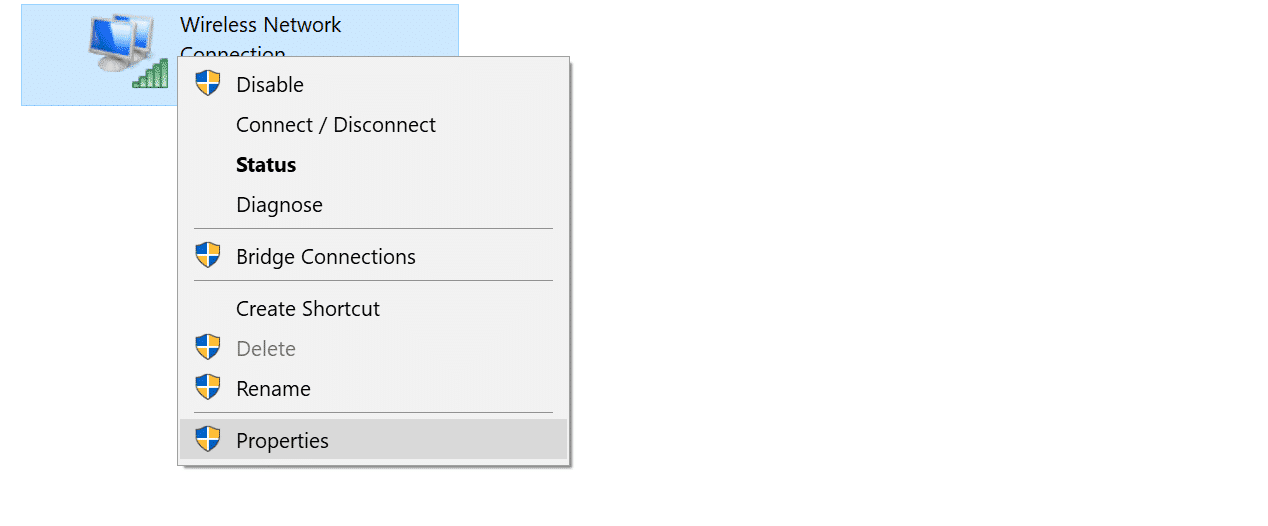
Right click on your current connection, this will either be Local Area Connection or Wireless Network Connection based on how you’re connecting. Then click on “Properties.”
Select Internet Protocol Version 4 (or IPv6 if desired) and click on “Properties.”
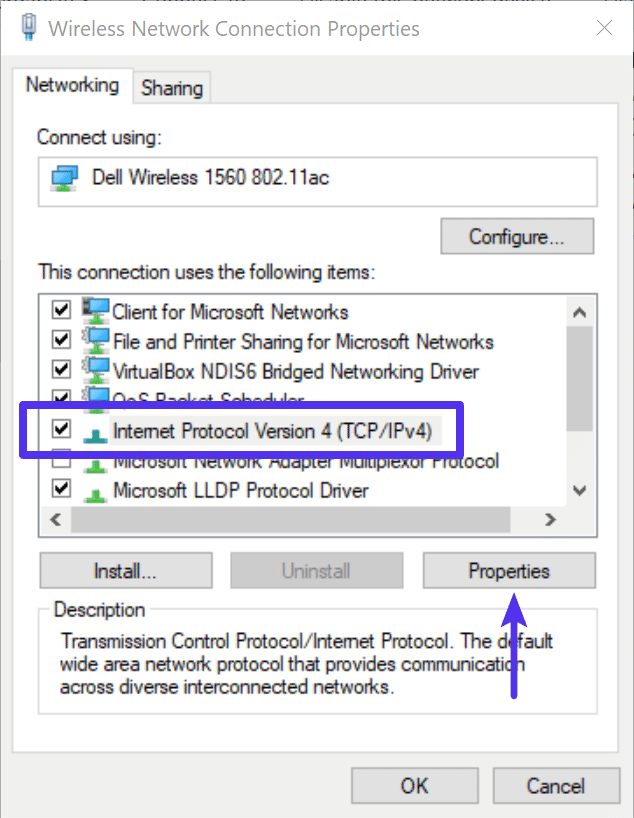
Make a note of any existing settings in case you need to revert back. Click “Use the following DNS server addresses.” Enter the following, or replace the existing with these:
For IPv4: 1.1.1.1 and 1.0.0.1
For IPv6: 2606:4700:4700::1111 and 2606:4700:4700::1001
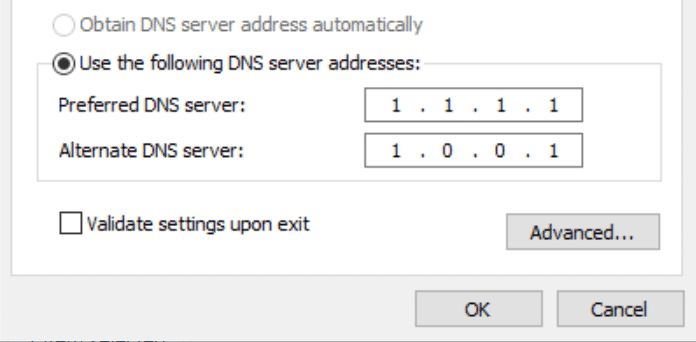
Click OK, then Close. Restart your browser.
Mac
To change DNS servers on a Mac, go to System Preferences…
Click on the network icon and then click “Advanced.”
Click on the “DNS” tab.
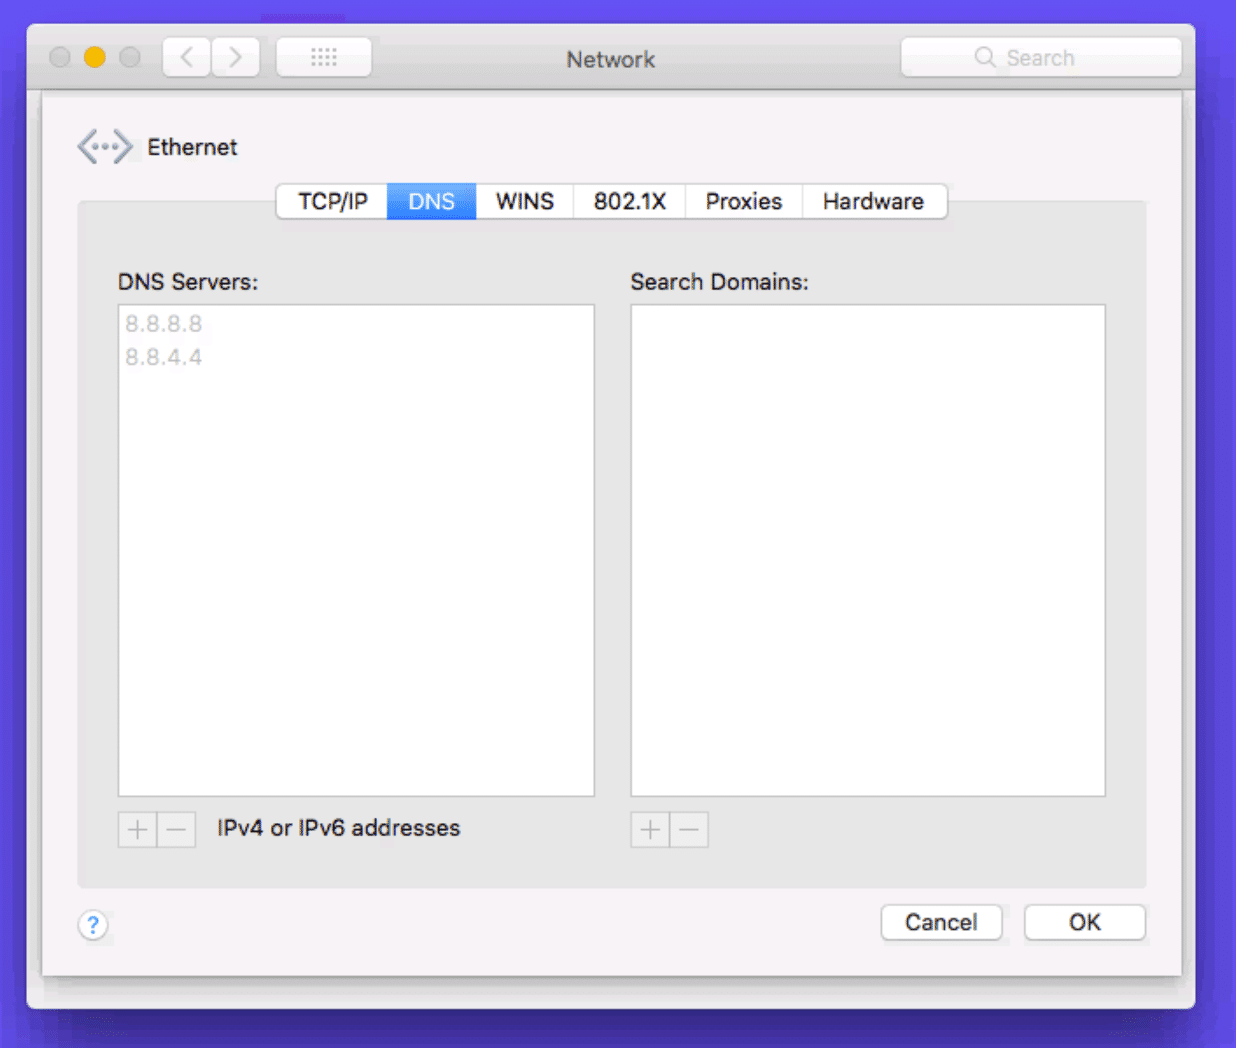
Then add Cloudflare’s DNS server addresses.
For IPv4: 1.1.1.1 and 1.0.0.1
For IPv6: 2606:4700:4700::1111 and 2606:4700:4700::1001
4. Reset Chrome Flags
Sometimes Chrome settings or experimental features can get accidentally changed or messed up. You reset these back to default by entering chrome://flags into your browser and clicking on “Reset all to default.”
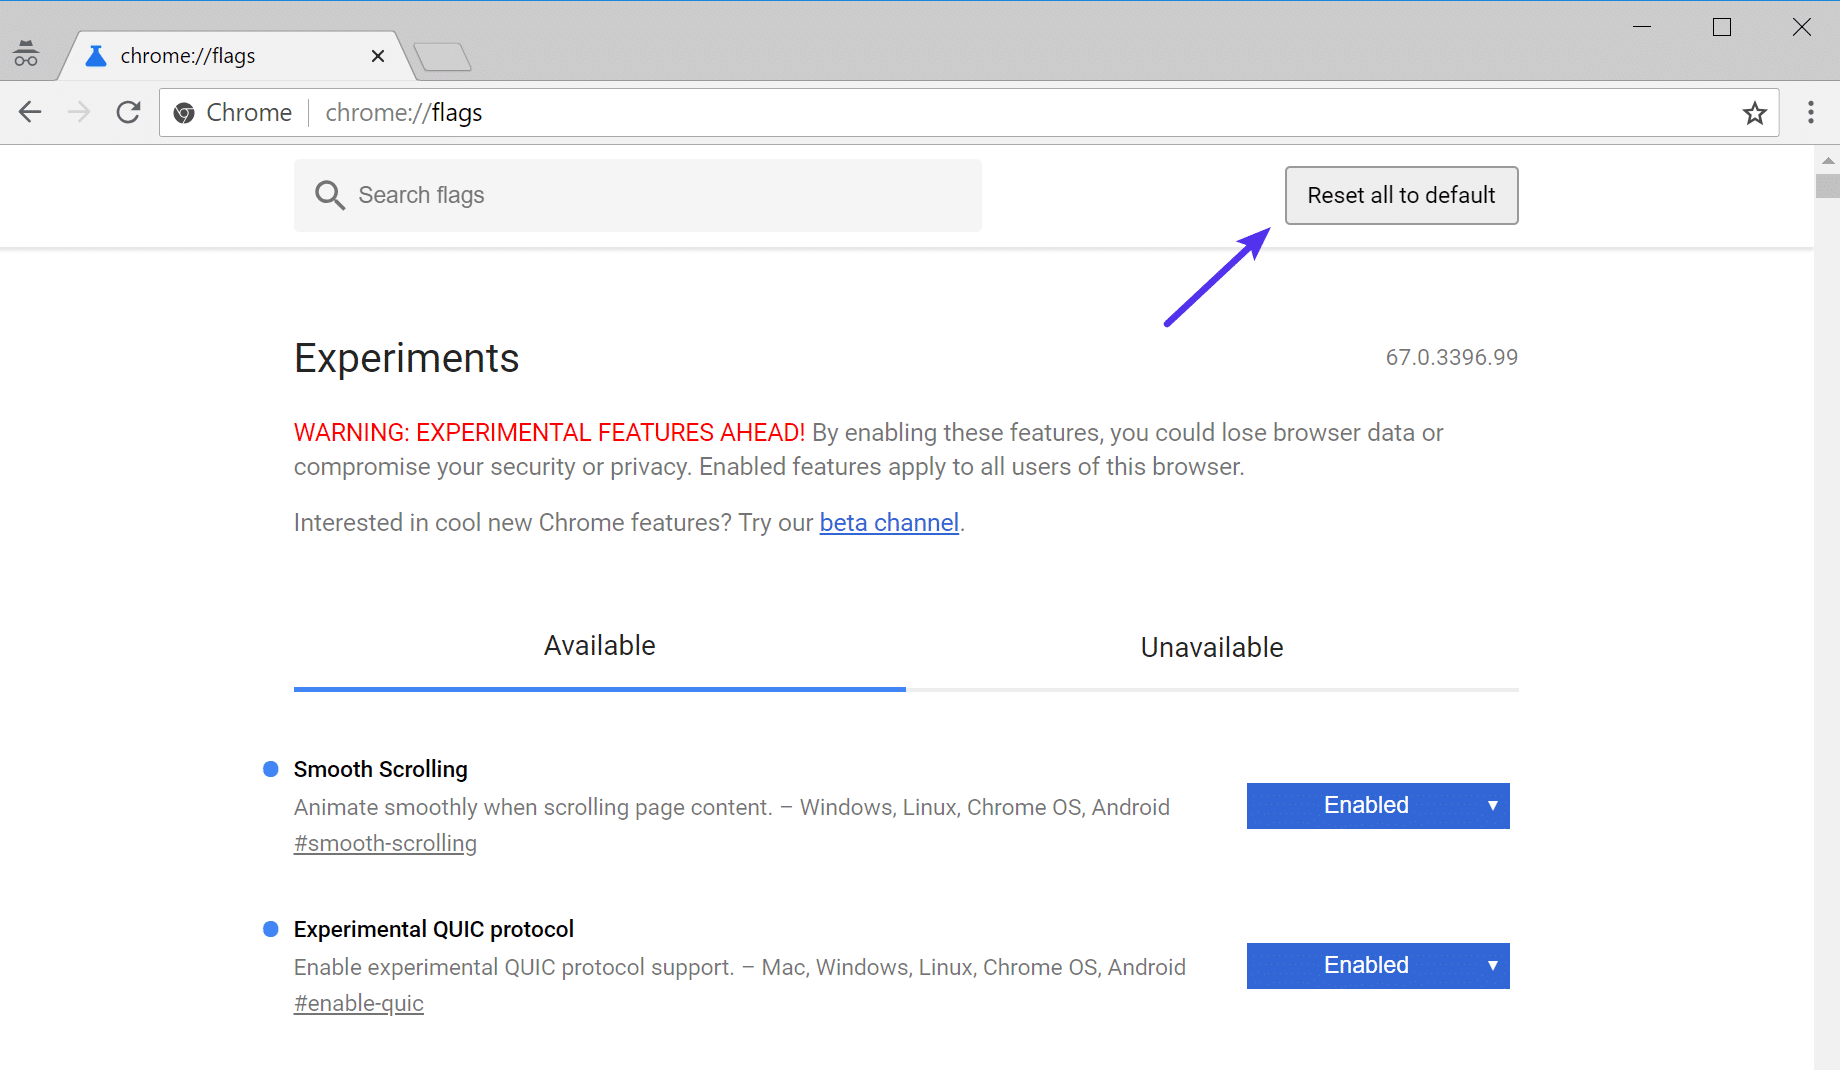
Then restart your browser.
5. Disable VPN and Antivirus Temporarily
Sometimes VPNs and Antivirus software can conflict or override your network settings, including your DNS servers, etc. If you have any running, try temporarily disabling them (closing them) to see if it resolves the DNS probe finished nxdomain error in Chrome.
6. Check Your Local Hosts File
Every computer has what they call a local hosts file. This is a file that contains manual DNS entries which are mapped to specific IP addresses. Typically this is only edited when you want to preview your DNS before switching over domains to a new host.
However, there is a multitude of different ways this file could have been changed or edited. Therefore, if none of the above options worked for you, it’s worth double checking your local hosts file to ensure the website you’re trying to access isn’t in there.
Windows
The hosts file typically requires additional access. So the first step is to open up your text editor as an administrator. Simply click on your start menu, search for your text editor, right-click on it and select “Run as administrator.” This can be done in any text editor such as Notepad, Notepad++, Atom, etc. We are using Sublime in our example below.
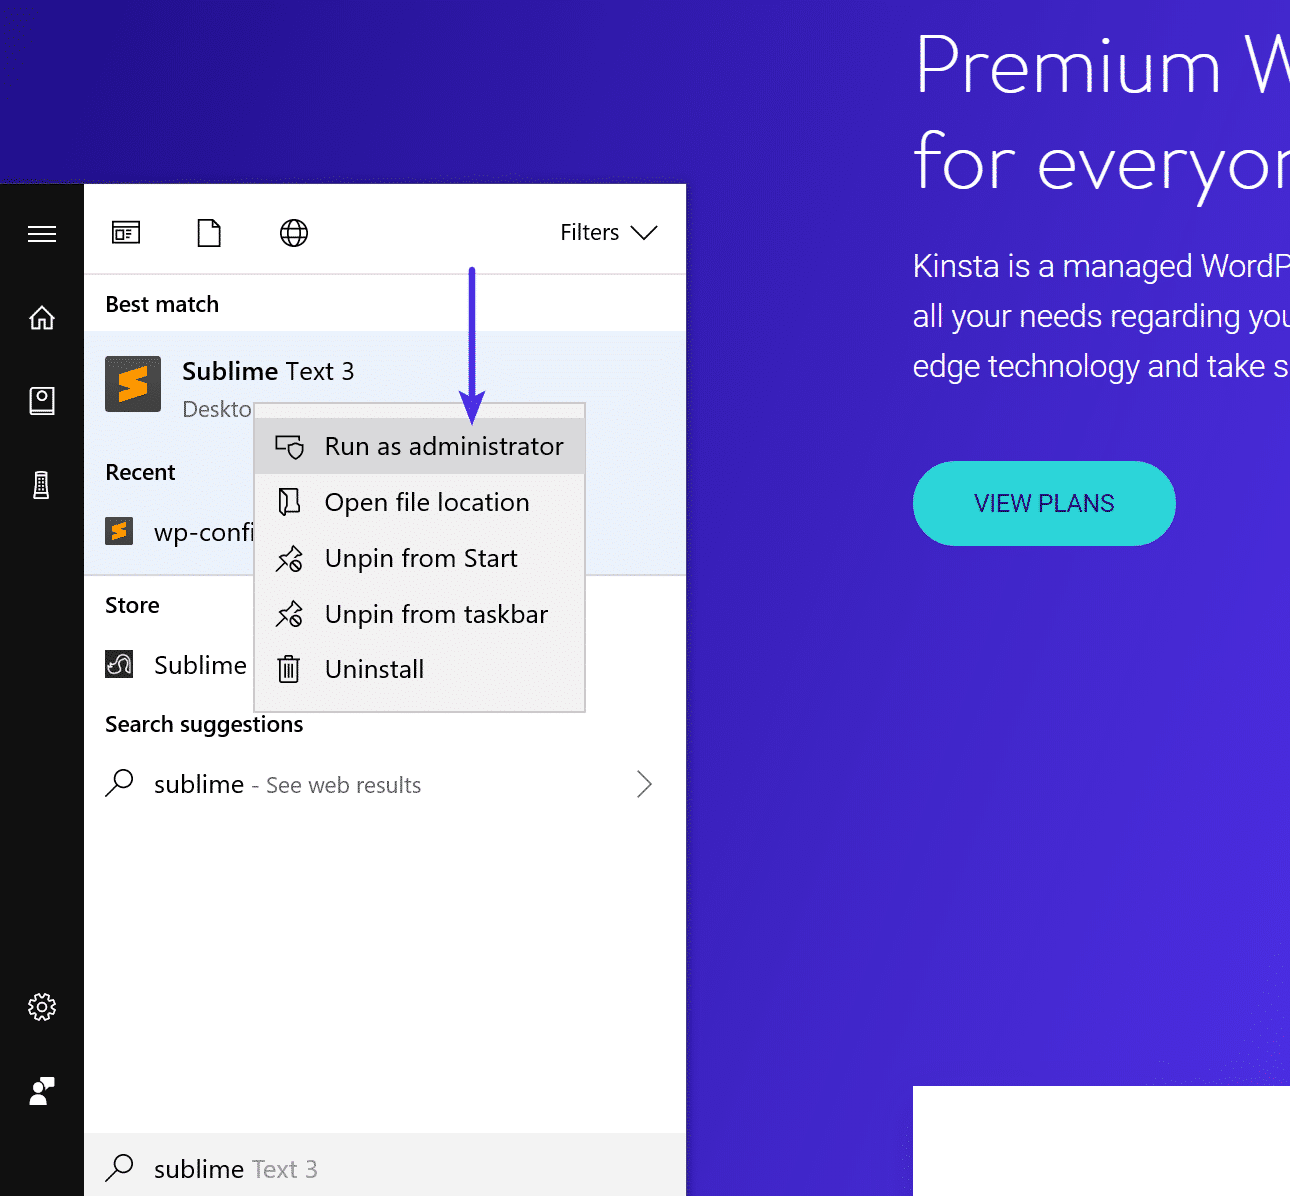
Within your text editor click File → Open and browse to the following location:
C:WindowsSystem32driversetc
Click on the hosts file and “Open.”
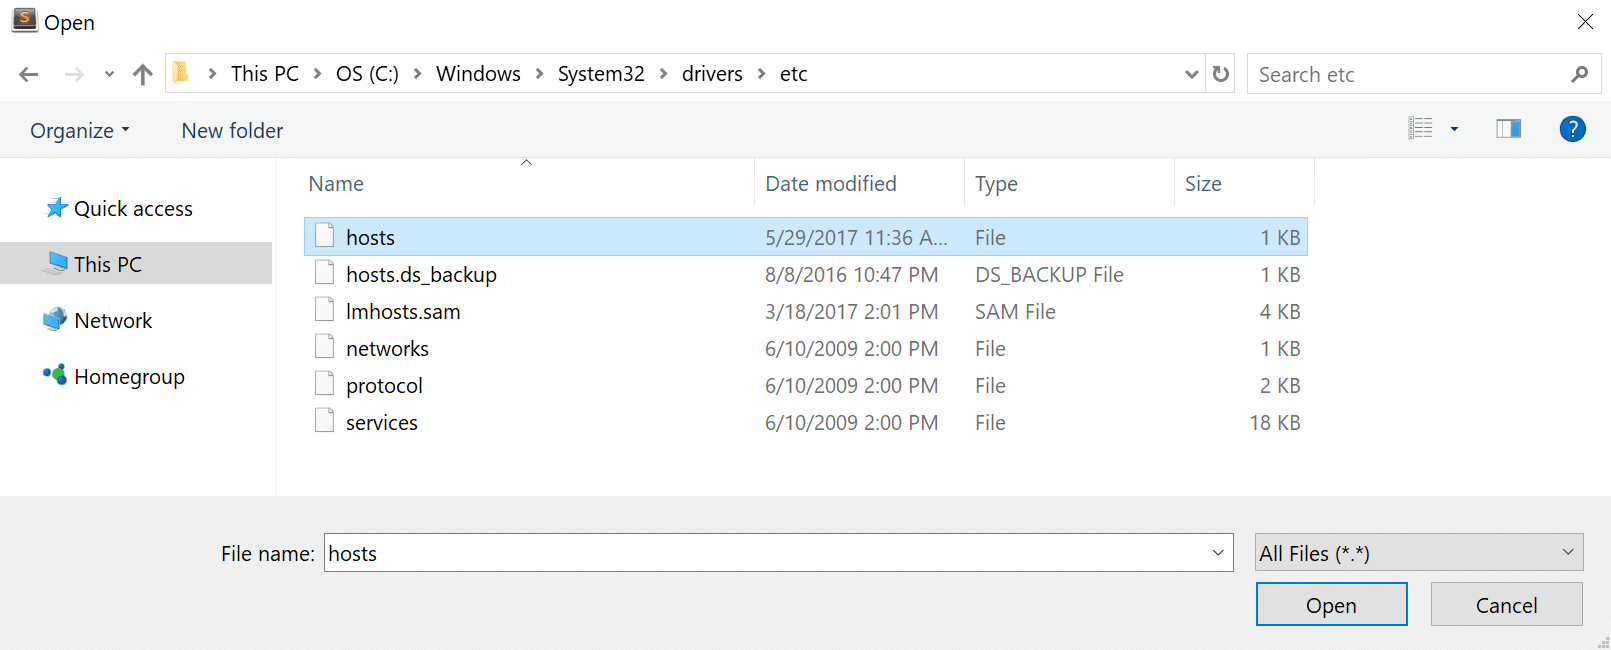
Double check and make sure the website you’re trying to visit isn’t listed in there. If it is, remove it.
Mac
To check your hosts file on a Mac, we recommend getting Gas Mask. It’s a free application which can be used as hosts file manager, hosts files editor, and switch between them. It makes everything quick and easy! Otherwise, you can follow the steps below to edit your hosts file on Mac manually.
Go to Utilities and then click on “Terminal.”
Enter in the following command and press Enter (you will most likely be prompted for your administrator password as well).
sudo nano /private/etc/hosts
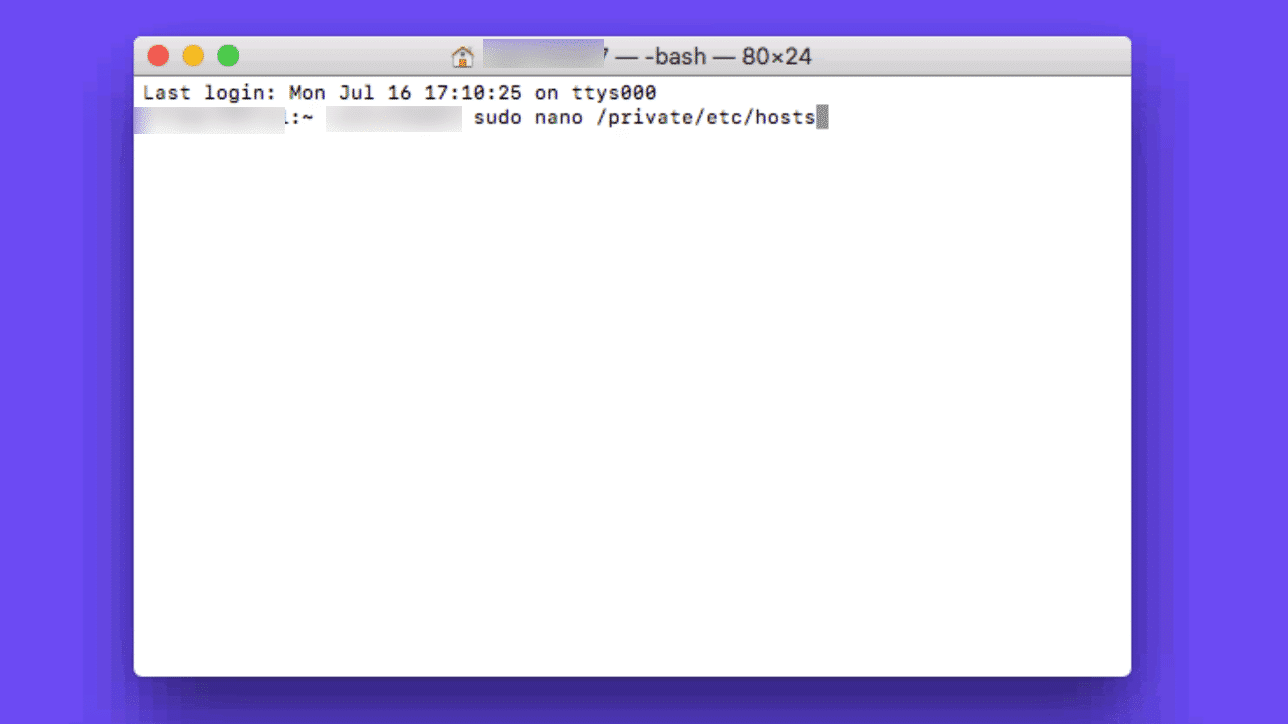
Double check and make sure the website you’re trying to visit isn’t listed in your hosts file. If it is, remove it.
7. Check DNS of Your Domain
If you’re only getting the DNS_PROBE_FINISHED_NXDOMAIN error on a single domain, even after checking your hosts file, you might need to check the DNS settings on the domain name itself.
If you’re a Kinsta client we have an in-depth post on how to point your domain and or DNS to Kinsta. If you recently migrated your website to a new hosting provider, it could be the DNS was cached incorrectly on your computer. In which case, Step 2 above should have resolved that.
8. Restart Your Computer
We know it’s annoying, but it has to be mentioned. 😬 If none of the above options work, trying restarting your computer and even your router. We realize many of you probably have hundreds of tabs or applications open and that’s why we made this the last option. But rebooting devices actually clears out a lot of temporary cache.
How to Fix DNS_PROBE_FINISHED_NXDOMAIN on Mobile (Android & iOS)
These are the most common ways to fix this error on your mobile device:
1. Restart Your Device
You know that famous tech support question “Have you tried turning it off and back on again?”
Well, the phrase is popular for a reason: A reboot does often fix the problem! Before attempting any of the other solutions on this list, start first with a simple device restart.
Android
To restart your Android device, press and hold your device’s power button to bring up the Options menu, then tap on the Restart option:
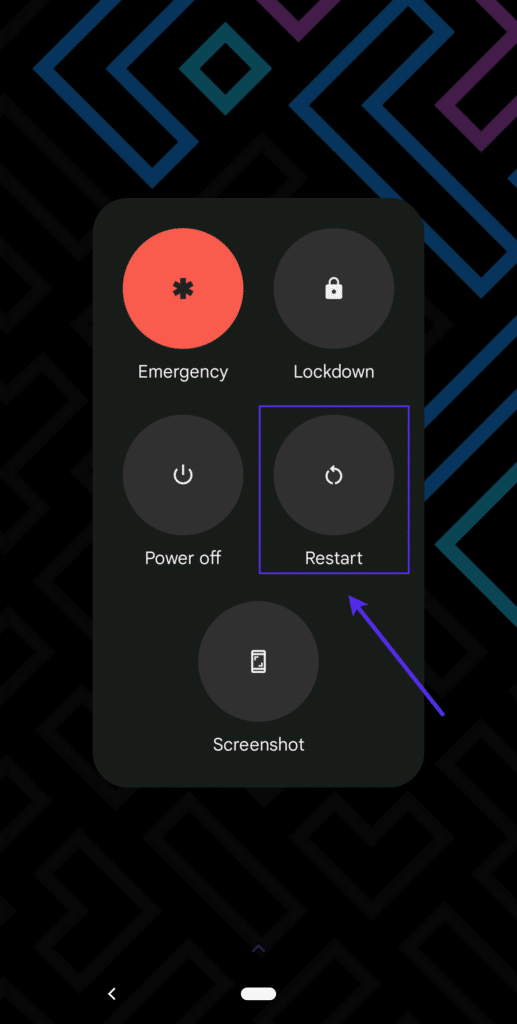
Wait for your device to restart, then open the Chrome app and check for the error.
iPhone/iOS
To restart your iPhone or other iOS device, begin by pressing and holding the power button and either of the two volume buttons:
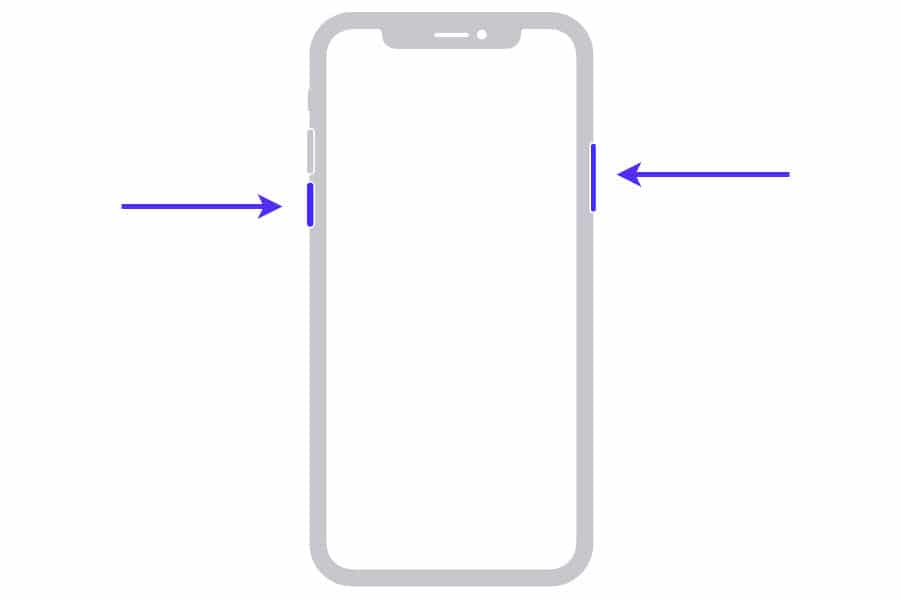
Keep these held down until the power-off slider appears on the screen:
Drag the slider from one side to the other, then wait for the device to turn off.
Once it’s completely off, press and hold the device’s power button to turn it back on. Then check to see whether you’re still encountering the error.
2. Check for Chrome App Updates
The next step is to make sure that you’re using the very latest version of the Google Chrome app on your Android device
You can check for any Chrome updates and install them by following these steps:
- Open the App Store app (this is called Google Play Store on Android devices).
- Tap your profile icon at the top right (in the search bar).
- Tap the Manage apps and device menu option.
- Tap the Updates available button.
- Look for Google Chrome in the list. If you see it, tap the Update button next to it.
After the update has finished installing, relaunch the Chrome app and check to see if you’re still getting the error. If you are, move on to the next solution below.
3. Clear Chrome’s Browser and App Data
Caches are useful because they speed up your browsing experience. In fact, our tests show that Edge Caching reduces the time it takes to deliver full pages to browsers by more than 50%.
However, this cached data can also frequently be the source of errors like DNS_PROBE_FINISHED_NXDOMAIN.
Luckily, you don’t actually need this cached data, and clearing it out may fix the error.
You can clear your mobile device’s Chrome cache and app data with just a few taps:
- Open the Chrome app.
- Tap the hamburger menu icon (
⋮or⋯) at the top or bottom. - Tap History > Clear browsing data.
- Check Browsing history and Cached images and files. Leave the other options unchecked.
- If prompted with a “Also clear data from these sites?” message, confirm by tapping Clear.
- Wait for Chrome to finish clearing the data, then tap the OK, got it confirmation message.
Now, try visiting the page again to see if the error has vanished. If it hasn’t, don’t lose heart! Just move on to the next option below.
4. Check for System Updates
As with Chrome, you’ll want to be sure you’re running the latest version of the Android operating system (OS) that’s available for your device.
Android
Here’s how to see if your Android device has any pending system updates:
- Navigate to Settings > System.
- Tap System Update.
- This screen may tell you that your system is up to date. Regardless, tap the Check for update button at the bottom.
- Wait for the system to look for any available OS updates.
- If an update is found, agree to install it, then follow any further prompts to complete the installation.
- Restart your device if the update process doesn’t do so automatically.
iPhone/iOS
You can check for pending updates on your iPhone or other iOS device with these steps:
- Navigate to Settings > General > Software Update.
- Review the screen to see if there’s an update available. If there is, tap the Download and install button.
- Tap Install Now when prompted.
- Restart the device.
Once your device’s system has been updated and rebooted, check again for the error in the Chrome app. If it’s still there, try the next solution on this list.
5. Change Your Mobile Device’s Network Settings
We talked earlier about modifying desktop devices’ DNS settings to fix the DNS_PROBE_FINISHED_NXDOMAIN error. This same approach can also work with mobile devices.
Android
To change the DNS settings on your Android, follow these steps:
- Navigate to Settings > Network & Internet > Internet.
- Make sure Wi-Fi is toggled “On.”
- Press and hold your Wi-Fi network connection, then tap Modify.
- Under Advanced options, locate the DNS 1 and DNS 2 fields and enter this information:
- DNS 1:
8.8.8.8 - DNS 2:
8.8.4.4
- DNS 1:
- Tap Save.

After saving your new settings, re-open the Chrome app and check to see if the error’s gone.
iPhone/iOS
You can change the DNS settings on your iPhone or other iOS device with these steps:
- Navigate to Settings > Wi-Fi.
- Tap on your network in the menu.
- Tap Configure DNS > Manual.
- Remove the current listings under DNS Servers and add the following listings instead:
8.8.8.88.8.4.42001:4860:4860::88882001:4860:4860::8844

Now, restart the Chrome app and check again for the error message.
Summary
Even though it’s frustrating, the DNS_PROBE_FINISHED_NXDOMAIN error is usually pretty easy to get resolved. Between flushing your DNS cache, renewing your IP, and trying different DNS servers, you should hopefully be back up and surfing the web in no time.
Suggested reading: How to Fix the DNS_PROBE_FINISHED_BAD_CONFIG Error Code.
FAQ
What Is DNS_PROBE_FINISHED_NXDOMAIN?
The DNS_PROBE_FINISHED_NXDOMAIN error indicates that the Domain Name System (DNS) failed to resolve the domain name or address. NXDOMAIN stands for Non-Existent Domain.
What Causes DNS_PROBE_FINISHED_NXDOMAIN?
The DNS_PROBE_FINISHED_NXDOMAIN is typically caused by a misconfiguration or problem with your DNS.
How Do You Fix DNS_PROBE_FINISHED_NXDOMAIN?
Here are some recommendations and things to check to fix the error (sorted in order by most common reasons we see):
- Release and Renew IP Address
- Restart DNS Client Service
- Change DNS Servers
- Reset Chrome Flags
- Disable VPN and Antivirus Temporarily
- Check Your Local Hosts File
- Check DNS of Your Domain
- Restart Your Computer
How Do You Fix DNS_PROBE_FINISHED_NXDOMAIN on Mobile?
These are the most common ways to fix this error on your mobile device:
- Restart Your Device
- Check for Chrome App Updates
- Clear Chrome’s Browser and App Data
- Check for System Updates
- Change Your Mobile Device’s Network Settings
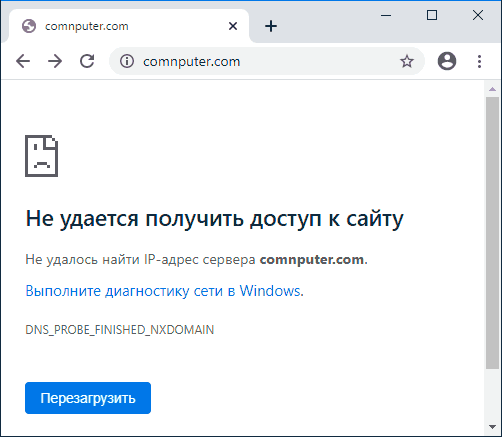
 Распространенная ошибка при открытии сайтов в Google Chrome — сообщение «Не удается получить доступ к сайту. Не удалось найти IP-адрес сервера.» и код ошибки DNS_PROBE_FINISHED_NXDOMAIN.
В этой инструкции подробно о том, что значит DNS PROBE FINISHED NXDOMAIN и как исправить эту ошибку Google Chrome в Windows 10, 8.1 и Windows 7, а также других ОС.
- Что значит эта ошибка
- Как исправить DNS PROBE FINISHED NXDOMAIN
- Дополнительные методы решения
- Видео инструкция
Что означает ошибка
Сам код ошибки при отсутствии иных факторов означает что вы обратились к несуществующему домену, NXDOMAIN — это Non-Existing Domain (несуществующий домен). К сожалению, появление этой ошибки не всегда говорит о том, что дело именно в этой причине.
Как исправить DNS PROBE FINISHED NXDOMAIN
Прежде чем приступать к каким-либо методам исправления, прошу внимательно отнестись к следующим 4-м пунктам:
- Правильно ли введен адрес сайта? Очень простой метод получить ошибку DNS_PROBE_FINISHED_NXDOMAIN — ввести произвольный случайный адрес (но для некоторых систем в этом случае вы увидите иную ошибку: ERR_NAME_NOT_RESOLVED).
- Если не удается получить доступ лишь к одному сайту, причем с разных устройств (даже при других кодах ошибок на некоторых из устройств), причина вероятнее всего в самом сайте, и вы здесь вряд ли сможете что-либо изменить: можно лишь предположить, что всё будет исправлено, а сайт не был закрыт.
- Если об ошибке сообщают все сайты на разных устройствах через один роутер, то, возможно, проблема на стороне провайдера и будет решена со временем. Также попробуйте перезагрузить роутер (выключить питание и включить снова).
- Если это ваш собственный сайт, который вы только что зарегистрировали, либо внесли изменения NS-серверов при смене хостинга, учитывайте, что для изменения записей на DNS серверах занимает время и в течение этого времени (обычно не более нескольких часов) вы можете получать NXDOMAIN-ошибку при попытке открыть сайт.
Если все эти пункты не относятся к вашему случаю, а об ошибке DNS PROBE FINISHED NXDOMAIN сообщают многие сайты или только на одном единственном компьютере или ноутбуке, далее первоочередные способы исправить проблему.
Смена параметров DNS-серверов на компьютере, очистка кэша DNS и проверка службы DNS-клиент
Прежде всего попробуйте изменить параметры DNS-серверов вашего Интернет-подключения:
- Нажмите клавиши Win+R на клавиатуре, введите ncpa.cpl и нажмите Enter.
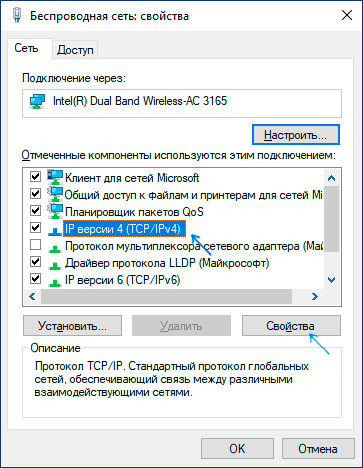
- Откроется список ваших сетевых подключений. Нажмите правой кнопкой мыши по активному Интернет-подключению и выберите пункт «Свойства».
- В списке выберите IP версии 4 (TCP/IPv4) и нажмите кнопку «Свойства».
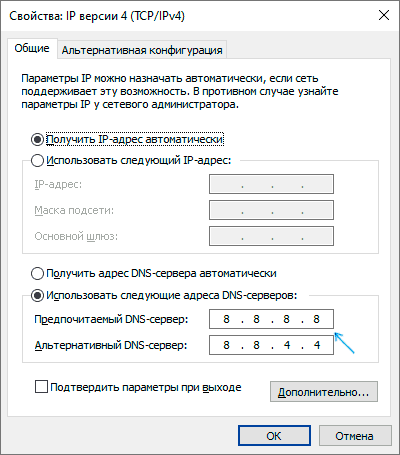
- Установите отметку «Использовать следующие адреса DNS-серверов» и укажите 8.8.8.8 и 8.8.4.4 (безопасные DNS-серверs Google). И нажмите Ок, применив настройки.
- Запустите командную строку от имени администратора, в ней введите ipconfig /flushdns и нажмите Enter.
- В адресной строке Google Chrome введите chrome://net-internals/#dns и нажмите кнопку «Clear host cache».
Дополнительно, зайдите в список служб Windows (Win+R, ввести services.msc) и проверьте, чтобы служба «DNS-клиент» была запущена, а тип её запуска был установлен в «Автоматически». Если это не так, подробно о включении службы в соответствующем разделе инструкции: Как исправить ошибку DNS_PROBE_FINISHED_NO_INTERNET.
По завершении этих действий проверьте, открывается ли сайт теперь или вновь сообщает об указанной ошибке.
Сброс Winsock и протокола TCP/IP
В ситуации, когда предыдущий метод не помог, попробуйте следующее: запустите командную строку от имени администратора и по порядку введите следующие 3 команды, нажимая Enter после каждой:
ipconfig /release
ipconfig /renew
netsh winsock reset
Если после выполнения этих трех команд и перезапуска Google Chrome ошибка не исчезла, используйте следующую команду:
netsh int ip reset
После неё закройте командную строку и обязательно перезагрузите ваш ПК или ноутбук, а лишь потом проверьте, была ли исправлена ошибка DNS PROBE FINOSHED NXDOMAIN.
Дополнительные методы исправить ошибку
Если предложенные способы не сработали, попробуйте также следующие шаги:
- Если на вашем компьютере установлена Windows 10, выполнить сброс параметров сети встроенными средствами системы.
- Отключите любые VPN, прокси (Как отключить Прокси-сервер), расширения анонимайзеры в Chrome, а также попробуйте отключить сторонние антивирусы и, при наличии, файрволлы. Также проверьте, будет ли появляться ошибка, если временно отключить брандмауэр Windows.
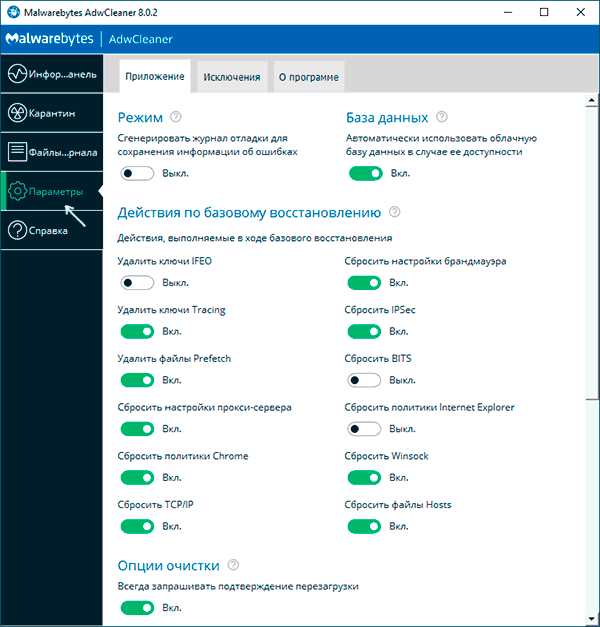
- Попробуйте загрузить AdwCleaner (специальное средство для удаления вредоносных программ) с официального сайта https://ru.malwarebytes.com/adwcleaner/ (если с компьютера не открылось с той же ошибкой, можно скачать на телефон, а потом по кабелю перенести на проблемный компьютер), затем в параметрах программы выставить параметры как на изображении ниже, после чего выполнить сканирование, очистку и перезагрузку компьютера.
- Если на компьютере есть точки восстановления, попробуйте использовать их, чтобы восстановить конфигурацию на дату до появления проблемы. Подробнее: Точки восстановления Windows 10 (подойдет и для предыдущих версий ОС).
- В диспетчере устройств (открыть его можно, нажав клавиши Win+R и введя devmgmt.msc) попробуйте удалить сетевой адаптер, использующийся для Интернет-подключения, а затем в меню выбрать «Действие» — «Обновить конфигурацию оборудования», дождаться повторной установки адаптера и посмотреть, была ли исправлена ошибка.
- Проверьте, не указан ли в настройках Интернет-подключения на Wi-Fi роутере DNS-сервер. Если указан, попробуйте отключить его (включить автоматическое получения адреса DNS-сервера).
Видео инструкция по решению DNS PROBE FINISHED NXDOMAIN в Chrome
Надеюсь, один из способов помог вам исправить DNS_PROBE_FINISHED_NXDOMAIN. Если же нет, еще раз прошу обратить внимание, на пункты из начала статьи, указывающие на то, что проблема может быть не с вашей стороны.
DNS Error in WordPress Website
A friend of mine, an ex-logistician by profession, thought of building a new website on WordPress. He wanted to try it out himself as WordPress is a simple CMS that you can use to build a website yourself. After 5 months of trial and error, he managed to build a basic version of what he wanted.
However, once his basic version was looking almost complete, his moonshot landed him in another universe where every problem seemed like the beginning of another complex problem. When he wanted to see the final version of the website to his dismay, it showed an error –
Dns_probe_finished_nxdomain
So, he consulted a WordPress Website Maintenance Company and although they helped him out with his problem, they also told him that such errors are pretty common in WordPress. Why? Because even though WordPress seems easy to use CMS it is not because of constant updates as it is an open source software.
However, our point in this article is not to discuss the drawbacks of WordPress but merely an error that can be easily solved if you have the right directions. So, in this light, we will be discussing what caused dns_probe_finished_nxdomain error and can the dns probe issue be fixed in Chrome and Android devices.
What exactly is DNS_FINISHED_NXDOMAIN?
DNS is an acronym for Domain Name System. It connects domain names with actual web servers to redirect the Internet traffic. Simply put, it is like a request which for example appears like wp-bridge.com but, in the backend, it would be 35.224.212.152.
Given this, a dns_probe_finished_nxdomain error happens as a result of misconfiguration with a DNS. For example, you typed a URL in the browser, DNS will work as an intermediary to connect the typed URL to the IP address – this entire process is called DNS name resolution. This is the stage where the error of DNS_FINISHED_NXDOMAIN can happen. Why? Because if DNS becomes unable to resolve the domain name, then you will get a DNS_PROBE_FINISHED_NXDOMAIN* error. This error normally occurs in Chrome, Android, Windows and Mac.
* Here, the NXDOMAIN stands for Non-Existent Domain.
Now that we have covered what this error is about, lets go about fixing it. In this article we will cover fixing this error in Chrome and Android while in the other article we will discuss fixing it in Windows and Mac as part 2 of this version.
Fix DNS_PROBE_FINISHED_NXDOMAIN in Chrome (in 4 quick ways)
There could be many reasons for what caused DNS error and it depends upon how you resolve them. But at this moment, we’ll look at four methods to fix dns problem which are:
- Disabling the VPN/Antivirus Software for a Short Time
- Clearing the Browsing Data
- Changing the DNS servers
- Examining the Local ‘Hosts’ Files
Let’s look at each of these more closely below.
1. Disable your VPN/Antivirus Software temporarily
In certain scenarios, VPNs(Virtual Private Networks) and antivirus software programs go crazy with DNS server settings which could lead to DNS error messages.
Therefore, a quick fix would be to disconnect VPN or disable the antivirus software (if you have any installed into your machines). A pragmatic way is to locate software in your apps and programs and hit right-click on it. At this point, look for the option to ‘disable/uninstall’ it and you’ll get rid of this problem ‘if it’s happening due to antivirus/VPN.’
2. Clear the Browsing Data and Revisit the website
There is another easy way to correct DNS_PROBE_FINISHED_NXDOMAIN error in Google Chrome. This method involves clearing the browsing data. How?
Click on 3-Vertical Dots in the top-right corner, it will open up drop-down and you need to click on more tools and then come to clear browsing data

Here, Windows under the advanced tab will show many boxes but you will have to select two of them: a) Cookies and other data, b) Cached images and files.

Hit the ‘Clear data’ button. And then restart browser and visit that site once again.

3. Change DNS Servers
If the top 2 methods do not work, the next thing which comes in line is the DNS servers to resolve the issue.
DNS servers, by default, are assigned by ISP, so you can temporarily change these public DNS server i.e. Google. Majority of netizens always prefer Google’s public DNS (8.8.8.8 & 8.8.4.4) as they are trustworthy.
So, next-time, when you see that the DNS settings have become itchy, change to another DNS server temporarily and it will resolve the DNS_PROBE_FINISHED_NXDOMAIN error message.
Remember: Fixing DNS_PROBE_FINISHED_NXDOMAIN varies based on operating system and device
4. Examine the Local ‘Hosts’ File
Another trick that you can use to fix the dns_probe_finished_nxdomain error is by examining the local ‘hosts’ file. Local ‘host’s files are created to preview a DNS when a user is about to switch to a new host. If you find them changed – accidentally or intentionally it might be the reason you’re seeing this message, DNS_PROBE_FINISHED_NXDOMAIN, again and again.
It’s a pretty straightforward process:
- Locate the ‘Host’ file in your network system.
- Then examine that the domain you’re trying to access is not in the list of local ‘hosts’ files of your PC/laptop.
- If it is there, delete it and restart your browser or your system.
So, the above 4 methods are the easiest to resolve the dns_probe_finished_nxdomain error in Google Chrome. There are however, more technical methods that are deployed if the presented solutions do not work. For those solutions, technical assistance is required which you can get from any good WordPress Website Maintenance Company.
Moving on with our article!
Now that we are finished with Google Chrome, let’s look at some of the ways that can be used to fix dns_probe_finished_nxdomain error in Android.
How to Fix DNS_PROBE_FINISHED_NXDOMAIN error in Android?
Android is the most common operating system these days. Even then, many face this problem or error in this system as well. Unlike fixing the error in Chrome, fixing the dns_probe_finished_nxdomain error in Android is a bit tricky. But don’t worry. We have tried to simplify it as much as possible for you so that you can handle it yourself.
There are three methods that can be used to fix the dns_probe_finished_nxdomain error in Android. These are:
- Update Chrome Apps
- Clear App and Chrome Browser Data
- Change the DNS settings
Let’s start with the first one.
1. Update Chrome Appshttps://www.wp-bridge.com/blog/fix-dns_probe_finished_nxdomain-error-in-chrome-and-android-in-5-minutes/https://www.wp-bridge.com/blog/fix-dns_probe_finished_nxdomain-error-in-chrome-and-android-in-5-minutes/
If you are seeing this message (DNS_PROBE_FINISHED_NXDOMAIN) in your Android device after restarting several times then it is a clear indication of one big problem – your apps are outdated. You don’t need to worry at all as we can help you solve it easily.
- First, go to Settings and come down to System in your Android system and locate System Update.

- Once you’ve clicked on System Update, It will inform you about the available update. Fortunately, if there is an update available, update it and visit that website again.
Another way to deal with this dns problem – in case, if there is no update available – is using the Google Play Store.
- Go to Google Play Store and search for the Chrome app. Hit on update button as shown below:

- Restart your device again and visit the website you want to access on your Android smartphone.
Hopefully the error will be resolved by either of the two methods. If not, then move on to the next one below.
2. Clear App and Chrome Browser Data
Can you recall the method that we used in Google Chrome on how to fix the error? If not, you can always scroll up and look or just read below.
Clearing the browsing data in Android just as in Chrome can also potentially fix the dns_probe_finished_nxdomain error. Follow the steps below:
- Open Chrome app on your Android smartphone, tap on three vertical dots, and follow this instruction Settings> Privacy> Clear Browsing Data.

- To clear the chrome app data, you have to follow this process: Settings> Storage > Apps > Google Chrome.
- Now, click on the ‘OK’ button and it will eliminate all redundant and unnecessary data/information which might cause the DNS error message.

3. Change the DNS settings
The last method in this series of fixing the dns_probe_finished_nxdomain error in Android is making changes to the DNS settings.
It’s not a hard-nut-to-crack to change the DNS settings. Here’s how:
- Go to Settings app and select Network and Internet.
- In Wi-Fi network connection, tap on Modify network button:

- Select ‘Static’ from the drop-down menu under Advanced options, keep scrolling to the bottom, and look for the fields to enter the DNS server address.

- Put (8.8.8.8) in DNS 1 and (8.8.4.4) in DNS 2; press ‘save’
Now you should access your desired website after restarting your browser….. Period!
Concluding our Article on How to Fix the DNS_PROBE_FINISHED_NXDOMAIN error in Chrome and Android
In this whole scenario, we can understand that when you visit a WordPress website and it shows you (DNS_PROBE_FINISHED_NXDOMAIN) – it feels like a last nail in the coffin when you are trying to run a business and also manage a website. But, as a saying by Charles Kettering – Famous Inventor and Head for Research for GM- goes:‘A problem well-stated is half-solved’.
Therefore, if you cannot get rid of problems by the above fixes, just ask for a specialist at WP-Bridge. We can help you with solving the other half of the problem.
Don’t hesitate. We are here for you in your time of need.
WordPress Website Monitoring 24/7?
Let us manage your WordPress site with top-notch security and high-end technical features– all-in-one-place.
Recent Blog

WordPress powers 14.7% of the world’s top-sites which makes 63.5% of the total market share. Only in 2020, 500+ sites were built on WordPress, and 60-80 sites on Shopify( a huge difference!). Plus, WordPress has over 59000 plugins – these stats show us how impactful and user-friendly WordPress is.
In this article, we’re going to discuss key reasons that make WordPress ‘The Most Popular CMS’.
What Reasons Make WordPress “The Most Successful CMS”?
Following are ten reasons that make WordPress “the most successful CMS”. Go through them and enlighten yourselves:
Reason # 1: Ease of Implementing SEO Practices
WordPress is the most SEO-friendly CMS. Pick a catchy domain, use a responsive WordPress theme and organize your content effectively and boom ! you are good-to-go; boost engagement and win your marketing goals. Yes, It is this simple – no rocket science is required.
Unlike custom sites, you don’t have to spend extra-buck in development of a site. Neither, you will have to wait any longer before your site is actually complete. Likewise, prior knowledge and skills are not indispensable to move the needle. With WordPress, you can establish yourself as a most trusted service provider, ecommerce site or a blogging site, you are just a few actions away from becoming the next Huffington post.
This is ‘why WordPress is So Popular CMS’ because you can implement SEO strategies easily.
Reason # 2: Content Management — It’s A Cinch At WordPress!
Everything, which delivers a value, a message and a meaning, is Content. Whether you want to upload a video, a text content, an infographic, or just an audio podcast; you’re using the power of content to launch your brand or service or just promoting your well-groomed online identity.
It is by far the handiest CMS to manage your content to optimize engagement and SEO endeavors. Content is King which enables you to rule the world of internet marketing. And, WordPress is the right CMS to ease up content management for maximum output and ROI.
WordPress is very popular from enterprises and bloggers to big companies because they can manage their content and can prioritize SEO for maximum effects.
Reason # 3: It is FREE (Yes! And You will Love it )
The best thing about WordPress is that “it is free” and you can easily install WordPress core software on your site. Though WordPress is FREE, but, you will have to pay money for themes and plugins. Long story short, WordPress is a search engine-friendly CMS where you can create top-notch websites with engaging content.
Irrespective of niche, industry, and types of services, WordPress is the sweet-spot where you can design and build responsive websites at low-cost to save money for other aspects of your business.
Reason # 4: There is a Plugin For Everything — Amazing, isn’t it?
WordPress plugin is a software that plugs into your WordPress site to expand existing functionalities or add new ones. Plugins can make small changes to massive enhancements as per your requirements.
Likewise, you can use plugins for the front-end of your site as well as the back-end of your site to carry out the variety of tasks i.e., for taking backups, for putting WordPress site on a maintenance mode, for search engine optimization (Yoast SEO), and for responsive video and photo galleries (Envira Gallery),etc.
WordPress is a powerhouse of 59000 free plugins to enable you to optimize your site visibility, expand its features, and secure it from potential threats and cyber-criminals. No other CMS is this much equipped with handy plugins. Following is the little list of content management systems with the total number of plugins:
- Joomla has total 5922 extensions
- Drupal has total 48208 modules
- Wix has total 300 web apps
- Magento has total 3758 extensions
Hence it proves, WordPress dominates the CMS market with its big collection of 59000 plugins. Well, do you agree?
Reason # 5: WordPress is Open-Source — For Everyone. AND . Anyone
WordPress is an open-source CMS. Its source code is accessible and modifiable so that you could add and expand functionalities of your website. So, if you own a WordPress site, you can easily adapt to changes to adjust in existing trends to keep your site responsive and fully-functional.
Since WordPress is open-source, this CMS has a big community of WordPress contributors who bring forth pragmatic and innovative ideas to help WordPress grow significantly. (That’s why, WordPress dominates CMS market by 60.8%, it powers more than 15% of world’s top sites, and 500+ sites are built just on WordPress everyday – jaw-dropping stats, isn’t it)
Reason # 6: Want to Become a Blogger? Make WordPress Your Next Home
Initially, when WordPress started off its journey, it was purely a blogging platform. Over the years, it has expanded its usability so that you can use this best CMS for all types of websites from business sites ,membership sites, educational websites to Ecommerce stores, etc.
So, if you are an aspiring blogger who wants to reach out to a massive audience, make WordPress Your Next Home. It is an easily manageable, open-source CMS with a massive community of developers and contributors who work persistently to add innovation to WordPress. Still confused? Well, look at the following pointers expressing usefulness of WordPress as a blogging platform:
It is SEO-Friendly. You can optimize your visibility as a blogger across the internet to boost subscribers and connect your target audience at the right time.
WordPress is full-of-plugins for bloggers. It has a plugin for everything. It has OptinMonster for conversion optimization. It has PushEngage for web push notification. It has an Uncanny Automator for creating workflows automatically. It has Pretty Links Pro for monetizing your WordPres site content. Finally, you can get plugins literally for anything.
You can manage your content perfectly. Strategically, content is inevitable to steer your online presence towards the right direction. Like we said earlier, content is anything of value with message and meanings (videos, texts, infographics or just an image). WordPress is,certainly, a launching pad for bloggers where they make most of all types of content for gaining traffic, targeting the right audience, and generating qualified leads.
This is our reason number six – if you want to become a blogger, use WordPress. And, we believe it is helpful – isn’t it?
Reasons # 7: WordPress is the Right CMS For Enterprises
Previously, we highlighted a reason why you should use WordPress if you want to embrace ‘blogging’ as a career choice. Right now, we are going to see WordPress as “the right CMS for enterprises”. One-size-fits-all is a metaphorically correct expression for a WordPress: A content management system where building an e-commerce empire or profile website is as easy as ABC.
Following are the clear-cut examples of a reason “Why WordPress is Right CMS for Enterprises”:
- elearning portals: elearning will grow globally to more than $240 Billion by 2022, 90% of businesses offer elearning training to their employees, and online education is expected to be a $374 billion industry by 2026. So, if you want to build your own e-learning platform, WordPress with LMS hosting is the right choice for you. You should use LifterLMS – a plugin for creating and marketing online courses including multimedia lessons.
- Enterprises can use WordPress for creating Invoicing systems manager for products and services with Sliced Invoices. It is basic and you can use it with ease. This is one of the best plugins available in WordPress plugin repository.
- Event management systems: You can set up an entire online system for event management. There are various plugins for event management. We would vote WP Event Manager because it is lightweight and open-source.
Reason # 8: Freedom. AND. Control in WordPress
Technically, WordPress is open-source. Therefore, there’s no limitation of flexibility and scalability. Especially, for ecommerce functionalities, you’re in a straitjacket at closed-source CMS. Likewise, your content is not even yours (unfortunately!)
Whereas, with WordPress, you have full freedom and control. You can move redundant files, build your online stores, incorporate plugins, or add a safe-and-secure WordPress theme for your site, you will have freedom and control in WordPress.
Reason # 9: Full Support for Almost All Media Formats
WordPress can support an extensive list of all media formats. Here, we’re covering primary media types and formats:
- .mp3, .mp4, .m4a, .mov, .wmv, and .avi (Video and audio)
- .pdf, .doc, .pptx (Documents)
- .jpeg, .png (Images)
- In fact, WordPress has file support for less common file formats such as .3pg, .ogg, .key, and .odt,etc.
Reason # 10: Massive Community Support (You won’t find it elsewhere!)
Since WordPress is an open-source CMS; anyone can optimize the source to scale up WordPress software enhancements and ease of developing secure, feature-packed and high-end themes and plugins.
Therefore, WordPress has solid community support of professional theme creators, plugin developers, and web hosting service providers, and professional WordPress maintenance service providers like WP-Bridge – which you won’t find elsewhere.
And, everybody co-exists with ONE MISSION: To Make WordPress Easy for Everybody.
Conclusion: Why WordPress has Become So Popular | Top Ten Reasons
WordPress is the most popular CMS where you can do anything. Build a blog or just run an Ecommerce store; you can do anything. Well, here are ten reasons that make WordPress such a popular CMS across the globe.
In nutshell, WordPress isn’t just a content management system, it is a launching pad to turn your ideas-on-paper into moonshots. If you have a WordPress site but can’t fix glitches yourself, don’t worry, we offer WordPress maintenance service and enjoy.
-
January 18, 2023
Permalinks – A means to Enhance the WordPress website Performance
URLs are something that actually connects business owners with the target audience. Having a right and easy URL such as Google.com or Target.com not only enables the audience to remember the business and its URL but also can easily access its main page/homepage. In the world of WordPress, these URLs are known as permalinks. WordPress.com defines permalinks as:
“Permalinks are permanent URLs (Uniform Resource Locators) assigned to individual blog posts, pages, category and tag archive”
Linguistically, permalink is a portmanteau of Permanent and Hyperlink. It’s a URL that allows people to reach out to different parts of your WordPress site.
The importance of URLs or Permalinks (as we will be using both interchangeably throughout this article), cannot be overlooked. But unfortunately, it is overlooked when WordPress websites are created. When WordPress websites are created, developers or even the owners do not pay a lot of attention while creating them because it is considered to be an unnecessary item. However, that is not the case. Permalinks are highly important when it comes to SEO and performance optimization of the WordPress website (will be discussing this in detail in the next sections).
A long, lengthy, or even a faulty permalink can affect the overall performance of the WordPress website and the SEO efforts. All-in-all, a well-defined permalink works as a clue for a search site and ensures that whether your content is search-friendly or not.
Therefore, in this article, we will be focusing on changing permalinks in order to make them optimized for the best WordPress performance.
But, first, as always, a little education on Permalinks is important!!
What does a Structure of WordPress Permalinks look like?
Basically, a permalink comes into two parts:
- First is the domain name of a website ( i.e., wp-bridge.com)
- Second is the slug: a URL-friendly name describing the content that user is going to find on the page (i.e., /contact-us)
Why are Permalinks So Important?
Permalinks have significant importance for WordPress sites as they have a direct impact on things such as SEO, user experience, and website navigation, etc. Some of these aspects are discussed below:
- User Experience: One of the things which makes the user experience of a website better is ‘URL’. Often, UX design is considered essential for all the stuff lying below the browser tabs, but holistically, the full user experience is not limited just to it. Technically, what you’ve included or have not included in your permalinks mark a big impact on whether a visitor can land on the correct page or will bounce back. For example, users look at the title and URLs of the site. So, they only pick those URLs which seem relevant. That’s why permalinks boost the UX of a WordPress site.
- Effect on SEO: “No visibility is no business” – No brand can successfully exist in today’s super-digitalized business ecosystem without an identifiable presence across search engines. And, this online visibility is bound to happen when you have a good SEO strategy in which ‘permalinks’ play an important role. In broader context, a SEO builds domain authority through the use of right keywords, and if those keywords are integrated objectively in permalinks, they are a surefire solution to boost your SEO rankings to pull search engine traffic to your WordPress site.
- Website Navigation: Permalinks enhance website navigation as they help users figure out the location of a content on the website. Permalinks make it easy for netizens to return back to their favorite post later and they can share the post with everyone else. Contextually, URLs help identify and organize content. It is the responsibility of the front-end to create user-friendly permalinks so that a visitor could get an idea of website structure for finding relevant content on your WordPress site.
When should you Reset or Change Permalinks?
From a technical standpoint, changing WordPress permalinks can badly affect SEO endeavors as it might impair link building efforts used for funnel-building to drive web traffic to your WordPress site that kills off lead-generation efforts. There are a few things you need to do to resolve these issues even after resetting permalinks in WordPress.
Here are some of the instances, when changing permalinks can prove useful:
- Possibly your existing posts have a page structure that’s not user-friendly. For instance, the old version of your WordPress post contains a Post ID which is not helpful for people to remember and they can’t use for reference for later use.
- An existing post consists of a worthless permalink structure with no SEO benefit.
- When you’ve rebranded your site and want your URLs to showcase your rebranding efforts.
What are the Easy and Safe Steps to Change WordPress Permalinks Without Breaking the Site?
To change permalinks in WordPress without breaking the site is not without difficulty. In order to change the permalinks without breaking the WordPress website, you should take the following easy and safe steps for changing WordPress permalinks correctly:
1. Backup your WordPress website
In order to change the permalinks, first take a backup of the page or if you have time – the whole website so that in case if a link does not work, you can revert back to original settings.
2. Change your permalinks
In order to change the multiple permalinks of your contents, just go to the WordPress dashboard where you can update the permalink structure. This action should produce two outputs:
- It should change the permalinks of already existing pages and posts in WordPress.
- It should change the custom URL structure to ease up storing content in future with relevant permalink format.
3. Redirect the website
Once you change the permalinks, users will see a WordPress 404 error. Therefore, in order to prevent users from bouncing off your site due to unavailability of content, set up redirects. Specifically, use HTTP 301.
Moreover, old indexed posts with old URLs get broken when permalinks are changed. Therefore, everybody with an old link would see – HTTP 404 Page Not Found – an error message, that’s very irritating.
Here, you can do two following things to redirect:
- Add the redirects manually to your WordPress site’s .htaccess file by using the following format for quick and easy redirection:
Redirect 301 /your-former-post-url.html /your-new-post-url.html
- Get a WordPress maintenance service from experts who will not only enable redirection to the file but also help you in the quick-fixes of other technical problems.
Final Words — Easy Ways of Changing Permalinks in WordPress in 2022 (without breaking up your site)
Permalinks are indispensable for WordPress sites due to a variety of factors that we’ve talked about comprehensively here – and we helped you understand how changing permalinks can harm your WordPress site as this process is fraught with peril. Even a slight mistake can damage the whole site leaving you agitated.
Or, you can have experts at WP-Bridge to handle everything for your website and make your site optimized and well-structured.
-
January 17, 2023
It’s a laborious task to create, manage and maintain a website but it can be made easy – from managing to maintenance – if you know your way around the hosting account control panel. Given the increase in usage of WordPress as a website builder platform, cPanel in WordPress has become quite popular.
Since cPanel is a popular web hosting control dashboard, certainly, there is an option of using it. It is user-friendly, intuitive and comes with all nuts and bolts for configuring your WordPress site.
In this article, you will walk through 7 effective and helpful tips to enable you to install, access and configure your WordPress site easily.
What are the Seven cPanel for WordPress Tips?
Following are the seven best cPanel for WordPress tips covering everything from installation and access to configuring. They are well-explained and highly useful to make it easy for you to use cPanel for WordPress:
Tip #1: How to Access your cPanel Dashboard?
Before we dive into details, let’s learn how to find your WordPress cPanel login screen. This process depends upon your hosting service provider.
First, log into your hosting account and check for a link or button saying you to ‘log in to cPanel’:
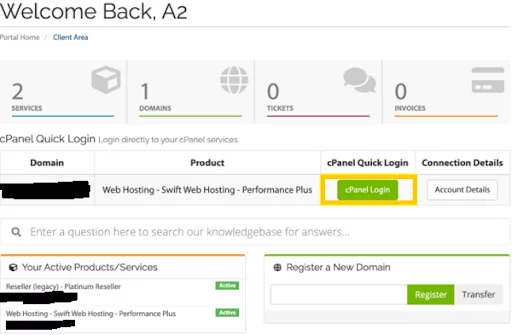
Once you click the button, you’ll land on the cPanel dashboard now.
If you do not see this option, then open your preferred browser, enter your domain name followed by 2083 (for example, https:// example.com:2083) and it will show you cPanel login page:
At this step, ask for cPanel credentials from your hosting provider and login.
Key Thing to Remember: You should have an SSL certificate installed on your WordPress site to access cPanel in this way.
Now that you have access to your cPanel account, it is time to get on the next step.
Tip # 2: What is the right way to Install WordPress in cPanel?
WordPress users can install Content Management System (CMS) without needing to upload files manually – a very useful feature for WordPress users.
To begin with, you need to log into your cPanel dashboard. Once you have access, browse the Apps section and select ‘Softaculous Apps Installer’. In this step, you’ll see a screen full of apps, from the list of available apps, select ‘WordPress’ right away:

Right on the next screen, click on ‘Install’ and then pick a ‘one-click’ or custom option. Here, you’ll have to select a domain for installation of WordPress. We will use ‘subdomain’ for this purpose.
You will see Softaculous (App Installer) showing the WordPress admin and password automatically at the bottom of the screen. Now, enter your email address in the email installation details.
Now, the installer will begin loading. It might take a little time to finish off the process. Upon completion, you will see the screen provided below:
The message comes with login information with a link to the WordPress login page. You will get all details sent to the provided email address.
How to Install WordPress in cPanel Manually?
Unfortunately, if you don’t have a one-click WordPress installation option provided by your hosting provider, you can install it yourself manually via cPanel which will take hardly five minutes to install, saving you from the extra tediousness of connecting your server via an FTP client remotely.
The first step here is to create a WordPress database. Log into your cPanel account to do so and click on MySQL Database Wizard under the database section:

Enter the name of your new database and click on the Next Step button. In the screen showing ‘Create Database Users’,put a username and password, and click on ‘Create User’:
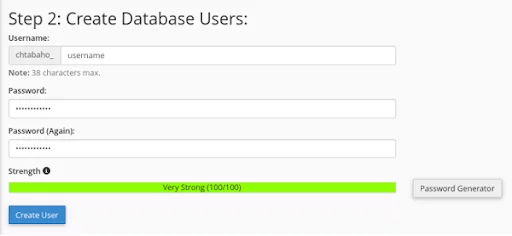
At this point, you’ll be asked to assign privileges to the database. For this, click on Next Step > Return Home. In case, if you haven’t already, you should navigate to the WordPress site and download the latest version.
Now, return to cPanel, navigate to File Manager present under the Files section:

When you’ve launched the File Manager, look for the public_html directory. Now, click on the Upload button and start uploading the WordPress.zip file:
Click on the ‘Go back’ button once loading is over. Here, select the WordPress files along with Extract.
After the files have moved to the public_html directory, visit your domain in the browser. A WordPress welcome message appears, following the installation prompts to begin setting up your WordPress site.
Tip # 3: What is the Way to Access your WordPress Admin Dashboard from cPanel?
After finishing WordPress installation, you can access your admin dashboard from cPanel. A quick and easy way to do this is to click on the link that was sent to your email when you installed the CMS. Also, don’t forget to click on the administration URL link provided in cPanel.
Right after clicking on the link, you’ll be redirected to the setup page. Here, you will see guidance for new users:
Tip # 4: How can You Use the cPanel File Manager?
File manager is a handy feature in cPanel. From accessing your WordPress sites’ files for critical editing to resolving technical glitches, you can do anything comfortably. Following are a few examples:
- When you have to create a child theme, or when you have to implement WordPress multisite.
- You can troubleshoot errors preventing you from accessing WordPress dashboard
- Upload or remove themes and plugins manually
- When you have to incorporate custom code or have to turn on debug mode.
File manager interface has a user-friendly interface where you don’t need an extra set of login credentials. Take a look at the image below telling you how to access the cPanel file manager – Files > File Manager:
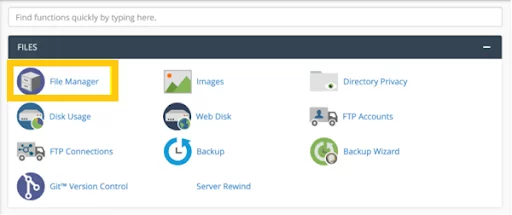
It will take you to a list of all files uploaded to your server through a hosting account. For accessing your WordPress files, search for public_html folder:
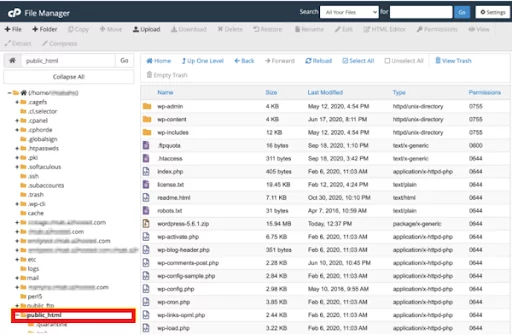
You can upload, delete, edit and download your website files for creating backup, managing file permissions and using more options:

Tip # 5: Open phpMyAdmin from cPanel
A WordPress site also contains a database in addition to WordPress files. A WordPress website owner can edit information stores in the database to solve errors, add/remove user(s) from a WordPress site, or even enable you to reset lost WordPress password.
Here, you’ll have to go phpMyAdmin: a database management tool used to communicate data from your site and successfully finish any of the tasks. A way to access comes via cPanel by Databases > phpMyAdmin
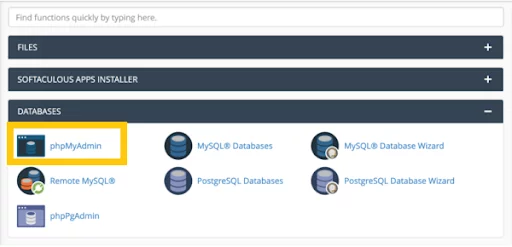
When you’ve opened phpMyAdmin, find your database in the list on the left side and view its tables by expanding it:
You should be able to apply relevant instructions to solve errors or you may edit the changes.
Tip # 6: Change your WordPress Password from cPanel
In case, if you have lost your WordPress password, you can use phpMyAdmin from cPanel to change your WordPress password. To do this, access phpMyAdmin from cPanel, go to the database of a website, edit the users. Now, in a few more clicks, you can comfortably reset the encrypted passwords for users.
Tip # 7: What is the correct way to uninstall WordPress from cPanel?
Let’s say, you want to launch a new website or want to get rid of WordPress installation, you can do anything via cPanel easily and in a record time. Well, before doing anything, you’ll have to build a backup first for future use. After you’ve made a backup of your WordPress site, log in to your cPanel account in the next step. At this stage, open your File Manager and look into the public_html directory where you could select and delete WordPress files.
Now comes the time to delete your database. For doing this, click on MySQL Databases under the Databases section of cPanel dashboard. And, finally, select and delete the WordPress database. WordPress no longer exists.
Final Words — 7 Effective Tips for cPanel for WordPress
Mo website owner can deny the fact, ‘a web hosting control panel by a hosting provider has to play a crucial role in managing a WordPress site. Therefore, it is super-important to be familiar with how to use cPanel for WordPress. That’s why, we talked about cPanel and its uses at length throughout the article.
If you feel this is too confusing or complicated, just reach out to us at WP-Bridge, and our experts will take care of everything.
-
January 15, 2023
Tired of a Slow Loading Website? Want to Make WordPress website Load Faster?
WP Bridge uses cookies and similar technologies as strictly necessary to make our site work. We and our partners would also like to set additional cookies to analyze your use of our site, to personalize and enhance your visit to our site and to show you more relevant content and advertising. For more information, please read our Privacy Statement.