I have written a library, but have problem with error does not name a type. I’ve tryed everything, searched for couple of hours and no luck. Library is placed in the «libraries» folder of the arduino sketch folder. Please help!!! I am using OSX, but the same problem occurs on Windows also.
This is header file of the library:
#ifndef OpticalSensor_h
#define OpticalSensor_h

#include <Arduino.h>
#include <SD.h>
#include <Wire.h>
#include <Adafruit_MCP23017.h>
#include <Adafruit_RGBLCDShield.h>
#include <String.h>

class OpticalSensor
{
    public:
        OpticalSensor(int analogPort);
        void LCDInit(int columns, int rows);
        void SerialInit(int bitRate);
        void SDInit();
        double& ReadFromAnalogPort();
        void SDCreateFile(String fileName);
        void SDDeleteFile(String fileName);
        void SDWriteToFile(String fileName);
        void SDStreamToFile(String Text);
        void SDOpenFileToStream(String fileName);
    private:
        int _analogPort;
        bool _displayFlag;
        Adafruit_RGBLCDShield _lcd;
        File _MainRecFile;
        double _voltage;
        void _LCDClearAll();
        void _LCDWriteInTwoRows(String row1, String row2);
        void _DelayAndClearLCD(bool returnStatus);
};

#endif
This is .cpp file of the library:
#include <OpticalSensor.h>

Adafruit_RGBLCDShield _lcd;
File _MainRecFile;
double _voltage;

OpticalSensor::OpticalSensor(int analogPort)
{
    _analogPort = analogPort;
}

void OpticalSensor::LCDInit(int columns, int rows)
{

    _lcd = Adafruit_RGBLCDShield();
    _lcd.begin(columns,rows);
}

void OpticalSensor::SerialInit(int bitRate)
{
    Serial.begin(bitRate);
    _bitRate = bitRate;
    while(!Serial) {
        //wait until serial is not open
    }
}

void OpticalSensor::SDInit()
{
    // On the Ethernet Shield, CS is pin 4. It's set as an output by default.
    // Note that even if it's not used as the CS pin, the hardware SS pin
    // (10 on most Arduino boards, 53 on the Mega) must be left as an output
    // or the SD library functions will not work.
    pinMode(10, OUTPUT);

    //check if SD can be found and initialized. Print also message to
    //Serial if initialized and to _lcd if initialized.
   if(!SD.begin(4)) {
     if(Serial){
         Serial.println("Initialization failed!");
     }
     if(_lcd){
         _lcd.print("Init failed!");
     }
     _DelayAndClearLCD(true);
   }
   else {
       if(Serial) {
           Serial.println("Initialization done!");
       }
       if(_lcd) {
           lcd.print("Init done!");
       }
       _DelayAndClearLCD(false);
   }
}

void OpticalSensor::SDCreateFile(String fileName)
{
    //check if file allready exists, if not it creates one
    //and writes apropriate response to
    //lcd and Serial if they are initialized.
    if(SD.exists(fileName)) {
        if(Serial) {
            Serial.println(fileName + " already exists!");
        }
        if(_lcd) {
            _LCDWriteInTwoLines(fileName,"already exists!");
        }
        _DelayAndClearLCD(false);
    }
    else
    {
        if(Serial) {
            Serial.println(fileName + "Creating file " + fileName + "...");
        }
        if(_lcd) {
            _LCDWriteInTwoLines("Creating file", fileName);
        }
        _MainRecFile = SD.open(fileName + ".txt", FILE_WRITE);
        _MainRecFile.close();
        _DelayAndClearLCD(false);


        //check if file was created successffully and print apropriate response
        //to lcd and Serial if they are initialized
        if(SD.exists(fileName + ".txt")) {
            if(Serial) {
                Serial.println(fileName + ".txt" + " created successffully!");
            }
            if(_lcd) {
                _LCDWriteInTwoLines(fileName + ".txt", "created!");
            }
            _DelayAndClearLCD(false);
        }
        else {
            if(Serial) {
                Serial.println("error: failed to create file!");
            }
            if(_lcd) {
                _LCDWriteInTwoLines("error: failed to","create file!");
            }
            _DelayAndClearLCD(false);
        }
    }
}

//delete file from SD card
void OpticalSensor::SDDeleteFile(String fileName)
{

}

//open file, write data to it, and close file after.
void OpticalSensor::SDWriteToFile(String fileName, String Text)
{
    _MainRecFile = SD.open(fileName + ".txt", FILE_WRITE);
    _MainRecFile.println(Text);
    _MainRecFile.close();
}

//Open file to stream data to it.
void OpticalSensor::SDOpenFileToStream(String fileName)
{
    _MainRecFile = SD.open(fileName + ".txt", FILE_WRITE);
}

//Write data to file while file is open.
//Notice that you can stream data only to one file at a time!!!
//For instance, if you have two sensors that you want to
//write data to two different files, you have to use SDWriteToFile
//function!!!
void OpticalSensor::SDStreamToFile(String Text)
{
    if(_MainRecFile) {
        _MainRecFile.println(Text);
    }
}

//close file that you streamed data too.
void OpticalSensor::SDCloseStreaming(String fileName)
{
    _MainRecFile.close();
}

//clear entire LCD
void OpticalSensor::_LCDClearAll()
{
    _lcd.clear();
    _lcd.setCursor(0,0);
}

void OpticalSensor::_LCDWriteInTwoRows(String row1, String row2)
{
    //write first String in row1
    _lcd.print(row1);
    //set cursor to the beginning of row 2
    _lcd.setCursor(0,1);
    //write second String to row 2
    _lcd.print(row2);
}

void OpticalSensor::_DelayAndClearLCD(bool returnStatus)
{
    //if Serial or _lcd are initialized, delay for 2 seconds
    //and clear LCD
    if(Serial || _lcd) {
        delay(2000);
        if(_lcd)
            _LCDClearAll();
    }
    //terminate
    if(bool == true) {
        return;
    }
}

double& ReadFromAnalogPort()
{
    _voltage = analogRead(_analogPort);
    return _voltage;
}
And this is the .ino file where library is included:
#include <OpticalSensor.h>

OpticalSensor sensor(0);

void setup() {
  sensor.LCDInit(16,2);
  sensor.SerialInit(9600);
  sensor.SDInit();
  sensor.SDCreateFile("test1");
  sensor.SDOpenFileToStream("test1");
}

void loop() {

}
this is the error:
In file included from Test_OpticalSensorLib.ino:1:
/Users/gaspersladic/Documents/Arduino/libraries/OpticalSensor/OpticalSensor.h:34:
error: ‘Adafruit_RGBLCDShield’ does not name a type
/Users/gaspersladic/Documents/Arduino/libraries/OpticalSensor/OpticalSensor.h:35:
error: ‘File’ does not name a type
Offline
Зарегистрирован: 15.07.2015
#include <EEPROM.h>

// чтение
int EEPROM_int_read(int addr) {
  byte raw[2];
  for(byte i = 0; i < 2; i++) raw[i] = EEPROM.read(addr+i);
  int &num = (int&)raw;
  return num;
}
int cycleTimer = 0;
cycleTimer = EEPROM_int_read(0);

void setup(){
}
void loop(){
}
Уже больше часа потратил на размышление и поиск решения, почему при компиляции этого наглядного примера скетча, что выше, появляется ошибка: ‘cycleTimer’ does not name a type. Уже решил использовать EEPROM.get, но все таки хочу понять, почему в объявленную ранее переменную не может идти запись?
Вот в этом примере ошибок не возникает:
#include <EEPROM.h>

// чтение
int EEPROM_int_read(int addr) {
  byte raw[2];
  for(byte i = 0; i < 2; i++) raw[i] = EEPROM.read(addr+i);
  int &num = (int&)raw;
  return num;
}
int cycleTimer = EEPROM_int_read(0);

void setup(){
}
void loop(){
}
I’m getting a "'Serial' does not name a type" error when this program is compiled. I need for the 8 channels of voltage to be displayed. I’m sure it’s a simple fix, however I’m still learning Arduino programming. I thank you for your help.
int pin_Out_S0 = 8;
int pin_Out_S1 = 9;
int pin_Out_S2 = 10;
int pin_In_Mux1 = A0;
int Mux1_State[8] = {0};
//float Mux1_State[i] =0;
int RawValue=0;
float Voltage = 0;
void setup() {
  pinMode(pin_Out_S0, OUTPUT);
  pinMode(pin_Out_S1, OUTPUT);
  pinMode(pin_Out_S2, OUTPUT);
  pinMode(pin_In_Mux1, INPUT);
  Serial.begin(9600);
}

void loop() {
 RawValue = analogRead(pin_In_Mux1);
 Voltage = (RawValue * 5.0) / 1024; //scale the ADC
  updateMux1();
  //Serial.println(Mux1_State);
  for(int i = 0; i < 8; i ++) {
    if(i == 7) {
      Serial.println(Mux1_State[i]);
    } else {
      Serial.print(Mux1_State[i]);
      Serial.print(",");
      //vout = (value * 5.0) / 1024.0;
    }
  }
}

void updateMux1 () {
  for (int i = 0; i < 8; i++){
    digitalWrite(pin_Out_S0, HIGH && (i & B00000001));
    digitalWrite(pin_Out_S1, HIGH && (i & B00000010));
    digitalWrite(pin_Out_S2, HIGH && (i & B00000100));
    Mux1_State[i] = analogRead(pin_In_Mux1);
  }
}
Serial.print("Raw  Value = " );
Serial.print(RawValue);
asked Mar 4, 2016 at 3:45
2
Your last two lines are not in any function. This confuses the compiler. You need to move those two statements inside a function.
Because those statements refer to RawValue, I’m guessing you want to put them in loop(), where RawValue is being updated.
Also, remember that the IDE will tell you on which line the error is, which is helpful when debugging compilation errors.
answered Mar 4, 2016 at 4:01
uint128_tuint128_t
8195 silver badges14 bronze badges
Please put these lines inside the loop() function block:
Serial.print("Raw  Value = " );
Serial.print(RawValue);
Should look something like:
void loop() {
 RawValue = analogRead(pin_In_Mux1);
 Voltage = (RawValue * 5.0) / 1024; //scale the ADC
  updateMux1();
  //Serial.println(Mux1_State);
  for(int i = 0; i < 8; i ++) {
    if(i == 7) {
      Serial.println(Mux1_State[i]);
    } else {
      Serial.print(Mux1_State[i]);
      Serial.print(",");
      //vout = (value * 5.0) / 1024.0;
    }
  }
  Serial.print("Raw  Value = " );
  Serial.print(RawValue);
}
That should at least remove the first issue with your code.
Cheers!
answered Mar 4, 2016 at 21:27
Mikael PatelMikael Patel
7,9292 gold badges12 silver badges21 bronze badges
In addition to the good answers by Mikael and Uint, everything needs to be inside {curly braces} otherwise the IDE does not know where it belongs. If you didn’t want the last 2 lines in your loop segment you could put them in a separate void xxxx () section to be called when the time is right (by using an ISR with an enableinterrupt function for example).
![]()
gre_gor
1,6794 gold badges18 silver badges28 bronze badges
answered Aug 24, 2018 at 16:02
MicrokMicrok
1159 bronze badges
The Arduino software is an open-source and easy to use platform which configures the Arduino board into functioning in a certain way. An Arduino code is written in C++ but with additional functions and methods. An Arduino is a hardware and software platform widely used in electronics.
In this article, we will see a few quick fixes for the error ‘does not name a type‘ or the ‘no such file or directory‘ error.
Also read: How to stop an Arduino program?
What does the error mean?
In almost every coding language known to man, every variable has a specific data type. In general, there are multiple data types like int indicating integer, float for decimal values, char and String for alphabets and sentences, boolean for true or false and many more. In Arduino, there are 16 data types commonly used.
- void: Used in function declarations, and indicates that the function will not return anything.
- boolean: It is a true or false value.
- char: Stores a character value in one byte of the memory.
- Unsigned char: Unsigned data type which encodes numbers between 0 and 255 and occupies one byte of the memory.
- byte: It is an 8-bit unsigned number holding a value between 0 and 255.
- int: It is a primary data type which stores a 16-bit integer value. It can store negative values.
- Unsigned int: Unsigned integer that stores only positive integer values in the 2 byte memory.
- long: It is a 32-bit memory for storing numbers, both positive and negative.
- Unsigned long: Unsigned long variables store only positive numbers in the 32-bit memory storage.
- short: It is a 16-bit data type storing positive and negative numbers.
- float: It is a decimal value having a 32-bit memory.
- double: It is a double floating number having either 32 or 64 bit memory depending on the board.
- word: Based on the type of board, it stores either 16-bit or 32-bit unsigned number.
- array: It is a collection of variables which is accessible using index numbers.
- String-char array: Converts the string into an array of characters.
- String-object: Class which can be used to manipulate, concatenate and perform other operations on strings and arrays.
The error ‘does not name a type‘ or the ‘no such file or directory‘ are errors that occur during the compilation process. They generally indicate missing data types or wrongly used data types. It may also indicate missing directories or libraries.
Also read: Arduino UNO vs Arduino Mega.
Here are two ways to fix the error.
Check data type
Every user-defined function and variable initialised or declared in the code should have a corresponding data type. The data type of the variable or function should also coincide with the value being stored or returned.
Consider a small example sample code below.
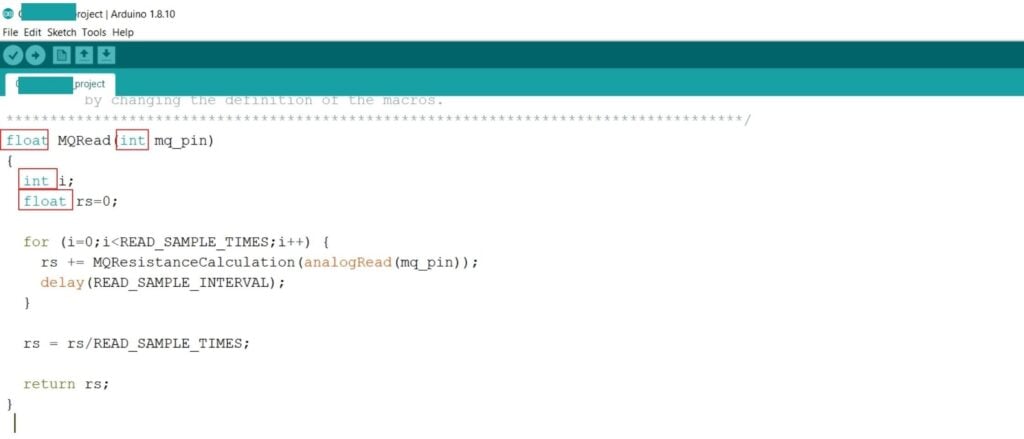
Here the function MQRead is of the type float. The variables i and mq_pin are integer type, while rs is float type. In the for loop, i is given the value 0, an integer value. The analogRead function always reads an integer value, which is being assigned to the mq_pin variable. Since the value or type for rs, the float type suffices for any value assigned to it as a result of the calculation. The user-defined function MQRead is of type float, which means that the return type for it is float, which is achieved by returning the value of rs for the function.
The error occurs if any of these data types don’t stand to the data being stored in the variables. Always check and recheck the data type for every variable, function and return type.
Library folder
In many cases, you may use libraries that are not standard or included in Arduino. But Arduino is flexible with the import of new libraries, making it easy to use all functions from any library. Follow the path below to check the currently available libraries in your Arduino software.
My Documents -> Arduino -> Libraries
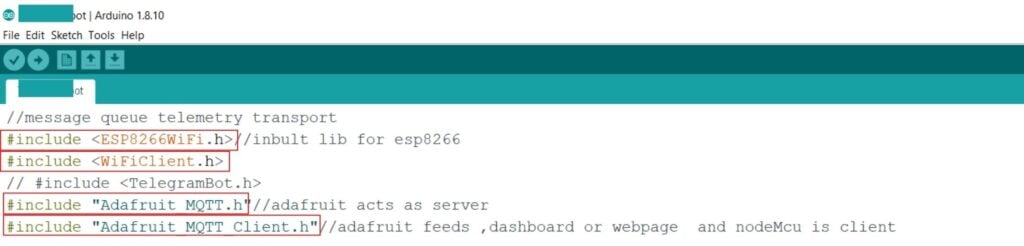
Consider the snippet of code below. There are four library folders that are included for the code to work. But these aren’t a part of the standard library of Arduino.
There are two ways to import a library to the Arduino.
Method 1
Step 1: Click on Sketch on the top left panel of the window. Go to the include Library option and select Manage Libraries.
Keyboard Shortcut: Ctrl+Shift+I.
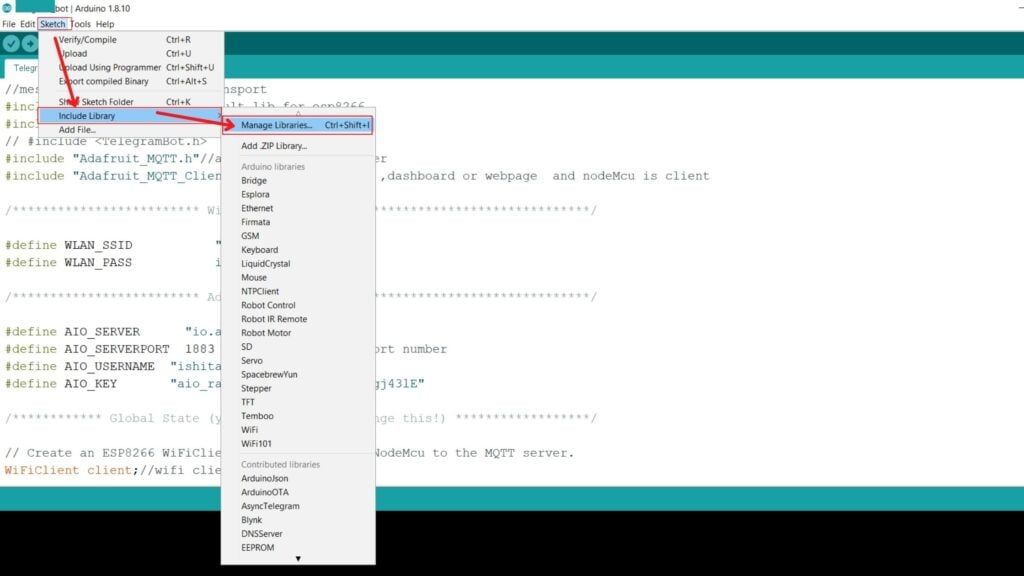
Step 2: Search or select from the options available and click on Install.
Note that a few Libraries may not be available if your software isn’t updated with the latest version.

All the libraries you are planning to use may not be easily found under the Manage Libraries section. In such cases, we use Method 2 for importing the libraries.
Method 2
Step 1: Download a zip file for the library from GitHub or any other reliable source present online.
Step 2: Click on Sketch on the top left panel of the window. Go to the include Library option and select Add ZIP Library.
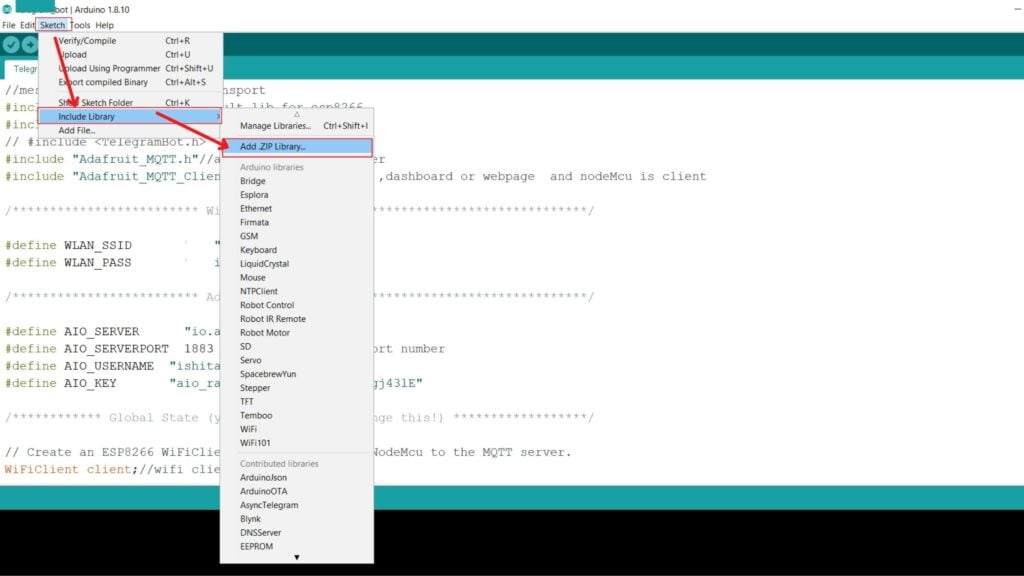
Step 3: Set the file type to be ZIP files and folders.
Step 4: Go to the download location of the zip file and select it. Click on Open.
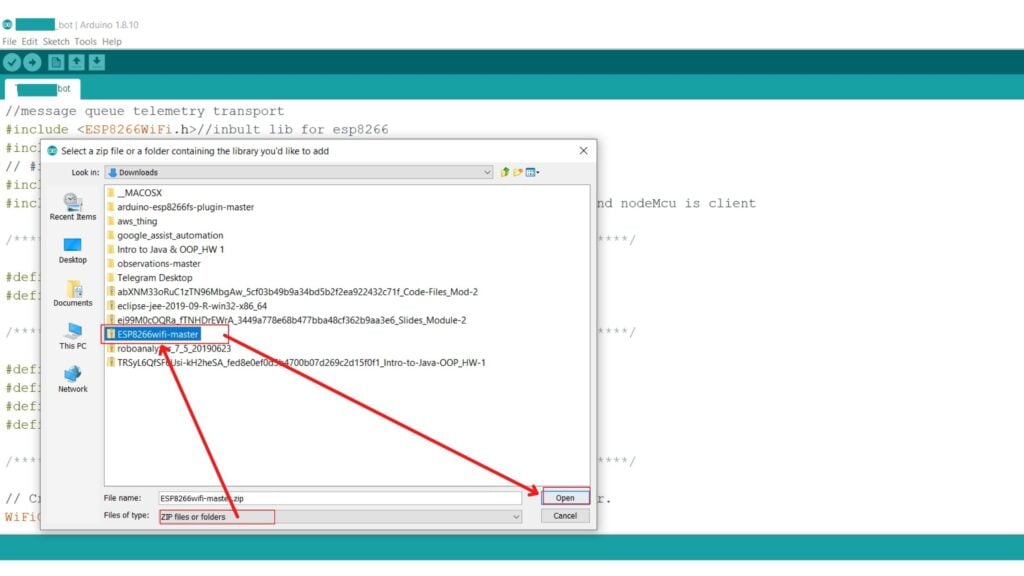
The library is successfully added to the Arduino software now.
Also read: NodeMCU vs Arduino vs Raspberry Pi.
Loading