Содержание
- ПК ребутается в некоторых играх
- Инициализирован отчет об ошибке iommu windows 10
- X1 Carbon 7 (X1C7): HAL error, event ID 16: The iommu fault reporting has been initialized
- Re:X1 Carbon 7 (X1C7): HAL error, event ID 16: The iommu fault reporting has been initialized
- Re:X1 Carbon 7 (X1C7): HAL error, event ID 16: The iommu fault reporting has been initialized
- Re:X1 Carbon 7 (X1C7): HAL error, event ID 16: The iommu fault reporting has been initialized
- Re:X1 Carbon 7 (X1C7): HAL error, event ID 16: The iommu fault reporting has been initialized
- Re:X1 Carbon 7 (X1C7): HAL error, event ID 16: The iommu fault reporting has been initialized
- Re:X1 Carbon 7 (X1C7): HAL error, event ID 16: The iommu fault reporting has been initialized
- Community Guidelines
- Check out current deals!
- Most Popular Posts
- Welcome to Ideation!
- Проблемы с включением IOMMU
- Как IOMMU работает для связи ЦП и периферийных устройств
- Где находится IOMMU?
- В чем его полезность?
- Использование IOMMU в виртуализированных системах
- Ошибка iommu windows 10
- Проверьте, включен ли VT-D / IOMMU в BIOS/UEFI
- 3 ответа
- Похожие вопросы:
ПК ребутается в некоторых играх
05 Jun 2022 в 01:59

05 Jun 2022 в 01:59 #1
Приветствую работяги!
Подскажите, вдруг кто сталкивался или знает как решить:
Мой пк:
Ryzen 7 3700x
2070 Super
24 RAM
Power supply 700+
Predator: Hunting Grounds(перезагрузка стабильно раз в 2 матча), RUST(перезагрузка где то через 1-2 минуты после захода на сервер), Necromunda:Hired Gun(перезагрузилась 1 раз за 20 часов игры), Biomutant(перезагрузилась пару раз за 10 часов игры)
Почитав в интернете нашел что это нечто связанное с производительностью вирутальной машины, хотя я ее не юзаю.
Думаю еще сделать стресс тест видуху и проца, чтобы наверняка
На этом больше ничего не пробовал. Находил в сети информацию что подобное может быть из за каких то проблем с напряжением, то есть например во время обработки данных условная видеокарта запрашивает большее напряжение чем ей разрешено использовать или типа того. Думал что возможно проблема с процом или видюхой, но чето маловероятно ибо в каких то играх все работает как часы, а в некоторых оно все падает.
Кто то советовал сделать андер волтаж проца, чтобы снизить пиковые частоты работы ЦПУ, но чет идея сомнительная ибо работает только турбобустинг, да и работает он при всех приложениях, так что будь проблем в этом, то он бы отрубался постоянно.
Источник
Инициализирован отчет об ошибке iommu windows 10

![]()
United States of America
![]()
X1 Carbon 7 (X1C7): HAL error, event ID 16: The iommu fault reporting has been initialized
Within the last two weeks, with the latest updates from Microsoft and Lenovo, My X1C7 often suddenly halts with the following error in Event Logs
Date: 2020-10-27 15:19:51
Task Category: None@Level: Information
Description: The iommu fault reporting has been initialized.
When X1C7 halted, the keyboard stopped responding to any keying, and the display stopped where it was right before the halt.
Windows 10 Pro, 10.0.19041 Built 19041 with the latest updates on 2020-10-27 (today’s issue: 2020-10-27 15:19:51)
X1C7 Model: 20R10015US
BIOS: NET2QET33W (1.27), 2020-10-08
SMBIOS: 3.2
Embedded Controller Version: 1.14
Hardware Abstraction Layer: 10.0.19041.488
![]()
United States of America
![]()
Re:X1 Carbon 7 (X1C7): HAL error, event ID 16: The iommu fault reporting has been initialized
I am getting the same error on X1E gen 1. My computer crashes randomly, ane each crash is preceded by HAL error, event ID 16. From what I understood from searching on the internet it may be related to memory failure, however when I contacted Lenovo support they told me that it is a software issue. I will see if the issue persists and report my findings. I could not find much about on the internet so it may be a very elusive problem. It seems to be a new problem, so maybe it is caused by some Windows update.
![]()
United States of America
![]()
Re:X1 Carbon 7 (X1C7): HAL error, event ID 16: The iommu fault reporting has been initialized
Maybe this issue is caused by BIOS update NET2QET33W (1.27), 2020-10-08, which has been recently removed from Lenovo website.
![]()
United States of America
![]()
Re:X1 Carbon 7 (X1C7): HAL error, event ID 16: The iommu fault reporting has been initialized
![]()
United States of America
![]()
Re:X1 Carbon 7 (X1C7): HAL error, event ID 16: The iommu fault reporting has been initialized
My X1C7 encounters this issue everyday 🙁
![]()
United States of America
![]()
Re:X1 Carbon 7 (X1C7): HAL error, event ID 16: The iommu fault reporting has been initialized
![]()
United States of America
![]()
Re:X1 Carbon 7 (X1C7): HAL error, event ID 16: The iommu fault reporting has been initialized
Yesterday, after updating Intel Wireless Bluetooth driver 22.10.0.2 via Intel Driver & Support Assistant, I tried to use my Bluetooth mouse, which is Microsoft Modern Mobile Mouse, again, and the issue happened after about 1-2 hours of use.
Please review our Guidelines before posting.
Check out current deals!
Most Popular Posts
Please log in to ‘Like’ this post
Welcome to Ideation!
Ideation sections have been created for customers to engage with us by discussing and promoting ideas and improvements relating to Lenovo’s products and services.
As a reminder, your participation in Ideation is governed by Lenovo’s website Terms of Use and by Lenovo’s Forums Community Guidelines. Additional terms governing the Ideation Program are included in the Ideation Terms and may be found here. For your convenience, here’s a
Quick summary of the highlights:
By clicking on “Yes” below you certify that you have read and agree to the Community Guidelines and the Ideation Terms, and acknowledge that by submitting any ideas, material, or information on the Ideation site you grant Lenovo the right to use any such submissions by you in any way without acknowledging, notifying, or compensating you, as described in those documents.
Источник
Сап, лорчан. Имею мать GA-990FXA-D3, rev 1.2. Биосе присутствуют пункты Virtualization и IOMMU, оба включены. Тем не менее, в dmesg всё время
Написал в саппорт Gigabyte:
Здравствуйте! Год назад приобрел эту материнскую плату, вот возникла проблема: вне зависимости от включенностивыключенности IOMMU в BIOS система просит включить в Биосе поддержку iommu. Проверялось на Gentoo
На что получил ответ:
Благодарим Вас за использование нашей продукции и за обращение в службу технической поддержки GIGABYTE TECHNOLOGY.
Материнские платы компании Gigabyte проходят соответствующую сертификацию на предмет совместимости с операционными системами компании Microsoft (сертификат Windows Hardware Quality Labs/WHQL), так же информацию о совместимости Вы можете найти на сайте Microsoft: http://www.microsoft.com/windows/compatibility/windows-7/en-us/Search.aspx?l=. Вся продукция компании Gigabyte, все программное обеспечение разрабатывается и тестируется только под операционные системы компании Microsoft. В разделе «Спецификации» или «Описание», к любой модели материнской платы есть пункт, в котором указаны поддерживаемые операционные системы, в Вашем случае это Microsoft Windows 7/Vista/XP.
Так же, на сайте отмечено, что: «Из-за особенностей осуществления поддержки семейства ОС Linux со стороны производителей системной логики, пожалуйста, обратитесь за драйверами для Linux на сайты разработчиков.»
Таким образом, мы не можем гарантировать какую-либо стабильную работу компьютера при использовании операционных систем Linux.
С Уважением и Наилучшими пожеланиями, GIGABYTE TECHNOLOGY
Они, блин, совсем там упоролись? Слов нет просто.
Источник
Как IOMMU работает для связи ЦП и периферийных устройств

Как периферийные устройства взаимодействуют с процессором? Использование ОЗУ системы в качестве общей точки для взаимной связи, но это подразумевает ряд механизмов, наиболее важным из которых является тот, который мы собираемся описать ниже.
Где находится IOMMU?

Как видно на схеме выше, периферийные устройства подключены к южному мосту или южному мосту, который, в свою очередь, подключен к северному мосту, который является концентратором, с которым, в основном, обмениваются данными интерфейс оперативной памяти и процессора. каждый. Что ж, IOMMU расположен внутри южного моста, где сосредоточены все интерфейсы ввода-вывода, такие как USB, PCI Express, SATA и т. Д.
Все эти интерфейсы должны находиться под управлением IOMMU для доступа к системной RAM. В этом случае IOMMU действует как своего рода пограничный контроль, который следит за тем, чтобы периферийные устройства не осуществляли незаконный доступ к памяти и не обращаются к той части ОЗУ, которая назначена каждому из них и никуда больше.
Таким образом, IOMMU действует как MMU, но для периферийных устройств ввода-вывода.
В чем его полезность?

Периферийные устройства ввода-вывода не используют MMU (блок управления памятью) совместно с ЦП и, следовательно, не просматривают память так же, как центральный системный процессор. Эта проблема позволяет периферийным устройствам получать доступ к чувствительным частям системной памяти, например тем, которые зарезервированы для функций самой операционной системы, что является проблемой в многозадачных средах.
С другой стороны, IOMMU автоматически и динамически назначает адреса памяти для связи с различными периферийными устройствами, таким образом, ЦП всегда знает, на какие адреса памяти он должен указывать для связи с ними.

В более старых системах IOMMU не было доступно, и вместе с ними была предоставлена карта памяти, где программисты были проинформированы, какие адреса RAM предназначены для связи с устройствами. По этой причине разработчикам в каждой отдельной архитектуре приходилось изучать адресацию памяти, чтобы использовать периферийные устройства и другое поддерживающее оборудование в системе.
Сегодня это уже не так, и наличие IOMMU позволяет разработчикам избавиться от необходимости изучать адреса памяти для связи и расширяет возможности конфигурации и настройки наших ПК, позволяя создавать совершенно разные конфигурации.
Использование IOMMU в виртуализированных системах

IOMMU обеспечивает безопасный доступ к физическим устройствам в виртуализированных средах посредством того, что мы называем сквозной передачей устройств. Тандем между MMU и IOMMU позволяет устройствам, подключенным к ПК, появляться в пространстве виртуальной памяти, которое выполняет функцию физической памяти для виртуальной среды, которая работает в данный момент.
Без IOMMU виртуализированные среды, которые имеют правильный доступ к оборудованию, установленному в системе, были бы невозможны, поэтому сегодня он является незаменимой частью всех процессоров, которым приходится обрабатывать виртуализированные среды.
Источник
Ошибка iommu windows 10
Проверьте, включен ли VT-D / IOMMU в BIOS/UEFI
Чтобы проверить, если корпорации Intel VT-X или AMD от AMD-V включена в BIOS/UEFI, я использую:
Я не мог найти способ проверить, включены ли Intel VT-D или AMD IOMMU в BIOS/UEFI.
3 ответа
При установке Intel HAXM у меня возникает следующая ошибка: Этот компьютер соответствует требованиям для HAXM, но технология виртуализации Intel (VT-x) не включена. HAXM не может быть установлен до тех пор, пока не будет включен VT-x. Итак, я проверил, что мой BiOS, VT-x поддерживается, и включил…
Я видел много сообщений, похожих на мою проблему, и хотя я пытался сделать те же шаги, это все равно не сработало. Intel Core i7 — 2670QM CPU @ 2.20GHz Windows 10 Мне нужно создать эмулятор для Android Studio, чтобы протестировать мои приложения, но он не работает, он говорит, что мне нужен Intel…
Если VT-d включен, то Linux настроит переназначение DMA во время boot. Самый простой способ найти это-поискать в dmesg DMAR записи. Если вы не видите ошибок, то VT-d включен.
Еще один пример с x2apic opt out:
В системе с отключенным VT-d вы либо увидите сообщение об ошибке, либо вообще ничего.
Я просто нашел другой способ, который, кажется, работает, даже если параметры iommu kernel не были установлены:
Основываясь на ответе Джо-Эрленда Шинстада:
Если CPU включен, вы должны увидеть что-то вроде:
В противном случае вы можете увидеть что-то вроде:
Я хочу использовать эмулятор Android, такой как Nox или Bluestacks, чтобы играть в мобильный PUBG на PC. Я знаю, что включение виртуализации в BIOS делает производительность намного, намного лучше. У меня НР примета рабочего стола (RX580 4 Гб, 7-го поколения процессор i5, 12 ГБ памяти DDR4, 128 ГБ…
Похожие вопросы:
Как я могу сказать, есть ли у конкретной машины SecureBoot/UEFI в качестве опции в BIOS, кроме загрузки в BIOS и визуального осмотра ее? Есть ли способ увидеть эту информацию в Windows, даже если…
Мои знания bios довольно низки, но каждый раз, когда я читаю некоторые документы о UEFI, я не понимаю, почему фаза SEC является корнем доверия к процедурам UEFI bios. Фаза SEC выполняет проверку…
Не удалось установить intel HAXM вместо того, что VT включен в BIOS. Я использую процессор intel core2 quad q9550 и windows 7 поверх него. Мой процессор не поддерживает гипер-визор.
При установке Intel HAXM у меня возникает следующая ошибка: Этот компьютер соответствует требованиям для HAXM, но технология виртуализации Intel (VT-x) не включена. HAXM не может быть установлен до…
Я видел много сообщений, похожих на мою проблему, и хотя я пытался сделать те же шаги, это все равно не сработало. Intel Core i7 — 2670QM CPU @ 2.20GHz Windows 10 Мне нужно создать эмулятор для…
Я хочу использовать эмулятор Android, такой как Nox или Bluestacks, чтобы играть в мобильный PUBG на PC. Я знаю, что включение виртуализации в BIOS делает производительность намного, намного лучше….
Id хотел бы прочитать/изменить некоторые настройки меню BIOS/UEFI с помощью скрипта uefi shell. Например, Id хотел бы изменить настройку ’CSM Support’ (Enabled/Disabled). Есть ли какой — нибудь…
Я понимаю, что если устройство PCI хочет сделать DMA RW, а IOMMU включено, драйвер должен сопоставить CPU PA с адресом DMA через pci_map_page(для некогерентного), то устройство PCI может…
Источник
You will find solutions to HAL_IOMMU_INTERNAL_ERROR Blue Screen of Death error in Windows 10 here. This BSOD issue having bugcheck value 0x000001D9 leads the desktop to freeze and hang. Frequent Reboot of PC also occurs when this stop error appears.
HAL IOMMU INTERNAL ERROR in Windows 10 mostly happens because of corrupt, old and incompatible device drivers. Conflicts between similar applications and malware infection are also the main reasons for this BSOD. Furthermore, if the system runs with memory problems, low disk space, problematic areas in HDD, corrupted Windows Image files it can face the error. In the below section, we will be discussing some effective and proven workarounds that can potentially help to resolve HAL_IOMMU_INTERNAL_ERROR BSOD in Windows 10. See the list of workarounds first –
Here is how to fix HAL_IOMMU_INTERNAL_ERROR BSOD in Windows 10 –
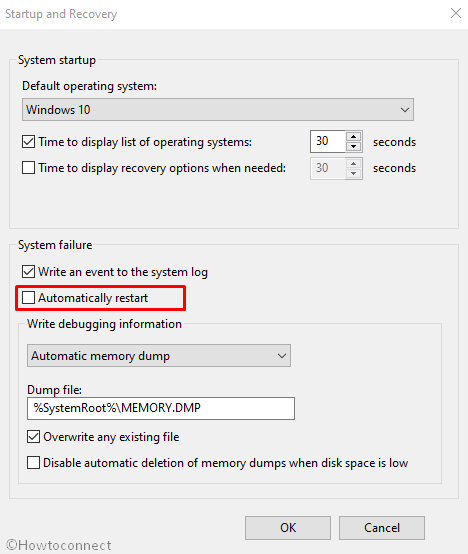
1] Disable Automatic Restart
With a confirmed HAL_IOMMU_INTERNAL_ERROR BSOD, Windows PC will have a tendency to perform Automatic restarting. This will be the most annoying problem you could ever come across. Unless this gets a fix, you cannot deploy other resolutions as well. Therefore, this solution comes at the top of the priority. Disabling the Automatic Restarting is not a complex job and you can proceed in the below steps –
Step-1: Navigate to the Desktop area after saving the running programs. Use Win+D hotkey press together and head to the place immediately.
Step-2: Right click on This PC icon. Choose Properties option from there to allow opening the System window.
Step-3: When it is visible on the screen, select Advanced system settings from the left side of the window.
Step-4: As the System Properties wizard appears, click on Advanced tab.
Step-5: Scroll a little down in the tab and reach Startup and Recovery section. When you see the Settings option here, hit it straightway.
Step-6: After a new wizard appears, go to its System failure part and uncheck the box for “Automatically restart”
Step-7: Lastly, select the Ok to save these changes.
Now windows will not go for rebooting automatically. Hence, there will be enough opportunity for you to deploy the upcoming resolutions and resolve the issue accordingly.
2] Resolve all the Memory problems including poor areas in RAM
Windows can suffer from memory issue due to wrong allocation of it and the presence of poor segments in the RAM. With these sorts of problems in the Windows, BSOD errors like HAL_IOMMU_INTERNAL_ERROR commonly occur. Luckily, we have the Windows Memory Diagnostic to deal with these troubles and fix the errors. Let’s proceed to the handy utility in the below process –
- Press Windows and S keys and invoke Taskbar Search.
- In the empty text box located here, type “Memory” and wait for results to load finally.
- Select Windows Memory Diagnostic Desktop app from the results to proceed.
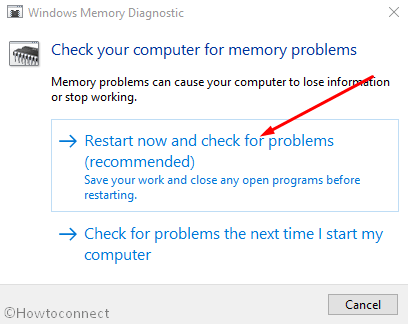
- Select the option “Restart now and check for problems (recommended)”.
- Then windows will prepare for the first cycle of rebooting.
- Subsequently, you will find blue screen upfront detecting memory issues with the rate of progress in percentage.
- When the info shows 100%, windows will Restart for the second time.
- Finally, you can check the diagnosis report in the Notification area of the System Tray.

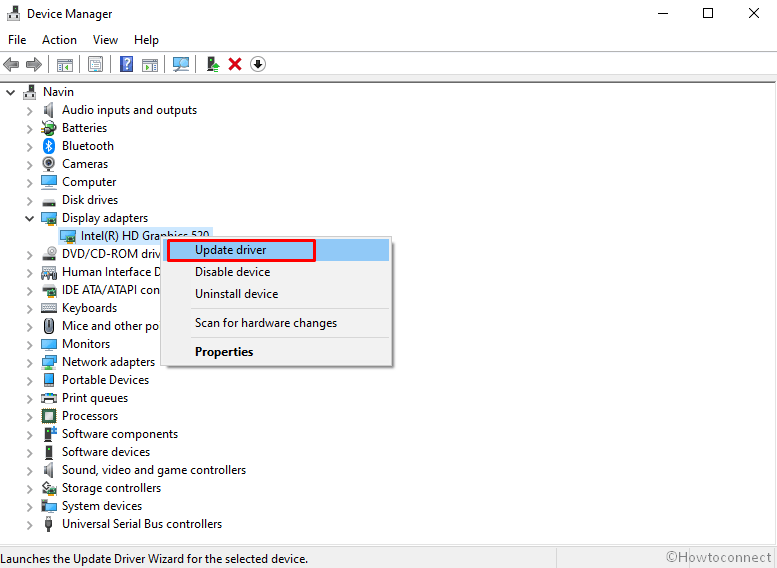
3] Update Drivers to fix HAL_IOMMU_INTERNAL_ERROR BSOD
HAL_IOMMU_INTERNAL_ERROR BSOD is the result of outdated and corrupt device drivers mostly. Every time we come across a critical issue, they play a greater role there. We really should not allow such a driver on the computer which is old and defective. The Windows Device Manager is a top-notch app in this regard and it shows them with a yellow accent if needs to be updated. To accomplish the workaround, move with below steps –
- Right click on Start menu and choose Run to invoke the window.
- In the text box provided here, write devmgmt.msc and eventually hit Enter key.
- Device Manager will hit on display and you have to watch closely in the console for any exclamation marks in the device’s list.
- Prior to expanding the device, right click on the drivers having Yellow warning icon on it.
- Select Update driver option and follow the other guidelines coming to display until these all get updated.
4] Detect the Malware in Full System and dismiss them using Windows Security
All over the web, Malware is present and often it exists in disguise. You can be easy prey to them after making a visit to a website or clicking link coming in emails. Sometimes inserting a USB can also be risky. Once they get entrance to the system, cause the necessary files to be removed or infected. As a result, many issues come up including HAL_IOMMU_INTERNAL_ERROR. You can avoid this malignant consequence by making regular scanning in Windows security. The default tool can also dismiss all the threats in the most effective way. Follow the below guidelines to complete the task –
- Click on Show hidden icon arrow from the right side of the taskbar.
- Select Shield icon from there and let the system open Windows Security app.
- Moving on to the App, select Virus & threat protection option.
- Now, click on Scan options link to reveal available methods.
- Check the radio button allocated for Full scan and then select Scan now option.
- After the detection gets over, you will be shown a result. If there is any malware present, hit Clean threats option located here.
- Go to the next page, among three options, select Remove first and then Start actions to dismiss all these viruses.

5] Load the Basic Programs only by Booting Device in Safe Mode
In all critical times, Booting in the Safe Mode came out as savior in Windows 10 including previous versions. In this startup procedure, the device starts with only the basic processes and hence, the problems get resolved immediately. Let’s give this renowned utility an attempt following below instructions –
Step#-1: Invoke Run dialog by pressing Win+R hotkeys together.
Step#-2: In the provided typing box, write msconfig using the keyboard and select System Configuration Desktop app once visible.
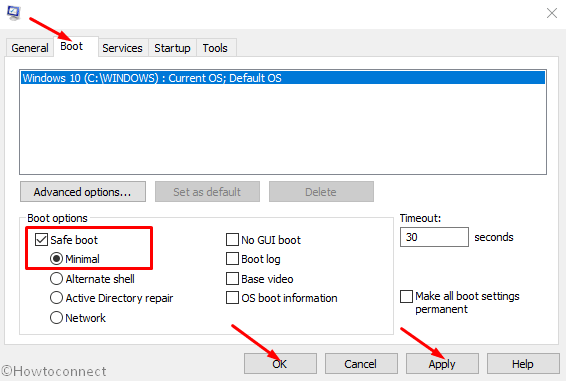
Step#-3: In the App UI, jump to Boot tab and straightway get at its second half.
Step#-4: Here, you can see the Boot options area. Now, check the box before Safe Boot and activate all the grayed out options.
Step#-5: Hit the radio button before Minimal option and proceed forward.
Step#-6: Select Apply button first and then Ok to save these changes.
Step#-7: Get inside of the Safe Mode on the further move.

6] Use Windows Blue Screen Troubleshooter to solve HAL_IOMMU_INTERNAL_ERROR
Since HAL IOMMU INTERNAL ERROR causes serious damages to the system, Microsoft technicians came up with a built-in tool for resolving this issue effectively. The utility named Blue Screen Troubleshooter and it is accessible through the settings app. Proceed with the below instructions to deploy the tool –
- Open Windows Settings app by pressing Win+I hotkeys altogether.
- From the app UI, head to Update & Security tile and eventually click on it.
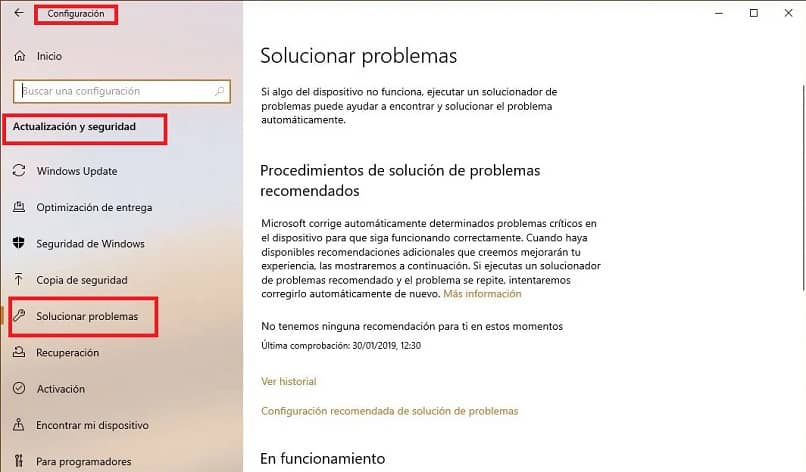
- When the page loads completely, choose Troubleshoot located in the left pane, and jump on the adjacent side.
- Reach out to Blue Screen there and expand it by clicking.
- Hit Run the Troubleshooter option from the extended pane.
The utility will now detect and fix all the Stop errors. In the end, there should not be any HAL_IOMMU_INTERNAL_ERROR in the system.
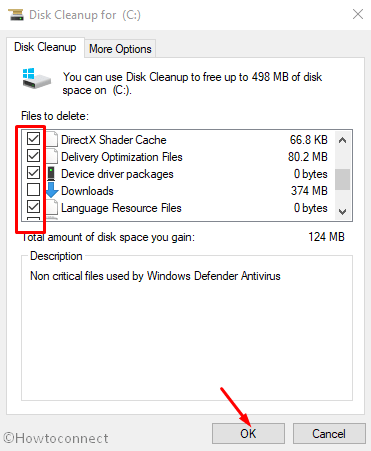
7] Delete the temporary and junk files from storage and make more space in it
Temporary files as stored in the Hard Disk, once grow bigger will occupy huge space in it. The ultimate result is, the storage runs in low space and operation gets slow down. In the process, HAL_IOMMU_INTERNAL_ERROR also hitched up. Using Disk Cleanup tool can be thoroughly beneficial to delete the junks in one platform. Here is how to proceed –
- Open Run dialog box.
- In the search box provided, type cleanmgr and press Enter from keyboard.
- A small popup window will float in and ask you to choose preferable Drive to run a cleanup. Select C: by doing a click on dropdown menu and then press Enter.
- Disk Cleanup Utility will come ahead slowly after calculating the space it can make free from the drive.
- When the wizard appears, come down to the bottom and click on Clean up system files.
- Once again, that small popup window will appear asking for the desired drive. Choose C: like before and press Enter key.
- When Disk Cleanup for C: comes ahead, reach Files to delete area.
- Check all the boxes available here and keep Downloads as it was.
- Hit Ok button and let the Cleanup start.
- Wait until this process ends automatically as this might take several minutes.
8] Disconnect external Hard drives to fix HAL_IOMMU_INTERNAL_ERROR
Some people come across HAL_IOMMU_INTERNAL_ERROR BSOD when an additional Hard Drive joins the system. Good news folks, Issue resolved easily as well just after disconnecting the external USB or other peripheral only. Follow the below guidelines and give a momentarily pause by disconnecting –
- Isolate all the Hardware accessories including the External HDD.
- Keep them at a separate and safe location to avoid damage.
- Now, restart the windows in the usual method.
- After completing the rebooting when you can see Desktop, make a check for the error.
- If resolved properly, start connecting them one after another.
- At this moment after connecting all, launch the web browser from windows.
- Visit Maker’s Webpage for each and Download the Latest drivers.
- Install the drivers in windows to use easily.
9] Settle up the bad areas present in Hard Disk
Prolonged use causes to form problematic areas inside a Disk Drive. When this happens, the system runs in various problems including HAL_IOMMU_INTERNAL_ERROR. The Disk Checking Utility comes handy to resolve these sectors automatically. See the method in detail –
- Press Win+S to call in Taskbar search and type cmd.exe. When Command Prompt appears in the result, right click on it.
- Choose “Run as Administrator” and also select “Yes” Once UAC prompts for your consent.
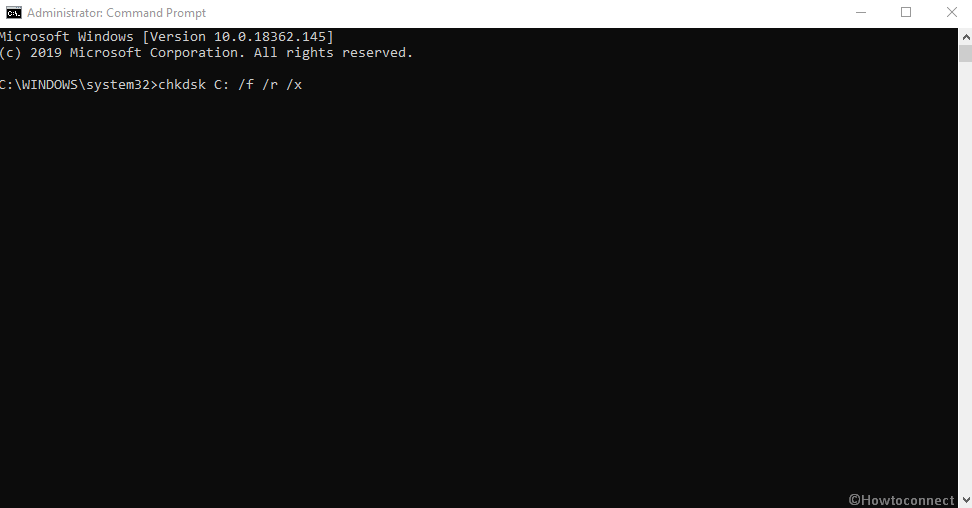
- In the Black Elevated Prompt, type following syntax and parameters –
chkdsk C: /f /r /x
- Press the Enter button when you have finished typing. This process will take a little longer as we have added three more notations instead of chkdsk only which would show disk status only.
- After the task is finished, Restart the device and upon coming back to operation, check if there is an error present.

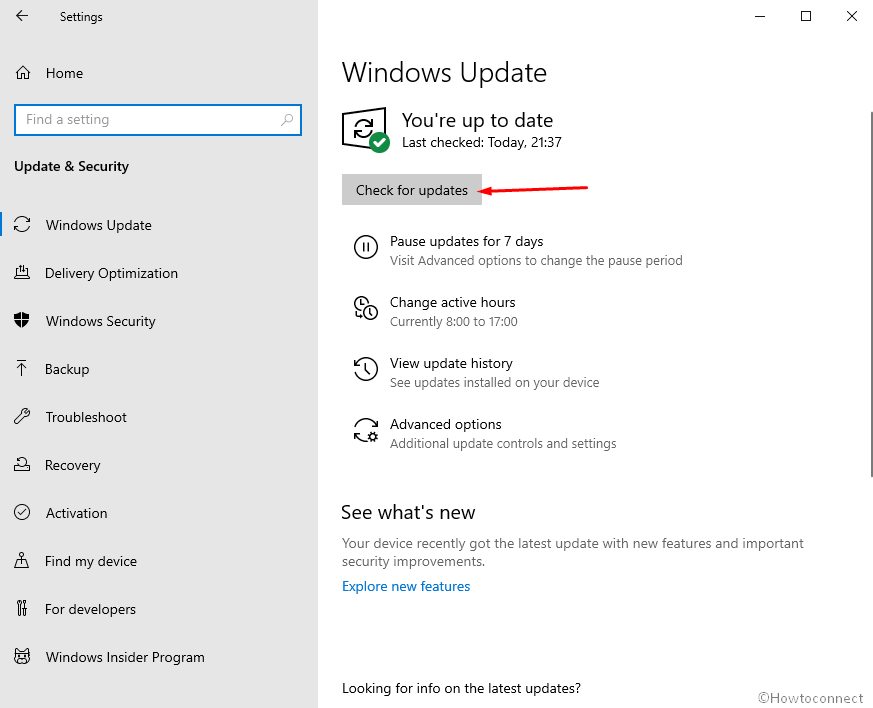
10] Install available Update Patches to solve HAL IOMMU INTERNAL ERROR
Any update patch contains fixing of existing bugs, quality improvements, the introduction of latest features. Installing these will give the OS a big blow and strength to fight vulnerabilities like HAL IOMMU INTERNAL ERROR. An Outdated Windows 10 is prone to get affected always. Follow the below guidelines to install them –
- Manage to Load the Settings page of Update & Security as shown in the above workaround.
- Select Windows Update available in the left pane.
- Navigating to the corresponding right, click on Check for updates link ignoring “You’re up to date” dialogue.
- Upon finishing the downloading, click on Install.
- Reboot the Windows once asked and update the OS.
11] Uninstall similar programs to eliminate conflicts
Having the same applications often become risky they tend to collide with one another. Meanwhile, the necessary OS files get eradicated and HAL_IOMMU_INTERNAL_ERROR evolves. In these cases, uninstalling comes ahead first. When we remove one of these, the action reduces the risk of collision between them. Follow the below guidelines to uninstall an App –
- Access Windows Settings app using any convenient method stated above.
- When on the Home page, roll the cursor to Apps and click on it eventually.
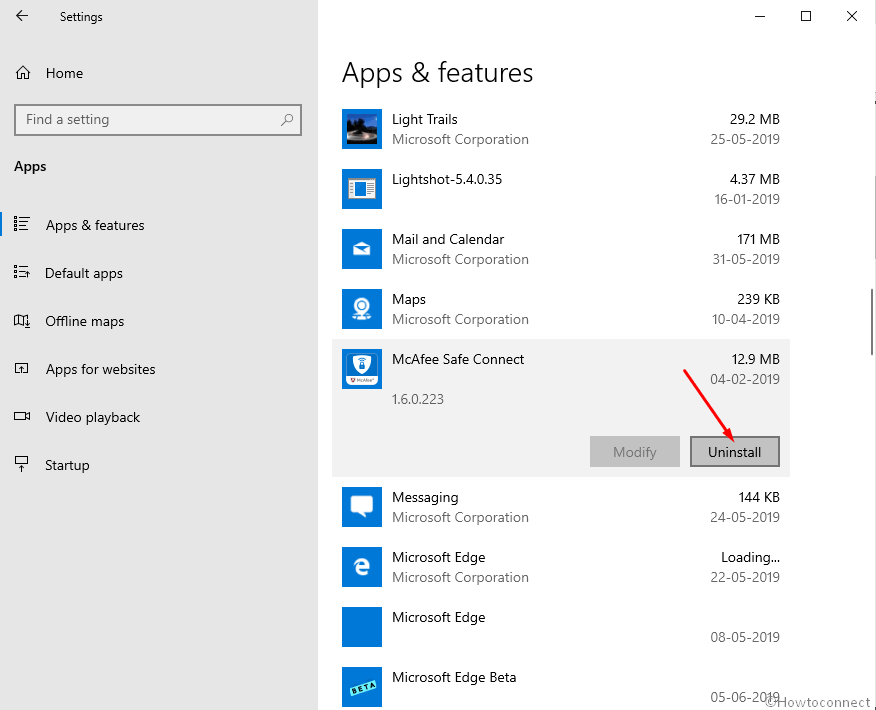
- On the next page after appears, choose Apps & features on the left wing and shift to the right.
- Once all the Apps be visible, reach out to applications colliding with each other.
- Select each and hit Uninstall option from the expanded pane.
- If User Account Control prompts for authentication, select Yes to proceed.
- Follow the on-screen guidelines until finally removed.
- Restart the device and once powers up next, do check for the error in the system.
- If resolved, you can Launch Microsoft Store and Download the deleted app again.
12] Undo recent changes by System Restore
Performing a System Restore directs you back to the state where you were. We often install an app or uninstall some for the necessity of work. These actions leave marks in Windows Registry and when they go wrong, HAL IOMMU INTERNAL ERROR is imminent. Therefore, to Undo these changes, perform the below tasks –
- Open the Taskbar search (commonly Win+S) using any of the above instructions.
- Type rstrui in the text area and hit the Enter button.
- Once the System Restore Wizard appears on the screen, select Next.
- From the consequent page, click on Show more restore points and reveal all the points you have created beforehand.
- Choose the last one in the list and click on Next.
- After the following page cuts your view, click Finish.
13] Recover missing DLL files and corrupted resources using System File Checker
So many vulnerabilities occur in Windows 10 and sometimes in worst extent, system resources are erased. In the same way, DLL files often go missing. When these cases happen, HAL_IOMMU_INTERNAL_ERROR BSOD comes in. System File Checker comes handy to fix these components once executed in the Elevated Command Prompt. To access the utility, follow the below instructions –
- Open the Taskbar search by pressing on Win+S keys.
- In the search box given here, type cmd.exe and select Run as administrator from the right flyout.
- After User Account Control asks for your consent, provide approval by choosing Yes.
- On the Black Elevated Command Prompt window, type underneath code and hit Enter key –
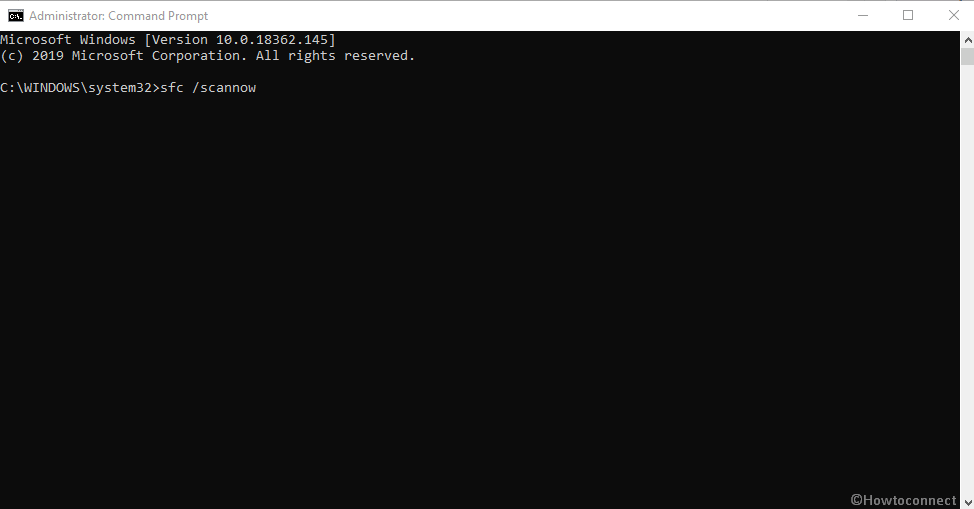
sfc /scannow
- System File Checker will be activated and start detecting file corruption and missing DLL ones. Fixing will also start automatically.
- Though this process is a little time-consuming, do not terminate abnormally and let it end by itself. After all these files are okay, there should not be any.
14] Uninstall the troublesome Windows Update
Sometimes Windows update creates the Blue screen HAL IOMMU INTERNAL ERROR. Uninstalling the files will be enough as to resolve the issue or prevent it. To complete the task, move with the following guidelines –
- Press Windows key.
- Once Start menu becomes visible on display, choose Gear cog.
- From App UI, move ahead to Update & Security and click on it.
- From the following page after loaded, select Windows Update and shift to the corresponding side.
- Click on View update history link.
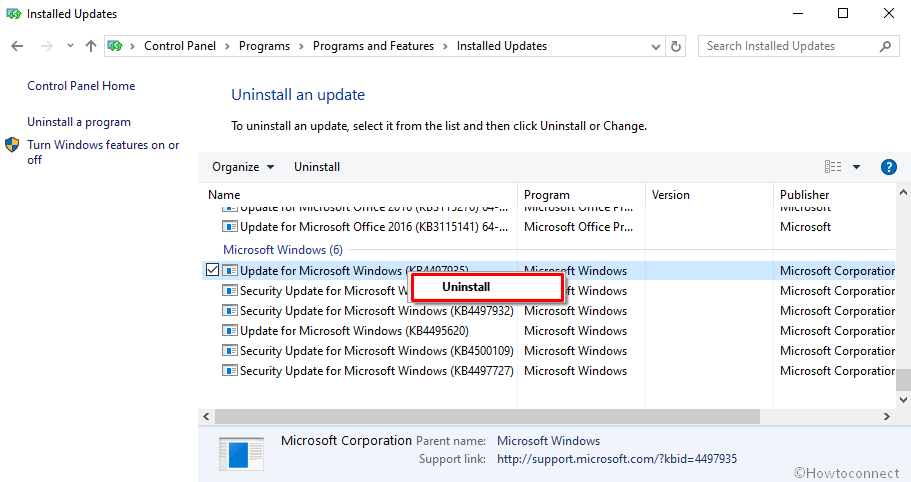
- Select Uninstall updates and let a window unroll from Control Panel.
- Reach the last received patch and do a right click on it.
- Select Uninstall and follow on-screen instructions until they get removed completely.
15] Remove all the Third Party Anti-Virus Programs
In virus issues, you might have used a free anti-virus solution as a safeguard. This is okay until Windows Security arrives. Since the tool is the default for Windows 10 and also very effective, there is no need of using a third party program in this regard. Moreover, most of these programs, due to conflict, often cause HAL_IOMMU_INTERNAL_ERROR BSOD. Therefore, if you have such applications, uninstall using the following guidelines –
- Type appwiz.cpl in the Windows search and Enter
- Select Third Party Anti-virus app in the list.
- Hit Uninstall option visible at the top ribbon.
- Next steps will be as shown in the display until it gets uninstalled completely.

16] Run the DISM tool in Command Prompt for fixing defective Windows image files
When Windows Image files fall into corruption, it might cause HAL_IOMMU_INTERNAL_ERROR. As a fix, DISM tool will be the best-suited utility. Here is the procedure –
- Rght click on Taskbar and select Task Manager from the appearing menu.
- From the app once loaded fully, select File located at the top left corner.
- Choose Run new task when seen and let Run dialog appear.
- In the empty writing field, cmd and move down later on.
- Mark the checkbox below the Open saying “Create this task with administrative privileges”.
- After Pressing Enter key, you will be straightaway guided to Elevated Command Prompt.
- At the black window, type following command where a cursor winks –
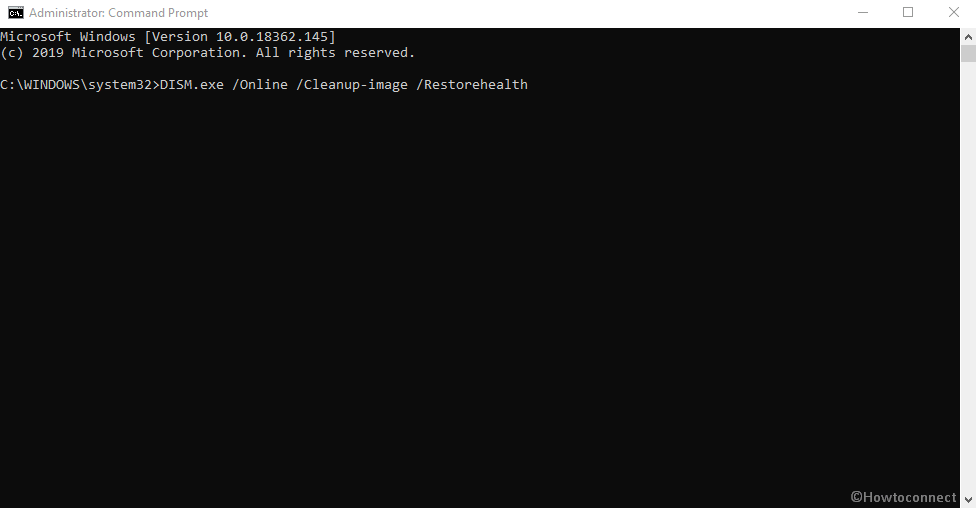
DISM.exe /Online /Cleanup-image /Restorehealth
- Hit Enter key and let the Tool fix corrupt Windows image files. The process may be lengthy, wait until it gets over automatically.
- When ends, Restart the windows and after coming back to operation, check if the error resolved.
Till this point, we have elaborated almost all the effective resolutions hoping to resolve HAL IOMMU INTERNAL ERROR in Windows 10. Hopefully, the issue is no more prevalent in your system and you are working smoothly. If the issue still persists, we can suggest only the last resort – Reinstalling Windows 10. This will be the ultimate solution to all the existing problems and if done accurately, no issue will be evolving next.
Methods:
1] Disable Automatic Restart
2] Resolve all the Memory problems
3] Update Drivers
4] Detect the Malware in Full System
5] Load the Basic Programs only by Booting Device in Safe Mode
6] Use Windows Blue Screen Troubleshooter
7] Delete the temporary and junk files
8] Disconnect external Hard drives
9] Settle up the bad areas present in Hard Disk
10] Install available Update Patches
11] Uninstall similar programs to eliminate conflicts
12] Undo recent changes by System Restore
13] Recover missing DLL files and corrupted resources using System File Checker
14] Uninstall the troublesome Windows Update
15] Remove all the Third Party Anti-Virus Programs
16] Run the DISM tool
That’s all!!
Repair any Windows problems such as Blue/Black Screen, DLL, Exe, application, Regisrty error and quickly recover system from issues using Reimage.
23.01.2020
Просмотров: 1190
BSOD или синий экран смерти ILLEGAL_IOMMU_PAGE_FAULT с цифровым кодом 0x00000158 возникает на различных сборках Windows по причине того, что IOMMU доставил пакет страничной ошибки для недействительного ASID. Это значит, что произошёл сбой в работе базы данных. Чтобы определить точную причину BSOD 0x00000158: ILLEGAL_IOMMU_PAGE_FAULT, стоит включить малый дамп памяти и проанализировать полученный файл с помощью программы BlueScreenView.
Читайте также: Методы исправления синего экрана смерти 0x00000157: KERNEL THREAD PRIORITY FLOOR VIOLATION
На официальном сайте Майкрософт нет указания, как исправить синий экран смерти ILLEGAL_IOMMU_PAGE_FAULT на Windows 7 и не только. Поэтому, проанализировав отечественные и зарубежные форумы, выделим случаи с описанием данной ошибки и методы её решения.
Случай 1. Появление ошибки во время запуска игр
На зарубежных форумах указано, что ошибка 0x00000158 может появиться во время запуска GTA 5, игр с сервиса Steam, а также Origin. Причин тому несколько:
- Нехватка свободного места на жестком диске;
- Проблемы с самим сервисом;
- Отсутствие нужных библиотек.
В данном случае нужно проверить жесткий диск на наличие достаточного количества свободного места, которое необходимо для запуска и работы игры. Также не стоит забывать, что для потребностей самой Windows 7 также нужно свободное место.
Если свободного места достаточно, то нужно попробовать переустановить игру или сам сервис, через который вы данную игру запускаете. Если после переустановки приложения ошибка не исчезла, то проблема может крыться в библиотеках.
Нужно проверить:
- Версию DirectX, а также её совместимость с Windows и играми;
- Версию Microsoft C++;
- Версию Microsoft .Net Framework.
Можно переустановить данные компоненты, предварительно скачав совместимую и актуальную версию с официального сайта Майкрософт.
Случай 2. Появление во время запуска Windows
Если ошибка 0x00000158: ILLEGAL IOMMU PAGE FAULT появляется во время загрузки Windows 7 и выше, то причина неполадки может крыться в драйверах. В данном случае нужно открыть «Диспетчер устройств» (Win+R, devmgmt.msc), развернуть все древовидное меню и проверить, нет ли указания на ошибку (значок с восклицательным или вопросительным знаком).
ВАЖНО! Если Windows не удается загрузить, то стоит попробовать загрузиться в Безопасном режиме (при запуске ПК нажать F8).
Если значок с ошибкой имеется, то нужно определить версию драйвера, скачать его с официального сайта производителя оборудования и выполнить следующие действия.
- Нажимаем на элементе правой кнопкой мыши и выбираем «Обновить драйвера…».
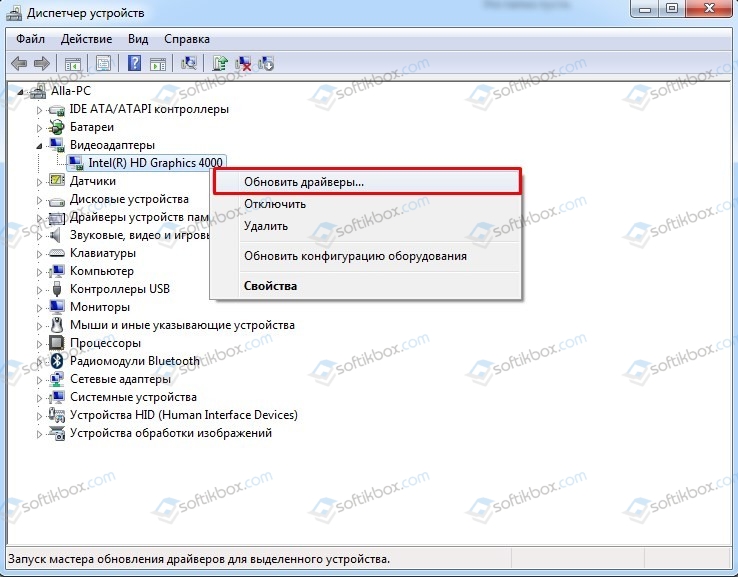
- Появится небольшое окно. Нажимаем на кнопку «Выполнить поиск драйверов на этом компьютере».
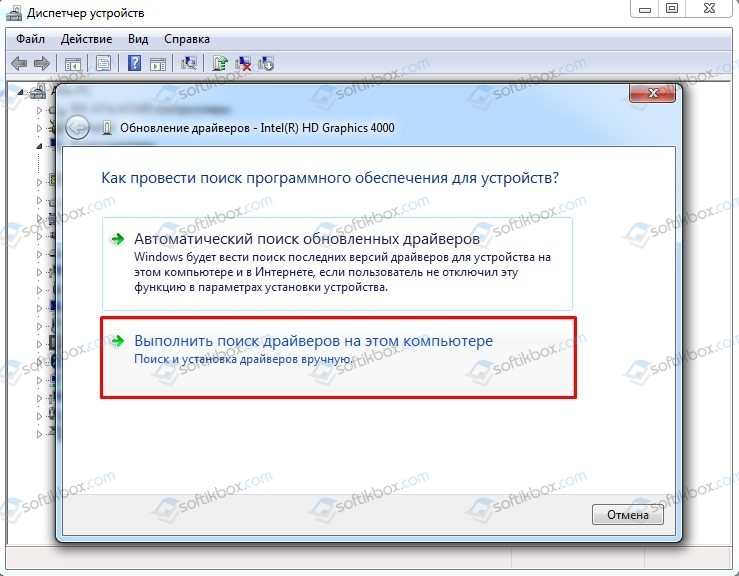
- Указываем путь к загруженному драйверу.
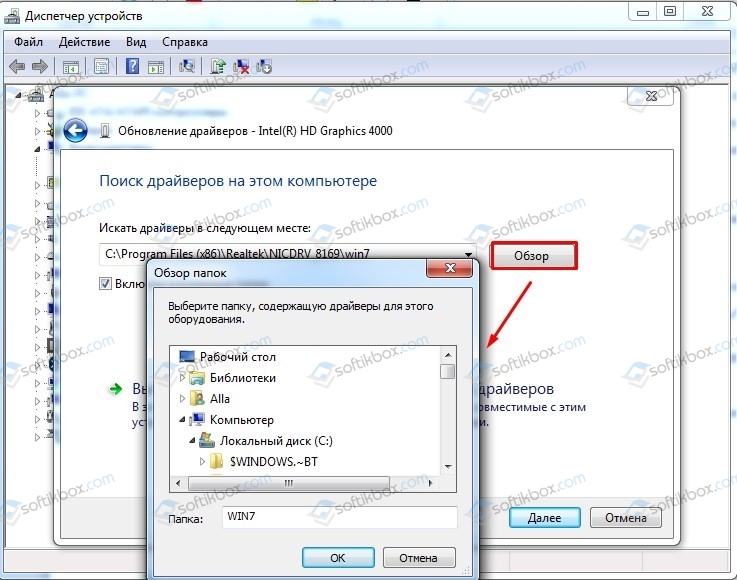
- Позволяем программному обеспечению обновиться. Перезагружаем компьютер, чтобы изменения вступили в силу.
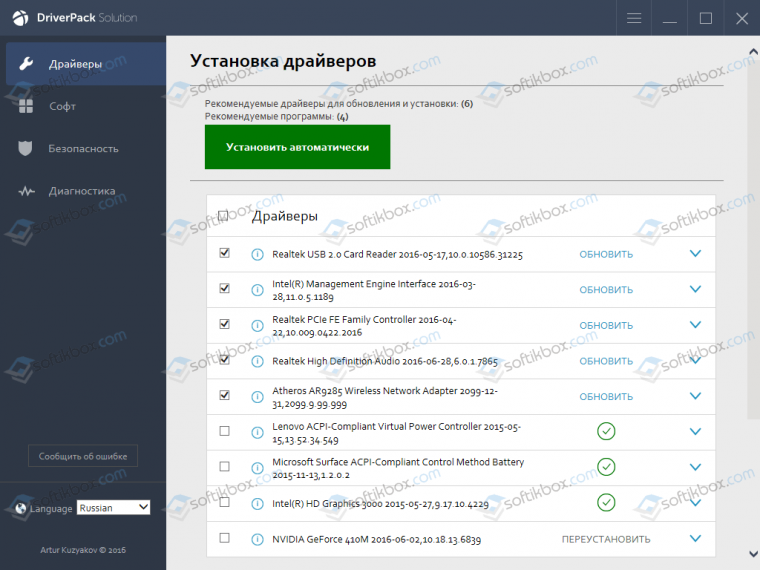
В случае, если обнаружить сбойный драйвер не удалось, то можно либо вручную по очереди обновить каждый драйвер (после каждого обновления нужно перезагружать ПК, чтобы проверить, исчезла ли ошибка и не появился ли новый BSOD), либо воспользоваться программами для автоматического поиска и обновления драйверов. К примеру, можно воспользоваться DriverPack Solution, Driver Booster, Driver Detective. Эти программы проанализируют состояние установленного ПО и позволят обновить, как отдельные драйвера, так и все сразу.
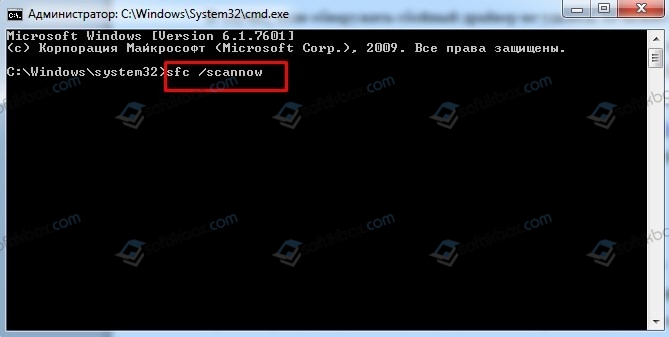
Также, некоторые пользователи сталкивались с этой ошибкой при заражении системы вирусами. В данном случае нужно проверить Windows на вредоносное ПО и затем просканировать на целостность системных файлов. Для последнего действия нужно запустить командную строку с правами Администратора и ввести sfc /scannow.
В случае, если вирусов не обнаружено, файлы не повреждены, с драйверами все в порядке, программы переустановлены и ошибка продолжает появляться, то рекомендуем откатить Windows до более раннего состояния с помощью точки восстановления или установочного диска.
Содержание
- Ошибка iommu windows 10
- Обновление Windows 10 KB5001330 приносит очередные проблемы, включая BSOD
- реклама
- реклама
- реклама
- реклама
- Fix: HAL_IOMMU_INTERNAL_ERROR BSOD in Windows 10
- HAL_IOMMU_INTERNAL_ERROR Windows 10 Solutions
- 1] Disable Automatic Restart
- 2] Resolve all the Memory problems including poor areas in RAM
- 3] Update Drivers to fix HAL_IOMMU_INTERNAL_ERROR BSOD
- 4] Detect the Malware in Full System and dismiss them using Windows Security
- 5] Load the Basic Programs only by Booting Device in Safe Mode
- 6] Use Windows Blue Screen Troubleshooter to solve HAL_IOMMU_INTERNAL_ERROR
- 7] Delete the temporary and junk files from storage and make more space in it
- 8] Disconnect external Hard drives to fix HAL_IOMMU_INTERNAL_ERROR
- 9] Settle up the bad areas present in Hard Disk
- 10] Install available Update Patches to solve HAL IOMMU INTERNAL ERROR
- 11] Uninstall similar programs to eliminate conflicts
- 12] Undo recent changes by System Restore
- 13] Recover missing DLL files and corrupted resources using System File Checker
- 14] Uninstall the troublesome Windows Update
- 15] Remove all the Third Party Anti-Virus Programs
- 16] Run the DISM tool in Command Prompt for fixing defective Windows image files
Ошибка iommu windows 10
Конфа следующая.
Мама: ASUS ROG Strix Gaming B350-F.
Камень: AMD Ryzen 7 1700, разгон до 3.75 ГГц.
Память: Geil EVO X 16GB, разгон до 3 ГГц.
Охлад камня: Scythe Mugen 5 Rev. B.
Накопители: SSD Samsung EVO 860 Gb, SSD SiliconPower 1Tb на NVMe, HDD 1 Tb Toshiba.
Видеокарта: ASUS Radeon RX 580 AREZ 8 Gb, драйвер последний и свежий.
ОС: Windows 2004, обновился недавно, но на 1909 творилась та же история.
БП: Cougar VTE 600 80 бронза, куплен недавно (март 2020) на смену умирающему старому.
Предыстория. Брал где-то в марте взамен своей старой уже умирающей затычки Radeon HD 6450 (какие-то пропажи изображения и повторное его потом появление) новую — Radeon RX 5500 XT. Поставил, начались регулярные зелёные экраны, чёрные экраны и просто зависы, в журнале значился BSOD 0x0116 (драйвер видяхи), ну и за драйвера серии RX подобное поведение не очень удивительно. По совету, нагугленному в Интернете, вырубил всякие Radeon Anti-Lag и прочие моменты — зависты и экраны смерти прекратились напрочь. Но карточка всё равно очень странно дребезжала каким-то металлическим звуком в нагрузке и наблюдались необъяснимые падения FPS до 15-16, поэтому сдал карту обратно в DNS, взял взамен ASUS Radeon RX 580, окей. Месяц не мог нарадоваться, всё было отлично, и FPS стабильный на ультрах и работа стабильная.
Однако, радость была недолгой. Сейчас примерно раз в 2-3 дня появляется следующее: совершенно рандомно (не зависит от игр, может быть и во время сидения в браузере, и при работе в Кубейсе, а в играх пока за всё это время 1 раз повисло) появляется чёрный экран, звук немного глитчит, потом пропадает, компьютер в перезагрузку НЕ уходит, так и остаётся, пока не сделаешь хард ресет. Сообщения в системном журнале ничего внятного не показывают: БСОДы отсутствуют, т.е. и в журнале их нет, и через BlueScreenView ничего не видно (хотя настройки на сохранение автодампа стоят), в журнале чё-т там время от времени ругается DistributedCOM, но оно было и до начала проблем. После ручного перезапуска появляется в журнале сообщение «Инициализован отчет об ошибке IOMMU.» от источника HAL, но я нагуглить по этому вопросу ничего не смог, да и оно появляется после перезапуска.
Куда дальше копать? Пробовал снижать разгон оперативы и ЦП — разницы не почувствовал. Пока что вместо ультра-свежей версии драйверов на видеокарту установил ту, что предлагает сама Винда (она за сентябрь 2019-ого года), AMD Radeon Software вместе с ней не идёт, поглядим. родной софт там идёт, но тоже старый.
Тестил:
смарт-данные накопителей: без реаллокейтов/пендингов и прочих критических индикаторов;
в Furmark минут 10 — греется, правда, до 80, но без вылетов и бсодов, а так же Doom Eternal на ультрах часа 2 — тоже нормально;
MemTest — нерасширенный тест, пройдено, а ещё и системной утилитой попробовал — пройдено, в системном журнале Memorydiagnostics или как там его написал, что пройдено успешно.
occt, aida64 по минут 20 — пройдено.
UPDATE:
Переделал тест OCCT и Linpack.
В первый раз OCCT показал на 4-ой минуте 157 ошибок, остановил. Максимум: 67 градусов. И хотя на забугорных форумах пишут, что на райзенах первой генерации OCCT регулярно ошибки показывает, всё равно как-то это странно.
Запустил Linpack, 15 минут — чисто. Максимум — 68 градусов.
Второй раз запустил OCCT, 15 минут — чисто. Максимум — 68 градусов.
Power запустил на 6 минут — нагрелась видео до 79 градусов, ЦП примерно до 76, чипсет примерно так же, дальше мучать не стал.
Обновление Windows 10 KB5001330 приносит очередные проблемы, включая BSOD
В некоторых конфигурациях Windows 10 возникают серьезные проблемы из-за недавнего обновления под номером KB5001330. Пользователи сообщают о проблемах с установкой, проблемах с производительностью, временной ошибке профиля пользователя и предупреждении о сбое системы.
реклама
На этой неделе во вторник Microsoft выпустила новые накопительные обновления за апрель 2021 года для поддерживаемых версий ОС. Для версии 20H2/2004 Microsoft выпустила Windows 10 KB5001330, обязательное обновление безопасности, направленное на устранение ряда уязвимостей и проблем, вызванных предыдущим обновлением, включая проблемы с принтерами.
Согласно многочисленным сообщениям на сайтах социальных сетей, растет число пользователей, которые не могут установить последнее обновление Windows на свое оборудование. При попытке это сделать появляются ошибки: 0x800f081f, 0x800f0984.
Об ошибках при загрузке обновления KB5001330 сообщили многие пользователи в Центре отзывов.
реклама
«Я получаю постоянный сбой при установке KP5001330 с кодом ошибки 0x800f0984. Это происходит на Surface Studio 2 и Pro 7. Второй месяц подряд нельзя установить накопительное обновление на моих устройствах. Установка приостанавливается на 20%, затем снова на 73%, потом на 100%, затем происходит сбой», — отметил один из пользователей.
В редких случаях также может повторяться известная ошибка временного профиля пользователя. Последний раз об этой ошибке сообщалось в декабре, она создает новый профиль пользователя при загрузке операционной системы после применения накопительного обновления. В этом случае пользовательские файлы и настройки (например, обои) могут исчезнуть.
«После обновления я больше не могу войти в свой компьютер. В нем говорится, что службе профилей пользователей не удалось войти в систему. Профиль пользователя не может быть загружен», — пожаловался один пользователь.
«После обновления Windows предлагает войти в гостевой профиль», — другой пользователь подтвердил проблему.
реклама
К счастью, есть обходной путь для решения указанной проблемы. Необходимо либо откатить обновление, либо вручную переместить пользовательские файлы.
Кроме того, пользователи сообщают о сбоях в играх: графических артефактах и значительном падении частоты кадров, но проблему можно решить, удалив накопительное обновление вручную. Лишь некоторые пользователи сообщают об этих проблемах на форумах, и, похоже, они не так распространены, как другие ошибки.
Также многие сталкиваются с периодическими появлениями BSOD (синего экрана смерти)/
«Это обновление сломало Windows для меня и других. BSOD при обновлении сообщал, что определенного драйвера больше нет или он не поддерживается. Я восстановил Windows и обновился снова, затем BSOD на моем ПК повторился дважды за несколько часов. Я удалил обновление. Это случилось не только со мной, поэтому я бы посоветовал не устанавливать это обновление», — сообщил один из пользователей.
реклама
Если вы загрузили обновление April 2021 Patch Tuesday и столкнулись с какими-либо проблемами, лучший способ решить проблему — это удалить исправление, выполнив следующие действия:
1. Откройте приложение «Настройки»;
2. Нажмите «Обновление и безопасность»;
3. Нажмите «Центр обновления Windows»;
4. Нажмите «Просмотреть историю обновлений»;
5. Нажмите «Удалить обновления», затем выберите KB5001330, чтобы удалить его;
6. Перезагрузите компьютер.
На данный момент компания Microsoft никак не прокоментировала многочисленные жалобы пользователей.
Fix: HAL_IOMMU_INTERNAL_ERROR BSOD in Windows 10
You will find solutions to HAL_IOMMU_INTERNAL_ERROR Blue Screen of Death error in Windows 10 here. This BSOD issue having bugcheck value 0x000001D9 leads the desktop to freeze and hang. Frequent Reboot of PC also occurs when this stop error appears.
HAL IOMMU INTERNAL ERROR in Windows 10 mostly happens because of corrupt, old and incompatible device drivers. Conflicts between similar applications and malware infection are also the main reasons for this BSOD. Furthermore, if the system runs in memory problems, low disk space, problematic areas in HDD, corrupted Windows Image files even can cause the error. In the below section, we will be discussing some effective and proven workarounds they can potentially help to resolve HAL_IOMMU_INTERNAL_ERROR BSOD in Windows 10. See the list of workarounds first –
HAL_IOMMU_INTERNAL_ERROR Windows 10 Solutions
Here is how to fix HAL_IOMMU_INTERNAL_ERROR BSOD in Windows 10 –
1] Disable Automatic Restart
With a confirmed HAL_IOMMU_INTERNAL_ERROR BSOD, Windows PC will have a tendency to perform Automatic restarting. This will be the most annoying problem you could ever come across. Unless this gets a fix, you cannot deploy other resolutions as well. Therefore, this solution comes at the top of the priority. Disabling the Automatic Restarting is not a complex job and you can proceed in the below steps –
Step-1: Navigate to the Desktop area after saving the running programs. Use Win+D hotkey press together and head to the place immediately.
Step-2: Perform a right click on This PC icon. Choose Properties option from there to allow opening the System window.
Step-3: When it is visible on the screen, select Advanced system settings from the left side of the window.
Step-4: As the System Properties wizard appears, click on Advanced tab.
Step-5: Scroll little down in the tab and reach Startup and Recovery section. When you see the Settings option here, hit straightway.
Step-6: After a new wizard appears, go to its System failure part and uncheck the box for “Automatically restart”
Step-7: Lastly, select the Ok to save these changes.

Now windows will not go for rebooting automatically. Hence, there will be enough opportunity for you to deploy the upcoming resolutions and resolve the issue accordingly.
2] Resolve all the Memory problems including poor areas in RAM
Windows can suffer from memory issue due to wrong allocation of it and the presence of poor segments in the RAM. With these sorts of problems in the Windows, BSOD errors like HAL_IOMMU_INTERNAL_ERROR commonly occur. Luckily, we have the Windows Memory Diagnostic to deal with these troubles and fix the errors. Let’s proceed to the handy utility in the below process –
- Make a together press of Windows and S keys and invoke Taskbar Search.
- In the empty text box located here, type “Memory” and wait for results to load finally.
- Select Windows Memory Diagnostic Desktop app from results to proceed.
- Select the option “Restart now and check for problems (recommended)”.
- Then windows will prepare for the first cycle of rebooting.
- Subsequently, you will find blue screen upfront detecting memory issues with the rate of progress in percentage.
- When the info shows 100%, windows will Restart for the second time.
- Finally, you can check the diagnosis report in the Notification area of the System Tray.
3] Update Drivers to fix HAL_IOMMU_INTERNAL_ERROR BSOD
HAL_IOMMU_INTERNAL_ERROR BSOD is the result of outdated and corrupt device drivers mostly. Every time we come across a critical issue, they play a greater role there. We really should not allow such a driver on the computer which is old and defective. The Windows Device Manager is a top-notch app in this regard and it shows them with a yellow accent if needs to be updated. To accomplish the workaround, move with below steps –
- Right click on Start menu and choose Run to invoke the window.
- In the text box provided here, write devmgmt.msc and eventually hit Enter key.
- Device Manager will hit on display and you have to watch closely in the console for any exclamation marks in the device’s list.
- Prior to expanding the device, do a right click on the drivers having Yellow warning icon on it.
- Select Update driver option and follow the other guidelines coming to display until these all get updated.

4] Detect the Malware in Full System and dismiss them using Windows Security
All over the web, Malware is present and often it exists in disguise. You can be easy prey to them after making a visit to a website or clicking link coming in emails. Sometimes inserting a USB can also be risky. Once they get entrance to the system, cause the necessary files to be removed or infected. As a result, many issues come up including HAL_IOMMU_INTERNAL_ERROR. You can avoid this malignant consequence by making regular scanning in Windows security. The default tool can also dismiss all the threats in the most effective way. Follow the below guidelines to complete the task –
- Click on Show hidden icon arrow from the right side of the taskbar.
- Select Shield icon from there and let the system to open Windows Security app.
- Moving on to the App, select Virus & threat protection option.
- Now, perform a click on Scan options link to reveal available methods.
- Check the radio button allocated for Full scan and then select Scan now option.
- After the detection gets over, you will be shown a result. If there is any malware present, hit Clean threats option located here.
- Go to the next page, among three options, select Remove first and then Start actions to dismiss all these viruses.

5] Load the Basic Programs only by Booting Device in Safe Mode
In all critical times, Booting in the Safe Mode came out as savior in Windows 10 including previous versions. In this startup procedure, the device starts with only the basic processes and hence, the problems get resolved immediately. Let’s give this renowned utility an attempt following below instruction –
Step#-1: Invoke Run dialog by pressing Win+R hotkeys together.
Step#-2: In the provided typing box, write msconfig using the keyboard and select System Configuration Desktop app once visible.
Step#-3: In the App UI, jump to Boot tab and straightway get at its second half.
Step#-4: Here, you can see the Boot options area. Now, check the box before Safe Boot and activate all the grayed out options.
Step#-5: Hit the radio button before Minimal option and proceed forward.
Step#-6: Select Apply button first and then Ok to save these changes.
Step#-7: Get inside of the Safe Mode on the further move.
6] Use Windows Blue Screen Troubleshooter to solve HAL_IOMMU_INTERNAL_ERROR
Since HAL IOMMU INTERNAL ERROR causes serious damages to the system, Microsoft technicians came up with a built-in tool for resolving this issue effectively. The utility named Blue Screen Troubleshooter and it is accessible through the settings app. Proceed with the below instructions to deploy the tool –
- Open Windows Settings app by pressing Win+I hotkeys altogether.
- From the app UI, head to Update & Security tile and eventually make a click on it.
- When the page loads completely, choose Troubleshoot located in the left pane and jump on the adjacent side.
- Reach out to Blue Screen there and expand it by clicking.
- Hit Run the Troubleshooter option from the extended pane.
The utility will now detect and fix all the Stop errors. In the end, there should not be any HAL_IOMMU_INTERNAL_ERROR in the system.
7] Delete the temporary and junk files from storage and make more space in it
Temporary files as stored in the Hard Disk, once grow bigger will occupy huge space in it. The ultimate result is, the storage runs in low space and operation get slow down. In the process, HAL_IOMMU_INTERNAL_ERROR also hitched up. Using Disk Cleanup tool can be thoroughly beneficial to delete the junks in one platform. Here is how to proceed –
- Open Run dialog box.
- In the search box provided, type cleanmgr and press Enter from keyboard.
- A small popup window will float in and ask you to choose preferable Drive to run a cleanup. Select C: by doing a click on dropdown menu and press Enter.
- Disk Cleanup Utility will come ahead slowly after calculating the space it can make free from the drive.
- When the wizard appears, come down to the bottom and do a click on Clean up system files.
- Once again, that small popup window will appear asking for the desired drive. Choose C: like before and press Enter key.
- When Disk Cleanup for C: comes ahead, reach Files to delete area.
- Check all the boxes available here and keep Downloads as it was.
- Hit Ok button and let the Cleanup start.
- Wait until this process ends automatically as this might take several minutes.
![]()
8] Disconnect external Hard drives to fix HAL_IOMMU_INTERNAL_ERROR
Some people come across HAL_IOMMU_INTERNAL_ERROR BSOD when an additional Hard Drive joins the system. Good news folks, Issue resolved easily as well just after disconnecting the external USB or other peripheral only. Follow the below guidelines and give a momentarily pause by disconnecting –
- Isolate all the Hardware accessories including the External HDD.
- Keep them separate and safe location to avoid damage.
- Now, restart the windows in the usual method.
- After completing the rebooting when you can see Desktop, make a check for the error.
- If resolved properly, start connecting them one after another.
- At this moment after connecting all, launch the web browser from windows.
- Perform a visit to Maker’s Webpage for each and Download the Latest drivers.
- Install the drivers in windows to use easily.
9] Settle up the bad areas present in Hard Disk
Prolonged use causes to form problematic areas inside a Disk Drive. When this happens, the system runs in various problems including HAL_IOMMU_INTERNAL_ERROR. The Disk Checking Utility comes handy to resolve these sectors automatically. See the method in details –
- Press Win+S to call in Taskbar search and type cmd.exe. When Command Prompt appears in the result, do a right click on it.
- Choose “Run as Administrator” and also select “Yes” Once UAC prompts for your consent.
- In the Black Elevated Prompt, type following syntax and parameters –
Press the Enter button when you have finished typing. This process will take little longer as we have added three more notations instead of chkdsk only which would show disk status only.
After the task is finished, Restart the device and upon coming back to operation, check if there is an error present.
10] Install available Update Patches to solve HAL IOMMU INTERNAL ERROR
Any update patch contains fixing of existing bugs, quality improvements, the introduction of latest features. Installing these will give the OS a big blow and strength to fight with vulnerabilities like HAL IOMMU INTERNAL ERROR. An Outdated Windows 10 is prone to get affected always. Follow the below guidelines to install them –
- Manage to Load the Settings page of Update & Security as shown in the above workaround.
- Select Windows Update available in the left pane.
- Navigating to the corresponding right, make a click on Check for updates link ignoring “You’re up to date” dialogue.
- Upon finishing the downloading, click on Install.
- Reboot the Windows once asked and update the OS.

11] Uninstall similar programs to eliminate conflicts
Having the same applications often become risky they tend to collide with one another. Meanwhile, the necessary OS files get eradicated and HAL_IOMMU_INTERNAL_ERROR evolves. In these cases, Uninstalling comes ahead first. When we remove one of these, the action reduces the risk of collision between them. Follow the below guidelines to uninstall an App –
- Manage Access to Windows Settings app using any convenient method stated above.
- When in the Home page, roll the cursor to Apps and make a click on it eventually.
- On the next page after appears, choose Apps & features on the left wing and shift to the right.
- Once all the Apps be visible, reach out to applications colliding with each other.
- Select each and hit Uninstall option from the expanded pane.
- If User Account Control prompts for authentication, select Yes to proceed.
- Follow the on-screen guidelines until finally removed.
- Restart the device and once powers up next, do check for the error in the system.
- If resolved, you can Launch Microsoft Store and Download the deleted app again.
12] Undo recent changes by System Restore
Performing a System Restore directs you back to the state where you were. We often install an app or uninstall some for the necessity of work. These actions leave marks in Windows Registry and when they go wrong, HAL IOMMU INTERNAL ERROR is imminent. Therefore, to Undo these changes, perform the below tasks –
- Open the Taskbar search (commonly Win+S) using any of the above instruction.
- Type rstrui in the text area and hit the Enter button.
- Once the System Restore Wizard appears on the screen, select Next.
- From the consequent page, make a click on Show more restore points and reveal all the points you have created beforehand.
- Choose the last one in the list and make a click on Next.
- After the following page cuts your view, click Finish.
13] Recover missing DLL files and corrupted resources using System File Checker
So many vulnerabilities occur in Windows 10 and sometimes in worst extent, system resources are erased. In the same way, DLL files often go missing. When these cases happen, HAL_IOMMU_INTERNAL_ERROR BSOD comes in. System File Checker comes handy to fix these components once executed in the Elevated Command Prompt. To access the utility, follow the below instructions –
- Open the Taskbar search by making together press on Win+S keys.
- In the search box given here, type cmd.exe and select Run as administrator from the right flyout.
- After User Account Control asks for your consent, provide approval by choosing Yes.
- On the Black Elevated Command Prompt window, type underneath code and hit Enter key –
- System File Checker will be activated and start detecting for file corruption and missing DLL ones. Fixing will also start automatically.
- Though this process is little time consuming, do not terminate abnormally and let it end by itself. After all these files are okay, there should not be any.

14] Uninstall the troublesome Windows Update
Sometimes Windows update creates the Blue screen HAL IOMMU INTERNAL ERROR. Uninstalling the files will be enough as to resolve the issue or prevent it. To complete the task, move with the following guidelines –
- Press Windows key.
- Once Start menu becomes visible on display, choose Gear cog.
- From App UI, move ahead to Update & Security and do a click on it.
- From the following page after loaded, select Windows Update and shift to the corresponding side.
- Here, perform a click on View update history link.
- Select Uninstall updates and let a window unroll from Control Panel.
- Reach the last received patch and do a right click on it.
- Select Uninstall and keep and follow on-screen instruction until they get removed completely.

15] Remove all the Third Party Anti-Virus Programs
In virus issues, you might have used a free anti-virus solution as a safeguard. This is okay until Windows Security arrives. Since the tool is the default for Windows 10 and also very effective, there is no need of using a third party program in this regard. Moreover, most of these programs, due to conflict, often cause HAL_IOMMU_INTERNAL_ERROR BSOD. Therefore, if you have such applications, uninstall using the following guidelines –
- Type appwiz.cpl in the Windows search and Enter
- Select Third Party Anti-virus app in the list.
- Hit Uninstall option visible at the top ribbon.
- Next steps will be as shown in the display until it gets uninstalled completely.
16] Run the DISM tool in Command Prompt for fixing defective Windows image files
When Windows Image files fall in corruption, it might cause HAL_IOMMU_INTERNAL_ERROR. As a fix, DISM tool will be best suited utility. Here is the procedure –
- Do a right click on Taskbar and select Task Manager from the appearing menu.
- From the app once loaded fully, select File located at the top left corner.
- Choose Run new task when seen and let Run dialog to appear.
- In the empty writing field, cmd and move down later on.
- Mark the checkbox below the Open saying “Create this task with administrative privileges”.
- After Pressing Enter key, you will be straightaway guided to Elevated Command Prompt.
- At the black window, type following command where a cursor winks –
DISM.exe /Online /Cleanup-image /Restorehealth
- Hit Enter key and let the Tool to fix corrupt Windows image files. The process may be lengthy, wait until it gets over automatically.
- When ends, Restart the windows and after coming back to operation, check of the error resolved.

Till this point, we have elaborated almost all the effective resolutions hoping to resolve HAL IOMMU INTERNAL ERROR in Windows 10. Hopefully, the issue is no more prevalent in your system and you are working smoothly. If the issue still persists, we can suggest only last resort – Reinstalling Windows 10. This will be the ultimate solution of all the existing problems and if done accurately, no issue will be evolving next. Follow – How to Clean Install Windows 10 May 2019 Update Version 1903.
Greetings Dear Members,
I have a hp pavilion 15 cs3153cl system and for the last couple of days I am experiencing screen flickering when I boot up the system move the mouse a but and then goes black or when I am doing a teams meeting, I have to restart it a few times to get it to work. No changes were made to the system, however, I did notice from the event viewer that
I am getting the iommu has detected an error I tried researching but I am not able to find what exactly causes this issue.
The OS is windows 11.
For Now, I have disabled hardware acceleration from the browsers because previously the flickering that occurred on this system was due to hardware acceleration that was enabled again and reinstalled the graphics adaptors but the same is occurring again
TIA

От одного до десяти, насколько важен для вас компьютер? Сегодня они являются основными инструментами для работы, учебы или развлечения.
Отсутствие обслуживания на вашем компьютере может вызвать проблемы, а система выдает ошибки, но еще важнее знать, как их исправить. Вот почему вы узнаете здесь как исправить ошибку HAL_IOMMU_INTERNAL_ERROR в Windows 10 .
Это одна из самых распространенных ошибок среди пользователей Windows. То, что, без сомнения, приводит в отчаяние не одного человека. Но не беспокойся! Потому что в этой статье вы найдете все, что вам нужно знать. Готовы исправить эту досадную ошибку?
Что касается операционных систем, Windows просто нет противников. C’est ле операционная система le самый используемый в мире . Это не менее важно, учитывая его характеристики и функции.
Эта операционная система дала много поводов для разговоров, и есть много причин для ее использования. Однако эта система, как и все остальные, не без проблем .
Количество ошибки как Windows 10 может генерировать может быть огромным. Причины? Разные. От проблем с оборудованием до проблем с программным обеспечением. С вашей стороны, это то, как вы можете решить одно или другое.
Какие есть решения?
Теперь, если есть что указать, это легкость, с которой эти ошибки могут быть исправлены . Поскольку это наиболее используемая операционная система, информация останется. Так что вы можете посещать разные страницы или смотреть видео, чтобы найти решение.
Кроме того, в Windows есть очень эффективный инструмент для устранения неполадок. Это облегчит любой процесс, который вам нужно выполнить с помощью других программ.
Исправить ошибку HAL_IOMMU_INTERNAL_ERROR в Windows 10
Но что происходит, когда ошибка действительно мешает вам искать решение? У многих людей компьютеры достигли точки, в которой он постоянно перезагружается . Хуже всего … появляется синий экран .
Для многих это часто бывает катастрофой. Этот экран — «синий экран смерти». Обычно это происходит, когда на жестком диске вашего компьютера есть серьезные ошибки, которые мешают его работе.
Однако ошибка HAL_IOMMU_INTERNAL_ERROR отличается. Если это правда, что ваш компьютер будет постоянно перезагружаться и появится синий экран, это не значит, что все потеряно!
Что ты можешь сделать?
К счастью, есть несколько шагов, которые вы можете предпринять для таких неудобных и безнадежных ситуаций. Вам просто нужно обратить внимание и выбрать тот вариант, который вам больше всего нравится.
Первое, что нужно сделать, это убедитесь, что на вашем компьютере установлены последние версии программ. . Обычно это одна из основных причин ошибки HAL_IOMMU_INTERNAL_ERROR в Windows 10. Об этом вы можете:
- Щелкните правой кнопкой мыши меню Windows, затем выберите «Диспетчер устройств». Перейдите на вкладку «Действие» и нажмите «Обновить драйвер».
- Скачайте программы для анализа вашего компьютера, вашего операционная система и характеристики, позволяющие определить, какие драйверы обновлять. TweakBit Driver Updater — один из наиболее рекомендуемых для этой задачи.
Другие просто предпочитают полагаться на навыки средства устранения неполадок Windows . Если вы хотите исправить ошибку HAL_IOMMU_INTERNAL_ERROR таким образом, вам необходимо:
- Щелкните меню «Пуск» и войдите в «Настройки».
- Прокрутите вниз и перейдите в раздел «Обновление и безопасность».
- Нажмите на опцию » помощь » .
Наконец, еще один способ исправить ошибку HAL_IOMMU_INTERNAL_ERROR в Windows 10 — это используйте командную консоль . Правильный способ сделать это:
- Откройте меню «Пуск» и введите «CMD».
- Щелкните «Командная строка», чтобы получить доступ к консоли (щелкните правой кнопкой мыши и обязательно запустите ее от имени администратора).
- Введите команду sfc / scannow .
В течение нескольких минут ваш компьютер будет просканирован. Эта функция выявляет ошибки и, если возможно, автоматически исправляет их, устраняя ошибку.
Какое решение вы предпочитаете?
Как вы можете видеть, Исправить ошибку HAL_IOMMU_INTERNAL_ERROR в Windows 10 несложно . Есть ряд гораздо более сложных решений, но они очень эффективны. Наслаждайтесь их применением на практике!
Приветствую работяги!
Подскажите, вдруг кто сталкивался или знает как решить:
Где то месяц назад нужно было обновить биос на новую версию. Биос успешно обновил, но после этого начал испытывать проблемы с перезагрузкой ПК в некоторых играх. То есть условно говоря, запускаю какую то игру, все работает, работает — потом БАЦ, перезагрузка. В некоторых играх перезагрузка происходит сразу после захода непосредственно в лобби/сервер/матч. При этом это не синий экран смерти, а просто обычный банальный ребут.
В обычное время ПК не перезагружается и работает в целом как часы. Во всяких программах типа Фотошопа, Лайтрума, для 3д модделинга тоже все нормМой пк:
Ryzen 7 3700x
2070 Super
24 RAM
Power supply 700+Протестированные игры:
Спойлер
Warzone/Cold War, Dota 2, Destiny 2, GTFO, Cyberpunk 2077, Red Dead Online, GTA V — перезагрузок нет
Predator: Hunting Grounds(перезагрузка стабильно раз в 2 матча), RUST(перезагрузка где то через 1-2 минуты после захода на сервер), Necromunda:Hired Gun(перезагрузилась 1 раз за 20 часов игры), Biomutant(перезагрузилась пару раз за 10 часов игры)
Смотрел логи винды — никаких ошибок перезагрузки нет. Едиснтвенное что он пишет, так это ошибка в неком IOMMU:
Инициализован отчет об ошибке IOMMU.
Источник — HAL
Инициализован отчет об ошибке IOMMU.Почитав в интернете нашел что это нечто связанное с производительностью вирутальной машины, хотя я ее не юзаю.
Что пробовал еще:
- обновлял драйвера видеокарты — не помогло
- обновлял драйвера чипсета — не помогло
- обновлял винду — не помогло
- пробовал измерять и мониторить температуру проца и видюхи — все в пределах нормы
- пробовал даунгрейдить биос до дефолта и до версии которая была у меня изначально — не помогло
- пробовал запустить проверку памяти — не помогло
- пробовал менять память местами, запускать без одной плажки, менял их — не помогло
Думаю еще сделать стресс тест видуху и проца, чтобы наверняка
На этом больше ничего не пробовал. Находил в сети информацию что подобное может быть из за каких то проблем с напряжением, то есть например во время обработки данных условная видеокарта запрашивает большее напряжение чем ей разрешено использовать или типа того. Думал что возможно проблема с процом или видюхой, но чето маловероятно ибо в каких то играх все работает как часы, а в некоторых оно все падает.
Кто то советовал сделать андер волтаж проца, чтобы снизить пиковые частоты работы ЦПУ, но чет идея сомнительная ибо работает только турбобустинг, да и работает он при всех приложениях, так что будь проблем в этом, то он бы отрубался постоянно.Еще раз говорю, все началось после ОБНОВЛЕНИЯ биоса. То есть вероятно какой то параметр поменялся, но вот какой — история умалчивает
Вообщем вдруг кто сталкивался или знает как решить — буду премного благодарен!