Состояние перевода: На этой странице представлен перевод статьи fsck. Дата последней синхронизации: 10 июля 2021. Вы можете помочь синхронизировать перевод, если в английской версии произошли изменения.
fsck (file system check) — утилита для проверки и восстановления файловых систем Linux. Проверка файловых систем разных физических дисков выполняется параллельно, что позволяет значительно её ускорить (см. fsck(8)).
Процесс загрузки Arch включает в себя процедуру fsck, поэтому проверка файловых систем на всех носителях выполняется автоматически при каждой загрузке. По этой причине обычно нет необходимости выполнять её через командную строку.
Проверка при загрузке
Механизм
Существует два возможных варианта:
- mkinitcpio предоставляет хук
fsckдля проверки корневой файловой системы перед монтированием. Корневой раздел должен быть смонтирован на запись и чтение (параметр ядраrw) [1]. - systemd проверяет все файловые системы, которым задано значение fsck больше 0 (либо параметром fstab, либо в пользовательском файле юнита). Корневая файловая система изначально должна быть смонтирована только на чтение (параметр ядра
ro), и лишь позже перемонтирована на чтение-запись в fstab. Имейте в виду, что опция монтированияdefaultsподразумеваетrw.
Рекомендуется по умолчанию использовать первый вариант. Если вы устанавливали систему в соответствии с руководством, то использоваться будет именно он. Если вы хотите вместо этого использовать вариант 2, то удалите хук fsck из mkinitcpio.conf и задайте параметр ядра ro. Кроме того, параметром ядра fsck.mode=skip можно полностью отключить fsck для обоих вариантов.
Принудительная проверка
Если вы используете base-хук mkinitcpio, то можно принудительно выполнять fsck во время загрузки, задав параметр ядра fsck.mode=force. Проверена будет каждая файловая система на машине.
В качестве альтернативы можно воспользоваться службой systemd systemd-fsck@.service(8), которая проверит все настроенные файловые системы, которые не были проверены в initramfs. Тем не менее, проверка корневой файловой системы этим способом может стать причиной задержки в время загрузки, поскольку файловая система будет перемонтироваться.
Примечание: Если вы используете другие дистрибутивы GNU/Linux, то учтите, что старые методы проверки вроде файлов forcefsck для каждой файловой системы или команды shutdown с флагом -F будут работать только с SysVinit и ранними версиями Upstart; работать с systemd они не будут. Решение, предложенное выше, является единственным рабочим для Arch Linux.
Советы и рекомандации
Восстановление повреждённых блоков
Следующая команда позволяет восстановить повреждённые участки файловых систем ext2/ext3/ext4 и FAT:
Важно: Разрешение на восстановление запрошено не будет. Подразумевается, что вы уже ответили «Да», запустив команду на выполнение.
# fsck -a
Интерактивное восстановление повреждённых блоков
Полезно в том случае, если файлы на загрузочном разделе были изменены, а журнал не обновился соответствующим образом. В этом случае размонтируйте загрузочный раздел и выполните:
# fsck -r диск
Изменение частоты проверки
Примечание: Команды tune2fs и dumpe2fs работают только с файловыми системами ext2/ext3/ext4.
По умолчанию fsck проверяет файловую систему каждые 30 загрузок (вычисляется отдельно для каждого раздела). Чтобы изменить частотку проверок, выполните:
# tune2fs -c 20 /dev/sda1
Здесь 20 — число загрузок между проверками. Если задать значение 1, то проверка будет выполняться при каждой загрузке, а значение 0 отключит сканирование.
Текущую частоту проверок и опции монтирования конкретного раздела можно узнать командой:
# dumpe2fs -h /dev/sda1 | grep -i 'mount count'
Параметры fstab
fstab — файл системных настроек, который используется для передачи ядру Linux информации о том, какие разделы (файловые системы) монтировать и в какие точки дерева файловой системы.
Записи в /etc/fstab выглядят примерно следующим образом.
/dev/sda1   /         ext4      defaults       0  1
/dev/sda2   /other    ext4      defaults       0  2
/dev/sda3   /win      ntfs-3g   defaults       0  0
Шестое поле каждой строки (выделено) — опция fsck:
0— не проверять.1— файловая система (раздел), которая должна быть проверена первой; для корневого раздела (/) должно использоваться именно это значение.2— прочие файловые системы, которые должны быть проверены.
Решение проблем
Не запускается fsck для отдельного раздела /usr
- Убедитесь, что используются соответствующие хуки в
/etc/mkinitcpio.conf, а также что вы не забыли пересоздать initramfs после последнего редактирования этого файла. - Проверьте fstab! Только корневому разделу должен быть задан параметр
1в последнем поле, все остальные разделы должны иметь либо2, либо0. Также проверьте файл на наличие иных опечаток.
ext2fs: no external journal
Иногда (например, из-за внезапного отключения питания) файловые системы ext(3/4) могут повредиться так сильно, что восстановить их обычным способом не удастся. Как правило, при этом fsck выводит сообщение о том, что не удалось найти журнал (no external journal). В этом случае выполните команды ниже.
Отмонтируйте раздел от соответствующего каталога:
# umount каталог
Запишите на раздел новый журнал:
# tune2fs -j /dev/раздел
Запустите fsck, чтобы восстановить раздел:
# fsck -p /dev/раздел
FSCK – очень важная утилита для Linux / Unix, она используется для проверки и исправления ошибок в файловой системе.
Она похоже на утилиту «chkdsk» в операционных системах Windows.
Она также доступна для операционных систем Linux, MacOS, FreeBSD.
FSCK означает «File System Consistency Check», и в большинстве случаев он запускается во время загрузки, но может также запускаться суперпользователем вручную, если возникнет такая необходимость.
Может использоваться с 3 режимами работы,
1- Проверка наличия ошибок и позволить пользователю решить, что делать с каждой ошибкой,
2- Проверка на наличие ошибок и возможность сделать фикс автоматически, или,
3- Проверка наличия ошибок и возможность отобразить ошибку, но не выполнять фикс.
Содержание
- Синтаксис использования команды FSCK
- Команда Fsck с примерами
- Выполним проверку на ошибки в одном разделе
- Проверьте файловую систему на ошибки и исправьте их автоматически
- Проверьте файловую систему на наличие ошибок, но не исправляйте их
- Выполним проверку на ошибки на всех разделах
- Проверим раздел с указанной файловой системой
- Выполнять проверку только на несмонтированных дисках
Синтаксис использования команды FSCK
$ fsck options drives
Опции, которые можно использовать с командой fsck:
- -p Автоматический фикс (без вопросов)
- -n не вносить изменений в файловую систему
- -у принять «yes» на все вопросы
- -c Проверить наличие плохих блоков и добавить их в список.
- -f Принудительная проверка, даже если файловая система помечена как чистая
- -v подробный режим
- -b использование альтернативного суперблока
- -B blocksize Принудительный размер блоков при поиске суперблока
- -j external_journal Установить местоположение внешнего журнала
- -l bad_blocks_file Добавить в список плохих блоков
- -L bad_blocks_file Установить список плохих блоков
Мы можем использовать любую из этих опций, в зависимости от операции, которую нам нужно выполнить.
Давайте обсудим некоторые варианты команды fsck с примерами.
Команда Fsck с примерами
Примечание: – Прежде чем обсуждать какие-либо примеры, прочтите это. Мы не должны использовать FSCK на смонтированных дисках, так как высока вероятность того, что fsck на смонтированном диске повредит диск навсегда.
Поэтому перед выполнением fsck мы должны отмонтировать диск с помощью следующей команды:
$ umount drivename
Например:
$ umount /dev/sdb1
Вы можете проверить номер раздела с помощью следующей команды:
$ fdisk -l
Также при запуске fsck мы можем получить некоторые коды ошибок.
Ниже приведен список кодов ошибок, которые мы могли бы получить при выполнении команды вместе с их значениями:
- 0 – нет ошибок
- 1 – исправлены ошибки файловой системы
- 2 – система должна быть перезагружена
- 4 – Ошибки файловой системы оставлены без исправлений
- 8 – Операционная ошибка
- 16 – ошибка использования или синтаксиса
- 32 – Fsck отменен по запросу пользователя
- 128 – Ошибка общей библиотеки
Теперь давайте обсудим использование команды fsck с примерами в системах Linux.
Выполним проверку на ошибки в одном разделе
Чтобы выполнить проверку на одном разделе, выполните следующую команду из терминала:
$ umount /dev/sdb1

$ fsck /dev/sdb1
Проверьте файловую систему на ошибки и исправьте их автоматически
Запустите команду fsck с параметром «a» для проверки целостности и автоматического восстановления, выполните следующую команду.
Мы также можем использовать опцию «у» вместо опции «а».
$ fsck -a /dev/sdb1
Проверьте файловую систему на наличие ошибок, но не исправляйте их
В случае, если нам нужно только увидеть ошибки, которые происходят в нашей файловой системе, и не нужно их исправлять, тогда мы должны запустить fsck с опцией “n”,
$ fsck -n /dev/sdb1
Выполним проверку на ошибки на всех разделах
Чтобы выполнить проверку файловой системы для всех разделов за один раз, используйте fsck с опцией «A»
$ fsck -A
Чтобы отключить проверку корневой файловой системы, мы будем использовать опцию «R»
$ fsck -AR
Проверим раздел с указанной файловой системой
Чтобы запустить fsck на всех разделах с указанным типом файловой системы, например, «ext4», используйте fsck с опцией «t», а затем тип файловой системы,
$ fsck -t ext4 /dev/sdb1
или
$ fsck -t -A ext4
Выполнять проверку только на несмонтированных дисках
Чтобы убедиться, что fsck выполняется только на несмонтированных дисках, мы будем использовать опцию «M» при запуске fsck,
$ fsck -AM
Вот наше короткое руководство по команде fsck с примерами.
Пожалуйста, не стесняйтесь присылать нам свои вопросы, используя поле для комментариев ниже.
Linux Filesystems are responsible for organizing how data is stored and recovered. One way or another, with time, the filesystem may become corrupted and certain parts of it may not be accessible. If your filesystem develops such inconsistency it is recommended to verify its integrity.
This can be completed via a system utility called fsck (file system consistency check), which checks the root file system automatically during boot time or ran manually.
In this article, we are going to review the fsck command and its usage to help you repair Linux disk errors.
Table of Contents
1
When to Use fsck Command in Linux
There are different scenarios when you will want to run fsck. Here are a few examples:
- The system fails to boot.
- Files on the system become corrupt (often you may see input/output error).
- The attached drive (including flash drives/SD cards) is not working as expected.
fsck Command Options
The fsck command needs to be run with superuser privileges or root. You can use it with different arguments. Their usage depends on your specific case. Below you will see some of the more important options:
-A– Used for checking all filesystems. The list is taken from/etc/fstab.-C– Show progress bar.-l– Locks the device to guarantee no other program will try to use the partition during the check.-M– Do not check mounted filesystems.-N– Only show what would be done – no actual changes are made.-P– If you want to check filesystems in parallel, including root.-R– Do not check the root filesystem. This is useful only with ‘-A‘.-r– Provide statistics for each device that is being checked.-T– Does not show the title.-t– Exclusively specify the Linux filesystem types to be checked. Types can be comma-separated lists.-V– Provide a description of what is being done.
Run fsck Command to Repair Linux File System Errors
In order to run fsck, you will need to ensure that the partition you are going to check is not mounted. For the purpose of this article, I will use my second drive /dev/sdb mounted in /mnt.
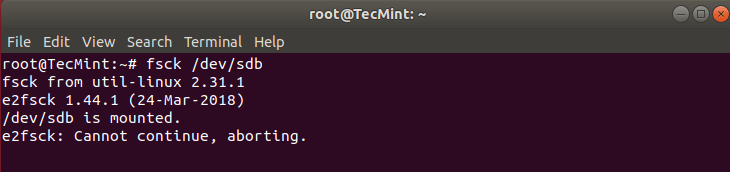
Here is what happens if I try to run fsck when the partition is mounted.
# fsck /dev/sdb
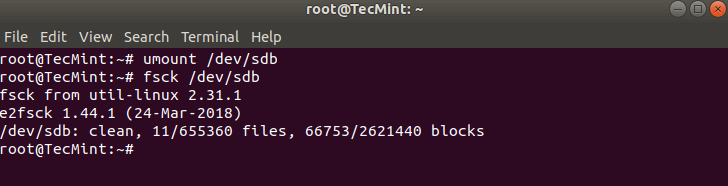
To avoid this unmount the partition using.
# umount /dev/sdb
Then fsck can be safely run with.
# fsck /dev/sdb
Understanding fsck Exit Codes
After running fsck, it will return an exit code. These codes can be seen in fsck’s manual by running:
# man fsck

0      No errors
1      Filesystem errors corrected
2      System should be rebooted
4      Filesystem errors were left uncorrected
8      Operational error
16     Usage or syntax error
32     Checking canceled by user request
128    Shared-library error
Fsck Repair Linux Filesystem
Sometimes more than one error can be found on a filesystem. In such cases, you may want fsck to automatically attempt to correct the errors. This can be done with:
# fsck -y /dev/sdb
The -y flag, automatically “yes” to any prompts from fsck to correct an error.
Similarly, you can run the same on all filesystems (without root):
$ fsck -AR -y
How to Run fsck on Linux Root Partition
In some cases, you may need to run fsck on the root partition of your system. Since you cannot run fsck while the partition is mounted, you can try one of these options:
- Force fsck upon system boot
- Run fsck in rescue mode
We will review both situations.
Force fsck Upon System Boot
This is relatively easy to complete, the only thing you need to do is create a file called forcefsck in the root partition of your system. Use the following command:
# touch /forcefsck
Then you can simply force or schedule a reboot of your system. During the next bootup, the fsck will be performed. If downtime is critical, it is recommended to plan this carefully, since if there are many used inodes on your system, fsck may take some extra time.
After your system boots, check if the file still exists:
# ls /forcefsck
If it does, you may want to remove it in order to avoid fsck on every system boot.
Run fsck in Rescue Mode
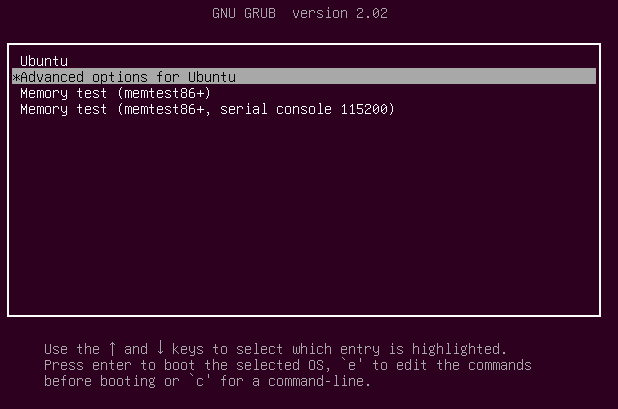
Running fsck in rescue mode requires a few more steps. First, prepare your system for reboot. Stop any critical services like MySQL/MariaDB etc and then type.
# reboot
During the boot, hold down the shift key so that the grub menu is shown. Select “Advanced options”.
Then choose “Recovery mode”.
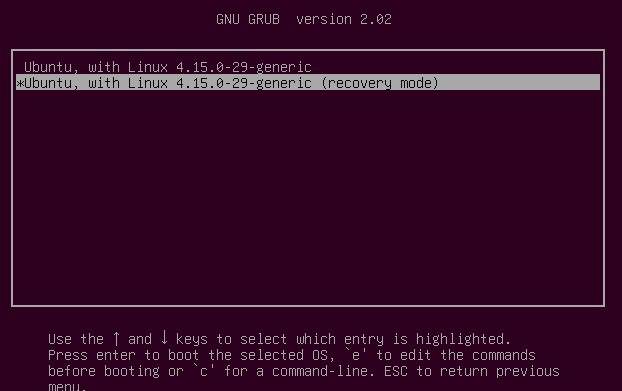
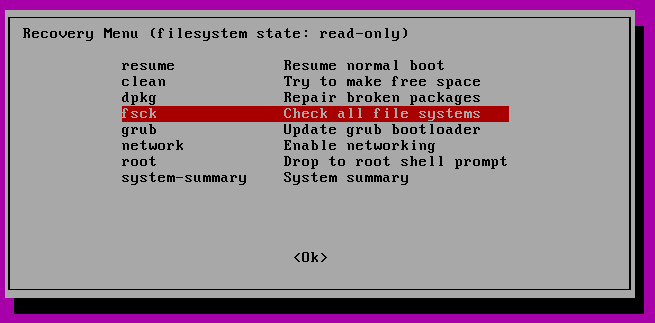
In the next menu select “fsck”.
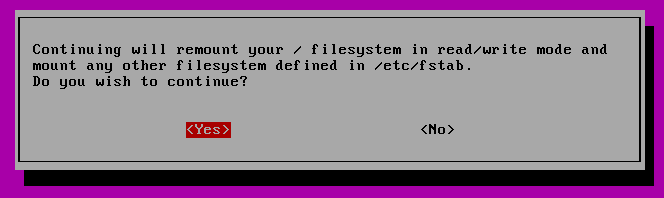
You will be asked if you wish to have your / filesystem remounted. Select “yes”.
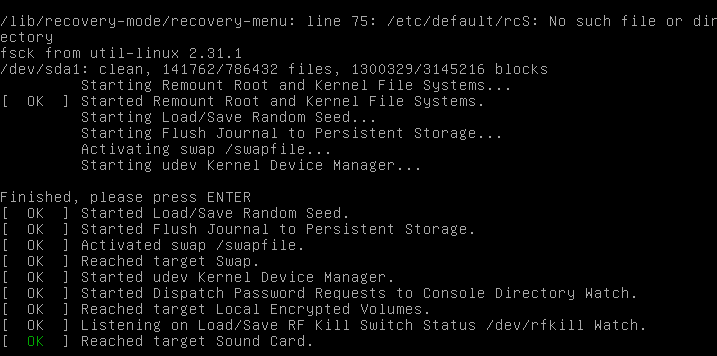
You should see something similar to this.
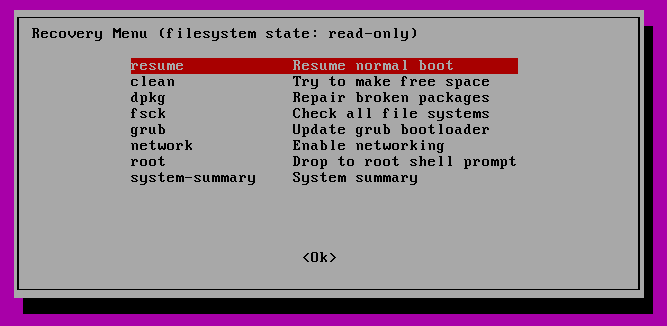
You can then resume normal boot, by selecting “Resume”.
Conclusion
In this tutorial, you learned how to use fsck and run consistency checks on different Linux filesystems. If you have any questions about fsck, please do not hesitate to submit them in the comment section below.
Sometimes bad things happen to good systems.
Fortunately, you’re a Linux user and you have fsck (file system check) to help with a potentially corrupted filesystem. This utility is used for checking and (optionally) repairing the file system.
There are several scenarios where you may want to use fsck. Typically, you would want to run this command if your system will not boot, a device (external drives or storage media) is not functioning properly, or if you have seen evidence of file corruption.
Fsck is a actually a «front-end» for a number of file system specific checkers like fsck.vfat, fsck.ext2, etc. These do not need to be specified, but you may be able to find more advanced options in the man pages of these more precise commands.
Introduction to the fsck command
The fsck command follows a pattern similar to most Linux commands.
fsck [options] [filesystem]
If you do not specify a filesystem, the system will analyze your fstab file (/etc/fstab) for the devices to scan.
You will need to run the command either as root user or use it with sudo.
You can use fdisk or df command to list the hard drive in Linux. This way, you can specify which device to be checked with fsck command.
Disk /dev/nvme0n1: 238.49 GiB, 256060514304 bytes, 500118192 sectors
Disk model: THNSN5256GPUK NVMe TOSHIBA 256GB
Units: sectors of 1 * 512 = 512 bytes
Sector size (logical/physical): 512 bytes / 512 bytes
I/O size (minimum/optimal): 512 bytes / 512 bytes
Disklabel type: gpt
Disk identifier: 014A45DC-22A2-4FC0-BEEA-25A6F2406380

Device            Start       End   Sectors   Size Type
/dev/nvme0n1p1     2048   1050623   1048576   512M EFI System
/dev/nvme0n1p2  1050624  98563270  97512647  46.5G Linux filesystem
/dev/nvme0n1p3 98564096 500117503 401553408 191.5G Linux filesystem
Unmount the device before running fsck
Do not run fsck on a mounted device, you will need to unmount the target first to avoid damage to your files.
If you try running fsck on a mounted device, you should see an error like this:
[email protected]:~$ sudo fsck /dev/sda3
fsck from util-linux 2.34
e2fsck 1.45.5 (07-Jan-2020)
/dev/sda3 is mounted.
e2fsck: Cannot continue, aborting.
Running fsck on a normal, healthy drive looks like this:
[email protected]:~$ sudo fsck /dev/sda2
fsck from util-linux 2.34
fsck.fat 4.1 (2017-01-24)
/dev/sda2: 5 files, 1967/1972 clusters
While fsck accepts a device name like /dev/sda, you may elect to enter the UUID to avoid confusion with mounting and unmounting devices. The UUID is a fixed value assigned to your device and will not be affected by these system changes.
Understanding exit codes for the fsck command
This is a list of the codes that may be returned from fsck after inspecting a disk. Your exit code will be a sum of these codes if you analyze one disk. If you are using fsck on multiple devices, it will return the bit-wise OR of the two sums.
- 0 — No errors
- 1 — File system errors corrected
- 2 — System should be rebooted
- 4 — File system errors left uncorrected
- 8 — Operational error
- 16 — Usage or syntax error
- 32 — Fsck canceled by user request
- 128 — Shared library error
You can check the exit code of the last run command using echo $? command.
Practical usage of the fsck command
Now that you are a tad bit familiar with the fsck command, let’s see practical use cases of this command.
Repair a USB disk and other removable devices
For our purpose, let’s assume that you have already identified the problematic device /dev/sdb.
First, you need to make sure that the drive has been unmounted:
sudo umount /dev/sdbNow run the fsck command:
sudo fsck /dev/sdb
Check the output for any errors. If none displayed, check the exit code with echo $?.
There are also some option flags that we can add to allow some automated correction. These commands aren’t standardized though, and you should verify the filesystem type and compare documentation from that specific man page.
Despite that, generally you can use -p to allow fsck to automatically apply repairs.
sudo fsck -p /dev/sdbSimilarly, -y will apply corrections to any detected filesystem corruption.
Repair the root file system
You cannot unmount the root partition while the system is active. If you suspect your main file system is corrupted, you have to use a different approach here.
There are actually a few different options that you can use. You can run fsck at boot time, in rescue mode, or use a recovery-themed live cd.
Many Linux distributions will automatically force fsck at start up after a certain number of failed boot attempts. If you prefer to take matters into your own hands, you can schedule the system to do this ourselves.
Most modern Linux versions feature a tool called tune2fs.
sudo tune2fs -c 1 /dev/sda
Presuming your root device is dev/sda, this is the command you would enter.
Now, what’s actually happening is that you’re changing the system settings so that fsck is run every n number of boots (1 in the example). You could also set this to a standard time interval. The options are days, weeks, or months.
Let’s say that you want fsck to run any time that you boot if there hasn’t been a check in a week. You could use -i to specify the interval and the command would look like this.
sudo tune2fs -i 1w /dev/sda
If you’re using systemd, you can force run fsck at your next boot by entering the following:
fsck.mode=force
fsck.repair=yes
Conclusion
You can always turn to the man-pages for more information. Just use man fsck in the terminal.
I hope you learned something new about the fsck command. If you have any comments or questions, please leave them below.