If you move your project or media folder or rename it, you will get an error message from Premiere Pro, saying Missing media for these clips. Here is how to show Premiere Pro where to find it:
Show Premiere Pro How to Resolve Error Message Missing Media For These Clips

- At the bottom of the Link Media Box, uncheck Use Media Browser to locate files.
- Click the Locate button, which opens a file browser.
- Look at the top of the screen, where Premiere is showing the previous location of the folder, and the name of the file.

- Click on the folder in the browser and then find the file name.
- Click on the file name.
- Click on Confirm.
Premiere Pro will automatically reconnect all the missing files and resolve the Missing media for these clips message.
Now continue editing.
Saved my project, come back two weeks later and all the original media files are «missing.» The locator can not see the files even though in the Mac Finder the files are there, in the same location, with the same name. Is there another way to link the file to the media clip?
Not sure why the Premiere file locator cannot find the file even though it is in the same place with the same name and I have not touched any of the files. They just do not show up on the file browser, though other files in the same folder do appear.
Restarted the Mac, still happening, restarted Premiere didn’t help.
Is there an issue with the cache that is an easy fix? Please help I needed to add the finishing touches to this project tonight and this is messing up the timeline for this project big time.
Hi Neil,
I’m afraid that failed. I’ve done this before and it worked in one other project but not with this.
I wonder if repeatedly editing a file in Audition (via Premiere) moves the audio file to some other cache location? Regardless, those audio files no longer exist. I’ve scoured my hard drive, recycle bin, even memory card in case I did something stupid like import the file from there and not the copy on my HD. Those files are GONE and I did not move, edit or delete them.
If you look at this file name ‘GOPR1711-hiding-from-lightening-copy Audio Extracted Audio Extracted Audio Extracted Audio Extracted.wav’ is shows ‘Extracted Audio’ mentioned 3 times.
I’m now terrified of spending more time working with Premiere if this happens again.
It seems my only option now is to re-edit from scratch. Is there a way to rebuild the audio from the original source MP4 clip like Premiere did in the first place?
The bridge is calling. I may jump.
In today’s post, I’ll walk you through exactly how easy it is to reconnect missing media files in Premiere Pro.
The dreaded missing media ‘red screen’ happens to the best of us, so don’t sweat it. Lucky for us, Premiere Pro has made it fairly quick and simple to reconnect multiple files at once so you can get back to editing in no time.
Understanding How Premiere Pro Works
Here’s a brief explanation for why you are getting the missing media notification in your project.
When you drag or import footage and other media files into your project panel within Premiere Pro, you need to know that the actual file itself hasn’t moved from its original location.
Premiere Pro simply creates a blueprint or a map of where that file lives and points back to the source of the file any time you use that file in your project.
For example, let’s say you’ve dragged in a file named ‘sunset’ from an external hard drive named ‘vacation videos’ that is located in a folder named ‘footage’.
The breakdown might look something like this:
Vacation Videos (External Hard Drive) -> Footage (Folder Name) -> Sunset (File Name)
This is where Premiere Pro will go to find this file anytime that you open your project.
However, if you move the file to a different folder OR if you rename and part of that equation (the hard drive, the folder, or the file itself) then Premiere Pro is going to be confused.
You changed the blueprint without letting Premiere Pro know.
This is why you’ll get the missing media link in your project.
If ever you move or rename a file, you have to redirect Premiere Pro to the new location of your file or files.
How to Relink Missing Media Files
First, think through what may have caused the broken link.
Did you move a folder or a file to a new location?
Did your hard drive get disconnected?
Did you rename any folders or files associated with your project?
If your hard drive was disconnected, you need to make sure that it is correctly connected before moving on to the next step.
Scenario 1: If you moved a folder or file to a new location.
Let’s walk through step by step the most common scenario – you moved a folder or file to a new location.

When you first open your project, you’ll see this ‘link media’ window pop open, letting you know exactly which files are missing.
If you don’t see this window, simply right click on a clip that is unlinked and choose ‘Link Media’.
For this scenario, you can leave all the default settings at the bottom as is.

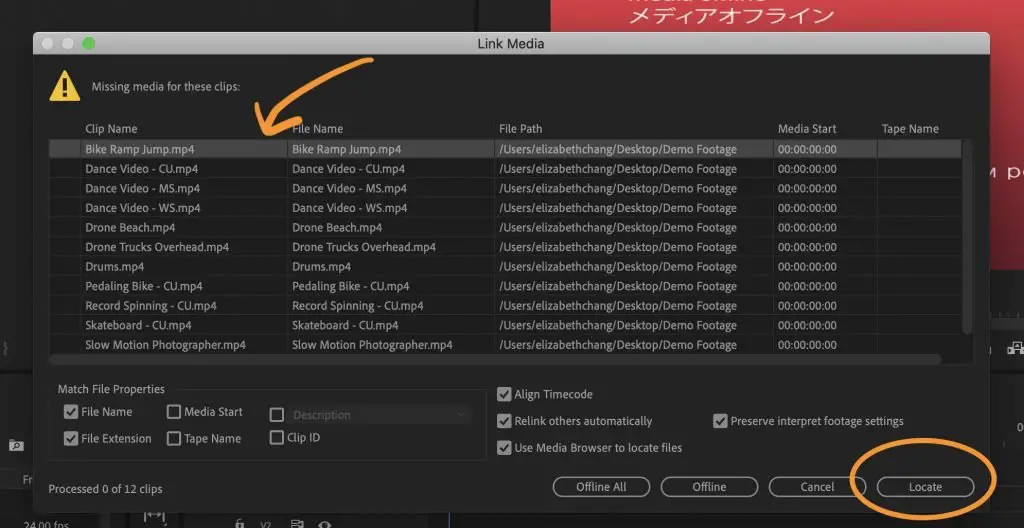
Select the top clip name and then hit the ‘Locate’ button in the bottom right corner.
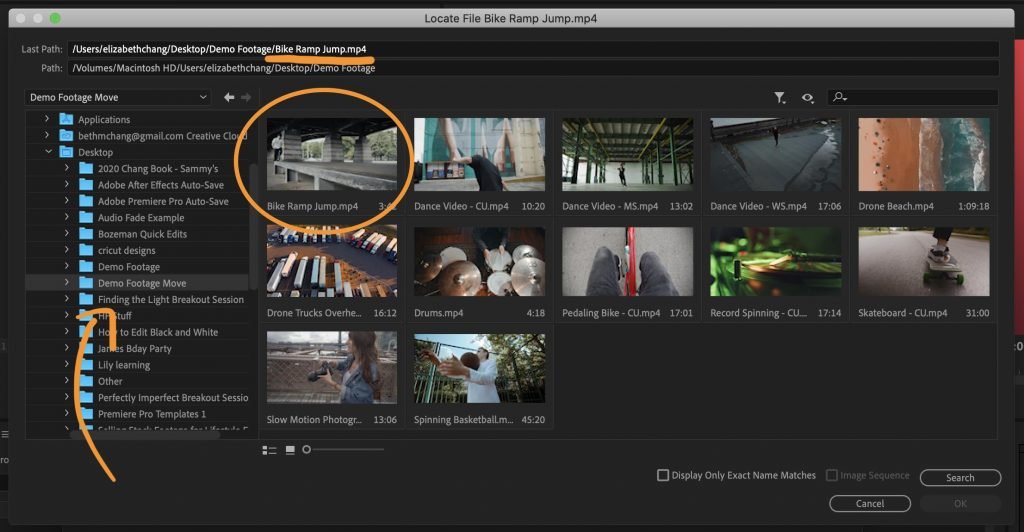
In this next window, you’ll see at the very top, the last place that Premiere Pro was able to locate your file, as well as the name of the file you are looking to connect.
On the left side, you will use this window to navigate to the new location of your footage. When you select a folder, it’s contents will appear in the main portion of the window.
If you find your clip right away, then you can select that single clip and hit ‘OK’ in the lower right hand corner.
If you can’t find your clip and aren’t sure where it is on your computer, then you can hit the ‘search’ button.
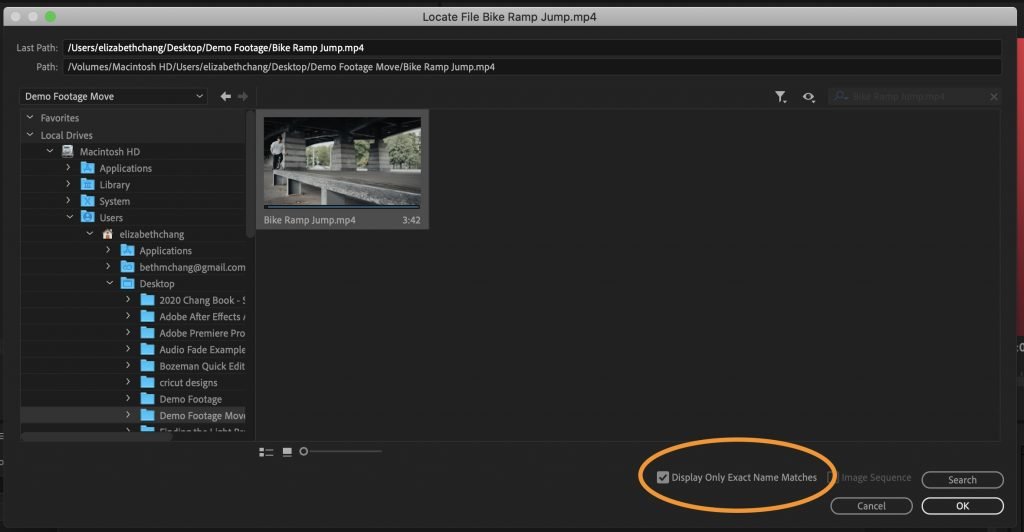
Lastly, if your clip is hard to find but you know you’re in the right folder (say the file has a long numerical name or you have tons of clips to sort through), you can click the option ‘Display Only Exact Name Matches’ to help narrow down your search.
Note: this only works if you haven’t changed the name or extension of your file.
Hit ‘OK’ and Premiere Pro will now reconnect and relink your media automatically.
Assuming you haven’t moved individual files into all different folders, Premiere Pro will be able to locate multiple files all at once.
For example, if you’ve moved an entire project folder from one drive to another, but haven’t changed the inner structure of that folder, Premiere Pro will be able to locate all the files at once.
Scenario 2: If you renamed a file or converted to a different extension.
If you have changed the name of a folder or a file within your project then you will follow most of the same steps above, but first you need to make sure you uncheck the ‘File Name’ default option under ‘Match File Properties’.
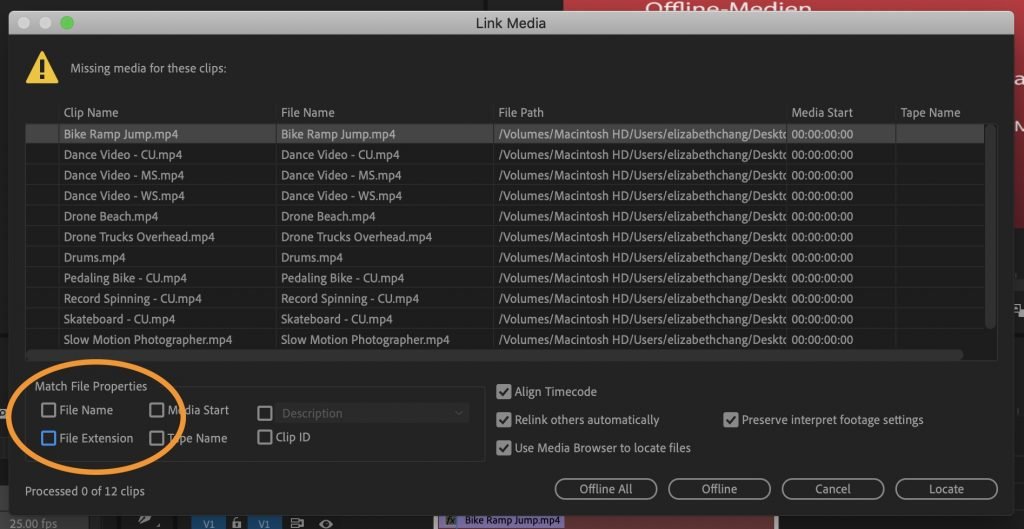
You also need to uncheck the second option for ‘File Extension’ if you’ve converted a file (from .MOV to .MP4, for example) from one format to another.
Now when you hit ‘Locate’, you’ll navigate to the newly named file, select it and hit ‘OK’ to reconnect your footage.
The Importance of File Organization
Now that you know why this error may have happened to you, you’ll understand much better why it’s so critical to be organized with your project from the start.
Any time that you make a single change to your folder structure or the files within them, you’ll have to reconnect those files again.
I have a specific folder structure that I use for all my video projects, which makes it very easy anytime I start a new project.
It looks like this:

As you can see, I have a separate folder for the most common types of files that I’ll have within my video projects.
I simply copy and paste this structure each and every time that I start a new project.
Feel free to copy my layout or create your own in a way that makes sense for you.
The point is to have a structure in place that allows you to keep your files organized from the start so you never end up moving them halfway through your edit.
Concluding Thoughts
That about wraps it up, guys.
Let me know if this helped solved your problem. Any further questions? Leave them for me in the comment box below.
Thanks!
-Beth
![]() Sigh… Just when you thought your project was ready to output, you get that dreaded red screen indicating your media is AWOL. It isn’t enough that it blares that your media is missing, it does so in eight languages.
Sigh… Just when you thought your project was ready to output, you get that dreaded red screen indicating your media is AWOL. It isn’t enough that it blares that your media is missing, it does so in eight languages.

Media goes missing for three principle reasons:
- You renamed or moved the media file.
- You renamed or moved one of the folders containing the media file.
- You deleted the media file or the folder containing the file.
If you deleted the file, well, ah, you’re screwed. You’re gonna need to recapture it from a backup. (You did remember to make backups, didn’t you?)
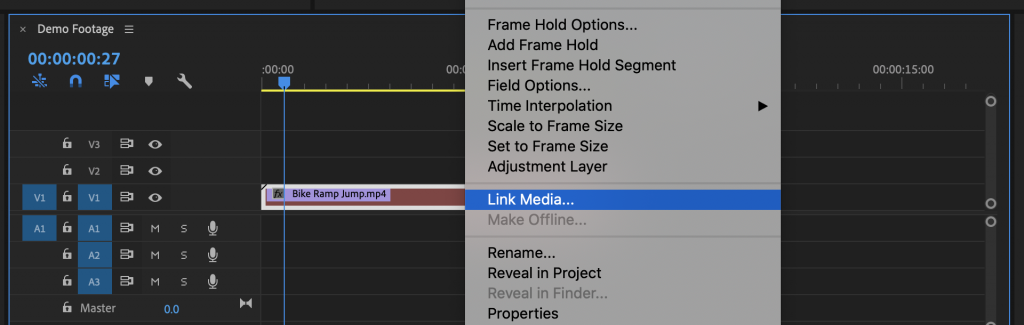
But, let’s assume that you simply renamed or moved something. In which case, Premiere Pro has a way to reconnect your project to your media. It’s called: Link Media. As you saw from the red screen above, Premiere is not shy about letting you know that media has gone missing. But there are other indicators, as well.

Here, in the Timeline, clips linked to missing media have a red cast.

And, in the Project pane, clips linked to missing media have a question mark in their file icon.
To relink media, select the missing media in either the Timeline or the Project pane. Then do one of the following:
- Right-click the selected clips and select Link Media.
- Choose Clip > Link Media

This opens the Link Media window, with a list of the selected missing media. The top half of this window lists all the clips that are missing, along with the path name to where they used to be. In this example, the media is on a drive called “Active Production” that is not mounted to the desktop.
The lower portion of this window allows you to select how you want files to be matched and how you want to find them. (In almost all cases, I like the default settings for this window.)

NOTE: An option I like a lot is “Relink others automatically.” This means that if ten files are missing in the same folder, or in nearby folders, when you find one file, Premiere will automatically find the rest of the missing media that is stored in a similar location.
The four buttons at the bottom allow you to indicate to Premiere whether you want to ignore all missing media (Offline All), ignore just the selected file (Offline), find the missing file (Locate), or give the entire situation up as hopeless and exit back to Premiere (Cancel).

In this example, we are not going to give up. Instead, click Locate to enable us to find the missing media and reunite it with our project.

This opens the Locate files window, with the name of the file we are looking for displayed in the title of this window. (Actually, this is the Media Browser, masquerading as the Locate Files window. Since we use the Media Browser when reviewing media for our projects, we already know how to select media using this.)

See this checkbox at the bottom: Display Only Exact Name Matches? When this is unchecked, all the files in the selected folder are displayed. When this is checked, only the files that exactly match the missing media (based upon the criteria you set previously in the Link Media window) are displayed.
Most of the time I leave this unchecked. But, when I’m in a folder with lots and lots of files, checking this allows me to quickly find the file I want.
NOTE: This checkbox remains checked until you uncheck it.

When you find the missing clip – and I emphasize that you need to find it, Premiere does not search your hard disk for you – select it, then click OK. (The text displayed in Last Path shows you where the media was located when it was last linked in Premiere Pro.)

When missing media is found, the Link Media window puts a checkbox next to the file name. When you are done, click the OK button, and the project is updated with new media connections.
Nice.
Bookmark the permalink.
Larry Recommends:
![]()
NEW & Updated!
Edit smarter with Larry’s latest training, all available in our store.
Access over 1,900 on-demand video editing courses. Become a member of our Video Training Library today!
JOIN NOW
Subscribe to Larry’s FREE weekly newsletter and save 10%
on your first purchase.