On 12/29/2016 at 1:00 AM, Helen said:
did you install it as service or not?
What IE version you have and is IE active (enabled or disabled) on your PC?
Open a browser and go to http://127.0.0.1:8888/gui , see what you get.
1) I did not install as a service (I believe). There was an option with a box that said it would run in the browser and I did not check it.
2) Internet Explorer says it’s version: 8.0.761.17514
3) When I type in the loopback address, port 8888/gui in Firefox I get a window asking for my login information. Then I type in a common ID I often use I get what looks like a functioning Sync window. When I do the same in Internet Explorer after I login I get the error massage that I described above.
I would prefer that Sync not run in a browser. Also I just found a link for IE version 11 for Windows 7 (my OS) that I have now installed. I’m going to restart now and see if that fixes it. I think that it will. Thanks for your help.
Hi @FrancisChung This is my favourite:
http://www.scootersoftware.com/features.php
Not just for source files, but:
» SYNCHRONIZE FOLDERS …You can efficiently update your laptop, backup your computer, or manage your website, and Beyond Compare will handle all the details. You can copy to and from disks, FTP servers, and zip files, all using the same interface. Anything you don’t want affected can be easily filtered out, and all of the powerful comparison techniques are available, making the backup as fast or robust as you need. You can automate repetitive tasks using a flexible scripting language, and any script can be called from the command line, allowing you to schedule your syncs for when it’s most convenient.»
It is also fast via FTP, and it can handle 10 simultaneous connections if needed, turning it to be the fastest diff/merge tool ever ![]() but this is only one example. I rarely usef the synchronize folders feature, but that one works well too.
but this is only one example. I rarely usef the synchronize folders feature, but that one works well too.
Edited January 9, 2017 by szabesz
typo

- Установка Resilio Sync на Ubuntu 16.04.
- Первый запуск.
- Удаленный доступ к Resilio Sync.
- Подключаем сертификат к Resilio Sync.
Resilio Sync (старое название BitTorrent Sync) — бесплатный, проприетарный (существует PRO версия) инструмент с закрытым исходным кодом для синхронизации паток, файлов и резервного копирования между произвольными устройствами по протоколу BitTorrent.
(?) Проблемы которое призвана решить программа:
- Ограничение на скорость передачи, размер файлов и занимаемое пространство на сервере.
- Безопасность передачи данных.
- Зависимость от облачной инфраструктуры.
(+) Плюсы использование:
- Возможность децентрализованного хранения информации.
- Зашифрованная передача данных.
- Многоплатформенность.
- Неограниченный размер папки.
- Высокая скорость обмена данными.
(-) Минусы использования:
- Закрытый код.
- Существование Pro версии.
Установка Resilio Sync на Ubuntu 16.04
Установка не требует много сил и времени, и ничем не отличается от установки других пакетов из неизвестных пока системе репозиториев.
Сразу после запуска Resilio Sync, можно открыть веб-интерфейс по адресу 127.0.0.1:8888. Этот адрес указан в файле конфигураций /etc/resilio-sync/config.json
Первый запуск
- Создаём пользователя: вводим логин, пароль.
- Вводим имя устройства, ставим галочки и нажимаем «Get started».
- Меняем язык в настройках, русский поддерживается.
Все действия в интерфейсе производятся через меню «+». Там можно выбрать синхронизировать папку уже находящуюся на сервере или добавить по ключу, которую мы хотим синхронизировать с нашим сервером. Для синхронизации папок создаются специальные ключи и ссылки, которые передаются на другие устройства с такой же программой.
Интерфейс прост и интуитивно понятен, разобраться вам не составит большого труда. Но не все идеально и без консоли иногда не обойтись, если вы при выборе папки для синхронизации получаете ошибку «Не хватает прав для записи в выбранную папку«, то выполните в терминале такую команду, она даст разрешение программе использовать папку, не меня владельца.
sudo setfacl -R -m "u:rslsync:rwx" /home/имя_пользователя
Я не ставил Resilio на свою локальную машину, поэтому, для доступа к веб-интерфейсу, мне понадобилось установить и настроить nginx. Прежде чем начинать немного объясню мои сокращения: текст меду «——» должен каким-то образом содержаться в файле, открытым ранее командой; вместо ВАШ.ДОМЕН.РУ, не забывайте вставлять ваш домен :Р
Перед началом создайте поддомен и направьте его на IP вашего сервера (пример).
Теперь по указанному вами адресу, при условии что, он направлен на IP адрес вашего сервера, откроется заветная страничка.
Подключаем SSL сертификат к Resilio
Приведенный мною способ удаленного доступ выше не учитывает «злых русских хакеров«, поэтому самое время подумать о безопасности и подключить сертификат (подробнее о SSL сертификатах) к веб-интерфейсу. Тут придется немного попотеть. Тут также сохраняются все сокращения и условности (+ВАШЕ@МЫЛО).
На этом статья подходит к концу, надеюсь, она вам понравилась и у вас все получилось. Жду ваших комментариев! Пока пока.
Хотите простой и беспроблемный способ синхронизации между Mac, Windows, Linux, Android и другими платформами? Попробуйте Resilio Sync! Это инструмент синхронизации, созданный некоторыми разработчиками BitTorrent. Он использует протокол BitTorrent для передачи файлов по сети и в Интернете в целом. Вот как настроить сервер Resilio Sync в Linux.
Добавить репозиторий программного обеспечения
Перед установкой программного обеспечения в системе Resilio Sync имеет репозиторий программного обеспечения, который необходимо добавить. Это потому, что это стороннее программное обеспечение, а дистрибутивы Linux не содержат его, возможно, потому, что Resilio Sync имеет закрытый исходный код, а дистрибутивы Linux не имеют лицензии на распространение этого программного обеспечения.
В любом случае следуйте этим инструкциям, чтобы добавить репозиторий стороннего программного обеспечения в вашу систему.
На основе Debian / Ubuntu
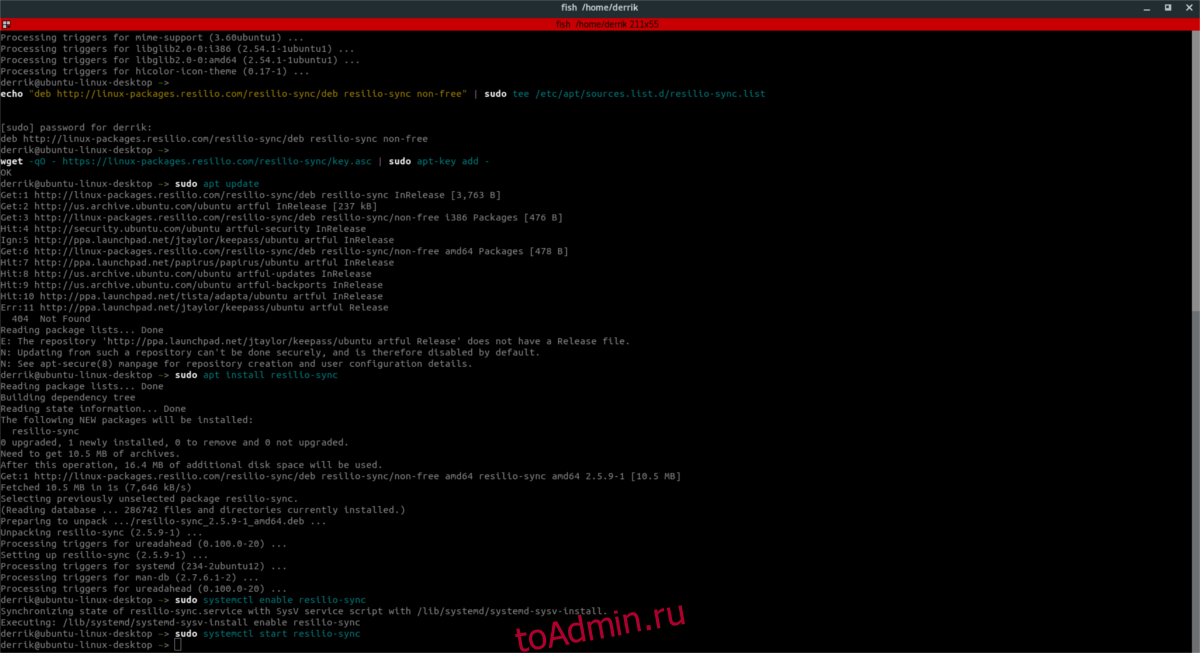
Хотя репозиторий программного обеспечения выглядит как Debian, он будет работать во всех дистрибутивах Linux, основанных на Debian и Ubuntu. В настоящее время нет надежного (и официального) PPA для пользователей Ubuntu. В итоге это придется делать. Откройте окно терминала и вставьте эту длинную строку внутрь. НЕ ДОБАВЛЯЙТЕ НИКАКИХ ПРОСТРАНСТВ. Если эту строку укоротить или каким-либо образом разнести, редактирование не будет работать правильно.
Эта строка команд автоматически редактирует программный файл основных источников. Не нужно ничего редактировать в текстовом редакторе.
echo "deb https://linux-packages.resilio.com/resilio-sync/deb resilio-sync non-free" | sudo tee /etc/apt/sources.list.d/resilio-sync.list
После того, как источник программного обеспечения будет в системе, вам нужно будет получить подписанный ключ GPG. Это важно, поскольку диспетчер пакетов НЕ БУДЕТ устанавливать неподписанное программное обеспечение:
wget -qO - https://linux-packages.resilio.com/resilio-sync/key.asc | sudo apt-key add -
Наконец, запустите обновление, чтобы отразить изменения.
На основе Ubuntu: sudo apt update
На основе Debian: sudo apt-get update
На основе Redhat
Дистрибутивы Linux на основе Redhat, такие как дистрибутивы на основе Debian, по умолчанию не поставляют программное обеспечение для синхронизации Resilio, и поэтому пользователи должны добавить сторонний программный сервер в свою систему, прежде чем получать программное обеспечение.
Вот как это сделать для Linux на базе Redhat. Сначала откройте окно терминала и получите root-доступ:
sudo -s
С корневым доступом создайте новый файл конфигурации репо.
sudo nano /etc/yum.repos.d/resilio-sync.repo
Затем вставьте в файл следующее:
[resilio-sync]
name=Resilio Sync
baseurl=https://linux-packages.resilio.com/resilio-sync/rpm/$basearch
enabled=1
gpgcheck=1
После создания нового файла репо добавьте публично подписанный ключ GPG. Системы на основе Redhat часто отказываются устанавливать программное обеспечение без этого шага, поскольку это проблема безопасности.
rpm --import https://linux-packages.resilio.com/resilio-sync/key.asc
Установка
В систему добавлены репозитории программного обеспечения. Теперь осталось только установить программное обеспечение. Если вы не используете Arch Linux, дистрибутив Linux на основе Debian / Ubuntu или Redhat, вместо выполнения приведенных ниже инструкций, вам нужно будет загрузить общий двоичный пакет для инструмента Resilio Syncing.
Примечание: если вы следите за этой статьей и используете общий двоичный файл, инструкции, скорее всего, будут такими же.
На основе Ubuntu (Mint / Elementary и другие производные)
sudo apt install resilio-sync
На основе Debian (Bunsen Labs и другие Linux на основе Debian)
sudo apt-get install resilio-sync
На основе Redhat (Fedora / CentOS / Rhel и т. Д.)
sudo dnf install resilio-sync
или же
sudo yum install resilio-sync
Arch Linux
Пользователям Arch Linux это легко. Как и большинство программ, программа Resilio Syncing легко доступна в пользовательском репозитории Arch Linux. Не знаете, как установить пакеты AUR? Перейдите к нашему руководству и узнайте о нем все!
Чтобы получить пакет Resilio Sync, загрузите снимок или укажите свой любимый помощник AUR непосредственно на этот пакет. здесь.
Конфигурация
Программное обеспечение установлено. Пришло время его настроить.
Systemd
В большинстве современных дистрибутивов Linux используется systemd (за исключением старых версий Debian). Именно благодаря этой системе инициализации включение и запуск службы синхронизации находятся на расстоянии двух команд. Во-первых, чтобы включить систему синхронизации, выполните эту команду:
systemctl --user enable resilio-sync
Systemctl enable позволит инструменту синхронизации автоматически запускаться при загрузке, если вы перезагрузитесь. Однако, если вы не заинтересованы в перезагрузке системы, пора запустить команду запуска. Эта команда сразу же запустит инструмент синхронизации для использования.
systemctl --user start resilio-sync
Старые версии Debian:
sudo service resilio-sync start
Синхронизации
Инструмент синхронизации не является программой GTK. Вместо этого инструмент основан на сети. Чтобы настроить синхронизацию, откройте веб-браузер и перейдите на этот веб-сайт: https: // localhost: 8888 / gui /
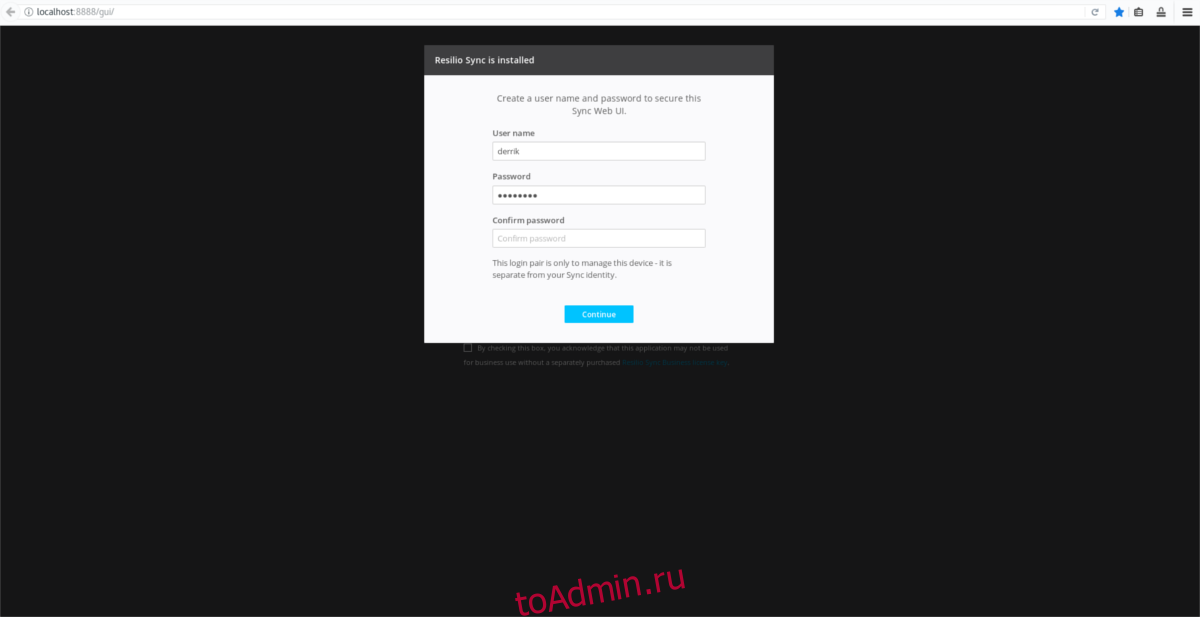
На веб-сайте Resilio Sync предлагает пользователю создать новое имя пользователя и пароль. Сделайте это и используйте надежный пароль.
На следующей странице пользователь должен указать имя для устройства синхронизации. Это то, что увидят другие пользователи сети, когда вы его используете. Введите имя вашего ПК. Например: ubuntu-PC или что-то подобное.

После того, как эта информация будет заполнена, вы попадете в интерфейс синхронизации.
Чтобы начать синхронизацию, нажмите знак + в пользовательском интерфейсе и выберите «стандартная папка».
Используйте браузер файлов, чтобы перейти к папке, которую следует использовать для синхронизации.
Настройте параметры синхронизации, такие как «только чтение» или «чтение и запись».
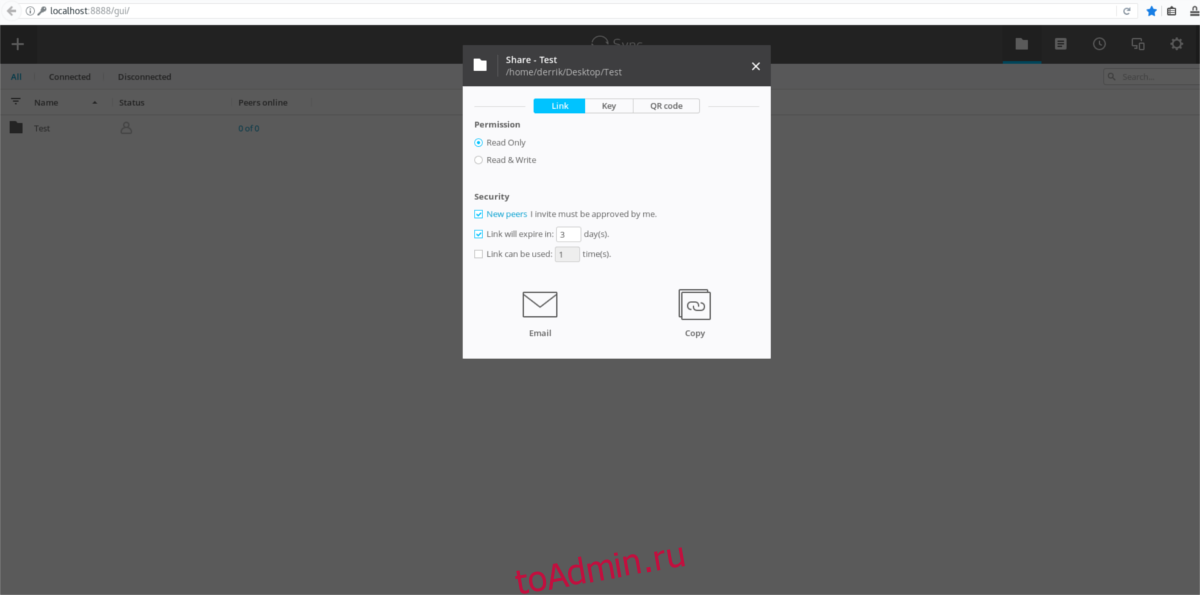
Установив разрешение, нажмите «ключ». Скопируйте этот ключ и отправьте его другим пользователям для добавления в синхронизацию. Или отсканируйте QR-код на мобильном телефоне.
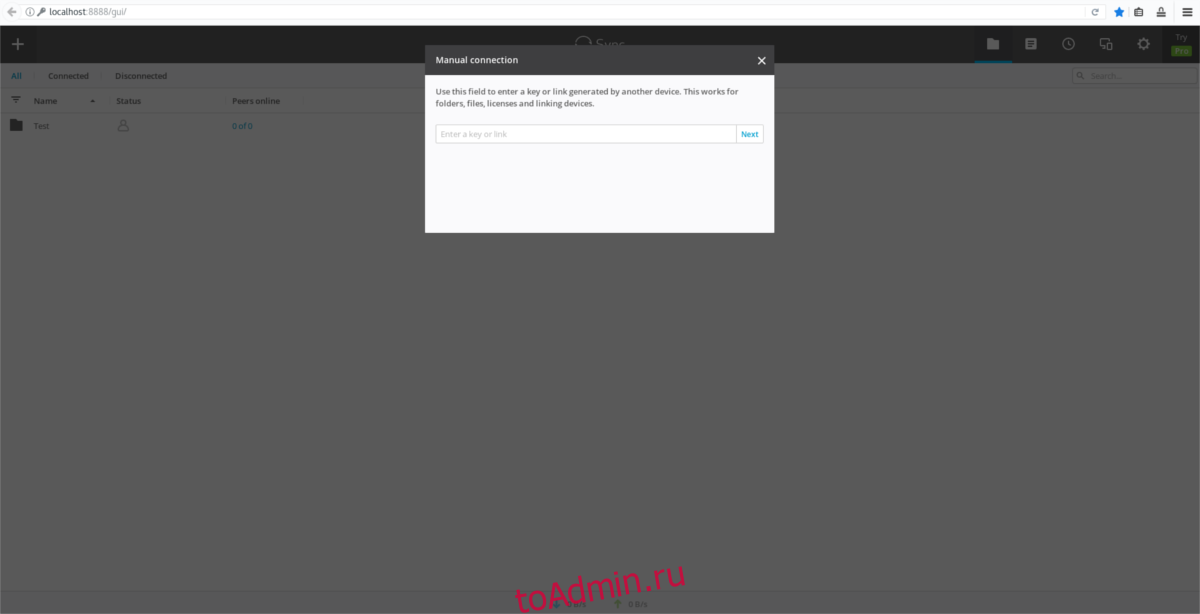
Примечание. Чтобы добавить синхронизацию с помощью ключа, нажмите +, а затем выберите «введите ссылку или ключ».
Resilio поддерживает Windows, Mac, Android.
Поставить оценку
Средний рейтинг 3.6, всего оценок — 8
- Скачать программу
- Описание и функции
- Скриншоты интерфейса
- Комментарии пользователей
| Название→ | Resilio Sync |
|---|---|
| Версия→ | 2.4.0.666 |
| Лицензия→ | Условно-бесплатно |
| Пробный период→ | 30 дней |
| Стоимость→ | 39.99 $ |
| Поддержка→ | Windows 11, 10, 8, 7, Vista, XP |
| Размер файла→ | 14.3 Мб |
| Разработчик→ | BitTorrent, Inc |
| Обновлено→ | 15 сентября 2016 |
Resilio Sync — удобный клиент для быстрой синхронизации файлов любого размера между устройствами без использования сторонних серверов.
Скачать для Windows
Скачайте последнюю версию Resilio Sync (2.4.0.666) по прямой ссылке с нашего сайта. Программа совместима с операционными системами Windows 11, 10, 8, 7, Vista, XP разрядностью 32/64-bit, размер установочного файла — 14.3 Мб. Данный программный продукт разработан BitTorrent, Inc и распространяется условно-бесплатно. Также вы можете скачать программу с официального сайта.
Описание программы
До ребрендинга эта программа называлась BitTorrent Sync, несложно догадаться, что для обмена данными в ней используется технология BitTorrent. Большинство пользователей привыкли к тому, что для синхронизации требуется «облако». Между тем такой вариант подходит не всем: одним недостаточно места, другие боятся утечки данных, а третьи уверены в постоянной слежке «Большого брата».
Файлы передаются непосредственно между устройствами пользователя, дополнительно весь трафик надежно шифруется. Скорость обмена информации в Resilio Sync зависит только от интернет-соединения и пользовательских настроек.
Можно выбрать папки для «расшаривания» — при любых изменениях программа обновляет данные на всех устройствах пользователя. Во время синхронизации работа программы незаметна. Resilio Sync дает возможность быстро делиться любыми файлами или в один клик удалять файлы со всех устройств одновременно.
Особенности лицензии
Через 30 дней бесплатное использование с ограниченными функциями
Преимущества и недостатки
- Неограниченный объем файлов для синхронизации
- Быстрое создание бекапов
- Может работать без подключения к интернету в локальной сети
- Высокий уровень конфиденциальности
- До ребрендинга в бесплатной версии было больше возможностей
- Ненужные функции в платных версиях
Скриншоты интерфейса
Комментарии пользователей
by Teodor Nechita
Eager to help those in need, Teodor writes articles daily on subjects regarding Windows, Xbox, and all things tech-related. When not working, you may usually find him either… read more
Updated on January 20, 2022
- Sync does not support your web browser is an error message that can be quickly fixed by following the steps indicated in this guide.
- Using a specialized, error-free browser will ensure that your account and your browser will be able to sync without problems.
- Make sure to check that the browser you are using si updated to the last version since this will fix the sync error quickly.
- Another quick fix for the sync that does not support your web browser error message is to ensure that you don’t have a plug-in or an add-on blocking the sync function.

- Optimize resource usage: Opera One uses your Ram more efficiently than Brave
- AI and User Friendly: New feature directly accessible from the sidebar
- No ads: Built-in Ad Blocker speeds up the loading of pages and protects against data-mining
- Gaming friendly: Opera GX is the first and best browser for gamers
- ⇒ Get Opera One
The sync browser option is a great feature that allows for a quick update between your browser and Google account.
From the settings, you can manage which data you want to sync, you can review the data and you can also manage the overall stored web and app activity.
Unfortunately, when trying to use the sync option, some users are getting the following error message:
Sync does not support your web browser. For your security, please use a current version of Chrome or Firefox.
There are s a few simple steps that you can take that will help solve this issue and we will explore them, in detail, in this article.
How can I fix the Sync does not support your web browser error?
1. Use a specialized browser
Opera is one of the world’s most popular and used browsers and it definitely comes with fantastic features that recommend it.
This is an error-free browser and the sync with your Google account happens within seconds and is extremely simple to manage.
Moreover, the browser has smart tab management features, a built-in ad blocker, and a free VPN.

Opera
Use one of the most reliable and error-free browser that will allow you to sync with your Google account instantly.
2. Update your browser
Chrome
- Open your Google Chrome browser.
- Click on the settings button in the upper-right corner of the screen.
- From the drop-down menu select the Help option.
- Now select About Google Chrome option.
- Google Chrome will automatically check for updates and install them.
Firefox
- Open your Mozilla Firefox browser.
- Click the Open menu button in the upper-right corner of your screen.
- Next, click on the Help option at the bottom.
- Select About Firefox.
- Mozilla Firefox will now search for updates and install the available ones.
Edge
- Open Microsoft Edge browser.
- Click the Settings and more icon in the upper-right corner of the browser window.
- From the drop-down menu that appears, go to Help and feedback.
- Next, select About Microsoft Edge from the side menu.
- If there are any available updates, install them and restart the browser.
3. Check the security options
Open another browser than the one you are currently using and see if you are getting the same error.
If not, then return to your initial browser go to the settings and search for the security option.
You need to make sure that there are no plug-ins, add-ons, that might be blocking the Sync links.
4. Ensure the Sync option is on
- On your computer, open your browser.
- At the top right, click on Profile
- Sign in to your Google Account.
- Next, click Turn on sync and select the Turn on option.
Sync does not support your web browser is an error message that can appear due to various reasons.
Fixing this problem is easy, by following the steps indicated in this article.
We would love to know which solution worked best for you, so don’t hesitate to let us know in the comments section below.
Still experiencing issues?
SPONSORED
If the above suggestions have not solved your problem, your computer may experience more severe Windows troubles. We suggest choosing an all-in-one solution like Fortect to fix problems efficiently. After installation, just click the View&Fix button and then press Start Repair.
![]()
How to set up Syncthing with a tray icon on a Windows PC you don’t have admin rights to
First things first: I do not recommend SyncTrayzor as it bundles the Syncthing binary. As such, it does not have the latest build of the latter. As a longtime user of various sync software, I absolutely assure you that you will always want to be running the latest build as the very nature of syncing […]
How to Afford the Latest New Apple Products
TL,DR: Apple gift cards If you think the iPad, iPhone, MacBook, MacBook Pro, MacBook Air, Mac Studio, iMac, Mac Mini, and Mac Pro are all too expensive and/or poor values for money relative to their competition, you’re not alone. It certainly doesn’t help that Apple’s own 0% interest financing tops out at 12 months for […]
How to restore the People Pane in Outlook 365
Microsoft has retired the People Pane, but you can still get it back … albeit not in the Outlook desktop app itself. Log in to the corresponding Outlook web app. You can find this via File -> Info -> Account Information -> Account Settings -> below Access this account on the web. If you do […]
How to get around Outlook 365 automatically encrypting emails you save to your computer
If the Microsoft Outlook 365 desktop app is encrypting emails you manually save to disk, here’s how to get around that. Log in to the corresponding Outlook web app. You can find this via File -> Info -> Account Information -> Account Settings -> below Access this account on the web. If you do not […]
How to connect to the NETGEAR BR500 router using OpenVPN-GUI on Windows
Assuming you’ve already installed OpenVPN and renamed the corresponding network adapter as the user manual‘s instructs, here are a few additional details: The config files downloaded from the router must all be located at C:Program FilesOpenVPNconfig or C:Users$USERNAMEOpenVPNconfig and must all have unique names. If you need only 1 connection and manually place files in […]
How to fix the HDHomeRun app getting stuck on the Recorded screen or being unable to find any tuners
If you find the above is happening, do this: If not already installed, install the HDHomeRun Software for your desktop OS. Please note that this is not the same as the app Run the HDHomeRun Setup app on your desktop. If a firmware update is available, it will execute and reboot the network tuner automatically. […]
How to convert a Workday job listing login redirect to the actual job listing
You just tried to apply directly to a job on the employer website from a job board link, but are greeted with a Workday login redirect that looks like this: To get to the original actual job listing: Click on the login page URL Delete login?redirect=%2FCompanyString Delete %2Fapply Replace remaining %2F strings with / Click […]
How to fix Windows Hello facial recognition locking your screen while the PC is use
If this is happening to you, you may have Personify ChromaCam installed. Stop the matching service in Serices.msc, then uninstall all Personify apps (as well as Logitech Capture). Fixed the problem for me with the Logitech BRIO 4K webcam on Windows 10. from jdrch https://dev.to/jdrch/how-to-fix-windows-hello-facial-recognition-locking-your-screen-while-the-pc-is-use-59ac via IFTTT
How to resolve the Resilio Sync service “Error 1069: The service did not start due to a logon failure.” on Windows
So you restarted your PC and Resilio Sync isn’t running. When you try to manually start the service, you get the Could not start the Resilio Sync Service service on Local Computer. Error 1069: The service did not start due to a logon failure. message. Here’s how to fix it: In Services.msc (which I assume […]
How to reset a default app preference in Samsung One UI 3.1 (Android 11)
Couldn’t find any writeup for this specifically elsewhere, so here’s how: Go to Settings -> Apps -> Choose default apps -> Opening links In the Installed apps list, tap the app you no longer want to be the default for something In the ensuing dialog, tap Clear defaults The above worked on a Samsung Galaxy […]
This tutorial will be showing you how to install Resilio Sync (formerly BitTorrent Sync) on Ubuntu 20.04 and 18.04. Resilio Sync is a free, fast, peer-to-peer file sharing and syncing tool released by Resilio, Inc, available for Linux, FreeBSD, Mac, Windows, Android, iOS, Amazon Kindle Fire and NAS devices.
Unlike Dropbox or NextCloud, Resilio Sync does not require a central server to store files. Instead, you just need to install Resilio Sync on end devices to sync files via the BitTorrent protocol, so you will not be bound by the storage limit of a server.
Installing Resilio Sync on Ubuntu 20.04 and Ubuntu 18.04 From Official Repository
Resilio Sync has a repository for Ubuntu. First, we need to import Resilio Sync’s public key so that the package manager can verify the Resilio Sync package. Open up a terminal window and run the following command to download the public key.
wget http://linux-packages.resilio.com/resilio-sync/key.asc
Then import the public key with apt-key.
sudo apt-key add key.asc
Next, run the following commands to add the Resilio Sync repository. (The add-apt-repository command is provided by the software-properties-common package.)
sudo apt install software-properties-common

sudo add-apt-repository "deb http://linux-packages.resilio.com/resilio-sync/deb resilio-sync non-free"

Ubuntu 20.04 and 18.04 will automatically update package index, so you don’t have to manually run sudo apt update. Now install the Resilio Sync package with the following command.
sudo apt install resilio-sync
Once installed, Resilio Sync will be automatically started. You can check its status with:
systemctl status resilio-sync
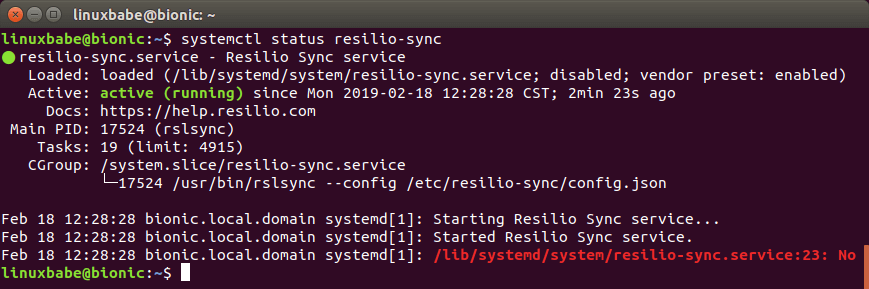
Hint: Press Q to gain back control of the terminal after running the above command.
If it’s not running, you can start it with:
sudo systemctl start resilio-sync
By default, Resilio Sync won’t start at boot time. You can enable auto start with:
sudo systemctl enable resilio-sync
Resilio Sync runs as the rslsync user and the Web UI listens on 127.0.0.1:8888 as specified in /etc/resilio-sync/config.json configuration file.
Setting Up the Resilio Sync Web UI
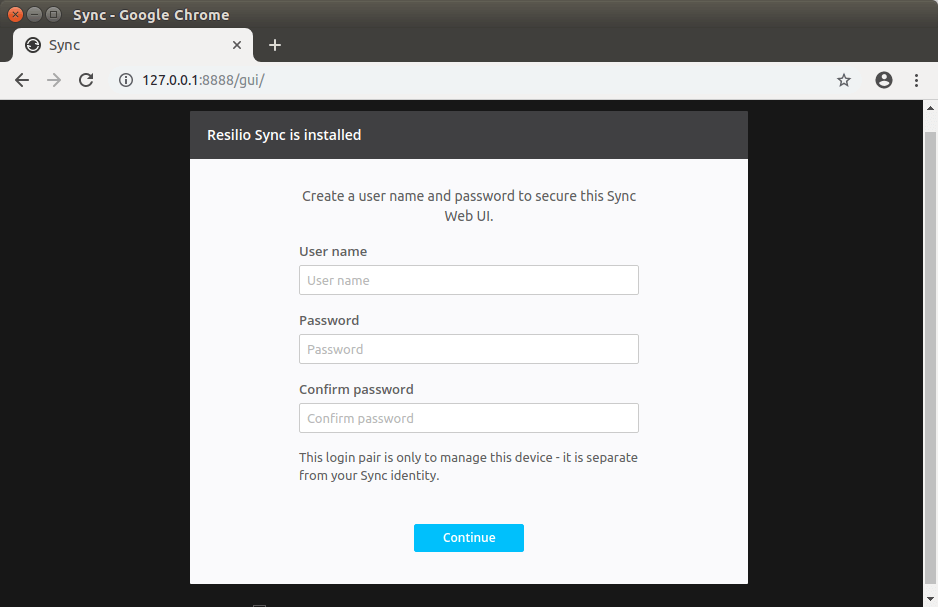
The Linux version of Resilio Sync doesn’t provide with a desktop client. Instead, you need to configure things via a web interface. Type in the following in your web browser address bar to access the Resilio Sync Web UI.
127.0.0.1:8888
If you install Resilio Sync on a remote Linux server, you need to set up a reverse proxy with Nginx or Apache in order to access the web UI. See the later part of this article.
You will be asked to set a username and password to secure the Web UI.
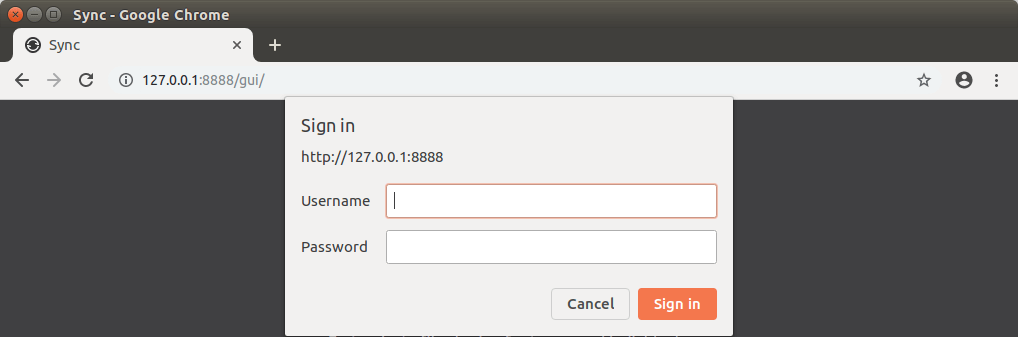
Then choose a name for your device and click Get started.

And enter the username and password you just created.
Once logged in, you can share a folder on your computer to other devices or receive a folder from another device.
Sharing Folders with Other Devices
To share a folder on your computer, click the + button at the upper left corner and select standard folder.
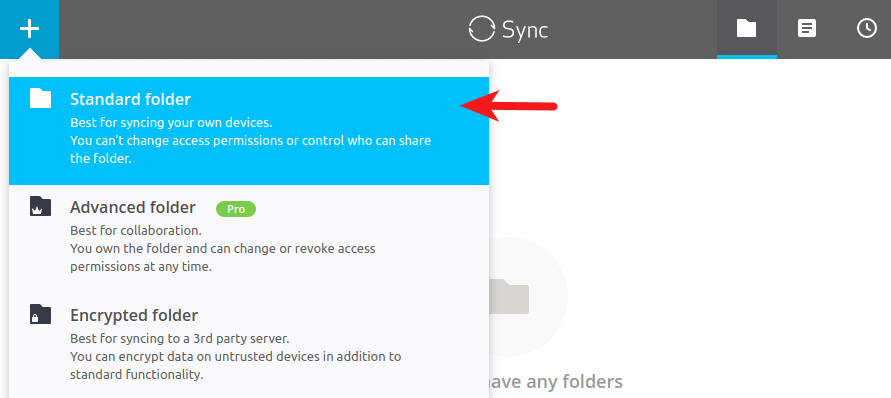
Then select a folder on your computer.
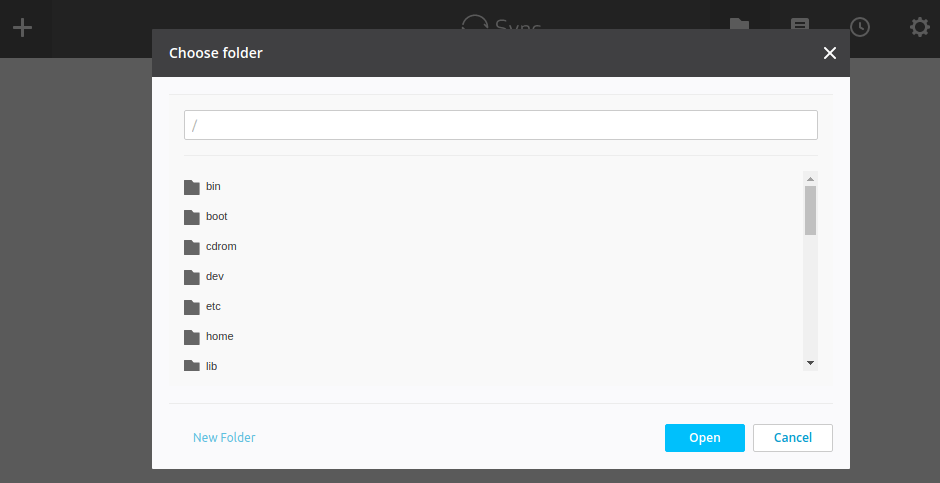
You might encounter the following error message.
Can't open the destination folder.
Or
Don't have permissions to write to selected folder.
That’s because Resilio Sync is running as rslsync user, who doesn’t have permission to access that folder.
Let’s say you selected your home folder /home/your-username/ as the shared folder. To fix the above error, all you need to do is to grant permissions on your home folder to the rslsync user with the following command.
sudo setfacl -R -m "u:rslsync:rwx" /home/your-username
The above command won’t change the owner of the shared folder. The owner has the same permissions as usual. What it does is to grant read, write and execute permissions to one more user, namely rslsync. Note that -R (recursive) flag must come before -m (modify) flag, which is immediately followed by the access control list entry (u:rslsync:rwx).
If you see this error:
sudo: setfacl: command not found
Then install the acl package and re-run the above setfacl command.
sudo apt install acl
Now you should be able to add your home folder as the shared folder.
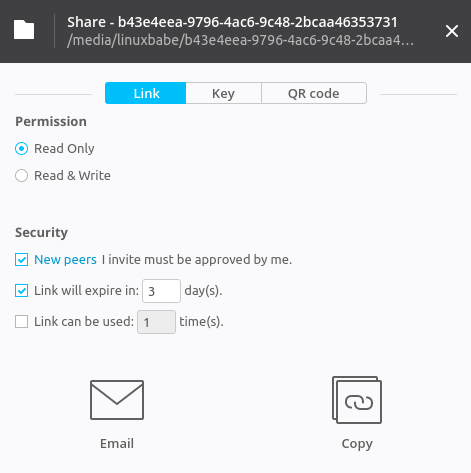
After the folder is added, you can share this folder via a link, secret key or QR code.
If the share folder is huge, it will take some time for Resilio Sync to index the content.
Receiving Folders From Other Devices
To receive a folder from another device, click the + button at the upper left corner and select “Enter a key or link”.

Then enter the key or link.
Using Resilio Sync on Ubuntu 20.04, 18.04 Server
You can install Resilio Sync on Ubuntu 20.04 and 18.04 server from repository mentioned above. If your server is sitting in the cloud, then you need to set up reverse proxy in order to access the Web UI because the Web UI listens on local host only. Once the reverse proxy is configured, you can access the Web UI via a domain name.
Setting Up Resilio Sync Reverse Proxy with Nginx
Nginx becomes more and more popular these days as a web server and reverse proxy. Install Nginx on Ubuntu 20.04, 18.04 server with the following command.
sudo apt install nginx
Start Nginx and enable auto start.
sudo systemctl start nginx

sudo systemctl enable nginx
Now create a virtual host file for Resilio Sync.
sudo nano /etc/nginx/conf.d/resilio-sync.conf
Copy and paste the following lines in to the file. Replace resilio.example.com with your real domain name. You should also add a DNS A record for this sub-domain.
server {
  listen 80;
  server_name resilio.example.com;

  access_log /var/log/nginx/resilio_access.log;
  error_log /var/log/nginx/resilio_error.log;
  location / {
     proxy_pass http://127.0.0.1:8888;
     proxy_set_header Host $host;
     proxy_set_header X-Real-IP $remote_addr;
     proxy_set_header X-Forwarded-For $proxy_add_x_forwarded_for;
  }
}
Save and close this file. Then test Nginx configuations.
sudo nginx -t
If the test is successful, reload Nginx.
sudo systemctl reload nginx
Now in your browser’s address bar type in resilio.example.com and you should be able to access the Web GUI.
Setting Up Resilio Sync Reverse Proxy with Apache
Apache is well-known web server that can also be used as a reverse proxy. If you prefer Apache to Nginx, install it on Ubuntu 20.04, 18.04 server with:
sudo apt install apache2
Start Apache and enable auto start.
sudo systemctl start apache2

sudo systemctl enable apache2
To use Apache as a reverse proxy, we need to enable the proxy modules and the header module.
sudo a2enmod proxy proxy_http headers proxy_wstunnel
Now create a virtual host file for Resilio Sync.
sudo nano /etc/apache2/sites-available/resilio-sync.conf
Copy and paste the following lines in to the file. Replace resilio.example.com with your real domain name. You should also add a DNS A record for this sub-domain.
<VirtualHost *:80>
   ServerName resilio.example.com
   ErrorDocument 404 /404.html

   ProxyPass / http://localhost:8888/
   ProxyPassReverse / http://localhost:8888/

   ErrorLog ${APACHE_LOG_DIR}/resilio_error.log
   CustomLog ${APACHE_LOG_DIR}/resilio_access.log combined

</VirtualHost>
Save and close the file. Then enable this virtual host.
sudo a2ensite resilio-sync.conf
Restart Apache
sudo systemctl restart apache2
Now you can access the Web UI via resilio.example.com.
Secure the Resilio Sync Web GUI with HTTPS
To encrypt the HTTP traffic when you visit Resilio Sync web UI via a domain name, we can enable HTTPS by installing a free TLS certificate issued from Let’s Encrypt. Run the following command to install Let’s Encrypt client (certbot) on Ubuntu 20.04, 18.04 server.
sudo apt install certbot
If you use Nginx, then you also need to install the Certbot Nginx plugin.
sudo apt install python3-certbot-nginx
Next, run the following command to obtain and install TLS certificate.
sudo certbot --nginx --agree-tos --redirect --hsts --staple-ocsp --email [email protected] -d resilio.example.com
If you use Apache, install the Certbot Apache plugin.
sudo apt install python3-certbot-apache
And run this command to obtain and install TLS certificate.
sudo certbot --apache --agree-tos --redirect --hsts --staple-ocsp --email [email protected] -d resilio.example.com
Where
--nginx: Use the nginx plugin.--apache: Use the Apache plugin.--agree-tos: Agree to terms of service.--redirect: Force HTTPS by 301 redirect.--hsts: Add the Strict-Transport-Security header to every HTTP response. Forcing browser to always use TLS for the domain. Defends against SSL/TLS Stripping.--staple-ocsp: Enables OCSP Stapling. A valid OCSP response is stapled to the certificate that the server offers during TLS.
The certificate should now be obtained and automatically installed.
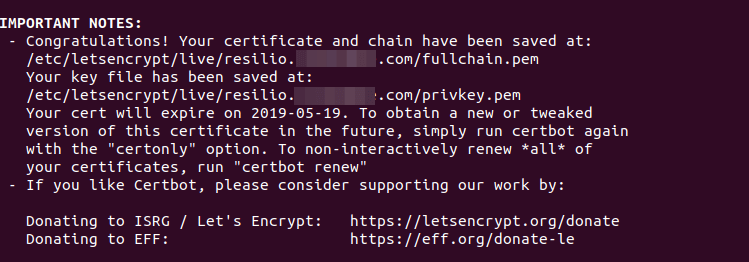
And you can access Resilio Sync Web UI via HTTPS (https://resilio.example.com).
Open Resilio Sync Port in Firewall
In addition to the Web UI port, Resilio Sync also needs to listen on the public interface to connect to peers. The listening port is different for each device. You can find it in Resilio Sync Web UI by going to Preference -> Advanced.
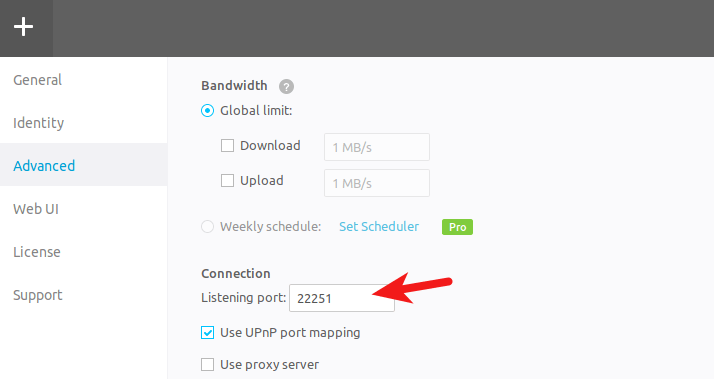
If you enabled UFW firewall on your Ubuntu server, then you need to open this port. For example, my port is 22251, so I run the following command to open it.
sudo ufw allow 22251
Resilio Sync iOS App
I use Resilio Sync to sync files between my Ubuntu desktop, Ubuntu server and iPhone. Some say that the iOS app is a complete disaster, but I found it working very well. By default, Selective Sync is enabled in the iOS app. That means individual files will be synced only when you choose to. If you disable Selective Sync, all files will be synced immediately.
How to Configure Selective Sync
In the Web UI, Resilio Sync tells you that selective sync is a pro feature for Linux users, but actually we can configure selective sync from the command line. Every sync folder has a hidden .sync folder created by Resilio Sync. In this hidden folder, there’s a file named IgnoreList, which is a UTF-8 encoded .txt file that helps you specify single files, paths and rules for ignoring during the synchronization job. It supports “?” and “*” wildcard symbols.
For example, I need to sync a folder between computer A and B in read and write mode. Computer B contains a file that I don’t want to be synced to computer A. Here’s the steps that I did to ignore that file.
- I add the folder in computer A’s Resilio Sync web UI.
- Now computer A has a
.synchidden folder. - I add the name of that file in
IgnoreListon computer A, so it will refuse to receive that file from Computer B. - Share the folder with computer B in read and write mode.
- Once the synchronization is finished, I can add the name of that file in Computer B’s
IgnoreList, so computer B won’t share that file with other computers if a new computer joins the synchronization.
Conclusion
I hope this tutorial helped you install Resilio Sync on Ubuntu 20.04 and Ubuntu 18.04. As always, if you found this post useful, then subscribe to our free newsletter to get more tips and tricks. Take care 🙂