Частенько бывает, что принтер внезапно впадает в ошибку, и перестает работать, как положено. В этом случае не стоит паниковать, а стоит разобраться, есть ли резон вызывать специалистов, или можно решить проблему самостоятельно? Если у вас имеется кое-какой опыт по решению несложных проблем, связанных с оргтехникой, то эта статья для вас. Она поможет определить возможные проблемы, возникшие в ходе эксплуатации вашего печатающего устройства.
Итак, начнем с Samsung ML1640/1645, 2240/2245.
Кнопки и индикаторы, расположенные на принтере:
1. Индикатор «OnLine / Error»
2. Индикатор «Toner»
3. Кнопка «Cancel»
Возможные ошибки:
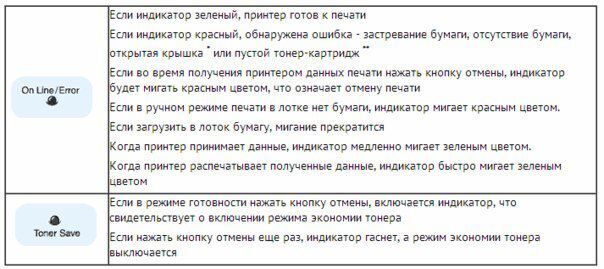
Рассмотрим индикацию ошибок в принтерах Samsung ML-1615, ML-2015 и им подобных.
Расположение кнопок и индикаторов: 
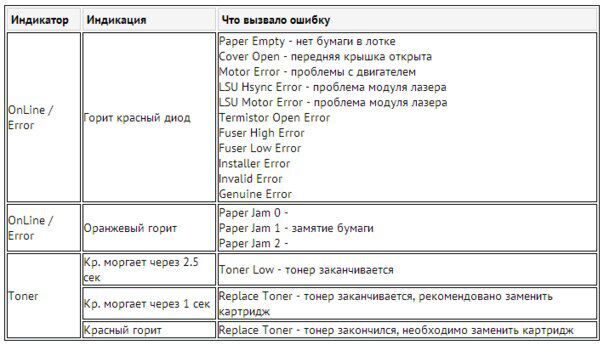
Расшифровка ошибок:
* В принтере две крышки – картриджа и печки. Обе вызывают эту индикацию
** Наличие картриджа определяется контактной площадкой на правой боковине картриджа и соответствующими контактами в принтере.
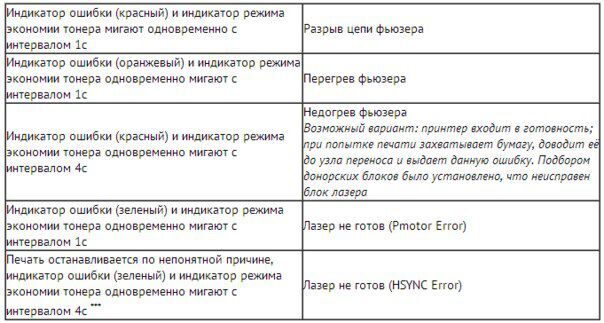
Если одновременно мигают оба индикатора, то в системе серьезная неисправность:
*** Эту ошибку на принтерах ML2015 и его аналогах вызывает также обломанный выступ возле левого самореза бункера отходов или неисправность соответствующего микрика.
Надеемся, эта статья поможет наставить вас на путь решения проблемы. А если это окажется для вас неподьемным, или вы захотите довериться специалистам — что ж, наша лаборатория СИТ-Мастер ждет вас с вашим поломанным печатающим другом, чтобы реанимировать его, и привести к доброму здравию. Ах и да — мы еще заправяем картриджи. Приходите к нам, и получите лучшую заправку из возможных.
Частенько бывает, что принтер внезапно впадает в ошибку, и перестает работать, как положено. В этом случае не стоит паниковать, а стоит разобраться, есть ли резон вызывать специалистов, или можно решить проблему самостоятельно? Если у вас имеется кое-какой опыт по решению несложных проблем, связанных с оргтехникой, то эта статья для вас. Она поможет определить возможные проблемы, возникшие в ходе эксплуатации вашего печатающего устройства.
Итак, начнем с Samsung ML1640/1645, 2240/2245.
Кнопки и индикаторы, расположенные на принтере:
1. Индикатор «OnLine / Error»
2. Индикатор «Toner»
3. Кнопка «Cancel»
Возможные ошибки:
Рассмотрим индикацию ошибок в принтерах Samsung ML-1615, ML-2015 и им подобных.
Расположение кнопок и индикаторов:
Расшифровка ошибок:
* В принтере две крышки – картриджа и печки. Обе вызывают эту индикацию
** Наличие картриджа определяется контактной площадкой на правой боковине картриджа и соответствующими контактами в принтере.
Если одновременно мигают оба индикатора, то в системе серьезная неисправность:
*** Эту ошибку на принтерах ML2015 и его аналогах вызывает также обломанный выступ возле левого самореза бункера отходов или неисправность соответствующего микрика.
Надеемся, эта статья поможет наставить вас на путь решения проблемы. А если это окажется для вас неподьемным, или вы захотите довериться специалистам — что ж, наша лаборатория СИТ-Мастер ждет вас с вашим поломанным печатающим другом, чтобы реанимировать его, и привести к доброму здравию. Ах и да — мы еще заправяем картриджи. Приходите к нам, и получите лучшую заправку из возможных.
К сожалению, любая техника иногда может работать с перебоями, выходить из строя или выдавать ошибки. Принтеры Samsung — не исключение. Для устранения неисправностей принтера в домашних условиях мы представляем вам таблицу индикации ошибок принтеров Samsung ML1640-1645, 2240-2245. Она поможет вам быстро установить причину сбоя и устранить ее самостоятельно. В том случае, если ошибка связана с неисправностями каки-либо деталей, то обращатесь в сервисный центр «Мастер Сервис». Мы поможем вам решить любую проблему, связанную с принтером Самсунг.

Коды ошибок Samsung ML1640-1645, 2240-2245 и способы их устранения:
| Индикатор | Индикация | Причина ошибки |
|---|---|---|
| OnLine / Error | Красный горит |
|
| OnLine / Error | Оранжевый горит |
|
| Toner | Кр. моргает через 2.5 сек | Toner Low |
| Кр. моргает через 1 сек | Replace Toner (заканчивается) | |
| Красный горит | Replace Toner (закончился) |
|
|

Устранение проблем, приводящих к сообщениям об ошибках на принтерах SamsungКогда принтер обнаруживает ошибку, он выдает сообщение об ошибке при помощи индикаторов на панели управления принтера. Найдите ниже комбинацию горящих и не горящих индикаторов, которая соответствует комбинации на панели управления принтера, и попробуйте предлагаемые решения для того, чтобы устранить проблему. |
|
Комбинации индикаторов на панели управления принтера приведена на верхнем рисунке; ниже дана расшифровка условных обозначений состояния индикаторов: |
Сообщения индикаторов об ошибках принтеров Samsung ML-1615, ML-2015 и им подобных |
||||||||||
|
|
||||||||||
|
||||||||||
| *) В принтере две крышки – картриджа и печки. Обе вызывают эту индикацию **) Наличие картриджа определяется контактной площадкой на правой боковине картриджа и соответствующими контактами в принтере |
||||||||||
 Если одновременно мигают оба индикатора, то в системе серьезная неисправность: Если одновременно мигают оба индикатора, то в системе серьезная неисправность: |
||||||||||
|
||||||||||
| ***) Эту ошибку на принтерах ML2015 и его аналогах вызывает также обломанный выступ возле левого самореза бункера отходов или неисправность соответствующего микрика |
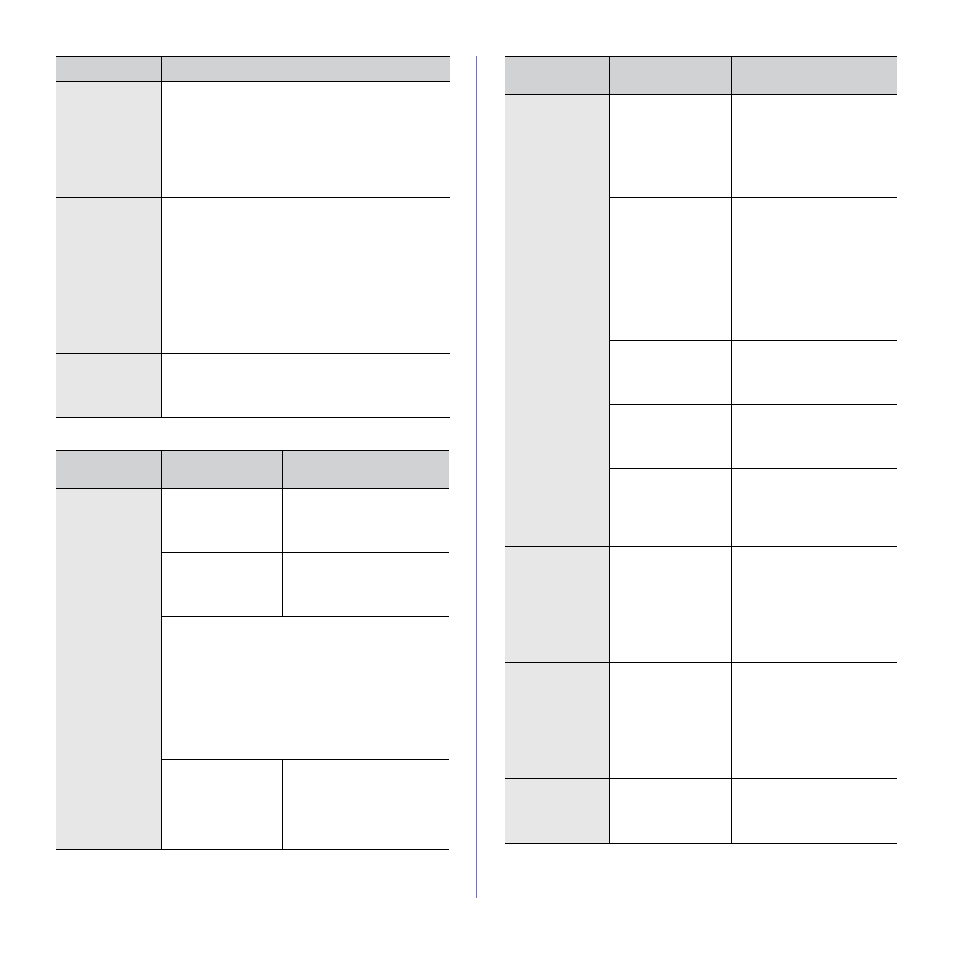
 Рассмотрим индикацию ошибок в принтерах Samsung ML-1615, ML-2015 и им подобных.

Индикация ошибок принтеров
Samsung ML1640-1645, 2240-2245
Панель управления, индикаторы
 |
|
| Индикатор | Индикация | Причина ошибки |
|---|---|---|
| OnLine / Error | Красный горит |
|
| OnLine / Error | Оранжевый горит |
|
| Toner | Кр. моргает через 2.5 сек | Toner Low |
| Кр. моргает через 1 сек | Replace Toner (заканчивается) | |
| Красный горит | Replace Toner (закончился) |
34_Устранение неисправностей
Неполадки при печати
Бумага
не подается
в устройство.
•
Устраните помехи внутри устройства.
•
Бумага загружена неправильно. Извлеките
бумагу из лотка и загрузите ее правильно.
•
В лотке слишком много бумаги. Извлеките из
лотка излишки бумаги.
•
Бумага слишком толстая. Используйте только
бумагу, соответствующую требованиям для
данного устройства. См. с. 19.
Бумага
постоянно
застревает.
•
В лотке слишком много бумаги. Извлеките из
лотка излишки бумаги. При использовании для
печати особых материалов допускается
одновременная загрузка в лоток только
материалов одинакового формата.
•
Используется бумага неподходящего типа.
Используйте только бумагу, соответствующую
требованиям для данного устройства. См. с. 20.
•
Внутри устройства скопились обрывки бумаги.
Откройте переднюю крышку и удалите остатки
бумаги.
Конверты
неправильно
подаются в
устройство.
Проверьте положение ограничителей по обеим
сторонам конверта.
ПРОБЛЕМА
ВОЗМОЖНАЯ
ПРИЧИНА
ПРЕДЛАГАЕМЫЕ
РЕШЕНИЯ
Устройство
не печатает.
На устройство не
подается питание.
Проверьте подключение
шнура питания. Проверьте
выключатель и источник
питания.
Устройство не
является принтером
по умолчанию.
Выберите Samsung ML-2240
Series в качестве принтера,
используемого Windows по
умолчанию.
•
Проверьте наличие следующих ошибок:
•
Не закрыта передняя крышка. Закройте крышку.
•
В принтере замялась бумага. Извлеките
замятую бумагу. См. с. 31.
•
Не загружена бумага. Загрузите бумагу. См. с. 22.
•
Не установлен картридж с тонером. Установите
картридж.
•
При возникновении системных ошибок во
время печати обратитесь к представителю
службы технической поддержки.
Неправильно
подключен
соединительный
кабель между
компьютером и
устройством.
Отключите кабель и
подключите его еще раз.
ПРОБЛЕМА
ПРЕДЛАГАЕМЫЕ РЕШЕНИЯ
Устройство
не печатает
(Продолжение).
Соединительный
кабель между
компьютером и
устройством
неисправен.
Если возможно, подключите
кабель к заведомо
исправному компьютеру и
напечатайте документ.
Кроме того, можно
проверить подключение с
другим кабелем принтера.
Указан
неправильный порт.
Проверьте настройки
принтера в операционной
системе Windows и
убедитесь, что задание
печати отправляется на
правильный порт. Если у
компьютера несколько
портов, убедитесь, что
устройство подключено к
нужному порту.
Неправильно
настроены
параметры
устройства.
Проверьте свойства
принтера и убедитесь, что
все параметры печати
установлены правильно.
Драйвер принтера
установлен
неправильно.
Переустановите программное
обеспечение принтера.
См. раздел «Программное
обеспечение».
Произошел сбой в
работе устройства.
Проверьте состояние
индикаторов панели
управления, чтобы
выяснить, не произошла ли
системная ошибка.
Устройство не
печатает на
бумаге
нестандартных
размеров
(например, на
бумаге для
счетов).
Фактический
размер бумаги
не соответствует
выбранным
настройкам.
Задайте правильный размер
бумаги на вкладке
Нестандартный в
свойствах принтера. Cм.
раздел «Программное
обеспечение»
Устройство
подает
материалы для
печати не из
указанного
источника
бумаги.
В окне свойств
принтера
неправильно указан
источник бумаги.
В большинстве приложений
выбрать источник бумаги
можно на вкладке Бумага
диалогового окна свойств
принтера. Правильно
укажите источник бумаги.
См. экран справки драйвера
принтера.
Печать
выполняется
слишком
медленно.
Задание печати
слишком сложное.
Упростите страницу или
измените параметры
качества печати.
ПРОБЛЕМА
ВОЗМОЖНАЯ
ПРИЧИНА
ПРЕДЛАГАЕМЫЕ
РЕШЕНИЯ
– Compatible Printer model: Samsung ML2240
– Samsung ML2240 Error Codes with quick guides:
- Code: 01
- Display: Vertical Black Line and Band
- Description: 1. Straight thin black vertical line occurs in the printing. 2. Dark black vertical band occur in the printing.
- Causes: 1. Damaged develop roller in the Developer. Deformed Doctor-blade or cleaningblade. 2. Scratched surface of the discharge roller in the developer. 3. Partly depression or deformation on the surface of the transfer roller.
- Troubleshooting Guides: 1. If causes 1 and 2 occur in the developer cartridge, replace the developer and try to print out. 2. Replace the transfer roller if occurred as No. 3.
- Code: 02
- Display: Vertical White Line
- Description: White vertical voids in the image.
- Causes: 1. Foreign matter stuck onto the window of internal lenses of LSU mirror. 2. Foreign matter or toner particles between the developer roller and blade. (In case the life of the developer has been expired, white lines or light image occur in front of the image.) 3. It may occur when Burr and foreign substances are on the window of the developer frame. 4. If the fuser is defective, voids occur periodically at the top of a black image.
- Troubleshooting Guides: 1. Foreign matter stuck onto the window : Clean the LSU window with recommended cleaner(IPA) Clean the window with a clean cotton swab. 2. Foreign matter in the LSU : Open the cover of LSU and clean with a cotton swab on the surface of the reflex mirror. 3. No 3. : Remove the foreign matter and burr of the exposure window. (Developer cartridge) 4. No. 4. : Open the front cover and check ribs that corresponds to the position of the voids. Remove if found. 5. If the problems are not solved, replace the developer cartridge.
- Code: 03
- Display: Horizontal Black Band
- Description: 1. Dark or blurry horizontal stripes occur in the printing periodically. (They may not occur periodically.)
- Causes: 1. Bad contacts of the voltage terminals to developer. 2. The rollers of developer may be stained. Charge roller = 38.5mm Supply roller = 51mm Develop roller = 50mm Transfer roller = 56.8mm
- Troubleshooting Guides: 1. Clean each voltage terminal of the Charge, Supply, Develop and Transfer roller. (remove the toner particles and paper particles) 2. Clean the right Gear that has relatively small gap of the teeth in the OPC. 3. If the malfunction persists, replace the developer.
- Code: 04
- Display: Black/White Spot
- Description: 1. Dark or blurry black spots occur periodically in the printing. 2. White spots occur periodically in the printing.
- Causes: 1. If dark or blurry black spots occur periodically, the rollers in the Developer may be contaminated with foreign matte or paper particles. ( Charge roller : 38.5 mm interval OPC drum : 96 mm interval) 2. If faded areas or voids occur in a black image at intervals of 96 mm, or black spots occur elsewhere, the OPC drum surface is damaged. 3. If a black image is partially broken, the transfer voltage is abnormal or the transfer roller’s life has expired.
- Troubleshooting Guides: 1. Run OPC cleaning Mode Print and run the Self-test 2 or 3 times. 2. In case of 96 mm interval unremovable in 1, cleanly remove foreign substances stuck on the OPC location equivalent to black spots and white spots with a dry duster. 3. The transfer roller guarantees 125,000 sheets printing. If the roller’s life is expired, replace it. 4. In case of 38.5 mm interval unremovable in 1, take measures as to replace the developer cartridge and try to print out. 5. Clean the inside of the set against the paper particles and foreign matter in order not to cause the trouble.
- Code: 05
- Display: Light Image
- Description: The printed image is light, with no ghost.
- Causes: 1. Develop roller is stained when the toner of developer cartridge is almost consumed. 2. Ambient temperature is below than 10°C. 3. Bad contact caused by the toner stains between the high voltage terminal in the HVPS and the one in the set. 4. Abnormal output from the HVPS. (Run self-test and check 1-4)
- Troubleshooting Guides: 1. Check if the Toner Save mode is off. 2. No 1 : Replace the developer cartridge and try to print out. 3. No 2 : Wait 30 minutes after printer is powered on before you start printing. 4. No3 : Clean up the contaminated area by the toner. 5. Replace the HVPS if the problems are not solved by the above four directions.
- Code: 06
- Display: Dark Image or a Black
- Description: The printed image is dark.
- Causes: 1. No charge voltage in the engine board. ( Perform DCU diagnostic code 01) 2. Charge voltage is not turned on due to the bad contacts between power supply in the side of the Developer and charge terminal of HVPS.
- Troubleshooting Guides: 1. Clean the high voltage charge terminal. 2. Check the state of the connector which connects the engine board and HVPS. 3. Replace the HVPS if not solved by the above direction 1 and 2.
- Code: 07
- Display: Uneven Density
- Description: Print density is uneven between left and right.
- Causes: 1. The pressure force on the left and right springs of the transfer roller is not even, the springs are damaged, the transfer roller is improperly installed, or the transfer roller bushing or holder is damaged. 2. The life of the Developer has expired. 3. The toner level is not even on the developer roller due to the bad blade.
- Troubleshooting Guides: 1. Replace both the left and right Spring Holder. 2. Occur in the developer cartridge, replace the developer and try to print out.
- Code: 08
- Display: Background
- Description: Light dark background appears in whole area of the printing.
- Causes: 1. Recycled recording paper has been used. 2. The life of the Developer has expired. 3. The up-to-down movement of the transfer roller is swift? 4. The HVPS is normal? (Perform DCU diagnostic code 01-04)
- Troubleshooting Guides: 1. B/S is not guaranteed when using recycled paper. 2. Replace the Developer that has expired. 3. Clean the busing part of the transfer roller. 4. Replace the Developer if not solved by the above direction 1-3.
- Code: 09
- Display: Ghost (1)
- Description: Ghost occurs at 96 mm intervals of the OPC drum in the whole printing.
- Causes: 1. Bad contacts caused by contamination from toner particles between high voltage terminal in the main body and the electrode of the Developer. 2. Bad contacts caused by contamination from toner particles between high voltage terminal in the main body and the one in the HVPS board. 3. The life of developer is expired. 4. Transfer roller lifetime(125,000 sheets) has expired. 5. Abnormal low temperature(below 10°C). 6. Damaged cleaning blade in the developer.
- Troubleshooting Guides: 1. Clean the terminals when contaminated by toner particles. 2. Occur in the developer cartridge, replace the developer and try to print out. 3. Replace the engine board if not solved by the above directions 1-2. 4. If not solved by the direction 3, check the transfer roller lifetime and replace it. 5. Wait about 1 hour after power on before using printer. 6. Occur in the developer cartridge, replace the developer and try to print out.
- Code: 10
- Display: Ghost (2)
- Description: Ghost occurs at 96 mm intervals of the OPC drum in the whole printing. (When printing on card stock or transparencies using manual feeder)
- Causes: When printing on card stock thicker than normal paper or transparencies such as OHP, higher transfer voltage is required.
- Troubleshooting Guides: Select ‘Thick Mode’ on paper type menu from the software application and after using returning to the original mode is recommended.
- Code: 11
- Display: Ghost (3)
- Description: White ghost occurs in the black image printing at 51mm intervals.
- Causes: 1. The life of the developer may be expired. 2. The abnormal voltage and bad contact of the terminal of the supply roller
- Troubleshooting Guides: 1. Occur in the developer cartridge, replace the developer and try to print out. 2. Check the approved voltage of the supply roller and contact of the terminal and adjust if necessary.
- Code: 12
- Display: Ghost (4)
- Description: Ghost occurs at 70 mm intervals.
- Causes: The temperature of the fuser is maintained high.
- Troubleshooting Guides: 1. Disassemble the fuser and remove the contaminated toner particles on the roller and clean the foreign matter between Thermistor and Heat roller.

Solve Samsung ML2240 Error codes
- Code: 13
- Display: Satins on the Face of Page
- Description: The background on the face of the printed page is stained.
- Causes: 1. Toner leakage due to improperly sealed developer. 2. If the transfer roller is contaminated, satins on the face of page will occur.
- Troubleshooting Guides: 1. Replace the developer cartridge. 2. If the transfer roller is contaminated, run PC Cleaning Mode Print 2 or 3 times. And perform Self-Test 2 or 3 times to remove contamination.
- Code: 14
- Display: Satins on Back of Page
- Description: The back of the page is stained at 56.1 mm intervals.
- Causes: 1. Transfer roller is contaminated. 2. Pressure roller is contaminated.
- Troubleshooting Guides: 1. Perform the OPC Cleaning Mode Print 2 or 3 times. Run Self-Test to remove the contamination of the transfer roller. 2. Replace the transfer roller if contaminated severely. 3. Disassemble the fuser and clean the H/R(Heat Roller) and P/R(Pressure roller). And check the area between H/R and Thermistor. If contaminated, clean the area not to be deformed.
- Code: 15
- Display: Blank Page Print out (1)
- Description: Blank page is printed.
- Causes: Bad ground contacts in OPC and/or developer.
- Troubleshooting Guides: Remove contamination of the terminals of the developer and the unit.
- Code: 16
- Display: Blank Page Print out (2)
- Description: 1. Blank page is printed. 2. One or several blank pages are printed. 3. When the printer turns on, several blank pages print.
- Causes: 1. Bad ground contacts in OPC and/or developer. 2. Abnormal solenoid.
- Troubleshooting Guides: 1. Remove contamination of the terminals of the developer. 2. Perform the engine self test using DCU to check if the Solenoid is normal.(refer to code 06) 3. If not solved by the above directions 1-2, Replace the engine board. 4. Turn the power off, delete the data of PC and try printing again.
- Code: 17
- Display: Wrong Print Position
- Description: Printing begins at wrong position on the paper.
- Causes: Wrong sense time caused by defective feed sensor actuator.
- Troubleshooting Guides: Replace the defective actuator
- Code: 18
- Display: JAM 0
- Description: 1. Paper is not exited from the cassette. 2. Jam-0 occurs if the paper feeds into the printer.
- Causes: 1. Check the Solenoid by using DCU diagnostic mode 06. 2. Check if the pad is loose due to bad sealing of the side-pad. 3. Check the surface of the roller-pickup for foreign matter. 4. If continuous clusters occur, check whether the assembly slot between shaft-pickup and housing-pickup become open or is broken away. 5. If the paper feeds into the printer rand Jam 0 occurs, perform DCU to check feed-sensor of the engine board.
- Troubleshooting Guides: 1. Replace the solenoid. 2. Replace the side-pad Assembly L or R, if necessary. 3. Clean with soft cloth dampened with IPA(Isopropyl Alcohol) or water. 4. Replace the Housing-Pickup and/or Shaft-Pickup.
- Code: 19
- Display: JAM 1
- Description: 1. Recording paper is jammed in front of or inside the fuser. 2. Recording paper is stuck in the discharge roller and in the fuser just after passing through the Actuator-Feed.
- Causes: 1. If the recording paper is jammed in front of or inside the fuser. (Perform DCU diagnostic code of) 2. If the recording paper is stuck in the discharge roller and the fuser just after passing through the Actuator- Feed, Feed Actuator may be defective.
- Troubleshooting Guides: 1. Replace the SMPS. 2. Reassemble the Actuator-Feed and Spring-Actuator if the returning is bad.
- Code: 20
- Display: JAM 2
- Description: 1. Recording paper is jammed in front of or inside the fuser. 2. Recording paper is stuck in the discharge roller and in the fuser just after passing through the Actuator-Feed.
- Causes: 1. If the paper is completely fed out of the printer, but Jam 2 occurs : Exit sensor is defective. • After the paper is completely discharged, actuator Exit should return to the original position to shut the photo-sensor. Sometimes it takes longer hour than it should and does not return. 2. If the paper is rolled in the Fuser Roller: • This occurs when a Guide claw is broken away or transformed. • It occurs when the Spring of a Guide claw is broken away or transformed. • It occurs when the Heat-Roller or Pressure-Roller is seriously contaminated with the toner. 3. Paper is accordion in the fuser.
- Troubleshooting Guides: 1. Check if the exit sensor actuator is defective. • Check if the actuator exit is unformed (Check if the lever part is unformed in shape). • Check whether burrs occur in the assembly part of the actuator exit or not and if the actuator is smoothly operated. • Check if foreign matters and wire get caught in the actuator exit’s operation. 2. If the paper is stuck in the fuser : disassemble the fuser and remove the jammed paper, and clean the surface of the pressure roller with dry gauze. 3. Remove the jammed paper after disassembling the fuser : Clean the surface of the pressure roller with dry gauze. • Remove the toner particles stained on the rib. • Check the assemblage and performance of the exit.
- Code: 21
- Display: Multi-Feeding
- Description: Multiple sheets of paper are fed at once.
- Causes: 1. Solenoid malfunction(the solenoid does not work properly): Perform DCU mode : solenoid check 06. 2. Pad-Friction is contaminated with foreign matter.(oil…) 3. The face of paper is blended.
- Troubleshooting Guides: 1. Replace the solenoid if necessary. 2. Clean the pad friction with soft clothe dampened with IPA(Isopropyl Alcohol). 3. Use the smooth paper.
- Code: 22
- Display: Paper rolled in the fuser
- Description: If contaminated at intervals of 57mm on the back of a paper.
- Causes: 1. Contamination of the pressure roller. (Background, Hot off set)
- Troubleshooting Guides: 1. Disassemble the fuser, clean the area between the Heat-roller and Thermistor and remove the foreign matter of the pressure roller. 2. If background appears badly in the printing, fix it by referring to the solutions for background. (See 4-2-8 Background)
- Code: 23
- Display: OPC
- Description: Paper is rolled up in the OPC.
- Causes: 1. Paper is too much thin. 2. The face of paper is curled.
- Troubleshooting Guides: 1. Recommend to use normal paper. 2. How to remove the rolled paper in the OPC. • Remove the paper while turning the OPC against the ongoing direction. • Clean fingerprints on the OPC softly with soft cloth dampened with IPA(Isopropyl Alcohol) or tissue.
- Code: 24
- Display: All LEDs blinking (Fuser Error)
- Description: 1. All the lamps on the operator panel blink. 2. Gear of the fuser does not work and breaks away melt away. When printing, motor breaks away from its place due to defective fuser gear.
- Causes: 1. Check if the thermostat, AC wire and Heat Lamp is open. 2. Check if the thermistor sensor is in place. 3. Check if the heat lamp works properly. 4. Check if the overheat circuit works properly. 5. The fuser gear is defective due to melting away.
- Troubleshooting Guides: 1. If the thermostat is open replace the fuser and check following items. 2. If the thermistor sensor device is located deep in the sponge, replace the fuser. 3. Check if the circuit of overheat mode works properly. 4. Run DCU mode : Perform DCU diagnostic code 10.
- Code: 25
- Display: All LEDs blinking (Scan Error)
- Description: 1. All lamps on the operator panel blink.
- Causes: DCU Mode : Perform DCU diagnostic code 05. If the DCU error code 95 is displayed, replace LSU.
- Troubleshooting Guides: Replace LSU. If you cannot solve the problem after you replace LSU, replace the main board.
- Code: 26
- Display: Not function of the gear of the fuser due to melting away
- Description: The motor breaks away from its place due to gear melting away.
- Causes: DCU Mode : Check if the Error States ’60’ ’62’ ’68’ occur. Check the operation of Fuser Erasing Lamp On/Off with the Error Code Check -10-.
- Troubleshooting Guides: 1. Replace the Fuser. 2. Replace the Main Control board.
- Code: 27
- Display: Paper Empty
- Description: The paper lamp on the operator panel is on even when paper is loaded in the cassette.
- Causes: 1. Bending or deformation of the actuator of the paper sensor. 2. The function of the engine board is defective Perform DCU mode: Perform DCU diagnostic code 8.
- Troubleshooting Guides: 1. Replace the defective actuator. 2. Replace the engine board.
- Code: 28
- Display: Paper Empty without indication
- Description: The paper lamp on the operator panel does not come on when the paper cassette is empty.
- Causes: 1. Bending or deformation of the actuator of the paper sensor. 2. The function of the engine board is defective Perform. DCU mode : Perform DCU diagnostic code 8.
- Troubleshooting Guides: 1. Replace the defective actuator. 2. Replace the engine board.
- Code: 29
- Display: Cover Open
- Description: The ERROR lamp is on even when the print cover is closed.
- Causes: 1. The hook lever in the top cover may be defective. 2. Check the connector (CN1 : Engine Bfd.HVPS) and circuit of the cover switch department in the Main Control board. Perform DCU mode : If Error state ’64’ occurs, Check the related codes of the Cover Open Error.
- Troubleshooting Guides: 1. Replace the hook lever, if defective. 2. Check the insertion of the Cover Open S/W Connect. 3. Replace the Main Control board or Cover Open S/W.
- Code: 30
- Display: No lamp on when the cover is open
- Description: The ERROR lamp does not come on even when the printer cover is open
- Causes: 1. Check the connector(CN8) and circuit of the cover switch department in the Main Control board. Perform DCU mode : If Error state ’64’ occurs, Check the related codes of the Cover Open Error
- Troubleshooting Guides: 1. Check the insertion of the Cover Open S/W Connect. 2. Replace the Main Control board or Cover Open S/W.
- Code: 31
- Display: Defective motor operation
- Description: Main motor is not driving when printing, and paper does not feed into the printer, resulting ‘Jam 0’.
- Causes: 1. Motor harness or sub PCB may be defective. 2. Perform DCU diagnostic code 00 and Check the motor operation.
- Troubleshooting Guides: 1. Check the motor harness, replace it, if defective. 2. Replace the SMPS, if necessary.
- Code: 32
- Display: No Power
- Description: When system power is turned on, all lamps on the operator panel do not come on.
- Causes: 1. Check if the power input and SMPS output are normal. 2. Check the inferiority of LED-Panel on the front-cover if the LED of Panel does not appear after normal warmingup.
- Troubleshooting Guides: 1. Replace the power supply cord or SMPS. 2. Replace the control board. 3. Replace the LED-panel.
- Code: 33
- Display: Vertical Line Getting Curved
- Description: When printing, vertical line gets curved.
- Causes: 1. If the supply of +24v is unstable in the Main Control board linking with LSU, check drive by DCU Mode: LSU Check -05- LSU Motor on.
- Troubleshooting Guides: 1. Replace LSU. 2. Replace the Main Control board.
- Code: 34
- Display: The printer is not working (1)
- Description: While Power turned on, the printer is not working in the printing mode.
- Causes: 1. Run Self-Test Mode: Turn the power on while pressing the test printing button for 2 or 3 seconds before printing works. 2. Check if the PC and the printer is properly connected and the toner cartridge installed. 3. Printing is nor working in the Windows. 4. Check if the printer cable is directly connected to peripheral devices
- Troubleshooting Guides: 1.Check the power of the printer and perform the Self- Test. If the test printing works, that means no problems in the printer itself. If the test printing does not work, that means bad functioning of the printer(not because of software). Perform DCU to check the Error Status. 2. Replace the printer cable. If the problems not solved even after the cable replaced, check the amount of the remaining tone. (refer to Toner Cartridge Service 4-5) 3. Check if the connection between PC and printer port is proper. If you use windows, check if the printer driver in the controller is set up. If the printer driver is properly set up, check in which program the printing is not working. The best way to find out is to open the memo pad to check the function of printing. If it is not working in a certain program, adjust the setup the program requires. Sometimes, the printout is normal within the Windows basic programs, but it’s not working in a particular program. In such case, install the new driver again. If not working in the Windows basic program, Check the setup of the port of CMOS is on ECP. And check the address of IRQ 7 and 378 4. If the scanner needs to be connected to the printer, first the remove the scanner from the PC to see if the printer is properly working alone.
- Code: 35
- Display: The printer is not working (2)
- Description: After receiving the printing order, no response at all or the low speed of printing occurs due to wrong setup of the environment rather than malfunction of the printer itself.
- Causes: 1. Secure more space of the hard disk. 2. Printing error occurs even if there is enough space in the hard disk. 3. Check the parallel-port-related items in the CMOS Setup. 4. Reboot the system to print.
- Troubleshooting Guides: 1. Not working with the message ‘insufficient printer memory’ means hard disk space problem rather than the RAM problem. In this case, provide more space for the hard disk. Secure more space using the disk utilities program. 2. The connection of the cable and printer port is not proper. Check if the connection is properly done and if the parallel port in CMOS is rightly set up. 3. As a printer port, Select ECP or SPP among SPP(Normal), ECP, and EPP modes(increase printing speed) SPP normal mode support 8-bit data transfer, while ECP Mode transfer the 12-bit data. 4. If the regular font is not printing, the cable or the printer driver may be defective. Turn the PC and printer off, and reboot the system to print again. If not solved, double-click the printer in my computer If the regular fonts are not printed this time again. the cable must be defective so replace the cable with new one.
- Code: 36
- Display: Abnormal Printing
- Description: The printing is not working properly even when the cable has no problem. (even after the cable is replaced) If the printer won’t work at all or the strange fonts are repeated, the printer driver may be defective or wrong setup in the CMOS Setup.
- Causes: 1. Set up the parallel port in the CMOS SETUP. 2. Printer Driver Error. 3. Error message from insufficient memory. (The printing job sometimes stops or due to insufficient virtual memory, but it actually comes from the insufficient space of the hard disk.)
- Troubleshooting Guides: 1. Select SPP(Normal) or ECP LPT Port the among ECP, EPP or SPP in the CMOS Setup. 2. Check the printer in My Computer.(to see if the printer driver is compatible to the present driver or delete the old driver, if defective and reinstall the new driver) 3. Delete the unnecessary files to secure enough space of the hard disk and start printing job again.
- Code: 37
- Display: SPOOL Error
- Description: To spool which stands for ‘simultaneous peripheral operations online’ a computer document or task list (or ‘job’) is to read it in and store it, usually on a hard disk or larger storage medium so that it can be printed or otherwise processed at a more convenient time (for example, when a printer is finished printing its current document).
- Causes: 1. Insufficient space of the hard disk in the directory assigned for the basic spool. 2. If the previous printing error not solved. 3. When expected to collide with other program. 4. When an application program or the printer driver is damaged. 5. When some files related to OS are damaged or virus infected. 6. Memory is less than suggested one.
- Troubleshooting Guides: 1. Delete the unnecessary files to provide more space to start printing job. 2. If there are some files with the extension name of ****.jnl, Delete them and Reboot the Windows to restart printing job. 3. Shut down all other programs except the current one, if possible. 4. Delete the printer driver completely and reinstall it. 5 After rebooting the computer, check for viruses, restore the damaged files and reinstall the program to do the printing job. 6. Add up enough memory to the PC.
– Get more information about Epson XP 15000 troubleshooting, click here
– Get more error code list with quick guide to fix printer product, click here
– About get help with reseting Epson inkpad or others, click here
Samsung printer reset software introduction:
Notes before resetting Samsung printer:
– Identify accurate version, serial and crum of Samsung printer.
– How to get Samsung printer model info: Click Here
– Before you continue with the reprogramming of the firmware, please make sure that the device is installed on your computer.
– It is very important that under no circumstances should you remove the chip from the cartridge while reprogramming the firmware. After you have succesfully reprogrammed the printer, remove the chip from the cartridge and store it somewhere safely (the chip – a key). In all cartridges which you are going to use in the printer, the chip has to be either removed or sealed. If you have accidently inserted a new cartridge without removing the chip, the device will be blocked. In order to unblock it, you can use the stored chip as a key which help you to unblock the printer.
– And make sure that any other devices (except mouse and keyboard), which are connected to your computer via USB or LPT ports are disconnected. It’s preferable that the computer is connected to the “UPS” (uninterruptible power source) device, because if during the reprogramming process the electricity source has any interruptions, then the reprogramming will be carried out with an error, which makes the device unable to work.
– This firmware will be installed directly to your printer. Before opening firmare link make sure that printer is turned on and connected to your computer and printer drivers are installed correctly.
Be aware that with the reprogramming of the firmware the manufacturer’s warranty goes lost!!
How To Run Firmware Fix Samsung printer
1. Connect the printer to the computer and turn it on.
2. Wait until the printer is ready for work.
3. Drag and drop *.hd to usbprns2.exe file.

4. The reprogramming process starts automatically.
5. Wait until the printer reprograms (10-20 minute) and restarts.
6. After that the reprogramming process is finished, restart the printer.
Contact us to get support with Samsung ML2240 Error case
Telegram: https://t.me/hyperaktiv
Facebook: https://www.facebook.com/dngnm/
Or click here to get more ways.
К сожалению, любая техника иногда может работать с перебоями, выходить из строя или выдавать ошибки. Принтеры Samsung — не исключение. Для устранения неисправностей принтера в домашних условиях мы представляем вам таблицу индикации ошибок принтеров Samsung ML1640-1645, 2240-2245. Она поможет вам быстро установить причину сбоя и устранить ее самостоятельно. В том случае, если ошибка связана с неисправностями каки-либо деталей, то обращатесь в сервисный центр «Мастер Сервис». Мы поможем вам решить любую проблему, связанную с принтером Самсунг.
Коды ошибок Samsung ML1640-1645, 2240-2245 и способы их устранения:
| Индикатор | Индикация | Причина ошибки |
|---|---|---|
| OnLine / Error | Красный горит |
|
| OnLine / Error | Оранжевый горит |
|
| Toner | Кр. моргает через 2.5 сек | Toner Low |
| Кр. моргает через 1 сек | Replace Toner (заканчивается) | |
| Красный горит | Replace Toner (закончился) |