Чтобы Linux выполнил проверку дисков (fsck) при следующей перезагрузке, нужно создать пустой файл forcefsck в корневом каталоге:
cd /
touch forcefsck
reboot
Тот же эффект даст следующая команда:
shutdown -rF now
Для того, чтобы fsck самостоятельно устраняла ошибки без ручного подтверждения запросов, в загрузочных параметрах требуется включить опцию автоматического подтверждения всех запросов.
CentOS, Fedora, RedHat
В конфигурационном файле /etc/sysconfig/autofsck добавляем значение -y переменной AUTOFSCK_OPT:
AUTOFSCK_OPT="$AUTOFSCK_OPT -y"
Debian, Ubuntu
В конфигурационном файле /etc/default/rcS присвоить переменной FSCKFIX значение yes:
FSCKFIX=yes
FreeBSD
В конфигурационном файле /etc/rc.conf присвоить переменной fsck_y_enable значение YES:
fsck_y_enable="YES"
Оригинал: How to Use ‘fsck’ to Repair File System Errors in Linux
Автор: Marin Todorov
Дата публикации: 1 октября 2018 года
Перевод: А. Кривошей
Дата перевода: июль 2019 г.
Файловые системы отвечают за организацию хранения данных. Так или иначе, со временем файловая система может быть повреждена и некоторые ее части могут быть недоступны. Если ваша файловая система имеет такое несоответствие, рекомендуется проверить ее целостность.
Это можно выполнить с помощью системной утилиты fsck (file system consistency check). Эта проверка может быть выполнена автоматически во время загрузки или запущена вручную.
В этой статье мы рассмотрим утилиту fsck и ее использование, чтобы помочь вам исправить дисковые ошибки.
Когда нужно использовать fsck в Linux
Существуют разные сценарии, когда вам понадобится запустить fsck. Вот несколько примеров:
Система не загружается.
Файлы в системе поврежденны (часто вы можете увидеть ошибку ввода/вывода).
Подключенный диск (включая флэшки/SD-карты) не работает должным образом.
Опции fsck
Команда Fsck должна быть запущена с привилегиями суперпользователя (root). Вы можете использовать ее с разными аргументами. Их использование зависит от вашего конкретного случая. Ниже вы увидите некоторые из наиболее важных опций:
-A — используется для проверки всех файловых систем. Список берется из /etc/fstab.
-C — показывать индикатор выполнения.
-l — блокирует устройство, чтобы гарантировать, что никакая другая программа не попытается использовать раздел во время проверки.
-M — не проверять смонтированные файловые системы.
-N — только показывать, что будет сделано — не делать никаких реальных изменений.
-P — если вы хотите проверять файловые системы параллельно, включая корневую.
-R — не проверять корневую файловую систему. Это полезно только вместе с ‘-A‘.
-r — предоставить статистику для каждого проверяемого устройства.
-T — не показывает заголовок.
-t — исключительно указать типы файловых систем, которые будут проверяться. Типы могут быть разделены запятыми.
-V — предоставить описание того, что делается.
Как запустить fsck для исправления ошибок файловой системы Linux
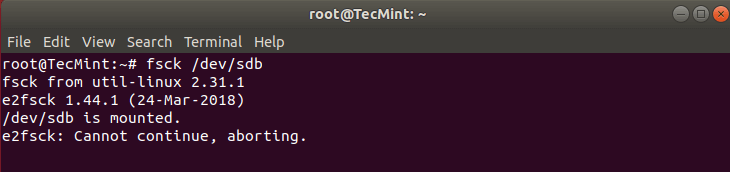
Чтобы запустить fsck, вам нужно убедиться, что раздел, который вы собираетесь проверить, не смонтирован. Для этой статьи я буду использовать мой второй диск /dev/sdb, смонтированный в /mnt.
Вот что произойдет, если я попытаюсь запустить fsck на смонтированном разделе.
# fsck /dev/sdb
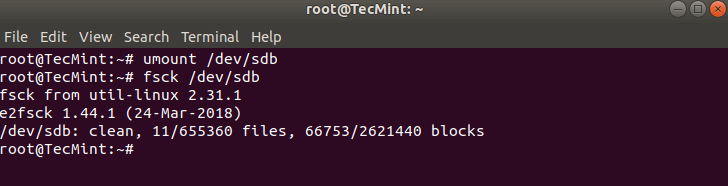
Чтобы избежать этого, размонтируйте раздел с помощью команды:
# umount /dev/sdb
Теперь fsck можно запустить безопасно.
# fsck /dev/sdb
Понимание кодов выхода fsck
После запуска fsck она вернет код выхода. Эти коды можно увидеть в руководстве fsck, выполнив:
# man fsck

0       Нет ошибок
1       Исправлены ошибки файловой системы
2       Система должна быть перезагружена
4       Ошибки файловой системы остались без исправления
8       Операционная ошибка
16     Ошибка использования или синтаксиса
32     Проверка отменена по запросу пользователя
128  Ошибка общей библиотеки
Исправление ошибок файловой системы Linux
Иногда в файловой системе можно найти ошибки. В таких случаях вы захотите, чтобы fsck автоматически пыталась исправить ошибки. Это можно сделать с помощью следующей команды:
# fsck -y /dev/sdb
Флаг -y автоматически даёт ответ «да» на любые запросы от fsck для исправления ошибок.
Точно так же вы можете запустить команду на всех файловых системах (без корневой):
$ fsck -AR -y
Как запустить fsck в корневом разделе Linux
В некоторых случаях вам может потребоваться запустить fsck в корневом разделе вашей системы. Поскольку вы не можете запустить fsck на смонтированном разделе, вы можете попробовать один из следующих вариантов:
1. Принудительно использовать fsck при загрузке системы
2. Запустить fsck в режиме восстановления
Мы рассмотрим обе ситуации.
Принудительная проверка корневой файловой системы с помощью fsck при загрузке системы
Это относительно легко выполнить, единственное, что вам нужно сделать, это создать файл с именем forcefsck в корневом разделе вашей системы. Используйте следующую команду:
# touch /forcefsck
Во время следующей загрузки будет выполняться fsck. Если время простоя является критическим, рекомендуется тщательно спланировать эту проверку, так как если в вашей системе много используемых inode, fsck может занять некоторое, довольно значительное время.
После загрузки системы проверьте, существует ли этот файл:
# ls /forcefsck
Если он есть, вы можете удалить его, чтобы избежать запуска fsck при каждой загрузке системы.
Запуск fsck в режиме восстановления
Запуск fsck в режиме восстановления требует еще нескольких шагов. Сначала подготовьте систему к перезагрузке. Остановите все важные службы, такие как MySQL/MariaDB и т. д., а затем перезагрузите компьютер.
# reboot
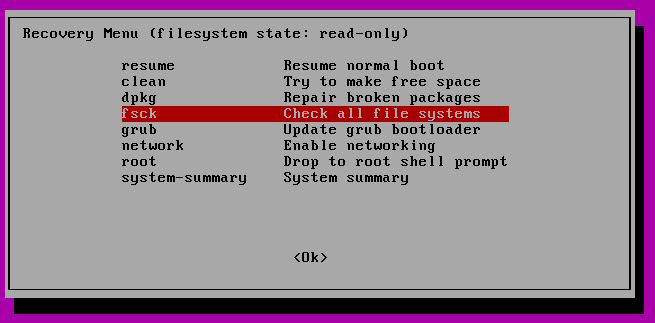
Во время загрузки удерживайте нажатой клавишу Shift, чтобы отобразилось меню grub. Выберите «Advanced options».
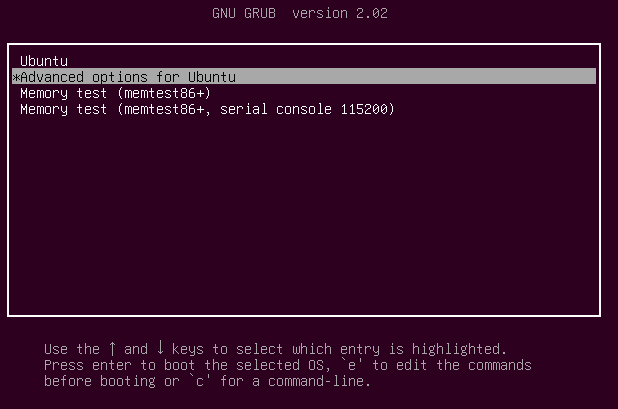
Затем выберите «Recovery mode».
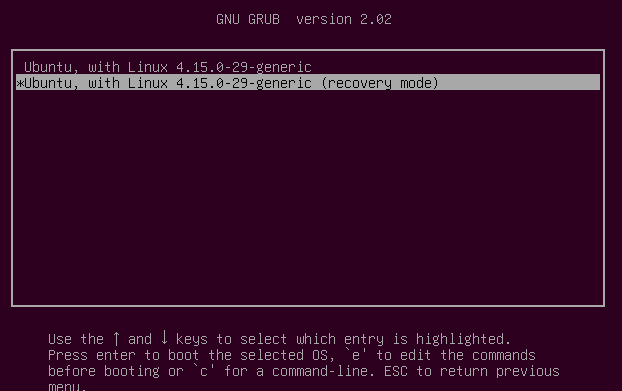
В следующем меню выберите «fsck».
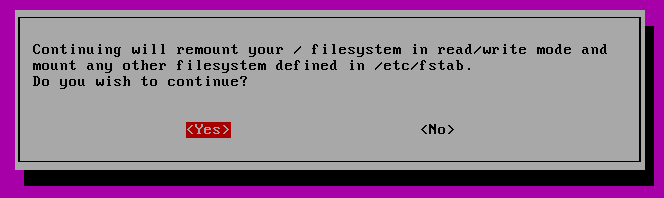
Вас спросят, хотите ли вы перемонтировать вашу корневую файловую систему. Выберите «yes».
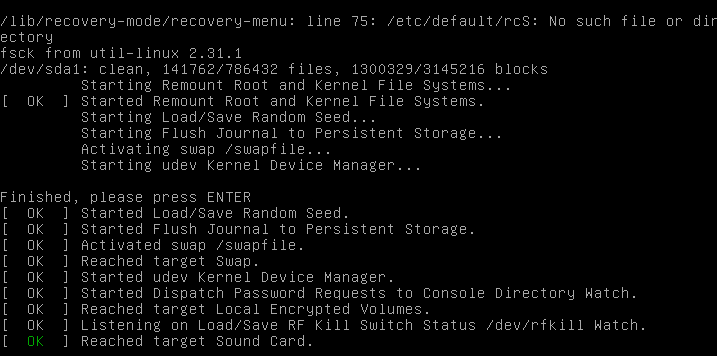
Вы должны увидеть что-то похожее на это.
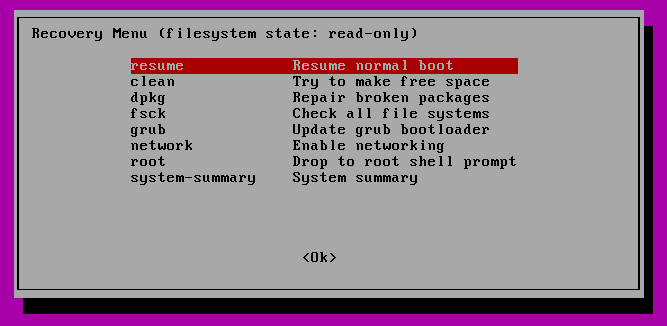
Затем вы можете вернуться к нормальной загрузке, выбрав «Resume».
Заключение
Из этого руководства вы узнали, как использовать fsck и выполнять проверки согласованности в разных файловых системах Linux. Если у вас есть какие-либо вопросы о fsck, пожалуйста, не стесняйтесь задавать их в разделе комментариев ниже.
Другие статьи о команде fsck в Linux:
- Программа fsck
- 4 утилиты для устранения проблем файловых систем EXT2, EXT3 и EXT4 в Linux
- Проверка жесткого диска на плохие сектора и блоки в Linux
- Software-RAID HOWTO. 4. Восстановление ошибок
Если вам понравилась статья, поделитесь ею с друзьями:
Throughout this answer I’ll assume, that a storage drive appears as a block device at the path /dev/sdc. To find the path of a storage drive in our current setup, use:
- Gnome Disks
(formerly Gnome Disk Utility, a. k. a.
palimpsest), if a GUI is available, or - on the terminal look at the output of
lsblkandls -l /dev/disk/by-idand try to find the right device by size, partitioning, manufacturer and model name.
Basic check
- only detects entirely unresponsive media
- almost instantaneous (unless medium is spun down or broken)
- safe
- works on read-only media (e. g. CD, DVD, BluRay)
Sometimes a storage medium simply refuses to work at all. It still appears as a block device to the kernel and in the disk manager, but its first sector holding the partition table is not readable. This can be verified easily with:
sudo dd if=/dev/sdc of=/dev/null count=1
If this command results in a message about an “Input/output error”, our drive is broken or otherwise fails to interact with the Linux kernel as expected. In the a former case, with a bit of luck, a data recovery specialist with an appropriately equipped lab can salvage its content. In the latter case, a different operating system is worth a try. (I’ve come across USB drives that work on Windows without special drivers, but not on Linux or OS X.)
S.M.A.R.T. self-test
- adjustable thoroughness
- instantaneous to slow or slower (depends on thoroughness of the test)
- safe
- warns about likely failure in the near future
Devices that support it, can be queried about their health through S.M.A.R.T. or instructed to perform integrity self-tests of different thoroughness. This is generally the best option, but usually only available on (non-ancient) hard disk and solid state drives. Most removable flash media don’t support it.
Further resources and instructions:
- Answer about S.M.A.R.T. on this question
- How can I check the SMART status of a drive on Ubuntu 14.04 through 16.10?
Read-only check
- only detects some flash media errors
- quite reliable for hard disks
- slow
- safe
- works on read-only media (e. g. CD, DVD, BluRay)
To test the read integrity of the whole device without writing to it, we can use badblocks(8) like this:
sudo badblocks -b 4096 -c 4096 -s /dev/sdc
This operation can take a lot of time, especially if the storage drive actually is damaged. If the error count rises above zero, we’ll know that there’s a bad block. We can safely abort the operation at any moment (even forcefully like during a power failure), if we’re not interested in the exact amount (and maybe location) of bad blocks. It’s possible to abort automatically on error with the option -e 1.
Note for advanced usage: if we want to reuse the output for e2fsck, we need to set the block size (-b) to that of the contained file system. We can also tweak the amount of data (-c, in blocks) tested at once to improve throughput; 16 MiB should be alright for most devices.
Non-destructive read-write check
- very thorough
- slowest
- quite safe (barring a power failure or intermittent kernel panic)
Sometimes – especially with flash media – an error only occurs when trying to write. (This will not reliably discover (flash) media, that advertise a larger size, than they actually have; use Fight Flash Fraud instead.)
-
NEVER use this on a drive with mounted file systems!
badblocksrefuses to operate on those anyway, unless you force it. -
Don’t interrupt this operation forcefully! Ctrl+C (SIGINT/SIGTERM) and waiting for graceful premature termination is ok, but
killall -9 badblocks(SIGKILL) isn’t. Upon forceful terminationbadblockscannot restore the original content of the currently tested block range and will leave it overwritten with junk data and possibly corrupt the file system.
To use non-destructive read-write checks, add the -n option to the above badblocks command.
Destructive read-write check
- very thorough
- slower
- ERASES ALL DATA ON THE DRIVE
As above, but without restoring the previous drive content after performing the write test, therefore it’s a little faster. Since data is erased anyway, forceful termination remains without (additional) negative consequence.
To use destructive read-write checks, add the -w option to the above badblocks command.
|
|
Duplicate Article |

See: SystemAdministration/Fsck and TestingStorageMedia
Introduction
Contents
- Introduction
-
Basic filesystem checks and repairs
- e2fsprogs — ext2, ext3, ext4 filesystems
- dosfstools — FAT12, FAT16 and FAT32 (vfat) filesystem
- ntfs-3g (previously also ntfsprogs) — NTFS filesystem
- reiserfstools — reiserfs
- xfsprogs — xfs
- Missing superblock
- Bad blocks
- Sources and further reading
This guide will help diagnose filesystem problems one may come across on a GNU/Linux system. New sections are still being added to this howto.
Basic filesystem checks and repairs
The most common method of checking filesystem’s health is by running what’s commonly known as the fsck utility. This tool should only be run against an unmounted filesystem to check for possible issues. Nearly all well established filesystem types have their fsck tool. e.g.: ext2/3/4 filesystems have the e2fsck tool. Most notable exception until very recently was btrfs. There are also filesystems that do not need a filesystem check tool i.e.: read-only filesystems like iso9660 and udf.
e2fsprogs — ext2, ext3, ext4 filesystems
Ext2/3/4 have the previously mentioned e2fsck tool for checking and repairing filesystem. This is a part of e2fsprogs package — the package needs to be installed to have the fsck tool available. Unless one removes it in aptitude during installation, it should already be installed.
There are 4 ways the fsck tool usually gets run (listed in order of frequency of occurrence):
- it runs automatically during computer bootup every X days or Y mounts (whichever comes first). This is determined during the creation of the filesystem and can later be adjusted using tune2fs.
- it runs automatically if a filesystem has not been cleanly unmounted (e.g.: powercut)
- user runs it against an unmounted filesystem
-
user makes it run at next bootup
case 1
When filesystem check is run automatically X days after the last check or after Y mounts, Ubuntu gives user the option to interrupt the check and continue bootup normally. It is recommended that user lets it finish the check.
case 2
If a filesystem has not been cleanly unmounted, the system detects a dirty bit on the filesystem during the next bootup and starts a check. It is strongly recommended that one lets it finish. It is almost certain there are errors on the filesystem that fsck will detect and attempt to fix. Nevertheless, one can still interrupt the check and let the system boot up on a possibly corrupted filesystem.
2 things can go wrong
-
fsck dies — If fsck dies for whatever reason, you have the option to press ^D (Ctrl + D) to continue with an unchecked filesystem or run fsck manually. See e2fsck cheatsheet for details how.
-
fsck fails to fix all errors with default settings — If fsck fails to fix all errors with default settings, it will ask to be run manually by the user. See e2fsck cheatsheet for details how.
case 3
User may run fsck against any filesystem that can be unmounted on a running system. e.g. if you can issue umount /dev/sda3 without an error, you can run fsck against /dev/sda3.
case 4
You can make your system run fsck by creating an empty ‘forcefsck’ file in the root of your root filesystem. i.e.: touch /forcefsck Filesystems that have 0 or nothing specified in the sixth column of your /etc/fstab, will not be checked
Till Ubuntu 6.06 you can also issue shutdown -rF now to reboot your filesystem and check all partitions with non-zero value in sixth column of your /etc/fstab. Later versions of Ubuntu use Upstart version of shutdown which does not support the -F option any more.
Refer to man fstab for what values are allowed.
e2fsck cheatsheet
e2fsck has softlinks in /sbin that one can use to keep the names of fsck tools more uniform. i.e. fsck.ext2, fsck.ext3 and fsck.ext4 (similarly, other filesystem types have e.g.: fsck.ntfs) This cheatsheet will make use of these softlinks and will use ext4 and /dev/sda1 as an example.
-
fsck.ext4 -p /dev/sda1 — will check filesystem on /dev/sda1 partition. It will also automatically fix all problems that can be fixed without human intervention. It will do nothing, if the partition is deemed clean (no dirty bit set).
-
fsck.ext4 -p -f /dev/sda1 — same as before, but fsck will ignore the fact that the filesystem is clean and check+fix it nevertheless.
-
fsck.ext4 -p -f -C0 /dev/sda1 — same as before, but with a progress bar.
-
fsck.ext4 -f -y /dev/sda1 — whereas previously fsck would ask for user input before fixing any nontrivial problems, -y means that it will simply assume you want to answer «YES» to all its suggestions, thus making the check completely non-interactive. This is potentially dangerous but sometimes unavoidable; especially when one has to go through thousands of errors. It is recommended that (if you can) you back up your partition before you have to run this kind of check. (see dd command for backing up filesystems/partitions/volumes)
-
fsck.ext4 -f -c -C0 /dev/sda1 — will attempt to find bad blocks on the device and make those blocks unusable by new files and directories.
-
fsck.ext4 -f -cc -C0 /dev/sda1 — a more thorough version of the bad blocks check.
-
fsck.ext4 -n -f -C0 /dev/sda1 — the -n option allows you to run fsck against a mounted filesystem in a read-only mode. This is almost completely pointless and will often result in false alarms. Do not use.
In order to create and check/repair these Microsoft(TM)’s filesystems, dosfstools package needs to be installed. Similarly to ext filesystems’ tools, dosfsck has softlinks too — fsck.msdos and fsck.vfat. Options, however, vary slightly.
dosfsck cheatsheet
These examples will use FAT32 and /dev/sdc1
-
fsck.vfat -n /dev/sdc1 — a simple non-interactive read-only check
-
fsck.vfat -a /dev/sdc1 — checks the file system and fixes non-interactively. Least destructive approach is always used.
-
fsck.vfat -r /dev/sdc1 — interactive repair. User is always prompted when there is more than a single approach to fixing a problem.
-
fsck.vfat -l -v -a -t /dev/sdc1 — a very verbose way of checking and repairing the filesystem non-interactively. The -t parameter will mark unreadable clusters as bad, thus making them unavailable to newly created files and directories.
Recovered data will be dumped in the root of the filesystem as fsck0000.rec, fsck0001.rec, etc. This is similar to CHK files created by scandisk and chkdisk on MS Windows.
ntfs-3g (previously also ntfsprogs) — NTFS filesystem
Due to the closed sourced nature of this filesystem and its complexity, there is no fsck.ntfs available on GNU/Linux (ntfsck isn’t being developed anymore). There is a simple tool called ntfsfix included in ntfs-3g package. Its focus isn’t on fixing NTFS volumes that have been seriously corrupted; its sole purpose seems to be making an NTFS volume mountable under GNU/Linux.
Normally, NTFS volumes are non-mountable if their dirty bit is set. ntfsfix can help with that by clearing trying to fix the most basic NTFS problems:
-
ntfsfix /dev/sda1 — will attempt to fix basic NTFS problems. e.g.: detects and fixes a Windows XP bug, leading to a corrupt MFT; clears bad cluster marks; fixes boot sector problems
-
ntfsfix -d /dev/sda1 — will clear the dirty bit on an NTFS volume.
-
ntfsfix -b /dev/sda1 — clears the list of bad sectors. This is useful after cloning an old disk with bad sectors to a new disk.
Windows 8 and GNU/Linux cohabitation problems This segment is taken from http://www.tuxera.com/community/ntfs-3g-advanced/ When Windows 8 is restarted using its fast restarting feature, part of the metadata of all mounted partitions are restored to the state they were at the previous closing down. As a consequence, changes made on Linux may be lost. This can happen on any partition of an internal disk when leaving Windows 8 by selecting “Shut down” or “Hibernate”. Leaving Windows 8 by selecting “Restart” is apparently safe.
To avoid any loss of data, be sure the fast restarting of Windows 8 is disabled. This can be achieved by issuing as an administrator the command : powercfg /h off
Install reiserfstools package to have reiserfsck and a softlink fsck.reiserfs available. Reiserfsck is a very talkative tool that will let you know what to do should it find errors.
-
fsck.reiserfs /dev/sda1 — a readonly check of the filesystem, no changes made (same as running with —check). This is what you should run before you include any other options.
-
fsck.reiserfs —fix-fixable /dev/sda1 — does basic fixes but will not rebuild filesystem tree
-
fsck.reiserfs —scan-whole-partition —rebuild-tree /dev/sda1 — if basic check recommends running with —rebuild-tree, run it with —scan-whole-partition and do NOT interrupt it! This will take a long time. On a non-empty 1TB partition, expect something in the range of 10-24 hours.
xfsprogs — xfs
If a check is necessary, it is performed automatically at mount time. Because of this, fsck.xfs is just a dummy shell script that does absolutely nothing. If you want to check the filesystem consistency and/or repair it, you can do so using the xfs_repair tool.
-
xfs_repair -n /dev/sda — will only scan the volume and report what fixes are needed. This is the no modify mode and you should run this first.
-
xfs_repair will exit with exit status 0 if it found no errors and with exit status 1 if it found some. (You can check exit status with echo $?)
-
-
xfs_repair /dev/sda — will scan the volume and perform all fixes necessary. Large volumes take long to process.
XFS filesystem has a feature called allocation groups (AG) that enable it to use more parallelism when allocating blocks and inodes. AGs are more or less self contained parts of the filesystem (separate free space and inode management). mkfs.xfs creates only a single AG by default.
xfs_repair checks and fixes your filesystems by going through 7 phases. Phase 3 (inode discovery and checks) and Phase 4 (extent discovery and checking) work sequentially through filesystem’s allocation groups (AG). With multiple AGs, this can be heavily parallelised. xfs_repair is clever enough to not process multiple AGs on same disks.
Do NOT bother with this if any of these is true for your system:
- you created your XFS filesystem with only a single AG.
-
your xfs_repair is older than version 2.9.4 or you will make the checks even slower on GNU/Linux. You can check your version with xfs_repair -V
- your filesystem does not span across multiple disks
otherwise:
-
xfs_repair -o ag_stride=8 -t 5 -v /dev/sda — same as previous example but reduces the check/fix time by utilising multiple threads, reports back on its progress every 5 minutes (default is 15) and its output is more verbose.
-
if your filesystem had 32 AGs, the -o ag_stride=8 would start 4 threads, one to process AGs 0-7, another for 8-15, etc… If ag_stride is not specified, it defaults to the number of AGs in the filesystem.
-
-
xfs_repair -o ag_stride=8 -t 5 -v -m 2048 /dev/sda — same as above but limits xfs_repair’s memory usage to a maximum of 2048 megabytes. By default, it would use up to 75% of available ram. Please note, -o bhash=xxx has been superseded by the -m option
== jfsutils — jfs == == btrfs ==
Missing superblock
Bad blocks
Sources and further reading
- man pages
-
<XFS user guide> — more details about XFS filesystem
Неисправный жёсткий диск — одно из самых неприятных явлений в работе компьютера. Мало того что мы легко можем потерять очень много важной информации и файлов, так и замена HDD неслабо бьёт по бюджету. Прибавим к этому потраченное время и нервы, которые, как известно, не восстанавливаются. Чтобы не дать проблеме застать нас врасплох и заранее диагностировать её, стоит знать, как проверить жёсткий диск на ошибки в ОС Ubuntu. Программных средств, предоставляющих такие услуги, предостаточно.

Как в Ubuntu протестировать жесткий диск на ошибки.
Проверка с помощью встроенного ПО
Совсем необязательно качать программы, чтобы выполнить проверку диска в Ubuntu. Операционная система уже обладает утилитой, которая предназначена для этой задачи. Называется она badblocks, управляется через терминал.
Открываем терминал и вводим:
sudo fdisk -l
Эта команда отображает информацию о всех HDD, которые используются системой.
После этого вводим:
sudo badblocks -sv /dev/sda
Команда служит уже для поиска повреждённых секторов. Вместо /dev/sda вводим имя своего накопителя. Ключи -s и -v служат для того, чтобы отображать в правильном порядке ход проверки блоков (s) и чтобы выдавать отчёт обо всех действиях (v).

Нажатием клавиш Ctrl + C мы останавливаем проверку жёсткого диска.
Для контроля за файловой системой можно также использовать две другие команды.
Для того чтобы размонтировать файловую систему, вводим:
umount /dev/sda
Для проверки и исправления ошибок:
sudo fsck -f -c /dev/sda
- «-f» делает процесс принудительным, то есть проводит его, даже если HDD помечен как работоспособный;
- «-c» находит и помечает бэд-блоки;
- «-y» — дополнительный вводимый аргумент, который сразу же отвечает Yes на все вопросы системы. Вместо него можно ввести «-p», он проведёт проверку в автоматическом режиме.
Программы
Дополнительное программное обеспечение также отлично справляется с этой функцией. А иногда даже лучше. Тем более что некоторым пользователям проще работать с графическим интерфейсом.
GParted
GParted как раз для тех, кому текстовый интерфейс не по душе. Утилита выполняет большое количество задач, связанных с работой HDD на Убунту. В их число входит и проверка диска на ошибки.

Для начала нам нужно скачать и установить GParted. Вводим следующую команду, чтобы выполнить загрузку из официальных репозиториев:
sudo apt-get install gparted
Установить программу легко и при помощи Центра загрузки приложений.
- Открываем приложение. На главном экране сразу же выводятся все носители. Если какой-то из них помечен восклицательным знаком, значит, с ним уже что-то не так.
- Щёлкаем по тому диску, который хотим проверить.
- Жмём на кнопку «Раздел», расположенную сверху.
- Выбираем «Проверка на ошибки».
Программа отсканирует диск. В зависимости от его объёма процесс может идти дольше или меньше. После сканирования мы будем оповещены о его результатах.
Smartmontools
Это уже более сложная утилита, которая выполняет более серьёзную проверку HDD по различным параметрам. Как следствие, управлять ей тоже сложнее. Графический интерфейс в Smartmontools не предусмотрен.

Качаем программу:
aptitude install smartmontools
Смотрим, какие накопители подключены к нашей системе. Обращать внимание нужно на строчки, оканчивающиеся буквой, а не цифрой. Именно в этих строках содержится информация о дисках.
ls -l /dev | grep -E ‘sd|hd’
Вбиваем команду для выведения подробной информации о носителе. Стоит посмотреть на параметр ATA. Дело в том, что при замене родного диска, лучше ставить устройство с тем же либо большим ATA. Так можно максимально раскрыть его возможности. А также посмотрите и запомните параметры SMART.
smartctl —info /dev/sde
Запускаем проверку. Если SMART поддерживается, то добавляем «-s». Если он не поддерживается или уже включён, то этот аргумент можно убрать.
smartctl -s on -a /dev/sde
После этого смотрим информацию под READ SMART DATA. Результат может принимать два значения: PASSED или FAILED. Если выпало последнее, можно начинать делать резервные копии и искать замену винчестеру.
Этим возможности программы не исчерпываются. Но для однократной проверки HDD этого будет вполне достаточно.
Safecopy
Это уже та программа, которую впору использовать на тонущем судне. Если мы осведомлены, что с нашим диском что-то не так, и нацелены спасти как можно больше выживших файлов, то Safecopy придёт на помощь. Её задача как раз заключается в копировании данных с повреждённых носителей. Причём она извлекает файлы даже из битых блоков.
Устанавливаем Safecopy:
sudo apt install safecopy
Переносим файлы из одной директории в другую. Выбрать можно любую другую. В данном случае мы переносим данные с диска sda в папку home.
sudo safecopy /dev/sda /home/
Бэд-блоки
У некоторых могут возникнуть вопросы: «что такое эти битые блоки и откуда они, вообще, взялись на моём HDD, если я его ни разу не трогал?» Bad blocks, или бэд-секторы — разделы HDD, которые больше не читаются. Во всяком случае так они по объективным причинам были помечены файловой системой. И скорее всего, с диском в этих местах действительно что-то не так. «Бэды» встречаются как на старых винчестерах, так и на самых современных, поскольку работают они практически по тем же самым технологиям.

Появляются же сбойные секторы по разным причинам.
- Прерывание записи из-за отключения питания. Вся информация, поступающая на жёсткий диск, разбивается в виде единиц и нулей на самые разные его части. Сбить этот процесс — значит сильно запутать винчестер. После такого сбоя может нарушиться загрузочный сектор и тогда система вообще не запускается.
- Некачественная сборка. Тут и говорить нечего. У дешёвого китайского устройства полететь может что угодно.
Теперь вы знаете, как сканировать HDD на ошибки. Проверка диска как на Ubuntu, так и на других системах довольно важная операция, которую стоит проводить хотя бы раз в год.