Cisco AnyConnect Untrusted VPN Server Blocked Error
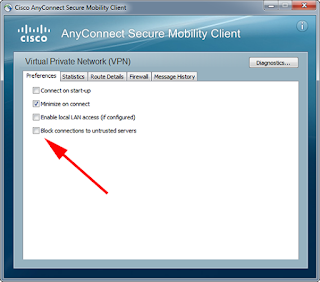
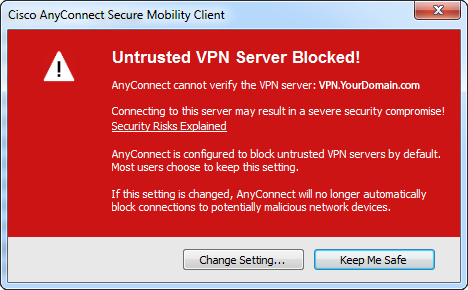
Cisco AnyConnect displays an error message «Untrusted VPN Server Blocked!» when connecting to a Cisco VPNs utilizing self signed certificate.

To resolve connecting to the VPN:
Click Change Settings
Uncheck the Block connections to untrusted servers option.
After changing this setting, you can successfully connect to the VPN and only receive a warning

Check the Always trust this VPN server and import the certificate checkbox, to never see the warning again
![]()
![]()
Сообщение об ошибке ‘AnyConnect не смог установить соединение с указанным безопасным шлюзом’Появляется, когда пользователи пытаются подключиться к VPN с помощью клиента AnyConnect. Эта проблема возникает из-за того, что VPN-клиент AnyConnect не может успешно выполнить процесс соединения с удаленным сервером, и на его пути существуют некоторые блокировки. Сегодня мы рассмотрим упомянутое сообщение об ошибке, включая причины сообщения об ошибке и различные решения, которые вы можете реализовать, чтобы избавиться от ошибки.
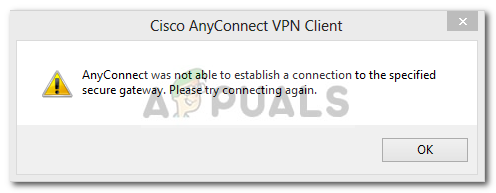 AnyConnect не смог установить соединение с указанным безопасным шлюзом
По какой причине AnyConnect не смогла установить соединение с указанным сообщением об ошибке безопасного шлюза?
Это может быть связано со многими причинами. Иногда это блокировка антивирусом или брандмауэром, а иногда это может быть вызвано плохим подключением к Интернету. Следующее будет основными причинами; упомянуть вкратце —
- Проблема с антивирусом или брандмауэром: Антивирусное программное обеспечение может иногда вмешиваться в процесс подключения VPN-клиента AnyConnect и не разрешать ему подключаться к внешним сетям или серверам по соображениям безопасности. Много раз это заблокирует много входящих и исходящих соединений. Таким образом, вы не сможете подключиться к своему любимому VPN с помощью Anyconnect.
- Неправильная конфигурация клиента: Если вы неправильно настроили свой клиент Anyconnect и сохраненные в нем конфигурации VPN неверны, тогда вы столкнетесь с проблемами при установлении успешных соединений.
- Интернет ограничения: Время от времени ваш провайдер может заблокировать IP-адреса некоторых стран, и вы не можете сознательно пытаться подключиться к VPN той же страны, которая была заблокирована вашим провайдером. Тогда вы столкнетесь с проблемами.
Чтобы обойти сообщение об ошибке, вы можете следовать решениям, приведенным ниже.
Решение 1. Отключение антивируса
Обо всем по порядку. Поскольку в большинстве случаев проблема вызвана антивирусной блокировкой, которая является распространенным сценарием. Поэтому, в таком случае, вы должны попытаться отключить любой сторонний антивирус, который вы установили в своей системе, а затем попытаться подключиться к VPN с помощью AnyConnect. Надеюсь, это изолирует проблему.
 Отключить антивирус
Решение 2. Остановите службу подключения к Интернету
Иногда служба ICS работает, что вызывает проблемы для клиента AnyConnect, чтобы соединиться с VPN. Вам придется отключить его, чтобы решить проблему. Вот как отключить службу:
- Нажмите Windows + R и введите services.msc
- Когда откроется окно с сервисами, выполните поиск Общий доступ к интернету оказание услуг. Щелкните правой кнопкой мыши и выберите Стоп.
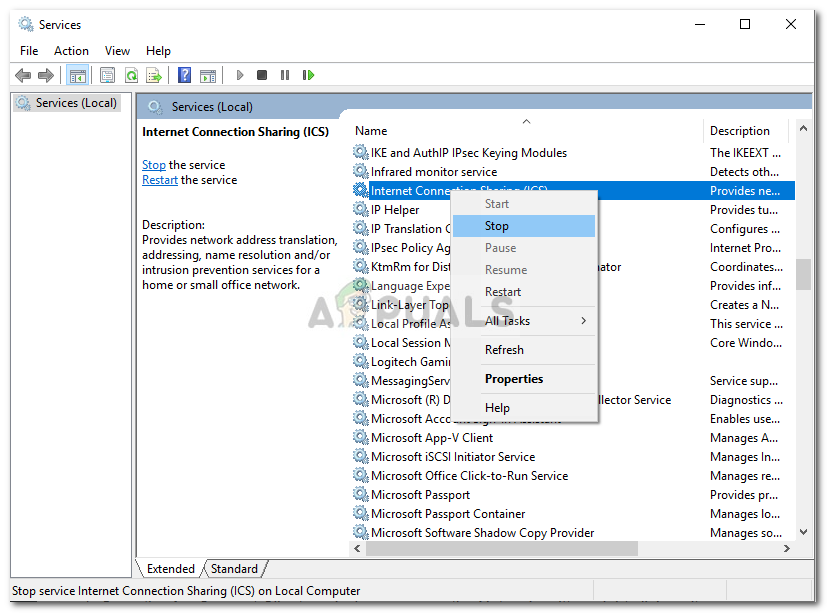 Остановка службы ICS
 - Затем выйдите из Сервисы окна, закрыв его.
Решение 3. Отключите общий доступ к подключению к Интернету (ICS)
Было несколько случаев, когда ICS был включен в Windows, тогда пользователи сталкивались с этой проблемой. Чтобы отключить ICS, следуйте инструкциям ниже:
- Откройте панель управления
- Идти к Сеть и Интернет-обмен а затем нажмите Смените настройки адаптера.
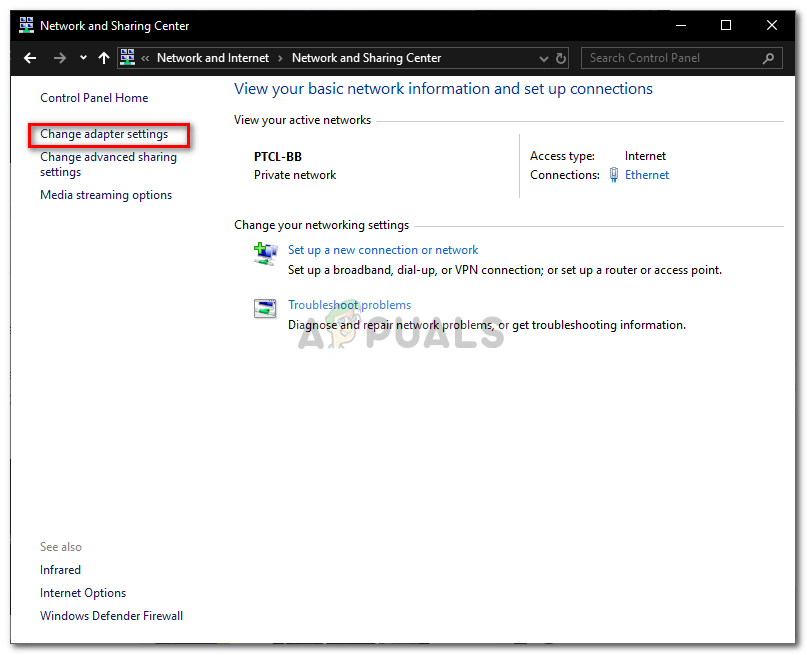 Центр коммуникаций и передачи данных
 - После этого вам нужно будет щелкнуть правой кнопкой мыши на подключение к общей сети, а затем нажмите на свойства.
- В окне свойств нажмите на разделение
- Оказавшись там, вы должны снять флажок с надписью «Разрешить другим пользователям сети подключаться к Интернету через этот компьютер».
- После этого нажмите ОК.
Если ваша проблема была вызвана включением ICS, то это должно быть исправлено.
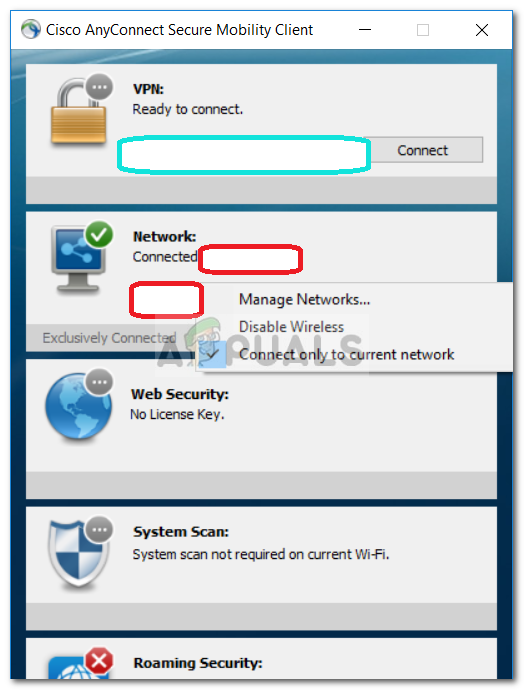
Решение 4. Выберите опцию Подключиться к текущей сети в AnyConnect VPN.
Иногда VPN-клиент Any Connect колеблется между разными сетями, поэтому вам нужно выбрать вариант подключения только к текущей сети. Это может решить проблему для вас. Вот как это сделать:
- Открой Клиент AnyConnect, и где вы видите сеть написано, щелкните правой кнопкой мыши на нем.
- Нажмите на «Подключаться только к текущей сети».
 Клиент Cisco AnyConnect
Решение 5. Попробуйте альтернативное соединение
Время от времени используемое вами интернет-соединение может иметь некоторые ограничения или работать неправильно, что является причиной проблемы. В таком случае вам придется использовать альтернативное соединение, например, WiFi или мобильную точку доступа, чтобы узнать, сможете ли вы подключиться к VPN.
Untrusted server blocked cisco anyconnect что делать
Скачал последнюю версию anyconnect-a и получил интересную картинку у всех клиентов! Кто может подсказать ему не нравится то что сертификат самоподписанный(и достаточно купить в комодо доверенный сертификат) или где-то в ASA настраивает доверие к самоподписанному сертификату?
Или тут вообще дело не в сертификате??
| Страница 1 из 1 | [ Сообщений: 2 ] |
Часовой пояс: UTC + 3 часа
Кто сейчас на конференции
Сейчас этот форум просматривают: нет зарегистрированных пользователей и гости: 2
Connect to Untrusted VPN Server using Cisco AnyConnect via command line in Windows
I have 2 VPN and sometimes I should switch them very often. I decided to create .bat file which could connect to desired VPN with credentials set in this file.
So I create .bat file with following code:
Where 1.txt contains credentials of VPN #1 which has trusted cerficate. here’s what 1.txt contains:
Where 1 goes for GROUP with number 1.
The second VPN is untrusted and I have this prompt awaring me what VPN is untrusted. I used similar code for .bat file:
And following data in 2.txt:
(«y» goes for accepting untrusted server)
But now it says «Login failed» after entering password is prompted and then it appears in loop and never stops.
The question is: how should I modify my 2.txt file to make script connect to VPN #2?
1 Answer 1
AnyConnect’s behavior with untrusted server handling is detailed in the admin guide. Please refer to it for details.
If your client is configured to block connections to untrusted servers, first your input text needs to be modified to change the preference to accept connections. This is the case of handling the red prompt (Untrusted error) as mentioned in the admin guide. Text input —
Once you saved the preference, you have to re-initiate the connection. This time client will provide options to continue connection and import the certificate as well. Among other certificate errors, AnyConnect will allow user to import the certificate only if the source is untrusted. For example, if the certificate is expired, user can not import the certificate. This is the case of handling the white prompt (Untrusted warning).
In your text input, you are actually missing the input for importing the certificate. So, try —
You may encounter the «Untrusted Server Blocked!» error message when attempting to connect to our network through VPN.
To correct this issue, please use the server address https://vpn.wfu.edu in the server address field in the Cisco AnyConnect Secure Mobility Client.
Was this answer helpful?
Yes
No
Sorry we couldn’t be helpful. Help us improve this article with your feedback.
kmgmt-2879-cbs-220-configure-port-security
Objective
The objective of this article is to guide you through creating and installing a self-signed certificate as a trusted source on a Windows machine. This will eliminate the “Untrusted Server” warning in AnyConnect.
Introduction
The Cisco AnyConnect Virtual Private Network (VPN) Mobility Client provides remote users with a secure VPN connection. It provides the benefits of a Cisco Secure Sockets Layer (SSL) VPN client and supports applications and functions unavailable to a browser-based SSL VPN connection. Commonly used by remote workers, AnyConnect VPN lets employees connect to the corporate network infrastructure as if they were physically at the office, even when they are not. This adds to the flexibility, mobility, and productivity of your workers.
Certificates are important in the communication process and are used to verify the identity of a person or device, authenticate a service, or encrypt files. Self-signed certificate is a SSL certificate which is signed by its own creator.
When connecting to AnyConnect VPN Mobility Client for the first time, users may encounter an “Untrusted Server” warning as shown in the image below.
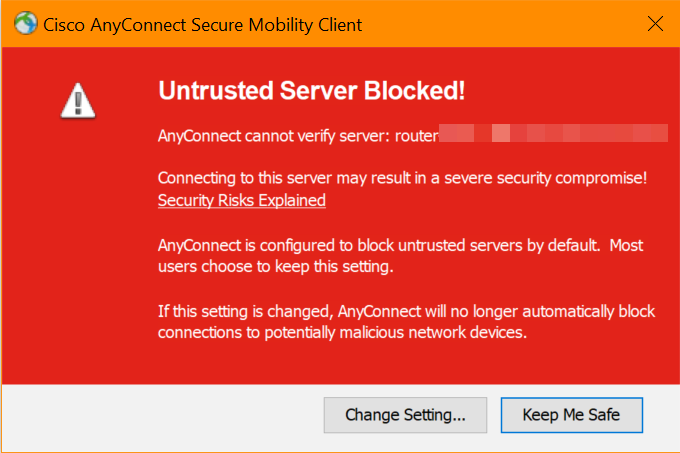
Follow the steps in this article to install a self-signed certificate as a trusted source on a Windows machine, to eliminate this issue.
When applying the exported certificate, be sure it gets put on the client PC with Anyconnect installed.
AnyConnect Software Version
- AnyConnect — v4.9.x (Download latest)
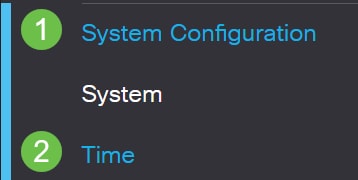
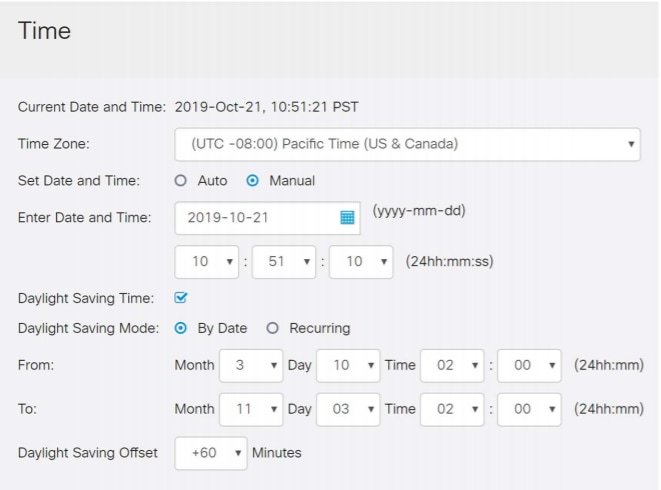
Check Time Settings
As a prerequisite, you need to ensure that your router has the correct time set, including time zone and daylight savings time settings.
Step 1
Navigate to System Configuration > Time.
Step 2
Ensure that everything is set correctly.
Create a Self-Signed Certificate
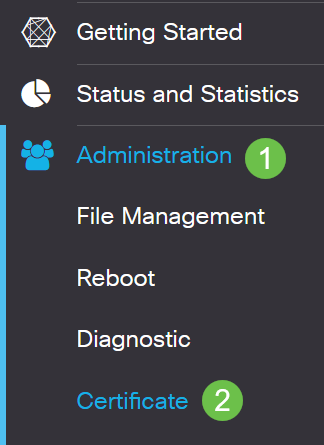
Step 1
Log into the RV34x series router and navigate to Administration > Certificate.
Step 2
Click on Generate CSR/Certificate.

Step 3
Fill out the following information:
- Type: Self-Signed Certificate
- Certificate Name: (Any name that you choose)
- Subject Alternative Name: If an IP address will be used on the WAN port, select IP Address below the box or FQDN if you will be using the Fully Qualified Domain Name. In the box, enter the IP address or FQDN of the WAN port.
- Country Name (C): Select the Country where the device is located
- State or Province Name (ST): Select the State or Province where the device is located
- Locality Name (L): (Optional) Select the Locality where the device is located. This could be a town, city, etc.
- Organization Name (O): (Optional)
- Organization Unit Name (OU): Company Name
- Common Name (CN): This MUST match what was set as the Subject Alternative Name
- Email Address (E): (Optional)
- Key Encryption Length: 2048
- Valid Duration: This is how long the Certificate will be valid. The default is 360 days. You can adjust this to any value you want, up to 10,950 days or 30 years.
Click on Generate.
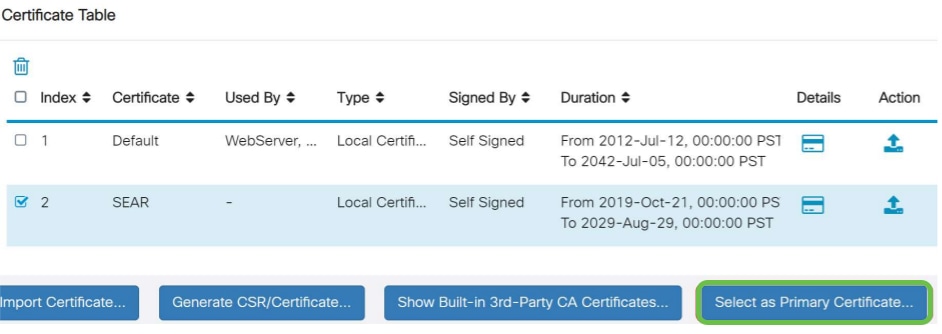
Step 4
Select the Certificate that was just created and click on Select as Primary Certificate.
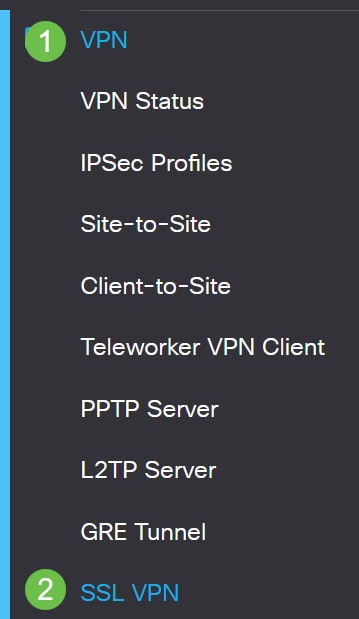
Step 5
Refresh the Web User Interface (UI). Since it is a new certificate, you will need to log in again. Once you have logged in, go to VPN > SSL VPN.
Step 6
Change Certificate File to the newly created Certificate.
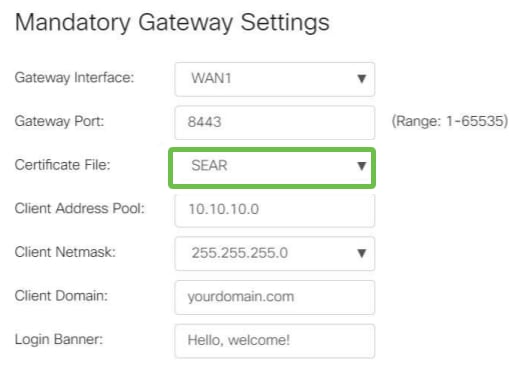
Step 7
Click Apply.

Installing a self-signed certificate
To install a self-signed certificate as a trusted source on a Windows machine, to eliminate the “Untrusted Server” warning in AnyConnect, follow these steps:
Step 1
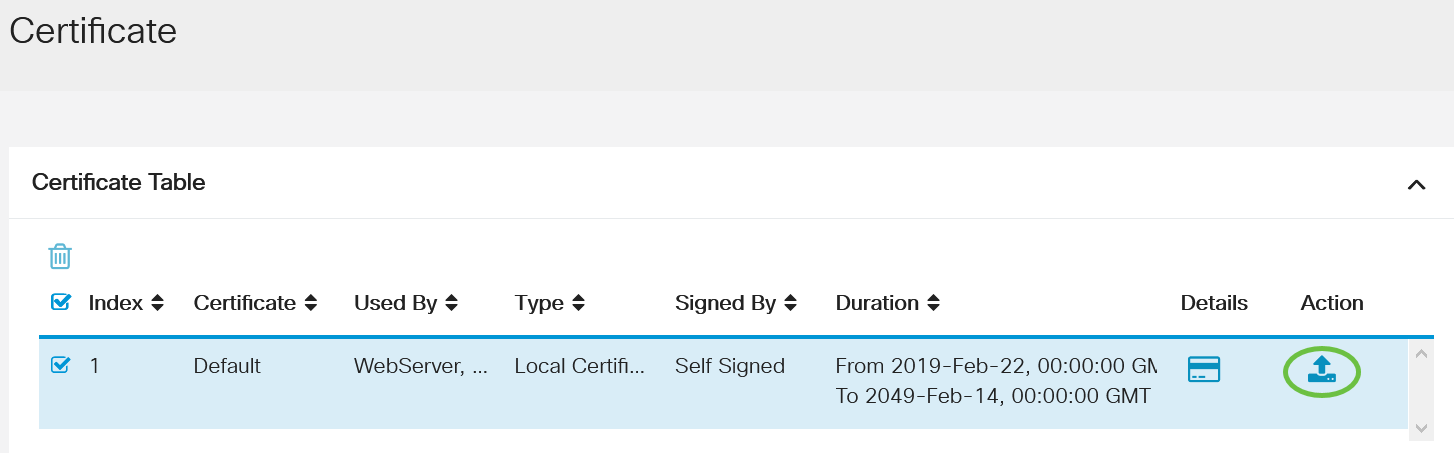
Log into the RV34x series router and navigate to Administration > Certificate.
Step 2
Select the default self-signed Certificate and click on the Export button to download your Certificate.
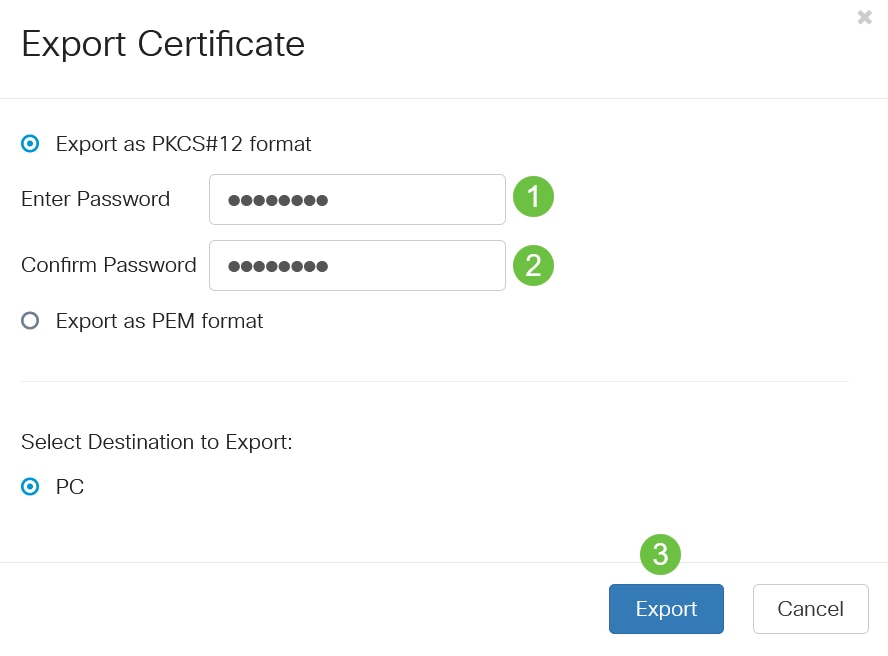
Step 3
In the Export Certificate window, enter a password for your Certificate. Re-enter the password in the Confirm Password field and then click Export.
Step 4
You will see a pop-up window to notify that the Certificate has been downloaded successfully. Click Ok.

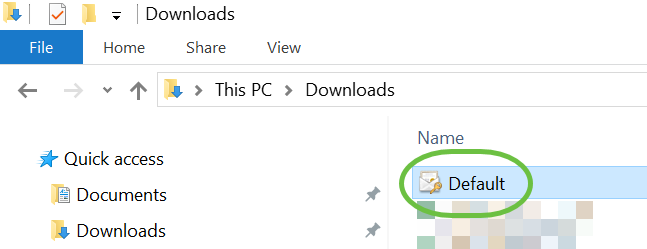
Step 5
Once the Certificate has been downloaded to your PC, locate the file, and double click it.
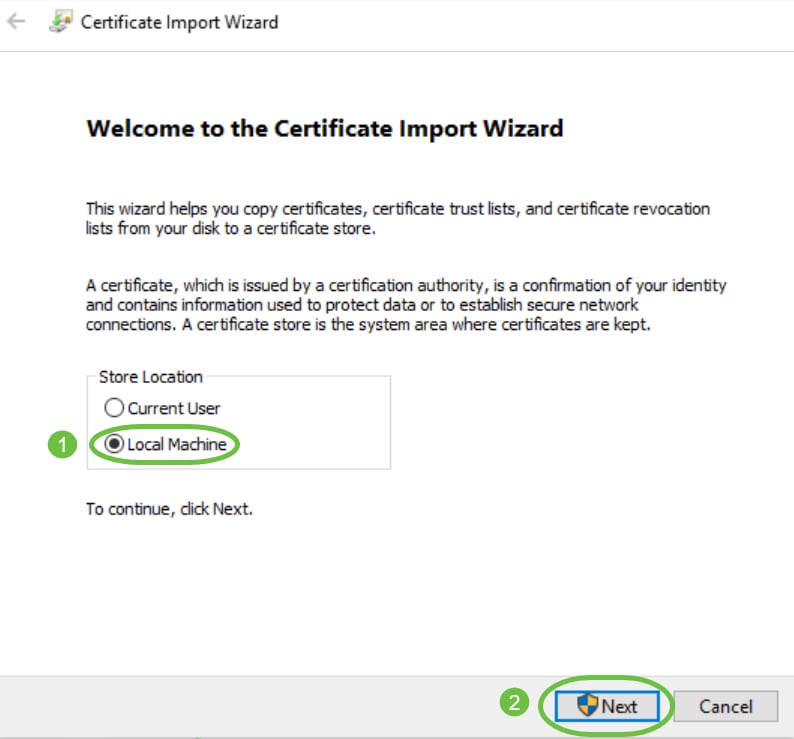
Step 6
The Certificate Import Wizard window will appear. For the Store Location, select Local Machine. Click Next.
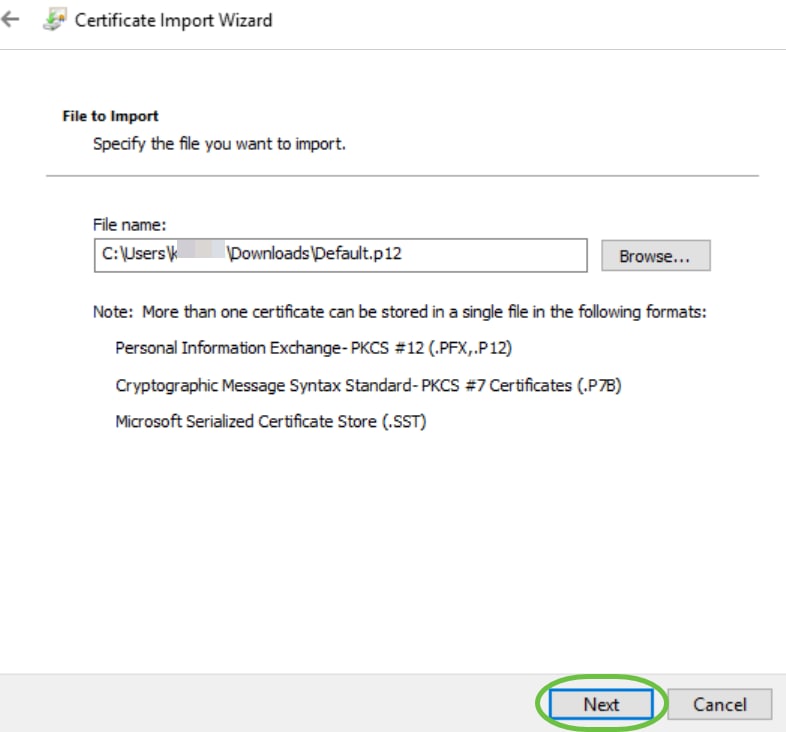
Step 7
On the following screen Certificate location and information will be displayed. Click Next.
Step 8
Enter the Password you selected for the Certificate and click Next.

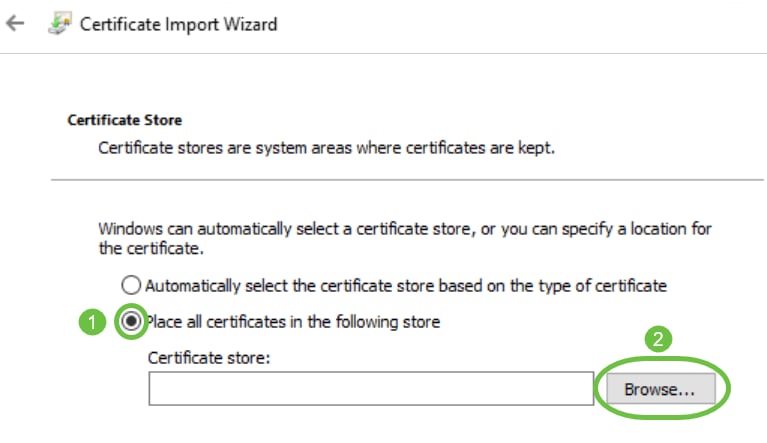
Step 9
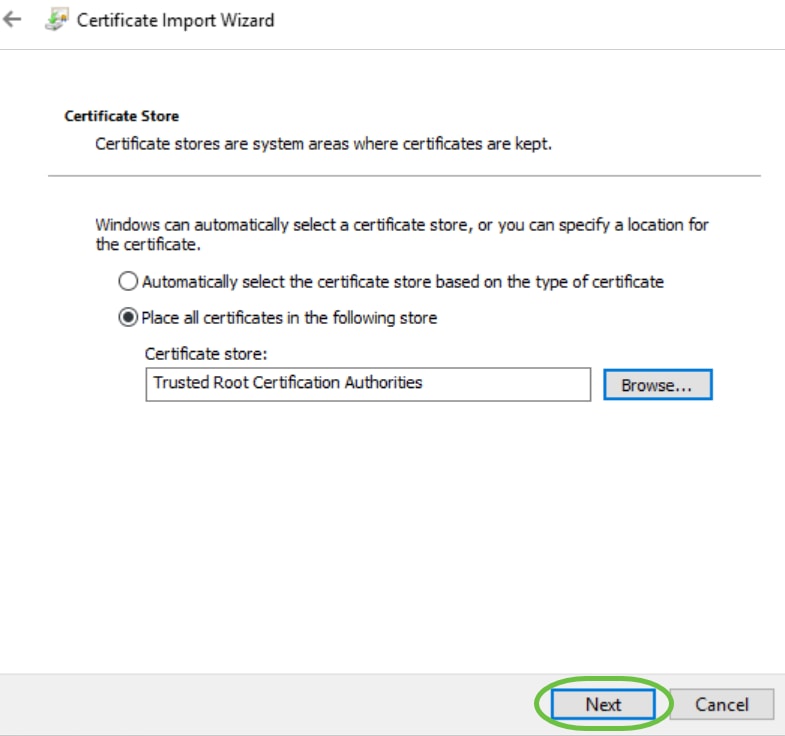
On the next screen, select Place all certificates in the following store and then click on Browse.
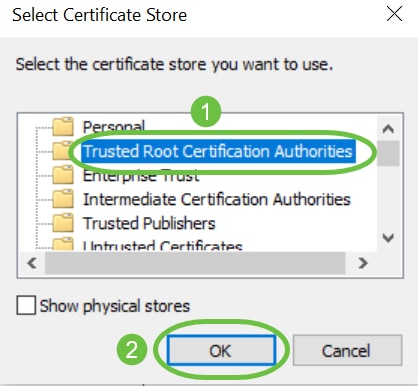
Step 10
Select Trusted Root Certification Authorities and click OK.
Step 11
Click Next.
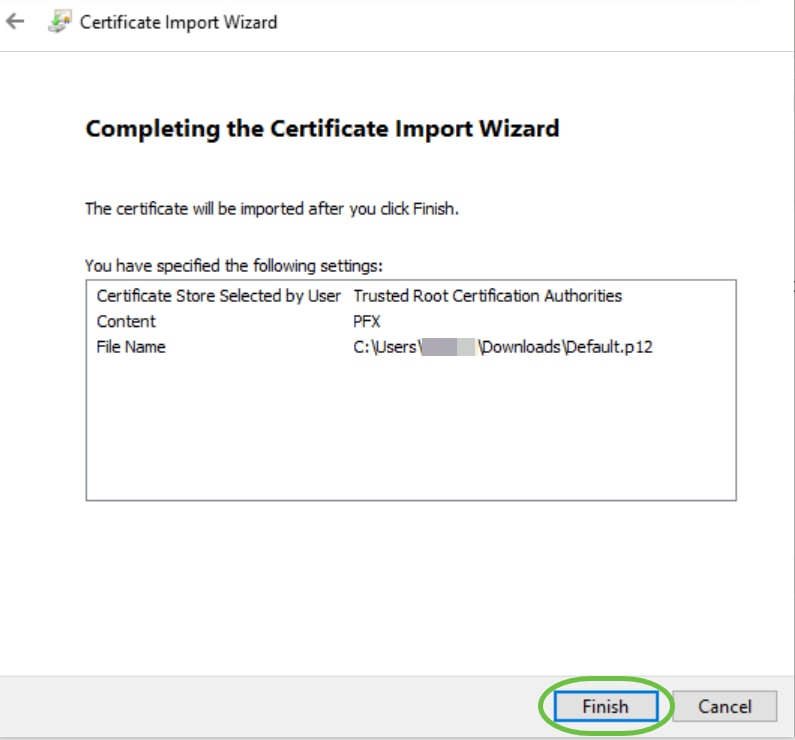
Step 12
A summary of the settings will be displayed. Click Finish to import the Certificate.
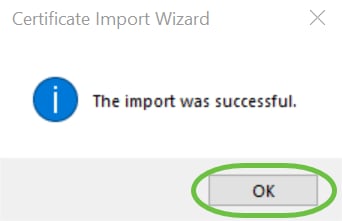
Step 13
You will see a confirmation that the Certificate was imported successfully. Click OK.
Step 14
Open Cisco AnyConnect and attempt to connect again. You should no longer see the Untrusted Server warning.
Conclusion
There you have it! You have now successfully learned the steps to install a self-signed certificate as a trusted source on a Windows machine, to eliminate the “Untrusted Server” warning in AnyConnect.
Additional Resources
This article explains how to connect to your Private Cloud via VPN with CISCO AnyConnect.
This article assumes that you have CISCO AnyConnect downloaded and installed on your local Windows workstation/computer
Connecting to your VPN with CISCO AnyConnect
- From the Windows System Tray, you will see your icon to open CISCO AnyConnect, right-click on this and select Open AnyConnect
- From there the CISCO AnyConnect Client will launch a dialog box
- In the textbox you will use the IP address that was given to you for VPN access, if you require this please contact our support team to request this information, select Connect (see above)
- In cases where just installed or connecting the first time with CISCO AnyConnect, a window will pop up stating that the «Untrusted VPN Server Blocked!» this is normal in the Managed.com Private Cloud environment. To remove this warning you can do the following:
- Select Change Setting…
- Uncheck the box labeled Block connections to untrusted servers (see below)
- Close the window to save the changes
- Reconnect to the VPN via CISCO AnyConnect
- Select Change Setting…
- You will be prompted about a security warning, simply select Connect Anyway
- You will be asked for your VPN credentials, enter your information to connect via the VPN tunnel
- When you are done with your VPN connection make sure you right-click on the system tray icon and select disconnect
Article ID: 2555, Created: April 26, 2017 at 2:58 PM, Modified: May 5, 2017 at 11:47 AM
-
#21
Уберите block connections to untrusted servers
Да убирал конечно. Как только не игрался с этими галками, не работает.
-
#23
Эта галка, если я правильно понимаю, отвечает за блок со стороны самого клиента, если пытаться подключиться к недоверенным хостам, а тут сбрасывает соединение шлюз.
-
#25
Эта галка, если я правильно понимаю, отвечает за блок со стороны самого клиента, если пытаться подключиться к недоверенным хостам, а тут сбрасывает соединение шлюз.
это да.
-
#26
Мистика какая то . Попробуйте перенести настройки с рабочего ПК на нерабочий
Вот тут что то подобное обсуждалось
-
#27
Установление сессии и дисконнект.

-
#28
Мистика какая то . Попробуйте перенести настройки с рабочего ПК на нерабочий
Вот тут что то подобное обсуждалось
Попробую. Но папки в ProgramData и :Users***.cisco переименовывал, чтобы новые создались, не помогло.
-
#29
Мистика какая то . Попробуйте перенести настройки с рабочего ПК на нерабочий
Вот тут что то подобное обсуждалось
Не помогло.

-
#30
А проблемный и рабочий комп в одной подсети? В интернет выходят одинаково ?
-
#31
А проблемный и рабочий комп в одной подсети? В интернет выходят одинаково ?
Да, в одной сети, в одном домене.
-
#32
А как интернет у вас подключен? Один провайдер или несколько ? Нет ли ситуации когда пакеты уходят через одного провайдера приходят через другого, к примеру если bgp. Если схема сложная то попробуйте до их ip прописать статический маршрут
-
#33
А как интернет у вас подключен? Один провайдер или несколько ? Нет ли ситуации когда пакеты уходят через одного провайдера приходят через другого, к примеру если bgp. Если схема сложная то попробуйте до их ip прописать статический маршрут
Провайдер один. Доступ в инет и сеть организованы через кластер шлюзов CheckPoint.
-
#34
Попробуйте ради интереса посмотреть лог в чекпойнте — в Smart Event происходит ли расшифровка https или нет (в поле action) именно по этому проблемному пассажиру. Попробуйте для него сделать правило bypass.

-
#35
вон в низу https inspect. Есть ли такие инспекты от src:»проблемныйкомп»
-
#36
вон в низу https inspect. Есть ли такие инспекты от src:»проблемныйкомп»
У меня доступа нет, а админ checkpoint`a говорит https inspect не включено.
-
#37
У меня доступа нет, а админ checkpoint`a говорит https inspect не включено.
было бы не плохо его потрепать за бочка и попросить лог

-
#38
было бы не плохо его потрепать за бочка и попросить лог
можно попробовать комп выпустить в инет минуя инфраструктуру FW и тд, например через точку доступа или смартфон, при этом ничего не меняя. По крайней мере сузится круг поиска
-
#39
было бы не плохо его потрепать за бочка и попросить лог
«Пробовал и из разных сетей, и из домена выводил, и адаптеры сетевые отключал/удалял/переустанавливал, проблема остается.»
-
#40
может стоит попробовать wireshark или подобный сканер?
Cisco AnyConnect — Untrusted VPN Server Blocked!
| Автор | Сообщение |
|---|---|
|
Зарегистрирован: 20 янв 2010, 13:27 |
Скачал последнюю версию anyconnect-a и получил интересную картинку у всех клиентов! Кто может подсказать ему не нравится то что сертификат самоподписанный(и достаточно купить в комодо доверенный сертификат) или где-то в ASA настраивает доверие к самоподписанному сертификату?
Или тут вообще дело не в сертификате?? |
| 26 сен 2012, 21:44 |
|
|
andrew13
Зарегистрирован: 16 апр 2012, 08:21 |
Так у клиентов в системе этот самоподписанный сертификат должен быть установлен как сертификат доверенного корневого CA. Или же да, на ASA нужно установить сертификат доверенного издателя. _________________ |
| 27 сен 2012, 09:06 |
|
| Показать сообщения за: Поле сортировки |

This article explains how to connect to your Private Cloud via VPN with CISCO AnyConnect.
This article assumes that you have CISCO AnyConnect downloaded and installed on your local Windows workstation/computer
Connecting to your VPN with CISCO AnyConnect
- From the Windows System Tray, you will see your icon to open CISCO AnyConnect, right-click on this and select Open AnyConnect
- From there the CISCO AnyConnect Client will launch a dialog box
- In the textbox you will use the IP address that was given to you for VPN access, if you require this please contact our support team to request this information, select Connect (see above)
- In cases where just installed or connecting the first time with CISCO AnyConnect, a window will pop up stating that the «Untrusted VPN Server Blocked!» this is normal in the Managed.com Private Cloud environment. To remove this warning you can do the following:
- Select Change Setting…
- Uncheck the box labeled Block connections to untrusted servers (see below)
- Close the window to save the changes
- Reconnect to the VPN via CISCO AnyConnect
- Select Change Setting…
- You will be prompted about a security warning, simply select Connect Anyway
- You will be asked for your VPN credentials, enter your information to connect via the VPN tunnel
- When you are done with your VPN connection make sure you right-click on the system tray icon and select disconnect
Article ID: 2555, Created: April 26, 2017 at 2:58 PM, Modified: May 5, 2017 at 11:47 AM