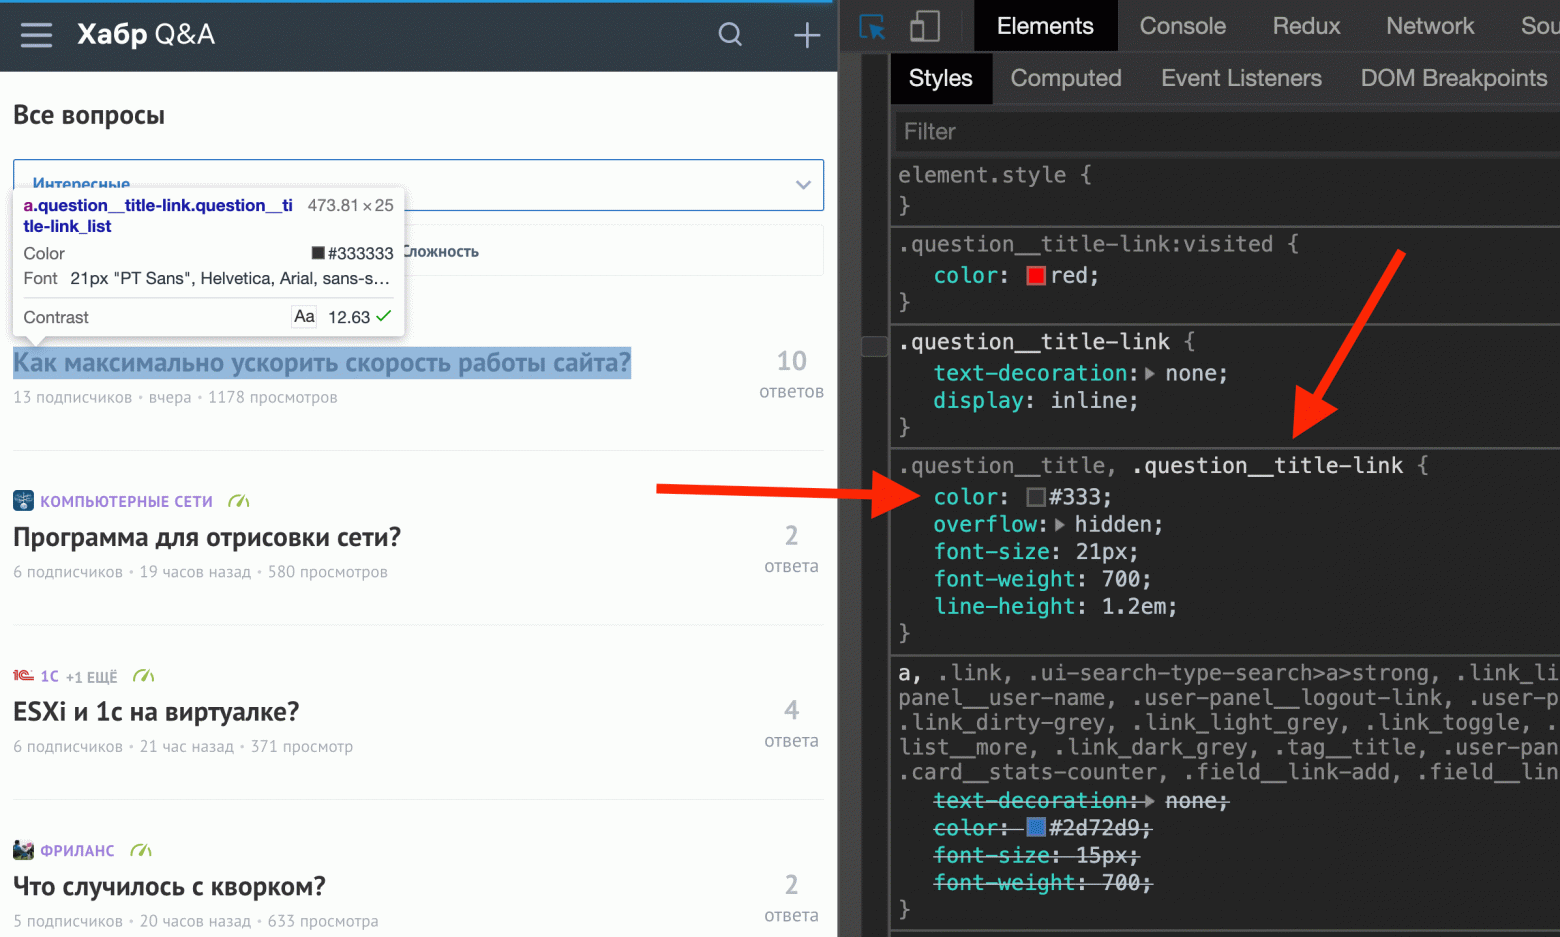
I’m in the process of creating a website with the aid of plugins and WordPress, the plugins are LearnDash, BuddyBoss and BuddyPanel, and I’m having trouble keeping the top navigation bar to stay the same before and after someone logs in, it’s how I’d like it when I log in, but not before hand.
So I got help off support staff from BuddyBoss about this and they gave me some code which contains an warning that I’ve never come across before, the line of code that it is, is.
color: #012243!important;
There is no other lines of code inside the {}, the warning is Use of !important.
How do I fix this?
asked Jul 16, 2016 at 10:55
4
Using of important! modifier is somewhat discouraged, but also, in most cases of prebuilt themes, the most appropriate way to override default settings. So, in your case, that’s probably the only way you can override default color. Just use it if it works.
Also, I would write that rule as:
color: #012243 !important;
So, put a space between color code and !important.
answered Jul 16, 2016 at 11:02
ceruleusceruleus
4501 gold badge6 silver badges18 bronze badges
2
The recommended way is to either increase the specificity
Or copy the existing rule and add it to a custom CSS, loaded after the theme’s CSS.
If the above is not possible, then one need to use !important, added after a property value, e.g.
property: value !important;
When an
importantrule is used on a style declaration, this
declaration overrides any other declarations. Although technically
!importanthas nothing to do with specificity, it interacts directly
with it. Using!important, however, is bad practice and should be
avoided because it makes debugging more difficult by breaking the
natural cascading in your stylesheets. When two conflicting
declarations with the!importantrule are applied to the same element,
the declaration with a greater specificity will be applied.
Src: https://developer.mozilla.org/en-US/docs/Web/CSS/Specificity#The_!important_exception
answered Jul 16, 2016 at 11:20
![]()
AsonsAsons
84.6k12 gold badges110 silver badges161 bronze badges
Когда CSS-правило не работает, многие разработчики хотят добавить !important и забыть о проблеме. Рассказываем, почему так делать не стоит и как правильно работать с CSS.
Когда браузер загружает веб-страницу, он собирает все CSS-правила, которые встречает: из внешних файлов, напрямую указанные в HTML-коде, добавленные с помощью JS. У каждого правила есть селектор, которые говорит к каким HTML-элементам его надо применять. Часто так случается, что один и тот же элемент получает не одно правило, а два и больше. И иногда эти правила даже относятся к одним и тем же свойствам.
Скорее всего именно по этой причине ваш CSS не работает. Просто есть другое правило, которое перекрывает ваше и применяется оно. Не может же быть цвет кнопки одновременно синим и красным.
Так как понять, какое CSS-правило «главнее»?
Для этого нам нужно представить, что все правила упорядочены по некоторой вертикали, которая называется каскадом стилей. Чем выше правило, тем больше у него приоритет. Если вы хотите, чтобы ваше правило применялось, надо чтобы оно было самым высоким по приоритету среди тех, которые содержат те же самые свойства. Дальше мы разберёмся, что влияет на приоритет и как строится этот самый каскад.
Но вернёмся к !important. Это магическое слово сразу же поднимет приоритет вашего CSS-правила до небес. Но так всё равно лучше не делать, потому что:
- так код сложнее поддерживать (если с вашим кодом будет работать человек, который знает, как строится каскад стилей, он не сможет ничего нормально написать как бы ни старался),
- надо постоянно использовать !important и дальше.
Зачем же всё таки иногда нужен !important?
- Чтобы переписать inline-свойства. Нужно редко, но иногда пригождается.
- Чтобы переписать !important сторонней библиотеки. Если её разработчик по какой-то причине его использовал. Возможно как раз потому, что не понимал каскад.
- Для прототипирования. Чтобы быстро прописать новые стили, вывести их наверх каскада, посмотреть результат и если всё устраивается — переписать правильно.
Как работает каскад CSS?
Общий принцип прост: «Чем специфичнее правило — тем выше оно в каскаде». Например, у нас на сайте в списке статей на главной каждый пост — это контейнер с классом box. У него прописан стиль
.box {
    box-shadow: 0 0 0 1px rgba(0,0,0,.05);
}
Это правило добавляет красивую рамку. Но в тёмной теме это бессмысленно, ибо на тёмном фоне тёмная рамка не нужна. В тёмной теме и так достаточно контраста.
Мы добавили правило
.dark .box {
    box-shadow: initial;
}
И прописали у тега body (родительский тег для всего контента вообще на сайте) класс dark.
В итоге второе правило более специфично, оно даёт путь из двух компонент. И применяется именно оно, перекрывая предыдущее. То есть в тёмной теме рамки у постов нет.
Каскад CSS
1. Важность
Первая ступень каскада рассматривает тип правила.
Есть четыре уровня типов:
transition(переход). Правила, которые применяются к активному переходу, имеют первостепенную важность.!important. Если поставить!importantв конце правила, оно перейдёт на этот уровень каскада. В идеале вы должны использовать!importantтолько для переопределения inline-стилей или других!importantиз сторонних библиотек.animation(анимация). Правила, применяющиеся к активной анимации, повышают уровень в каскаде.normal. На этом уровне находится основная часть правил.
Как видите, эти типы обеспечивают корректную анимацию элементов. Если оба правила относятся к одному уровню, приоритет определяется на другой ступени каскада.
2. Происхождение
Вторая ступень смотрит, где определено правило.
Таких мест может быть три (расположены в порядке приоритета):
- Веб-сайт. Единственный уровень, который вы можете контролировать как веб-разработчик.
- Пользователь. Стили, которые пользователь подключает через настройки браузера.
- Браузер. У каждого браузера есть свой набор стилей — например элемент <button> всегда использует стиль браузера по умолчанию.
Так выглядит кнопка в вашем браузере
Примечание Важно! Иерархия для правил с !important здесь работает наоборот: !important-правило браузера выигрывает у !important-правила веб-сайта, тогда как обычные правила сайта превосходят правила браузера.
3. Специфичность
На третьей ступени важна специфичность правила. Значение специфичности определяется исходя из уровней селекторов CSS.
Всего уровней четыре:
inline. Стили, объявленные в HTML-свойствеstyle, обладают наибольшей специфичностью.id. Можно использовать идентификатор (синтаксис#id) для определения стиля конкретного элемента.класс | атрибут | псевдокласс. Определять стиль элемента также позволяют классы (синтаксис.class). Этот уровень включает селекторы HTML-атрибутов, например[checked]или[href="https://wattenberger.com"], и псевдоклассы, такие как:hoverи:first-of-type.тип | псевдоэлемент. Тип тега (синтаксисtype) тоже используется для определения стиля элементов. Сюда же входят псевдоэлементы вроде:beforeи:selection.
Стоит отметить, что здесь имеет значение число «вхождений» в какой-либо уровень.
Если же оба правила имеют одинаковое количество вхождений на самом высоком уровне, можно установить приоритет за счёт следующего по иерархии уровня.
4. Позиция
Последняя ступень каскада смотрит на порядок определения правил.
Всегда побеждает то правило, которое объявлено позже (при условии, что всё остальное в каскаде одинаково).
***
Когда в следующий раз вам захочется написать волшебное слово !important, лучше притормозите, оглянитесь назад и выясните, на каких ступенях каскада находятся конфликтующие стили. А ещё можете почитать спецификацию CSS.
А теперь небольшой тест: как думаете, какое из двух правил победит?
На основе «The CSS Cascade»
When styling elements with CSS, sometimes we can get frustrated that the styling is not applied and using the !important rule can force a CSS snippet to work.
We can use this to force a CSS style. It sometimes work as a quick fix but not always.
This post will go through reasons why using the !important CSS keyword might not be working for you
and their fixes.
The common reasons why !important is not working comes down to:
- You are using the wrong CSS selector and not targeting the correct element,
- You are using in animation
@keyframes - Using !important multiple times and having conflicts
What is the !important keyword?
The !important rule have been around since CSS1 specification in 1991 and allows the user to overrride browser specificity — this just means how a browser
will decide which style to apply to each element.
The following diagram shows how browser will render HTML and display it to the user

Consider the following CSS style where we want to make all fonts in the <blockquote> to be italic:
blockquote * {
    font-style: italic;
}
Now if somehow the above is not working, we can use the !important rule like so:
blockquote * {
    font-style: italic !important; /* Adding important to increase specifity */
}
CSS Specifity — which style gets applied!
CSS specifity just refers to which style the browser will apply to each element. There are quirks amongs browsers but most modern browsers like Chrome, Edge, Safari,
etc generally follow the same rules.
Browsers will use the following order when deciding to apply a style to a specific element — lower down the list gets the highest precedence:
- Browser Styles — each browser (chrome, safari, etc) comes with their own stylesheets. These default styles applied by your browser with the least precedence.
- User Styles — Custom styles created by the brower’s user.
- Author Styles — Styles created by the author/ creator of the website or page.
!importantAuthor Styles — author styles declared withimportantkeyword.!importantUser Styles — user styles declared withimportantkeyword.- Inline Styles — inline styles will be given highest precedence and overwrite any styles previously.
Within each of the CSS stylesheets, it then follows the below order — lower down the list is given the most specifity:
*— wildcard selector- Type Selectors e.g
<p>and Pseudo Elements e.g::after - Class Selectors e.g. .container , Attributes Selectors e.g. [target=”_blank”] and Pseudo Classes e.g.
:hover. - ID Selectors e.g.
#app - Inline styles
- !important — this will override any other previous styles
Fix 1 — !important not targetting correct element
The most common reason why using !important CSS rule is not working to style your element is that it is not targetting the correct element.
As an example, consider the following HTML and CSS
<div class="ui-tabs">
    <ul>
        <li class="ui-active">
            <a href="#">Text</a>
        </li>
    </ul>
</div>.ui-tabs .ui-active {
background: #084;
color: blue !important;
}
a:link {
color: red;
}Now we can see that that text link <a> is not blue — even though we applied the !important rule to it. The reason this is failing is because we applied the rule
to the wrong element. From the above, we have applied the color blue the list item elements and not link elements.
If we change the CSS to the following:
.ui-tabs .ui-active a:link {
    background: #084;
    color: blue !important;
}

a:link {
    color: red;
}
This will target the link <a> inside the list item <li> element
Fix 2 — !important used in @keyframes
One reason that the !important rule would not work is it only works on cascade properties. The cascade is how browers determine styles from different sources are combined
to be applied for a specific element.
At rules such as the @keyframes do not participate in the cascade and therefore using !important will not work!
As example, consider the following HTML
<div id="mydiv" style="margin-left: 5px"></div>We then want to animate this <div> using @keyframes as follows:
#mydiv {
    width: 100px;
    height: 100px;
    animation: animateLeft 4s infinite ease-in 1s
}

@keyframes animateLeft {
    0% {
        margin-left: 100px!important
    }
    100% {
        margin-left: 500px
    }
}
The above margin-left: 100px!important will not work, because @keyframes does not interact with the cascade and therefore the margin-left style of the <div> will not be overwritten by the value inside the 0%.
It will stay the same style as the inline style margin-left: 5px. If we remove the !important, then the margin-left: 100px; will be enforced!
#mydiv {
    width: 100px;
    height: 100px;
    animation: animateLeft 4s infinite ease-in 1s
}

@keyframes animateLeft {
    0% {
        margin-left: 100px;
    }
    100% {
        margin-left: 500px
    }
}
💡 Tip — dont use !important in @keyframes!
More information located here:
https://www.w3.org/TR/css-animations-1/#keyframes
Fix 3 — !important used multiple times
The !important rule can be used to override an element’s styles, but it could be used to be overritten by itself. This can happen when you have multiple !important rules
with the same selectors. Consider the following CSS style:
img { border: none !important; }
#article img { border: 2px solid #fff !important; } /* This will be applied*/
The bottom rule that specifies a border around the image will be applied because it has a higher specifity than the more generic top rule!
💡 Tip — matching selectors that are declared lower in the CSS document will take precedence
One thing to keep in mind is that when you have multiple selectors that select the same element, the selector that is at the bottom of the CSS document will be applied!
So for example, lets say we have the following paragraphs and their styles:
<div>
    <p>First paragraph</p>
</div>
<p>First paragraph</p>
p { color: red; }
p { color: blue; }In the above, all <p> paragraph elements will have text of blue color! Even though we have two matching selectors, CSS style that is lower in the document will take precedence!
To get around this and make the first paragraph color red, we can bump up the specifity declaring the following:
div p { color: red; }
p { color: blue; }
When should you use !important
Best practice is to avoid using !important and use specifity rules instead. This will make your CSS much cleaner and easier to manage. For example, too many important rules
will make you loose track of which one is more important than the other (given the same selector).
However, the important rule can be handy and useful in some use cases:
- Used with user styles to apply the user custom CSS they want to apply for a webpage. This is because we have no control over the CSS that has been loaded.
- Dynamic styles set by JavaScript — to override styles applied by JS on the fly
Browser support
!important has been part of the CSS spec ever since CSS1 in 1991 and browser support for this is good for most modern browsers (chrome, safari, firefox, etc) and even older browsers such as IE (Internet explorer)
Summary
In this post I went over how CSS !important is not working — this can be a quick fix, but not recommended approach!
A checklist of how to troubleshoot why !important is not working is:
- Check that the !important property is applied correctly to the target element.
- Determine if the !important is used in at-rules such as @keyframes. This will not work because @keyframes will ignore the cascade
- Check that important is not used multiple times with your CSS — for example a higher specifity CSS declaration with !important applied will override anything that is less specific
20 November, 2012
Written by on CSS Wizardry.
Table of Contents
- Undoing styles
- Magic numbers
- Qualified selectors
- Hard-coded/absolute values
- Brute forcing
- Dangerous selectors
- Reactive
!important - IDs
- Loose class names
- Final word
Chris Coyier recently answered someone’s question:
How can you tell if your CSS code smells? What are the signs that the code is sub-optional, or that the developer hasn’t done a good job? What do you look for in the code to determine how good or bad it is?
I thought I would extend Chris’ great answer with my own, additional take on things…
My day-to-day life is spent working in-house at BSkyB… I work on big websites, the last of which took me over a year to build the front-end for (and it’s still ongoing). For me, in my world, bad CSS is a very specific and troublesome thing; when you’re working on one site for months on end, you can’t afford poor code, be it CSS or otherwise, and any bad code needs righting.
I’m going to share just a few things (there will, no doubt, be things that I have missed) that I look out for in CSS that will give you and idea as to its quality, its maintainability and its integrity…
Undoing styles
Any CSS that unsets styles (apart from in a reset) should start ringing alarm bells right away. The very nature of CSS is that things will, well, cascade and inherit from things defined previously. Rulesets should only ever inherit and add to previous ones, never undo.
Any CSS declarations like these:
border-bottom: none;
padding: 0;
float: none;
margin-left: 0;
…are typically bad news. If you are having to remove borders, you probably applied them too early. This is really hard to explain so I’ll go with a simple example:
h2 {
    font-size: 2em;
    margin-bottom: 0.5em;
    padding-bottom: 0.5em;
    border-bottom: 1px solid #ccc;
}
Here we’re giving all h2s our usual font-size and margin for spacing, but also a bit of padding and a keyline on the bottom edge to visually separate it from the next element on the page. But, perhaps we have a circumstance in which we don’t want that keyline, perhaps we have a situation where we want a h2 to not have that border and padding. We’d likely end up with something like this:
h2 {
    font-size: 2em;
    margin-bottom: 0.5em;
    padding-bottom: 0.5em;
    border-bottom: 1px solid #ccc;
}

.no-border {
    padding-bottom: 0;
    border-bottom: none;
}
Here we have ten lines of CSS and one ugly class name. What would have been better is this:
h2 {
    font-size: 2em;
    margin-bottom: 0.5em;
}

.headline {
    padding-bottom: 0.5em;
    border-bottom: 1px solid #ccc;
}
Here we have eight lines of CSS, no undoing anything, and a nice, sensible class name.
As you go down a stylesheet you should only ever be adding styles, not taking away. If you find you are having to undo styling as you go down your document the chances are you jumped the gun and started adding too much too soon.
This was a very timid example, but it helps illustrate my point perfectly. Imagine CSS like this over tens of thousands of lines… that’s a lot of bloat and a lot of unnecessary undoing. Peg things onto simpler things that came before it, do not start too complex and risk having to undo your work later on; you’ll end up writing more CSS to achieve less styling.
As soon as I see CSS that undoes previous styling, I can be pretty sure that it’s because something was poorly architected and that the order in which things were built/written needs a rework.
Magic numbers
These are a particular bugbear of mine. I loathe magic numbers.
A magic number is a value that is used ‘because it just works’. Take the following example:
.site-nav {
    [styles]
}

    .site-nav > li:hover .dropdown {
        position: absolute;
        top: 37px;
        left: 0;
    }
top: 37px; here is a magic number; the only reason it works, presumably, is because the lis inside .site-nav happen to be 37px tall, and the .dropdown flyout menu needs to appear at the bottom of it.
The problem here is that 37px is entirely circumstantial and as such, we should place no faith in that number. What if someone changes the font-size in .site-nav and now everything is 29px tall? This number is no longer valid and the next dev needs to know to update it.
What happens when Chrome does render the lis at 37px, but IE renders it at 36px? That number only works in one situation.
Never, ever use numbers just because they work. In this situation we’d be far better off replacing top: 37px; with top: 100%;, which basically means ‘all the way from the top’.
Magic numbers have several problems associated with them. As above, they cannot be relied upon, but also, with their very ‘just because it works’ nature, it’s difficult to communicate to another dev where that number came from. If you had a more complex example which used a magic number—and that magic number became invalid—you are faced with one or more of the following problems:
- The next dev doesn’t know where the magic number came from, so they delete it and are back at square one.
- The next dev is a cautious dev who, because he doesn’t know where the magic number came from, decides to try and fix the problem without touching that magic number. This means that an old, outdated, hacky magic number stays in the code, and the next dev simply hacks away on top of it. You are now hacking on top of a hack.
Magic numbers are bad news; they soon become out of date, they confuse other developers, they cannot be explained, they cannot be trusted.
There’s nothing worse than hitting someone else’s code and seeing an inexplicable number. You’re left wondering what the hell it does, why it’s needed and whether or not you should dare touch it.
As soon as I see magic numbers in CSS I start asking questions. Why is this here? What does it do? Why does that number work? How can you achieve the same without that magic number?
Avoid magic numbers like the plague.
Qualified selectors
Qualified selectors are ones like:
ul.nav {}
a.button {}
div.header {}
Basically, selectors who are needlessly prepended by an element. These are bad news because:
- They totally inhibit reusability on another element.
- They increase specificity.
- They increase browser workload (decreasing performance).
These are all bad traits. Those selectors can, and should be:
.nav {}
.button {}
.header {}
Now I know I can apply .nav to an ol, I can apply .button to an input, and—when the site gets ported over to HTML5—I can quickly swap out my header div for a header element without worrying about invalidating any styles.
With regards performance, this is only a very slight issue, however it is an issue nonetheless. Why make a browser look for a class .button on an a when you could just ask it to look for .button and be done? By qualifying selectors you are increasing a browser’s workload.
More extreme examples might be:
ul.nav li.active a {}
div.header a.logo img {}
.content ul.features a.button {}
All of these selectors can be trimmed down massively, or totally rewritten, to:
.nav .active a {}
.logo > img  {}
.features-button {}
Which will help us:
- Save actual amounts of code
- Increase performance
- Allow greater portability
- Reduce specificity
As soon as I spot overqualified selectors when I scroll down a stylesheet I instantly want to know why they’re written so verbosely and how we can trim them down to as short as possible.
Hard-coded/absolute values
Not unlike magic numbers, hard-coded values are also bad news. A hard-coded value might be something like this:
h1 {
    font-size: 24px;
    line-height: 32px;
}
line-height: 32px; here is not cool, it should be line-height: 1.333…
Line heights should always be set relatively in order to make them more forgiving and flexible. If you ever change the font-size of a h1, you want to know that your line-height will track it. Not having a relative line-height means that if you ever need to modify a h1 you will likely end up with something like this:
h1 {
    font-size: 24px;
    line-height: 32px;
}

/**
 * Main site `h1`
 */
.site-title {
    font-size: 36px;
    line-height: 48px;
}
Here we need to keep on adding fixed line-heights indefinitely as our initial one was never flexible enough. With a unitless and/or relative line-height, we’d have simply needed:
h1 {
    font-size: 24px;
    line-height: 1.333;
}

/**
 * Main site `h1`
 */
.site-title {
    font-size: 36px;
}
This may not seem like a massive difference, but on every text element over a large project, this has a big impact.
N.B. this applies to a lot more than just line-heights; basically any hard-coded absolute in a stylesheet needs treating with caution and suspicion.
Hard-coded values are not very future proof, flexible or forgiving, and thus should be avoided. The only things that should ever really have hard-coded values are things like sprites which will always need to be a certain size no matter what.
As soon as I see a hard-coded unit in a stylesheet I want to know why it was required and how it could be avoided.
Brute forcing
This one is in a similar vein to hard-coded numbers, but a little more specific. Brute forcing CSS is when you use hard-coded magic numbers and a variety of other techniques to force a layout to work. Take for example:
.foo {
    margin-left: -3px;
    position: relative;
    z-index: 99999;
    height: 59px;
    float: left;
}
This is terrible CSS. All of these declarations are heavy-handed, brute-forced, layout-affecting declarations which are clearly only used to force something to render as and where it’s wanted.
This type of CSS is indicative of either a poorly coded layout that requires this kind of manipulation, a lack of understanding of box-model and layout, or both.
Well coded layouts should never need brute-forcing, and a solid understanding of box model, layout and taking a look at your computed styles more often should mean that you’d rarely end up in a situation like this.
As soon as I see brute-forced CSS I want to know how it happened, and how far back we need to unpick things before we can lay things out more rationally.
Dangerous selectors
A ‘dangerous selector’ is one with far too broad a reach. A really obvious and simple example of a dangerous selector might be:
div {
   background-color: #ffc;
   padding: 1em;
}
This will instantly scream at any developer; why on earth would you want to carpet bomb every div on your site? Good question, so why would anyone ever want to have a selector like aside {} for example? Or header {}, or ul {}? Selectors like these are way, way too far reaching and will ultimately lead to us having to undo CSS, as per the section previously.
Let’s look at the header {} example more closely…
A lot of people use a header element to mark up their site’s main header—which is fine—however, if you style that site-wide header like this:
header {
    padding: 1em;
    background-color: #BADA55;
    color: #fff;
    margin-bottom: 20px;
}
…then that’s not so fine. The header element does not mean ‘your site’s main header’ and, as per the spec, the header element can be used multiple times in multiple contexts. This should be targeted via a selector more like .site-header {}, for example.
To give such specific styling to such a generic selector is dangerous. Your styles will leak out into areas they shouldn’t as soon as you start trying to use that element again, and you’ll need to start undoing styles (adding more code to take styles away) in order to combat this.
Make sure your selectors have good selector intent.
Take the following:
ul {
    font-weight: bold;
}

header .media {
    float: left;
}
As soon as I see selectors that end in either a type selector or a very basic abstraction class, as above, I start to panic. I know that these selectors are far too broad and will quickly run us into trouble. As soon as we try and reuse those elements we will find that they’re inheriting styles we don’t necessarily want because, somewhere, there’s a really broad selector managing to reach them.
Reactive !important
!important is fine. It’s fine and it’s a, well, important tool. However, !important should only be used in certain circumstances.
!important should only ever be used proactively, not reactively.
By this I mean that there are times when you know you will always, always want a style to take precedence, and you will know this up front.
For example, you know that you will always want errors to be red, so this rule is totally fine:
.error-text {
    color: #c00!important;
}
If the error occurs in a div where the text is always blue, we can be confident that we want to break that rule in the case of errors. We always want errors to be red because it’s an error, and user messaging should always remain consistent. Here we can proactively add !important because we know we always want errors to be red.
Where !important is bad is when it is used reactively, that is to say, it’s been used to get someone out of a specificity problem, or they’re in a bit of a bind and resort to !important to force things to work. This is using !important reactively and this is bad news.
Using !important reactively is just a way of circumventing the problems caused by ill-formed CSS. It doesn’t fix any problems, it only fixes the symptoms. The problems still exist, but now with and added layer of super-specificity that will take yet more specificity to overcome.
I have no qualms whatsoever with !important, as long as it has been used proactively. As soon as I see reactive use of !important I know right away that it’s likely because of some poorly architected CSS, and that the solution is a refactor, not a hasty addition of heavy-handed specificity.
IDs
This one is very specific to me, and to larger teams. I have written before about how IDs are a bad idea because of their heightened specificity; they are of no use to anyone and should never be used in CSS. Use IDs in HTML for fragment identifiers and JS hooks, but never in CSS.
The reasons are simple:
- IDs can never be used more than once in a page.
- Classes can exist only once, or a million times in a page.
- IDs can often have their traits abstracted out into many reusable classes.
- An ID is 255 times more specific than one class…
infinitely more specific than a class. - This means you’d need 256 chained classes to override one ID
no amount of chained classes can override an ID.
If that last bullet point hasn’t convinced you not to use them then I don’t know what will…
As soon as I see an ID in a stylesheet, I want it replaced with a class. Specificity is how projects start to spiral so it is vital to keep it low.
Fun exercise: try elegantly solving this problem. Clue: this isn’t elegant, nor is this.
Loose class names
A ‘loose’ class name is one that isn’t specific enough for its intended purpose. Imagine a class of .card. What does this do?
This class name is very loose, and loose class names are very bad for two main reasons:
- You can’t necessarily glean its purpose from the class alone.
- It’s so vague that it could very easily be redefined accidentally by another dev.
The first point is the simplest; what does .card mean? What does it style? Is it a Trello-esque concept where a card is a component? Is it a class that you add to a playing card on a poker website? Does it refer to an image of a credit card? It’s difficult to know, because it’s far too loose. Let’s imagine it means credit card; this class would have been much better had it been .credit-card-image {}. A lot longer, yes; a lot better, hell yes!
The second problem with loose class names is that they can very easily be (accidentally) reassigned/redefined. Let’s say you’re working on an commerce site using .card again, and it refers to the user’s credit card linked to their account. Now imagine another dev comes along and wants to add some functionality whereby you can send a purchase to someone as a present, with the option to add a card with a message on it. Their temptation might be to use .card again somewhere, which is wrong, but in certain (albeit unlikely events) this could lead to your .card class being redefined and overwritten.
All this can be avoided by using much stricter class names. Classes like .card and .user and suchlike are far too loose, making them hard to quickly understand, and easy to accidentally reuse/override.
As soon as I see loose class names I start having to work out what it actually refers to, and asking what we can rename it to. Class names should be as specific as possible.
Final word
So there we have it, just a few of the many things I perceive to be code smells in CSS. These are things that I look out for on a daily basis and strive to avoid at all costs. When working on larger projects that last for months and months (and, ultimately, years) it is vital to keep a tight ship, and keeping an eye out for the above—among other things—is paramount. (I can’t stress enough how small a sub-set of things this is; there is a lot more that I look out for.)
Now, of course, there are exceptions to every rule, but they will need assessing on a case by case basis. For the most part, however, these are all things I work hard to avoid, and can spot a mile off in CSS.
☕️ Did this help? Buy me a coffee!
Используя !important вы даете максимально больше важности CSS правилу на котором его применяете. Вы можете применять его не только в таблице сталей, но и в инлайновых стилях. И кстати, если вы так делаете, то вы совершаете большую ошибку. Сейчас узнаем почему.

Правило !important представлено в спецификации CSS1 с целью перезаписи буквально любых стилевых значений. Для разработчиков это куда более важный элемент, нежели для простых пользователей. Как вы уже наверное догадались, этот подход был мало связан с доступностью и поэтому пришлось его переосмыслить, но уже в CSS2.
Правило с !important само по себе не обращает внимания на специфику или каскадирование. Поведение зависит от контекста, но практически всё в CSS может быть перезаписано с !important.
Если вы почитаете о CSS архитектуре, то вы увидите, что никто не советует использование !important. Применяя его, по факту, вы делаете код только хуже. По большому счету это правда, так как вы полностью убиваете каскадирование и специфичность перезаписываемого стиля элемента. Если вы используете его, чтобы перезаписать правило в коде посложнее, то тут каждый человек заверит вас, что это обернется для вас кошмаром.
И так, зная это, зачем тогда нам использовать !important? Как вы уже предположили, это удобный инструмент, но мы должны использовать его с осторожностью. Давайте посмотрим несколько возможных примеров использования, но сначала немного простого CSS.
Говоря о специфичности, мы имеем ввиду более точный селектор, как в следующем примере:
.entry-content {
    color: red;
}

.entry-content p {
    color: black;
}
Последнее правило более точное, так как мы выбрали <p> элементы внутри .entry-content, следовательно <p> теги будут черного цвета.
Менее специфичные селекторы это типовые селекторы (h1, p, span, div), следующие за классовыми селекторами (.entry-content), селекторами атрибутов (type='radio') и псевдоклассами(:hover, :focus). Самые весомые в этом случае это ID селекторы (#main).
Под каскадированием мы подразумеваем естественный каскадный поток CSS. Где по важности находится правило? Чем оно ближе к концу в цепочке правил, тем больше важности оно имеет. Порядок таков: объявления из браузера, затем от пользователя, затем от автора, затем от автора с !important, затем от пользователя с !important. Если у браузера есть дефолтный стиль для тегов заголовков, то вы как автор легко можете перезаписать его с селекторами меньшей специфичности. И мы еще не упоминали наследование, которое случается довольно часто.
Конечно же, такое каскадирование тоже работает в таблице стилей: более позднее правило с той же специфичностью побьёт предыдущее.
Вообще понимание специфичности и каскадирования могло бы быть посложнее. Для большей информации проверьте ссылки.
И так, для чего мы можем его использовать?
Безусловно !important имеет плохую репутацию, так как иногда для ленивых разработчиков — особенно для меня — гораздо удобнее перезаписать всё с помощью этого не совсем элегантного способа, вместо того, чтобы копаться в коде и решать реальную проблему, которая обычно кроется в плохой архитектуре.
Дебажиим код
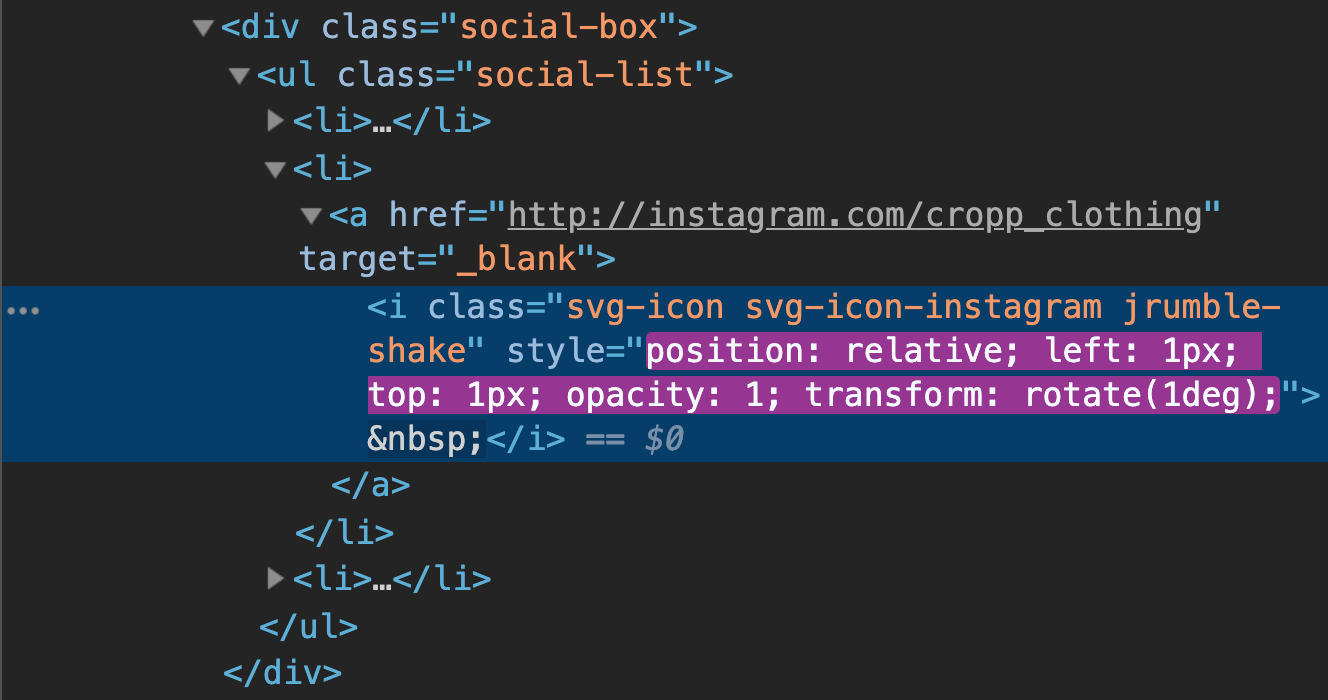
Самый очевидный способ использовать это слово — это дебаггинг вашего кода, обычно в браузере. Временно используя !important в вашем коде, вы можете устранить некоторые конфликты и можете изолировать проблему. В Chrome, вы можете также добавить инлайновые стили, которые также переписывают необходимые авторские значения.
Это удобно для быстрых правок и целей исследования. Если вам всё таки понадобилось это правило, то возможно вам пора заняться рефакторингом кода.
Скрытие элементов
Есть разные способы что-нибудь спрятать от обычных пользователей, но если вы хотите точно убедиться в результате, то !important может быть полезным. Конечно, если вы работаете над своим проектом, вы знаете точно — так ли это вам нужно.
.visually-hidden {
    position: absolute !important;
    height: 1px; width: 1px;
    overflow: hidden;
    clip: rect(1px 1px 1px 1px);
    clip: rect(1px, 1px, 1px, 1px);
}
В этом примере, вы заставляете элемент выставить позиционирование на абсолютное, несмотря на каскадирование и специфичность. Обратите внимание, что тут может быть несколько случаев, где этого не совсем достаточно, но это несомненно паршивый подход в плане долгосрочной перспективы.
Защитный CSS
Это концепция в которой вы, как разработчик пытаетесь убедиться в том, что пользователь может сделать наименьшее количество ошибок во время редактирования контента. Вот например как тут, где конкретно указывается, что все изображения будут блочными элементами.
.entry-content img {
    display: block !important;
}
Используя этот коды вы убедитесь в том, что пользователь по ошибке не сможет сделать изображение строчным или строчно-блочным , даже если теоретически может.
Хакнуть восхитительный WYSIWYG редактор
В WordPress стандартным WYSIWYG редактором является TinyMCE, который по моему мнению не самый худший. Один из его вспомогательным атрибутов не использует инлайновые стили как CKEditor.
Когда вы редактируете контент в CKEditor, тут будут инлайновые стили, которые имеют больший вес в приоритезации, чем авторские. Что нам делать? Использовать !important и контролировать необходимое поведение.
Вспомогательные классы
Большинство вспомогательных классов имеют низкую специфичность, особенно с всего одним классом. Этот момент может быть довольно коварным, если вы используете класы внутри контейнера, как например тут.
.btn{
    display: inline-block;
    background: #3590f1;
    padding: 0.7em 1.6em;
    border-radius: 2px;
    font-size: 1rem;
    font-weight: 700;
    color: #fff;
    text-transform: uppercase;
    text-decoration: none;

    &:hover,
    &:focus {
        background: #5adba0;
    }
}

.entry-content a {
    text-decoration: underline;
    color: #3590f1;
}
Хотя с нашим классом .btn всё ок, его специфичность низка, так что простое второе правило, которое идет дальше — перепишет его свойства, в данном случае это color и text-decoration. Вам нужно написать простой селектор, но проблема всё же останется.
Вы можете решить ее, использовав !important, как в этом примере:
See the Pen
CSS !important with Utility Classes by Adam Laki (@adamlaki)
on CodePen.
После этого, вам также придется применять эту технику в модификаторах и всяких псевдо объявлениях стилей.
БЭМ метод
БЭМ это тот метод, который основывается низкой специфичности и иногда из-за этого может вызывать некоторые неприятности со стилями. Почти все селекторы имеют один класс. Я даже не знаю сколько раз мне надо было рефакторить код, созданный по этой технике. Конечно, у вас есть и свои решения описанных проблем, но в следующий раз может вы тоже будете использовать !important.
I’m in the process of creating a website with the aid of plugins and WordPress, the plugins are LearnDash, BuddyBoss and BuddyPanel, and I’m having trouble keeping the top navigation bar to stay the same before and after someone logs in, it’s how I’d like it when I log in, but not before hand.
So I got help off support staff from BuddyBoss about this and they gave me some code which contains an warning that I’ve never come across before, the line of code that it is, is.
color: #012243!important;
There is no other lines of code inside the {}, the warning is Use of !important.
How do I fix this?
asked Jul 16, 2016 at 10:55
4
Using of important! modifier is somewhat discouraged, but also, in most cases of prebuilt themes, the most appropriate way to override default settings. So, in your case, that’s probably the only way you can override default color. Just use it if it works.
Also, I would write that rule as:
color: #012243 !important;
So, put a space between color code and !important.
answered Jul 16, 2016 at 11:02
ceruleusceruleus
4501 gold badge6 silver badges18 bronze badges
2
The recommended way is to either increase the specificity
Or copy the existing rule and add it to a custom CSS, loaded after the theme’s CSS.
If the above is not possible, then one need to use !important, added after a property value, e.g.
property: value !important;
When an
importantrule is used on a style declaration, this
declaration overrides any other declarations. Although technically
!importanthas nothing to do with specificity, it interacts directly
with it. Using!important, however, is bad practice and should be
avoided because it makes debugging more difficult by breaking the
natural cascading in your stylesheets. When two conflicting
declarations with the!importantrule are applied to the same element,
the declaration with a greater specificity will be applied.
Src: https://developer.mozilla.org/en-US/docs/Web/CSS/Specificity#The_!important_exception
answered Jul 16, 2016 at 11:20
![]()
AsonsAsons
83.6k12 gold badges103 silver badges154 bronze badges
Когда CSS-правило не работает, многие разработчики хотят добавить !important и забыть о проблеме. Рассказываем, почему так делать не стоит и как правильно работать с CSS.
Когда браузер загружает веб-страницу, он собирает все CSS-правила, которые встречает: из внешних файлов, напрямую указанные в HTML-коде, добавленные с помощью JS. У каждого правила есть селектор, которые говорит к каким HTML-элементам его надо применять. Часто так случается, что один и тот же элемент получает не одно правило, а два и больше. И иногда эти правила даже относятся к одним и тем же свойствам.
Скорее всего именно по этой причине ваш CSS не работает. Просто есть другое правило, которое перекрывает ваше и применяется оно. Не может же быть цвет кнопки одновременно синим и красным.
Так как понять, какое CSS-правило «главнее»?
Для этого нам нужно представить, что все правила упорядочены по некоторой вертикали, которая называется каскадом стилей. Чем выше правило, тем больше у него приоритет. Если вы хотите, чтобы ваше правило применялось, надо чтобы оно было самым высоким по приоритету среди тех, которые содержат те же самые свойства. Дальше мы разберёмся, что влияет на приоритет и как строится этот самый каскад.
Но вернёмся к !important. Это магическое слово сразу же поднимет приоритет вашего CSS-правила до небес. Но так всё равно лучше не делать, потому что:
- так код сложнее поддерживать (если с вашим кодом будет работать человек, который знает, как строится каскад стилей, он не сможет ничего нормально написать как бы ни старался),
- надо постоянно использовать !important и дальше.
- Чтобы переписать inline-свойства. Нужно редко, но иногда пригождается.
- Чтобы переписать !important сторонней библиотеки. Если её разработчик по какой-то причине его использовал. Возможно как раз потому, что не понимал каскад.
- Для прототипирования. Чтобы быстро прописать новые стили, вывести их наверх каскада, посмотреть результат и если всё устраивается — переписать правильно.
Как работает каскад CSS?
Общий принцип прост: «Чем специфичнее правило — тем выше оно в каскаде». Например, у нас на сайте в списке статей на главной каждый пост — это контейнер с классом box. У него прописан стиль
.box {
    box-shadow: 0 0 0 1px rgba(0,0,0,.05);
}
Это правило добавляет красивую рамку. Но в тёмной теме это бессмысленно, ибо на тёмном фоне тёмная рамка не нужна. В тёмной теме и так достаточно контраста.
Мы добавили правило
.dark .box {
    box-shadow: initial;
}
И прописали у тега body (родительский тег для всего контента вообще на сайте) класс dark.
В итоге второе правило более специфично, оно даёт путь из двух компонент. И применяется именно оно, перекрывая предыдущее. То есть в тёмной теме рамки у постов нет.
Каскад CSS
1. Важность
Первая ступень каскада рассматривает тип правила.
Есть четыре уровня типов:
transition(переход). Правила, которые применяются к активному переходу, имеют первостепенную важность.!important. Если поставить!importantв конце правила, оно перейдёт на этот уровень каскада. В идеале вы должны использовать!importantтолько для переопределения inline-стилей или других!importantиз сторонних библиотек.animation(анимация). Правила, применяющиеся к активной анимации, повышают уровень в каскаде.normal. На этом уровне находится основная часть правил.
Как видите, эти типы обеспечивают корректную анимацию элементов. Если оба правила относятся к одному уровню, приоритет определяется на другой ступени каскада.
2. Происхождение
Вторая ступень смотрит, где определено правило.
Таких мест может быть три (расположены в порядке приоритета):
- Веб-сайт. Единственный уровень, который вы можете контролировать как веб-разработчик.
- Пользователь. Стили, которые пользователь подключает через настройки браузера.
- Браузер. У каждого браузера есть свой набор стилей — например элемент <button> всегда использует стиль браузера по умолчанию.
Так выглядит кнопка в вашем браузере
Примечание Важно! Иерархия для правил с !important здесь работает наоборот: !important-правило браузера выигрывает у !important-правила веб-сайта, тогда как обычные правила сайта превосходят правила браузера.
3. Специфичность
На третьей ступени важна специфичность правила. Значение специфичности определяется исходя из уровней селекторов CSS.
Всего уровней четыре:
inline. Стили, объявленные в HTML-свойствеstyle, обладают наибольшей специфичностью.id. Можно использовать идентификатор (синтаксис#id) для определения стиля конкретного элемента.класс | атрибут | псевдокласс. Определять стиль элемента также позволяют классы (синтаксис.class). Этот уровень включает селекторы HTML-атрибутов, например[checked]или[href="https://wattenberger.com"], и псевдоклассы, такие как:hoverи:first-of-type.тип | псевдоэлемент. Тип тега (синтаксисtype) тоже используется для определения стиля элементов. Сюда же входят псевдоэлементы вроде:beforeи:selection.
Стоит отметить, что здесь имеет значение число «вхождений» в какой-либо уровень.
Если же оба правила имеют одинаковое количество вхождений на самом высоком уровне, можно установить приоритет за счёт следующего по иерархии уровня.
4. Позиция
Последняя ступень каскада смотрит на порядок определения правил.
Всегда побеждает то правило, которое объявлено позже (при условии, что всё остальное в каскаде одинаково).
***
Когда в следующий раз вам захочется написать волшебное слово !important, лучше притормозите, оглянитесь назад и выясните, на каких ступенях каскада находятся конфликтующие стили. А ещё можете почитать спецификацию CSS.
А теперь небольшой тест: как думаете, какое из двух правил победит?
На основе «The CSS Cascade»
Любая фича в «кривых» руках становится плохой. Импортант — не исключение. Плохо не то, что он умеет, а то, как его используют.

Как работает !important
В CSS для определения приоритета стилей мы пользуемся механизмом специфичности. Мы пишем каскады или сложные селекторы, повышаем вес селектора, таким образом указываем браузеру приоритетность одних стилей над другими.
Например:
.content .title {
    color: red;
}

.title {
    color: blue;
}
В этом случае, несмотря на то, что синий цвет применяется к заголовку после красного, в результате мы получим все же красный заголовок. Потому, что первый селектор является более специфичным (если вдруг вы с этим не знакомы, не читайте дальше — будет только хуже, лучше вот сюда и учите специфичность).
Так вот, используя этот же пример, но с !important, мы вдруг узнаём, что ему «плевать» на вашу специфичность.
.content .title {
    color: red;
}

.title {
    color: blue !important;
}
Заголовок будет синим! Это свойство нарушает естественный поток написанных нами правил и менее приоритетным стилям даёт наибольший приоритет.
Ну хотя, как «плевать»… Не совсем уж и плевать. Допишем ещё один импортант.
.content .title {
    color: red !important;
}

.title {
    color: blue !important;
}
И заголовок снова красный. Потому что у нас конфликтуют два !important и решается этот конфликт сравнением весов селекторов.
Импортант — это плохо, когда так:
.title {
    color: red;
}
«Хм, я же написал “красный”, почему мой заголовок не красный? А если так?»
.title {
    color: red !important;
}
«Отлично! Красный!» А точно ли отлично?
Такой подход плох как минимум потому, что вы переопределяете стили не разобравшись, почему они не применялись без импортанта. Скорее всего, вес селектора, которым вы воспользовались, оказался просто недостаточным и, написав чуть более точный и «тяжелый» селектор, вы бы решили свою проблему, а так вы жестко переопределили стили, и хорошо, если вы знаете и проверили все места, где использовался этот класс, но если это не так, то вы подчинили элемент в одном месте и, вероятно, сломали в другом.
Инструмент для hotfix
Очень часто, когда я задаю кому-то вопрос про импортанты, я слышу ответ в стиле: «Я использую important тогда, когда мне нужно быстро пофиксить проблему и некогда разбираться в коде, который писал не я и который написан очень плохо».
Да, но только задачи всегда «срочные», такие задачи, как правило, никто и никогда не доделает, так это и оставив. Вы и сами не заметили, как сделали «плохой чужой код» ещё хуже.
Что значит «быстро»? Разве узнать необходимый вес селектора для переопределения так сложно и долго? Мы очень активно используем DevTools при разработке, и для решения этой задачи ответ у нас есть там же.
Инспектируем элемент, который хотим изменить. Его текущий цвет — черный. Смотрим, по какому же селектору был назначен этот цвет?
Используем этот же селектор для назначения нового цвета или для повышения веса, и дело в шляпе, какой бы сложности не был этот селектор.

Разве это долго? Мне кажется, по времени это мало отличается от того, чтобы дописать !important, однако намного правильнее и безопаснее.
Сторонние решения и чужой код
Второй по популярности ответ на вопрос про необходимость использования импортантов: «Я использую !important, когда переопределяю стили сторонних библиотек и плагинов или CMS-ок».
Этот ответ чуть ближе к правде, но только если его чуть более точно сформулировать. Именно в такой форме он неправильный, потому как стили сторонних файлов можно перезаписывать точно так же, как и свои, просто дописывая их после подключения чужих стилей и повышая вес селектора.
Однако в некоторых случаях этот ответ «попадает» в вопрос. Например, если вы подключили слайдер к своей странице, который реализован так, что при переключении слайда JavaScript-ом перезаписываются значения некоторых свойств в CSS.
А вам почему-то надо переопределить эти свойства, проигнорировав изменения самого плагина.
JS может переназначать значения свойств только с помощью inline-стилей. То есть фактически любые свойства, изменённые у элемента с помощью JavaScript, будут просто записаны в атрибут style. С точки зрения механизма специфичности, эти стили более приоритетные, и как бы вы ни повышали вес селектора, вы не сможете перезаписать их.
Это именно тот первый случай, в котором нам просто не обойтись без important.
Если нам нужно переопределить инлайновые стили, то нам поможет только important.
Приоритетность стилей с импортантом выше, чем приоритетность инлайн-стилей, и если у вас почему-то появилась необходимость перезаписывать инлайновые стили, то у вас нет вариантов, кроме как использовать !important.
Important во благо
Рассмотрим ещё один случай, который иногда применяют в коде различных библиотек и плагинов.
Если вы откроете исходный CSS-код библиотеки Bootstrap, то увидите, что там разработчики библиотеки очень часто прибегают к использованию импортантов. Возможно, им тоже просто нужно было быстро пофиксить, и они так поступили (сарказм), но вообще этому есть более подходящее объяснение. В этом случае important-ы используются «во благо». Таким образом разработчики Bootstrap «защищают» свой код.
Дело в том, что вы, подключая к своему сайту эту библиотеку, можете переопределять её исходные стили. Таким образом, разработчики перестраховались, и сломать поведение их кода будет сложнее, если вы не знаете, как работает специфичность. Но если вы понимаете, как работает механизм специфичности в CSS, то можете переопределить их импортант, записав свои стили тоже с импортантом, но с более «тяжелым» селектором.
Тем самым мы приходим к второму случаю, когда без импортанта нельзя.
Если вам нужно переопределить important (ваш или из сторонней библиотеки), то вам поможет только !important.
Именно поэтому некорректно говорить: «Я использую импортанты, когда мне нужно переопределить стили сторонних библиотек», правильнее будет сказать: «Я использую импортанты, когда мне нужно переопределить inline-стили или другие !important». И совсем не важно откуда эти стили: из ваших файлов или из сторонних.
Хелперы
В предыдущем абзаце, по сути, описаны все случаи, когда использование импортантов будет нормальным и правильным. Это те случаи, в которых применение импортантов будет неизбежным. Но существуют ещё случаи, в которых использование импортантов будет допустимым, хоть, возможно, уже и не совсем уместным.
Иногда нам необходимы вспомогательные универсальные классы, которые мы используем в своём коде с целью повторного использования кода и некоторого упрощения.
Например, мы создаём какой-то класс .warning, который будем применять к различным элементам на странице, тем самым обозначая их важность.
.warning {
     color: red;
}
И мы хотим, чтобы, применяя этот класс к любому элементу, мы точно делали текст в этом элементе красным. Но ведь у элемента могут быть более приоритетные стили, записанные по более точному селектору, и тогда наш цвет из класса .warning перетрется. В таком случае, добавив important в наш классхелпер, мы делаем его более универсальным, потому что цвет, применяемый в этом классе, будет более приоритетным. Однако сказать, что это хорошо, я не могу. Ведь это делает стили класса более приоритетными, но все равно не гарантирует вам стопроцентной работы, поскольку этот хелпер может столкнуться с другим important, и все равно всё пойдёт не по плану. А потом, когда окажется, что все же в определенном случае этот класс должен делать текст «не таким уж и красным», то вы сразу же «родите» новый селектор с повторением импортанта.
Когда всё таки можно
Правильно и нормально использовать !important, когда вам нужно переопределить inline-стили или другие !important.
Если следовать этому правилу, то выходит, что в обычной верстке, особенно если вы верстаете страницу с нуля, у вас не возникает необходимости использовать импортант вплоть до того момента, пока вы не начинаете подключать сторонние решения к своей странице, но даже это, как мы разобрались выше, не обязательно приводит к их использованию.
Современные методологии вроде БЭМ тоже диктуют свои правила, в которых использование инлайновых стилей или импортантов будет неуместным.
Импортант вам не нужен не потому, что он какой-то загадочный и ужасный, а просто потому, что в большинстве случаев можно обойтись без него.
Все исключения, которые я определил для себя, как правило, сводятся к не очень типичным случаям. Например, у вас может появиться необходимость использовать это, когда вы разрабатываете собственную библиотеку, плагин или браузерное расширение и вам нужно какое-то более приоритетное поведение конкретных стилей. Однако это далеко не про типичное регулярное использование.
When styling elements with CSS, sometimes we can get frustrated that the styling is not applied and using the !important rule can force a CSS snippet to work.
We can use this to force a CSS style. It sometimes work as a quick fix but not always.
This post will go through reasons why using the !important CSS keyword might not be working for you
and their fixes.
The common reasons why !important is not working comes down to:
- You are using the wrong CSS selector and not targeting the correct element,
- You are using in animation
@keyframes - Using !important multiple times and having conflicts
What is the !important keyword?
The !important rule have been around since CSS1 specification in 1991 and allows the user to overrride browser specificity — this just means how a browser
will decide which style to apply to each element.
The following diagram shows how browser will render HTML and display it to the user
Consider the following CSS style where we want to make all fonts in the <blockquote> to be italic:
blockquote * {
    font-style: italic;
}
Now if somehow the above is not working, we can use the !important rule like so:
blockquote * {
    font-style: italic !important; /* Adding important to increase specifity */
}
CSS Specifity — which style gets applied!
CSS specifity just refers to which style the browser will apply to each element. There are quirks amongs browsers but most modern browsers like Chrome, Edge, Safari,
etc generally follow the same rules.
Browsers will use the following order when deciding to apply a style to a specific element — lower down the list gets the highest precedence:
- Browser Styles — each browser (chrome, safari, etc) comes with their own stylesheets. These default styles applied by your browser with the least precedence.
- User Styles — Custom styles created by the brower’s user.
- Author Styles — Styles created by the author/ creator of the website or page.
!importantAuthor Styles — author styles declared withimportantkeyword.!importantUser Styles — user styles declared withimportantkeyword.- Inline Styles — inline styles will be given highest precedence and overwrite any styles previously.
Within each of the CSS stylesheets, it then follows the below order — lower down the list is given the most specifity:
*— wildcard selector- Type Selectors e.g
<p>and Pseudo Elements e.g::after - Class Selectors e.g. .container , Attributes Selectors e.g. [target=”_blank”] and Pseudo Classes e.g.
:hover. - ID Selectors e.g.
#app - Inline styles
- !important — this will override any other previous styles
Fix 1 — !important not targetting correct element
The most common reason why using !important CSS rule is not working to style your element is that it is not targetting the correct element.
As an example, consider the following HTML and CSS
<div class="ui-tabs">
    <ul>
        <li class="ui-active">
            <a href="#">Text</a>
        </li>
    </ul>
</div>.ui-tabs .ui-active {
background: #084;
color: blue !important;
}
a:link {
color: red;
}Now we can see that that text link <a> is not blue — even though we applied the !important rule to it. The reason this is failing is because we applied the rule
to the wrong element. From the above, we have applied the color blue the list item elements and not link elements.
If we change the CSS to the following:
.ui-tabs .ui-active a:link {
    background: #084;
    color: blue !important;
}

a:link {
    color: red;
}
This will target the link <a> inside the list item <li> element
Fix 2 — !important used in @keyframes
One reason that the !important rule would not work is it only works on cascade properties. The cascade is how browers determine styles from different sources are combined
to be applied for a specific element.
At rules such as the @keyframes do not participate in the cascade and therefore using !important will not work!
As example, consider the following HTML
<div id="mydiv" style="margin-left: 5px"></div>We then want to animate this <div> using @keyframes as follows:
#mydiv {
    width: 100px;
    height: 100px;
    animation: animateLeft 4s infinite ease-in 1s
}

@keyframes animateLeft {
    0% {
        margin-left: 100px!important
    }
    100% {
        margin-left: 500px
    }
}
The above margin-left: 100px!important will not work, because @keyframes does not interact with the cascade and therefore the margin-left style of the <div> will not be overwritten by the value inside the 0%.
It will stay the same style as the inline style margin-left: 5px. If we remove the !important, then the margin-left: 100px; will be enforced!
#mydiv {
    width: 100px;
    height: 100px;
    animation: animateLeft 4s infinite ease-in 1s
}

@keyframes animateLeft {
    0% {
        margin-left: 100px;
    }
    100% {
        margin-left: 500px
    }
}
💡 Tip — dont use !important in @keyframes!
More information located here:
https://www.w3.org/TR/css-animations-1/#keyframes
Fix 3 — !important used multiple times
The !important rule can be used to override an element’s styles, but it could be used to be overritten by itself. This can happen when you have multiple !important rules
with the same selectors. Consider the following CSS style:
img { border: none !important; }
#article img { border: 2px solid #fff !important; } /* This will be applied*/
The bottom rule that specifies a border around the image will be applied because it has a higher specifity than the more generic top rule!
💡 Tip — matching selectors that are declared lower in the CSS document will take precedence
One thing to keep in mind is that when you have multiple selectors that select the same element, the selector that is at the bottom of the CSS document will be applied!
So for example, lets say we have the following paragraphs and their styles:
<div>
    <p>First paragraph</p>
</div>
<p>First paragraph</p>
p { color: red; }
p { color: blue; }In the above, all <p> paragraph elements will have text of blue color! Even though we have two matching selectors, CSS style that is lower in the document will take precedence!
To get around this and make the first paragraph color red, we can bump up the specifity declaring the following:
div p { color: red; }
p { color: blue; }
When should you use !important
Best practice is to avoid using !important and use specifity rules instead. This will make your CSS much cleaner and easier to manage. For example, too many important rules
will make you loose track of which one is more important than the other (given the same selector).
However, the important rule can be handy and useful in some use cases:
- Used with user styles to apply the user custom CSS they want to apply for a webpage. This is because we have no control over the CSS that has been loaded.
- Dynamic styles set by JavaScript — to override styles applied by JS on the fly
Browser support
!important has been part of the CSS spec ever since CSS1 in 1991 and browser support for this is good for most modern browsers (chrome, safari, firefox, etc) and even older browsers such as IE (Internet explorer)
Summary
In this post I went over how CSS !important is not working — this can be a quick fix, but not recommended approach!
A checklist of how to troubleshoot why !important is not working is:
- Check that the !important property is applied correctly to the target element.
- Determine if the !important is used in at-rules such as @keyframes. This will not work because @keyframes will ignore the cascade
- Check that important is not used multiple times with your CSS — for example a higher specifity CSS declaration with !important applied will override anything that is less specific
- 9 min read
- Coding,
CSS,
Essentials
!important declarations that would help developers and users easily override normal specificity when making changes to their stylesheets. For the most part, !important declarations have remained the same, with only one change in CSS2.1 and nothing new added or altered in the CSS3 spec in connection with this unique declaration.When the CSS1 specification was drafted in the mid to late 90s, it introduced !important declarations that would help developers and users easily override normal specificity when making changes to their stylesheets. For the most part, !important declarations have remained the same, with only one change in CSS2.1 and nothing new added or altered in the CSS3 spec in connection with this unique declaration.
Further Reading on SmashingMag:
- CSS Specificity And Inheritance
- Mastering CSS Principles: A Comprehensive Guide
- CSS Specificity: Things You Should Know
- CSS Inheritance, The Cascade And Global Scope
Let’s take a look at what exactly these kinds of declarations are all about, and when, if ever, you should use them.
A Brief Primer on the Cascade
Before we get into !important declarations and exactly how they work, let’s give this discussion a bit of context. In the past, Smashing Magazine has covered CSS specificity in-depth, so please take a look at that article if you want a detailed discussion on the CSS cascade and how specificity ties in.
More after jump! Continue reading below ↓

Below is a basic outline of how any given CSS-styled document will decide how much weight to give to different styles it encounters. This is a general summary of the cascade as discussed in the spec:
- Find all declarations that apply to the element and property
- Apply the styling to the element based on importance and origin using the following order, with the first item in the list having the least weight:
- Declarations from the user agent
- Declarations from the user
- Declarations from the author
- Declarations from the author with
!importantadded - Declarations from the user with
!importantadded
- Apply styling based on specificity, with the more specific selector “winning” over more general ones
- Apply styling based on the order in which they appear in the stylesheet (i.e., in the event of a tie, last one “wins”)
With that basic outline, you can probably already see how !important declarations weigh in, and what role they play in the cascade. Let’s look at !important in more detail.
What is Important CSS?
An !important declaration provides a way for a stylesheet author to give a CSS value more weight than it naturally has.
Syntax and Description
It should be noted here that the phrase “!important declaration” is a reference to an entire CSS declaration, including property and value, with !important added (thanks to Brad Czerniak for pointing out this discrepancy). Here is a simple code example that clearly illustrates how !important affects the natural way that styles are applied:
#example {
    font-size: 14px !important;
}

#container #example {
    font-size: 10px;
}
In the above code sample, the element with the id of “example” will have text sized at 14px, due to the addition of !important.
Without the use of !important, there are two reasons why the second declaration block should naturally have more weight than the first: The second block is later in the stylesheet (i.e. it’s listed second). Also, the second block has more specificity (#container followed by #example instead of just #example). But with the inclusion of !important, the first font-size rule now has more weight.
Some things to note about !important declarations:
- When
!importantwas first introduced in CSS1, an author rule with an!importantdeclaration held more weight than a user rule with an!importantdeclaration; to improve accessibility, this was reversed in CSS2 - If
!importantis used on a shorthand property, this adds “importance” to all the sub-properties that the shorthand property represents - The
!importantkeyword (or statement) must be placed at the end of the line, immediately before the semicolon, otherwise it will have no effect (although a space before the semicolon won’t break it) - If for some particular reason you have to write the same property twice in the same declaration block, then add
!importantto the end of the first one, the first one will have more weight in every browser except IE6 (this works as an IE6-only hack, but doesn’t invalidate your CSS) - In IE6 and IE7, if you use a different word in place of
!important(like!hotdog), the CSS rule will still be given extra weight, while other browsers will ignore it
When Should !important Be Used?
As with any technique, there are pros and cons depending on the circumstances. So when should it be used, if ever? Here’s my subjective overview of potential valid uses.
Never
!important declarations should not be used unless they are absolutely necessary after all other avenues have been exhausted. If you use !important out of laziness, to avoid proper debugging, or to rush a project to completion, then you’re abusing it, and you (or those that inherit your projects) will suffer the consequences.
If you include it even sparingly in your stylesheets, you will soon find that certain parts of your stylesheet will be harder to maintain. As discussed above, CSS property importance happens naturally through the cascade and specificity. When you use !important, you’re disrupting the natural flow of your rules, giving more weight to rules that are undeserving of such weight.
If you never use !important, then that’s a sign that you understand CSS and give proper forethought to your code before writing it.
That being said, the old adage “never say never” would certainly apply here. So below are some legitimate uses for !important.
To Aid or Test Accessibility
As mentioned, user stylesheets can include !important declarations, allowing users with special needs to give weight to specific CSS rules that will aid their ability to read and access content.
A special needs user can add !important to typographic properties like font-size to make text larger, or to color-related rules in order to increase the contrast of web pages.
In the screen grab below, Smashing Magazine’s home page is shown with a user-defined stylesheet overriding the normal text size, which can be done using Firefox’s Developer Toolbar:

In this case, the text size was adjustable without using !important, because a user-defined stylesheet will override an author stylesheet regardless of specificity. If, however, the text size for body copy was set in the author stylesheet using an !important declaration, the user stylesheet could not override the text-size setting, even with a more specific selector. The inclusion of !important resolves this problem and keeps the adjustability of text size within the user’s power, even if the author has abused !important.
To Temporarily Fix an Urgent Problem
There will be times when something bugs out in your CSS on a live client site, and you need to apply a fix very quickly. In most cases, you should be able to use Firebug or another developer tool to track down the CSS code that needs to be fixed. But if the problem is occurring on IE6 or another browser that doesn’t have access to debugging tools, you may need to do a quick fix using !important.
After you move the temporary fix to production (thus making the client happy), you can work on fixing the issue locally using a more maintainable method that doesn’t muck up the cascade. When you’ve figured out a better solution, you can add it to the project and remove !important — and the client will be none the wiser.
To Override Styles Within Firebug or Another Developer Tool
Inspecting an element in Firebug or Chrome’s developer tools allows you to edit styles on the fly, to test things out, debug, and so on — without affecting the real stylesheet. Take a look at the screen grab below, showing some of Smashing Magazine’s styles in Chrome’s developer tools:

The highlighted background style rule has a line through it, indicating that this rule has been overridden by a later rule. In order to reapply this rule, you could find the later rule and disable it. You could alternatively edit the selector to make it more specific, but this would give the entire declaration block more specificity, which might not be desired.
!important could be added to a single line to give weight back to the overridden rule, thus allowing you to test or debug a CSS issue without making major changes to your actual stylesheet until you resolve the issue.
Here’s the same style rule with !important added. You’ll notice the line-through is now gone, because this rule now has more weight than the rule that was previously overriding it:
To Override Inline Styles in User-Generated Content
One frustrating aspect of CSS development is when user-generated content includes inline styles, as would occur with some WYSIWYG editors in CMSs. In the CSS cascade, inline styles will override regular styles, so any undesirable element styling that occurs through generated content will be difficult, if not impossible, to change using customary CSS rules. You can circumvent this problem using an !important declaration, because a CSS rule with !important in an author stylesheet will override inline CSS.
For Print Stylesheets
Although this wouldn’t be necessary in all cases, and might be discouraged in some cases for the same reasons mentioned earlier, you could add !important declarations to your print-only stylesheets to help override specific styles without having to repeat selector specificity.
For Uniquely-Designed Blog Posts
If you’ve dabbled in uniquely-designed blog posts (many designers take issue with using “art direction” for this technique, and rightly so), as showcased on Heart Directed, you’ll know that such an undertaking requires each separately-designed article to have its own stylesheet, or else you need to use inline styles. You can give an individual page its own styles using the code presented in this post on the Digging Into WordPress blog.
The use of !important could come in handy in such an instance, allowing you to easily override the default styles in order to create a unique experience for a single blog post or page on your site, without having to worry about natural CSS specificity.
Conclusion
!important declarations are best reserved for special needs and users who want to make web content more accessible by easily overriding default user agent or author stylesheets. So you should do your best to give your CSS proper forethought and avoid using !important wherever possible. Even in many of the uses described above, the inclusion of !important is not always necessary.
Nonetheless, !important is valid CSS. You might inherit a project wherein the previous developers used it, or you might have to patch something up quickly — so it could come in handy. It’s certainly beneficial to understand it better and be prepared to use it should the need arise.
Do you ever use !important in your stylesheets? When do you do so? Are there any other circumstances you can think of that would require its use?
Further Resources
- !important rules in the CSS2.1 spec
- !important Declarations on SitePoint’s CSS Reference
- CSS Specificity And Inheritance on Smashing Magazine
- Everything You Need to Know About !important CSS Declarations
- What are the implications of using “!important” in CSS?
A ! delimiter followed by the important keyword marks the declaration as important. The !important flag alters the rules selecting declarations inside the cascade. A declaration that is not important is called normal.
To mark a declaration important, add the important flag (!important) after the value in the declaration. While white space is allowed between the delimiter and the keyword, the flag is generally written as !important without any white space.
selector {
  property: value; /* normal declaration */
  property: value !important; /* important declaration (preferred) */
  property: value ! important; /* important declaration (not preferred) */
}
The !important comes after the value of the property value pair declaration, preceded by at least one space. The important flag must be the last token in the declaration. In other words, there can be white space and comments between the flag and the declaration’s ending semicolon, but nothing else.
Impact on the cascade
When it comes to important declarations, the cascade origin and layer orders are reversed. Without the important flag, declarations in the author’s style sheets override declarations in a user’s style sheet, which override declarations in the user-agent’s default style sheet.
When a declaration is important, the order of precedence is reversed. Declarations marked as important in the user-agent style sheets override all important declarations in the user style sheets. Similarly, all important declarations in the user style sheets override all important declarations in the author’s style sheets. Finally, all important declarations take precedence over all animations.
Note: All important declarations take precedence over all animations. !important is not valid within @keyframes animation declarations.
Reversing the precedence order for important declarations ensures users with special needs, such as personalized color schemes or large fonts, can override author styles when needed by marking some declarations in their user’s style sheet as important. It also guarantees malicious extensions can’t override important user-agent styles, which might break functionality or negatively impact security.
Does anything have precedence over important declarations? Yes, transitions. CSS transitions are a way to control the speed at which the property changes from one value to another. While transitioning from one value to another, a property will not match a specific important declaration.
a {
  color: red !important;
  background-color: yellow;
  transition: all 2s linear;
}
a:hover {
  color: blue !important;
  background-color: orange !important;
}
In this example, the color and background-color properties will transition to the hovered state over two seconds. Even though default states are normal declarations and hover states are !important declarations, the transition does happen.
Cascade layers
Within each of the three origins for style sheets – author, user, and user-agent – normal declarations in unlayered styles override layered style declarations, with the last declared having precedence over the layers declared before it. Important declarations reverse the order of precedence: important declarations in the first layer take precedence over important declarations in the next layer, and so on. Also, all the important declarations have precedence over important declarations made outside any layer.
Inline styles
Inline styles are styles defined using the style attributes. They can also be normal or important. Inline normal styles take precedence over all normal declarations, no matter the origin. Inline important styles take precedence over all other important author styles, no matter the layer, but important styles from user’s or user-agent’s style sheets and transitions override them.
!important and specificity
While !important is not part of determining specificity, it is related. Important declarations override all other declarations from the same origin and cascade layer.
#myElement#myElement#myElement .myClass.myClass p:hover {
  color: blue;
}

p {
  color: red !important;
}
This example displays a case of over-specifying a selector. No matter how high the selector specificity matches a normal declaration, an important declaration from the same source and cascade layer will always have precedence. In this case, the paragraph will always be red.
When two important declarations from the same origin and layer apply to the same element, browsers select and use the declaration with the highest specificity.
#myElement p {
  color: green !important;
}

p {
  color: purple !important;
}
In this case, the selector specificity matters. Only if the selectors had the same specificity would source order matter.
Impact on shorthand properties
Declaring a shorthand property with !important sets all of sub-properties as important. To two following selector style blocks are equivalent:
p {
  background: blue !important;
}

p {
  background-image: none !important;
  background-position: 0 0 !important;
  background-size: auto auto !important;
  background-repeat: repeat !important;
  background-origin: padding-box !important;
  background-clip: border-box !important;
  background-attachment: scroll !important;
  background-color: blue !important;
}
This example shows one of the several reasons avoiding the important flag is generally recommended.
Impact on custom properties
When the !important flag is added to a custom property value declaration, it makes the value assignment important. The !important flag is then stripped from the custom property value. The !important flag is not passed as part of the custom property value to the var() function.
:root {
  --myColor: red !important;
  --myColor: blue;
}
p {
  color: var(--myColor);
  }
blockquote {
   color: var(--myColor);
   color: purple;
}
<p>This is a paragraph</p>
<blockquote>This is a blockquote</blockquote>
In this example, the paragraph will be red, not blue, as the custom property value assignment is important. The blockquote will be purple, because the purple normal declaration comes after the normal red declaration.
Best practices
Avoid using !important to override specificity. When intentionally creating important declarations for UI requirements, comment in your CSS code to explain to maintainers why they should not override that feature.
Even when working to override high-specificity styles not under your control, such as styles in a 3rd party plugin declared with an id selector, you don’t need to use !important. Consider instead importing the 3rd party stylesheet script into a named or anonymous layer as your first cascade layer, instead of using !important. As long as the external styles do not include important declarations, your styles will take precedence over the widget styles, no matter the specificity.
If you need to override an external stylesheet containing important declarations, create a cascade layer containing the needed overrides, and declare that layer first.
Accessibility
Important styles from a user stylesheet take precedence over the author style sheet’s important declarations, meaning adding an !important flag to a site’s styles will not prevent individual users with special requirements, such as large fonts, from being able to override your styles by adding important styles in their own user’s style sheet.
Browser compatibility
This feature is supported in all browsers.
See also

by Muna Mohamed
A Case Study

Recently, there was a Twitter poll floating around where the user asked their followers a question about CSS specificity . Unfortunately, I was unable to find the original tweet (comment below if you happen to find it!) but long story short, the majority of people got the answer wrong.
That Twitter poll (and its aftermath) led to me brushing up on my own knowledge of the topic of specificity and in turn, made me start fixing specificity issues in my own projects — which brings me to the purpose of this post.
In this post, we will be refactoring CSS code from a project of mine that has CSS specificity issues that are in need of fixing.
CSS Specificity
Definition
Specificity is described by MDN Web Docs as:
the means by which browsers decide which CSS property values are the most relevant to an element and therefore, applied.
Rules
When deciding which CSS property values are the most relevant to apply to an element, the browser uses the source order (i.e the cascade) of the CSS stylesheet to determine this. But this rule applies when the CSS selectors have equal specificity. What happens when the specificity of one CSS selector is higher than another?
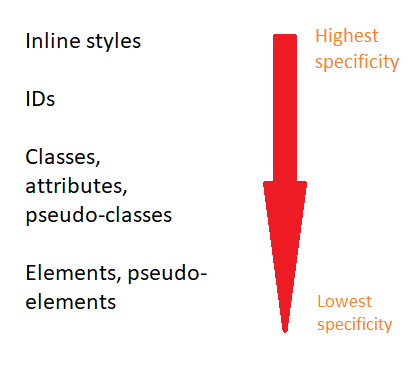
In that case, browsers will use the specificity of a CSS selector to determine what CSS statements to apply. The higher the specificity of a CSS selector, the more likely that browsers will apply its CSS declarations over another.
nav a {
  color: green;
}

a {
  color: red;
}
For example, in the example above, both of the CSS selectors are targeting the same HTML element, the anchor tag. In order to determine which CSS rule to apply to the anchor tag, the browser will calculate the specificity value and check which one is the highest. In this case, the first selector has a higher specificity value, therefore the browser will use its declarations to apply to the anchor tag.
I’d like to point out here that although !important is not a CSS selector, it is a keyword that is used to forcefully override a CSS rule regardless of the specificity value, origin or source order of a CSS selector. Some use cases include:
- Temporary fixes (a bit like putting duct-tape on a leaky pipe)
- Overriding inline styling
- Testing/debugging purposes
As useful as using the !important keyword may seem, the use of it can be more problematic than helpful. Over time, it can make it difficult to maintain your CSS and it can negatively affect the readability of your stylesheet, particularly for anyone else who is or will be working with it in the future.
Which brings us to what we’ll be doing today — fixing the specificity issues in a project.
The Project

A little background about the project we’ll be refactoring — it is a Netflix inspired landing page using MovieDB’s API.
The stylesheet
The aim is to remove the “!important” keyword from the CSS rules that it has been applied to by refactoring the code so that it follows specificity rules.
Below, you can see the stylesheet for the project.
@import url("https://fonts.googleapis.com/css?family=Montserrat:400,400i,700");

body {
  margin: 0;
  padding: 0;
  overflow-x: hidden;
}

.wrapper {
  width: 100%;
}

.wrapper #header {
  position: fixed;
  z-index: 300;
  padding: 15px;
  width: calc(100% - 30px);
  display: flex;
  justify-content: space-between;
  align-items: center;
  background: linear-gradient(to bottom, black 0%, transparent 100%);
}

.wrapper #header #brand-logo {
  color: #d32f2f;
  text-shadow: 1px 1px 2px black;
  letter-spacing: 5px;
  text-transform: uppercase;
  font-family: Montserrat;
  font-weight: bold;
  font-size: 22px;
}

.wrapper #header #menu-icon {
  display: none;
}

.wrapper #header .nav-link,
.wrapper #header .icon {
  color: #bdbdbd;
  cursor: pointer;
}

.wrapper #header .nav-menu {
  width: 400px;
  display: flex;
  justify-content: space-around;
  align-items: center;
}

.wrapper #header .nav-link {
  padding: 5px 10px;
  font-size: 15px;
  font-family: century gothic;
  text-decoration: none;
  transition: background-color 0.2s ease-in;
}

.wrapper #header .nav-link:hover {
  color: #c62828;
  background-color: rgba(0, 0, 0, 0.7);
}

.wrapper #header .icon {
  font-size: 16px;
}

.wrapper #header .icon:hover {
  color: #c62828;
}

.wrapper #site-banner,
.wrapper #categories {
  width: 100%;
}

.wrapper #site-banner {
  height: 550px;
  background-image: url("https://s1.gifyu.com/images/rampage_2018-1024x576.jpg");
  background-size: cover;
  background-position: center;
  background-repeat: no-repeat;
  background-attachment: fixed;
}

.wrapper #site-banner .main-movie-title,
.wrapper #site-banner .watch-btn,
.wrapper #site-banner .main-overview {
  position: absolute;
  z-index: 3;
}

.wrapper #site-banner .main-movie-title, .wrapper #site-banner .watch-btn {
  text-transform: uppercase;
}

.wrapper #site-banner .main-movie-title {
  top: 120px;
  left: 20px;
  background: -webkit-linear-gradient(#ff9100, #dd2c00);
  -webkit-background-clip: text;
  -webkit-text-fill-color: transparent;
  font-size: 55px;
  font-family: Montserrat;
  font-weight: bold;
}

.wrapper #site-banner .main-overview {
  width: 400px;
  top: 230px;
  left: 25px;
  color: #fafafa;
  line-height: 25px;
  font-family: helvetica;
}

.wrapper #site-banner .watch-btn {
  width: 150px;
  height: 35px;
  top: 350px;
  left: 25px;
  border: none;
  border-radius: 20px;
  color: #fafafa;
  cursor: pointer;
  transition: all 0.2s ease-in;
  background-color: #ff0000;
  box-shadow: 1px 5px 15px #940000;
}

.wrapper #site-banner .watch-btn:hover {
  color: #F5F5F5;
  background-color: #940000;
}

.wrapper .after {
  position: relative;
  top: 0;
  left: 0;
  z-index: 2;
  width: 100%;
  height: 100%;
  background-color: rgba(0, 0, 0, 0.3);
}

.wrapper #categories {
  padding: 30px 0;
  display: flex;
  flex-direction: column;
  background: linear-gradient(to top, #090909 0%, #000000 100%);
  overflow: hidden;
}

.wrapper #categories .category {
  margin: 30px 0;
}

.wrapper #categories .category-header, .wrapper #categories .content {
  margin-left: 20px;
  color: #B0BEC5;
  font-family: helvetica;
}

.wrapper #categories .category-header {
  margin-bottom: 50px;
  font-weight: normal;
  letter-spacing: 5px;
}

.wrapper #categories .content {
  position: relative;
  right: 0;
  display: flex;
  justify-content: flex-start;
  transition: all 3s ease-in-out;
}

.wrapper #categories .movie {
  margin-right: 10px;
  display: flex;
  flex-direction: column;
  align-items: center;
  justify-content: flex-start;
}

.wrapper #categories .movie-img {
  transition: all 0.2s ease-in;
}

.wrapper #categories .movie-img:hover {
  -webkit-filter: contrast(1.1);
          filter: contrast(1.1);
  -webkit-transform: scale(1.05);
          transform: scale(1.05);
  cursor: pointer;
}

.wrapper #footer {
  width: 100%;
  height: 120px;
  background-color: #090909;
  display: flex;
  align-items: flex-end;
  justify-content: flex-start;
}

.wrapper #footer #copyright-label {
  margin-left: 20px;
  padding: 10px;
  color: rgba(255, 255, 255, 0.3);
  opacity: 0.7;
  letter-spacing: 2px;
  font-family: helvetica;
  font-size: 12px;
}

//Media Query
@media (max-width: 750px) {
  .nav-menu {
    visibility: hidden;
  }

#menu-icon {
    display: block !important;
    font-size: 22px;
  }

.main-movie-title {
    font-size: 45px !important;
  }

.main-overview {
    width: 350px !important;
    font-size: 14px !important;
  }

.watch-btn {
    width: 130px !important;
    height: 25px !important;
    font-size: 13px;
  }

.movie-img {
    width: 170px;
  }
}
So, we can see from the stylesheet that the use of the !important keyword is mainly focused in the media query section which outlines the styles that the browser should apply when the screen-width is less than 750 pixels.
So, what happens when we remove the !important keyword from the CSS rules that it has been applied to? Well, we no longer have a “trump card” forcefully overriding the CSS rules of other CSS selectors that target the same HTML element. So, the browser will look at the stylesheet to see if there are any conflicting CSS rules.
If there are, then in order to determine which CSS rules to apply over another, the browser will use the source order, specificity and importance of the CSS selectors. If the CSS selectors with conflicting CSS rules have equal specificity, then the browser will use the source order rule and apply the CSS rules of the CSS selector that comes lower down in the stylesheet. Using this information, we can see that this situation is not the case for our stylesheet.
But, if the CSS selectors with conflicting CSS rules don’t have equal specificity, then the browser will apply the CSS rules of the CSS selector that has higher specificity. We can see from our stylesheet that this is the case; the CSS selectors in our media query have lower specificity than the CSS selectors in the main part of our stylesheet.
Now that we have identified the issue, let’s fix it!
First we have to locate the corresponding CSS selectors that match the CSS selectors in our media query.
.wrapper #header #menu-icon {
  display: none;
}

.wrapper #site-banner .main-movie-title {
  ...
  font-size: 55px;
  ...
}

.wrapper #site-banner .main-overview {
  width: 400px;
  ...
}

.wrapper #site-banner .watch-btn {
  width: 150px;
  height: 35px;
  ...
}

@media (max-width: 750px) {
#menu-icon {
    display: block !important;
    ...
  }

.main-movie-title {
    font-size: 45px !important;
  }

.main-overview {
    width: 350px !important;
    font-size: 14px !important;
  }

.watch-btn {
    width: 130px !important;
    height: 25px !important;
    ...
  }
}
We can see that the CSS selectors in the main part of the stylesheet have higher specificity than the corresponding CSS selectors in the media query. Despite the CSS selectors in the media query appearing later on in the stylesheet, because of specificity rules (which take precedence over source order rules), the browser will apply the CSS rules of the CSS selectors that come before it.
To fix this, we must increase the specificity values of the CSS selectors in the media query. If we make it so that the CSS selectors that target the same HTML elements have equal specificity, then the browser will follow the source order rule. The CSS rules outlined in the media query (that’s located lower down in the stylesheet) will be applied when the screen-width is less than 750 pixels.
The end result will look like this:
.wrapper #header #menu-icon {
  display: none;
}

.wrapper #site-banner .main-movie-title {
  ...
  font-size: 55px;
  ...
}

.wrapper #site-banner .main-overview {
  width: 400px;
  ...
}

.wrapper #site-banner .watch-btn {
  width: 150px;
  height: 35px;
  ...
}

@media (max-width: 750px) {
.wrapper #header #menu-icon {
    display: block;
    ...
  }

.wrapper #site-banner .main-movie-title {
    font-size: 45px;
  }

.wrapper #site-banner .main-overview {
    width: 350px;
    font-size: 14px;
  }

.wrapper #site-banner .watch-btn {
    width: 130px;
    height: 25px;
    font-size: 13px;
  }
}
And that’s it! We have removed all traces of the !important keyword from the stylesheet. Already we can see that the stylesheet is easier to read, and you can imagine that our refactored stylesheet would be a lot easier to work with and maintain (particularly if others will be working on it too).
Conclusion
So, what have we learned?
We have learned about how browsers determine which CSS styles to apply by using the source order, specificity and origin of selectors. We have also learned about the problems which can arise by using !important in your CSS and why its use should be kept to a bare minimum.
We do not have to resort to using !important in order to fix things — there are much better solutions out there.
The concept of specificity is one that can take a while to get your head around, but I hope that by documenting the process and using a real project, it helps you better understand the concept of specificity and how to apply it in your own CSS.
Additional Resources
- MDN Web Docs
- Batficity by Mandy Michael
- CSS Specificity Wars by Andy Clarke
- Specificity Visualizer by Francesco Schwarz.
- When using !important is the right choice by Chris Coyier
You can find the project we’ve been working on here.
Learn to code for free. freeCodeCamp’s open source curriculum has helped more than 40,000 people get jobs as developers. Get started
When styling your website, you may apply multiple CSS declarations to the same element. In that case, the browser determines which declarations are the most relevant to an element and applies those.

This relevance — or, specificity — is based on the matching rules of CSS selectors. CSS selectors are modifiers that tell a browser which elements to style with CSS. There are different selector types, each with their own syntax and level of specificity.

However, there is an exception to the rules of CSS specificity. It’s known as the !important rule. Let’s go over a brief recap of the rules of specificity, then take a closer look at the !important rule below. We’ll cover:
- what important means in CSS
- how to use the !important rule
- why the !important rule isn’t working
- how to override the !important rule
Recap of CSS Specificity
The following selector types rank from having the highest specificity to the lowest:
- ID selectors: These select an element based on its ID attribute and have the syntax #idname.
- Class selectors, attribute selectors, and pseudo-class selectors:
a) Class selectors select all elements in a CSS class and have the syntax .class name.b) Attribute selectors selects all elements that have a given attribute and have the syntax [attr].
c) Pseudo-class selectors select elements only when in a special state, like visited or hover, and have the syntax selector:pseudo-class.
- Type selectors: These select all HTML elements that have a given node name and have the syntax element.
Note: The universal selector (*) has no effect on specificity.
If multiple declarations with equal specificity, like a class selector and attribute selector, are made on the same element, then the last declaration (ie. the declaration listed later in the stylesheet) will be applied to the element.
The other major rule to keep in mind when coding the HTML and CSS of your website is the !important rule. This is the exception to all the specificity rules mentioned above. Let’s take a closer look at what it means below.
What does important mean in CSS?
In CSS, important means that only the !important property value is to be applied to an element and all other declarations on the element are to be ignored. In other words, an important rule can be used to override other styling rules in CSS.
Although easier than following the many rules of specificity when combining property values, using the !important property is considered a bad practice. That’s because it breaks the natural cascading of stylesheets, which makes maintaining and debugging your website much more difficult.
However, there are specific use cases in which using the !important property is ideal. One such use case is defining utility classes, like the button class.
Say you want any element targeted by the button class to look like the same button: orange background, white font color, solid black border. Without the !important property, you’d use the following code to make a link look like a button.
Here’s the HTML:
<a href="#" class="button">Click Me</a>
Here’s the CSS:
.button {
background: #FF7A59;
color: #FFFFFF;
padding: 5px;
font-size: 50px;
border-radius: 5px;
border: 2px solid black;
}
Here’s the result:
See the Pen Anchor element with button class by Christina Perricone (@hubspot) on CodePen.
Now let’s say you keep building out your web page. At some point, you add a new section with the ID “content” to your HTML. This section contains another link with the button class. You also add another rule to your CSS, defining all <a> elements with the ID name “content” to have a solid blue border. You’d have the following code.
Here’s the HTML:
<a href="#" class="button">Click Me</a>
<section id="content">
<p> text text blah <a href="#" class="button">Click Me</a> </p>
</section>
Here’s the CSS:
.button {
background: #FF7A59;
color: #FFFFFF;
padding: 5px;
font-size: 50px;
border-radius: 5px;
border: 2px solid black;
}
#content a {
border: 4px solid #00A4BD;
}
Here’s the result:
See the Pen xxgQYKq by Christina Perricone (@hubspot) on CodePen.
Because an ID selector has a higher specificity than a class selector, the CSS style of the selector #content a takes precedence over the CSS style of the selector .button. That’s why the second <a> element has a solid blue border, not a solid black one.
A scenario like this is inevitable, whether you’re building a site from scratch or using a framework like Bootstrap CSS. The larger the volume of code you’re working with, the harder it is to keep track of the specificity of your CSS selectors.
You can avoid the style inconsistencies of the above-mentioned scenario on your site by using the !important property. Let’s look at how exactly to use this property below.
Using the !important rule in CSS is easy. You just have to add !important at the end of the line, immediately before the semicolon. So the syntax would be:
   element {
style property !important;
}
Let’s take a look at how the CSS for the example above changes when adding the !important rule.
CSS Important Example
For this example, you want any element targeted by the button class to look like the same button: orange background, white font color, solid black border.
The problem is that you have some anchor elements (or links) defined by the button class and an ID name. In your CSS, elements with this ID name will have a solid blue border. Since ID selectors are more specific than class selectors, these anchor elements will be styled like a button with a orange background and white font color — but they’ll have a solid blue border instead of solid black.
You don’t want that type of inconsistent styling on your site. So you’ll use the !important rule when specifying the CSS for the button class.
The HTML stays the same:
<a href="#" class="button">Click Me</a>
<section id="content">
<p> text text blah <a href="#" class="button">Click Me</a> </p>
</section>
The CSS becomes:
.button {
background: #FF7A59 !important;
color: #FFFFFF !important;
padding: 5px !important;
font-size: 50px !important;
border-radius: 5px !important;
border: 2px solid black !important;
}
#content a {
border: 4px dotted #00A4BD;
}
The result is:
See the Pen CSS Important Example by Christina Perricone (@hubspot) on CodePen.
You’ll notice how both <a> elements look identical thanks to the !important rule.
CSS Important Not Working
Let’s say you use the !important rule in your CSS, but the elements aren’t styled as you want them to. There are only a couple reasons the !important rule would not work.
First, the !important rule will not work in the author’s stylesheet if it is being used in the user’s stylesheet. The author stylesheet is supplied by the author of the web page. The user stylesheet is supplied by the user of the browser.
By default, CSS rules in an author’s stylesheet override those in a user’s stylesheet. However, to create a balance of power between authors and users, !important rules in a user stylesheet will override !important rules in the author’s stylesheet. This CSS feature is designed for accessibility. Users that need larger fonts, specific color combinations, or other requirements due to disabilities related to vision can maintain control over the presentation of a web page.
It also possible that you have added !important to a CSS rule set that is overridden by another CSS rule set with the !important rule later in the stylesheet. You may have done this on accident, which would explain why important is not working — or you may want to do this on purpose.
Let’s say you change your website’s color scheme or you don’t want all elements with the button class to look the same. Whatever the reason, you may want to override the !important rule in your CSS. Let’s look at how below.
How to Override Important in CSS
There are two ways you can override an !important tag in CSS. You can add another CSS rule with an !important tag and use a selector with a higher specificity. Or you can add another CSS rule with an !important tag using the same selector and simply add it later in the stylesheet.
Why do these two methods work? Because of the rules of specificity. When two declarations using the !important rule are applied to the same element, the declaration with a greater specificity or the declaration defined last will be applied. You might remember these rules from the introduction, but it’s important to understand they apply to declarations using the !important rule as well as declarations not using the rule.
Rather than override the !important property in CSS with another !important property, it is ideal to rewrite the rule and avoid using the property altogether. But sometimes this isn’t possible.
Take user stylesheets, for example. Using a custom user stylesheet, a reader can override styles of the website according to their wishes. A reader might, for example, increase the font size or change the color of typography on the page to enable them to see the content better.
Since a user-defined stylesheet will override an author stylesheet regardless of specificity, a reader might be able to add CSS rules without the !important tag. However, if the author stylesheet is using the !important rule to define its font size or color, then the !important rule will be necessary in the user stylesheet.
Let’s continue using the same button example from above. Say, my website already had the !important rules applied to the button class. But now I do want all <a> elements with the ID name “content” to have a solid blue border.
I should simply rewrite the code, removing all !important tags from my CSS. But let’s say I’m on a time crunch and looking for a quick fix. Then I could simply add the !important tag to the CSS ID selector. Then both declarations would be using the !important property and, because ID selectors have a higher specificity then class selectors, the <a> element in the content section would have a solid blue border.
The HTML stays the same:
<a href="#" class="button">Click Me</a>
<section id="content">
<p> text text blah <a href="#" class="button">Click Me</a> </p>
</section>
The CSS becomes:
.button {
background: #FF7A59 !important;
color: #FFFFFF !important;
padding: 5px !important;
font-size: 50px !important;
border-radius: 5px !important;
border: 2px solid black !important;
}
#content a {
border: 4px dotted #00A4BD !important;
}
The result is:
See the Pen Example 1 of Overriding !Important Rule by Christina Perricone (@hubspot) on CodePen.
The !important rules essentially cancel each other out. So since the ID selector has a higher specificity than a class selector, the second <a> element has a solid blue border, not a solid black one.
You can also override the !important rule by using a CSS selector of the same specificity, but placing it later in the stylesheet.
Let’s say I want all buttons on my website to have a solid blue border. Again, I should simply rewrite the code but I can use the !important tag for a quick fix. Using the same class selector .btn with a new rule for the solid blue border and an !important tag, I can simply add it after the existing rule in the stylesheet. Because it comes later, it has higher specificity and will be applied to elements with the .btn class.
The HTML stays the same:
<a href="#" class="button">Click Me</a>
<section id="content">
<p> text text blah <a href="#" class="button">Click Me</a> </p>
</section>
The CSS becomes:
.button {
background: #FF7A59 !important;
color: #FFFFFF !important;
padding: 5px !important;
font-size: 50px !important;
border-radius: 5px !important;
border: 2px solid black !important;
}
.button {
border: 4px solid #00A4BD !important;
}
Here’s the result:
See the Pen Example 2 of Overriding !Important Rule by Christina Perricone (@hubspot) on CodePen.
Using the !important Property in your CSS
While !important declarations should rarely be used in code, it’s still necessary to understand what this property is and how to use it. Maybe you’ll need to use the !important rule in your user stylesheets. Maybe you’ll take over a website that contains instances of the rule. Whatever the reason, becoming familiar with the !important property is useful step in learning HTML and CSS.
Editor’s note: This post was originally published in May 2020 and has been updated for comprehensiveness.

DigitalOcean provides cloud products for every stage of your journey. Get started with $200 in free credit!
Inspiration from Stephanie Rewis:
Using !important in your CSS usually means you’re narcissistic & selfish or lazy. Respect the devs to come…
For those that don’t know, an !important rule works like this:
p {
  color: red !important;
}
#thing {
  color: green;
}
<p id="thing">Will be RED.</p>The paragraph is will be red, even though the ID selector has higher specificity. The !important rule overrides that particular property.
Stephanie, surely out of frustration, was talking about how postscripting your CSS values with !important can be highly abused and make for messy and hard to maintain CSS. The unfortunate typical use case goes like this:
- WHY IS MY FRAGGLE ROCKING CSS NOT WORKING INTERROBANG
- (use !important rule)
- OK, now it’s working
Then the next person comes along and tries to make new changes. He tries to alter some existing CSS rules, but now their changes aren’t behaving how they should. He traces the issue back to the !important rules, then has a choice. He can try and remove those and attempt to get things back on track, or add some more of his own to fight them and get his change done. Since he might not know exactly why those !important rules were added in the first place, he might opt for the second option for fear of breaking something somewhere else on the site he’s not aware of. And thus the vicious cycle starts.
Potentially good use case: utility classes
So when is the !important rule actually useful and a good idea? In my opinion, utility classes are a good use case.
Think of “buttons.” Let’s say you have a class name of .button on your site and whatever element you put it on, you want that element to look like a button: specific font, rounded corners, special background and borders, whatever. So you do this:
.button {
   background: red;
   color: white;
   padding: 3px;
   border-radius: 5px;
   border: 1px solid black;
}
<a class="button" href="#">Do Thing</a>The specificity for that is 0,0,1,0. As soon as that element has another selector affecting it that has a higher specificity, you may have styling issues. Like:
<section id="content">
   <p>text text blah <a href="#" class="button">Do Thing</a></p>
</section>
#content a {
border-bottom: 1px dotted blue;
}Now those buttons you have a specific design for have a dotted blue bottom border, which is not what you want. Here’s a fiddle of that kinda scenario happening.
I don’t think this is the fault of sloppy CSS. It’s easy and often perfectly valid to write a CSS selector that has a higher specificity value than 0,0,1,0 and accidentally screws up a button.
To make your button class super robust and not easily trifled with, put !important rules on the values. And maybe even add in a few that your button doesn’t need but could screw it up.
.button {
   background: red            !important;
   color: white               !important;
   padding: 3px               !important;
   border-radius: 5px         !important;
   border: 1px solid black    !important;

   /* For good measure */
   text-decoration: none      !important;
}
Any other “utility class” could benefit from this. Think of the popular “clearfix” class, which uses pseudo-elements to do its thing. Pseudo-elements are becoming more popular and being used for more things, so it would be possible to have a selector override the clearfix pseudo-elements and have the float clearing fail. Almost certainly not what you want, so adding !important rules to those could be useful.
I even talked to Nicole Sullivan who said she’d be adding !important rules to the spacer classes that she uses in her OOCSS framework, and she’s a hard sell on this idea, since her style of writing CSS actually makes writing selectors with a higher specificity than 0,0,1,0 kind of rare.
User style sheets
I believe the original use case and reason !important rules exist is user stylesheets. That is, a custom stylesheet written by you that you tell the web browser to apply to every page visited. This is particularly easy to do in a browser like Safari. Preferences > Advanced > Stylesheet and select one. In this user stylesheet, you might do things like hide comments, hide ads, or attempt your own readability improvements by settings colors and sizes on fonts.
Since these styles apply to all websites, not specific websites, you’ll need to write fairly generic selectors that are the most likely to apply to all sites, like body { }. But a selector like that has very low specificity (0,0,0,1) and is likely to be beaten by a websites own styles. And so, !important rules allow you write generic selectors but still have the power to change things.
Others?
So what about you folks? Got some use cases for !important you think are solid? I’d be interested to hear.
When styling elements with CSS, sometimes we can get frustrated that the styling is not applied and using the !important rule can force a CSS snippet to work.
We can use this to force a CSS style. It sometimes work as a quick fix but not always.
This post will go through reasons why using the !important CSS keyword might not be working for you
and their fixes.
The common reasons why !important is not working comes down to:
- You are using the wrong CSS selector and not targeting the correct element,
- You are using in animation
@keyframes - Using !important multiple times and having conflicts
What is the !important keyword?
The !important rule have been around since CSS1 specification in 1991 and allows the user to overrride browser specificity — this just means how a browser
will decide which style to apply to each element.
The following diagram shows how browser will render HTML and display it to the user
Consider the following CSS style where we want to make all fonts in the <blockquote> to be italic:
blockquote * {
    font-style: italic;
}
Now if somehow the above is not working, we can use the !important rule like so:
blockquote * {
    font-style: italic !important; /* Adding important to increase specifity */
}
CSS Specifity — which style gets applied!
CSS specifity just refers to which style the browser will apply to each element. There are quirks amongs browsers but most modern browsers like Chrome, Edge, Safari,
etc generally follow the same rules.
Browsers will use the following order when deciding to apply a style to a specific element — lower down the list gets the highest precedence:
- Browser Styles — each browser (chrome, safari, etc) comes with their own stylesheets. These default styles applied by your browser with the least precedence.
- User Styles — Custom styles created by the brower’s user.
- Author Styles — Styles created by the author/ creator of the website or page.
!importantAuthor Styles — author styles declared withimportantkeyword.!importantUser Styles — user styles declared withimportantkeyword.- Inline Styles — inline styles will be given highest precedence and overwrite any styles previously.
Within each of the CSS stylesheets, it then follows the below order — lower down the list is given the most specifity:
*— wildcard selector- Type Selectors e.g
<p>and Pseudo Elements e.g::after - Class Selectors e.g. .container , Attributes Selectors e.g. [target=”_blank”] and Pseudo Classes e.g.
:hover. - ID Selectors e.g.
#app - Inline styles
- !important — this will override any other previous styles
Fix 1 — !important not targetting correct element
The most common reason why using !important CSS rule is not working to style your element is that it is not targetting the correct element.
As an example, consider the following HTML and CSS
<div class="ui-tabs">
    <ul>
        <li class="ui-active">
            <a href="#">Text</a>
        </li>
    </ul>
</div>.ui-tabs .ui-active {
background: #084;
color: blue !important;
}
a:link {
color: red;
}Now we can see that that text link <a> is not blue — even though we applied the !important rule to it. The reason this is failing is because we applied the rule
to the wrong element. From the above, we have applied the color blue the list item elements and not link elements.
If we change the CSS to the following:
.ui-tabs .ui-active a:link {
    background: #084;
    color: blue !important;
}

a:link {
    color: red;
}
This will target the link <a> inside the list item <li> element
Fix 2 — !important used in @keyframes
One reason that the !important rule would not work is it only works on cascade properties. The cascade is how browers determine styles from different sources are combined
to be applied for a specific element.
At rules such as the @keyframes do not participate in the cascade and therefore using !important will not work!
As example, consider the following HTML
<div id="mydiv" style="margin-left: 5px"></div>We then want to animate this <div> using @keyframes as follows:
#mydiv {
    width: 100px;
    height: 100px;
    animation: animateLeft 4s infinite ease-in 1s
}

@keyframes animateLeft {
    0% {
        margin-left: 100px!important
    }
    100% {
        margin-left: 500px
    }
}
The above margin-left: 100px!important will not work, because @keyframes does not interact with the cascade and therefore the margin-left style of the <div> will not be overwritten by the value inside the 0%.
It will stay the same style as the inline style margin-left: 5px. If we remove the !important, then the margin-left: 100px; will be enforced!
#mydiv {
    width: 100px;
    height: 100px;
    animation: animateLeft 4s infinite ease-in 1s
}

@keyframes animateLeft {
    0% {
        margin-left: 100px;
    }
    100% {
        margin-left: 500px
    }
}
💡 Tip — dont use !important in @keyframes!
More information located here:
https://www.w3.org/TR/css-animations-1/#keyframes
Fix 3 — !important used multiple times
The !important rule can be used to override an element’s styles, but it could be used to be overritten by itself. This can happen when you have multiple !important rules
with the same selectors. Consider the following CSS style:
img { border: none !important; }
#article img { border: 2px solid #fff !important; } /* This will be applied*/
The bottom rule that specifies a border around the image will be applied because it has a higher specifity than the more generic top rule!
💡 Tip — matching selectors that are declared lower in the CSS document will take precedence
One thing to keep in mind is that when you have multiple selectors that select the same element, the selector that is at the bottom of the CSS document will be applied!
So for example, lets say we have the following paragraphs and their styles:
<div>
    <p>First paragraph</p>
</div>
<p>First paragraph</p>
p { color: red; }
p { color: blue; }In the above, all <p> paragraph elements will have text of blue color! Even though we have two matching selectors, CSS style that is lower in the document will take precedence!
To get around this and make the first paragraph color red, we can bump up the specifity declaring the following:
div p { color: red; }
p { color: blue; }
When should you use !important
Best practice is to avoid using !important and use specifity rules instead. This will make your CSS much cleaner and easier to manage. For example, too many important rules
will make you loose track of which one is more important than the other (given the same selector).
However, the important rule can be handy and useful in some use cases:
- Used with user styles to apply the user custom CSS they want to apply for a webpage. This is because we have no control over the CSS that has been loaded.
- Dynamic styles set by JavaScript — to override styles applied by JS on the fly
Browser support
!important has been part of the CSS spec ever since CSS1 in 1991 and browser support for this is good for most modern browsers (chrome, safari, firefox, etc) and even older browsers such as IE (Internet explorer)
Summary
In this post I went over how CSS !important is not working — this can be a quick fix, but not recommended approach!
A checklist of how to troubleshoot why !important is not working is:
- Check that the !important property is applied correctly to the target element.
- Determine if the !important is used in at-rules such as @keyframes. This will not work because @keyframes will ignore the cascade
- Check that important is not used multiple times with your CSS — for example a higher specifity CSS declaration with !important applied will override anything that is less specific