HERES THE SOLUTION:
The only way I can think of that you had Hyper-V installed and running without you doing it is either
1.) Someone else did it
2.) You did it (or someone else) in windows 8.1 (if you had upgraded from that)
How it got installed doesn’t matter.
Now, assuming you still need to know what to do to fix this here a simple step by step guide to fix it.
1.) Right click the start button in windows 10 (This solution will NOT touch VMWARE at all), and click «Control Panel»
2.) Make sure it has the icons listed instead of the groups. Click on «Programs and Features»
3.) On the left side of the window, click on «Turn Windows features on or off»
4.) When the next window opens, locate the check box labeled as «Hyper-V» ans make sure it isnt filled, and that it isnt checked.
5.) Then click on «Ok» button on the bottom of the window. It will refresh and apply the change to the computer. It will probably ask you to reboot. If it does, hit the «reboot now» button.
6.) After the computer restarts, try to launch VMWare again. If it still wont allow you to run a virtual machine, make sure your computer has virtualization enabled. (If you dont know, google it. Lots of tutorials out there). If it is enabled, uninstall Vmware and install it again.
I hope this helped you if you still needed help!!
If you still need help, i can provide a video tutorial if needed. 
When you install a virtualization application on a Windows machine on which Hyper-V or related services are installed, errors can often occur. Errors that happen when you run VMs on non-Hyper-V virtualization applications cause significant problems. This blog post explains what causes these errors, how to fix them, and how to run other virtualization applications on a computer with Hyper-V.
Background and Working Principle
After you install VMware Workstation, VMware Player, or Oracle VirtualBox on a Windows machine, you might get errors when starting a VM in these virtualization applications. The errors occur even if Hyper-V VMs are not running at that time. You can install VMware Workstation and VirtualBox, and run VMware VMs and VirtualBox VMs on the same computer, but not simultaneously. What causes this problem with Hyper-V? Let’s take a closer look.
VMware Workstation, VMware Player, and VirtualBox are type 2 hypervisors, while Hyper-V is a type 1 hypervisor. A type 2 hypervisor is installed on the operating system that is running on hardware. A type 1 hypervisor is installed on top of hardware. All hypervisors require processor virtualization extensions, which are instruction sets for hardware virtualization – Intel VT-x or AMD-V. Hyper-V takes control of virtualization extensions when Windows boots. These virtualization extensions are not available for VMware Workstation and VirtualBox when Windows loads. Only one software component can use Intel VT-x or AMD-V at a time.

This incompatibility is caused by Hyper-V because virtualization extensions are not exposed to type 2 hypervisors installed on a Windows machine where the Hyper-V role is enabled.
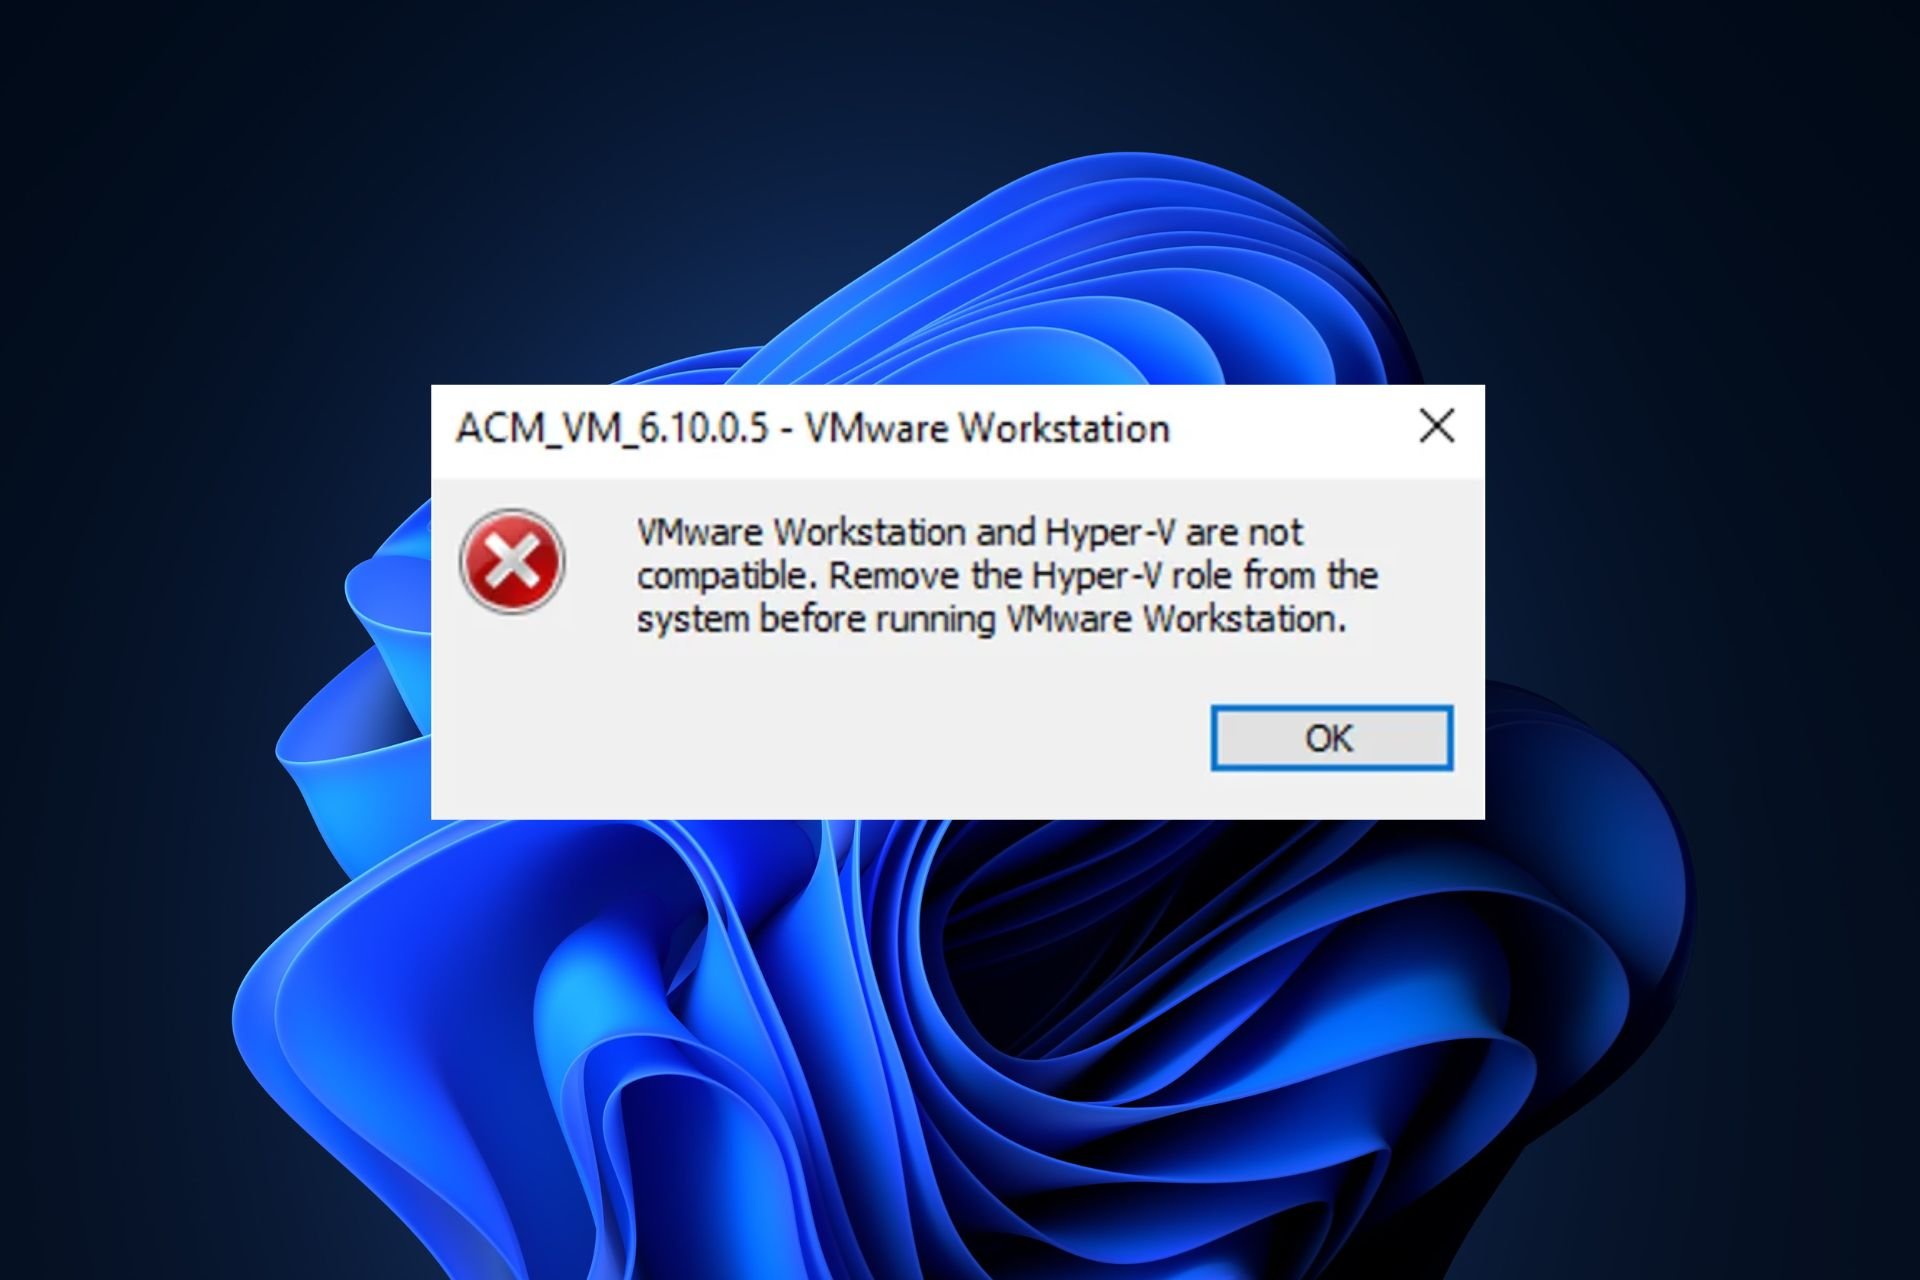
VMware Workstation errors:
VMware Workstation and Hyper-V are not compatible. Remove the Hyper-V role from the system before running VMware Workstation.
VMware Workstation and Device/Credential Guard are not compatible. VMware Workstation can be run after disabling Device/Credential guard.
VirtualBox errors:
BSOD, such as BSOD with SYSTEM_SERVICE_EXCEPTION
VT-x is not available (VER_VMX_NO_VMX). E_FAIL (0x80004005).
A VirtualBox VM works too slowly and uses the paravirtualisation (emulation) mode.
The most interesting situation is when a user doesn’t install Hyper-V and still encounters one of the errors mentioned earlier when using VMware Workstation or VirtualBox. The error occurs when automatic Windows updates are enabled. With the updates (Windows 10 v1607 and the appropriate Windows Server versions starting from Windows Server 2016), some new Hyper-V-related features are installed and enabled automatically without Windows user consent. These features are Device Guard and Credential Guard. Windows updates known vulnerabilities but can add issues and destroy a working configuration. That’s why many users don’t like automatic updates.
Device Guard is a group of security features in Windows. The idea of implementing this feature is to harden the execution of malicious code. Device Guard is available in Windows 10, Windows Server 2019, and Windows Server 2019. The main requirements are: UEFI running in native mode and Secure Boot enabled.
Credential Guard is a feature to minimize the impact of attacks if malicious code is already running by isolating system and user secrets to make more difficult to compromising.
Virtual Secure Mode (VSM) is a feature to leverage processor virtualization extensions that secures data in an isolated region of memory. HVCI is Hypervisor-protected code integrity. LSA is Local Security Authority.
Virtualization Based Security (VBS) is a class of technologies that uses virtualization extensions, including VSM, to provide security in Windows. The Hyper-V role is required to make these features work (Hyper-V management tools are not needed).
The hypervisor (Hyper-V) loads first, and then the operating system (Windows) loads. Hyper-V provides an abstraction layer between hardware and the operating system. A VSM allows the tagging of specific critical processes and memory used by them as they belong to a separate independent operating system controlled by Hyper-V. The principle is similar to the isolation of two VMs running on a Hyper-V host when each VM can use only the hardware resources provisioned to it.

Note: If you need a type 1 hypervisor from VMware, use VMware ESXi and VMware vSphere environment. Learn more in these blog posts: Hyper-V vs VMware, VMware Workstation vs VMware Player, and How to install ESXi on Hyper-V.
Let’s explore how to resolve the incompatibility issue of Hyper-V and other virtualization applications in detail.
Method 1: Uninstall Hyper-V in the GUI
Check system information about Windows configuration by running the following command in CMD:
msinfo32.exe
A System Information window opens. On the following screenshot, you see that Hyper-V is enabled (a hypervisor has been detected), and Device Guard Virtualization-based security is running. Now you can remove these features.

You should be aware that the following Hyper-V related features will not be available after you remove Hyper-V:
- Hyper-V
- Credential Guard and Device Guard
- Virtual Machine Platform
- Windows Sandbox
- WSL2.
Remove the Hyper-V feature in the graphical user interface (GUI) by using Control Panel, Add Roles, and Features wizard.
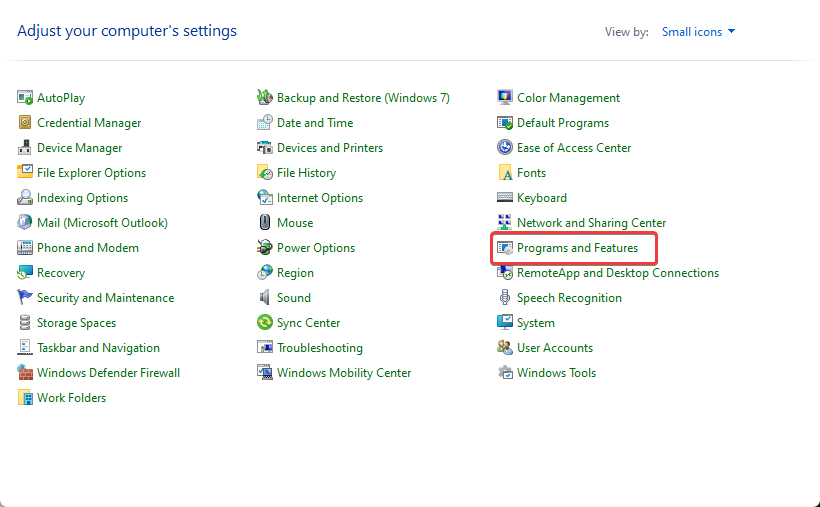
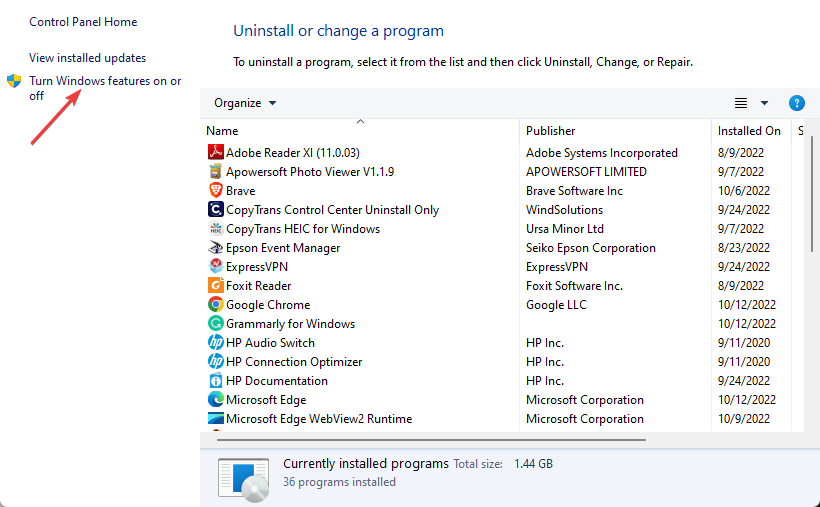
In Windows 10, open Control Panel, click Programs and Features, then click Turn Windows features on or off.
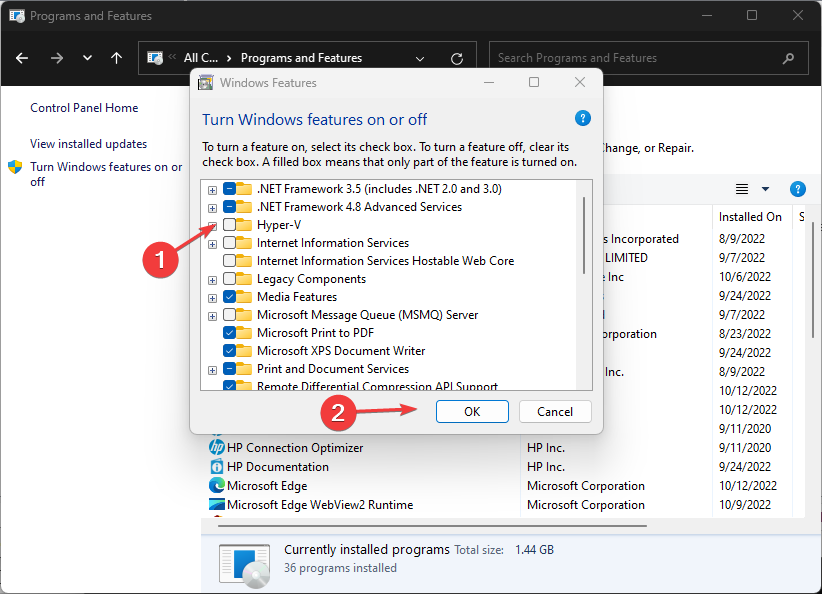
The Windows Features window opens.
Deselect the Hyper-V checkbox, and hit OK.
To finish removing Hyper-V, restart the computer.

The steps for removing Hyper-V on Windows 10 and Windows Server 2016 are similar.
In Windows Server 2016, open Server Manager and click Manage > Remove Roles and Features. In the Remove Roles and Features Wizard, go to the Server Roles step, and deselect Hyper-V. Hit Next at each step to continue. Restart is required to finish removing the Hyper-V role.

Method 2: Use PowerShell to Disable the Hyper-V Feature
You can do a similar action by using the command-line interface rather than the GUI.
Log in to PowerShell as Administrator, and run the command to disable the Hyper-V feature:
Disable-WindowsOptionalFeature -Online -FeatureName Microsoft-Hyper-V-Hypervisor
Restart your host machine:
shutdown -r -t 0
Method 3: Disable Hyper-V by Using BCDedit
The idea behind this method is to edit boot configuration data and disable booting of Hyper-V without uninstalling the Hyper-V role.
Log in to PowerShell as Administrator, or run the command from an elevated command prompt to disable Hyper-V:
bcdedit /set hypervisorlaunchtype off
If you need to re-enable Hyper-V and set the default value back, run this command:
bcdedit /set hypervisorlaunchtype auto
For more control and convenience, disable fast boot in Windows 10. Open Windows Registry Editor, and go to:
HKEY_LOCAL_MACHINESYSTEMCurrentControlSetControlSession ManagerPower
Set the HiberbootEnabled parameter to 0
If you need to use Hyper-V VMs sometimes, create two entries for a Windows boot loader: one to boot Windows with Hyper-V and another to boot Windows without Hyper-V. Then, select the needed option before you boot Windows. This approach prevents you from running commands in PowerShell manually each time when you need to enable or disable Hyper-V.
bcdedit /copy “{current}” /d “No Hyper-V”
“The entry was successfully copied to {xxxxxxxx-xxxx-xxxx-xxxx-xxxxxxxxxxxx}.”
Copy and paste your value instead of xxxxxxxx-xxxx-xxxx-xxxx-xxxxxxxxxxxx.
bcdedit /set “{xxxxxxxx-xxxx-xxxx-xxxx-xxxxxxxxxxxx}” hypervisorlaunchtype off

Restart the computer.
Once your computer has restarted, you should see two options in Windows Boot Manager.

If you want to remove the No Hyper-V boot entry, use the /delete option for bcdedit.
Get a list of the current boot entries:
bcdedit /v
A list of all entries with their identifiers is displayed in the output. Copy the ID of the entry which you want to remove, and run the following command:
bcdedit /delete “{xxxxxxxx-xxxx-xxxx-xxxx-xxxxxxxxxxxx}”
Method 4: Uninstall the Hyper-V Role in PowerShell with dism.exe
The idea behind this method is to use the Deployment Image Servicing and Management tool in the command-line interface to uninstall Hyper-V.
Log in to CMD or PowerShell as Administrator. Run the following command to uninstall Hyper-V:
dism.exe /Online /Disable-Feature:Microsoft-Hyper-V
If you want to install Hyper-V again, use this command:
dism.exe /Online /Enable-Feature:Microsoft-Hyper-V /All

Method 5: Turn off virtualization Based Security in Windows
This method is used to disable Device Guard and Credential Guard, which are Hyper-V-related features.
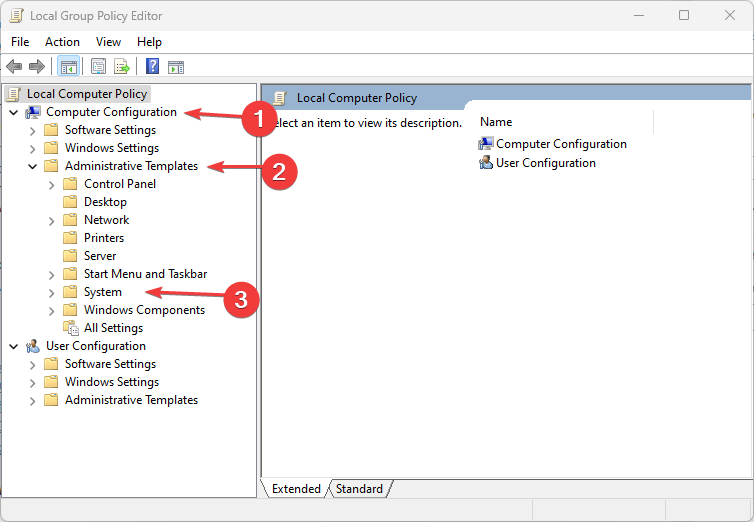
Open the Group Policy Editor for a local machine. The group Policy Editor is available in Windows 10 Pro, Enterprise, and Education. In the command prompt, run gpedit.msc
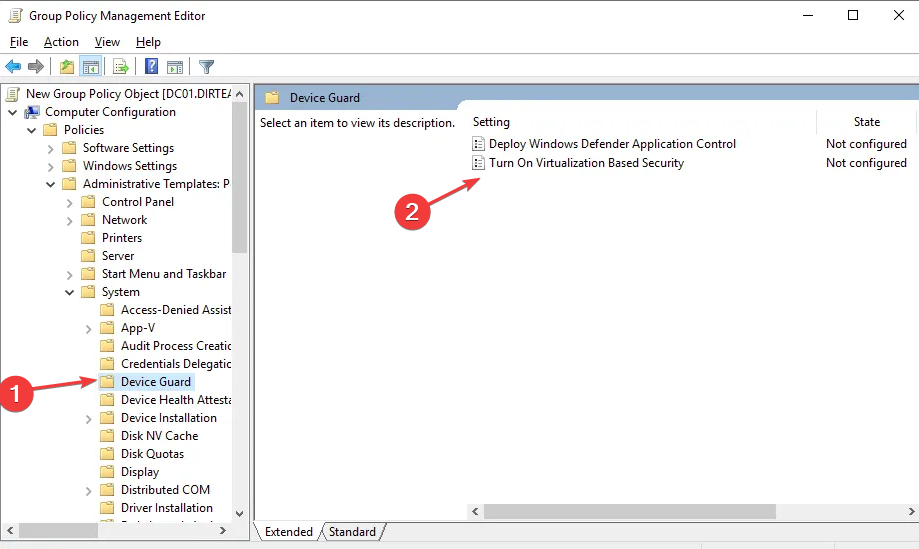
Go to Local Computer Policy > Computer Configuration > Administrative Templates > System > Device Guard
Double-click Turn On Virtualization Based Security. By default, the status of this setting is Not configured.

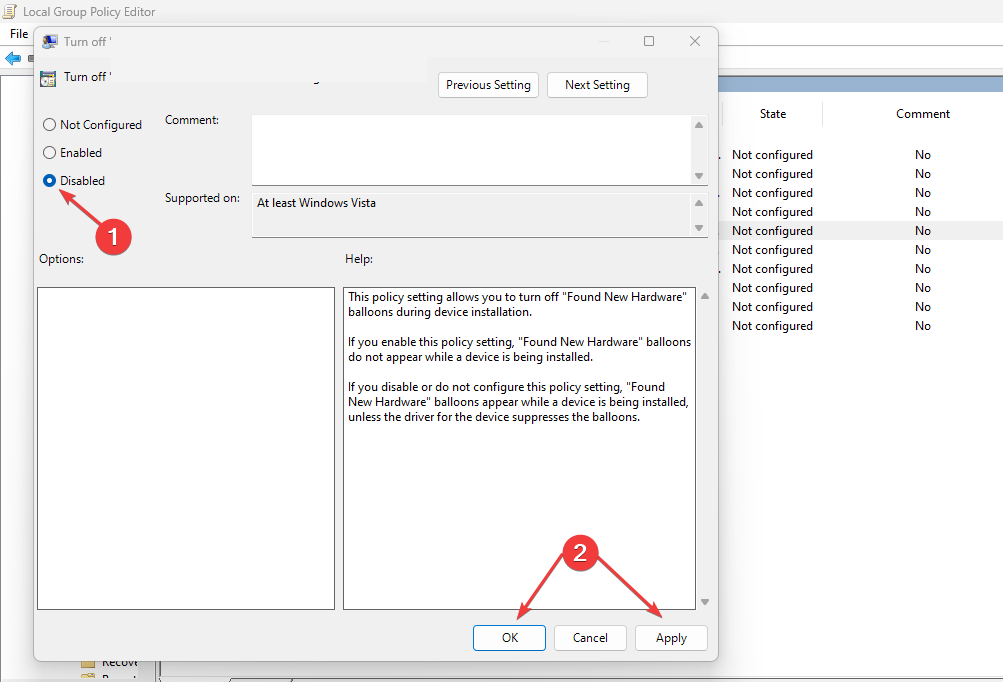
In the window that opens, select Disabled and hit OK to save settings, and close the window.

Edit Registry as an alternative
In Windows 10 Home, where the Group Policy Editor is not present, you can disable Virtualization Based Security in Windows Registry.
Create a backup of the Windows registry before changing registry settings to avoid errors and issues.
Open Registry Editor. Run regedit in the command line that should be opened as Administrator.
Go to HKEY_LOCAL_MACHINE > SYSTEM > CurrentControlSet > Control > DeviceGuard
Create the EnableVirtualizationBasedSecurity entry if this entry is missing. To create a new entry, right-click an empty place in the DeviceGuard directory, and in the context menu, click New > DWORD (32-bit) Value. Enter the EnableVirtualizationBasedSecurity name for this registry entry. By default, data set for this entry should be 0 (see the following screenshot). You can double-click the EnableVirtualizationBasedSecurity and set 0 manually.

Go to HKEY_LOCAL_MACHINE > SYSTEM > CurrentControlSet > Control > Lsa
Create a new registry entry in the Lsa directory. Right-click an empty space in the right pane of the Registry Editor window. In the context menu, click New > DWORD (32-bit) Value.
Enter the LsaCfgFlags name for this value. This value must be set to 0.

Close the Registry Editor, and restart your computer.
You can run the following commands in PowerShell (as Administrator) to disable Device Guard and Credential Guard on the next Windows boot.
Mont a UEFI system partition to the drive X: (select an unused volume):
mountvol X: /s
Copy the C:WindowsSystem32SecConfig.efi to X:EFIMicrosoftBootSecConfig.efi with an option to overwrite the file if the file exists. This file is a boot image for Windows security configuration tool.
copy %WINDIR%System32SecConfig.efi X:EFIMicrosoftBootSecConfig.efi /Y
Create a new option in the boot menu with the ID {0cb3b571-2f2e-4343-a879-d86a476d7215} and the DebugTool name:
bcdedit /create {0cb3b571-2f2e-4343-a879-d86a476d7215} /d “DebugTool” /application osloader
Set the boot option you created to boot at the previous step to EFIMicrosoftBootSecConfig.efi:
bcdedit /set {0cb3b571-2f2e-4343-a879-d86a476d7215} path “EFIMicrosoftBootSecConfig.efi”
Set Windows Boot Manager to make the new entry the default one for the next reboot. After that, reboot your Windows should go back to normal boot.
bcdedit /set {bootmgr} bootsequence {0cb3b571-2f2e-4343-a879-d86a476d7215}
Set the bootloader to pass the options DISABLE-LSA-ISO,DISABLE-VBS to the SecConfig.efi file when the bootloader launches the file.
bcdedit /set {0cb3b571-2f2e-4343-a879-d86a476d7215} loadoptions DISABLE-LSA-ISO,DISABLE-VBS
Set the partition for the booted drive to the X: drive:
bcdedit /set {0cb3b571-2f2e-4343-a879-d86a476d7215} device partition=X:
Unmount the X: drive from the system:
mountvol X: /d
Method 6: Update VMware Workstation
If you have Windows 10 version 2004 (20H1) build 19041 or newer on your physical computer, you can upgrade VMware Workstation to VMware Workstation 15.5.6 or newer and run VMware VMs on your Windows machine without disabling/uninstalling Hyper-V and Virtualization Based Security (VBS) features, including Device Guard and Credential Guard.
Due to many complaints from customers, Microsoft and VMware decided to develop a joint project that adopts Microsoft Windows Hypervisor Platform (WHP) APIs to allow type 2 hypervisors, such as VMware Workstation, to run on a host where Hyper-V is enabled. These APIs allow applications to manage CPU resources, read/write registry values, terminate CPU operation, and generate interruptions.
VMware Workstation before version 15.5.5 uses a Virtual Machine Monitor (VMM) that has direct access to a CPU and virtualization instruction sets (Intel VT-x or AMD-V). A VMM operates in a privileged mode. If Virtualization Based Security features are enabled on a Windows host, then an additional hypervisor layer (Hyper-V) is added between hardware and Windows. Hyper-V has direct access to CPU features used for hardware virtualization, and VMM has no access to CPU virtualization features.
VMware made changes in the architecture of VMware Workstation 15.5.6 to allow their product to use Microsoft WHP APIs and fix the compatibility issue. VMM can now run at the user level (not in the privileged mode) using the WHP APIs and run VMs without direct access to CPU virtualization extensions. This mode is called User Level Monitor (ULM) or a Host VBS mode. If you uninstall Hyper-V-related features from your Windows host, VMware Workstation detects it automatically, and VMM is switched to direct access of CPU virtualization extensions (running in the privileged mode).
Windows Hypervisor Platform (WHP) must be installed on a physical Windows machine where Hyper-V is enabled to allow VMware Workstation to run VMware VMs on this machine. Install the Windows Hypervisor Platform feature in Control Panel by clicking Turn Windows features on or off.
Thus, you can update Windows 10 and VMware Workstation on your physical machine to versions that support running Hyper-V-related features and VMware Workstation VMs on the same machine.
Limitations of the Host VBS mode:
- Windows Hypervisor Platform is not supported on Windows Server 2016 and other Windows Server versions and editions. As a result, VMware Workstation cannot run VMs in the host VBS mode on physical machines running Windows Server.
- Nested Virtualization is not supported. You cannot run nested VMs (VMs inside VMware Workstation VMs).
- VMware VMs can run slower.
- X86 performance monitoring counters (PMC) are not supported.
- User-mode protection keys (PKU) capability is not available.
- Restricted transactional memory (RTM) and hardware lock elision (HLE) capabilities are not available.
VirtualBox and Hyper-V
VirtualBox can co-exist with Hyper-V, Device Guard, and Credential Guard starting from VirtualBox 6.0. VirtualBox 6 can work with Hyper-V APIs similarly to VMware Workstation on Windows 10 v1803 x64.
These features must be enabled on a host Windows machine to allow VirtualBox to work with Hyper-V APIs:
- Hyper-V
- Windows Hypervisor Platform
If the Hyper-V feature is enabled, but the Windows Hypervisor Platform feature is disabled, in System > Acceleration in VM configuration summary, you can see that the Paravirtualisation mode is on. If you try to start a VM, VirtualBox reminds you that you should enable Windows Hypervisor Platform and displays the error message.
The error message:
WHvCapabilityCodeHypervisorPresent is FALSE! Make sure you have enabled the ‘Windows Hypervisor Platform’ feature.
(VERR_NEM_NOT_AVAILABLE).
VT-x is not available (VERR_VMX_NO_VMX).
If the required Hyper-V-related features in Windows are enabled, the following information is displayed for the VM in the System section:
Acceleration: VT-x/AMD-v, Nested Paging, Paravirtualization Hyper-V

The VM should start successfully. A green turtle icon is displayed in the bottom panel of the VirtualBox window. This icon indicates that a VM is running in the Hyper-V paravirtualization mode instead of the native mode that is usually used by VirtualBox when interacting directly with CPU virtualization extensions. The performance of VirtualBox VMs degrades on machines on which Hyper-V and related features are enabled. You can disable or remove Hyper-V as explained earlier to run VMs on VirtualBox in the native mode using CPU virtualization extensions directly.
Read also the VirtualBox vs Hyper-V comparison and the VirtualBox vs VMware comparison.
Conclusion
New Windows features such as Virtualization Based Security (Device Guard and Credential Guard), Windows Sandbox, WSL that use the Hyper-V engine cause a lot of problems to users, administrators, and software developers using other hypervisors such as VMware Workstation, VirtualBox, QEMU, and Google Android Emulator on Windows machines. There are two approaches to resolve these incompatibility issues: Disable/uninstall Hyper-V or use new versions of virtualization applications that support work with Hyper-V APIs, such as Windows Hypervisor Platform API provided by Microsoft.
Running VMs on VirtualBox, VMware Workstation, and other hypervisors on machines with Hyper-V by using APIs can degrade the performance of non-Hyper-V VMs. Data backup is crucial for the cases when virtualization applications fail. If you still haven’t chosen the best Hyper-V backup solution for your environment, consider NAKIVO Backup & Replication. The solution offers robust backup, ransomware protection, disaster recovery and more. Download the Free Edition to see the solution in action.
- Remove From My Forums
-
Вопрос
-
При запуске виртуальной машины на VMware® Workstation в Windows Server 2008 R2
Ошибка : VMware Workstation and Hyper-V are not compatible. Remove the Hyper-V role from the system before running VMware Workstation.
после отстановки Hyper-V командой ошибка не та же самая
Ответы
-
А в чем вопрос тогда? если ошибка самоговорящая

Roman Levchenko, MCSA, MCITP, MCTS http://www.rlevchenko.com
-
Предложено в качестве ответа
16 августа 2014 г. 9:24
-
Помечено в качестве ответа
Иван ПродановMicrosoft contingent staff
18 августа 2014 г. 5:03
-
Предложено в качестве ответа
-
При запуске виртуальной машины на VMware® Workstation в Windows Server 2008 R2
Ошибка : VMware Workstation and Hyper-V are not compatible. Remove the Hyper-V role from the system before running VMware Workstation.
после отстановки Hyper-V командой ошибка не та же самая
Вам же пишут русским по белому, удалите роль Hyper-V а не отключитеостановите: «Remove the Hyper-V role»
-
Предложено в качестве ответа
R.LevchenkoMVP
16 августа 2014 г. 9:24 -
Помечено в качестве ответа
Иван ПродановMicrosoft contingent staff
18 августа 2014 г. 5:03
-
Предложено в качестве ответа
-
Для несовместимости Hyper-V и VMware Workstation есть очень серьезное основание: основная ОС — Win2K8 — при установленной роли Hyper-V выполняется на виртуальной машине (в первичном разделе). Хотя этот раздел и имеет особые привилегии — доступ ко всей аппаратуре,
оперативной памяти, на него отображаются все прерывания — но он всё равно рабтает под управлением гипервизора в виртуальном режиме процессора и не имеет доступа к средствам виртуализации, встроенным в процессор (Hyper-V их не эмулирует).Остановка службы Hyper-V не влияет на способ выполнения Windows: гипервизор и первичный раздел активизируются драйверами в процессе загрузки Windows. Служба же всего лишь занимается эмуляцией различных устройств для вторичных разделов (запущенных под Hyper-V
виртуальных машин). Так что если вам по какой-то причине понадобилось установить на сервер VMware Workstation, роль Hyper-V придется удалить.
Слава России!
-
Предложено в качестве ответа
R.LevchenkoMVP
16 августа 2014 г. 9:24 -
Помечено в качестве ответа
Иван ПродановMicrosoft contingent staff
18 августа 2014 г. 5:04
-
Предложено в качестве ответа
🔥 На прошлой неделе после того как решил потестить windows sandbox у меня перестал загружаться виндоус (если у вас такая же проблема читайте мою статью как я это победил) так вот в выходные переставил свой Windows 10 PRO (скачать оригинальный образ Windows 10PRO можно по этой статье) и при установке WMware версия 15.5.1 и запуску одной из моей виртуалок выдала такую ошибку:

✅ VMware Workstation and Device/Credential Guard are not compatible. VMware Workstation can be run after disabling Device/Credential Guard.
🔥 Не запускается виртуальные машины VMware что делать?
Начал изучать этот вопрос и он в основном появляется на Windows 10, Windows Server 2016 и Windows Server 2019
✅ Что такое Credential Guard – это система защита учётных записей которая изолирует данные с помощью технологий основанных на виртуализации, а доступ к ним могут получить только привилегированные службы и системы.
Более подробно по работе и управлению Credential Guard можно прочитать на официальном сайте Микрософт – ⚡️⚡️⚡️ ссылка
Наша же задача решить данную проблему для того что бы запустить нашу виртуальную машину.
✅ VMware Workstation и Hyper-V несовместимы – Данная проблема возникает по большей части из-за конфликта виртуализации Hyper-V которая уже при загрузки ОС резервирует на себя все аппаратные возможности виртуализации процессора, а остальным ничего не остается поэтому нам это надо отключить!
🔥 В статье приведу несколько способов которые можно использовать!
Способ 1 – Отключаем Hyper-V
- Запускаем командную строку WIN + R
- Вводим команду cmd которая нам откроет терминал в котором мы вводим следующую команду
bcdedit /set hypervisorlaunchtype off
Этой командой мы отключаем службу Hyper-V на нашем компьютеере
- Перезагружаем компьютер
Если его нужно вернуть все обратно, тогда нужно будет выполнить команду bcdedit /set hypervisorlaunchtype auto
PS Если после перезагрузки у Вас не заработала VMware тогда переходите ко второму способу.
Способ 2 – Отключаем ядро
В данном способе мы не просто отключим изоляцию ядра в настройках.
- Заходим в настройки и в меню выбираем Обновление и Безопасность

- Переходим в меню Безопасность Windows и выбираем Безопасность Устройства

- Далее переходим в Безопасность устройства и в пункте Изоляция ядра нажимаем на ссылку

- переводим ползунок в режим Откл закрываем и перезагружаем компьютер

- Если этот способ не помог, переходим ко второй инструкции
Способ 3 – Отключаем Credential Guard
- Запускаем командную строку WIN + R
- Вводим команду gpedit.msc которая нам откроет – Редактор локальной и групповой политики
- Длаее идем в ветку: Конфигурация компьютера => Административные шаблоны => Система => Device Guard
- Открываем службу Включить средство обеспечения безопасности на основе виртуализации и нам надо ее отключить

- на этом закрываем Редактор локальной и групповой политики
- Запускаем командную строку WIN + R
- Вводим команду appwiz.cpl которая нам откроет Программы и компоненты и тут выбираем меню Включение или отключение компонентов Windows

- В открывшемся окне снимаем галку с пункта Hyper-V

- Перезагружаем компьютер
Вот наверно и все! Таким образом мы решили проблему конфликта виртуализации между приложениями VMware Workstation и Hyper-V! Если у вас есть какие то замечания или дополнения пишите в комментариях.
Insufficient memory can cause Hyper-V’s incompatibility with VMware
by Loredana Harsana
Loredana is a passionate writer with a keen interest in PC software and technology. She started off writing about mobile phones back when Samsung Galaxy S II was… read more
Updated on March 23, 2023
Reviewed by
Vlad Turiceanu

Passionate about technology, Windows, and everything that has a power button, he spent most of his time developing new skills and learning more about the tech world. Coming… read more
- VMware not compatible with Hyper-V error can occur when the Hyper-V role is enabled as a secondary virtual machine creator.
- VMware needs a 4GB RAM or more because your PC needs to run its systems also.
- One of the possible fixes for the incompatibility issue is to uninstall Hyper-V in the GUI.
XINSTALL BY CLICKING THE DOWNLOAD FILE
Fortect is a tool that does not simply cleans up your PC, but has a repository with several millions of Windows System files stored in their initial version. When your PC encounters a problem, Fortect will fix it for you, by replacing bad files with fresh versions. To fix your current PC issue, here are the steps you need to take:
- Download Fortect and install it on your PC.
- Start the tool’s scanning process to look for corrupt files that are the source of your problem
- Right-click on Start Repair so the tool could start the fixing algorythm
- Fortect has been downloaded by 0 readers this month.
It can be quite annoying if you get the Hyper-V not compatible with VMware error after installing a virtualization application on a Windows machine.
This error is almost inevitable because Windows 11 cannot run another Virtual Machine creator alongside Hyper-V. Regardless, fixing the VMware and Hyper-V incompatibility issues is still possible.
Why is VMware not compatible with Hyper-V?
Whenever the Hyper-V role is enabled, the virtualization extensions are not exposed to type 2 hypervisors installed on a Windows machine, hence the incompatibility issue. However, other factors responsible for this error are:
- Outdated or low-bit processor: VMware workstation and Hyper-V may not be compatible if you use an outdated processor for Windows Server 2012. Regardless of the Hyper-V feature you wish to use, a 64-bit processor of second-level address translation (SLAT) is a requirement for newer hardware.
- Insufficient Memory: To run multiple Virtual Machines simultaneously, you’ll need enough memory of at least 4 GB of RAM or more for the host and other Virtual Machines.
- Hyper-V is a Virtual Machine creator: Hyper-V is also a Virtual Machine creator and cannot run with another VM due to competition for resources. You may have to disable Hyper-V in Windows 11 in such cases.
What can I do if VMware is not compatible with Hyper-V?
You should ensure to perform the following preparatory checks before engaging in any troubleshooting or settings tweaks:
- Ensure you have about 60GB and above of hard disk storage.
- Your computer should have a minimum RAM of 4GB.
- Get to know how to locate the files & folders and their respective functions.
- Ensure that your processor is compatible with a 64-bit processor and supports AMD, Intel, and Qualcomm processors.
Having checked these and the issue persists, proceed to the advanced fixes below.
1. Uninstall Hyper-V in the Graphical User Interface (GUI)
- Click the Start button, input cmd, and launch the Command Prompt.
- Run the following command to open System Information to check if Hyper-V is installed and press Enter:
msinfo32.exe
- If Hyper-V is installed, proceed to uninstall it with the next steps.
- Open Control Panel and click Programs and Features.
- Then, click Turn Windows features on or off.
- When the Windows features page opens, deselect the Hyper-V checkbox, and click OK.
- Restart the computer.
You can follow similar steps for Windows Server 2016. However, should you later need to re-enable Hyper-V, you can check our guide on how to Install Hyper-V in Windows 11.
2. Turn off Virtualization Based Security
- Press the Windows + R keys simultaneously, input gpedit.msc and click OK or hit Enter.
- Go to Local Computer Policy, then click on Computer Configuration.
- Select Administrative Templates and click on System.
- Then, click on Device Guard and double-click Turn On Virtualization Based Security (the status of this setting should show Not configured by default).
- A window should open, select Disabled and click OK to save the settings, then close the window.
Alternatively, if you can’t seem to access Virtualization-Based Security, you can read how to disable VBS on Windows 11 PCs and find some relevant solutions.
- What is Cleanmgr.exe & How to Properly Use it
- How to Easily Bypass Netflix Password Sharing
3. Disable Hyper-V using PowerShell
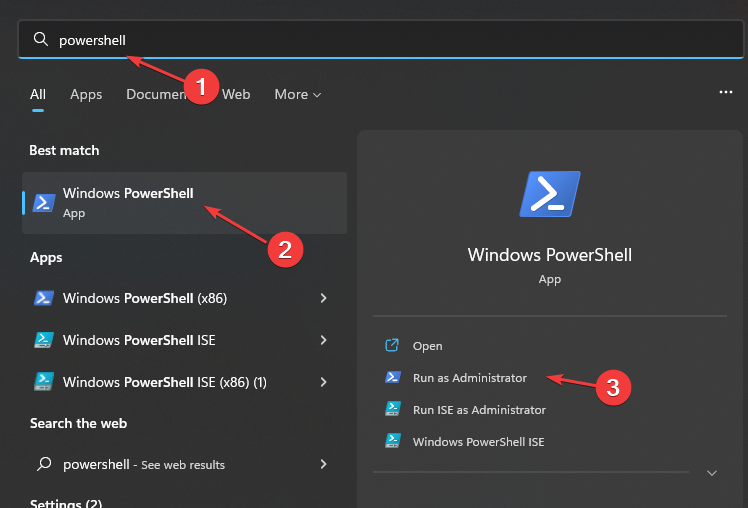
- Press the Windows key, type Powershell, right-click on PowerShell and select Run as Administrator.
- Type the following shell command in the PowerShell window and hit Enter:
Disable-WindowsOptionalFeature -Online -FeatureName Microsoft-Hyper-V-All - PowerShell will initiate the Hyper-V disabling process.
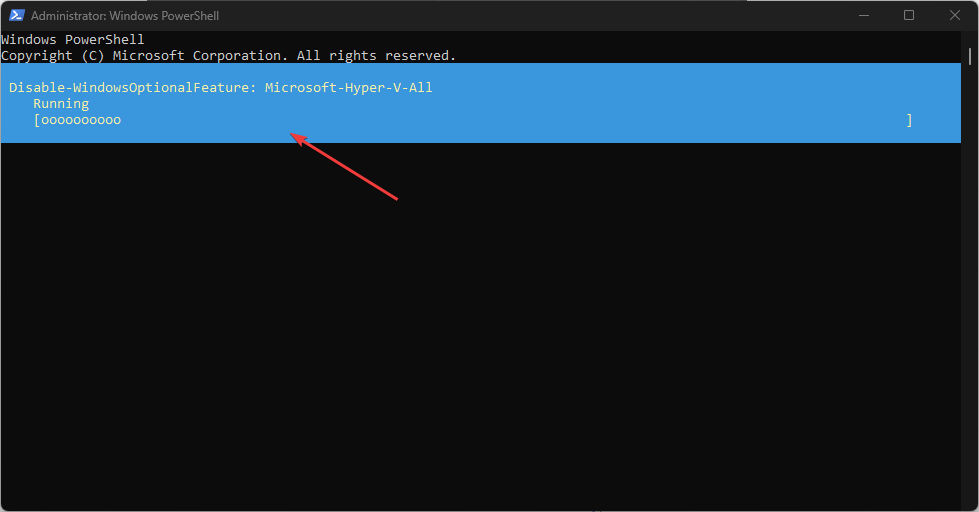
- If it is successful, you will be asked to restart your PC, type Y to confirm, and your PC will restart to apply the changes and enable a new feature.

If you want to re-enable Hyper-V in PowerShell, you can read through our guide on enabling Hyper-V in Windows 11.
You can also check our detailed guide on what to do if VMware workstation and Hyper-V are not compatible with Windows 11.
However, if the Hyper-V to VMware compatibility problems persists, you should consider checking our article to fix Windows 11 Hyper-V errors.
If you have new queries or suggestions about other fixes that have worked for you, kindly drop them in the comments section. We will appreciate your input.
Still experiencing issues?
SPONSORED
If the above suggestions have not solved your problem, your computer may experience more severe Windows troubles. We suggest choosing an all-in-one solution like Fortect to fix problems efficiently. After installation, just click the View&Fix button and then press Start Repair.
![]()