- Remove From My Forums
-
Question
-
Trying to create and deploy a Windows 7 pro image for Dell optiplex 390s. Getting the dreaded error above when trying to connect to the DHCP. After a couple days of research I’ve tried injecting drivers, different version of drivers, injecting drivers into
a different boot image, changing the name and/or deleting the setup.exe file from the image, verified that spanning-tree portfast was enabled on the switch, and edited windowssystem32startnet.cmd. Everything i’ve tried results in the error still showing.When running ipconfig it looks like the NIC is not even initializing which leads me to believe it’s a driver issue still. I’m out of ideas on this one. Anyone else have any?
Answers
-
Yes, I agree that this seems to be a driver issue.
Please follow the steps below to find the correct NIC driver for the problematic clients and create a new boot image, then add the NIC drivers to the new boot image for a test.
Error message when you start a PXE client to connect to a WDS server on a Windows Server 2003 SP1-based computer or on a Windows Server 2008-based computer: «WdsClient: An error occurred while starting networking»
http://support.microsoft.com/kb/923834
Thanks
ZeroPlease remember to click “Mark as Answer” on the post that helps you, and to click “Unmark as Answer” if a marked post does not actually answer your question. This can be beneficial to other community members reading the thread.
-
Proposed as answer by
Tuesday, October 9, 2012 1:26 AM
-
Marked as answer by
LudoTheGreat
Tuesday, October 9, 2012 1:27 AM
-
Proposed as answer by
- Remove From My Forums
-
Question
-
Hi!
I’m trying to deploy a WDS server for a while, but I get the next error (but then in dutch):
WdsClient: An error occurred while obtaining an IP address from the DHCP server. Please check to ensure there is an operational DHCP Server on this network segment.The
server I work with is Server 2012R2.
What I have tried:
- Downloaded and implemented all 16 ethernet drivers for the client (HP Probook 430 G2) by the WDS «add drivers» feature.
- Implemented all drivers from an official W7 «Applications and Driver Recovery DVD» in WDS. (this solved an missing driver error earlier)
- tried a different boot.wim and install.wim from another Windows 7 pro .iso.
- Tried 4 different HP computers (3 laptops and 1 desktop). one of these laptops is my own computer, which worked fine by another WDS server from my last traineeship.
- Installed the server on a different computer.
- Reinstalled the Server like 4 times totally.
- Rebuilded everything in VMware Workstation, everything works fine in here untill I connect a physical computer by peer-to-peer cable, than I get the error again (drivers from HP site and CD as told above are added).
- The different networks I tried: a cisco switch with 4 clients and 1 server attached, nothing more. I read about the portforwarding problem in cisco switches, so I tried peer-to-peer between a physical Server and client and like I said between a virtual
switch in vmware. - First installed the server with the DHCP role, tested the connections, IP addresses are leased and I can ping while clients are in Windows 7.
- I get the error while running the setup from the boot.wim, so I have a connection with the server, however if I start a command prompt by SHIFT+F10 and put «ipconfig» in, the results are pretty empty: «Windows IP-configuration«.
Even after a few minutes I have no IP configuration. Results of the command «ipconfig /renew» is: «An error occured while releasing interface Loopback Pseudo-Interface 1: The system cannot find the file specified.« - DHCP configuration on active scope: 60 «PXEClient» and 66 for the ip address of my WDS server.
- DHCP properties in WDS: «Do not listen on DHCP ports» and «Configure DHCp options to indicate that this is also a PXE server» are enabled because my Windows DHCP role is active beside the WDS role on the same phisical server.
- Configured the windowssystem32startnet.cmd succesfully in a mounted image 3 times from different suggestions, doesn’t help me either.
I read aslwell that it could be something with HP. I only have 1 DHCP server active to be clear. I’m not using DNS. My teachers at school can’t help me, I hope someone here can! I would be amazing happy if the problem wille be solved.
Thanks!
Answers
-
Hi Alex,
>> I get the error while running the setup from the boot.wim, so I have a connection with the server, however if I start a command prompt by SHIFT+F10 and put «ipconfig» in,
the results are pretty empty: «Windows IP-configuration». Even after a few minutes I have no IP configuration. Results of the command «ipconfig /renew» is: «An error occured while releasing interface Loopback Pseudo-Interface 1: The
system cannot find the file specified.»According your description,it seems to be a driver issue. As far as I know,you should extract and only add the corresponding Drivers into the boot image,if you added them all, you will
getting hardware errors on the PC.
Best Regards,Cartman
Please remember to mark the replies as answers if they help and unmark them if they provide no help. If you
have feedback for TechNet Support, contact tnmff@microsoft.com.-
Marked as answer by
Thursday, March 10, 2016 9:33 AM
-
Marked as answer by

При загрузке образа с WDS появляется ошибка
WdsClient: ошибка получения IP-адреса от сервера DHCP.
Не могу понять, что делать.
я пробовал подкидывать драйвера вручную по инструкции.
https://support.microsoft.com/ru-ru/kb/923834
Пробовал через сам WDS к boot образу докидывать драйвера, но все равно ничего.
Может я что-то не то делаю? Кто-нибудь сталкивался с такой бедой?
Сам wds настроен нормально, потому что такая проблема не на всех компах. Wds+DHCP и порт настроен нормально.
Спасибо
-
Вопрос заданболее трёх лет назад
-
2830 просмотров
Пригласить эксперта
WdsClient: ошибка получения IP-адреса от сервера DHCP.
Где вы такое ловите?
Вообще, встречал такие сетевки встроенные, на которых PXE отказывался работать вообще. Ссылаюсь на кривизну чипа сетевой карты.
Проблема скорее всего с драйверами. Если сделать shift+F10, ipconfig /all, то видно что сетевухи нет. Значит драйвера на нее не установились в загрузочном образе.
С аналогичной проблемой сталкиваюсь не первый раз. Обычно легко интегрируются драйвера. Сейчас на intel i219 не получается. Новые матери h410 не поддерживаются из коробки последним релизом W10 (2004).
Возьмите образ boot.wim из Windows Server 2022, на нём всё работает.
WDS стоит на Windows server 2019, разворачиваю Windows 10
Проблема актуальная до сих пор, причем проблема на сетевых картах intel i219 и выше. Дистрибутив свежий, версия сборки 10.0.19041 . Драйвера в образе на сетевые карты есть
-
Показать ещё
Загружается…
22 июн. 2023, в 10:49
5000 руб./за проект
22 июн. 2023, в 10:00
2500 руб./за проект
22 июн. 2023, в 09:29
500 руб./за проект
Минуточку внимания
 If you are using new (or different) hardware from what you built your Windows image on, you may see: WdsClient: An Error Occured While Obtaining IP Address From the DHCP Server. Fortunately, you can ignore most of the other solutions floating around the internet telling you to manually inject the drivers into your image. Windows Deployment Service (WDS) has a simple mechanism to inject drivers into your image using the WDS GUI.
How to Add Drivers to Windows Deployment Server:
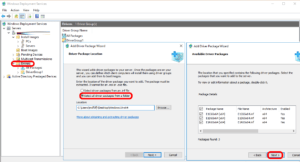 Go to your hardware manufacturers website and download the network card driver(s) for the hardware in question
- Open your WDS MMC, expand the server in question and then expand DRIVERS
- Select ADD DRIVER PACKAGE,
- Select SELECT ALL DRIVER PACKAGES FROM A FOLDER and browse to a folder that contains your unpacked drivers
- Unpacked drivers means that your driver files must be extracted from their .EXE or .MSI or .ZIP file.
- If you do not already know how to do this, download, 7-ZIP and start 7ZIP, select your driver package and click the EXTRACT button
- Unpacked drivers means that your driver files must be extracted from their .EXE or .MSI or .ZIP file.
- In the AVAILABLE DRIVER PACKAGES window just click NEXT
- In the DRIVER GROUPS window, make sure you choose, SELECT AN EXISTING DRIVER GROUP.
- If you do not select a group your drivers will be in WDS but will NOT be applied to any of your images
- In the TASK COMPLETE window you can click MODIFY THE FILTERS FOR THIS GROUP NOW but I would not
- If you add a filter, the drivers will only be applied to devices that meet that filter… I want Windows to figure out if it is needed or not.
- The default is “…install all packages that match the installed hardware…” which is good with me
- If you add a filter, the drivers will only be applied to devices that meet that filter… I want Windows to figure out if it is needed or not.
Now you can add those drivers to the image in question.
How to Add Drivers to An Image on your Windows Deployment Server:
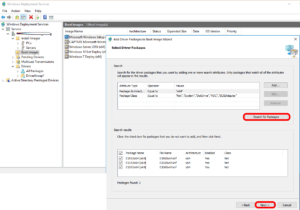 In WDS, click BOOT IMAGES and right click on the image in question
- Select ADD DRIVER PACKAGE, then NEXT, then click the SEARCH FOR PACKAGES button
- The drivers you just added to your WDS server will now appear in the SEARCH RESULTS window
- Click NEXT, NEXT, NEXT
WDS will then open the image, inject the drivers and close the image. This is much easier than going through the manual process.
You should not have to restart your WDS service, but if you have troubles, restart it.
Also remember that you will likely want to add these drivers to images other than the BOOT image. Specifically, you will likely want to repeat the process for the image you are trying to apply and to any CAPTURE image you may have.
WdsClient – An error occurred while obtaining an IP address from the DHCP server. Please check to ensure that there is an operation DHCP server on this network segment.
This is the error I got recently when trying to image some new machines for one of the schools I support.

The correct drivers were installed on the WDS server and I’d previously imaged some desktops of the same model with no problems. I tried a new cable and network point, restarted WDS and DHCP on the server all to no avail. All settings on WDS were fine and as they should be.
Do try the above steps first, as 90% of the time it’s resolved by one of them. This problem is also common if you have a faulty or very long network cable.
It turned out that the PC was taking too long to get an IP address, meaning it couldn’t reach the WDS server at the time it tried to. By the time it has been assigned an IP it had already timed out and thrown me this error.
DHCP seemed to be functioning correctly, as other devices were working with no problems – it just seemed to be DHCP and WDS that weren’t working together properly. I needed a way around this, and after a lot of research I found a way to modify my WIM file so it wouldn’t launch the PE until it could ping the server. Obviously if it can ping it has an IP address, so therefore can continue as it should.
Here’s how to do it:
I advise doing this on a client PC, and not the server.
- Install the Windows AIK. In this example, I am using and deploying Windows 7, so required the Windows 7 AIK.
- Open “Windows PE Tools Command Prompt” and type the command below that corresponds to the CPU architecture that your current WDS boot image is on:
-
32bit - copype x86 C:newbootimage
-
64bit – copype x64 C:newbootimage
These commands will create a new Windows PE wim image in C:newbootimage. The file path can be altered if you so wish.
-
- Go into the WDS console on your server, and export the current image that you’re having trouble booting to. (Right click > Export Image) and copy that to C:oldbootimage on the client PC you created other wim with in the previous step. For the rest of the tutorial, I will assume this file is called wds.wim
- Mount both images:
- Mount the image created in step two by running:
imagex /mountrw “C:newbootimageWinPE.wim” 1 "C:newbootimagemount"
- Mount the image exported in step three by running:
imagex /mountrw “C:oldbootimagewds.wim” 2 "C:oldbootimagemount"
- Mount the image created in step two by running:
- Now, copy the sources folder from the old boot image (C:oldbootimagemountsources) to the new boot image (C:newbootimagemountsources). This adds the necessary WDS client setup files to the new image.
- Open the startnet.cmd file (C:newbootimagemountwindowssystem32starnet.cmd) in Notepad.
The current files will most likely contain very little text. You need to replace the contents with the following:@echo off wpeinit @echo Waiting for the WDS server… :testagain ping –n 1 wds > NUL if %errorlevel% == 0 goto pingok REM wait 3 sec. and try it again ping –n 3 127.0.0.1 >nul goto testagain :pingok x:sourcessetup.exe /wds /wdsserver:WDS
This small script will keep trying to ping the server called WDS until it receives at reply. At which point it will continue to boot into WDS setup mode.
You may change the server name from WDS in the script if you wish, however I advise keeping the script as is and adding a DNS entry for the WDS to point to your server’s IP. This way, the wim file is usable across any server / network by just adding a DNS entry. - Save changes to the cmd file.
- Remove all unnecessary components from the new WDS image with the following command:
peimg /prep mountwindows
- Unmount the new image and save changes with the following command:
imagex /unmount /commit mount
- At this point the new wim image will probably be around 200mb. It’s advised you export the image to a new wim file to reduce it in size with the following command:
imagex /export “C:newbootimageWinPE.wim” 1 “C:newbootimagenewwds.wim” “Custom WDS Windows PE”
The image at this point is now complete, and will be around 120mb. You can then add this to the boot images section of your WDS server as you normally would with boot.wim from a Windows DVD or ISO.
For your convenience, I have created a Windows 7 32 and 64 bit version of wim which you can download from the following links:
- W732PE.wim
- W764PE.wim
Thanks to svengru at TechNet for sharing his solution. The above is merely a modified version of his solution, clearing up some sections that don’t need to be done post Vista such as importing drivers to the wim.