by Loredana Harsana
Loredana is a passionate writer with a keen interest in PC software and technology. She started off writing about mobile phones back when Samsung Galaxy S II was… read more
Updated on February 23, 2023
- Users have reported their Windows 11 Installation Assistant hasn’t been working properly after its download and it might have to do with their system’s settings.
- Another possible cause is not having the right permissions to access the file.
- As a solution, you should try running the downloaded file as an administrator by right-clicking it.
XINSTALL BY CLICKING THE DOWNLOAD FILE
This tool repairs common computer errors by replacing the problematic system files with the initial working versions. It also keeps you away from system errors, BSoDs, and repairs damages made by malware and viruses. Fix PC issues and remove viruses damage now in 3 easy steps:
- Download and Install Fortect on your PC
- Launch the tool and Start scanning to find broken files that are causing the problems
- Right-click on Start Repair to fix issues affecting your computer’s security and performance
- Fortect has been downloaded by 0 readers this month.
Windows 11 has officially been made available, and users are scrambling to get their hands on Microsoft’s operating system.
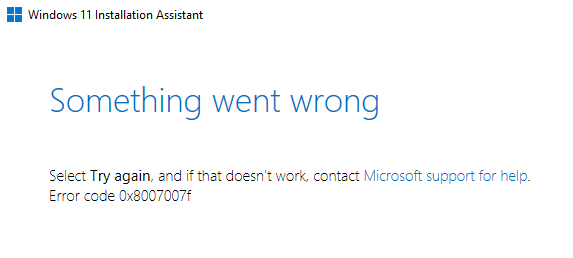
While many customers have claimed success with the Windows 11 upgrade, some have experienced an error code of 0x8007007f while using the Windows 11 Installation Assistant to complete the update.
Similarly, others have encountered error messages stating that the Windows 11 Installation Assistant is already running, or that something went wrong with it.
You shouldn’t be too concerned about the Windows 11 upgrade problem because bugs are common with big Windows upgrade releases. Continue reading to learn how to resolve it so that you may upgrade to Windows 11.
What’s new in Windows 11?
Windows 11 introduces a completely redesigned UI that is more similar to a Mac. It has a simple design with rounded sides and soft pastel colors to complement it. 
Along with the Taskbar, the Start menu, which is a Windows icon, is moved to the middle of the screen. However, if you like, you can return those to their original positions on the left, as they are in Windows 10.
Android applications will be made available via the Microsoft Store (but not immediately) through the Amazon Appstore, which will be available in Windows 11.
The ability to access Android apps on Windows 10 was previously available through a few methods, including using a Samsung Galaxy phone, but this will make it native.)
For Windows customers, this is something they’ve been waiting for for years, and it represents another step toward the integration of mobile and laptop computers. This functionality is currently in beta and only available to Windows Insiders, who can test it out.
Windows 11 will allow you to create virtual desktops in a manner similar to that of Mac computers. It enables you to switch between numerous computers at the same time for personal, professional, educational, or gaming purposes. This was more difficult to configure and utilize in Windows 10.
The addition of gestures and greater space between icons on the taskbar are two ways in which Microsoft is attempting to improve the touch experience on tablets. When using your digital pen to take notes or sketch, you may now hear and feel vibrations.
To find out more, check out our article with a full Windows 10 vs Windows 11 performance comparison and the best features in the latter operating system.
What is Windows 11 Installation Assistant Error code 0x8007007f?
This is a common error that many users report having when trying to run the Windows 11 Installation Assistant.
The error message is not very specific, and Microsoft has not yet officially addressed this problem on its support page.
It may appear right when you start the Assistant, but also when the process is in progress.
Some PC issues are hard to tackle, especially when it comes to missing or corrupted system files and repositories of your Windows.
Be sure to use a dedicated tool, such as Fortect, which will scan and replace your broken files with their fresh versions from its repository.
As for what causes this issue, there are multiple possible culprits. The most prevalent are storage problems, driver incompatibility, or outdated drivers.
How to fix the Windows 11 Installation Assistant error 0x8007007f
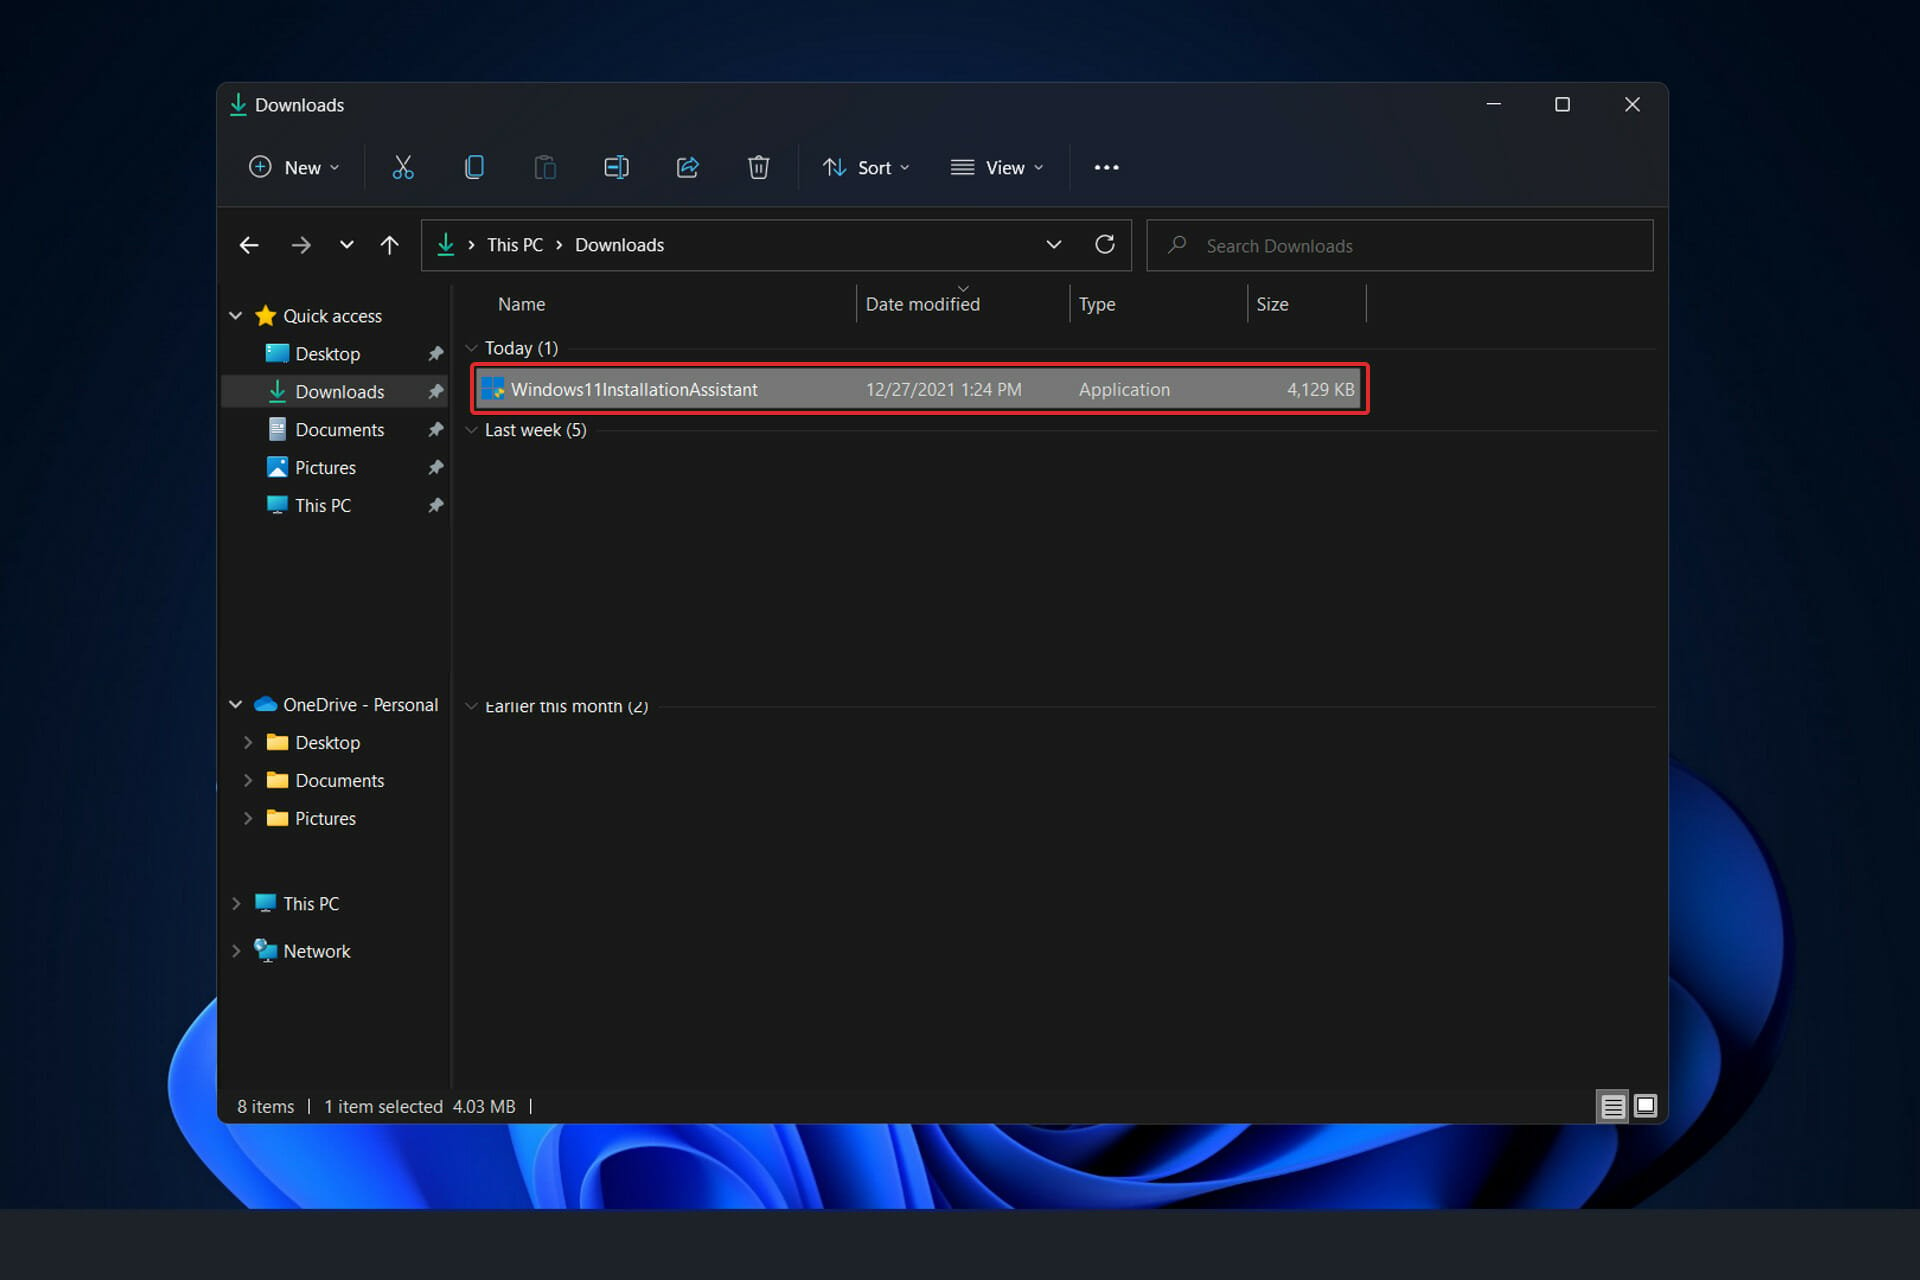
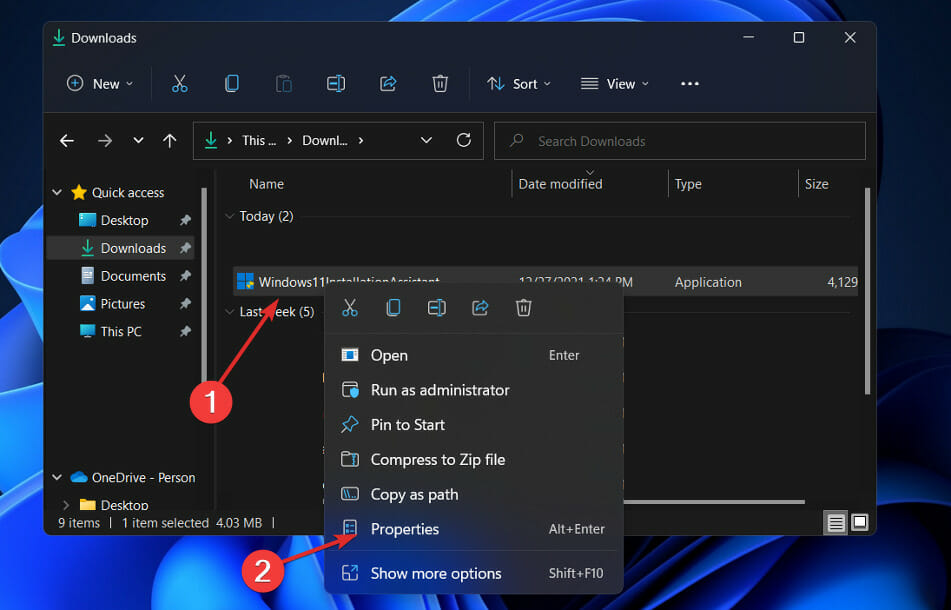
1. Run the Assistant as an administrator
- After you have downloaded the Installation Assistant from Microsoft’s official website, locate the executable program file. It will most probably be in the Downloads folder of your PC.
- Once you found it, right-click on the executable file and choose Run as administrator.

- A dialog box will pop up to ask your permission. Click Yes to allow Windows 11 Installation Assistant to run with administrator privilege.
Now continue with the installation steps that are shown to you. Make sure to follow them carefully.
2. Disable your antivirus
- Tap on the expand arrow from your taskbar then right-click on your antivirus to choose Avast shields control followed by Disable for 10 minutes.
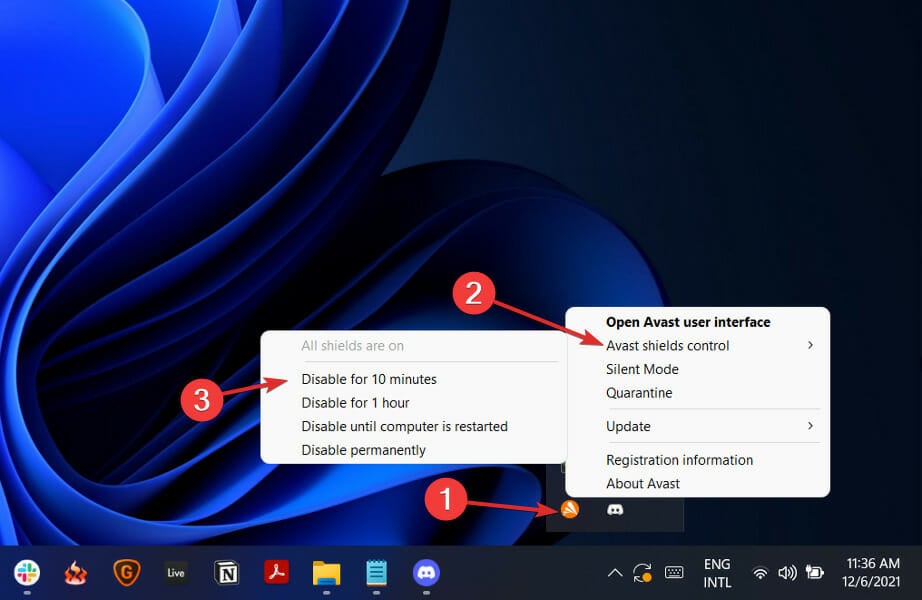
- If you have other antivirus programs installed, you can temporarily disable the app by following the same or similar methods as before.
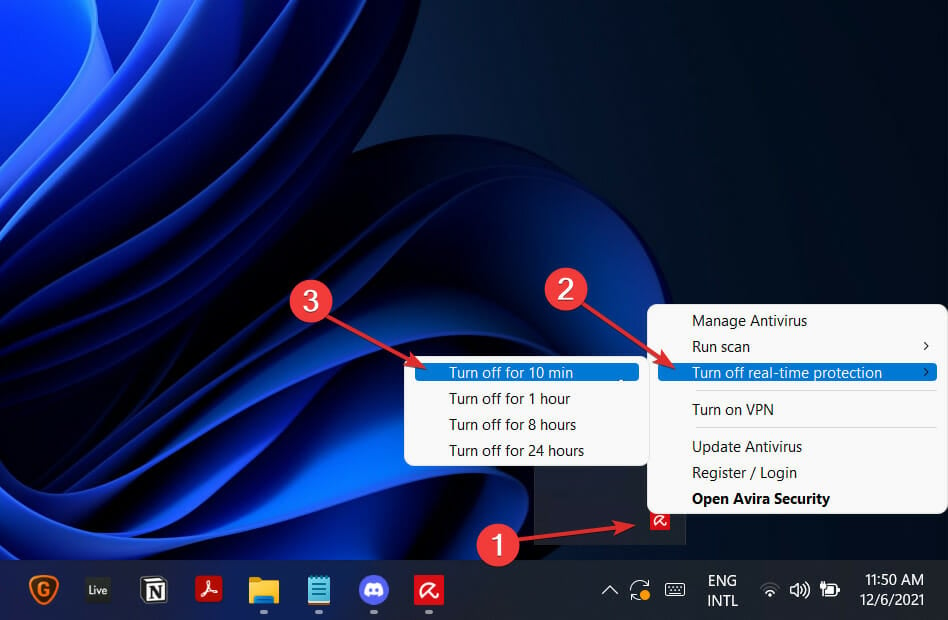
The likelihood that your antivirus application was the source of the problem is high if the problem no longer occurs. In order to secure your computer, you should consider using another antivirus product that is compatible with Windows 11.
3. Run SFC
- Press the Windows + S key to open the Search bar, then type cmd. Next, right-click on the most relevant result given to you to run it as an administrator.
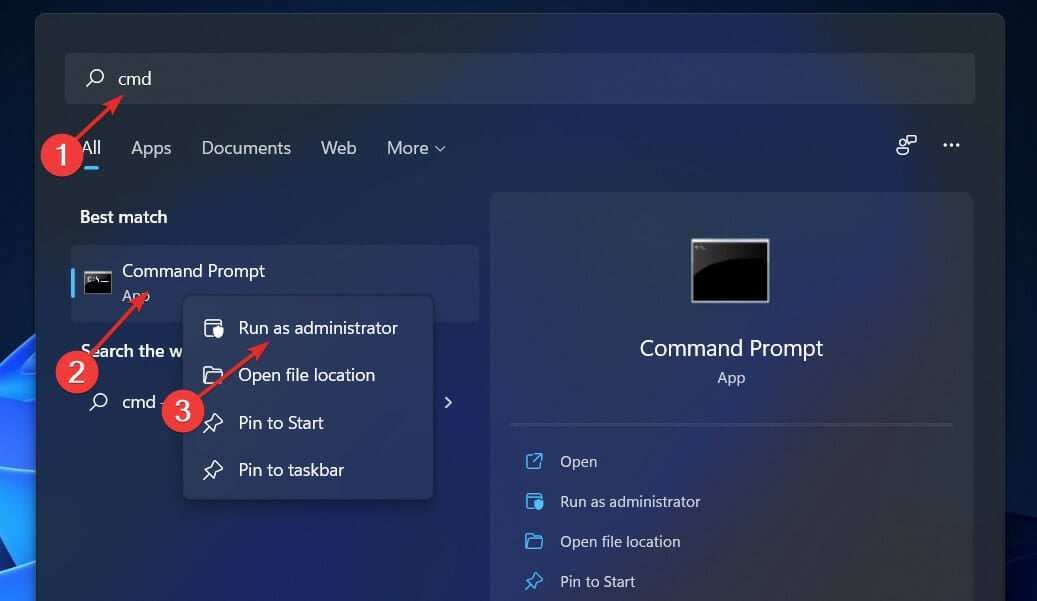
- Type or paste in the following command and press Enter in order to perform the scan:
sfc /scannow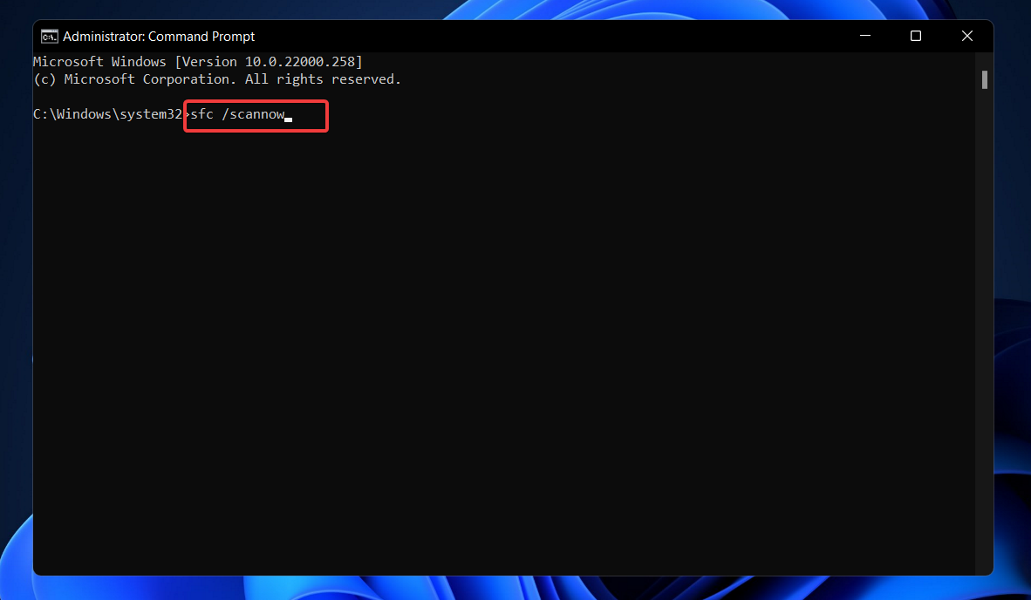
When you’ve finished waiting for the process to complete, restart your computer (which could take some time). Alternatively, you can give a try to Restoro which will scan your PC and fix any issues related to missing or corrupted system files.
4. Set the compatibility mode
- After you have downloaded the Installation Assistant from Microsoft’s official website, locate the executable program file. It will most probably be in the Downloads folder of your PC.
- Right-click on it, then choose Properties.
- Now navigate to the Compatibility tab, click on Run this program in compatibility mode for: and choose Windows 7.
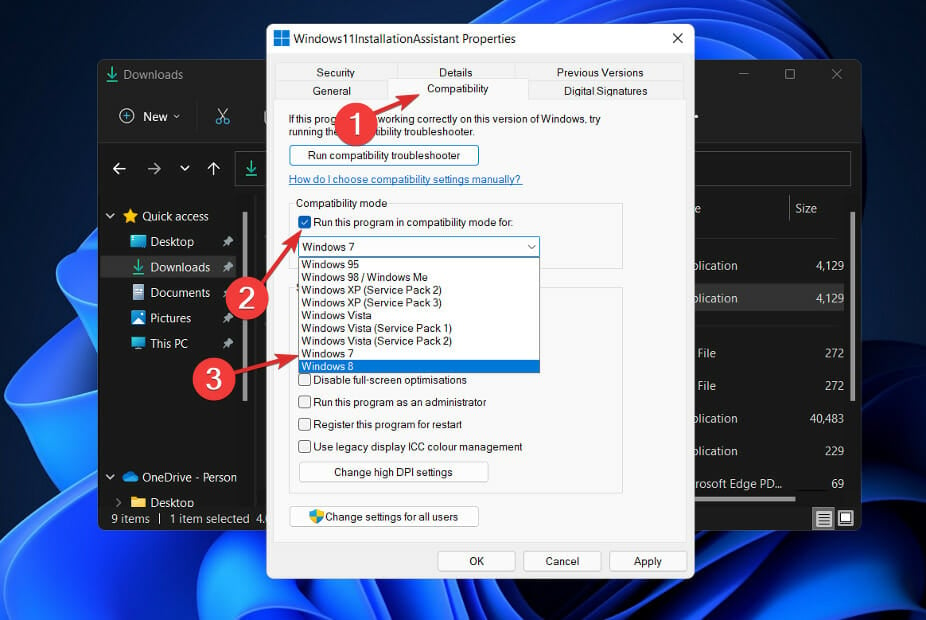
- Hit Apply to save the changes, then run the executable normally and see if the window nor remains open long enough for you to perform your tasks.
How to check for new updates in Windows 11?
During the development of Windows 11, the developers made a point of analyzing the data to determine which settings are used the most and which settings are used the least.
Without a question, Windows Updates were given top priority, and a new menu was built specifically for them. Manually updating Windows 11 can be accomplished as follows:
- Press the Windows key + I to open the Settings app, then click on Windows Update in the left panel.
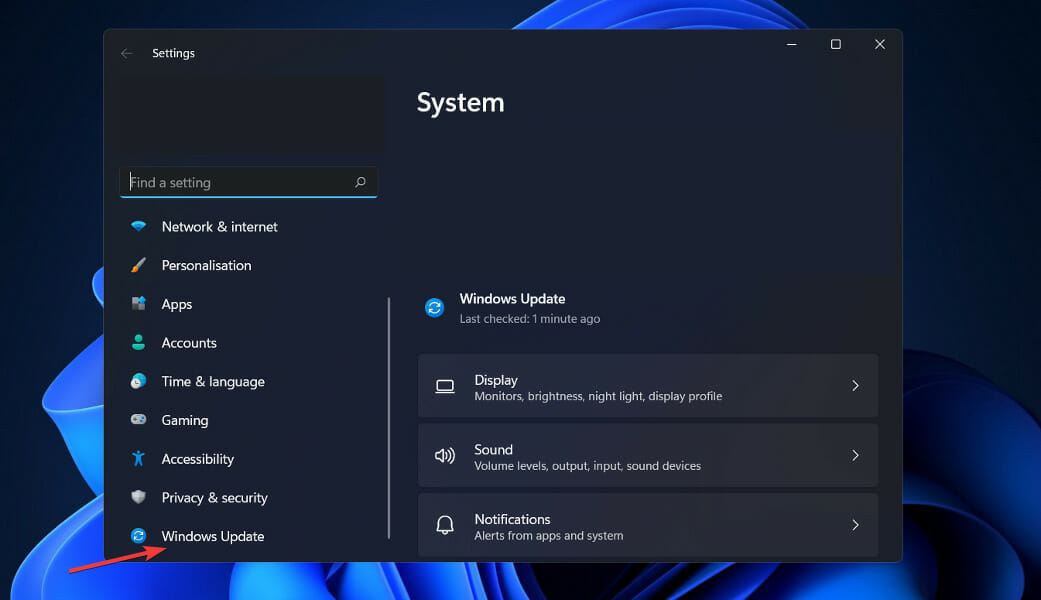
- If you have any new updates to download, click on the Install now button and wait for the process to finish, otherwise click on the Check for updates button.
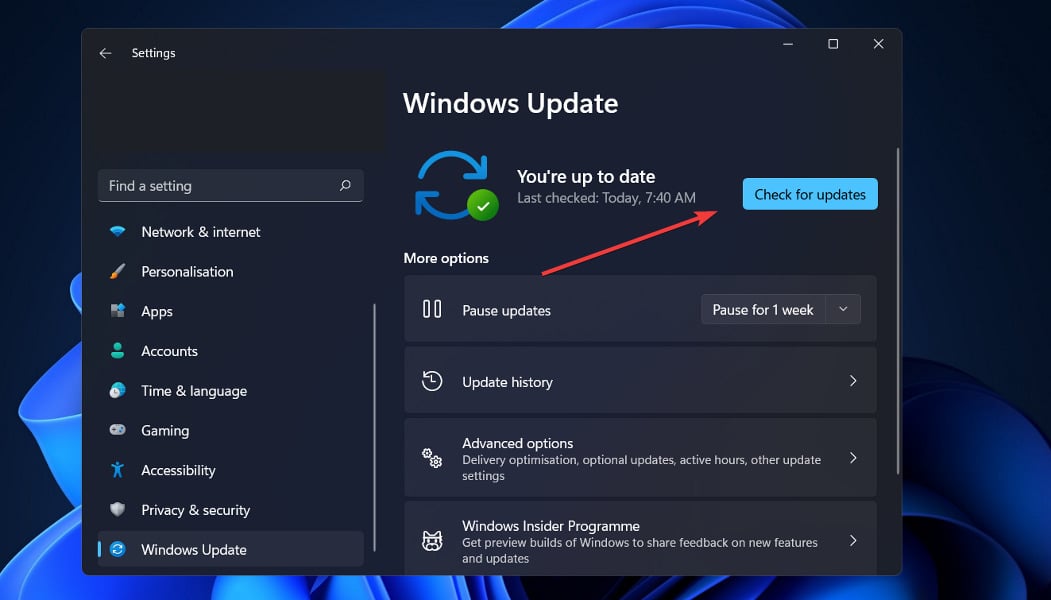
- If there are any new updates, the system will download and install them right away.
That’s all there is to it! The new OS has been installed on your computer, and we hope that our solutions assisted you in completing the upgrade without difficulty.
Please remember that Windows 11 is recently launched, and there may be a number of glitches and faults to contend with; nevertheless, we will provide solutions for these issues on our website.
If you find that you don’t have the option to upgrade to Windows 11 from the Windows Update settings, you should take a look at our linked guide on what to do if this is the case.
Still experiencing issues?
SPONSORED
If the above suggestions have not solved your problem, your computer may experience more severe Windows troubles. We suggest choosing an all-in-one solution like Fortect to fix problems efficiently. After installation, just click the View&Fix button and then press Start Repair.
![]()
![Помощник по установке Windows 11 не работает [Руководство]](https://clickthis.blog/wp-content/uploads/2022/01/installation-assis.webp)
Windows 11 официально стала доступной, и пользователи изо всех сил пытаются заполучить операционную систему Microsoft.
Хотя многие клиенты заявили об успешном обновлении Windows 11, некоторые из них столкнулись с кодом ошибки 0x8007007f при использовании помощника по установке Windows 11 для завершения обновления.
Точно так же другие сталкивались с сообщениями об ошибках, в которых говорилось, что Помощник по установке Windows 11 уже запущен или что с ним что-то пошло не так.
Вы не должны слишком беспокоиться о проблеме обновления Windows 11, потому что ошибки являются обычным явлением в больших выпусках обновления Windows. Продолжайте читать, чтобы узнать, как решить эту проблему, чтобы вы могли перейти на Windows 11.
Что нового в Windows 11?
Windows 11 представляет полностью переработанный пользовательский интерфейс, который больше похож на Mac. У него простой дизайн с закругленными краями и мягкие пастельные тона, которые дополняют его.

Наряду с панелью задач меню «Пуск», которое представляет собой значок Windows, перемещается в середину экрана. Однако, если хотите, вы можете вернуть их в исходное положение слева, как в Windows 10.
Приложения Android будут доступны через Microsoft Store (но не сразу) через Amazon Appstore, который будет доступен в Windows 11.
Возможность доступа к приложениям Android в Windows 10 ранее была доступна несколькими способами, в том числе с помощью телефона Samsung Galaxy, но это сделает его родным.)
Для клиентов Windows это то, чего они ждали годами, и это представляет собой еще один шаг к интеграции мобильных и портативных компьютеров. Эта функция в настоящее время находится в стадии бета-тестирования и доступна только участникам программы предварительной оценки Windows, которые могут ее протестировать.
Windows 11 позволит вам создавать виртуальные рабочие столы аналогично компьютерам Mac. Он позволяет переключаться между несколькими компьютерами одновременно в личных, профессиональных, образовательных или игровых целях. Это было сложнее настроить и использовать в Windows 10.
Добавление жестов и большее пространство между значками на панели задач – два способа, которыми Microsoft пытается улучшить сенсорное взаимодействие на планшетах. Теперь, когда вы используете цифровое перо для заметок или набросков, вы можете слышать и чувствовать вибрации.
Чтобы узнать больше, ознакомьтесь с нашей статьей с полным сравнением производительности Windows 10 и Windows 11 и лучшими функциями последней операционной системы.
Что мне делать, если помощник по установке Windows 11 не работает?
1. Запустите Ассистент от имени администратора.
- После загрузки Помощника по установке с официального сайта Microsoft найдите исполняемый файл программы. Скорее всего, он будет в папке « Загрузки » на вашем компьютере.
- Найдя его, щелкните исполняемый файл правой кнопкой мыши и выберите « Запуск от имени администратора» .

- Появится диалоговое окно с запросом вашего разрешения. Нажмите Да, чтобы разрешить помощнику по установке Windows 11 работать с правами администратора.
Теперь продолжайте показанные вам шаги по установке. Обязательно внимательно им следуйте.
2. Отключите антивирус.
- Щелкните стрелку раскрытия на панели задач и щелкните правой кнопкой мыши значок антивируса, затем выберите элемент управления Avast Shields, а затем Отключить на 10 минут .
![]()
- Если у вас установлены другие антивирусные программы, вы можете временно отключить приложение, выполнив те же действия, что и выше, или аналогичные шаги.
![]()
Вероятность того, что ваше антивирусное приложение было источником проблемы, высока, если проблема больше не возникает. Чтобы обезопасить свой компьютер, вам следует подумать об использовании другого антивирусного продукта, совместимого с Windows 11.
3. Запустите SFC
- Нажмите клавишу Windows +, S чтобы открыть панель поиска , затем введите cmd и щелкните правой кнопкой мыши наиболее подходящий результат, чтобы запустить его от имени администратора.

- Введите или вставьте следующую команду и нажмите Enter:
sfc /scannow

Перезагрузите компьютер, дождавшись завершения процесса (что может занять некоторое время).
4. Установите режим совместимости.
- После загрузки Помощника по установке с официального сайта Microsoft найдите исполняемый файл программы. Скорее всего, он будет в папке « Загрузки » на вашем компьютере.
- Щелкните его правой кнопкой мыши и выберите « Свойства» .

- Теперь перейдите на вкладку « Совместимость », нажмите « Запустить эту программу в режиме совместимости для:» и выберите Windows 7 .

- Нажмите « Применить», чтобы сохранить изменения, затем запустите исполняемый файл в обычном режиме и посмотрите, остается ли окно открытым достаточно долго, чтобы вы могли выполнить свои задачи.
Как проверить наличие новых обновлений в Windows 11?
Во время разработки Windows 11 разработчики уделяли особое внимание анализу данных, чтобы определить, какие настройки используются чаще всего, а какие – меньше всего.
Без сомнения, обновления Windows получили высший приоритет, и новое меню было создано специально для них. Обновление Windows 11 вручную можно выполнить следующим образом:
- Нажмите Windows клавишу +, I чтобы открыть приложение « Настройки» , затем нажмите « Центр обновления Windows» на левой панели.

- Если у вас есть новые обновления для загрузки, нажмите кнопку « Установить сейчас» и дождитесь завершения процесса, в противном случае нажмите кнопку « Проверить наличие обновлений» .

- Если появятся какие-либо новые обновления, система сразу загрузит и установит их.
Вот и все! Новая ОС установлена на вашем компьютере, и мы надеемся, что наши решения помогли вам без проблем завершить обновление.
Помните, что Windows 11 запущена недавно, и может возникнуть ряд сбоев и ошибок, с которыми нужно бороться; тем не менее, мы предоставим решения для этих проблем на нашем веб-сайте.
Дайте нам знать в разделе комментариев ниже, какое решение работает для вас лучше всего, а также скучаете ли вы по Windows 10 уже или нет. Спасибо за чтение!
There are many reasons why you might receive an error message when upgrading or installing Windows 11, but common errors can be fixed with a few steps that you can do on your own. Note: An upgrade takes your device from an older version of Windows, such as Windows 7, Windows 8.1, or Windows 10 to Windows 11.
Before searching for a specific error code, try the tips listed in General fixes. If those don’t fix your upgrade or installation problem, check the table of error codes at the bottom of this article.
General fixes
Here are some things you can try to fix upgrade and installation errors:
Unplug any nonessential hardware devices. These could include headphones, printers, scanners speakers, USB flash drives, and external hard drives.
If you’re using a laptop and it’s plugged in to a docking station, undock it.
It’s a good idea to make sure that all important updates are installed before trying to upgrade Windows. This includes updates to hardware drivers on your device.
For information and to make sure you’re up-to-date, see Windows Update: FAQ.
Use Windows Defender to protect your device during the upgrade—non-Microsoft antivirus software can sometimes cause upgrade problems. As long as you have installation media and all required activation information, you can always reinstall the software after you upgrade.
To remove an antivirus application, go to Control PanelProgramsPrograms and Features. Select the program, and then select Uninstall. Select Yes to confirm.
Outdated software can cause problems with a Windows upgrade, so removing old or nonessential applications can help.
If you plan to reinstall the application later, make sure you have the installation media and all required activation information before removing it.
To uninstall software, go to Control PanelProgramsPrograms and Features. Select the program, and then select Uninstall. Select Yes to confirm.
To upgrade to Windows 11, you need enough space on your hard drive for the installation to take place.
To view how much hard drive space is available on your computer, select File Explorer on the taskbar (known as Windows Explorer in Windows 7) or press Windows logo key + E.
Then select Computer or This PC and look under Hard Disk Drives or under Devices and drives. If there are multiple drives listed, the system drive is the drive that includes a Microsoft Windows logo above the drive icon. You’ll see the amount of available space under the drive.
If it looks like your drive is running low on space, see Tips to free up drive space on your PC.
0xC1900101 Errors
An error that begins with 0xC1900101 is usually a driver error. If you see any of these error codes, try the following steps first to fix the problem. If these steps don’t work, see Resolve Windows upgrade errors for more detailed technical info.
-
0xC1900101 — 0x2000c
-
0xC1900101 — 0x20017
-
0xC1900101 — 0x30018
-
0xC1900101 — 0x3000D
-
0xC1900101 — 0x4000D
-
0xC1900101 — 0x40017
-
Make sure that your device has enough space. Your device requires at least 16 GB of free space to upgrade a 32-bit OS, or 20 GB for a 64-bit OS. For more info, see Free up drive space in Windows.
-
Run Windows Update a few times. Download and install any available updates in Windows Update, including software updates, hardware updates, and some third-party drivers. Use the Windows Update Troubleshooter to fix Windows 11 Update errors.
-
Check third-party drivers and download any updates. You can find third-party drivers and installation instructions for any hardware you’ve added to your device on the manufacturer’s website.
-
Unplug extra hardware. Remove all external storage devices and drives, docks, and other hardware you might have plugged into your device that isn’t needed for basic functionality.
-
Check Device Manager for errors. In the search box on the taskbar, type device manager. Choose Device Manager from the results. In the window that pops up, look for any device with a yellow exclamation mark beside it (you may have to select each category to switch to the list of devices). Press and hold (or right-click) the device name and select either Update Driver Software or Uninstall to correct the errors.
-
Remove third-party security software. Make sure you know how to reinstall your programs and that any necessary product keys are on hand. Windows Defender will help protect your device in the meantime.
-
Repair hard-drive errors. In the search box on the taskbar, type command prompt. Choose Command Prompt from the list of results. In the window that pops up, type chkdsk/f C: and press the Enter key. Repairs automatically start on your hard drive, and you’ll be asked to restart your device.
Note: You must have administrator permissions on your device to do this.
-
Do a clean restart into Windows. See How to perform a clean boot in Windows.
-
Restore and repair system files. In the search box on the taskbar, type command prompt. Choose Command Prompt from the list of results. In the window that pops up, type DISM.exe /Online /Cleanup-image /Restorehealth and press the Enter key. (Learn to repair a Windows image)
Note: You must have administrator permissions on your device to do this.
Other Common Errors
The following table lists the most common upgrade and installation errors and some things you can try to fix them. If you continue having problems upgrading or installing Windows, contact Microsoft support.
|
Error |
What it means and how to fix it |
|---|---|
|
0xc1900223 |
This indicates that there was a problem downloading and installing the selected update. Windows Update will try again later and there is nothing you need to do at this time. |
|
0xC1900208 – 0x4000C |
This could indicate that an incompatible app installed on your PC is blocking the upgrade process from completing. Check to make sure that any incompatible apps are uninstalled and then try upgrading again. |
|
0xC1900107 |
A cleanup operation from a previous installation attempt is still pending, and a system restart is required to continue the upgrade. Restart the device and run setup again. If restarting device does not resolve the issue, then use the Disk Cleanup utility and clean up the temporary files and the System files. For more information, see Disk cleanup in Windows. |
|
0x80073712 |
A file needed by Windows Update is likely damaged or missing. Try repairing your system files: In the search box on the taskbar, type command prompt. Choose Command Prompt from the list of results. In the window that appears, type DISM.exe /Online /Cleanup-image /Restorehealth and press the Enter key. |
|
0xC1900200 – 0x20008 0xC1900202 – 0x20008 |
This may signify that your PC doesn’t meet the minimum requirements to download or install the upgrade to Windows 11. Learn more about the minimum requirements for Windows 11. |
|
0x800F0923 |
This might indicate that a driver or other software on your PC isn’t compatible with the upgrade to Windows 11. For info about how to fix this problem, contact Microsoft support. |
|
0x80200056 |
This could mean that the upgrade process was interrupted because you accidentally restarted your PC or signed out of your PC. Try upgrading again and make sure your PC is plugged in and stays turned on. |
|
0x800F0922 |
This error might mean that your PC couldn’t connect to the Windows Update servers. If you’re using a VPN connection to connect to a work network, disconnect from the network and turn off the VPN software (if applicable) and try upgrading again. The error could also mean there isn’t enough free space in the System Reserved partition. You might be able to fix this problem by using third-party software to increase the size of the System Reserved partition. |
|
Error: We couldn’t complete the updates. Undoing changes. Don’t turn off your computer. Error: Failure configuring Windows Updates. Reverting changes. |
These are generic errors that might appear any time a Windows update fails. You’ll need to determine the specific error code to investigate how to best resolve this problem. You can find the error code for the failed update by viewing your update history. Look for the update that wasn’t installed, note the error code, and then contact Microsoft support. To view your update history in Windows 11:
|
|
Error: The update isn’t applicable to your computer. |
This error might mean that your PC doesn’t have the required updates installed. Check to make sure that all important updates are installed on your PC before you try upgrading. |
|
0x80070070 – 0x50011 0x80070070 – 0x50012 0x80070070 – 0x60000 |
This likely indicates that your PC doesn’t have enough space available to install the upgrade. Free some space on the drive and try again. Get tips for freeing up drive space |
|
0x80300024 |
The specified disk operation is not supported by the target disk, partition, or volume. Make sure your machine meets the minimum requirements to install Windows. |
|
0x80070002 0x20009 |
The system cannot find the file specified. If you have a disk or disks where you are not installing Windows 11 on, remove those disks. |
|
0xC1900101 0x20017 0xC1900101 0x30017 |
A driver has caused a problem. Disable or remove all 3rd party antivirus or antispyware from your system. Disconnect all peripheral devices that are connected to the system, except for the mouse, keyboard and display. Contact your hardware vendor to obtain updated device drivers. |
|
0x8007042B 0x4000D |
Windows Setup terminated unexpectedly due to another process running in the background. When you start Windows by using a normal startup, several applications and services start automatically, and then run in the background. These programs include basic system processes, antivirus software, system utility applications, and other software that has been previously installed. These applications and services can cause interference when you attempt to upgrade to the latest version of Windows 11. To help you determine whether a background program is interfering with the upgrade, a «clean boot» may be needed. See How to perform a clean boot in Windows. |
|
0x800700B7 0x2000a |
Windows Setup terminated unexpectedly due to another process running in the background. Uninstall any antivirus or antispyware software and update again. |
There are many reasons why you might receive an error message when upgrading or installing Windows 10, but common errors can be fixed with a few steps that you can do on your own. Note: An upgrade takes your device from an older version of Windows, such as Windows 7 or Windows 8.1, to Windows 10.
Before searching for a specific error code, try the tips listed in General fixes. If those don’t fix your upgrade or installation problem, check the table of error codes at the bottom of this article.
General fixes
Here are some things you can try to fix upgrade and installation errors:
Unplug any nonessential hardware devices. These could include headphones, printers, scanners speakers, USB flash drives, and external hard drives.
If you’re using a laptop and it’s plugged in to a docking station, undock it.
It’s a good idea to make sure that all important updates are installed before trying to upgrade Windows. This includes updates to hardware drivers on your device.
For information and to make sure you’re up-to-date, see Windows Update: FAQ.
Use Windows Defender to protect your device during the upgrade—non-Microsoft antivirus software can sometimes cause upgrade problems. As long as you have installation media and all required activation information, you can always reinstall the software after you upgrade.
To remove an antivirus application, go to Control PanelProgramsPrograms and Features. Select the program, and then select Uninstall. Select Yes to confirm.
Outdated software can cause problems with a Windows upgrade, so removing old or nonessential applications can help.
If you plan to reinstall the application later, make sure you have the installation media and all required activation information before removing it.
To uninstall software, go to Control PanelProgramsPrograms and Features. Select the program, and then select Uninstall. Select Yes to confirm.
To upgrade to Windows 10, you need enough space on your hard drive for the installation to take place.
To view how much hard drive space is available on your computer, select the Start button, then in the search box on the taskbar, type File Explorer (known as Windows Explorer in Windows 7).
Then select Computer or This PC and look under Hard Disk Drives or under Devices and drives. If there are multiple drives listed, the system drive is the drive that includes a Microsoft Windows logo above the drive icon. You’ll see the amount of available space under the drive.
If it looks like your drive is running low on space, see Tips to free up drive space on your PC.
0xC1900101 Errors
An error that begins with 0xC1900101 is usually a driver error. If you see any of these error codes, try the following steps first to fix the problem. If these steps don’t work, see Resolve Windows upgrade errors for more detailed technical info.
-
0xC1900101 — 0x2000c
-
0xC1900101 — 0x20017
-
0xC1900101 — 0x30018
-
0xC1900101 — 0x3000D
-
0xC1900101 — 0x4000D
-
0xC1900101 — 0x40017
-
Make sure that your device has enough space. Your device requires at least 16 GB of free space to upgrade a 32-bit OS, or 20 GB for a 64-bit OS. For more info, see Free up drive space in Windows.
-
Run Windows Update a few times. Download and install any available updates in Windows Update, including software updates, hardware updates, and some third-party drivers. Use the Windows Update Troubleshooter to fix Windows Update errors.
-
Check third-party drivers and download any updates. You can find third-party drivers and installation instructions for any hardware you’ve added to your device on the manufacturer’s website.
-
Unplug extra hardware. Remove all external storage devices and drives, docks, and other hardware you might have plugged into your device that isn’t needed for basic functionality.
-
Check Device Manager for errors. Select the Start button, then in the search box on the taskbar, type device manager. Choose Device Manager from the results. In the window that pops up, look for any device with a yellow exclamation mark beside it (you may have to select each category to switch to the list of devices). Press and hold (or right-click) the device name and select either Update Driver Software or Uninstall to correct the errors.
-
Remove third-party security software. Make sure you know how to reinstall your programs and that any necessary product keys are on hand. Windows Defender will help protect your device in the meantime.
-
Repair hard-drive errors. Select the Start button, then in the search box on the taskbar, type command prompt. Choose Command Prompt from the list of results. In the window that pops up, type chkdsk/f C: and press the Enter key. Repairs automatically start on your hard drive, and you’ll be asked to restart your device.
Note: You must have administrator permissions on your device to do this.
-
Do a clean restart into Windows.
Learn how. -
Restore and repair system files. Select the Start button, then in the search box on the taskbar, type command prompt. Choose Command Prompt from the list of results. In the window that pops up, type DISM.exe /Online /Cleanup-image /Restorehealth and press the Enter key. (Learn to repair a Windows image)
Note: You must have administrator permissions on your device to do this.
Other Common Errors
The following table lists the most common upgrade and installation errors and some things you can try to fix them. If you continue having problems upgrading or installing Windows 10, contact Microsoft support.
|
Error |
What it means and how to fix it |
|---|---|
|
0xc1900223 |
This indicates that there was a problem downloading and installing the selected update. Windows Update will try again later and there is nothing you need to do at this time. |
|
0xC1900208 – 0x4000C |
This could indicate that an incompatible app installed on your PC is blocking the upgrade process from completing. Check to make sure that any incompatible apps are uninstalled and then try upgrading again. |
|
0xC1900107 |
A cleanup operation from a previous installation attempt is still pending, and a system restart is required to continue the upgrade. Restart the device and run setup again. If restarting device does not resolve the issue, then use the Disk Cleanup utility and clean up the temporary files and the System files. For more information, see Disk cleanup in Windows. |
|
0x80073712 |
A file needed by Windows Update is likely damaged or missing. Try repairing your system files: Select the Start button and type command prompt in the search box on the taskbar. Choose Command Prompt from the list of results. In the window that appears, type DISM.exe /Online /Cleanup-image /Restorehealth and press the Enter key. |
|
0xC1900200 – 0x20008 0xC1900202 – 0x20008 |
This may signify that your PC doesn’t meet the minimum requirements to download or install the upgrade to Windows 10. Learn more about the minimum requirements for Windows |
|
0x800F0923 |
This might indicate that a driver or other software on your PC isn’t compatible with the upgrade to Windows 10. For info about how to fix this problem, contact Microsoft support. |
|
0x80200056 |
This could mean that the upgrade process was interrupted because you accidentally restarted your PC or signed out of your PC. Try upgrading again and make sure your PC is plugged in and stays turned on. |
|
0x800F0922 |
This error might mean that your PC couldn’t connect to the Windows Update servers. If you’re using a VPN connection to connect to a work network, disconnect from the network and turn off the VPN software (if applicable) and try upgrading again. The error could also mean there isn’t enough free space in the System Reserved partition. You might be able to fix this problem by using third-party software to increase the size of the System Reserved partition. |
|
Error: We couldn’t complete the updates. Undoing changes. Don’t turn off your computer. Error: Failure configuring Windows Updates. Reverting changes. |
These are generic errors that might appear any time a Windows update fails. You’ll need to determine the specific error code to investigate how to best resolve this problem. You can find the error code for the failed update by viewing your update history. Look for the update that wasn’t installed, note the error code, and then contact Microsoft support. To view your update history in Windows 8.1:
To view your update history in Windows 7:
|
|
Error: The update isn’t applicable to your computer. |
This error might mean that your PC doesn’t have the required updates installed. Check to make sure that all important updates are installed on your PC before you try upgrading. |
|
0x80070070 – 0x50011 0x80070070 – 0x50012 0x80070070 – 0x60000 |
This likely indicates that your PC doesn’t have enough space available to install the upgrade. Free some space on the drive and try again. Get tips for freeing up drive space |
|
0x80300024 |
The specified disk operation is not supported by the target disk, partition, or volume. Make sure your machine meets the minimum requirements to install Windows 10. |
|
0x80070002 0x20009 |
The system cannot find the file specified. If you have a disk or disks where you are not installing Windows 10 on, remove those disks. |
|
0xC1900101 0x20017 0xC1900101 0x30017 |
A driver has caused a problem. Disable or remove all 3rd party antivirus or antispyware from your system. Disconnect all peripheral devices that are connected to the system, except for the mouse, keyboard and display. Contact your hardware vendor to obtain updated device drivers. |
|
0x8007042B 0x4000D |
Windows Setup terminated unexpectedly due to another process running in the background. When you start Windows by using a normal startup, several applications and services start automatically, and then run in the background. These programs include basic system processes, antivirus software, system utility applications, and other software that has been previously installed. These applications and services can cause interference when you attempt to upgrade to the latest version of Windows 10. To help you determine whether a background program is interfering with the upgrade, a «clean boot» may be needed. See How to perform a clean boot in Windows. |
|
0x800700B7 0x2000a |
Windows Setup terminated unexpectedly due to another process running in the background. Uninstall any antivirus or antispyware software and update again. |
 button. In the search box, type Update, and then, in the list of results, Select Windows Update > View update history.
Возможны три причины её возникновения
После того, как Microsoft опубликовала ISO-файл Windows 11, многие пользователи, не рисковавшие использовать бета-версии, наконец-то решились на установку финальной. Сделать это можно разными способами, но один из наиболее удобных — при помощи фирменной утилиты-ассистента (той самой, которая позволяет избежать проверки на совместимость аппаратного обеспечения и установить Windows 11 на любой компьютер). Однако, как оказалось, этот способ установки нередко сопряжён с ошибками.
Одна из них возникает особенно часто, о чём свидетельствуют сообщения на крупнейшем американском форуме Reddit. Ошибка имеет обозначение 0x8007007f. С чем она может быть связана?
Основных причин её возникновения, как пишет источник, три: разрешение со стороны системы контроля учётных записей пользователей (UAC), нехватка свободного места на накопителе и драйверы. Запуск ассистента установки Windows 11 от имени Администратора в большинстве случаев решает проблему. Если возникновение ошибки обусловлено несовместимостью с драйверами, то можно попробовать их обновить. Если же ошибка продолжит возникать, то можно попробовать установку Windows 11 без ассистента — смонтировать ISO-образ в системе и запустить setup.exe напрямую.
6 октября 2021 в 13:13
| Теги: Microsoft, Windows
| Источник: Windowslatest
Время на прочтение
2 мин
Количество просмотров 36K
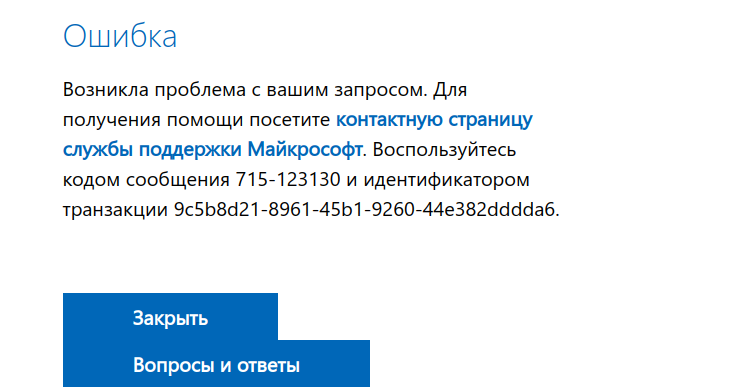
 Ошибка при попытке скачать Windows 11 Installation Assistant и скачанный файл через VPN.
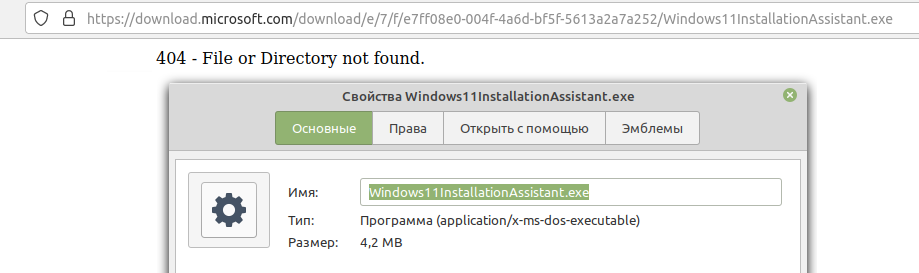
Проблема со скачиванием программ и продуктов с сайта Microsoft в РФ продолжает быть актуальной. Пользователи из РФ без VPN не могут скачать утилиты (MediaCreationTool, Windows 11 Installation Assistant), дистрибутивы Office, серверные продукты и ISO-образы Windows 10 и Windows 11 с сайта Microsoft. Разработчик до сих пор не пояснил, с чем связана эта проблема. Компания не отвечает пользователям на обращения в техподдержку по этой ситуации.
В процессе попытки скачивания возникают ошибка: «Возникла проблема с вашим запросом» или «404 — File or Directory not found». Примечательно, что при заходе через VPN скачивание образов новых ОС и утилит происходит нормально.
Также Microsoft заблокировала установку обновлений для инсайдеров Windows 11 в России. Для установки Windows 11 Insider Preview Build 25145 необходимо использовать VPN.
Рабочая ссылка на скачивание MediaCreationTool.
Совет от пользователя Хабра: «заблокировано только получение ссылки. Через VPN получаем ссылку, а затем уже можно качать напрямую».
Скрипт от пользователя Хабра по выкачиванию Office 2019/2021/365 (все равно нужен VPN) с обходом блокировки по региону.
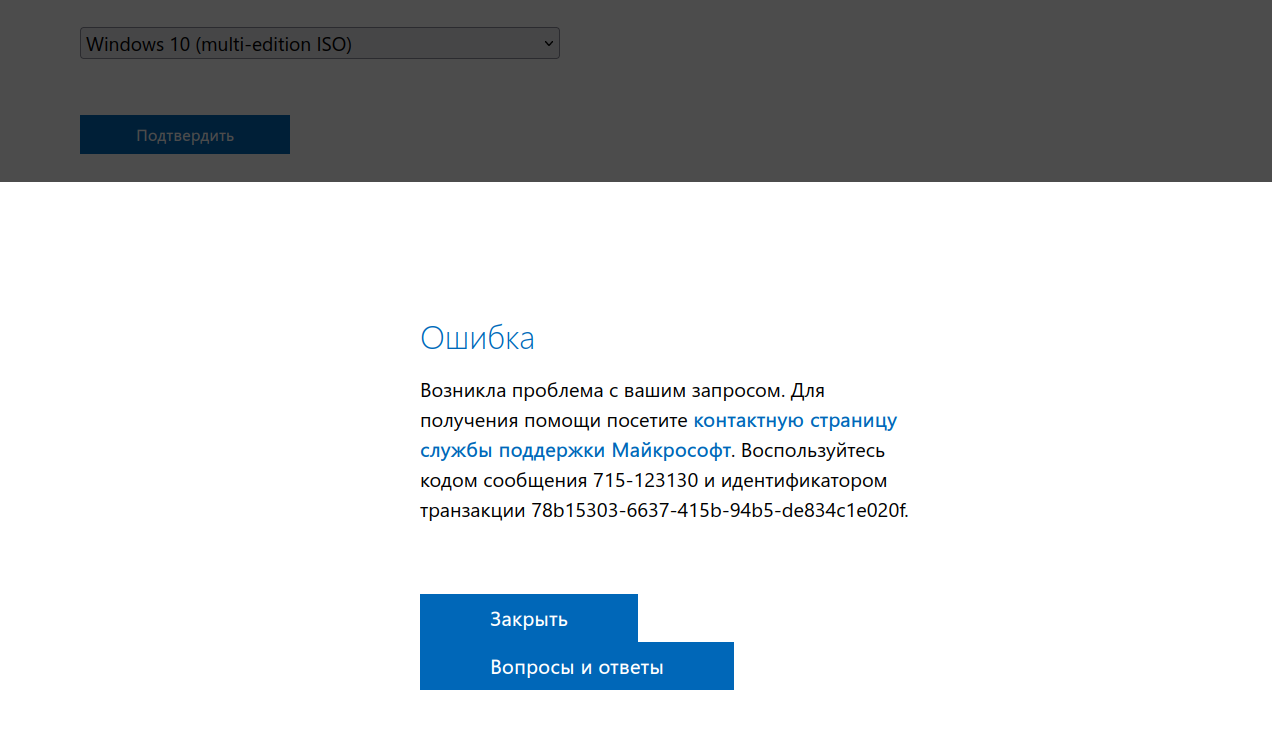 Ошибка при попытке скачать ISO-образ Windows 10.
 Ошибка при попытке скачать ISO-образ Windows 11.
Если вы столкнулись еще с проблемами на сайте Microsoft по скачиванию продуктов или нашли способ, как без VPN их скачать (кроме ссылок на сторонние ресурсы) — просьба написать в комментариях для обновления публикации.
С чем связана эта проблема — непонятно. Microsoft ранее обещала, что продолжит выполнять все существующие договорные обязательства с российскими клиентами, пока действует приостановка новых продаж. Компания не объявляла, что будет блокировать доступ к своему сайту и продуктам
8 июня Microsoft сообщила, что компания сокращает операционную деятельность в России.
В начале марта Microsoft приостанавила продажу товаров, ПО, сервисов и предоставление любых новых услуг в России. Тем не менее компания продолжила поддерживать существующих клиентов и сохранила в стране офисы.
В марте Dell и Lenovo закрыли возможность пользователям из РФ скачать драйвера без VPN.
В апреле Intel приостановила свою деятельность в России. Также для всех пользователей из РФ перестал работать сайт Intel. Нельзя скачать драйвера или документацию. Везде стоит заглушка о прекращении работы. Теперь для скачивания информации нужно использовать VPN. Портал ark.intel.com работает, но с него многие ссылки ведут на заглушку.