Download Windows Repair & Speedup Tool to fix errors automatically
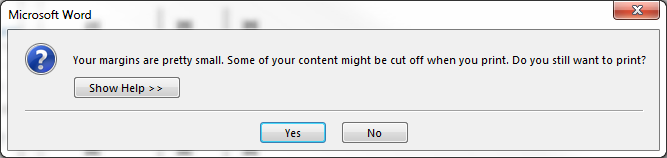
If you’re encountering the printing error message Your margins are pretty small when you try printing a document from Word or Excel on your Windows 11/10 computer, then this post is intended for you. When you encounter this issue, you’ll receive the following full error message;
Your margins are pretty small. Some of your content might be cut off when you print. Do you still want to print?

For most applications, like some documents, this is not a problem. However, if you are creating a document such as a brochure or other marketing material for your business, the pre-programmed margins may not suit your needs. For some printers, you can expand the print area by adjusting the margins in the software’s print dialog box. However, without a specialized printer, there may still be a small portion of the page margins that you cannot access.
If you’re faced with this issue, you can try our recommended solutions below in no particular order and see if that helps to resolve the issue.
- Run Printer Troubleshooter
- Use the maximum printing area
- Change the Page size to A4
- Export the Word document to PDF and print
Let’s take a look at the description of the process involved concerning each of the listed solutions.
1] Run Printer Troubleshooter
This solution requires you to run the inbuilt Printer Troubleshooter in Windows and see if the issue will be resolved. If not, continue with the next solution.
2] Use the maximum printing area

The main reason behind this issue is that you are trying to print a document exceeding the minimum limit of margin, which varies printer to printer. To automatically fix it, do the following:
- Open the Word document you are having the issue with.
- When the document has opened, click on the Layout on the menu-bar.
- Now, click on the Margins.
- Now, on the bottom-most portion of the drop-down window, click on the Custom Margins.
- In the Page Setup window, in the Margins section, set all the margins to 0.
- Click OK.
As soon as you click OK, a prompt will appear referring to the minimum margin requirements.
- Click the Fix button.
Now, in the Margins section, you will notice the top and bottom margins have automatically set to the minimum value.
- Click OK.
You can now print the document without any issues.
3] Change the Page size to A4

Do the following:
- Press the Windows key and type Printers.
- Click on the Printers & Scanners from the top of the search result.
- On the right-hand side of the Settings window, click on the printer device you are currently using.
- Now, click on Manage.
- Next, click on the Printer Properties to access the printer settings.
- In the Printer Properties window, go to the Advanced tab.
- In the Advanced tab, click on the Printing Defaults.
- Now, go to the Layout tab.
- Click Advanced.
- Now, click on the drop-down beside Paper Size.
- Select A4 from the list of the available sizes.
- Click OK to save changes.
Exit the Setting window and try printing and see if the issue persists. If so, continue with the next solution.
4] Export the Word document to PDF and print
This solution entails that you convert the Word document to PDF and the print. This should resolve the issue.
Hope this helps!
Obinna has completed B.Tech in Information & Communication Technology. He has worked as a System Support Engineer, primarily on User Endpoint Administration, as well as a Technical Analyst, primarily on Server/System Administration. He also has experience as a Network and Communications Officer. He has been a Windows Insider MVP (2020) and currently owns and runs a Computer Clinic.
Обновлено Июнь 2023: перестаньте получать сообщения об ошибках и замедлите работу вашей системы с помощью нашего инструмента оптимизации. Получить сейчас в эту ссылку
- Скачайте и установите инструмент для ремонта здесь.
- Пусть он просканирует ваш компьютер.
- Затем инструмент почини свой компьютер.
Непечатаемая область, используемая Word, определяется драйвером принтера, а не самим Word. Word получает информацию от драйвера принтера. Если вы не можете переопределить непечатаемую область в настройках свойств принтера, это сообщение может быть невозможно обойти.
Чтобы убрать предупреждение, вы должны печатать с минимальными полями, указанными вашим принтером (это зависит от вашего принтера, но некоторые источники определяют 0.17 дюйма как минимум «по умолчанию»).
Вы всегда можете игнорировать всплывающее окно, так как это всего лишь предупреждение.
Как мне убрать ошибку принтера «У вас очень маленькие поля»?
Переопределить непечатную область

Прежде всего, обратите внимание, что принтер определяет поле для печати, но Word предупреждает вас о превышении поля. Word просто получает информацию от драйвера принтера, поэтому рекомендуется переопределить непечатаемую область в настройках свойств принтера.
Чтобы окончательно удалить предупреждение, вы должны печатать с минимальными полями, указанными вашим принтером. Это значение варьируется в зависимости от модели принтера, но 0.17 дюйма часто является минимальным значением по умолчанию.
Обновление за июнь 2023 г .:
Теперь вы можете предотвратить проблемы с ПК с помощью этого инструмента, например, защитить вас от потери файлов и вредоносных программ. Кроме того, это отличный способ оптимизировать ваш компьютер для достижения максимальной производительности. Программа с легкостью исправляет типичные ошибки, которые могут возникнуть в системах Windows — нет необходимости часами искать и устранять неполадки, если у вас под рукой есть идеальное решение:
- Шаг 1: Скачать PC Repair & Optimizer Tool (Windows 10, 8, 7, XP, Vista — Microsoft Gold Certified).
- Шаг 2: Нажмите «Начать сканирование”, Чтобы найти проблемы реестра Windows, которые могут вызывать проблемы с ПК.
- Шаг 3: Нажмите «Починить все», Чтобы исправить все проблемы.

Использование автоматической корректировки полей
Если вы не знаете минимальное значение маржи для вашего принтера, позвольте программе сделать это за вас. Просто нажмите «Установить», и вы заметите, что текст в документе перемещается. Как указали другие пользователи, они находят настройки очень маленькими, едва заметными.
Однако, если вам не нравится результат, вы можете отменить изменение или просто закрыть файл, не сохраняя изменения.

Используйте меньшие поля
Иногда вам может понадобиться способ уменьшить количество страниц, напечатанных в вашем документе. Один из самых простых способов — использовать меньшие поля. Просто перейдите на вкладку «Макет», нажмите «Поля» и выберите «Узкий» (вы также можете выбрать «Пользовательские поля» для еще меньших полей). Помните, что использование очень маленьких полей может привести к тому, что часть текста будет обрезана вашим принтером.
Мы нашли это особенно полезным, если у вас есть многостраничный документ с несколькими предложениями на последней странице. При сужении полей текст будет помещен вверху, что обычно удалит лишнюю страницу.
Заключение
У принтеров часто есть заранее запрограммированные поля, которые ограничивают эффективную область печати документа. Для большинства приложений, как и некоторых документов, это не проблема. Однако, если вы создаете такой документ, как брошюра или другие маркетинговые материалы для своего бизнеса, заранее запрограммированные поля могут не соответствовать вашим потребностям. Для некоторых принтеров вы можете расширить область печати, отрегулировав поля в диалоговом окне печати программного обеспечения. Однако без специализированного принтер, может быть небольшая часть полей страницы, к которым вы не можете получить доступ.
https://h30434.www3.hp.com/t5/Printers-Archive-Read-Only/How-to-Remove-quot-Your-Margins-Are-Pretty-Small-quot/td-p/5656757
Совет экспертов: Этот инструмент восстановления сканирует репозитории и заменяет поврежденные или отсутствующие файлы, если ни один из этих методов не сработал. Это хорошо работает в большинстве случаев, когда проблема связана с повреждением системы. Этот инструмент также оптимизирует вашу систему, чтобы максимизировать производительность. Его можно скачать по Щелчок Здесь

CCNA, веб-разработчик, ПК для устранения неполадок
Я компьютерный энтузиаст и практикующий ИТ-специалист. У меня за плечами многолетний опыт работы в области компьютерного программирования, устранения неисправностей и ремонта оборудования. Я специализируюсь на веб-разработке и дизайне баз данных. У меня также есть сертификат CCNA для проектирования сетей и устранения неполадок.
Сообщение Просмотров: 857
by Radu Tyrsina
Radu Tyrsina has been a Windows fan ever since he got his first PC, a Pentium III (a monster at that time). For most of the kids of… read more
Updated on March 2, 2020
XINSTALL BY CLICKING THE DOWNLOAD FILE
This software will simplify the process by both searching and updating your drivers to prevent various malfunctions and enhance your PC stability. Check all your drivers now in 3 easy steps:
- Download Outbyte Driver Updater.
- Launch it on your PC to find all the problematic drivers.
- Afterward, Click Update & Apply Selected to get the latest driver versions.
- OutByte Driver Updater has been downloaded by 0 readers this month.
One big issue that arises while trying to print is getting this error:
Your margins are pretty small, some of the content you print may be cut off. Are you sure you want to print?
This is an extremely annoying error message since it repeatedly appears. Plus, a good number of users describe starting a large print job and walking away only to discover that it never started because they didn’t dismiss the warning.
If you too are frequently encountering this error message, follow the steps listed in this detailed guide and you will get rid of it in no time.
How can I remove Your margins are pretty small error?
1. Redefine the unprintable area

First of all, do note that the printer defines the printable margin area, but it’s Word that warns you of the margin crossing. Word simply gets the information from the printer driver, so it’s wise to redefine the unprintable area in the printer’s Property setting.
To remove the warning for good, you will need to print with at least the minimum margins specified from your printer. The value varies between different printer models, but 0.17 inches is often the default minimum.
2. Use the automatic adjustment of the margins

In case of not knowing your printer’s minimum margins value, let the program take care of this task for you. You only need to click Fix and you’ll further notice the position of text shifting on the document. As stated by other users, they find the adjustments as being very small, barely noticeable.
However, if you don’t like the result, feel free to use to undo the change, or simply close the file without saving that change.
3. Set Printable area to Maximum

Another workaround is to enter into Printer properties, under the Advanced tab, and select the option that says Compatibility. Here you’ll see a selection for Printable area. Don’t hesitate to change it from Standard to Maximum.
4. Change file size to A4

- Conduct a search by typing Control Panel into the search box and typing Enter.
- Click on Devices and Printers. You should get a series of icons identifying the printers for which you have installed drivers, along with the default printer.
- Select Printing Preferences which houses a wealth of settings for print quality, layout, profile presets, and more.
- While here, just change the original size to A4.
- Finally, click on Apply.
When you are still getting this annoying message, a simple readjustment of the file size could become effective and nothing will cut off again.
5. Save the file as PDF file

For large documents, i.e. mail merges, you may try to save the file as a PDF, then print it from Adobe Reader. Printing to a PDF is a bit of a hassle indeed, but this helps you clear up all previous issues.
6. Configure Alignment and Wrapping options

If you’re doing a label mail merge, we have another quick tip for you. All you have to do is to change the table’s wrap format to Around, center-aligned, then make the left and right margins equal-sized.
To make it happen, enter into Table Tools > Layout >Properties>Table, and you’ll find there the table Alignment & Wrapping options.
Increasing the paper size a little is another trick described as possibly working while trying to use a different driver for the printer is also recommended. Start with the most recent one provided by the manufacturer. If this makes no difference, go further back to an older one.
That said, getting rid of the Your margins are pretty small printer error should be quite easy and can be done in just a few minutes. If all these solutions are inefficient, seek professional help from the printer manufacturer.
READ NEXT:
- FIX: Printer cannot be contacted over the network
- My printer doesn’t pull the paper [FIX]
- Printer is blinking orange: Here’s a quick fix for that
![]()
Download PC Repair Tool to quickly find & fix Windows errors automatically
If you’re encountering the printing error message Your margins are pretty small when you try printing a document from Word or Excel on your Windows 11/10 computer, then this post is intended for you. When you encounter this issue, you’ll receive the following full error message;
Your margins are pretty small. Some of your content might be cut off when you print. Do you still want to print?

For most applications, like some documents, this is not a problem. However, if you are creating a document such as a brochure or other marketing material for your business, the pre-programmed margins may not suit your needs. For some printers, you can expand the print area by adjusting the margins in the software’s print dialog box. However, without a specialized printer, there may still be a small portion of the page margins that you cannot access.
If you’re faced with this issue, you can try our recommended solutions below in no particular order and see if that helps to resolve the issue.
- Run Printer Troubleshooter
- Use the maximum printing area
- Change the Page size to A4
- Export the Word document to PDF and print
Let’s take a look at the description of the process involved concerning each of the listed solutions.
1] Run Printer Troubleshooter
This solution requires you to run the inbuilt Printer Troubleshooter in Windows and see if the issue will be resolved. If not, continue with the next solution.
2] Use the maximum printing area
The main reason behind this issue is that you are trying to print a document exceeding the minimum limit of margin, which varies printer to printer. To automatically fix it, do the following:
- Open the Word document you are having the issue with.
- When the document has opened, click on the Layout on the menu-bar.
- Now, click on the Margins.
- Now, on the bottom-most portion of the drop-down window, click on the Custom Margins.
- In the Page Setup window, in the Margins section, set all the margins to 0.
- Click OK.
As soon as you click OK, a prompt will appear referring to the minimum margin requirements.
- Click the Fix button.
Now, in the Margins section, you will notice the top and bottom margins have automatically set to the minimum value.
- Click OK.
You can now print the document without any issues.
3] Change the Page size to A4
Do the following:
- Press the Windows key and type Printers.
- Click on the Printers & Scanners from the top of the search result.
- On the right-hand side of the Settings window, click on the printer device you are currently using.
- Now, click on Manage.
- Next, click on the Printer Properties to access the printer settings.
- In the Printer Properties window, go to the Advanced tab.
- In the Advanced tab, click on the Printing Defaults.
- Now, go to the Layout tab.
- Click Advanced.
- Now, click on the drop-down beside Paper Size.
- Select A4 from the list of the available sizes.
- Click OK to save changes.
Exit the Setting window and try printing and see if the issue persists. If so, continue with the next solution.
4] Export the Word document to PDF and print
This solution entails that you convert the Word document to PDF and the print. This should resolve the issue.
Hope this helps!

Obinna Onwusobalu has studied Information & Communication Technology and is a keen follower of the Windows ecosystem. He has been a Windows Insider MVP (2020). He runs a computer software clinic.
Download PC Repair Tool to quickly find & fix Windows errors automatically
If you’re encountering the printing error message Your margins are pretty small when you try printing a document from Word or Excel on your Windows 11/10 computer, then this post is intended for you. When you encounter this issue, you’ll receive the following full error message;
Your margins are pretty small. Some of your content might be cut off when you print. Do you still want to print?
For most applications, like some documents, this is not a problem. However, if you are creating a document such as a brochure or other marketing material for your business, the pre-programmed margins may not suit your needs. For some printers, you can expand the print area by adjusting the margins in the software’s print dialog box. However, without a specialized printer, there may still be a small portion of the page margins that you cannot access.
If you’re faced with this issue, you can try our recommended solutions below in no particular order and see if that helps to resolve the issue.
- Run Printer Troubleshooter
- Use the maximum printing area
- Change the Page size to A4
- Export the Word document to PDF and print
Let’s take a look at the description of the process involved concerning each of the listed solutions.
1] Run Printer Troubleshooter
This solution requires you to run the inbuilt Printer Troubleshooter in Windows and see if the issue will be resolved. If not, continue with the next solution.
2] Use the maximum printing area
The main reason behind this issue is that you are trying to print a document exceeding the minimum limit of margin, which varies printer to printer. To automatically fix it, do the following:
- Open the Word document you are having the issue with.
- When the document has opened, click on the Layout on the menu-bar.
- Now, click on the Margins.
- Now, on the bottom-most portion of the drop-down window, click on the Custom Margins.
- In the Page Setup window, in the Margins section, set all the margins to 0.
- Click OK.
As soon as you click OK, a prompt will appear referring to the minimum margin requirements.
- Click the Fix button.
Now, in the Margins section, you will notice the top and bottom margins have automatically set to the minimum value.
- Click OK.
You can now print the document without any issues.
3] Change the Page size to A4
Do the following:
- Press the Windows key and type Printers.
- Click on the Printers & Scanners from the top of the search result.
- On the right-hand side of the Settings window, click on the printer device you are currently using.
- Now, click on Manage.
- Next, click on the Printer Properties to access the printer settings.
- In the Printer Properties window, go to the Advanced tab.
- In the Advanced tab, click on the Printing Defaults.
- Now, go to the Layout tab.
- Click Advanced.
- Now, click on the drop-down beside Paper Size.
- Select A4 from the list of the available sizes.
- Click OK to save changes.
Exit the Setting window and try printing and see if the issue persists. If so, continue with the next solution.
4] Export the Word document to PDF and print
This solution entails that you convert the Word document to PDF and the print. This should resolve the issue.
Hope this helps!
Obinna Onwusobalu has studied Information & Communication Technology and is a keen follower of the Windows ecosystem. He has been a Windows Insider MVP (2020). He runs a computer software clinic.
@Random_HP_User
Bear with me: I am not at all sure this is the correct answer; I have not your printer and have only limited access to the settings.
Looking at the installation files, it appears that the printer hardware likes a minimum print margin of 0.167 inches. If that is indeed the case, then the smallest achievable margin might be defined (to the nearest hundreth) at 0.17 inches.
Given that restriction,
Set your Word document > File > Print > Margins > Custom Margin >
tab Margins (to no less than) .17 >
OK
Note that this does not include «booklet» settings, which by definition, might require a larger «gutter» margin to accomodate the booklet style print option.
More resources:
Printer Learn and Use
Note:
IF your printer is an Enterprise edition, then you might be able to take advantage of the Custom Form setup:
HP LaserJet Enterprise — Setup custom paper types using the Embedded Web Server or Web Jetadmin
Good Luck!
When you see a Post that helps you,
Inspires you, provides fresh insight,
Or teaches you something new,
Click the «Thumbs Up» on that Post.
Click my Answer Accept as Solution to help others find Answers.
by Radu Tyrsina
Radu Tyrsina has been a Windows fan ever since he got his first PC, a Pentium III (a monster at that time). For most of the kids of… read more
Published on March 12, 2020
XINSTALL BY CLICKING THE DOWNLOAD FILE
This software will keep your drivers up and running, thus keeping you safe from common computer errors and hardware failure. Check all your drivers now in 3 easy steps:
- Download DriverFix (verified download file).
- Click Start Scan to find all problematic drivers.
- Click Update Drivers to get new versions and avoid system malfunctionings.
- DriverFix has been downloaded by 0 readers this month.
One big issue that arises while trying to print is getting this error:
Your margins are pretty small, some of the content you print may be cut off. Are you sure you want to print?
This is an extremely annoying error message since it repeatedly appears. Plus, a good number of users describe starting a large print job and walking away only to discover that it never started because they didn’t dismiss the warning.
If you too are frequently encountering this error message, follow the steps listed in this detailed guide and you will get rid of it in no time.
How can I remove Your margins are pretty small error?
1. Redefine the unprintable area
First of all, do note that the printer defines the printable margin area, but it’s Word that warns you of the margin crossing. Word simply gets the information from the printer driver, so it’s wise to redefine the unprintable area in the printer’s Property setting.
To remove the warning for good, you will need to print with at least the minimum margins specified from your printer. The value varies between different printer models, but 0.17 inches is often the default minimum.
2. Use the automatic adjustment of the margins
In case of not knowing your printer’s minimum margins value, let the program take care of this task for you. You only need to click Fix and you’ll further notice the position of text shifting on the document. As stated by other users, they find the adjustments as being very small, barely noticeable.
However, if you don’t like the result, feel free to use to undo the change, or simply close the file without saving that change.
3. Set Printable area to Maximum
Another workaround is to enter into Printer properties, under the Advanced tab, and select the option that says Compatibility. Here you’ll see a selection for Printable area. Don’t hesitate to change it from Standard to Maximum.
4. Change file size to A4
- Conduct a search by typing Control Panel into the search box and typing Enter.
- Click on Devices and Printers. You should get a series of icons identifying the printers for which you have installed drivers, along with the default printer.
- Select Printing Preferences which houses a wealth of settings for print quality, layout, profile presets, and more.
- While here, just change the original size to A4.
- Finally, click on Apply.
When you are still getting this annoying message, a simple readjustment of the file size could become effective and nothing will cut off again.
5. Save the file as PDF file
For large documents, i.e. mail merges, you may try to save the file as a PDF, then print it from Adobe Reader. Printing to a PDF is a bit of a hassle indeed, but this helps you clear up all previous issues.
6. Configure Alignment and Wrapping options
If you’re doing a label mail merge, we have another quick tip for you. All you have to do is to change the table’s wrap format to Around, center-aligned, then make the left and right margins equal-sized.
To make it happen, enter into Table Tools > Layout >Properties>Table, and you’ll find there the table Alignment & Wrapping options.
Increasing the paper size a little is another trick described as possibly working while trying to use a different driver for the printer is also recommended. Start with the most recent one provided by the manufacturer. If this makes no difference, go further back to an older one.
That said, getting rid of the Your margins are pretty small printer error should be quite easy and can be done in just a few minutes. If all these solutions are inefficient, seek professional help from the printer manufacturer.
READ NEXT:
- FIX: Printer cannot be contacted over the network
- My printer doesn’t pull the paper [FIX]
- Printer is blinking orange: Here’s a quick fix for that
![]()
Newsletter
- When printing documents from Word or Excel, you may get an error message “Your margins are very small” When printing an image or document, follow these simple solutions to resolve it.
- The main reason for this problem is that you are trying to print a document that exceeds the minimum allowable margin, which varies from printer to printer.
- Some printers allow you to expand the print area by adjusting the margins in the software’s print dialog box.
You may encounter an error message stating “Your margins are too small.” when printing documents or images in Word or Excel. Here are some solutions to this problem.
How To Print From Microsoft Word
Create a new document or open an existing document by clicking Open… on the menu bar in the upper-left of the screen. Then click New… to create a new one.
Your margins are quite small” will appear on your Windows 10 computer if you try to print a document from Word or Excel. The full error message will be displayed as follows;
Multicolumn documents benefit from narrow margins, which give each column more room.
When I checked my Word documents for margins, the standard margins have always been the same as what the Normal template is set to. For Office 2011 and 2016, the Normal template has 1.5″ margins. The margins on either of my printers will generate an error if I set them to .5″, but when I use a 1″ margin for most of my documents, they print without errors.
Unless the non-printable area can be redefined in the printer properties settings, you may not be able to get around this message. Word receives this information from the printer driver, not from Word.
Printing these fields may result in some content being cut off. Are you still interested in printing them?
As a result of this error message, many users describe starting a large print job, then walking away to find that the print job did not start because the warning was ignored.
How To Print In Microsoft Word
Your document will open when you click on it. Once you are ready to print, click on Print in the upper left-hand corner.
If you print from Word, some of your contents may be cut off because your margins are quite small.
Listed below are some recommended solutions that you can try if you encounter this issue.
What is the cause of the printing error – Your margins are very low

Usually, this isn’t a problem for most applications, such as documents. However, if you’re creating marketing material, such as a brochure, you may not be able to take advantage of the pre-programmed margins. As part of the print dialog box, you can adjust the margins in order to expand the print area on some printers. However, you may not be able to access all of the margins without a specialized printer.
It is usually caused by trying to print a document with a margin that exceeds the printer’s minimum margin.
Listed below are some recommended solutions that you can try if you encounter this issue.
How To Print In Word Document
Select Manually Print on Both Sides under the Pages: field in File > Print (if you have not previously changed this option, it will say Print One Sided). When you print your document, you will need to reload the page into the printer to print the other side of the page after it has been printed on one side.
Here’s how to fix the printer error: Your margins are very small

Redefine the unprintable area
Note that this information is pulled from the printer driver and that Word uses it to warn you when it exceeds the margin. Therefore, you should edit the printer properties to define the nonprintable area.
This warning can be permanently removed by printing with the printer’s minimum margins specified in the printer’s specifications. Generally, 0.17 inches are the minimum margins specified by the printer.
Use Automatic Margin Adjustment
You can use the software to find out your printer’s minimum margin value if you don’t know it. Click on Fix, and you’ll see the text position on the document move. Other users have described the adjustments as being extremely minor, barely visible.
How To Print A Word Document
Print is available from the File menu. When you click on Print, the comments will appear in the print preview.
How To Print On Word
Note: Now to see the print preview, click File and then Print. It will print in Outline view when you run the print job.
Make sure your margins are within printable area, in other words, remove the problem.
The change can be undone or deleted if you do not like it.
Set the printable area to maximum
You can also change the Printable Area setting on the Advanced tab of the printer properties by selecting Compatibility.
Change the file size to A4
- Press Enter to search for Control Panel.
- In the Devices and Printers page, you should see a series of icons indicating the default printer and the printers for which drivers have been installed.
- A number of print quality settings, page settings, profile settings, and more can be found in the Print Options window.
- This can simply be changed to A4 by changing the original size.
- Click Apply at the end.
It will not cut off anything if you simply reconfigure the file size.
Save the file as a PDF
It is quicker to print large documents by saving them as PDF files, such as mail-in letters. Saving the PDF files is a bit tedious, but once you have done it, you will no longer have to deal with any of the problems described previously.
Adjust the alignment and cropping options
The next quick tip is to center your labels and make the margins the same size on the left and right if you are printing labels consistently.
You can align and paginate the table by clicking Table Tools – > Layout – > Properties – > Table.
Another trick that has been described as working is to increase the paper size a bit. A different printer driver might also be helpful. Try the latest manufacturer’s driver first, then switch to the old one if necessary.
Frequently Asked Questions
One of the easiest ways is to use smaller margins. Just go to the Page Setup tab, click on Margins, and choose Narrow (you can also choose Custom Margins for even smaller margins). Note that using very small margins can cause the printer to cut the text.
- Press [Ctrl][G].
- In the «Go to which section» field, scroll to the desired section and select it.
- In the section number entry field, enter the section number indicated in the error message, press [Enter], and press the Close button.
- Go to File | Page Setup.
- On the Margins tab, click OK.
- Click Restore.
- Click OK.
- Choose Layout -> Margins -> Custom Margins.
- Set Borders.
- Select Set Default.
- Confirm your choice.
- In the document, you want to print without margins, click Layout -> Page Setup in the Page Setup group.
- In the Page Setup window, under the Margins tab, set the Top, Bottom, Left, and Right values to 0, then click OK.
- In the Microsoft Word dialog box that appears, click Ignore.

Mark Ginter
Mark Ginter is a tech blogger with a passion for all things gadgets and gizmos. A self-proclaimed «geek», Mark has been blogging about technology for over 15 years. His blog, techquack.com, covers a wide range of topics including new product releases, industry news, and tips and tricks for getting the most out of your devices. If you’re looking for someone who can keep you up-to-date with all the latest tech news and developments, then be sure to follow him over at Microsoft.
Fix Your Margins Are Pretty Small Printer Error
 Чтобы исправить различные проблемы с ПК, мы рекомендуем Restoro PC Repair Tool: Это программное обеспечение исправит распространенные компьютерные ошибки, защитит вас от потери файлов, вредоносных программ, сбоев оборудования и оптимизирует ваш компьютер для максимальной производительности. Устраните проблемы с ПК и удалите вирусы прямо сейчас за 3 простых шага:
- Скачать Restoro PC Repair Tool который поставляется с запатентованными технологиями (имеется патент Вот ).
- Нажмите Начать сканирование чтобы найти проблемы с Windows, которые могут вызывать проблемы с ПК.
- Нажмите Починить все для устранения проблем, влияющих на безопасность и производительность вашего компьютера
- Restoro был загружен0читатели в этом месяце.
Одна большая проблема, которая возникает при попытке печати, — это ошибка:
Ваши поля довольно маленькие, часть печатаемого вами содержимого может быть обрезана. Вы уверены, что хотите распечатать?
Это очень раздражаетсообщение об ошибкетак как он неоднократно появляется. Кроме того, большое количество пользователей описывают, как начали большое задание печати и ушли, только чтобы обнаружить, что оно так и не началось, потому что они не отклонили предупреждение.
Если вы тоже часто сталкиваетесь с этим сообщением об ошибке, следуйте инструкциям в этом подробном руководстве, и вы избавитесь от него в кратчайшие сроки.
как увеличить все периоды в google docs
Как я могу убрать Ваши поля с довольно маленькой ошибкой?
1. Измените определение непечатаемой области.

Прежде всего, обратите внимание, чтопринтеропределяет область полей для печати, но это слово который предупреждает вас о пересечении границы. Word просто получает информацию от драйвера принтера, поэтому разумно переопределить непечатаемую область в Настройка собственности .
Чтобы удалить предупреждение навсегда, вам нужно будет печатать с минимальными полями, указанными в вашемпринтер. Это значение варьируется в зависимости от модели принтера, но обычно минимальным значением по умолчанию является 0,17 дюйма.
2. Воспользуйтесь автоматической настройкой полей.

В случае незнания своегопринтерМинимальное значение маржи, позвольте программе позаботиться об этой задаче за вас. Вам нужно только нажать Исправить и вы также заметите сдвиг текста в документе. Как заявили другие пользователи, они находят настройки очень маленькими, едва заметными.
Однако, если вам не нравится результат, не стесняйтесь использовать для отмены изменения или просто закройте файл без сохранения этого изменения.
3. Установите для области печати значение ‘Максимум’.

Другой обходной путь — войти в Свойства принтера , под Продвинутая вкладка , и выберите вариант с надписью Совместимость . Здесь вы увидите выбор для Область печати . Не бойтесь изменить его с Стандарт к Максимум .
4. Измените размер файла на A4.

- Проведите поиск, набрав Панель управления в поисковая строка и печатать Войти .
- Нажмите на Устройства и принтеры . Вы должны получить серию значков, определяющихпринтерыдля которого вы установили драйверы вместе с принтером по умолчанию.
- Выбрать Настройки печати который содержит множество настроек качества печати, макета, предустановок профиля и т. д.
- Здесь просто измените исходный размер на A4 .
- Наконец, нажмите на Применять .
Если вы все еще получаете это раздражающее сообщение, простое изменение размера файла может стать эффективным, и ничего не будет отключено снова.
5. Сохраните файл как файл PDF.

Интернет отключается на несколько секунд
Для больших документов, например, слияния почты, вы можете попытаться сохранить файл в формате PDF, а затем распечатать его из Adobe Reader . Печать в PDF — это действительно хлопотно, но это поможет вам решить все предыдущие проблемы.
6. Настройте параметры выравнивания и упаковки.

Если вы выполняете слияние ярлыков писем, у нас есть еще один совет для вас. Все, что вам нужно сделать, это изменить формат переноса таблицы на Вокруг , по центру , затем сделайте левое и правое поля одинаковыми.
Чтобы это произошло, войдите в Работа с таблицами> Макет> Свойства> Таблица , и вы найдете там стол Варианты выравнивания и упаковки .
Небольшое увеличение размера бумаги — это еще один прием, который описывается как работающий при попытке использовать другой драйвер дляпринтертакже рекомендуется. Начните с самого последнего, предоставленного производителем. Если это не имеет значения, вернитесь к более старому.
Тем не менее, избавившись отВаша маржа довольно малаОшибка принтера должна быть довольно простой и может быть устранена всего за несколько минут. Если все эти решения неэффективны, обратитесь за профессиональной помощью к производителю принтера.
Windows 10 приложение Xbox не может найти микрофон
ЧИТАЙТЕ СЛЕДУЮЩИЙ:
2] Use the maximum printing area The main reason behind this issue is that you are trying to print a document exceeding the minimum limit of margin, which varies printer to printer. To automatically fix it, do the following: … In the Page Setup window, in the Margins section, set all the margins to 0. Click OK.
- How do you fix your margins are pretty small?
- How do you fix a margin print error?
- How do you print too small margins?
- How do I fix small margins in Word?
- How do I fix the outside printable area margins?
- How do you override margins on a printer?
How do you fix your margins are pretty small?
How can I remove Your margins are pretty small error?
- Redefine the unprintable area. …
- Use the automatic adjustment of the margins. …
- Set Printable area to Maximum. …
- Change file size to A4. …
- Save the file as PDF file. …
- Configure Alignment and Wrapping options.
How do you fix a margin print error?
Here’s how:
- Press [Ctrl][G].
- In the Go To What box, scroll to and select Section.
- In the Enter Section Number box, enter the section number given in the error message, press [Enter], and click Close.
- Go to File | Page Setup.
- On the Margins tab, click OK.
- Click Fix.
- Click OK.
How do you print too small margins?
Use smaller page margins
One of the easiest ways to do this is by using smaller margins. Just go to the Page Layout tab, click Margins, then select Narrow (you can also select Custom Margins for even smaller margins).
How do I fix small margins in Word?
Change margins in your document to change the layout and make sure everything fits. Select Layout > Margins.
…
Try it!
- Select Layout > Margins.
- Select Custom Margins.
- In Margins, use the Up and Down arrows to enter the values you want.
- Select OK when done.
How do I fix the outside printable area margins?
From the Microsoft Word Document:
- Select the Layout Tab.
- Select the Small Arrow at the bottom right corner of the Page Setup Section. The Page Setup screen will open.
- Select the Margins Tab.
- Make Sure the Top, Bottom, Left and Right page margins are configured to at least 0.16″ or higher.
- Select OK to save changes.
How do you override margins on a printer?
However, without a specialized printer, there may always be some small amount of margin which you cannot access.
- Launch Microsoft Word and open your document.
- Click «Page Layout,» followed by «Margins,» and then «Custom Margins.»
- Enter your desired margins in the Top, Bottom, Left and Right boxes, and then click «OK.»
@Random_HP_User
Bear with me: I am not at all sure this is the correct answer; I have not your printer and have only limited access to the settings.
Looking at the installation files, it appears that the printer hardware likes a minimum print margin of 0.167 inches. If that is indeed the case, then the smallest achievable margin might be defined (to the nearest hundreth) at 0.17 inches.
Given that restriction,
Set your Word document > File > Print > Margins > Custom Margin >
tab Margins (to no less than) .17 >
OK
Note that this does not include «booklet» settings, which by definition, might require a larger «gutter» margin to accomodate the booklet style print option.
More resources:
Printer Learn and Use
Note:
IF your printer is an Enterprise edition, then you might be able to take advantage of the Custom Form setup:
HP LaserJet Enterprise — Setup custom paper types using the Embedded Web Server or Web Jetadmin
Good Luck!
When you see a Post that helps you,
Inspires you, provides fresh insight,
Or teaches you something new,
Click the «Thumbs Up» on that Post.
Click my Answer Accept as Solution to help others find Answers.
Dragon-Fur
