FSCK – очень важная утилита для Linux / Unix, она используется для проверки и исправления ошибок в файловой системе.
Она похоже на утилиту «chkdsk» в операционных системах Windows.
Она также доступна для операционных систем Linux, MacOS, FreeBSD.
FSCK означает «File System Consistency Check», и в большинстве случаев он запускается во время загрузки, но может также запускаться суперпользователем вручную, если возникнет такая необходимость.
Может использоваться с 3 режимами работы,
1- Проверка наличия ошибок и позволить пользователю решить, что делать с каждой ошибкой,
2- Проверка на наличие ошибок и возможность сделать фикс автоматически, или,
3- Проверка наличия ошибок и возможность отобразить ошибку, но не выполнять фикс.
Содержание
- Синтаксис использования команды FSCK
- Команда Fsck с примерами
- Выполним проверку на ошибки в одном разделе
- Проверьте файловую систему на ошибки и исправьте их автоматически
- Проверьте файловую систему на наличие ошибок, но не исправляйте их
- Выполним проверку на ошибки на всех разделах
- Проверим раздел с указанной файловой системой
- Выполнять проверку только на несмонтированных дисках
Синтаксис использования команды FSCK
$ fsck options drives
Опции, которые можно использовать с командой fsck:
- -p Автоматический фикс (без вопросов)
- -n не вносить изменений в файловую систему
- -у принять «yes» на все вопросы
- -c Проверить наличие плохих блоков и добавить их в список.
- -f Принудительная проверка, даже если файловая система помечена как чистая
- -v подробный режим
- -b использование альтернативного суперблока
- -B blocksize Принудительный размер блоков при поиске суперблока
- -j external_journal Установить местоположение внешнего журнала
- -l bad_blocks_file Добавить в список плохих блоков
- -L bad_blocks_file Установить список плохих блоков
Мы можем использовать любую из этих опций, в зависимости от операции, которую нам нужно выполнить.
Давайте обсудим некоторые варианты команды fsck с примерами.
Команда Fsck с примерами
Примечание: – Прежде чем обсуждать какие-либо примеры, прочтите это. Мы не должны использовать FSCK на смонтированных дисках, так как высока вероятность того, что fsck на смонтированном диске повредит диск навсегда.
Поэтому перед выполнением fsck мы должны отмонтировать диск с помощью следующей команды:
$ umount drivename
Например:
$ umount /dev/sdb1
Вы можете проверить номер раздела с помощью следующей команды:
$ fdisk -l
Также при запуске fsck мы можем получить некоторые коды ошибок.
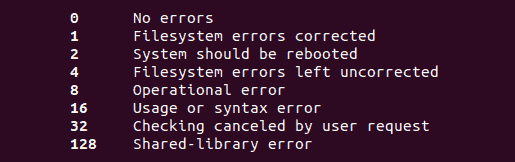
Ниже приведен список кодов ошибок, которые мы могли бы получить при выполнении команды вместе с их значениями:
- 0 – нет ошибок
- 1 – исправлены ошибки файловой системы
- 2 – система должна быть перезагружена
- 4 – Ошибки файловой системы оставлены без исправлений
- 8 – Операционная ошибка
- 16 – ошибка использования или синтаксиса
- 32 – Fsck отменен по запросу пользователя
- 128 – Ошибка общей библиотеки
Теперь давайте обсудим использование команды fsck с примерами в системах Linux.
Выполним проверку на ошибки в одном разделе
Чтобы выполнить проверку на одном разделе, выполните следующую команду из терминала:
$ umount /dev/sdb1

$ fsck /dev/sdb1
Проверьте файловую систему на ошибки и исправьте их автоматически
Запустите команду fsck с параметром «a» для проверки целостности и автоматического восстановления, выполните следующую команду.
Мы также можем использовать опцию «у» вместо опции «а».
$ fsck -a /dev/sdb1
Проверьте файловую систему на наличие ошибок, но не исправляйте их
В случае, если нам нужно только увидеть ошибки, которые происходят в нашей файловой системе, и не нужно их исправлять, тогда мы должны запустить fsck с опцией “n”,
$ fsck -n /dev/sdb1
Выполним проверку на ошибки на всех разделах
Чтобы выполнить проверку файловой системы для всех разделов за один раз, используйте fsck с опцией «A»
$ fsck -A
Чтобы отключить проверку корневой файловой системы, мы будем использовать опцию «R»
$ fsck -AR
Проверим раздел с указанной файловой системой
Чтобы запустить fsck на всех разделах с указанным типом файловой системы, например, «ext4», используйте fsck с опцией «t», а затем тип файловой системы,
$ fsck -t ext4 /dev/sdb1
или
$ fsck -t -A ext4
Выполнять проверку только на несмонтированных дисках
Чтобы убедиться, что fsck выполняется только на несмонтированных дисках, мы будем использовать опцию «M» при запуске fsck,
$ fsck -AM
Вот наше короткое руководство по команде fsck с примерами.
Пожалуйста, не стесняйтесь присылать нам свои вопросы, используя поле для комментариев ниже.
|
|
Duplicate Article |

See: SystemAdministration/Fsck and TestingStorageMedia
Introduction
Contents
- Introduction
-
Basic filesystem checks and repairs
- e2fsprogs — ext2, ext3, ext4 filesystems
- dosfstools — FAT12, FAT16 and FAT32 (vfat) filesystem
- ntfs-3g (previously also ntfsprogs) — NTFS filesystem
- reiserfstools — reiserfs
- xfsprogs — xfs
- Missing superblock
- Bad blocks
- Sources and further reading
This guide will help diagnose filesystem problems one may come across on a GNU/Linux system. New sections are still being added to this howto.
Basic filesystem checks and repairs
The most common method of checking filesystem’s health is by running what’s commonly known as the fsck utility. This tool should only be run against an unmounted filesystem to check for possible issues. Nearly all well established filesystem types have their fsck tool. e.g.: ext2/3/4 filesystems have the e2fsck tool. Most notable exception until very recently was btrfs. There are also filesystems that do not need a filesystem check tool i.e.: read-only filesystems like iso9660 and udf.
e2fsprogs — ext2, ext3, ext4 filesystems
Ext2/3/4 have the previously mentioned e2fsck tool for checking and repairing filesystem. This is a part of e2fsprogs package — the package needs to be installed to have the fsck tool available. Unless one removes it in aptitude during installation, it should already be installed.
There are 4 ways the fsck tool usually gets run (listed in order of frequency of occurrence):
- it runs automatically during computer bootup every X days or Y mounts (whichever comes first). This is determined during the creation of the filesystem and can later be adjusted using tune2fs.
- it runs automatically if a filesystem has not been cleanly unmounted (e.g.: powercut)
- user runs it against an unmounted filesystem
-
user makes it run at next bootup
case 1
When filesystem check is run automatically X days after the last check or after Y mounts, Ubuntu gives user the option to interrupt the check and continue bootup normally. It is recommended that user lets it finish the check.
case 2
If a filesystem has not been cleanly unmounted, the system detects a dirty bit on the filesystem during the next bootup and starts a check. It is strongly recommended that one lets it finish. It is almost certain there are errors on the filesystem that fsck will detect and attempt to fix. Nevertheless, one can still interrupt the check and let the system boot up on a possibly corrupted filesystem.
2 things can go wrong
-
fsck dies — If fsck dies for whatever reason, you have the option to press ^D (Ctrl + D) to continue with an unchecked filesystem or run fsck manually. See e2fsck cheatsheet for details how.
-
fsck fails to fix all errors with default settings — If fsck fails to fix all errors with default settings, it will ask to be run manually by the user. See e2fsck cheatsheet for details how.
case 3
User may run fsck against any filesystem that can be unmounted on a running system. e.g. if you can issue umount /dev/sda3 without an error, you can run fsck against /dev/sda3.
case 4
You can make your system run fsck by creating an empty ‘forcefsck’ file in the root of your root filesystem. i.e.: touch /forcefsck Filesystems that have 0 or nothing specified in the sixth column of your /etc/fstab, will not be checked
Till Ubuntu 6.06 you can also issue shutdown -rF now to reboot your filesystem and check all partitions with non-zero value in sixth column of your /etc/fstab. Later versions of Ubuntu use Upstart version of shutdown which does not support the -F option any more.
Refer to man fstab for what values are allowed.
e2fsck cheatsheet
e2fsck has softlinks in /sbin that one can use to keep the names of fsck tools more uniform. i.e. fsck.ext2, fsck.ext3 and fsck.ext4 (similarly, other filesystem types have e.g.: fsck.ntfs) This cheatsheet will make use of these softlinks and will use ext4 and /dev/sda1 as an example.
-
fsck.ext4 -p /dev/sda1 — will check filesystem on /dev/sda1 partition. It will also automatically fix all problems that can be fixed without human intervention. It will do nothing, if the partition is deemed clean (no dirty bit set).
-
fsck.ext4 -p -f /dev/sda1 — same as before, but fsck will ignore the fact that the filesystem is clean and check+fix it nevertheless.
-
fsck.ext4 -p -f -C0 /dev/sda1 — same as before, but with a progress bar.
-
fsck.ext4 -f -y /dev/sda1 — whereas previously fsck would ask for user input before fixing any nontrivial problems, -y means that it will simply assume you want to answer «YES» to all its suggestions, thus making the check completely non-interactive. This is potentially dangerous but sometimes unavoidable; especially when one has to go through thousands of errors. It is recommended that (if you can) you back up your partition before you have to run this kind of check. (see dd command for backing up filesystems/partitions/volumes)
-
fsck.ext4 -f -c -C0 /dev/sda1 — will attempt to find bad blocks on the device and make those blocks unusable by new files and directories.
-
fsck.ext4 -f -cc -C0 /dev/sda1 — a more thorough version of the bad blocks check.
-
fsck.ext4 -n -f -C0 /dev/sda1 — the -n option allows you to run fsck against a mounted filesystem in a read-only mode. This is almost completely pointless and will often result in false alarms. Do not use.
In order to create and check/repair these Microsoft(TM)’s filesystems, dosfstools package needs to be installed. Similarly to ext filesystems’ tools, dosfsck has softlinks too — fsck.msdos and fsck.vfat. Options, however, vary slightly.
dosfsck cheatsheet
These examples will use FAT32 and /dev/sdc1
-
fsck.vfat -n /dev/sdc1 — a simple non-interactive read-only check
-
fsck.vfat -a /dev/sdc1 — checks the file system and fixes non-interactively. Least destructive approach is always used.
-
fsck.vfat -r /dev/sdc1 — interactive repair. User is always prompted when there is more than a single approach to fixing a problem.
-
fsck.vfat -l -v -a -t /dev/sdc1 — a very verbose way of checking and repairing the filesystem non-interactively. The -t parameter will mark unreadable clusters as bad, thus making them unavailable to newly created files and directories.
Recovered data will be dumped in the root of the filesystem as fsck0000.rec, fsck0001.rec, etc. This is similar to CHK files created by scandisk and chkdisk on MS Windows.
ntfs-3g (previously also ntfsprogs) — NTFS filesystem
Due to the closed sourced nature of this filesystem and its complexity, there is no fsck.ntfs available on GNU/Linux (ntfsck isn’t being developed anymore). There is a simple tool called ntfsfix included in ntfs-3g package. Its focus isn’t on fixing NTFS volumes that have been seriously corrupted; its sole purpose seems to be making an NTFS volume mountable under GNU/Linux.
Normally, NTFS volumes are non-mountable if their dirty bit is set. ntfsfix can help with that by clearing trying to fix the most basic NTFS problems:
-
ntfsfix /dev/sda1 — will attempt to fix basic NTFS problems. e.g.: detects and fixes a Windows XP bug, leading to a corrupt MFT; clears bad cluster marks; fixes boot sector problems
-
ntfsfix -d /dev/sda1 — will clear the dirty bit on an NTFS volume.
-
ntfsfix -b /dev/sda1 — clears the list of bad sectors. This is useful after cloning an old disk with bad sectors to a new disk.
Windows 8 and GNU/Linux cohabitation problems This segment is taken from http://www.tuxera.com/community/ntfs-3g-advanced/ When Windows 8 is restarted using its fast restarting feature, part of the metadata of all mounted partitions are restored to the state they were at the previous closing down. As a consequence, changes made on Linux may be lost. This can happen on any partition of an internal disk when leaving Windows 8 by selecting “Shut down” or “Hibernate”. Leaving Windows 8 by selecting “Restart” is apparently safe.
To avoid any loss of data, be sure the fast restarting of Windows 8 is disabled. This can be achieved by issuing as an administrator the command : powercfg /h off
Install reiserfstools package to have reiserfsck and a softlink fsck.reiserfs available. Reiserfsck is a very talkative tool that will let you know what to do should it find errors.
-
fsck.reiserfs /dev/sda1 — a readonly check of the filesystem, no changes made (same as running with —check). This is what you should run before you include any other options.
-
fsck.reiserfs —fix-fixable /dev/sda1 — does basic fixes but will not rebuild filesystem tree
-
fsck.reiserfs —scan-whole-partition —rebuild-tree /dev/sda1 — if basic check recommends running with —rebuild-tree, run it with —scan-whole-partition and do NOT interrupt it! This will take a long time. On a non-empty 1TB partition, expect something in the range of 10-24 hours.
xfsprogs — xfs
If a check is necessary, it is performed automatically at mount time. Because of this, fsck.xfs is just a dummy shell script that does absolutely nothing. If you want to check the filesystem consistency and/or repair it, you can do so using the xfs_repair tool.
-
xfs_repair -n /dev/sda — will only scan the volume and report what fixes are needed. This is the no modify mode and you should run this first.
-
xfs_repair will exit with exit status 0 if it found no errors and with exit status 1 if it found some. (You can check exit status with echo $?)
-
-
xfs_repair /dev/sda — will scan the volume and perform all fixes necessary. Large volumes take long to process.
XFS filesystem has a feature called allocation groups (AG) that enable it to use more parallelism when allocating blocks and inodes. AGs are more or less self contained parts of the filesystem (separate free space and inode management). mkfs.xfs creates only a single AG by default.
xfs_repair checks and fixes your filesystems by going through 7 phases. Phase 3 (inode discovery and checks) and Phase 4 (extent discovery and checking) work sequentially through filesystem’s allocation groups (AG). With multiple AGs, this can be heavily parallelised. xfs_repair is clever enough to not process multiple AGs on same disks.
Do NOT bother with this if any of these is true for your system:
- you created your XFS filesystem with only a single AG.
-
your xfs_repair is older than version 2.9.4 or you will make the checks even slower on GNU/Linux. You can check your version with xfs_repair -V
- your filesystem does not span across multiple disks
otherwise:
-
xfs_repair -o ag_stride=8 -t 5 -v /dev/sda — same as previous example but reduces the check/fix time by utilising multiple threads, reports back on its progress every 5 minutes (default is 15) and its output is more verbose.
-
if your filesystem had 32 AGs, the -o ag_stride=8 would start 4 threads, one to process AGs 0-7, another for 8-15, etc… If ag_stride is not specified, it defaults to the number of AGs in the filesystem.
-
-
xfs_repair -o ag_stride=8 -t 5 -v -m 2048 /dev/sda — same as above but limits xfs_repair’s memory usage to a maximum of 2048 megabytes. By default, it would use up to 75% of available ram. Please note, -o bhash=xxx has been superseded by the -m option
== jfsutils — jfs == == btrfs ==
Missing superblock
Bad blocks
Sources and further reading
- man pages
-
<XFS user guide> — more details about XFS filesystem
fsck stands for «file system check» and it is used to check and optionally repair one or more Linux file systems. Normally, the fsck program will try to handle file systems on different physical disk drives in parallel to reduce the total amount of time needed to check all of the file systems (see fsck(8)).
The Arch Linux boot process conveniently takes care of the fsck procedure for you and will check all relevant partitions on your drive(s) automatically on every boot. Hence, there is usually no need to resort to the command-line.
Boot time checking
Mechanism
There are two players involved:
- mkinitcpio offers you the option to fsck your root file system before mounting it via the
fsckhook. If you do this, you should mount root read-write via the appropriaterwkernel parameter.[1] - systemd will fsck all file systems having a fsck pass number greater than 0 (either with #fstab options or a user-supplied unit file). For the root file system, it also has to be mounted read-only initially with the kernel parameter
roand only then remounted read-write from fstab (note that thedefaultsmount option impliesrw).
The first option is the recommended default, and what you will end up with if you follow the Installation guide. If you want to go with option 2 instead, you should remove the fsck hook from mkinitcpio.conf and use ro on the kernel command-line. The kernel parameter fsck.mode=skip can be used to make sure fsck is disabled entirely for both options.
Forcing the check
If you use the base mkinitcpio hook, you can force fsck at boot time by passing fsck.mode=force as a kernel parameter. This will check every file system you have on the machine.
Alternatively, systemd provides systemd-fsck@.service(8), which checks all configured file systems, which were not checked in the initramfs. However, checking the root file system this way causes a delay in the boot process, because the file system has to be remounted.
![]() This article or section needs expansion.
This article or section needs expansion.![]()
Reason: Is it possible to run fsck from initramfs using the systemd hook? (Discuss in Talk:Fsck)
Note: For those accustomed to use other GNU/Linux distributions, the old tricks consisting in writing a file with the name forcefsck to the root of each file system or using the command shutdown with the -F flag were only working for the old SysVinit and early versions of Upstart and are not working with systemd. The aforementioned solution is thus the only one working for Arch Linux.
Automatically answer yes to all repair questions
The boot time fsck checks might end up saying:
"UNEXPECTED INCONSISTENCY; RUN fsck MANUALLY."
This happens when you need to apply some changes to fix the filesystem which are not considered completely safe, and thus require fsck to be run manually.
You can set fsck to automatically apply all suggested change (i.e.: answer yes to all questions) by setting the fsck.repair kernel command line option to yes. (Other possible values are no and preen.) Check the documentation systemd-fsck@.service(8), for the meaning of these options.
Tips and tricks
Attempt to repair damaged blocks
To automatically repair damaged portions of an ext2/ext3/ext4 or FAT file system, run:
Warning: This will not ask if you want to repair it, as the answer is Yes when you run it.
# fsck -a
Repair damaged blocks interactively
This is useful for when files on the boot partition have changed, and the journal failed to properly update. In this case, unmount the boot partition, and run the following code to repair damaged portions:
# fsck -r drive
Changing the check frequency
Note: The following commands tune2fs and dumpe2fs work only with ext2/ext3/ext4 file systems.
By default, fsck checks a file system every 30 boots (counted individually for each partition). To change the frequency of checking, run:
# tune2fs -c 20 /dev/sda1
In this example, 20 is the number of boots between two checks.
Note that 1 would make it scan at every boot, while 0 would stop scanning altogether.
If you wish to see the frequency number and the current mount count for a specific partition, use:
# dumpe2fs -h /dev/sda1 | grep -i 'mount count'
fstab options
fstab is a system configuration file and is used to tell the Linux kernel which partitions (file systems) to mount and where on the file system tree.
A typical /etc/fstab entry may look like this:
/dev/sda1   /         ext4      defaults       0  1
/dev/sda2   /other    ext4      defaults       0  2
/dev/sda3   /win      ntfs-3g   defaults       0  0
The 6th column (in bold) is the fsck option.
0— do not check.1— first file system (partition) to check;/(root partition) should be set to1.2— all other file systems to be checked.
Troubleshooting
Can’t run fsck on a separate /usr partition
- Make sure you have the required hooks in
/etc/mkinitcpio.confand that you remembered to re-generate your initramfs image after editing this file. - Check your fstab! Only the root partition needs
1at the end, everything else should have either2or0. Carefully inspect it for other typos, as well.
ext2fs: no external journal
There are times (due to power failure) in which an ext(3/4) file system can corrupt beyond normal repair. Normally, there will be a prompt from fsck indicating that it cannot find an external journal. In this case, run the following commands:
Unmount the partition based on its directory
# umount directory
Write a new journal to the partition
# tune2fs -j /dev/partition
Run an fsck to repair the partition
# fsck -p /dev/partition
Introduction
The fsck (File System Consistency Check) Linux utility checks filesystems for errors or outstanding issues. The tool is used to fix potential errors and generate reports.
This utility comes by default with Linux distributions. No specific steps or an installation procedure is required to use fsck. Once you load the terminal, you are ready to exploit the functionalities of the tool.
Follow this guide to learn how to use fsck to check and repair filesystem on a Linux machine. The tutorial will list examples of how to use the tool and for which use cases.
Prerequisites
- Linux or UNIX-like system
- Access to a terminal or command line
- A user with root permissions to run the tool
When to Use fsck in Linux
The fsck tool can be used in various situations:
- Use fsck to run a filesystem check as preventive maintenance or when there is an issue with your system.
- One common problem fsck can diagnose is when the system fails to boot.
- Another one is when you get an input/output error when the files on your system become corrupt.
- You can also use the fsck utility to check the health of external drives, such as SD cards or USB flash drives.
Basic fsck Syntax
The basic syntax for the fsck utility follows this pattern:
fsck <options> <filesystem>In the above example, filesystem can be a device, a partition, a mount point, etc. You can also use filesystem-specific options at the end of the command.
There are a few steps to do before you check and repair your file system. You need to locate a device and unmount.
View Mounted Disks and Partitions
To view all mounted devices on your system and check disk location, use one of the available tools in Linux.
One method to locate the disk you want to scan is to list the filesystem disks with the df command:
df -h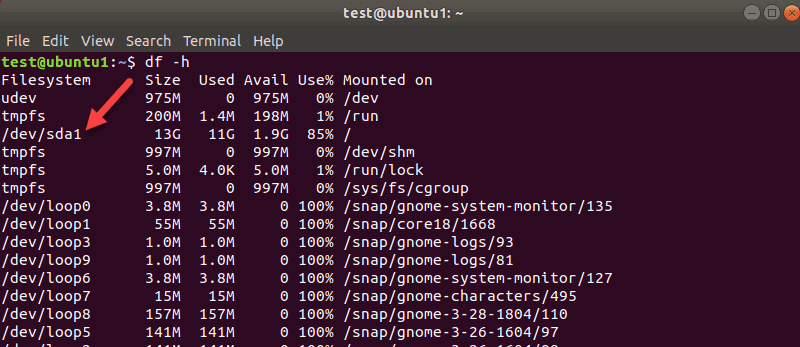
The tool prints the data usage on your system and filesystems. Take note of the disk you want to check with the fsck command.
To view partitions for your first disk, for example, use the following command:
sudo parted /dev/sda 'print'sda is how Linux refers to your first SCSI disk. If you have two, the second would be sdb, and so on.
In our example, we got one result since there was only one partition on this virtual machine. You will get more results if you have more partitions.
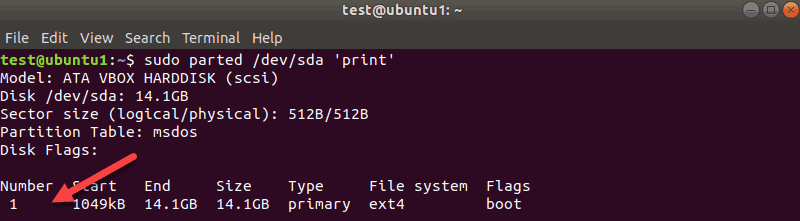
The disk name here is /dev/sda and then the number of partitions is shown in the Number column. In our case, it is one: sda1.
Unmount the Disk
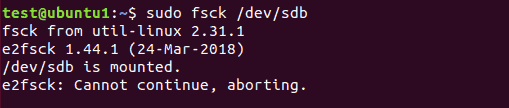
Before you can run a disk check with fsck, you need to unmount a disk or partition. If you try to run fsck on a mounted disk or partition, you will get a warning:
Make sure to run the unmount command:
sudo umount /dev/sdbReplace /dev/sdb with the device you want to unmount.
Note that you cannot unmount root filesystems. Hence, now fsck can’t be used on a running machine. More on that towards the end of the guide.
Run fsck to Check for Errors
Now that you unmounted the disk, you can run fsck. To check the second disk, enter:
sudo fsck /dev/sdb
The above example shows the output for a clean disk. If there are multiple issues on your disk, a prompt appears for each one where you have to confirm the action.
The exit code the fsck utility returns is the sum of these states:
Mount the Disk
When you finish checking and repairing a device, mount the disk so you can use it again.
In our case, we will remount the sdb disk:
mount /dev/sdbDo a Dry Run with fsck
Before you perform a live check, you can do a test run with fsck. Pass the -N option to the fsck command to perform a test:
sudo fsck -N /dev/sdbThe output prints what would happen but does not perform any actions.
Fix Detected Errors Automatically with fsck
To try to fix potential problems without getting any prompts, pass the -y option to fsck.
sudo fsck -y /dev/sdbThis way, you say “yes, try to fix all detected errors” without being prompted every time.
If no errors are found, the output looks the same as without the -y option.
Skip Repair but Print fsck Errors in the Output
Use the -n option if you want to check potential error on a file system without repairing them.
We have a second drive sdb with some journaling errors. The -n flag prints the error without fixing it:
sudo fsck -n /dev/sdb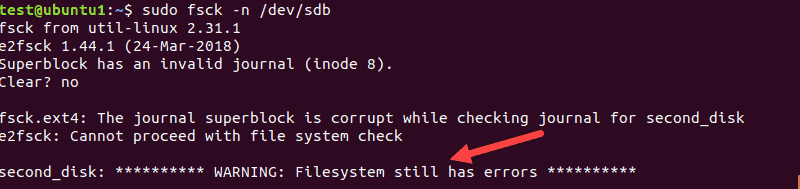
Force fsck to Do a Filesystem Check
When you perform a fsck on a clean device, the tool skips the filesystem check. If you want to force the filesystem check, use the -f option.
For example:
sudo fsck -f /dev/sdb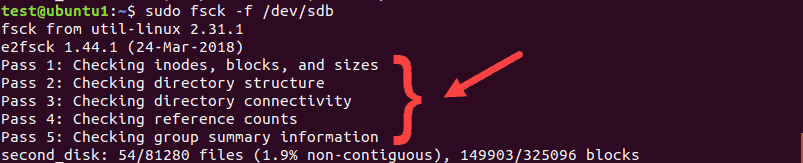
The scan will perform all five checks to search for corruptions even when it thinks there are no issues.
Run fsck on All Filesystems at Once
If you want to perform a check on all filesystems with fsck in one go, pass the -A flag. This option will go through the etc/fstab file in one run.
Since root filesystems can’t be unmounted on a running machine, add the -R option to skip them:
fsck -ARTo avoid the prompts, add the -y option we talked about.
Skip fsck on a Specific Filesystem
If you want fsck to skip checking a filesystem, you need to add -t and “no” before a filesystem.
For example, to skip ext3 filesystem, run this command:
sudo fsck -AR -t noext3 -yWe added -y to skip the prompts.
Skip Fsck on Mounted Filesystems
To make sure you do not try to run fsck on a mounted filesystem, add the -M option. This flag tells the fsck tool to skip any mounted filesystems.
To show you the difference, we will run fsck on sdb while it is mounted, and then when we unmount it.
sudo fsck -M /dev/sdb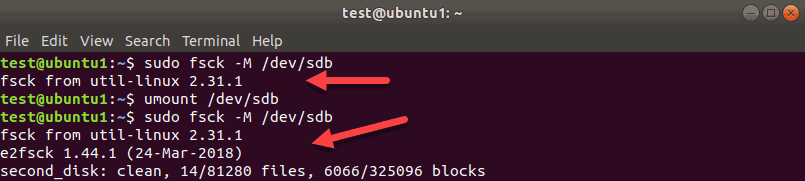
While sdb is mounted, the tool exits without running a check. Then, we unmount sdb and run the same command again. This time, fsck checks the disk and reports it as clean, or with errors.
Note: To remove the first title line of the fsck tool “fsck from util-linux 2.31.1” use the -T option.
Run fsck on Linux Root Partition
As we already mentioned, fsck cannot check root partitions on a running machine since they are mounted and in use. However, even Linux root partitions can be checked if you boot into recovery mode and run the fsck check:
1. To do so, power on or reboot your machine through the GUI or by using the terminal:
sudo reboot2. Press and hold the shift key during boot-up. The GNU GRUB menu appears.
3. Select Advanced options for Ubuntu.
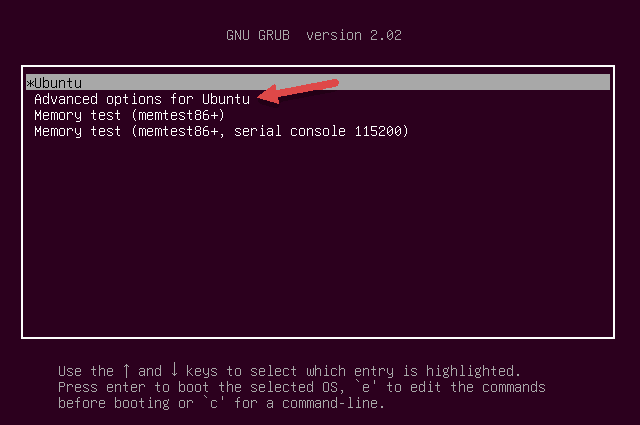
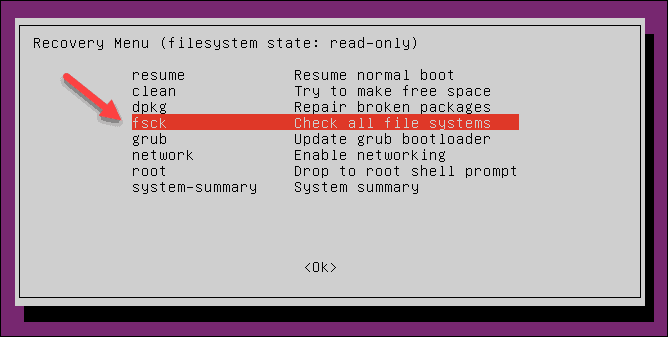
4. Then, select the entry with (recovery mode) at the end. Let the system load into the Recovery Menu.
5. Select fsck from the menu.
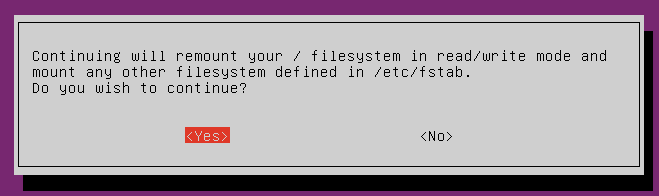
6. Confirm by selecting <Yes> at the prompt.
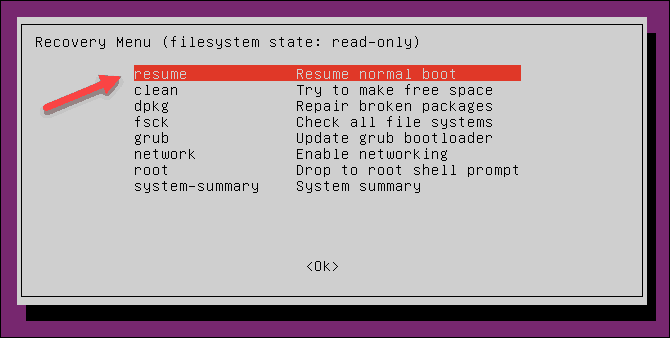
7. Once finished, select resume at the recovery menu to boot up the machine.
What if fsck is Interrupted?
You should not interrupt the fsck tool while it is in progress. However, if the process is interrupted, fsck will finish the ongoing check and then stop.
In case the utility found an error while the check was in process, it will not try to fix anything if interrupted. You can rerun the check next time and let it finish.
fsck Linux Command Options Summary
To wrap up, below is the list of the options you can use with the fsck Linux utility.
| Option | Description |
|---|---|
-a |
Try to repair filesystem errors automatically. There will be no prompts, so use it with caution. |
-A |
Check all filesystems listed in /etc/fstab. |
-C |
Show progress for ext2 and ext3 filesystems. |
-f |
Force fsck to check a filesystem. The tool checks even when the filesystem appears to be clean. |
-l |
Lock the device to prevent other programs from using the partition during the scan and repair. |
-M |
Do not check mounted filesystems. The tool returns an exit code 0 when a filesystem is mounted. |
-N |
Do a dry run. The output prints what the fsck would do without executing any actions. The warning or error messages are printed as well. |
-P |
Use to run a scan on multiple filesystems in parallel. It can cause issues, depending on your setup. Use with caution. |
-R |
Tell the fsck tool not to check the root filesystems when you use the -A option. |
-r |
Print device statistics. |
-t |
Specify which filesystems type(s) to check with fsck. Consult the man page for detailed information. |
-T |
Hide the title when the tool starts. |
-y |
Try to repair filesystem errors automatically during the check. |
-V |
Verbose output. |
Note: Learn about the error code SIGSEGV (signal segmentation violation) and how to troubleshoot it.
Conclusion
Now you know how to use fsck Linux command to check and repair filesystems. The guide provided examples of the tool’s functionalities and features.
Make sure you have root permissions before running the listed commands. For a detailed description of all options, you can consult the man file of the tool or visit the fsck Linux man page.
В моей статье «Проверка файловой системы на ошибки с помощью fsck на Linux» я расскажу как можно проверить файловую систему на вашей ОС в Linux.
Некоторым системам необходим пароль root чтобы запустить fsck или других аналогичных утилит, когда не могут загрузить полностью ОС. В этом случае –стоит выполнить проверку диска загрузившись в single-user mode , либо – загрузившись с другого диска.
Fsck расшифровывается как «файловая система Проверка целостности» (file system consistency check). На большинстве систем, Fsck запускается во время загрузки, если определенные условия.
Сам Fsck команда взаимодействует с соответствующей файловой системой конкретных FSCK команд, созданной авторами файловой системы. Независимо от типа вашей файловой системы, Fsck как правило, имеет три режима работы:
- Проверка на наличие ошибок и подсказывает пользователю интерактивное решение, как решить индивидуальные проблемы;
- Проверка на наличие ошибок и постарается автоматически исправить все ошибки;
- Проверка на наличие ошибок без возможности восстановить их, но тогда выдаст ошибки на стандартный вывод.
Код выхода возвращается FSCK это уникальный номер, представляющего собой сумму следующих значений состояния:
0 — Без ошибок (No errors ).
1 — Исправлены ошибки файловой системы(Filesystem errors corrected).
2 — Система должна быть перезагружена (System should be rebooted).
4 — Ошибки файловой системы оставили без изменений (Filesystem errors left uncorrected).
8 — Эксплуатационная ошибка (Operational error).
16 — Ошибки при использовании или синтаксические ошибки (Usage or syntax error).
32 — Fsck отменен по запросу пользователя (Fsck canceled by user request).
128 — Ошибка общей библиотеки (Shared-library error).
Код выхода возвращается, когда несколько файловых систем которая проверяется побитовое ИЛИ (OR) для каждой файловой системы, которая проверяется.
В действительности, Fsck — это просто фронт-энд для различных проверочных утилит для файловых систем (fsck.fstype), которые доступны на Linux.
Файловая система для конкретных проверок ищет сначала в /sbin, а затем в /etc/fs и /etc/, и, наконец в директориях, перечисленных в переменной PATH (среда переменного кружения).
Прочитайте мануал для конкретных страниц проверки, например, чтобы узнать больше о конкретных проверок для ext3 FSCK, выполните:
$ man fsck.ext3
Опции FSCK.
Основные Опции.
-l
Блокировка целого дискового устройства эксклюзивным flock. Этот параметр может быть использован только с одного устройства (это означает, что -A и -l являются взаимоисключающими). Эта опция рекомендуется, когда несколько экземпляров FSCK выполняются в то же время. Параметр игнорируется, когда используется для нескольких устройств или для невращающихся дисков. Fsck не блокируется базовые устройства при выполнении проверки сложенных устройств (например, MD или DM); эта функция еще не реализована.
-s
Сериализация FSCK операций. Это отличная идея, если вы проверяете несколько файловых систем в интерактивном режиме. (Примечание. E2fsck работает в интерактивном режиме по умолчанию. Чтобы запустить e2fsck в не-интерактивном режиме, необходимо указать -p или -a, если вы хотите чтобы все ошибки исправлялись автоматически используйте опцию -n если вы не делаете.)
-t
Задает тип (ы) файловой системы которые должны быть проверены. Когда флаг -A, используется только файловые системы, которые соответствуют fslist проверяются. Fslist параметр разделенный запятыми список файловых систем и опционов спецификаторов. Если ни один из файловых систем в fslist не начинается с оператора отрицания (OR или !), то только те, которые перечислены файловые системы будут проверены.
Опции спецификаторы могут быть включены раздельными запятыми в fslist. Они должны иметь формат opts=fs-option. Если спецификатор присутствует, то только файловые системы, которые содержат FS-option в их опциях монтирования области /etc/fstab будут проверены. Если спецификатор используется с отрицанием, то только те файловые системы, которые не имеют FS-option в их опции монтирования области /etc/fstab будут проверены.
Например, если OPTS = ро появляется в fslist, то только файловые системы, перечисленные в/etc/fstab с возможностью ро будут проверены.
Как правило, тип файловой системы выводится с помощью функции поиска для filesys в файле /etc/fstab и используя соответствующую запись. Если тип не может быть выведен, и есть только одна файловая система в качестве аргумента для опции -t, Fsck будет использовать указанный тип файловой системы. Если этот тип не доступен, то тип по умолчанию файловая система (в настоящее время ext2) не используется.
-A
Поиск в файле /etc/fstab и программа попытаться проверить все файловые системы за один проход. Эта опция обычно используется из файла инициализации /etc/rc, вместо нескольких команд для проверки единой файловой системы.
Корневая файловая система будет сначала проверяется, если опция -P не указана (смотрите ниже). После этого файловые системы будут проверяться в порядке, установленном в поле fs_passno (в шестом)в файле /etc/fstab. Файловые системы со значением fs_passno 0 пропускаются и не проверяются вообще. Файловые системы со значением fs_passno больше нуля будут проверены в порядке, файловых систем ( Наименьшее число в fs_passno проверяется в первую очередь).
Если существует несколько файловых систем с одинаковым числом, Fsck будет пытаться проверить их параллельно, хотя это позволит избежать запуска нескольких проверок файловой системы на одном физическом диске.
Fsck не проверяет сложенные устройств (рейды, DM-склеп …) параллельно с любым другим устройством. Смотрите ниже для установки FSCK_FORCE_ALL_PARALLEL для файловой системы используется определения зависимостей между устройствами.
Таким образом, очень распространенная конфигурация в файле /etc/fstab для установки корневой файловой системы имеет значение fs_passno из 1 и установить все другие файловые системы имеют значение fs_passno 2. Это позволит запустить проверку Fsck для автоматического запуска файловой системы параллельно.
Системные администраторы могут не использовать эту конфигурацию, если они должны избежать многочисленных проверок файловой системы которые работают параллельно по некоторым причинам.
Fsck обычно не проверяет, действительно ли существует устройство перед вызовом зависящих от файловой системы проверки. Следовательно, не существующие устройства могут привести систему в режим ремонта файловой системы во время загрузки, если файловая система будет выполнять конкретные проверки и они будет возвращать фатальную ошибку.
/etc/fstab опцию монтирования nofail могут быть использованы, чтобы пропустить в Fsck несуществующие устройства. Fsck также пропускает несуществующие устройства, которые имеют особый тип файловой системы автоматически.
-C [fd]
Показать завершения / индикаторы выполнения для этих проверок файловых систем (в настоящее время только для ext2 и ext3), которые поддерживают их. Fsck будет управлять проверкой файловой системы так, что только один из них будет отображать индикатор выполнения. С графическим интерфейсом пользователя можно указать дескриптор файла fd, в этом случае информация о ходе выполнения будет отправлена в дескриптор файла.
-M
Не проверять смонтированные файловые системы и вернуть код завершения 0, для смонтированных файловых систем.
-N
Ничего не делать, просто показывает, что должно быть сделано.
-P
Когда опция -A устанавливается, то fsck проверяет корневую файловую систему параллельно с другими файловыми системами. Это не очень безопасно, чтобы делать так, т.к если корневая файловая система находится под e2fsck, то исполняемый файл может быть поврежден!
Эта опция в основном предназначены для тех администраторов, которые не хотят перераспределить корневую файловую систему, чтобы быть маленькой и компактной (на самом деле правильное решение).
-R
При проверке всех файловых систем с флагом -A, пропускать корневую файловую систему. (Это полезно в случае когда корневая файловая система уже смонтирована для чтения и записи.)
-T
Не показывать название при запуске.
-V
Подробный вывод, в том числе всех команд конкретной файловой системы , которые выполняются.
Специальные параметры для файловой системы.
Параметры, которые не понимают FSCK передаются в файловой системе конкретной проверкой. Эти опции не должны принимать аргументы, т.к нет никакого способа для Fsck, чтобы иметь возможность должным образом угадать, какие параметры имеют аргументы, а какие нет.
Параметры и аргументы, которые следуют — рассматриваются как файловая система конкретных вариантов, которые будут переданы в файловой системе конкретной проверки.
Пожалуйста, обратите внимание, что Fsck не предназначен для передачи сколь угодно сложных вариантов файловой системы, конкретных проверок. Если вы делаете что-то сложное, пожалуйста, просто выполните конкретную проверку напрямую для файловой системы.
Хотя не гарантируется, что следующие параметры поддерживаются большинством файловых систем:
-a
Автоматическое восстановление файловой системы без каких-либо вопросов (используйте эту опцию с осторожностью). Обратите внимание, что e2fsck поддерживает -a только для обратной совместимости. Эта опция отображается на e2fsck-х с опцией -p, которая является безопасной в использовании, в отличие от опции -a.
-n
Для некоторых файловых систем конкретных проверок, опция -n вызовет fs-specific FSCK и тем самым данная опция говорит о отказе от попыток исправить все проблемы, но просто сообщать о таких проблемах в стандартный вывод.
В частности, fsck.reiserfs не будет сообщать любые повреждения при использовании этих варианта.
fsck.minix браузер не поддерживает параметр -n вообще.
-r
Интерактивный ремонт файловой системы (спросит подтверждение).
Примечание: Как правило, плохая идея использовать эту опцию, если несколько FSCK в настоящее время работают параллельно. Также обратите внимание, что это поведение для E2fsck по умолчанию; он поддерживает эту опцию только для причин обратной совместимости.
-y
Для некоторых файловых систем конкретная проверка, -у — этот вариант вызовет fs-specific Fsck которая всегда пытаться автоматически исправить все обнаруженные и поврежденное в файловой системы. Иногда эксперт может быть в состоянии сделать лучше запустить FSCK вручную. Обратите внимание, что не все файловые системы конкретных проверок поддерживают этот вариант. В частности, fsck.minix и fsck.cramfs не поддерживают опцию -y.
Для удобства – настроим сеть:
# ifconfig eth0 inet 77.120.106.** netmask 255.255.255.0
# route add default gw 77.120.106.1 eth0
В ОС — Linux уже имеется утилита FSCK («Проверка системных файлов») для проверки файловой системы.
Синтаксис выглядит следующим образом, есть необходимость проверить и при необходимости отремонтировать одну или несколько файловых систем Linux:
# fsck Fs-Name-Here
# fsck /dev/xyz
# fsck /home
# fsck.ext3 /dev/hdc1
# fsck.ext2 /dev/flash/device/name
Fs-Name-Here -может быть одним из следующих:
Имя устройства — (e.g. /dev/hda1, /dev/sda2, /dev/md0, /dev/vg1/volume_1).
Точка монтирования — (e.g. /var, /home).
Метка ext2 — (e.g. LABEL=home ).
UUID спецификатор — (e.g. UUID=8536abf2-44c3-5a90-34b3-bfc23456f6bd).
Готовые примеры.
Во-первых, файловая система должна быть демонтирована. Вы не можете восстановить его, пока он работает, но для начала перейдем в init 1:
# init 1
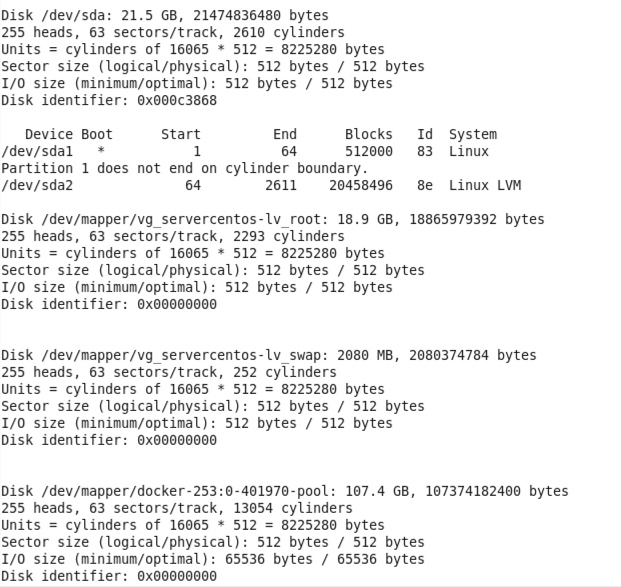
Выполняем проверку, чтобы узнать какие диски и какие разделы у меня имеются:
# fdisk -l
Далее, выполним проверку чтобы узнать тип файловой системы:
# file -s /dev/sda1
/dev/sda1: Linux rev 1.0 ext4 filesystem data (needs journal recovery) (extents) (huge files)
Далее, демонтировать файловую систему, например, если это /home (/dev/sda3) файловая система введите команду:
# umount /home
Или
# umount /dev/sda1
Можно вывести, что можно выполнить для данной ФС:
# fsck -N /dev/sda1
 fsck from util-linux-ng 2.17.2
[/sbin/fsck.ext4 (1) -- /boot] fsck.ext4 /dev/sda1
Например, запустим проверку целостности ФС с исправлением всех ошибок в автоматическом режиме:
# fsck.ext4 -y /dev/sda1
e2fsck 1.41.12 (17-May-2010)
/dev/sda1 is mounted.
e2fsck: Cannot continue, aborting.
У меня данный раздел примонтирован, нужно его отмонтировать и выполнить заново данную команду:
# umount /dev/sda1
Отмонтировали, теперь выполняем проверку:
# fsck.ext4 -y /dev/sda1
Вот что получили:
e2fsck 1.41.12 (17-May-2010)
/dev/sda1: clean, 64/128016 files, 148908/512000 blocks
Наконец, запустите FSCK на разделе, введите следующую команду:
# fsck /dev/sda3
Однако не забудьте указать тип файловой системы, используя опцию -t. Fsck по умолчанию предполагает, файловую систему ext2:
# fsck -t ext3 /dev/sda3
Или для ext3:
# fsck.ext3 /dev/sda3
Или для ext4:
# fsck.ext4 /dev/sda5
Если вы не знаете, какай тип файловой системы у вас, то выполните команду которая будет отображать тип монтирования файловой системы:
$ mount
Если какие-либо файлы восстановлены, то они размещаются в /home/lost+found, FSCK команды.
Переходим (используем) на multiuser mode, выполнив:
# init 3
Автоисправление файловая системы при обнаружении ошибок
В ходе проверки файловой системы, если ошибки обнаружены, вы можете получить «FSCK», чтобы отремонтировать в автоматическом режиме вашу файловую систему, нужно к команде добавить флаг «-a». Например:
$ fsck -a /dev/sda1
Аналогично, используя флаг «-y» можете получить такую же работу:
# fsck -y /dev/sda1
Проверка всех файловых систем за один проход
Если есть несколько файловых систем на вашем ПК, то можно проверить все, выполнив команду fsck с флагом «-А». Пример:
# fsck -A
Что он будет делать, чтобы захватить все записи файловой системы с /etc/fstab и сканировать их на наличие ошибок. Вы можете использовать его вместе с «-R» и флагом «-y», чтобы предотвратить его сканирования файловую систему root и исправить все ошибки, если оно имеется:
# fsck -AR -y
Исключение проверки на смонтированной файловой системе
Как упоминалось ранее, Fsck не может быть запущен на смонтированной файловой системе. Если вы используете флаг -A для проверки всех файловых систем, и некоторые из них установлены, вы можете повредить эти файловые системы.Способ преодолеть это использовать флаг «-M», чтобы предотвратить его от проверки в установленной системы.
Например, выполнив команду
# fsck -M /dev/sdc1
ничего не возвращает и код возврата 0 (означает «нет ошибки»). Сканирования не было сделано вообще, так как все файловые системы монтируются. По этому, нужно отмонтировать данный раздел и выполнить команду заново.
Определение типа файловой системы
Есть моменты, когда вы просто хотите проверить файловую систему определенного типа, скажем, ext2. Вы можете воспользоваться флагом -t, чтобы указать тип файловой системы, чтобы проверить. Например, команда
$ fsck -t ext4 /dev/sdc1
будет сканировать внешний жесткий диск, только если он находится в формате ext4. Кроме того, вы можете комбинировать с флагом «-A» для сканирования всех файловых систем определенного типа:
$ fsck -A -t ext4 -y
Force fsck запуск каждый раз при загрузке
По умолчанию, в Ubuntu будет работать FSCK после каждых 30 bootups, но если вы хотите, чтобы система выполняла «FSCK» каждый раз когда она загружается, то все что вам нужно сделать, это создать пустой файл «звонок» «forcefsck» и поместите его в корневую папку. Это уведомит ОС, о там чтобы она выполнила «FSCK» и начала проверять файловую систему каждый раз во время загрузки:
$ sudo touch /forcefsck
Чтобы изменить частоту проверки, вы можете использовать команды «tune2fs». Следующая команда дает указание системе запустить «FSCK» после каждых 30 загрузок:
# tune2fs -c 30 /dev/sdaX
Или можно использовать опцию «-f» :
# fsck /dev/sda1 -f
Избегать ремонта, но сообщать о проблемах на стандартный вывод с помощью опции -n
Можно печатать все обнаруженные проблемы в стандартный вывод без ремонта в файловой системе, используя FSCK с опцией «-n»:
# fsck -n /dev/sda1
Использование FSCK с графическим интерфейсом
Для Debian/Ubuntu/Mint можно установить программу:
$ sudo apt-get install gparted
На этом, моя статья «Проверка файловой системы на ошибки с помощью fsck на Linux» подошла к завершению.