I’m using VS Code for TypeScript/JavaScript development. When I open a file it will check that file for errors. The problem is if I’m refactoring (like I move some shared code to a new location or change a name) it won’t show me the errors this caused until I open the file with the problem. …so if I want to do extensive refactoring I have to open every file just to make it scan the file for errors.
How can I make VS Code scan the whole project for errors without having to open each file one by one manually?
asked Jan 17, 2017 at 16:59
![]()
3
VS Code (v1.44) has an experimental feature, that allows project wide error reporting in TS. Try it out:
// put this line in settings.json
"typescript.tsserver.experimental.enableProjectDiagnostics": true
answered Apr 15, 2020 at 17:30
![]()
ford04ford04
64.4k18 gold badges195 silver badges169 bronze badges
9
Figured it out. Note this answer is specific to TypeScript, which is what I am using. Here it is:
Make sure typescript is installed globally (I just had mine installed locally apparently):
npm install -g typescript
Then in VS Code press Shift+Ctrl+B. If you don’t have a task runner set up it will ask what you want. I selected typescript and the tasks.json file will look like this:
{
    "version": "0.1.0",
    "command": "tsc",
    "isShellCommand": true,
    "args": ["-p", "."],
    "showOutput": "silent",
    "problemMatcher": "$tsc"
}
Then pressing Shift+Ctrl+B (or Shift+Command+B in macOS) will check the entire project for problems and they will be reported in your «problems» panel.
![]()
mx0
6,38812 gold badges49 silver badges54 bronze badges
answered Jan 18, 2017 at 0:17
![]()
WillyCWillyC
3,8676 gold badges33 silver badges50 bronze badges
4
If you don’t want to install TypeScript globally, you can do the following:
-
Install TypeScript locally on the project, that is
yarn add --dev typescriptornpm install --save-dev typescript. -
Add a check-types run script to
./package.json.--noEmitmeans that the compiler will won’t generate any JavaScript files.
{
  "scripts": {
    "check-types": "tsc --noEmit"
  }
}
- Let VSCode know about the run script in
/.vscode/tasks.json.
{
  "version": "2.0.0",
  "tasks": [
    {
      "type": "npm",
      "script": "check-types",
      "problemMatcher": [
        "$tsc"
      ]
    }
  ]
}
-
To run the tasks hit the F1 key and select ‘Run Task’, and then ‘npm: check-types’.
-
If you add the following lines to the task, pressing
Ctrl+Bwill run it.«group»: {
«kind»: «build»,
«isDefault»: true
}
4
For the most recent version of tasks.json this is the correct json, following deprecations in version 1.14. Create this as /.vscode/tasks.json
{
    "version": "2.0.0",
    "command": "tsc",
    "type": "shell",
    "args": [
        "-p",
        "."
    ],
    "presentation": {
        "reveal": "silent"
    },
    "problemMatcher": "$tsc"
}
answered Dec 10, 2018 at 11:50
manoftheyearmanoftheyear
3741 gold badge6 silver badges18 bronze badges
2
Once you have open your project in vs code, open the vs code terminal and run:
node_modules/.bin/tsc --noEmit
answered Sep 24, 2019 at 13:56
AriElsaAriElsa
1411 silver badge3 bronze badges
2
UPDATE.
My answer below does not answer the original question, but if you’re like me and have found this thread searching for how to turn on // @ts-check project-wide in VSCode so that you don’t need to add // @ts-check to every file then my answer below is what you need. I have searched and searched and kept getting this thread as my top result so hopefully this helps others as well
I’m on vscode version 1.52.1 and the answer is so simple and right on the vscode website:
https://code.visualstudio.com/docs/nodejs/working-with-javascript#_type-checking-javascript
scroll down to the «Using jsconfig or tsconfig» section
Add a jsconfig.json in your project root and add "checkJs": true
{
  "compilerOptions": {
    "checkJs": true
  },
  "exclude": ["node_modules", "**/node_modules/*"]
}
You might need to restart vscode once you add it in
answered Feb 3, 2021 at 17:49
Francisc0Francisc0
9481 gold badge14 silver badges28 bronze badges
None of the other solutions worked fully for me. Here’s a tasks.json that does, working with vscode 1.67+. On Linux etc. set command to tsc, on Windows be sure to run tsc.cmd as tsc alone will attempt to run the bash script and produce the following error:
The terminal process failed to launch: A native exception occurred during launch (Cannot create process, error code: 193)
"revealProblems": "always" in the presentation section shows the Problems panel on completion.
{
  "version": "2.0.0",
  "tasks": [
    {
      "label": "tsc: error check project",
      "command": "tsc.cmd",
      "args": [
        "-p",
        ".",
        "--noEmit"
      ],
      "isBackground": false,
      "problemMatcher": "$tsc",
      "group": {
        "kind": "build",
        "isDefault": true
      },
      "presentation": {
        "revealProblems": "always",
      }
    }
  ]
}
answered Jun 9, 2022 at 12:42
![]()
sebtsebt
2,2542 gold badges14 silver badges11 bronze badges
- Go to View menu > Extensions and make sure the Microsoft VS Code ESLint extension is installed.
- In Settings, search for «ESLint > Lint Task: Enable», and enable that setting (docs).
- In the Terminal menu, choose Run Task… >
eslint: lint whole folder.
answered Mar 28, 2022 at 14:58
jrcjrc
20.1k10 gold badges69 silver badges63 bronze badges
1
Edit: Since updating to 1.52.0 this no longer works. It will instead replace the current project files with what you selected…
===
I’ve tried every solution I can find and I think it’s safe to say the answer is: You can’t*
The best I’ve found is still technically opening each file manually, but at least it’s not one-by-one:
- You can’t drag/drop a directory but you can select multiple files (including directories) and drag/drop. The directories will be ignored and any files you had selected will be opened in tabs.
- Next, you need to give each tab focus so it triggers eslint to run. (Holding down the next tab keyboard shortcut works.)
This is terrible and I beg someone to prove me wrong.
*I haven’t found a way that works as well as opening files manually. Each method — experimental vscode feature and tsc task — has its own set of drawbacks. The vscode feature is clearly the solution but without a way to ignore node_modules, etc. it’s too painful to use.
answered Nov 30, 2020 at 20:23
![]()
2
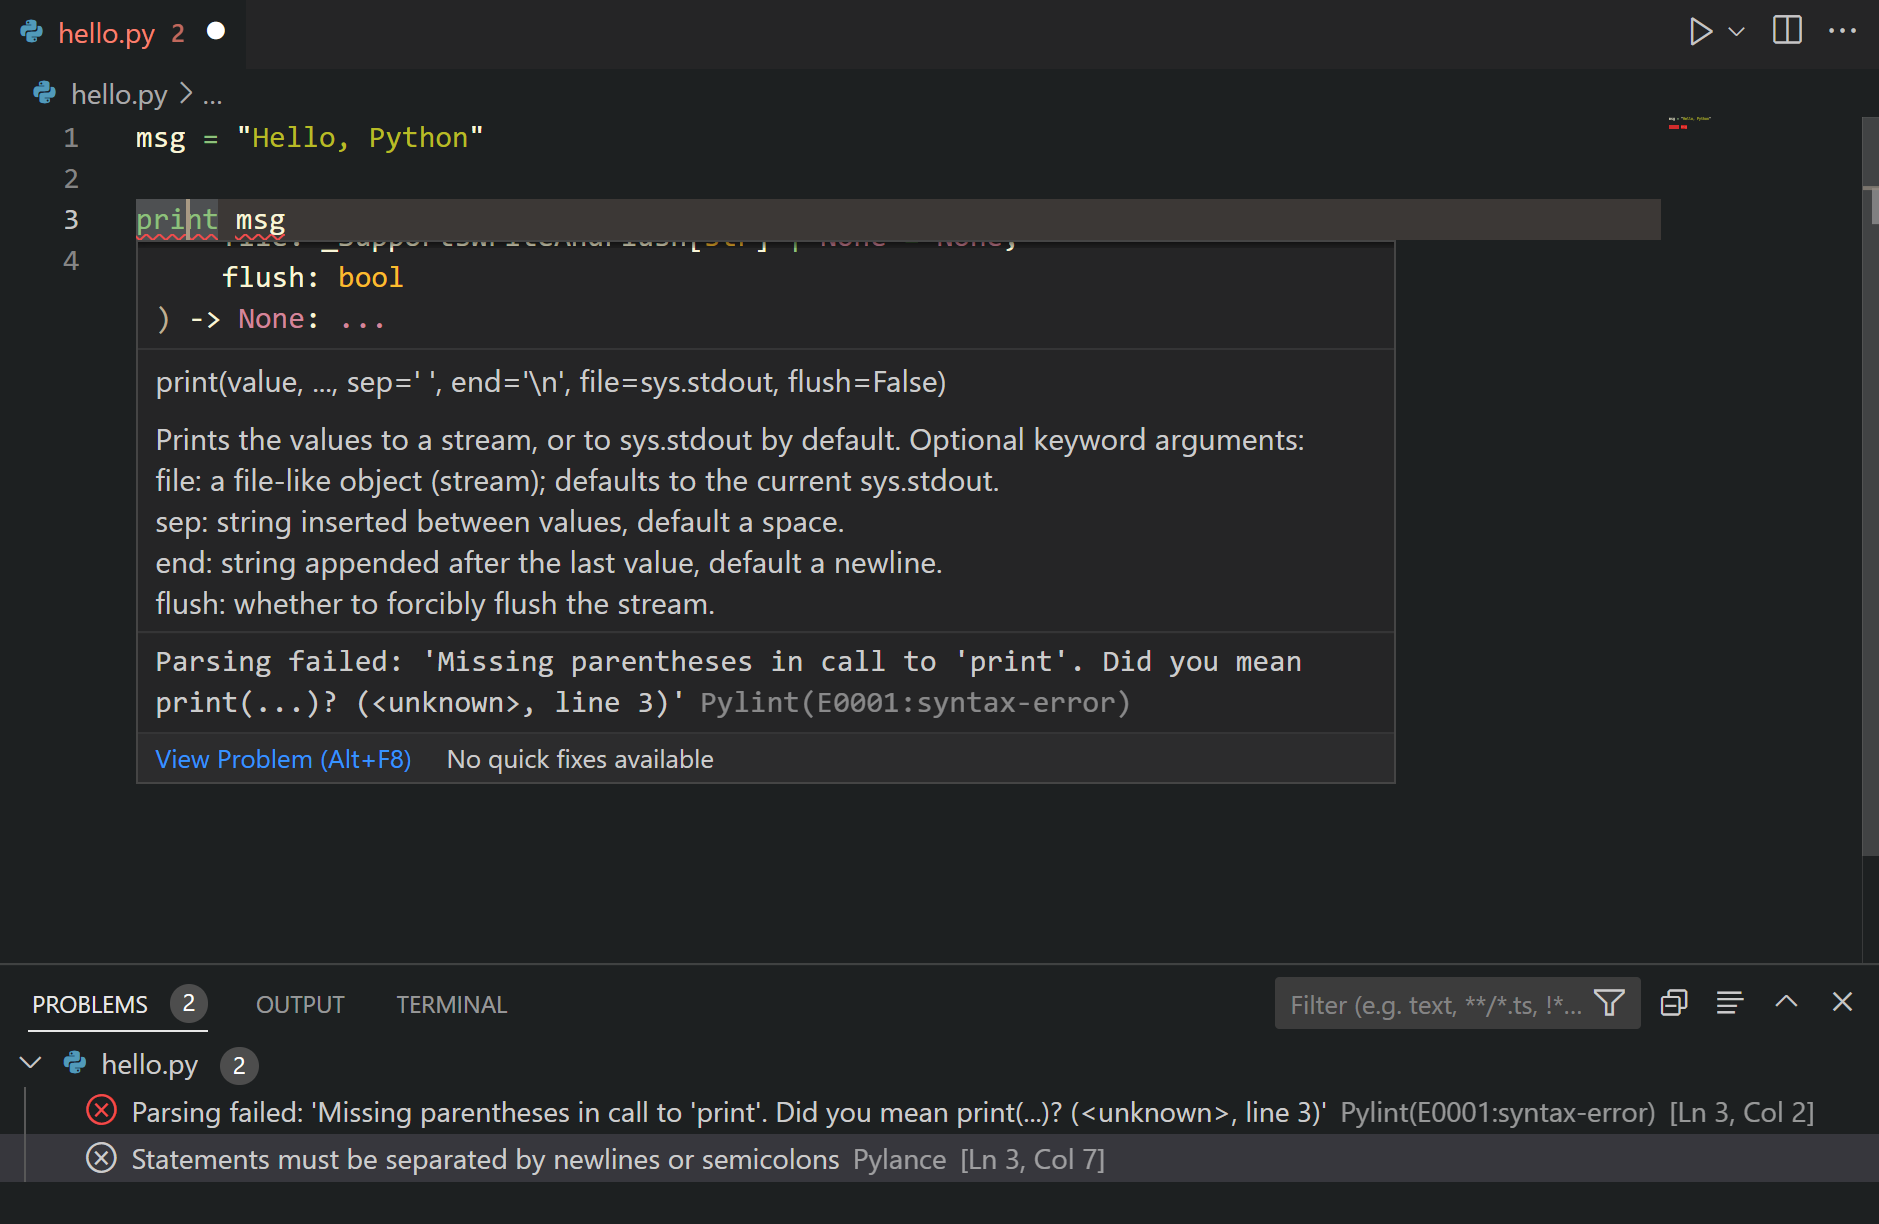
Linting highlights syntactical and stylistic problems in your Python source code, which often helps you identify and correct subtle programming errors or unconventional coding practices that can lead to errors. For example, linting detects use of an uninitialized or undefined variable, calls to undefined functions, missing parentheses, and even more subtle issues such as attempting to redefine built-in types or functions. Linting is distinct from Formatting because linting analyzes how the code runs and detects errors whereas formatting only restructures how code appears.
Note: Stylistic and syntactical code detection is enabled by the Language Server. To enable third-party linters for additional problem detection, you can enable them by using the Python: Select Linter command and selecting the appropriate linter.
Choose a linter
Install the linting tool of your choice from the VS Code Marketplace.
Microsoft publishes the following linting extensions:
| Linter | Extension |
|---|---|
| Pylint | https://marketplace.visualstudio.com/items?itemName=ms-python.pylint |
| flake8 | https://marketplace.visualstudio.com/items?itemName=ms-python.flake8 |
| mypy | https://marketplace.visualstudio.com/items?itemName=ms-python.mypy-type-checker |
Linting extensions offered by the community:
| Linter | Extension |
|---|---|
| Ruff | https://marketplace.visualstudio.com/items?itemName=charliermarsh.ruff |
| mypy | https://marketplace.visualstudio.com/items?itemName=matangover.mypy |
Note: If you don’t find your preferred linter in the table above or in the Marketplace, you can add support for it via an extension. You can use the Python Extension Template to integrate new Python tools into VS Code.
General Settings
| Setting | Default | Description |
|---|---|---|
| args | [] |
Arguments to be passed to the linter. Note: The officially supported linters run on individual open files. Make sure your configuration applies in that scenario. |
| importStrategy | useBundled |
When set to useBundled, the extension uses the version of the tool that it ships with. When set to fromEnvironment, it attempts to load from your selected Python environment first, otherwise it falls back to the bundled version. |
Disable linting
Linters, if installed, are enabled by default. You can disable them by disabling the extension per workspace.
Run linting
Linting will automatically run when a Python file is opened or saved.
Errors and warnings are shown in the Problems panel (⇧⌘M (Windows, Linux Ctrl+Shift+M)) for open files, and are also highlighted in the code editor. Hovering over an underlined issue displays the details:
Code Actions
Some linters may offer Code Actions that can help address reported problems. You can refer to the Feature Contributions section under your preferred linter extension to find out what Code Actions it offers.
Logging
Logs for linters are available in the Output panel (⇧⌘U (Windows Ctrl+Shift+U, Linux Ctrl+K Ctrl+H)) when you select <linter name> from the drop down menu.
You can change the log level for a linter extension by running the Developer: Set Log Level command from the Command Palette (⇧⌘P (Windows, Linux Ctrl+Shift+P)). Select the extension from the Extension Logs group, and then select the desired log level.
Severity
Linters report issues with some predefined severity. This can be changed using severity setting for the linter. Refer to each linter extension’s README for more details on the supported values and severity levels.
Troubleshooting linting
| Issue | Cause | Solution |
|---|---|---|
| No problems reported | No Python has been selected for your workspace. | Look at the logs for the linter you are using and check the path to the Python environment it’s using. If there is no Python selected, run the Python: Select Interpreter command from the Command Palette and select an existing interpreter for your workspace. |
Next steps
- Debugging — Learn to debug Python both locally and remotely.
- Testing — Configure test environments and discover, run, and debug tests.
- Basic Editing — Learn about the powerful VS Code editor.
- Code Navigation — Move quickly through your source code.
- Python Extension Template — Create an extension to integrate your favorite linter into VS Code.
6/15/2023
I’m using VS Code for TypeScript/JavaScript development. When I open a file it will check that file for errors. The problem is if I’m refactoring (like I move some shared code to a new location or change a name) it won’t show me the errors this caused until I open the file with the problem. …so if I want to do extensive refactoring I have to open every file just to make it scan the file for errors.
How can I make VS Code scan the whole project for errors without having to open each file one by one manually?
asked Jan 17, 2017 at 16:59
![]()
3
VS Code (v1.44) has an experimental feature, that allows project wide error reporting in TS. Try it out:
// put this line in settings.json
"typescript.tsserver.experimental.enableProjectDiagnostics": true
answered Apr 15, 2020 at 17:30
![]()
ford04ford04
64.4k18 gold badges195 silver badges169 bronze badges
9
Figured it out. Note this answer is specific to TypeScript, which is what I am using. Here it is:
Make sure typescript is installed globally (I just had mine installed locally apparently):
npm install -g typescript
Then in VS Code press Shift+Ctrl+B. If you don’t have a task runner set up it will ask what you want. I selected typescript and the tasks.json file will look like this:
{
    "version": "0.1.0",
    "command": "tsc",
    "isShellCommand": true,
    "args": ["-p", "."],
    "showOutput": "silent",
    "problemMatcher": "$tsc"
}
Then pressing Shift+Ctrl+B (or Shift+Command+B in macOS) will check the entire project for problems and they will be reported in your «problems» panel.
![]()
mx0
6,38812 gold badges49 silver badges54 bronze badges
answered Jan 18, 2017 at 0:17
![]()
WillyCWillyC
3,8676 gold badges33 silver badges50 bronze badges
4
If you don’t want to install TypeScript globally, you can do the following:
-
Install TypeScript locally on the project, that is
yarn add --dev typescriptornpm install --save-dev typescript. -
Add a check-types run script to
./package.json.--noEmitmeans that the compiler will won’t generate any JavaScript files.
{
  "scripts": {
    "check-types": "tsc --noEmit"
  }
}
- Let VSCode know about the run script in
/.vscode/tasks.json.
{
  "version": "2.0.0",
  "tasks": [
    {
      "type": "npm",
      "script": "check-types",
      "problemMatcher": [
        "$tsc"
      ]
    }
  ]
}
-
To run the tasks hit the F1 key and select ‘Run Task’, and then ‘npm: check-types’.
-
If you add the following lines to the task, pressing
Ctrl+Bwill run it.«group»: {
«kind»: «build»,
«isDefault»: true
}
4
For the most recent version of tasks.json this is the correct json, following deprecations in version 1.14. Create this as /.vscode/tasks.json
{
    "version": "2.0.0",
    "command": "tsc",
    "type": "shell",
    "args": [
        "-p",
        "."
    ],
    "presentation": {
        "reveal": "silent"
    },
    "problemMatcher": "$tsc"
}
answered Dec 10, 2018 at 11:50
manoftheyearmanoftheyear
3741 gold badge6 silver badges18 bronze badges
2
Once you have open your project in vs code, open the vs code terminal and run:
node_modules/.bin/tsc --noEmit
answered Sep 24, 2019 at 13:56
AriElsaAriElsa
1411 silver badge3 bronze badges
2
UPDATE.
My answer below does not answer the original question, but if you’re like me and have found this thread searching for how to turn on // @ts-check project-wide in VSCode so that you don’t need to add // @ts-check to every file then my answer below is what you need. I have searched and searched and kept getting this thread as my top result so hopefully this helps others as well
I’m on vscode version 1.52.1 and the answer is so simple and right on the vscode website:
https://code.visualstudio.com/docs/nodejs/working-with-javascript#_type-checking-javascript
scroll down to the «Using jsconfig or tsconfig» section
Add a jsconfig.json in your project root and add "checkJs": true
{
  "compilerOptions": {
    "checkJs": true
  },
  "exclude": ["node_modules", "**/node_modules/*"]
}
You might need to restart vscode once you add it in
answered Feb 3, 2021 at 17:49
Francisc0Francisc0
9481 gold badge14 silver badges28 bronze badges
None of the other solutions worked fully for me. Here’s a tasks.json that does, working with vscode 1.67+. On Linux etc. set command to tsc, on Windows be sure to run tsc.cmd as tsc alone will attempt to run the bash script and produce the following error:
The terminal process failed to launch: A native exception occurred during launch (Cannot create process, error code: 193)
"revealProblems": "always" in the presentation section shows the Problems panel on completion.
{
  "version": "2.0.0",
  "tasks": [
    {
      "label": "tsc: error check project",
      "command": "tsc.cmd",
      "args": [
        "-p",
        ".",
        "--noEmit"
      ],
      "isBackground": false,
      "problemMatcher": "$tsc",
      "group": {
        "kind": "build",
        "isDefault": true
      },
      "presentation": {
        "revealProblems": "always",
      }
    }
  ]
}
answered Jun 9, 2022 at 12:42
![]()
sebtsebt
2,2542 gold badges14 silver badges11 bronze badges
- Go to View menu > Extensions and make sure the Microsoft VS Code ESLint extension is installed.
- In Settings, search for «ESLint > Lint Task: Enable», and enable that setting (docs).
- In the Terminal menu, choose Run Task… >
eslint: lint whole folder.
answered Mar 28, 2022 at 14:58
jrcjrc
20.1k10 gold badges69 silver badges63 bronze badges
1
Edit: Since updating to 1.52.0 this no longer works. It will instead replace the current project files with what you selected…
===
I’ve tried every solution I can find and I think it’s safe to say the answer is: You can’t*
The best I’ve found is still technically opening each file manually, but at least it’s not one-by-one:
- You can’t drag/drop a directory but you can select multiple files (including directories) and drag/drop. The directories will be ignored and any files you had selected will be opened in tabs.
- Next, you need to give each tab focus so it triggers eslint to run. (Holding down the next tab keyboard shortcut works.)
This is terrible and I beg someone to prove me wrong.
*I haven’t found a way that works as well as opening files manually. Each method — experimental vscode feature and tsc task — has its own set of drawbacks. The vscode feature is clearly the solution but without a way to ignore node_modules, etc. it’s too painful to use.
answered Nov 30, 2020 at 20:23
![]()
2
Linting highlights syntactical and stylistic problems in your Python source code, which often helps you identify and correct subtle programming errors or unconventional coding practices that can lead to errors. For example, linting detects use of an uninitialized or undefined variable, calls to undefined functions, missing parentheses, and even more subtle issues such as attempting to redefine built-in types or functions. Linting is thus distinct from Formatting because linting analyzes how the code runs and detects errors whereas formatting only restructures how code appears.
Note: Stylistic and syntactical code detection is enabled by the Language Server. To enable third-party linters for additional problem detection, you can enable them by using the Python: Select Linter command and selecting the appropriate linter.
Enable linting
To enable linters, open the Command Palette (⇧⌘P (Windows, Linux Ctrl+Shift+P)) and select the Python: Select Linter command. The Select Linter command adds "python.linting.<linter>Enabled": true to your settings, where <linter> is the name of the chosen linter. See Specific linters for details.
Enabling a linter prompts you to install the required packages in your selected environment for the chosen linter.

Note: If you’re using a global environment and VS Code is not running elevated, linter installation may fail. In that case, either run VS Code elevated, or manually run the Python package manager to install the linter at an elevated command prompt for the same environment: for example
sudo pip3 install pylint(macOS/Linux) orpip install pylint(Windows, at an elevated prompt).
Disable linting
You can easily toggle between enabling and disabling your linter. To switch, open the Command Palette (⇧⌘P (Windows, Linux Ctrl+Shift+P)) and select the Python: Enable/Disable Linting command.
This will populate a dropdown with the current linting state and options to Enable or Disable Python linting.

Run linting
To perform linting, open the Command Palette (⇧⌘P (Windows, Linux Ctrl+Shift+P)), filter on «linting», and select Python: Run Linting. Linting will run automatically when you save a file.
Issues are shown in the Problems panel and as wavy underlines in the code editor. Hovering over an underlined issue displays the details:
General linting settings
You can add any of the linting settings to your user settings.json file (opened with the File > Preferences > Settings command ⌘, (Windows, Linux Ctrl+,)). Refer to User and Workspace settings to find out more about working with settings in VS Code.
To change the linting behavior across all enabled linters, modify the following settings:
| Feature | Setting (python.linting.) |
Default value |
|---|---|---|
| Linting in general | enabled | true |
| Linting on file save | lintOnSave | true |
| Maximum number of linting messages | maxNumberOfProblems | 100 |
| Exclude file and folder patterns | ignorePatterns | [".vscode/*.py", "**/site-packages/**/*.py"] |
When enabling lintOnSave, you might also want to enable the generic files.autoSave option (see Save / Auto Save). The combination provides frequent linting feedback in your code as you type.
Specific linters
The following table provides a summary of available Python linters and their basic settings. For descriptions of individual settings, see the Linter settings reference.
| Linter | Package name for pip install command |
True/false enable setting (python.linting.) |
Arguments setting (python.linting.) |
Custom path setting (python.linting.) |
|---|---|---|---|---|
| Pylint | pylint | pylintEnabled | pylintArgs | pylintPath |
| Flake8 | flake8 | flake8Enabled | flake8Args | flake8Path |
| mypy | mypy | mypyEnabled | mypyArgs | mypyPath |
| pycodestyle (pep8) | pycodestyle | pycodestyleEnabled | pycodestyleArgs | pycodestylePath |
| prospector | prospector | prospectorEnabled | prospectorArgs | prospectorPath |
| pylama | pylama | pylamaEnabled | pylamaArgs | pylamaPath |
| bandit | bandit | banditEnabled | banditArgs | banditPath |
Note: If you don’t find your preferred linter in the table above, you can add support via an extension. The Python Extension Template makes it easy to integrate new Python tools into VS Code.
To select a different linter, use the Python: Select Linter command. You can also edit your settings manually to enable multiple linters. Note, that using the Select Linter command overwrites those edits.
Custom arguments are specified in the appropriate arguments setting for each linter. Each top-level element of an argument string that’s separated by a space on the command line must be a separate item in the args list. For example:
"python.linting.pylintArgs": ["--reports", "12", "--disable", "I0011"],
"python.linting.flake8Args": ["--ignore=E24,W504", "--verbose"]
"python.linting.pydocstyleArgs": ["--ignore=D400", "--ignore=D4"]
If a top-level element is a single value (delineated by quotation marks or braces), it still appears as a single item in the list even if the value itself contains spaces.
A custom path is generally unnecessary as the Python extension resolves the path to the linter based on the Python interpreter being used (see Environments). To use a different version of a linter, specify its path in the appropriate custom path setting. For example, if your selected interpreter is a virtual environment but you want to use a linter that’s installed in a global environment, then set the appropriate path setting to point to the global environment’s linter.
Note: The following sections provide additional details for the individual linters linked in the Specific linters table above. In general, custom rules must be specified in a separate file as required by the linter you’re using.
Pylint
Pylint messages fall into the categories in the following table with the indicated mapping to VS Code categories. You can change the setting to change the mapping.
| Pylint category | Description | VS Code category mapping | Applicable setting (python.linting.) |
|---|---|---|---|
| Convention (C) | Programming standard violation | Information (underline) | pylintCategorySeverity.convention |
| Refactor (R) | Bad code smell | Hint (light bulbs) | pylintCategorySeverity.refactor |
| Warning (W) | Python-specific problems | Warning | pylintCategorySeverity.warning |
| Error (E) | Likely code bugs | Error (underline) | pylintCategorySeverity.error |
| Fatal (F) | An error prevented further Pylint processing | Error | pylintCategorySeverity.fatal |
Command-line arguments and configuration files
You can easily generate an options file using different methods. See Pylint command-line arguments for general switches.
If you’re using command-line arguments:
Command-line arguments can be used to load Pylint plugins, such as the plugin for Django:
"python.linting.pylintArgs": ["--load-plugins", "pylint_django"]
If you’re using a pylintrc file:
Options can also be specified in a pylintrc or .pylintrc options file in the workspace folder, as described on Pylint command line arguments.
To control which Pylint messages are shown, add the following contents to an options file:
[MESSAGES CONTROL]

# Enable the message, report, category or checker with the given id(s). You can
# either give multiple identifier separated by comma (,) or put this option
# multiple time.
#enable=

# Disable the message, report, category or checker with the given id(s). You
# can either give multiple identifier separated by comma (,) or put this option
# multiple time (only on the command line, not in the configuration file where
# it should appear only once).
#disable=
If you’re using Pylint:
You can create an options file using Pylint itself, by running the command below.
# Using an *nix shell or cmd on Windows
pylint --generate-rcfile > .pylintrc
If you are running Pylint in PowerShell, you have to explicitly specify a UTF-8 output encoding. This file contains sections for all the Pylint options, along with documentation in the comments.
pylint --generate-rcfile | Out-File -Encoding utf8 .pylintrc
pydocstyle
Command-line arguments and configuration files
See pydocstyle Command Line Interface for general options. For example, to ignore error D400 (first line should end with a period), add the following line to your settings.json file:
"python.linting.pydocstyleArgs": ["--ignore=D400"]
A code prefix also instructs pydocstyle to ignore specific categories of errors. For example, to ignore all Docstring Content issues (D4XXX errors), add the following line to settings.json:
"python.linting.pydocstyleArgs": ["--ignore=D4"]
More details can be found in the pydocstyle documentation.
Options can also be read from a [pydocstyle] section of any of the following configuration files:
setup.cfgtox.ini.pydocstyle.pydocstyle.ini.pydocstylerc.pydocstylerc.ini
For more information, see Configuration Files.
Message category mapping
The Python extension maps all pydocstyle errors to the Convention (C) category.
pycodestyle (pep8)
Command-line arguments and configuration files
See pycodestyle example usage and output for general switches. For example, to ignore error E303 (too many blank lines), add the following line to your settings.json file:
"python.linting.pycodestyleArgs": ["--ignore=E303"]
pycodestyle options are read from the [pycodestyle] section of a tox.ini or setup.cfg file located in any parent folder of the path(s) being processed. For details, see pycodestyle configuration.
Message category mapping
The Python extension maps pycodestyle message categories to VS Code categories through the following settings. If desired, change the setting to change the mapping.
| pycodestyle category | Applicable setting (python.linting.) |
VS Code category mapping |
|---|---|---|
| W | pycodestyleCategorySeverity.W | Warning |
| E | pycodestyleCategorySeverity.E | Error |
Prospector
Command-line arguments and configuration files
See Prospector Command Line Usage for general options. For example, to set a strictness level of «very high,» add the following line to your settings.json file:
"python.linting.prospectorArgs": ["-s", "veryhigh"]
It’s common with Prospector to use profiles to configure how Prospector runs. By default, Prospector loads the profile from a .prospector.yaml file in the current folder.
Because Prospector calls other tools, such as Pylint, any configuration files for those tools override tool-specific settings in .prospector.yaml. For example, suppose you specify the following, in .prospector.yaml:
pylint:
  disable:
    - too-many-arguments
If you also have a .pylintrc file that enables the too-many-arguments warning, you continue to see the warning from Pylint within VS Code.
Message category mapping
The Python extension maps all Prospector errors and warnings to the Error (E) category.
Flake8
Command-line arguments and configuration files
See Invoking Flake8 for general switches. For example, to ignore error E303 (too many blank lines), use the following setting:
"python.linting.flake8Args": ["--ignore=E303"]
By default, Flake8 ignores E121, E123, E126, E226, E24, and E704.
Flake8 user options are read from the C:Users<username>.flake8 (Windows) or ~/.config/flake8 (macOS/Linux) file.
At the project level, options are read from the [flake8] section of a tox.ini, setup.cfg, or .flake8 file.
For details, see Flake8 configuration.
Message category mapping
The Python extension maps flake8 message categories to VS Code categories through the following settings. If desired, change the setting to change the mapping.
| Flake8 category | Applicable setting (python.linting.) |
VS Code category mapping |
|---|---|---|
| F | flake8CategorySeverity.F | Error |
| E | flake8CategorySeverity.E | Error |
| W | flake8CategorySeverity.W | Warning |
mypy
Message category mapping
The Python extension maps mypy message categories to VS Code categories through the following settings. If desired, change the setting to change the mapping.
| mypy category | Applicable setting (python.linting.) |
VS Code category mapping |
|---|---|---|
| error | mypyCategorySeverity.error | Error |
| note | mypyCategorySeverity.note | Information |
Troubleshooting linting
| Error message | Cause | Solution |
|---|---|---|
| … unable to import <module_name> | The Python extension is using the wrong version of Pylint. | Ensure that selected interpreter is a valid Python installation where Pylint is installed. Alternately, set the python.linting.pylintPath to an appropriate version of Pylint for the Python interpreter being used. |
| Linting with <linter> failed … | The path to the Python interpreter is incorrect. | Make sure you selected a valid interpreter path by running the Python: Select Interpreter command (see Environments). |
| The linter has not been installed in the current Python environment. | Open a command prompt, navigate to the location where your selecter interpreter is, and run pip install for the linter. |
|
| The path to the linter is incorrect. | Ensure that the appropriate python.linting.<linter>Path setting for the linter is correct. |
|
| Custom arguments are defined incorrectly. | Check the appropriate python.linting.<linter>Args settings, and that the value of the setting is a list of the argument elements that are separated by spaces. For example, "python.linting.pylintPath": "pylint --load-plugins pylint_django" is incorrect. The correct syntax is "python.linting.pylintArgs": ["--load-plugins", "pylint_django"]. |
Next steps
- Debugging — Learn to debug Python both locally and remotely.
- Testing — Configure test environments and discover, run, and debug tests.
- Basic Editing — Learn about the powerful VS Code editor.
- Code Navigation — Move quickly through your source code.
- Python Extension Template — Create an extension to integrate your favorite linter into VS Code.
4/30/2022
4 марта, 2021 1:31 пп
20 258 views
| Комментариев нет
Development, Java

Если вы пишете JavaScript в редакторе, например в Visual Studio Code, у вас есть несколько способов убедиться, что ваш код имеет правильный синтаксис и соответствует передовым практикам. Для этого можно использовать линтер. Линтеры – это программы, которые проверяют ваш код на наличие синтаксических ошибок и выделяют их, чтобы вы могли быстро их найти и исправить. ESLint – это линтер, который вы можете интегрировать в Visual Studio Code, чтобы обеспечить целостность вашего кода.
ESLint может форматировать код и анализировать его, а также вносить предложения по улучшению. Кроме того, вы можете настроить способ оценки вашего кода.
В этом руководстве вы узнаете, как установить ESLint на Visual Studio Code и реализовать пользовательскую конфигурацию для работы с операторами логов при отладке. Также мы покажем, как настроить автоматическое исправление синтаксических ошибок в ESLint при сохранении файлов.
Требования
- Последняя версия Visual Studio Code на вашем компьютере. В этом руководстве используется Visual Studio Code 1.43.0.
- Последняя версия Node на вашем компьютере. Вы можете следовать инструкциям по установке Node.js в macOS, Debian 10, CentOS 8, Ubuntu 20.04.
1: Создание простого кода JavaScript
Мы начнем с подготовки тестового проекта, на примере которого рассмотрим функции линтера. Создайте для своего проекта каталог с помощью следующей команды:
mkdir linting
Теперь, когда папка для проекта готова, перейдите в нее:
cd linting
Находясь внутри каталога linting, создайте файл JavaScript по имени app.js:
touch app.js
Откройте app.js в Visual Studio Code. Поместите следующий код JavaScript в файл app.js:
const name = 'James'
const person = {first: name}
console.log(person)
const sayHelloLinting = (fName) => {
console.log(`Hello linting, ${fName}`);
};
С точки зрения форматирования вы можете сразу заметить несколько вещей, которые можно улучшить:
- Кавычки использованы непоследовательно.
- Точка с запятой – тоже.
- Интервалы установлены неправильно.
Подготовив этот файл JavaScript, вы можете инициализировать этот проект. Для этого вернитесь в командную строку и в каталоге linting выполните следующую команду:
npm init
Команда npm init при инициализации вашего проекта создаст в каталоге linting файл package.json. В package.json будут храниться зависимости и другие важные параметры конфигурации вашего проекта.
Теперь, когда тестовый проект JavaScript готов, мы можем установить ESLint.
2: Установка и настройка ESLint
Чтобы установить ESLint, введите:
npm install eslint --save-dev
В эту команду важно включить флаг –save-dev, поскольку он сохраняет пакет как зависимость разработки – и тогда он будет использован только в разработке, но не в производстве. Пакет eslint нужен только тогда, когда вы активно работаете над кодом и вносите изменения в свой проект. Как только ваш проект будет на стадии производства, eslint больше не понадобится. И флаг –save-dev гарантирует, что eslint будет указан в вашем файле package.json только как зависимость разработки.
Теперь, когда ESLint установлен, вы можете инициализировать конфигурацию ESLint для своего проекта, используя для этого следующую команду:
./node_modules/.bin/eslint --init
Важным элементом этой команды является флаг –init. Раздел ./node_modules/.bin/eslint этой команды – это путь к ESLint в вашем проекте. Флаг –init активирует ESLint для вашего проекта. Процедура активации или инициализации ESLint создаст конфигурационный файл, который позволит вам настроить ESLint для вашего проекта.
Прежде чем вы сможете получить доступ к своему конфигурационному файлу ESLint, программа задаст вам несколько вопросов о проекте. Эти вопросы помогут программе убедиться, что конфигурация, инициализированная для вашего проекта, наилучшим образом соответствует требованиям.
Первый вопрос будет выглядеть так:
? How would you like to use ESLint? …
To check syntax only
To check syntax and find problems
❯ To check syntax, find problems, and enforce code style
Здесь мы выберем To check syntax, find problems, and enforce code style – чтобы программа проверяла синтаксис, сообщала о проблемах и поддерживала единый стиль кода.
Следующий вопрос выглядит так:
What type of modules does your project use? …
JavaScript modules (import/export)
❯ CommonJS (require/exports)
None of these
Выберите опцию CommonJS, чтобы использовать глобальные переменные CommonJS.
В следующем вопросе будет сказано:
? Which framework does your project use? …
React
Vue.js
❯ None of these
Выберите вариант None of these.
Затем программа спросит:
? Does your project use TypeScript? › No / Yes
Выберите вариант No.
Затем появится такой вопрос:
? Where does your code run? … (Press <space> to select, <a> to toggle all, <i> to invert selection)
✔ Browser
✔ Node
Выберите Browser.
Затем вы увидите такой вопрос:
✔ How would you like to define a style for your project? …
❯ Use a popular style guide
Answer questions about your style
Inspect your JavaScript file(s)
Выберите ответ Use a popular style guide.
На вопрос:
Which style guide do you want to follow?
Ответьте Airbnb: https://github.com/airbnb/javascript.
Затем будет такой вопрос:
? What format do you want your config file to be in? …
JavaScript
YAML
❯ JSON
Нужно выбрать JSON.
Вы получите такое сообщение:
Checking peerDependencies of eslint-config-airbnb-base@latest
The config that you've selected requires the following dependencies:
eslint-config-airbnb-base@latest eslint@^5.16.0 || ^6.8.0 || ^7.2.0 eslint-plugin-import@^2.21.2
Последний вопрос программы выглядит так:
? Would you like to install them now with npm? › No / Yes
Выберите вариант Yes, чтобы установить зависимости с помощью npm.
Вам также будет предложено установить дополнительные пакеты. Выберите yes.
После всех вопросов вы заметите, что в ваш каталог linting был добавлен файл .eslintrc.json. Теперь инструмент ESLint установлен. Код в app.js пока не изменился – и это связано с тем, что ESLint необходимо интегрировать с Visual Studio Code.
3: Настройка ESLint
Чтобы интегрировать ESLint в Visual Studio Code, вам необходимо установить расширение ESLint для VS Code. Вернитесь в Visual Studio Code и найдите ESLint во вкладке Extensions. После того, как вы найдете это расширение, нажмите Install.
После установки расширения ESLint вы заметите красочное подчеркивание в файле app.js – это линтер выделил ошибки в файле. Отметки в ESLint имеют разные цвета в зависимости от степени серьезности. Если вы наведете курсор на подчеркнутый код, вы увидите сообщение, объясняющее вам ошибку. Таким образом, ESLint помогает находить ошибки в коде и устранять их.
ESLint может сделать для вас даже больше: к примеру, он может автоматически исправлять ошибки при каждом сохранении файла (для этого требуется отдельная настройка).
4: Форматирование при сохранении
Чтобы ESLint мог автоматически исправлять синтаксис и устранять ошибки форматирования при каждом сохранении, вам нужно открыть меню настроек. Меню в Visual Studio Code – это значок шестеренки в левом нижнем углу. Нажмите его и выберите Settings.
В меню настроек найдите Code Actions on Save. Первой идет опция Editor: Code Actions on Save, а ниже – Edit in settings.json, и как раз она нам нужна.
Файл settings.json откроется в редакторе кода. Чтобы ESLint исправлял ошибки при сохранении файла, вам нужно добавить следующий код в settings.json:
"editor.codeActionsOnSave": {
"source.fixAll.eslint": true
},
"eslint.validate": ["javascript"]
С помощью этого кода ESLint сможет автоматически исправляет ошибки и проверяет JavaScript при сохранении.
Вернитесь к файлу app.js и сохраните его. Вы увидите, что линтер внес некоторые изменения, и цвет подчеркивания тоже изменился. Вот некоторые из ошибок форматирования, которые исправил ESLint:
- Теперь одинарные кавычки использованы последовательно.
- Точки с запятой – тоже.
- Отступ внутри функции расставлены правильно.
ESLint автоматически будет устранять синтаксические ошибки при сохранении файла app.js. Но пока у нас еще остались сообщения об ошибках. Их можно исправить, настроив ESLint для обнаружения или игнорирования определенных ошибок и проблем с форматированием.
5: Пользовательская настройка ESLint
«Из коробки» ESLint подчеркивает все операторы console.log() в app.js. В некоторых случаях распознавание операторов console.log в качестве ошибки может быть не в приоритете. Вы можете игнорировать операторы console.log.
Правила конфигурации ESLint можно изменить в файле .eslintrc.json.
Откройте файл .eslintrc.json. В этом файле вы увидите такой код:
{
"env": {
"browser": true,
"commonjs": true,
"es2021": true
},
"extends": [
"airbnb-base"
],
"parserOptions": {
"ecmaVersion": 12
},
"rules": {
}
}
В конце файла .eslintrc.json вы увидите объект «rules». Чтобы настроить триггеры ESLint (или отключить реакцию ESLint на определенные фрагменты кода), нужно добавить пары «ключ-значение» к объекту «rules». Ключ – это название правила, которое нужно добавить или изменить. Значение задает уровень серьезности проблемы. ESLint поддерживает три уровня серьезности:
- error – подчеркивается красным
- warn – подчеркивается желтое
- off – ничего неподчеркивается.
Если вы не хотите подчеркивать операторы console.log как ошибки, вы можете назвать правило no-console и указать это имя в качестве ключа. Используйте off как значение:
"rules" : {
"no-console": "off"
}
Это правило удаляет подчеркивание операторов console.log в app.js.
Некоторые правила требуют нескольких фрагментов данных, включая уровень серьезности и значение. К примеру, чтобы указать тип кавычек, которые вы хотите использовать в своем коде, вы должны передать и выбранный тип кавычек, и уровень серьезности:
"rules" : {
"no-console": "off",
"quotes": [
"error",
"double"
]
}
Если теперь вы включите в код одинарные кавычки, ESLint выдаст ошибку.
Заключение
Это руководство вкратце знакомит с некоторыми функциями интеграции ESLint в Visual Studio Code. Инструменты линтинга, такие как ESLint, помогут вам сэкономить время для более сложных задач за счет автоматизации и упрощения проверки синтаксиса и остальных требований к коду.
Если вам нужна дополнительная информация о правилах и о том, какие пары «ключ-значение» вы можете использовать для настройки ESLint, вы можете ознакомиться с документацией.
Tags: ESLint, Javascript, Node.js, Visual Studio Code
Статья, в которой рассмотрим, что такое Visual Studio Code, как его установить и настроить для фронтенд разработки.
Visual Studio Code или просто VS Code – это бесплатный, популярный и имеющий множество дополнений текстовый редактор, который в первую очередь предназначен для создания и отладки современных веб- и облачных приложений.
Разработан он компанией Microsoft и доступен для операционных систем Windows, MacOS и Linux.
Распространяется данная программа бесплатно, исходный код её доступен на GitHub.
VS Code поддерживает большое количество языков программирования, включает в себя отладчик, средства для работы с Git, подсветку синтаксиса, технологию автодополнения IntelliSense, инструменты для рефакторинга, терминал и многое другое.
VS Code является достаточно гибким инструментом, расширяемым с помощью плагинов, доступных на Visual Studio Marketplace. Открыть панель с расширениями в программе можно через комбинацию клавиш Ctrl+Shift+X.
Плагинов для Visual Studio Code очень много, но в рамках этой статьи рассмотрим только наиболее популярные из них. В VS Code уже встроен такой плагин как Emmet. Если вы не знакомы с ним, то он предназначен для быстрого набора кода. Дополнительно его устанавливать не нужно.
Для установки VS Code на компьютер необходимо перейти на этот сайт. После этого на странице выбрать вашу операционную систему и нажать на значок «Загрузки». После завершения скачивания программы установить её себе на компьютер.
Чтобы лучше ориентироваться в программе вы можете установить языковый пакет для русского языка. Для этого откройте панель «Расширения» (Ctrl+Shift+X) и введите в ней текст «Russian Language Pack for Visual Studio Code». После этого выберите его в результатах поиска и установите его.
В Visual Studio Code имеется огромное количество различных плагинов кроме языковых пакетов. Предназначены они для расширения функциональности этого редактора. Все плагины для этого редактора размещены на Marketplace.
Общая настройка VS Code
VS Code содержит большое количество настроек, с помощью которых вы можете настроить этот редактор под себя.
Изменение настроек в VS Code осуществляется в соответствующем окне. Открыть его можно несколькими способами:
- через комбинацию клавиш Ctrl+,;
- через пункт меню «Файл -> Настройки -> Параметры» (в версии на английском языке «File -> Preferences -> Settings»);
- нажать на значок шестерёнки и выбрать в открывшемся меню пункт «Параметры» (Settings).
Список параметров, которые пользователи наиболее часто настраивают:
editor.tabsize— число пробелов при табуляции;editor.insertSpaces— вставлять ли пробелы при нажатии Tab;editor.detectIndentation— нужно ли параметры «#editor.tabsize» и «editor.insertSpaces» определять автоматически при открытии файла на основе его содержимого;editor.wordWrap— управляет тем, как следует переносить строки;editor.fontSize— размер шрифта в пикселях;editor.mouseWheelZoom— нужно ли включать изменение размера шрифта в редакторе при нажатой клавише Ctrl и движении колесика мыши;editor.minimap.enabled— включает или отключает отображение мини-карты;editor.formatOnSave— выполнять ли автоматическое форматирование файла при его сохранении;workbench.startupEditor— управляет тем, что будет отображаться при запуске, если содержимое редактора не было восстановлено из предыдущего сеанса;files.insertFinalNewline— если этот параметр включен, то при сохранении файла в его конец вставляется пустая строка;files.trimFinalNewlines— если этот параметр активен, то при сохранении файла будут удалены все пустые строки, идущие за последней в конце файла;files.trimTrailingWhitespace— если этот параметр включен, то при сохранении файла будут удалены все пробельные символы на концах строк;files.autoSave— для включения автосохранения файлов;terminal.integrated.cwd— позволяет задать путь явного запуска, по которому будет запущен терминал;telemetry.enableTelemetry— включает или отключает отправку сведений об использовании и ошибках в веб-службу Майкрософт;telemetry.enableCrashReporter— разрешает отправку отчетов о сбоях в веб-службу Майкрософт;
Изменять настройки можно как глобально, так и конкретно для текущего проекта. Изменение глобальных настроек осуществляется в окне «Параметры» на вкладке «Пользователь». Эти настройки сохраняются в файл «settings.json». Открыть его можно нажав на значок «Открыть параметры (JSON)».
Пример файла «settings.json»:
{
  "editor.wordWrap": "wordWrapColumn",
  "editor.wordWrapColumn": 120,
  "editor.minimap.enabled": false,
  "editor.formatOnSave": true,
  "editor.tabSize": 2,
  "editor.detectIndentation": false,
  "editor.fontSize": 17,
  "editor.mouseWheelZoom": true,
  "workbench.startupEditor": "none",
  "files.insertFinalNewline": true,
  "files.trimFinalNewlines": true,
  "files.trimTrailingWhitespace": true,
  "telemetry.enableTelemetry": false,
  "telemetry.enableCrashReporter": false,
  "files.autoSave": "afterDelay",
  "files.autoSaveDelay": 10000
}
Кстати, изменять настройки также можно просто посредством редактирования этого файла.
Сохранение настроек для рабочей директории выполняется в специальный файл «settings.json», который будет добавлен в папку «.vscode». Настройка параметров для рабочей директории (проекта) можно также выполнить просто посредством редактирования этого файла.
Настройка VS Code для HTML и CSS
Visual Studio Code обеспечивает базовую поддержку при написании HTML и CSS из коробки. Имеется подсветка синтаксиса, умные дополнения с IntelliSense и настраиваемое форматирование. VS Code также имеет отличную поддержку Emmet.
Зачем нужен Emmet? Он позволяет очень быстро писать код.
Например, Emmet аббревиатура ul>li*3>span.item-$ после нажатии клавиши Tab создаст следующий код:
<ul>
  <li><span class="item-1"></span></li>
  <li><span class="item-2"></span></li>
  <li><span class="item-3"></span></li>
</ul>
В CSS аббревиатура Emmet как dn создаст код display: none.
VS Code имеет встроенные средства для форматирования кода. Настроить параметры форматирования можно в настройках. Находятся они в разделах «Расширения -> HTML» и «Расширения -> CSS».
Комбинация клавиш для выполнения форматирования в VS Code: Shift+Alt+F.
Функциональность VS Code при работе с HTML и CSS можно улучшить с помощью расширений.
Вот перечень некоторых из них:
- Auto Rename Tag – автоматически изменяет имя закрывающего тега при переименовывании открывающегося;
- Auto Close Tag – автоматически добавляет закрывающий HTML/XML тег при вводе закрывающей скобки открывающегося тега (кроме HTML, это дополнение добавляет эту возможность в JavaScript и многие другие языки);
- HTMLHint – плагин для статического анализа HTML кода;
- HTML CSS Support — поддержка CSS для документов HTML;
- IntelliSense for CSS class names in HTML — плагин для предложения вариантов завершения имени CSS класса в HTML на основе определений, найденных им в вашем рабочем пространстве;
- Autoprefixer — для автоматического добавления CSS свойств с префиксами;
- CSS Peek — позволяет посмотреть свойства, прикреплённые к классу или идентификатору без переключения на CSS файл, в котором они описаны;
- Prettier — Code formatter — для форматирования кода (HTML, CSS, JavaScript и др.);
VS Code имеет возможность, которая позволяет сворачивать области CSS кода заключенные между /*#region*/ и /*#endregion*/:
/*#region*/
...
/*#endregion*/
Настройка VS Code для разработки на JavaScript
Разработку веб-проекта в Windows 10 можно ввести не только с использованием программ, предназначенных только для этой операционной системы, но и посредством WSL (Linux). Если вам нравится Linux и вы хотите его использовать, то Windows 10 позволяет вам это сделать из коробки (то есть непосредственно из дистрибутива). В следующем разделе приведена инструкция по установке WSL в Windows 10 и настройке Visual Studio Code для её использования в качестве среды разработки.
Кроме этого, ОС Linux в большинстве случаев — это система, которая затем у вас будет установлена на продакшене. А это значит, что вы получите окружение как на сервере или более близкое к этому.
Если вы не хотите использовать WSL в качестве среды разработки или работаете в другой операционной системе, то в этом случае можете сразу же перейти к разделу «Установка и настройка ES Lint».
Как в Windows 10 установить WSL и использовать её в VS Code
Коротко о подсистеме Windows для Linux (WSL). В Windows 10 появилась возможность осуществлять веб-разработку прямо в среде на основе Linux. Для этого вам необходимо просто включить компонент Windows 10 «Подсистема Windows для Linux (WSL)» и установить из Microsoft Store «любимый» дистрибутив Linux (например, Ubuntu 18.04). Подсистема WSL появилась в Windows 10, начиная с обновления «Anniversary Update» (1607), а версия 2004 этой ОС уже включает WSL 2.
Более подробно процесс установки WSL описан в этой статье, а именно в разделах «Включение подсистемы Windows для Linux» и «Установка приложения «Ubuntu». Если вы ещё не читали эту статью, то можете это сделать, перейдя по представленной выше ссылке.
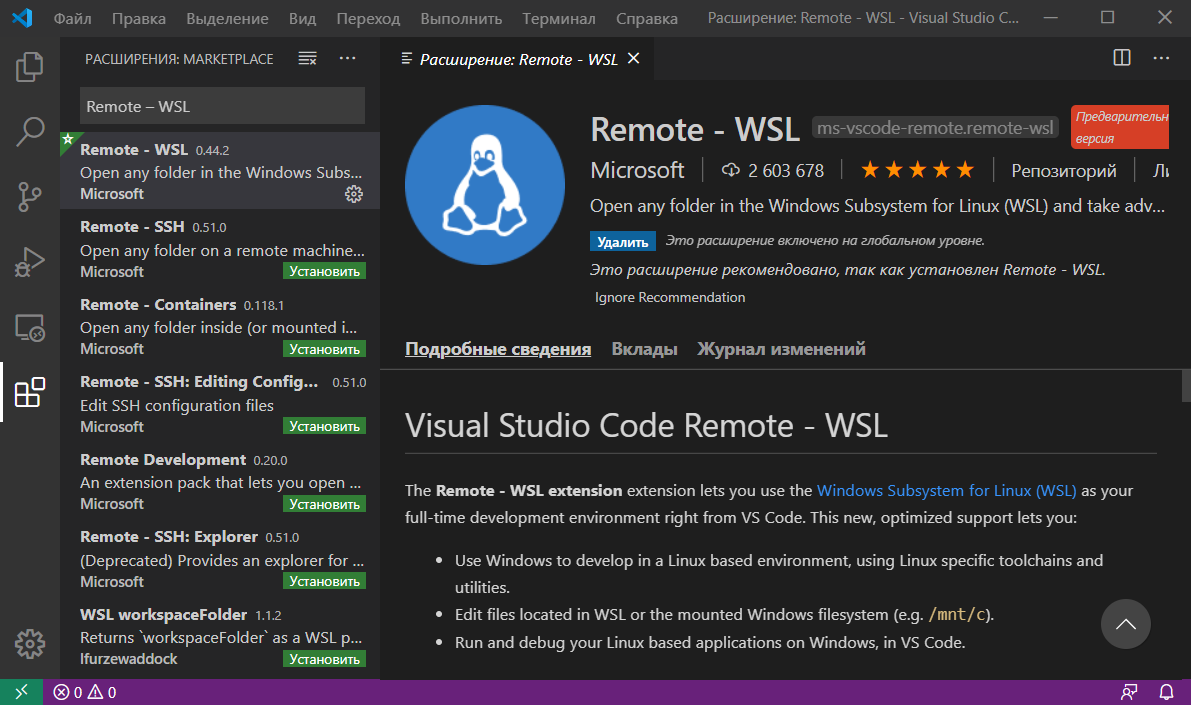
Установка расширения «Remote – WSL» в VS Code. Для использования WSL в качестве среды для полной разработки прямо из VS Code необходимо установить расширение «Remote – WSL».
Это позволит вам ввести веб-разработку прямо в среде на основе Linux, использовать специфичные для неё наборы инструментов и утилит, а также запускать и отлаживать свои приложения в Linux, не выходя при этом из Windows.
Это расширение позволит выполнять команды непосредственно в WSL, а также редактировать файлы, расположенные в WSL или в смонтированной файловой системе Windows (локальные диски находятся в /mnt) не беспокоясь о проблемах с совместимостью.
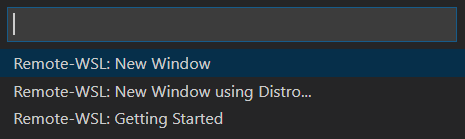
После установки расширения и перезагрузки редактора VS Code у вас появится индикатор WSL в нижнем левом углу окна программы.
При нажатии на него вам будут показаны команды Remote-WSL. Используя их, вы можете открыть новое окно VS Code, в котором в качестве среды будет использоваться WSL. При этом команда «Remote-WSL: New Window» выполнит это с использованием дистрибутива Linux, который у вас назначен по умолчанию, а команда «Remote-WSL: New Window using Distro…» — используя конкретный дистрибутив Linux из установленных.
Версия дистрибутива Linux, которая сейчас используется в WSL отображается в индикаторе следующим образом:

Установка и настройка ESLint
ESLint – это инструмент, который крайне желательно установить в систему, если вы разрабатываете код на JavaScript. Он будет показывать вам ошибки в коде, а также направлять вас при его написании так, чтобы он был выдержан в едином стиле.
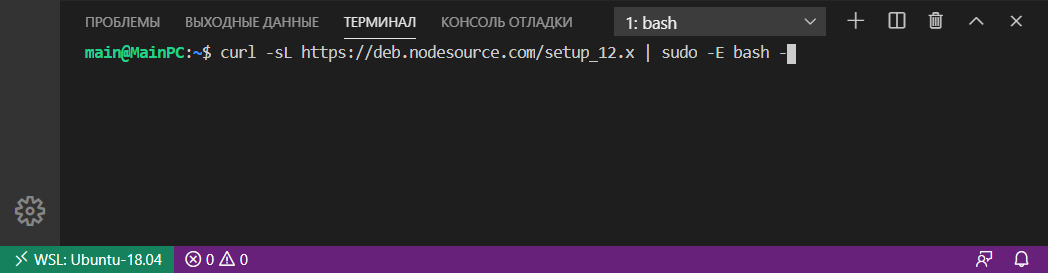
Перед тем как переходить к установке ESLint сначала инсталлируем в ОС «Node.js v12.x».
В Ubuntu это осуществляется следующим образом:
curl -sL https://deb.nodesource.com/setup_12.x | sudo -E bash -
sudo apt-get install -y nodejs
Вводить эти команды будем через терминал VS Code. Открыть его можно посредством комбинации клавиш Ctrl+Shift+` или кликнув в главном меню на пункт «Терминал -> Создать терминал».
Проверить номер установленной версии «Node.js» можно так:
node -vПосле установки «Node.js» создадим папку для проекта в файловой системе ОС, а затем откроем её с помощью VS Code.
Создание проекта обычно начинается с его инициализации посредством npm. Этот процесс можно выполнить посредством следующей команды:
npm init -yВ результате выполнения этой команды у вас появится файл «package.json». Этот файл кроме информации о проекте и других вещей, ещё будет содержать набор зависимостей для данного проекта. Имея этот файл, мы сможем при необходимости очень быстро развернуть проект на любом другом компьютере.
Теперь перейдём к установке ESLint и некоторых других npm пакетов в проект:
sudo npm install --save-dev eslint eslint-config-airbnb-base eslint-plugin-importКлюч --save-dev используется для того чтобы сделать запись об этих пакетах в «package.json». Данный ключ добавит их в секцию devDependencies.
Установка npm пакетов осуществляется в папку «node_modules» этого проекта.
В качестве стиля кода мы будем использовать Airbnb. Это руководство используется многими известными организациями и имеет очень большое количество звёзд на GitHub.
Для того, чтобы можно было использовать Airbnb для расширения базовой конфигурации ESLint мы установили пакеты eslint-config-airbnb-base (без зависимостей от React) и eslint-plugin-import (для поддержки синтаксиса импорта/экспорта ES6+ и предотвращения проблем с неправильным написанием путей к файлам и имен импорта).
После окончания загрузки пакетов приступим к интегрированию ESLint в Visual Studio Code. Осуществляется это посредством установки расширения с одноимённым названием.
Для того чтобы ESLint работал необходимо создать конфигурационный файл. Это можно выполнить как посредством команды ./node_modules/.bin/eslint --init (настройка осуществляется посредством ответов на вопросы мастера), так и самостоятельно.
Конфигурационный файл необходим для задания настроек, в соответствии с которыми ESLint будет осуществлять проверку JavaScript кода.
Чтобы сделать это самостоятельно нам необходимо в корне проекта создать файл .eslintrc и добавить в него, например, следующие данные:
{
  "env": { "browser": true, "es6": true },
  "extends": "airbnb-base",
  "parserOptions": { "ecmaVersion": 6 }
}
Эти данные будут определять следующие настройки для ESLint:
env— это свойство определяет среды, в которых JavaScript должен работать. Для фронтенда средой выступает браузер, поэтому добавим вenvсвойство"browser": true. Свойство"es6": trueпредназначено для автоматического включения синтаксиса ES6.extends— предназначен для указания конфигурации, с помощью которой мы хотим расширить общую конфигурацию ESLint. В качестве значенияextendsукажем конфигурациюairbnb-base(без React). При необходимости можно указать не одну, а несколько конфигурации. В этом случае каждая следующая конфигурация будет расширять предыдущую. Т.е. если мы укажем какую-то конфигурацию послеairbnb-base, то она будет уже расширять не общую конфигурацию ESLint, аairbnb-base;parserOptions— позволяет задать параметры языку JavaScript, которые мы хотим поддерживать. В настоящее время рекомендуется использовать при разработке проектов синтаксис ECMAScript 6. Указание поддержки этой версии осуществляется посредством задания ключуecmaVersionзначения 6. При необходимости вы можете указать вместо этой другую версию.
Если вам необходимо дополнительно линтить ошибки кода, размещенного в теге <script>, то установите плагин eslint-plugin-html:
sudo npm install --save-dev eslint-plugin-htmlФорматирование кода JavaScript будем выполнять с помощью Prettier. Для правильной совместной работы Prettier и ESLint установим следующие npm пакеты:
sudo npm install --save-dev prettier eslint-plugin-prettier eslint-config-prettierДля того чтобы ESLint не просматривал определённые папки и не выдавал по ним ошибки следует создать файл .eslintignore и прописать их в нём:
/.vscode
/.git
node_modules
Если у вас включено стандартное форматирование кода в VS Code при сохранении, то чтобы в качестве плагина для форматирования js файлов применялся ESLint, следует в конфигурационный файл «settings.json» добавить следующее:
"editor.formatOnSave": true,
// добавить это
"[javascript]": {
  "editor.defaultFormatter": "dbaeumer.vscode-eslint"
},
"eslint.format.enable": true
Если вы хотите чтобы при сохранении файлов форматировались только js файлы, то editor.formatOnSave необходимо установить значение false, а true этому ключу только в секции "[javascript]":
"editor.formatOnSave": false,
"[javascript]": {
  "editor.formatOnSave": true,
  "editor.defaultFormatter": "dbaeumer.vscode-eslint"
},
"eslint.format.enable": true
Теперь, ESlint будет проверять JavaScript код и показывать в нём ошибки и предупреждения. Они будут помечаться с использованием волнистых линий.
Результат проверки JavaScript кода ESLint:
Дополнительная настройка VS Code
Вот ещё некоторый список плагинов для VS Code, которые могут расширить возможности Visual Studio Code для фронтенд разработки и не только:
- Project Manager – для удобного управления вашими проектами, независимо от того, где они расположены;
- LiveServer – локальный сервер с возможностью автоматического обновления страниц в браузере при их изменении (запустить сервер можно посредством нажатия на иконку «Go Live» в строке состояния или выбора пункта «Open with Live Server» в контекстном меню области редактора);
- Debugger for Chrome – применяется для отладки JavaScript кода в среде редактора на основе браузера Chrome или любого другого, который поддерживает протокол Chrome Debugger;
- Settings Sync – плагин для синхронизации настроек VS Code (хранение настроек осуществляется на GitHub);
- Visual Studio IntelliCode – система, которая предназначена для экономии вашего времени, помещая наиболее часто используемые элементы завершения для текущего контекста в верхней части списка;
- TODO HighLight – для выделения TODO, FIXME и другие аннотаций в коде;
- Version Lens – показывает информацию о версии пакета для npm, jspm, dub и dotnet ядра;
- GitLens – расширяет возможности Git встроенного в этот редактор (он позволяет очень просто понять почему и когда были изменены те или иные строки кода, изучить историю и развитие кодовой базы проекта и многое другое).
Я только что переключился на Visual Studio Code для веб-разработки от Netbeans и нахожу свой путь. В Netbeans, если я забуду закрыть скобку на tagname, это укажет на мою ошибку с красным волнистым подчеркиванием и предупреждением в левом поле.
Я бы подумал, что проверка ошибок является фундаментальной функцией в Редакторе веб-разработчиков, таком как vs code. Может быть, я просто не нахожу правильный вариант или расширение.
Как я могу достичь этой же ошибки html, css проверка поведения в VS-коде?
4 ответов
VSCode не имеет проверки HTML по умолчанию. Но это позволяет добавлять расширения и включать эти функции.
чтобы добавить проверку HTML (линтинг), откройте VSCode, затем нажмите Ctrl + P и затем вставить ext install HTMLHint в нем, и нажмите Enter. Он установит валидатор HTML. Возможно, Вам потребуется перезагрузить VSCode для загрузки расширения.
теперь, если вы откроете тот же html-документ, в котором была синтаксическая ошибка, вы увидите, что в строке состояния внизу отображается проблема и он также покажет вам ошибки в этих строках.
14
автор: Nimeshka Srimal
VS код по умолчанию поддерживает форматирование кода и отслеживает синтаксическую ошибку. Если вы создаете новый файл и непосредственно пытаетесь написать код, то VS Code не может понять, какой язык или тип синтаксиса пользователь хочет отформатировать / исправить.
Итак, сначала нужно сохранить новый файл с соответствующим расширением, чем visual studio правильно определит синтаксис.
форматирование кода доступно в VS Code через следующие ярлыки:
- На Windows Shift + Alt + F
- На Mac Shift + опции + F
- На Ubuntu Ctrl + Shift + я
вы можете добавить Auto Close Tag из VS Code marketplace.
Launch VS Code Quick Open (Ctrl+P), вставьте следующую команду и нажмите enter.
-
автоматически добавить HTML / XML закрыть тег, так же, как Visual Studio IDE или Sublime Text
ext install auto-close-tag -
VS Code integration for HTMLHint-инструмент статического анализа кода для HTML
ext install HTMLHint -
обеспечивает завершение имени класса CSS для атрибута класса HTML на основе файлов CSS в рабочей области. Также поддерживает атрибут className React.
ext install html-css-class-completion
код VS поддерживает это по умолчанию. Он также поддерживает Emmet по умолчанию, что означает, что вам не нужно беспокоиться о близких тегах HTML. Он автоматически добавляет закрывающий тег.
Это не встроенная функциональность VsCode…Тем не менее, у него есть много доступных плагинов. Я бы рекомендовал вам плагин HTMLHint. Это то, что я использую.
вы можете установить его с помощью: ext install HTMLHintкоманда

Установить расширение для VS Code очень легко. Откройте вкладку Extensions в левой части экрана и найдите HTML Hint с помощью строки поиска.
На экране появится множество расширений, где нужно будет выбрать нужное. Выберить его и нажмите кнопку «Установить». Готово! Теперь с расширением можно работать, оно уже встроено в ваш VS Code.
2) Как работать с расширением?
Представим такую ситуацию: вы написали HTML-код и искренне считаете, что все сделали правильно. Однако через некоторое время выясняется, что некоторые теги не закрыты или закрыты другими, неподходящими тегами.
Вполне возможно, что вы написали что-то лишнее в теге или добавили некорректные атрибуты, например, вместо «class=”image__card”» написали «CLASS=”image__card”». Расширение HTML Hint сразу находит неточности.

HTML Hint находит ошибки в коде и подчеркивает их, а также пишет комментарии, чтобы пользователь понял, что он сделал не так. Посмотреть список неточностей кода можно и во вкладке Problems внизу экрана, откуда вы можете переместиться именно в то место кода, где была допущена ошибка.

3) Преимущества HTML Hint
HTML Hint – это огромный плюс для веб-разработчика и для всех, кто использует в работе язык разметки HTML. Когда мы пишем код, мы можем случайно что-либо упустить, и тогда весь проект или его часть перестанет функционировать. Если код большой, на поиски ошибок могут уйти часы и даже дни.
Расширение, которое проверяет ошибки – это помощник в работе с HTML. Оно ускоряет создание сайтов и особенно полезно для новичков, которые только начинают свой профессиональный путь в разработке.
Еще одно достоинство HTML Hint – это возможность настраивать расширение под себя.
475 просмотров
Отказ от ответственности: Вся размещенная информация была взята из открытых источников и представлена исключительно в ознакомительных целях а также не несет призыва к действию. Создано лишь в образовательных и развлекательных целях. | Так же, если вы являетесь правообладателем размещенного на страницах портала материала, просьба написать нам через контактную форму жалобу на удаление определенной страницы, а также ознакомиться с инструкцией для правообладателей материалов. Спасибо за понимание.
Если вам понравились материалы сайта, вы можете поддержать проект финансово, переведя некоторую сумму с банковской карты, счёта мобильного телефона или из кошелька ЮMoney.