Overview of VHDX/VHD Corruption
VHD and VHDX files are recognized as two major virtual disk image file formats used to create a virtual environment of a Windows system. Similar to a physical hard disk drive, a VHD/VHDX file is vulnerable to corruption. As a consequence, the entire virtual machine file data becomes inaccessible. Therefore, knowing how to repair VHDX and recover data from corrupted VHDX files begins the main topic of this page.
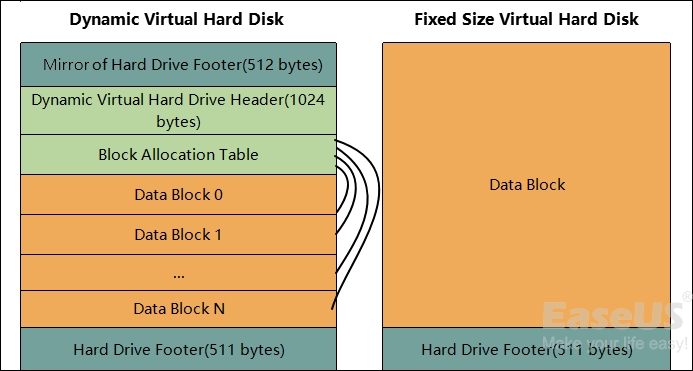
The issue of VHD corruption with data loss can be a nightmare for many users, so it’s important to know how to get corrupted VHD files back in Windows 10 or other Windows systems. Many of you are told to run VHD data recovery tools inside the virtual machine when data is in danger. But are those data files recoverable after the VHDX gets corrupted? We need to observe a little how the virtual hard disk is structured. Read from the Virtual Hard Disk specification (available here), and you can see that virtual hard disks have the following structure:
Can you recover data from corrupted VHD or VHDX files?
- If Virtual PC / Virtual Server / Hyper-V report that the virtual hard disk is corrupt – then one of the headers/footer sections has been corrupted – there is nothing you can do.
- If the virtual machine starts correctly – but then reports errors accessing the disk – run EaseUS Data Recovery Wizard inside the virtual machine.
How do you opt for VHDX repair solutions for different scenarios?
- If the HVD or VHDX image files are damaged or corrupted, being unable to be loaded, please get in touch with a local or online VHD repair center or the support team of your VHD manufacturer and ask them for help.
- If the VHD or VHDX image files are safe, try to reboot your virtual machine and check if you can visit your VHD or VHDX disks. If not, move on to follow Part 1 to restore important files on your virtual disk and run methods in Part 2 to repair the corrupted or unreadable virtual disk.
Part 1. Recover Corrupted VHD Files with VHD Data Recovery Tool
It is necessary for users to choose a professional data recovery tool to bring back their corrupted VHD files. Here we recommend EaseUS Data Recovery Wizard. It works effectively to help you restore all files from VHD or VHDX disk partition with simple clicks. Check the brilliant features of this data recovery software first.
- Recover corrupted and lost files and data in 3 steps.
- Recover files from emptied Recycle Bin, HDD/SSD, external hard drive, SD card, and more.
- Support users to preview recoverable files before actual recovery.
- 100% secure and works well on both Windows and Mac computers.
Download and install this VHD repair tool on your VM and apply the steps to restore your lost VHD files:
Step 1. Run EaseUS Data Recovery Wizard. Choose the drive where you lost files and start scanning. This software allows you to recover lost data from all devices, including HDD, SSD, USB drive, SD card, pen drive, camera, etc.

Step 2. Browse the full scan results. You can choose the file type you need by clicking on the file type filter. EaseUS data recovery software supports 1000+ file types like photos, videos, documents, emails, audio files, and many more.

Step 3. Select the files you want to preview. Click «Recover» and set a storage location to save the recovered data.

Part 2. Repair the Corrupted or Unreadable VHD/VHDX
After getting all data out of the unreadable virtual disk, you can now follow the VHDX repair part to repair and fix the corrupted VHD or VHDX:
Method 1. Run CHKDSK command to repair bad sectors on VHD
If bad sectors exist on your virtual disk, you may not be able to access all saved data or important files on the drive. CHKDSK command will effectively solve this issue and repair all bad sectors on VHD for you:
Caution: As the CHKDSK command will cause a permanent data loss error, ensure you recover all data from the VHD or VHDX drive with a reliable EaseUS Data Recovery Wizard first.
- Click Search and, type: cmd, hit «Enter» to bring up Command Prompt.
- Right-click Command Prompt and select «Run as administrator.»
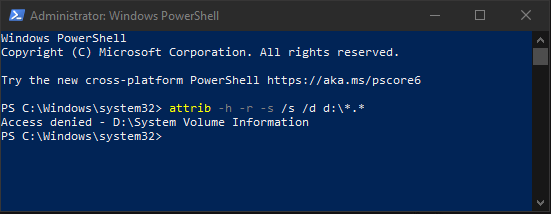
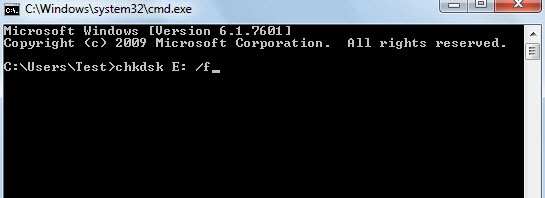
- Type: chkdsk D: /f /r /x and hit «Enter».
By doing so, the CHKDSK command will automatically find and repair all existing errors, bad sectors, and even corrupted system files on your VHD disk.
Use CHKDSK Alternative to Fix Problematic Device
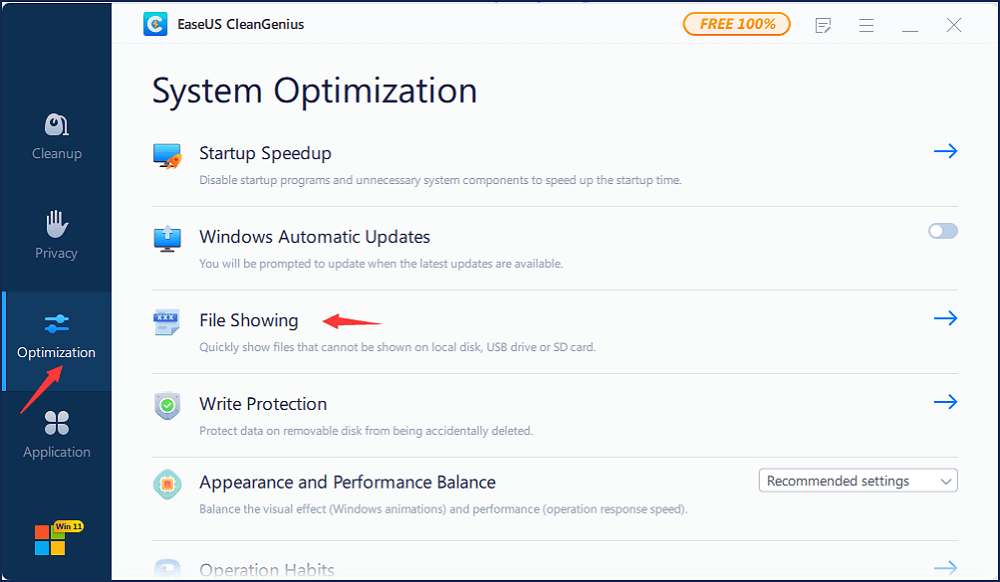
Download EaseUS CleanGenius and install it on your computer. Let’s start checking and refixing file system error on your device now.
Step 1. Click «File Showing» to enter the next step.
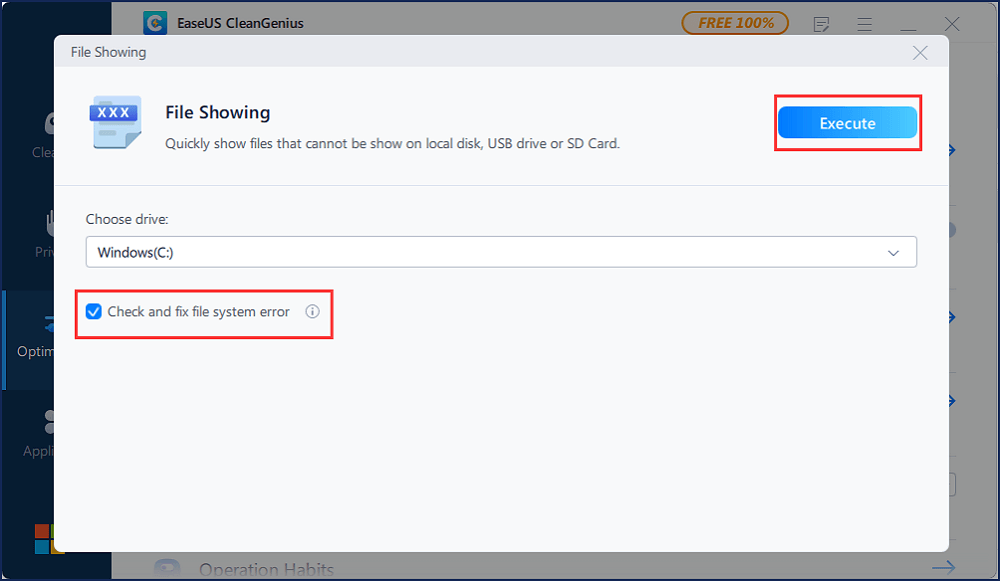
Step 2. Choose the target device and tick the box of «Check and fix file system error». Click «Execute» to start fixing the problematic device.
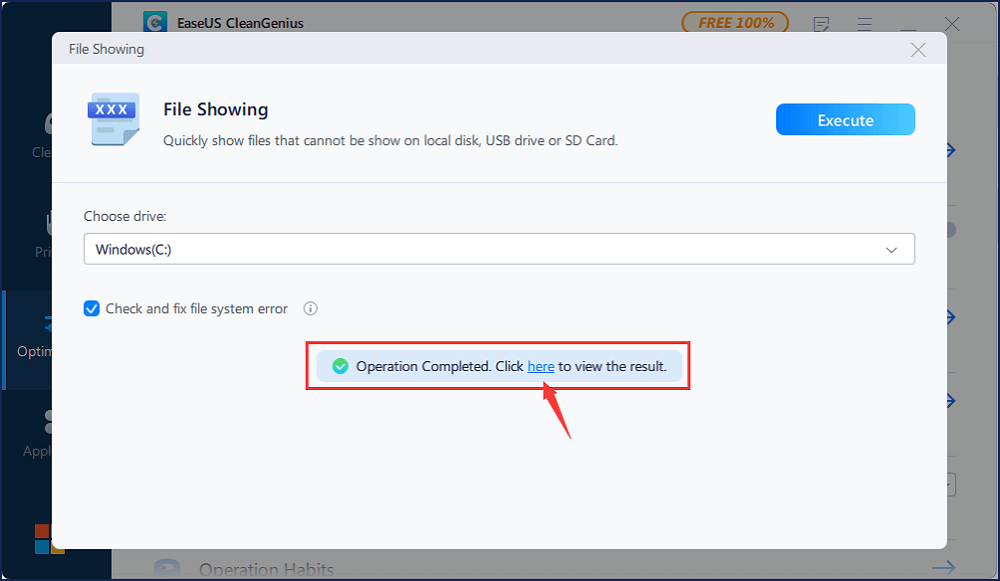
Step 3. When the fixing process completes, click «here» to open and use your device.
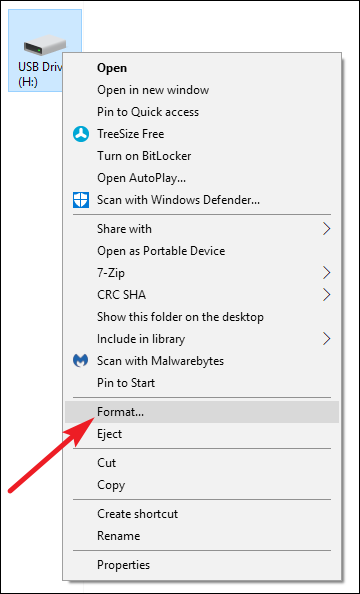
Method 2. Format VHD to NTFS file system
If the VHD disk is still not working, you can directly format the disk into the NTFS file system to make it work again:
- Open This PC on your virtual machine, find and right-click on the VHD disk, and select Format.
- Select NTFS as the file system of VHD that you want to format it to.
- Then click «OK» to confirm that you need to format the VHD to NTFS.
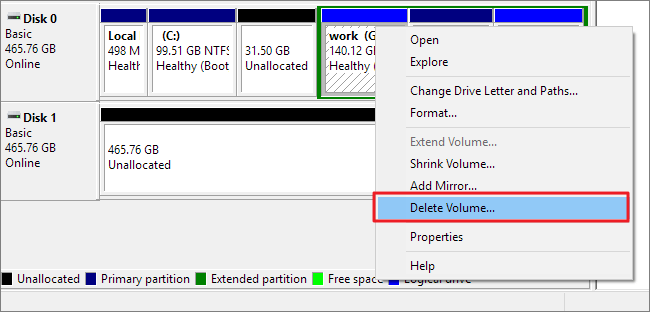
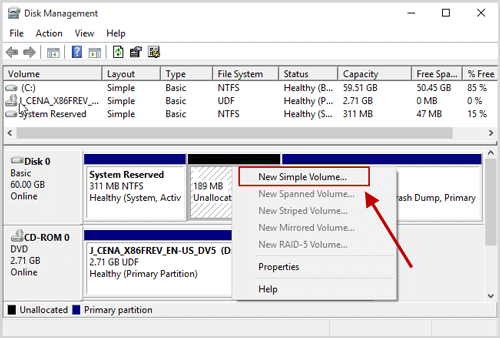
Method 3. Delete and create a new VHD partition
The last way you can try is to delete and create a new partition on your VHD disk.
- Right-click on This PC > Manage.
- Click Disk Management, find and right-click on the VHD disk partition, then select Delete Volume;
- Click Yes to confirm the deletion;
- Then right-click on the unallocated space on the VHD and select New Simple Volume;
- Assign the volume with a new drive letter, file system, and size, then follow the onscreen instructions to complete the process.
After this, you’ll get a brand new VHD partition, which you can use to save data again.
Still cannot solve the problem? If the provided methods don’t work, you may need a manual fix. Try to email the EaseUS Support team at [email protected] You’re not guaranteed a 100% working VHD/VHDX repair from there, but it seems the last resort when all the online workarounds cannot help.
VHDX Repair FAQs
1. How to recover the deleted VHD file?
Run EaseUS VHD recovery Software on your PC. Choose the partition drive where your VHD file was created, and click the Scan button. After a while, depending on how large the VHD file is, the software will automatically display the scanning results for you. Locate the VHD file you’re looking for and click the Recover button. You’re then able to recover the deleted VHD file successfully.
2. Is it possible to recover shift-deleted VHD data?
Using the Shift and Del/Delete keys to delete a file or bulk delete some files are said to be a permanent deletion. In this case, only the third-party data recovery software can scan and recover permanently deleted files from the VHD files.
Overview of VHDX/VHD Corruption
VHD and VHDX files are recognized as two major virtual disk image file formats used to create a virtual environment of a Windows system. Similar to a physical hard disk drive, a VHD/VHDX file is vulnerable to corruption. As a consequence, the entire virtual machine file data becomes inaccessible. Therefore, knowing how to repair VHDX and recover data from corrupted VHDX files begins the main topic of this page.
The issue of VHD corruption with data loss can be a nightmare for many users, so it’s important to know how to get corrupted VHD files back in Windows 10 or other Windows systems. Many of you are told to run VHD data recovery tools inside the virtual machine when data is in danger. But are those data files recoverable after the VHDX gets corrupted? We need to observe a little how the virtual hard disk is structured. Read from the Virtual Hard Disk specification (available here), and you can see that virtual hard disks have the following structure:
Can you recover data from corrupted VHD or VHDX files?
- If Virtual PC / Virtual Server / Hyper-V report that the virtual hard disk is corrupt – then one of the headers/footer sections has been corrupted – there is nothing you can do.
- If the virtual machine starts correctly – but then reports errors accessing the disk – run EaseUS Data Recovery Wizard inside the virtual machine.
How do you opt for VHDX repair solutions for different scenarios?
- If the HVD or VHDX image files are damaged or corrupted, being unable to be loaded, please get in touch with a local or online VHD repair center or the support team of your VHD manufacturer and ask them for help.
- If the VHD or VHDX image files are safe, try to reboot your virtual machine and check if you can visit your VHD or VHDX disks. If not, move on to follow Part 1 to restore important files on your virtual disk and run methods in Part 2 to repair the corrupted or unreadable virtual disk.
Part 1. Recover Corrupted VHD Files with VHD Data Recovery Tool
It is necessary for users to choose a professional data recovery tool to bring back their corrupted VHD files. Here we recommend EaseUS Data Recovery Wizard. It works effectively to help you restore all files from VHD or VHDX disk partition with simple clicks. Check the brilliant features of this data recovery software first.
- Recover corrupted and lost files and data in 3 steps.
- Recover files from emptied Recycle Bin, HDD/SSD, external hard drive, SD card, and more.
- Support users to preview recoverable files before actual recovery.
- 100% secure and works well on both Windows and Mac computers.
Download and install this VHD repair tool on your VM and apply the steps to restore your lost VHD files:
Step 1. Run EaseUS Data Recovery Wizard. Choose the drive where you lost files and start scanning. This software allows you to recover lost data from all devices, including HDD, SSD, USB drive, SD card, pen drive, camera, etc.
Step 2. Browse the full scan results. You can choose the file type you need by clicking on the file type filter. EaseUS data recovery software supports 1000+ file types like photos, videos, documents, emails, audio files, and many more.
Step 3. Select the files you want to preview. Click «Recover» and set a storage location to save the recovered data.
Part 2. Repair the Corrupted or Unreadable VHD/VHDX
After getting all data out of the unreadable virtual disk, you can now follow the VHDX repair part to repair and fix the corrupted VHD or VHDX:
Method 1. Run CHKDSK command to repair bad sectors on VHD
If bad sectors exist on your virtual disk, you may not be able to access all saved data or important files on the drive. CHKDSK command will effectively solve this issue and repair all bad sectors on VHD for you:
Caution: As the CHKDSK command will cause a permanent data loss error, ensure you recover all data from the VHD or VHDX drive with a reliable EaseUS Data Recovery Wizard first.
- Click Search and, type: cmd, hit «Enter» to bring up Command Prompt.
- Right-click Command Prompt and select «Run as administrator.»
- Type: chkdsk D: /f /r /x and hit «Enter».
By doing so, the CHKDSK command will automatically find and repair all existing errors, bad sectors, and even corrupted system files on your VHD disk.
Use CHKDSK Alternative to Fix Problematic Device
Download EaseUS CleanGenius and install it on your computer. Let’s start checking and refixing file system error on your device now.
Step 1. Click «File Showing» to enter the next step.
Step 2. Choose the target device and tick the box of «Check and fix file system error». Click «Execute» to start fixing the problematic device.
Step 3. When the fixing process completes, click «here» to open and use your device.
Method 2. Format VHD to NTFS file system
If the VHD disk is still not working, you can directly format the disk into the NTFS file system to make it work again:
- Open This PC on your virtual machine, find and right-click on the VHD disk, and select Format.
- Select NTFS as the file system of VHD that you want to format it to.
- Then click «OK» to confirm that you need to format the VHD to NTFS.
Method 3. Delete and create a new VHD partition
The last way you can try is to delete and create a new partition on your VHD disk.
- Right-click on This PC > Manage.
- Click Disk Management, find and right-click on the VHD disk partition, then select Delete Volume;
- Click Yes to confirm the deletion;
- Then right-click on the unallocated space on the VHD and select New Simple Volume;
- Assign the volume with a new drive letter, file system, and size, then follow the onscreen instructions to complete the process.
After this, you’ll get a brand new VHD partition, which you can use to save data again.
Still cannot solve the problem? If the provided methods don’t work, you may need a manual fix. Try to email the EaseUS Support team at [email protected] You’re not guaranteed a 100% working VHD/VHDX repair from there, but it seems the last resort when all the online workarounds cannot help.
VHDX Repair FAQs
1. How to recover the deleted VHD file?
Run EaseUS VHD recovery Software on your PC. Choose the partition drive where your VHD file was created, and click the Scan button. After a while, depending on how large the VHD file is, the software will automatically display the scanning results for you. Locate the VHD file you’re looking for and click the Recover button. You’re then able to recover the deleted VHD file successfully.
2. Is it possible to recover shift-deleted VHD data?
Using the Shift and Del/Delete keys to delete a file or bulk delete some files are said to be a permanent deletion. In this case, only the third-party data recovery software can scan and recover permanently deleted files from the VHD files.
It is probably a safe bet that the VHD and VHDX files in a Hyper-V environment are incredibly important. If the file isn’t where you expect it to be or if there is a problem with it, Hyper-V won’t be very happy. Typically when a virtual machine is running if there is a problem with a disk file you’ll know right away. But perhaps you have a library of virtual machines that aren’t always online. It would be better to know ahead of time if there is a problem by testing your VHD and VHDX files.
Here are some techniques using the PowerShell cmdlets in the Hyper-V 3.0 module.
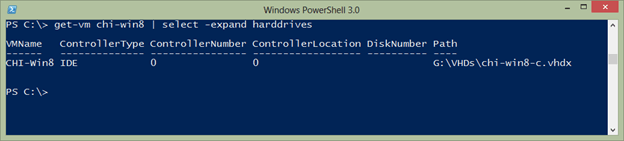
Getting VHD Paths
Finding the associated file paths with virtual machine is pretty simple. The virtual machine has a hard drives property which is a collection of hard drive objects.
PS C:> get-vm chi-win8 | select -expand harddrives
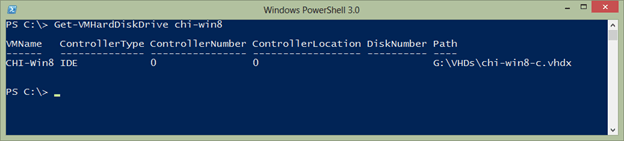
Or, you can use the Get-VMHardDiskDrive cmdlet.
PS C:> Get-VMHardDiskDrive chi-win8
This works even better when used in a pipelined expression.
PS C:> get-vm chi* | Get-VMHardDiskDrive
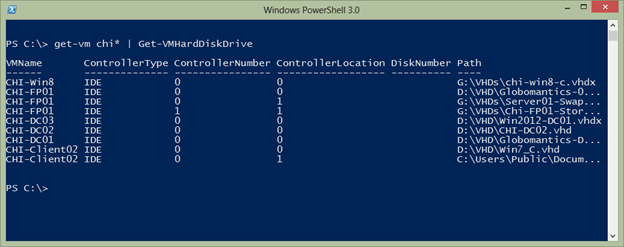
I could have gotten all virtual machines. You can see the path, but that is only the configuration. There is no way of knowing if the file even exists unless you start the virtual machine or test.
Testing Path
One test we can do is to use the Test-Path cmdlet. This is an easy way to verify a file or folder exists.
PS C:> test-path c:windows
True
To use with the Hyper-V cmdlets takes a little more because we need to get the Path property.
PS C:> Get-VMHardDiskDrive chi-fp01 | foreach { Test-path $_.path}
True
True
True
Or here’s a neat trick we can do in PowerShell 3.0.
PS C:> Test-Path (Get-VMHardDiskDrive chi-fp01).Path
True
True
True
The downside here is that if a file couldn’t be found PowerShell would return False, but I wouldn’t know which file failed. One solution is to simply add the test as a custom property.
PS C:> Get-VMHardDiskDrive chi-win8 | Select VMName,Controller*,DiskNumber,Path,@{Name="TestPath";Expression={$_ | Test-Path}}
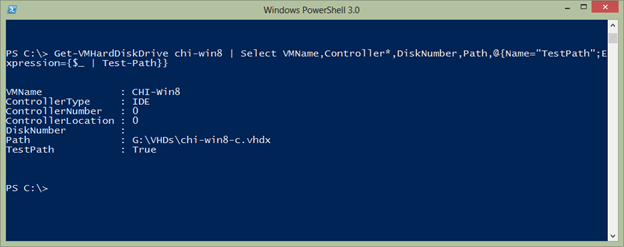
This should work as well on multiple virtual machines and those with multiple drives.
PS C:> Get-VMHardDiskDrive chi-fp01,chi-dc01 | Select VMName,Controller*,DiskNumber,Path,@{Name="TestPath";Expression={$_ | Test-Path}}
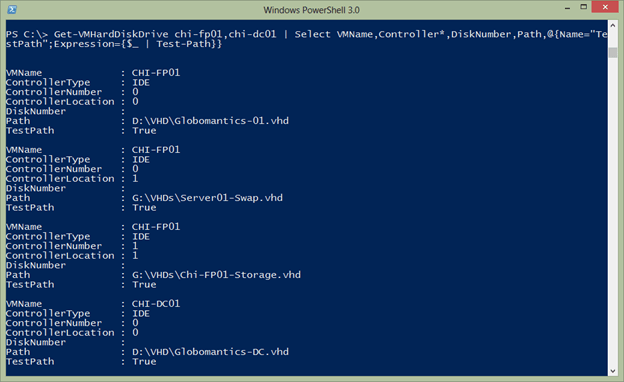
Let’s check all of my virtual machines and see if there are any problems:
PS C:> Get-VMHardDiskDrive * | Select VMName,Controller*,DiskNumber,Path, @{Name="TestPath";Expression={$_ | Test-Path}} | where {-Not $_.TestPath}

Because of PowerShell’s object-based nature, this is a one-line command and now I can see where I have a problem.
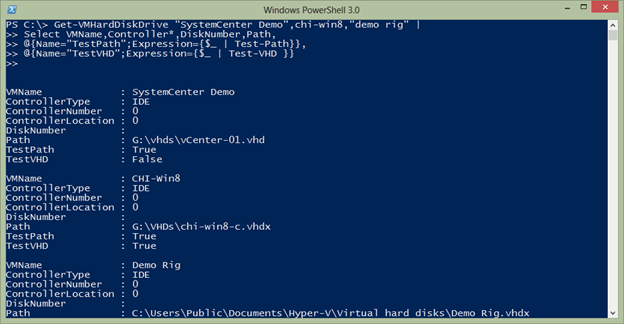
But verifying the path is only half the battle. The file might exist but it might be corrupted or in the case of a differencing disk there may be an issue with the chain of disks. We can accomplish this with Test-VHD from the Hyper-V PowerShell module. It is as simple to use as this.
PS C:> Get-VMHardDiskDrive chi-win8 | test-vhd
True
PS C:> Get-VMHardDiskDrive chi-fp01 | test-vhd
True
True
True
If there is a failure PowerShell will tell you and display the error.

Like Test-Path it is hard to tell what file goes with the result unless there is a problem. So we can expand our earlier pipelined expression.
PS C:> Get-VMHardDiskDrive "SystemCenter Demo",chi-win8,"demo rig" | Select VMName,Controller*,DiskNumber,Path, @{Name="TestPath";Expression={$_ | Test-Path}},@{Name="TestVHD";Expression={$_ | Test-VHD }}
Or I can filter for test failures as I did before. If this is something I wanted to use often, I’d turn it into a PowerShell function.
#requires -version 3.0

Function Test-VHDIntegrity {

<#
.Synopsis
Test VHD files for integrity
.Description
Test the drive files for a Hyper-V virtual machine and verify the specified
file exists and that there are no problems with it.
.Example
PS C:> Get-VM | Test-VHDIntegrity | Out-Gridview
.Example
PS C:> Get-VM | Test-VHDIntegrity | where {(-NOT $_.TestPath) -OR (-NOT $_.TestVHD)}
.Link
Test-Path
Test-VHD
#>

[CmdletBinding()]

Param (
 [Parameter(Position=0,Mandatory,
 ValueFromPipelineByPropertyName,
 ValueFromPipeline)]
 [alias("vmname","name")]
 [ValidateNotNullorEmpty()]
 [object[]]$VM
)
Process {
#write-verbose ($vm | out-string)
    foreach ($item in $VM) {
      Write-Verbose "Analyzing disks for $item"
      <#
      I intentionally omitted parameter names for
      Get-VMHardDiskDrive so that it can detect if it
      is processing a string or a virtual machine
      #>
      Get-VMHardDiskDrive $item |
      Select VMName,Controller*,DiskNumber,Path,
      @{Name="TestPath";Expression={$_ | Test-Path}},
      @{Name="TestVHD";Expression={$_ | Test-VHD }}
    } #foreach
}

} #end function
With this function loaded into my PowerShell session I can now run commands like this to identify problems:
PS C:> get-vm | Test-VHDIntegrity | where {(! $_.TestPath) -or (! $_.TestVHD)}
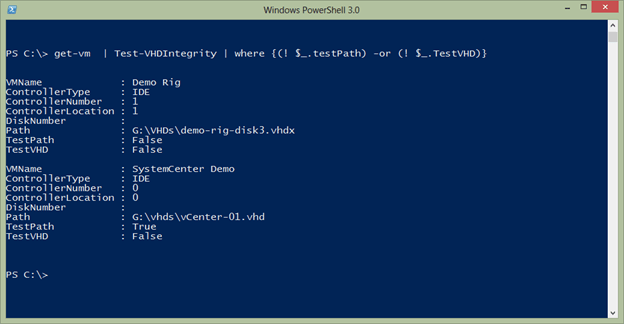
I retrieved all the virtual machines, and tested the drives with my function for each one, then I filtered out all the results except those where one of the tests failed. Now I can see which virtual machines I need to look at in more detail. As with all the PowerShell samples I post here, please review and test thoroughly in a non-production environment.
Summary
The health and integrity of your VHD and VHDX files are paramount in Hyper-V. With a little PowerShell it is easy to discover problems before they become major headaches. Of course, this is another scenario where having decent backups is critical so that if a file is found missing you can easily restore it.
Is it possible to fix a corrupted Hyper-V VHDX file? The answer is ‘Yes’.
But how you can do so? Let’s read this article till the end to know a few effective solutions to repair VHD files…
Hyper-V VHDX format is almost similar to a hard disk, it used to store the cherished information. Like physical hard drives, a VHD (virtual hard drive) is also prone to corruption and this makes trouble for users to access the data present on it.
Read further to know more…
- Part 1: What Causes the VHD/VHDX File Corruption Issue?
- Part 2: What To Do If VHD Get Corrupted Or Damaged?
- Part 3: How To Fix A Corrupted Hyper-V VHDX File?
- Part 4: Bottom Line
Well, there could be numerous reasons for Hyper V VHDX files corruption. Therefore, before moving ahead to know how to fix a corrupted Hyper-V VHDX file, have a look at the major factors behind the .vhd corruption.
Part 1: What Causes the VHD/VHDX File Corruption Issue?
There are many reasons due to which your VHD file becomes corrupted & unreadable. So, here are some of the major root causes that can lead to the .vhd corruption problem:
1. Failure Of The Storage Media
Because of the failure or corruption of storage media, your files become inaccessible and get damaged.
2. Virus Infection
The virus is one of the major reasons behind the VHD file corruption. When a system is attacked, it ruins the files on a system including VHD files.
3. Paused State Of Virtual Machines
If you don’t notice the early signs of the Virtual Machines (VM) failure or paused state of the Virtual Machines, it might lead to VHD file corruption.
4. Unexpected System Shutdown
Accidental/sudden closure of the PC can cause severe damage to the hardware and software of your computer. Moreover, if a Virtual Machine is active at that moment, then it can lead to the corruption or damage of VHD file.
5. Due To The Human Errors
Intentional/unintentional deletion of stored files, force shutdown of a system, registry modification errors, and inadequate disk management are some of the human errors that can damage VHDX files.
Part 2: What To Do If VHD Get Corrupted Or Damaged?
When you notice that your VHD gets corrupted, you need to first restore the data present on it.
However, you can recover deleted VHD/VHDX files by using the powerful VHD File Recovery Software. It is enough solution that provides better recovery of your valuable stuff.
The best thing about this program is that- it can help you in recovering deleted, formatted, or inaccessible media files from digital devices without any destruction.
And, it is a read-only program, 100% clean, safe & easy to use, and compatible with both the Windows & Mac OS.


* Free version of the program only scans and previews recoverable objects.
You just have to download & install this program and start performing the step-by-step guide. This software will surely help you to retrieve deleted virtual hard drives.
If your .vhdx or .vhd file gets corrupted and you’re not able to access it then you need trustworthy fixes to repair corrupt Hyper-V VHD files and make them healthy.
In this section, I’ll explain the six best ways to fix a corrupted Hyper-V VHDX file. Click out the below solutions right now:
Method #1: Repair Corrupt Hyper-V VHD Files by Creating The New Virtual Machine
Create a new VM and add a corrupted .vhd files to it. Then, compact an added virtual file and follow the below-given instructions:
Step 1: At first, create a fresh Virtual Server & add a new hard disk.
Step 2: Find & click on the Setting and load a .vhd file.
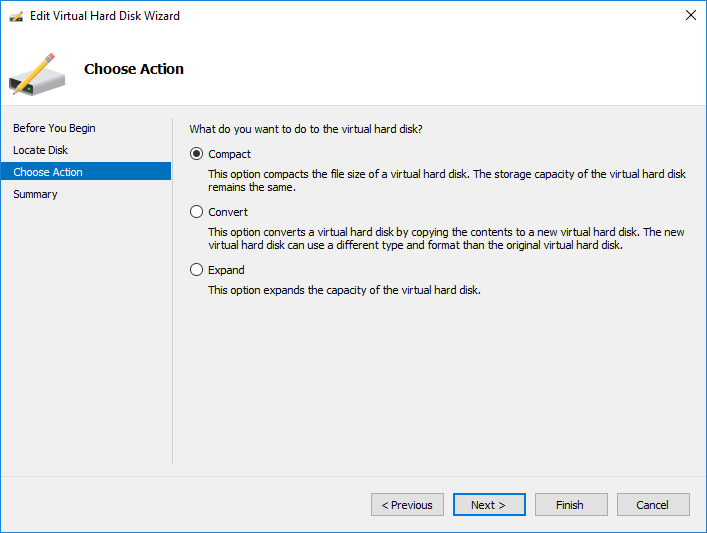
Step 3: Click on a virtual disk >> choose a Compact option >> click Next.
Step 4: Also, check to convert it to a fixed-size virtual hard disk option is selected or not. If not, then select it and move to the next step.
Step 5: Now you can save the resultant VHDX file with the same or new name.
Step 6: Once the VHD file is compacted copy the resultant file and mount it to the original server.
Please Note: – If your .vhd file is of 100 GB and you stored only 30 GB of data in it. Then the resultant VHD will be 30 GB in size.
Method #2: Fix Corrupted VHD File With PowerShell
To repair corrupted VHD files, just open the Windows PowerShell as an Admin & try the below steps:
- Type Mount-VHD–path d:foldervdisk.vhdx –ReadOnly >> press the Enter.
- Next, you need to type the Optimize-VHD –path d:foldervdisk.vhdx– Mode Full >> hit Enter.
- Now, type the Dismount-VHD –path d:foldervdisk.vhdx& press the Enter (where d:foldervdisk.vhdx is a complete path of the corrupted VHD file.
Method #3: Run CHKDSK To Repair Bad Sectors On The VHD
Sometimes, it may happen that bad sectors present on your virtual disk can lead to .vhdx corruption due to which you are unable to access the data saved on a drive.
Thus, the CHKDSK command will easily solve this problem & repair all the bad sectors that exist on the VHD:
Step 1: Click on Search >> type the cmd >> hit the Enter option to open the Command Prompt.
Step 2: Type the diskpart >> press the “Enter” to open the DiskPart.
Step 3: After that, type the chkdsk D: /f /r /x >> press the “Enter“.
After doing so, a CHKDSK will automatically find & repair the bad sectors, existing errors, and even corrupted/damaged system files on your VHD disk.
Method #4: Delete & Create New VHDX Partition
Another method you could try to fix a corrupted Hyper-V VHDX file is to delete & create new partition on the VHDX hard disk.
- First, make a right-click on the option This PC and then tap on Manage.
- At this time, make a tap on Disk Management then find & right-click on a VHD disk partition >> select the Delete Volume.
- After that, click on Yes option to confirm a deletion.
- Right-click on an unallocated space on a VHD >> select the New Simple Volume.
- Then, assign a volume with the new drive letter to finish the process.
Once you completed the above steps, you will get a new VHDX partition & you can use it to save data again.
Method #5: Fix Hyper V VHDX Files With Inbuilt Utility
Microsoft offers an inbuilt utility with the help of which you can easily solve damaged VHDX files. Let’s follow the beneath easy steps to troubleshoot VHD file corruption issue:
Step 1: Firstly, you need to mount a VHDX file with a parent partition
Step 2: In the second step, use the CHKDSK to resolve the issue.
Step 3: Next, check the integrity of a VHDX using the Hyper-V VM (virtual machine).
Step 4: Then, you need to Add a VHDX file to IDE controller >> choose the option Inspect.
Step 5: After this, simply merge any of the VHD files. They need to verify if it can be opened by Windows 7, server 2008.
Step 6: Now, download a free VHD tool, it includes the “repair” option that is created to undo an expanding mode on a base VHDX when different VHDs are available.
Method #6: Format The VHDX To NTFS File System
Last but not the least, if the above five fixes don’t work for you to repair VHD files then you can format a disk into the NTFS file system to make it accessible:
- Just open My Computer or This PC on your VM (virtual machine)
- Find & make right-click on the virtual hard disk >> select the Format.
- Choose the NTFS as a file system of the VHD which you need to format.
- Now, click on the “OK” in order to confirm it and format VHD to NTFS.
FAQ:
How Do I Repair A VHDX File?
You can repair corrupt VHDX files by using any of the solutions mentioned above in this blog.
Is It Possible to Recover Shift Deleted VHD File?
Yes, of course, it is possible to recover normal deleted or shift deleted VHD files with the help of the VHD File Recovery software mentioned here.
Part 4: Bottom Line
While accessing a VHD file, you may face the corruption problem. This issue can take place because of server downtime, network connectivity on the virtual machine.
However, in the above section of this blog, I have covered each and every possible solution on how to fix a corrupted Hyper-V VHDX file easily.
Ultimate Suggestion: Try the VHD Recovery tool to recover VHD/VHDX files before repairing the damaged VHD files.

Taposhi is an expert technical writer with 5+ years of experience. Her in-depth knowledge about data recovery and fascination to explore new DIY tools & technologies have helped many. She has a great interest in photography and loves to share photography tips and tricks with others.
- Remove From My Forums
-
Question
-
Добрый день!
подвёл RAID массив, при сверке данных дисков, обнаружил разногласия и на своё усмотрение совместил….
Теперь несколько vhdx файлов не подключаются. Среди них системные диски, в т.ч. и контроллер домена и диски с файлами общего доступа.
Предполагаю, что файлы вытащить оттуда смогу, а хотелось бы починить эти диски, что бы запустить ОС.
Чем можно проверить и исправить ошибки на виртуальных дисках?
All replies
-
лучше вытягивать бекапы чем чинить рассогласованные архивные файлы
The opinion expressed by me is not an official position of Microsoft
- Marked as answer by
Thursday, March 5, 2020 8:23 AM
- Unmarked as answer by
Vector BCOModerator
Tuesday, March 10, 2020 5:56 AM
- Marked as answer by
-
лучше вытягивать бекапы чем чинить рассогласованные архивные файлы
The opinion expressed by me is not an official position of Microsoft
Разве это ответ на вопрос?
-
лучше вытягивать бекапы чем чинить рассогласованные архивные файлы
The opinion expressed by me is not an official position of Microsoft
Разве это ответ на вопрос?
если у вас есть другой ответ, то вы можете его написать, если нет, то зачем флудить?
The opinion expressed by me is not an official position of Microsoft
Если бы у меня был ответ или бэкап, я бы не просил совета на форуме, не так ли?
А что касается флуда, так это как раз к Вам. Зачем Вы флудите? Не можете помочь — ничего не пишите. Перефразирую вопрос, может кто чего подскажет.
-
Зеркальный массив LSI с vhdx дисками на HDD. По какой-то причине отвалился 1 диск. В логах были ошибки и питания и CRC. Поменяли корзину, посадили на другой шлейф. Пометили диск on-line, он подключился в массив как ни в чём
не бывало.
А как же сравнение данных? Первый диск отсутствовал в системе более суток!
Вручную запускаю consistency check. (этого не надо было делать!)
После этого не могу открыть vhdx файл. Там файлопомойка, но кое-что нужно достать.
На сегодняшний день имею 2 диска, и, если я не ошибаюсь, с абсолютно идентичными данными.
Подключаю диски по отдельности, сканирую R-Studio. Восстановление найденного vhdx результата не даёт. Открытие и сканирование проблемного vhdx в R-Studio, позволило увидеть в целостности структуру папок и файлов внутри. Файлы восстанавливаются, но некоторые
текстовые файлы открываются, а Excel и Word файлы — нет.Подскажите, есть ли шанс восстановить текстовые, Excel и Word файлы?
-
лучше вытягивать бекапы чем чинить рассогласованные архивные файлы
The opinion expressed by me is not an official position of Microsoft
Разве это ответ на вопрос?
если у вас есть другой ответ, то вы можете его написать, если нет, то зачем флудить?
The opinion expressed by me is not an official position of Microsoft
Если бы у меня был ответ или бэкап, я бы не просил совета на форуме, не так ли?
А что касается флуда, так это как раз к Вам. Зачем Вы флудите? Не можете помочь — ничего не пишите. Перефразирую вопрос, может кто чего подскажет.
автор (Andrey2020, а не Andrey14), создал вопрос 1 месяц назад, получил ответ после чего пропал. Логично предположить что автор (Andrey2020), получил ответ, или нашел решение самостоятельно (тут так часто бывают что люди получают/находят решение
и больше на форуме не появляются долгие годы до следующей проблемы)Если Andrey2020 и Andrey14 это один и тот же человек, то пожалуйста перелогинтесь под правильной учеткой для понимания того с кем мы говорим.
Если Andrey2020 и Andrey14 это разные люди, то вам Andrey14, стоит создать новую тему, и по возможности не пропадайте из нее на месяц.
Восстановление битых архивов возможно, но требует вагон времени и скилов, либо аналогичное количество денег для оплаты труда специалистов потративших пол жизни на такие задачи. Как правило это не целесообразно и более правильным решением
является не починка архива, а восстановление его бекапа. Именно об этом я написал. Именно это модератор отметил как ответ, учитывая что других ответов не от сообщества не от Andrey2020 не поступилоП.С. ответ мной был написан 9 февраля, после чего не поступило ни единого друго ответа, и через 25 дней модератор пометил ответ.
Сколько вы планируете ждать альтернативных идей?
The opinion expressed by me is not an official position of Microsoft
- Edited by
Vector BCOModerator
Wednesday, March 11, 2020 6:19 AM
- Edited by
-
Andrey2020 и Andrey14 это я, автор темы.
Andrey2020 была создана, т.к. не смог войти под старой учёткой (Andrey14).
Уже после, нормально зашёл.Если бы у меня был бэкап, я бы и тему не создавал.
Ваше сообщение я не посчитал ответом, поэтому и не было реакции.
Ну какое то время ещё поищу решение. Время на это выделяется по остаточному принципу.
Структура целая, файлы есть, размер есть, а они повреждены. Может получится извлечь хоть что-то…
От этих RAID-ов больше проблем, чем пользы)))
Диски ещё ни разу не выходили из строя, зато проблемы согласованности встречались
It is probably a safe bet that the VHD and VHDX files in a Hyper-V environment are incredibly important. If the file isn’t where you expect it to be or if there is a problem with it, Hyper-V won’t be very happy. Typically when a virtual machine is running if there is a problem with a disk file you’ll know right away. But perhaps you have a library of virtual machines that aren’t always online. It would be better to know ahead of time if there is a problem by testing your VHD and VHDX files.
Here are some techniques using the PowerShell cmdlets in the Hyper-V 3.0 module.
Getting VHD Paths
Finding the associated file paths with virtual machine is pretty simple. The virtual machine has a hard drives property which is a collection of hard drive objects.
PS C:> get-vm chi-win8 | select -expand harddrives
Or, you can use the Get-VMHardDiskDrive cmdlet.
PS C:> Get-VMHardDiskDrive chi-win8
This works even better when used in a pipelined expression.
PS C:> get-vm chi* | Get-VMHardDiskDrive
I could have gotten all virtual machines. You can see the path, but that is only the configuration. There is no way of knowing if the file even exists unless you start the virtual machine or test.
Testing Path
One test we can do is to use the Test-Path cmdlet. This is an easy way to verify a file or folder exists.
PS C:> test-path c:windows
True
To use with the Hyper-V cmdlets takes a little more because we need to get the Path property.
PS C:> Get-VMHardDiskDrive chi-fp01 | foreach { Test-path $_.path}
True
True
True
Or here’s a neat trick we can do in PowerShell 3.0.
PS C:> Test-Path (Get-VMHardDiskDrive chi-fp01).Path
True
True
True
The downside here is that if a file couldn’t be found PowerShell would return False, but I wouldn’t know which file failed. One solution is to simply add the test as a custom property.
PS C:> Get-VMHardDiskDrive chi-win8 | Select VMName,Controller*,DiskNumber,Path,@{Name="TestPath";Expression={$_ | Test-Path}}
This should work as well on multiple virtual machines and those with multiple drives.
PS C:> Get-VMHardDiskDrive chi-fp01,chi-dc01 | Select VMName,Controller*,DiskNumber,Path,@{Name="TestPath";Expression={$_ | Test-Path}}
Let’s check all of my virtual machines and see if there are any problems:
PS C:> Get-VMHardDiskDrive * | Select VMName,Controller*,DiskNumber,Path, @{Name="TestPath";Expression={$_ | Test-Path}} | where {-Not $_.TestPath}
Because of PowerShell’s object-based nature, this is a one-line command and now I can see where I have a problem.
But verifying the path is only half the battle. The file might exist but it might be corrupted or in the case of a differencing disk there may be an issue with the chain of disks. We can accomplish this with Test-VHD from the Hyper-V PowerShell module. It is as simple to use as this.
PS C:> Get-VMHardDiskDrive chi-win8 | test-vhd
True
PS C:> Get-VMHardDiskDrive chi-fp01 | test-vhd
True
True
True
If there is a failure PowerShell will tell you and display the error.
Like Test-Path it is hard to tell what file goes with the result unless there is a problem. So we can expand our earlier pipelined expression.
PS C:> Get-VMHardDiskDrive "SystemCenter Demo",chi-win8,"demo rig" | Select VMName,Controller*,DiskNumber,Path, @{Name="TestPath";Expression={$_ | Test-Path}},@{Name="TestVHD";Expression={$_ | Test-VHD }}
Or I can filter for test failures as I did before. If this is something I wanted to use often, I’d turn it into a PowerShell function.
#requires -version 3.0

Function Test-VHDIntegrity {

<#
.Synopsis
Test VHD files for integrity
.Description
Test the drive files for a Hyper-V virtual machine and verify the specified
file exists and that there are no problems with it.
.Example
PS C:> Get-VM | Test-VHDIntegrity | Out-Gridview
.Example
PS C:> Get-VM | Test-VHDIntegrity | where {(-NOT $_.TestPath) -OR (-NOT $_.TestVHD)}
.Link
Test-Path
Test-VHD
#>

[CmdletBinding()]

Param (
 [Parameter(Position=0,Mandatory,
 ValueFromPipelineByPropertyName,
 ValueFromPipeline)]
 [alias("vmname","name")]
 [ValidateNotNullorEmpty()]
 [object[]]$VM
)
Process {
#write-verbose ($vm | out-string)
    foreach ($item in $VM) {
      Write-Verbose "Analyzing disks for $item"
      <#
      I intentionally omitted parameter names for
      Get-VMHardDiskDrive so that it can detect if it
      is processing a string or a virtual machine
      #>
      Get-VMHardDiskDrive $item |
      Select VMName,Controller*,DiskNumber,Path,
      @{Name="TestPath";Expression={$_ | Test-Path}},
      @{Name="TestVHD";Expression={$_ | Test-VHD }}
    } #foreach
}

} #end function
With this function loaded into my PowerShell session I can now run commands like this to identify problems:
PS C:> get-vm | Test-VHDIntegrity | where {(! $_.TestPath) -or (! $_.TestVHD)}
I retrieved all the virtual machines, and tested the drives with my function for each one, then I filtered out all the results except those where one of the tests failed. Now I can see which virtual machines I need to look at in more detail. As with all the PowerShell samples I post here, please review and test thoroughly in a non-production environment.
Summary
The health and integrity of your VHD and VHDX files are paramount in Hyper-V. With a little PowerShell it is easy to discover problems before they become major headaches. Of course, this is another scenario where having decent backups is critical so that if a file is found missing you can easily restore it.
Формат файла VHD / VHDX, который похож на жесткий диск, также подвержен повреждению и иногда не читается. Разница между VHDX и физическим жестким диском заключается в том, что VHDX — это среда виртуальной машины. Повреждение или нечитаемость файлов VHD/VHDX является распространенной проблемой, которую нелегко исправить. Однако существует множество приемов и решений для исправления ошибки. В большинстве случаев файлы восстанавливаются из испорченного и поврежденного файла с помощью методов, обсуждаемых в этом блоге.
Повреждение может привести к огромной потере данных для пользователя, а также может быть постоянным. Когда файл VHD поврежден или испорчен, вы увидите ошибку, как указано ниже.
«Не удалось открыть вложение. Ошибка: файл или каталог поврежден или не читается».
Наиболее распространенные 3 причины повреждения файлов VHD/VHDX
- Неисправное хранилище на жестком диске – По вине производителя или прошивки жесткий диск может выйти из строя или выйти из строя.
- Передача файлов по неисправной сети – Существует большая вероятность повреждения файлов при их передаче по неисправной сети. Кроме того, если во время создания или передачи файлов на виртуальном диске происходит отключение, это также вызывает ошибки.
- Ошибки из-за антивирусного программного обеспечения – Антивирус иногда влияет на все в системе, сканируя и создавая барьеры.
Точно так же, если он мешает работе виртуальных машин, это вызывает ошибки. Желательно исключить операции, связанные с виртуальными машинами, из сканера антивируса.
Исправление ошибок
В системе существует множество обходных путей для решения этих проблем. В этом блоге мы расскажем о шести методах сохранения данных из поврежденных файлов и их восстановления.
Исправление 1. Создайте новую виртуальную машину для восстановления файлов VHD/VHDX.
- Создать новый Виртуальный сервер затем добавьте новый жесткий диск.
- Найдите Настройки возможность загрузки файла .vhd.
- Нажмите на Виртуальный диск > нажмите на Компактный вариант, прежде чем нажать на Следующий кнопка.
- На следующем шаге установите флажок и преобразуйте его в вариант виртуального жесткого диска фиксированного размера. Затем перейдите к следующий шаг.
- Теперь вы можете сохранить выходной файл VHDX под новым именем.
- После сжатия файла VHDX его можно скопировать и смонтировать на исходный сервер.
Исправление 2: использование Windows Powershell для восстановления файла VHDX
- Для начала откройте Windows PowerShell от имени администратора.
- Входить Mount-VHD-путь d:foldervdisk.vhdx – Только чтение перед нажатием Входить. Следующий, Оптимизировать-VHD-путь d:foldervdisk.vhdx –Modefull> Enter.
- Окончательно, Dismount-VHD-path d:foldervdisk.vhdx > Enter (путь d:foldervdisk.vhdx полный путь к поврежденному файлу).
Исправление 3. Восстановите VHD/VHDX, запустив CHKDSK
Исправление 4: удаление и создание новых разделов VHDX
Исправление 5: исправление файлов VHDX с помощью встроенной утилиты
- Смонтируйте родительский раздел VHDX в системе.
- Использовать ЧКДСК возможность исправить и решить проблему.
- Теперь проверьте целостность файла VHDX с помощью виртуальной машины Hyper-V.
- Теперь необходимо добавлять файл VHDX на контроллер IDE. Затем выберите Осмотреть вариант.
- Чтобы проверить, работает ли файл на сервере Windows 2007, 2008, сливаться любые файлы VHD.
- Загрузите бесплатный инструмент VHD, который включает в себя ремонт вариант. Это отменит расширение локального VHDX при объединении разных файлов.
Исправление 6: форматирование VHDX в файловую систему NTFS
Если какое-либо из пяти вышеперечисленных решений не работает, вы можете использовать его для создания новой файловой системы, чтобы сделать ее доступной.
- Открыть Мой компьютер или ЭтотПК на виртуальной машине.
- Найдите виртуальный жесткий диск и щелкните его правой кнопкой мыши, чтобы выбрать Формат.
- Выбирать NTFS как файловая система для виртуального жесткого диска, который необходимо отформатировать.
- Наконец, нажмите Хорошо для форматирования VHD в NTFS.
Суммируя
Файл VHD/VHDX, похожий на физический жесткий диск, также подвержен повреждению. В большинстве случаев данные можно восстановить, а файл можно восстановить, но когда ущерб велик, это приводит к необратимой потере данных. Чтобы восстановить данные, пользователь может использовать инструмент восстановления VHD для восстановления поврежденных файлов VHD/VHDX.
Скачать сейчас
Repair Corrupt Hyper-V VHD or VHDX files – Know Dual Techniques
Mark Regan ~
Modified: 31-01-2022 ~ Recover Your Data ~ 6 Minutes Reading
Summary: Looking for a solution for how to fix a corrupted Hyper V VHDX file? But facing issues in this. We have a solution which will solve your issue. By using manual and automatic methods users can easily repair corrupt Hyper-V VHD files. As we know that corrupted VHDX files can create trouble and inconvenience for the users to access their valuable information.
Hyper V Virtual hard disk uses .vhdx file format which acts similar to the hard disk to store valuable information. Just like physical hard drives, virtual hard drives are also liable to corruption. As said above, corrupted VHDX files can create trouble for users in accessing their information.
There could be multiple reasons behind the corruption of Hyper V VHDX files and users may have to face difficulties in finding out the exact reason. Due to this, users are unable to open their attachments as well and then their data becomes inaccessible.
Reasons behind Hyper V VHDX file is corrupted
- Due to sudden hard drive failure
- Corrupted file systems are another reason
- Interruption in storage device’s connection
- Errors due to faulty Antivirus installation
Methods to repair corrupt Hyper-V VHD / VHDX files
If the VHDX files are corrupted and the user is not able to access those files then, there are two approaches through which the user can fix this.
- Fix corrupted Hyper-V VHDX files manually
- Repair corrupt Hyper-V VHD files automatically
Method 1: Fix corrupted Hyper V VHDX files manually
Solution: Microsoft provides an inbuilt utility through which user can easily repair corrupted .vhdx file. Let’s discuss steps that will help to solve the VHDX file corrupted issue:
- First, the user needs to mount the VHDX file with the parent partition, and then, use CHKDSK to solve the issue.
- Now, check the integrity of VHDX by using Hyper-V virtual machine.
- After that, users have to Add the .vhdx file to the IDE controller and select the Inspect option.
- Users can merge any VHD and VHDX data files. They need to verify if it can be opened by Windows 7, server 2008.
- Now users can download the free Microsoft VHD tool, which includes a “repair” option which is created to undo the expanding mode on a base VHD when different VHDs are available.
Disadvantages of the manual method
There are various limitations of using Manual Methods. Manual methods are very lengthy and time-consuming and it is not compulsory that by opting for this method user will be able to repair corrupt Hyper-V VHD.
Method 2: Repair corrupt Hyper-V VHD files automatically
Solution: If the manual method didn’t work in this scenario then users can take the help of trusted solution VHD Recovery Software as well. It has a user-friendly interface and it can be used with ease. This tool is a complete solution and can explore corrupted virtual drives saved as .vhdx and .vhd files. Any technical and non-technical users can easily use this tool without facing any issues.


Now we’ll discuss the procedure for solving “how to fix a corrupted Hyper V VHDX file” related questions.
How to repair corrupt hyper v VHD file in simple steps ?
- Install the recommended software on your Windows computer.
- The software provides four modes of recovery for recovering data.
- Select folders and click on Save to continue.
- The saving process will begin.
How to fix a corrupted Hyper v VHDX file ?
1 – The very first step is to install the software and select the VHDX file.

2 – Then software will show four options of recovery mode. Select the required one.

3 – Now select disk and partition according to the requirement.

4 – After selecting disk partition, software analysis the corrupted files and folder data.
5 – This utility will show the files and folders which can be solved and then select data according to your needs.

6 – Now choose the files and folders which you have to fix from virtual files and select destination as well to save output data.

7 – Thus, start the recovery process of corrupted files of the virtual drive.
8 – After completion of the process, a pop-up box will appear showing completion of the process. Click on OK.

Major features of the software
- Read, explore, view & extract files or folders from corrupt & damaged .vhd, .vhdx, .avhd or .avhdx virtual drives. Perform VHDX or VHD data recovery, if the user is getting the error: ‘The file or directory is corrupted and unreadable’ while starting one of his virtual machines or while mounting the VHD or VHDX file via disk management. This message means the Virtual file is corrupted. The hyper v recovery tool is perfectly designed to fix VHDX drive files to a safe location to save user’s VHDX data from corruption.
- Recover deleted files from virtual machines, even after emptying it from recycle bin or trash this tool can recover those files.
- Tool Supports data recovery from corrupt, crashed, or damaged virtual machines. Virus, Malware & other potential harmful apps & files can corrupt the Virtual hard disk and even bare metal servers. With this tool, users can easily restore virtual disk data from a corrupt Hyper-V Server, VirtualBox Manager, and file also.
- Supports Virtual machines .vhd or .vhdx files created in Windows 10, 2016, 2012, 2003, 8.1, 8, 7, 2000, XP.
Frequently asked questions of users and their solutions
Query 1: I am unable to repair my corrupted VHDX data. Can this software will be able to do that?
Solution: Yes, this software is specially designed to repair corrupt Hyper V VHD file. You can use this software for solving “how to fix a corrupted Hyper V vhdx file” related queries.
Query 2: Is it possible to shift recover VHDX corrupted data?
Solution: Yes, you can do this by using this software. The tool will help you in this situation.
Conclusion
In the above-mentioned write up we have talked about different methods for solving the “how to fix a corrupted Hyper V VHDX file” query. Manual methods are time-consuming and not guarantee 100% success. By using the software, you can easily repair corrupt Hyper-V VHD / VHDX files. If you have any doubt you can use the trial version of the tool as well but to save data you have to buy the licensed version of the tool.
Table of Contents
- Introduction
- Symptoms and error messages
- Solutions
Introduction
This article was first published as a blog post. It is offered here for community extension. Do you know of another symptom, cause, fix or tool that is relevant? Please add what you have; it is the wiki way.
Symptoms and error messages
Symptoms and error messages for corrupted Hyper-V VHD files are numerous, from the VM refusing to start, to failures to attach the VHD with messages like
- «Failed to open attachment ‘C: directory MyVHD.vhd’.
- Error: ‘The file or directory is corrupted and unreadable.’”
There are many possible causes why your VHD may become corrupted. It is not necessary to figure out the exact cause if you need it back fast: just
restore the VHD from your latest backup, or as
Ben Armstrong puts it in his blogpost “Run data recovery tools inside the virtual machine.»” As with all things in IT “fast” is a relative term – restoring a 500 GB disk from backup can take hours. Plan accordingly.
If you are going to take the time to investigate the cause, or do not have a backup, then you must “get forensic”.
No matter what the VHD type, most
common causes of data corruption in the VHD (whether fixed or dynamic) are from:
- Data corruption due to faulty / failing physical storage
- Data corruption due to transferring files over faulty / failing networks
If you can trace back the chain of events leading to the corruption, you will usually find a failure either by disconnecting storage while the virtual drive was being created or moved over the network Note that switching the disk-type from one to the other
or expanding the disk may cause the problem, and,
for some people, it has solved the problem. Sometimes this failure is not hardware, but caused by 3rd party encryption and
anti-virus programs that have been installed on the host.
This Core Team blog post shows one way to begin your analysis.

Solutions
Fixes to try:
- Mounting the vhd file to the parent partition, and then chkdsk to repair it.
Ben Armstrong gives the method of mounting vhd files in his blog. - Check for integrity using the Hyper-V. Add the vhd file to the IDE controller and then hit the Inspect button.
- Merge any VHD and AVHD files. Check if you can open them through windows 7, server 2008 or
WinImage (for Virtual PC and Virtual Server VHDs). - This forum thread mentions a 3rd party $150 tool called
MediaHeal if the disk is an older OS (WinXP,WinVista,Windows2000,Windows2003,WinServer,Windows Vista Ultimate,WinNT 4).
- Try the free Microsoft vhdtool (http://archive.msdn.microsoft.com/vhdtool) that includes a»repair» function which is designed to undo an expand operation on a base VHD when differencing VHDs are present.