RSS


Use the vmkfstools command to check or repair a virtual disk if it gets corrupted.
-x|--fix [check|repair]
For example,
vmkfstools -x check /vmfs/volumes/my_datastore/my_disk.vmdk
check-circle-line
exclamation-circle-line
close-line

Когда мы сталкиваемся с неким программным продуктом, с которым нам предстоит взаимодействовать, сценарий взаимодействия мы вольны выбирать сами. Можно героически изобретать велосипед, а можно понадеяться, что авторы несколько лучше, чем мы, знают свой продукт, поэтому предоставляемый ими API (или набор библиотек) является оптимальным решением. На практике, к сожалению, не всё так радужно, но сегодня не об этом.
Для работы со своей дисковой подсистемой VMware уже много лет предоставляет VDDK — развесистый набор библиотек, документации и примеров кода, с помощью которых ваше приложение может работать с дисками виртуальных машин. Само собой мы в Veeam очень не любим изобретать ненужные велосипеды, поэтому VDDK в наших продуктах используется крайне активно.
Но это всё никак не влияет на количество клиентов, которые считают, что работать с дисками можно ещё быстрее, а все предлагаемые тесты производительности показывают априори неверные результаты. Вот в такие моменты нам на помощь и приходит ультимативное оружие — VixDiskLibSample.

VixDiskLibSample — это небольшая программа на С++, входящая в VDDK и демонстрирующая принципы работы с библиотекой vixDiskLib.То есть с дисками виртуальных машин лучше и быстрее, чем она, никто работать не будет. И что нам особенно важно, её можно использовать как бенчмарк на запись и чтение. Этакий ультимативный тест, результаты которого будет сложно назвать невалидными.
Заполучить её можно вместе с самим VDDK. Скачиваем его с сайта VMware и в случае Linux просто компилируем после установки
[root@toor diskLib] cd /usr/lib/vmware-vix-disklib/doc/samples/diskLib
[root@toor diskLib] ls
Makefile  vixDiskLibSample.cpp
[root@toor disklib] make
[root@toor diskLib] ls
Makefile  vix-disklib-sample  vixDiskLibSample.cpp
Предлагаемый по умолчанию путь для установки.
/usr/share/doc/vmware-vix-disklib/samples/disklibТакже в сети есть информация, что на некоторых дистрибутивах надо добавить следующие строчки в vixDiskLibSample.cpp для успешной компиляции:
#else
#include <stdio.h>
#include <string.h>
Если и в этом случае не скомпилируется, то рекомендуют попробовать добавить переменную окружения LD_LIBRARY_PATH=/usr/lib/vmware-vix-disklib/lib64 и запустить ldconf с правами рута после добавления адреса /usr/lib/vmware-vix-disklib/lib64 в /etc/ld.so.conf.d/vmware-vix-disklib.conf
Зато под Windows в Visual Studio всё компилируется без проблем. И хозяйке на заметку: VDDK в Veeam используется только при работе через Windows прокси. На Linux, по ряду причин, используется собственное решение с применением vSphere API.
А что с этого пользователям Veeam, спросите вы?
Отвечаем: подключая библиотеки VDDK разных версий, идущих вместе с Veeam Backup & Replication, вы можете проверить истинную скорость работы с хостом в самых разнообразных режимах.
Библиотеки хранятся по адресу C:Program Files (x86)VeeamBackup Transportx64vddk_Х_Х, и их использование обязательно для верных результатов.
Теперь давайте посмотрим на самые важные для нас команды и опции при запуске. Ибо, как и для всех инструментов для тестирования, полный список здесь весьма и весьма не мал.
-readbench Запуск бенчмарка на чтение с указанным размером блока. Размер указывается в секторах.
-writebench Всё то же самое, только запись. Важно: Это деструктивная операция! Запись идёт по-честному! Не вздумайте запускать на продакшн машину! Её перезапишет бинарным мусором!
-multithread N Начиная с версии 6.5, можно использовать в параллельном режиме для работы с несколькими дисками.
-host Хост для подключения. Можно в виде DNS имени, можно IP.
-user Пользователь по схеме domainuser
-password Думаю, понятно
-vm vmPath=/path/to/vm Это если мы знаем, где лежит наша машина, но не знаем других её координат
-vm «moref=vm-ХХХ» Путь до машины в инвентори. Он же moref. Проще всего находить через MOB по адресу https://vcenter.local/mob/ Важно: если у вас просто одинокий хост без vCenter, используйте moref=XXX, без vm
-ssmoref Ссылка на снапшот вашей машины, ибо, как известно, одно дело читать данные просто с дисков, а другое — когда на вашем пути стоит снепшот. Или несколько снепшотов. Обязательный параметр(как и сам снепшот) для включённых машин.
-mode Параметр, указывающий режим работы с диском. Ссылается на VixDiskLib_ConnectEx. Доступные значения nbd, nbdssl, san и hotadd. Все они хорошо известны нашим пользователям.
-libdir Путь до папки с библиотеками. По умолчанию должен быть «C:Program Files (x86)VeeamBackup Transportx86vddk_X_X» Если работать с standalone хостом, можно не указывать.
-thumb Появившийся в версии 6.0 обязательный параметр для указания отпечатка SSL сертификата. Без него работать не будет. Проще всего подсмотреть в браузере
-initex configfile Путь до файла с конфигом для VixDiskLib_InitEx
Подробные логи по умолчанию пишутся в папку
C:Userscurrent userAppDataLocalTempvmware-current uservixDiskLib-####.log
Для беспроблемной жизни очень советую очищать эту папку после каждого запуска тестов в режимах san и hotadd. И закрывать окно с консолью (имеется в виду виндовое cmd, а не линуксовое). Это связано с особенностью работы функции VDDKEndAccess, которая не вызывается, если прекратить тест по Ctrl+C, и тестовые диски остаются висеть прицепленными в выбранной машине.
Теперь, когда с общей теорией покончено, переходим к разделу
Практика
Общий синтаксис запуска выглядит как
vixdisklibsample.exe command [options] diskPathВ простейшем случае мы можем подключиться к хосту, указав его имя, логин, пароль и путь до нужной машины.
C:VDDKbin>vixDiskLibSample.exe -info -host demo -user root -password secret [datastore1] test/test.vmdk-info покажет DiskPath выбранного диска.
Если хост подключён к vCenter, надо добавить параметры -libdir и -vm. В случае VDDK>6.0 не забываем про -thumb
C:VDDKbin>vixDiskLibSample.exe -info -host demo -user Administrator -password secret -thumb "00:00:00:00:00:00:00:00:00:00:00:00:00:00:00:00:00:00:00:00" -libdir "C:Program Files (x86)VeeamBackup Transportx86vddk_X_X" -vm vmPath=Datastorage/vm/DemoVM "[datastore1] DemoVM/Demo.vmdk"А дальше начинается самое интересное: указываем -mode и -ssmoref. Очень сильно рекомендую делать все тесты именно со снапшотом, чтобы случайно не испортить оригинальный диск. И помним: тест на запись — операция деструктивная! Он действительно пишет данные, а не симулирует процесс!
С другой стороны, запретить я вам тоже ничего не могу.
Итак, запускаем тест на запись в режиме Hotadd
C:VDDKbin>vixDiskLibSample.exe -writebench 1024 -host demo.local -user "demoadm" -password "%TOPSECRET%" -vm "moref=vm-80380" -ssmoref "snapshot-82782" -thumb "00:00:00:00:00:00:00:00:00:00:00:00:00:00:00:00:00:00:00:00"
-mode hotadd -libdir "C:Program Files (x86)VeeamBackup Transportx86vddk_6_0" "[datastore1] test/test.vmdk"

appGlobals.port902VixDiskLib: Invalid configuration file parameter.  Failed to read configuration file.
Disk "[datastore1] test/test-000001.vmdk" is open using transport mode "hotadd".
ReadFlag  : 0
Processing 10240 buffers of 1048576 bytes.
Wrote 64 MBytes in 2699 msec (23 MBytes/sec)
Wrote 64 MBytes in 2667 msec (23 MBytes/sec)
Wrote 64 MBytes in 687 msec (93 MBytes/sec)
Wrote 64 MBytes in 608 msec (105 MBytes/sec)
Wrote 64 MBytes in 687 msec (93 MBytes/sec)
...
Wrote 64 MBytes in 795 msec (80 MBytes/sec)
Wrote 64 MBytes in 749 msec (85 MBytes/sec)
Wrote 64 MBytes in 1326 msec (48 MBytes/sec)
Wrote 64 MBytes in 2465 msec (25 MBytes/sec)
Wrote 64 MBytes in 2449 msec (26 MBytes/sec)
Wrote 10240 MBytes in 141040 msec (72 MBytes/sec)
Deleted directory C:UsersADMINI~1AppDataLocalTemp2vmware-Administrator4206be79-cfef-4175-51a5-6e7c0900591b-vm-80380hotadd
Для SAN mode всё тоже самое, но надо учитывать, что для этого теста cmd надо запустить с правами администратора, иначе вы получите ошибки «You do not have access rights to this file» и «No path to device LVID».
А если вы хотите протестировать вариант восстановления в режиме Direct SAN, то надо указать фейковый UUID в ветке HKEY_LOCAL_MACHINESOFTWAREWow6432NodeVMware, Inc.volatileUUIDHost
Теперь попробуем запустить тест на скорость чтения в режиме nbd.
C:VDDKbin>vixDiskLibSample.exe -readbench 1024 -host demo.local -user "demoadm" -password "%TOPSECRET%" -vm "moref=vm-80380" -ssmoref "snapshot-82782" -thumb "00:00:00:00:00:00:00:00:00:00:00:00:00:00:00:00:00:00:00:00"  -ssmoref "snapshot-82782"
-mode nbd -libdir "C:Program Files (x86)VeeamBackup Transportx86vddk_6_0" "[datastore1] test/test.vmdk"

appGlobals.port902VixDiskLib: Invalid configuration file parameter.  Failed to read configuration file.
Disk "[datastore1] test/test.vmdk" is open using transportmode "nbd".
ReadFlag  : 4
Processing 20480 buffers of 524288 bytes.
Read 64 MBytes in 2293 msec (27 MBytes/sec)
Read 64 MBytes in 2153 msec (29 MBytes/sec)
Read 64 MBytes in 1747 msec (36 MBytes/sec)
Read 64 MBytes in 2013 msec (31 MBytes/sec)
Read 64 MBytes in 2823 msec (22 MBytes/sec)
…
Если захотите дать настоящей нагрузки, смело запускайте -readbench или -writebench сразу для нескольких дисков. Но для этого вам понадобится VDDK 6.5 или 7.0
C:VDDKbinvixDiskLibSample.exe" -readbench 1024 -host "10.0.0.1" -user "ADuser" -password "****" -vm "moref=vm-1" -ssmoref "snapshot-100" -thumb "00:00:00:00:00:00:00:00:00:00:00:00:00:00:00:00:00:00:00:00" -mode san -libdir "C:Program Files (x86)VeeamBackup Transportx64vddk_6_5" -initex "C:VDDK60initex.txt" "[Datastore01] VM/VM.vmdk" "[Datastore01] VM/VM_1.vmdk" "[Datastore01] VM/VM_2.vmdk" "[Datastore01] VM/VM_3.vmdkИ в завершение давайте посмотрим, какую информацию о виртуальных дисках мы можем получить с помощью -info
C:VDDKbin>vixDiskLibSample.exe -info -host demo.local -user "demoadm" -password "%TOPSECRET%" -vm "moref=vm-80380"
-ssmoref "snapshot-82787" -thumb "00:00:00:00:00:00:00:00:00:00:00:00:00:00:00:00:00:00:00:00" -mode nbd -libdir "C:Program Files (x86)VeeamBackup Transportx86vddk_6_0" "[datastore1] test/test.vmdk"

appGlobals.port902VixDiskLib: Invalid configuration file parameter.  Failed to read configuration file.
Disk "[datastore1] test/test.vmdk" is open using transport mode "nbd".
capacity          = 20971520 sectors
number of links   = 1
adapter type      = LsiLogic SCSI
BIOS geometry     = 0/0/0
physical geometry = 1305/255/63
Transport modes supported by vixDiskLib: file:san:hotadd:nbdssl:nbd
Кстати, если вдруг не хочется рисковать настоящими дисками от настоящих машин, их можно создать здесь же. Правда, через -create нельзя создать диск сразу на хосте, но тут нам на помощь приходит опция -clone. Параметр -cap задаёт размер в мегабайтах, а делать это уже удобнее на linux машине.
./vix-disklib-sample -create -cap 1024 newdisk.vmdk
./vix-disklib-sample -clone virtdisk.vmdk –host demo.local –user root –password TOP_SECRET newdisk.vmdk
На этом мой быстрый экскурс в мир широких возможностей VixDiskLibSample закончен. Да, местами утилита несколько дуболомна, а её вывод не слишком удобен. Однако вы всегда можете на её основе сделать нечто своё, что позволит вам элегантно решать свои задачи без изобретения велосипедов и использования невнятных прослоек.
И немного полезных ссылок в конце:
- Любую версию VDDK можно скачать по этой ссылке. По умолчанию вам предложат 7.0, однако сверху можно переключиться хоть на 5.1
- Многообразие наших КВ посвящённых возможным проблемам с VDDK.
Read time8 minutes
Virtual Disk Image Files (VMDK) is used for storing data in order to use them in virtual machines like VMware Workstation, QEMU, Virtual Box, etc. Generally, it is used for cloud computing and virtualization. In other words, we can say that it is a direct competitor of MS VHD file format.
Just like VHD files, VMDK files are also prone to corruption, and recovering a VMDK file could be very complicated, as it contains the entire data of a disk, and any errors in the recovery process can lead to data loss. Thus, recovering corrupt VMDK files is crucial to saving the entire disk data.
Also, when it comes to choosing a recovery method for corrupt VMDK files, there are not enough options available. But, we can perform a basic VMDK file repair with the manual method.
Reasons for VMDK Corruption
- Due to virus/malware that is present in your system or enters via any external source
- Due to immediate termination of VMDK files without saving it properly
- Immediate system shutdown, which often damages opened files
Methods to Repair Corrupt VMDK Files
If you’re unable to access the data of your VMDK file for the first time, then some basic repairing tips can help you resolve this problem. Here is the detailed process to perform basic VMDK file recovery. But, before that, understand how these files are made up of.
A VMDK file is basically a combination of two types of files, which include VMDK and *-flat.vmdk. The VMDK file works as a plain text pointer for the *-flat.vmdk. The (*) denotes the VM server’s name.
Basic VMDK File Repairing Methods
1st Method: Restore VMDK File by Booting the Machine
If you’re unable to access VMDK files from Windows for the first time, then there are some basic repairing tips that can help you resolve this problem. Here is the detailed process to perform basic VMDK file recovery.
A VMDK file is basically a combination of two types of files, which include VMDK and *-flat.vmdk. The VMDK file works as a plain text pointer for the *-flat.vmdk. The (*) denates the VM server’s name. Whenever a VMDK file or VM server gets corrupt, the Virtual Machine fails to start. In such cases, the following steps can help you repair corrupt VMDK file.
- Create a backup copy of the original VMDK file.
- Now, make a copy of the pointer file with a different VM to your system.
- Make the required modifications to the fields and save the changes.
- Boot the virtual machine to repair the VMDK file.
This process might seem easy to execute. But, the hardest part of this procedure is to get Cylinders, Heads, and Sectors precisely according to the size of the *-flat.vmdk file. Most users, especially beginners often fail to recover their VMDK file with this process and wonder how they can recover their VMDK file.
Well, there is another method to recover the VMDK file using command prompt in the Windows operating system.
2nd Method: Use Command Prompt in Windows
Using Command Prompt is also a great technique to recover VMDK files, but it is more suitable for technical users who are well-versed with CMD. Even if you’re a beginner, you can try to recover VMDK files with this method. Follow the below steps to recover the VMDK file with cmd.
- Open the command prompt by pressing Window + R and enter cmd.
- Now, go to the location of local installation of your VMware Dev kit.
- Use this command in the cmd “vmware-vsdiskmanager.exe” – R “the fully qualified path to your corrupt VMDK.”
- After typing the command hit Enter.
You might be able to recover your corrupt VMDK files using this technique, but this method also has the same limitations as the previous one. So, what is a secure and reliable solution to this problem? – use a third party VMDK recovery software.
Kernel VMDK Recovery
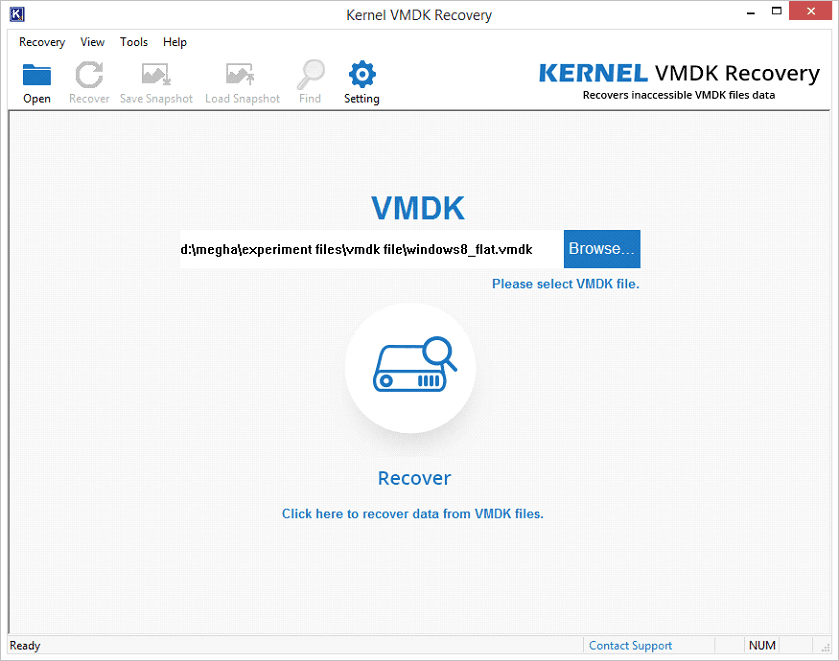
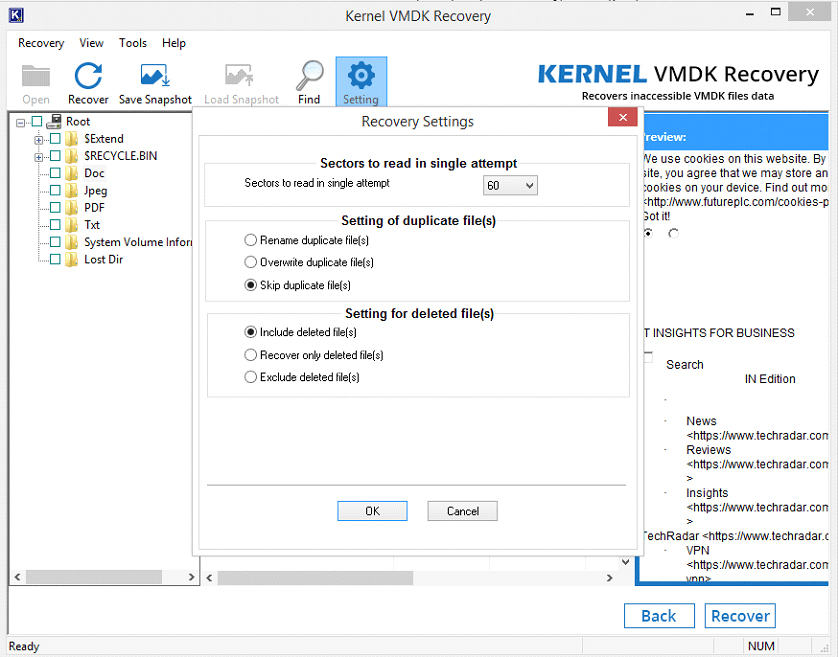
Kernel VMDK Recovery is a great utility to recover corrupt VMDK files. It offers a flawless recovery for all types of VMDK files, whether it’s created by VMware Workstation or VirtualBox. Also, the built-in Find feature allows you to search specific file type in the file system. With the help of this software, you can even customize the number of sectors to be read on a single scan. You can overwrite, rename, skip, and include or exclude duplicate files with this software. Now, let’s have a clear look at how this software works.
- Download and install the software on your system.
- After launching the tool, click the Browse button, select the desired VMDK file, and click Recover.
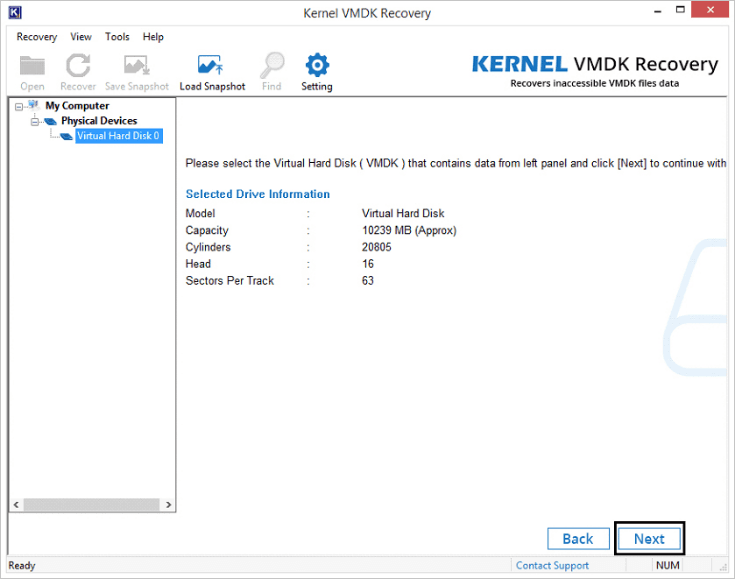
- The details of the VMDK file will be displayed on the tool screen. Select the drive that you want to open and preview and click Next.
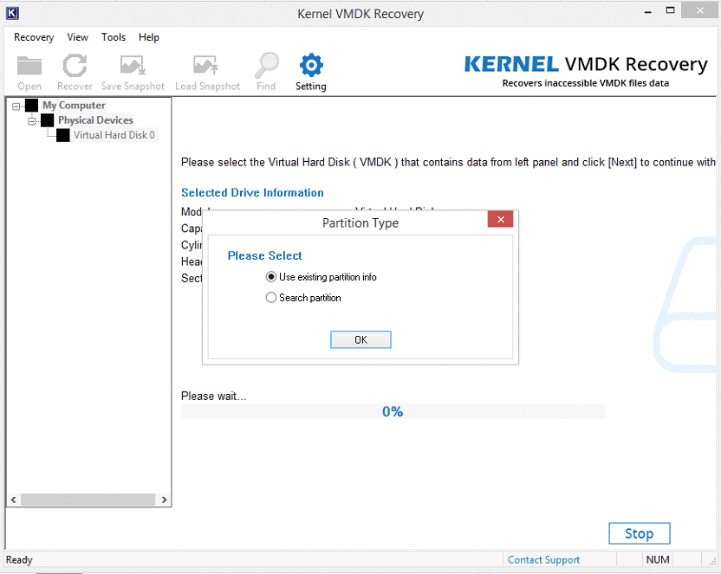
- Select an option from the following partition types and click OK.
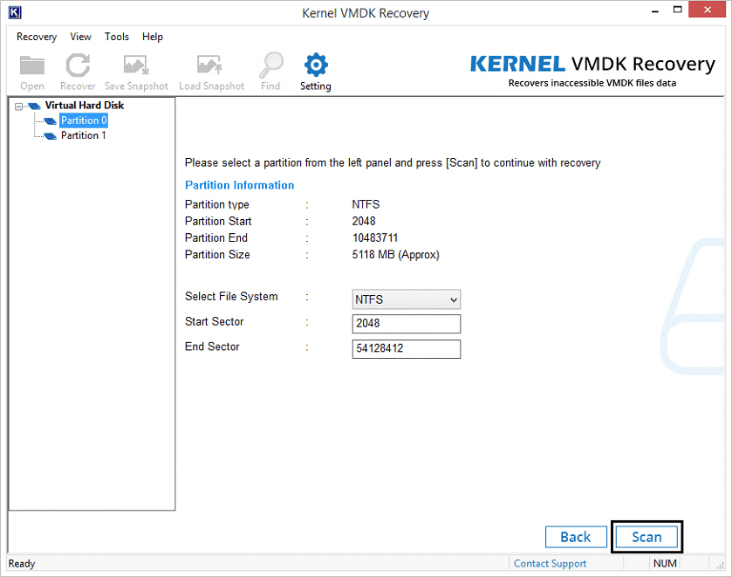
- Select the specific partition, file system, and provide the Start Sector and End Sector and click Scan.
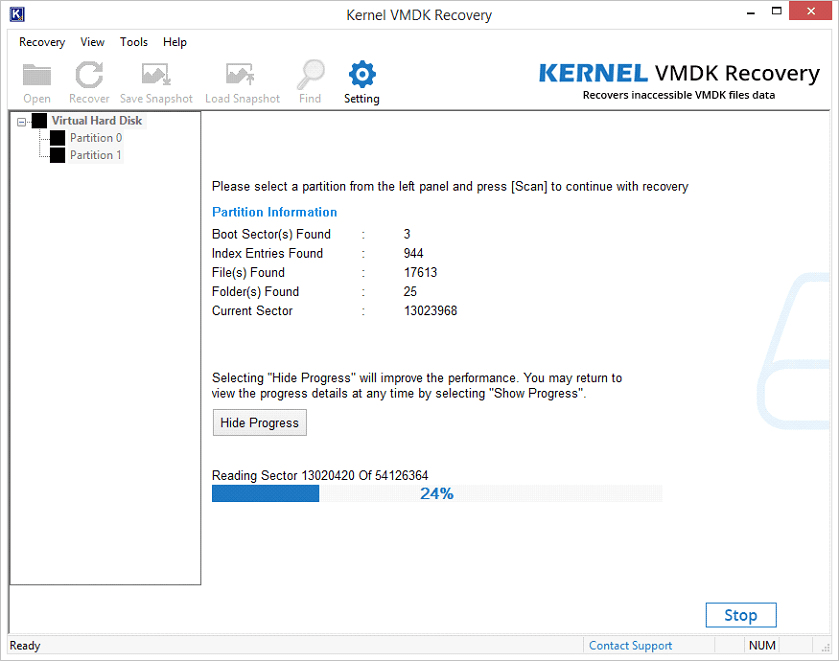
- You can view the scanning process of the tool while recovering the corrupt VMDK file. You can click Hide Progress to improve the scanning speed.
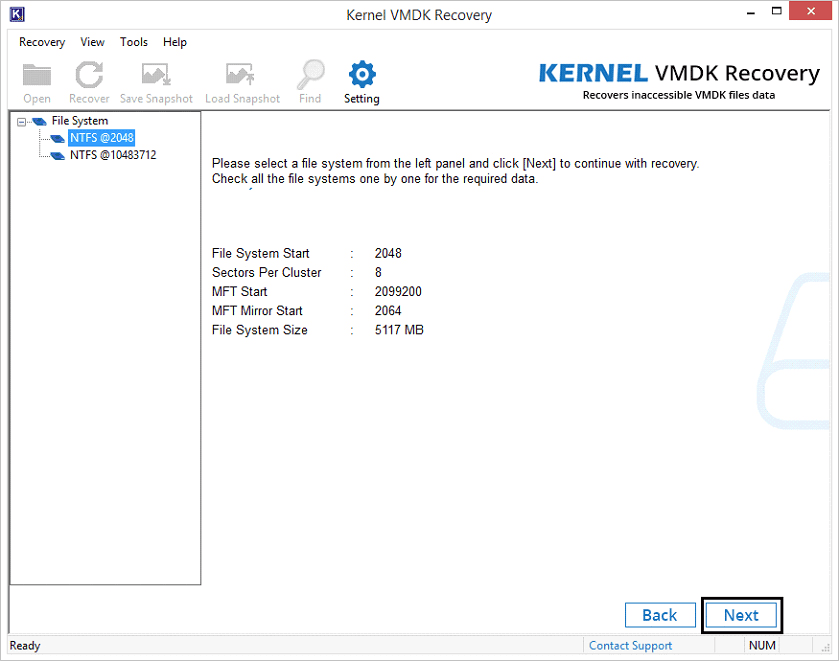
- Once the scanning is complete, select the desired file system to recover and click Next.
- The entire data of the selected file system will be displayed on the screen. You can preview any folder by selecting it.

- Now, to recover VMDK files, select the required folder(s) and files in the tree structure and click Recover.
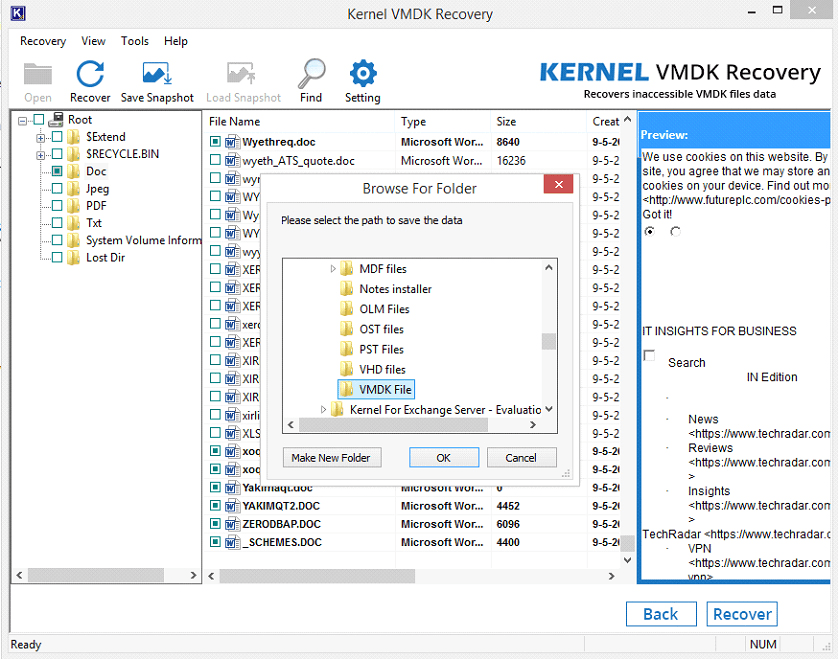
- Select a specific location to save the file and click OK.
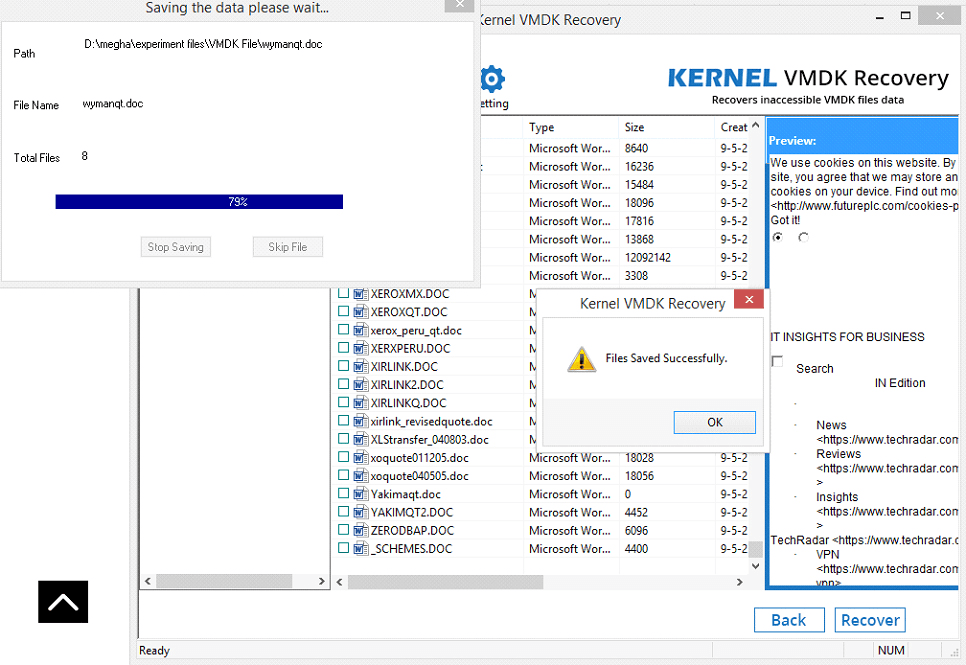
- Once the files are saved, a notification will be displayed on the screen. Click OK to end the process.
 Note: There are some other recovery options with the tool that you can use to recover the VMDK file, such as:
Using Kernel VMDK Recovery, you can quickly retrieve the entire data of VMDK files of any VMware Workstations and VirtualBox.
Note: If you want to save a snapshot of the scanning process, you can accomplish it by clicking Save Snapshot.
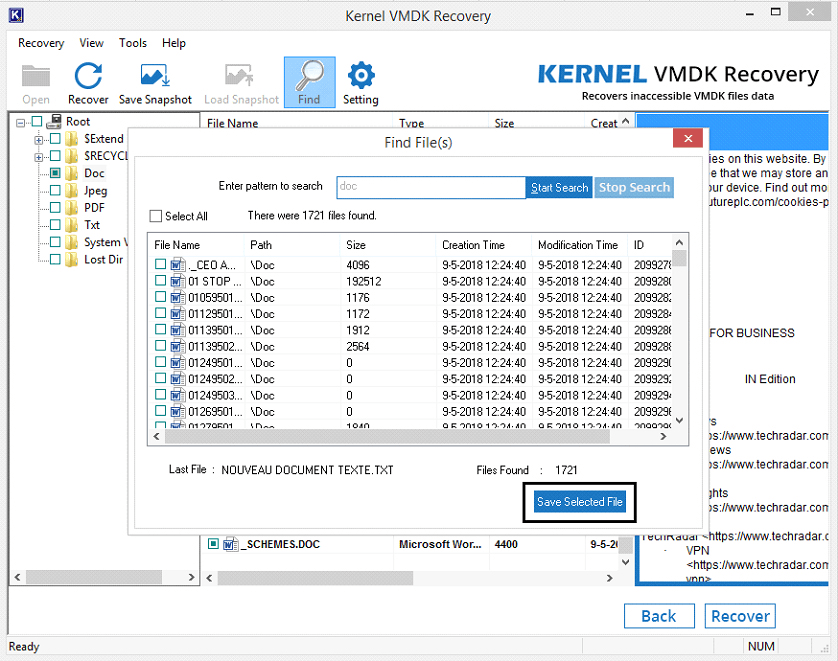
Note: To search any specific file, use the Find option to find files by their name pattern.
Conclusion
Many organizations use VMware Workstations and VirtualBox for their daily tasks. When it gets corrupt, it becomes almost difficult to retain its data. And the manual approaches to recover the entire data are not viable. However, using Kernel VMDK Recovery software, you can easily recover the entire data of the VMDK file.
Posted by K_9 2015-03-19T20:27:58Z
Hi all;
I have a Windows Server 2008 R2 VM on ESXi 5.1 host managed by vCenter 5.5.
The VM C drive is suffering Event ID 55 (The file system structure on disk is corrupt and unusable. Please run the chkdsk utility on the volume «Drive_letter:»)
CHKDSK fixes the issue for few days, and then the issue occurs again.
Any idea how to check the VMDK disk for errors?
Thank you.
6 Replies
-
The VMDK is just a file that sits on top of another file structure. Is this local disk, SAN or something else?
Was this post helpful?
thumb_up
thumb_down
-

All the storage is on EMC SANs… Is there a way to check the VMDK file integrity «check for errors. Other VMs on the same host are all ok.
Was this post helpful?
thumb_up
thumb_down
-
You run a check disk just as you normally would from within the VM that has the troubled disk attached. If you need to check individual file integrity (VHDx/VMDK’s are just files to begin with) then on VMware ESXi, this is how you do it:
http://kb.vmware.com/selfservice/microsites/search.do?language=en_US&cmd=displayKC&externalI… Opens a new window
Was this post helpful?
thumb_up
thumb_down
-

I know this is old—we have a similar issue happening with a 2008 server on ESX 6.5. Every couple of weeks we get such severe corruption it crashes. Did you ever get it to stop?
Was this post helpful?
thumb_up
thumb_down
-

There is actually a check and repair option now in
VMKFSTOOLS with -x (lowercase) I found it detailed on this website’s page http://www.enterprisedaddy.com/2016/08/use-vmkfstools-virtual-disks/ Opens a new window I don’t know when this was included in the tool, but its worth checking to see if its there for you.
Was this post helpful?
thumb_up
thumb_down
Rate this post
Если у вас на системе виртуализации ESX повредился файл VMDK, первое что необходимо, использовать утилиту
vmkfstools —fix check disk-s001.vmdk
После этого мы можем использовать команду для ремонта диска:
vmkfstools —fix repair disk-s001.vmdk
Так же можно пропробовать скопировать старый диск в новый:
vmkfstools -i disk-s001.vmdk disk-new.vmdk
Есть проблемы с установкой и администрирование серверов ? Обращайтесь — [email protected]
Похожие статьи:
- Как конвертировать образа DD и qcow2 и RAW img в образ VMDK для Vmware
- Что делать, если тормозит Docker?
- Что делать, если сайт выдает ошибку 503, 504
- Что делать если mysql выдает: MySQL server PID file could not be found!

Read time8 minutes
Virtual Disk Image Files (VMDK) is used for storing data in order to use them in virtual machines like VMware Workstation, QEMU, Virtual Box, etc. Generally, it is used for cloud computing and virtualization. In other words, we can say that it is a direct competitor of MS VHD file format.
Just like VHD files, VMDK files are also prone to corruption, and recovering a VMDK file could be very complicated, as it contains the entire data of a disk, and any errors in the recovery process can lead to data loss. Thus, recovering corrupt VMDK files is crucial to saving the entire disk data.
Also, when it comes to choosing a recovery method for corrupt VMDK files, there are not enough options available. But, we can perform a basic VMDK file repair with the manual method.
Reasons for VMDK Corruption
- Due to virus/malware that is present in your system or enters via any external source
- Due to immediate termination of VMDK files without saving it properly
- Immediate system shutdown, which often damages opened files
Methods to Repair Corrupt VMDK Files
If you’re unable to access the data of your VMDK file for the first time, then some basic repairing tips can help you resolve this problem. Here is the detailed process to perform basic VMDK file recovery. But, before that, understand how these files are made up of.
A VMDK file is basically a combination of two types of files, which include VMDK and *-flat.vmdk. The VMDK file works as a plain text pointer for the *-flat.vmdk. The (*) denotes the VM server’s name.
Basic VMDK File Repairing Methods
1st Method: Restore VMDK File by Booting the Machine
If you’re unable to access VMDK files from Windows for the first time, then there are some basic repairing tips that can help you resolve this problem. Here is the detailed process to perform basic VMDK file recovery.
A VMDK file is basically a combination of two types of files, which include VMDK and *-flat.vmdk. The VMDK file works as a plain text pointer for the *-flat.vmdk. The (*) denates the VM server’s name. Whenever a VMDK file or VM server gets corrupt, the Virtual Machine fails to start. In such cases, the following steps can help you repair corrupt VMDK file.
- Create a backup copy of the original VMDK file.
- Now, make a copy of the pointer file with a different VM to your system.
- Make the required modifications to the fields and save the changes.
- Boot the virtual machine to repair the VMDK file.
This process might seem easy to execute. But, the hardest part of this procedure is to get Cylinders, Heads, and Sectors precisely according to the size of the *-flat.vmdk file. Most users, especially beginners often fail to recover their VMDK file with this process and wonder how they can recover their VMDK file.
Well, there is another method to recover the VMDK file using command prompt in the Windows operating system.
2nd Method: Use Command Prompt in Windows
Using Command Prompt is also a great technique to recover VMDK files, but it is more suitable for technical users who are well-versed with CMD. Even if you’re a beginner, you can try to recover VMDK files with this method. Follow the below steps to recover the VMDK file with cmd.
- Open the command prompt by pressing Window + R and enter cmd.
- Now, go to the location of local installation of your VMware Dev kit.
- Use this command in the cmd “vmware-vsdiskmanager.exe” – R “the fully qualified path to your corrupt VMDK.”
- After typing the command hit Enter.
You might be able to recover your corrupt VMDK files using this technique, but this method also has the same limitations as the previous one. So, what is a secure and reliable solution to this problem? – use a third party VMDK recovery software.
Kernel VMDK Recovery
Kernel VMDK Recovery is a great utility to recover corrupt VMDK files. It offers a flawless recovery for all types of VMDK files, whether it’s created by VMware Workstation or VirtualBox. Also, the built-in Find feature allows you to search specific file type in the file system. With the help of this software, you can even customize the number of sectors to be read on a single scan. You can overwrite, rename, skip, and include or exclude duplicate files with this software. Now, let’s have a clear look at how this software works.
- Download and install the software on your system.
- After launching the tool, click the Browse button, select the desired VMDK file, and click Recover.
- The details of the VMDK file will be displayed on the tool screen. Select the drive that you want to open and preview and click Next.
- Select an option from the following partition types and click OK.
- Select the specific partition, file system, and provide the Start Sector and End Sector and click Scan.
- You can view the scanning process of the tool while recovering the corrupt VMDK file. You can click Hide Progress to improve the scanning speed.
- Once the scanning is complete, select the desired file system to recover and click Next.
- The entire data of the selected file system will be displayed on the screen. You can preview any folder by selecting it.
- Now, to recover VMDK files, select the required folder(s) and files in the tree structure and click Recover.
- Select a specific location to save the file and click OK.
- Once the files are saved, a notification will be displayed on the screen. Click OK to end the process.Note: There are some other recovery options with the tool that you can use to recover the VMDK file, such as:
Using Kernel VMDK Recovery, you can quickly retrieve the entire data of VMDK files of any VMware Workstations and VirtualBox.
Note: If you want to save a snapshot of the scanning process, you can accomplish it by clicking Save Snapshot.
Note: To search any specific file, use the Find option to find files by their name pattern.
Conclusion
Many organizations use VMware Workstations and VirtualBox for their daily tasks. When it gets corrupt, it becomes almost difficult to retain its data. And the manual approaches to recover the entire data are not viable. However, using Kernel VMDK Recovery software, you can easily recover the entire data of the VMDK file.
Video – Free Methods To Repair Corrupt And Damaged VMDK File