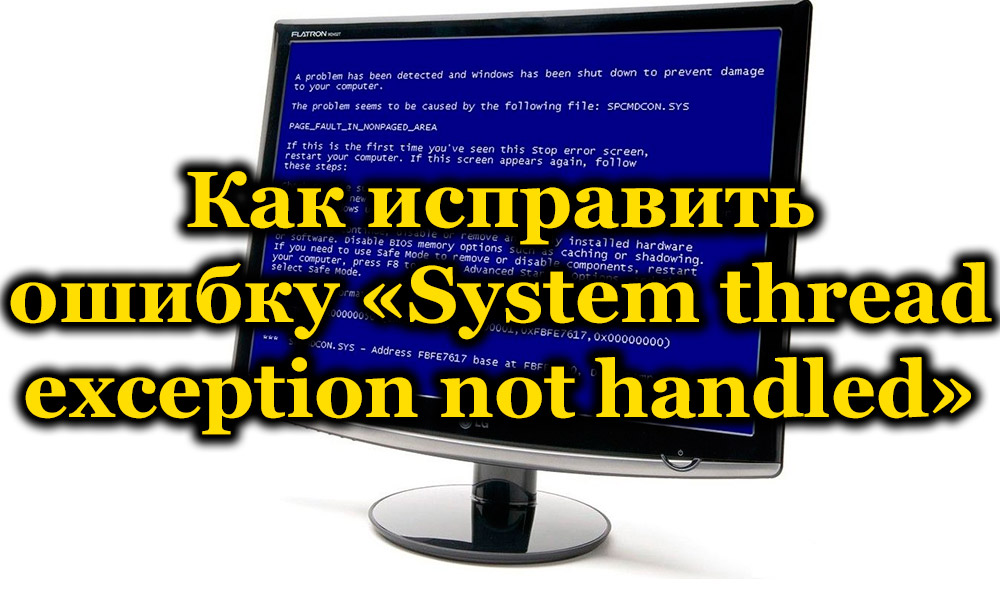
Как исправить BSoD с кодом 1000007e на Windows?
1000007e — код синего экрана смерти, которые внезапно может возникнуть на всех современных версиях ОС Windows, начиная от Windows 7 и заканчивая Windows 10. Однако наибольшее количество сообщений об этом BSoD исходит от пользователей «семерки» и «восьмерки». Увидеть код можно непосредственно после BSoD в системном сообщении, которое будет ждать вас по входу в Windows.
Содержание
- Что вызывает BSoD 1000007e?
- Способы решения BSoD 1000007e
- Способ №1 Установка всех обновлений
- Способ №2 Удаление стороннего антивируса
- Способ №3 Обновление BIOS
- Способ №4 Вернуть ПК в исходное состояние
Что вызывает BSoD 1000007e?
Как правило, для появления этого синего экрана смерти выделяют четыре причины:
- некорректно перенесенные драйвера со старой версии Windows;
- работа антивирусного программного обеспечения;
- устаревшая версия BIOS материнской платы;
- повреждения системных файлов.
Понятное дело, BSoD 1000007e — это крайне неприятная проблема, появление которой может довольно сильно напугать неподготовленных пользователей. Тем не менее при помощи способов, расписанных ниже, вы сможете избавиться от нее в течение получаса или часа.
Способы решения BSoD 1000007e
Способ №1 Установка всех обновлений
Отсутствие определенных обновлений в Windows может вызвать набор самых разных проблем. В этот же список порой может входить и синий экран смерти, хоть и крайне редко. Мы рекомендуем попробовать вам установить для своей Windows все доступные обновления. Выполняется это следующим образом:
- нажмите правой кнопкой мыши на Пуск;
- кликните на пункт «Параметры»;
- перейдите в раздел «Обновление и безопасность»;
- пройдите во вкладку «Центр обновления Windows»;
- нажмите на кнопку «Проверить наличие обновлений»;
- следуйте инструкциям на экране.
Не бойтесь, если ваш компьютер начнет перезагружаться в процессе обновления системы — это вполне нормальное явление. Как только ваша Windows получит все актуальные обновления, протестируйте свой ПК на наличие BSoD 1000007e. Если он не будет появляться в течение длительного периода времени, то дело определенно заключалось в каком-то отсутствующем обновлении.
Способ №2 Удаление стороннего антивируса
У вас на компьютере установлен сторонний антивирус? Знайте, что именно он может стоять за появление синего экрана смерти с кодом 1000007e. Мы рекомендуем вам поступить следующим образом: удалите стороннее антивирусное ПО, перезагрузите компьютер и проверьте, перестанет ли проявляться BSoD. Удалить антивирус вы сможете следующим образом:
- нажмите Windows+R;
- пропишите в пустой строчке значение «appwiz.cpl» и нажмите Enter;
- оказавшись в «Программы и компоненты», найдите свой антивирус в списке установленных приложений;
- нажмите на него правой кнопкой мыши и выберите «Удалить»;
- следуйте инструкциям на экране и перезагрузите свой компьютер.
Протестируйте свой компьютер на наличие синего экрана смерти с кодом 1000007e. Как только вы удалить сторонний антивирус, системной будет задействован Защитник Windows. Попробуйте установить другой антивирус либо пользуйтесь услугами системной утилиты.
Способ №3 Обновление BIOS
В некоторых случаях синий экран смерти 1000007e может появляться на компьютерах с устаревшим BIOS для материнской платы. Если вы давненько не обновляли BIOS на своем ПК, то определенно попробуйте сделать это для решения проблемы.
К сожалению, процесс обновления BIOS отличается в зависимости от производителя материнской платы. Мы настоятельно советуем вам пройти на официальный ресурс вашего производителя и ознакомиться с инструкцией по обновлению BIOS.
Вот несколько примеров по обновлению BIOS на различных материнках:
- Dell;
- Acer;
- Lenovo;
- Asus.
Способ №4 Вернуть ПК в исходное состояние
Если ничего не вышло и вышеуказанные методы оказались абсолютно бессильны в вашей ситуации, то вы можете попробовать прибегнуть к такой процедуре, как возвращение компьютера к исходному состоянию. Проще говоря, переустановка операционной системы без потери установленных приложений, личных данных и настроек. Осуществить это можно следующим образом:
- нажмите правой кнопкой мыши на Пуск и выберите пункт «Параметры»;
- перейдите в раздел «Обновление и безопасность»;
- кликните на вкладку «Восстановление»;
- нажмите на кнопку «Начать» под разделом «Вернуть компьютер в исходное состояние»;
- на экране «Выбор действия» кликните на опцию «Сохранить мои файлы»;
- и наконец, нажмите на кнопку «Сброс» для начала возврата своего ПК к исходному состоянию.
Процесс возврата к исходному состоянию может занять довольно продолжительное время, плюс, ваш ПК по окончанию процедуры будет перезагружен. Синий экран смерти с кодом 1000007e после сброса определенно будет исправлен.
by Vlad Turiceanu
Passionate about technology, Windows, and everything that has a power button, he spent most of his time developing new skills and learning more about the tech world. Coming… read more
Updated on March 29, 2021
- The 0x1000007e BSoD error is caused by a severely outdated Silverlight version, or by system file corruption.
- The first step to fix 0x1000007e on Windows 10 should be to install the pending updates, if any.
- An SFC scan will help you find any possible corrupted files that lead to bug check code 0x1000007e.
- Don’t forget that an all-in-one BSoD fixer can be the answer to many such blue screen errors.

XINSTALL BY CLICKING THE DOWNLOAD FILE
This software will repair common computer errors, protect you from file loss, malware, hardware failure and optimize your PC for maximum performance. Fix PC issues and remove viruses now in 3 easy steps:
- Download Restoro PC Repair Tool that comes with Patented Technologies (patent available here).
- Click Start Scan to find Windows issues that could be causing PC problems.
- Click Repair All to fix issues affecting your computer’s security and performance
- Restoro has been downloaded by 0 readers this month.
Getting an error message immediately after starting your Windows 10 computer is not an uncommon occurrence.
The 0x1000007e BSoD error is caused by a severely outdated Silverlight version, system file corruption, or interference from a third-party service.
A hardware-related issue may also be the reason why this 0x1000007e error is shown, but you shouldn’t imagine the worst scenario yet.
Because of the multiple factors that cause this error, it’s likely that you may have to attempt more than one potential fix to suitably repair it.
With that said, we may only suggest you try the solutions below in the given order.
How can I fix error 0x1000007e on Windows?
1. Install pending updates

- Press Windows key + R keyboard hotkey to open up a Run dialog box.
- Type wuapp.exe inside the text box and press Enter to open up the Windows Update tab of the Settings app.
- Once you’re inside the Windows Update screen, click on Check for updates.
- After that, follow the next on-screen instructions to install every pending update.
- After each Windows update is installed, restart your computer and you should be good to go.
Windows 10 updates are supposed to be automatically downloaded when available and installed. Make sure you install every pending update that Windows has lined up for you.
Can’t install Windows updates? Just check out this guide to see how easy is to fix that.
2. Use a troubleshooting tool
Some PC issues are hard to tackle, especially when it comes to corrupted repositories or missing Windows files. If you are having troubles fixing an error, your system may be partially broken.
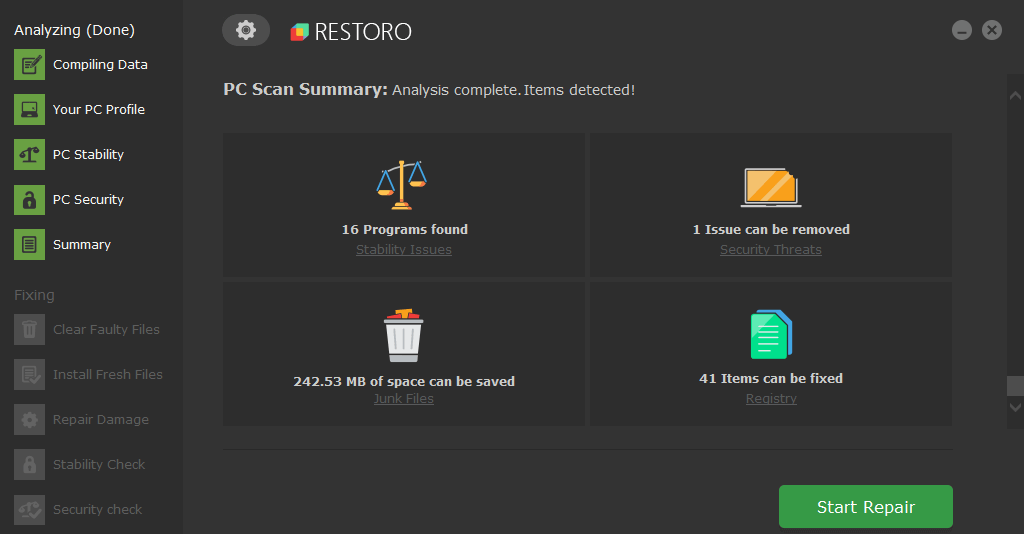
We recommend installing Restoro, a tool that will scan your machine and identify what the fault is.
Click here to download and start repairing.
Since the issue might be deeper than you thought and finding the cause might be difficult, a general troubleshooting BSoD tool can be very useful.
Restoro is powered by an online database that features the latest functional system files for Windows 10 PCs, allowing you to easily replace any elements that can cause a BSoD error.
This software can also help you by creating a restore point before starting the repairs, enabling you to easily restore the previous version of your system if something goes wrong.
This is how you can fix registry errors using Restoro:
- Download and install Restoro.
- Launch the application.
- Wait for the software to identify stability issues and possible corrupted files.
- Press Start Repair.
- Restart your PC for all the changes to take effect.
As soon as the fixing process is completed, your PC should work without problems, and you will not have to worry about BSoD errors or slow response times ever again.
⇒ Get Restoro
Disclaimer: This program needs to be upgraded from the free version in order to perform some specific actions.
3. Use SFC /Scannow

- Click on Start.
- Then, you need to search for Command Prompt, right-click the top result, and select Run as administrator.
- Type the following command and then press Enter:
sfc /scannow - System File Checker will now verify the integrity of all protected operating system files on your computer.
- It might take quite a while to finish. Once you start this process, you must not interrupt it until the operation is finished.
- Restart your computer if sfc /scannow repaired any files.
System file corruption problems could occur as a result of an issue installing a driver, a system update, or application, or even while making any changes to the installation manually.
Windows 10’s System File Checker (SFC) scannow command can’t fix hardware issues.
But it’s a great place to start if you’re still experiencing the 0x1000007e error and suspect corrupted system files as the culprit.
In the unlikely case that the scannow command stops before the process finishes, we’ve also got an easy fix for you.
4. Use the System Restore utility

- Open up a Run dialog box by pressing Windows key + R.
- Inside the text box, type rstrui and press Enter to open up the System Restore wizard.
- Click Next at the initial prompt.
- Select the Restore point you wish to return to and click Next.
- Follow the instructions to complete the process.
- Lastly, your computer will restart and the new state will be enforced at the next system startup.
Many users reported that the 0x1000007e error was fixed after restoring their PC with the System Restore tool. You may try to do the same.
If System Restore is not working, there is no reason to panic. Just take a look at this useful guide and set things right once again.
Have you attempted to apply one or more of the solutions we have outlined below? Let us know which one worked for you in the comments area below.
![]()
Newsletter
by Vlad Turiceanu
Passionate about technology, Windows, and everything that has a power button, he spent most of his time developing new skills and learning more about the tech world. Coming… read more
Updated on March 29, 2021
- The 0x1000007e BSoD error is caused by a severely outdated Silverlight version, or by system file corruption.
- The first step to fix 0x1000007e on Windows 10 should be to install the pending updates, if any.
- An SFC scan will help you find any possible corrupted files that lead to bug check code 0x1000007e.
- Don’t forget that an all-in-one BSoD fixer can be the answer to many such blue screen errors.
XINSTALL BY CLICKING THE DOWNLOAD FILE
This software will repair common computer errors, protect you from file loss, malware, hardware failure and optimize your PC for maximum performance. Fix PC issues and remove viruses now in 3 easy steps:
- Download Restoro PC Repair Tool that comes with Patented Technologies (patent available here).
- Click Start Scan to find Windows issues that could be causing PC problems.
- Click Repair All to fix issues affecting your computer’s security and performance
- Restoro has been downloaded by 0 readers this month.
Getting an error message immediately after starting your Windows 10 computer is not an uncommon occurrence.
The 0x1000007e BSoD error is caused by a severely outdated Silverlight version, system file corruption, or interference from a third-party service.
A hardware-related issue may also be the reason why this 0x1000007e error is shown, but you shouldn’t imagine the worst scenario yet.
Because of the multiple factors that cause this error, it’s likely that you may have to attempt more than one potential fix to suitably repair it.
With that said, we may only suggest you try the solutions below in the given order.
How can I fix error 0x1000007e on Windows?
1. Install pending updates
- Press Windows key + R keyboard hotkey to open up a Run dialog box.
- Type wuapp.exe inside the text box and press Enter to open up the Windows Update tab of the Settings app.
- Once you’re inside the Windows Update screen, click on Check for updates.
- After that, follow the next on-screen instructions to install every pending update.
- After each Windows update is installed, restart your computer and you should be good to go.
Windows 10 updates are supposed to be automatically downloaded when available and installed. Make sure you install every pending update that Windows has lined up for you.
Can’t install Windows updates? Just check out this guide to see how easy is to fix that.
2. Use a troubleshooting tool
Some PC issues are hard to tackle, especially when it comes to corrupted repositories or missing Windows files. If you are having troubles fixing an error, your system may be partially broken.
We recommend installing Restoro, a tool that will scan your machine and identify what the fault is.
Click here to download and start repairing.
Since the issue might be deeper than you thought and finding the cause might be difficult, a general troubleshooting BSoD tool can be very useful.
Restoro is powered by an online database that features the latest functional system files for Windows 10 PCs, allowing you to easily replace any elements that can cause a BSoD error.
This software can also help you by creating a restore point before starting the repairs, enabling you to easily restore the previous version of your system if something goes wrong.
This is how you can fix registry errors using Restoro:
- Download and install Restoro.
- Launch the application.
- Wait for the software to identify stability issues and possible corrupted files.
- Press Start Repair.
- Restart your PC for all the changes to take effect.
As soon as the fixing process is completed, your PC should work without problems, and you will not have to worry about BSoD errors or slow response times ever again.
⇒ Get Restoro
Disclaimer: This program needs to be upgraded from the free version in order to perform some specific actions.
3. Use SFC /Scannow
- Click on Start.
- Then, you need to search for Command Prompt, right-click the top result, and select Run as administrator.
- Type the following command and then press Enter:
sfc /scannow - System File Checker will now verify the integrity of all protected operating system files on your computer.
- It might take quite a while to finish. Once you start this process, you must not interrupt it until the operation is finished.
- Restart your computer if sfc /scannow repaired any files.
System file corruption problems could occur as a result of an issue installing a driver, a system update, or application, or even while making any changes to the installation manually.
Windows 10’s System File Checker (SFC) scannow command can’t fix hardware issues.
But it’s a great place to start if you’re still experiencing the 0x1000007e error and suspect corrupted system files as the culprit.
In the unlikely case that the scannow command stops before the process finishes, we’ve also got an easy fix for you.
4. Use the System Restore utility
- Open up a Run dialog box by pressing Windows key + R.
- Inside the text box, type rstrui and press Enter to open up the System Restore wizard.
- Click Next at the initial prompt.
- Select the Restore point you wish to return to and click Next.
- Follow the instructions to complete the process.
- Lastly, your computer will restart and the new state will be enforced at the next system startup.
Many users reported that the 0x1000007e error was fixed after restoring their PC with the System Restore tool. You may try to do the same.
If System Restore is not working, there is no reason to panic. Just take a look at this useful guide and set things right once again.
Have you attempted to apply one or more of the solutions we have outlined below? Let us know which one worked for you in the comments area below.
![]()
Newsletter
Как и любое сложное оборудование, компьютер может выйти из строя по целому ряду причин. В операционных системах Windows о возникновении критических ошибок пользователю сообщает BSoD (blue screen of death) – синий экран смерти. Несмотря на свое грозное название, данный отчет крайне полезен – он информирует о характере и источнике проблемы, из-за которой нормальная работа ПК невозможна. Зная причину, пользователь в силах самостоятельно наладить нормальную работу компьютера без необходимости обращения в сервисные центры. Темой данной статьи станет распространенная ошибка 0x0000007E. Наши подсказки помогут вам разобраться в проблеме и найти ее решение.
Содержание
- 1 Учимся читать отчет BSoD
- 2 Освобождаем память системного раздела HDD
- 3 Устанавливаем «свежий» драйвер
- 4 Полная проверка и откат системы
- 5 Проверяем «железо» на борту ПК
- 6 В итоге
Учимся читать отчет BSoD
При появлении «синего экрана» на мониторе многие неопытные пользователи надолго впадают в ступор или начинают в панике нажимать на кнопку перезагрузки компьютера. Стоит запомнить навсегда, что BSoD несет в себе очень нужную вам информацию о критической ошибке, с которой необходимо ознакомиться.

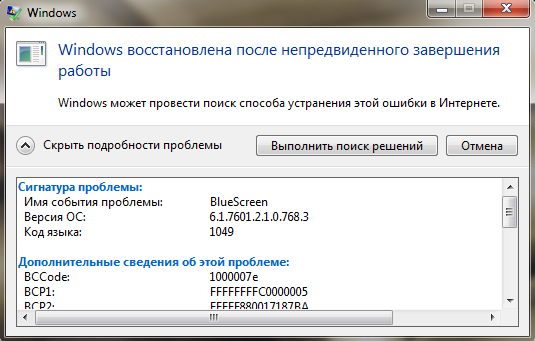
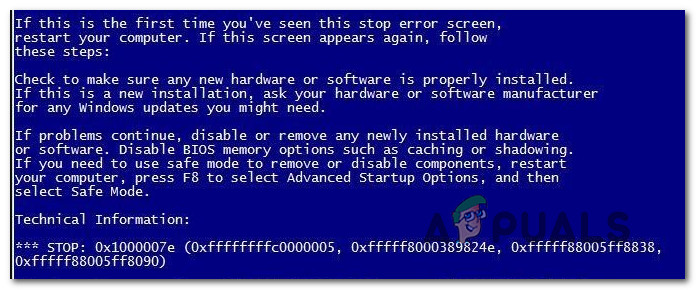
Распознавание ошибки 0x0000007E в Windows 7 и 10 происходит одинаково. Сообщение о сбое может иметь разное содержание, но одинаковую схематичность. На скриншоте выше изображен данный BSoD с названием «SYSTEM_ THREAD_EXCEPTION_NOT_HANDLED».
Отчет разделен на несколько частей.
- Общая информация и рекомендуемый пользователю план действий при возникновении данного сбоя.
- Код критической ошибки.
- Основные параметры.
Строка основных параметров включает в себя:
- код исключения, который привел к сбою системы;
- адрес его запуска в памяти;
- адрес записи исключения;
- адрес контекста.
В некоторых случаях система сообщает о проблемном драйвере, что очень облегчает поиск источника проблемы.

Код ошибки 0x0000007E свидетельствует о невозможности исполнения определенной операции. Причиной может стать конфликт драйверов, малый объем свободной памяти на системном разделе винчестера, неисправность комплектующих ПК, несовместимость «железа» и «софта» и другие функции. Для конкретизации источника нужно обращать внимание на код исключения.
Самые часто появляющиеся исключения:
- 0x80000002: (STATUS_DATATYPE_MISALIGNMEN) ‒ неправильное выравнивание ссылки данных при сохранении или загрузке;
- 0x80000003: (STATUS_BREAKPOINT) – точка прекращения работы отладчика ядра;
- 0xC0000005: (STATUS_ACCESS_VIOLATION) – получение доступа к недействительным участкам памяти.
При появлении на экране другого кода воспользуйтесь онлайн-справочниками, например, http://allerrorcodes.ru/ntstatus.
Ниже мы покажем вам, как исправить данную ошибку и приведем для этого несколько способов.
Освобождаем память системного раздела HDD
Первой и самой распространенной причиной возникновения ошибки 0x0000007E в Windows 7 и 10 является малый объем свободной памяти на жестком диске, а именно в системном разделе (по умолчанию «C:»). Проверьте наличие свободного места раздела в меню «Компьютер» (Win 7) или «Этот компьютер» (Win 10). Если система сигнализирует о его переполненности – удалите все ненужные файлы.
- В окне «Компьютер» кликаем правой кнопкой мыши на диск «C:» и выбираем «Свойства/Очистка диска».

- Система выведет на экран список файлов, подлежащих удалению. Подтверждаем действие нажатием «OK». Процесс удаления займет от нескольких секунд до пары минут времени.

- Дополнительно можно освободить память за счет удаления ненужных программ и резервных копий.

- При желании освободить как можно больше места на винчестере установите бесплатную утилиту CCleaner для глубокой проверки всего жесткого диска. Скачиваем и устанавливаем ее на сайте https://www.ccleaner.com/ru-ru.

- Запускаем CCleaner и начинаем анализ содержимого HDD.

- Удаляем информацию кнопкой «Очистка».

Важно! Советуем не добавлять галочки элементов, назначение которых вы не знаете. Также мы не рекомендуем неопытным людям проводить очистку реестра – это может привести к повреждению системных файлов.
Устанавливаем «свежий» драйвер
Вторым по частоте «виновником» в появлении критического сбоя выступает некорректный драйвер или служба. В этом случае ошибка 0xc000007E выскакивает при запуске приложения, которое использует ресурсы определенного устройства, например, видеокарты. В отчете BSoD обычно появляется файл проблемного драйвера (смотрите начало статьи). Его-то и нужно обновить до новой версии.
Внимание! Если ошибка появилась при установке драйвера, то нужно, наоборот, откатить его до прежней версии.
Для определения и обновления драйвера выполняем следующее:
- Скачиваем и устанавливаем программу BlueScreenView от компании NirSoft на сайте https://www.nirsoft.net/utils/blue_screen_view.html.

- Скачиваем русификатор, распаковываем и копируем его файлы в папку с установленной программой.

- Запускаем BlueScreenView и ждем окончания проверки файла дампа памяти. Проблемный объект будет выделен красным цветом – он и есть корень проблемы. Двойной клик по нему даст полную информацию о его происхождении, назначении и других параметрах.

Совет: чтобы быстро определить, какой именно драйвер или приложение нужно менять – скопируйте название этого файла и вставьте в поисковую строку браузера. Это займет не более 1-2 минут.
- Определившись с источником проблемы, переходим к ее устранению. Для примера: сымитируем обновление драйвера видеокарты – одного из самых сбойных узлов компьютера. Переходим в меню «Пуск/Панель Управления/Система и безопасность/Система/Диспетчер устройств» и выбираем двойным кликом активный видеоадаптер.

- Выбираем вкладку «Драйвер» и нажимаем «Обновить», а после – «Автоматический поиск». Система сама определит необходимость в обновлении и загрузит новую версию инструкций.

- Может случиться так, что драйвер не был найден, при загрузке произошел сбой или конечный эффект не дал результатов. Тогда следует скачать его на сайте производителя с указанием полного названия модели устройства.
- Если причиной глюков ПК является служебная программа: обновите, переустановите либо удалите ее в меню «Пуск/Программы/Программы и компоненты».
Полная проверка и откат системы
Следующая проблема вытекает из предыдущей – причиной может оказаться поврежденная системная служба Windows.
Начинаем с проверки системы на наличие дефектных системных файлов.
- В строке поиска меню «Пуск» вводим «cmd» и жмем «Enter».
- В консоли прописываем команду «sfc /scannow» и подтверждаем выполнение.

- В случае нахождения повреждений целостности вам понадобится диск или флэшка с дистрибутивом ОС Windows, аналогичным установленной на ПК. Загрузочный диск будет использоваться для восстановления системы. Второй возможный вариант исправить ситуацию – попытаться откатить систему стандартной программой «Восстановление системы», находящейся по пути «Пуск/Программы/Стандартные/Служебные».
Проверяем «железо» на борту ПК
Нередки ситуации, когда компоненты компьютера не могут работать в единой системе. Это приводит к конфликтам их ПО и появлению ошибки SYSTEM_THREAD_EXCEPTION_NOT_HANDLED в Windows 7 и 10. Наихудший вариант ‒ это возникшая неисправность отдельного модуля или устройства, при которой обновление драйвера бесполезно.
Попытайтесь вспомнить: какие действия над ПК производились перед появлением ошибки. Если вы подсоединили новое устройство (видео- или звуковую карту, Wi-Fi адаптер, модуль памяти и др.) и увидели на экране BSoD – изучите инструкцию к нему. Возможно, данная модификация несовместима с вашей материнской платой либо она требует перепрошивки микросхемы BIOS. Решением проблемы станет удаление устройства либо перепрошивка материнской платы.
Если «синий экран» возник внезапно без вмешательств в аппаратную и программную часть системы – велика вероятность поломки компонента системного блока. Нужно произвести поэтапную проверку всех комплектующих, начиная с модулей оперативной памяти и заканчивая периферией.
Выключите компьютер из сети, откройте крышку системного блока и отсоедините все комплектующие на материнке. Если имеется встроенное в процессор или чипсет видеоядро – отсоедините дискретную видеокарту и переключите кабель монитора в аналогичное гнездо на плате. Оставьте на месте только ЦП и один модуль ОЗУ. После запускайте компьютер и следите за появлением «синего экрана смерти». Если ошибка не дала о себе знать – выключайте ПК и добавляйте один модуль памяти (если он присутствует), и так со всеми снятыми устройствами до того момента, когда вы не «поймаете» ее. Последняя подсоединенная деталь и есть источник проблемы – ее нужно заменить.
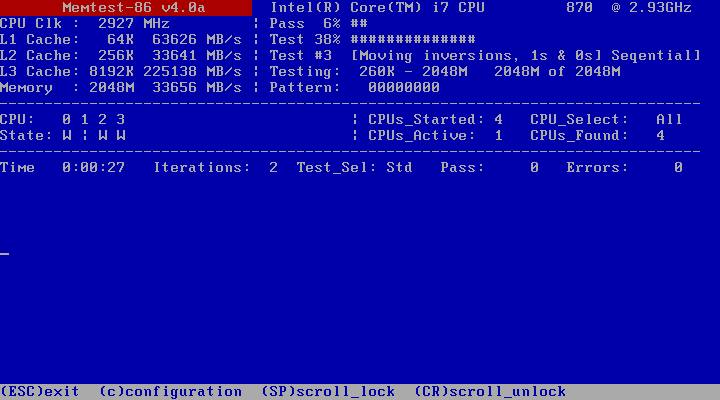
Помимо вышеизложенного способа, вы можете проверить исправность оперативной памяти мини-утилитой MemTest или программой Memtest86+ из-под MS-DOS.
Рассмотрим работу с MemTest.
- Скачиваем утилиту на сайте https://hcidesign.com/memtest.

- Запускаем ее без установки и нажимаем «Start Testing».

- Если оперативная память работает корректно, то результат не должен показать ошибки.

Существенным минусом утилиты является ограничение ее бесплатной версии по объему проверяемой памяти – не более 3,5 Гб. Проверяйте модули, вставляя их по отдельности (предварительно выключая ПК из сети).
В редких случаях владельца ПК может подвести жесткий диск, который отработал свой ресурс или был ударен в момент записи и чтения. Для профилактики проверьте и его с помощью программы Western Digital Data LifeGuard Diagnostic.
Порядок работы приведен ниже.
- Скачиваем, распаковываем и устанавливаем бесплатную программу на сайте support.wdc.com/downloads.aspx.

- Запускаем утилиту, выбираем жесткий диск с системным разделом (если дисков несколько), нажимаем «QUICK TEST» и «Start».


- После прохождения проверки вы можете ознакомиться с ее результатами во вкладке «VIEW TEST RESULT».

Исправный винчестер будет иметь статус «PASS». Вы также можете пройти полную проверку, нажав «EXTENDED TEST» (занимает значительно больше времени).
В итоге
Как видим, ошибка 0xc000007E является обобщенной, оповещающей о нарушениях работы различных компонентов и программного обеспечения компьютера. Чтобы быстро и эффективно устранить проблему – не впадайте в панику при виде «экрана смерти», а подробно изучите содержимое отчета. Тут вашими главными помощниками являются специальные бесплатные утилиты для проверки комплектующих ПК и наши полезные советы из этой статьи.
Информация о системе:
На вашем ПК работает: …
специальное предложение
0x1000007E часто может появляться из-за неправильно настроенных параметров системы или из-за нарушений в реестре Windows. Эту ошибку относительно быстро и легко исправить, если использовать PC Repair, настроенную на решение всех распространенных проблем с реестром.
![]()
- Название ошибки: 0x1000007E
- Совместимо с: Windows 10, 11, 8, 7, Vista, XP
- 0x1000007E появляется и начинает нарушать окно активной программы;
- 0x1000007E появляется на экране;
- Появляется сообщение ‘Обнаружена проблема, и Windows была выключена, чтобы предотвратить повреждение компьютера. Похоже, что проблема вызвана следующим файлом…’;
- Компьютер пользователя перестает работать, выдавая ошибку 0x1000007E при запуске программы;
- Windows работает плохо, медленно реагируя на команды;
- Компьютер пользователя часто зависает
0x1000007E сообщения об ошибке могут появляться из-за засорения реестра Windows и ошибочных записей несуществующих программ, поскольку пользователь обычно неправильно удаляет программное обеспечение. Другими распространенными причинами являются неправильный ввод данных, отсутствие файлов, которые были случайно удалены из реестра, что вызывает проблемы в работе системы.
- 1. Скачать PC Repair.
- 2. Установить и запустить программу.
- 3. Нажмите Scan Now для обнаружения ошибок и различных отклонений от оптимального уровня.
- 4. Нажмите Repair All для устранения каждой проблемы.
Эта страница доступна на других языках:
English |
Deutsch |
Español |
Italiano |
Français |
Indonesia |
Nederlands |
Nynorsk |
Português |
Українська |
Türkçe |
Malay |
Dansk |
Polski |
Română |
Suomi |
Svenska |
Tiếng việt |
Čeština |
العربية |
ไทย |
日本語 |
简体中文 |
한국어
Одна из частых проблем в Windows — system thread exception not handled. Пользователи могут получить синий экран смерти (BSoD) этого типа в любое время. Чаще всего он появляется при работе операционной системы, а после перезагрузки ПК все восстанавливается. Второй вариант – компьютер получает эту ошибку при запуске Windows и бесконечно перезагружается.
Что это за ошибка и почему возникает
BSoD с названием system thread exception not handled иногда сопровождается кодом ошибки 0x1000007e или 0x0000007e и возникает в Windows 7, 8, 10. Характеризуется следующими причинами возникновения:
- случайный сбой компьютера;
- повреждение важных системных файлов;
- неправильные настройки БИОС;
- ошибки оперативной памяти (ОЗУ);
- неисправность HDD или SSD, на котором установлена система;
- неверно установленные драйвера при подключении устройств.
Также на экране с ошибкой могут быть небольшие пояснения. Помимо самого кода появляется и название системного файла или драйвера, вызвавшего ошибку, например:
- nvlddmkm.sys – относится к драйверу видеоадаптера от NVIDIA.
- atikmdag.sys – компонент драйвера видеокарты от ATI/AMD Radeon.
- ntfs.sys – компонент HDD диска с файловой системой NTFS.
- etd.sys – компонент драйвера тачпада ноутбука.
Конечно, это не весь перечень проблемных файлов. Но для устранения проблемы в любых вариациях чаще всего используются одни и те же методы.
Проблемы с драйверами устройств
Итак, если пользователь уверен, что экран BSoD с ошибкой system thread exception not handled появляется из-за драйверов видеоадаптера или другого устройства, то от них необходимо избавиться. Конечно, просто так в систему не попадешь, когда компьютер постоянно перезагружается. В этом случае решить проблему поможет безопасный режим:
- Найдите установочный диск либо флэш-накопитель с ОС той версии, которая установлена на ПК.
- Загрузитесь с носителя и нажмите по опции «Восстановление системы».

- Выберите раздел «Поиск и устранение неисправностей».

- Посетите подраздел «Дополнительные параметры».

- Щелкните по опции «Командная строка».

- Вставьте команду — bcdedit /set {default}bootmenupolicy legacy – служит для запуска безопасного режима (вернуть все как было можно, вставив вместо слова legacy — standard).

- Закрываем CMD и перезапускаем компьютер.
- Загрузится окно безопасного режима, где выбираем самый первый пункт и жмём Enter.

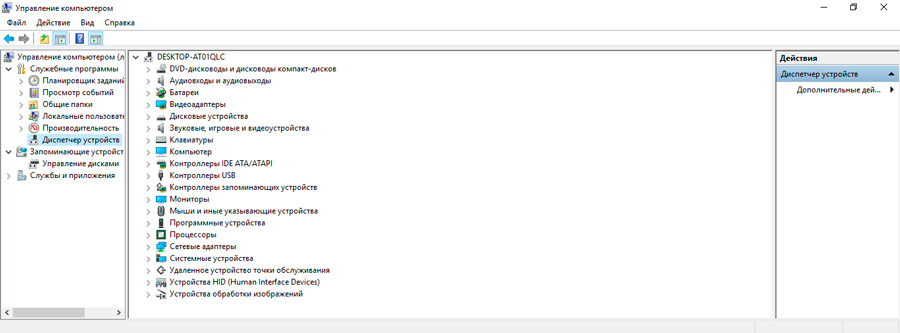
- Сейчас Windows запустится без драйверов. Перейдите в диспетчер устройств (можно найти через поиск).
- Жмём правой кнопкой мышки по проблемному драйверу и выбираем «Удалить».
Настройки БИОСа
Иногда может помочь сброс настроек BIOS до заводских. Даже если в настройках ничего не изменилось, эта операция не помешает.
Для разных видов системных плат и ноутбуков процесс входа в BIOS отличается. Чаще всего это клавиши DEL, ESC, F8, F1 или F4. Ищите сведения в паспорте к системной плате или в интернете.
Чаще всего в разделе Exit или другом месте есть пункт Load Optimized Defaults, Load BIOS Setup Defaults, Load Fail-Safe Defaults или Load Setup Defaults. При помощи стрелок выбираем его и щелкаем клавишу Enter.
Чтобы изменения сохранились — выходим, выбрав пункт Save and Exit Setup.
Проверка системных файлов
Если проблема связана с повреждением системных файлов или файловой системы жёсткого диска, то исправить ошибку поможет утилита SFC:
- Открываем командую строку или PowerShell с повышенными правами.
- Пишем команду — sfc /scannow.

Появление ошибки на ноутбуке
В случае ноутбука можно попробовать способ отключения питания. В некоторых случаях это помогает:
- Отключите устройство с помощью кнопки питания.
- Отсоедините кабель зарядного устройства.
- Выньте аккумулятор и через пару минут вставьте.

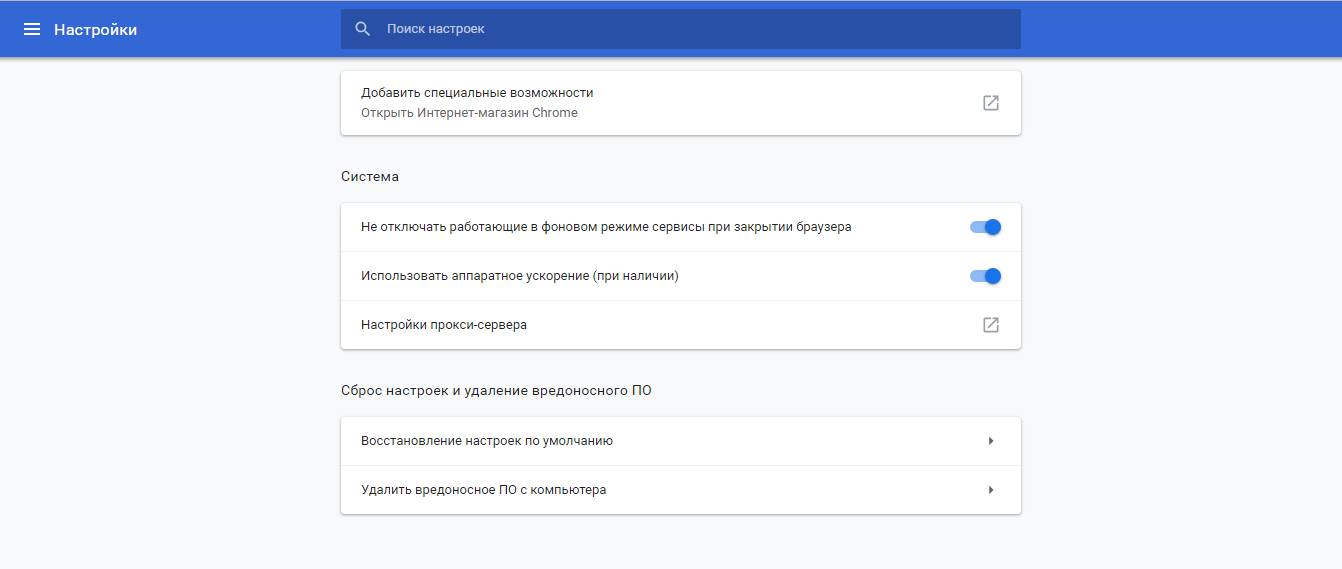
Отключение аппаратного ускорения в браузерах
Во время использования браузера с включенным аппаратным ускорением, чаще всего на Windows 10, так же может возникать данная проблема. Отключим эту функцию:
- В Google Chrome переходим в настройки (в остальных браузерах процедура идентична. Незначительно отличается интерфейс).
- Опускаемся вниз и жмем по пункту «Дополнительные».
- Находим в разделе «Система» функцию «Использовать аппаратное ускорение (при наличии)» и отключаем её.
- Перезаходим в браузер.
Проверка оперативной памяти на ошибки
Оперативная память – еще одна частая причина появления system thread exception not handled. Рассмотрим метод проверки памяти на ошибки:
- Выниманием модули ОЗУ, аккуратно протираем ластиком контакты, вставляем обратно.
- Скачиваем утилиту memtest86+ и выполняем тестирование ОЗУ.
Для исправления этого типа ошибки необходимо сделать следующее:
- Сбросить BIOS до заводского состояния.
- Обновить БИОС или отключить в нем параметры кэширования или затенения памяти.
- Обновить/удалить драйвер через безопасный режим, как это было описано выше.
- Иногда требуется поменять проблемный компонент, например, видеокарту.
К огромному сожалению пользователей компьютеров под управлением ОС Windows различных версий, многим из них пришлось хоть раз столкнуться с проблемой в виде синего экрана смерти. Он же BSOD.
Причины синего экрана бывают разными. От безобидных, до более чем серьёзных, требующих вмешательства в техническую составляющую компьютерного устройства.
Одной из распространённых ошибок, которые сопровождаются синим экраном смерти, является «System thread exception not handled». Соответствующая надпись сопровождается цифро-буквенным кодом 00x1000007e, либо же 0x0000007E.
Необходимо понять, почему такая ошибка вообще может появляться, и что нужно сделать для её устранения. Многие из представленных советов можно вполне реализовать своими силами, не привлекая к работе специалистов и не затрачивая лишние деньги на их услуги.
Основные причины
Логично будет начать с причин появления кода остановки в виде подписи «System thread exception not handled» на экране ноутбука или стационарного компьютера. Подобная ошибка появляется на ОС Windows 10, но встречается и на более ранних версиях популярной операционной системы.

Причин появления ошибки достаточно много. Установить точно, почему именно пользователь столкнулся с подобной надписью на мониторе своего компьютера, порой возможно только методом исключения всех остальных потенциальных виновников.
С такой ошибкой юзер потенциально мог столкнуться по следующим причинам:
- произошёл случайный сбой компьютера или ноутбука;
- проблема находится со стороны нового подключаемого оборудования;
- всё дело в системных ошибках, которые придётся исправлять;
- нарушены корректные настройки в БИОСе;
- последствия неправильного или некорректного аппаратного ускорения;
- причина со стороны узла оперативной памяти;
- неполадки драйвера того или иного оборудования;
- поломки и дефекты комплектующих компьютерного устройства и пр.
В зависимости от того, что именно послужило причиной возникновения рассматриваемой ошибки, существуют соответствующие пути для их решения.
Каждую причину, как и рекомендации по её устранению, следует рассматривать отдельно.
СОВЕТ. Перед началом любых действий будет нелишним создать установочный диск с ОС Windows, если даже в безопасном режиме система запускаться не хочет. Либо же используйте безопасный режим или LiveCD.
Теперь последовательно о каждой из представленных причин, а также о действиях, необходимых для их устранения.
Произошёл случайный сбой
Достаточно часто с ошибкой «System thread exception not handled» пользователи сталкиваются именно в той ситуации, когда происходит случайный сбой системы. Этому удивляться не приходится, поскольку нет совершенной операционной системы. И периодически сбои не исключены.
Если это единичная акция, тогда особых проблем с устранением ошибки «System thread exception not handled» на компьютере возникнуть не должно. Единственное, что может потребоваться от юзера в такой ситуации, это на несколько минут полностью отключить от сети компьютерное устройство, после чего перезапустить его.
Когда код рассматриваемой ошибки «System thread exception not handled» всё равно остаётся на фоне синего экрана смерти, придётся прибегать к более серьёзным действиям. Зато так удалось исключить вариант случайного сбоя. Есть какая-то проблема, устранять которую придётся методом исключения. Лучше начинать от наиболее вероятных и легко устранимых, постепенно двигаясь к тяжёлым и серьёзным потенциальным неполадкам.
Новое оборудование
Нельзя исключать, что с ошибкой «System thread exception not handled» пользователь столкнулся именно после того, как было куплено и установлено новое оборудование. Потому в этой ситуации придётся подтвердить либо же опровергнуть эту теорию.
Для начала проверьте подключённое оборудование на предмет его работоспособности. Также убедитесь в совместимости используемых драйверов для подключённого принтера, сканера, мышки и иного девайса с используемой версией операционной системы.
Одним из вариантов устранения ошибки типа «System thread exception not handled» является временное отключение нового оборудования. Если это было сразу несколько девайсов, отключать лучше поочерёдно. Параллельно проверяйте, не восстановилась ли нормальная работа ПК.
Статистика вещь упрямая. Она показывает, что с синим экраном и надписью «System thread exception not handled» на синем фоне сталкиваются чаще остальных пользователи мышек и веб-камер производства Logitech. Вероятнее всего, причина, из-за которой появляется синий экран, заключается в несовместимости драйверов.

Компьютерные комплектующие от компании Logitech
Тут можно попробовать 2 основных варианта:
- Приобрести новые девайсы. Если есть такая возможность. Но сначала проверьте, действительно ли причина ошибки с подписью «System thread exception not handled» кроется именно в этом оборудовании. Для этого просто подключите аналогичные девайсы и проверьте, как поведёт себя компьютер с ними.
- Переустановить или обновить программное обеспечение. Если драйверы устанавливались с диска, лучше удалить их, зайти на официальный сайт разработчиков девайсов и загрузить свежее ПО оттуда. Затем перезагрузите операционную систему.
Какой из этих вариантов подходит пользователю, решать только ему. Но точно не стоит спешить с покупкой нового оборудования, не убедившись, что причина ошибки кроется именно в этом.
Наличие системных ошибок
Столкнуться с кодом остановки с надписью «System thread exception not handled» также можно и по другой причине. Здесь речь идёт про системные ошибки на компьютере.
Проверить ПК или ноутбук на наличие системных ошибок можно 2 способами:
- через «Мой компьютер»;
- с помощью командной строки.
В случае с командной строкой нужно запустить её от имени Администратора, и прописать команду sfc /scannow.
Альтернативным вариантом будет использование возможностей сканирования через «Мой компьютер». Для этого следует выполнить такие процедуры:
Бывает и так, что появляется сообщение о невозможности проверить накопитель. В этом случае нажмите на «Расписание проверки».
После этого компьютер отправляется на перезагрузку. Система будет проверяться на наличие ошибок через BIOS и параллельно их исправлять при наличии.
Сама проверка может занимать от нескольких минут до пары часов. Это напрямую связано с характеристиками и объёмом тестируемого накопителя.
Важно заметить, что оба варианта устранения системных ошибок работают только при выполненном входе в операционную систему. Потому в ситуациях, когда ОС не запускается, придётся задействовать установочный образ.
Сброс в BIOS
Также в некоторых случаях с кодом остановки, сопровождающегося ошибкой «System thread exception not handled», помогает выполненный сброс настроек в BIOS.
Это одна из вероятных причин появления синего экрана. Причём необязательно вносить изменения в БИОС своими руками, чтобы произошла ошибка. Иногда это происходит автоматически в результате произошедшего сбоя.
Чтобы сбросить настройки, потребуется действовать согласно следующей инструкции:
- войти в сам БИОС;
- найти раздел, который отвечает за сброс текущих настроек, в основном он именуется как Optimized Defaults;
- кликнуть по этому разделу;
- подтвердить своё намерение сброса нажатием на кнопку «Yes»;

- сохранить внесённые изменения;
- перезагрузить компьютерное устройство.
Если причина крылась в этом, тогда после перезагрузки операционной системы всё должно нормально работать.
Если и этот шаг ни к чему не привёл, тогда следует пробовать следующий метод.
Аппаратное ускорение
Когда подобная ошибка происходит в процессе работы одной из версий операционной системы Windows 10, есть высокая вероятность, что причина кроется в аппаратном ускорении. Оно включено, и это ведёт к соответствующим проблемам.
Если виновником выступает аппаратное ускорение, тогда просто отключаем его, и всё должно нормализоваться.
На примере наиболее популярного браузера Chrome процесс отключения выглядит следующим образом:
- откройте панель настроек;
- листайте список меню практически до самого конца;
- внизу найдите пункт «Дополнительные»;
- найдите здесь опцию аппаратного ускорения;
- отключите её;

- сохраните изменения;
- перезапустите браузер.
Даже при использовании другого браузера принцип действий будет идентичным. Необходимо найти в настройках соответствующую опцию и выключить её.
Но это далеко не последняя причина, из-за которой может появляться синий экран с соответствующей надписью.
Оперативная память
Ещё в некоторых ситуациях отлично помогает диагностика оперативной памяти компьютера или ноутбука с установленной операционной системой Windows.
Проблемы со стороны оперативки также нередко оказываются причиной такой ошибки. Даже при условии, что для компьютера была куплена совершенно новая ОЗУ высокого качества от проверенного производителя. Всё равно от ошибок и проблемы несовместимости пользователи полностью не защищены.
В этой ситуации рекомендуется придерживаться такой последовательности действий:
- Сначала попробуйте просто вытащить модули ОЗУ. Протрите их. Для этого можно использовать ветошь. Ещё очистку контактов хорошо делать с помощью обычного школьного ластика.
- Теперь верните модули на место в свои разъёмы. Даже после таких манипуляций проблема неоднократно уходила.
- Если это не помогло, проверьте модули на совместимость друг с другом, а также с материнской платой. Тут проще всего поочерёдно вытащить по одному модулю и контролировать работу компьютера при этом.
- Протестируйте оперативную память с помощью специальной утилиты. Ярким примером выступает инструмент под названием Memtest86.

Если диагностика оперативной памяти показала, что имеются ошибки, либо есть проблема несовместимости, планки ОЗУ придётся заменить. Это позволит избавиться от назойливого синего экрана.
Проблемы со стороны драйверов
Если диагностика ОЗУ результата не дала, тогда, вероятно, поможет обновление имеющегося проблемного драйвера при наличии такового. Это ещё одна из распространённых причин появления рассматриваемой ошибки.
Проверка выполняется одним из двух способов.
Первый вариант самый простой. Подходит он в тех случаях, когда операционную систему удаётся запустить в обычном режиме или через безопасный способ загрузки.
В этой ситуации нужно сделать следующее:
- открыть диспетчер устройств;
- проверить, нет ли напротив компонентов красного или жёлтого знака;
- если такие значки присутствуют, драйверы проблемного компонента следует обновить;
- перезагрузить компьютерное устройство.
СОВЕТ. Драйверы рекомендуется загружать только с официального сайта разработчика. Использовать сторонние ресурсы потенциально очень опасно.
Ведь вместе с драйверами можно прихватить и вредоносное программное обеспечение.
Также диагностику легко выполнить специальными программами. К примеру, с помощью Blue Screen View.
Второй метод подходит для ситуаций, когда в обычном или безопасном режиме загрузить операционную систему никак не получается. В этом случае потребуется установочный диск. Здесь нужно сделать следующее:
Есть очень высокая вероятность, что проделанные манипуляции в итоге помогут справиться с возникшей ошибкой.
Неисправности комплектующих
Нельзя исключать, что какие-то компоненты компьютера привели к рассматриваемой ошибке. Потому диагностируем возможную поломку со стороны компьютерных комплектующих.
Это уже категория аппаратных неисправностей. К этому варианту прибегают в том случае, когда все остальные методы демонстрируют свою неэффективность. В особенности если пользователь переустановил операционную систему или перешёл на другую версию ОС.
Среди наиболее часто страдающих комплектующих стоит выделить такие:
- Материнская плата. Тут ситуация сравнительно простая. Специалисты выделяют 3 неисправности. Каждую из них можно диагностировать визуально. Речь идёт о появлении затемнённых участков на плате, о вздутии конденсаторов, а также о физических повреждениях элемента. Всё остальное диагностируется только с использованием специальных тестеров и оборудования.
- Блок питания. Если блоку питания не хватает мощности, это провоцирует сбой всего установленного и подключённого оборудования. Распространённой причиной дефицита мощности выступает вздувшийся конденсатор.
- Видеокарта. Её также рекомендуется проверить. Из-за перегрева в результате воздействия высоких температур видеокарта может выйти из строя, на ней отваливается чип, либо же сбивается работа драйверов. Стоит попробовать отключить видеокарту или установить другую на её место.
- Жёсткий диск. Тут вариантов огромное количество, включая перегрев, ошибки в файловой системе, физические неисправности и пр. Здесь потребуется комплексная диагностика.

Столкнувшись с тем или иным видом неисправности, можно потенциально решить, удастся ли их устранить своими силами, либо потребуется обязательная помощь квалифицированного специалиста.
Альтернативные решения
Есть и другие варианты. Если ничего из рассмотренного не даёт положительных результатов и ошибка всё равно появляется на синем экране, единственным решением может стать откат операционной системы до последней работоспособной конфигурации.
Когда даже такая мера не помогает, тогда пользователю стоит переустановить операционную систему. Какую именно версию использовать, юзер уже решит самостоятельно.
С рассмотренной ошибкой сталкиваются многие пользователи, на компьютерах которых стоит не только ОС Windows 10, но также и более ранние версии операционной системы. Вопрос лишь в том, сумеет ли юзер справиться с ней самостоятельно, либо потребуется помощь.
Всем спасибо за внимание! Подписывайтесь, оставляйте свои комментарии, задавайте актуальные вопросы и рассказывайте своим друзьям о нашем проекте!
Several Windows users have been seeing BSOD critical crashes with the error code 0x1000007e. Most affected users are reporting that for them, the issue seems to occur randomly with no apparent trigger. What’s even more annoying is the fact that they encounter the critical crash just minutes after they start their PC. As it turns out, the issue is not exclusive to a certain Windows version since it’s encountered on Windows 7, Windows 8.1 and Windows 10.
What’s causing the Error code 0x1000007e?
We investigated this particular error code by looking into various user reports and analyzing the various fixes that are recommended by other users that also encountered this issue. As it turns out, several different causes might trigger the 0x1000007e error. Here’s a list of culprits that might be responsible for the random BSODs:
- Silverlight version is outdated – As it turns out, this particular crash can occur due to a severely outdated Silverlight version. Fortunately, Microsoft has released a hotfix for the issue, that resolves the issue by installing the latest stable version. To take advantage of the fix, you’ll need to install every pending update since it’s included in one of the Cumulative updates.
- 3rd party AV conflict – According to various user reports, this problem can also arise due to a conflict between an overprotective antivirus suite and a Kernel process. In situations like this one, the easiest way to resolve the issue is to simply move away from the AV suite that’s causing the problem and revert to the default security suite (Windows Defender).
- System File Corruption – Another potential scenario in which this error code will occur is system file corruption. If certain Windows become affected by corruption, it might end up triggering general system instability which might trigger BSODs of this kind. In this case, you should be able to resolve the issue by running a couple of utilities capable of resolving OS corruption issues (DISM and SFC).
- 3rd Party Service interference – It’s also possible that some kind of startup service or process is interfering with an operating system component, which ends up crashing the system when certain circumstances are met. If this scenario is applicable, you can resolve the issue by achieving a clean boot state and identifying the process that is causing the problem.
- Underlying System File Corruption – In some rare cases, the corruption that ens up triggering this error code is so severe that it cannot be resolved conventionally. In situations like this one, the only viable fix is to reset every OS component or rever them to a healthy point in time. To do this, you can either use a viable system restore point or you can go for a repair install or clean install.
- Hardware-related issues – Several users have confirmed that this particular error code can also occur due to some hardware-issues that are contributing to the general instability of the system. In this case, the only viable fix is to test out the various components to find out the culprits or to take your PC directly to a certified technician.
If you’re currently struggling to find a way that will resolve the 0x1000007e error and allow you to use your computer normally without the annoying BSODs, this article will provide you with troubleshooting strategies. Down below, you’ll find a selection of repair strategies that have been confirmed to be effective by other affected users finding themselves in a similar situation.
For the best results, we advise you to follow the potential fixes below in the same order that we arranged them in (via efficiency and difficulty). Eventually, you will stumble upon a method that will be applicable regardless of the scenario in which you’re encountering the issue.
Let’s begin!
Method 1: Install every pending Windows Update
As it turns out, one particular reason that will cause BSOD crashes with the 0x1000007e error code is a scenario in which the latest Silverlight version is not installed on the affected machine. This is odd considering that Silverlight is on it’s way out as new tech is slowly replacing it, but it seems like Microsoft has already released an update that fixes an instability caused by an older version.
To take advantage of the fix, you’ll need to install every pending update that Windows has lined up for you (Critical and Non-Critical).
Several users that were also encountering this problem have reported that the issue was resolved after they installed every pending update and restarting their computer.
Here’s a quick guide on installing every pending update on your Windows computer:
Note: This guide will work regardless of the Windows version that you’re using.
- Press Windows key + R to open up a Run dialog box. Next, type “ms-settings:windowsupdate” inside the text box and press Enter to open up the Windows Update tab of the Settings app.
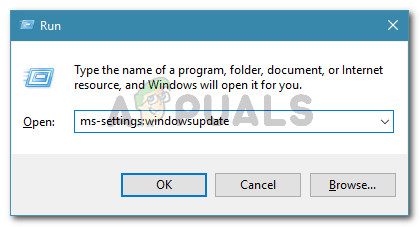
Run dialog: ms-settings:windowsupdate Note: If you’re not using Windows 10, type “wuapp” instead of “ms-settings:windowsupdate”.
- Once you’re inside the Windows Update screen, move over to the right-hand pane and click on Check for updates, then follow the on-screen prompts to install every pending update.
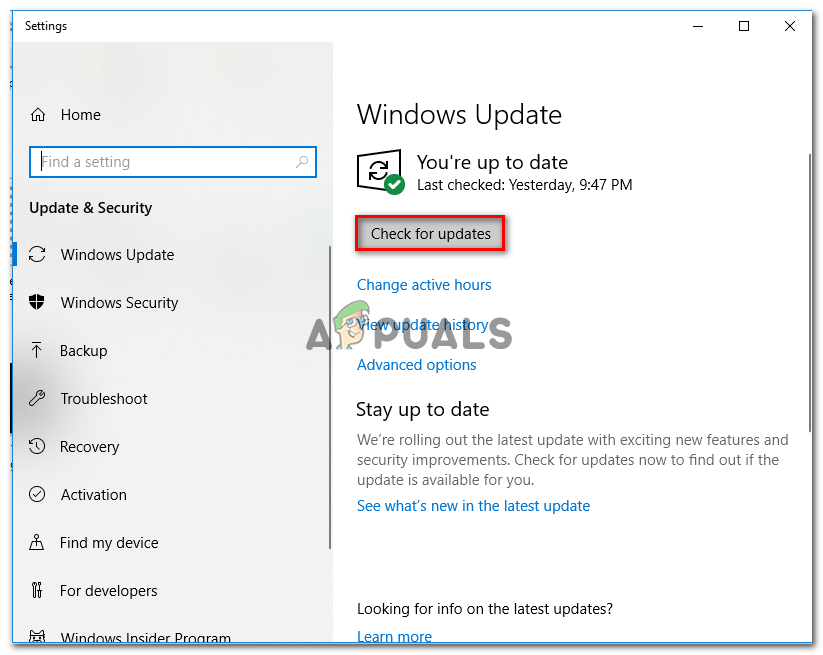
Installing every pending Windows update Note: If during the procedure of installing the pending updates you are prompted to restart, do so, but make sure to return to this same screen at the next startup sequence to ensure that you install every update.
- After each Windows update is installed, restart your computer once again and see if the issue is resolved by looking out for a 0x1000007e BSOD once the next startup sequence is complete.
If the same critical error is still occurring, move down to the next method below.
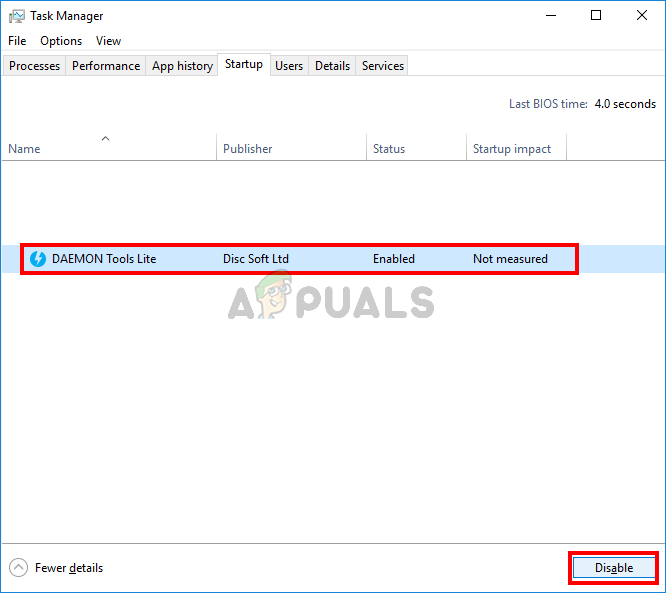
Method 2: Uninstalling 3rd party security suite (if applicable)
As it turns out, the 0x1000007e error can also occur due to a conflict between a 3rd party security suite and a Kernel process. We have managed to identify several user reports blaming Comodo AV for this issue, but there might be other suites triggering the same behavior.
If this scenario is applicable and you’re using a 3rd party security suite, you should disable the real-time protection of your antivirus and see if the issue stops occurring. But to ensure that your 3rd party AV suite has no role in the apparition of the annoying BSODs, you’ll need to uninstall the security program and remove any remnant files.
But first, start by disabling the real-time protection – This procedure is different across the various 3rd party AV suites, but you are typically able to do so via the dedicated taskbar menu.

Leave the real-time protection disabled for a while and see if the issue is still occurring. If it is, try uninstalling the security program altogether and remove any remnant files that can still cause this problem. In case you decide to go this route, follow this article (here) for step by step instructions on uninstalling 3rd party security suites & removing all remnant files.
If this method wasn’t applicable or you’ve done this and the BSOD critical crash is still occurring, move down to the next method below.
Method 3: Resolving System File Corruption
In most documented cases, the 0x1000007e error occurs due to some kind of system file corruption that ends up crashing some critical component that in its turn triggers system instability. Some affected users that found themselves in a similar situation have reported that they finally managed to take care of the issue by running a series of utilities capable of fixing logical errors and system file corruption.
We recommend to avoid using 3rd party solutions and stick to the repair tools offered by Microsoft – DISM and SFC. Both DISM (Deployment Image Servicing and Management) and SFC (System File Checker) are equipped to deal with corrupted system files, but they go about this task differently.
DISM is a more modern tool that relies on the WU (Windows Update) component to replace corrupted instances with healthy copies, while SFC doesn’t need an Internet connection since it uses a locally stored archive to deal with corrupted system files.
IMPORTANT: We highly recommend that you run both utilities to make sure that you maximize your chances of fixing your system file problem.
Here’s a quick guide on running both scans to resolve the system file corruption and resolve the 0x1000007e error:
- Press Windows key + R to open up a Run dialog box. Then, type “cmd” inside the text box and press Ctrl + Shift + Enter to open up a Command Prompt with admin access. When you see the UAC (User Account Prompt), click Yes to grant administrative access.

Running Command Prompt - Once you manage to get inside the elevated Command Prompt, type the following command and press Enter to initiate an SFC scan:
sfc /scannow
Note: Once you start this process, DO NOT interrupt (by closing the CMD window or restarting your computer) it until the operation is finished. Doing this might produce additional logical errors that might cause further problems on your PC.
- Once the SFC scan is complete, close the elevated CMD window and restart your computer. During the next startup, wait until your OS is fully loaded, then follow step 1 again to open up another elevated CMD. After you’ve done this, type the following commands and press Enter after each command to initiate a DISM scan:
Dism.exe /online /cleanup-image /scanhealth
Dism.exe /online /cleanup-image /restorehealth
Note: Before you initiate the DISM scan, make sure you have a stable connection to the Internet, otherwise the utility won’t be able to download the fresh copies needed to replace the corruption. The first command (scanhealth) will scan for inconsistencies while the second (restorehealth) will fix any type of corruption that is found.
- Once the DISM scan is complete, restart your computer once again and see if the issue is resolved at the next system startup.
If you’re still encountering random BSOD crashes with the 0x1000007e error, move down to the next method below.
Method 4: Achieving a Clean Boot State
If you’re performed the steps appropriated to cleaning your system free of corruption and you’re still encountering the 0x1000007e error, some kind of 3rd party service or process is likely interfering with an OS component, which ends up crashing the system under certain circumstances.
Some affected users have blamed a 3rd party security suite, while others have singled a partitioning software for causing this issue. Since we can’t possibly cover every application that might trigger this 0x1000007e BSOD, the best course of action would be to configure your computer to start in a clean boot state.
This will prevent any 3rd party startup service or process from running, effectively preventing a BSOD crash caused by 3rd party interference. If the crash doesn’t occur while your system clean boots, it’s clear that some 3rd party program was previously causing the annoying BSODs.
Follow the instructions below to achieve a clean boot state and then identify the 3rd party program that was causing the 0x1000007e error:
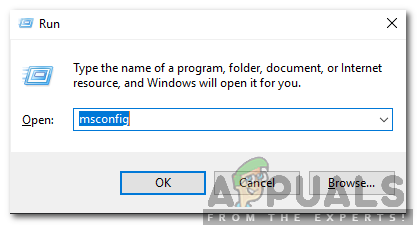
- Open up a Run dialog box by pressing Windows key + R. Then, type “msconfig” and press Enter to open up the System Configuration menu. Once you’re at the UAC (User Account Prompt), click Yes to grant administrative privileges.
Typing msconfig in a Run box and pressing Enter - After you manage to get inside the System Configuration window, click on the Services tab from the top of the menu, then check the box associated with the “Hide all Microsoft Services” option. Once you’ve done this, all Windows services will be removed from the list, which will prevent you from mistakenly disabling a Windows service.
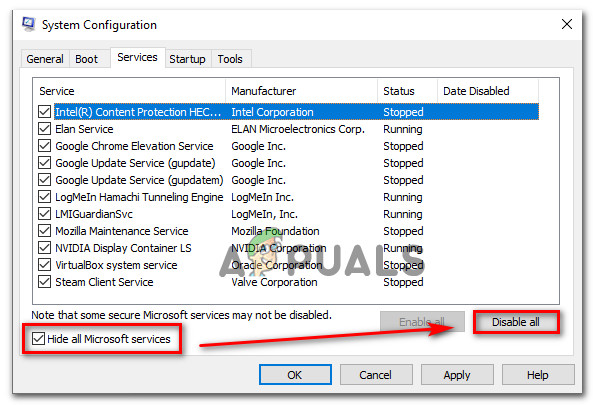
Disabling all non-Microsoft startup items - Once all Windows services are excluded from that list, click the Disable all button to effectively prevent any 3rd party services from being called into action at the next machine startup.
- After you’re done with this, select the Startup tab and click on Open Task Manager from the newly appeared menu.
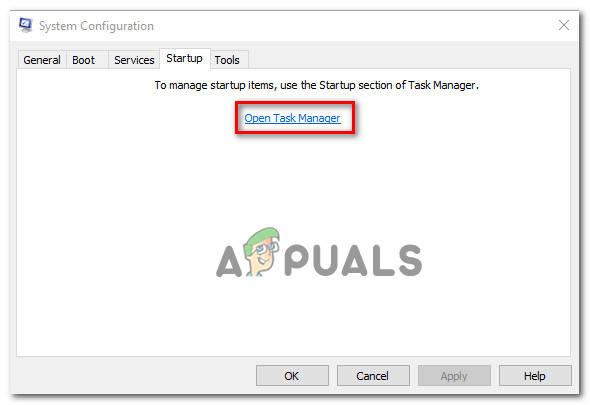
Opening the Startup items window via Task Manager - Once you’re inside the Startup tab of Task Manager, start to systematically select each startup service and then click on the Disable button at the bottom of the screen. This procedure will ensure that no startup service will get called at the next system startup.
Disabling Apps from Startup - Once you’re done with the step above, you have effectively disabled every service or process that might contribute to the 0x1000007e BSOD. All that’s left to do now is to take advantage of the clean boot state by restarting your computer.
- At the next startup, your computer will boot directly into a clean boot state, which will allow you to see if a 3rd party service or process was indeed causing the problem.
- If the crash no longer happens while in clean boot, reverse engineer the steps above and re-enable the previously disabled services one by one coupled with random restarts until you figure out which item is responsible for the crash. Once you manage to discover it, leave it disabled to avoid further issues of this kind.
If you followed the instructions above and you confirmed that the issue is not occurring due to a 3rd party service or process, move down to the next method below.
Method 5: Using System Restore
If none of the methods above have allowed you to get rid of the annoying 0x1000007e BSODs and the issue only started occurring recently, you might be able to resolve the issue promptly by utilizing the System Restore utility to restore your computer back to a healthy point when the circumstances that are know causing the problem didn’t exist.
The System Restore utility utilizes a snapshots to restore machines to the exact state it was in that previous point in time. By default, Windows creates new snapshots at every important event (app installation, major update, etc. so if you haven’t changed the default behavior, you should have plenty of snapshots to choose from.
But before you start using System Restore to restore your computer state to a previous point in time, keep in mind that all changes made after the snapshot was created will be lost. This means that any app installation, established user preferences and anything else enforced during that time will be reverted.
If you decide to try and fix the 0x1000007e error by doing a system restore, here’s a step-by-step guide through the whole thing:
- Open up a Run dialog box by pressing Windows key + R. Inside the text box, type “rstrui” and press Enter to open up the System Restore wizard.
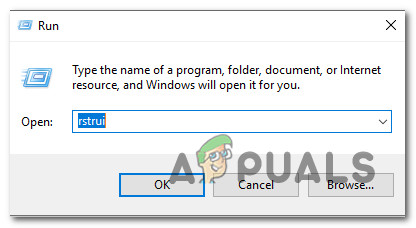
Opening the System Restore wizard via Run box - Once you’re inside the System Restore wizard, click Next at the initial prompt to advance to the next menu.

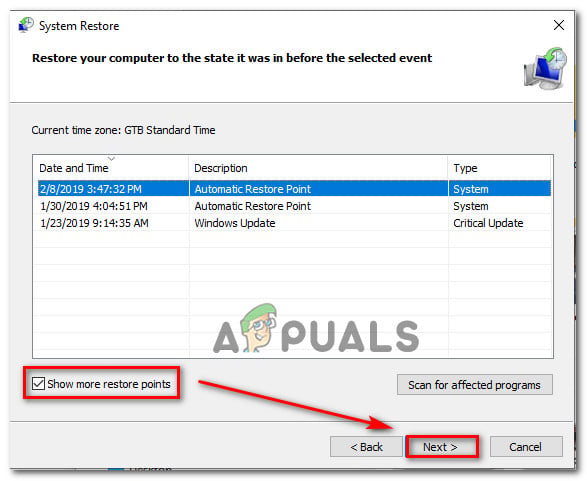
Getting past the initial screen of System Restore - Next, proceed by selecting a restore point that is dated before the apparition of the annoying 0x1000007e error and click Next to advance to the final menu.
Restoring your system to a previous point in time Note: All changes you made after the snapshot was created will be lost if you go forward with the next step.
- To start the restoring process, click Finish, then click Yes at the confirmation prompt to start the restoring process.
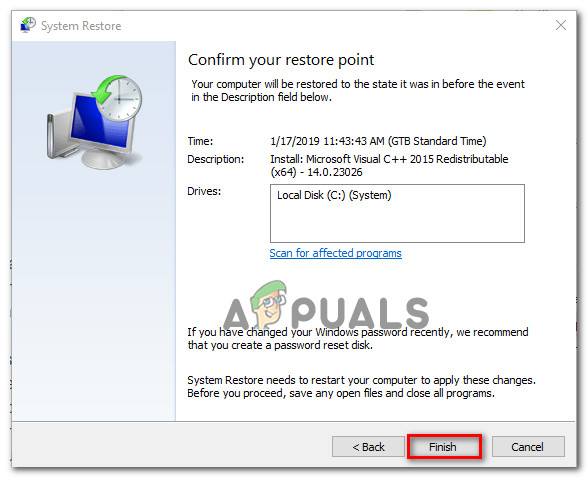
Starting the System Restore process - After several seconds, your computer will restart and the new state will be enforced at the next system startup. Once the old state is enforced, see if the same 0x1000007e error is still occurring.
If you’re still experiencing random BSODs even after using System Restore, move down to the next method below.
Method 6: Performing a repair / clean install
If none of the methods below have allowed you to resolve the BSOD crashes pointing towards the 0x1000007e error, it’s clear that you’re system is suffering from an underlying problem that cannot be resolved conventionally. In this case, the only viable fix that will treat the issue in every scenario where the problem is occurring due to a software component is to reset every OS component.
Several Windows users that found themselves in a similar scenario have reported that they finally managed to resolve the issue either by going for a clean install or by performing an in-place repair (repair install).
A repair install (in-place repair) is a longer procedure, with the major advantage that it allows you to keep all your data including applications, games, user preferences, and personal media.
On the other hand, a clean install is simple and effective, but be prepared for a total data loss unless you don’t back up your data before initiating this procedure. All your personal files (personal media, applications, games, user preferences, etc.) will be lost after a clean install.
If you’ve performed one of the procedures above and you’re still having the same kind of BSOD crash, you can conclude that the issue is occurring due to a hardware component. In this case, the ideal way of resolving the issue is to take your PC to a certified technician.
by Vlad Turiceanu
Passionate about technology, Windows, and everything that has a power button, he spent most of his time developing new skills and learning more about the tech world. Coming… read more
Updated on March 29, 2021
- The 0x1000007e BSoD error is caused by a severely outdated Silverlight version, or by system file corruption.
- The first step to fix 0x1000007e on Windows 10 should be to install the pending updates, if any.
- An SFC scan will help you find any possible corrupted files that lead to bug check code 0x1000007e.
- Don’t forget that an all-in-one BSoD fixer can be the answer to many such blue screen errors.
XINSTALL BY CLICKING THE DOWNLOAD FILE
Fortect is a tool that does not simply cleans up your PC, but has a repository with several millions of Windows System files stored in their initial version. When your PC encounters a problem, Fortect will fix it for you, by replacing bad files with fresh versions. To fix your current PC issue, here are the steps you need to take:
- Download Fortect and install it on your PC.
- Start the tool’s scanning process to look for corrupt files that are the source of your problem
- Right-click on Start Repair so the tool could start the fixing algorythm
- Fortect has been downloaded by 0 readers this month.
Getting an error message immediately after starting your Windows 10 computer is not an uncommon occurrence.
The 0x1000007e BSoD error is caused by a severely outdated Silverlight version, system file corruption, or interference from a third-party service.
A hardware-related issue may also be the reason why this 0x1000007e error is shown, but you shouldn’t imagine the worst scenario yet.
Because of the multiple factors that cause this error, it’s likely that you may have to attempt more than one potential fix to suitably repair it.
With that said, we may only suggest you try the solutions below in the given order.
How can I fix error 0x1000007e on Windows?
1. Install pending updates
- Press Windows key + R keyboard hotkey to open up a Run dialog box.
- Type wuapp.exe inside the text box and press Enter to open up the Windows Update tab of the Settings app.
- Once you’re inside the Windows Update screen, click on Check for updates.
- After that, follow the next on-screen instructions to install every pending update.
- After each Windows update is installed, restart your computer and you should be good to go.
Windows 10 updates are supposed to be automatically downloaded when available and installed. Make sure you install every pending update that Windows has lined up for you.
Can’t install Windows updates? Just check out this guide to see how easy is to fix that.
2. Use a troubleshooting tool
Since the issue might be deeper than you thought and finding the cause might be difficult, a general troubleshooting BSoD tool can be very useful.
3. Use SFC /Scannow
- Click on Start.
- Then, you need to search for Command Prompt, right-click the top result, and select Run as administrator.
- Type the following command and then press Enter:
sfc /scannow - System File Checker will now verify the integrity of all protected operating system files on your computer.
- It might take quite a while to finish. Once you start this process, you must not interrupt it until the operation is finished.
- Restart your computer if sfc /scannow repaired any files.
System file corruption problems could occur as a result of an issue installing a driver, a system update, or application, or even while making any changes to the installation manually.
Windows 10’s System File Checker (SFC) scannow command can’t fix hardware issues.
But it’s a great place to start if you’re still experiencing the 0x1000007e error and suspect corrupted system files as the culprit.
In the unlikely case that the scannow command stops before the process finishes, we’ve also got an easy fix for you.
4. Use the System Restore utility
- Open up a Run dialog box by pressing Windows key + R.
- Inside the text box, type rstrui and press Enter to open up the System Restore wizard.
- Click Next at the initial prompt.
- Select the Restore point you wish to return to and click Next.
- Follow the instructions to complete the process.
- Lastly, your computer will restart and the new state will be enforced at the next system startup.
Many users reported that the 0x1000007e error was fixed after restoring their PC with the System Restore tool. You may try to do the same.
If System Restore is not working, there is no reason to panic. Just take a look at this useful guide and set things right once again.
Have you attempted to apply one or more of the solutions we have outlined below? Let us know which one worked for you in the comments area below.
![]()
Одна из частых проблем в Windows — system thread exception not handled. Пользователи могут получить синий экран смерти (BSoD) этого типа в любое время. Чаще всего он появляется при работе операционной системы, а после перезагрузки ПК все восстанавливается. Второй вариант – компьютер получает эту ошибку при запуске Windows и бесконечно перезагружается.
Что это за ошибка и почему возникает
BSoD с названием system thread exception not handled иногда сопровождается кодом ошибки 0x1000007e или 0x0000007e и возникает в Windows 7, 8, 10. Характеризуется следующими причинами возникновения:
- случайный сбой компьютера;
- повреждение важных системных файлов;
- неправильные настройки БИОС;
- ошибки оперативной памяти (ОЗУ);
- неисправность HDD или SSD, на котором установлена система;
- неверно установленные драйвера при подключении устройств.
Также на экране с ошибкой могут быть небольшие пояснения. Помимо самого кода появляется и название системного файла или драйвера, вызвавшего ошибку, например:
- nvlddmkm.sys – относится к драйверу видеоадаптера от NVIDIA.
- atikmdag.sys – компонент драйвера видеокарты от ATI/AMD Radeon.
- ntfs.sys – компонент HDD диска с файловой системой NTFS.
- etd.sys – компонент драйвера тачпада ноутбука.
Конечно, это не весь перечень проблемных файлов. Но для устранения проблемы в любых вариациях чаще всего используются одни и те же методы.
Проблемы с драйверами устройств
Итак, если пользователь уверен, что экран BSoD с ошибкой system thread exception not handled появляется из-за драйверов видеоадаптера или другого устройства, то от них необходимо избавиться. Конечно, просто так в систему не попадешь, когда компьютер постоянно перезагружается. В этом случае решить проблему поможет безопасный режим:
- Найдите установочный диск либо флэш-накопитель с ОС той версии, которая установлена на ПК.
- Загрузитесь с носителя и нажмите по опции «Восстановление системы».
- Выберите раздел «Поиск и устранение неисправностей».
- Посетите подраздел «Дополнительные параметры».
- Щелкните по опции «Командная строка».
- Вставьте команду — bcdedit /set {default}bootmenupolicy legacy – служит для запуска безопасного режима (вернуть все как было можно, вставив вместо слова legacy — standard).
- Закрываем CMD и перезапускаем компьютер.
- Загрузится окно безопасного режима, где выбираем самый первый пункт и жмём Enter.
- Сейчас Windows запустится без драйверов. Перейдите в диспетчер устройств (можно найти через поиск).
- Жмём правой кнопкой мышки по проблемному драйверу и выбираем «Удалить».
Настройки БИОСа
Иногда может помочь сброс настроек BIOS до заводских. Даже если в настройках ничего не изменилось, эта операция не помешает.
Для разных видов системных плат и ноутбуков процесс входа в BIOS отличается. Чаще всего это клавиши DEL, ESC, F8, F1 или F4. Ищите сведения в паспорте к системной плате или в интернете.
Чаще всего в разделе Exit или другом месте есть пункт Load Optimized Defaults, Load BIOS Setup Defaults, Load Fail-Safe Defaults или Load Setup Defaults. При помощи стрелок выбираем его и щелкаем клавишу Enter.
Чтобы изменения сохранились — выходим, выбрав пункт Save and Exit Setup.
Проверка системных файлов
Если проблема связана с повреждением системных файлов или файловой системы жёсткого диска, то исправить ошибку поможет утилита SFC:
- Открываем командую строку или PowerShell с повышенными правами.
- Пишем команду — sfc /scannow.
Появление ошибки на ноутбуке
В случае ноутбука можно попробовать способ отключения питания. В некоторых случаях это помогает:
- Отключите устройство с помощью кнопки питания.
- Отсоедините кабель зарядного устройства.
- Выньте аккумулятор и через пару минут вставьте.
Отключение аппаратного ускорения в браузерах
Во время использования браузера с включенным аппаратным ускорением, чаще всего на Windows 10, так же может возникать данная проблема. Отключим эту функцию:
- В Google Chrome переходим в настройки (в остальных браузерах процедура идентична. Незначительно отличается интерфейс).
- Опускаемся вниз и жмем по пункту «Дополнительные».
- Находим в разделе «Система» функцию «Использовать аппаратное ускорение (при наличии)» и отключаем её.
- Перезаходим в браузер.
Проверка оперативной памяти на ошибки
Оперативная память – еще одна частая причина появления system thread exception not handled. Рассмотрим метод проверки памяти на ошибки:
- Выниманием модули ОЗУ, аккуратно протираем ластиком контакты, вставляем обратно.
- Скачиваем утилиту memtest86+ и выполняем тестирование ОЗУ.
Для исправления этого типа ошибки необходимо сделать следующее:
- Сбросить BIOS до заводского состояния.
- Обновить БИОС или отключить в нем параметры кэширования или затенения памяти.
- Обновить/удалить драйвер через безопасный режим, как это было описано выше.
- Иногда требуется поменять проблемный компонент, например, видеокарту.
Several Windows users have been seeing BSOD critical crashes with the error code 0x1000007e. Most affected users are reporting that for them, the issue seems to occur randomly with no apparent trigger. What’s even more annoying is the fact that they encounter the critical crash just minutes after they start their PC. As it turns out, the issue is not exclusive to a certain Windows version since it’s encountered on Windows 7, Windows 8.1 and Windows 10.
What’s causing the Error code 0x1000007e?
We investigated this particular error code by looking into various user reports and analyzing the various fixes that are recommended by other users that also encountered this issue. As it turns out, several different causes might trigger the 0x1000007e error. Here’s a list of culprits that might be responsible for the random BSODs:
- Silverlight version is outdated – As it turns out, this particular crash can occur due to a severely outdated Silverlight version. Fortunately, Microsoft has released a hotfix for the issue, that resolves the issue by installing the latest stable version. To take advantage of the fix, you’ll need to install every pending update since it’s included in one of the Cumulative updates.
- 3rd party AV conflict – According to various user reports, this problem can also arise due to a conflict between an overprotective antivirus suite and a Kernel process. In situations like this one, the easiest way to resolve the issue is to simply move away from the AV suite that’s causing the problem and revert to the default security suite (Windows Defender).
- System File Corruption – Another potential scenario in which this error code will occur is system file corruption. If certain Windows become affected by corruption, it might end up triggering general system instability which might trigger BSODs of this kind. In this case, you should be able to resolve the issue by running a couple of utilities capable of resolving OS corruption issues (DISM and SFC).
- 3rd Party Service interference – It’s also possible that some kind of startup service or process is interfering with an operating system component, which ends up crashing the system when certain circumstances are met. If this scenario is applicable, you can resolve the issue by achieving a clean boot state and identifying the process that is causing the problem.
- Underlying System File Corruption – In some rare cases, the corruption that ens up triggering this error code is so severe that it cannot be resolved conventionally. In situations like this one, the only viable fix is to reset every OS component or rever them to a healthy point in time. To do this, you can either use a viable system restore point or you can go for a repair install or clean install.
- Hardware-related issues – Several users have confirmed that this particular error code can also occur due to some hardware-issues that are contributing to the general instability of the system. In this case, the only viable fix is to test out the various components to find out the culprits or to take your PC directly to a certified technician.
If you’re currently struggling to find a way that will resolve the 0x1000007e error and allow you to use your computer normally without the annoying BSODs, this article will provide you with troubleshooting strategies. Down below, you’ll find a selection of repair strategies that have been confirmed to be effective by other affected users finding themselves in a similar situation.
For the best results, we advise you to follow the potential fixes below in the same order that we arranged them in (via efficiency and difficulty). Eventually, you will stumble upon a method that will be applicable regardless of the scenario in which you’re encountering the issue.
Let’s begin!
Method 1: Install every pending Windows Update
As it turns out, one particular reason that will cause BSOD crashes with the 0x1000007e error code is a scenario in which the latest Silverlight version is not installed on the affected machine. This is odd considering that Silverlight is on it’s way out as new tech is slowly replacing it, but it seems like Microsoft has already released an update that fixes an instability caused by an older version.
To take advantage of the fix, you’ll need to install every pending update that Windows has lined up for you (Critical and Non-Critical).
Several users that were also encountering this problem have reported that the issue was resolved after they installed every pending update and restarting their computer.
Here’s a quick guide on installing every pending update on your Windows computer:
Note: This guide will work regardless of the Windows version that you’re using.
- Press Windows key + R to open up a Run dialog box. Next, type “ms-settings:windowsupdate” inside the text box and press Enter to open up the Windows Update tab of the Settings app.
Run dialog: ms-settings:windowsupdate Note: If you’re not using Windows 10, type “wuapp” instead of “ms-settings:windowsupdate”.
- Once you’re inside the Windows Update screen, move over to the right-hand pane and click on Check for updates, then follow the on-screen prompts to install every pending update.
Installing every pending Windows update Note: If during the procedure of installing the pending updates you are prompted to restart, do so, but make sure to return to this same screen at the next startup sequence to ensure that you install every update.
- After each Windows update is installed, restart your computer once again and see if the issue is resolved by looking out for a 0x1000007e BSOD once the next startup sequence is complete.
If the same critical error is still occurring, move down to the next method below.
Method 2: Uninstalling 3rd party security suite (if applicable)
As it turns out, the 0x1000007e error can also occur due to a conflict between a 3rd party security suite and a Kernel process. We have managed to identify several user reports blaming Comodo AV for this issue, but there might be other suites triggering the same behavior.
If this scenario is applicable and you’re using a 3rd party security suite, you should disable the real-time protection of your antivirus and see if the issue stops occurring. But to ensure that your 3rd party AV suite has no role in the apparition of the annoying BSODs, you’ll need to uninstall the security program and remove any remnant files.
But first, start by disabling the real-time protection – This procedure is different across the various 3rd party AV suites, but you are typically able to do so via the dedicated taskbar menu.
Leave the real-time protection disabled for a while and see if the issue is still occurring. If it is, try uninstalling the security program altogether and remove any remnant files that can still cause this problem. In case you decide to go this route, follow this article (here) for step by step instructions on uninstalling 3rd party security suites & removing all remnant files.
If this method wasn’t applicable or you’ve done this and the BSOD critical crash is still occurring, move down to the next method below.
Method 3: Resolving System File Corruption
In most documented cases, the 0x1000007e error occurs due to some kind of system file corruption that ends up crashing some critical component that in its turn triggers system instability. Some affected users that found themselves in a similar situation have reported that they finally managed to take care of the issue by running a series of utilities capable of fixing logical errors and system file corruption.
We recommend to avoid using 3rd party solutions and stick to the repair tools offered by Microsoft – DISM and SFC. Both DISM (Deployment Image Servicing and Management) and SFC (System File Checker) are equipped to deal with corrupted system files, but they go about this task differently.
DISM is a more modern tool that relies on the WU (Windows Update) component to replace corrupted instances with healthy copies, while SFC doesn’t need an Internet connection since it uses a locally stored archive to deal with corrupted system files.
IMPORTANT: We highly recommend that you run both utilities to make sure that you maximize your chances of fixing your system file problem.
Here’s a quick guide on running both scans to resolve the system file corruption and resolve the 0x1000007e error:
- Press Windows key + R to open up a Run dialog box. Then, type “cmd” inside the text box and press Ctrl + Shift + Enter to open up a Command Prompt with admin access. When you see the UAC (User Account Prompt), click Yes to grant administrative access.
Running Command Prompt - Once you manage to get inside the elevated Command Prompt, type the following command and press Enter to initiate an SFC scan:
sfc /scannow
Note: Once you start this process, DO NOT interrupt (by closing the CMD window or restarting your computer) it until the operation is finished. Doing this might produce additional logical errors that might cause further problems on your PC.
- Once the SFC scan is complete, close the elevated CMD window and restart your computer. During the next startup, wait until your OS is fully loaded, then follow step 1 again to open up another elevated CMD. After you’ve done this, type the following commands and press Enter after each command to initiate a DISM scan:
Dism.exe /online /cleanup-image /scanhealth
Dism.exe /online /cleanup-image /restorehealth
Note: Before you initiate the DISM scan, make sure you have a stable connection to the Internet, otherwise the utility won’t be able to download the fresh copies needed to replace the corruption. The first command (scanhealth) will scan for inconsistencies while the second (restorehealth) will fix any type of corruption that is found.
- Once the DISM scan is complete, restart your computer once again and see if the issue is resolved at the next system startup.
If you’re still encountering random BSOD crashes with the 0x1000007e error, move down to the next method below.
Method 4: Achieving a Clean Boot State
If you’re performed the steps appropriated to cleaning your system free of corruption and you’re still encountering the 0x1000007e error, some kind of 3rd party service or process is likely interfering with an OS component, which ends up crashing the system under certain circumstances.
Some affected users have blamed a 3rd party security suite, while others have singled a partitioning software for causing this issue. Since we can’t possibly cover every application that might trigger this 0x1000007e BSOD, the best course of action would be to configure your computer to start in a clean boot state.
This will prevent any 3rd party startup service or process from running, effectively preventing a BSOD crash caused by 3rd party interference. If the crash doesn’t occur while your system clean boots, it’s clear that some 3rd party program was previously causing the annoying BSODs.
Follow the instructions below to achieve a clean boot state and then identify the 3rd party program that was causing the 0x1000007e error:
- Open up a Run dialog box by pressing Windows key + R. Then, type “msconfig” and press Enter to open up the System Configuration menu. Once you’re at the UAC (User Account Prompt), click Yes to grant administrative privileges.
Typing msconfig in a Run box and pressing Enter - After you manage to get inside the System Configuration window, click on the Services tab from the top of the menu, then check the box associated with the “Hide all Microsoft Services” option. Once you’ve done this, all Windows services will be removed from the list, which will prevent you from mistakenly disabling a Windows service.
Disabling all non-Microsoft startup items - Once all Windows services are excluded from that list, click the Disable all button to effectively prevent any 3rd party services from being called into action at the next machine startup.
- After you’re done with this, select the Startup tab and click on Open Task Manager from the newly appeared menu.
Opening the Startup items window via Task Manager - Once you’re inside the Startup tab of Task Manager, start to systematically select each startup service and then click on the Disable button at the bottom of the screen. This procedure will ensure that no startup service will get called at the next system startup.
Disabling Apps from Startup - Once you’re done with the step above, you have effectively disabled every service or process that might contribute to the 0x1000007e BSOD. All that’s left to do now is to take advantage of the clean boot state by restarting your computer.
- At the next startup, your computer will boot directly into a clean boot state, which will allow you to see if a 3rd party service or process was indeed causing the problem.
- If the crash no longer happens while in clean boot, reverse engineer the steps above and re-enable the previously disabled services one by one coupled with random restarts until you figure out which item is responsible for the crash. Once you manage to discover it, leave it disabled to avoid further issues of this kind.
If you followed the instructions above and you confirmed that the issue is not occurring due to a 3rd party service or process, move down to the next method below.
Method 5: Using System Restore
If none of the methods above have allowed you to get rid of the annoying 0x1000007e BSODs and the issue only started occurring recently, you might be able to resolve the issue promptly by utilizing the System Restore utility to restore your computer back to a healthy point when the circumstances that are know causing the problem didn’t exist.
The System Restore utility utilizes a snapshots to restore machines to the exact state it was in that previous point in time. By default, Windows creates new snapshots at every important event (app installation, major update, etc. so if you haven’t changed the default behavior, you should have plenty of snapshots to choose from.
But before you start using System Restore to restore your computer state to a previous point in time, keep in mind that all changes made after the snapshot was created will be lost. This means that any app installation, established user preferences and anything else enforced during that time will be reverted.
If you decide to try and fix the 0x1000007e error by doing a system restore, here’s a step-by-step guide through the whole thing:
- Open up a Run dialog box by pressing Windows key + R. Inside the text box, type “rstrui” and press Enter to open up the System Restore wizard.
Opening the System Restore wizard via Run box - Once you’re inside the System Restore wizard, click Next at the initial prompt to advance to the next menu.
Getting past the initial screen of System Restore - Next, proceed by selecting a restore point that is dated before the apparition of the annoying 0x1000007e error and click Next to advance to the final menu.
Restoring your system to a previous point in time Note: All changes you made after the snapshot was created will be lost if you go forward with the next step.
- To start the restoring process, click Finish, then click Yes at the confirmation prompt to start the restoring process.
Starting the System Restore process - After several seconds, your computer will restart and the new state will be enforced at the next system startup. Once the old state is enforced, see if the same 0x1000007e error is still occurring.
If you’re still experiencing random BSODs even after using System Restore, move down to the next method below.
Method 6: Performing a repair / clean install
If none of the methods below have allowed you to resolve the BSOD crashes pointing towards the 0x1000007e error, it’s clear that you’re system is suffering from an underlying problem that cannot be resolved conventionally. In this case, the only viable fix that will treat the issue in every scenario where the problem is occurring due to a software component is to reset every OS component.
Several Windows users that found themselves in a similar scenario have reported that they finally managed to resolve the issue either by going for a clean install or by performing an in-place repair (repair install).
A repair install (in-place repair) is a longer procedure, with the major advantage that it allows you to keep all your data including applications, games, user preferences, and personal media.
On the other hand, a clean install is simple and effective, but be prepared for a total data loss unless you don’t back up your data before initiating this procedure. All your personal files (personal media, applications, games, user preferences, etc.) will be lost after a clean install.
If you’ve performed one of the procedures above and you’re still having the same kind of BSOD crash, you can conclude that the issue is occurring due to a hardware component. In this case, the ideal way of resolving the issue is to take your PC to a certified technician.