Содержание
- Причины и типы горящей кнопки «Внимание» на принтере Kyocera
- Ошибки картриджей
- Код C7990
- Замятие бумаги
- Другие неисправности
- Сброс ошибок у принтеров Kyocera своими руками
Причины и типы горящей кнопки «Внимание» на принтере Kyocera
Для начала необходимо разобраться, какие варианты свечения красной кнопки на принтере Kyocera существуют. В большинстве случаев именно определение характера свечения позволяет устранить проблему, не делая ничего лишнего. Каждый из этих типов связан с конкретной природой проблемы, которую мы рассмотрим ниже.

- Медленное мигание лампочки. Если свет тускнеет, а затем ярко вспыхивает и медленно меняет яркость, это может быть одной из двух проблем печати. Первый вызван тем, что закончилась бумага, которую следует проверить и при необходимости вставить заново. Если бумага уже вставлена, но принтер ее не видит, попробуйте слегка отрегулировать ее и отрегулировать ручки, затянув или ослабив их. Вторая причина заключается в том, что тонер в картридже заканчивается, и чтобы проверить это, просто визуально проверьте качество печати готового документа и вспомните, когда принтер заправлялся в последний раз.
- Быстрое мигание света. Иногда свет имеет другой коэффициент горения, довольно часто мигая. Это может означать, что был обнаружен неоригинальный картридж, не совместимый с данным устройством. Другой причиной этого явления является переполнение памяти принтера, вызванное попыткой распечатать слишком большой документ. Реже быстрое мигание вызвано перегруженным или засоренным лотком для бумаги, поэтому мы рекомендуем немедленно проверить это и при необходимости устранить неисправность.
- Непрерывное мигание индикаторной лампочки. Если возникают ошибки печати и кнопка горит постоянно, стоит проверить, закрыта ли крышка принтера и есть ли тонер в кассете. Вы можете устранить эти неисправности самостоятельно, поэтому трудностей возникнуть не должно. Более редкой и серьезной проблемой является выход из строя барабана формирования изображения. В таких случаях следует обратиться в сервисный центр для дальнейшей диагностики и ремонта.
Теперь, когда вы знаете, какой мигающий рисунок отвечает за те или иные проблемы, вы сможете провести диагностику устройства и понять, какие действия необходимо предпринять. Тем, кто недавно заправил чернильный картридж и столкнулся с этой проблемой, следует перезагрузить принтер, как описано ниже. Всем, кому не удалось самостоятельно устранить ошибку, рекомендуется выполнить следующие шаги, а затем перейти к последнему совету, если и он окажется безуспешным.
Ошибки картриджей
Все современные принтеры страдают от ошибок картриджей. В большинстве случаев они возникают после отгрузки устройства. Решение заключается в извлечении и повторной установке картриджа. Сделать это можно следующим образом (на примере многофункционального устройства Kyocera FS-1040):
- Выключите принтер.
- На передней панели принтера находится откидная крышка. Откройте откидную крышку.
- Под откидной крышкой с левой стороны находится картридж. Извлеките картридж.
- Чтобы подстраховаться, проверьте переднюю часть картриджа. Если на контактах есть грязь, удалите ее мягкой безворсовой тканью. Для засохших чернил смочите салфетку в воде и протрите ею контакты.
- Замените чернильный картридж, плотно задвинув его до щелчка.
- Включите принтер и подождите около 5-10 секунд, пока картридж инициализируется.
Если проблема была связана с картриджем, эта процедура должна помочь ее решить.
Код C7990
Этот номер ошибки в таких моделях, как FS 1020MFP, указывает на то, что бункер для тонера переполнен.

Ошибка C7990
Возможны три причины ошибки C7990:
-плата PWB неисправна;
-Датчик чернил неисправен;
Неисправен блок барабана; — Картридж переполнен — Рекомендуется заменить блок барабана.

Блок барабана формирования изображения
В первых двух случаях обратитесь в сервисный центр.
В третьем случае появляется код C7990, если срок службы барабана изображения не закончился, барабан изображения можно очистить от чернил. Процедура выполняется следующим образом:
1.Откройте переднюю крышку и извлеките блок проявителя.
2.Извлеките барабан с изображением.
3.Осторожно откройте крышку резервуара и удалите чернила.
4.Соберите машину в обратном порядке.
Как видите, ошибку C7990 в принтере Kyocera легко устранить самостоятельно, и к специалисту нужно обращаться только в том случае, если платы действительно неисправны.

Замятие бумаги
Застревание бумаги внутри принтера — распространенная проблема принтеров. Устройства Kyocera не являются исключением. Механизм подачи бумаги состоит из нескольких вращающихся роликов. Если любой из них застрянет, печать не будет выполнена. Если произошло замятие бумаги, на передней панели принтера также появится соответствующее сообщение.
В самых оптимистичных случаях нет необходимости разбирать принтер для извлечения бумаги. Чаще всего он заклинивает прямо на входе. Однако если замятие бумаги произошло внутри принтера, его необходимо удалить.
Другие неисправности
Также могут возникнуть следующие коды:
-C-F040. Выключите и снова включите принтер, нажав кнопку питания.
-J-0511 Код указывает на замятие бумаги под задней крышкой. В инструкциях описано, как удалить бумагу в соответствующем разделе.
-PF. Принтер показывает, что листы были добавлены во входной лоток.

Как видите, японские принтеры Kyocera редко ломаются. Чаще всего ошибки возникают из-за неправильного или невнимательного обращения. Вы можете починить их самостоятельно, но если вы не уверены, лучше обратиться к профессионалу.
Сброс ошибок у принтеров Kyocera своими руками
Сброс ошибок на принтерах Kyocera следует понимать как набор шагов, которые потенциально может выполнить опытный пользователь для восстановления работоспособности печатающих устройств, не прибегая к услугам сервиса.
|
Ошибка # |
Причина |
Решение |
|
E-0001 |
В принтер был установлен совместимый картридж или поврежден чип расходного материала. | Эта проблема может быть решена несколькими способами:
1. установка оригинального картриджа; 2. замена неисправного чипа; 3. перепрошивка принтера — после этого любой картридж может быть установлен в принтер неограниченное количество раз; 4. сброс ошибки — Нажмите кнопки «Режим» и «Сброс» на несколько секунд. |
|
E-0002 |
Регион используемого картриджа не соответствует принтеру. | Эта проблема может быть решена несколькими способами:
1. установите правильный картридж для региона принтера; 2. Замените микросхему; 3) Обновите микропрограмму принтера. |
|
E-0003 |
Память в принтере заполнена. | Распечатайте документы, которые уже были отсканированы, или сбросьте операцию с помощью соответствующей кнопки. |
|
E-0007 |
Тонер-картридж закончился. | Замените новый оригинальный тонер-картридж, совместимый тонер-картридж или перезарядите картридж. |
|
E-0008 |
Одна из крышек принтера не закрыта. | Закройте переднюю и заднюю крышки принтера, звучно щелкнув. |
|
E-0009 |
Лоток для печати заполнен. | Извлеките отпечатанные листы бумаги, затем нажмите кнопку Старт, чтобы возобновить печать. |
|
E-0012 |
Память принтера заполнена. | Уменьшите разрешение печати до 600 точек на дюйм. |
|
E-0014 |
Установлен размер бумаги, который не поддерживается принтером. | Замените бумагу на совместимую по размеру.
Иногда функциональность принтера может быть ограничена на уровне программного обеспечения. Для расширения диапазона размеров рекомендуется обновить программное обеспечение принтера. |
|
E-0015 |
1 Принтер не имеет источника питания.
2. сетевой кабель не подключен. 3. на персональном компьютере отсутствует драйвер. |
Проверьте целостность сетевого кабеля.
Включите принтер. При необходимости установите драйвер. |
|
E-0018 |
Выбранный файл отсутствует в очереди печати. | Сбросьте операцию, нажав кнопку «Сброс». Затем выберите новый файл и продолжите печать. |
|
E-0019 |
Формат печати не поддерживается принтером. | Сбросьте действие, нажав кнопку «Сброс». |
|
J-0511 |
Бумага замята. | Осторожно извлеките оставшуюся бумагу из корпуса принтера. |
|
ПФ |
Во входном лотке нет бумаги. | Вставьте бумагу во входной лоток и возобновите печать, нажав кнопку Старт. |
Источники
- https://Lumpics.ru/kyocera-printer-does-not-print-attention-button-is-on/
- https://ru.NoDevice.com/articles/printers/does-not-print-a-kyocera-printer
- https://www.dvenashka.ru/2021/11/kody-oshibok-printerov-kyocera-i-ih-sbros.html
- https://computermaker.info/ecosys-fs-1020mfp-oshibka-e7.html
- http://printergid.ru/neispravnosti/oshibki-kyocera
- https://moscowtoner.ru/kody-oshibok-u-printerov-kyocera/
Содержание
- 1 Самые распространенные коды ошибок принтеров Kyocera
- 2 Код C7990
- 3 Способ №2. Замена чипа
- 4 Другие неисправности
- 5 Способ №1. Сброс счетчика страниц / тонера
- 6 Сброс ошибок у принтеров Kyocera своими руками
- 7 Способы решения проблемы
- 7.1 Сброс сообщения о неоригинальном тонере на Kyocera fs 1040
- 8
- 9
- 10
- 11
- 12
- 13
- 14 Значения мигания индикаторов
Самые распространенные коды ошибок принтеров Kyocera
Слово «ошибка» на английском языке будет «ошибка», поэтому большинство кодов начинаются с заглавной E.
Итак, какие ошибки могут возникать в принтерах Kyocera FS 1020MFP японского производства:
1.E-0002. Указывает, что картридж с тонером не подходит для региональных спецификаций. Вам нужно использовать другой картридж.
2.E-0003. Эта ошибка указывает на то, что память сканера заполнена. Будут доступны только самые последние отсканированные изображения. Чтобы сбросить ошибку E-0003, необходимо очистить память сканера. Для этого нажмите Стоп / Сброс.

Стирание памяти
3.E-0007. Значит, для печати не хватает чернил. Исправить код 07 просто — нужно добавить тонер.
4. При открытой задней или передней крышке МФУ Kyocera не работает и выдает код ошибки E-0008.
5. После печати или копирования большого количества бумаги (сто листов), если лоток не опорожняется, отображается сообщение об ошибке принтера Kyocera E-0009. Вам нужно удалить листы и нажать кнопку Старт, чтобы продолжить работу.
6. Иногда выдается код E-0012, что означает, что задача не может быть выполнена из-за нехватки оперативной памяти. Для решения этой проблемы необходимо изменить разрешение печати с 1200 на 600. Порядок действий описан в инструкции.
7. Когда появится код E-0014, загрузите бумагу нужного формата во входной лоток. Размер листов определяется драйвером принтера.
8. Если вы забыли подключить сетевой или USB-кабель, принтер отобразит код ошибки E-0015. Нужно нажать Stop / Reset, подключить кабель и снова нажать эту кнопку.

Замена картриджа с тонером
В японских принтерах Kyocera FS 1020MFP могут возникать ошибки, как описанные в предыдущем разделе, так и конкретные ошибки. Все коды можно найти в инструкции по эксплуатации.
Код C7990
Этот номер ошибки на моделях FS 1020MFP указывает на сигнал о переполнении тонера.

Ошибка C7990
Причин возникновения ошибки C7990 может быть три:
• неисправна плата PWB;
• неисправен датчик количества краски;
• бункер действительно полон — рекомендуется заменить барабан.

Барабан
В первых двух случаях необходимо обратиться в сервисный центр.
В третьем случае появления кода C7990, если ресурс барабана еще не исчерпан, можно очистить бункер для краски. Делают они это так:
1. Откройте переднюю крышку и выньте блок проявки.
2. Подойдите к барабану.
3. Осторожно откройте крышку бункера и удалите краску.
4. Соберите прибор в обратном порядке.
Как видите, ошибку принтера Kyocera C7990 легко устранить самостоятельно, а обращаться к специалистам нужно только тогда, когда карты действительно плохие.

Способ №2. Замена чипа
Альтернативный вариант сброса счетчика вручную — замена микросхемы. Вы можете заправлять картридж принтера KyoceraFS-1040 сколько угодно, но благодаря установке нового защитного чипа устройство не распознает замену расходного материала.

Ошибочно многие пользователи считают неисправностью, когда на корпусе принтера Kuoser 1040 горит красная кнопка с сообщением «Внимание» и принтер не печатает присланные ему документы. В этом материале мы рассмотрим, в каких случаях это происходит, что делать, как быстро все отремонтировать в домашних условиях, не обращаясь в сервисный центр. Инструкции применимы ко многим моделям Kyocera. Например, fs1040 взят из-за его популярности.
Другие неисправности
Также возможно появление таких кодов:
• C-F040. Вам нужно выключить и снова включить устройство, нажав кнопку питания.
• J-0511. Код указывает на то, что бумага застряла под задней крышкой. Инструкции описывают, как удалить бумагу в соответствующем разделе.
• ПФ. Принтер предложит вам добавить бумагу во входной лоток.

Как видите, принтеры японской компании Kyocera выходят из строя редко. Чаще всего ошибки возникают из-за неправильных или неосторожных действий. Вы можете исправить их самостоятельно, но если не уверены в своих силах, лучше проконсультироваться со специалистом.
Способ №1. Сброс счетчика страниц / тонера
Чтобы запустить принтер KyoceraFS-1040, просто сбросьте счетчик страниц / тонера, удерживая нажатыми кнопки «Отмена» и «GO».

Единственная проблема заключается в том, что удаление предупреждения принтера об использовании неоригинального картриджа может привести к аннулированию гарантии. Так как устройство записывает абсолютно все ошибки в «Журнал событий».
Сброс ошибок у принтеров Kyocera своими руками
Сбрасывая ошибки в принтерах Kyocera, необходимо понимать ряд мер, которые опытный пользователь может потенциально предпринять для восстановления и запуска печатающих устройств без обращения в сервисный центр.
Ошибка №
Это вызывает
Решение
E-0001
В принтер установлен совместимый картридж или повреждена микросхема расходных материалов. Проблему можно решить несколькими способами:
1 установите оригинальный картридж;
2 замена поврежденного чипа;
3 прошивки принтера — так что любой картридж можно устанавливать в принтер неограниченное количество раз;
4 сброс ошибки — держать нажатыми несколько секунд кнопки «Режим» и «Сброс».
E-0002
Регион используемого картриджа не соответствует техническим характеристикам принтера. Проблему можно решить несколькими способами:
1. Установите картридж, соответствующий региону принтера;
3 прошивки принтера.
E-0003
Память печатающего устройства заполнена. Распечатайте уже отсканированные документы или сбросьте операцию с помощью соответствующей кнопки.
E-0007
В картридже закончился тонер. Замените картридж на новый, оригинальный, совместимый или заправьте расходный материал.
E-0008
Одна из крышек принтера не закрыта. Закройте переднюю и заднюю крышки принтера до щелчка.
E-0009
Лоток для печати заполнен. Удалите отпечатанную бумагу и возобновите печать, нажав кнопку «Пуск».
E-0012
Память принтера заполнена. Измените разрешение печати до 600 dpi.
E-0014
Установлен формат бумаги, не поддерживаемый принтером. Замените бумагу листами совместимого размера.
Иногда функциональность принтера может быть ограничена на программном уровне.
Для расширения диапазона форматов рекомендуется обновить программное обеспечение печатающего устройства.
E-0015
1. В принтере нет питания.
2. Сетевой кабель не подключен.
3. На ПК нет драйверов. Проверьте целостность сетевого кабеля.
При необходимости установите драйвер.
E-0018
Выбранный файл отсутствует в очереди печати. Сбросьте операцию, нажав кнопку «Сброс». Затем выберите новый файл и продолжите печать.
E-0019
Формат печати не поддерживается принтером. Сбросьте операцию, нажав кнопку «Сброс».
J-0511
Бумага замята. Осторожно удалите оставшуюся бумагу из корпуса принтера.
ПФ
Во входном лотке нет бумаги. Загрузите бумагу во входной лоток и возобновите печать, нажав кнопку «Пуск».
Способы решения проблемы
Сброс сообщения о неоригинальном тонере на Kyocera fs 1040
Если вышеперечисленные варианты не сработали, то, скорее всего, проблема в самом картридже. Дело в том, что он оснащен датчиком уровня тонера и чипом, отслеживающим количество отпечатанных листов. Когда расходный материал заканчивается или, согласно чипу, он должен закончиться, печать блокируется до тех пор, пока он не будет заменен новым картриджем. Именно это и произошло в нашей ситуации.

Есть три варианта решения проблемы:
- Купите новый картридж и продолжайте его печатать. Это недешево.
- После каждой пополнения порошка следует заменять чип, который начнет отсчет количества распечатанных документов с нуля.
- Сбросить счетчик на микросхеме. Сделать это несложно, но делать это нужно каждый раз при включении устройства.
Инструкции по сбросу:
- Включите устройство.
- Подождите, пока двигатель остановится и красный свет не начнет мигать.
- Одновременно нажмите кнопки «Пуск» и «Отмена» на 5-7 секунд».

- Нажмите и удерживайте, пока красный и зеленый не начнут мигать по очереди.
- Ждем завершения процесса.
- Пытаюсь распечатать.
Значения мигания индикаторов
- Ничего не горит и уведомлений нет, значит, устройство полностью готово к работе.
- Медленное мигание кнопки означает, что в лотке нет бумаги или в картридже низкий уровень пыли.
- Индикатор мигает быстрее: внутри устройства застрял лист бумаги, лоток окончательной обработки заполнен, и распечатки невозможно вставить, вся память принтера заполнена и используются неоригинальные расходные материалы.
- Индикатор горит и не гаснет. Проверьте, закрыты ли крышки. Тонер для печати, возможно, уже закончился.
Если у вас возникли трудности с определением причин появления сообщения «Внимание», вы можете воспользоваться специальным программным обеспечением от инженеров компании — «Kyocera Client Tool». Эта утилита поможет вам более точно диагностировать проблему. Вы можете найти его на сайте компании или на диске с драйверами принтера.
Источники
- http://printergid.ru/neispravnosti/oshibki-kyocera
- https://dudom.ru/kompjutery/kyocera-1040-indikacija-oshibok/
- https://window-10.ru/ecosys-fs-1020mfp-oshibka-e7/
[свернуть]
Все современные копировальные аппараты, мфу и принтеры Kyocera имеют возможность диагностировать все узлы устройства в режиме запуска и во время работы аппарата. По этому, если во время включения или во время работы произошел сбой, то техника Kyocera сможет сообщить о наличии ошибки.
В большинстве случаев у аппаратов Kyocera код ошибки отображается на дисплее, в остальных случаях тип ошибки зависит от последовательности и количества миганий индикаторов.
Если Ваш копировальный аппарат, МФУ или принтер Kyocera выдал на дисплее некий код, то узнать причину, описание возникновения ошибки, а так же в каком узле аппарата стоит искать проблему, Вы можете в этом разделе выбрав интересующую модель из списка.
Но диагностика не решит проблему сбоя аппарата, для этого лучше обратиться к профессиональным и опытным сервисным специалистам компании Kyomart! Позвоните нам по телефону
8 (343) 288-23-45 или отправьте запрос на электронную почту: sales@kyomart.ru , и мы обязательно свяжемся с Вами в кратчайшие сроки.
| Код ошибки | Описание ошибки | Причина ошибки |
|---|---|---|
| 0030 | FAX control PWB system error Processing with the fax software was disabled due to a hardware problem. |
Defective FAX control PWB. |
| 0060 | Control PWB mismatch Unmatching engine and engine sub boards. Defective engine subboard |
Control PWB |
| 0070 | FAX control PWB incompatible detection Error Abnormal detection of FAX control PWB incompatibility In the initial communication with the FAX control PWB, any normal communication command is not transmitted. |
FAX control PWB (The FAX PWB installed will not be the one designed for the machine. |
| 0100 | Backup memory device error | EEPROM (Control PWB) |
| 0110 | Backup memory data error | EEPROM (Control PWB) |
| 0120 | MAC address data error For data in which the MAC address is invalid. |
EEPROM (Control PWB) |
| 0130 | Backup memory read/write error (main NAMD) | Flash memory (Control PWB) |
| 0140 | Backup memory data error (main NAND) | Flash memory (Control PWB) |
| 0150 | Backup memory read/write error (control PWB) No response is issued from the device in reading/writing for 5 ms or more and this problem is repeated 5 times successively. Mismatch of reading data from 2 locations occurs 8 times successively. Mismatch between writing data and reading data occurs 8 times successively. |
EEPROM (Control PWB) |
| 0160 | Backup memory data error (control PWB) Reading data from EEPROM is abnormal. |
EEPROM |
| 0170 | Billing counting error The values on the main circuit PWB and on the engine do not match for any of charging counter, life counter, and scanner counter. |
EEPROM. Control PWB |
| 0180 | Machine number mismatch Machine number of control does not match. |
Data damage of EEPROM. |
| 0190 | Backup memory device error (control PWB) | Control PWB |
| 0080 | Image processing error JAM010X is detected twice. |
Control PWB. |
| 0800 | Image processing error JAM010X is detected twice. |
Control PWB. |
| 0830 | FAX control PWB flash program area checksum error A checksum error occurred with the program of the FAX control PWB. |
FAX software. FAX control PWB. |
| 0420 | Paper feeder communication error Communication error between control PWB and optional paper feeder. |
Improper installation paper feeder. Defective harness between control PWB (YC30) and paper feeder interface connector, or improper connector insertion. Defective control PWB. Defective harness between PF main PWB (YC5) and paper feeder interface connector, or improper connector insertion. Defective PF mainPWB. |
| 0830 | FAX control PWB flash program area checksum error A checksum error occurred with the program of the FAX control PWB. |
Defective fax software. Defective FAX control PWB. |
| 0840 | Faults of RTC The time is judged to go back based on the comparison of the RTC time and the current time or five years or more have passed. |
Defective control PWB. The battery is disconnected from the control PWB. |
| 0870 | FAX control PWB to control PWB high capacity data transfer problem High-capacity data transfer between the FAX control PWB and the control PWB of the machine was not normally performed even if the data transfer was retried the specified times. |
Improper installation FAX control PWB. Defective FAX control PWB or control PWB. |
| 0920 | Fax file system error The backup data is not retained for file system abnormality of flash memory of the FAX control PWB. |
Defective FAX control PWB. |
| 0970 | 24 V power down detect If a 24V power disconnection signal is observed and a 12V power disconnection signal is observed simultaneously for one second. |
Connect right PWB. Control PWB |
| 1010 | Lift motor error (50/60 ppm model only) After cassette 1 is inserted, lift sensor does not turn on within 10 s. This error is detected four times successively. |
Bottom plate elevation mechanism in the cassette. Connector cable or poor contact in the connector. Drive transmission system of the lift motor. Lift motor. Connect right PWB. Control PWB. |
| 1020 | PF lift motor 1 error (paper feeder) After cassette 2 is inserted, PF lift sensor 1 does not turn on. This error is detected four times successively. |
Bottom plate elevation mechanism in the cassette. Connector cable or poor contact in the connector. Drive transmission system of the PF lift motor. PF lift motor. PF main PWB. |
| 1030 | PF lift motor 2 error (paper feeder) After cassette 3 is inserted, PF lift sensor 2 does not turn on. This error is detected four times successively. |
Dottom plate elevation mechanism in the cassette. Connector cable or poor contact in the connector. Drive transmission system of the PF lift motor. PF lift motor. PF main PWB. |
| 1040 | PF lift motor 3 error (paper feeder) After cassette 4 is inserted, PF lift sensor 3 does not turn on. This error is detected four times successively. |
Bottom plate elevation mechanism in the cassette. Connector cable or poor contact in the connector. Drive transmission system of the PF lift motor. PF lift motor. PF main PWB. |
| 1050 | PF lift motor 4 error (paper feeder) After cassette 5 is inserted, PF lift sensor 4 does not turn on. This error is detected four times successively. |
Bottom plate elevation mechanism in the cassette. Connector cable or poor contact in the connector. Drive transmission system of the PF lift motor. PF lift motor. PF main PWB. |
| 1800 | Paper feeder 1 communication error A communication error is detected 10 times in succession. |
Paper feeder. Connector cable or poor contact in the connector. PF main PWB. Control PWB. |
| 1810 | Paper feeder 2 communication error A communication error from paper feeder is detected 10 times in succession. |
Paper feeder. PF main PWB. Control PWB. |
| 1820 | Paper feeder 3 communication error A communication error from paper feeder is detected 10 times in succession. |
Paper feeder. PF main PWB. Control PWB |
| 1830 | Paper feeder 4 communication error A communication error from paper feeder is detected 10 times in succession. |
Paper feeder. PF main PWB. Control PWB |
| 1900 | Paper feeder 1 EEPROM error When writing the data, read and write data does not match 4 times in succession. |
PF main PWB (EEPROM) |
| 1910 | Paper feeder 2 EEPROM error When writing the data, read and write data does not match 4 times in succession. |
PF main PWB (EEPROM) |
| 1920 | Paper feeder 3 EEPROM error When writing the data, read and write data does not match 4 times in succession. |
PF main PWB (EEPROM) |
| 1930 | Paper feeder 4 EEPROM error When writing the data, read and write data does not match 4 times in succession. |
PF main PWB (EEPROM) |
| 2000 | Main motor startup error Main motor is not stabilized within 2 s since the motor is activated. |
Main motor. Connect right PWB. Control PWB |
| 2010 | Main motor steady-state error After main motor is stabilized, the ready signal is not ready for 2 s continuously. |
Main motor. Connect right PWB. Control PWB. |
| 2200 | Drum motor drive error (50/60 ppm model only) The drum motor is not stabilized within 2 s after driving starts. |
Connector cable or poor contact in the connector. Drive transmission system of the drum motor. Drum motor. Connect right PWB. Control PWB. |
| 2210 | Drum motor steady-state error (50/60 ppm model only) Stable OFF is detected for 2 s continuously after drum motor stabilized. |
Connector cable or poor contact in the connector. Drive transmission system of the drum motor. Drum motor. Connect right PWB. Control PWB. |
| 2330 | Envelope motor error (Over-current) (50/60 ppm model only) The over-current detection signal of the motor is detected continuously twenty times. |
Connector cable or poor contact in the connector. Drive transmission system of the envelope motor. Envelope motor. Connect left PWB. Control PWB. |
| 2340 | Envelope motor error (Timeout) (50/60 ppm model only) The position detection sensor is not detected continuously for 30 s. |
Connector cable or poor contact in the connector. Drive transmission system of the envelope motor. Envelope motor. Connect left PWB. Control PWB. |
| 2600 | PF drive motor 1 error (paper feeder 1) When the PF drive motor is driven, error signal is detected continuously for 2 s. |
Connector cable or poor contact in the connector. Drive transmission system of the PF drive motor. DPF drive motor. DPF main PWB. |
| 2610 | PF drive motor 2 error (paper feeder 2) When the PF drive motor is driven, error signal is detected continuously for 2 s. |
Connector cable or poor contact in the connector. Drive transmission system of the PF drive motor. PF drive motor. PF main PWB. |
| 2620 | PF drive motor 3 error (paper feeder 3) When the PF drive motor is driven, error signal is detected continuously for 2 s |
Connector cable or poor contact in the connector. Drive transmission system of the PF drive motor. PF drive motor. PF main PWB. |
| 2630 | PF drive motor 4 error (paper feeder 4) When the PF drive motor is driven, error signal is detected continuously for 2 s |
Connector cable or poor contact in the connector. Drive transmission system of the PF drive motor. PF drive motor. PF main PWB. |
| 3100 | Scanner carriage error The home position is not correct when the power is turned on, at the end of a reading process of the table and document processor. |
Image scanner motor. Home position sensor. CCD PWB. Control PWB. |
| 3200 | Exposure lamp error When a lamp is made to turn on one side at a time, the white standard data at the time of an initial is lower than a rated value. |
LED PWB. CCD PWB. Control PWB. |
| 3500 | Communication error between scanner and ASIC An error code is detected. |
CCD PWB. Control PWB. |
| 4000 | Polygon motor steady-state error After Polygon motor is stabilized, the ready signal is at the H level for 20 s continuously. |
Polygon motor (LSU). Control PWB. |
| 4200 | BD steady-state error The BD signal is not detected. |
PD PWB (LSU). Control PWB. |
| 5100 | Chager current error When the current value measured at the time of potential adjustment is less than 20 mcA. The error of the charge current before toner installation. The error of the charge current before printing. | Connector cable or poor contact in the connector. High voltage PWB. Control PWB. |
| 6000 | Broken fuser heater wire (Center) (50/60 ppm model) Fuser thermistor 2 detects a temperature less than 100°C/ 212°F continuously for 30 s after a warm-up start. (40 ppm model) Fuser thermistor 1 detects a temperature less than 100°C/ 212°F continuously for 30 s after a warm-up start. |
Fuser unit. Fuser thermistor connect PWB. Control PWB. Power source PWB. Fuser heater. |
| 6020 | Abnormally high fuser thermistor 2 temperature (Center) (50/60 ppm model only) Fuser thermistor 2 detects a temperature higher than 235°C/455°F. In a heater-off state, the detection temperature of fuser thermistor 2 is higher than 195°C/383°F after the detection temperature of fuser thermistor 2 was 155°C/311°F or less. |
Fuser unit. Fuser thermistor connect PWB. Control PWB. |
| 6030 | Broken fuser thermistor 2 wire (Center) (50/60 ppm model only) Input from fuser thermistor 2 is 1019 or more (A/D value) continuously for 4 s. |
Fuser unit. Fuser thermistor connect PWB. Control PWB. Fuser thermistor 2. Fuser thermostat (triggered). Power source PWB |
| 6120 | Abnormally high fuser thermistor 1 temperature (50/60 ppm model) The detection temperature of fuser thermistor 1 is higher than 245°C/473°F. In a heater-off state, the detection temperature of fuser thermistor 1 is higher than 195°C/383°F after the detection temperature of fuser thermistor 1 was 155°C/311°F or less. (40 ppm model) The detection temperature of fuser thermistor 1 is higher than 250°C/482°F. In a heater-off state, the detection temperature of fuser thermistor 1 is higher than 170°C/338°F after the detection temperature of fuser thermistor 1 was 155°C/311°F or less. |
Connector pin. Triac. Fuser thermistor. Contrl PWB. |
| 6130 | Broken fuser thermistor 1 wire (50/60 ppm model only) A/D value of the fuser thermistor 1 exceeds 1019 bit continuously for 4 s during warming up. |
Connector cable or poor contact in the connector. Connector pin. Triac. Fuser thermistor. Fuser thermistor connect PWB. Control PWB. |
| 6400 | Zero-cross signal error While fuser heater ON/OFF control is performed, the zerocross signal is not input within 2 s. |
Fuser unit. Power source PWB. Connect right PWB. Control PWB. |
| 7000 | Toner motor error During driving the toner motor, an over-current detection signal is detected at intervals of 10 ms as for 300 accumulation. |
Connector cable or poor contact in the connector. Drum unit. Connect left PWB. Control PWB. |
| 7100 | Toner sensor error Sensor output value of 930 or more continuously for 5 s. |
Toner sensor. Toner motor. Connect left PWB. Control PWB. |
| 7400 | Developer unit non-installing error Sensor output value of 31 or less continuously for 5 s. |
Connector cable or poor contact in the connector. Toner sensor. Connect left PWB. Control PWB. |
| 7410 | Drum unit type mismatch error The drum PWB EEPROM does not communicate normally. Absence of the drum unit is detected. |
Connector cable or poor contact in the connector. Toner sensor. Connect left PWB. Control PWB. |
| 7800 | Broken temperature sensor wire Input from temperature sensor is 1019 or more continuously for 160 ms. Input from temperature sensor is 930 or more continuously for 5 s. |
Temperature sensor. Control PWB. |
| 7810 | Short-circuited temperature sensor wire Input from temperature sensor is 31 or less continuously for 5 s. |
Temperature sensor. Control PWB. |
| 7900 | Drum EEPROM error No response is issued from the device in reading/writing for 5 ms or more and this problem is repeated 5 times successively. Mismatch of reading data from 2 locations occurs 8 times successively. Mismatch between writing data and reading data occurs 8 times successively. |
DR PWB. Connect left PWB. Control PWB. |
| F000 | Communication error between Control PWB and Operation PWB | Control PWB. Operation PWB. |
| F010 | Control PWB checksum error | Control PWB. |
| F020 | Control PWB RAM check sum error | Main memory (RAM). |
| F040 | Communication error between Controller and Print engine | Control PWB. |
| F041 | Communication error between Controller and Scan engine | Control PWB. |
| F050 | Print engine ROM checksum error | Control PWB. |
| F051 | Scan engine ROM checksum error | Control PWB. |
проблема с бункером отработки.
| Назначен ответственным: | dyachenko |
| Создано: | Denis_1985 в Пнд, 01.08.2011 — 14:39 |
| Статус: | Закрыт | Тип запроса: Проблема | Приоритет: Высокий |
| Case ID: | Принтеры Kyocera: 578-712 |
| Последнее изменение: | Пнд, 01.08.2011 — 17:05 |
добрый день. Столкнулся с такой проблемой. После некоторого времени эксплуатации принтера fs-4020dn он выдает сообщение на дисплее- Проверьте бункер отработки. Бункер вытрусил, вытер горлышко, вставляю и опять такое же сообщение, после нескольких манипуляций такого рода становится все нормально. Затем, после продолжения работы, выходит очень громкий звук/скрежет, как будто шестерни не попадают друг в друга. Вытаскиваю картридж, снимаю фотобарабан, все шестерни, шнек, вся спираль забита тонером, как сыпучим, так и незначительными кусками какбы спресованного тонера, вычищаю все это, собираю, вставляю. После очистки все работает, но через недели 2 все заново ломается. купил ремкомплект, заменил узел связанный с отработкой. Поставил новый картридж. пару недель, может три поработал и опять сообщение проверьте бункер отработки. И еще в обоих случаях заметил, что на стыке шестерни фотобарабана и корпуса картриджа присутствует как бы вытертость пластмассы и шестерня на фотобарабане не попадает на соседнюю. Что это может быть и как это решать? Принтер дорогой. не все же время мне покупать ремкомплекты и заменять узлы, вышедшие из строя по неизвестным мне причинам. Помогите. Заранее спасибо.
Информация об оборудовании пользователя
Ответы
Принтер проверяет переполнение бункера с помощью оптического датчика, направленного на горлышко ёмкости для отработки. Если просто вытряхивать отработанный тонер — горлыко изнутри покрывается тонером и датчик выдаёт сигнал. Если уж вытряхиваете тонер — надо протереть горлышко изнутри.
Однако при нормальной эксплуатации вытряхивать ничего не нужно — в комплеке с каждым оригинальным тонер-контейнером прилагается пустая ёмкость. Объёма банки для отработки с большим запасом хватает на работу с оригинальным тонер-контейнером.
Такого регулярного переполнения отработки при оригинальном тонере быть не должно. Если использовался оригинальный тонер — нельзя исключить неправильную работу электроники.
Если у Вас возникают подозрения по поводу неправильной работы — рекомендуем обращаться в авторизованный сервис (список находится здесь — http://kyocera-products.ru/service/service-centers). Такой путь решения будет эффективнее самостоятельных попыток исправления. Например, наши авторизованные сервисы имеют не только ремкомплекты в сборе, но и отдельно узлы фотобарабана, проявки, платы и т.д. — для вашего принтера можно было поставить только блок фотобарабана. Причём узел фотобарабана в FS-4020 имеет гарантию 3 года или 300 тысяч страниц.
В общем, рекомендуем обратиться в сервис-центр для диагностирования причин, принятия решения по поводу возникновения выработки на пластике, определения мер по ремонту и принятия решения о возможности починки по гарантии.
Источник
Как Сбросить ошибку С7990 на Аппаратах KYOCERA
Сброс ошибки С7990 на аппаратах Kyocera FS-1030MFP, FS-1130MFP, FS-1035MFP, FS-1135MFP, Kyocera Ecosys M2030dn, M2035dn, M2530dn, M2535dn, а также ECOSYS M2135dn, M2040dn, M2635dn, M2635dw, M2540dn, M2540dw, M2735dn, M2835dw.
Пользователи Kyocera сталкиваются с ошибкой С7990. Она возникает очень внезапно и в самый неподходящий момент. Ошибка С7990 не несет в себе ничего плохого. И вам не стоит переживать о больших тратах на ремонт или покупке новой МФУ.
Сброс ошибки С7990 Kyocera
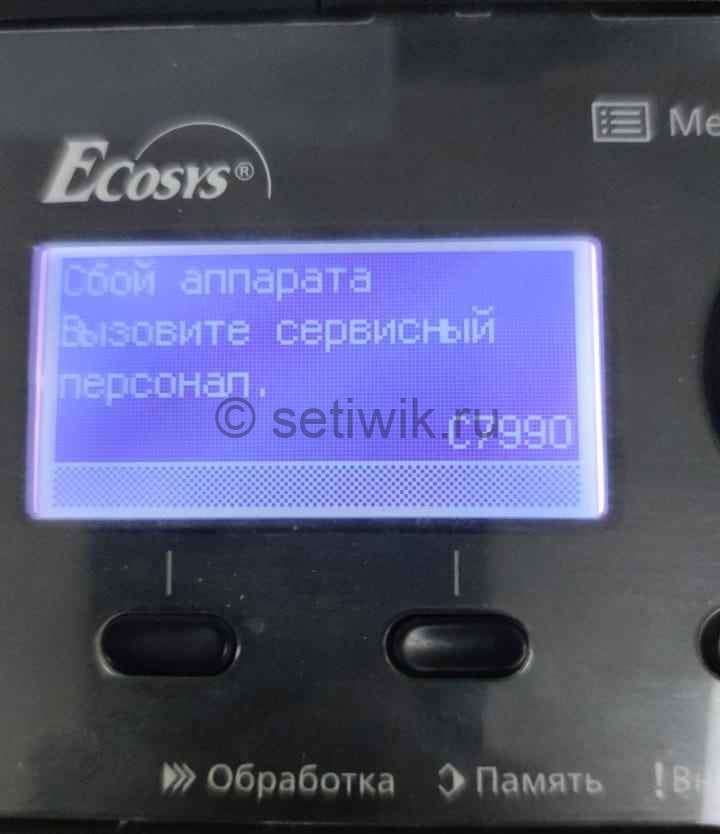
Ошибка С7990 — это сообщение говорит о том, что переполнился бункер отработанного тонера. И его требуется очистить.
 Пример ошибки 7990
Например в аппаратах Kyocera M3040dn бункер отработанного тонера находится сбоку и его очень просто очистить. Достаточно достать контейнер и вытрусить его.
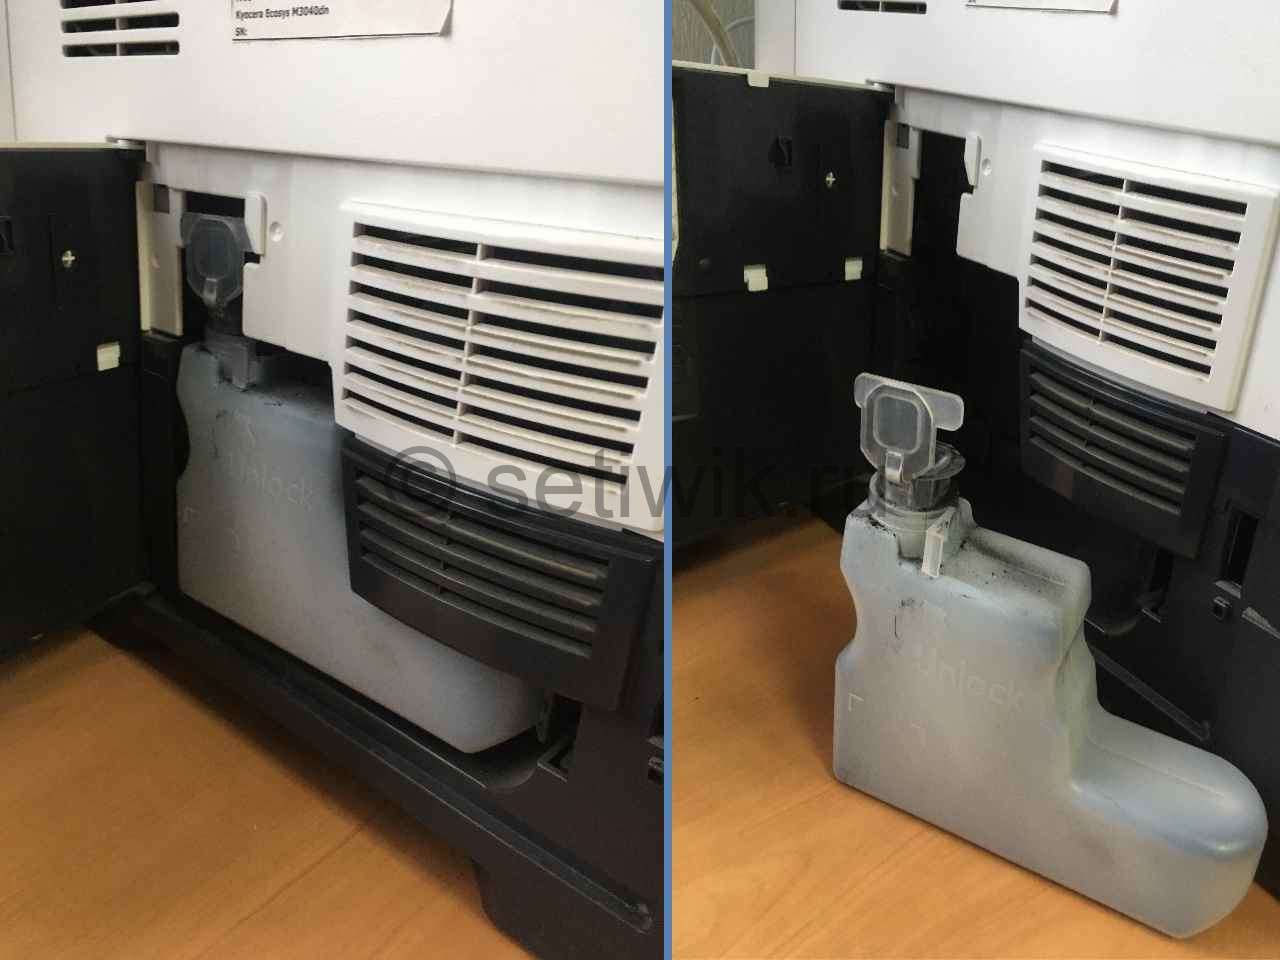 Бункер отработанного тонера Kyocera 3040dn
А вот бункер отработки некоторых моделей выдают ошибку С7990. И бункер отработанного тонера находится в блоке фотобарабана (Drum-Unit или барабан).
Первый вариант сброса ошибки С7990
Этот вариант подойдет для некоторых моделей Kyocera. Делается это очень просто:
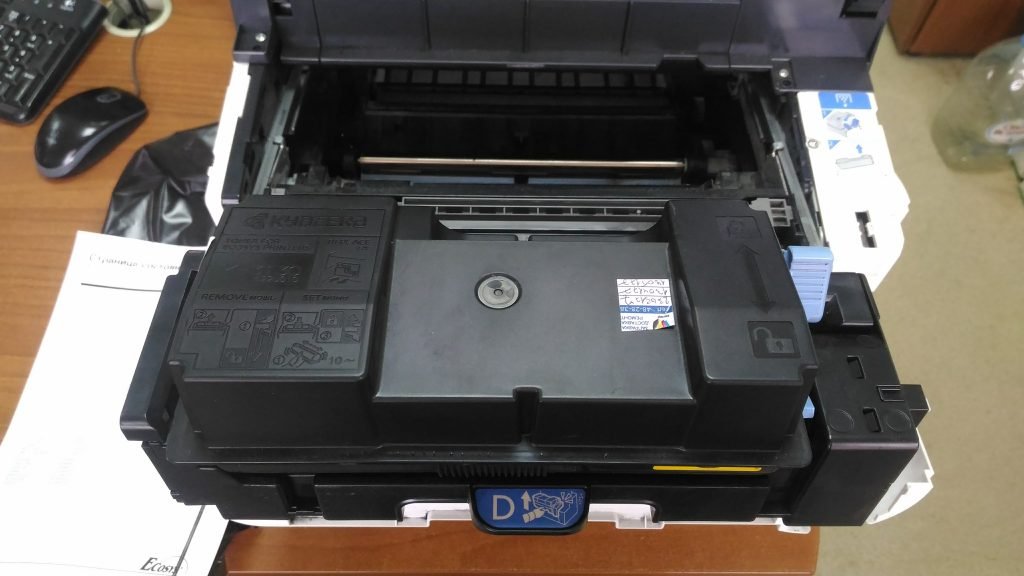
- Первое что требуется сделать это открытье переднюю крышку, как показано на рисунке:
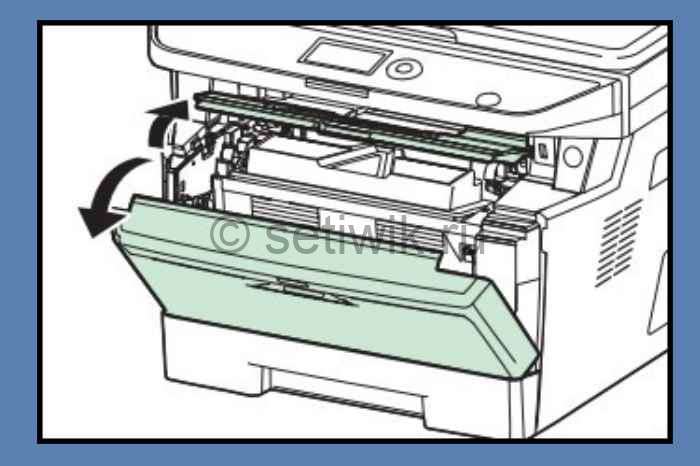 Откройте переднюю крышку
Далее вытащите картридж с блоком проявки из МФУ. Можно отдельно, а можно и вместе.
 Вытащите узел проявки из МФУ
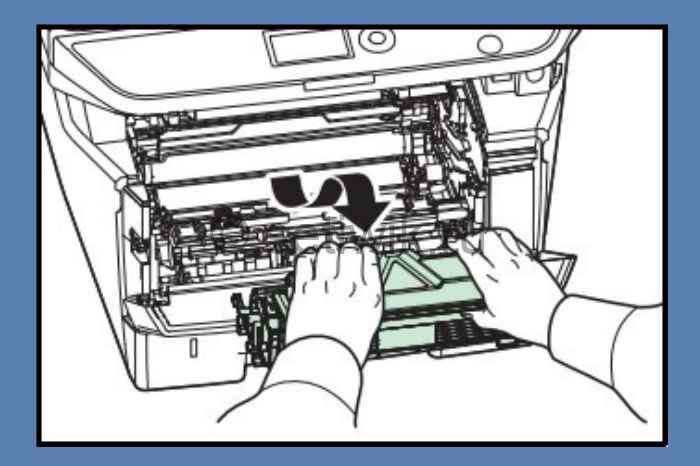
Теперь извлеките узел фотобарабана из МФУ, удерживая за зеленые или синие рычаги обеими руками.
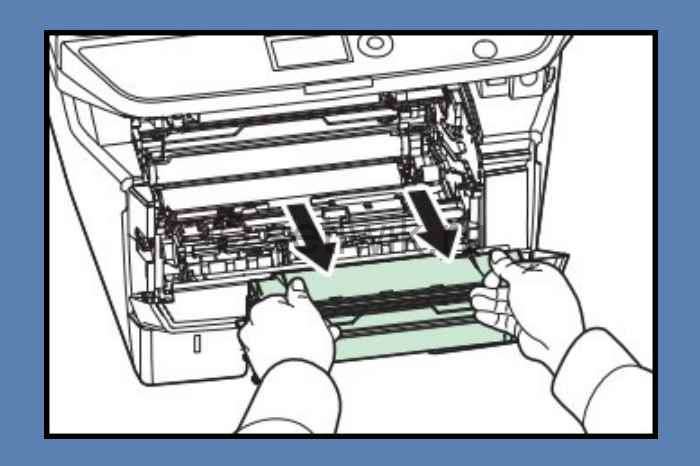 Извлеките узел барабана из МФУ
Внимание!
Никогда не оставляйте узел барабана на свету более чем на 5 мин. Так как он очень чувствителен к свету и может выйти из строя.
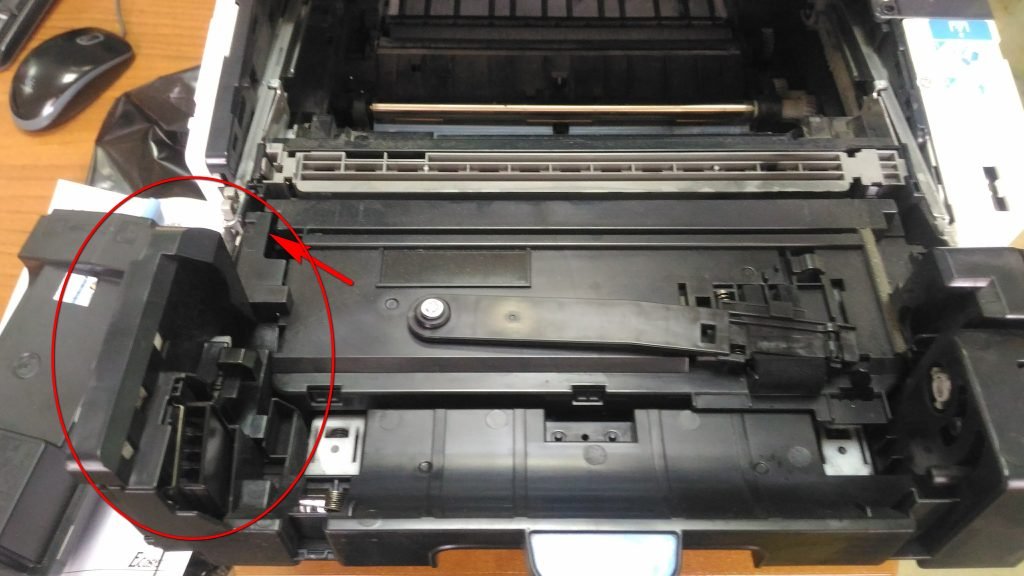
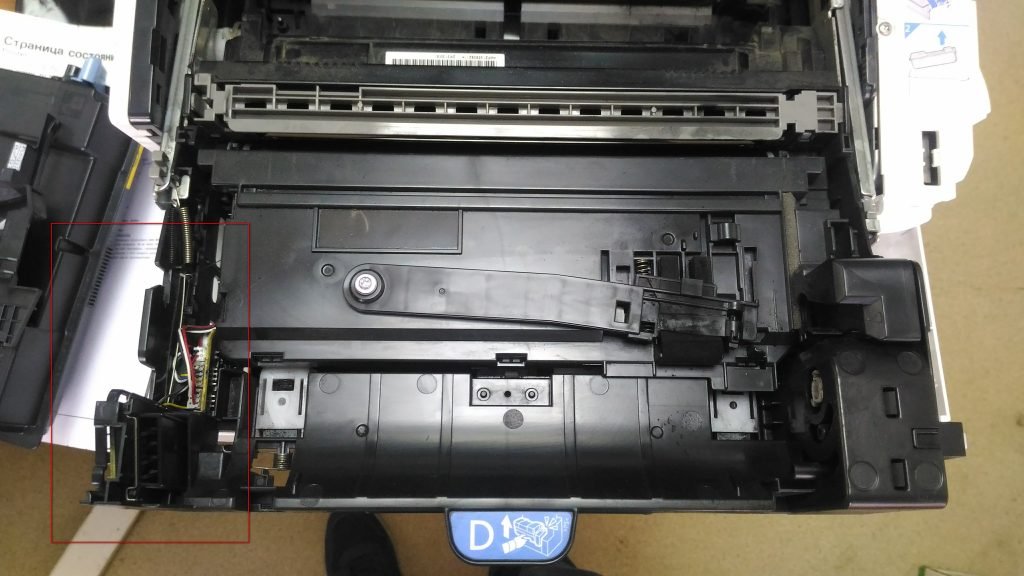
После того когда вы достали узел барабана, вам требуется найти 2 крышечки на этом блоке. На фото они отмечены красными прямоугольниками.
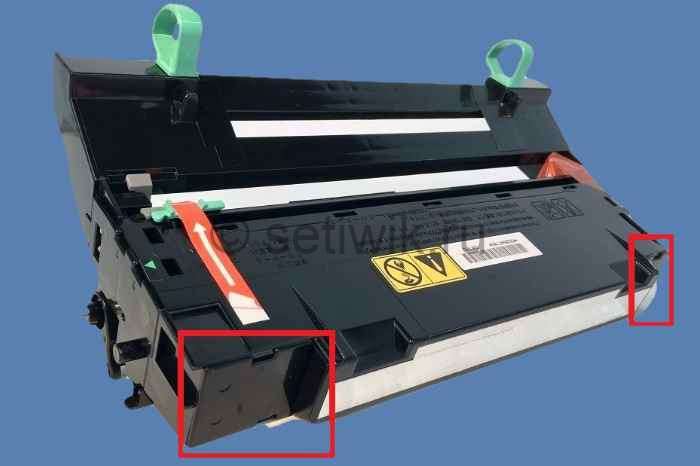 Крышки на узле барабана Kyocera
На крышках стрелками указаны защелки, которые требуется отстегнуть. Делается это маленькой отверткой или ножницами. Теперь аккуратно отстегиваем защелки и вытаскиваем крышки. Все эти манипуляции производить крышками в вверх. Так как если отстегнуть крышку которая смотрит в низ, то отработанный тонер посыпется на пол.
После того как крышки отстегнуты содержимое барабана аккуратно вытряхиваем в целый (без дырок) мусорный пакет.
Внимание!
Тонер это летучий мелкодисперсный порошок, может представлять опасность для здоровья человека, особенно при вдыхании! Все работы желательно производить в медицинской маске.
После того как вы очистили бункер от отработанного тонера. Одеваем крышки обратно, собираем все в обратной последовательности и ставим на место.
Выключаем и включаем аппарат. Ошибка С7990 сбросилась и МФУ Kyocera готов к работе!
Второй вариант сброса ошибки С7990
Очистка отработанного тонера МФУ Kyocera если нет крышек для очистки
Например в таких аппаратах как Kyocera ECOSYS M2135dn, M2040dn, M2635dn, M2635dw, M2540dn, M2540dw, M2735dn, M2835dw. На этих моделях установлен блок фотобарабана нового типа. И на экране появляется надпись «Вызовите сервисный персонал с7990»
В этих барабанах нет крышки и очистки отработанного тонера. И на первый взгляд очистка практически невозможна. Но это всего лишь на первый взгляд. Принцип узла фотобарабана такой же. И вам всего лишь требуется просверлить в нем отверстие диаметром до 2 см (дырку).
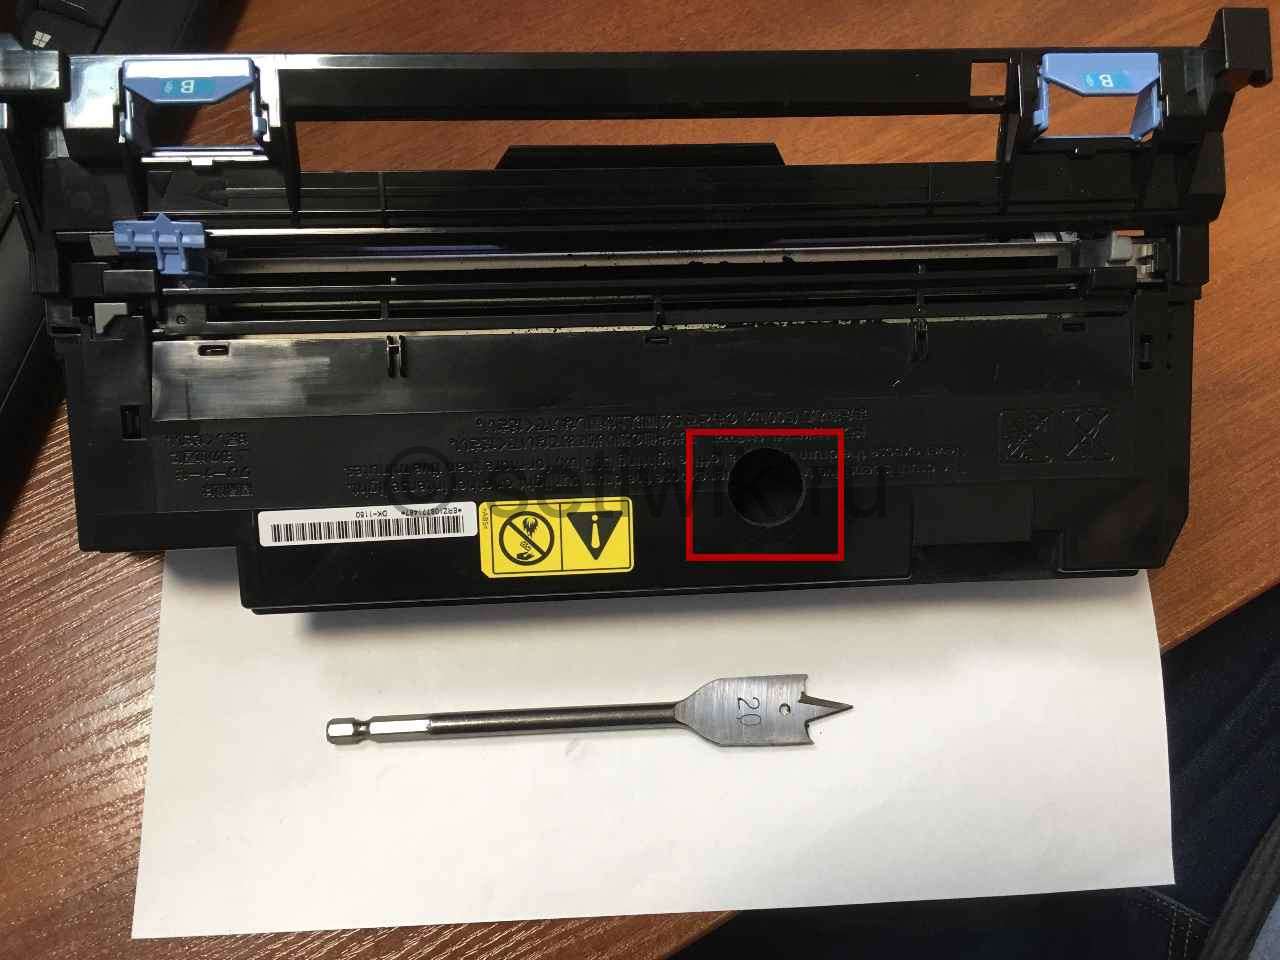 Сверление отверстия для удаления отработанного тонера Kyocera
После того как вы сделали отверстие и очистили тонер. Заклейте отверстие изолентой или армированным скотчем. Как показано на фото.
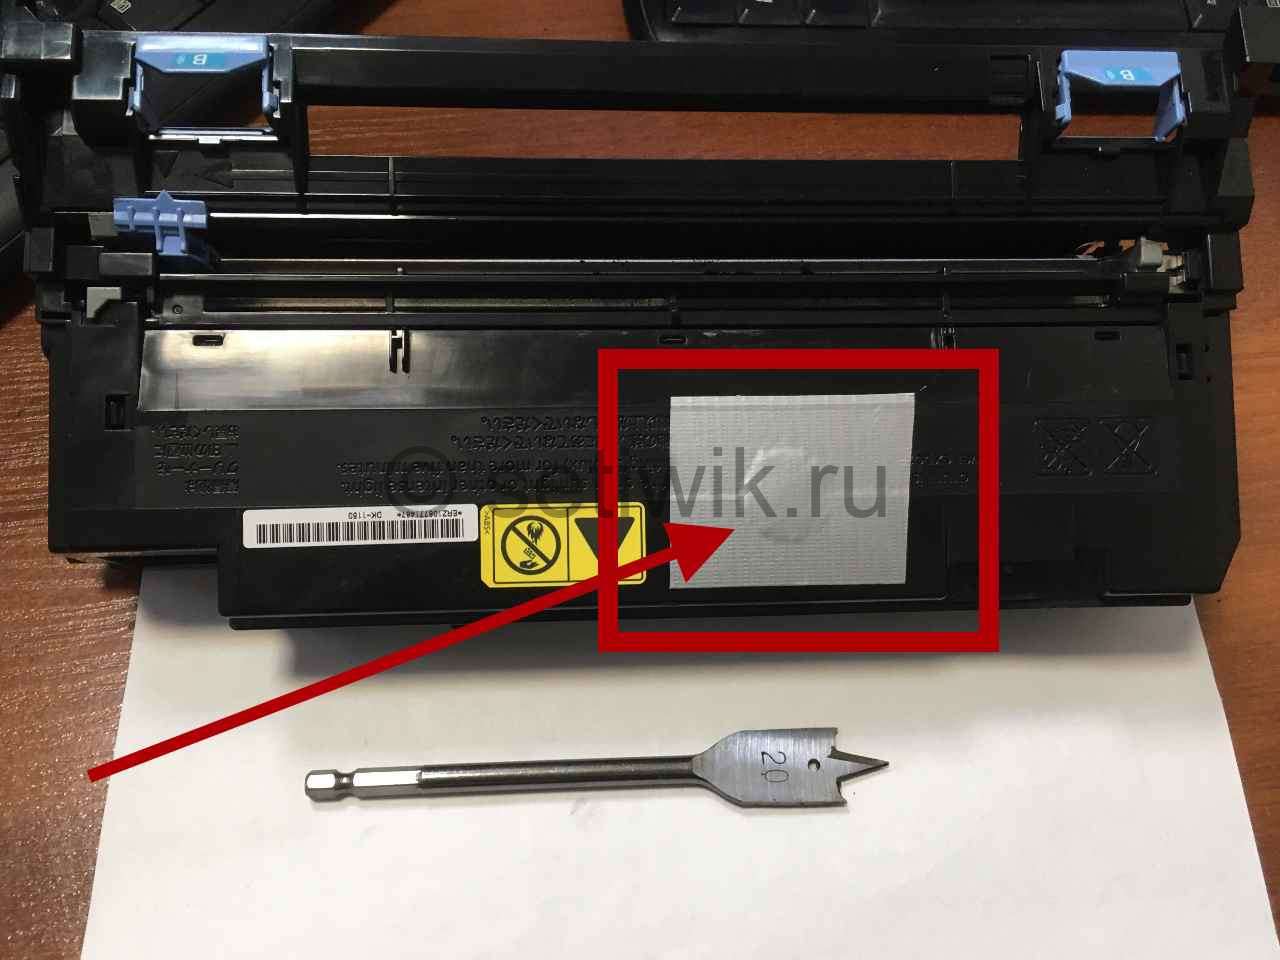 заклеенное отверстие для удаления отработанного тонера МФУ Kyocera
После очистки и заклейки фотобарабана, верните все обратно. Выключите и включите аппарат. Ошибка С7990 сбросилась и МФУ готова к работе!
Заключение
Вот и все я рассказал как легко и просто сбросить ошибку С7990 на различных МФУ Kyocera. Надеюсь эта статья поможет вам сэкономить деньги на сервисном центре. Если есть вопросы или где-то нашли ошибку оставляйте комментарии не стесняйтесь.
Источник
Kyocera 3040 добавьте тонер
Суть проблемы: При включении постоянно пытается подмешать тонер в блок проявки. Никакие действия сделать в дальнейшем не дает.
Подкачка тонера включается по команде платы управления после получения сигнала низкого уровня с датчика тонера. Диагностика датчика проста — положить на него металлическую монетку. При исправном датчике подкачка должна прекратиться. Особое внимание уделите разъемам в блоке проявки, поскольку они могут быть нарушены или загрязнены.
 Недавно столкнулся с тем, что Kyocera FS-1128(1028) стала печатать бледно и с пробелами. МФУ не выдавал никаких признаков, что закончился тонер. Открыл крышку, достал картридж, по весу – картридж полный. Поставил все назад. Стал нормально печатать. Буквально пол дня и снова пробелы в печати. Заменил картридж на новый. Все повторилось. То есть тонер из картриджа не добавлялся в блок проявки. Как заставить добавить тонер в блок проявки.
Для входа в меню:
Логин – 2800
Пароль – 2800
- На панеле управления в левом углу нажимаем “Системное меню/счетчики”
- Выбираем “Настройки/обслуживание “
- “Настройка сервиса”
- “Новый узел проявки”
- Подтверждаем уверенность в своих действиях, выбираем “Да”
- Выключаем МФУ кнопкой On/Off
- Включаем, начинается процесс добавление тонера, которое высвечивается на экране. Процесс добавление может занять от пары минут до получаса
После этой процедуры МФУ стала печатать без пробелов.
Добавить комментарий Отменить ответ
Для отправки комментария вам необходимо авторизоваться.
Столкнулся с бедой — принтер Kyocera FS-4200dn пишет — замените тонер. Клавиатура при этом не работает (не дает ничего нажать), только справка открывается, в которой описано, как заменить картридж. Пробовал поставить другой — ни помогло.
В поисковиках нашел варианты решений:
1. Очистить бункер отработанного тонера — не помогло
2. Заменить картридж — не помогло
Полез разбирать и смотреть, оказало датчик под узлом проявки засыпало тонером, и он как то не правильно себя вел. Очистил — все работает. Рассмотрим, что было сделано.
Исправляем ошибку Kyocera FS-4200 замените тонер
Выключаем принтер !
Внимание, разборку Вы осуществляете на свой страх и риск. Автор ответственности за испорченное имущество ответственности не несет. Статья носит ознакомительный характер и ни в коем случае не побуждает Вас лезть туда, куда вы не знаете. Если Вы не уверены в своих действиях — обратитесь в сертифицированный сервисный центр!
Открываем переднюю крышку и выкатываем DrumUnit
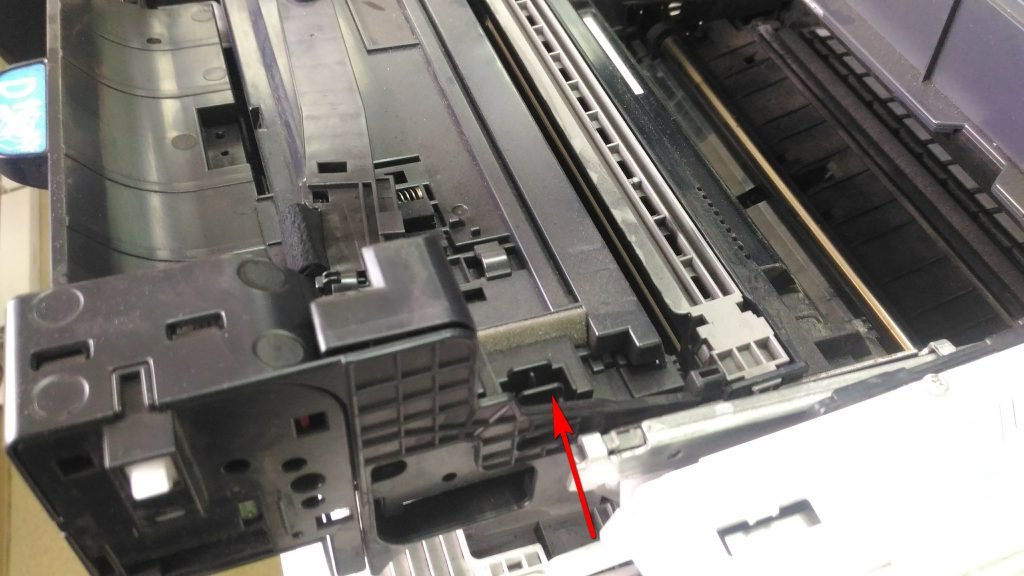
Далее необходимо снять защитную крышку слева, для этого поднимаем ее где указывает стрелочка и отодвигаем ее от себя:
У Вас должно получиться вот так. Сразу можно отключить провод, идущий к узлу проявки, это самый ближний разъем к Вам:
Теперь смотрим на правую сторону. Чтобы достать узел проявки из DrumUnit, необходимо надавить на защелку, которая отмечена стрелкой и потянуть его вверх.
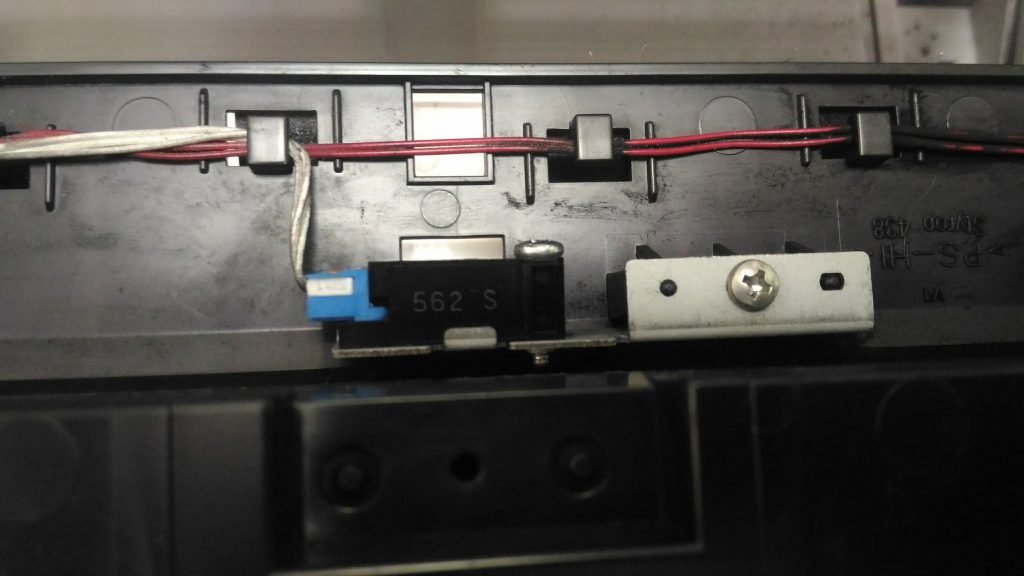
После снятия узла проявки я увидел вот такое. То ли пользователи так ставили картридж в него, то ли это минус конструкции, что он просыпается, но это совсем не порядок. Слева видим датчик тонера (как я понял), который тоже весь в нем (это я уже с него немного сдул, так он был такой же, как и справа.
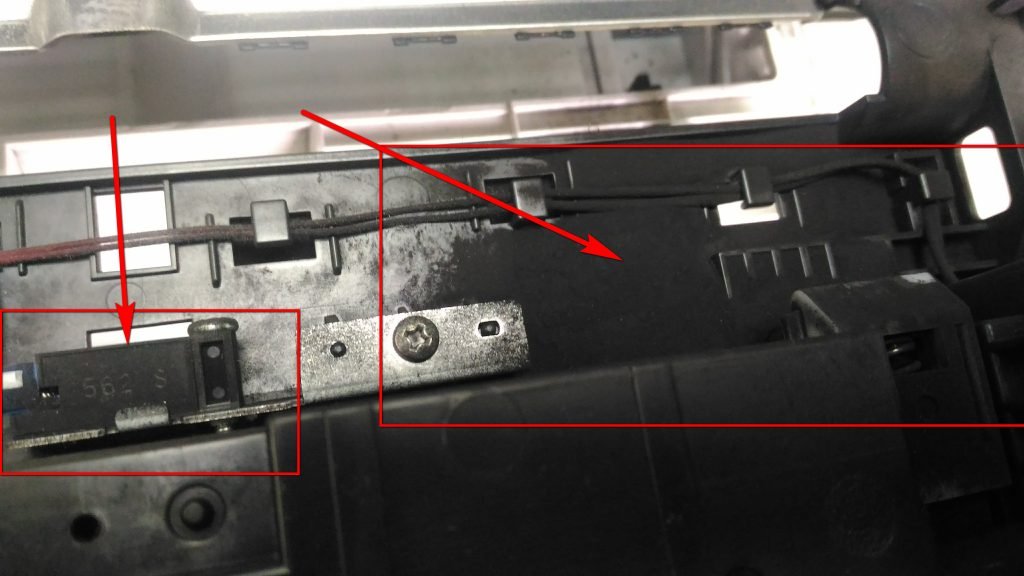
Чистим все это дело и собираем обратно (в обратной последовательности), ставим картридж на место и включаем принтер.
После сборки обратно, принтер добавил себе тонера и радостно сказал «Готов к печати«.
Источник
kyocera m3040dn добавьте тонер
Суть проблемы: При включении постоянно пытается подмешать тонер в блок проявки. Никакие действия сделать в дальнейшем не дает.
Подкачка тонера включается по команде платы управления после получения сигнала низкого уровня с датчика тонера. Диагностика датчика проста — положить на него металлическую монетку. При исправном датчике подкачка должна прекратиться. Особое внимание уделите разъемам в блоке проявки, поскольку они могут быть нарушены или загрязнены.
Недавно столкнулся с тем, что Kyocera FS-1128(1028) стала печатать бледно и с пробелами. МФУ не выдавал никаких признаков, что закончился тонер. Открыл крышку, достал картридж, по весу – картридж полный. Поставил все назад. Стал нормально печатать. Буквально пол дня и снова пробелы в печати. Заменил картридж на новый. Все повторилось. То есть тонер из картриджа не добавлялся в блок проявки. Как заставить добавить тонер в блок проявки.
Для входа в меню:
Логин – 2800
Пароль – 2800
- На панеле управления в левом углу нажимаем “Системное меню/счетчики”
- Выбираем “Настройки/обслуживание “
- “Настройка сервиса”
- “Новый узел проявки”
- Подтверждаем уверенность в своих действиях, выбираем “Да”
- Выключаем МФУ кнопкой On/Off
- Включаем, начинается процесс добавление тонера, которое высвечивается на экране. Процесс добавление может занять от пары минут до получаса
После этой процедуры МФУ стала печатать без пробелов.
Добавить комментарий Отменить ответ
Для отправки комментария вам необходимо авторизоваться.
Новые модели принтеров и МФУ Kyocera (выпущенные после 2013 года) при использовании неоригинальных картриджей без чипа или заправке картриджей блокируются:
— блокируется функция печати
— появляется уведомление на дисплее об ошибке и/или красная световая индикация
Тем не менее производитель, компания Kyocera, допускает работу с устройством и информация о сбросе ошибки указана в инструкции по эксплуатации. Необходимо выполнить одновременное нажатие на две кнопки и удержание в течение 3-4 секунд — до момента исчезновения надписи предупреждающей надписи на устройствах с экраном и/или появления зеленой индикации предупреждающих диодов.
В большинстве случаев для сброса информации об ошибке необходимо нажать кнопки [Сброс] (оранжевая) и [Ок] за исключением моделей серии Aquarius:

Сброс информации в МФУ Kyocera FS-1020mfp — кнопка [Стоп/Сброс] и кнопка выбора

Сброс информации в МФУ Kyocera FS-1025mfp, Kyocera FS-1120mfp — кнопки [Стоп/Сброс] и [OK]

Сброс информации в МФУ Kyocera FS-118MFP


Сброс информации в принтерах Kyocera FS-1040, Kyocera FS-1060DN — кнопки [GO] и [Отмена]
Расположение кнопок в зависимости от модели устройства Kyocera:

Сброс информации в МФУ Kyocera M3040DN, M3540DN

Сброс информации в МФУ Kyocera M2030DN, M2035DN, M2535DN

Сброс информации в принтерах Kyocera FS-2100DN, FS-4100DN, FS-4200DN

Сброс информации в Ecosys P2035d, FS-1120D, FS-1320dn, FS-1110

Сброс информации в FS-1370dn, P2135dn


Сброс информации в P3045dn /P3050dn /P3055dn /P3060dn/ P4040DN


Сброс информации в P5021cdn/P5021cdw
Сброс информации в P5026cdn/P5026cdw
Сброс информации в МФУ Kyocera M5521cdn/ M5521cdw

Сброс информации в МФУ Kyocera M6030cdn/M6530cdn

Сброс информации в TASKalfa 1800

Другие устройства Kyocera
В остальных устройствах: выпускавшихся ранее, новых цветных или серии TASKalfa информация носит предупреждающий характер, работа принтера или МФУ не блокируются.
Источник
-
Catalog
-
Sign In
-
Contacts
-
Forum
-
Eng
- Error Codes
- Kyocera
- FS4300DN
- Code 7900
- Code: 7900
- Description: Drum unit EEPROM error
No response is issued from the device in reading/writing for 5 ms or more and this problem is repeated five times successively. Mismatch of reading data from two locations occurs eight times successively. Mismatch between writing data and reading data occurs eight times successively. - Causes: Defective connector cable or poor contact in the connector. Defective drum unit.
- Remedy: Defective connector cable or poor contact in the connector. Reinsert the connector. Also check for continuity within the connector cable. If none, replace the cable. Drum unit and drum connect PWB (YC1) Drum connect PWB and relay-L PWB (YC3) Relay-L PWB and engine PWB (YC15)
Defective drum unit. Replace the drum unit.
Code
Contents
7800
Broken temperature sensor
wire
Input from temperature sensor
is 0.3 V (A/D value) or less
7810
Short-circuited tempera-
ture sensor wire
Input from temperature sensor
is 0.3 V (A/D value) or more
7900
Drum EEPROM error
No response is issued from
the device in reading/writing
for 5 ms or more and this
problem is repeated five times
successively.
Related parts
Outer temperature
sensor
Main/Engine PWB
Outer temperature
sensor
Main/Engine PWB
DR PWB
Main/Engine PWB
1-4-33
2NC/2NF/2NG/2NN/3P7/3P8/3P9
Check procedures/
corrective measures
1. Confirm that the wiring connector is
firmly connected and, if necessary,
connect the connector all the way in.
Temperature sensor and main/engine
PWB (YC6)
2. If the wiring is disconnected, shorted or
grounded, replace the wiring.
3. Replace the temperature sensor.
1. Check the main/engine software and
upgrade to the latest, if necessary.
2. Replace the main/engine PWB (see
page 2-2-11).
1. Confirm that the wiring connector is
firmly connected and, if necessary,
connect the connector all the way in.
DR PWB and main/engine PWB (YC9)
2. If the wiring is disconnected, shorted or
grounded, replace the wiring.
3. Replace the Drum unit (see page 1-5-
40).
1. Check the main/engine software and
upgrade to the latest, if necessary.
2. Replace the main/engine PWB (see
page 2-2-11).
Содержание
- 1 Самые распространенные коды ошибок принтеров Kyocera
- 2 Код C7990
- 3 Способ №2. Замена чипа
- 4 Другие неисправности
- 5 Способ №1. Сброс счетчика страниц / тонера
- 6 Сброс ошибок у принтеров Kyocera своими руками
- 7 Способы решения проблемы
- 7.1 Сброс сообщения о неоригинальном тонере на Kyocera fs 1040
- 8
- 9
- 10
- 11
- 12
- 13
- 14 Значения мигания индикаторов
Слово «ошибка» на английском языке будет «ошибка», поэтому большинство кодов начинаются с заглавной E.
Итак, какие ошибки могут возникать в принтерах Kyocera FS 1020MFP японского производства:
1.E-0002. Указывает, что картридж с тонером не подходит для региональных спецификаций. Вам нужно использовать другой картридж.
2.E-0003. Эта ошибка указывает на то, что память сканера заполнена. Будут доступны только самые последние отсканированные изображения. Чтобы сбросить ошибку E-0003, необходимо очистить память сканера. Для этого нажмите Стоп / Сброс.
Стирание памяти
3.E-0007. Значит, для печати не хватает чернил. Исправить код 07 просто — нужно добавить тонер.
4. При открытой задней или передней крышке МФУ Kyocera не работает и выдает код ошибки E-0008.
5. После печати или копирования большого количества бумаги (сто листов), если лоток не опорожняется, отображается сообщение об ошибке принтера Kyocera E-0009. Вам нужно удалить листы и нажать кнопку Старт, чтобы продолжить работу.
6. Иногда выдается код E-0012, что означает, что задача не может быть выполнена из-за нехватки оперативной памяти. Для решения этой проблемы необходимо изменить разрешение печати с 1200 на 600. Порядок действий описан в инструкции.
7. Когда появится код E-0014, загрузите бумагу нужного формата во входной лоток. Размер листов определяется драйвером принтера.
8. Если вы забыли подключить сетевой или USB-кабель, принтер отобразит код ошибки E-0015. Нужно нажать Stop / Reset, подключить кабель и снова нажать эту кнопку.
Замена картриджа с тонером
В японских принтерах Kyocera FS 1020MFP могут возникать ошибки, как описанные в предыдущем разделе, так и конкретные ошибки. Все коды можно найти в инструкции по эксплуатации.
Код C7990
Этот номер ошибки на моделях FS 1020MFP указывает на сигнал о переполнении тонера.
Ошибка C7990
Причин возникновения ошибки C7990 может быть три:
• неисправна плата PWB;
• неисправен датчик количества краски;
• бункер действительно полон — рекомендуется заменить барабан.
Барабан
В первых двух случаях необходимо обратиться в сервисный центр.
В третьем случае появления кода C7990, если ресурс барабана еще не исчерпан, можно очистить бункер для краски. Делают они это так:
1. Откройте переднюю крышку и выньте блок проявки.
2. Подойдите к барабану.
3. Осторожно откройте крышку бункера и удалите краску.
4. Соберите прибор в обратном порядке.
Как видите, ошибку принтера Kyocera C7990 легко устранить самостоятельно, а обращаться к специалистам нужно только тогда, когда карты действительно плохие.
Способ №2. Замена чипа
Альтернативный вариант сброса счетчика вручную — замена микросхемы. Вы можете заправлять картридж принтера KyoceraFS-1040 сколько угодно, но благодаря установке нового защитного чипа устройство не распознает замену расходного материала.
Ошибочно многие пользователи считают неисправностью, когда на корпусе принтера Kuoser 1040 горит красная кнопка с сообщением «Внимание» и принтер не печатает присланные ему документы. В этом материале мы рассмотрим, в каких случаях это происходит, что делать, как быстро все отремонтировать в домашних условиях, не обращаясь в сервисный центр. Инструкции применимы ко многим моделям Kyocera. Например, fs1040 взят из-за его популярности.
Другие неисправности
Также возможно появление таких кодов:
• C-F040. Вам нужно выключить и снова включить устройство, нажав кнопку питания.
• J-0511. Код указывает на то, что бумага застряла под задней крышкой. Инструкции описывают, как удалить бумагу в соответствующем разделе.
• ПФ. Принтер предложит вам добавить бумагу во входной лоток.
Как видите, принтеры японской компании Kyocera выходят из строя редко. Чаще всего ошибки возникают из-за неправильных или неосторожных действий. Вы можете исправить их самостоятельно, но если не уверены в своих силах, лучше проконсультироваться со специалистом.
Способ №1. Сброс счетчика страниц / тонера
Чтобы запустить принтер KyoceraFS-1040, просто сбросьте счетчик страниц / тонера, удерживая нажатыми кнопки «Отмена» и «GO».
Единственная проблема заключается в том, что удаление предупреждения принтера об использовании неоригинального картриджа может привести к аннулированию гарантии. Так как устройство записывает абсолютно все ошибки в «Журнал событий».
Сброс ошибок у принтеров Kyocera своими руками
Сбрасывая ошибки в принтерах Kyocera, необходимо понимать ряд мер, которые опытный пользователь может потенциально предпринять для восстановления и запуска печатающих устройств без обращения в сервисный центр.
Ошибка №
Это вызывает
Решение
E-0001
В принтер установлен совместимый картридж или повреждена микросхема расходных материалов. Проблему можно решить несколькими способами:
1 установите оригинальный картридж;
2 замена поврежденного чипа;
3 прошивки принтера — так что любой картридж можно устанавливать в принтер неограниченное количество раз;
4 сброс ошибки — держать нажатыми несколько секунд кнопки «Режим» и «Сброс».
E-0002
Регион используемого картриджа не соответствует техническим характеристикам принтера. Проблему можно решить несколькими способами:
1. Установите картридж, соответствующий региону принтера;
3 прошивки принтера.
E-0003
Память печатающего устройства заполнена. Распечатайте уже отсканированные документы или сбросьте операцию с помощью соответствующей кнопки.
E-0007
В картридже закончился тонер. Замените картридж на новый, оригинальный, совместимый или заправьте расходный материал.
E-0008
Одна из крышек принтера не закрыта. Закройте переднюю и заднюю крышки принтера до щелчка.
E-0009
Лоток для печати заполнен. Удалите отпечатанную бумагу и возобновите печать, нажав кнопку «Пуск».
E-0012
Память принтера заполнена. Измените разрешение печати до 600 dpi.
E-0014
Установлен формат бумаги, не поддерживаемый принтером. Замените бумагу листами совместимого размера.
Иногда функциональность принтера может быть ограничена на программном уровне.
Для расширения диапазона форматов рекомендуется обновить программное обеспечение печатающего устройства.
E-0015
1. В принтере нет питания.
2. Сетевой кабель не подключен.
3. На ПК нет драйверов. Проверьте целостность сетевого кабеля.
При необходимости установите драйвер.
E-0018
Выбранный файл отсутствует в очереди печати. Сбросьте операцию, нажав кнопку «Сброс». Затем выберите новый файл и продолжите печать.
E-0019
Формат печати не поддерживается принтером. Сбросьте операцию, нажав кнопку «Сброс».
J-0511
Бумага замята. Осторожно удалите оставшуюся бумагу из корпуса принтера.
ПФ
Во входном лотке нет бумаги. Загрузите бумагу во входной лоток и возобновите печать, нажав кнопку «Пуск».
Способы решения проблемы
Сброс сообщения о неоригинальном тонере на Kyocera fs 1040
Если вышеперечисленные варианты не сработали, то, скорее всего, проблема в самом картридже. Дело в том, что он оснащен датчиком уровня тонера и чипом, отслеживающим количество отпечатанных листов. Когда расходный материал заканчивается или, согласно чипу, он должен закончиться, печать блокируется до тех пор, пока он не будет заменен новым картриджем. Именно это и произошло в нашей ситуации.
Есть три варианта решения проблемы:
- Купите новый картридж и продолжайте его печатать. Это недешево.
- После каждой пополнения порошка следует заменять чип, который начнет отсчет количества распечатанных документов с нуля.
- Сбросить счетчик на микросхеме. Сделать это несложно, но делать это нужно каждый раз при включении устройства.
Инструкции по сбросу:
- Включите устройство.
- Подождите, пока двигатель остановится и красный свет не начнет мигать.
- Одновременно нажмите кнопки «Пуск» и «Отмена» на 5-7 секунд».
- Нажмите и удерживайте, пока красный и зеленый не начнут мигать по очереди.
- Ждем завершения процесса.
- Пытаюсь распечатать.
Значения мигания индикаторов
- Ничего не горит и уведомлений нет, значит, устройство полностью готово к работе.
- Медленное мигание кнопки означает, что в лотке нет бумаги или в картридже низкий уровень пыли.
- Индикатор мигает быстрее: внутри устройства застрял лист бумаги, лоток окончательной обработки заполнен, и распечатки невозможно вставить, вся память принтера заполнена и используются неоригинальные расходные материалы.
- Индикатор горит и не гаснет. Проверьте, закрыты ли крышки. Тонер для печати, возможно, уже закончился.
Если у вас возникли трудности с определением причин появления сообщения «Внимание», вы можете воспользоваться специальным программным обеспечением от инженеров компании — «Kyocera Client Tool». Эта утилита поможет вам более точно диагностировать проблему. Вы можете найти его на сайте компании или на диске с драйверами принтера.
Источники
- http://printergid.ru/neispravnosti/oshibki-kyocera
- https://dudom.ru/kompjutery/kyocera-1040-indikacija-oshibok/
- https://window-10.ru/ecosys-fs-1020mfp-oshibka-e7/
[свернуть]
Tech Support 24/7
Ask a Tech Specialist Online
Connect with the Expert via email, text or phone. Include photos, documents, and more. Get step-by-step instructions from verified Tech Support Specialists.

On this page, you will find more information about the most common causes and most relevant solutions for the Printer error ‘C7900’. Do you need help straight away? Visit our support page.
Error information
What causes the C7900 error?
The Kyocera documentation indicates that error code ‘C7900’ is caused by the following problem: «Drum EEPROM Error Reading or writing to the EEPROM cannot be performed».
Do you think there is another cause for this error? Let others know in the comments.
How to solve Kyocera Printer error C7900
We’ve created a list of solutions which you can follow if you want to solve this Printer problem yourself. Do you need more help? Visit our support page if you need professional support with Printer right away.
Tech Support 24/7
Ask a Tech Specialist Online
Connect with the Expert via email, text or phone. Include photos, documents, and more. Get step-by-step instructions from verified Tech Support Specialists.
Have you found a solution yourself, but it is not in the list? Share your solution in the comments below.
Need more help?
Do you need more help?
Tech experts are ready to answer your questions.
Ask a question
- Code: 0100
- Description: Backup memory device error
- Remedy: Defective flash memory. Replace the main PWB and check for correct operation.
Defective main PWB. Replace the main PWB and check for correct operation.
- Code: 0120
- Description: MAC address data error For data in which the MAC address is invalid.
- Remedy: Defective flash memory. Replace the main PWB and check for correct operation.
Defective main PWB. Replace the main PWB and check for correct operation.
- Code: 0130
- Description: Backup memory read/write error (main PWB)
- Remedy: Defective flash memory. Replace the main PWB and check for correct operation.
Defective main PWB. Replace the main PWB and check for correct operation.
- Code: 0140
- Description: Backup memory data error (main PWB)
- Remedy: Defective flash memory. Replace the main PWB and check for correct operation.
Defective main PWB. Replace the main PWB and check for correct operation.
- Code: 0150
- Description: Backup memory read/write error (engine PWB) Detecting engine PWB EEPROM communication error.
- Remedy: Improper installation engine PWB EEPROM. Check the installation of the EEPROM and remedy if necessary.
Defective engine PWB. Replace the engine PWB and check for correct operation.
Device damage of EEPROM. Contact the Service Administrative Division.
- Code: 0160
- Description: Backup memory data error (engine PWB)
- Remedy: Defective EEPROM. Replace the engine PWB and check for correct operation.
Defective engine PWB. Replace the engine PWB and check for correct operation.
- Code: 0170
- Description: Billing counting error A checksum error is detected in the main and engine backup memories for the billing counters.
- Remedy: Data damage of EEPROM. Contact the Service Administrative Division.
Defective PWB. Replace the main PWB or the engine PWB and check for correct operation.
- Code: 0190
- Description: Backup memory device error (engine PWB)
- Remedy: Defective engine PWB. Replace the engine PWB and check for correct operation.
- Code: 0800
- Description: Image processing error JAM010x is detected twice.
- Remedy: Defective main PWB. Replace the main PWB and check for correct operations page 1-5-22).
- Code: 0840
- Description: Faults of RTC Unable to communicate with the RTC device normally. The RTC data is mismatched due to dead battery or shortcircuit with the metal part.
- Remedy: Other RTC device failure due to dead battery or short-circuit with the metal part. Restart the main unit and set the correct time from the operation panel. Repair it if the battery comes off from the main PWB.
Defective main PWB. Replace the main PWB and check for correct operation.
- Code: 1010
- Description: Lift motor error (60/55/50 ppm model only) After cassette 1 is inserted, lift sensor does not turn on within 10 s. This error is detected five times successively.
- Remedy: Defective bottom plate elevation mechanism in the cassette. Check to see if the bottom plate can move smoothly and repair it if any problem is found.
Defective connector cable or poor contact in the connector. Reinsert the connector. Also check for continuity within the connector cable. If none, replace the cable. Lift motor and engine PWB (YC13)
Defective drive transmission system of the lift motor. Check if the gears rotate smoothly. If not, grease the bushes and gears. Check for broken gears and replace if any.
Defective lift motor. Replace the lift motor.
Defective engine PWB. Replace the engine PWB and check for correct operation.
- Code: 1020
- Description: PF lift motor 1 error (paper feeder) After cassette 2 is inserted, PF lift sensor 1 does not turn on. This error is detected four times successively.
- Remedy: Defective bottom plate elevation mechanism in the cassette. Check to see if the bottom plate can move smoothly and repair it if any problem is found.
Defective connector cable or poor contact in the connector. Reinsert the connector. Also check for continuity within the connector cable. If none, replace the cable. PF lift motor 1 and PF main PWB (YC7)
Defective drive transmission system of the PF lift motor. Check if the gears rotate smoothly. If not, grease the bushes and gears. Check for broken gears and replace if any.
Defective PF lift motor. Replace the PF lift motor 1.
Defective PF main PWB. Replace the PF main PWB (Refer to the service manual for the paper feeder).
- Code: 1030
- Description: PF lift motor 2 error (paper feeder) After cassette 3 is inserted, PF lift sensor 2 does not turn on. This error is detected four times successively.
- Remedy: Defective bottom plate elevation mechanism in the cassette. Check to see if the bottom plate can move smoothly and repair it if any problem is found.
Defective connector cable or poor contact in the connector. Reinsert the connector. Also check for continuity within the connector cable. If none, replace the cable. PF lift motor 2 and PF main PWB (YC7)
Defective drive transmission system of the PF lift motor. Check if the gears rotate smoothly. If not, grease the bushes and gears. Check for broken gears and replace if any.
Defective PF lift motor. Replace the PF lift motor 2.
Defective PF main PWB. Replace the PF main PWB (Refer to the service manual for the paper feeder).
- Code: 1040
- Description: PF lift motor 3 error (paper feeder) After cassette 4 is inserted, PF lift sensor 3 does not turn on. This error is detected four times successively.
- Remedy: Defective bottom plate elevation mechanism in the cassette. Check to see if the bottom plate can move smoothly and repair it if any problem is found.
Defective connector cable or poor contact in the connector. Reinsert the connector. Also check for continuity within the connector cable. If none, replace the cable. PF lift motor 3 and PF main PWB (YC7)
Defective drive transmission system of the PF lift motor. Check if the gears rotate smoothly. If not, grease the bushes and gears. Check for broken gears and replace if any.
Defective PF lift motor. Replace the PF lift motor 3.
Defective PF main PWB. Replace the PF main PWB (Refer to the service manual for the paper feeder).
- Code: 1050
- Description: PF lift motor 4 error (paper feeder) After cassette 5 is inserted, PF lift sensor 4 does not turn on. This error is detected four times successively.
- Remedy: Defective bottom plate elevation mechanism in the cassette. Check to see if the bottom plate can move smoothly and repair it if any problem is found.
Defective connector cable or poor contact in the connector. Reinsert the connector. Also check for continuity within the connector cable. If none, replace the cable. PF lift motor 4 and PF main PWB (YC7)
Defective drive transmission system of the PF lift motor. Check if the gears rotate smoothly. If not, grease the bushes and gears. Check for broken gears and replace if any.
Defective PF lift motor. Replace the PF lift motor 4.
Defective PF main PWB. Replace the PF main PWB (Refer to the service manual for the paper feeder).
- Code: 1140
- Description: BPF lift motor upward error (Bulk paper feeder) BPF lift maximum sensor does not turn on. The lock signal of the motor is detected continuously three times.
- Remedy: Defective connector cable or poor contact in the connector. Reinsert the connector. Also check for continuity within the connector cable. If none, replace the cable. BPF lift motor and BPF main PWB (YC4)
Defective drive transmission system of the motor. Check if the gears rotate smoothly. If not, grease the bushes and gears. Check for broken gears and replace if any.
Defective BPF lift motor. Replace the BPF lift motor.
Defective BPF main PWB. Replace the BPF main PWB (Refer to the service manual for the paper feeder).
- Code: 1150
- Description: BPF lift motor downward error (Bulk paper feeder) BPF lift minimum sensor does not turn on. The lock signal of the motor is detected continuously three times. When detecting an overcurrent detection signal.
- Remedy: Defective connector cable or poor contact in the connector. Reinsert the connector. Also check for continuity within the connector cable. If none, replace the cable. BPF lift motor and BPF main PWB (YC4)
Defective drive transmission system of the motor. Check if the gears rotate smoothly. If not, grease the bushes and gears. Check for broken gears and replace if any.
Defective BPF lift motor. Replace the BPF lift motor.
Defective BPF main PWB. Replace the BPF main PWB (Refer to the service manual for the paper feeder).
- Code: 1800
- Description: Paper feeder 1 communication error A communication error is detected 10 times in succession.
- Remedy: Improper installation paper feeder. Follow installation instruction carefully again.
Defective connector cable or poor contact in the connector. Reinsert the connector. Also check for continuity within the connector cable. If none, replace the cable. PF main PWB (YC3) and engine PWB (YC22)
Defective engine PWB. Replace the engine PWB and check for correct operation.
Defective PF main PWB. Replace the PF main PWB (Refer to the service manual for the paper feeder).
- Code: 1810
- Description: Paper feeder 2 communication error A communication error is detected 10 times in succession.
- Remedy: Improper installation paper feeder. Follow installation instruction carefully again.
Defective connector cable or poor contact in the connector. Reinsert the connector. Also check for continuity within the connector cable. If none, replace the cable. PF main PWB (YC3) and engine PWB (YC22)
Defective PF main PWB. Replace the PF main PWB (Refer to the service manual for the paper feeder).
- Code: 1820
- Description: Paper feeder 3 communication error A communication error is detected 10 times in succession.
- Remedy: Improper installation paper feeder. Follow installation instruction carefully again.
Defective connector cable or poor contact in the connector. Reinsert the connector. Also check for continuity within the connector cable. If none, replace the cable. PF main PWB (YC3) and engine PWB (YC22)
Defective PF main PWB. Replace the PF main PWB (Refer to the service manual for the paper feeder).
- Code: 1830
- Description: Paper feeder 4 communication error A communication error is detected 10 times in succession.
- Remedy: Improper installation paper feeder. Follow installation instruction carefully again.
Defective connector cable or poor contact in the connector. Reinsert the connector. Also check for continuity within the connector cable. If none, replace the cable. PF main PWB (YC3) and engine PWB (YC22)
Defective PF main PWB. Replace the PF main PWB (Refer to the service manual for the paper feeder).
- Code: 1900
- Description: Paper feeder 1/BPF paper feeder EEPROM error When writing the data, the write data and the read data is not in agreement.
- Remedy: Defective PF main PWB. Replace the PF main PWB or the BPF main PWB.
Device damage of EEPROM. Replace the PF main PWB or the BPF main PWB.
- Code: 1910
- Description: Paper feeder 2 EEPROM error When writing the data, the write data and the read data is not in agreement.
- Remedy: Defective PF main PWB. Replace the PF main PWB (Refer to the service manual for the paper feeder).
Device damage of EEPROM. Replace the PF main PWB (Refer to the service manual for the paper feeder).
- Code: 1920
- Description: Paper feeder 3 EEPROM error When writing the data, the write data and the read data is not in agreement.
- Remedy: Defective PF main PWB. Replace the PF main PWB (Refer to the service manual for the paper feeder).
Device damage of EEPROM. Replace the PF main PWB (Refer to the service manual for the paper feeder).
- Code: 1930
- Description: Paper feeder 4 EEPROM error When writing the data, the write data and the read data is not in agreement.
- Remedy: Defective PF main PWB. Replace the PF main PWB (Refer to the service manual for the paper feeder).
Device damage of EEPROM. Replace the PF main PWB (Refer to the service manual for the paper feeder).
- Code: 2000
- Description: Main motor drive error The main motor is not stabilized within 2 s after driving starts.
- Remedy: Defective connector cable or poor contact in the connector. Reinsert the connector. Also check for continuity within the connector cable. If none, replace the cable. Main motor and engine PWB (YC4)
Defective drive transmission system of the main motor. Check if the rollers and gears rotate smoothly. If not, grease the bushes and gears. Check for broken gears and replace if any.
Defective main motor. Replace the main motor.
Defective engine PWB. Replace the engine PWB and check for correct operation.
- Code: 2010
- Description: Main motor steady-state error Stable OFF is detected for 2 s continuously after main motor stabilized.
- Remedy: Defective connector cable or poor contact in the connector. Reinsert the connector. Also check for continuity within the connector cable. If none, replace the cable. Main motor and engine PWB (YC4)
Defective drive transmission system of the main motor. Check if the rollers and gears rotate smoothly. If not, grease the bushes and gears. Check for broken gears and replace if any.
Defective main motor. Replace the main motor.
Defective engine PWB. Replace the engine PWB and check for correct operation.
- Code: 2200
- Description: Drum motor drive error (60/55/50 ppm model only) The drum motor is not stabilized within 2 s after driving starts.
- Remedy: Defective connector cable or poor contact in the connector. Reinsert the connector. Also check for continuity within the connector cable. If none, replace the cable. Drum motor and engine PWB (YC4)
Defective drive transmission system of the drum motor. Check if the rollers and gears rotate smoothly. If not, grease the bushes and gears. Check for broken gears and replace if any.
Defective drum motor. Replace the drum motor.
Defective engine PWB. Replace the engine PWB and check for correct operation.
- Code: 2210
- Description: Drum motor steady-state error (60/55/50 ppm model only) Stable OFF is detected for 2 s continuously after drum motor stabilized.
- Remedy: Defective connector cable or poor contact in the connector. Reinsert the connector. Also check for continuity within the connector cable. If none, replace the cable. Drum motor and engine PWB (YC4)
Defective drive transmission system of the drum motor. Check if the rollers and gears rotate smoothly. If not, grease the bushes and gears. Check for broken gears and replace if any.
Defective drum motor. Replace the drum motor.
Defective engine PWB. Replace the engine PWB and check for correct operation.
- Code: 2330
- Description: Fuser pressure release motor error (Over-current) The over-current detection signal of the motor is detected continuously twenty times.
- Remedy: Defective connector cable or poor contact in the connector. Reinsert the connector. Also check for continuity within the connector cable. If none, replace the cable. Fuser pressure release motor and relay-L PWB(YC11) Relay-L PWB(YC3) and engine PWB(YC2)
Defective drive transmission system of the fuser pressure release motor. Check if the gears rotate smoothly. If not, grease the bushes and gears. Check for broken gears and replace if any.
Defective fuser pressure release motor. Replace the fuser pressure release motor.
Defective PWB. Replace the relay-L PWB or engine PWB.
- Code: 2340
- Description: Fuser pressure release motor error (Timeout) The position detection sensor is not detected continuously for 30 s.
- Remedy: Defective connector cable or poor contact in the connector. Reinsert the connector. Also check for continuity within the connector cable. If none, replace the cable. Fuser pressure release motor and relay-L PWB(YC11) Relay-L PWB(YC1) and engine PWB(YC2)
Defective drive transmission system of the fuser pressure release motor. Check if the gears rotate smoothly. If not, grease the bushes and gears. Check for broken gears and replace if any.
Defective fuser pressure release motor. Replace the fuser pressure release motor.
Defective PWB. Replace the relay-L PWB or engine PWB.
- Code: 2600
- Description: PF drive motor 1 error (paper feeder 1) When the PF drive motor is driven, error signal is detected continuously for 2 s.
- Remedy: Defective connector cable or poor contact in the connector. Reinsert the connector. Also check for continuity within the connector cable. If none, replace the cable. PF drive motor 1 and PF main PWB (YC6)
Defective drive transmission system of the PF drive motor. Check if the rollers and gears rotate smoothly. If not, grease the bushes and gears. Check for broken gears and replace if any.
Defective PF drive motor. Replace the PF drive motor 1.
Defective PF main PWB. Replace the PF main PWB (Refer to the service manual for the paper feeder).
- Code: 2610
- Description: PF drive motor 2 error (paper feeder 2) When the PF drive motor is driven, error signal is detected continuously for 2 s.
- Remedy: Defective connector cable or poor contact in the connector. Reinsert the connector. Also check for continuity within the connector cable. If none, replace the cable. PF drive motor 2 and PF main PWB (YC6)
Defective drive transmission system of the PF drive motor. Check if the rollers and gears rotate smoothly. If not, grease the bushes and gears. Check for broken gears and replace if any.
Defective PF drive motor. Replace the PF drive motor 2.
Defective PF main PWB. Replace the PF main PWB (Refer to the service manual for the paper feeder).
- Code: 2620
- Description: PF drive motor 3 error (paper feeder 3) When the PF drive motor is driven, error signal is detected continuously for 2 s.
- Remedy: Defective connector cable or poor contact in the connector. Reinsert the connector. Also check for continuity within the connector cable. If none, replace the cable. PF drive motor 3 and PF main PWB (YC6)
Defective drive transmission system of the PF drive motor. Check if the rollers and gears rotate smoothly. If not, grease the bushes and gears. Check for broken gears and replace if any.
Defective PF drive motor. Replace the PF drive motor 3.
Defective PF main PWB. Replace the PF main PWB (Refer to the service manual for the paper feeder).
- Code: 2630
- Description: PF drive motor 4 error (paper feeder 4) When the PF drive motor is driven, error signal is detected continuously for 2 s.
- Remedy: Defective connector cable or poor contact in the connector. Reinsert the connector. Also check for continuity within the connector cable. If none, replace the cable. PF drive motor 4 and PF main PWB (YC6)
Defective drive transmission system of the PF drive motor. Check if the rollers and gears rotate smoothly. If not, grease the bushes and gears. Check for broken gears and replace if any.
Defective PF drive motor. Replace the PF drive motor 4.
Defective PF main PWB. Replace the PF main PWB (Refer to the service manual for the paper feeder).
- Code: 4000
- Description: Polygon motor synchronization error The polygon motor is not stabilized within 20 s after driving starts.
- Remedy: Defective connector cable or poor contact in the connector. Reinsert the connector. Also check for continuity within the connector cable. If none, replace the cable. Polygon motor and engine PWB (YC15)
Defective polygon motor. Replace the laser scanner unit.
Defective engine PWB. Replace the engine PWB and check for correct operation.
- Code: 4200
- Description: BD steady-state error When the value of Register BDSET is 1 after setting Register BDSET as one and passing by BD1 cycle.
- Remedy: Defective connector cable or poor contact in the connector. Reinsert the connector. Also check for continuity within the connector cable. If none, replace the cable. APC PWB(YC1) and engine PWB (YC16) APC PWB(YC2) and PD PWB(YC1)
Defective PD PWB. Replace the laser scanner unit.
Defective engine PWB. Replace the engine PWB and check for correct operation.
- Code: 5100
- Description: Chager current error When the current value measured at the time of potential adjustment is less than 20 uA.
- Remedy: Defective connector cable or poor contact in the connector. Reinsert the connector. Also check for continuity within the connector cable. If none, replace the cable. Chager unit and high voltage PWB High voltage PWB (YC101) and engine PWB (YC19)
Defective high voltage PWB. Replace the high voltage PWB and check for correct operation.
Defective engine PWB. Replace the engine PWB and check for correct operation.
- Code: 6000
- Description: Broken fuser heater wire The detection temperature of fuser thermistor 2 is 100 °C/ 212°F or less after the fuser heater lamp has been turned on continuously for 30 s.
- Remedy: Defective connector cable or poor contact in the connector. Reinsert the connector. Also check for continuity within the connector cable. If none, replace the cable. Fuser heater and power source PWB (YC2) Fuser thermistor and Fuser thermistor connect PWB(YC1 and YC2) Fuser thermistor connect PWB(YC3) and engine PWB (YC21)
Deformed connector pin.
Defective triac.
Fuser thermostat triggered. Reinsert the fuser unit.
Broken fuser heater wire. Reinsert the fuser unit.
Defective engine PWB. Replace the engine PWB and check for correct operation.
- Code: 6020
- Description: Abnormally high fuser thermistor 2 temperature The detection temperature of fuser thermistor 2 is higher than 235°C/455°F. In a heater-off state, the detection temperature of fuser thermistor 2 is higher than 195°C/383°F after the detection temperature of fuser thermistor 2 was 155°C/311°F or less.
- Remedy: Deformed connector pin.
Defective triac.
Shorted fuser thermistor. Replace the fuser unit.
Defective engine PWB. Replace the engine PWB and check for correct operation.
- Code: 6030
- Description: Broken fuser thermistor 2 wire A/D value of the fuser thermistor 2 exceeds 1019 bit continuously for 4 s during warming up.
- Remedy: Defective connector cable or poor contact in the connector. Reinsert the connector. Also check for continuity within the connector cable. If none, replace the cable. Fuser thermistor and fuser thermistor connect PWB(YC2) Fuser thermistor connect PWB(YC3) and engine PWB (YC21)
Deformed connector pin.
Defective triac.
Defective fuser thermistor. Replace the fuser unit.
Defective engine PWB. Replace the engine PWB and check for correct operation.
- Code: 6120
- Description: Abnormally high fuser thermistor 1 temperature The detection temperature of fuser thermistor 1 is higher than 245°C/473°F. In a heater-off state, the detection temperature of fuser thermistor 1 is higher than 195°C/383°F after the detection temperature of fuser thermistor 1 was 155°C/311°F or less.
- Remedy: Deformed connector pin.
Defective triac.
Shorted fuser thermistor. Replace the fuser unit.
Defective engine PWB. Replace the engine PWB and check for correct operation.
- Code: 6130
- Description: Broken fuser thermistor 1 wire A/D value of the fuser thermistor 1 exceeds 1019 bit continuously for 4 s during warming up.
- Remedy: Defective connector cable or poor contact in the connector. Reinsert the connector. Also check for continuity within the connector cable. If none, replace the cable. Fuser thermistor and fuser thermistor connect PWB(YC1) Fuser thermistor connect PWB(YC3) and engine PWB (YC21)
Deformed connector pin.
Defective triac.
Defective fuser thermistor.
Defective engine PWB. Replace the engine PWB and check for correct operation.
- Code: 6400
- Description: Zero-cross signal error While fuser heater control is performed, the zero-cross signal is not input within 2 s.
- Remedy: Defective connector cable or poor contact in the connector. Reinsert the connector. Also check for continuity within the connector cable. If none, replace the cable. Power source PWB (YC3) and engine PWB (YC1)
Defective power source PWB or engine PWB. Replace the power source PWB or the engine PWB and check for correct operation.
- Code: 7100
- Description: Toner sensor error Sensor output value of 930 or more continuously for 5 s.
- Remedy: Defective connector cable or poor contact in the connector. Reinsert the connector. Also check for continuity within the connector cable. If none, replace the cable. Toner sensor and drum PWB (YC3) Drum connect PWB(YC2) and relay-L PWB (YC3) Relay-L PWB(YC1) and engine PWB (YC2)
Defective toner sensor. Replace the developer unit.
Defective engine PWB. Replace the engine PWB and check for correct operation.
- Code: 7400
- Description: Developer unit non-installing error Sensor output value of 31 or less continuously for 5 s.
- Remedy: Defective connector cable or poor contact in the connector. Reinsert the connector. Also check for continuity within the connector cable. If none, replace the cable. Toner sensor and drum PWB (YC3) Drum connect PWB(YC2) and relay-L PWB (YC3) Relay-L PWB(YC1) and engine PWB (YC2)
Defective toner sensor. Replace the developer unit.
Defective engine PWB. Replace the engine PWB and check for correct operation.
- Code: 7410
- Description: Drum unit type mismatch error The drum PWB EEPROM does not communicate normally. Absence of the drum unit is detected.
- Remedy: Defective connector cable or poor contact in the connector. Reinsert the connector. Also check for continuity within the connector cable. If none, replace the cable. Drum unit and drum connect PWB (YC1) Drum connect PWB(YC2) and relay-L PWB (YC3) Relay-L PWB(YC1) and engine PWB (YC2)
Defective toner sensor. Replace the drum unit.
Defective engine PWB. Replace the engine PWB and check for correct operation.
- Code: 7800
- Description: Broken external thermistor wire The average of thermistor output value of 93 or less.
- Remedy: Defective connector cable or poor contact in the connector. Reinsert the connector. Also check for continuity within the connector cable. If none, replace the cable. Operation PWB (YC1) and engine PWB (YC17)
Defective temperature sensor. Replace the operation PWB.
- Code: 7810
- Description: Short-circuited external thermistor wire The average of thermistor output value of 930 or more.
- Remedy: Defective connector cable or poor contact in the connector. Reinsert the connector. Also check for continuity within the connector cable. If none, replace the cable. Operation PWB (YC1) and engine PWB (YC17)
Defective temperature sensor. Replace the operation PWB.
- Code: 7900
- Description: Drum unit EEPROM error No response is issued from the device in reading/writing for 5 ms or more and this problem is repeated five times successively. Mismatch of reading data from two locations occurs eight times successively. Mismatch between writing data and reading data occurs eight times successively.
- Remedy: Defective connector cable or poor contact in the connector. Reinsert the connector. Also check for continuity within the connector cable. If none, replace the cable. Drum unit and drum connect PWB (YC1) Drum connect PWB(YC2) and relay-L PWB (YC3) Relay-L PWB(YC1) and engine PWB (YC2)
Defective drum unit. Replace the drum unit.
- Code: F000
- Description: Main PWB — operation PWB communication error
- Remedy: Defective connector cable or poor contact in the connector. Reinsert the connector. Also check for continuity within the connector cable. If none, replace the cable. Operation PWB(YC1) and engine PWB (YC17)
Defective main PWB. Turn the main power switch off/on to restart the machine. If the error is not resolved, replace main PWB.
Defective operation PWB. Replace the operation PWB and check for correct operation.
- Code: F000
- Description: CF000 will be displayed if * notes progress is carried out for a definite period of time with a Welcome screen.The communication fault between Panel-Main boardsCommunication fault between Panel Core-Main Core Notes 2
- Remedy: (1) Check the harness, and the connection state of a connector between Panel<=>Main boards, and perform an operation check. (2) Check contact of a DDR memory (extracting) and perform an operation check. If exchangeable, it will exchange and will perform an operation check. (3) U021 Controller backup initialization is carried out and an operation check is performed. (4) Exchange a Main board and perform an operation check. (5) Exchange a PanelMain board and perform an operation check. (6) It will get, if USBLOG is obtainable, and contact service headquarters. 1. Panel <=> Main IF (Engine PWB Relay) Main PWB: YC2 Engine PWB: YC20,YC30 Panel PWB: YC1 2. DDR memory Main PWB: YS1
- Code: F010
- Description: Main PWB checksum error
- Remedy: Defective main PWB. Turn the main power switch off/on to restart the machine. If the error is not resolved, replace main PWB.
- Code: F020
- Description: Main PWB RAM checksum error
- Remedy: Defective main memory (RAM) in main PWB Turn the main power switch off/on to restart the machine. If the error is not resolved, replace main PWB.
Defective expended memory (DIMM) Replace the expansion memory (DIMM). Also in the case of the capacity besides specification, it displays.
- Code: F040
- Description: Main PWB — print engine communication error
- Remedy: Defective main PWB. Turn the main power switch off/on to restart the machine. If the error is not resolved, replace main PWB.
Defective engine PWB. Replace the engine PWB and check for correct operation.
- Code: F050
- Description: Print engine ROM checksum error
- Remedy: Defective engine PWB. Turn the main power switch off/on to restart the machine. If the error is not resolved, replace engine PWB.
- Code: F15X
- Description: Abnormality detecting in an authentication device control section
- Remedy: (1) Check the harness between authentication device <=>Main boards, and the connection situation of a connector, and perform an operation check. (2) Carry out U021 Main backup initialization and perform an operation check. (3) Exchange a Main board and perform an operation check. (4) Get USBLOG and contact service headquarters. 1.Authentication device <=> Main IF Main PWB: YC6 Authentication device: IC card reader etc.
- Code: F17X
- Description: Abnormality detecting in a printer data control part
- Remedy: (1) U021 Controller backup initialization is carried out and an operation check is performed. (2) Exchange a Main board and perform an operation check. (3) Get USBLOG and contact service headquarters.
- Code: F18X
- Description: Abnormality detecting in a Video control section
- Remedy: (1) Check the harness between Engine<=>Main boards, and the connection state of a connector, and perform an operation check. (2) U021 Controller backup initialization is carried out and an operation check is performed. (3) Exchange an Engine board and perform an operation check. (4) Exchange a Main board and perform an operation check. (5) Get USBLOG and contact service headquarters.
- Code: F1DX
- Description: Abnormality detecting of the image memory Management Department
- Remedy: (1) U021 Controller backup initialization is carried out and an operation check is performed. (2) Exchange a Main board and perform an operation check. (3) Get USBLOG and contact service headquarters.
- Code: F21X, F22X, F23X
- Description: Abnormality detecting in an image-processing part
- Remedy: (1) Check contact of a DDR memory and perform an operation check. (2) Carry out U021 Main backup initialization and perform an operation check. (3) Exchange a Main board and perform an operation check. (4) Get USBLOG and contact service headquarters.
- Code: F24X
- Description: Abnormality detecting in the system Management Department
- Remedy: (1) Check contact of a DDR memory and perform an operation check. (2) Carry out U021 Main backup initialization and perform an operation check. (3) Exchange a Main board and perform an operation check. (4) Get USBLOG and contact service headquarters * F248 is the abnormalities of a printer process.In recurring by specific printer data, please give me cooperation at acquisition of capture data and USBLOG.
- Code: F25X
- Description: Abnormality detecting in a network management department
- Remedy: (1) U021 Controller backup initialization is carried out and an operation check is performed. (2) Exchange a Main board and perform an operation check. (3) Get USBLOG and contact service headquarters. * It may occur according to a visitor’s network environment
- Code: F26X, F27X, F28X
- Description: Abnormality detecting in the system Management Department
- Remedy: (1) U021 Controller backup initialization is carried out and an operation check is performed. (2) Exchange a Main board and perform an operation check. (3) Get USBLOG and contact service headquarters.
- Code: F29X, F2AX
- Description: Abnormality detecting in the system Management Department
- Remedy: (1) U021 Controller backup initialization is carried out and an operation check is performed. (2) Exchange a Main board and perform an operation check. (3) Get USBLOG and contact service headquarters.
- Code: F2BX, F2CX, F2DX
- Description: Abnormality detecting in a network control part
- Remedy: (1) Exchange a Main/Engine PWB and perform an operation check. (2) Get USBLOG and contact service headquarters.(Depending on an analysis result, it is packet capture acquisition)
- Code: F2EX, F2FX, F30X
- Description: Abnormality detecting in a network control part
- Remedy: (1) Exchange a Main/Engine PWB and perform an operation check. (2) Get USBLOG and contact service headquarters.(Depending on an analysis result, it is packet capture acquisition)
- Code: F31X, F32X
- Description: Abnormality detecting in a network control part
- Remedy: (1) Exchange a Main/Engine PWB and perform an operation check. (2) Get USBLOG and contact service headquarters.(Depending on an analysis result, it is packet capture acquisition)
- Code: F35X
- Description: Abnormality detecting in the printing controlling Management Department
- Remedy: (1) Exchange a Main/Engine PWB and perform an operation check. (2) Get USBLOG and contact service headquarters.
- Code: F38X
- Description: Abnormality detecting in the authentication authorized Management Department
- Remedy: (1) Exchange a Main/Engine PWB and perform an operation check. (2) Get USBLOG and contact service headquarters.
- Code: F3AX, F3BX, F3CX
- Description: Abnormality detecting in the Entity Management Department
- Remedy: (1) Exchange a Main/Engine PWB and perform an operation check. (2) Get USBLOG and contact service headquarters
- Code: F3DX, F3EX, F3FX
- Description: Abnormality detecting in the Entity Management Department
- Remedy: (1) Exchange a Main/Engine PWB and perform an operation check. (2) Get USBLOG and contact service headquarters
- Code: F40X, F41X, F42X
- Description: Abnormality detecting in the Entity Management Department
- Remedy: (1) Exchange a Main/Engine PWB and perform an operation check. (2) Get USBLOG and contact service headquarters
- Code: F43X, F44X, F45X
- Description: Abnormality detecting in the Entity Management Department
- Remedy: (1) Exchange a Main/Engine PWB and perform an operation check. (2) Get USBLOG and contact service headquarters
- Code: F46X
- Description: Abnormality detecting of a printer rendering part
- Remedy: (1) Exchange boards and perform an operation check. (2) the acquisition wish of USBLOG — carry out (Depending on the (2) case, it is print capture data acquisition)
- Code: F47X
- Description: Abnormality detecting of an image editing processing part
- Remedy: (1) Exchange a Main/Engine PWB and perform an operation check. (2) Get USBLOG and contact service headquarters.
- Code: F4DX, F4EX
- Description: Abnormality detecting in the Entity Management Department
- Remedy: (1) Exchange a Main/Engine PWB and perform an operation check. (2) Get USBLOG and contact service headquarters
- Code: F4FX
- Description: Abnormality detecting in the JOB Management Department
- Remedy: (1) Exchange a Main/Engine PWB and perform an operation check. (2) Get USBLOG and contact service headquarters.
- Code: F51X, F52X, F53X
- Description: Abnormality detecting in a JOB execution part
- Remedy: (1) Exchange a Main/Engine PWB and perform an operation check. (2) Get USBLOG and contact service headquarters
- Code: F55X, F56X, F57X
- Description: Abnormality detecting in a JOB execution part
- Remedy: (1) Exchange a Main/Engine PWB and perform an operation check. (2) Get USBLOG and contact service headquarters
- Code: F5FX
- Description: Abnormality detecting in a service execution part
- Remedy: (1) Exchange a Main/Engine PWB and perform an operation check. (2) Get USBLOG and contact service headquarters.
- Code: F62X
- Description: Abnormality detecting in a service execution part
- Remedy: (1) Exchange a Main/Engine PWB and perform an operation check. (2) Get USBLOG and contact service headquarters.
- Code: F63X
- Description: Abnormality detecting in a device control section
- Remedy: (1) Exchange a Main/Engine PWB and perform an operation check. (2) Get USBLOG and contact service headquarters.