Приборный щиток и сигнальные устройства
Общий вид панели приборов представлен в разделе Органы управления и приемы безопасной эксплуатации автомобиля.
Комбинация приборов
Схема расположения компонентов комбинации приборов представлена на сопроводительных иллюстрациях.
Схема размещения рабочих элементов комбинации приборов модели Toyota Land Cruiser
 |
|
|
1 — Вольтметр |
6 — Указатель температуры охлаждающей жидкости |
Схема размещения рабочих элементов комбинации приборов модели TLexus LX 470
 |
|
|
1 — К/Л активации дополнительного топливного бака |
21 — К/Л неисправности системы рулевого управления с переменным передаточным числом |
Рукоятка регулятора положения рулевого колеса на модели Lexus LX 470

Контрольные лампы и индикаторы
Перечень контрольных ламп комбинации приборов, не указанных на иллюстрации см. в таблице.
|
Указанные в таблице контрольные лампы могут встречаться на некоторых вариантах комбинации приборов модели Lexus LX 470, отличных от указанной на иллюстрации, а также на моделях Toyota Land Cruiser. Некоторые К/Л комбинации приборов модели Toyota Land Cruiser также перечислены на иллюстрации, отличается только их расположение. |
Видео про «Приборный щиток и сигнальные устройства» для Toyota Land Cruiser
Значения иконок на приборной панели автомобиля часть 2
Внимание!!! Контрольные лампочки приборной панели!
Контрольные лампы на панели приборов
Другие материалы раздела
ДТП в России
-

03.23.21
-

07.30.19
-

07.30.19
-

07.30.19
-

07.29.19
-

07.29.19
- Manuals
- Brands
- Toyota Manuals
- Automobile
- Land Cruiser 100
- Operating manual
-
Contents
-
Table of Contents
-
Bookmarks
Quick Links
Part 1
OPERATION OF
INSTRUMENTS AND
CONTROLS—
Chapter 1- 1
Overview of instruments
and controls
_
_
_
Indicator
symbols
on
instrument panel
the
New L/C100(U)
1
Related Manuals for Toyota Land Cruiser 100
Summary of Contents for Toyota Land Cruiser 100
-
Page 1: Instruments And Controls
New L/C100(U) Part 1 OPERATION OF INSTRUMENTS AND CONTROLS— Chapter 1- 1 Overview of instruments and controls Instrument panel overview Instrument cluster overview Indicator symbols instrument panel…
-
Page 2: Instrument Panel Overview
New L/C100(U) Instrument panel overview «View A 1. Side vents 2. Side defroster outlets 3. Instrument cluster 4. Center vents 5. Electric moon roof switches and/or personal lights 6. Glove box 7. Power door lock switches 8. Power window switches 9.
- Page 3
New L/C100(U) «View B 1. Headlight, turn signal and front fog light switches 2. Cruise control switch 3. Ignition switch 4. Windshield wiper, rear window wiper and washer switches 5. Emergency flasher switch 6. Power antenna switch 7. Car audio 8. -
Page 4: Lower Part Of Center Cluster Panel
New L/C100(U) «Lower part of center cluster panel 1. Ashtray 2. Cigarette lighter 3. Power outlet…
-
Page 5: Instrument Cluster Overview
New L/C100(U) Instrument cluster overview 1. Voltmeter 4. Tachometer 7. Odometer and two trip meters 2. Speedometer 5. Oil pressure gauge 8. Trip meter reset knob 3. Service reminder indicators and 6. Engine coolant temperature gauge 9. Fuel gauge indicator lights…
-
Page 6: Indicator Symbols On Instrument Panel
New L/C100(U) Indicator symbols on the instrument panel Brake system warning light Unengaged ”Park” warning light Automatic transmission fluid temperature warning Driver’s seat belt reminder light light Front passenger’s seat belt reminder light Turn signal indicator lights Discharge warning light Headlight high beam indicator light Malfunction indicator lamp Overdrive- off indicator light…
- Page 7
New L/C100(U) Cruise control indicator light Automatic transmission indicator lights : For details, see ”Service reminder indicators and warning buzzers” in Chapter 1- 5. : If this light flashes, see ”Cruise control” in Chapter 1- 6. - Page 8
New L/C100(U) -
Page 9: Keys
”Side doors” in 1. Master key (black)—This key works in » Manual quarter windows this chapter. every lock. Your Toyota dealer will » need it to make you a new key with Power quarter windows built- in transponder chip.
- Page 10
New L/C100(U) NOTICE z When starting the engine, do not z Do not bend the key grip. use the key with other transponder When using a key containing a trans- keys around (including keys of oth- ponder chip, observe the following er vehicles) and do not press other precautions: key plates against the key grip. - Page 11
If you should lose your keys or if you hicle. The engine will start, only when need additional keys, duplicates can be the electronic code in the chip corre- made by a Toyota dealer using the key sponds to the registered ID code for number. the vehicle. - Page 12
This device complies with Part 15 of the FCC Rules. Operation is subject to the For your Toyota dealer to make you a following two conditions: new key with built- in transponder chip, your dealer will need your key number (1) This device may not cause harmful and master key. - Page 13
New L/C100(U) Side doors— Driver’s side LOCKING AND UNLOCKING WITH KEY LOCKING UNLOCKING WITH INSIDE LOCK KNOB Insert the key into the keyhole and turn Move the lock knob. To lock: Turn the key forward. To lock: Push the knob forward. To unlock: Turn the key backward. - Page 14
New L/C100(U) LOCKING UNLOCKING WITH CAUTION POWER DOOR LOCK SWITCH Push the switch. Before driving, be sure that the doors To lock: Push the switch on the front side. closed locked, especially To unlock: Push the switch on the rear when small children are in the ve- side. - Page 15
New L/C100(U) —Wireless remote control Your vehicle has a wireless remote You have 30 seconds to open a door after control system that can lock or unlock using the wireless remote unlock feature. all the side doors and back door from a If a door is not opened by then, all the distance within approximately 1 m (3 side doors and back door will be automati-… - Page 16
Do not leave the key on places where If you lose your wireless remote control the temperature becomes high such as key, contact your Toyota dealer as soon ”PANIC” SWITCH on the dashboard. as possible to avoid the possibility of «… - Page 17
New L/C100(U) REPLACING THE BATTERY This equipment has been tested and —Reorient or relocate the receiving For replacement, use a lithium battery found to comply with the limits for a antenna. CR1616 and a special screwdriver. Class B digital device, pursuant to —Increase the separation between the Part 15 of the FCC Rules. - Page 18
New L/C100(U) 1. Remove the screw, and then the cover. 2. Remove module from 3. Remove the 2 screws to take out the frame. lid of the module. Take out the dis- charged battery and put a new battery with the positive side up. NOTICE Do not bend the terminals. - Page 19
New L/C100(U) Power windows 4. Install the lid with the 2 screws. 5. Install the module into the key frame and secure the cover with the screw. 6. When pushing any switch on the wire- less key, make sure the indicator light comes on. - Page 20
New L/C100(U) CAUTION Window lock button » Never try jamming any part of your body to make the jam protection function work intentionally. » The jam protection function may work when something gets caught just before the window is fully closed. OPERATING THE PASSENGERS’… - Page 21
New L/C100(U) Manual quarter windows Power quarter windows CAUTION To avoid serious personal injury, you must do the following. » Always make sure the head, hands and other parts of the body of all occupants are kept completely in- side the vehicle before you close the power windows. - Page 22
New L/C100(U) Back door CAUTION To avoid serious personal injury, you must do the following. » Always make sure the hands and other parts of the body of all occu- pants are kept completely inside the vehicle before you close the power quarter windows. - Page 23
New L/C100(U) CAUTION » Keep the back door closed while driving. This not only keeps the luggage from being thrown out but also prevents exhaust gases from entering the vehicle. » If the open back door hides the stop and tail lights, rear turn signal lights or rear retro reflectors while you are parked, other road users must be warned of your vehicle by… - Page 24
New L/C100(U) Hood CAUTION Before driving, be sure that the back door is closed and locked, especially when small children are in the ve- hicle. Along with the proper use of seat belts, locking the doors helps prevent the driver and passengers from being thrown out from the ve- hicle during an accident. - Page 25
New L/C100(U) Theft deterrent system— 2. In front of the vehicle, pull up the To deter the vehicle theft, the system SETTING THE SYSTEM auxiliary catch lever and lift is designed to give an alarm if any of 1. Turn the ignition key to the ”LOCK” hood. - Page 26
» If the system does not work properly, and then reconnected Turn the ignition key from the ”LOCK” have it checked by your Toyota dealer. to ”ON” position. The indicator light will come on when the » system is activating. - Page 27
Make sure the cap is tightened se- curely to prevent fuel spillage in case of an accident. » Use only a genuine Toyota fuel tank cap for replacement. It has a built- in check valve to reduce fuel tank vacuum. - Page 28
New L/C100(U) Electric moon roof To operate the moon roof, use the The roof will fully close. To stop the roof switches beside the personal light. partway, push the same switch or tilt switch. The moon roof works when the ignition switch is in the ”ON”… - Page 29
New L/C100(U) » CAUTION Never sit on top of the vehicle around the roof opening. To avoid serious personal injury, you » Never try jamming any part of your must do the following. body to make the jam protection » While the vehicle is moving, always function work intentionally. - Page 30
New L/C100(U) -
Page 31: Steering Wheel And Mirrors
New L/C100(U) Seats Part 1 » While the vehicle is being driven, all ve- Power tilt and telescopic steering OPERATION OF hicle occupants should have the seatback wheel upright, sit well back in the seat and prop- INSTRUMENTS AND » Outside rear view mirrors erly wear the seat belts provided.
- Page 32
New L/C100(U) Front seats— —Seat adjustment precautions —Adjusting front seats Adjust the driver’s seat so that the foot » While adjusting the seat, do not put pedals, steering wheel instrument your hands under the seat or near panel controls are within easy reach of the moving parts. - Page 33
New L/C100(U) Armrest 1. SEAT POSITION AND SEAT CUSHION CAUTION ANGLE ADJUSTING SWITCH Move the control switch in the desired To reduce the risk of sliding under direction. the lap belt during a collision, avoid Releasing the switch will stop the seat at reclining the seatback any more than that position. - Page 34
New L/C100(U) Rear seats— —Moving second seat —Adjusting second seats third seat entry SEATBACK ANGLE ADJUSTING LEVER Lean forward and pull the lever toward you. Then lean back to the desired angle and release the lever. CAUTION » To reduce the risk of sliding under belt during collision,… -
Page 35: Folding Up Second Seat
New L/C100(U) —Folding up second seat CAUTION After returning the seat, make sure the seat is securely locked by push- ing forward and rearward on the top of the seatback or by trying to pull up the edge of the bottom cushion. BEFORE FOLDING UP SECOND SEAT 2.
- Page 36
New L/C100(U) FOLDING UP SECOND SEAT 2. Unlock the seat cushion. Swing the 3. Hook the strap. whole seat up and forward. 1. Lower the outer head restraint to the When returning the second seat to its lowest position and pull up the cen- original position, put the holding strap into ter head restraint. - Page 37
New L/C100(U) CAUTION When returning seats to their original position: » Make sure the seat belts are not twisted or caught under the seat and are arranged in their proper position and are ready to use. » Make sure that the seat is securely locked by pushing forward and rear- ward on the top of the seatback or by trying to pull up the edge of the… - Page 38
New L/C100(U) —Adjusting third seats —Folding up third seats SEATBACK ANGLE ADJUSTING LEVER Lean forward and pull the lever toward you. Then lean back to the desired angle and release the lever. CAUTION » To reduce the risk of sliding under belt during collision,… - Page 39
New L/C100(U) 2. Make sure the shoulder belt passes FOLDING UP THIRD SEAT 2. Unlock the seat cushion and slide through the hanger when folding the the whole seat the rear- most 1. Lower the head restraint to the low- third seat. - Page 40
New L/C100(U) 3. Swing the whole seat up. 4. Hook the strap. 5. Remove the seat striker covers from the back of the seat cushion, and When returning the third seat to its origi- install them over the seat strikers. nal position, put the holding strap into the hole. - Page 41
New L/C100(U) —Removing third seats CAUTION When returning seats to their original position: » Make sure the seat belts are not twisted or caught under the seat and are arranged in their proper position and are ready to use. » Make sure that the seat is securely locked by pushing forward and rear- ward on the top of the seatback or… - Page 42
New L/C100(U) Head restraints » CAUTION When reinstalling the seat, be care- ful not to hit the seat against you When removing or reinstalling the or inside of the vehicle. » seat, observe the following to prevent Install each seat in the same posi- personal injury: tion from which it was removed. - Page 43
New L/C100(U) Seat heaters For your safety and comfort, adjust the Right side CAUTION head restraint before driving. front seat To raise: Pull it up. Occupants must use caution when op- To lower: Push it down while pressing the erating the seat heater because it lock release button. - Page 44
New L/C100(U) Seat belts— —Seat belt precautions Toyota strongly urges that the driver and Do not allow the child to stand up or NOTICE passengers in the vehicle be properly re- kneel on either rear or front seats. An z Do not put unevenly weighed ob-… - Page 45
New L/C100(U) —3- point seat belts » CAUTION Keep the belts clean and dry. If they need cleaning, use a mild soap Persons should ride in their seats solution or lukewarm water. Never use bleach, dye, or abrasive clean- properly wearing their seat… - Page 46
» If the seat belt does not function normally, immediately contact your Toyota dealer. Do not use the seat until the seat belt is fixed. It cannot protect an adult occupant or your child from injury. - Page 47
New L/C100(U) CAUTION Take up slack » High- positioned belts loose- fitting belts both could cause serious injuries due to sliding under Too high the lap belt during a collision or oth- er unintended result. Keep the lap belt positioned as low on hips as possible. - Page 48
If the seat belt does not function Keep as low on hips as possible normally, immediately contact your Toyota dealer. Do not use the seat Sit up straight and well back in the Remove excess length of the belt and until the seat belt is fixed. - Page 49
Please contact your local Toyota dealer so nally intended for. that the dealer can order the proper re- quired length for the extender. Bring the heaviest coat you expect to wear for prop- er measurement and selection of length. - Page 50
» If the seat belt does not function normally, immediately contact your Toyota dealer. Do not use the seat To connect the extender to the seat The driver and front passenger’s seat until the seat belt is fixed. It cannot… - Page 51
New L/C100(U) When a seat belt pretensioner is acti- vated, an operating noise may be heard and a small amount of smoke- like gas may be released. This gas is harmless and does not indicate that a fire is occur- ring. - Page 52
If either of the following conditions occurs, this ture indicates a malfunction of the airbags or z Attachment of a grille guard (bull pretensioners. Contact your Toyota dealer bar, kangaroo bar, etc.), snowplow, soon possible service winches or any other equipment to vehicle. - Page 53
A driver or front passenger too close to the steering wheel or dashboard during airbag deployment killed seriously injured. Toyota strongly recommends that: » The driver sit as far back as pos- sible from the steering wheel while still maintaining control of the ve- hicle. «… - Page 54
New L/C100(U) However, this threshold velocity will be considerably higher if the vehicle strikes an object, such as a parked vehicle or sign pole, which can move or deform on impact, or if it is involved in an underride collision (e.g. a collision in which the nose Collision from the rear of the vehicle ”underrides”, or goes under, the bed of a truck, etc.). - Page 55
New L/C100(U) In a severe frontal impact, sensors detect deceleration and the system triggers the airbag inflators. Then a chemical reaction in the inflators momentarily fills the air- Hitting a curb, Falling into or bags with non- toxic gas to help restrain edge of pavement jumping over a the forward motion of the occupants. - Page 56
The front seat occupants can restraint system. Toyota strongly be killed or seriously injured by an recommends that all infants and inflating airbag if they do not wear children be placed in the rear seat the available seat belts. - Page 57
New L/C100(U) Move seat fully back » » » Never put a rear- facing child re- A forward- facing child restraint sys- Do not sit on the edge of the seat straint system on the front seat be- tem should be allowed to put on or lean over the dashboard when cause the force of the rapid infla- the front seat only when it is un-… - Page 58
New L/C100(U) » Do not modify or remove any wir- ing. Do not modify, remove, strike or open any components such as the steering wheel pad, steering wheel, column cover, front passen- ger airbag cover, front passenger airbag or airbag sensor assembly. Doing any of these may cause sud- den SRS airbag inflation or disable the system, which could result in… - Page 59
Modification of the suspension sys- z Modification of the front end struc- This SRS airbag system has a service In the following cases, contact your Toyota ture reminder indicator to inform the driver of dealer as soon as possible:… - Page 60
New L/C100(U) Child restraint— —Child restraint precautions Toyota strongly urges the use of child » » Toyota strongly urges use of Make sure that you have complied restraint systems children small proper child restraint system which with all installation instructions pro- enough to use them. - Page 61
New L/C100(U) —Child restraint system A child restraint system for a small When not using the child restraint system, CAUTION child or baby must itself be properly keep it secured with the seat belt or place restrained on the seat with either the it somewhere other than the passenger «… - Page 62
New L/C100(U) —Types of child restraint system Child restraint systems are classified into the following 3 types depending on the child’s age and size. (A) Infant seat (B) Convertible seat (C) Booster seat Install the child restraint system following the instructions provided by its manufac- turer. - Page 63
New L/C100(U) —Installation with 2- point type seat belt (A) INFANT SEAT INSTALLATION 1. Run the center lap belt through or CAUTION around the infant seat following the An infant seat is used in rear- facing instructions provided by its manufactur- position only. - Page 64
Contact your 2. While pressing the infant seat firmly Toyota dealer immediately. Do not CAUTION against the seat cushion and seatback, use the seat until the seat belt is tighten the lap belt by pulling its free fixed. - Page 65
New L/C100(U) 3. To remove the infant seat, press the (B) CONVERTIBLE SEAT INSTALLATION CAUTION buckle- release button. A convertible seat is used in forward- facing and rear- facing position depend- Do not put a rear- facing child re- ing on the child’s age and size. When straint system on the third seat if it installing, follow… - Page 66
1. Run the center lap belt through or 2. While pressing convertible seat Toyota dealer immediately. Do not around the convertible seat following firmly against the seat cushion and use the seat until the seat belt is instructions provided seatback, tighten the lap belt by pulling fixed. - Page 67
New L/C100(U) —Installation with 3- point type seat belt 3. To remove the convertible seat, press (A) INFANT SEAT INSTALLATION CAUTION the buckle- release button. An infant seat is used in rear- facing position only. Push and pull the child restraint sys- tem in different directions to be sure it is secure. - Page 68
New L/C100(U) 1. Run the lap and shoulder belt through » CAUTION Do not put a rear- facing child re- or around the infant seat following the straint system on the second (or instructions provided by its manufactur- » Never put a rear- facing child re- third) seat if it interferes with the er and insert the tab into the buckle straint system on the front seat be-… - Page 69
2. Fully extend the shoulder belt to put it 3. While pressing the infant seat firmly Toyota dealer immediately. Do not in the lock mode. When the belt is against the seat cushion and seatback, use the seat until the seat belt is… - Page 70
New L/C100(U) 4. To remove the infant seat, press the (B) CONVERTIBLE SEAT INSTALLATION CAUTION buckle- release button and allow the A convertible seat is used in forward- belt to retract completely. The belt will facing and rear- facing position depend- Push and pull the child restraint sys- move freely again and be ready to ing on the child’s age and size. - Page 71
New L/C100(U) Move seat fully back » » CAUTION A forward- facing child restraint sys- Do not put a rear- facing child re- tem should be allowed to put on straint system on the second (or » Never put a rear- facing child re- the front seat only when it is un- third) seat if it interferes with the straint system on the front seat be-… - Page 72
1. Run the lap and shoulder belt through 2. Fully extend the shoulder belt to put it Toyota dealer immediately. Do not or around the convertible seat following in the lock mode. When the belt is use the seat until the seat belt is… - Page 73
New L/C100(U) 3. While pressing convertible seat 4. To remove the convertible seat, press CAUTION firmly against the seat cushion and the buckle- release button and allow the seatback, let the shoulder belt retract belt to retract completely. The belt will Push and pull the child restraint sys- as far as it will go to hold the convert- move freely again and be ready to… - Page 74
New L/C100(U) Move seat fully back (C) BOOSTER SEAT INSTALLATION 1. Sit the child on a booster seat. Run CAUTION the lap and shoulder belt through or A booster seat is used in forward- fac- around the booster seat and child fol- ing position only. - Page 75
Always make sure the shoulder belt child from injury. Contact your Toyota dealer immediately. Do not is positioned across the center of child’s shoulder. The belt should be use the seat until the seat belt is kept away from child’s neck, but fixed. - Page 76
» After adjusting the steering wheel, This feature can be set inoperative. Ask try moving it up and down to make your Toyota dealer. sure it is locked in position. - Page 77
New L/C100(U) Outside rear view mirrors— CAUTION CAUTION » Do not adjust the steering column Do not adjust the mirror while the while the vehicle is moving. vehicle is moving. It may cause the driver to mishandle the vehicle and an accident may occur resulting in personal injuries. - Page 78
New L/C100(U) —Power rear view mirror control —Folding rear view mirrors NOTICE If ice should jam the mirror, do not operate the control or scrape the mir- ror face. Use a spray de- icer to free the mirror. To adjust a mirror, use the switches. The rear view mirrors can be folded backward parking… - Page 79
New L/C100(U) Anti-glare inside rear view mir- Sun visors— CAUTION Do not adjust the mirror while the vehicle is moving. It may cause the driver to mishandle the vehicle and an accident may occur resulting in personal injuries. Adjust the mirror so that you can just To block out glare, move the sun visor. - Page 80
New L/C100(U) —Vanity mirror To block the glare from the front when the To use the vanity mirror, swing down main sun visor is swung down, swing the sun visor and open the cover. down the second sun visor The vanity light comes on when you open the cover. - Page 81
If you feel that the automatic light control above » Center interior and personal lights comes into operation too early or too late, Position 3 (”AUTO”)—Headlights and/or all have the sensor adjusted by your Toyota » Ignition switch light of the above dealer. «… - Page 82
New L/C100(U) The tail lights automatically turn off when To turn on the other exterior lights and the driver’s door is opened with the igni- instrument panel lights, twist the knob to tion key in the ”ACC” or ”LOCK” position. the position 1. - Page 83
New L/C100(U) Emergency flashers NOTICE To prevent the battery from being dis- charged, do not leave the switch on longer than necessary when the en- gine is not running. TURN SIGNALS To turn on the emergency flashers, push the switch. To signal a turn, push the headlight/ All the turn signal lights will flash. - Page 84
New L/C100(U) Instrument panel light control Front fog lights Interior lights Type A To adjust the brightness of the instru- To turn on the front fog lights, twist ment panel lights, turn the dial. the band of the headlight and turn sig- nal switch lever. - Page 85
New L/C100(U) Personal lights » To turn on the interior light, slide the All the doors are locked when the light switch. is still on. » The interior light switch has the following One front side door will be closed with positions: the lock knob pushed forward while the other doors are locked. - Page 86
New L/C100(U) Center interior and personal lights To turn on the personal light, push the CENTER PERSONAL LIGHTS switch on 1 side. To turn the lights off, To turn on the center personal light, push the switch on 2 side. push the switch on 1 side. - Page 87
New L/C100(U) Ignition switch light Windshield wipers and washer INTERIOR AND PERSONAL LIGHTS CUT OFF OPERATION When the ignition switch is ”OFF” and any interior lights in the vehicle stay lighting on, the lights will cut off automatically after 30 minutes. You can cancel the cut off operation by: «… - Page 88
New L/C100(U) Rear window wiper and washer To squirt washer fluid, pull the lever NOTICE toward you. Do not operate the rear wiper if the If the windshield wipers are off, they will rear window is dry. It may scratch the operate a couple of times after the washer glass. - Page 89
New L/C100(U) Rear window defogger Outside rear view mirror heaters Make sure you turn the defoggers off when the surfaces are clear. Leaving the defoggers on for a long time could cause the battery to discharge, especially during stop- and- go driving. The defoggers are not designed for drying rain water or for melting snow. - Page 90
New L/C100(U) CAUTION Since the mirror surfaces can get hot, keep your hands off them when the mirror heater switch is on. Make sure you turn the mirror heaters off when the surfaces are clear. Leaving the mirror heaters on for a long time could cause the battery to discharge, especially during stop- and- go driving. - Page 91
INSTRUMENTS AND The indicator lamp goes off after driving CONTROLS— several times. If the indicator lamp does not go off, contact your Toyota dealer as soon as possible. Chapter 1- 5 Gauges, Meters and Service reminder indicators «… - Page 92
Call a Toyota dealer or qualified repair shop for assistance. Your vehicle may overheat during severe operating conditions, such as: Oil pressure may not build up when the «… - Page 93
New L/C100(U) Voltmeter Tachometer NOTICE Do not drive the vehicle with the oil pressure below the normal range until the cause is fixed—it may ruin the engine. The voltmeter tells whether the battery The tachometer indicates engine speed is charged discharged. - Page 94
Take vehicle to Toyota dealer. You can use one trip meter to calculate the fuel economy and the other to measure the distance on each trip. All Fill up tank. - Page 95
Con- fully released. Stop and check. tact your Toyota dealer. If the brake fluid level is low… If the hydraulic boost pressure is lowered, At a safe place, test your brakes by start- the warning light comes on and buzzer ing and stopping. - Page 96
Unless the driver fastens paired by your Toyota dealer as soon as the nearest Toyota dealer or repair shop. the belt, the light keeps on flashing and possible. - Page 97
If it comes on while you are driving, have occurs, immediately stop your vehicle system of the airbag and front seat belt your vehicle checked by your Toyota deal- at a safe place and contact your pretensioners are operating properly. - Page 98
If the light does not go off, call a Toyota 4. Place the four- wheel drive control lever circuit in need of repair. - Page 99
New L/C100(U) Ignition switch with steering lock Part 1 ”LOCK”—Engine is off and the steering OPERATION OF wheel is locked. The key can be re- moved only at this position. INSTRUMENTS AND To turn the key from ”ACC” to the ”LOCK” CONTROLS—… - Page 100
New L/C100(U) Automatic transmission Lock release button To prevent misshifting Overdrive switch For selecting either a three- speed or Parking, engine starting and four- speed transmission key removal position Reverse position ON position OFF position “O/D OFF” indicator Neutral position (Shifting into (Shifting into light on the… - Page 101
New L/C100(U) » Your automatic transmission has a shift Shift into the ”L” position. The trans- CAUTION lock system to minimize the possibility of mission will downshift to the first gear incorrect operation. This means you can when the vehicle speed drops down to Never put your foot on the accelera- only shift out of ”P”… - Page 102
New L/C100(U) (c) Using ”2” and ”L” positions If the four–wheel drive control is in the z Do not continue hill climbing or ”N” position while the selector lever is in The ”2” and ”L” positions are used for hard towing for a long time in the the ”P”… - Page 103
”PWR” mode, push in the driving nearby people or objects. parking brake. pattern selector button. The ”PWR” mode indicator light comes on. For ordinary driving, Toyota recommends NOTICE using the Normal mode to improve fuel If you rock your vehicle, observe the economy. - Page 104
New L/C100(U) Four-wheel drive system— (a) Four-wheel drive control (j) Driving ”2nd STRT” (second ”H” (high speed position, center differ- start) mode ential locked): Lever at ”H”, center differ- ential lock button pushed in In the ”2nd STRT” (Second start) mode, the transmission system shifts up from Use this for greater traction when you second gear. - Page 105
New L/C100(U) Rear differential lock system (b) Shifting procedure SHIFTING BETWEEN ”H” (UNLOCKED) CAUTION AND ”H” (LOCKED) To shift between unlock and lock modes Do not use the rear differential lock in ”H”, push the center differential lock but- in the conditions other than above. ton. - Page 106
New L/C100(U) The differential will also unlock if you shift CAUTION the four–wheel drive control lever to ”H”. Never forget to turn of the switch after » Do not lock the differentials until using this feature. the wheels have stopped spinning. To check the indicator bulb, turn the igni- Otherwise, the vehicle may move in tion key to the ”ON”… - Page 107
New L/C100(U) Parking brake Cruise control The cruise control allows you to cruise CAUTION the vehicle at a desired speed over 40 km/h (25 mph) even with your foot off Before driving, be sure the parking the accelerator pedal. brake is fully released and the park- Your cruising speed can be maintained up ing brake reminder light is off. - Page 108
Another push on the switch will hicle at that speed. your vehicle checked by your Toyota deal- turn the system completely off. If the speed is not satisfactory, tap the er at the earliest opportunity. - Page 109
If you use the brake pedal, cruise comes on. celerate the vehicle and then push the control is cancelled. If this is the case, contact your Toyota control lever down in the ”SET/COAST” RESUMING THE PRESET SPEED dealer and have your vehicle inspected. - Page 110
New L/C100(U) - Page 111
New L/C100(U) Car audio system— —Reference Part 1 OPERATION OF Air conditioning system » Controls INSTRUMENTS AND » Air flow selector settings CONTROLS— » Operating tips » Instrument panel vents Chapter 1- 7 Rear heater system Car audio system and Rear air conditioning system Air conditioning «… - Page 112
This section describes some of the basic TONE AND BALANCE YOUR RADIO ANTENNA features on Toyota audio systems. Some For details about your system’s tone and Lowering the antenna information may not pertain to your sys- balance controls, see the description of To lower a power antenna, push the ”… - Page 113
New L/C100(U) YOUR CASSETTE PLAYER 8 cm (3 in.) compact disc singles When you insert a cassette, the exposed Your compact disc player does not need tape should be to the right. an adaptor to play compact disc singles. Compact disc singles are about 8 cm (3 NOTICE in.) diameter- smaller… - Page 114
New L/C100(U) —Using your audio system: controls and features Details of specific buttons, controls, and features are described in the alphabetical listing that follows. - Page 115
New L/C100(U) 1 2 3 4 5 6 (Preset buttons) AM F M (Reverse/Fast forward buttons) These buttons are used to preset and Push ”AM F M” to switch between the AM Cassette Player tune in radio stations. and FM bands. ”AM”, ”FM1” or ”FM2” will Push the fast forward button to fast for- appear on the display. - Page 116
If the malfunction is not rectified, take CONTROL / MODE” repeatedly until ”FAd” disc player and automatic changer. your vehicle to your Toyota dealer. appears on the display. Then turn the If the player malfunctions, your audio sys- knob to adjust the front/rear balance. - Page 117
New L/C100(U) Dolby_ B NR PROG (Program) Random playing for the tracks on a disc: Quickly push and release ”RAND”. ”RAND” Push ”PROG” to select the other side of If you are listening to a tape that was will appear on the display. The disc you a cassette tape. - Page 118
New L/C100(U) Compact Disc Player SCAN Compact disc player There are two repeat features—you can Radio There are two scan features—you can ei- either replay a disc track or a whole com- ther scan the tracks on a specific disc or You can either scan all the frequencies on pact disc. - Page 119
New L/C100(U) SEEK (Seeking) When counting the number of tracks you SKIP want to rewind, remember to count the Radio The skip feature allows you to fast for- current track as well. For example, if you ward past long stretches of blank tape. In the seek mode, the radio finds and want to rewind to a song that is two be- This is especially useful at the end of… - Page 120
Usually, a problem with radio reception signals are blocked by buildings, trees, or does not mean there is a problem with Your Toyota has an electronic tuning radio other large objects. Increasing the bass your radio—it is just the normal result of (ETR). - Page 121
New L/C100(U) Use high- quality cassettes. » Fading—AM broadcasts are reflected by Low- quality cassette tapes can cause the upper atmosphere—especially at night. many problems, including poor sound, These reflected signals can interfere with inconsistent playing speed, those received directly from the radio sta- constant auto- reversing. - Page 122
New L/C100(U) » » If moisture gets into your compact disc Handle compact discs carefully, espe- player, you may not hear any sound cially when you are inserting them. even though your compact disc player Hold them on the edge and do not appears to be working. - Page 123
New L/C100(U) CAUTION Compact disc players use invisible la- ser beam which could cause hazard- radiation exposure directed outside the unit. Be sure to operate the player correctly as instructed. A new disc may have rough edges on its inner and outer perimeter. Remove the rough edges by pressing the side of a ball- point pen or pencil against the inner and outer perimeter of the… - Page 124
New L/C100(U) Air conditioning system— —Controls 1. Air Intake Selector 2. Air Flow Selector 3. ”A/C” Button 4. Fan Speed Selector 5. ”AUTO” Position (for fan speed) 6. ”AUTO” Position (for air flow) 7. Temperature Selector… - Page 125
New L/C100(U) ”AUTO” position 5. Windshield—Air flows mainly from the windshield vents. For automatic operation of the air condi- tioning, turn the fan speed and air flow For details about air flow selector settings, selector knobs to the ”AUTO” position. see the illustration after ”A/C”… - Page 126
If this happens, take your ve- hicle to a Toyota dealer for service. Air intake selector Press the button to select the air source. An indicator light will illuminate to show which air intake mode is being selected. - Page 127
New L/C100(U) —Air flow selector settings —Operating tips » To cool off your Toyota after it has been parked in the hot sun, drive with the windows open for a few minutes. This vents the hot air, allowing the air conditioning to cool the interior more quickly. - Page 128
New L/C100(U) » If following another vehicle on a dusty Heating Air conditioning road, or driving in windy and dusty For best results, set controls to: For best results, set controls to: conditions, it is recommended that the air intake selector be temporarily set to Fan speed—”AUTO”… - Page 129
New L/C100(U) Ventilation Defogging Defrosting For best results, set controls to: The inside of the windshield The outside of the windshield For best results, set controls to: For best results, set controls to: Fan speed—”AUTO” Temperature—To the desired Temperature—Towards high Temperature—Towards high temperature temperature to heat;… - Page 130
New L/C100(U) —Instrument panel vents Center vents Lower vent If air flow control is not satisfactory, check the instrument panel vents. The instrument panel vents may be opened or closed as shown. Side vents… - Page 131
New L/C100(U) Rear heater system 1. Fan Speed Selector 2. Temperature Selector… - Page 132
New L/C100(U) Fan speed selector This button is used to turn the rear heater system on and off, and adjust the fan speed. Pressing the button once adjusts the fan speed ”LO” mode twice successionally adjusts the fan speed to the ”HI”… - Page 133
New L/C100(U) Rear air conditioning system— —Controls 1. Rear Air Conditioning On- Off Button 2. ”AUTO” Button 3. Air Flow Selector 4. Fan Speed Selector 5. Temperature Selector 6. ”OFF” Button… - Page 134
New L/C100(U) Rear air conditioning on- off button Temperature selector To turn the rear air conditioning on, press Move the lever to adjust the tempera- the ”REAR” button. To turn the rear air ture—to the right to warm, to the left to conditioning off, press the button again. - Page 135
New L/C100(U) —Air flow selector settings… - Page 136
New L/C100(U) - Page 137
New L/C100(U) Clock Part 1 For example, if the ”:00” button is de- OPERATION OF pressed when time between 1:01—1:29, the time will change to 1:00. INSTRUMENTS AND If the time is between 1:30—1:59, the CONTROLS— time will change to 2:00. If the electrical power source has been disconnected from the clock, the time dis- Chapter 1- 8… - Page 138
The display indicates between the range of -22 F and 122 F. If the engine is not running, the key must be in the ”ACC” position. Do not hold the cigarette lighter pressed Use a Toyota genuine cigarette lighter or equivalent for replacement. - Page 139
New L/C100(U) Power outlets The power outlets are designed for power supply for car accessories. To use them, open the lids as shown in the following illustrations. The key must be in the ”ACC” or ”ON” position to be used. NOTICE z To prevent the fuse from being… - Page 140
New L/C100(U) Fuel pump shut- off system If the fuel pump shut- off system has acti- The fuel pump shut- off system is de- vated, you can turn on the fuel pump signed to activate in a collision which may shut- off system with the reset switch on cause a large amount of vehicle deforma- the impact detection sensor. - Page 141
New L/C100(U) Glove box Garage door opener box To use the glove box, do this. Your vehicle is equipped with a box To use the garage door opener box, do designed to store a garage door opener the following. To open: Pull the lever. transmitter. - Page 142
New L/C100(U) 2. Unscrew the screws on both sides 3. Remove Velcro loop on the stay. Re- Please note if the transmitter has wire clip and remove the stay. move the paper strip covering the for sun visor, this clip must be removed adhesive on back side of Velcro loop prior to adhesion of the Velcro. - Page 143
New L/C100(U) 4. Install the transmitter on the center 5. Remove the cover on the opening on 6. Reinstall the stay and secure it with of the stay with Velcro. the lid. the screws. Before fixing it with the screws, adjust the position of the transmitter as it can be operated through the opening on the lid. - Page 144
New L/C100(U) Auxiliary boxes— To use the auxiliary boxes, open the lids as shown in the following illustra- tions. CAUTION To reduce the chance of injury in case of an accident or a sudden stop, always keep the auxiliary box closed while driving. - Page 145
New L/C100(U) Type C (luggage compartment) Type E (center console) Type G (front ceiling) Type D (luggage compartment) Type F (front ceiling) Type H (front ceiling) - Page 146
New L/C100(U) —First- aid kit holder —Warning reflector holder Types A and B auxiliary boxes are equipped with a band or strap to hold the first- aid kit. Although the first- aid kit itself is not in- cluded as an original equipment, this aux- iliary box can be used to store the first- aid kit. - Page 147
New L/C100(U) Cup holders Types C and D auxiliary boxes are The cup holder is designed for holding equipped with a band or straps to hold cups drink- cans securely the warning reflector. holes. To use them, observe the follow- ing illustrations. - Page 148
New L/C100(U) Tie- down hooks Luggage cover For third seats (right- hand side) Type A To secure your luggage, use the tie- down hooks as shown above. ”Luggage stowage precautions” Part 2 for precautions to observe for load- ing luggage. NOTICE Do not use the seat anchors instead of the tie- down hooks. - Page 149
New L/C100(U) Floor mat To use the luggage cover, pull it out of the retractor and hook it on the an- chors. To remove the luggage cover, lift it up. Use a floor mat of the correct size. After you remove the luggage cover, place If the floor carpet and floor mat have a it somewhere other than the passenger hole, then it is designed for use with a… - Page 150
New L/C100(U) CAUTION Make sure the floor mat is properly placed on the floor carpet. If the floor slips and interferes with movement of the pedals during driv- ing, it may cause an accident. - Page 151
It is not designed for cornering at the same speeds as conventional » Limited- slip differential two- wheel drive vehicles any more than » low- slung sports cars are designed to Your Toyota’s identification perform satisfactorily under off- road conditions. - Page 152
New L/C100(U) Break- in period Drive gently and avoid high speeds. » CAUTION When driving off- road or in rugged Your vehicle does not need an elaborate terrain, do not drive at excessive break- in. But following a few simple tips Always observe the following precau- speeds, jump, strike objects, etc. - Page 153
To help prevent gas station mix- ups, your premium type cannot be obtained, you avoid build- up of engine deposits. Toyota has a new smaller fuel tank open- may temporarily use unleaded gasoline ing. The special nozzle on pumps with… - Page 154
New L/C100(U) Operation in foreign countries GASOLINES CONTAINING MMT GASOLINES QUALITY If you plan to drive your Toyota in another country… Some gasolines contain an octane- en- In a very few cases, you may experience hancing additive called MMT (methylcy-… - Page 155
Do not drive with an extremely low the exhaust system. as possible. Remember, your Toyota fuel level; running out of fuel could Its purpose is to reduce pollutants in the dealer knows your vehicle and its cause the engine to misfire, creat- exhaust gas. - Page 156
It contains carbon monoxide, which periodic inspections required by the is a colorless and odorless gas. It gases to be drawn into the vehicle. Toyota Maintenance Schedule. For can cause unconsciousness or even » To allow proper operation of your scheduled maintenance information, death. - Page 157
Toyota recommends that the oil by the high temperature combustion diluted and make it difficult to judge level be checked every time you refuel gases during the combustion process. - Page 158
In this case the brakes may not work properly. If they do not work well, depress the brake pedal firmly. If the brake system warning light comes on, immediately stop your vehicle and contact your Toyota deal-… - Page 159
New L/C100(U) There may be the case that the brake » Even if the power assist is com- Effective way to press the ”ABS” brake system warning light stays on for about pletely lost, the brakes will still pedal: When the anti- lock brake system 60 seconds after the engine is started. - Page 160
You may prevent the anti- road surface. Have your vehicle checked Depressing the brake pedal repeatedly lock brake system from operating at by your Toyota dealer as soon as pos- may turn on the light. It is normal if it full effectiveness. sible. - Page 161
» Be careful to keep the vehicle bal- brake shoes and/or drums are replaced. anced. Locating the weight as far for- Have your Toyota dealer perform the bed- ward as possible helps maintain the ding- down. balance. «… - Page 162
New L/C100(U) Rear step bumper » NOTICE Never allow anyone to ride in the luggage compartment. It is not de- Do not load the vehicle beyond the signed for passengers. They should vehicle capacity weight given in Part ride in their seats with their seat belts properly fastened. - Page 163
This is the primary identification number Use only a spare tire of the same for your Toyota. It is used in registering size, construction and load capacity the ownership of your vehicle. as the original tires on your Toyota… - Page 164
New L/C100(U) —Engine number Theft prevention labels Suspension and chassis Your new vehicle carries theft preven- CAUTION tion labels which are approximately 56 mm (2.20 in.) by 16 mm (0.63 in.). Do not modify the suspension/chassis The purpose of these labels is to reduce with lift kits, spacers, springs, etc. - Page 165
New L/C100(U) Types of tires Determine what kind of tires your ve- CAUTION hicle is originally equipped with. 1. Summer tires » Do not mix summer and all season Summer tires are high- speed capability tires on your vehicle as this can tires best suited to highway driving under cause dangerous handling charac- dry conditions. - Page 166
New L/C100(U) - Page 167
New L/C100(U) How to start the engine– (a) Before cranking Before starting the engine Part 3 1. Check the area around the vehicle be- 1. Apply the parking brake firmly. STARTING AND DRIV- fore entering it. 2. Turn off unnecessary lights and acces- 2. - Page 168
If the engine will not start… ing brake pulled. If they still do not See ”If your vehicle will not start” in Part work safely, pull to the side of the road and call a Toyota dealer for assistance. - Page 169
New L/C100(U) Off- road driving precautions When driving your vehicle off- road, please » CAUTION Do not drive in excess of the speed observe the following precautions to en- limit. Even if the legal speed limit sure your driving enjoyment and to help «… - Page 170
New L/C100(U) » z Sand and mud that has accumulated CAUTION driver passengers in brake drums and around brake should fasten their seat belts when- ever the vehicle is moving. discs may affect braking efficiency Always observe the following precau- and may damage brake system com- tions to minimize the risk of serious ponents. - Page 171
”Toyota Long Life Coolant” or equivalent. harder starting. If you are not sure about accumulated in and around the parking which oil to use, call your Toyota dealer– brake mechanism may freeze, making it See Chapter 7- 2 for details about coolant he will be pleased to help. - Page 172
Ask your fied for the trailer- hitch. Exceeding capacity. The combination of the local Toyota dealer for further details be- gross trailer weight added to the the maximum weight rating set by fore towing. - Page 173
» Tongue load If you wish to install a trailer hitch, you 100 = 9 to 11% ( 1) should consult with your Toyota dealer. Total trailer weight or 15% ( 2) » Use only a hitch recommended by the… - Page 174
New L/C100(U) Trailer Class Typical Trailer Ball Size NOTICE 2—5/16 in. 2 in. Do not use axle- mounted hitches as 1—7/8 in. they can cause damage to the axle housing, wheel bearings, wheels or 2. Select the appropriate trailer ball to tires. - Page 175
» Never tap into your vehicle’s hy- BRAKES AND SAFETY CHAINS draulic system as it would lower its » Toyota recommends trailers with braking effectiveness. brakes that conform to any applica- » Never tow a trailer without using a… - Page 176
This is especially » provincial or local regulation. If not, true on wet or slippery surfaces. Toyota recommends that you do not install the rear view mirrors required tow a trailer with a new vehicle or a for towing purpose. - Page 177
New L/C100(U) » » » Avoid jerky starts or sudden accelera- Crosswinds and rough roads will ad- Because of the added load of the trail- tion. versely affect handling of your vehicle er, your vehicle’s engine may overheat » and trailer, causing sway. Pay attention on hot days temperatures over Avoid jerky steering and sharp turns. - Page 178
New L/C100(U) How to save fuel and make your vehicle last longer, too When restarting out after parking on a Getting more kilometers/mileage from a CAUTION slope: liter/gallon of fuel is easy–just take it easy. It will help make your vehicle last 1. - Page 179
New L/C100(U) » » Avoid continuous speeding up and Keep the bottom of your vehicle free slowing down. Stop- and- go driving from mud, etc. This not only lessens wastes fuel. weight but also helps prevent corro- » sion. Avoi d u nnecessar y s t oppi ng a nd «… - Page 180
New L/C100(U) - Page 181
IN CASE OF AN you have followed the correct starting not start, it needs adjustment or repair. procedure given in ”How to start the Call a Toyota dealer or qualified repair EMERGENCY engine” in Part 3 and that you have shop. - Page 182
If the engine still will not start, it needs » Batteries contain sulfuric acid adjustment or repair. Call a Toyota dealer which is poisonous and corrosive. or qualified repair shop for assistance. Wear protective safety glasses when jump starting, and avoid spilling NOTICE acid on your skin, clothing, or ve- hicle. - Page 183
New L/C100(U) JUMP STARTING PROCEDURE » The gas normally produced by a 1. If the booster battery is installed in Discharged battery battery will explode if a flame or another vehicle, make sure the vehicles spark is brought near. Use only are not touching. - Page 184
New L/C100(U) 5. Start your engine in the normal way. After starting, run it at about 2000 rpm Jumper cable for several minutes with the accelerator pedal lightly depressed. 6. Carefully disconnect the cables in the exact reverse order: the negative cable and then the positive cable. - Page 185
If there is no coolant will be much harder than usual. coolant is leaking, stop the engine im- boiling over or steam, leave the engine mediately. Call a Toyota dealer for as- running. sistance. CAUTION 5. If the engine drive belt is O.K. and… - Page 186
5. Read the following instructions thor- Never get under the vehicle when system. You should have it checked as oughly. the vehicle is supported by the jack soon as possible at your Toyota dealer. alone. CAUTION » Use the jack only for lifting your vehicle during wheel changing. - Page 187
New L/C100(U) —Required tools and spare tire NOTICE Do not continue driving with a de- flated tire. Driving even a short dis- tance can damage a tire beyond re- pair. 1. Get the required tools and spare Turn the jack joint by hand. tire. - Page 188
New L/C100(U) To remove the spare tire under the lug- When connecting a jack handle extension 2. Remove the access hole cover on the gage compartment: with a jack handle end, use a Phillips- rear bumper with a flat- blade screw- head screwdriver or jack handle to tighten driver. - Page 189
New L/C100(U) 3. Insert the jack handle end into the low- 4. After the tire is lowered completely to When storing the spare tire, put it in place ering screw through the access hole the ground, remove the holding bracket with the outer side of the wheel facing up and turn it counterclockwise with push- as shown in the illustration. - Page 190
New L/C100(U) —Blocking the wheel —Removing wheel ornament —Loosening wheel nuts 2. Block the wheel diagonally opposite 3. Remove the wheel ornament. 4. Loosen all the wheel nuts. the flat tire to keep the vehicle from Pry off the wheel ornament, using the Always loosen the wheel nuts before rais- rolling when it is jacked up. -
Page 191: Positioning The Jack
New L/C100(U) —Positioning the jack When jacking up the rear tires, do not install the adapter on the jack. CAUTION Make sure of the secure installation of the adapter and the jack positioned Front Rear on a level and solid surface. Make sure the jack is positioned on a level and solid place.
- Page 192
New L/C100(U) —Raising your vehicle CAUTION Never get under the vehicle when the vehicle supported jack alone. When connecting a jack handle extension 6. After making sure that no one is in with another extension and a jack handle the vehicle, raise it high enough so end, use a Phillips- head screwdriver or that the spare tire can be installed. - Page 193
New L/C100(U) —Changing wheels —Reinstalling wheel nuts 7. Remove the wheel nuts and change Before putting on wheels, remove any cor- 8. Reinstall all the wheel nuts finger tires. rosion on the mounting surfaces with a tight. wire brush or such. Installation of wheels Lift the flat tire straight off and put it Reinstall the wheel nuts (tapered end in- without good metal- to- metal contact at the… - Page 194
New L/C100(U) —Lowering your vehicle —Reinstalling wheel ornament CAUTION When lowering the vehicle, make sure all portions of your body and all oth- er persons around will not be injured the vehicle is lowered to the ground. 9. Lower the vehicle completely and 10. - Page 195
11. Check the air pressure of the re- If towing is necessary, we recommend (a) Towing with wheel lift type truck— placed tire. you have it done by your Toyota dealer or a commercial tow truck service. In Adjust the air pressure to the specification —From front consultation with them, have your ve- designated in Part 8. - Page 196
New L/C100(U) —Emergency towing (a) Towing with wheel lift type truck (c) Towing with sling type Use a towing dolly under the wheels not truck lifted by the truck. (b) Using flat bed truck Front (c) Towing with sling type truck NOTICE Do not tow with sling type truck, ei- ther from the front or rear. - Page 197
New L/C100(U) If towing is necessary, we recommend CAUTION CAUTION you to have it done by your Toyota dealer or a commercial tow truck ser- Use extreme caution when towing ve- If the engine is not running, the pow- vice. - Page 198
» If the towing vehicle can hardly move, do not forcibly continue the towing. Contact your Toyota dealer or a commercial tow truck service for assistance. » Tow the vehicle as straight ahead as possible. - Page 199
Toyota dealer if you can give them the key number and master key. Even if you lose only one key, contact your Toyota dealer to make a new key. If you lose all your master keys, you cannot make new keys; the whole engine immobi- liser system must be replaced. - Page 200
New L/C100(U) - Page 201
Now, it is up to you. Proper » High temperatures will cause corrosion care of your Toyota can help ensure long- to those components of the vehicle » Protecting your Toyota from term corrosion prevention. - Page 202
We recommend See ”Washing and waxing your Toyota” for » When driving in the areas where there that the fittings and the area where the more tips. - Page 203
NOTICE ing your Toyota through an automatic car wash. NOTICE Do not use gasoline or strong sol- vents, which may be toxic or cause Always remove the plastic bumpers if damage. - Page 204
New L/C100(U) Cleaning the interior NOTICE NOTICE CAUTION z Do not use dye or bleach on the Do not use solvent, thinner, gasoline Do not wash the vehicle floor with or window cleaner on the interior. belts—it may weaken then water, or allow water to get onto the z Do not use the belts until they be- floor when cleaning the vehicle interi-… - Page 205
If you have any questions about the leather these could cleaning of your Toyota, your local cause discoloring. Toyota dealer will be pleased to answer them. z Use of a nylon brush or synthetic fiber cloth, etc. may scratch the fine grained surface of the leather. - Page 206
New L/C100(U) -
Page 207: Maintenance And Care
See ”Owner’s War- or if you prefer, your Toyota dealer will be ranty Information Booklet” or ”Owner’s pleased to do them at a nominal cost.
- Page 208
They learn to work on Supplement” for the details. vehicle to your Toyota dealer or a quali- Toyotas before they work on your vehicle, fied service shop immediately. It is recom- rather than while they are working on it. - Page 209
New L/C100(U) Tire surface and wheel nuts INSIDE THE VEHICLE Seat belts Check the tires carefully for cuts, damage Check that the seat belt system such as Items listed below should be checked or excessive wear. See Chapter 7- 2 for buckles, retractors and anchors operate regularly, e.g. - Page 210
New L/C100(U) Does your vehicle need repairing? Automatic transmission ”Park” mecha- Brake fluid level Be on the alert for changes in perfor- nism Make sure the brake fluid level is correct. mance, sounds, and visual tip- offs that Check the lock release button of the se- See Chapter 7- 2 for additional information. - Page 211
» Engine continually runs hot; oil pres- sure gauge stays low If you notice any of these clues, take your vehicle to your Toyota dealer as soon as possible. It probably needs adjustment or repair. CAUTION Do not continue driving with the ve- hicle unchecked. - Page 212
New L/C100(U) - Page 213
New L/C100(U) Part 7 DO- IT- YOURSELF MAINTENANCE Chapter 7- 1 Introduction » Engine compartment overview » Fuse locations » Do- it- yourself service precautions » Parts and tools… - Page 214
New L/C100(U) Engine compartment overview 1. Engine oil filler cap 2. Brake fluid reservoir 3. Fuse blocks 4. Battery 5. Windshield rear window washer fluid tank 6. Engine oil level dipstick 7. Engine coolant reservoir 8. Electric cooling fan 9. Power steering fluid reservoir… - Page 215
New L/C100(U) Fuse locations Spare fuses… - Page 216
Read separate compartment—the engine, radiator, should be taken to avoid prolonged Toyota Warranty statement for details and exhaust manifold, power steering and repeated contact with it. To re- suggestions. fluid reservoir… - Page 217
Remember that battery and ignition nance. Remember all Toyota parts are de- wear could result. Also backfiring signed in metric sizes, so your tools must cables carry high currents or volt- could cause a fire in the engine be metric. - Page 218
New L/C100(U) Checking brake fluid Checking and replacing fuses Parts (if level is low): Parts (if replacement is necessary): » » SAE J1703 or FMVSS No.116 DOT 3 Fuse with same amperage rating as brake fluid original Tools: Adding washer fluid «… - Page 219
New L/C100(U) Checking the engine oil level Part 7 DO- IT- YOURSELF Low level Full level MAINTENANCE— Chapter 7- 2 Engine and Chassis » Checking the engine oil level » Add oil O.K. Too full Checking engine coolant level » Checking brake fluid With the engine at operating tempera- 3. - Page 220
New L/C100(U) 4. Pull the dipstick out and look at the oil ENGINE OIL SELECTION NOTICE level on the end. Use API grade SJ, ”Energy- Conserving” z Avoid overfilling, engine multigrade engine oil or ILSAC multigrade CAUTION could be damaged. engine oil. - Page 221
Visually check the radiator, hoses, radiator cap and drain cock and water pump. If you can find no leak, have your Toyota dealer test the cap pressure and check for leaks in the cooling system. ILSAC certification mark… - Page 222
New L/C100(U) Checking brake fluid We recommend to use 50% solution for CAUTION your Toyota, to provide protection down to about -35_C (- 31_F). When it is extreme- To prevent burning yourself, do not ly cold, to provide protection down to… - Page 223
New L/C100(U) Checking power steering fluid If the level is low, add SAE J1703 or NOTICE FMVSS No. 116 DOT 3 brake fluid to the brake reservoir. If you spill the fluid, be sure to wipe If cold If hot it off to prevent it from damaging the O.K. - Page 224
If the caps If a tire frequently needs refilling, have it have been lost, have new ones put on checked by your Toyota dealer. as soon as possible. - Page 225
When a tire is replaced, the wheel REPLACING YOUR TIRES The tires on your Toyota have built- in should always be balanced. tread wear indicators to help you know When replacing a tire, use only the An unbalanced wheel may affect vehicle when the tires need replacement. - Page 226
SNOW TIRE SELECTION If you need snow tires, select the same size, construction and load capacity as the original tires on your Toyota. Do not use tires other than those men- tioned above. Do not install studded tires without first checking local regulations for To equalize tire wear and help extend possible restrictions. - Page 227
New L/C100(U) Regulations regarding the use of tire CAUTION chains vary according to location or Side chain type of road, so always check them » Do not exceed 50 km/h (30 mph) or before installing chains. chain manufacturer’s recom- CHAIN INSTALLATION mended speed limit, whichever is Install the chains on the rear tires as lower. - Page 228
When replacing wheels, care should be » Use only the Toyota wheel nuts and taken to ensure that the wheels are re- wrench designed for your aluminum placed by ones with the same load ca- wheels. - Page 229
New L/C100(U) Checking battery condition— —Precautions Part 7 DO-IT-YOURSELF » CAUTION If electrolyte gets on your skin, thoroughly wash the contact area. If MAINTENANCE— BATTERY PRECAUTIONS you feel pain or burning, get medi- cal attention immediately. The battery produces flammable and «… - Page 230
Have battery tighten. DARK WHITE checked by your Tighten hold- down clamp only Toyota dealer. enough to keep the battery firmly in place. Overtightening may damage the battery CLEAR Have battery case. or LIGHT checked by your YELLOW Toyota dealer. - Page 231
New L/C100(U) Checking and replacing fuses Battery recharging precautions During recharging, the battery is pro- ducing hydrogen gas. Therefore, before recharging: Type A 1. If recharging with the battery installed on the vehicle, be sure to disconnect the ground cable. 2. - Page 232
Add washer tool is shown in the illustration. tem. Have your Toyota dealer correct it as fluid. soon as possible. If you are not sure whether the fuse has You may use plain water as washer fluid. - Page 233
New L/C100(U) Replacing light bulbs— —Headlights The following illustrations show how to Bulb Light bulbs Type gain access to the bulbs. When replacing a bulb, make sure the ignition switch and Front fog lights 9006 light switch are off. Use bulbs with the Parking lights —… - Page 234
If the connector is tight, wiggle it. LEFT–HAND HEADLIGHT: Install washer inlet securely. Aiming is not necessary after replacing the bulb. When aiming adjustment is nec- essary, contact your Toyota dealer. - Page 235
If the connector is tight, wiggle it. Aiming is not necessary after replacing the bulb. When aiming adjustment is nec- essary, contact your Toyota dealer. - Page 236
New L/C100(U) —Front turn signal and front side marker lights —Parking lights Use a Phillips – head screwdriver. Use a Phillips – head screwdriver. - Page 237
New L/C100(U) —Stop and tail lights Use a Phillips–head screwdriver. - Page 238
New L/C100(U) —Rear turn signal, stop and tail, and back–up lights —License plate lights Use a Flat- bladed screwdriver. a: Back–up light b: Rear turn signal light c: Stop and tail light… - Page 239
New L/C100(U) - Page 240
New L/C100(U) -
Page 241: Specifications
New L/C100(U) Dimensions and weight Engine Part 8 Overall length mm (in.) 4890 (192.5) Model: SPECIFICATIONS 2UZ- FE Overall width mm (in.) 1940 (76.4) Type: Overall height mm (in.) 1875 (73.8) » Dimensions and weight 8 cylinder V type, 4 cycle, gasoline Wheelbase mm (in.) 2850 (112.2)
- Page 242
Coolant type: be obtained, you may temporarily use DENSO SK20R11 unleaded gasoline with an Octane Rat- ”Toyota Long Life Coolant” or equivalent IFR6A11 ing as low as 87 (Research Octane With ethylene- glycol type coolant for a Number 91). Spark plug gap, mm (in.): proper corrosion protection of aluminum 1.1 (0.043) - Page 243
New L/C100(U) AUTOMATIC TRANSMISSION Oil type: BRAKES Standard differential Fluid capacity (drain and refill), L (qt., Minimum pedal clearance when depressed Hypoid gear oil API GL- 5 Imp. qt.) with the pressure of 490 N (50 kgf, 110 Limited slip differential Up to 3.5 (3.7, 3.1) lbf) with the engine running, mm (in.): Hypoid gear oil for limited slip differ-… - Page 244
New L/C100(U) Tires Fuses Tire size: P275/70R16 114S Tire pressure, kPa (kgf/cm or bar, psi): Normal driving Front 220 (2.2, 32) Rear 220 (2.2, 32) Tailer towing Front 220 (2.2, 32) Rear 240 (2.4, 35) Wheel size: Wheel nut torque, N·m (kgf·m, ft·lbf): 131 (13.4, 96.6) Engine compartment Engine compartment… - Page 245
New L/C100(U) 18. HEAD (RH- UPR) 20 A: Right- hand 28. GAUGE 15 A: Gauges and meters, headlight (high beam) service reminder indicators and warning buzzer (except discharge, open door 19. HEAD (LH- LWR) Left- hand warning lights), back- up headlight (low beam), front fog lights lights, air conditioning system, electron- 20. - Page 246
New L/C100(U) 40. ECU- IG 15 A: Anti- lock brake system, 51. AM1 NO.1 80 A: Charging system, all shift lock system, power seats, power components in ”AM1 NO.2”, ”GAUGE”, antenna, power tilt telescopic ”WIPER”, ”DIFF”, ”A.C” ”SEAT steering system HTR”… -
Page 247: Uniform Tire Quality Grading
However, NHTSA cannot become involved in individual prob- lems between you, your dealer, or Toyota Motor Sales, U.S.A., Inc.
- Page 248
A tire marked C may have tire failure. quality grading. poor traction performance. Your Toyota dealer will help answer any Warning: The traction grade assigned to questions you may have as you read this this tire is based on braking (straight information. - Page 249
New L/C100(U) U −3 Quick index » If a service reminder indicator or warning buzzer comes on ..» If your vehicle will not start ……..»…
Общий вид панели приборов представлен в разделе Органы управления и приемы безопасной эксплуатации автомобиля.
Комбинация приборов
Схема расположения компонентов комбинации приборов представлена на сопроводительных иллюстрациях.
Схема размещения рабочих элементов комбинации приборов модели Toyota Land Cruiser

1 — Вольтметр; 2 — Спидометр; 3 — Контрольной лампы и индикаторы; 4 — Тахометр; 5 — Указатель давления двигательного масла; 6 — Указатель температуры охлаждающей жидкости; 7 — Одометр и два счетчика пробега; 8 — Кнопка сброса показаний счетчика пробега; 9 — Указатель запаса топлива
Схема размещения рабочих элементов комбинации приборов модели TLexus LX 470
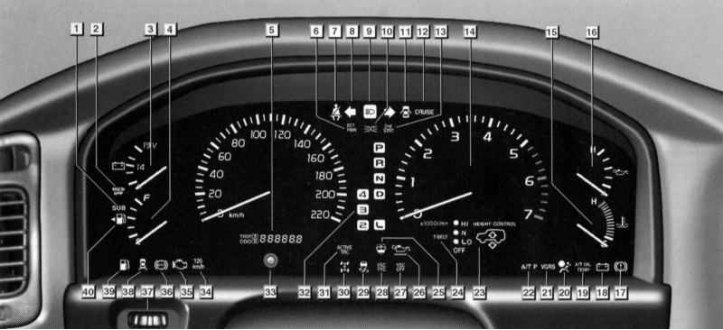
1 — К/Л активации дополнительного топливного бака; 2 — К/Л отключения боковых подушек безопасности; 3 — Вольтметр; 4 — Указатель запаса топлива; 5 — Одометр и 2-режимный счетчик пробега; 6 — К/Л активации режима PWR; 7 — К/Л не пристегнутого ремня безопасности водителя; 8 — К/Л включенных указателей поворотов; 9 — К/Л включенного дальнего света головных фар; 10 — К/Л включенных задних туманных фонарей; 11 — К/Л открытой двери; 12 — К/Л активации темпостата; 13 — К/Л активации режима старта со 2-й передачи; 14 — Тахометр; 15 — Указатель температуры охлаждающей жидкости; 16 — Указатель давления двигательного масла; 17 — К/Л неисправности тормозной системы; 18 — К/Л разрядки батареи; 19 — К/Л температуры ATF; 20 — К/Л системы SRS; 21 — К/Л неисправности системы рулевого управления с переменным передаточным числом; 22 — К/Л не установленного положения «Park» АТ; 23 — Индикаторы системы управления высотой подвески; 24 — К/Л требующейся замены ремня привода ГРМ; 25 — К/Л низкого уровня жидкости стеклоомывателя; 26 — К/Л низкого уровня двигательного масла; 27 — К/Л выключенной системы VSC; 28 — К/Л неисправности систем VSC и TRC; 29 — К/Л обнаружения проскальзывания колес; 30 — К/Л блокировки межосевого дифференциала; 31 — К/Л активации системы TRC; 32 — Индикаторы выбранной передачи АТ; 33 — Кнопка выбора отображения показаний счетчиков пробега и одометра; 34 — К/Л превышения скорости; 35 — К/Л неисправности (MIL); 36 — К/Л системы ABS; 37 — Регулятор яркости подсветки комбинации приборов; 38 — К/Л неисправности задних фонарей; 39 — К/Л низкого уровня топлива; 40 — Указатель стороны автомобиля, на которой расположена дверца топливной заливной горловины
Рукоятка регулятора положения рулевого колеса на модели Lexus LX 470

Контрольные лампы и индикаторы
Перечень контрольных ламп комбинации приборов, не указанных на иллюстрации см. в таблице.
Примечание. Указанные в таблице контрольные лампы могут встречаться на некоторых вариантах комбинации приборов модели Lexus LX 470, отличных от указанной на иллюстрации, а также на моделях Toyota Land Cruiser. Некоторые К/Л комбинации приборов модели Toyota Land Cruiser также перечислены на иллюстрации, отличается только их расположение.
Ссылка в разных форматах на эту статью
TEXTHTMLBB Code
Комментарии и отзывы посетителей
Комментариев пока нет
Приборный щиток и сигнальные устройства
Общий вид панели приборов представлен в разделе Органы управления и приемы безопасной эксплуатации автомобиля.
Комбинация приборов
Схема расположения компонентов комбинации приборов представлена на сопроводительных иллюстрациях.
Схема размещения рабочих элементов комбинации приборов модели Toyota Land Cruiser
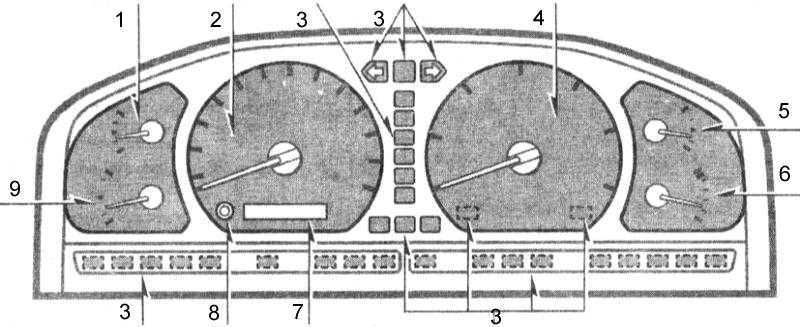 |
|
|
1 — Вольтметр |
6 — Указатель температуры охлаждающей жидкости |
Схема размещения рабочих элементов комбинации приборов модели TLexus LX 470
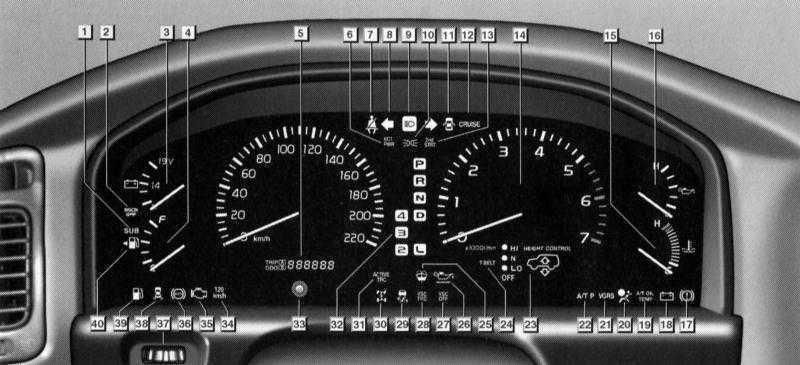 |
|
|
1 — К/Л активации дополнительного топливного бака |
21 — К/Л неисправности системы рулевого управления с переменным передаточным числом |
Рукоятка регулятора положения рулевого колеса на модели Lexus LX 470

Контрольные лампы и индикаторы
Перечень контрольных ламп комбинации приборов, не указанных на иллюстрации см. в таблице.
|
Указанные в таблице контрольные лампы могут встречаться на некоторых вариантах комбинации приборов модели Lexus LX 470, отличных от указанной на иллюстрации, а также на моделях Toyota Land Cruiser. Некоторые К/Л комбинации приборов модели Toyota Land Cruiser также перечислены на иллюстрации, отличается только их расположение. |
Коды неисправностей электронных систем TOYOTA
Коды неисправностей бензиновых двигателей (Toyota)
———————————————————————————
Коды самодиагностики считываются по числу вспышек индикатора «CHECK ENGINE» при замкнутых выводах «TE1»-«E1» разъема DLC1 под капотом или «TC»-«CG» разъема DLC3 под приборной панелью и включенном зажигании.
12 — Датчик положения коленчатого вала (P0335)
13 — Датчик положения коленчатого вала (P0335, P1335)
14 — Система зажигания, катушка №1 (P1300) и №4 (P1315)
15 — Система зажигания, катушка №2 (P1305) и №3 (P1310)
16 — Система управления АКПП
18 — Система VVT-i — фазы (P1346)
19 — Датчик положения педали акселератора (P1120)
19 — Датчик положения педали акселератора (P1121)
21 — Кислородный датчик (P0135)
22 — Датчик температуры охлаждающей жидкости (P0115)
24 — Датчик температуры воздуха на впуске (P0110)
25 — Кислородный датчик — сигнал бедной смеси (P0171)
27 — Кислородный датчик №2
31 — Датчик абсолютного давления (P0105, P0106)
34 — Система турбонаддува
35 — Датчик давления турбонаддува
36 — Датчик CPS (P1105)
39 — Система VVT-i (P1656)
41 — Датчик положения дроссельной заслонки (P0120, P0121)
42 — Датчик скорости автомобиля (P0500)
43 — Сигнал стартера
47 — Датчик положения дополнительной дроссельной заслонки
49 — Датчик давления топлива (D-4) (P0190, P0191)
51 — Состояние выключателей
52 — Датчик детонации (P0325)
53 — Сигнал детонации
55 — Датчик детонации №2
58 — Привод SCV (D-4) (P1415, P1416, P1653)
59 — Сигнал VVT-i (P1349)
71 — Система EGR (P0401, P0403)
78 — ТНВД (D-4)
89 — Привод ETCS (P1125, P1126, P1127, P1128, P1129, P1633)
92 — Форсунка холодного пуска (D-4) (P1210)
97 — Форсунки (D-4) (P1215)
Коды неисправностей дизельных двигателей (Toyota)
———————————————————————————
12 — Датчик положения коленчатого вала
13 — Датчик частоты вращения
14 — Клапан регулировки угла опережения впрыска
15 — Сервопривод дроссельной заслонки
17 — Сигнал блока управления
18 — Электромагнитный перепускной клапан
19 — Датчик положения педали акселератора
22 — Датчик температуры охлаждающей жидкости
24 — Датчик температуры воздуха на впуске
32 — Корректирующие резисторы
35 — Датчик давления наддува
39 — Датчик температуры топлива
42 — Датчик скорости автомобиля
96 — Датчик положения клапана EGR
Коды неисправностей АКПП (Toyota)
———————————————————————————
Коды самодиагностики считываются по числу вспышек индикатора «O/D OFF» при замкнутых выводах «TE1»-«E1» разъема DLC1 под капотом или «TC»-«CG» разъема DLC3 под приборной панелью и включенном зажигании (при этом должно быть разрешено включение повышающей передачи — «O/D OFF» не горит).
11 — Норма
37 — Датчик частоты вращения входного вала АКПП (Р1705)
38 — Датчик температуры рабочей жидкости АКПП
42 — Датчик скорости (или датчик частоты вращения выходного вала) (Р0500)
44 — Датчик скорости (или датчик частоты вращения заднего выходного вала)
46 — Соленоид управления давлением гидроаккумулятора (Р1765)
61 — Датчик скорости (или датчик частоты вращения переднего выходного вала)
62 — Соленоид №1 (Р0753)
63 — Соленоид №2 (Р0758)
64 — Соленоид муфты блокировки гидротрансформатора (Р0773)
67 — Датчик частоты вращения входного вала АКПП
68 — Соленоид управления муфтой блокировки гидротрансформатора
73 — Соленоид муфты блокировки межосевого дифференциала
Коды неисправностей ABS (Toyota)
———————————————————————————
Считывание кодов (модели с разъемом DLC1)
— Включите зажигание.
— Перемкните выводы «ТС» и «E1» разъема DLC1.
— Снимите перемычку с выводов «WA» и «WB» разъема DLC1.
— Через 4 секунды считайте код по количеству вспышек индикатора.
— Снимите перемычку с выводов «TC» и «E1».
— Установите перемычку на выводы «WA» и «WB».
Сброс кодов (модели с разъемом DLC1)
— Включите зажигание.
— Перемкните выводы «ТС» и «E1» разъема DLC1 (автомобиль неподвижен).
— Нажмите на педаль тормоза восемь или более раз в интервале трех секунд.
— Индикатор должен выводить код нормы (мигать 2 раза в секунду).
— Выключите зажигание.
— Снимите перемычку с выводов «TC» и «E1».
— Убедитесь, что индикатор ABS погас.
Считывание кодов (модели с разъемом DLC3)
— Перемкните выводы «ТС» и «CG» разъема DLC3.
— Включите зажигание.
— Через 4 секунды считайте код по количеству вспышек индикатора.
— Снимите перемычку с выводов «TC» и «CG».
Сброс кодов (модели с разъемом DLC3)
— Перемкните выводы «ТС» и «CG» разъема DLC3.
— Включите зажигание.
— Нажмите на педаль тормоза восемь или более раз в интервале трех секунд.
— Индикатор должен выводить код нормы (мигать 2 раза в секунду).
— Снимите перемычку с выводов «TC» и «CG».
Код Система
11 Обрыв цепи реле электромагнитного клапана
12 Короткое замыкание в цепи реле э/м клапана
13 Обрыв в цепи реле электронасоса
14 Короткое замыкание в цепи реле электронасоса
21 Обрыв или короткое замыкание в э/м клапане переднего правого колеса
22 Обрыв или короткое замыкание в э/м клапане переднего левого колеса
23 Обрыв или короткое замыкание в э/м клапане заднего правого (левого) колеса
24 Обрыв или короткое замыкание в э/м клапане заднего левого (правого) колеса
31 Неисправность датчика частоты вращения переднего правого колеса
32 Неисправность датчика частоты вращения переднего левого колеса
33 Неисправность датчика частоты вращения заднего правого колеса
34 Неисправность датчика частоты вращения заднего левого колеса
41 Слишком высокое или слишком низкое напряжение аккумуляторной батареи
43 Неисправность в цепи датчика замедления
44 Обрыв или короткое замыкание в цепи датчика замедления
49 Обрыв в цепи выключателя стоп-сигналов
51 Короткое замыкание или обрыв цепи питания электронасоса
71 Низкий уровень сигнала от датчика частоты вращения переднего правого колеса
72 Низкий уровень сигнала от датчика частоты вращения переднего левого колеса
73 Низкий уровень сигнала от датчика частоты вращения заднего правого колеса
74 Низкий уровень сигнала от датчика частоты вращения заднего левого колеса
75 Неправильное изменение сигнала от датчика частоты вращения переднего правого колеса
76 Неправильное изменение сигнала от датчика частоты вращения переднего левого колеса
77 Неправильное изменение сигнала от датчика частоты вращения заднего правого колеса
78 Неправильное изменение сигнала от датчика частоты вращения заднего левого колеса
79 Неисправность датчика замедления
98 — Датчик разрежения в вакуумном усилителе тормозов (C1200
Коды неисправностей SRS (Toyota)
———————————————————————————
Коды самодиагностики считываются аналогично прочим, по числу вспышек индикатора «SRS» при замкнутых выводах «TC»-«E1» разъема DLC1 под капотом или «TC»-«CG» разъема DLC3 под приборной панелью и включенном зажигании.
Стирание кодов должно происходить при выключении зажигание. Если коды сохраняются, необходимо провести процедуру очистки:
— подсоединть два провода к выводам «TC» и «AB»
— включить зажигание и подождать не менее 6 секунд
— поочередно, раз в секунду, замыкать на массу выводы «TC» и «AB» (пауза между замыканием — менее 0,2 секунды)
— после третьего замыкания вывода «TC» индикатор должен замигать с высокой частотой — значит коды стерты.
11 — Воспламенитель ПБ водителя (замыкание на массу)
12 — Воспламенитель ПБ водителя (замыкание на питание)
13 — Воспламенитель ПБ водителя (замыкание в цепи)
14 — Воспламенитель ПБ водителя (разрыв в цепи)
15 — Передний правый датчик SRS (замыкание или разрыв в цепи)
15 — Передний правый датчик SRS (замыкание на массу или питание)
16 — Передний левый датчик SRS (замыкание или разрыв в цепи)
16 — Передний левый датчик SRS (замыкание на массу или питание)
31 — Неисправность блока управления SRS
51 — Воспламенитель ПБ пассажира (замыкание на массу)
52 — Воспламенитель ПБ пассажира (замыкание на питание)
53 — Воспламенитель ПБ пассажира (замыкание в цепи)
54 — Воспламенитель ПБ пассажира (разрыв в цепи)
61 — Воспламенитель преднатяжителя ремня водителя (замыкание на массу)
62 — Воспламенитель преднатяжителя ремня водителя (замыкание на питание)
63 — Воспламенитель преднатяжителя ремня водителя (замыкание в цепи)
64 — Воспламенитель преднатяжителя ремня водителя (разрыв в цепи)
71 — Воспламенитель преднатяжителя ремня пассажира (замыкание на массу)
72 — Воспламенитель преднатяжителя ремня пассажира (замыкание на питание)
73 — Воспламенитель преднатяжителя ремня пассажира (замыкание в цепи)
74 — Воспламенитель преднатяжителя ремня пассажира (разрыв в цепи)
Коды неисправностей системы 4WS (Toyota)
———————————————————————————
Коды самодиагностики считываются по числу вспышек индикатора «4WS» при замкнутых выводах «TC»-«E1» разъема DLC1 под капотом и включенном зажигании.
Код Система
— —
11 Электронный блок управления 4WS
12 Неисправность главного электродвигателя заднего рулевого механизма
13 Неисправность привода управления рулевым механизмом
21 Короткое замыкание в системе главного электродвигателя
22 Разрыв цепи в системе главного электродвигателя
23 Блокировка главного электродвигателя
24 Неисправность в работе главного электродвигателя
31 Разрыв в системе электродвигателя заднего хода
32 Неисправность в работе электродвигателя заднего хода
41 Неисправность датчика частоты вращения левого переднего колеса
42 Неисправность датчика системы 4WS
43 Неверная работа датчика системы 4WS
Комбиниция приборов, измерители, контрольные лампы и индикаторы
Комбинация приборов

|
|
|
15 — К/Л низкого уровня жидкости омывателей стёкол 16 — К/Л высокой температуры ATF 17 — К/Л системы зарядки 18 — К/Л низкого давления двигательного масла 19 — К/Л системы SRS 20 — К/Л тормозной системы 21 — К/Л непристёгнутого ремня безопасности водителя 22 — К/Л открытой двери 23 — К/Л режима «SNOW» АТ 24 — К/Л режима «POWER» АТ 25 — К/Л выключения режима O/D 26 — К/Л низкого уровня топлива в баке 27 — Указатель запаса топлива |
Контрольно-измерительные приборы
Спидометр
Спидометр расположен в центральной части комбинации приборов и показывает скорость движения автомобиля в км/ч (миль/ч).
В разрыве циферблата спидометра размещён указатель пробега.
Указатель пробега
Указатель пробега может работать в одном из трёх режимов: одометр (регистрирует общий пробег транспортного средства с момента ввода его в эксплуатацию) и один из двух указателей пробега с момента обнуления показаний. Для переключения между режимами кратковременно нажмите соответствующую кнопку (№7), расположенную слева от указателя. При каждом нажатии режимы будут меняться в следующей последовательности: одометр, сбрасываемый счётчик A, сбрасываемый счётчик B, одометр и т.д.
Сбрасываемые счётчики пробега работают независимо друг от друга и могут быть использованы, например, для расчёта расхода топлива и для измерения пройденного расстояния. Для сбрасывания одного из счётчиков переведите указатель пробега в режим его отображения, затем нажмите и удерживайте кнопку переключения между режимами указателя.
|
|
Сбрасываемые счётчики пробега обнуляются при отсоединении проводов от аккумуляторной батареи. |
Тахометр
Тахометр находится справа от спидометра и показывает частоту вращения коленчатого вала двигателя в тысячах оборотов в минуту.
Тахометр предназначен для контроля над оборотами двигателя и для избегания работы двигателя на слишком низких или слишком высоких оборотах (когда стрелка доходит до красной зоны шкалы).
Указатель запаса топлива
Указатель запаса топлива расположен в левой нижней части комбинации приборов и служит для визуального мониторинга запаса остающегося в баке топлива.
Погрешность показаний указателя запаса топлива минимальна, когда автомобиль занимает строго горизонтальное положение, и увеличивается при движении автомобиля по извилистым или холмистым дорогам. Функционирование указателя не зависит от положения ключа зажигания. Метка «F» соответствует состоянию полной заправки, «E» – пустому баку. Расположенная справа от циферблата К/Л с изображением заправочной колонки извещает водителя о необходимости при первой же возможности произвести дозаправку автомобиля.
|
|
При полном опустошении топливного бака может загораться MIL. |
Указатель температуры двигателя
Указатель температуры двигателя расположен в левой верхней части комбинации приборов и служит для визуального представления температуры охлаждающей жидкости двигателя. Указатель работает только в том случае, если ключ зажигания находится в положении «ON».
Перемещение стрелки указателя к отметке «H» указывает на перегрев двигателя, который может привести к его повреждению. В этом случае следует прекратить движение, выключить К/В (если он был включён) и дождаться остывания двигателя. Проверьте уровень охлаждающей жидкости, проверьте систему охлаждения на наличие утечек при необходимости устраните их и долейте ОЖ.
Контрольные лампы и индикаторы
В сборку комбинации приборов автомобиля встроен целый комплекс контрольных ламп и индикаторов, при помощи которых водитель получает важную информацию об исправности/нарушении функционирования основных агрегатов и систем автомобиля. Некоторые К/Л встроены в выключатели, расположенные на панели приборов (см. иллюстрацию
Схема расположения элементов управления на панели приборов).
Ниже приведён перечень и описание
К/Л, встроенных в комбинацию приборов.

|
Световые индикаторы указателей поворотов и аварийной сигнализации. Учащенный режим работы индикаторов указывает на возможный выход из строя одной из ламп указателей поворотов. |
CRUISE — К/Л темпостата. Горит при включённом темпостате и выключается при его деактивации. Если во время работы темпостата К/Л начинает мигать, выключите и снова включите темпостат. Если мигание не прекращается, а также если К/Л не включается или не гаснет, обратитесь на СТО для решения этой проблемы.
ABS — Данная К/Л служит для контроля за исправностью функционирования ABS, кратковременно срабатывает при включении зажигания и через несколько секунд должна гаснуть. Отказ лампы от отключения, а также активация её во время движения свидетельствует о нарушении исправности функционирования ABS. Автомобиль следует без промедления отогнать на СТО для проведения диагностики и выполнения необходимого восстановительного ремонта.
ECT
PWR — Данная К/Л указывает на работу АТ в режиме «POWER».
ECT
SNOW — Данная К/Л указывает на работу АТ в режиме «SNOW».
O/D
OFF — Данная К/Л загорается при выключении режима «O/D».

|
К/Л низкого давления двигательного масла, — загорается в случае давления двигательного масла, недостаточного для нормальной работы двигателя. Если данная К/Л загорится во время движения автомобиля, при первой же возможности остановитесь и заглушите двигатель. Проверьте уровень двигательного масла и при необходимости откорректируйте его. Если при нормальном уровне масла К/Л всё равно не гаснет, обратитесь на СТО. |

|
К/Л системы зарядки, кратковременно срабатывает при включении зажигания и должна гаснуть спустя несколько секунд после осуществления запуска двигателя. Отказ лампы от отключения свидетельствует о наличии неисправности в системе зарядки. В этом случае проверьте и при необходимости отрегулируйте натяжение приводного ремня генератора. Если ремень натянут правильно, неисправность заключается в электропроводке системы заряда. Обратитесь на СТО для решения данной проблемы. |

|
К/Л непристёгнутого ремня безопасности водителя, напоминает о том, что водитель забыл пристегнуться ремнём безопасности. Индикатор продолжает гореть до тех пор, пока ремень не будет пристёгнут. Включение данного индикатора сопровождается звуковым напоминанием, которое будет звучать в течение около шести секунд. |
BRAKE К/Л низкого уровня тормозной жидкости/отказов тормозной системы/индикатор взведения стояночного тормоза. Индикатор взведения стояночного тормоза включается, если ключ зажигания находится в положении ON или START, а стояночный тормоз взведён. При отпускании стояночного тормоза индикатор должен выключиться. Включение К/Л низкого уровня тормозной жидкости происходит при включении зажигания, после чего К/Л должна погаснуть. В противном случае следует проверить уровень тормозной жидкости в резервуаре, а также гидравлические линии тормозной системы на наличие утечек.
|
|
Движение на автомобиле с неисправной тормозной системой недопустимо. |

|
Данная К/Л указывает на низкий уровень топлива в баке и напоминает о том, что при первой возможности следует заправится. |

|
К/Л открытой двери включается, если хотя бы одна из дверей автомобиля не закрыта. |

|
Данная К/Л служит для подтверждения включения фар. |

|
Данная К/Л служит для подтверждения включения дальнего света фар. |
P,
R,
N,
D,
2,
L — Индикаторы положения рычага селектора АТ используются расположены вертикально в ряд, слева от спидометра.

|
К/Л отказов (MIL, «Проверьте двигатель») кратковременно срабатывает при включении зажигания и должна гаснуть спустя несколько секунд после осуществления запуска двигателя. Отказ лампы от отключения, а также её активация во время движения свидетельствует о нарушении исправности функционирования системы управления двигателем. |

|
К/Л системы дополнительной безопасности (SRS) загорается при включении зажигания приблизительно на 6 секунд и должна гаснуть сразу после осуществления запуска двигателя. Если этого не происходит или если лама продолжает гореть при работающем двигателе, какой-либо из компонентов системы SRS неисправен (см. Раздел Система дополнительной безопасности (SRS)). Обратитесь на СТО для устранения такой неисправности. |

|
Если К/Л неисправности задних фонарей загорается при включении наружных осветительных приборов, это свидетельствует о том, что вышла из строя одна из ламп габаритных огней. Если данная К/Л загорается при нажатии на педаль тормоза, вышла из строя какая-либо лампа стоп-сигналов. |
AT OIL
TEMP — Данная К/Л указывает на перегрев ATF. Если данная К/Л загорится во время движения автомобиля, при первой же возможности остановитесь, переведите рычаг селектора АТ в положение «P» и дайте поработать двигателю до тех пор, пока К/Л не погаснет. Проверьте уровень ATF и при необходимости откорректируйте его. Если при нормальном уровне ATF К/Л всё равно не гаснет, обратитесь на СТО.

|
Данная К/Л указывает на низкий уровень жидкости омывателей стёкол. |
TRAC
OFF — К/Л системы VSC включается на несколько секунд при включении зажигания и при отсутствии неисправностей в системе VSC гаснет. Мигание этой К/Л свидетельствует о неисправности VSC. К/Л VSC включается также и при принудительном выключении системы посредством выключателя на панели приборов (№14 на иллюстрации
Схема расположения элементов управления на панели приборов).

|
Данная К/Л загорается при срабатывании системы VSC, т.е. при обнаружении проскальзывания одного из колёс. |

Технические дефекты появляются рано или поздно в автомобилях всех производителей, в том числе и японских. Коды ошибок Тойота водитель способен расшифровать самостоятельно, при этом определить неисправность систем возможно без применения сканеров. Если автолюбитель никогда раньше не сталкивался с такой проблемой, то эта статья поможет разобраться во всех нюансах и выполнить работы на профессиональном уровне.
Диагностика автомобилей Toyota
Диагностика доступна на автомобилях всего модельного ряда Toyota и делится на два вида:
Перед началом электронного диагностирования водитель обязан убедиться в рабочем состоянии всех систем и основных механизмов автомобиля Toyota. Для этого следует проверить предохранители, электропроводку, а также обследовать на предмет поломок соединения и узлы транспортного средства.
Если обнаруживается какая-либо серьезная неполадка, то ее необходимо устранить, и только потом проводить компьютерную диагностику, которая бывает:
Поэтапная самодиагностика
Для самодиагностики водителю необходимо работать с разъёмами DLC 1 и DLC 2. Расшифровывается эта аббревиатура Data Link Connector, что в переводе с английского означает – разъем для подключения данных. Выглядит DLC 1 как пластиковая коробка с крышкой сверху. Находится под капотом, чаще всего слева. Ее легко найти по надписи Diagnostic.
Подпись Diagnostic на разъёме
В старых моделях диагностический разъем выполнен в форме круга жёлтого цвета и расположен возле аккумулятора. Детали DLC2 в таких авто, как Королла AE 100, нет.
Коды неисправностей более старых моделей авто: Тойота Корона 1992 года, Карина 1992-97 годов, Toyota Марк считываются только с помощью мигания индикаторов.
В новых моделях DLC 2 находится непосредственно в салоне, под панелью торпеды и «в ногах» возле рулевого колеса. Чаще всего он круглый и используется во время проверки, проводимой с помощью специального оборудования.
Круглый разъём DLC2
При самодиагностике с помощью замыкания отдельных контактов разъёма, только соединив их в нужной последовательности, можно получить корректный код для расшифровки.
Узнать о наличии неисправностей в системе двигателя и/или КПП помогут такие шаги:
Схема разъёма DLC 1
С машиной все в порядке и никаких поломок с ДВС и трансмиссией не обнаружено если:
Любые другие комбинации свечения лампочек говорят о неисправностях в работе систем двигателя, коробки передач или других механизмов в автомобиле.
Если схема на обороте крышки стёрлась, вы не можете найти контакт или неуверены, что замкнули нужный, необходимо:
Удобнее будет, если за лампочкой кто-то поможет следить, пока вы меняете положение провода.
Распознают коды неисправностей при помощи двух систем мигания лампочек.
Первый вариант настройки позволит узнать ошибки, обозначенные двузначным кодом (тип 09):
С помощью 10-го типа настройки определяются однозначные коды. Здесь лампочка «промигает» точное число ошибки.
«Читать» такой код следует по правилам:
На видео представлена диагностика с помощью кода 9-го типа, автор Дмитрий Кузьмин:
Поломки в системе ABS определяются по той же схеме, но замыкаются выводы ТС и E1. Коды неисправностей SRS и 4WS считаются по соответствующему датчику при тех же замкнутых контактах, что и в ABS.
Фотогалерея «Самодиагностика автомобилей Тойота»
 Разъем для диагностики DLC 1
  Контакты TE1 и E1 на разъёме
  Замыкание контактов
  Расположение разъёма под капотом
Расшифровка неисправностей
Общие для всех автомобилей Тойота коды ошибок типа 9 представлены двузначными шифрами.
| Код | Расшифровка |
| 11 | Нет питания на блок EFI |
| 12 | Нет сигнала от датчика оборотов двигателя |
| 13 | Нет сигнала от датчика оборотов двигателя при оборотах более 1000 об/мин |
| 14 | Нет сигнала от «минуса» катушки зажигания или от «минуса» катушки номер один (если их две) |
| 15 | Нет сигнала от «минуса» катушки зажигания номер два |
| 16 | Нет связи блока управления коробки-автомата с блоком управления двигателем |
| 17 | Неправильный сигнал от датчика положения распредвала номер 1 |
| 18 | Неправильный сигнал от датчика положения распредвала номер 2 |
| 21 | Неправильный сигнал от датчика кислорода, если двигатель V-образный, то неисправен нагреватель левого главного датчика кислорода |
| 22 | Неправильный сигнал от датчика температуры двигателя (THW) |
| 23 | Неправильный сигнал от датчика температуры всасываемого воздуха (THA) |
| 24 | Неправильный сигнал от датчика температуры всасываемого воздуха (THA) |
| 25 | Слишком бедная смесь |
| 26 | Слишком богатая смесь |
| 27 | Неправильный сигнал от дополнительного датчика кислорода (левого у V-образных двигателей) |
| 28 | Неправильный сигнал от датчика кислорода (у V-образных двигателей нагреватель правого главного датчика кислорода) |
| 29 | Неисправен дополнительный датчик кислорода (правый у V-образных двигателей) |
| 31 | Неправильный сигнал отдатчика расхода воздуха или, если его нет, от датчика давления во впускном коллекторе (вакуум-сенсор) |
| 32 | Неправильный сигнал от датчика расхода воздуха |
| 34 | Неисправен наддув |
| 35 | Неправильный сигнал датчика атмосферного давления во впускном коллекторе (вакуум-сенсор) |
| 38 | Датчик температуры рабочей жидкости автоматической коробки передач |
| 41 | Неправильный сигнал от датчика положения дроссельной заслонки (TPS) |
| 42 | Неправильный сигнал от датчика скорости автомобиля (спидометра) |
| 43 | Нет стартерного сигнала (STA) на блок управления двигателем |
| 46 | Неисправен соленоидный клапан номер 4 или его цепи |
| 47 | Неисправен дополнительный датчик положения дроссельной заслонки (TPS) или его цепи |
| 48 | Неисправна система управления подачей дополнительного воздуха |
| 51 | Нет сигнала холостого хода от TPS |
| 52 | Неправильный сигнал от датчика детонации (если их два, то от левого или от переднего) |
| 53 | Проблемы в цепях управления датчиками детонации (опережение зажигания) |
| 55 | Неправильный сигнал от датчика детонации (если их два, то от правого или от заднего) |
| 61 | Неисправен главный датчик скорости или его цепи |
| 62 | Неисправен соленоидный клапан номер 1 или его цепи |
| 63 | Неисправен соленоидный клапан номер 2 или его цепи |
| 64 | Неисправен соленоидный клапан номер 3 или его цепи |
| 65 | Неисправен соленоидный клапан номер 4 или его цепи |
| 67 | Неисправен датчик включения O/D или его цепи |
| 71 | Неисправна система управления EGR |
| 72 | Соленоид отсечки топлива |
| 77 | Неисправен соленоид управления давлением или его цепи (в автомате) |
| 78 | Нет сигнала на топливный насос или неисправны его цепи |
| 81 | Неисправна цепь между ТСМ и ЕСТ1 |
| 82 | Неисправна цепь между ТСМ и ЕSA1 |
| 84 | Неисправна цепь между ТСМ и ЕSA2 |
| 85 | Неисправна цепь между ТСМ и ЕSA3 |
| 86 | Неисправен датчик оборотов двигателя |
| 88 | Неисправна цепь от блока управления двигателем к блоку управления автоматической коробкой передач |
| 89 | Нарушена связь между блоком управления двигателем и блоком управления системой TRC |
| 99 | Кодов неисправностей нет |
Общий список однозначных кодов (тип-10) для автомобиля Тойота состоит из следующих пунктов.
| Код | Расшифровка |
| 1 | Поломки отсутствуют |
| 2 | Датчика расхода воздуха некорректно подает сигнал |
| 3 | Некорректный сигнал от коммуникатора |
| 4 | Температура охлаждающей жидкости вне пределов нормы, вышел из строя датчик |
| 5 | Некорректная связь с датчиком кислорода |
| 6 | Поломка заключается в числе оборотов двигателя |
| 7 | Дроссельная заслонка в неправильном положении |
| 8 | Датчик показывает неправильную температуру всасываемого воздуха |
| 9 | Проблема в скорости автомобиля |
| 10 | Отсутствует сигнал включения стартера |
| 11 | Сломан кондиционер или неисправен тумблер, отвечающий за нейтральное положение в машине |
Бензиновые ДВС
Если в машине есть бортовой компьютер или робот, то шифр появится на экране километража. Он будет состоять из латинской буквы в начале, например P, B, C, и 4-х цифр. Это характерно для таких автомобилей как Toyota Рав 4 Авенсис, Corolla, Mark II или Land Cruiser 200, Тойота Прадо 120 и других, фукционирующих на бензине.
Таблица для расшифровки диагностических кодов неисправностей бензиновых ДВС.
| Коды | Расшифровка | Аналог на БК |
| 12 и 13 | Проблемы с датчиком положения коленчатого вала | P0335, P0335, P1335 |
| 14 и 15 | Неполадки в системе зажигания или с катушками | P1300 и P1315, P1305 и P1310 |
| 18 | Система VVT-i фазы | P1346 |
| 19 | Положение педали акселератора | P1120 и P1121 |
| 21 | Кислородный датчик | P0135 |
| 22 | Температура охлаждающей жидкости | P0115 |
| 24 | Поломка датчика температуры воздуха на впуске | P0110 |
| 25 | Кислородный датчик – бедная смесь | P0171 |
| 31 | Датчик абсолютного давления | P0105 и P0106 |
| 36 | Датчик CPS | P1105 |
| 39 | Система VVT-i | P1656 |
| 41 | Положение дроссельной заслонки | P0120, P0121 |
| 42 | Неполадки датчика скорости автомобиля | P0500 |
| 49 | Давление топлива D-4 | P0190, P0191 |
| 52 и 55 | Поломка датчика детонации | P0325 |
| 58 | Привод SCV | P1415, P1416, P1653 |
| 59 | Неправильный сигнал VVT-i | P1349 |
| 71 | Система EGR | P0401, P0403 |
| 89 | Привод ETCS | P1125, P1126, P1127, P1128, P1129, P1633 |
| 92 | Проблемы с форсункой холодного пуска | P1210 |
| 97 | Неисправна форсунка | P1215 |
Дизельные двигатели
Многие автомобили Тойота выпускались с двигателем, работающим на дизеле. Наиболее популярными моделями являются седаны Витц, Caldina, Avensis (Т25), Камри, Камри Грация, Corolla E150, Аурис 2008 года, внедорожники Land Cruiser Prado 120 и Land Cruiser Прадо 200 или кроссовер RAV4.
Записывая коды для дизельных авто, вы можете увидеть следующие обозначения.
| Код | Расшифровка |
| 13 | Частота вращения вне допустимых норм |
| 19 | Некорректное положение педали акселератора |
| 22 | Неисправность в показателях температуры охлаждающей жидкости |
| 24 | Некорректные данные о температуре воздуха на впуске |
| 35 | Давление наддува вне нормы |
| 39 | Плохо работают датчики температуры топлива |
| 42 | Неисправность кроется в датчике скорости автомобиля |
| 96 | Положение клапана EGR неправильно |
Поломки других деталей дизельного движка.
| Код | Расшифровка |
| 12 | Проблема в положении коленчатого вала |
| 14 | Поломка в клапане, регулирующем угол опережения впрыска |
| 15 | Сервопривод дроссельной заслонки вышел из строя |
| 17 | Некорректный сигнал, идущий от блока управления |
| 18 | Поломка в электромагнитного перепускного клапана |
| 32 | Поломка корректирующих резисторов |
Автоматическая коробка передач
Отличаются машины одной марки не только двигателем, но и коробкой передач. Для тех же Тойота Королла 150, Цельсиор или Виста поломки АКПП будут разниться с неисправностями «механики».
Если в работе трансмиссии есть неисправности, вы увидите один из кодов.
| Код | Расшифровка | Аналог для АКП |
| 37 | Неисправность датчика частоты вращения входного вала коробки передач | P1705 |
| 42, 44, 36 | Проблема в датчике скорости (может быть и частота вращения вала) | P0500 |
| 46 | Давление гидроаккумулятора, неисправен соленоид | P1765 |
| 62, 63 | Проблемы с одним из соленоидов | P0753 P0758 |
| 64, 68 | Муфта блокировки гидротрансформатора, неисправен соленоид | P0773 |
Такие ошибки характерны для разных моделей, среди которых Тойота Ипсум, Тойота Хайлендер 2001 г и Caldina.
Прочие комбинации
Для диагностики также используют специальную технику и приборы. Такие приспособления покажут пятизначные коды. Их же можно узнать и при помощи бортового компьютера, который установлен в новых авто и моделях типа гибрид.

Код на экране Тойота с бортовым компьютером
В гибридной версии вышли Тойота Эстима, Toyota Prius, третье поколение Toyota Harrier и другие. У этих моделей (кроме других поломок) могут возникать неисправности системы высоковольтных батарей (ВВБ). Коды ошибок гибридной установки и их расшифровки приведены в таблице.
Самые распространенные коды ошибок, не связанные с ВВБ, это.
| Код | Расшифровка |
| P1604 | Запуск двигателя не удался, поломка в системе впуска |
| B0101 | Система безопасности работает некорректно, неполадки с защитными подушками |
| В 1801 | С водительской стороны оборваны цепи пиропатрона |
| C1201 | Работа двигателя некорректна, обороты ниже допустимого |
| P0420 | Система катализаторов В1 работает ниже допустимого порога эффективности |
| P0352З | Неполадки в цепях системы зажигания |
В фотогалерее представлены ошибки в работе иммобилайзера и шин на автомобилях Toyota.
Сброс ошибок
После того как был произведен ремонт и поломку устранили, коды ошибок могут сами не исчезнуть. Чтобы их сбросить также есть определенная последовательность действий. Для этого нам снова понадобится разъём для диагностики.
Чтобы произвести сброс кодов необходимо:
Как пошагово осуществить самодиагностику автомобилей Тойота на видео рассказывает «Artem0023»:
Проблемы с коробкой передач у Land Cruiser – явление редкое, поскольку японские внедорожники считаются эталоном надежности. Частые причины неисправности АКПП – большой пробег, некорректная эксплуатация, несвоевременная замена масла.
Проблемы с АКПП на ТЛК100
Отдельные модификации TLC100 комплектуются автоматической КПП, которая из-за своей технологичности требует своевременного сервисного обслуживания и бережной эксплуатации.
Чтобы избежать неисправностей АКПП и продлить ее ресурс, необходимо придерживаться следующих норм использования:
При проявлении малейших признаков неисправностей рекомендуется диагностика КПП.
Удары в трансмиссии 100-ки: причины
Наиболее частой причиной поломки АКПП у Тойоты становится агрессивный стиль езды. Это проявляется резким разгоном авто с пробуксовкой, работой мотора на больших оборотах и резким торможением.
Узлы агрегата выходят из строя при неграмотной буксировке джипа из-за перегрева гидравлической системы. Сбои в трансмиссии вызывают и удары АКПП при затяжных спусках/подъемах Ленд Крузера 100 и езде по бездорожью.

При большом пробеге внедорожника сателлиты и фрикционные диски редуктора изнашиваются, а прокладки и сальники пропускают масло из-за потери эластичности. Гидроблок постепенно засоряется частицами изношенных шестерен, из-за чего продуктивность работы коробки снижается.
При продолжительной эксплуатации TLC100 возможны поломки масляного насоса, отвечающего за давление в гидросистеме, износ дифференциала и подшипников валов.
Диагностика АКПП Тойота Ленд Крузер 100
Заподозрить неполадки в трансмиссии владелец может по следующим признакам:
Некоторые владельцы проверяют износ коробки путем проведения стал (stall) теста АКПП. Для Тойоты Ленд Крузер 100 выполнять эту процедуру своими руками нежелательно, т. к. даже автомеханик при тестировании может повредить авто.
Стояночный (stall) тест осуществляется на полностью заторможенном внедорожнике (колеса рекомендуется дополнительно зафиксировать упорами) с заведенным двигателем, работающим на максимальных оборотах. Для недопущения травм необходимо контролировать, чтобы сзади и спереди авто не находились люди.
При тестировании ведущие колеса блокируются, замеряют максимальные обороты мотора (stall speed) во всех положениях коробки кроме N — и P-режима. Полученные test показатели сверяют с эталонными данными завода-производителя. По результатам сравнения выявляют неисправности трансмиссии.

Для оценки техсостояния коробки передач лучше обратиться в автомастерскую, оснащенную диагностическим оборудованием.
Ремонт АКПП ТЛК 100
Коробка – сложный по конструкции агрегат, поэтому ремонт неисправностей гидравлики АКПП джипа Ленд Крузер 100 требуется проводить в проверенном автосервисе, оснащенном современным диагностическим и ремонтным оборудованием.
Компьютерное тестирование коробки выявит причины сбоя в ее работе. Для диагностики и обнаружения информации об ошибках оборудование подключают к разъему внедорожника. После расшифровки сведений автомеханик определяет, какие элементы требуют ремонта.
После диагностики КПП снимают с авто и частично разбирают. Мастер заполняет дефектовочную ведомость и предлагает автовладельцу варианты устранения поломки.
Частичный ремонт обычно не занимает много времени. В случае капремонта водителю придется выложить существенную сумму, т. к. процедура требует замены основных элементов гидравлики.
Капремонт трансмиссии происходит в несколько этапов:

После ремонта трансмиссию тестируют в различных режимах.
Замена АКПП
В процессе диагностики могут выявиться существенные проблемы в работе КПП, требующие полной замены узла трансмиссии. В такой ситуации автомеханик предложит на выбор установку новой АКПП, монтаж контрактной запчасти либо агрегата, снятого с аварийной машины.
Новая АКПП на TLC имеет стоимость, способную шокировать даже состоятельных автовладельцев. Наряду с мотором, коробка составляет львиную долю от общей цены внедорожника. Если водителя не смутит цена, то этот вариант наиболее предпочтителен среди остальных.
Второй вариант отличается существенной разницей в цене, поэтому зачастую владельцы Toyota выбирают для замены восстановленную коробку с гарантией от автосервиса.
В восстановленной автоматической КПП все неисправные элементы заменяют. Ставят новые резинки и уплотнители, меняют соленоиды, сальники, прокладки и фильтр. В коробку заливают свежее масло и при необходимости ремонтируют элементы гидросистемы. Завершив ремонт АКПП Тойота Ленд Крузер 100, агрегат тщательно очищают и промывают.
Источники:
https://autodvig. com/diagnostics/kody-oshibok-tojota-32077/
https://4-x-4.ru/udary-v-akpp-lend-kruzer-100-prichiny-i-ustranenie/
Как расшифровываются пиктограммы на приборной панели Toyota

Сегодняшняя тема — Пиктограммы на приборной панели. Их существует великое множество и как говорится, они на разные случаи жизни. Одни предупреждают водителя от будущих всевозможных неприятностях, другие просто информируют о работе тех или иных систем машины, ну а третьи в буквальном смысле кричат водителю о неисправности. Согласно статистике можно твердо утверждать, что обладателем одних из самых многообразных по своему количеству символов на приборной панели машины остается автомобиль марки Тойота. Поэтому уважаемые друзья, в сегодняшней нашей статье мы постараемся как можно полнее и подробнее рассказать все о предупреждающих значках-пиктограммах находящихся в автомашинах, которые могут загораться на приборной панели автомобиля Toyota.
Разумеется, что при обычной эксплуатации автомобиля вам будет вовсе необязательно знать, какой символ-значок на приборной панели Toyota что обозначает, так как при правильной эксплуатации и своевременном обслуживании автомобиля они никогда вас не побеспокоят.
Но жизнь учит нас автомобилистов тому, что нужно быть готовым к любым поворотам судьбы. Как говорится, даже на старуху бывает проруха, значит, даже самый крупный в мире автопроизводитель в том числе может совершать определенные ошибки. Это означает, что в течении жизни автомобиля даже при тщательном соблюдении всех регламентов и заботе о своем железном коне, приборная панель в машине может в один прекрасный день вспыхнуть предательскими огнями, буд-то бы новогодняя ёлка. Виной этому всему может оказаться просто банальный заводской брак. К нашему сожалению, от ошибок на сборочном конвейере никто не застрахован.
Смотрите также: 12 автомобильных «хаков», о которых должен знать любой автомобилист
Прежде чем случится неприятность и вам придется вглядываться в приборную панель просматривая определенный мануал или нашу статью, спешим предупредить наших автомобилистов о том, что некоторые индикаторы на определенных комплектациях моделей Toyota на сегодняшнее время достаточно редки. Поэтому мы публикуем в своей статье список самых распространенных на сегодняшний день обозначений с наиболее популярных автомобилей Тойота.
Не бойтесь друзья предупреждающих символов на приборной панели.
В конце вступительного слова нам хотелось бы сказать о том, что предупреждающие знаки на приборной панели загораются каждый последующий раз при включении зажигания. Это нормальная практика, которая говорит о том, что компьютер автомобиля начинает проверку датчиков и всех систем автомобиля. Паниковать стоит только в том случае, когда эти значки не погаснут.
И наконец, также необходимо помнить, что некоторые предупреждающие значки-символы могут предупредить вас водителей об общих недугах автомобиля не называя при этом конкретную проблему. При появлении на приборной панели такого индикатора необходимо незамедлительно обратиться в сервис для прохождения диагностики.


1. Индикатор предупреждения подушек безопасности— он указывает на проблемы связанные с системой подушек безопасности, которые должны быть незамедлительно проверены в сертифицированном сервисном центре, если вы заботитесь о своей безопасности. Значок может также появиться и при ручном отключении одной или нескольких подушек безопасности.

2. Предупреждение неисправности антиблокировочной системы— он говорит о том, что в антиблокировочной системе ABS (что предотвращает блокировку колес при резком торможении и помогает водителю сохранить контроль над машиной) обнаружена ошибка или сам датчик нуждается в своей замене. Такой значок-символ может появится и в том случае, если на один из датчиков налипло слишком много грязи, а также, если вы использовали свой автомобиль в спортивном режиме с быстрыми ускорениями и резкими торможениями, что могло или позволило «обмануть» саму систему ABS. Тот же самый эффект может дать и застрявший в грязи или в снегу автомобиль, где одно или несколько колес будут буксовать на месте.

3. Индикатор неисправности двигателя— это наверное самый страшный индикатор на приборной панели из всех имеющихся. Многие автомобилисты увидя его сразу начинают думать, что произошла поломка двигателя. Однако, все может быть не настолько печально. Появление данного значка на «приборке» может информировать вас о том, что сам датчик вышел из строя или в двигателе произошел сбой и он перестал работать в оптимальном режиме, а мотор из-за него выбрасывает в атмосферу больше вредных веществ чем положено.
Действительно, опасаться стоит лишь в том случае, если одновременно при появлении такой индикации мотор начал издавать посторонние звуки или у него пропала тяга. Но в любом случае друзья, посещение СТО — для вас ОБЯЗАТЕЛЬНО!

4. Значок давления масла – если говорить простым языком, то можно сказать следующее, если загорелся этот значок-символ, то это будет означать, что давление масла в двигателе слишком низкое или слишком высокое, так что необходимо проверить уровень масла в двигателе перед тем как начнете дальнейшее вождение автомобиля. Индикатор может также предупредить и о неисправности масляного насоса, что он поврежден, или о появлении пробки в масляной магистрали. Неправильная вязкость масла может также стать еще одной причиной появления этой пиктограммы.

5. Низкая температура охлаждающей жидкости двигателя— говорит нам о том, что охлаждающая жидкость в двигателе имеет слишком холодную и заниженную температуру для данного мотора. Если индикатор на приборной панели не исчезает после того, как автомобиль проехал несколько километров пути, то это будет означать, что-то пошло не так, и в этом случае надо обратиться к механику. Термостат, то есть клапан, который позволяет охлаждающей жидкости проходить через радиатор, или тот же электрический вентилятор могут по ошибке работать в постоянном режиме с максимальным охлаждением двигателя.
Автозапчасти от А до Я: Устройство автомобилей для водителей-новичков
Данную проблему нельзя назвать серьезной, но все-же, при ней двигатель работающий не на оптимальной температуре будет потреблять больше топлива и выбрасывать в атмосферу больше выхлопных газов чем ему положено.

6. Индикатор ближнего света— сообщает нам, что ближний свет или дневные ходовые/габаритные огни включены. Если индикатор имеет восклицательный знак, то вы должны проверить сами фары, так как одна или несколько лампочек в них перегорели.

7. Необходимость техобслуживания— информирует нас о том, что масло и соответствующие фильтры должны быть заменены в рамках текущего технического обслуживания. Сообщение на мульти-информационном дисплее (если он у вас есть) может предупредить вас за несколько сотен километров о приближающемся графике технического обслуживания, прежде чем загорится основной индикатор.

8. Предупреждающий знак низкого уровня жидкости в бачке омывателя— он информирует нас о том, что необходимо долить в бачок омывающей жидкости.
9. Предупреждение о необходимости дозаправиться— если последняя полоска на индикаторе начинает загораться и мигает, то пора заехать на АЗС и пополнить бак горючим.
10. Предупреждение системы электроусилителя— указывает нам о наличии проблемы с электроусилителем руля. В запущенном варианте вы сами почувствуете наличие проблемы своими же руками, когда руль Тойоты станет тяжелым, прямо как на КамАЗе. Это не опасно, но и не приятно. Посетите друзья автосервис.

11. Предупреждение об открытых дверях— это означает, что одна или несколько дверей открыты или закрыты не полностью.

12. Индикатор парковочного тормоза— информирует нас о поднятом стояночном тормозе. Если вы отпустили стояночный тормоз, а значок-символ не пропал, то вероятнее всего, что имеется проблема, поэтому вы должны проверить тормоза автомобиля. Тормозным дискам или колодкам может потребоваться замена.
13. Предупреждение о повышенной температуре охлаждающей жидкости— означает следующее, что двигатель слишком горячий и скоро наступят необратимые последствия. Заглушите пожалуйста мотор и вызовите механика, или отбуксируйте машину в ближайший автосервис. Если индикация сработала при холодном пуске мотора, то это предупреждение может быть вызвано коротким замыканием, а также неисправным датчиком или ошибкой компьютера. В любом случае друзья, лучше отвезите свой автомобиль к механику.

14. Индикатор противотуманных фар— информирует нас о том, что противотуманки (фары) включены.
15. Индикатор габаритных огней— проинформирует нас о том, что стояночные огни в машине (дневные ходовые огни/габаритные огни) ВКЛЮЧЕНЫ.

16. Пиктограмма дальнего света— информирует нас о том, что дальний свет в машине включен. Убедитесь пожалуйста, что в ночное время вы не слепите попутных и встречных автомобилистов.

17. Стрелки, указывающие на работу поворотников— предупреждают нас о включенных поворотниках или о работающей аварийной сигнализации.

18. Аварийная лампочка предупреждения аккумулятора— в основном она сообщает нам о том, что аккумулятор не заряжается правильно или он не заряжается вовсе. В основном данный значок-символ (индикатор) отображается в тот момент, когда двигатель выключен, а свет или радио включены.

19. Значок ремня безопасности— обозначает следующее, что вы или пассажир(ы) должны пристегнуть ремень безопасности.
20. Индикатор работы трансмиссии— указывает нам на неисправность в трансмиссии. Обычно он появляется на автомобилях с АКПП, когда коробка передач по какой-то причине перестает должным образом исполнять свои прямые обязанности. Мы в этом случае, если индикатор включился, не рекомендуем водителям самостоятельно передвигаться на автомобиле.
21. Предупреждающий символ топливного фильтра— если индикатор продолжает гореть, то это указывает на то, что в топливном фильтре была обнаружена вода. Не паникуйте друзья в тот момент, когда появилось данное предупреждение на приборной панели, вы были или находитесь за рулем и у вас достаточно времени, чтобы посетить автосервис и избавится от воды.
22. Индикатор свечей накаливания (предпусковые свечи)— этот символ-значок появится в тот момент, когда на улице холодно и он будет информировать вас о том, что свечи внутри двигателя начали прогрев камеры сгорания (в дизельных двигателях). Не запускайте в такой момент двигатель, ждите, пока индикатор не погаснет. Если он не исчезает и не гаснет, и будет слишком долго гореть, то значит в вашем автомобиле появилась неисправность свечей накаливания или им слишком холодно.

23. Тот же самый индикатор, что мы упомянули в пункте № 13, но другого цвета. Заглушите пожалуйста двигатель, потому что ему слишком жарко.
24. Пиктограмма STO — это нормально, если она появляется при запуске автомобиля, но если так пойдет и дальше пока вы едете на машине, то вместе с № 13 или N 5 это будет действительно означать, что вы должны остановиться.

25. Индикатор круиз-контроля— говорит нам о том, что система круиз-контроля включена. Как правило, вы сами можете отключить ее просто нажав на тормоз.

26. Индикатор положения передачи— показывает нам, на какой передаче вы едите или находитесь.
27. Тот же самый индикатор, что был нами упомянут в пункте № 8. Он означает, что необходимо долить жидкость в стеклоомыватель.

28. Тот же самый индикатор, что был в пункте № 9 — Требуется заправка авто.
29. Контроль устойчивости автомобиля или сигнальная лампа Traction Control— если индикация не гаснет, то таким образом она предупреждает нас, что существует проблема с одной из данных систем.

30. Индикатор давление в шинах— он означает, что давление в одной или нескольких шинах низкое или наоборот, слишком высокое. Это очень удобная система оповещения, которая предупредит нас о внезапном проколе колеса.

31. Индикатор отключения контроля тягового усилия— он предупреждает нас, что мы (вы) отключили противобуксовочную систему.

32. Индикатор скольжения транспортного средства— если он включится при движении по снегу, по льду, по грязи или по очень мокрой дороге, то это будет означать, что автомобиль буксует и данная система контроля тяги работает для обеспечения максимального сцепления с дорожным покрытием.
33. Индикатор Overdrive OFF— информирует нас о том, что система овердрайв выключена.
34. Предупреждение о температуре масла в автоматической коробке передач- этот значок-символ (индикатор) означает, что температура масла в трансмиссии слишком высока, вы должны снизить скорость движения или вообще остановиться, чтобы дать маслу остыть. Неправильное трансмиссионное масло может привести к перегреву компонентов КПП. Отвезите ваш автомобиль в автосервис, если данная проблема не устранилась.
35. Lane Keeping Assist— этот индикатор означает неполадки, связанные с той системой, которая удерживает ваш автомобиль на полосе движения. Не убирайте пожалуйста руки с руля.
36. Adaptive Front Lighting— это значок индикатора автоматической система, которая производит переключение между фарами ближнего и дальнего света, если он загорелся, то это означает, что система работает не правильно.

37. Тот же самый индикатор, что был упомянут в пункте № 10.
38. Pre Collision System— данный значок-символ предупреждает нас о том, что система, помогающая предотвратить фронтальное столкновение, не работает. Ведите машину как можно осторожнее и обратитесь в автосервис для устранения данной проблемы.
39. Индикация стояночного тормоза— информирует нас о том, что стояночный тормоз на машине включен.

40. Индикатор Экологичного/Экономичного режима— он сообщает нам, что мы едем (вы едете) в ЭКО-режиме для экономии топлива.
Что это значит?- Простое руководство по автомобильным терминам
Чтобы доскональнее изучить материальную часть вашей Тойоты, не забудьте друзья прочитать инструкции по эксплуатации поставляемую в комплекте с самим автомобилем. Старайтесь ездить аккуратно и вовремя делать регулярное техническое обслуживание автомобилю, всегда используйте только оригинальные запасные части и технические жидкости разработанные специально для вашей модели автомобиля.
mongol89
29
-
Откуда: Москва. Ясенево
-
Машина: TLC 80VX➡️ LX 470 ➡️ Chevrolet Tahoe 900

Oleg V8
0
-
Откуда: Нефтеюганск
-
Машина: тойота

Oleg V8
0
-
Откуда: Нефтеюганск
-
Машина: тойота
ваван555
22
-
Откуда: калуга
-
Машина: лк200 дизель

Oleg V8
0
-
Откуда: Нефтеюганск
-
Машина: тойота
Oleg V8
0
-
Откуда: Нефтеюганск
-
Машина: тойота
Oleg V8
0
-
Откуда: Нефтеюганск
-
Машина: тойота
Oleg V8
0
-
Откуда: Нефтеюганск
-
Машина: тойота
Oleg V8
0
-
Откуда: Нефтеюганск
-
Машина: тойота
Oleg V8
0
-
Откуда: Нефтеюганск
-
Машина: тойота
Oleg V8
0
-
Откуда: Нефтеюганск
-
Машина: тойота
подводник
3
-
Откуда: Москва Новогиреево
-
Машина: ТLC 100 VX и лебедочка имеется
![]()
Oleg V8
0
-
Откуда: Нефтеюганск
-
Машина: тойота
DimaArm
34
-
Откуда: Хабаровск
-
Машина: Были TLC80 1HD-FT, TLC100 2UZ сейчас MMC Pajero IV 3.0

Oleg V8
0
-
Откуда: Нефтеюганск
-
Машина: тойота
VVA
6
-
Откуда: Москва
-
Машина: Kyron

VVA
6
-
Откуда: Москва
-
Машина: Kyron
Oleg V8
0
-
Откуда: Нефтеюганск
-
Машина: тойота
Oleg V8
0
-
Откуда: Нефтеюганск
-
Машина: тойота
Присоединяйтесь к обсуждению
Вы можете опубликовать сообщение сейчас, а зарегистрироваться позже.
Если у вас есть аккаунт, войдите в него для написания от своего имени.
- Manuals
- Brands
- Toyota Manuals
- Automobile
- Land Cruiser 100
- Operating manual
-
Contents
-
Table of Contents
-
Bookmarks
Quick Links
Part 1
OPERATION OF
INSTRUMENTS AND
CONTROLS—
Chapter 1- 1
Overview of instruments
and controls
_
_
_
Indicator
symbols
on
instrument panel
the
New L/C100(U)
1
Related Manuals for Toyota Land Cruiser 100
Summary of Contents for Toyota Land Cruiser 100
-
Page 1: Instruments And Controls
New L/C100(U) Part 1 OPERATION OF INSTRUMENTS AND CONTROLS— Chapter 1- 1 Overview of instruments and controls Instrument panel overview Instrument cluster overview Indicator symbols instrument panel…
-
Page 2: Instrument Panel Overview
New L/C100(U) Instrument panel overview «View A 1. Side vents 2. Side defroster outlets 3. Instrument cluster 4. Center vents 5. Electric moon roof switches and/or personal lights 6. Glove box 7. Power door lock switches 8. Power window switches 9.
-
Page 3
New L/C100(U) «View B 1. Headlight, turn signal and front fog light switches 2. Cruise control switch 3. Ignition switch 4. Windshield wiper, rear window wiper and washer switches 5. Emergency flasher switch 6. Power antenna switch 7. Car audio 8. -
Page 4: Lower Part Of Center Cluster Panel
New L/C100(U) «Lower part of center cluster panel 1. Ashtray 2. Cigarette lighter 3. Power outlet…
-
Page 5: Instrument Cluster Overview
New L/C100(U) Instrument cluster overview 1. Voltmeter 4. Tachometer 7. Odometer and two trip meters 2. Speedometer 5. Oil pressure gauge 8. Trip meter reset knob 3. Service reminder indicators and 6. Engine coolant temperature gauge 9. Fuel gauge indicator lights…
-
Page 6: Indicator Symbols On Instrument Panel
New L/C100(U) Indicator symbols on the instrument panel Brake system warning light Unengaged ”Park” warning light Automatic transmission fluid temperature warning Driver’s seat belt reminder light light Front passenger’s seat belt reminder light Turn signal indicator lights Discharge warning light Headlight high beam indicator light Malfunction indicator lamp Overdrive- off indicator light…
-
Page 7
New L/C100(U) Cruise control indicator light Automatic transmission indicator lights : For details, see ”Service reminder indicators and warning buzzers” in Chapter 1- 5. : If this light flashes, see ”Cruise control” in Chapter 1- 6. -
Page 8
New L/C100(U) -
Page 9: Keys
”Side doors” in 1. Master key (black)—This key works in » Manual quarter windows this chapter. every lock. Your Toyota dealer will » need it to make you a new key with Power quarter windows built- in transponder chip.
-
Page 10
New L/C100(U) NOTICE z When starting the engine, do not z Do not bend the key grip. use the key with other transponder When using a key containing a trans- keys around (including keys of oth- ponder chip, observe the following er vehicles) and do not press other precautions: key plates against the key grip. -
Page 11
If you should lose your keys or if you hicle. The engine will start, only when need additional keys, duplicates can be the electronic code in the chip corre- made by a Toyota dealer using the key sponds to the registered ID code for number. the vehicle. -
Page 12
This device complies with Part 15 of the FCC Rules. Operation is subject to the For your Toyota dealer to make you a following two conditions: new key with built- in transponder chip, your dealer will need your key number (1) This device may not cause harmful and master key. -
Page 13
New L/C100(U) Side doors— Driver’s side LOCKING AND UNLOCKING WITH KEY LOCKING UNLOCKING WITH INSIDE LOCK KNOB Insert the key into the keyhole and turn Move the lock knob. To lock: Turn the key forward. To lock: Push the knob forward. To unlock: Turn the key backward. -
Page 14
New L/C100(U) LOCKING UNLOCKING WITH CAUTION POWER DOOR LOCK SWITCH Push the switch. Before driving, be sure that the doors To lock: Push the switch on the front side. closed locked, especially To unlock: Push the switch on the rear when small children are in the ve- side. -
Page 15
New L/C100(U) —Wireless remote control Your vehicle has a wireless remote You have 30 seconds to open a door after control system that can lock or unlock using the wireless remote unlock feature. all the side doors and back door from a If a door is not opened by then, all the distance within approximately 1 m (3 side doors and back door will be automati-… -
Page 16
Do not leave the key on places where If you lose your wireless remote control the temperature becomes high such as key, contact your Toyota dealer as soon ”PANIC” SWITCH on the dashboard. as possible to avoid the possibility of «… -
Page 17
New L/C100(U) REPLACING THE BATTERY This equipment has been tested and —Reorient or relocate the receiving For replacement, use a lithium battery found to comply with the limits for a antenna. CR1616 and a special screwdriver. Class B digital device, pursuant to —Increase the separation between the Part 15 of the FCC Rules. -
Page 18
New L/C100(U) 1. Remove the screw, and then the cover. 2. Remove module from 3. Remove the 2 screws to take out the frame. lid of the module. Take out the dis- charged battery and put a new battery with the positive side up. NOTICE Do not bend the terminals. -
Page 19
New L/C100(U) Power windows 4. Install the lid with the 2 screws. 5. Install the module into the key frame and secure the cover with the screw. 6. When pushing any switch on the wire- less key, make sure the indicator light comes on. -
Page 20
New L/C100(U) CAUTION Window lock button » Never try jamming any part of your body to make the jam protection function work intentionally. » The jam protection function may work when something gets caught just before the window is fully closed. OPERATING THE PASSENGERS’… -
Page 21
New L/C100(U) Manual quarter windows Power quarter windows CAUTION To avoid serious personal injury, you must do the following. » Always make sure the head, hands and other parts of the body of all occupants are kept completely in- side the vehicle before you close the power windows. -
Page 22
New L/C100(U) Back door CAUTION To avoid serious personal injury, you must do the following. » Always make sure the hands and other parts of the body of all occu- pants are kept completely inside the vehicle before you close the power quarter windows. -
Page 23
New L/C100(U) CAUTION » Keep the back door closed while driving. This not only keeps the luggage from being thrown out but also prevents exhaust gases from entering the vehicle. » If the open back door hides the stop and tail lights, rear turn signal lights or rear retro reflectors while you are parked, other road users must be warned of your vehicle by… -
Page 24
New L/C100(U) Hood CAUTION Before driving, be sure that the back door is closed and locked, especially when small children are in the ve- hicle. Along with the proper use of seat belts, locking the doors helps prevent the driver and passengers from being thrown out from the ve- hicle during an accident. -
Page 25
New L/C100(U) Theft deterrent system— 2. In front of the vehicle, pull up the To deter the vehicle theft, the system SETTING THE SYSTEM auxiliary catch lever and lift is designed to give an alarm if any of 1. Turn the ignition key to the ”LOCK” hood. -
Page 26
» If the system does not work properly, and then reconnected Turn the ignition key from the ”LOCK” have it checked by your Toyota dealer. to ”ON” position. The indicator light will come on when the » system is activating. -
Page 27
Make sure the cap is tightened se- curely to prevent fuel spillage in case of an accident. » Use only a genuine Toyota fuel tank cap for replacement. It has a built- in check valve to reduce fuel tank vacuum. -
Page 28
New L/C100(U) Electric moon roof To operate the moon roof, use the The roof will fully close. To stop the roof switches beside the personal light. partway, push the same switch or tilt switch. The moon roof works when the ignition switch is in the ”ON”… -
Page 29
New L/C100(U) » CAUTION Never sit on top of the vehicle around the roof opening. To avoid serious personal injury, you » Never try jamming any part of your must do the following. body to make the jam protection » While the vehicle is moving, always function work intentionally. -
Page 30
New L/C100(U) -
Page 31: Steering Wheel And Mirrors
New L/C100(U) Seats Part 1 » While the vehicle is being driven, all ve- Power tilt and telescopic steering OPERATION OF hicle occupants should have the seatback wheel upright, sit well back in the seat and prop- INSTRUMENTS AND » Outside rear view mirrors erly wear the seat belts provided.
-
Page 32
New L/C100(U) Front seats— —Seat adjustment precautions —Adjusting front seats Adjust the driver’s seat so that the foot » While adjusting the seat, do not put pedals, steering wheel instrument your hands under the seat or near panel controls are within easy reach of the moving parts. -
Page 33
New L/C100(U) Armrest 1. SEAT POSITION AND SEAT CUSHION CAUTION ANGLE ADJUSTING SWITCH Move the control switch in the desired To reduce the risk of sliding under direction. the lap belt during a collision, avoid Releasing the switch will stop the seat at reclining the seatback any more than that position. -
Page 34
New L/C100(U) Rear seats— —Moving second seat —Adjusting second seats third seat entry SEATBACK ANGLE ADJUSTING LEVER Lean forward and pull the lever toward you. Then lean back to the desired angle and release the lever. CAUTION » To reduce the risk of sliding under belt during collision,… -
Page 35: Folding Up Second Seat
New L/C100(U) —Folding up second seat CAUTION After returning the seat, make sure the seat is securely locked by push- ing forward and rearward on the top of the seatback or by trying to pull up the edge of the bottom cushion. BEFORE FOLDING UP SECOND SEAT 2.
-
Page 36
New L/C100(U) FOLDING UP SECOND SEAT 2. Unlock the seat cushion. Swing the 3. Hook the strap. whole seat up and forward. 1. Lower the outer head restraint to the When returning the second seat to its lowest position and pull up the cen- original position, put the holding strap into ter head restraint. -
Page 37
New L/C100(U) CAUTION When returning seats to their original position: » Make sure the seat belts are not twisted or caught under the seat and are arranged in their proper position and are ready to use. » Make sure that the seat is securely locked by pushing forward and rear- ward on the top of the seatback or by trying to pull up the edge of the… -
Page 38
New L/C100(U) —Adjusting third seats —Folding up third seats SEATBACK ANGLE ADJUSTING LEVER Lean forward and pull the lever toward you. Then lean back to the desired angle and release the lever. CAUTION » To reduce the risk of sliding under belt during collision,… -
Page 39
New L/C100(U) 2. Make sure the shoulder belt passes FOLDING UP THIRD SEAT 2. Unlock the seat cushion and slide through the hanger when folding the the whole seat the rear- most 1. Lower the head restraint to the low- third seat. -
Page 40
New L/C100(U) 3. Swing the whole seat up. 4. Hook the strap. 5. Remove the seat striker covers from the back of the seat cushion, and When returning the third seat to its origi- install them over the seat strikers. nal position, put the holding strap into the hole. -
Page 41
New L/C100(U) —Removing third seats CAUTION When returning seats to their original position: » Make sure the seat belts are not twisted or caught under the seat and are arranged in their proper position and are ready to use. » Make sure that the seat is securely locked by pushing forward and rear- ward on the top of the seatback or… -
Page 42
New L/C100(U) Head restraints » CAUTION When reinstalling the seat, be care- ful not to hit the seat against you When removing or reinstalling the or inside of the vehicle. » seat, observe the following to prevent Install each seat in the same posi- personal injury: tion from which it was removed. -
Page 43
New L/C100(U) Seat heaters For your safety and comfort, adjust the Right side CAUTION head restraint before driving. front seat To raise: Pull it up. Occupants must use caution when op- To lower: Push it down while pressing the erating the seat heater because it lock release button. -
Page 44
New L/C100(U) Seat belts— —Seat belt precautions Toyota strongly urges that the driver and Do not allow the child to stand up or NOTICE passengers in the vehicle be properly re- kneel on either rear or front seats. An z Do not put unevenly weighed ob-… -
Page 45
New L/C100(U) —3- point seat belts » CAUTION Keep the belts clean and dry. If they need cleaning, use a mild soap Persons should ride in their seats solution or lukewarm water. Never use bleach, dye, or abrasive clean- properly wearing their seat… -
Page 46
» If the seat belt does not function normally, immediately contact your Toyota dealer. Do not use the seat until the seat belt is fixed. It cannot protect an adult occupant or your child from injury. -
Page 47
New L/C100(U) CAUTION Take up slack » High- positioned belts loose- fitting belts both could cause serious injuries due to sliding under Too high the lap belt during a collision or oth- er unintended result. Keep the lap belt positioned as low on hips as possible. -
Page 48
If the seat belt does not function Keep as low on hips as possible normally, immediately contact your Toyota dealer. Do not use the seat Sit up straight and well back in the Remove excess length of the belt and until the seat belt is fixed. -
Page 49
Please contact your local Toyota dealer so nally intended for. that the dealer can order the proper re- quired length for the extender. Bring the heaviest coat you expect to wear for prop- er measurement and selection of length. -
Page 50
» If the seat belt does not function normally, immediately contact your Toyota dealer. Do not use the seat To connect the extender to the seat The driver and front passenger’s seat until the seat belt is fixed. It cannot… -
Page 51
New L/C100(U) When a seat belt pretensioner is acti- vated, an operating noise may be heard and a small amount of smoke- like gas may be released. This gas is harmless and does not indicate that a fire is occur- ring. -
Page 52
If either of the following conditions occurs, this ture indicates a malfunction of the airbags or z Attachment of a grille guard (bull pretensioners. Contact your Toyota dealer bar, kangaroo bar, etc.), snowplow, soon possible service winches or any other equipment to vehicle. -
Page 53
A driver or front passenger too close to the steering wheel or dashboard during airbag deployment killed seriously injured. Toyota strongly recommends that: » The driver sit as far back as pos- sible from the steering wheel while still maintaining control of the ve- hicle. «… -
Page 54
New L/C100(U) However, this threshold velocity will be considerably higher if the vehicle strikes an object, such as a parked vehicle or sign pole, which can move or deform on impact, or if it is involved in an underride collision (e.g. a collision in which the nose Collision from the rear of the vehicle ”underrides”, or goes under, the bed of a truck, etc.). -
Page 55
New L/C100(U) In a severe frontal impact, sensors detect deceleration and the system triggers the airbag inflators. Then a chemical reaction in the inflators momentarily fills the air- Hitting a curb, Falling into or bags with non- toxic gas to help restrain edge of pavement jumping over a the forward motion of the occupants. -
Page 56
The front seat occupants can restraint system. Toyota strongly be killed or seriously injured by an recommends that all infants and inflating airbag if they do not wear children be placed in the rear seat the available seat belts. -
Page 57
New L/C100(U) Move seat fully back » » » Never put a rear- facing child re- A forward- facing child restraint sys- Do not sit on the edge of the seat straint system on the front seat be- tem should be allowed to put on or lean over the dashboard when cause the force of the rapid infla- the front seat only when it is un-… -
Page 58
New L/C100(U) » Do not modify or remove any wir- ing. Do not modify, remove, strike or open any components such as the steering wheel pad, steering wheel, column cover, front passen- ger airbag cover, front passenger airbag or airbag sensor assembly. Doing any of these may cause sud- den SRS airbag inflation or disable the system, which could result in… -
Page 59
Modification of the suspension sys- z Modification of the front end struc- This SRS airbag system has a service In the following cases, contact your Toyota ture reminder indicator to inform the driver of dealer as soon as possible:… -
Page 60
New L/C100(U) Child restraint— —Child restraint precautions Toyota strongly urges the use of child » » Toyota strongly urges use of Make sure that you have complied restraint systems children small proper child restraint system which with all installation instructions pro- enough to use them. -
Page 61
New L/C100(U) —Child restraint system A child restraint system for a small When not using the child restraint system, CAUTION child or baby must itself be properly keep it secured with the seat belt or place restrained on the seat with either the it somewhere other than the passenger «… -
Page 62
New L/C100(U) —Types of child restraint system Child restraint systems are classified into the following 3 types depending on the child’s age and size. (A) Infant seat (B) Convertible seat (C) Booster seat Install the child restraint system following the instructions provided by its manufac- turer. -
Page 63
New L/C100(U) —Installation with 2- point type seat belt (A) INFANT SEAT INSTALLATION 1. Run the center lap belt through or CAUTION around the infant seat following the An infant seat is used in rear- facing instructions provided by its manufactur- position only. -
Page 64
Contact your 2. While pressing the infant seat firmly Toyota dealer immediately. Do not CAUTION against the seat cushion and seatback, use the seat until the seat belt is tighten the lap belt by pulling its free fixed. -
Page 65
New L/C100(U) 3. To remove the infant seat, press the (B) CONVERTIBLE SEAT INSTALLATION CAUTION buckle- release button. A convertible seat is used in forward- facing and rear- facing position depend- Do not put a rear- facing child re- ing on the child’s age and size. When straint system on the third seat if it installing, follow… -
Page 66
1. Run the center lap belt through or 2. While pressing convertible seat Toyota dealer immediately. Do not around the convertible seat following firmly against the seat cushion and use the seat until the seat belt is instructions provided seatback, tighten the lap belt by pulling fixed. -
Page 67
New L/C100(U) —Installation with 3- point type seat belt 3. To remove the convertible seat, press (A) INFANT SEAT INSTALLATION CAUTION the buckle- release button. An infant seat is used in rear- facing position only. Push and pull the child restraint sys- tem in different directions to be sure it is secure. -
Page 68
New L/C100(U) 1. Run the lap and shoulder belt through » CAUTION Do not put a rear- facing child re- or around the infant seat following the straint system on the second (or instructions provided by its manufactur- » Never put a rear- facing child re- third) seat if it interferes with the er and insert the tab into the buckle straint system on the front seat be-… -
Page 69
2. Fully extend the shoulder belt to put it 3. While pressing the infant seat firmly Toyota dealer immediately. Do not in the lock mode. When the belt is against the seat cushion and seatback, use the seat until the seat belt is… -
Page 70
New L/C100(U) 4. To remove the infant seat, press the (B) CONVERTIBLE SEAT INSTALLATION CAUTION buckle- release button and allow the A convertible seat is used in forward- belt to retract completely. The belt will facing and rear- facing position depend- Push and pull the child restraint sys- move freely again and be ready to ing on the child’s age and size. -
Page 71
New L/C100(U) Move seat fully back » » CAUTION A forward- facing child restraint sys- Do not put a rear- facing child re- tem should be allowed to put on straint system on the second (or » Never put a rear- facing child re- the front seat only when it is un- third) seat if it interferes with the straint system on the front seat be-… -
Page 72
1. Run the lap and shoulder belt through 2. Fully extend the shoulder belt to put it Toyota dealer immediately. Do not or around the convertible seat following in the lock mode. When the belt is use the seat until the seat belt is… -
Page 73
New L/C100(U) 3. While pressing convertible seat 4. To remove the convertible seat, press CAUTION firmly against the seat cushion and the buckle- release button and allow the seatback, let the shoulder belt retract belt to retract completely. The belt will Push and pull the child restraint sys- as far as it will go to hold the convert- move freely again and be ready to… -
Page 74
New L/C100(U) Move seat fully back (C) BOOSTER SEAT INSTALLATION 1. Sit the child on a booster seat. Run CAUTION the lap and shoulder belt through or A booster seat is used in forward- fac- around the booster seat and child fol- ing position only. -
Page 75
Always make sure the shoulder belt child from injury. Contact your Toyota dealer immediately. Do not is positioned across the center of child’s shoulder. The belt should be use the seat until the seat belt is kept away from child’s neck, but fixed. -
Page 76
» After adjusting the steering wheel, This feature can be set inoperative. Ask try moving it up and down to make your Toyota dealer. sure it is locked in position. -
Page 77
New L/C100(U) Outside rear view mirrors— CAUTION CAUTION » Do not adjust the steering column Do not adjust the mirror while the while the vehicle is moving. vehicle is moving. It may cause the driver to mishandle the vehicle and an accident may occur resulting in personal injuries. -
Page 78
New L/C100(U) —Power rear view mirror control —Folding rear view mirrors NOTICE If ice should jam the mirror, do not operate the control or scrape the mir- ror face. Use a spray de- icer to free the mirror. To adjust a mirror, use the switches. The rear view mirrors can be folded backward parking… -
Page 79
New L/C100(U) Anti-glare inside rear view mir- Sun visors— CAUTION Do not adjust the mirror while the vehicle is moving. It may cause the driver to mishandle the vehicle and an accident may occur resulting in personal injuries. Adjust the mirror so that you can just To block out glare, move the sun visor. -
Page 80
New L/C100(U) —Vanity mirror To block the glare from the front when the To use the vanity mirror, swing down main sun visor is swung down, swing the sun visor and open the cover. down the second sun visor The vanity light comes on when you open the cover. -
Page 81
If you feel that the automatic light control above » Center interior and personal lights comes into operation too early or too late, Position 3 (”AUTO”)—Headlights and/or all have the sensor adjusted by your Toyota » Ignition switch light of the above dealer. «… -
Page 82
New L/C100(U) The tail lights automatically turn off when To turn on the other exterior lights and the driver’s door is opened with the igni- instrument panel lights, twist the knob to tion key in the ”ACC” or ”LOCK” position. the position 1. -
Page 83
New L/C100(U) Emergency flashers NOTICE To prevent the battery from being dis- charged, do not leave the switch on longer than necessary when the en- gine is not running. TURN SIGNALS To turn on the emergency flashers, push the switch. To signal a turn, push the headlight/ All the turn signal lights will flash. -
Page 84
New L/C100(U) Instrument panel light control Front fog lights Interior lights Type A To adjust the brightness of the instru- To turn on the front fog lights, twist ment panel lights, turn the dial. the band of the headlight and turn sig- nal switch lever. -
Page 85
New L/C100(U) Personal lights » To turn on the interior light, slide the All the doors are locked when the light switch. is still on. » The interior light switch has the following One front side door will be closed with positions: the lock knob pushed forward while the other doors are locked. -
Page 86
New L/C100(U) Center interior and personal lights To turn on the personal light, push the CENTER PERSONAL LIGHTS switch on 1 side. To turn the lights off, To turn on the center personal light, push the switch on 2 side. push the switch on 1 side. -
Page 87
New L/C100(U) Ignition switch light Windshield wipers and washer INTERIOR AND PERSONAL LIGHTS CUT OFF OPERATION When the ignition switch is ”OFF” and any interior lights in the vehicle stay lighting on, the lights will cut off automatically after 30 minutes. You can cancel the cut off operation by: «… -
Page 88
New L/C100(U) Rear window wiper and washer To squirt washer fluid, pull the lever NOTICE toward you. Do not operate the rear wiper if the If the windshield wipers are off, they will rear window is dry. It may scratch the operate a couple of times after the washer glass. -
Page 89
New L/C100(U) Rear window defogger Outside rear view mirror heaters Make sure you turn the defoggers off when the surfaces are clear. Leaving the defoggers on for a long time could cause the battery to discharge, especially during stop- and- go driving. The defoggers are not designed for drying rain water or for melting snow. -
Page 90
New L/C100(U) CAUTION Since the mirror surfaces can get hot, keep your hands off them when the mirror heater switch is on. Make sure you turn the mirror heaters off when the surfaces are clear. Leaving the mirror heaters on for a long time could cause the battery to discharge, especially during stop- and- go driving. -
Page 91
INSTRUMENTS AND The indicator lamp goes off after driving CONTROLS— several times. If the indicator lamp does not go off, contact your Toyota dealer as soon as possible. Chapter 1- 5 Gauges, Meters and Service reminder indicators «… -
Page 92
Call a Toyota dealer or qualified repair shop for assistance. Your vehicle may overheat during severe operating conditions, such as: Oil pressure may not build up when the «… -
Page 93
New L/C100(U) Voltmeter Tachometer NOTICE Do not drive the vehicle with the oil pressure below the normal range until the cause is fixed—it may ruin the engine. The voltmeter tells whether the battery The tachometer indicates engine speed is charged discharged. -
Page 94
Take vehicle to Toyota dealer. You can use one trip meter to calculate the fuel economy and the other to measure the distance on each trip. All Fill up tank. -
Page 95
Con- fully released. Stop and check. tact your Toyota dealer. If the brake fluid level is low… If the hydraulic boost pressure is lowered, At a safe place, test your brakes by start- the warning light comes on and buzzer ing and stopping. -
Page 96
Unless the driver fastens paired by your Toyota dealer as soon as the nearest Toyota dealer or repair shop. the belt, the light keeps on flashing and possible. -
Page 97
If it comes on while you are driving, have occurs, immediately stop your vehicle system of the airbag and front seat belt your vehicle checked by your Toyota deal- at a safe place and contact your pretensioners are operating properly. -
Page 98
If the light does not go off, call a Toyota 4. Place the four- wheel drive control lever circuit in need of repair. -
Page 99
New L/C100(U) Ignition switch with steering lock Part 1 ”LOCK”—Engine is off and the steering OPERATION OF wheel is locked. The key can be re- moved only at this position. INSTRUMENTS AND To turn the key from ”ACC” to the ”LOCK” CONTROLS—… -
Page 100
New L/C100(U) Automatic transmission Lock release button To prevent misshifting Overdrive switch For selecting either a three- speed or Parking, engine starting and four- speed transmission key removal position Reverse position ON position OFF position “O/D OFF” indicator Neutral position (Shifting into (Shifting into light on the… -
Page 101
New L/C100(U) » Your automatic transmission has a shift Shift into the ”L” position. The trans- CAUTION lock system to minimize the possibility of mission will downshift to the first gear incorrect operation. This means you can when the vehicle speed drops down to Never put your foot on the accelera- only shift out of ”P”… -
Page 102
New L/C100(U) (c) Using ”2” and ”L” positions If the four–wheel drive control is in the z Do not continue hill climbing or ”N” position while the selector lever is in The ”2” and ”L” positions are used for hard towing for a long time in the the ”P”… -
Page 103
”PWR” mode, push in the driving nearby people or objects. parking brake. pattern selector button. The ”PWR” mode indicator light comes on. For ordinary driving, Toyota recommends NOTICE using the Normal mode to improve fuel If you rock your vehicle, observe the economy. -
Page 104
New L/C100(U) Four-wheel drive system— (a) Four-wheel drive control (j) Driving ”2nd STRT” (second ”H” (high speed position, center differ- start) mode ential locked): Lever at ”H”, center differ- ential lock button pushed in In the ”2nd STRT” (Second start) mode, the transmission system shifts up from Use this for greater traction when you second gear. -
Page 105
New L/C100(U) Rear differential lock system (b) Shifting procedure SHIFTING BETWEEN ”H” (UNLOCKED) CAUTION AND ”H” (LOCKED) To shift between unlock and lock modes Do not use the rear differential lock in ”H”, push the center differential lock but- in the conditions other than above. ton. -
Page 106
New L/C100(U) The differential will also unlock if you shift CAUTION the four–wheel drive control lever to ”H”. Never forget to turn of the switch after » Do not lock the differentials until using this feature. the wheels have stopped spinning. To check the indicator bulb, turn the igni- Otherwise, the vehicle may move in tion key to the ”ON”… -
Page 107
New L/C100(U) Parking brake Cruise control The cruise control allows you to cruise CAUTION the vehicle at a desired speed over 40 km/h (25 mph) even with your foot off Before driving, be sure the parking the accelerator pedal. brake is fully released and the park- Your cruising speed can be maintained up ing brake reminder light is off. -
Page 108
Another push on the switch will hicle at that speed. your vehicle checked by your Toyota deal- turn the system completely off. If the speed is not satisfactory, tap the er at the earliest opportunity. -
Page 109
If you use the brake pedal, cruise comes on. celerate the vehicle and then push the control is cancelled. If this is the case, contact your Toyota control lever down in the ”SET/COAST” RESUMING THE PRESET SPEED dealer and have your vehicle inspected. -
Page 110
New L/C100(U) -
Page 111
New L/C100(U) Car audio system— —Reference Part 1 OPERATION OF Air conditioning system » Controls INSTRUMENTS AND » Air flow selector settings CONTROLS— » Operating tips » Instrument panel vents Chapter 1- 7 Rear heater system Car audio system and Rear air conditioning system Air conditioning «… -
Page 112
This section describes some of the basic TONE AND BALANCE YOUR RADIO ANTENNA features on Toyota audio systems. Some For details about your system’s tone and Lowering the antenna information may not pertain to your sys- balance controls, see the description of To lower a power antenna, push the ”… -
Page 113
New L/C100(U) YOUR CASSETTE PLAYER 8 cm (3 in.) compact disc singles When you insert a cassette, the exposed Your compact disc player does not need tape should be to the right. an adaptor to play compact disc singles. Compact disc singles are about 8 cm (3 NOTICE in.) diameter- smaller… -
Page 114
New L/C100(U) —Using your audio system: controls and features Details of specific buttons, controls, and features are described in the alphabetical listing that follows. -
Page 115
New L/C100(U) 1 2 3 4 5 6 (Preset buttons) AM F M (Reverse/Fast forward buttons) These buttons are used to preset and Push ”AM F M” to switch between the AM Cassette Player tune in radio stations. and FM bands. ”AM”, ”FM1” or ”FM2” will Push the fast forward button to fast for- appear on the display. -
Page 116
If the malfunction is not rectified, take CONTROL / MODE” repeatedly until ”FAd” disc player and automatic changer. your vehicle to your Toyota dealer. appears on the display. Then turn the If the player malfunctions, your audio sys- knob to adjust the front/rear balance. -
Page 117
New L/C100(U) Dolby_ B NR PROG (Program) Random playing for the tracks on a disc: Quickly push and release ”RAND”. ”RAND” Push ”PROG” to select the other side of If you are listening to a tape that was will appear on the display. The disc you a cassette tape. -
Page 118
New L/C100(U) Compact Disc Player SCAN Compact disc player There are two repeat features—you can Radio There are two scan features—you can ei- either replay a disc track or a whole com- ther scan the tracks on a specific disc or You can either scan all the frequencies on pact disc. -
Page 119
New L/C100(U) SEEK (Seeking) When counting the number of tracks you SKIP want to rewind, remember to count the Radio The skip feature allows you to fast for- current track as well. For example, if you ward past long stretches of blank tape. In the seek mode, the radio finds and want to rewind to a song that is two be- This is especially useful at the end of… -
Page 120
Usually, a problem with radio reception signals are blocked by buildings, trees, or does not mean there is a problem with Your Toyota has an electronic tuning radio other large objects. Increasing the bass your radio—it is just the normal result of (ETR). -
Page 121
New L/C100(U) Use high- quality cassettes. » Fading—AM broadcasts are reflected by Low- quality cassette tapes can cause the upper atmosphere—especially at night. many problems, including poor sound, These reflected signals can interfere with inconsistent playing speed, those received directly from the radio sta- constant auto- reversing. -
Page 122
New L/C100(U) » » If moisture gets into your compact disc Handle compact discs carefully, espe- player, you may not hear any sound cially when you are inserting them. even though your compact disc player Hold them on the edge and do not appears to be working. -
Page 123
New L/C100(U) CAUTION Compact disc players use invisible la- ser beam which could cause hazard- radiation exposure directed outside the unit. Be sure to operate the player correctly as instructed. A new disc may have rough edges on its inner and outer perimeter. Remove the rough edges by pressing the side of a ball- point pen or pencil against the inner and outer perimeter of the… -
Page 124
New L/C100(U) Air conditioning system— —Controls 1. Air Intake Selector 2. Air Flow Selector 3. ”A/C” Button 4. Fan Speed Selector 5. ”AUTO” Position (for fan speed) 6. ”AUTO” Position (for air flow) 7. Temperature Selector… -
Page 125
New L/C100(U) ”AUTO” position 5. Windshield—Air flows mainly from the windshield vents. For automatic operation of the air condi- tioning, turn the fan speed and air flow For details about air flow selector settings, selector knobs to the ”AUTO” position. see the illustration after ”A/C”… -
Page 126
If this happens, take your ve- hicle to a Toyota dealer for service. Air intake selector Press the button to select the air source. An indicator light will illuminate to show which air intake mode is being selected. -
Page 127
New L/C100(U) —Air flow selector settings —Operating tips » To cool off your Toyota after it has been parked in the hot sun, drive with the windows open for a few minutes. This vents the hot air, allowing the air conditioning to cool the interior more quickly. -
Page 128
New L/C100(U) » If following another vehicle on a dusty Heating Air conditioning road, or driving in windy and dusty For best results, set controls to: For best results, set controls to: conditions, it is recommended that the air intake selector be temporarily set to Fan speed—”AUTO”… -
Page 129
New L/C100(U) Ventilation Defogging Defrosting For best results, set controls to: The inside of the windshield The outside of the windshield For best results, set controls to: For best results, set controls to: Fan speed—”AUTO” Temperature—To the desired Temperature—Towards high Temperature—Towards high temperature temperature to heat;… -
Page 130
New L/C100(U) —Instrument panel vents Center vents Lower vent If air flow control is not satisfactory, check the instrument panel vents. The instrument panel vents may be opened or closed as shown. Side vents… -
Page 131
New L/C100(U) Rear heater system 1. Fan Speed Selector 2. Temperature Selector… -
Page 132
New L/C100(U) Fan speed selector This button is used to turn the rear heater system on and off, and adjust the fan speed. Pressing the button once adjusts the fan speed ”LO” mode twice successionally adjusts the fan speed to the ”HI”… -
Page 133
New L/C100(U) Rear air conditioning system— —Controls 1. Rear Air Conditioning On- Off Button 2. ”AUTO” Button 3. Air Flow Selector 4. Fan Speed Selector 5. Temperature Selector 6. ”OFF” Button… -
Page 134
New L/C100(U) Rear air conditioning on- off button Temperature selector To turn the rear air conditioning on, press Move the lever to adjust the tempera- the ”REAR” button. To turn the rear air ture—to the right to warm, to the left to conditioning off, press the button again. -
Page 135
New L/C100(U) —Air flow selector settings… -
Page 136
New L/C100(U) -
Page 137
New L/C100(U) Clock Part 1 For example, if the ”:00” button is de- OPERATION OF pressed when time between 1:01—1:29, the time will change to 1:00. INSTRUMENTS AND If the time is between 1:30—1:59, the CONTROLS— time will change to 2:00. If the electrical power source has been disconnected from the clock, the time dis- Chapter 1- 8… -
Page 138
The display indicates between the range of -22 F and 122 F. If the engine is not running, the key must be in the ”ACC” position. Do not hold the cigarette lighter pressed Use a Toyota genuine cigarette lighter or equivalent for replacement. -
Page 139
New L/C100(U) Power outlets The power outlets are designed for power supply for car accessories. To use them, open the lids as shown in the following illustrations. The key must be in the ”ACC” or ”ON” position to be used. NOTICE z To prevent the fuse from being… -
Page 140
New L/C100(U) Fuel pump shut- off system If the fuel pump shut- off system has acti- The fuel pump shut- off system is de- vated, you can turn on the fuel pump signed to activate in a collision which may shut- off system with the reset switch on cause a large amount of vehicle deforma- the impact detection sensor. -
Page 141
New L/C100(U) Glove box Garage door opener box To use the glove box, do this. Your vehicle is equipped with a box To use the garage door opener box, do designed to store a garage door opener the following. To open: Pull the lever. transmitter. -
Page 142
New L/C100(U) 2. Unscrew the screws on both sides 3. Remove Velcro loop on the stay. Re- Please note if the transmitter has wire clip and remove the stay. move the paper strip covering the for sun visor, this clip must be removed adhesive on back side of Velcro loop prior to adhesion of the Velcro. -
Page 143
New L/C100(U) 4. Install the transmitter on the center 5. Remove the cover on the opening on 6. Reinstall the stay and secure it with of the stay with Velcro. the lid. the screws. Before fixing it with the screws, adjust the position of the transmitter as it can be operated through the opening on the lid. -
Page 144
New L/C100(U) Auxiliary boxes— To use the auxiliary boxes, open the lids as shown in the following illustra- tions. CAUTION To reduce the chance of injury in case of an accident or a sudden stop, always keep the auxiliary box closed while driving. -
Page 145
New L/C100(U) Type C (luggage compartment) Type E (center console) Type G (front ceiling) Type D (luggage compartment) Type F (front ceiling) Type H (front ceiling) -
Page 146
New L/C100(U) —First- aid kit holder —Warning reflector holder Types A and B auxiliary boxes are equipped with a band or strap to hold the first- aid kit. Although the first- aid kit itself is not in- cluded as an original equipment, this aux- iliary box can be used to store the first- aid kit. -
Page 147
New L/C100(U) Cup holders Types C and D auxiliary boxes are The cup holder is designed for holding equipped with a band or straps to hold cups drink- cans securely the warning reflector. holes. To use them, observe the follow- ing illustrations. -
Page 148
New L/C100(U) Tie- down hooks Luggage cover For third seats (right- hand side) Type A To secure your luggage, use the tie- down hooks as shown above. ”Luggage stowage precautions” Part 2 for precautions to observe for load- ing luggage. NOTICE Do not use the seat anchors instead of the tie- down hooks. -
Page 149
New L/C100(U) Floor mat To use the luggage cover, pull it out of the retractor and hook it on the an- chors. To remove the luggage cover, lift it up. Use a floor mat of the correct size. After you remove the luggage cover, place If the floor carpet and floor mat have a it somewhere other than the passenger hole, then it is designed for use with a… -
Page 150
New L/C100(U) CAUTION Make sure the floor mat is properly placed on the floor carpet. If the floor slips and interferes with movement of the pedals during driv- ing, it may cause an accident. -
Page 151
It is not designed for cornering at the same speeds as conventional » Limited- slip differential two- wheel drive vehicles any more than » low- slung sports cars are designed to Your Toyota’s identification perform satisfactorily under off- road conditions. -
Page 152
New L/C100(U) Break- in period Drive gently and avoid high speeds. » CAUTION When driving off- road or in rugged Your vehicle does not need an elaborate terrain, do not drive at excessive break- in. But following a few simple tips Always observe the following precau- speeds, jump, strike objects, etc. -
Page 153
To help prevent gas station mix- ups, your premium type cannot be obtained, you avoid build- up of engine deposits. Toyota has a new smaller fuel tank open- may temporarily use unleaded gasoline ing. The special nozzle on pumps with… -
Page 154
New L/C100(U) Operation in foreign countries GASOLINES CONTAINING MMT GASOLINES QUALITY If you plan to drive your Toyota in another country… Some gasolines contain an octane- en- In a very few cases, you may experience hancing additive called MMT (methylcy-… -
Page 155
Do not drive with an extremely low the exhaust system. as possible. Remember, your Toyota fuel level; running out of fuel could Its purpose is to reduce pollutants in the dealer knows your vehicle and its cause the engine to misfire, creat- exhaust gas. -
Page 156
It contains carbon monoxide, which periodic inspections required by the is a colorless and odorless gas. It gases to be drawn into the vehicle. Toyota Maintenance Schedule. For can cause unconsciousness or even » To allow proper operation of your scheduled maintenance information, death. -
Page 157
Toyota recommends that the oil by the high temperature combustion diluted and make it difficult to judge level be checked every time you refuel gases during the combustion process. -
Page 158
In this case the brakes may not work properly. If they do not work well, depress the brake pedal firmly. If the brake system warning light comes on, immediately stop your vehicle and contact your Toyota deal-… -
Page 159
New L/C100(U) There may be the case that the brake » Even if the power assist is com- Effective way to press the ”ABS” brake system warning light stays on for about pletely lost, the brakes will still pedal: When the anti- lock brake system 60 seconds after the engine is started. -
Page 160
You may prevent the anti- road surface. Have your vehicle checked Depressing the brake pedal repeatedly lock brake system from operating at by your Toyota dealer as soon as pos- may turn on the light. It is normal if it full effectiveness. sible. -
Page 161
» Be careful to keep the vehicle bal- brake shoes and/or drums are replaced. anced. Locating the weight as far for- Have your Toyota dealer perform the bed- ward as possible helps maintain the ding- down. balance. «… -
Page 162
New L/C100(U) Rear step bumper » NOTICE Never allow anyone to ride in the luggage compartment. It is not de- Do not load the vehicle beyond the signed for passengers. They should vehicle capacity weight given in Part ride in their seats with their seat belts properly fastened. -
Page 163
This is the primary identification number Use only a spare tire of the same for your Toyota. It is used in registering size, construction and load capacity the ownership of your vehicle. as the original tires on your Toyota… -
Page 164
New L/C100(U) —Engine number Theft prevention labels Suspension and chassis Your new vehicle carries theft preven- CAUTION tion labels which are approximately 56 mm (2.20 in.) by 16 mm (0.63 in.). Do not modify the suspension/chassis The purpose of these labels is to reduce with lift kits, spacers, springs, etc. -
Page 165
New L/C100(U) Types of tires Determine what kind of tires your ve- CAUTION hicle is originally equipped with. 1. Summer tires » Do not mix summer and all season Summer tires are high- speed capability tires on your vehicle as this can tires best suited to highway driving under cause dangerous handling charac- dry conditions. -
Page 166
New L/C100(U) -
Page 167
New L/C100(U) How to start the engine– (a) Before cranking Before starting the engine Part 3 1. Check the area around the vehicle be- 1. Apply the parking brake firmly. STARTING AND DRIV- fore entering it. 2. Turn off unnecessary lights and acces- 2. -
Page 168
If the engine will not start… ing brake pulled. If they still do not See ”If your vehicle will not start” in Part work safely, pull to the side of the road and call a Toyota dealer for assistance. -
Page 169
New L/C100(U) Off- road driving precautions When driving your vehicle off- road, please » CAUTION Do not drive in excess of the speed observe the following precautions to en- limit. Even if the legal speed limit sure your driving enjoyment and to help «… -
Page 170
New L/C100(U) » z Sand and mud that has accumulated CAUTION driver passengers in brake drums and around brake should fasten their seat belts when- ever the vehicle is moving. discs may affect braking efficiency Always observe the following precau- and may damage brake system com- tions to minimize the risk of serious ponents. -
Page 171
”Toyota Long Life Coolant” or equivalent. harder starting. If you are not sure about accumulated in and around the parking which oil to use, call your Toyota dealer– brake mechanism may freeze, making it See Chapter 7- 2 for details about coolant he will be pleased to help. -
Page 172
Ask your fied for the trailer- hitch. Exceeding capacity. The combination of the local Toyota dealer for further details be- gross trailer weight added to the the maximum weight rating set by fore towing. -
Page 173
» Tongue load If you wish to install a trailer hitch, you 100 = 9 to 11% ( 1) should consult with your Toyota dealer. Total trailer weight or 15% ( 2) » Use only a hitch recommended by the… -
Page 174
New L/C100(U) Trailer Class Typical Trailer Ball Size NOTICE 2—5/16 in. 2 in. Do not use axle- mounted hitches as 1—7/8 in. they can cause damage to the axle housing, wheel bearings, wheels or 2. Select the appropriate trailer ball to tires. -
Page 175
» Never tap into your vehicle’s hy- BRAKES AND SAFETY CHAINS draulic system as it would lower its » Toyota recommends trailers with braking effectiveness. brakes that conform to any applica- » Never tow a trailer without using a… -
Page 176
This is especially » provincial or local regulation. If not, true on wet or slippery surfaces. Toyota recommends that you do not install the rear view mirrors required tow a trailer with a new vehicle or a for towing purpose. -
Page 177
New L/C100(U) » » » Avoid jerky starts or sudden accelera- Crosswinds and rough roads will ad- Because of the added load of the trail- tion. versely affect handling of your vehicle er, your vehicle’s engine may overheat » and trailer, causing sway. Pay attention on hot days temperatures over Avoid jerky steering and sharp turns. -
Page 178
New L/C100(U) How to save fuel and make your vehicle last longer, too When restarting out after parking on a Getting more kilometers/mileage from a CAUTION slope: liter/gallon of fuel is easy–just take it easy. It will help make your vehicle last 1. -
Page 179
New L/C100(U) » » Avoid continuous speeding up and Keep the bottom of your vehicle free slowing down. Stop- and- go driving from mud, etc. This not only lessens wastes fuel. weight but also helps prevent corro- » sion. Avoi d u nnecessar y s t oppi ng a nd «… -
Page 180
New L/C100(U) -
Page 181
IN CASE OF AN you have followed the correct starting not start, it needs adjustment or repair. procedure given in ”How to start the Call a Toyota dealer or qualified repair EMERGENCY engine” in Part 3 and that you have shop. -
Page 182
If the engine still will not start, it needs » Batteries contain sulfuric acid adjustment or repair. Call a Toyota dealer which is poisonous and corrosive. or qualified repair shop for assistance. Wear protective safety glasses when jump starting, and avoid spilling NOTICE acid on your skin, clothing, or ve- hicle. -
Page 183
New L/C100(U) JUMP STARTING PROCEDURE » The gas normally produced by a 1. If the booster battery is installed in Discharged battery battery will explode if a flame or another vehicle, make sure the vehicles spark is brought near. Use only are not touching. -
Page 184
New L/C100(U) 5. Start your engine in the normal way. After starting, run it at about 2000 rpm Jumper cable for several minutes with the accelerator pedal lightly depressed. 6. Carefully disconnect the cables in the exact reverse order: the negative cable and then the positive cable. -
Page 185
If there is no coolant will be much harder than usual. coolant is leaking, stop the engine im- boiling over or steam, leave the engine mediately. Call a Toyota dealer for as- running. sistance. CAUTION 5. If the engine drive belt is O.K. and… -
Page 186
5. Read the following instructions thor- Never get under the vehicle when system. You should have it checked as oughly. the vehicle is supported by the jack soon as possible at your Toyota dealer. alone. CAUTION » Use the jack only for lifting your vehicle during wheel changing. -
Page 187
New L/C100(U) —Required tools and spare tire NOTICE Do not continue driving with a de- flated tire. Driving even a short dis- tance can damage a tire beyond re- pair. 1. Get the required tools and spare Turn the jack joint by hand. tire. -
Page 188
New L/C100(U) To remove the spare tire under the lug- When connecting a jack handle extension 2. Remove the access hole cover on the gage compartment: with a jack handle end, use a Phillips- rear bumper with a flat- blade screw- head screwdriver or jack handle to tighten driver. -
Page 189
New L/C100(U) 3. Insert the jack handle end into the low- 4. After the tire is lowered completely to When storing the spare tire, put it in place ering screw through the access hole the ground, remove the holding bracket with the outer side of the wheel facing up and turn it counterclockwise with push- as shown in the illustration. -
Page 190
New L/C100(U) —Blocking the wheel —Removing wheel ornament —Loosening wheel nuts 2. Block the wheel diagonally opposite 3. Remove the wheel ornament. 4. Loosen all the wheel nuts. the flat tire to keep the vehicle from Pry off the wheel ornament, using the Always loosen the wheel nuts before rais- rolling when it is jacked up. -
Page 191: Positioning The Jack
New L/C100(U) —Positioning the jack When jacking up the rear tires, do not install the adapter on the jack. CAUTION Make sure of the secure installation of the adapter and the jack positioned Front Rear on a level and solid surface. Make sure the jack is positioned on a level and solid place.
-
Page 192
New L/C100(U) —Raising your vehicle CAUTION Never get under the vehicle when the vehicle supported jack alone. When connecting a jack handle extension 6. After making sure that no one is in with another extension and a jack handle the vehicle, raise it high enough so end, use a Phillips- head screwdriver or that the spare tire can be installed. -
Page 193
New L/C100(U) —Changing wheels —Reinstalling wheel nuts 7. Remove the wheel nuts and change Before putting on wheels, remove any cor- 8. Reinstall all the wheel nuts finger tires. rosion on the mounting surfaces with a tight. wire brush or such. Installation of wheels Lift the flat tire straight off and put it Reinstall the wheel nuts (tapered end in- without good metal- to- metal contact at the… -
Page 194
New L/C100(U) —Lowering your vehicle —Reinstalling wheel ornament CAUTION When lowering the vehicle, make sure all portions of your body and all oth- er persons around will not be injured the vehicle is lowered to the ground. 9. Lower the vehicle completely and 10. -
Page 195
11. Check the air pressure of the re- If towing is necessary, we recommend (a) Towing with wheel lift type truck— placed tire. you have it done by your Toyota dealer or a commercial tow truck service. In Adjust the air pressure to the specification —From front consultation with them, have your ve- designated in Part 8. -
Page 196
New L/C100(U) —Emergency towing (a) Towing with wheel lift type truck (c) Towing with sling type Use a towing dolly under the wheels not truck lifted by the truck. (b) Using flat bed truck Front (c) Towing with sling type truck NOTICE Do not tow with sling type truck, ei- ther from the front or rear. -
Page 197
New L/C100(U) If towing is necessary, we recommend CAUTION CAUTION you to have it done by your Toyota dealer or a commercial tow truck ser- Use extreme caution when towing ve- If the engine is not running, the pow- vice. -
Page 198
» If the towing vehicle can hardly move, do not forcibly continue the towing. Contact your Toyota dealer or a commercial tow truck service for assistance. » Tow the vehicle as straight ahead as possible. -
Page 199
Toyota dealer if you can give them the key number and master key. Even if you lose only one key, contact your Toyota dealer to make a new key. If you lose all your master keys, you cannot make new keys; the whole engine immobi- liser system must be replaced. -
Page 200
New L/C100(U) -
Page 201
Now, it is up to you. Proper » High temperatures will cause corrosion care of your Toyota can help ensure long- to those components of the vehicle » Protecting your Toyota from term corrosion prevention. -
Page 202
We recommend See ”Washing and waxing your Toyota” for » When driving in the areas where there that the fittings and the area where the more tips. -
Page 203
NOTICE ing your Toyota through an automatic car wash. NOTICE Do not use gasoline or strong sol- vents, which may be toxic or cause Always remove the plastic bumpers if damage. -
Page 204
New L/C100(U) Cleaning the interior NOTICE NOTICE CAUTION z Do not use dye or bleach on the Do not use solvent, thinner, gasoline Do not wash the vehicle floor with or window cleaner on the interior. belts—it may weaken then water, or allow water to get onto the z Do not use the belts until they be- floor when cleaning the vehicle interi-… -
Page 205
If you have any questions about the leather these could cleaning of your Toyota, your local cause discoloring. Toyota dealer will be pleased to answer them. z Use of a nylon brush or synthetic fiber cloth, etc. may scratch the fine grained surface of the leather. -
Page 206
New L/C100(U) -
Page 207: Maintenance And Care
See ”Owner’s War- or if you prefer, your Toyota dealer will be ranty Information Booklet” or ”Owner’s pleased to do them at a nominal cost.
-
Page 208
They learn to work on Supplement” for the details. vehicle to your Toyota dealer or a quali- Toyotas before they work on your vehicle, fied service shop immediately. It is recom- rather than while they are working on it. -
Page 209
New L/C100(U) Tire surface and wheel nuts INSIDE THE VEHICLE Seat belts Check the tires carefully for cuts, damage Check that the seat belt system such as Items listed below should be checked or excessive wear. See Chapter 7- 2 for buckles, retractors and anchors operate regularly, e.g. -
Page 210
New L/C100(U) Does your vehicle need repairing? Automatic transmission ”Park” mecha- Brake fluid level Be on the alert for changes in perfor- nism Make sure the brake fluid level is correct. mance, sounds, and visual tip- offs that Check the lock release button of the se- See Chapter 7- 2 for additional information. -
Page 211
» Engine continually runs hot; oil pres- sure gauge stays low If you notice any of these clues, take your vehicle to your Toyota dealer as soon as possible. It probably needs adjustment or repair. CAUTION Do not continue driving with the ve- hicle unchecked. -
Page 212
New L/C100(U) -
Page 213
New L/C100(U) Part 7 DO- IT- YOURSELF MAINTENANCE Chapter 7- 1 Introduction » Engine compartment overview » Fuse locations » Do- it- yourself service precautions » Parts and tools… -
Page 214
New L/C100(U) Engine compartment overview 1. Engine oil filler cap 2. Brake fluid reservoir 3. Fuse blocks 4. Battery 5. Windshield rear window washer fluid tank 6. Engine oil level dipstick 7. Engine coolant reservoir 8. Electric cooling fan 9. Power steering fluid reservoir… -
Page 215
New L/C100(U) Fuse locations Spare fuses… -
Page 216
Read separate compartment—the engine, radiator, should be taken to avoid prolonged Toyota Warranty statement for details and exhaust manifold, power steering and repeated contact with it. To re- suggestions. fluid reservoir… -
Page 217
Remember that battery and ignition nance. Remember all Toyota parts are de- wear could result. Also backfiring signed in metric sizes, so your tools must cables carry high currents or volt- could cause a fire in the engine be metric. -
Page 218
New L/C100(U) Checking brake fluid Checking and replacing fuses Parts (if level is low): Parts (if replacement is necessary): » » SAE J1703 or FMVSS No.116 DOT 3 Fuse with same amperage rating as brake fluid original Tools: Adding washer fluid «… -
Page 219
New L/C100(U) Checking the engine oil level Part 7 DO- IT- YOURSELF Low level Full level MAINTENANCE— Chapter 7- 2 Engine and Chassis » Checking the engine oil level » Add oil O.K. Too full Checking engine coolant level » Checking brake fluid With the engine at operating tempera- 3. -
Page 220
New L/C100(U) 4. Pull the dipstick out and look at the oil ENGINE OIL SELECTION NOTICE level on the end. Use API grade SJ, ”Energy- Conserving” z Avoid overfilling, engine multigrade engine oil or ILSAC multigrade CAUTION could be damaged. engine oil. -
Page 221
Visually check the radiator, hoses, radiator cap and drain cock and water pump. If you can find no leak, have your Toyota dealer test the cap pressure and check for leaks in the cooling system. ILSAC certification mark… -
Page 222
New L/C100(U) Checking brake fluid We recommend to use 50% solution for CAUTION your Toyota, to provide protection down to about -35_C (- 31_F). When it is extreme- To prevent burning yourself, do not ly cold, to provide protection down to… -
Page 223
New L/C100(U) Checking power steering fluid If the level is low, add SAE J1703 or NOTICE FMVSS No. 116 DOT 3 brake fluid to the brake reservoir. If you spill the fluid, be sure to wipe If cold If hot it off to prevent it from damaging the O.K. -
Page 224
If the caps If a tire frequently needs refilling, have it have been lost, have new ones put on checked by your Toyota dealer. as soon as possible. -
Page 225
When a tire is replaced, the wheel REPLACING YOUR TIRES The tires on your Toyota have built- in should always be balanced. tread wear indicators to help you know When replacing a tire, use only the An unbalanced wheel may affect vehicle when the tires need replacement. -
Page 226
SNOW TIRE SELECTION If you need snow tires, select the same size, construction and load capacity as the original tires on your Toyota. Do not use tires other than those men- tioned above. Do not install studded tires without first checking local regulations for To equalize tire wear and help extend possible restrictions. -
Page 227
New L/C100(U) Regulations regarding the use of tire CAUTION chains vary according to location or Side chain type of road, so always check them » Do not exceed 50 km/h (30 mph) or before installing chains. chain manufacturer’s recom- CHAIN INSTALLATION mended speed limit, whichever is Install the chains on the rear tires as lower. -
Page 228
When replacing wheels, care should be » Use only the Toyota wheel nuts and taken to ensure that the wheels are re- wrench designed for your aluminum placed by ones with the same load ca- wheels. -
Page 229
New L/C100(U) Checking battery condition— —Precautions Part 7 DO-IT-YOURSELF » CAUTION If electrolyte gets on your skin, thoroughly wash the contact area. If MAINTENANCE— BATTERY PRECAUTIONS you feel pain or burning, get medi- cal attention immediately. The battery produces flammable and «… -
Page 230
Have battery tighten. DARK WHITE checked by your Tighten hold- down clamp only Toyota dealer. enough to keep the battery firmly in place. Overtightening may damage the battery CLEAR Have battery case. or LIGHT checked by your YELLOW Toyota dealer. -
Page 231
New L/C100(U) Checking and replacing fuses Battery recharging precautions During recharging, the battery is pro- ducing hydrogen gas. Therefore, before recharging: Type A 1. If recharging with the battery installed on the vehicle, be sure to disconnect the ground cable. 2. -
Page 232
Add washer tool is shown in the illustration. tem. Have your Toyota dealer correct it as fluid. soon as possible. If you are not sure whether the fuse has You may use plain water as washer fluid. -
Page 233
New L/C100(U) Replacing light bulbs— —Headlights The following illustrations show how to Bulb Light bulbs Type gain access to the bulbs. When replacing a bulb, make sure the ignition switch and Front fog lights 9006 light switch are off. Use bulbs with the Parking lights —… -
Page 234
If the connector is tight, wiggle it. LEFT–HAND HEADLIGHT: Install washer inlet securely. Aiming is not necessary after replacing the bulb. When aiming adjustment is nec- essary, contact your Toyota dealer. -
Page 235
If the connector is tight, wiggle it. Aiming is not necessary after replacing the bulb. When aiming adjustment is nec- essary, contact your Toyota dealer. -
Page 236
New L/C100(U) —Front turn signal and front side marker lights —Parking lights Use a Phillips – head screwdriver. Use a Phillips – head screwdriver. -
Page 237
New L/C100(U) —Stop and tail lights Use a Phillips–head screwdriver. -
Page 238
New L/C100(U) —Rear turn signal, stop and tail, and back–up lights —License plate lights Use a Flat- bladed screwdriver. a: Back–up light b: Rear turn signal light c: Stop and tail light… -
Page 239
New L/C100(U) -
Page 240
New L/C100(U) -
Page 241: Specifications
New L/C100(U) Dimensions and weight Engine Part 8 Overall length mm (in.) 4890 (192.5) Model: SPECIFICATIONS 2UZ- FE Overall width mm (in.) 1940 (76.4) Type: Overall height mm (in.) 1875 (73.8) » Dimensions and weight 8 cylinder V type, 4 cycle, gasoline Wheelbase mm (in.) 2850 (112.2)
-
Page 242
Coolant type: be obtained, you may temporarily use DENSO SK20R11 unleaded gasoline with an Octane Rat- ”Toyota Long Life Coolant” or equivalent IFR6A11 ing as low as 87 (Research Octane With ethylene- glycol type coolant for a Number 91). Spark plug gap, mm (in.): proper corrosion protection of aluminum 1.1 (0.043) -
Page 243
New L/C100(U) AUTOMATIC TRANSMISSION Oil type: BRAKES Standard differential Fluid capacity (drain and refill), L (qt., Minimum pedal clearance when depressed Hypoid gear oil API GL- 5 Imp. qt.) with the pressure of 490 N (50 kgf, 110 Limited slip differential Up to 3.5 (3.7, 3.1) lbf) with the engine running, mm (in.): Hypoid gear oil for limited slip differ-… -
Page 244
New L/C100(U) Tires Fuses Tire size: P275/70R16 114S Tire pressure, kPa (kgf/cm or bar, psi): Normal driving Front 220 (2.2, 32) Rear 220 (2.2, 32) Tailer towing Front 220 (2.2, 32) Rear 240 (2.4, 35) Wheel size: Wheel nut torque, N·m (kgf·m, ft·lbf): 131 (13.4, 96.6) Engine compartment Engine compartment… -
Page 245
New L/C100(U) 18. HEAD (RH- UPR) 20 A: Right- hand 28. GAUGE 15 A: Gauges and meters, headlight (high beam) service reminder indicators and warning buzzer (except discharge, open door 19. HEAD (LH- LWR) Left- hand warning lights), back- up headlight (low beam), front fog lights lights, air conditioning system, electron- 20. -
Page 246
New L/C100(U) 40. ECU- IG 15 A: Anti- lock brake system, 51. AM1 NO.1 80 A: Charging system, all shift lock system, power seats, power components in ”AM1 NO.2”, ”GAUGE”, antenna, power tilt telescopic ”WIPER”, ”DIFF”, ”A.C” ”SEAT steering system HTR”… -
Page 247: Uniform Tire Quality Grading
However, NHTSA cannot become involved in individual prob- lems between you, your dealer, or Toyota Motor Sales, U.S.A., Inc.
-
Page 248
A tire marked C may have tire failure. quality grading. poor traction performance. Your Toyota dealer will help answer any Warning: The traction grade assigned to questions you may have as you read this this tire is based on braking (straight information. -
Page 249
New L/C100(U) U −3 Quick index » If a service reminder indicator or warning buzzer comes on ..» If your vehicle will not start ……..»…

1 — Боковые вентиляционные дефлекторы; 2 — Боковые вентиляционные дефлекторы; 3 — Панель приборов; 4 — Центральные вентиляционные дефлекторы; 5 — Выключатели электропривода крышки верхнего люка и/или персональных подсветок; 6 — Вещевой ящик; 7 — Выключатели стеклоподъемников; 8 — Рычаг управления приводом на четыре колеса; 9 — Рычаг селектора АТ; 10 — Выключатели обогревателей сидений; 11 — Рычаг стояночного тормоза; 12 — Кнопка селектора второго режима запуска и кнопка селектора режима вождения; 13 — Нижнее вентиляционное сопло; 14 — Рычаг снятия предохранителя замка капота; 15 — Устройство для открывания дверцы заливной горловины топливного бака; 16 — Выключатели приводов дверных замков
Панель приборов Land Cruiser, вид B

1 — Выключатели света фар, сигналов поворотов и противотуманных фар; 2 — Выключатель управления темпостатом; 3 — Выключатель зажигания; 4 — Выключатели стеклоочистителей ветрового стекла, заднего окна и стеклоомывателя; 5 — Выключатель аварийной сигнализации; 6 — Выключатель электроприводной антенны; 7 — Автомобильная аудиосистема; 8 — Часы или часы с индикацией внешней температуры; 9 — Регуляторы кондиционера воздуха; 10 — Выключатель обогревателя наружного зеркала заднего вида; 11 — Выключатель заднего обогревателя; 12 — Выключатель стеклообогревателя заднего окна; 13 — Выключатель блокировки межосевого дифференциала; 14 — Рычаг разблокировки рулевого управления; 15 — Выключатель управления освещением приборной панели; 16 — Выключатель блокировки заднего дифференциала или выключатель блокировки переднего и заднего дифференциала; 17 — Ручка дроссельной заслонки; 18 — Выключатель привода управления зеркалом заднего вида; 19 — Регулятор наклона луча света фар; 20 — Выключатель задних туманных фонарей; 21 — Выключатель привода обогревателя
Панель приборов модели Lexus LX 470, тип 1

1 — Переключатели управления стеклоподъемниками; 2 — Выключатель электропривода замка двери; 3 — Выключатель запирания окна; 4 — Переключатель выбора настроек положения сиденья; 5 — Переключатель управления наружными зеркалами заднего вида; 6 — Переключатель управления малыми боковыми окнами; 7 — Выключатель активации дополнительного топливного бака; 8 — Переключатель управления головными фарами и указателями поворотов; 9 — Переключатель управления стеклоочистителем и стеклоомывателем; 10 — Выключатель блокировки межосевого дифференциала; 11 — Выключатель выдвижной антенны; 12 — Выключатель аварийной сигнализации; 13 — Индикатор пробега; 14 — Часы; 15 — Индикатор внешней температуры; 16 — Индикатор противоугонной сигнализации; 17 — Аудиосистема; 18 — К/Л непристегнутого ремня безопасности переднего пассажира; 19 — Панель управления отопителем и кондиционером воздуха; 20 — Ручка вещевого ящика; 21 — Выключатель заднего отопителя; 22 — Розетка отбора мощности; 23 — Прикуриватель; 24 — Рычаг управления полным приводом; 25 — Выключатель обогрева заднего стекла; 26 — Пепельница; 27 — Рычаг селектора АТ; 28 — Переключатель управления жесткостью подвески; 29 — Переключатель управления высотой подвески; 30 — Выключатель режима повышенной мощности (PWR); 31 — Выключатель режима старта со 2-й передачи; 32 — Выключатель темпостата; 33 — Кнопки дистанционного управления аудиосистемой; 34 — Кнопка отпирания замка капота; 35 — Кнопка открывания дверцы топливного бака; 36 — Выключатель боковых подушек безопасности
Панель приборов модели Lexus LX 470, тип 2

1 — Переключатели управления стеклоподъемниками; 2 — Выключатель электропривода замка двери; 3 — Выключатель запирания окна; 4 — Переключатель выбора настроек положения сиденья; 5 — Переключатель управления наружными зеркалами заднего вида; 6 — Выключатель задних туманных фар; 7 — Переключатель управления малыми боковыми окнами; 8 — Выключатель боковых подушек безопасности; 9 — Переключатель управления головными фарами и указателями поворотов; 10 — Переключатель управления стеклоочистителем и стеклоомывателем; 11 — Выключатель блокировки межосевого дифференциала; 12 — Выключатель выдвижной антенны; 13 — Выключатель аварийной сигнализации; 14 — Индикатор пробега; 15 — Часы; 16 — Индикатор внешней температуры; 17 — Индикатор противоугонной сигнализации; 18 — Аудиосистема; 19 — К/Л не пристегнутого ремня безопасности переднего пассажира; 20 — Панель управления отопителем и кондиционером воздуха; 21 — Ручка вещевого ящика; 22 — Выключатель обогрева наружных зеркал заднего вида; 23 — Выключатель заднего отопителя; 24 — Розетка отбора мощности; 25 — Прикуриватель; 26 — Рычаг управления полным приводом; 27 — Выключатели подогрева сидений; 28 — Выключатель обогрева заднего стекла; 29 — Пепельница; 30 — Рычаг селектора АТ; 31 — Переключатель управления жесткостью подвески; 32 — Переключатель управления высотой подвески; 33 — Выключатель режима повышенной мощности (PWR); 34 — Выключатель режима старта со 2-й передачи; 35 — Выключатель темпостата; 36 — Кнопки дистанционного управления аудиосистемой; 37 — Кнопка отпирания замка капота; 38 — Кнопка открывания дверцы топливного бака
Типичный вид нижней части панели приборов

1 — Пепельница; 2 — Сигаретный прикуриватель; 3 — Разъем отбора мощности
Обновлено: 22.06.2023
Система антиблокировки тормозов (ABS) – общая информация и коды неисправностей Toyota Land Cruiser
Система антиблокировки тормозов (ABS) – общая информация и коды неисправностей
Типичная схема расположения компонентов ABS
1 — Колесный датчик
2 — Реле ABS
3 — Гидравлический модулятор ABS
4 — ECU системы ABS
5 — Диагностический разъем DLC 1
6 — Датчик замедления
7 — Контрольная лампа ABS
8 — Колесный датчик
9 — Ротор колесного датчика
10 — Колесный датчик
11 — Роторы колесных датчиков
12 — Колесный датчик
Электронный блок управления (ECU) ABS
ECU системы ABS закреплен под передней накладкой порога правой двери.
ECU отслеживает скорость вращения каждого из колес автомобиля, ориентируясь на поступающие сигналы от колесных датчиков. Когда при аварийном торможении какое-либо из колес начинает преждевременно блокироваться, ECU выдает команду на активацию помещенного внутрь гидравлического модулятора электромагнитного клапана, который, срабатывая, открывает соответствующий участок тормозного контура, выпуская из него часть рабочей жидкости в резервуар и, соответственно, снижая рабочее давление. Как только скорости вращения колес уравниваются, клапан вновь закрывается и давление продолжает подниматься. Цикл длится доли секунды на каждом из колес и повторяется до тех пор, пока торможение не будет завершено. Конструкция системы позволяет корректировать давление в гидравлических контурах каждого из четырех колес. В действительности схема функционирования ABS намного сложнее, чем это может показаться, поэтому составители настоящего Руководства не рекомендуют владельцам автомобилей производить попытки самостоятельного выполнения ремонта системы. В случае возникновения неполадок разумнее всего будет обратиться к специалистам автосервиса.
Модулятор установлен внутри двигательного отсека и оборудован срабатывающим по команде ECU электромагнитным клапаном регулировки гидравлического давления в контурах тормозной системы.
Каждое из колес оборудовано индивидуальным датчиком оборотов. Датчик состоит из ротора (кольца с равномерно расположенными по его периметру зубцами) и чувствительного элемента в виде подмагниченной катушки. Чувствительный элемент датчика фиксирует моменты прохождения мимо него зубьев ротора и преобразует получаемую информацию в электрические сигналы, непрерывно передаваемые на модуль управления ABS. По результатам обработки поступающих сигналов ECU получает информацию об относительной скорости вращения каждого из колес. Пока все четыре колеса вращаются с одинаковой частотой, ABS пребывает в пассивном состоянии. Как только любое из колес начинает блокироваться, блок управления фиксирует изменение входящего сигнала и вырабатывает команду на срабатывание модулятора, мгновенно сбрасывающего давление гидравлической жидкости в тормозном механизме соответствующего колеса.
По сигналам, поступающим от датчика-выключателя стоп-сигналов ECU определяет момент, когда водитель выжимает педаль ножного тормоза, сразу же активируя ABS.
Диагностика и восстановительный ремонт
Если вмонтированная в панель приборов автомобиля контрольная лампа ABS загорается и продолжает гореть во время движения, в первую очередь удостоверьтесь, что стояночный тормоз полностью отпущен, а тормозная система функционирует исправно. Если все в норме, следовательно, произошел отказ ABS. При этом в память ECU должен быть занесен код неисправности. При диагностике и считывании кодов неисправностей предупреждающая лампочка на панели приборов будет мигать. При наличии нескольких кодов, их индикация будет начата с меньшего номера по возрастающей, вне зависимости от времени их поступления. При движении автомобиля коды неисправности не индицируются. Проведите визуальный осмотр:
- Проверьте состояние тормозных суппортов и колесных цилиндров;
- Проверьте состояние и надежность крепления контактных р
- азъемов электропроводки ECU и колесных датчиков (см. Бортовое электрооборудование);
- Проверьте соответствующие предохранители (см. Бортовое электрооборудование).
Восстановительный ремонт ABS выходит за пределы квалификации среднестатистического механика-любителя.
Считывание и стирание кодов неисправностей
Видео про «Система антиблокировки тормозов (ABS) – общая информация и коды неисправностей» для Toyota Land Cruiser
Prado ABS Brake sound
2000 toyota land cruiser abs problem?
100 series Land Cruiser ABS noise
Кто-нибудь ставил в противотуманные фары светодиодные лампы HB4? Они ночью хоть что-то освещают или только можно использовать, как ходовые (дневные) огни? Или вообще фуфло полное:)) лучше оставить заводской галоген.
Подскажи, что такое САМОдиагностика и как я понял, ты её (самодиагностику) уже провел. Где вырисовываются (высвечиваются) коды ошибок?
Подскажи, что такое САМОдиагностика и как я понял, ты её (самодиагностику) уже провел. Где вырисовываются (высвечиваются) коды ошибок?
самодиагностика это вставить перемычку в разъем на нужные контакты , включить зажигание , когда включишь зажигание то все лампочки на панели такие как — абс, ручник, чек , трекшен итд начнут моргать , вот по этим морганием и считывается код ошибки той или иной неисправности , но нужна камасутра для этого
Самодиагностику я не провел,а поехал на сканер. САМОдиагностика снизу под рулем есть диагностический разем там надо перемыкать какието контакты Лампочка CHECK на панели приборов начнет высвечивать (мигать) двоичные коды неисправности
Вот еще нарыл.Включите зажигание, двигатель не запускайте.
Перемкните зажимы ТЕ1 и Е1 диагностического разъема
Если в системе отсутствует неисправность, лампа «CHECK ENGINE» начнет мигать с длительностью мигания и паузы 0.25 сек .
Если же в системе есть неисправность то лампа «CHECK ENGINE» будет индицировать код неисправности.
Код неисправности состоит из двух групп миганий, с интервалом между двумя группами 1,5 секунды. Первая группа состоит из мигания большей длительности и представляет «десятичную» цифру, а вторая группа состоит из более коротких миганий и представляет «единичную» цифру кода неисправности .
Сосчитав количество миганий в каждой группе, узнаем номер кода неисправности
Если в системе есть больше одной неисправности, то индицирование второй неисправности будет отделено от первой интервалом 2,5 сек.
Последовательности всех существующих в системе кодов неисправностей будут индицироваться с интервалом времени 4. 5 сек .
самодиагностика это вставить перемычку в разъем на нужные контакты , включить зажигание , когда включишь зажигание то все лампочки на панели такие как — абс, ручник, чек , трекшен итд начнут моргать , вот по этим морганием и считывается код ошибки той или иной неисправности , но нужна камасутра для этого
Не, пацаны, ТАКОЙ самодиагностикой с «перемычкой на нужные контакты» я заниматься не хочу. Уж в этом случае съезжу к диагносту и через сканер получу коды (виды) неисправности, а то скупой-то платит дважды, ну её (самодиагностику) на .
Решил потратить немножко времени, и с редактировать на обычном русском языке как производится самодиагностика.
Удачи!
Коды неисправностей бензиновых двигателей (Toyota)
Коды самодиагностики считываются по числу вспышек индикатора «CHECK ENGINE» при замкнутых выводах «TE1»-«E1» разъема DLC1 под капотом или «TC»-«CG» разъема DLC3 под приборной панелью и включенном зажигании.Так же встречается разъём DLС2 в нём замыкаются «ТЕ1»-«Е1».
При отсутствие неисправности индикатор мигает с частотой 0,25 секунды.
При наличии неисправности индикатор выдаёт с начало десятки через 0,5 секунды, потом пауза 1,5 секунды и единицы с паузой 0,5 секунды.
При наличии двух и более кодов, пауза между ними 2,5 секунды.
После вывода всех кодов, наступает пауза 4,5 секунды, а затем коды повторяются.
12 — Датчик положения коленчатого вала (P0335)
13 — Датчик положения коленчатого вала (P0335, P1335)
14 — Система зажигания, катушка №1 (P1300) и №4 (P1315)
15 — Система зажигания, катушка №2 (P1305) и №3 (P1310)
16 — Система управления АКПП
18 — Система VVT-i — фазы (P1346)
19 — Датчик положения педали акселератора (P1120)
19 — Датчик положения педали акселератора (P1121)
21 — Кислородный датчик (P0135)
22 — Датчик температуры охлаждающей жидкости (P0115)
24 — Датчик температуры воздуха на впуске (P0110)
25 — Кислородный датчик — сигнал бедной смеси (P0171)
26 — Богатая смесь (Р0172)
27 — Кислородный датчик №2
31 — Датчик абсолютного давления (P0105, P0106)
33 — Клапан ISCV (Р0505)
34 — Система турбонаддува
35 — Датчик давления турбонаддува
36 — Датчик CPS (P1105)
39 — Система VVT-i (P1656)
41 — Датчик положения дроссельной заслонки (P0120, P0121)
42 — Датчик скорости автомобиля (P0500)
43 — Сигнал стартера
47 — Датчик положения дополнительной дроссельной заслонки
49 — Датчик давления топлива (D-4) (P0190, P0191)
51 — Состояние выключателей
52 — Датчик детонации (P0325)
53 — Сигнал детонации
55 — Датчик детонации №2
58 — Привод SCV (D-4) (P1415, P1416, P1653)
59 — Сигнал VVT-i (P1349)
71 — Система EGR (P0401, P0403)
75 — Датчик давления ГУР (Р0550)
78 — ТНВД (D-4)
89 — Привод ETCS (P1125, P1126, P1127, P1128, P1129, P1633)
92 — Форсунка холодного пуска (D-4) (P1210)
97 — Форсунки (D-4) (P1215)
Коды неисправностей дизельных двигателей (Toyota)
12 — Датчик положения коленчатого вала
13 — Датчик частоты вращения
14 — Клапан регулировки угла опережения впрыска
15 — Сервопривод дроссельной заслонки
17 — Сигнал блока управления
18 — Электромагнитный перепускной клапан
19 — Датчик положения педали акселератора
22 — Датчик температуры охлаждающей жидкости
24 — Датчик температуры воздуха на впуске
32 — Корректирующие резисторы
33 — Привод дроссельной заслонки
35 — Датчик даления наддува
39 — Датчик температуры топлива
42 — Датчик скорости автомобиля
47 — Датчик положения дроссельной заслонки
89 — ЭБУ (IC)
96 — Датчик положения клапана EGR
Коды неисправностей АКПП (Toyota)
Коды самодиагностики считываются по числу вспышек индикатора «O/D OFF» при замкнутых выводах «TE1»-«E1» разъема DLC1 под капотом или «TC»-«CG» разъема DLC3 под приборной панелью и включенном зажигании (при этом должно быть разрешено включение повышающей передачи — «O/D OFF» не горит).
11 — Норма
37 — Датчик частоты вращения входного вала АКПП (Р1705)
38 — Датчик температуры рабочей жидкости АКПП
42 — Датчик скорости (или датчик частоты вращения выходного вала) (Р0500)
44 — Датчик скорости (или датчик частоты вращения заднего выходного вала)
46 — Соленоид управления давлением гидроаккумулятора (Р1765)
61 — Датчик скорости (или датчик частоты вращения переднего выходного вала)
62 — Соленоид №1 (Р0753)
63 — Соленоид №2 (Р0758)
64 — Соленоид муфты блокировки гидротрансформатора (Р0773)
67 — Датчик частоты вращения входного вала АКПП
68 — Соленоид управления муфтой блокировки гидротрансформатора
73 — Соленоид муфты блокировки межосевого дифференциала
Коды неисправностей ABS (Toyota)
Считывание кодов (модели с разъемом DLC1)

— Включите зажигание.
— Перемкните выводы «ТС» и «E1» разъема DLC1.
— Снимите перемычку с выводов «WA» и «WB» разъема DLC1.
— Через 4 секунды считайте код по количеству вспышек индикатора.
— Снимите перемычку с выводов «TC» и «E1».
— Установите перемычку на выводы «WA» и «WB».
Сброс кодов (модели с разъемом DLC1)
— Включите зажигание.
— Перемкните выводы «ТС» и «E1» разъема DLC1 (автомобиль неподвижен).
— Нажмите на педаль тормоза восемь или более раз в интервале трех секунд.
— Индикатор должен выводить код нормы (мигать 2 раза в секунду).
— Выключите зажигание.
— Снимите перемычку с выводов «TC» и «E1».
— Убедитесь, что индикатор ABS погас.
Считывание кодов (модели с разъемом DLC3)

— Перемкните выводы «ТС» и «CG» разъема DLC3.
— Включите зажигание.
— Через 4 секунды считайте код по количеству вспышек индикатора.
— Снимите перемычку с выводов «TC» и «CG».
Сброс кодов (модели с разъемом DLC3)
— Перемкните выводы «ТС» и «CG» разъема DLC3.
— Включите зажигание.
— Нажмите на педаль тормоза восемь или более раз в интервале трех секунд.
— Индикатор должен выводить код нормы (мигать 2 раза в секунду).
— Снимите перемычку с выводов «TC» и «CG».
11 Обрыв цепи реле электромагнитного клапана
12 Короткое замыкание в цепи реле э/м клапана
13 Обрыв в цепи реле электронасоса
14 Короткое замыкание в цепи реле электронасоса
21 Обрыв или короткое замыкание в э/м клапане переднего правого колеса
22 Обрыв или короткое замыкание в э/м клапане переднего левого колеса
23 Обрыв или короткое замыкание в э/м клапане заднего правого (левого) колеса
24 Обрыв или короткое замыкание в э/м клапане заднего левого (правого) колеса
31 Неисправность датчика частоты вращения переднего правого колеса
32 Неисправность датчика частоты вращения переднего левого колеса
33 Неисправность датчика частоты вращения заднего правого колеса
34 Неисправность датчика частоты вращения заднего левого колеса
35 Попадание постороннего материала между ротором и датчиком ABS переднего правого колеса
36 Попадание постороннего материала между ротором и датчиком ABS переднего левого колеса
38 Попадание постороннего материала между ротором и датчиком ABS заднего правого колеса
39 Попадание постороннего материала между ротором и датчиком ABS заднего левого колеса
41 Слишком высокое или слишком низкое напряжение аккумуляторной батареи
43 Неисправность в цепи датчика замедления
44 Обрыв или короткое замыкание в цепи датчика замедления
49 Обрыв в цепи выключателя стоп-сигналов
51 Короткое замыкание или обрыв цепи питания электронасоса
71 Низкий уровень сигнала от датчика частоты вращения переднего правого колеса
72 Низкий уровень сигнала от датчика частоты вращения переднего левого колеса
73 Низкий уровень сигнала от датчика частоты вращения заднего правого колеса
74 Низкий уровень сигнала от датчика частоты вращения заднего левого колеса
75 Неправильное изменение сигнала от датчика частоты вращения переднего правого колеса
76 Неправильное изменение сигнала от датчика частоты вращения переднего левого колеса
77 Неправильное изменение сигнала от датчика частоты вращения заднего правого колеса
78 Неправильное изменение сигнала от датчика частоты вращения заднего левого колеса
79 Неисправность датчика замедления
98 — Датчик разрежения в вакуумном усилителе тормозов (C1200
Коды неисправностей SRS (Toyota)
Коды самодиагностики считываются аналогично прочим, по числу вспышек индикатора «SRS» при замкнутых выводах «TC»-«E1» разъема DLC1 под капотом или «TC»-«CG» разъема DLC3 под приборной панелью и включенном зажигании.
Стирание кодов должно происходить при выключении зажигание. Если коды сохраняются, необходимо провести процедуру очистки:
— подсоединть два провода к выводам «TC» и «AB»
— включить зажигание и подождать не менее 6 секунд
— поочередно, раз в секунду, замыкать на массу выводы «TC» и «AB» (пауза между замыканием — менее 0,2 секунды)
— после третьего замыкания вывода «TC» индикатор должен замигать с высокой частотой — значит коды стерты.
11 — Воспламенитель ПБ водителя (замыкание на массу)
12 — Воспламенитель ПБ водителя (замыкание на питание)
13 — Воспламенитель ПБ водителя (замыкание в цепи)
14 — Воспламенитель ПБ водителя (разрыв в цепи)
15 — Передний правый датчик SRS (замыкание или разрыв в цепи)
15 — Передний правый датчик SRS (замыкание на массу или питание)
16 — Передний левый датчик SRS (замыкание или разрыв в цепи)
16 — Передний левый датчик SRS (замыкание на массу или питание)
31 — Неисправность блока управления SRS
51 — Воспламенитель ПБ пассажира (замыкание на массу)
52 — Воспламенитель ПБ пассажира (замыкание на питание)
53 — Воспламенитель ПБ пассажира (замыкание в цепи)
54 — Воспламенитель ПБ пассажира (разрыв в цепи)
61 — Воспламенитель преднатяжителя ремня водителя (замыкание на массу)
62 — Воспламенитель преднатяжителя ремня водителя (замыкание на питание)
63 — Воспламенитель преднатяжителя ремня водителя (замыкание в цепи)
64 — Воспламенитель преднатяжителя ремня водителя (разрыв в цепи)
71 — Воспламенитель преднатяжителя ремня пассажира (замыкание на массу)
72 — Воспламенитель преднатяжителя ремня пассажира (замыкание на питание)
73 — Воспламенитель преднатяжителя ремня пассажира (замыкание в цепи)
74 — Воспламенитель преднатяжителя ремня пассажира (разрыв в цепи)
Коды неисправностей системы 4WS (Toyota)
Коды самодиагностики считываются по числу вспышек индикатора «4WS» при замкнутых выводах «TC»-«E1» разъема DLC1 под капотом и включенном зажигании.
11 Электронный блок управления 4WS
12 Неисправность главного электродвигателя заднего рулевого механизма
13 Неисправность привода управления рулевым механизмом
21 Короткое замыкание в системе главного электродвигателя
22 Разрыв цепи в системе главного электродвигателя
23 Блокировка главного электродвигателя
24 Неисправность в работе главного электродвигателя
31 Разрыв в системе электродвигателя заднего хода
32 Неисправность в работе электродвигателя заднего хода
41 Неисправность датчика частоты вращения левого переднего колеса
42 Неисправность датчика системы 4WS
43 Неверная работа датчика системы 4WS
Пардонте.
Спросил, потому, что в памяти свежо скидывание ошибок на Авенсисе 2003 года, а там уже алгоритм другой, АВ там не используется! Видимо на Королле это пошло с 2006 года.
Перерыл все свои тойотовские книжки, картинки полной распиновки DLC3 так и не нашёл  Отредактировал имеющуюся картинку, обращусь к Алексу может получится вставить
Но на всякий случай выкладываю здесь.
Огромное спасибо, что указали на ошибку (недоработку). Что делать, лоханулся ;))
Считывание ошибок через климат-контроль, 100 кузов — реально ли?
Всем привет!
Недавно в автосервисе на диагностике мне показали, как можно считать ошибки с компа машины через климат контроль. Как делать: с выключенным зажиганием зажимаем кнопки AUTO и кнопку переключения забора воздуха снаружи/из салона (надеюсь, поняли:)), включаем зажигание и держим эти кнопки зажатыми. На табло «климата» повляются надписи, ждем, пока они моргнут 3-4 раза, и отпускаем кнопки. И на экране появляется код ошибок, если они есть, и два нуля, если они отсутствуют. Но есть одно НО: один раз мне выдался код ошибки, которого нету ни в одном мануале по диагностике (вроде 23). Возникает вопрос: реально ли так считывать ошибки, или эта процедура с климатом это нечто другое? Если считывать ошибки методом замыкания контактов в диагностическом разьеме (считать кол-во морганий чека), то такой ошибки там нету. Кто что может сказать по этому поводу?
Эта процедура и есть диагностика климат-контроля, и всего с ним связанного, кондиционер, датчики, блок управления, к диагностике двигателя отношения не имеет.
Ошибка 23 — Отклонение давления хладагента от нормы.
Место неисправности:
1. Выключатель по давлению
2. Жгут проводов или разьемы между блоком управления кондюком и выключателем по давлению
3. Компрессор кондиционера
4. Блок управления кодиционером
Взято с букваря по Краунам, по 100-му кузову скорей всего тоже самое есть в книге, если есть под рукой, смотри раздел «Кондиционер, отопление и вентиляция»
Спасибо, теперь буду знать=) Одно печально- у таким «мастеров», который мне про эту диагностику рассказал, приходиться машины чинить. ужс
Всем привет!
Недавно в автосервисе на диагностике мне показали, как можно считать ошибки с компа машины через климат контроль. Как делать: с выключенным зажиганием зажимаем кнопки AUTO и кнопку переключения забора воздуха снаружи/из салона (надеюсь, поняли:)), включаем зажигание и держим эти кнопки зажатыми. На табло «климата» повляются надписи, ждем, пока они моргнут 3-4 раза, и отпускаем кнопки. И на экране появляется код ошибок, если они есть, и два нуля, если они отсутствуют. Но есть одно НО: один раз мне выдался код ошибки, которого нету ни в одном мануале по диагностике (вроде 23). Возникает вопрос: реально ли так считывать ошибки, или эта процедура с климатом это нечто другое? Если считывать ошибки методом замыкания контактов в диагностическом разьеме (считать кол-во морганий чека), то такой ошибки там нету. Кто что может сказать по этому поводу?
Пересмотрел книгу по устройству, техническому обслуживанию и ремонту от Легион-Автодата, ничего такого там нет и в помине. Устройство климата вообще никак не диагностируется, возможна только проверка разъемов на напряжение от блока управления и сопротивления датчиков и моторчиков заслонок. Если есть какая-нибудь другая инфа по диагностике, просьба поделиться. Да, и кодов ошибок, связанных с климатом, в книге нет.

Миниатюры
Датчики и активатор системы ABS Toyota Land Cruiser
Датчики и активатор системы ABS
Датчики скорости (VSS) системы ABS
Нижеописанную процедуру проводят на движущемся автомобиле, переведя систему в режим диагностики. При этом система ABS действовать не будет, останется работать только обычная тормозная система.
При погасшей лампе не подвергайте автомобиль резким разгонам и торможениям.
Передний VSS системы ABS

Задний VSS системы ABS
Чтобы избежать повреждений, не стучите по ротору и ступице молотком.
Снятие и установка
Старые креплений выбросите.
Проверка датчика замедления
Нижеописанную процедуру проводят не движущемся автомобиле, переведя систему в режим диагностики. При этом система ABS действовать не будет, останется работать только обычная тормозная система.
Снятие и установка активатора

Активатор, установленный на ECU системы ABS
Видео про «Датчики и активатор системы ABS» для Toyota Land Cruiser
Прописываем датчики контроля давления в шинах с помощью Launch
Ремонт Toyota Land Cruiser 100 (нежданчик) + «на катере в МакАвто. » ЛЕГКО!
Как снять заменить датчик ABS на Audi A4 B5 кузове
Читайте также:
- Шкода рапид пищит при запуске
- Разряжается аккумулятор пежо 206
- Штраф если перекрыл чужую машину
- Микроскоп из видеорегистратора своими руками
- Обогрев лобового стекла опель