
Как исправить ошибку агента клиента VPN для Cisco AnyConnect
Cisco AnyConnect — это программное обеспечение VPN, которое включает расширенную защиту для блокировки вредоносных программ на конечных точках. Однако некоторые пользователи говорят, что не могут установить или запустить Cisco AnyConnect. Когда они пытаются установить или запустить AnyConnect, появляется сообщение об ошибке, в котором говорится, что агент клиента VPN не смог создать хранилище межпроцессного взаимодействия . Пользователи исправили это сообщение об ошибке с разрешениями ниже.
Как пользователи могут исправить ошибку агента клиента VPN?
1. Отключите общий доступ к Интернету
- Отключение общего доступа к интернет-подключению является одним из наиболее распространенных исправлений для ошибки агента клиента VPN. Для этого нажмите сочетание клавиш Windows + R, которое открывает аксессуар «Запуск».
- Введите ‘control.exe / имя Microsoft.NetworkAndSharingCenter’ в поле Открыть.
- Нажмите кнопку ОК , чтобы открыть апплет Панели управления Центром управления сетями и общим доступом.
- Нажмите Изменить настройки адаптера в левой части апплета панели управления.
- Щелкните правой кнопкой мыши сетевое соединение с общим состоянием, чтобы выбрать « Свойства» .
- Затем выберите вкладку «Общий доступ», показанную на снимке ниже.
- Снимите флажок Разрешить другим пользователям подключаться к Интернету через этот компьютер .
- Нажмите кнопку ОК .
- Повторите вышеуказанные шаги для всех сетевых подключений с включенным общим доступом.
- Перезагрузите Windows после отключения общего доступа к соединению.
Проверьте UR Browser, который поставляется со встроенным VPN для частного и безопасного просмотра.
2. Отключите службу ICS
- Или попробуйте отключить службу ICS. Откройте аксессуар «Выполнить» в Windows.
- Введите «services.msc» в поле «Открыть» и выберите опцию « ОК» .
- Щелкните правой кнопкой мыши службу общего доступа к Интернету, указанную в окне «Службы», и выберите « Остановить» .
- Дважды щелкните Internet Connection Sharing, чтобы открыть окно его свойств.
- Щелкните раскрывающееся меню «Тип запуска», чтобы выбрать параметр « Отключено» .
- Не забудьте нажать кнопку Применить .
- Затем нажмите OK, чтобы выйти из окна.
- После этого перезапустите Windows после выключения службы ICS.
Это два подтвержденных решения, которые исправили ошибку агента клиента VPN для пользователей Cisco AnyConnect. После исправления ошибки пользователи могут установить или запустить Cisco AnyConnect.
СВЯЗАННЫЕ СТАТЬИ, ЧТОБЫ ПРОВЕРИТЬ:
- ИСПРАВЛЕНИЕ: VPN не удалось загрузить настройки на Cisco AnyConnect
- ИСПРАВЛЕНИЕ: Не удалось инициализировать подсистему подключения в Cisco AnyConnect ошибка в Windows
- Cisco VPN Client не устанавливается в Windows 10 [ГАРАНТИЙНОЕ ИСПРАВЛЕНИЕ]
by Milan Stanojevic
Milan has been enthusiastic about technology ever since his childhood days, and this led him to take interest in all PC-related technologies. He’s a PC enthusiast and he… read more
Updated on July 30, 2021
- Unable to install Cisco Anyconnect or the classic Cisco VPN Client?
- You may be surprised to learn that its development has ceased in 2011.
- However, there are still ways you can get hold of the installation files.
- We have the solution you need — simply follow the steps below.

XINSTALL BY CLICKING THE DOWNLOAD FILE
Fortect is a tool that does not simply cleans up your PC, but has a repository with several millions of Windows System files stored in their initial version. When your PC encounters a problem, Fortect will fix it for you, by replacing bad files with fresh versions. To fix your current PC issue, here are the steps you need to take:
- Download Fortect and install it on your PC.
- Start the tool’s scanning process to look for corrupt files that are the source of your problem
- Right-click on Start Repair so the tool could start the fixing algorythm
- Fortect has been downloaded by 0 readers this month.
While it is a good virtual private network software, many users reported that Cisco Anyconnect won’t install on their PC at all or that Cisco Anyconnect installation failed on Windows 10. This issue can occur because of the fact that the Cisco VPN service was last updated in the year 2011.
Even though the latest version of this software is not natively compatible with the Windows 10 operating system, in this article we will explore a way to make it run on your Windows 10 PC without any issues.
Please make sure to follow all the steps presented in this article in the order that they are written for the best results.
Cisco VPN Client was officially abandoned as a project in 2011, and you might find yourself unable to install Cisco Anyconnect.
To avoid any potential problems, try downloading and installing the Cisco VPN client from a third-party source.
What can I do if Cisco VPN won’t install on Windows?
How to install Cisco on your Windows 10 PC
Note: If you recently upgraded from Windows 7 or Vista to Windows 10, then it is recommended that you uninstall SonicWALL Global VPN Client and Cisco VPN Client by searching for them in Control Panel >Add or remove program window.
If you are using a clean install of Windows 10, then you are ready to start setting up the Cisco VPN.
- Click here to download the 32bit version of the Cisco VPN Client, and here for the 64-bit version.
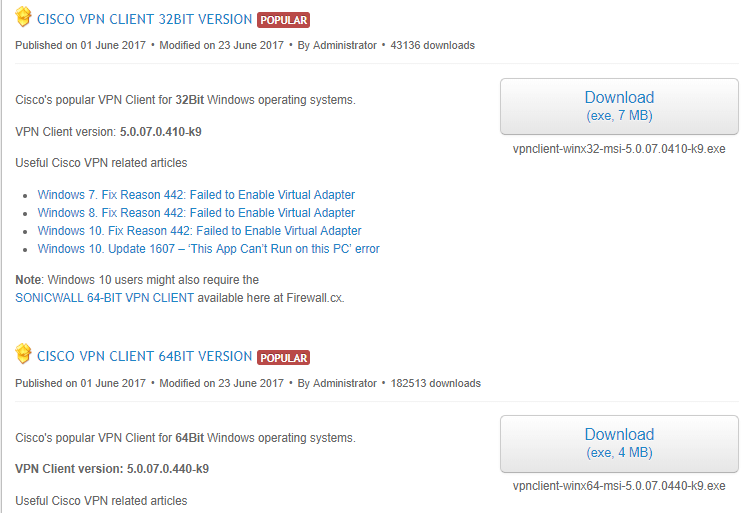
- Run the .exe file you downloaded, select Browse and choose a specific location on your hard-drive for the files to be extracted (in this example image, we created a folder on the Desktop called Cisco VPN to which we extracted the files from the .exe).
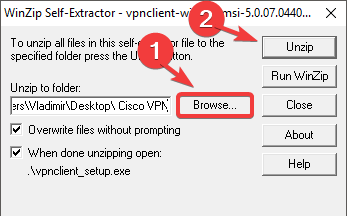
- Navigate to the location in which you unzipped the folder, and search for the vpnclient_setup.msi file.

- Double click on the installer, and select Next.
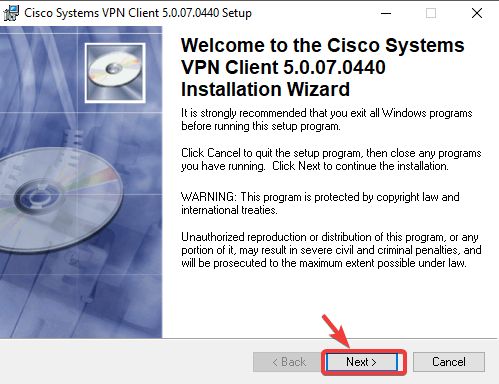
- You are now done. The installation process will start normally and you will be able to follow the on-screen instructions
Install Private Internet Access

While the Cisco VPN Client was a great solution back in the days, it is safe to declare that it is not quite cutting-edge technology nowadays.
In fact, CISCO Systems has completely shut down support for this product since 2014 and no updates were released for this product since 2012, thus it is no wonder that error messages like there is a problem with this windows installer package appear.
Running obsolete software can cause more damage than you might think, which is why we recommend a modern VPN client like Private Internet Access.
Switching to a world-leading VPN client like Kape Technologies owned PIA can significantly improve your online experience by streamlining your connection, reducing loading times, and enhancing your download speeds.
With an impressive network of global gateways, you will never have to worry about your connection to worldwide servers not being successful. Plus, your traffic data will be routed through secure VPN tunnels and protected by the best-in-class encryption technology.

Private Internet Access
Cisco Anyconnect won’t install? Go for a more modern, more friendly, more performant VPN like PIA!
In this article we explored the best way to install Cisco VPN on your Windows 10 PC. We are sure that the solution provided here will help you bypass any installation issues with this software.
Please feel free to let us know if this method worked for you by using the comment section found below.
Your connection is not secure — websites you visit can find out your details:
- Your IP Address:
loading
Companies can sell this information, alongside your location and internet provider name, and profit from it by serving targeted ads or monitoring your data usage.
We recommend Private Internet Access, a VPN with a no-log policy, open source code, ad blocking and much more; now 79% off.
![]()
На чтение 3 мин. Просмотров 3.2k. Опубликовано 03.09.2019
Использование VPN-клиента, такого как Cisco AnyConnect, должно обеспечить беспрецедентный доступ к конечной точке как для ваших сотрудников, так и для вас. Преимущества использования такой услуги более чем очевидны, поскольку вы можете получить удаленный доступ к сети компании с любого ПК или мобильного устройства.
Тем не менее, даже несмотря на то, что редкая проблема может омрачить общую функциональность, их обычно просто разобрать. Сегодня мы обращаемся к ошибке «VPN не удалось загрузить настройки».
Эта ошибка не позволяет пользователям подключаться к сети VPN.
Содержание
- Что делать, если VPN не удалось загрузить настройки
- Решение 1 – Переустановите клиент
- Решение 2 – Удалить папку Cisco
- Решение 3 – Изменить настройки безопасности
- Решение 4 – Удалить профиль XML
Что делать, если VPN не удалось загрузить настройки
- Переустановите клиент
- Удалите папку Cisco
- Изменить настройки безопасности
- Удалить профиль XML
Решение 1 – Переустановите клиент
Первый довольно очевидный шаг – попытаться переустановить клиент. Некоторые пользователи предполагают, что определенная версия AnyConnect не будет работать, поэтому вы можете получить ее после приобретения более поздней версии. Вы не начнете с нуля, так как файлы конфигурации и профиля ProgramData останутся нетронутыми.
После удаления VPN-клиента Cisco AnyConnect перейдите на официальный веб-сайт и загрузите свежий установщик. Если проблема не устранена, перейдите к следующему шагу.
Решение 2 – Удалить папку Cisco
Возможное повреждение файлов конфигурации может привести к таким проблемам. Поскольку возникает ошибка «VPN не удалось загрузить настройки», клиент не может получить настройки, по которым настроен клиент.
Чтобы решить эту проблему, вы можете попробовать удалить все связанные файлы настроек из нескольких мест.
Вот файлы, которые вы должны удалить:
- % ProgramData% CiscoCisco AnyConnect Secure Mobility ClientProfile
- % AppData% LocalCiscoCisco AnyConnect Secure Mobility Client
Удаление этой папки приведет к удалению всех настроек. Некоторые пользователи предлагают переустановить клиент после этого, но вы можете сначала попробовать его, а затем действовать соответствующим образом, если проблема не устранена.
– СВЯЗАННО: что делать, если Cisco VPN не удалось включить виртуальный адаптер
Решение 3 – Изменить настройки безопасности
Кажется, есть еще одна возможная причина ошибки «VPN не удалось загрузить настройки». А именно, похоже, что это мешает только пользователям, у которых не включены необходимые разрешения доступа. Вы можете исправить это, и, надеюсь, это решит проблему. Вот что вам нужно сделать:
- Перейдите на % ProgramData% CiscoCisco AnyConnect Secure Mobility Client .
- Нажмите правой кнопкой мыши папку Профиль и откройте Свойства .
- Выберите вкладку Безопасность .
- Нажмите «Изменить» (для этого понадобится административное разрешение).
- Установите флажок « Полный контроль » и подтвердите изменения.
Решение 4 – Удалить профиль XML
Наконец, если ни одно из предыдущих решений не помогло устранить ошибку, у нас есть еще одна вещь, которую вы можете попробовать. Конечно, всегда есть возможность связаться со службой поддержки и отправить им все необходимые журналы, чтобы они могли вам помочь. Просто, прежде чем сделать это, попробуйте эти шаги:
-
- Включите псевдоним группы или URL группы для туннельных групп.
- Создайте резервную копию профиля XML и удалите его из устройства адаптивной безопасности.
-
Теперь удалите (удалите) следующие файлы с зараженного компьютера:
- preferences.xml
- preferences_global.xml
- Профиль XML в папке Профили .
- Наконец, переподключите клиента.
С учетом сказанного мы можем завершить эту статью. Если у вас есть какие-либо вопросы или предложения, не стесняйтесь сообщить нам в разделе комментариев ниже.
Содержание
- Не могу установить cisco anyconnect на windows 10
- Видео: How to install Cisco VPN client on Window 10 2022.
- Как исправить проблемы Cisco VPN в Windows 10
- 1: Ремонт установки
- 2. Разрешить VPN свободно общаться через брандмауэр
- 3: настроить реестр
- 4: выполнить чистую переустановку
- ИСПРАВЛЕНИЕ: Cisco VPN не работает на Windows 10
- ИСПРАВЛЕНИЕ: Cisco VPN не работает на Windows 10
- Как исправить проблемы Cisco VPN в Windows 10
- 1: Ремонт установки
- 2. Разрешить VPN свободно общаться через брандмауэр
- 3: настроить реестр
- 4: выполнить чистую переустановку
- Не удалось инициализировать подсистему подключения в Cisco AnyConnect. Ошибка в Windows.
- Не удалось инициализировать подсистему подключения в ошибке Cisco AnyConnect
- 1. Зайдите в Центр обновления Майкрософт
- 2. Запустите средство устранения неполадок совместимости на Cisco AnyConnect
- 3. Отключите общий доступ к Интернету
- 4. Отредактируйте реестр
- Как настроить Cisco VPN Client в Windows 10 и Windows 7
- Функциональность Cisco VPN Client
- Загрузка
- Подготовка
- Установка Cisco VPN Client для Windows 10
- Установка Cisco VPN Client для Windows 7
- Настройка Cisco VPN Client
- Возможные проблемы
- Установка и настройка VPN-клиента Cisco в Windows 10
- Установка VPN-клиента Cisco в Windows 10
- Настройка VPN-клиента Cisco в Windows 10
Не могу установить cisco anyconnect на windows 10
Видео: How to install Cisco VPN client on Window 10 2022.
Решение Cisco VPN работает довольно хорошо в Windows 10, если мы посмотрим на отчеты. Наиболее заметные проблемы появляются только после серьезных обновлений, которые могут сломать приложение. Они не распространены, но, с другой стороны, они делают клиент VPN полностью непригодным для использования. По крайней мере, так было в случае с Fall Creators Update и April Update.
Тем не менее, нет необходимости беспокоиться. Мы нашли некоторые подходящие шаги и зачислили их ниже, поэтому обязательно ознакомьтесь с ними.
Как исправить проблемы Cisco VPN в Windows 10
1: Ремонт установки
Начнем с ремонта установки. Многие сторонние приложения, как правило, ломаются после выполнения крупного обновления. Вот почему всегда рекомендуется переустанавливать их после установки обновления.
Еще лучше, если вы хотите избежать одной из многочисленных ошибок обновления / обновления, удаление является жизнеспособным выбором. Однако, если вы не удалили Cisco VPN до обновления, вместо переустановки, вы должны сначала попробовать восстановить текущую установку.
Если вы не знаете, как восстановить Cisco VPN, выполните действия, описанные ниже:


2. Разрешить VPN свободно общаться через брандмауэр
Обновления системы могут довольно часто изменять системные настройки и предпочтения на значения по умолчанию. Этот проступок, конечно, может повлиять и на настройки Защитника Windows. В таком случае есть вероятность, что многие сторонние приложения, которым требуется бесплатный трафик через брандмауэр, не будут работать. Включая клиент Cisco VPN.
Вот почему мы рекомендуем вам проверить настройки и убедиться, что приложение действительно разрешено в настройках брандмауэра Windows. Вот что вам нужно сделать:

3: настроить реестр
Как и многие другие решения для интеграции VPN, Cisco VPN поставляется со специальным связанным виртуальным сетевым адаптером. Отказ этого устройства является еще одним распространенным явлением, и он сопровождается кодом ошибки 442. Первое, что вы можете сделать, если эта ошибка возникает, это проверить драйвер виртуального адаптера в диспетчере устройств.
Вот где это можно найти:

Теперь, если это не решит проблему, вы можете попробовать настройку реестра, которая, кажется, полностью ее устраняет. Это требует административного разрешения для внесения изменений в Реестр. Кроме того, мы настоятельно рекомендуем действовать осторожно, поскольку неуместное вмешательство в реестр может привести к системному отказу.
Выполните следующие действия, чтобы настроить реестр и восстановить Cisco VPN:

4: выполнить чистую переустановку
Выполните следующие действия, чтобы выполнить чистую переустановку и исправить Cisco VPN в Windows 10:
Если это не помогло, попробуйте связаться со службой поддержки, поскольку они, скорее всего, помогут вам наилучшим образом.
Вот и все. Если у вас есть какие-либо альтернативные решения, которыми вы хотите поделиться с нами, не стесняйтесь сделать это в разделе комментариев ниже.
Источник
ИСПРАВЛЕНИЕ: Cisco VPN не работает на Windows 10

ИСПРАВЛЕНИЕ: Cisco VPN не работает на Windows 10
Тем не менее, нет необходимости беспокоиться. Мы нашли некоторые подходящие шаги и зачислили их ниже, поэтому обязательно ознакомьтесь с ними.
Как исправить проблемы Cisco VPN в Windows 10
1: Ремонт установки
Если вы не уверены, как восстановить Cisco VPN, выполните шаги, которые мы предоставили ниже:
2. Разрешить VPN свободно общаться через брандмауэр
Обновления системы могут довольно часто изменять системные настройки и предпочтения на значения по умолчанию. Этот проступок, конечно, может повлиять и на настройки Защитника Windows. В таком случае есть вероятность, что многие сторонние приложения, которым требуется бесплатный трафик через брандмауэр, не будут работать. Включая клиент Cisco VPN.
Вот почему мы рекомендуем вам проверить настройки и убедиться, что приложение действительно разрешено в настройках брандмауэра Windows. Вот что вам нужно сделать:
3: настроить реестр
Как и многие другие решения для интеграции VPN, Cisco VPN поставляется со специальным связанным виртуальным сетевым адаптером. Отказ этого устройства является еще одним распространенным явлением, и он сопровождается кодом ошибки 442. Первое, что вы можете сделать, если эта ошибка возникает, это проверить драйвер виртуального адаптера в диспетчере устройств.
Вот где это можно найти:
Теперь, если это не решит проблему, вы можете попробовать настройку реестра, которая, кажется, полностью ее устраняет. Это требует административного разрешения для внесения изменений в реестр. Кроме того, мы настоятельно рекомендуем действовать осторожно, поскольку неуместное вмешательство в реестр может привести к системному отказу.
Выполните следующие действия, чтобы настроить реестр и восстановить Cisco VPN:
4: выполнить чистую переустановку
Наконец, если ни одно из предыдущих решений не позволило использовать Cisco VPN, единственное оставшееся решение, которое мы можем предложить, — это выполнить чистую переустановку. В идеале это потребует установки с чистого листа, при которой вы удалите все оставшиеся связанные файлы с вашего ПК до повторной установки Cisco VPN.
Выполните следующие действия, чтобы выполнить чистую переустановку и исправить Cisco VPN в Windows 10:
Если Cisco VPN по-прежнему не работает в Windows 10, попробуйте обратиться в службу поддержки, поскольку они, скорее всего, помогут вам наилучшим образом.
Вот и все. Если у вас есть какие-либо альтернативные решения, которыми вы хотите поделиться с нами, не стесняйтесь сделать это в разделе комментариев ниже.
СВЯЗАННЫЕ ИСТОРИИ, КОТОРЫЕ ВЫ ДОЛЖНЫ УЗНАТЬ:
Источник
Не удалось инициализировать подсистему подключения в Cisco AnyConnect. Ошибка в Windows.
Cisco AnyConnect – это больше, чем просто виртуальная частная сеть, поскольку она позволяет вашей рабочей силе работать из любого места, на любом устройстве и в любое время.
Это упрощает безопасный доступ к конечным точкам, обеспечивая безопасность, необходимую для обеспечения безопасности и защиты вашего бизнеса.
Некоторые из его основных функций и преимуществ включают в себя высокозащищенный доступ к сетевому предприятию из любого места и с любого устройства, лучшую видимость поведения пользователей и конечных точек по всему предприятию, комплексную защиту от угроз независимо от того, где они находятся, а также упрощенное управление и удобство использования на всех устройствах. в помещении и за его пределами, с одним агентом.
Хотя все эти функции и преимущества удивительны, при попытке соединения с AnyConnect Cisco вы можете столкнуться с некоторыми общими проблемами устранения неполадок.
Одна из таких распространенных проблем – когда вы получаете не удалось инициализировать подсистему соединения в ошибке Cisco AnyConnect, особенно при использовании операционной системы Windows.
Эта проблема возникает, когда выполняются следующие условия:
Microsoft подтвердила, что не удалось инициализировать подсистему подключения в Cisco AnyConnect ошибка в продуктах Microsoft, таких как Windows Server 2012 R2 Datacenter, Standard, Essentials и Foundation, Windows 8.1 Enterprise и Pro, Windows 8.1 и Windows RT 8.1.
Ознакомьтесь с некоторыми решениями, которые могут помочь вам обойти эту ошибку и устранить ее на своем компьютере.
Не удалось инициализировать подсистему подключения в ошибке Cisco AnyConnect
1. Зайдите в Центр обновления Майкрософт
Центр обновления Майкрософт поможет вам установить самое последнее накопительное обновление для системы безопасности Internet Explorer, поскольку уязвимость в SChannel делает возможным обход функций безопасности: 10 марта 2015 г. (MS15-031).
Если вы загружаете и устанавливаете обновления вручную, проверьте ссылки на скачивание в таблице «Подвержены уязвимости» в бюллетене по безопасности Microsoft MS15-018.
Если это не поможет, попробуйте следующее решение.
2. Запустите средство устранения неполадок совместимости на Cisco AnyConnect
Не удалось инициализировать подсистему подключения в Cisco AnyConnect ошибка обычно связана с недавним Центром обновления Windows, поэтому вы можете запустить средство устранения неполадок совместимости для решения проблемы, выполнив следующие действия:
Примечание. Для vpnagent.exe – локальной службы, которая поддерживает пользовательский интерфейс клиента – вам может потребоваться повторить эти шаги.
Это исправило не удалось инициализировать подсистему соединения в ошибке Cisco AnyConnect? Если нет, попробуйте следующее решение.
3. Отключите общий доступ к Интернету
Иногда не удалось инициализировать подсистему подключения в Cisco AnyConnect ошибка может произойти, потому что в вашей локальной сети включен общий доступ к подключению к Интернету (ICS).
Вот как это решить:


4. Отредактируйте реестр
Если вам не удалось инициализировать подсистему подключения в ошибке Cisco AnyConnect, вы можете исправить ее, внеся небольшое изменение в реестр, выполнив следующие действия:

Проверьте, можете ли вы подключиться.
Было ли какое-либо из этих решений исправить ошибку инициализации подсистемы подключения в Cisco AnyConnect? Дайте нам знать, оставив комментарий в разделе ниже.
Источник
Как настроить Cisco VPN Client в Windows 10 и Windows 7
Cisco VPN Client предназначен для удобной работы с сетевым оборудованием от компании Cisco. Нетрудно догадаться, исходя из названия, что эта программа позволяет быстро и правильно создать, настроить и легко использовать подключение к защищённой частной сети. Например, VPN-клиент от Cisco идеально подходит для работы с корпоративной сетью, поэтому он очень охотно используется сотрудниками компаний, которые работают на дому или находятся в командировке.

Приложение активно используют для управления корпоративными сетями
Несмотря на достаточно простую установку и настройку Cisco VPN Client, у пользователей Windows 10 и Windows 7 довольно часто всё же возникают определённые вопросы.
Функциональность Cisco VPN Client
Основная функция программы — удалённое использование ресурсов частной сети, созданной на базе оборудования Cisco. При запуске правильно настроенного подключения пользователь, находясь в любом месте, получает доступ к сетевым ресурсам так же, как если бы он был подключен напрямую.
Кроме того, этот VPN-клиент поддерживает и протокол SCEP (Simple Certificate Enrollment Protocol), разработанный самой компанией Cisco.
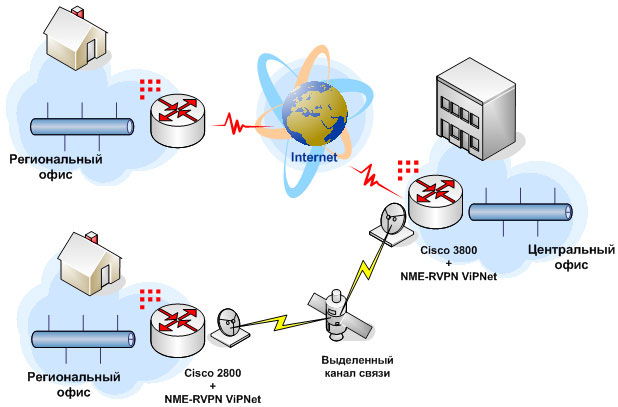
Cisco VPN Client обеспечивает беспрецедентную надёжность благодаря технологии Cisco Secure Connectivity System, использующей шифрование и двухфакторную аутентификацию при помощи смарткарт Aladdin eToken или USB-токенов.
Используемые методы шифрования:
Наличие встроенного файерволла — ещё одна из особенностей VPN-клиента от Cisco.
Программа может быть установлена на разные операционные системы, в том числе для Windows 7 и Windows 10.
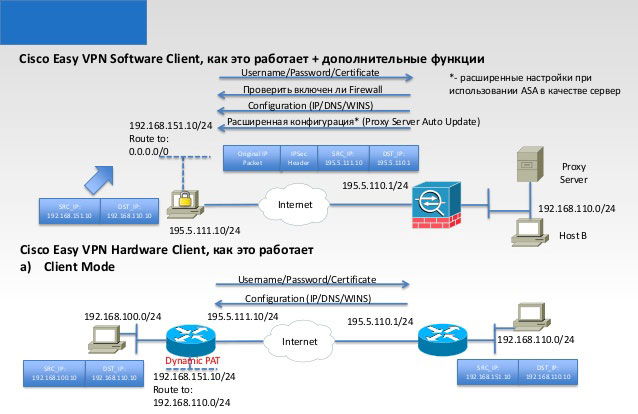
Правда, компания Cisco, видимо, является фанатами x86, поэтому программное обеспечение в основном заточено под работу именно с такой разрядностью операционной системы (что отражается в стабильности работы). Но это, разумеется, совсем не значит, что обладатели Windows 10 x64 или Windows 7 x64 никогда не смогут корректно запустить Cisco VPN-клиент. Есть и для них версия, но её установка и настройка имеет свои нюансы.
Загрузка

Подготовка
Чтобы корректно установить и настроить Cisco VPN Client на Windows (это касается и 10 и 7), необходимо обладать правами администратора.
Проверьте доступность портов UDP 500 и 4500 для входа и выхода. При необходимости внесите правки в настройки брэндмауэра.

Учтите, что VPN-клиент не будет работать через прокси.
Установка Cisco VPN Client для Windows 10
Обязательно сначала убедитесь, что версия, которую вы собираетесь установить, свежая и совместима с установленной операционной системой. Windows 10 не особо лояльна к устаревшему программному обеспечению, поэтому при попытке поставить и использовать старую версию Cisco VPN Client могут возникать различные ошибки, связанные с несовместимостью. В большинстве случаев они решаются отключением безопасной загрузки в BIOS перед установкой ПО. Но если вы не являетесь любителем «танцев с бубном», лучше всего просто скачать последнюю версию, совместимую именно с Windows 10.
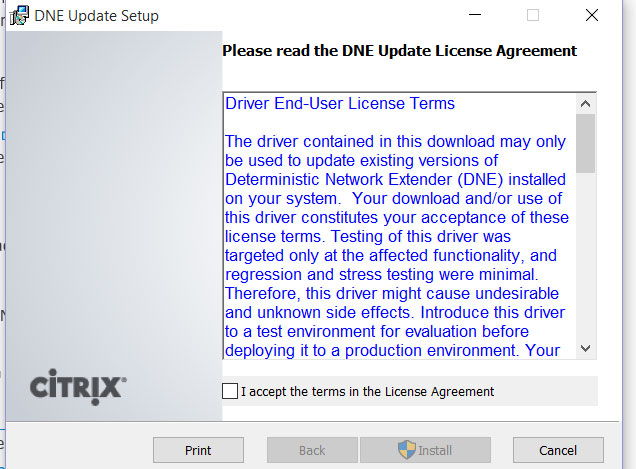
Предварительно устанавливаем DNE Citrix (Deterministic Network Enhancer), наличие которого потребуется для корректной инсталляции Cisco VPN Client. Проверьте, чтобы версия DNE подходит для вашей системы Windows 10 по разрядности! Обратите внимание, что антируткит может начать жаловаться во время запуска инсталлятора DNE, но повода для беспокойства нет (разумеется, если вы скачали установочный файл из надёжного источника, — например, с официального сайта). А вообще имейте в виду, что перед установкой рекомендуется выключать антивирусы и брэндмауэры.
Установка Cisco VPN Client для Windows 7
Установка VPN-клиента Cisco на Windows 7 осуществляется аналогично инсталляции на Windows 10.
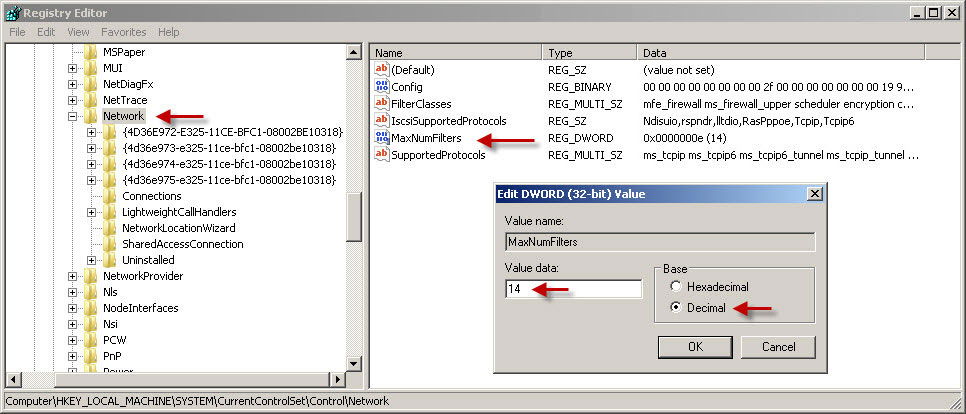
При возникновении проблем во время установки DNE может потребоваться редактирование параметра в реестре: HKEY_LOCAL_MACHINESystemCurrentControlSetControlNetworkMaxNumFilters — значение должно быть 14. Исправьте значение, если у вас выставлена цифра 8.
Настройка Cisco VPN Client
Настройка Cisco VPN Client для Windows 10 и Windows 7 достаточно проста, так как интерфейс VPN-клиента интуитивно понятен, но требует знания английского языка и некоторых терминов.
Новое подключение создаётся путём нажатия на кнопку «New». Открывается собственно окно с полями для указания информации о создаваемом подключении. Информация обычно предоставляется администратором частной сети или провайдером.
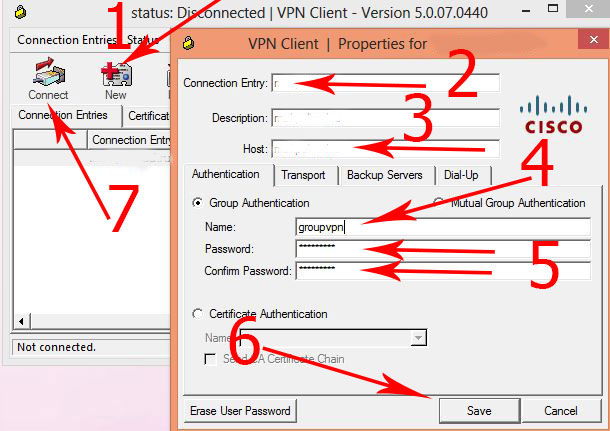
Имя подключения вписывается в поле «Connection Entry».
В поле «Host» указывается домен (IP-адрес VPN-шлюза).
На вкладке «Authentication»: в поле «Name» — имя группы, в поле «Password» — пароль для группы, «Confirm Password» — подтверждение пароля. Эти данные нужны для первичной групповой аутентификации.
После того, как данные введены, нажимаем «Save». Готово! Теперь в окне VPN-клиента появляется строка с новым подключением.
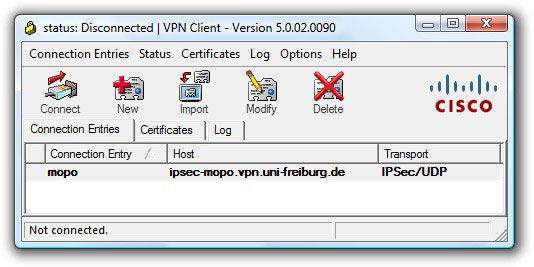
При подключении появится окошко вторичной авторизации, запрашивающее ваши личные логин и пароль.
Если всё было сделано правильно, то соединение установится, а в трее появится соответствующая пиктограмма. Правый клик по ней откроет меню, в котором можно выбрать пункт «Statistics» — статистика. Там будет указано количество отправленных и полученных пакетов.
Возможные проблемы
Бывает, что пользователи Windows 10 и Windows 7 жалуются на возникновение различных ошибок, — например, 440, 412, 414, 433, 442. Они являются результатом неправильной установки и настройки клиента и дополнительных компонентов. Решаются, как правило, корректным удалением установленного ПО, чисткой реестра и грамотной установкой заново. В исключительных случаях возникает необходимость в переустановке системы.
Довольно часто при использовании Cisco VPN Client в Windows 10 и Windows 7 x64 возникают различные ошибки, связанные с работающей безопасной загрузкой. Эта функция запрещает использование в системе программного обеспечения, которое не входит в список доверия производителя компьютера. Решение заключается в отключении безопасной загрузки через BIOS.
Не помешает и заглянуть в реестр: HKLMSYSTEMCurrentControlSetServicesCVirtADisplayName. Там должно быть название установленного продукта (если вы видите непонятный набор символов — исправьте на «Cisco Systems VPN Adapter for 32-bit (или 64-bit) Windows»).

Если при использовании Cisco VPN Client упорно продолжают возникать ошибки, можно вместо DNE установить Sonic VPN.
Источник
Установка и настройка VPN-клиента Cisco в Windows 10


В связи с переходом на Windows 10 некоторые приложения отказываются устанавливаться и нормально работать. Именно так и случилось с VPN-клиентом Cisco, а точнее с последней выпущенной версией Cisco Systems VPN Client 5.0.07.0440. Здесь я предлагаю вам решение этой проблемы.

Установка VPN-клиента Cisco в Windows 10
После того, как вы распаковали дистрибутив, вы можете запустить один из двух файлов для установки: vpnclient_setup.exe или vpnclient_setup.msi. При запуске первого файла вы сразу получаете сообщение, что приложение установить невозможно и Cisco VPN Client не работает в данной версии Windows.

А если вы запустите файл vpnclient_setup.msi, то он даже начнёт установку, но сломается примерно посередине процесса во время настройки сетевых компонентов. У меня вылетела ошибка «Error 27850. Unable to manage networking component. Operating system corruption may be preventing installation».

Но решение есть. Сначала нужно установить последнее обновление DNE (Deterministic Network Extender), которое вы можете скачать с сайта Citrix отсюда. Скачивать нужно не всё, а только файл необходимые файлы: dneupdate.msi для 32-битных Windows или dneupdate64.msi для 64-битных Windows. Если при установке DNE у вас будут какие-либо проблемы, то рекомендуется удалить все программы, использующие DNE (такие как VPN-клиенты), затем воспользоваться утилитой очистки winfix.exe и повторить установку dneupdate.msi или dneupdate64.msi.
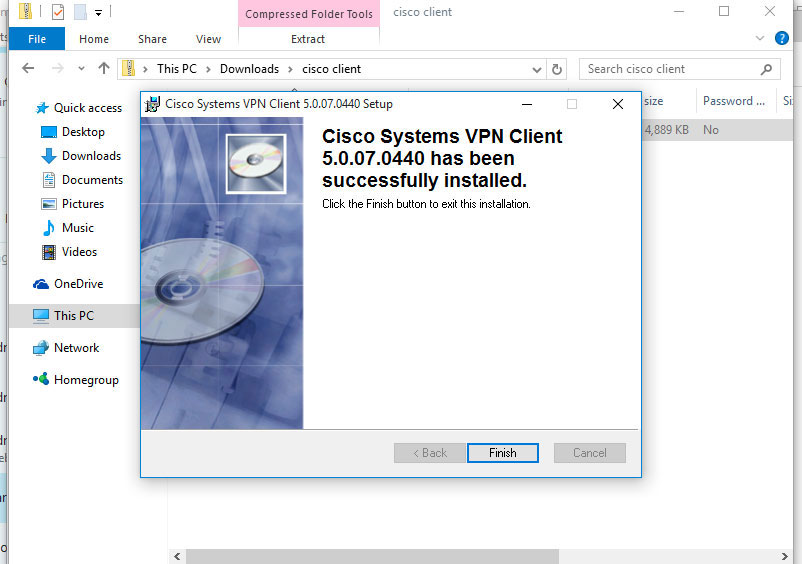
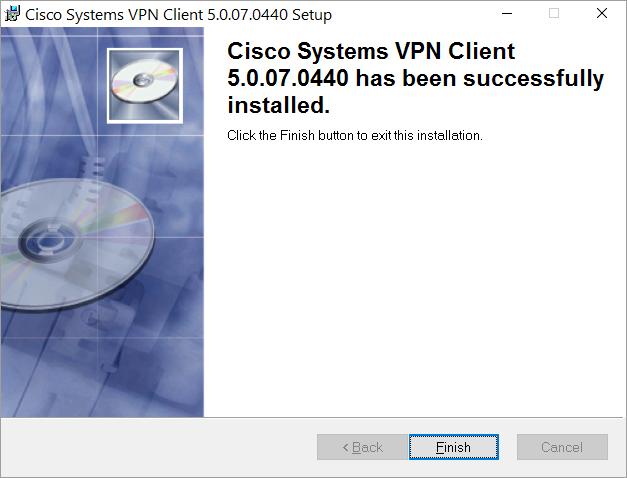
После установки обновления DNE можете повторить установку Cisco VPN-клиента. Запускать нужно файл vpnclient_setup.msi. У меня установка прошла успешно.
Настройка VPN-клиента Cisco в Windows 10
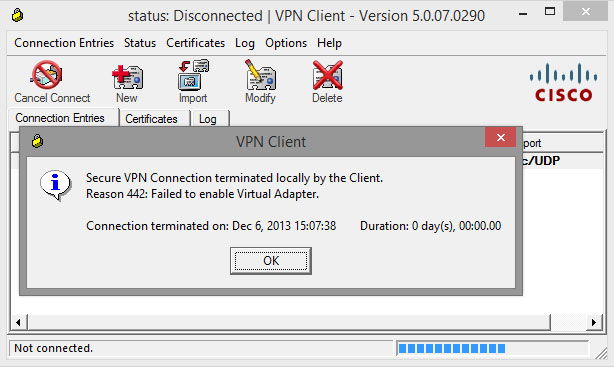
После создания подключения я попытался подключиться к серверу. Но получил ошибку «Reason 442: Failed to enable Virtual Adapter».

Эта ошибка происходит из-за того, что VPN-клиент не находит виртуальный адаптер сети (в моём случае Cisco Systems VPN Adapter for 64-bit Windows). Исправляется это так. Запустите редактор реестра (regedit.exe), найдите ветку HKEY_LOCAL_MACHINESYSTEMCurrentControlSetServicesCVirtA, в ней есть значение с именем DisplayName, которое содержит что то подобное: «@oem172.inf,%CVirtA_Desc%;Cisco Systems VPN Adapter for 64-bit Windows».
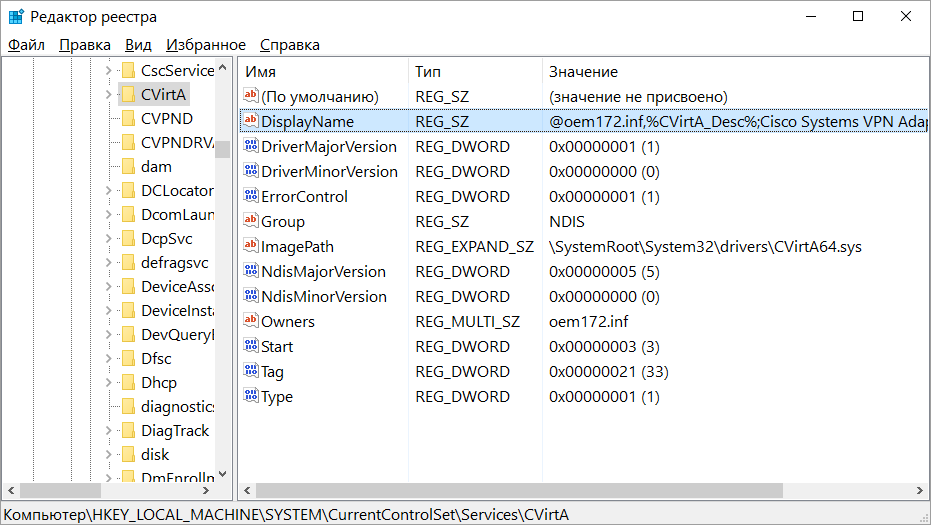
Поменяйте значение этого поля (контекстное меню «Изменить…» по правой кнопке мышки), чтобы осталось только «Cisco Systems VPN Adapter for 64-bit Windows» (для 32-битного VPN-клиента здесь должно остаться «Cisco Systems VPN Adapter»).
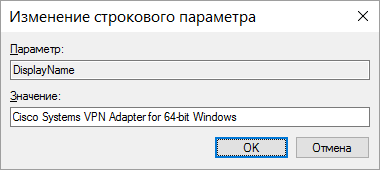
После этого попробуйте установить соединение снова (перезапускать VPN-клиент при этом не обязательно). У меня всё заработало без проблем.
Источник
![]()
My company recently took over IT operations for another company. We have next to no documentation to go off of.
Users use CiscoAnyconnect for VPN and we need to be able to manage this system for them.
One user is getting «Login Failed» when trying to connect and I cannot find a way to get their password reset. I can confirm that their AD environment is not integrated with Cisco VPN.
Any guidance will be appreciated. where to start especially. We have access to their servers and domain controllers.
Исправление: AnyConnect не смог установить соединение с указанным безопасным шлюзом.
Сообщение об ошибке « AnyConnect не смог установить соединение с указанным безопасным шлюзом » появляется, когда пользователи пытаются подключиться к VPN с помощью клиента AnyConnect. Эта проблема возникает из-за того, что VPN-клиент AnyConnect не может успешно выполнить процесс соединения с удаленным сервером, и на его пути есть некоторые блокировки. Сегодня мы рассмотрим указанное сообщение об ошибке, включая причины появления сообщения об ошибке и различные решения, которые вы можете реализовать, чтобы избавиться от ошибки.

Что вызывает сообщение об ошибке «AnyConnect не смог установить соединение с указанным безопасным шлюзом»?
Это может быть связано с множеством причин. Иногда это блокировка антивируса или брандмауэра, а иногда это может быть вызвано плохим подключением к Интернету. Следующие будут основными причинами; упомянуть вкратце —
- Проблема с антивирусом или брандмауэром: антивирусное программное обеспечение может время от времени мешать процессу подключения AnyConnect Client VPN и не позволять ему подключаться к внешним сетям или серверам из соображений безопасности. Часто он блокирует множество входящих и исходящих соединений. Таким образом, вы не сможете подключиться к своей любимой VPN с помощью Anyconnect.
- Неправильная конфигурация клиента: если вы неправильно настроили свой клиент Anyconnect и хранящиеся в нем конфигурации VPN неверны, то вы столкнетесь с проблемами при установлении успешных соединений.
- Интернет-ограничения: иногда IP-адреса некоторых стран могут быть заблокированы вашим интернет-провайдером, и вы можете сознательно не пытаться подключиться к VPN той же страны, которая была заблокирована вашим интернет-провайдером. Тогда вы столкнетесь с проблемами.
Чтобы обойти сообщение об ошибке, вы можете следовать приведенным ниже решениям, но обязательно перезагрузите компьютер и приложение, прежде чем переходить к другим исправлениям.
Решение 1. Отключение антивируса
Перво-наперво. В большинстве случаев проблема возникает из-за блокировки антивируса, что является распространенным сценарием. Следовательно, в таком случае вы должны попытаться отключить любой сторонний антивирус, который вы установили в своей системе, а затем попытаться подключиться к VPN с помощью AnyConnect. Надеюсь, это решит проблему.

Решение 2. Остановите службу подключения к Интернету
Время от времени служба ICS работает, что вызывает проблемы для клиента AnyConnect при подключении к VPN. Вам нужно будет отключить его, чтобы решить проблему. Вот как отключить службу:
- Нажмите Windows + R и введите services.msc.
- Когда откроется окно со службами, найдите службу общего доступа к подключению Интернета . Щелкните его правой кнопкой мыши и выберите « Остановить» .

- Затем выйдите из окна служб , закрыв его.
Решение 3. Отключите общий доступ к подключению к Интернету (ICS)
Было несколько случаев, когда, если в Windows был включен ICS, пользователи сталкивались с этой проблемой. Чтобы отключить ICS, следуйте приведенным ниже инструкциям:
- Откройте панель управления
- Перейдите в раздел «Сеть и общий доступ к Интернету» и нажмите « Изменить настройки адаптера» .

- После этого вам нужно будет щелкнуть правой кнопкой мыши по общему сетевому подключению , а затем выбрать « Свойства» .
- В окне свойств нажмите на Совместное использование
- Оказавшись там, вам нужно снять флажок с надписью « Разрешить другим пользователям сети подключаться через подключение к Интернету этого компьютера ».
- После этого нажмите ОК.
Если ваша проблема была вызвана включением ICS, это должно было исправить ее.
Решение 4. Выберите параметр Подключиться к текущей сети в AnyConnect VPN.
Иногда клиентский VPN Any Connect колеблется между разными сетями, поэтому вам нужно выбрать вариант подключения только к текущей сети. Это может решить проблему для вас. Вот как это сделать:
- Откройте клиент AnyConnect и там, где вы видите написанную сеть , щелкните ее правой кнопкой мыши.
- Щелкните « Подключиться только к текущей сети ».

Решение 5. Попробуйте другое подключение
Иногда используемое вами интернет-соединение может иметь некоторые ограничения или может работать неправильно, что является причиной проблемы. В таком сценарии вам придется использовать альтернативное соединение, такое как Wi-Fi или мобильная точка доступа, чтобы узнать, можете ли вы подключиться к VPN.
AnyConnect VPN Client Troubleshooting Guide — Common Problems
The documentation set for this product strives to use bias-free language. For the purposes of this documentation set, bias-free is defined as language that does not imply discrimination based on age, disability, gender, racial identity, ethnic identity, sexual orientation, socioeconomic status, and intersectionality. Exceptions may be present in the documentation due to language that is hardcoded in the user interfaces of the product software, language used based on RFP documentation, or language that is used by a referenced third-party product. Learn more about how Cisco is using Inclusive Language.
Contents
Introduction
This document describes a troubleshooting scenario which applies to applications that do not work through the Cisco AnyConnect VPN Client.
Prerequisites
Requirements
There are no specific requirements for this document.
Components Used
The information in this document is based on a Cisco Adaptive Security Appliance (ASA) that runs Version 8.x.
The information in this document was created from the devices in a specific lab environment. All of the devices used in this document started with a cleared (default) configuration. If your network is live, make sure that you understand the potential impact of any command.
Troubleshooting Process
This typical troubleshooting scenario applies to applications that do not work through the Cisco AnyConnect VPN Client for end-users with Microsoft Windows-based computers. These sections address and provide solutions to the problems:
Installation and Virtual Adapter Issues
Complete these steps:
- Obtain the device log file:
- Windows XP / Windows 2000:
Note: Hidden folders must be made visible in order to see these files.
If you see errors in the setupapi log file, you can turn up verbosity to 0x2000FFFF.
If this is an initial web deploy install, this log is located in the per-user temp directory.
- Windows XP / Windows 2000:
If this is an automatic upgrade, this log is in the temp directory of the system:
The filename is in this format: anyconnect-win-x.x.xxxx-k9-install-yyyyyyyyyyyyyy.log. Obtain the most recent file for the version of the client you want to install. The x.xxxx changes based on the version, such as 2.0.0343, and yyyyyyyyyyyyyy is the date and time of the install.
- From a Command Prompt/DOS box, type this:
- Windows XP / Windows 2000:
Note: After you type into this prompt, wait. It can take between two to five minutes for the file to complete.
Windows XP and Windows Vista:
Refer to AnyConnect: Corrupt Driver Database Issue in order to debug the driver issue.
Disconnection or Inability to Establish Initial Connection
If you experience connection problems with the AnyConnect client, such as disconnections or the inability to establish an initial connection, obtain these files:
- The configuration file from the ASA in order to determine if anything in the configuration causes the connection failure:
From the console of the ASA, type write net x.x.x.x:ASA-Config.txt where x.x.x.x is the IP address of a TFTP server on the network.
From the console of the ASA, type show running-config . Let the configuration complete on the screen, then cut-and-paste to a text editor and save.
- In order to enable logging on the ASA for auth, WebVPN, Secure Sockets Layer (SSL), and SSL VPN Client (SVC) events, issue these CLI commands:
- Choose Start > Run.
Note: Always save it as the .evt file format.
If the user cannot connect with the AnyConnect VPN Client, the issue might be related to an established Remote Desktop Protocol (RDP) session or Fast User Switching enabled on the client PC. The user can see the AnyConnect profile settings mandate a single local user, but multiple local users are currently logged into your computer. A VPN connection will not be established error message error on the client PC. In order to resolve this issue, disconnect any established RDP sessions and disable Fast User Switching. This behavior is controlled by the Windows Logon Enforcement attribute in the client profile, however currently there is no setting that actually allows a user to establish a VPN connection while multiple users are logged on simultaneously on the same machine. Enhancement request CSCsx15061 was filed to address this feature.
Note: Make sure that port 443 is not blocked so the AnyConnect client can connect to the ASA.
When a user cannot connect the AnyConnect VPN Client to the ASA, the issue might be caused by an incompatibility between the AnyConnect client version and the ASA software image version. In this case, the user receives this error message: The installer was not able to start the Cisco VPN client, clientless access is not available .
In order to resolve this issue, upgrade the AnyConnect client version to be compatible with the ASA software image.
When you log in the first time to the AnyConnect, the login script does not run. If you disconnect and log in again, then the login script runs fine. This is the expected behavior.
When you connect the AnyConnect VPN Client to the ASA, you might receive this error: User not authorized for AnyConnect Client access, contact your administrator .
This error is seen when the AnyConnect image is missing from the ASA. Once the image is loaded to the ASA, AnyConnect can connect without any issues to the ASA.
This error can be resolved by disabling Datagram Transport Layer Security (DTLS). Go to Configuration > Remote Access VPN > Network (Client) Access > AnyConnect Connection Profiles and uncheck the Enable DTLS check box. This disables DTLS.
The dartbundle files show this error message when the user gets disconnected: TUNNELPROTOCOLDPDMGR_ERROR_NO_DPD_RESPONSE:The secure gateway failed to respond to Dead Peer Detection packets . This error means that the DTLS channel was torn due to Dead Peer Detection (DPD) failure. This error is resolved if you tweak the DPD keepalives and issue these commands:
The svc keepalive and svc dpd-interval commands are replaced by the anyconnect keepalive and anyconnect dpd-interval commands respectively in ASA Version 8.4(1) and later as shown here:
Problems with Passing Traffic
When problems are detected with passing traffic to the private network with an AnyConnect session through the ASA, complete these data-gathering steps:
- Obtain the output of the show vpn-sessiondb detail svc filter name <username> ASA command from the console. If the output shows Filter Name: XXXXX , then gather the output for show access-list XXXXX. Verify that the access-list XXXXX does not block the intended traffic flow.
For example, if the VPN Client needs to access a resource which is not in the routing table of the VPN Gateway, the packet is routed through the standard default gateway. The VPN gateway does not need the complete internal routing table in order to resolve this. The tunneled keyword can be used in this instance.
AnyConnect Crash Issues
Complete these data-gathering steps:
- Ensure that the Microsoft Utility Dr Watson is enabled. In order to do this, choose Start > Run, and run Drwtsn32.exe. Configure this and click OK:
When the crash occurs, gather the .log and .dmp files from C:Documents and SettingsAll UsersApplication DataMicrosoftDr Watson. If these files appear to be in use, then use ntbackup.exe.
- Choose Start > Run.
Note: Always save it as the .evt file format.
Fragmentation / Passing Traffic Issues
Some applications, such as Microsoft Outlook, do not work. However, the tunnel is able to pass other traffic such as small pings.
This can provide clues as to a fragmentation issue in the network. Consumer routers are particularly poor at packet fragmentation and reassembly.
Try a scaling set of pings in order to determine if it fails at a certain size. For example, ping -l 500, ping -l 1000, ping -l 1500, ping -l 2000.
It is recommended that you configure a special group for users that experience fragmentation, and set the SVC Maximum Transition Unit (MTU) for this group to 1200. This allows you to remediate users who experience this issue, but not impact the broader user base.
Problem
TCP connections hang once connected with AnyConnect.
Solution
In order to verify if your user has a fragmentation issue, adjust the MTU for AnyConnect clients on the ASA.
Uninstall Automatically
Problem
The AnyConnect VPN Client uninstalls itself once the connection terminates. The client logs show that keep installed is set to disabled.
Solution
AnyConnect uninstalls itself despite that the keep installed option is selected on the Adaptive Security Device Manager (ASDM). In order to resolve this issue, configure the svc keep-installer installed command under group-policy.
Issue Populating the Cluster FQDN
Problem: AnyConnect client is pre-populated with the hostname instead of the cluster Fully Qualified Domain Name (FQDN).
When you have a load-balancing cluster set up for SSL VPN and the client attempts to connect to the cluster, the request is redirected to the node ASA and the client logs in successfully. After some time, when the client tries to connect to the cluster again, the cluster FQDN is not seen in the Connect to entries. Instead, the node ASA entry to which the client has been redirected is seen.
Solution
This occurs because the AnyConnect client retains the host name to which it last connected. This behavior is observed and a bug has been filed. For complete details about the bug, refer to Cisco bug ID CSCsz39019. The suggested workaround is to upgrade the Cisco AnyConnect to Version 2.5.
Backup Server List Configuration
A backup server list is configured in case the main server selected by the user is not reachable. This is defined in the Backup Server pane in the AnyConnect profile. Complete these steps:
- Download the AnyConnect Profile Editor (registered customers only) . The file name is AnyConnectProfileEditor2_4_1.jar.
- Go to the server list tab.
- In ASDM, choose Configuration > Remote Access VPN > Network (Client) Access > AnyConnect Connection Profiles.
AnyConnect: Corrupt Driver Database Issue
This entry in the SetupAPI.log file suggests that the catalog system is corrupt:
W239 driver signing class list «C:WINDOWSINFcertclas.inf» was missing or invalid. Error 0xfffffde5: Unknown Error. , assuming all device classes are subject to driver signing policy.
You can also receive this error message: Error(3/17): Unable to start VA, setup shared queue, or VA gave up shared queue .
You can receive this log on the client: «The VPN client driver has encountered an error» .
Repair
This issue is due to Cisco bug ID CSCsm54689. In order to resolve this issue, make sure that Routing and Remote Access Service is disabled before you start AnyConnect. If this does not resolve the issue, complete these steps:
- Open a command prompt as an Administrator on the PC (elevated prompt on Vista).
Failed Repair
If the repair fails, complete these steps:
- Open a command prompt as an Administrator on the PC (elevated prompt on Vista).
Analyze the Database
You can analyze the database at any time in order to determine if it is valid.
- Open a command prompt as an Admimistrator on the PC.
Error Messages
Error: Unable to Update the Session Management Database
While the SSL VPN is connected through a web browser, the Unable to Update the Session Management Database. error message appears, and the ASA logs show %ASA-3-211001: Memory allocation Error. The adaptive security appliance failed to allocate RAM system memory .
Solution 1
This issue is due to Cisco bug ID CSCsm51093. In order to resolve this issue, reload the ASA or upgrade the ASA software to the interim release mentioned in the bug. Refer to Cisco bug ID CSCsm51093 for more information.
Solution 2
This issue can also be resolved if you disable threat-detection on ASA if threat-detection is used.
Error: «Module c:Program FilesCiscoCisco AnyConnect VPN Clientvpnapi.dll failed to register»
When you use the AnyConnect client on laptops or PCs, an error occurs during the install:
When this error is encountered, the installer cannot move forward and the client is removed.
Solution
These are the possible workarounds to resolve this error:
- The latest AnyConnect client is no longer officially supported with Microsoft Windows 2000. It is a registry problem with the 2000 computer.
- vpnapi.dll
- vpncommon.dll
- vpncommoncrypt.dll
The log message related to this error on the AnyConnect client looks similar to this:
Error: «An error was received from the secure gateway in response to the VPN negotiation request. Please contact your network administrator»
When clients try to connect to the VPN with the Cisco AnyConnect VPN Client, this error is received.
This message was received from the secure gateway:
«Illegal address class» or «Host or network is 0» or «Other error»
Solution
The issue occurs because of the ASA local IP pool depletion. As the VPN pool resource is exhausted, the IP pool range must be enlarged.
Cisco bug ID is CSCsl82188 is filed for this issue. This error usually occurs when the local pool for address assignment is exhausted, or if a 32-bit subnet mask is used for the address pool. The workaround is to expand the address pool and use a 24-bit subnet mask for the pool.
Error: Session could not be established. Session limit of 2 reached.
When you try to connect more than two clients with the AnyConnect VPN Client, you receive the Login Failed error message on the Client and a warning message in the ASA logs that states Session could not be established. Session limit of 2 reached . I have the AnyConnect essential license on the ASA, which runs Version 8.0.4.
Solution 1
This error occurs because the AnyConnect essential license is not supported by ASA version 8.0.4. You need to upgrade the ASA to version 8.2.2. This resolves the error.
Note: Regardless of the license used, if the session limit is reached, the user will receive the login failed error message.
Solution 2
This error can also occur if the vpn-sessiondb max-anyconnect-premium-or-essentials-limit session-limit command is used to set the limit of VPN sessions permitted to be established. If the session-limit is set as two, then the user cannot establish more than two sessions even though the license installed supports more sessions. Set the session-limit to the number of VPN sessions required in order to avoid this error message.
Error: Anyconnect not enabled on VPN server while trying to connect anyconnect to ASA
You receive the Anyconnect not enabled on VPN server error message when you try to connect AnyConnect to the ASA.
Solution
This error is resolved if you enable AnyConnect on the outside interface of the ASA with ASDM. For more information on how to enable AnyConnect on the outside interface, refer to Configure Clientless SSL VPN (WebVPN) on the ASA.
Error:- %ASA-6-722036: Group client-group User xxxx IP x.x.x.x Transmitting large packet 1220 (threshold 1206)
The %ASA-6-722036: Group < client-group > User < xxxx > IP < x.x.x.x> Transmitting large packet 1220 (threshold 1206) error message appears in the logs of the ASA. What does this log mean and how is this resolved?
Solution
This log message states that a large packet was sent to the client. The source of the packet is not aware of the MTU of the client. This can also be due to compression of non-compressible data. The workaround is to turn off the SVC compression with the svc compression none command. This resolves the issue.
Error: The secure gateway has rejected the agent’s vpn connect or reconnect request.
When you connect to the AnyConnect Client, this error is received: «The secure gateway has rejected the agent’s vpn connect or reconnect request. A new connection requires re-authentication and must be started manually. Please contact your network administrator if this problem persists. The following message was received from the secure gateway: no assigned address» .
This error is also received when you connect to the AnyConnect Client: «The secure gateway has rejected the connection attempt. A new connection attempt to the same or another secure gateway is needed, which requires re-authentication. The following message was received from the secure gateway:Host or network is 0» .
This error is also received when you connect to the AnyConnect Client: «The secure gateway has rejected the agent’s vpn connect or reconnect request. A new connection requires a re-authentication and must be started manually. Please contact the network administrator if the problem persists. The following message was received from the secure gateway: No License» .
Solution
The router was missing pool configuration after reload. You need to add the concerned configuration back to the router.
The «The secure gateway has rejected the agent’s vpn connect or reconnect request. A new connection requires a re-authentication and must be started manually. Please contact the network administrator if the problem persists. The following message was received from the secure gateway: No License» error occurs when the AnyConnect mobility license is missing. Once the license is installed, the issue is resolved.
Error: «Unable to update the session management database»
When you try to authenticate in WebPortal, this error message is received: «Unable to update the session management database» .
Solution
This problem is related to memory allocation on the ASA. This issue is mostly encountered when the ASA Version is 8.2.1. Originally, this requires a 512MB RAM for its complete functionality.
As a permanent workaround, upgrade the memory to 512MB.
As a temporary workaround, try to free the memory with these steps:
- Disable the threat-detection.
Error: «The VPN client driver has encountered an error»
This is an error message obtained on the client machine when you try to connect to AnyConnect.
Solution
In order to resolve this error, complete this procedure in order to manually set the AnyConnect VPN agent to Interactive:
- Right-click My Computer > Manage > Services and Applications > Services > and select the Cisco AnyConnect VPN Agent.
This sets the registry Type value DWORD to 110 (default is 010) for the HKEY_LOCAL_MACHINESYSTEMCurrentControlSetServicesvpnagent.
Note: If this is to be used, then the preference would be to use the .MST transform in this instance. This is because if you set this manually with these methods, it requires that this be set after every install/upgrade process. This is why there is a need to identify the application that causes this problem.
Error: «Unable to process response from xxx.xxx.xxx.xxx»
AnyConnect clients fail to connect to a Cisco ASA. The error in the AnyConnect window is «Unable to process response from xxx.xxx.xxx.xxx» .
Solution
In order to resolve this error, try these workarounds:
- Remove WebVPN from the ASA and reenable it.<
For more information on how to enable WebVPN and change the port for WebVPN, refer to this Solution.
Error: «Login Denied , unauthorized connection mechanism , contact your administrator»
AnyConnect clients fail to connect to a Cisco ASA. The error in the AnyConnect window is «Login Denied , unauthorized connection mechanism , contact your administrator» .
Solution
This error message occurs mostly because of configuration issues that are improper or an incomplete configuration. Check the configuration and make sure it is as required to resolve the issue.
Error: «Anyconnect package unavailable or corrupted. Contact your system administrator»
This error occurs when you try to launch the AnyConnect software from a Macintosh client in order to connect to an ASA.
Solution
In order to resolve this, complete these steps:
- Upload the Macintosh AnyConnect package to the flash of the ASA.
The svc image command is replaced by the anyconnect image command in ASA Version 8.4(1) and later as shown here:
Error: «The AnyConnect package on the secure gateway could not be located»
This error is caused on the user’s Linux machine when it tries to connect to the ASA by launching AnyConnect. Here is the complete error:
Solution
In order to resolve this error message, verify whether the Operating System (OS) that is used on the client machine is supported by the AnyConnect client.
If the OS is supported, then verify if the AnyConnect package is specified in the WebVPN configuration or not. See the Anyconnect package unavailable or corrupted section of this document for more information.
Error: «Secure VPN via remote desktop is not supported»
Users are unable to perform a remote desktop access. The Secure VPN via remote desktop is not supported error message appears.
Solution
This issue is due to these Cisco bug IDs: CSCsu22088 and CSCso42825. If you upgrade the AnyConnect VPN Client, it can resolve the issue. Refer to these bugs for more information.
Error: «The server certificate received or its chain does not comply with FIPS. A VPN connection will not be established»
When you attempt to VPN to the ASA 5505, the The server certificate received or its chain does not comply with FIPS. A VPN connection will not be established error message appears.
Solution
In order to resolve this error, you must disable the Federal Information Processing Standards (FIPS) in the AnyConnect Local Policy file. This file can usually be found at C:ProgramDataCiscoCisco AnyConnect VPN ClientAnyConnectLocalPolicy.xml . If this file is not found in this path, then locate the file at a different directory with a path such as C:Documents and SettingsAll UsersApplication DataCisco AnyConnectVPNClientAnyConnectLocalPolicy.xml . Once you locate the xml file, make changes to this file as shown here:
Change the phrase:
<FipsMode>true</FipsMode>
<FipsMode>false</FipsMode>
Then, restart the computer. Users must have administrative permissions in order to modify this file.
Error: «Certificate Validation Failure»
Users are unable to launch AnyConnect and receive the Certificate Validation Failure error.
Solution
Certificate authentication works differently with AnyConnect compared to the IPSec client. In order for certificate authentication to work, you must import the client certificate to your browser and change the connection profile in order to use certificate authentication. You also need to enable this command on your ASA in order to allow SSL client-certificates to be used on the outside interface:
ssl certificate-authentication interface outside port 443
Error: «VPN Agent Service has encountered a problem and needs to close. We are sorry for the inconvenience»
When AnyConnect Version 2.4.0202 is installed on a Windows XP PC, it stops at updating localization files and an error message shows that the vpnagent.exe fails.
Solution
This behavior is logged in Cisco bug ID CSCsq49102. The suggested workaround is to disable the Citrix client.
Error: «This installation package could not be opened. Verify that the package exists»
When AnyConnect is downloaded, this error message is received:
«Contact your system administrator. The installer failed with the following error: This installation package could not be opened. Verify that the package exists and that you can access it, or contact the application vendor to verify that this is a valid Windows Installer package.»
Solution
Complete these steps in order to fix this issue:
- Remove any anti-virus software.
Error: «Error applying transforms. Verify that the specified transform paths are valid.»
This error message is recieved during the auto-download of AnyConnect from the ASA:
This is the error message received when connecting with AnyConnect for MacOS:
Solution
Complete one of these workarounds in order to resolve this issue:
- The root cause of this error might be due to a corrupted MST translation file (for example, imported). Perform these steps to fix this:
- Remove the MST translation table.
If neither of these workarounds resolve the issue, contact Cisco Technical Support.
Error: «The VPN client driver has encountered an error»
This error is received:
Solution
This issue can be resolved when you uninstall the AnyConnect Client, and then remove the anti-virus software. After this, reinstall the AnyConnect Client. If this resolution does not work, then reformat the PC in order to fix this issue.
Error: «A VPN reconnect resulted in different configuration setting. The VPN network setting is being re-initialized. Applications utilizing the private network may need to be restored.»
This error is received when you try to launch AnyConnect:
Solution
In order to resolve this error, use this:
The svc mtu command is replaced by the anyconnect mtu command in ASA Version 8.4(1) and later as shown here:
AnyConnect Error While Logging In
Problem
The AnyConnect receives this error when it connects to the Client:
Solution
The issue can be resolved if you make these changes to the AnyConnect profile:
Add this line to the AnyConnect profile:
IE Proxy Setting is Not Restored after AnyConnect Disconnect on Windows 7
Problem
In Windows 7, if the IE proxy setting is configured for Automatically detect settings and AnyConnect pushes down a new proxy setting, the IE proxy setting is not restored back to Automatically detect settings after the user ends the AnyConnect session. This causes LAN issues for users who need their proxy setting configured for Automatically detect settings.
Solution
This behavior is logged in Cisco bug ID CSCtj51376. The suggested workaround is to upgrade to AnyConnect 3.0.
Error: AnyConnect Essentials can not be enabled until all these sessions are closed.
This error message is received on Cisco ASDM when you attempt to enable the AnyConnect Essentials license:
Solution
This is the normal behavior of the ASA. AnyConnect Essentials is a separately licensed SSL VPN client. It is entirely configured on the ASA and provides the full AnyConnect capability, with these exceptions:
- No Cisco Secure Desktop (CSD) (including HostScan/Vault/Cache Cleaner)
This license cannot be used at the same time as the shared SSL VPN premium license. When you need to use one license, you need to disable the other.
Error: Connection tab on Internet option of Internet Explorer hides after getting connected to the AnyConnect client.
The connection tab on the Internet option of Internet Explorer hides after you are connected to the AnyConnect client.
Solution
This is due to the msie-proxy lockdown feature. If you enable this feature, it hides the Connections tab in Microsoft Internet Explorer for the duration of an AnyConnect VPN session. If you disable the feature, it leaves the display of the Connections tab unchanged.
Error: Few users getting Login Failed Error message when others are able to connect successfully through AnyConnect VPN
A few users receive the Login Failed Error message when others can connect successfully through the AnyConnect VPN.
Solution
This issue can be resolved if you make sure the do not require pre-authentication checkbox is checked for the users.
Error: The certificate you are viewing does not match with the name of the site you are trying to view.
During the AnyConnect profile update, an error is shown that says the certificate is invalid. This occurs with Windows only and at the profile update phase. The error message is shown here:
Solution
This can be resolved if you modify the server list of the AnyConnect profile in order to use the FQDN of the certificate.
This is a sample of the XML profile:
Note: If there is an existing entry for the Public IP address of the server such as <HostAddress> , then remove it and retain only the FQDN of the server (for example, <HostName> but not <Host Address> ).
Cannot Launch AnyConnect From the CSD Vault From a Windows 7 Machine
When the AnyConnect is launched from the CSD vault, it does not work. This is attempted on Windows 7 machines.
Solution
Currently, this is not possible because it is not supported.
AnyConnect Profile Does Not Get Replicated to the Standby After Failover
The AnyConnect 3.0 VPN client with ASA Version 8.4.1 software works fine. However, after failover, there is no replication for the AnyConnect profile related configuration.
Solution
This problem has been observed and logged under Cisco bug ID CSCtn71662. The temporary workaround is to manually copy the files to the standby unit.
AnyConnect Client Crashes if Internet Explorer Goes Offline
When this occurs, the AnyConnect event log contains entries similar to these:
Solution
This behavior is observed and logged under Cisco bug ID CSCtx28970. In order to resolve this, quit the AnyConnect application and relaunch. The connection entries reappear after relaunch.
Error Message: TLSPROTOCOL_ERROR_INSUFFICIENT_BUFFER
The AnyConnect client fails to connect and the Unable to establish a connection error message is received. In the AnyConnect event log, the TLSPROTOCOL_ERROR_INSUFFICIENT_BUFFER error is found.
Solution
This occurs when the headend is configured for split-tunneling with a very large split-tunnel list (approximately 180-200 entries) and one or more other client attributes are configured in the group-policy, such as dns-server.
In order to resolve this issue, complete these steps:
- Reduce the number of entries in the split-tunnel list.
For more information, refer to Cisco bug ID CSCtc41770.
Error Message: «Connection attempt has failed due to invalid host entry»
The Connection attempt has failed due to invalid host entry error message is received while AnyConnect is authenticated with the use of a certificate.
Solution
In order to resolve this issue, try either of these possible solutions:
- Upgrade the AnyConnect to Version 3.0.
- Disable Cisco Secure Desktop on your computer.
For more information, refer to Cisco bug ID CSCti73316.
Error: «Ensure your server certificates can pass strict mode if you configure always-on VPN»
When you enable the Always-On feature on AnyConnect, the Ensure your server certificates can pass strict mode if you configure always-on VPN error message is received.
Solution
This error message implies that if you want to use the Always-On feature, you need a valid sever certificate configured on the headend. Without a valid server certificate, this feature does not work. Strict Cert Mode is an option that you set in the AnyConnect local policy file in order to ensure the connections use a valid certificate. If you enable this option in the policy file and connect with a bogus certificate, the connection fails.
Error: «An internal error occurred in the Microsoft Windows HTTP Services»
This Diagnostic AnyConnect Reporting Tool (DART) shows one failed attempt:
Also, refer to the event viewer logs on the Windows machine.
Solution
This could be caused due to a corrupted Winsock connection. Reset the connection from the command promt with this command and restart your windows machine:
netsh winsock reset
Error: «The SSL transport received a Secure Channel Failure. May be a result of a unsupported crypto configuration on the Secure Gateway.»
This Diagnostic AnyConnect Reporting Tool (DART) shows one failed attempt:
Solution
Windows 8.1 does not support RC4 according to the following KB update:
Either configure DES/3DES ciphers for SSL VPN on the ASA using the command «ssl encryption 3des-sha1 aes128-sha1 aes256-sha1 des-sha1» OR edit the Windows Registry file on the client machine as mentioned below:

