При запуске какого-либо кода, написанного на Java, программист может получить сообщение об ошибке с текстом «A JNI error has occurred, please check your installation and try again». Обычно причиной ошибки выступает разница в версии компилятора и среды выполнения, из-за чего происходит некорректная интерпретация и выполнение имеющегося кода. Ниже разберём, в чём суть данной ошибки, как её исправить, а также отдельно укажем, как решить данную ошибку при запуске игры Minecraft.
- Что такое JVM, JNI и JRE?
- Причина проблемы A JNI error has occurred, please check your installation and try again
- Установите одинаковую версию JRE и JDK
- Правильно настройте переменные среды для Java
- Ошибка JNI error has occurred при запуске Майнкрафт
- Заключение
Что такое JVM, JNI и JRE?
Как известно, программы, написанные на «Java», компилируются в байтовый код, который распознаётся виртуальной машиной Ява, называемой «JVM» (Java Virtual Machine). JVM по своей сути является компьютерным симулятором, и при запуске программы написанной на Java, распознаёт инструкции байтового кода, и переводит их в машинные инструкции собственной системы.
JVM должна обеспечивать удобный способ доступа к ресурсам системы – файлам, сетевым соединениям, видеокарте и другим компонентам. Механизмы доступа к этим ресурсам напрямую зависят от системы, в которой работает JVM. Для обеспечения своей работы виртуальная машина использует собственный интерфейс Java, называемый «JNI» (Java Native Interface).
Методы Java, использующие JNI для доступа к службам, квалифицируются термином «native». Квалификатор «native» сообщает виртуальной машине, что код для выполнения при вызове данного метода присутствует во внешней библиотеке. JVM ищет конкретный вызов библиотеки, который необходимо выполнить, на основе полного имени пути к методу и его аргументам. Существует специальное соглашение об именах, позволяющее сопоставить метод с конкретной ссылкой на внешнюю библиотеку.
Данный механизм JNI позволяет программам на Java кодировать имя переносимого метода. И скомпилированный в Виндовс код Java будет отлично запускаться на компьютерах под управлением Линукс или Мак.
Как мы уже писали выше, Java имеет собственные библиотеки для обеспечения базового взаимодействия с системой на уровне чтения-записи файлов, создания сетевых подключений и вывода изображения на экран. Они распространяются с JVM как часть среды выполнения Ява, известные как «JRE» (Java Runtime Environment), независимо от того, является ли она автономной JRE или включена в Java Development Kit (JDK).
Причина проблемы A JNI error has occurred, please check your installation and try again
Текст данной ошибки переводится как «Произошла ошибки INI, пожалуйста, проверьте вашу инсталляцию и попробуйте вновь». Данная ошибка, получаемая при запуске программы на JVM, указывает на проблему с запуском кода, связанного с собственным методом.
Причины проблемы могут быть следующими:
- Повреждена библиотека JDK / JRE, вследствие чего она не может быть загружена, и JVM не сможет выполнить код;
- Повреждён функционал операционной системы, вследствие чего последняя не в состоянии удовлетворить системный вызов, созданный нативным кодом;
- Имеются различия в номерах версий JRE (среда выполнения Java) и JDK (Java Development Kit), что также может вызывать ошибку JNI. Различия в номерах версий приведут к тому, что JVM откажется запускать код, потому что он был скомпилирован для совместимости с версией Java, превышающей максимальную версию, поддерживаемую JVM. Проще говоря, код может быть скомпилирован на одной версии Ява (например, 10), а пытается запускаться с помощью версии Ява 9;
- Также проблема может быть вызвана при попытке запустить файл.jar через командную строку, например с помощью команды java -jar File.jar.
Давайте разберём способы, позволяющие устранить ошибку JNI на вашем ПК.
Это может помочь: ошибка Out of memory — как устранить.
Установите одинаковую версию JRE и JDK
Исправить ошибку «A JNI error has occurred» поможет обновление JRE и JDK до актуальных синхронных версий. Необходимо убедится в их одинаковой версии, для чего вызовите системную строку (нажмите Win+R, введите там cmd и нажмите ввод), и наберите там:
java -version и нажмите ввод.
Затем наберите: javac –version
Полученные результаты должны совпадать. Если они они не совпадают, то это сигнализирует о несоответствии версии компилятора и среды выполнения Java. Для решения проблемы рекомендуем установить однотипные и актуальные версии компилятора и среды выполнения, после чего вновь используйте команды «java -version» и «javac -version» для проверки, возвращают ли данные команды один и тот же номер версии.
Если версии синхронны, тогда ваш код Java необходимо будет скомпилировать с помощью компилятора новой версии. После этого ошибка «A JNI error has occurred, please check your installation» может быть устранена.
Правильно настройте переменные среды для Java
Для исправления ошибки «A JNI error has occurred» может понадобится настроить переменные среды для Java. Выполните следующее:
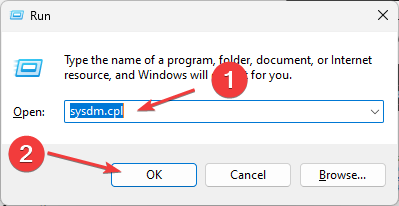
- Нажмите на Win+R;
- В открывшемся окошке введите sysdm.cpl и нажмите на ввод;
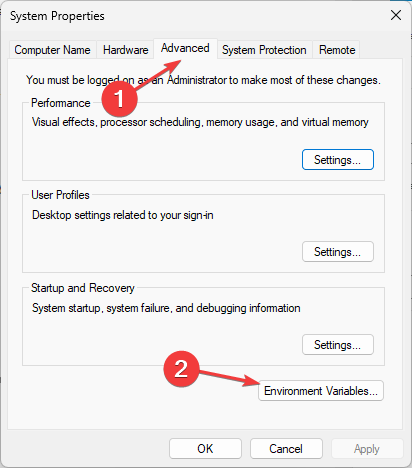
- Откроется окно свойств системы. Выберите вкладку «Дополнительно»;
- Далее внизу кликните на кнопку «Переменные среды»;
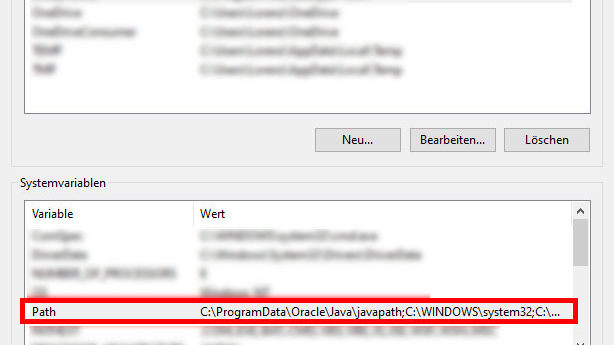
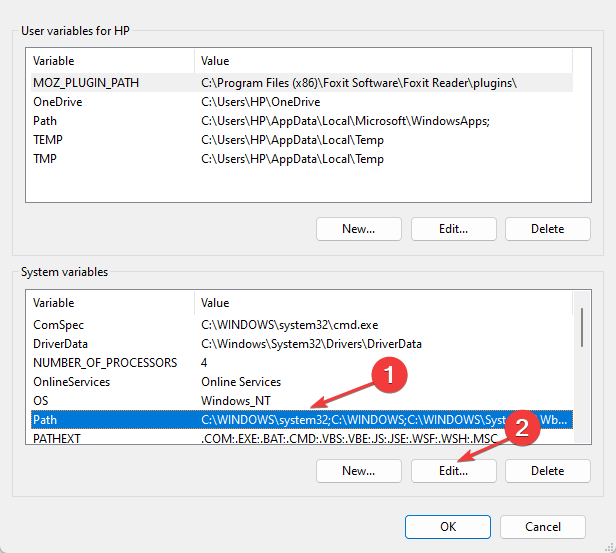
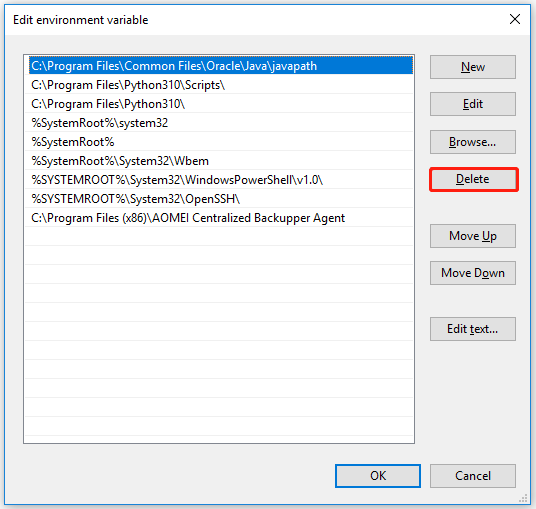
- В нижнем окне выберите переменную «Path», после чего нажмите чуть ниже на кнопку «Изменить»;
Выберите «Path», и нажмите на «Изменить» - Здесь вы ищите строку, в которой прописан путь установки вашего JDK. Например, он может хранится по пути C:ProgramFilesJavajdk-13.0.1bin;
- Если этой записи в перечне ваших переменных нет, вы можете добавить её, нажав на «Создать» справа. Если же вы еще не установили JDK, вы можете скачать её с https://www.oracle.com/java/technologies/downloads/;
- Когда вы найдёте данную строку, используйте кнопку «Вверх» пока запись не окажется в самой верхней части;
- Нажмите внизу на «Ок» для сохранения результата, и перезагрузите ваш ПК. Ошибка «JNI error has occurred» будет исправлена.
Смотрите на данном англоязычном виде способ решения возникшей проблемы:
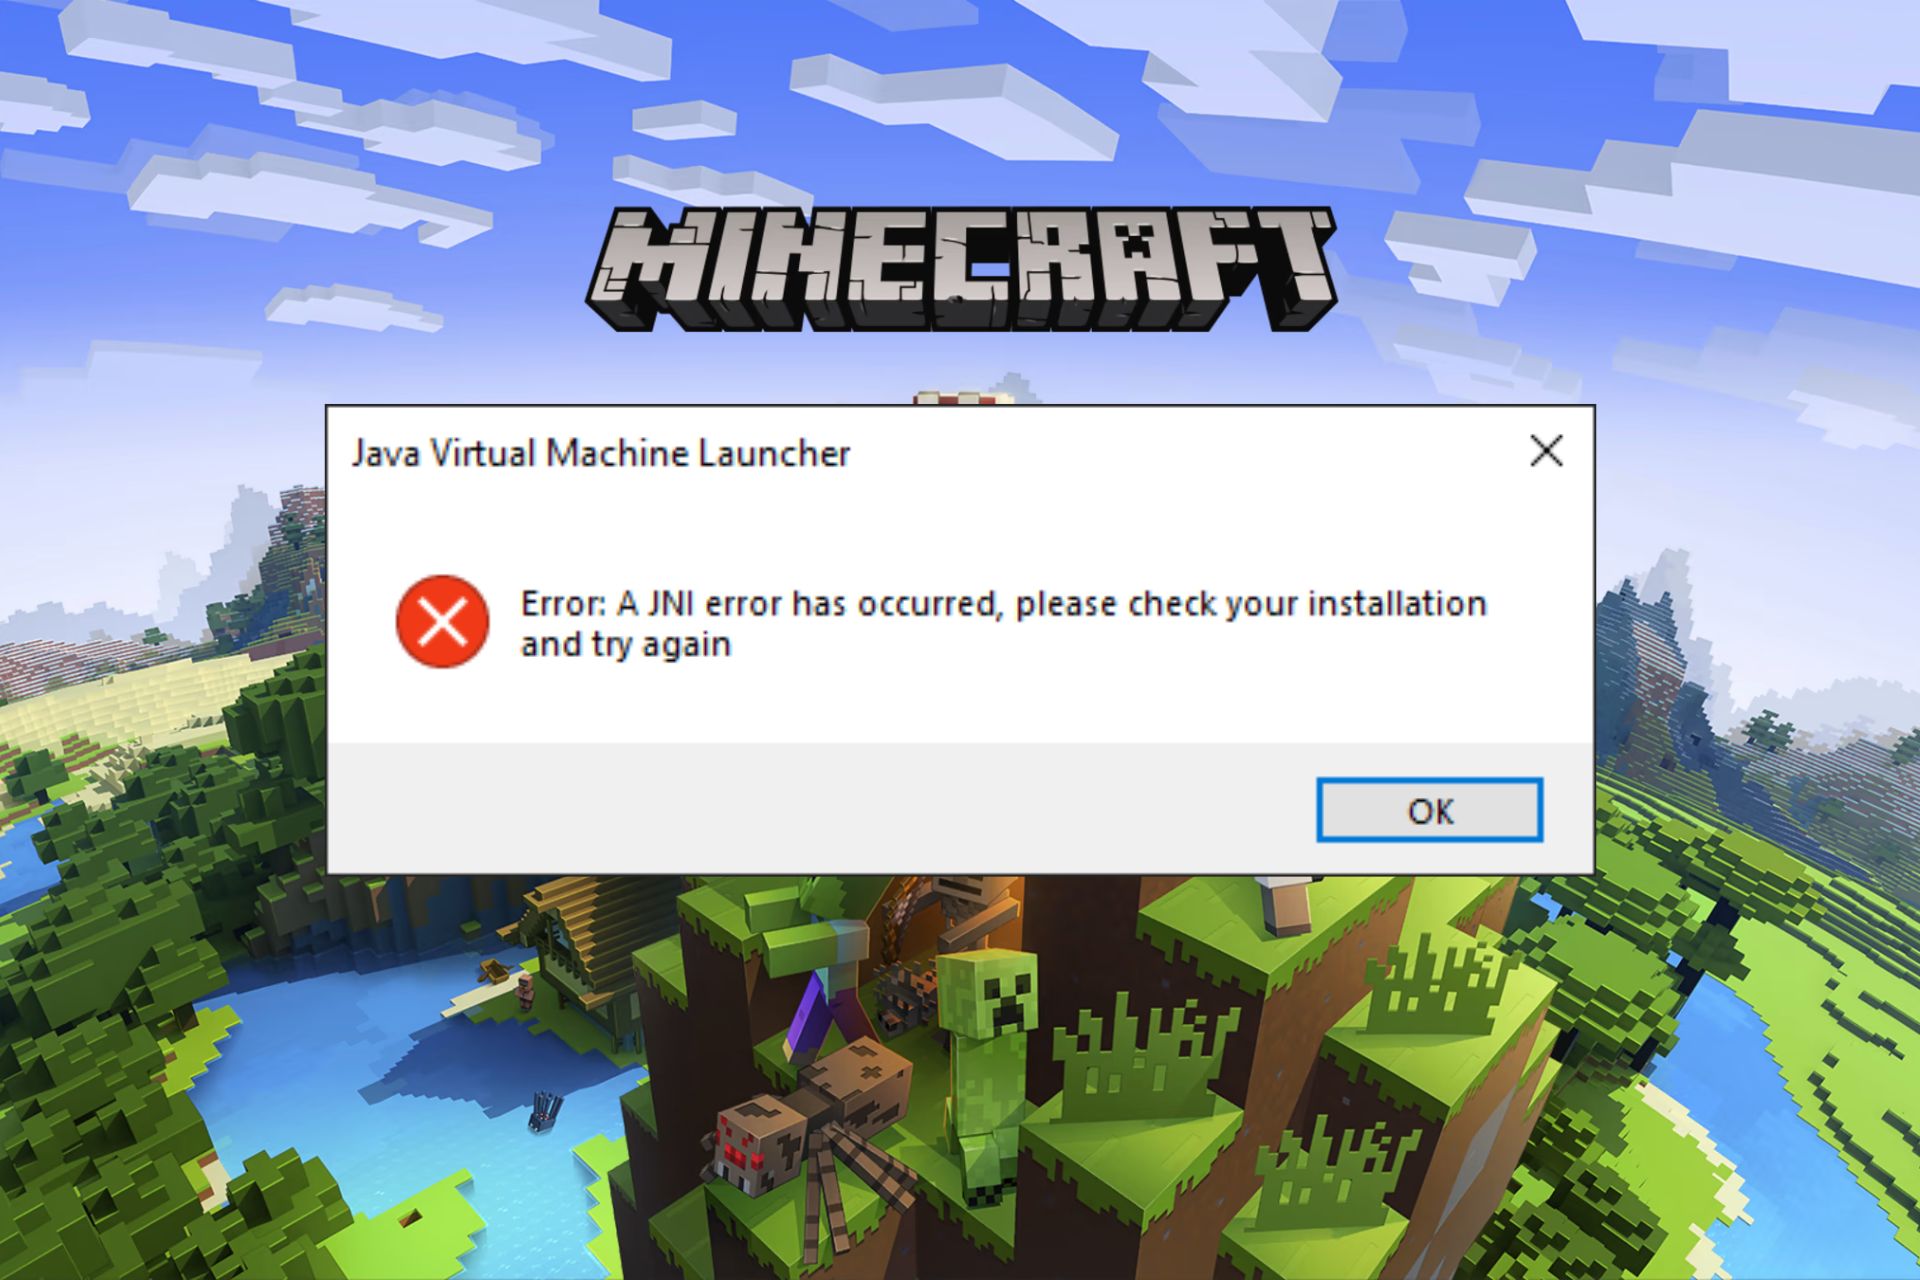
Ошибка JNI error has occurred при запуске Майнкрафт
Некоторые пользователи, установившие обновление Minecraft 1.17 («Caves and Cliffs: Part 1»), сообщают, что получают сообщение об ошибке «A JNI error has occurred, please check your installation and try again» или «Java exception».
Если вы один из таких пользователей, тогда вам нет повода для беспокойства. «Ошибка JNI», которая начала появляться с последним обновлением Minecraft 1.17, может быть исправлена путем установки Java 16 или более поздних версий для своей работы. Это подтверждается многими сообщениями от игроков, у которых возникла рассматриваемая в статье проблема.
Читайте также: GLFW error 65542: WGL the driver does not appear to support OpenGL – как решить?
Заключение
В нашем материале была рассмотрена суть ошибки «A JNI error has occurred, please check your installation and try again», и перечислены способы для её решения. Обычно причиной ошибки является несоответствие версии JRE и JDK, которые приводят к появлению рассматриваемой ошибки. Рекомендуем обновить версию данных инструментов до самой синхронной и актуальной, после чего декомпилировать ваш код. Обычно после этого ошибка будет устранена, и вы сможете использовать рабочую версию вашего кода для необходимых вам задач.

С таким количеством движущихся частей в Minecraft вы неизбежно будете время от времени сталкиваться с проблемой. Иногда бывает очень сложно понять, что вызывает проблему и как ее можно исправить. Если вы сталкиваетесь с сообщением «Произошла ошибка JNI», это довольно просто преодолеть. Вот как позаботиться об этой ошибке.
Как исправить ошибку JNI Error has Occurred в Minecraft
Если вы получаете сообщение об ошибке «Произошла ошибка JNI», это означает, что вам нужно обновить Java. С добавлением обновления «Пещеры и скалы» для правильной работы Minecraft Java Edition теперь требуется последняя версия Java.
Чтобы загрузить последнюю версию Java, перейдите на страницу загрузчика Java и выберите платформу ПК. ты используешь. Установите соответствующий файл установщика и запустите его. Это очень простой процесс, поэтому не беспокойтесь о каких-либо неожиданных шагах. После установки последней версии попробуйте снова запустить Minecraft Java Edition, и все должно работать гладко.
 Как упоминалось выше, это не было проблемой, которая раньше была применима к Minecraft Java Edition, потому что она использовалась для поддержки более старых версий Java. Будь то изменение, внесенное для того, чтобы все могли получить наилучшие возможности, или какая-то новая функция в игре больше не может работать в этих предыдущих версиях, это может быть раздражающим, но необходимым шагом для загрузки вашего обновления Java.
You have encountered this JNI Error error message? Don’t panic! The problem can usually be solved quite quickly – and here you can find out how.
Have you encountered this error message or popup?
Error: A JNI error has occurred, please check your installation and try again
The problem comes from the fact that your JRE (Java Runtime Enviroment), that is your installed Java version and your JDK (Java Development Kit) do not work together correctly.
Now there are several possible solutions for you. Just choose the scenario that applies to you:
JNI Error in Windows CMD
JNI Error in Eclipse
JNI Error when starting a Minecraft Server
JNI Error in Minecraft TLauncher

JNI Error in Windows CMD
The problem can occur if you want to call a .jar file via command line (Windows CMD), e.g. via the command java -jar File.jar or if you have compiled your program with Eclipse before.
To fix the error, you need to adjust the environment variables for Java.
- To do this, type “environment variable” in your Windows search and open the “Edit System Environment Variables” item. In this window you click on “Environment variables…”.

- The “Environment variables” window opens. There you select the variable “Path” in the lower window “System variables” and click on “Edit…”.
- There you look for the line where the installation path of your Java JDK is stored. In my case this is under C:Program FilesJavajdk-13.0.1bin.
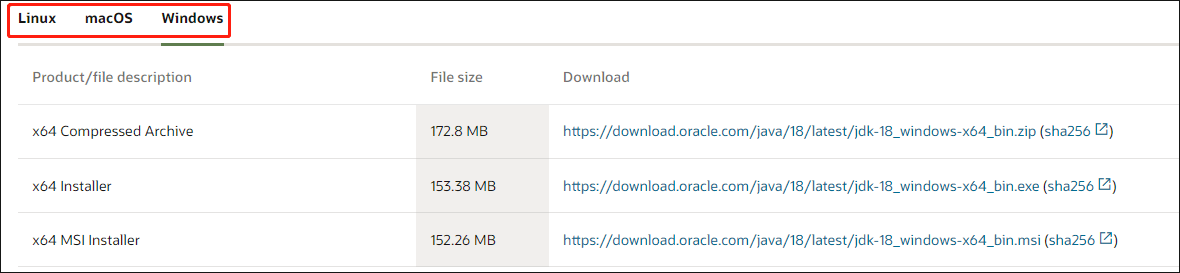
If you don’t have a Java JDK installed yet, you can download and install the .exe installation file (“x64 Installer”) here.
- If you do not have this entry, you can add it by clicking the “New” button.
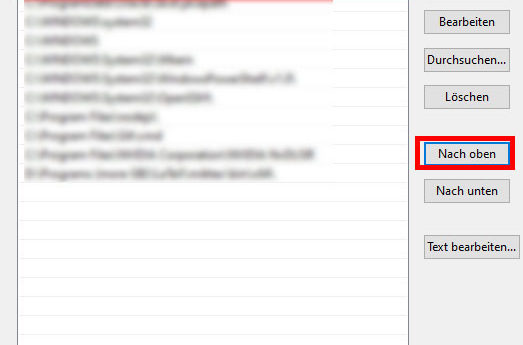
- Select the line with the Java JDK and click on “Move up” until the entry is at the top. Done!
- Now you have to close and reopen the Windows-CMD once and the error should be fixed.
JNI Error in Eclipse
In Eclipse the problem can also be the JDK and JRE version. But first see if it might be a simpler problem:
Maybe you have named one of your packages identically to a Java internal package (e.g. java). Try to rename your package – this can be the simple solution.
If the problem is not fixed I navigate to your Eclipse workspace and compile your main file manually in the Windows CMD using the following command: javac Main.java. Then you can run the file manually with java Main. If this works, it is probably due to the JDK and JRE versions in Eclipse. Reinstalling Eclipse may help.
JNI Error when starting a Minecraft Server
If you try to start your Minecraft server via the official server.jar (error occurs since version 1.17), you may get this error message:
- Download the latest Java JDK version as .exe file (“x64 Installer”) and install by clicking on the .jar file
- Now the server should start again
JNI Error in Minecraft TLauncher
This error message can also appear when launching the Minecraft TLauncher.
- Download the latest Java JDK version as .zip archive (“x64 Compressed Archive”) (see screenshot)
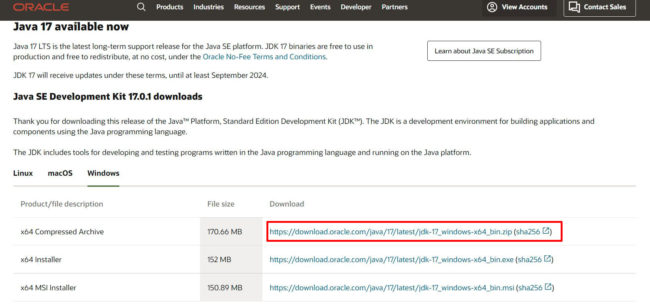
- Right-click on the downloaded file and click “Extract here”.
- Copy the unzipped folder to the directory C:Program FilesJava
- Launch your Minecraft TLauncher and click on the gear in the bottom right corner
- Click at “Java path” on “Browse…” and choose C:Program FilesJavajdkXbinjavaw.exe (replace the X by the name of your JDK folder).
- Save everything – now the game should start again
Java JNI error message still appears?
- Restart your computer
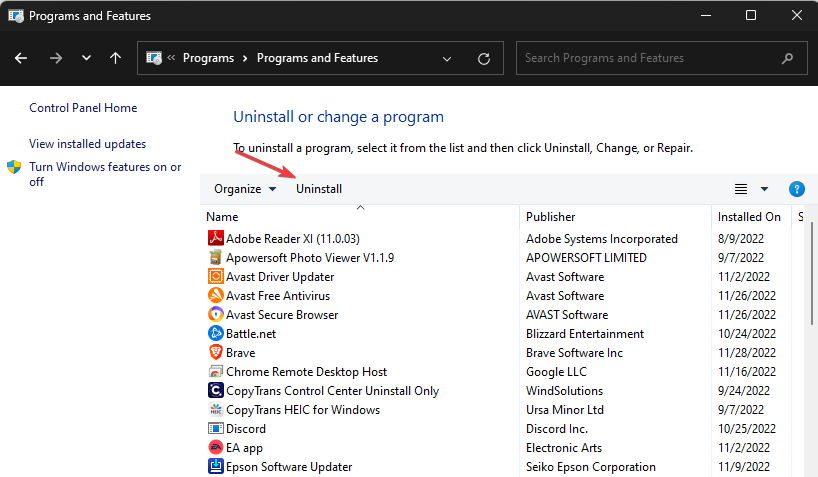
- Uninstall old Java versions under Control Panel > Programs > Programs and Features and install the latest Java JRE and Java SDK.
I hope that you were able to fix the JNI error with the help of this post. If this is still not the case, feel free to write me a comment.
What did you think of this post?
![]()
![]()
Related Posts
This can also interest you
Outdated Java version could cause this error
by Henderson Jayden Harper
Passionate about technology, Crypto, software, Windows, and everything computer-related, he spends most of his time developing new skills and learning more about the tech world. He also enjoys… read more
Updated on December 7, 2022
Reviewed by
Alex Serban

After moving away from the corporate work-style, Alex has found rewards in a lifestyle of constant analysis, team coordination and pestering his colleagues. Holding an MCSA Windows Server… read more
- A JNI error in Minecraft can occur if the Java version on your system is outdated.
- Resetting the Java path on your PC can fix the error with the Java runtime environment.
- Deleting old versions of Java from your computer will force Minecraft to use the latest version.
XINSTALL BY CLICKING THE DOWNLOAD FILE
Fortect is a tool that does not simply cleans up your PC, but has a repository with several millions of Windows System files stored in their initial version. When your PC encounters a problem, Fortect will fix it for you, by replacing bad files with fresh versions. To fix your current PC issue, here are the steps you need to take:
- Download Fortect and install it on your PC.
- Start the tool’s scanning process to look for corrupt files that are the source of your problem
- Right-click on Start Repair so the tool could start the fixing algorythm
- Fortect has been downloaded by 0 readers this month.
There are a couple of errors users can encounter with the Minecraft client. Recently, users report the -error: a JNI error has occurred, please check your installation and try again when starting the game client or server (.jar) on their computers.
Hence, knowing how to fix Java Virtual Machine launcher fatal exception errors will be beneficial.
Why do I get a JNI error in Minecraft?
Games like Minecraft depend on Java libraries to function on your PC. So, issues with the Java library will affect the game client. It can prompt Windows error 2 while loading the Java VM on the system.
Also, compatibility is a common cause of the problem. If you’re using a Minecraft server, mods, or a feature that is incompatible with the Java library, you will likely encounter this error.
Other factors that can cause the JNI error has occurred in Minecraft are:
- The corrupt system path for Java – The Minecraft JNI error can occur if the Java system variable path is compromised. It can cause conflicts between the client and Java on your PC, resulting in a JNI error in the Minecraft server. Also, a wrong Java installation path can cause errors in Minecraft.
- Outdated version of Java – Older versions of Java only support designated versions of clients. So, having an outdated version for your game client can cause errors. It means the Minecraft client is running on a Java version lower than it should be.
The above-listed causes may differ depending on the circumstances around the error. Nonetheless, you can fix the error by troubleshooting your PC.
How do I fix the error: JNI error has occurred issue?
Try the following preliminary checks:
- Create a System image backup on your PC.
- Restart Windows in Safe Mode and check if the error is resolved.
If the error persists, go on with the solutions below.
1. Install the Latest Java Version
- Go to Oracle’s official website, and download the installation package for your OS.

- Click on the downloaded file, double-click the .exe file, and allow the installer to make changes when prompted.
- Follow the onscreen installation instructions to install the latest Java.
- Restart your PC after the installation and check if the error persists.
Installing the latest version of Java will fix any compatibility errors that can cause the error between the game client and Java. You can read about downloading Java on Windows 11 for more guidance.
2. Reset Java Path
- Press Windows + R to open the Run dialog box, type sysdm.cpl, and press Enter to open the System properties.
- Navigate to the Advanced tab and click the Environment Variables button.
- On the System Variables page, select Path and click the Edit button.
- Find the Java variable paths files and delete them.

- Restart your PC afterwards and check if the JNI error persists.
Resetting the Java path will fix Java runtime environment errors that can cause the error.
- Riot Client won’t Open? Here’s What You Can Do
- Fix: League of Legends Error Connecting with Maestro
- Epic Games Stuck on Loading Your Order: How to Fix
- Minecraft Exit Code 6: How to Fix It in 4 Steps
3. Uninstall Old Versions of Java
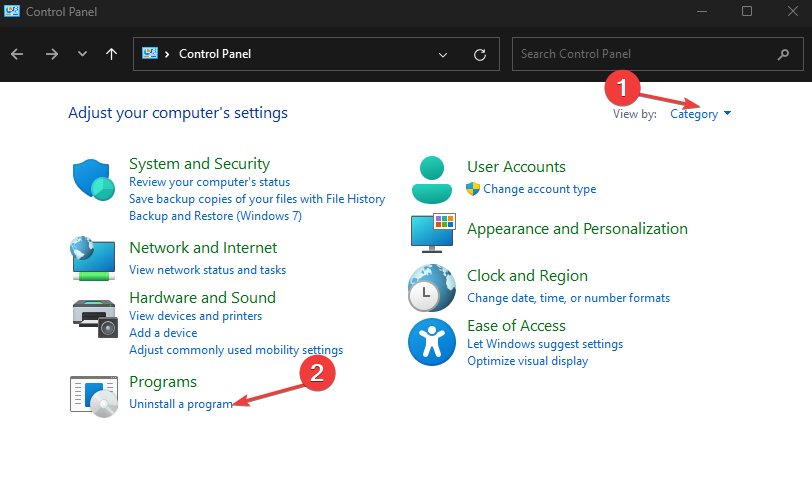
- Press Windows + R key to open the Run dialog window, type the control panel, and press Enter.
- Click on the View by option and select Category. Go to Programs and click on the Uninstall a Program link.
- Click on the older versions of Java and hit the Uninstall option.
- Close the Control Panel and restart your PC to check if the JNI error in Minecraft persists.
Some users still report not being able to fix the error after the two fixes above. So, uninstalling the old versions of Java on your PC will force Minecraft to use the latest version if it isn’t using it.
Alternatively, our readers can check ways to fix JAR files not opening on Windows 11. Also, you can read about fixing Java update/install not complete error 1603 on your PC.
If you have more questions or suggestions, do not hesitate to use the comments below.
Still experiencing issues?
SPONSORED
If the above suggestions have not solved your problem, your computer may experience more severe Windows troubles. We suggest choosing an all-in-one solution like Fortect to fix problems efficiently. After installation, just click the View&Fix button and then press Start Repair.
![]()
-
Partition Wizard
-
Partition Manager
- How to Fix A JNI Error Has Occurred in Minecraft [A Full Guide]
By Vega | Follow |
Last Updated January 05, 2023
Some Minecraft users see the “a JNI error has occurred” error when trying to start the client (game) or server (.jar). If you also encounter this issue, then you can refer to the solutions provided in this article from MiniTool Partition Wizard.
Some Minecraft users see the JNI error Minecraft server message that appears when trying to start the client or server: «A JNI error has occurred, please check your installation and try again». This issue mainly occurs in Minecraft version 21w19a and newer.
Why does this “a JNI error has occurred” error occur? Here are possible reasons:
- The version of Java is old: Previous versions of Minecraft came with server software that was compatible with older versions of Java. However, this is not the case with the latest Minecraft update, which now requires Java to get up and running properly.
- The corrupted system path for Java: The system variable path for Java is corrupted and tricks the Minecraft launcher into thinking that Java is not actually installed on your PC.
Whatever the cause of this problem, the solutions below will help you fix it in no time.
Solution 1: Install the Latest Java Version
This a JNI error has occurred Minecraft server error occurs when you try to start Minecraft or a Minecraft server on a PC that does not have the latest version installed. To fix this, you just need to update your current Java to the latest version.
You can complete the installation of Java’s latest version of Minecraft by following these steps:
Tip: Make sure the Minecraft launcher (Tlauncher or any other) is completely closed.
Step 1: Go to the official website to download the latest version of Java. Here you need to download the installation package you need correctly. For Windows users, they may choose to download the file ending with .exe.
Step 2: After downloading Java, install the software on your computer. You just double-click the downloaded executable and allow the installer to make changes when asked.
Step 3: Follow the on-screen instructions to finish the installation.
After that, you can check if the “a JNI error has occurred” error still appears.
Solution 2: Remove Broken System Path Variables for Java
If the first method doesn’t work, then this “a JNI error has occurred Minecraft” error is due to a corrupted system path variable for Java.
In this case, you can fix the problem by visiting the System Properties screen and modifying the environment variables in a way that removes the Java environment variables.
To do so, here is the guide:
Step 1: Press the Win + R key to open the Run dialog box. Then type sysdm.cpl in it and press Enter.
Step 2; In the System Properties window, switch to the Advanced tab, and then click on the Environment Variables button.
Step 3: Once enter the System Variables window, under the System variables section, select Path and click on the Edit button.
Step 4: In the next window, find the environment variables for Java. Then click it and click Delete.
After removing the offending environment variable, restart your PC, then start Minecraft again and see if the «a JNI error has occurred » issue is fixed.
Bottom Line
Two ways for fixing Minecraft server a JNI error has occurred issue. If you have any doubts about this article or have a better way to this problem, you can share it in the comment zone.
About The Author

Position: Columnist
Vega joined MiniTool as an editor after graduation. She enjoys helping people with computer problems, including disk management, data recovery, and more. She is constantly expanding her knowledge in related fields. And she will continue to bring more easy-to-understand professional articles to help people solve various problems on the PC.
In her daily life, Vega enjoys hanging out with friends, shopping online and listening to music. She is someone who knows how to enjoy life.