None of the methods listed on this page worked for me; specifically:
- I had an issue where the Settings app would crash when selecting Revoke USB debugging authorizations
- I was running LineageOS 14 x86_64
- I was using ADB over network
- The
/data/misc/adbcontained noadb_keysfile - Removing my local
~/.android/adbkeydid not help either - I had root access from the local terminal
- I was not getting any confirmation dialog
adb: error: failed to get feature set: device unauthorized.
This adb server's $ADB_VENDOR_KEYS is not set
Try 'adb kill-server' if that seems wrong.
Otherwise check for a confirmation dialog on your device.
- waiting for device -
In the end, I found a very useful post here that suggested to manually put the contents of ~/.android/adbkey.pub inside the /data/misc/adb/adb_keys file.
They suggested one of these two methods:
-
From another working device, copy the
adb_keysfile into your computer:# On the other Android device cp /data/misc/adb/adb_keys /sdcard# From your computer adb pull /sdcard/adb_keys .Then put the working
adb_keysfile into the problematic Android device’s sdcard (using Web or MTP) named asadb_keys, then copy the file into the correct path:# On the problematic device cp /sdcard/adb_keys /data/misc/adb/adb_keys -
The other method is to simply copy your machine’s
adbkey.pubfrom the~/.android/directory, and put it into the problematic Android device’s sdcard (using Web or MTP) named asadb_keys, then copy the file into the correct path:# On the problematic device cp /sdcard/adbkey.pub /data/misc/adb/adb_keys(Note: there’s a similar answer on SO that goes into further details for this method.)
Since I was running a web server on my computer, and I had curl installed on Android, I su‘ed from the terminal and ran the following on my Android device:
cd /data/misc/adb
curl 192.168.1.35:8080/adbkey.pub > adb_keys
Killed the adb daemon (using adb kill-server) and BAM! The adb shell worked fine, like it should have been from the beginning.
Hopefully, the method described here works for you as it did for me.
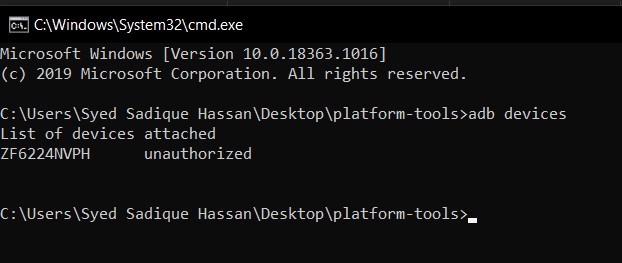
So you are executing an ADB command, most probably ‘adb devices’, and while you get the device-specific code, you also end up getting the unauthorized message next to it. In this guide, we will explain why this error is happening and more importantly how you could fix it. Follow along for the complete instructions to fix unauthorized device error while executing ADB Commands.
There are literally a plethora of reasons as to why you need to execute the ADB commands. Among the most important ones is the ability to boot your device to Fastboot/Bootloader Mode. Apart from that, you might also use it for sideloading purposes or even boot your device to stock recovery or even a custom one like TWRP.
Well, most of these could easily be carried out by your device’s hardware key combinations as well, but it no easy task in remembering the key combinations. This is because there is no fixed combination, different OEMs have their own set of keys to boot to Fastboot or Recovery Mode. But with ADB commands, things are different, and for good.
The thing with these commands is they are universal, i.e same for all Android devices. Furthermore, it is independent of Android versions and hence is the preferred mode of communications for many. But while executing the commands, some users might encounter the unauthorized device error. In this guide, we will let you know why you are facing the unauthorized device error while executing ADB Commands as well as the steps to fix it. Follow along.
- Fix Magisk Module Bootloop without TWRP Recovery
- How to Fix TWRP Error 20 GApps after flashing LineageOS
- Fix Mi Account Authorization | Unbrick Xiaomi | EDL Mode
- How to Fix Error: Cannot load recovery.img
Reason for Unauthorized Device Error
While there could be a couple of reasons why you might get this error, the major reasons is that you haven’t authorized your PC to recognize your device in ADB Mode. See, you have enabled the USB Debugging on your device and that is why you are getting the alphanumeric code. The unauthorized message is because you haven’t given your permissions to authorize this connection.
Hence your Mac or Windows PC isn’t able to recognize the connected device. It has nothing to do with missing ADB or Fastboot files or even the USB drivers. It’s just that the authorization is missing from your end. With that said, let’s now check out the steps to fix unauthorized device error while executing ADB Commands.
To begin with, we always advise our readers to keep a safe distance from various third-party ADB and Fastboot tools. When it comes to dealing with these binary files, you should always stick to the package provided officially by Google. And in this guide, we will be dealing with just that. So let’s get on with the instructions set beginning with the correct ADB and Fastboot files provided by the Silicon Valley giants.
STEP 1: Download and Install Android SDK Platform Tools
Download and install the Android SDK Platform Tools binary packages from Google. Once downloaded, extract it to any location on your PC. With this, you now have all the required ADB and Fastboot files. You could also refer to Google’s Official Documentation to gain technical knowledge about the Command Line Tools.
STEP 2: Enable USB Debugging
Now its time to enable USB Debugging on your device. For that, head over to Settings > About Phone > Tap on Build Number 7 times (Xiaomi users should tap on MIUI version 7 times) > You will get a toast message that You are now a developer.

Head back to Settings > System > Advanced (or Additional Settings) > You should now see the Developer Options. Tap on it and scroll to the USB Debugging option and enable the toggle next to it. You will now get a popup to Allow USB Debugging, tap on OK. Also, check out our guide on Enable USB Debugging on a Broken Android Device’s Screen? Here’s a Workaround.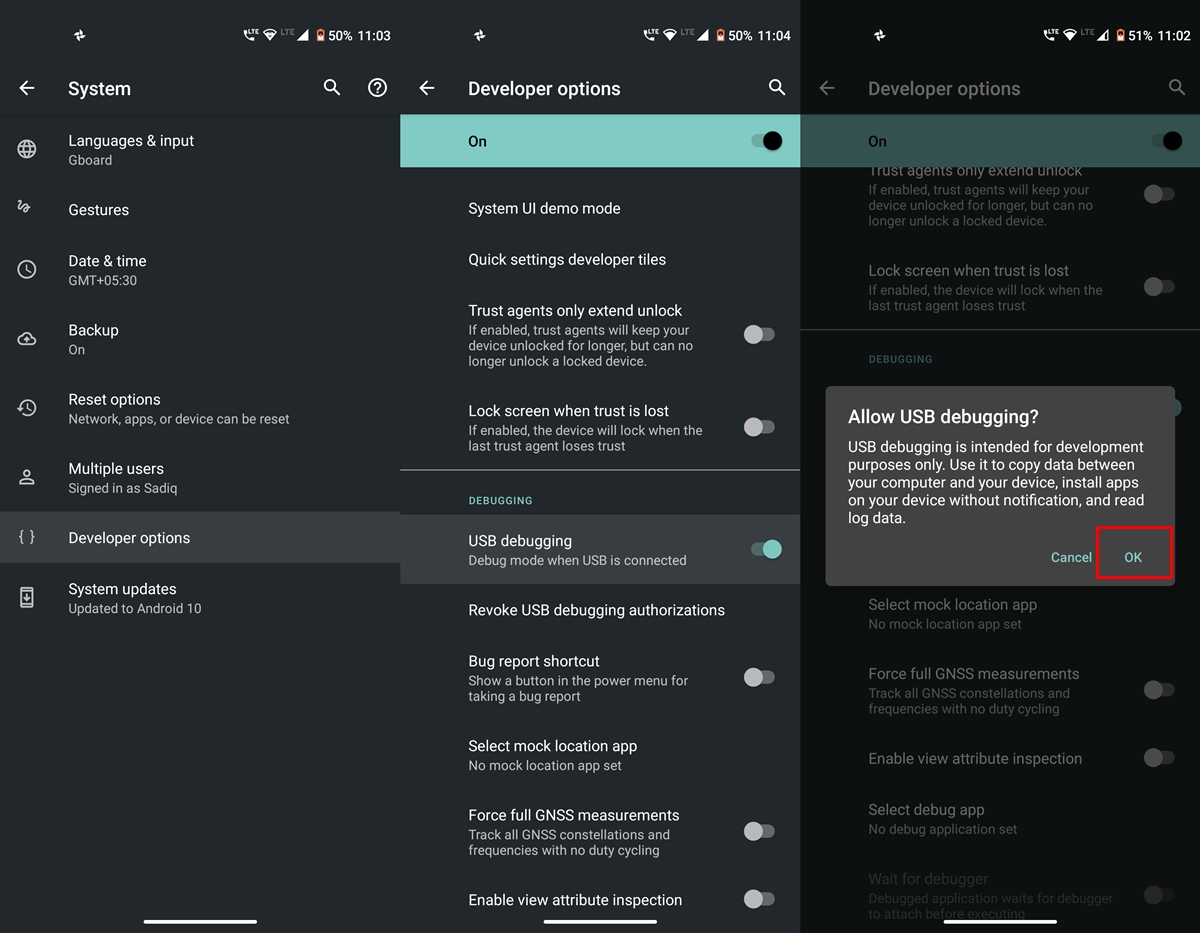
USB Debugging on Android
- How to Boot into Recovery (TWRP/Stock) from Fastboot Mode
- Fix TWRP Error 7 (While Flashing Custom ROM via TWRP)
- How to Fix FAILED (remote: unknown command) Error
- Mi Unlock Tool Errors and their Fixes
STEP 3: Authorize USB Debugging [3 Methods]
- Now comes the most important part of this guide to fix unauthorized device error while executing ADB Commands. Please follow the below-given instructions carefully:
- Connect your device to PC via USB cable. Make sure Debugging is enabled.
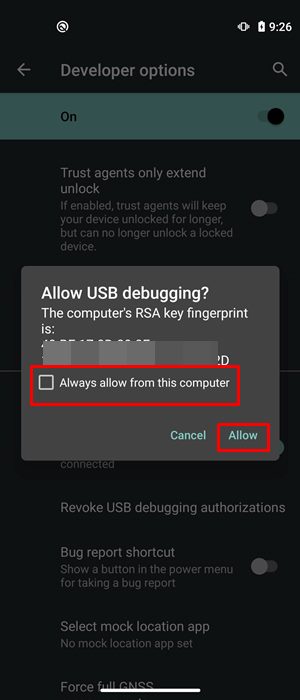
- [FIX 1] As soon as connect to the PC, you will get an Allow USB Debugging with your PC’s RSA Fingerprint key. Tap on Allow and if it is your own PC, then you could also tick mark the Aways allow from this computer.
- But what if you haven’t got the prompt on your device? Well, not an issue, you may still proceed ahead and we will make the prompt re-appear.
- Go to the platform-tools folder (where you have installed/extracted the Android SDK). Inside that folder’s address bar, type in CMD and hit Enter. This will launch the Command Prompt.

- Now type in the following command in the CMD window:
adb devices
- [FIX 2]If you have earlier Allowed the RSA Fingerprint key, then you should now get the alphanumeric ID and the device keyword. However, if you didn’t get the prompt earlier, then by executing the ‘adb devices’ command, you will definitely get the prompt. So head over to your device and tap on Allow in the popup that appears. That’s it.
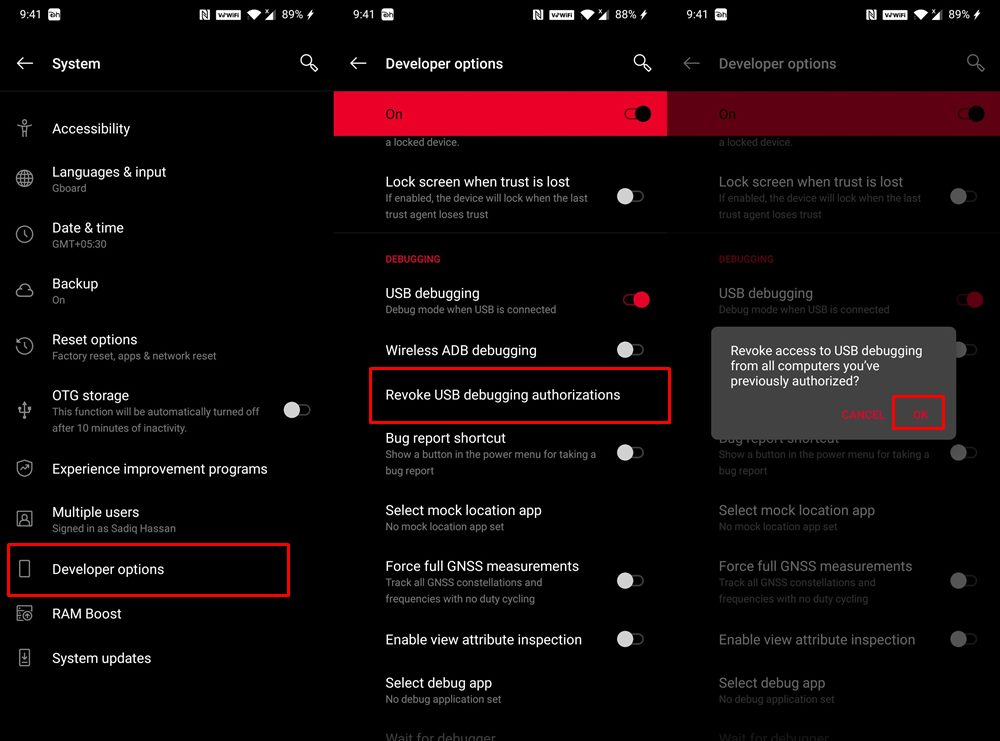
- [FIX 3] Still Not able to get success? Well, turns out there is a third way out as well. This time go to Settings > System > Advanced > Developer Options and head over to the Debugging section. Within that, tap on Revoke USB Debugging Authorization. Then tap on OK in the dialog box that appears.
- Now again connect your device to PC via USB cable, with USB Debugging enabled. Head over to the platform-tools folder, type in CMD in the address bar, and hit Enter. Now execute the below command in the CMD window that you have just opened:
adb devices
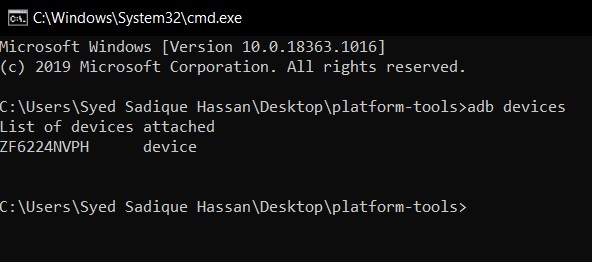
- You will now get the prompt on your device, tap on Allow, and your device will be recognized. To check it, simply re-execute the adb devices command and this time you will not get the unauthorized keyword next to the device ID.
With this, we conclude the guide on how to fix Unauthorized Device error with ADB Commands. We have shared three different methods for the same, any one of which should spell out success for you. If you still have any queries. do let us know in the comments section below. We will get back to you with a solution as soon as possible.
- How to Install OTA Updates in Rooted Android Device
- How to Install Substratum Themes on any Android (Oreo 8.0 and above)
- Permanently Install TWRP without TWRP ZIP File (only using TWRP.img file)
- Root Android Devices Without TWRP Recovery
About Chief Editor

Sadique Hassan
administrator
A technical geek by birth, he always has a keen interest in the Android platform right since the birth of the HTC Dream. The open-source environment always seems to intrigue him with the plethora of options available at his fingertips. “MBA by profession, blogger by choice!”
So you are executing an ADB command, most probably ‘adb devices’, and while you get the device-specific code, you also end up getting the unauthorized message next to it. In this guide, we will explain why this error is happening and more importantly how you could fix it. Follow along for the complete instructions to fix unauthorized device error while executing ADB Commands.
There are literally a plethora of reasons as to why you need to execute the ADB commands. Among the most important ones is the ability to boot your device to Fastboot/Bootloader Mode. Apart from that, you might also use it for sideloading purposes or even boot your device to stock recovery or even a custom one like TWRP.
Well, most of these could easily be carried out by your device’s hardware key combinations as well, but it no easy task in remembering the key combinations. This is because there is no fixed combination, different OEMs have their own set of keys to boot to Fastboot or Recovery Mode. But with ADB commands, things are different, and for good.
The thing with these commands is they are universal, i.e same for all Android devices. Furthermore, it is independent of Android versions and hence is the preferred mode of communications for many. But while executing the commands, some users might encounter the unauthorized device error. In this guide, we will let you know why you are facing the unauthorized device error while executing ADB Commands as well as the steps to fix it. Follow along.
- Fix Magisk Module Bootloop without TWRP Recovery
- How to Fix TWRP Error 20 GApps after flashing LineageOS
- Fix Mi Account Authorization | Unbrick Xiaomi | EDL Mode
- How to Fix Error: Cannot load recovery.img
Reason for Unauthorized Device Error
While there could be a couple of reasons why you might get this error, the major reasons is that you haven’t authorized your PC to recognize your device in ADB Mode. See, you have enabled the USB Debugging on your device and that is why you are getting the alphanumeric code. The unauthorized message is because you haven’t given your permissions to authorize this connection.

Hence your Mac or Windows PC isn’t able to recognize the connected device. It has nothing to do with missing ADB or Fastboot files or even the USB drivers. It’s just that the authorization is missing from your end. With that said, let’s now check out the steps to fix unauthorized device error while executing ADB Commands.
To begin with, we always advise our readers to keep a safe distance from various third-party ADB and Fastboot tools. When it comes to dealing with these binary files, you should always stick to the package provided officially by Google. And in this guide, we will be dealing with just that. So let’s get on with the instructions set beginning with the correct ADB and Fastboot files provided by the Silicon Valley giants.
STEP 1: Download and Install Android SDK Platform Tools
Download and install the Android SDK Platform Tools binary packages from Google. Once downloaded, extract it to any location on your PC. With this, you now have all the required ADB and Fastboot files. You could also refer to Google’s Official Documentation to gain technical knowledge about the Command Line Tools.
STEP 2: Enable USB Debugging
Now its time to enable USB Debugging on your device. For that, head over to Settings > About Phone > Tap on Build Number 7 times (Xiaomi users should tap on MIUI version 7 times) > You will get a toast message that You are now a developer.

Head back to Settings > System > Advanced (or Additional Settings) > You should now see the Developer Options. Tap on it and scroll to the USB Debugging option and enable the toggle next to it. You will now get a popup to Allow USB Debugging, tap on OK. Also, check out our guide on Enable USB Debugging on a Broken Android Device’s Screen? Here’s a Workaround.
USB Debugging on Android
- How to Boot into Recovery (TWRP/Stock) from Fastboot Mode
- Fix TWRP Error 7 (While Flashing Custom ROM via TWRP)
- How to Fix FAILED (remote: unknown command) Error
- Mi Unlock Tool Errors and their Fixes
STEP 3: Authorize USB Debugging [3 Methods]
- Now comes the most important part of this guide to fix unauthorized device error while executing ADB Commands. Please follow the below-given instructions carefully:
- Connect your device to PC via USB cable. Make sure Debugging is enabled.
- [FIX 1] As soon as connect to the PC, you will get an Allow USB Debugging with your PC’s RSA Fingerprint key. Tap on Allow and if it is your own PC, then you could also tick mark the Aways allow from this computer.

- But what if you haven’t got the prompt on your device? Well, not an issue, you may still proceed ahead and we will make the prompt re-appear.
- Go to the platform-tools folder (where you have installed/extracted the Android SDK). Inside that folder’s address bar, type in CMD and hit Enter. This will launch the Command Prompt.

- Now type in the following command in the CMD window:
adb devices

- [FIX 2]If you have earlier Allowed the RSA Fingerprint key, then you should now get the alphanumeric ID and the device keyword. However, if you didn’t get the prompt earlier, then by executing the ‘adb devices’ command, you will definitely get the prompt. So head over to your device and tap on Allow in the popup that appears. That’s it.
- [FIX 3] Still Not able to get success? Well, turns out there is a third way out as well. This time go to Settings > System > Advanced > Developer Options and head over to the Debugging section. Within that, tap on Revoke USB Debugging Authorization. Then tap on OK in the dialog box that appears.

- Now again connect your device to PC via USB cable, with USB Debugging enabled. Head over to the platform-tools folder, type in CMD in the address bar, and hit Enter. Now execute the below command in the CMD window that you have just opened:
adb devices
- You will now get the prompt on your device, tap on Allow, and your device will be recognized. To check it, simply re-execute the adb devices command and this time you will not get the unauthorized keyword next to the device ID.
With this, we conclude the guide on how to fix Unauthorized Device error with ADB Commands. We have shared three different methods for the same, any one of which should spell out success for you. If you still have any queries. do let us know in the comments section below. We will get back to you with a solution as soon as possible.
- How to Install OTA Updates in Rooted Android Device
- How to Install Substratum Themes on any Android (Oreo 8.0 and above)
- Permanently Install TWRP without TWRP ZIP File (only using TWRP.img file)
- Root Android Devices Without TWRP Recovery
About Chief Editor
Sadique Hassan
administrator
A technical geek by birth, he always has a keen interest in the Android platform right since the birth of the HTC Dream. The open-source environment always seems to intrigue him with the plethora of options available at his fingertips. “MBA by profession, blogger by choice!”
Improve Article
Save Article
Like Article
Improve Article
Save Article
Like Article
In this article, we see an error that occurs on the ADB tool while connecting the laptop/pc with android. Android Debug Bridge is used for the connect pc with the android device and using ADB we can control the android device using our pc. For more information about Android Debug Bridge follow this article. These Unauthorized Device error are solved by the below methods. We are going to cover 4 different approaches to resolving the issue.
Method 1
- Step 1: Open C-Drive on the laptop.
- Step 2: Go to the users folder.
- Step 3: Open the personal data application folder for example DELL on our pc.
- Step 4: Open .android folder.
- Step 5: Remove the adbkey and adbkey.pub file from the folder.
- Step 6: Connect again your android device with your pc using ADB.
- Step 7: Ask the Device to remember RSA Key when it Prompts. Allow the notification.
- Now it’s done.

Method 2
- Step 1: Open Developer Mode on your android device.
- Step 2: Enable USB Debugging (if already unable ignore this step).
- Step 3: Revoke USB debugging authorization.
- Step 4: Reconnect the android device using USB with pc.
- Step 5: You get a pop-up on your mobile device i.e. Allow USB Debugging.
- Step 6: Allow permission.
- Now it’s done.

Method 3
- Step 1: Disconnect the USB device from pc.
- Step 2: Click Revoke USB debugging authorizations in developer mode.
- Step 3: Disable developer mode on top.
- Step 4: Restart the developer mode.
- Step 5: Unable USB debugging.
- Step 6: Run the command ‘adb kill-server’ on the terminal on pc.
- Step 7: Run the command ‘adb Start-server’ on the terminal.
- Step 8: Connect and Reauthorize your device.


Method 4
For Linux operating system follow the below steps. Run the following command in the terminal on the operating system.
Step 1:
$ mv ~/.android/adbkey ~/.android/adbkey.old
Step 2:
$ mv ~/.android/adbkey.pub ~/.android/adbkey.pub.old
Step 3:
$ adb kill-server
Step 4:
$ adb start-server
Last Updated :
31 Oct, 2022
Like Article
Save Article