
Solve Error Executing Updater Binary In Zip using three simple methods. Fix updater process ended with Status 7 Error through TWRP recovery. Since Android is open-source, it is possible to edit the code, recompile, and re-release it for different types of devices. You can easily tweak the kernel, theme, recovery, or user interface from the Operating system.
Many third-party developers compile various custom ROMs and kernels to experience a change in the appearance and performance of a device. A brand-new Android device comes with preinstalled stock firmware. This stock ROM has limited functionality; however, you can improve it by flashing a custom ROM.

This way you can not only gain some extra features but also improve your device performance. But flashing any custom firmware is a risky process. A small mistake during installation can brick your Android device, thus making it completely useless. For flashing any custom ROM or kernel, you must have a custom recovery installed on your device.
ClockworkMod (CWM) and Team Win Recovery Project (TWRP) are the most popular custom recoveries. Both of these recoveries come loaded with features and are useful for installing third-party ROM or even stock Android images. However, replacing the stock recovery with a custom voids your device warranty.
Related: How to Solve Status 7 Error in TWRP Recovery
Sometimes while installing a zip file through recovery, an unexpected or unwanted error might occur, thus failing the flashing process. At such times, it becomes really difficult as you cannot restart your device because of wiped partitions. The only way to get out of this situation is to restore your previously backed-up ROM or to flash any working ROM.
But what if you don’t have any custom ROM or backup ROM? Don’t worry, as we will guide you through our tutorial on how to fix error executing updater binary in zip. Without wasting any more time, let’s get started.
How to Fix Error Executing Updater Binary In Zip
When installing certain custom ROMs, you can encounter errors like Status 7 Error, Error: 7 or zip signature verification failed, Error Executing Updater Binary in Zip, and many more. Generally, these errors are caused due to the updater-script file, which is present in your custom ROM. This file confirms your Android device model to check the compatibility with the ROM.
This is a safety mechanism to prevent the flashing of incompatible ROM on your device. But sometimes, you may encounter these errors even if you have the correct ROM for your device. The reason for this is a code error in the updater script created by the developer while compiling the ROM zip file. The solution to this problem is quite simple, but still, many users get stuck when they encounter such errors.
Related: How to Fix TWRP Error 70 while installing GApps
You can fix these common errors by using our easy step-by-step tutorial given below. To fix this issue, all you need is a computer and software. That’s it! You can even use your Android device if you don’t have a PC. Here in this guide to fix error executing updater binary in zip errors, we have listed three methods. Refer to any one of the three methods to solve the error executing updater binary in zip error.
Disclaimer
Proceed at your own risk. Implement every step correctly without doing anything on your own. If your device gets bricked by following this guide, then we at Droid Thunder will not be held responsible for that.
Method 1: By Editing Updater-Script file
In this method, we’ll edit and update the Updater-Script file present in the zip package file. Let’s get straight into it.
Downloads
WinRar
Notepad++
Steps to Fix Error Executing Updater Binary In Zip
- Download and install WinRar and Notepad++ on your computer.
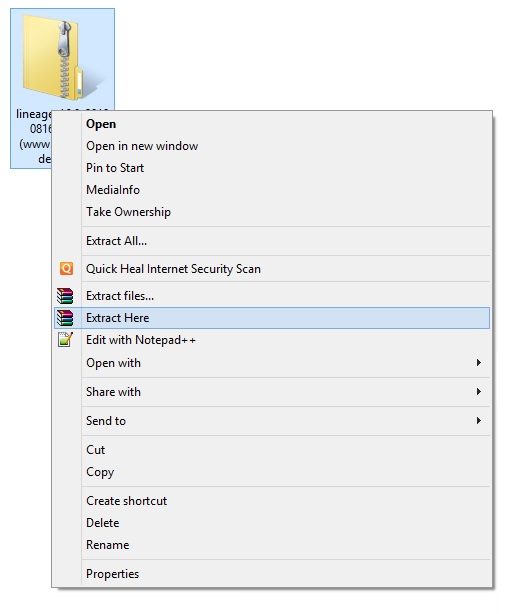
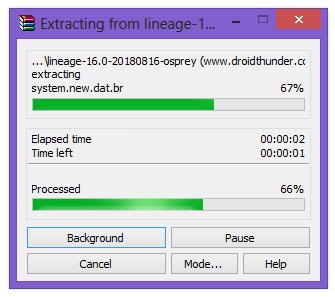
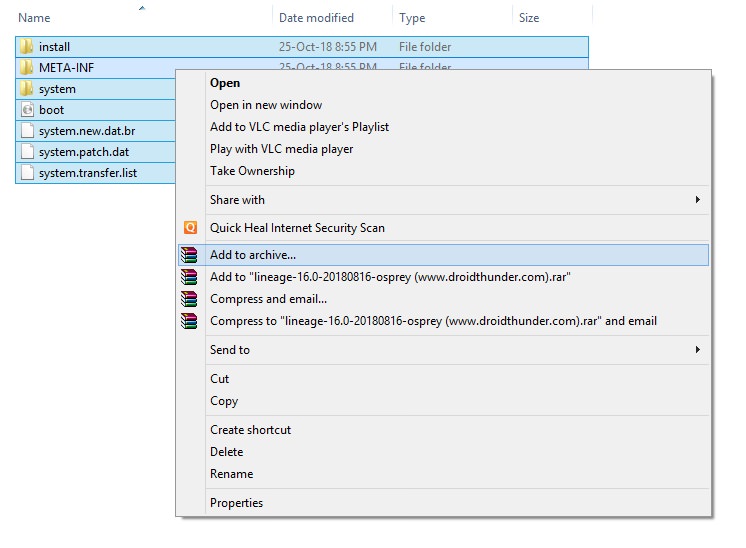
- Copy the ROM zip file on your computer and extract it using WinRar.
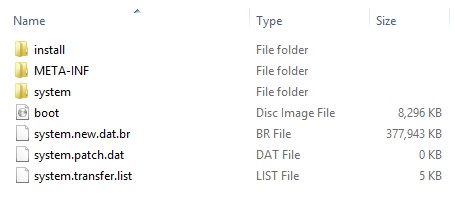
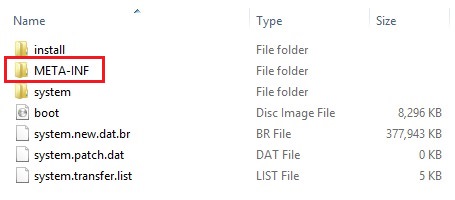
- After extracting, you’ll find Install, META-INF, and System folders along with other files.
- Note: Files may differ from those shown in the image.
- Open the META-IN folder.
- Then open the com folder.

- Next, open the google folder.

- Finally, open the android folder.

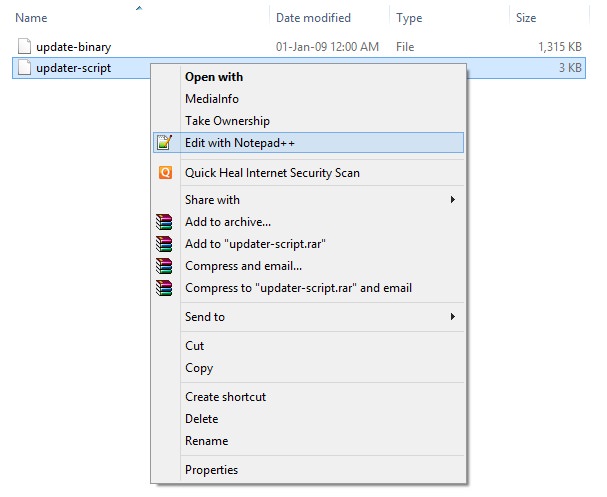
- Here, you’ll find these two files: update-binary and updater-script.

- Right-mouse click on the updater-script file and select Edit with Notepad++ option.
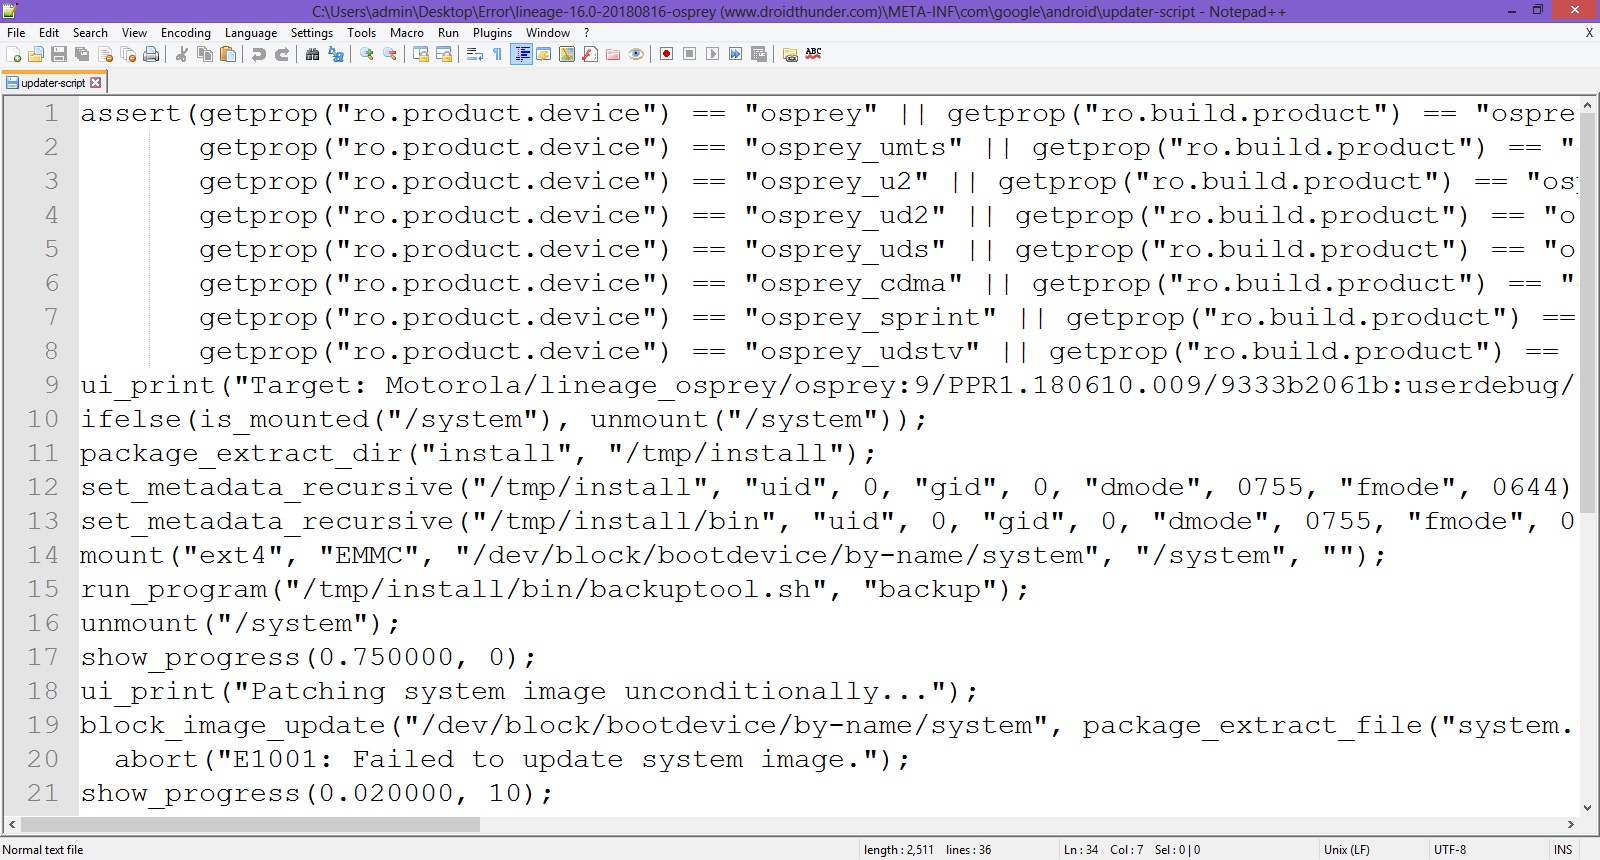
- Select the line starting with ‘assert’ to the next semi-colon and delete it.
- Normally this is the first line or one of the first lines at the top of the text file.
- Remove everything until the command ‘mount’ is visible.
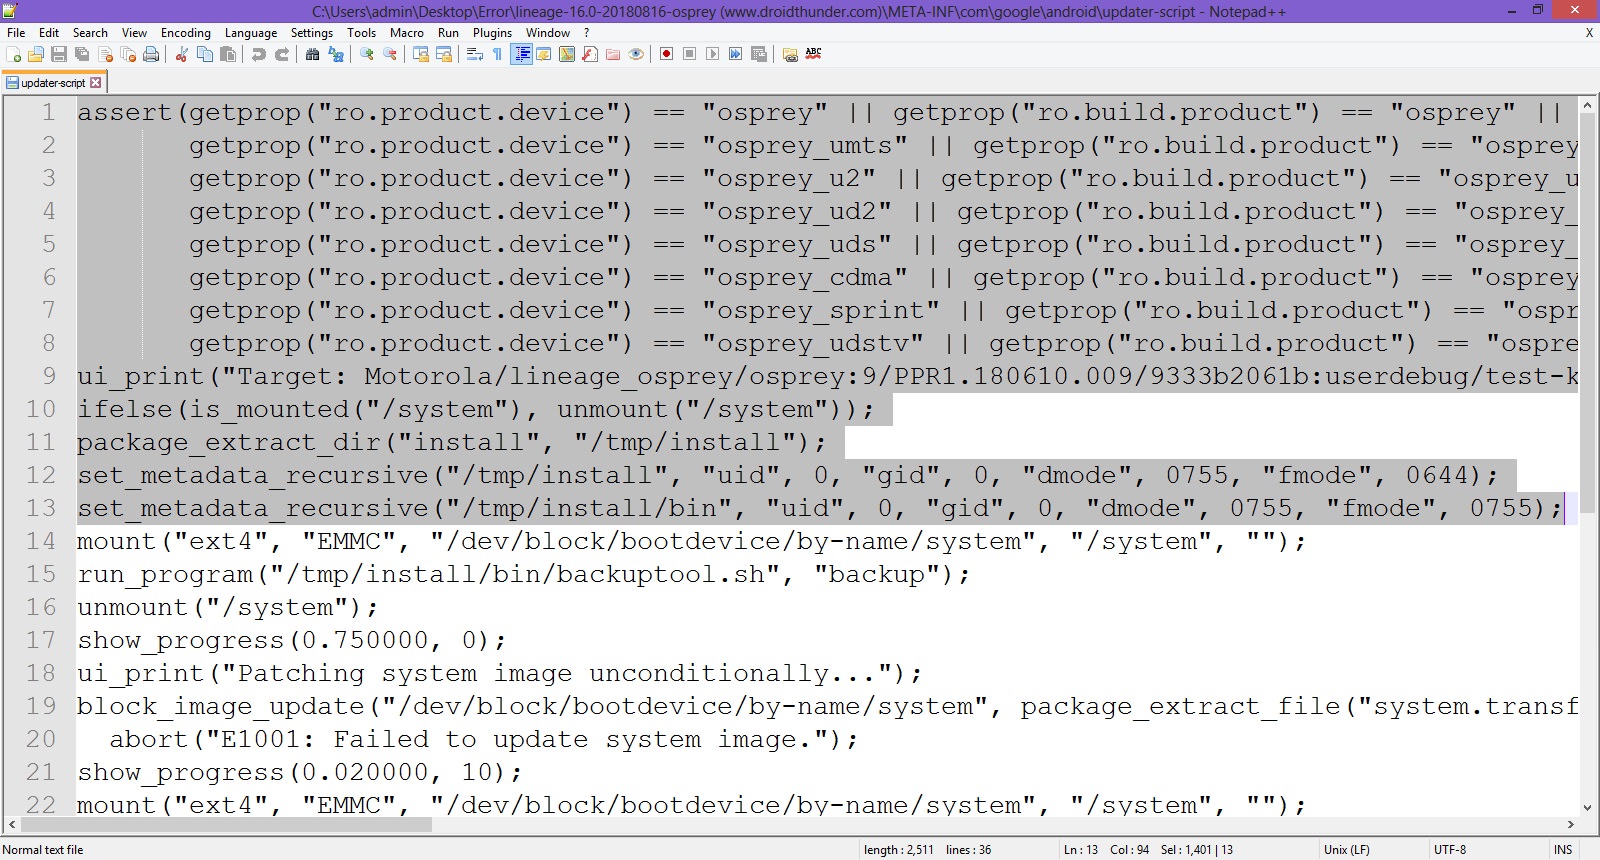
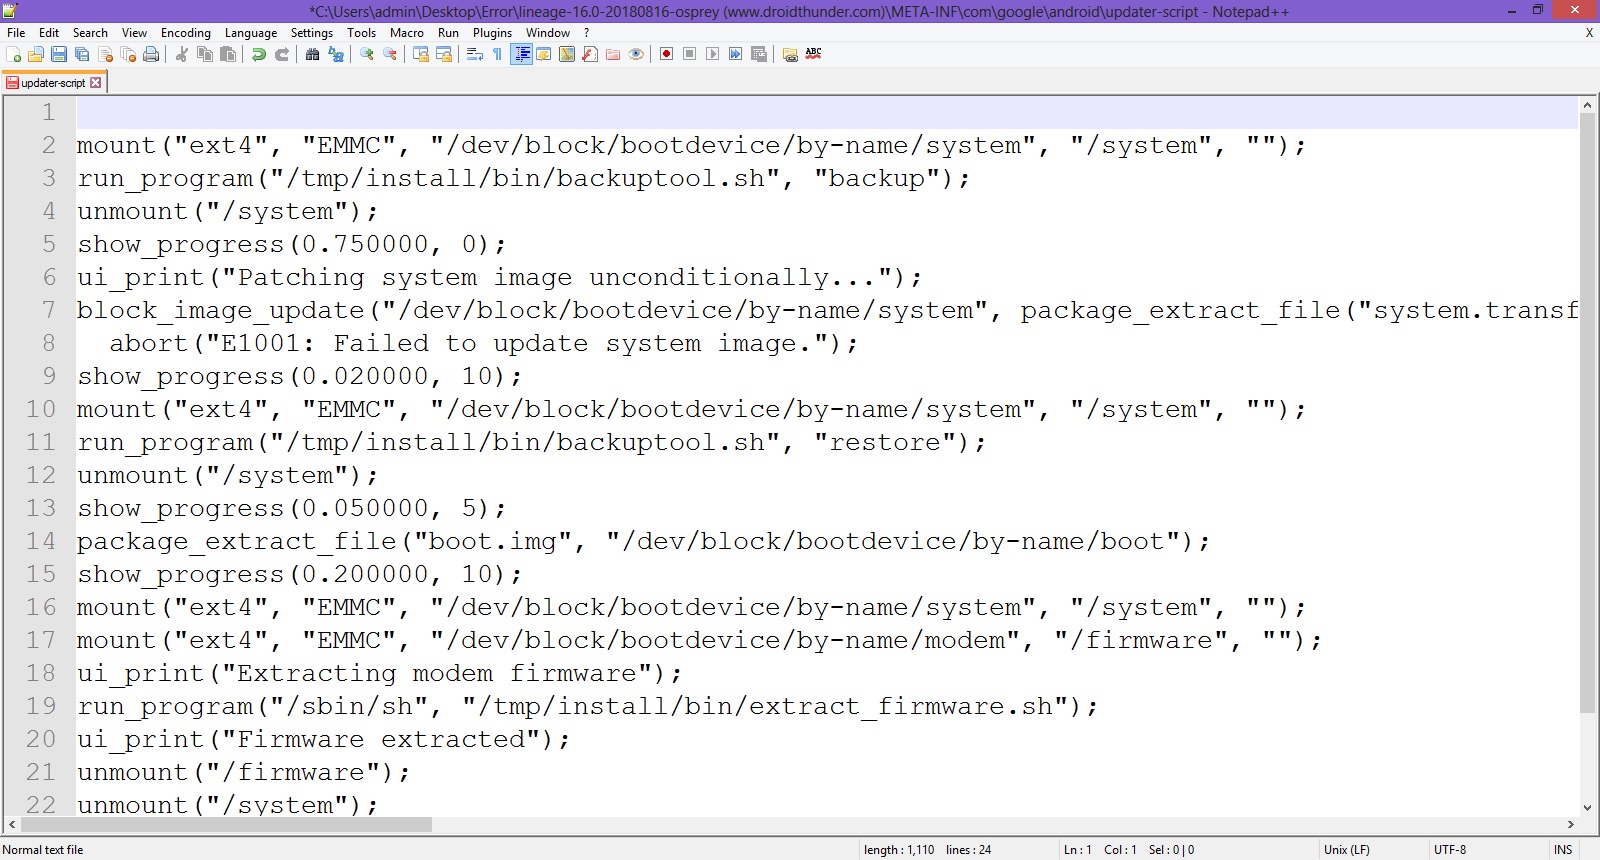
- Now your first line will start from mount. Save the file.
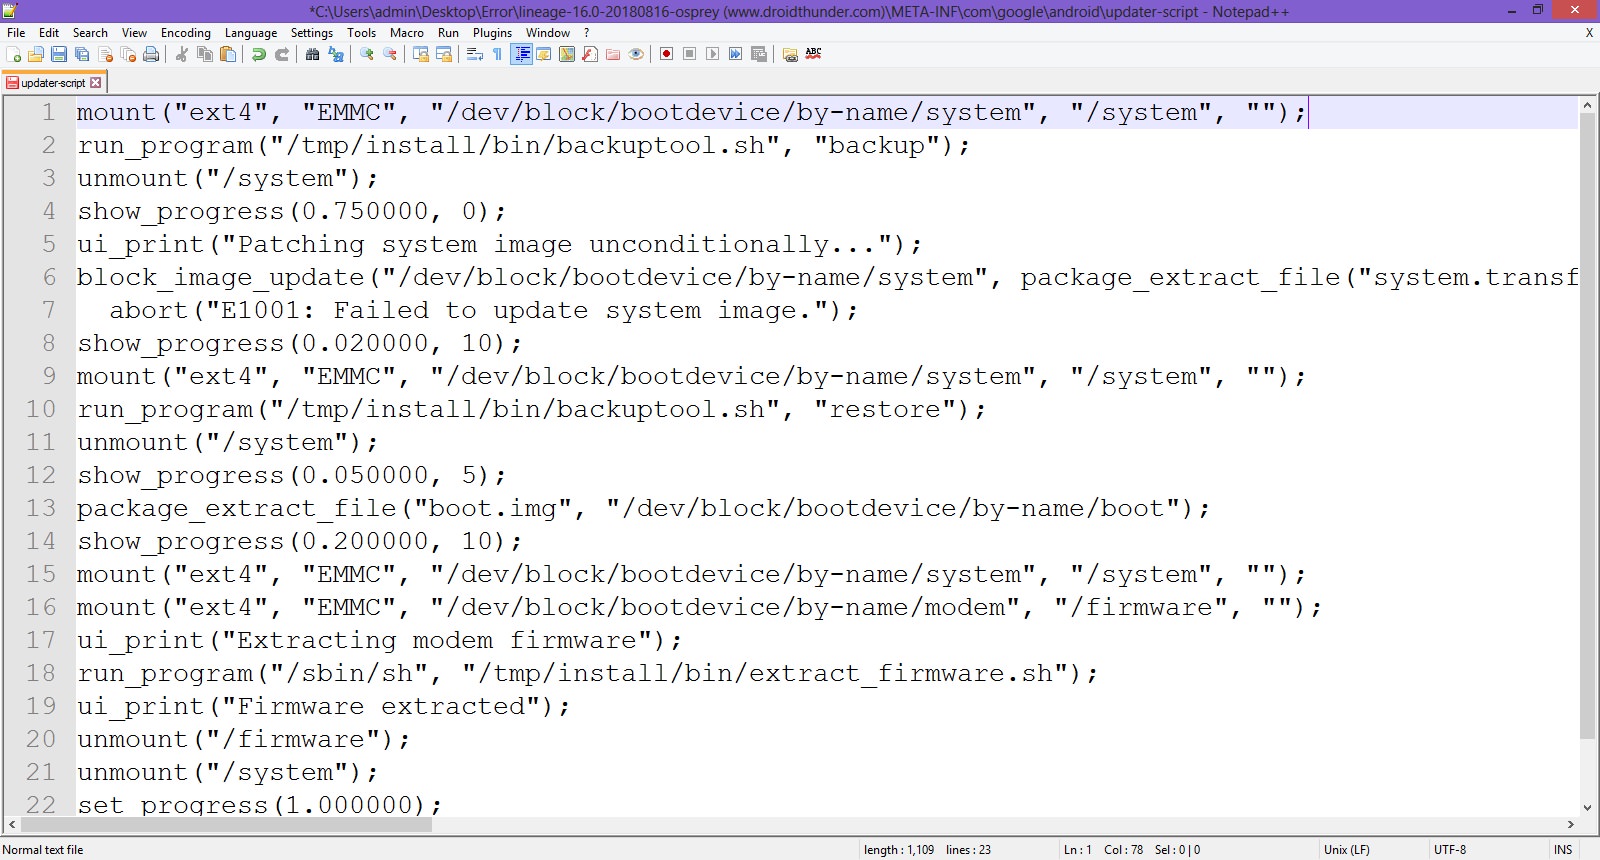
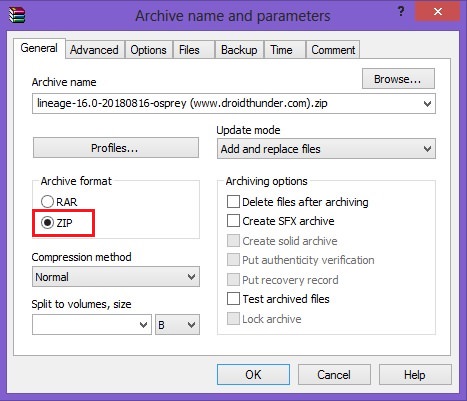
- Rezip/Re-compress all the files you’ve unzipped.
- Note: Save it as a .zip file and NOT .rar.
- Now copy this ROM.zip file on your device. And flash it through TWRP recovery. Now the ROM will be installed successfully without giving Error Executing Updater Binary In Zip error.
Method 2: By using Flashify app
We’ll use the Flashify app and install the latest TWRP custom recovery in this second method.
Downloads
Flashify app
Steps to Fix Error Executing Updater Binary In Zip
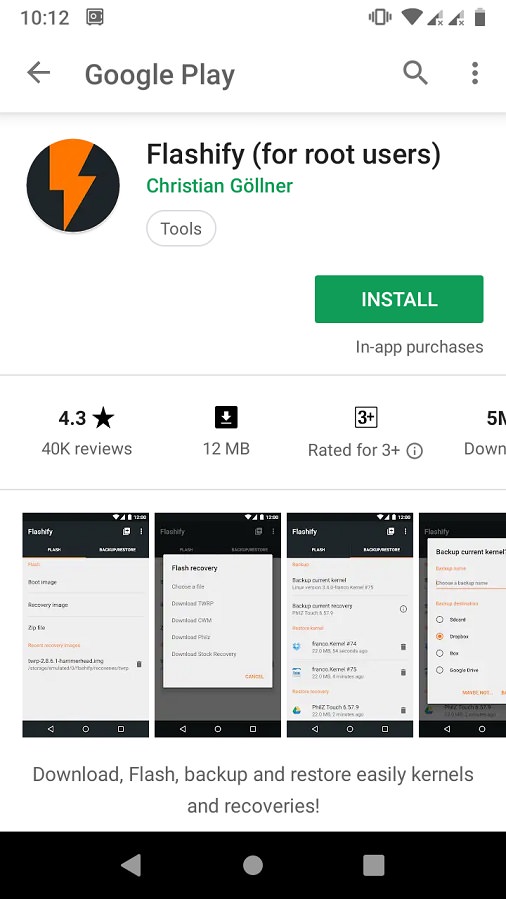
- Install the Flashify app from Google Play Store.
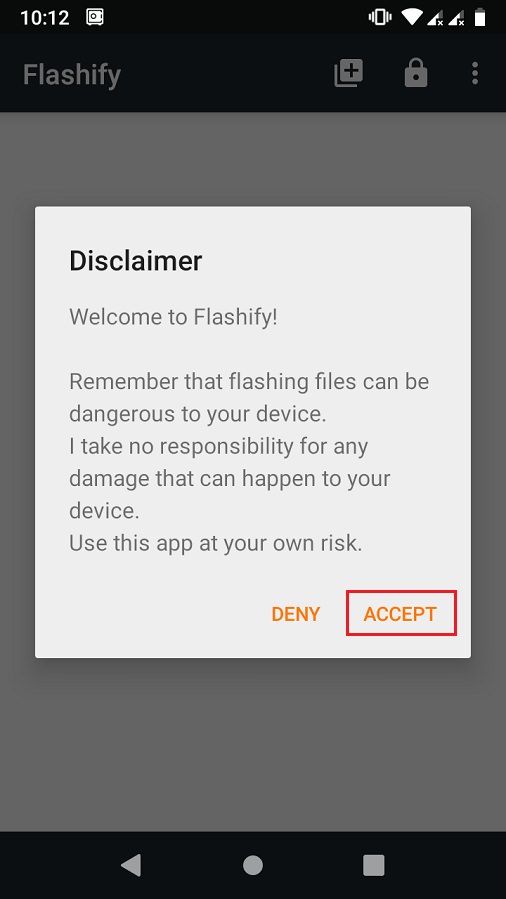
- Launch the app and give root permissions to the app.
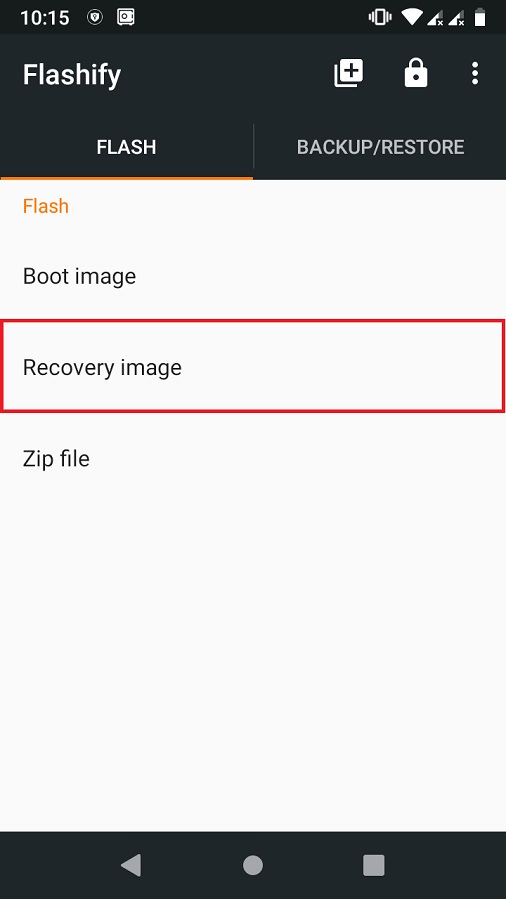
- From the Flash tab, select the Recovery image option.
- Then click on the Download TWRP option.
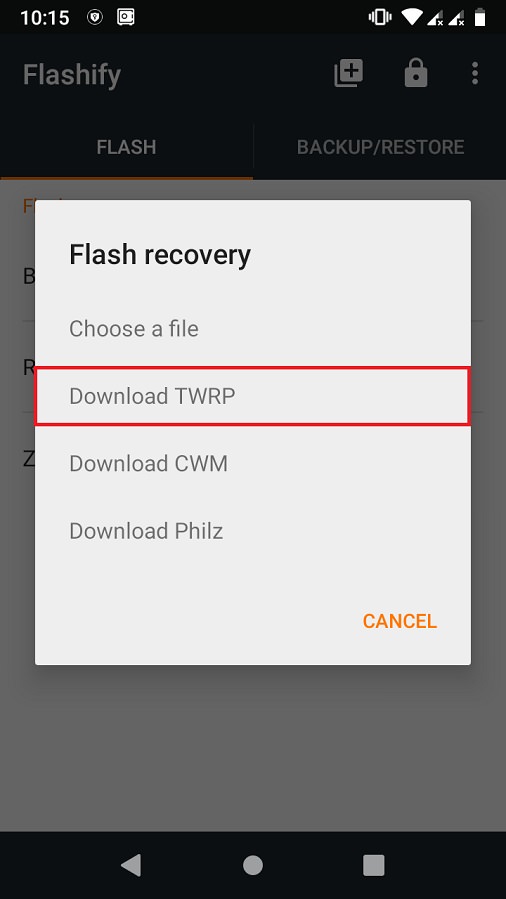
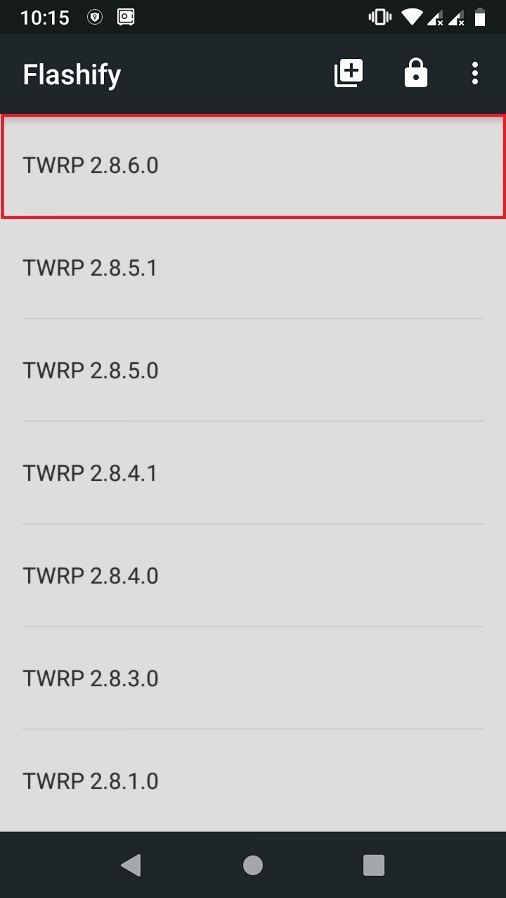
- A list of TWRP recoveries will be shown. Just choose the latest one.
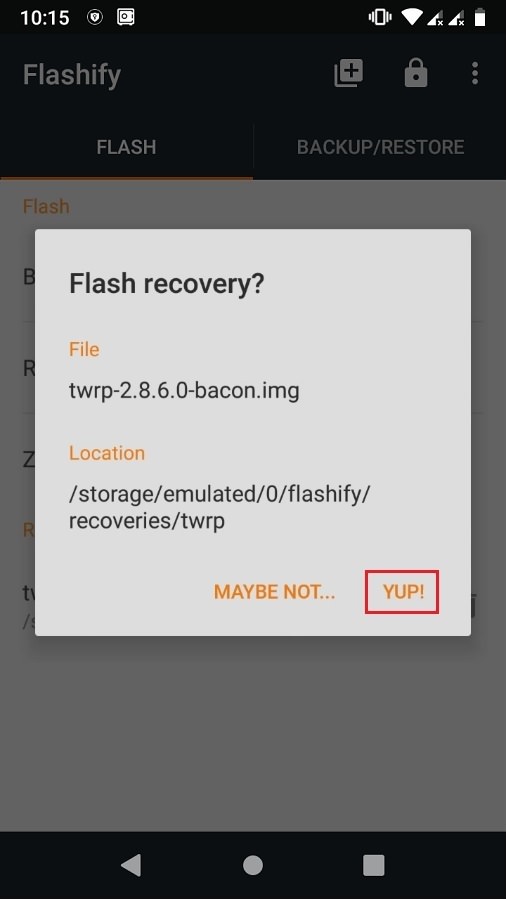
- Click on Yup to initiate the flashing of the latest TWRP recovery on your Android device.
- After the installation completes, boot into TWRP and flash the ROM.zip file. This time the zip file will be installed successfully without giving Error Executing Updater Binary In Zip error.
Method 3: Factory Reset
In this method, we’ll use TWRP recovery and perform a factory reset and wipe the Dalvik cache. Let’s get straight into it.
Steps to Fix Error Executing Updater Binary In Zip
- Boot your Android device into TWRP recovery.
- Click on the Wipe option.
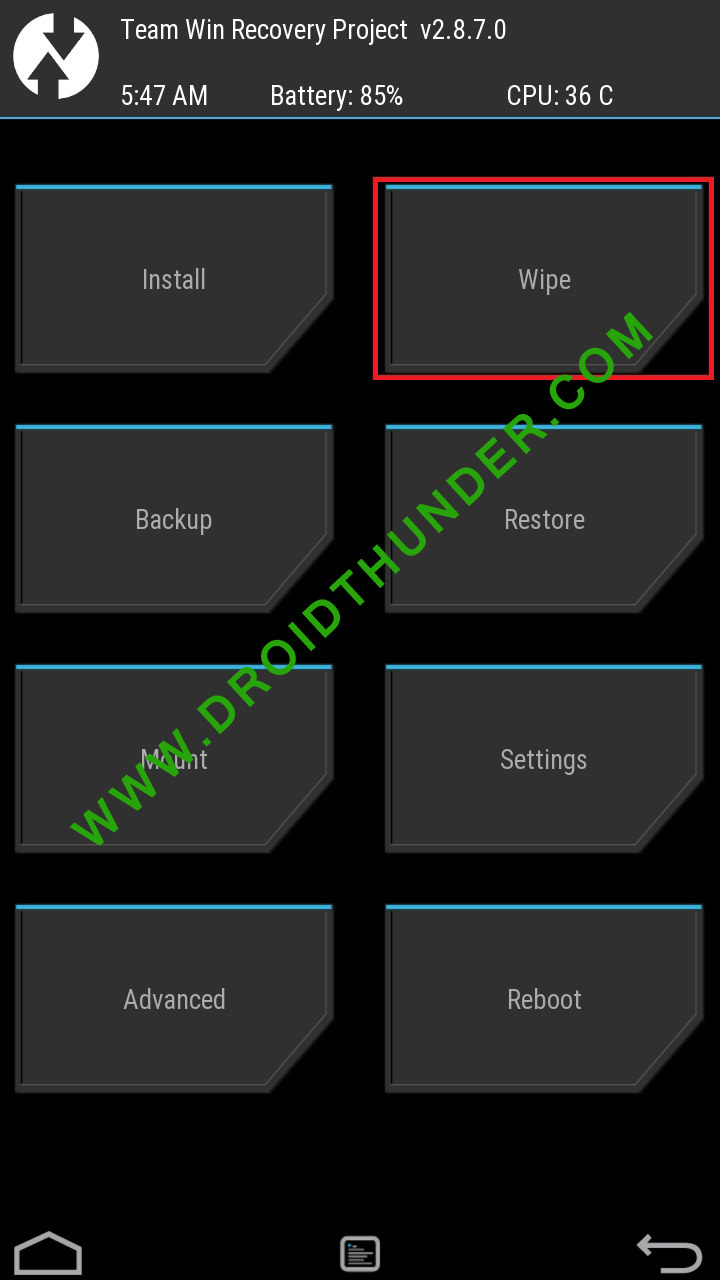
- Then swipe right to start the factory reset process.

- After factory resetting your device, again select the Wipe option. And then, click on the Advanced Wipe option.
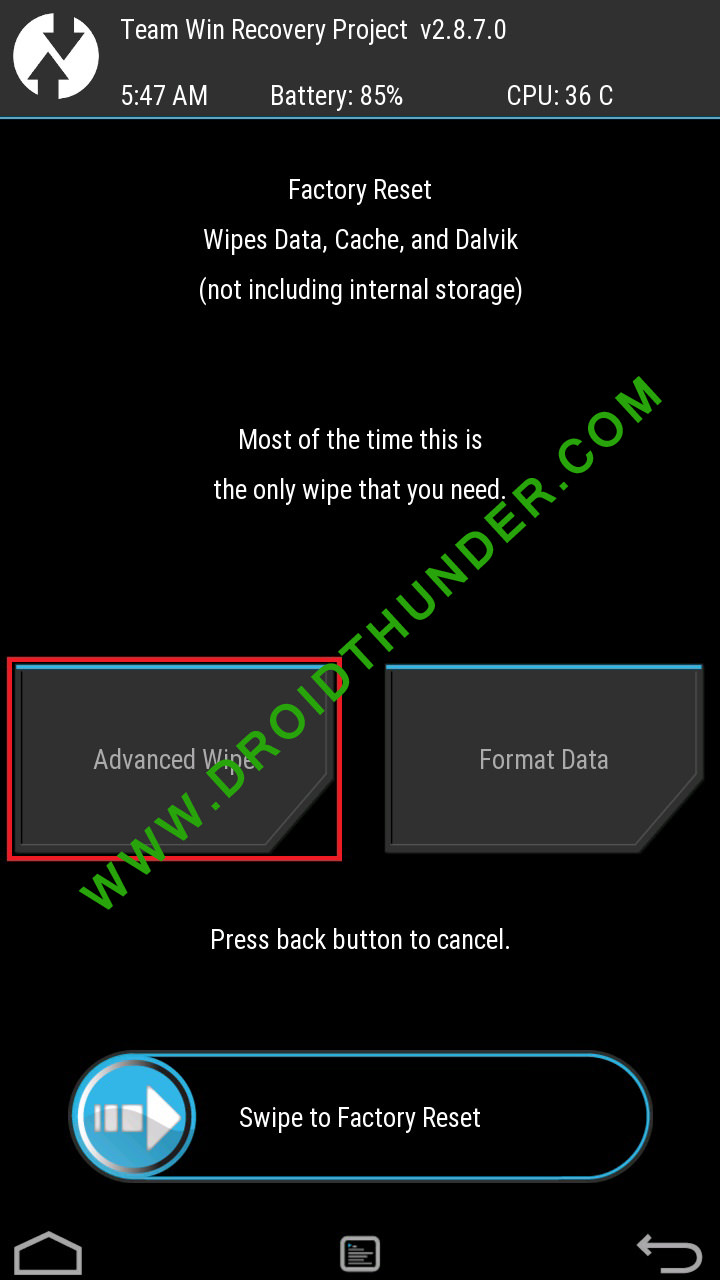
- On the next screen, select only the Dalvik cache partition.
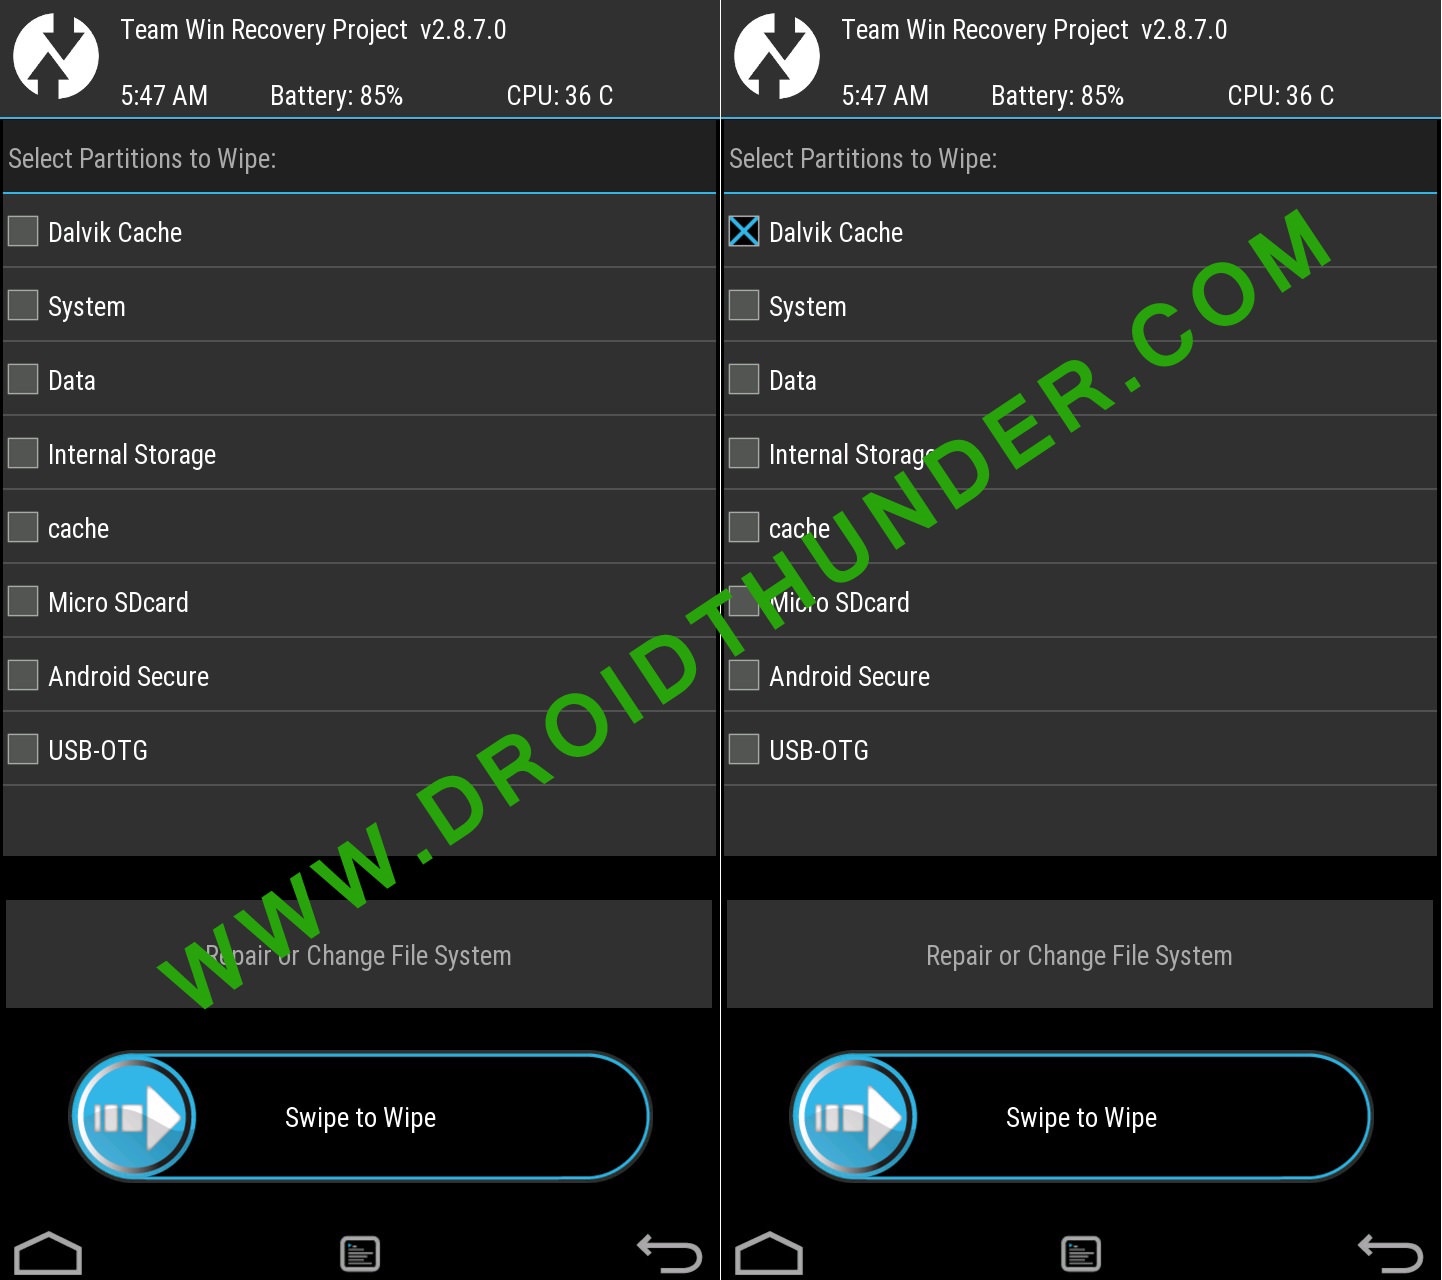
- Note: Do NOT select system and data partitions.
- Then swipe right to initiate the wiping process.
- After the wiping completes, flash the ROM.zip file, and it’ll be installed without giving Error Executing Updater Binary In Zip error.
Conclusion
Finally! This is how you can solve Error Executing Updater Binary In Zip in TWRP while flashing custom ROM. If the above methods don’t work, kindly comment below.
Leave a Comment
47 thoughts on “How to Solve Error Executing Updater Binary In Zip”
-
1ST METHOD IS WORKING FINE..
THANK YOU BRO…
Reply
-
-
its work. Thank you sir.
Reply
-
-
Thanks,it seems to work like a charm. Accidentally formatted the entire phone and nothing seemed to help. Keeping this article incase I’ll need it for future use. Currently waiting for the initial (long) start of LineageOS 16, but there’s the logo so that’s already a good sign
Reply
-
Glad to hear that! 🙂
Reply
-
-
Abhijeet…. You are a LEGEND!!!!!!! Thank you sooooooo much! Keep up the good work!!!
Reply
-
Thanks for the kind words Jaydee! 🙂
Reply
-
-
Thanks mate! What a annoying issue
Reply
-
Many thanks!
Several days I tried installing LineageOS 16 (unofficial) to a Samsung A5 (SM-A500FU) but it failed hopelessly… Until I discovered your post!
The 1st did the trick (didn’t try the others though).
Now I have a phone running on Android 9 – the stock version stopped at 6.0.1.
Again: thanks!Reply
-
-
Thank u so much bro. it worked as a charm
now i have pixel launcher with android pieReply
-
-
After a long suffering period, installing lineage OS finally worked on my Samsung Galaxy S5. With method 2 and 3, i was not successful, but with method 1. Thank you very much for this helpful instruction.
Reply
-
-
it says E:zip signature verification failed:1
Reply
-
Which method did you use?
Reply
-
Method 1 as well as method 3
Reply
-
May I know what are you trying to flash?
Reply
-
-
I’m trying to flash lenovo K3 note.
Reply
-
Try with this TWRP recovery.
Reply
-
-
Hey sorry to disturb but I noticed in super su app that currently I haven’t checkmarked the “enable su during boot” option. Is that why I’m getting error?
Reply
-
No problem dude. Generally, this error occurs due to the updater-script file which is present in your file. Maybe the downloaded file is not compatible with your device. Just update the TWRP recovery and try again. Let me know if the problem persists.
Reply
-
-
Hey I installed twrp from your link by installing it and selecting recovery option and I again rebooted into recovery. I allowed modifications too and then I followed method 3 but it taking a long time to perform factory reset. It’s still going. I’m worried what do I do?
Reply
-
Don’t worry Aravindh. Are you sure you are flashing the correct package file?
Reply
-
-
Hey it finally completed the format and I tried again method 3 but same error. Zip signature verification failed.
Reply
-
Tell me the file name and its source
Reply
-
-
Okay. So are you now using the TWRP v3.1.1-0 that I’ve mentioned earlier? If yes, then I request you to download the LineageOS again, and follow only Method 1 from the above guide. Sometimes, the error might occur due to incomplete downloads as well.
Reply
-
Okay I’ll try that and get back to soon. Thank you for your help!
Reply
-
-
-
-
I’m using twrp 2.8.7
Reply
-
Hey I’m really sorry to bother you but I tried other ROM Aospextended for K3 note(k50a40_S327_160517_ROW) with aio_otfp board.
but I’m getting that same error zip file verification failed. I don’t know what I’m doing wrong. If you could help me figure this out I’ll be really grateful. Thanks!Reply
-
No issues Aravindh. I’ll check the package file and get back to you.
Reply
-
It seems there is no issue with the ROM package file. The only solution is update TWRP to the latest one.
Reply
-
-
-
Hey one more thing. I’m trying to install twrp 3.4.0 (latest) and I selected lenovo but my exact model isn’t available. Closest thing is A7000 aio_row but cpuz tells me that my board is aio_otfp. Is that ok or?
Reply
-
Nope, don’t flash that. Have you tried with CWM? I think K3 Note does have a CWM recovery.
Reply
-
-
So now to do cwm, how do I remove twrp? Could you please point to any article that helps? Thank you very much
Reply
-
-
None of the methods worked for me……..its still showing the same error…. when i try the first method the binary error was not there instead it showed error flashing zip…..can you please help me….. maybe i ve downloaded the wrong rom…..can u provide me a link to download the correct rom and TWRP???
My device is
Samsung galaxy tab 3, 7.0 inch
SM-T211Thank you
Reply
-
-
In method 1:
My updater script didnt start with assert..
What should i do??Reply
-
No problem, just delete everything until the command ‘mount’ is visible.
Reply
-
3rd method worked for me. Thanks
Reply
-
-
-
Finally, a well written article that works. Thanks Mr. Abhijeet
Reply
-
-
Completely fixed everything. Thanks guys, I’m so thrilled to finally have my first phone that has a custom ROM on it. So again, thanks.
Reply
-
You are welcome, Heather!
Reply
-
Several users over XDA forums and our Facebook page have reported that an “error executing updater binary in zipping” Error creates problems while flashing custom ROM through Recovery. Here’s how you can fix the Error Executing Updater Binary In zipping.
Well, it’s no doubt that we all love to use Android devices. Android is right now the most popular mobile operating system, which is loved by millions of users all over the world. One of the most probable reasons behind the success of Android is its open-source nature. Since it’s based on Linux, we can enjoy many custom ROMs on the operating system.
We have also shared one article discussing different types of custom ROMs you can enjoy on your Android device. However, to install Custom ROM, you must have a rooted Android smartphone.
Not only just rooted devices, you must also have a custom recovery installed on your device. Well-known and popular recoveries like TWRP and CMW can help Android users in multiple ways. However, several Android users have reported the “error executing updater binary in zipping” Error while flashing custom ROM.
What Is Error Executing Updater Binary In zipping?
Several users over XDA forums and our Facebook page have reported that an “error executing updater binary in zipping” Error creates problems while flashing custom ROM through Recovery. The worst thing is that the Error leaves no room to roll back because we usually wipe out everything before flashing custom ROM.
Some Android users also believe that the Error occurred because they have been trying to flash a corrupted or wrong one. However, there’s nothing like that; the Error is mostly seen while flashing through TWRP recovery mode. So, if the same thing creates problems for you, let’s know how to fix the Error executing the updater binary in zip Android Error.
Important: All the information shared in the article is collected online. Techviral doesn’t hold any responsibility if any damage happens. Therefore, follow it at your own risk.
Steps To Follow Before Flashing Custom Rom
Well, there are a few things that you should remember before you flash a new ROM. These things are common, and we will share the easiest method to fix the Error. However, before you flash Custom ROM, create a complete android backup.
- Create a complete nandroid backup of your current ROM (That was running on your device)
- To create your current ROM’s backup to the Recovery and then select the ‘Backup’ option.
- The backup option in Recovery will create a backup of your whole Android system and store it on your SD card.
The Error executing updater binary in zip error is mostly caused by Android users failing to utilize the Advanced Wipe option correctly. Normally, users use the ‘factory reset & the Dalvik cache’ option, which triggers the Error. So, if you are also facing the same Error, follow the simple steps listed below.

- Go To Recovery
- On the Recovery, go to Wipe > Advanced Wipe (Important)
- Under the Advanced Wipe, select Data, System, Cache & Dalvik Cache, then swipe to wipe all.
- Now select the ZIP file of your ROM and flash it as usual.
- You will get the Error executing updater binary in the zip, but don’t panic!
- Now move to the reboot menu and then select reboot to Recovery
- Once your device reboots in Recovery, flash the ZIP file again Without wiping (Don’t wipe anything)
This will probably fix the Error executing the updater binary in the zip error. Now you won’t get the Error again. However, it’s worth noting that you might also get the Error after following the tutorial for several reasons. Maybe there’s something wrong with the ROM, and you might need to download a fresh copy of the ZIP file.
If you have read the article, you are probably already getting the ‘error executing updater binary in zip error’ while flashing custom ROM. However, if the above tutorial failed to fix the Error, you might raise a question on the XDA-Developer forum.
So, what’s your opinion on this? If the tutorial helped you to fix the problem, then make sure to drop a comment below.
Solve Error Executing Updater Binary In Zip using three simple methods. Fix updater process ended with Status 7 Error through TWRP recovery. Since Android is open-source, it is possible to edit the code, recompile, and re-release it for different types of devices. You can easily tweak the kernel, theme, recovery, or user interface from the Operating system.
Many third-party developers compile various custom ROMs and kernels to experience a change in the appearance and performance of a device. A brand-new Android device comes with preinstalled stock firmware. This stock ROM has limited functionality; however, you can improve it by flashing a custom ROM.
This way you can not only gain some extra features but also improve your device performance. But flashing any custom firmware is a risky process. A small mistake during installation can brick your Android device, thus making it completely useless. For flashing any custom ROM or kernel, you must have a custom recovery installed on your device.
ClockworkMod (CWM) and Team Win Recovery Project (TWRP) are the most popular custom recoveries. Both of these recoveries come loaded with features and are useful for installing third-party ROM or even stock Android images. However, replacing the stock recovery with a custom voids your device warranty.
Related: How to Solve Status 7 Error in TWRP Recovery
Sometimes while installing a zip file through recovery, an unexpected or unwanted error might occur, thus failing the flashing process. At such times, it becomes really difficult as you cannot restart your device because of wiped partitions. The only way to get out of this situation is to restore your previously backed-up ROM or to flash any working ROM.
But what if you don’t have any custom ROM or backup ROM? Don’t worry, as we will guide you through our tutorial on how to fix error executing updater binary in zip. Without wasting any more time, let’s get started.
When installing certain custom ROMs, you can encounter errors like Status 7 Error, Error: 7 or zip signature verification failed, Error Executing Updater Binary in Zip, and many more. Generally, these errors are caused due to the updater-script file, which is present in your custom ROM. This file confirms your Android device model to check the compatibility with the ROM.
This is a safety mechanism to prevent the flashing of incompatible ROM on your device. But sometimes, you may encounter these errors even if you have the correct ROM for your device. The reason for this is a code error in the updater script created by the developer while compiling the ROM zip file. The solution to this problem is quite simple, but still, many users get stuck when they encounter such errors.
Related: How to Fix TWRP Error 70 while installing GApps
You can fix these common errors by using our easy step-by-step tutorial given below. To fix this issue, all you need is a computer and software. That’s it! You can even use your Android device if you don’t have a PC. Here in this guide to fix error executing updater binary in zip errors, we have listed three methods. Refer to any one of the three methods to solve the error executing updater binary in zip error.
Disclaimer
Proceed at your own risk. Implement every step correctly without doing anything on your own. If your device gets bricked by following this guide, then we at Droid Thunder will not be held responsible for that.
Method 1: By Editing Updater-Script file
In this method, we’ll edit and update the Updater-Script file present in the zip package file. Let’s get straight into it.
Downloads
WinRar
Notepad++
Steps to Fix Error Executing Updater Binary In Zip
- Download and install WinRar and Notepad++ on your computer.
- Copy the ROM zip file on your computer and extract it using WinRar.
- After extracting, you’ll find Install, META-INF, and System folders along with other files.
- Note: Files may differ from those shown in the image.
- Open the META-IN folder.
- Then open the com folder.
- Next, open the google folder.
- Finally, open the android folder.
- Here, you’ll find these two files: update-binary and updater-script.
- Right-mouse click on the updater-script file and select Edit with Notepad++ option.
- Select the line starting with ‘assert’ to the next semi-colon and delete it.
- Normally this is the first line or one of the first lines at the top of the text file.
- Remove everything until the command ‘mount’ is visible.
- Now your first line will start from mount. Save the file.
- Rezip/Re-compress all the files you’ve unzipped.
- Note: Save it as a .zip file and NOT .rar.
- Now copy this ROM.zip file on your device. And flash it through TWRP recovery. Now the ROM will be installed successfully without giving Error Executing Updater Binary In Zip error.
Method 2: By using Flashify app
We’ll use the Flashify app and install the latest TWRP custom recovery in this second method.
Downloads
Flashify app
Steps to Fix Error Executing Updater Binary In Zip
- Install the Flashify app from Google Play Store.
- Launch the app and give root permissions to the app.
- From the Flash tab, select the Recovery image option.
- Then click on the Download TWRP option.
- A list of TWRP recoveries will be shown. Just choose the latest one.
- Click on Yup to initiate the flashing of the latest TWRP recovery on your Android device.
- After the installation completes, boot into TWRP and flash the ROM.zip file. This time the zip file will be installed successfully without giving Error Executing Updater Binary In Zip error.
Method 3: Factory Reset
In this method, we’ll use TWRP recovery and perform a factory reset and wipe the Dalvik cache. Let’s get straight into it.
Steps to Fix Error Executing Updater Binary In Zip
- Boot your Android device into TWRP recovery.
- Click on the Wipe option.
- Then swipe right to start the factory reset process.
- After factory resetting your device, again select the Wipe option. And then, click on the Advanced Wipe option.
- On the next screen, select only the Dalvik cache partition.
- Note: Do NOT select system and data partitions.
- Then swipe right to initiate the wiping process.
- After the wiping completes, flash the ROM.zip file, and it’ll be installed without giving Error Executing Updater Binary In Zip error.
Conclusion
Finally! This is how you can solve Error Executing Updater Binary In Zip in TWRP while flashing custom ROM. If the above methods don’t work, please comment below.
Leave a Comment
47 thoughts on “How to Solve Error Executing Updater Binary In Zip”
-
1ST METHOD IS WORKING FINE..
THANK YOU BRO…
Reply
-
-
its work. Thank you sir.
Reply
-
-
Thanks,it seems to work like a charm. Accidentally formatted the entire phone and nothing seemed to help. Keeping this article incase I’ll need it for future use. Currently waiting for the initial (long) start of LineageOS 16, but there’s the logo so that’s already a good sign
Reply
-
Glad to hear that! 🙂
Reply
-
-
Abhijeet…. You are a LEGEND!!!!!!! Thank you sooooooo much! Keep up the good work!!!
Reply
-
Thanks for the kind words Jaydee! 🙂
Reply
-
-
Thanks mate! What a annoying issue
Reply
-
Many thanks!
Several days I tried installing LineageOS 16 (unofficial) to a Samsung A5 (SM-A500FU) but it failed hopelessly… Until I discovered your post!
The 1st did the trick (didn’t try the others though).
Now I have a phone running on Android 9 – the stock version stopped at 6.0.1.
Again: thanks!Reply
-
-
Thank u so much bro. it worked as a charm
now i have pixel launcher with android pieReply
-
-
After a long suffering period, installing lineage OS finally worked on my Samsung Galaxy S5. With method 2 and 3, i was not successful, but with method 1. Thank you very much for this helpful instruction.
Reply
-
-
it says E:zip signature verification failed:1
Reply
-
Which method did you use?
Reply
-
Method 1 as well as method 3
Reply
-
May I know what are you trying to flash?
Reply
-
-
I’m trying to flash lenovo K3 note.
Reply
-
Try with this TWRP recovery.
Reply
-
-
Hey sorry to disturb but I noticed in super su app that currently I haven’t checkmarked the “enable su during boot” option. Is that why I’m getting error?
Reply
-
No problem dude. Generally, this error occurs due to the updater-script file which is present in your file. Maybe the downloaded file is not compatible with your device. Just update the TWRP recovery and try again. Let me know if the problem persists.
Reply
-
-
Hey I installed twrp from your link by installing it and selecting recovery option and I again rebooted into recovery. I allowed modifications too and then I followed method 3 but it taking a long time to perform factory reset. It’s still going. I’m worried what do I do?
Reply
-
Don’t worry Aravindh. Are you sure you are flashing the correct package file?
Reply
-
-
Hey it finally completed the format and I tried again method 3 but same error. Zip signature verification failed.
Reply
-
Tell me the file name and its source
Reply
-
-
Okay. So are you now using the TWRP v3.1.1-0 that I’ve mentioned earlier? If yes, then I request you to download the LineageOS again, and follow only Method 1 from the above guide. Sometimes, the error might occur due to incomplete downloads as well.
Reply
-
Okay I’ll try that and get back to soon. Thank you for your help!
Reply
-
-
-
-
I’m using twrp 2.8.7
Reply
-
Hey I’m really sorry to bother you but I tried other ROM Aospextended for K3 note(k50a40_S327_160517_ROW) with aio_otfp board.
but I’m getting that same error zip file verification failed. I don’t know what I’m doing wrong. If you could help me figure this out I’ll be really grateful. Thanks!Reply
-
No issues Aravindh. I’ll check the package file and get back to you.
Reply
-
It seems there is no issue with the ROM package file. The only solution is update TWRP to the latest one.
Reply
-
-
-
Hey one more thing. I’m trying to install twrp 3.4.0 (latest) and I selected lenovo but my exact model isn’t available. Closest thing is A7000 aio_row but cpuz tells me that my board is aio_otfp. Is that ok or?
Reply
-
Nope, don’t flash that. Have you tried with CWM? I think K3 Note does have a CWM recovery.
Reply
-
-
So now to do cwm, how do I remove twrp? Could you please point to any article that helps? Thank you very much
Reply
-
-
None of the methods worked for me……..its still showing the same error…. when i try the first method the binary error was not there instead it showed error flashing zip…..can you please help me….. maybe i ve downloaded the wrong rom…..can u provide me a link to download the correct rom and TWRP???
My device is
Samsung galaxy tab 3, 7.0 inch
SM-T211Thank you
Reply
-
-
In method 1:
My updater script didnt start with assert..
What should i do??Reply
-
No problem, just delete everything until the command ‘mount’ is visible.
Reply
-
3rd method worked for me. Thanks
Reply
-
-
-
Finally, a well written article that works. Thanks Mr. Abhijeet
Reply
-
-
Completely fixed everything. Thanks guys, I’m so thrilled to finally have my first phone that has a custom ROM on it. So again, thanks.
Reply
-
You are welcome, Heather!
Reply
-
Содержание
- How to Solve Error Executing Updater Binary In Zip
- How to Fix Error Executing Updater Binary In Zip
- Disclaimer
- Method 1: By Editing Updater-Script file
- Downloads
- Steps to Fix Error Executing Updater Binary In Zip
- Method 2: By using Flashify app
- Downloads
- Steps to Fix Error Executing Updater Binary In Zip
- Method 3: Factory Reset
- Steps to Fix Error Executing Updater Binary In Zip
- Conclusion
- Zip signature verification failed при прошивке twrp xiaomi
How to Solve Error Executing Updater Binary In Zip
Solve Error Executing Updater Binary In Zip using three simple methods. Fix updater process ended with Status 7 Error through TWRP recovery. Since Android is open-source, it is possible to edit the code, recompile, and re-release it for different types of devices. You can easily tweak the kernel, theme, recovery, or user interface from the Operating system.
Many third-party developers compile various custom ROMs and kernels to experience a change in the appearance and performance of a device. A brand-new Android device comes with preinstalled stock firmware. This stock ROM has limited functionality; however, you can improve it by flashing a custom ROM.
This way you can not only gain some extra features but also improve your device performance. But flashing any custom firmware is a risky process. A small mistake during installation can brick your Android device, thus making it completely useless. For flashing any custom ROM or kernel, you must have a custom recovery installed on your device.
ClockworkMod (CWM) and Team Win Recovery Project (TWRP) are the most popular custom recoveries. Both of these recoveries come loaded with features and are useful for installing third-party ROM or even stock Android images. However, replacing the stock recovery with a custom voids your device warranty.
Sometimes while installing a zip file through recovery, an unexpected or unwanted error might occur, thus failing the flashing process. At such times, it becomes really difficult as you cannot restart your device because of wiped partitions. The only way to get out of this situation is to restore your previously backed-up ROM or to flash any working ROM.
But what if you don’t have any custom ROM or backup ROM? Don’t worry, as we will guide you through our tutorial on how to fix error executing updater binary in zip. Without wasting any more time, let’s get started.
How to Fix Error Executing Updater Binary In Zip
When installing certain custom ROMs, you can encounter errors like Status 7 Error, Error: 7 or zip signature verification failed, Error Executing Updater Binary in Zip, and many more. Generally, these errors are caused due to the updater-script file, which is present in your custom ROM. This file confirms your Android device model to check the compatibility with the ROM.
This is a safety mechanism to prevent the flashing of incompatible ROM on your device. But sometimes, you may encounter these errors even if you have the correct ROM for your device. The reason for this is a code error in the updater script created by the developer while compiling the ROM zip file. The solution to this problem is quite simple, but still, many users get stuck when they encounter such errors.
You can fix these common errors by using our easy step-by-step tutorial given below. To fix this issue, all you need is a computer and software. That’s it! You can even use your Android device if you don’t have a PC. Here in this guide to fix error executing updater binary in zip errors, we have listed three methods. Refer to any one of the three methods to solve the error executing updater binary in zip error.
Disclaimer
Proceed at your own risk. Implement every step correctly without doing anything on your own. If your device gets bricked by following this guide, then we at Droid Thunder will not be held responsible for that.
Method 1: By Editing Updater-Script file
In this method, we’ll edit and update the Updater-Script file present in the zip package file. Let’s get straight into it.
Downloads
Steps to Fix Error Executing Updater Binary In Zip
- Download and install WinRar and Notepad++ on your computer.
- After extracting, you’ll find Install, META-INF, and System folders along with other files.
- Note: Files may differ from those shown in the image.
- Open the META-IN folder.
- Finally, open the android folder.
- Here, you’ll find these two files: update-binary and updater-script.
- Right-mouse click on the updater-script file and select Edit with Notepad++ option.
- Select the line starting with ‘assert’ to the next semi-colon and delete it.
- Normally this is the first line or one of the first lines at the top of the text file.
- Remove everything until the command ‘mount’ is visible.
- Now your first line will start from mount. Save the file.
- Rezip/Re-compress all the files you’ve unzipped.
- Note: Save it as a .zip file and NOT .rar.
- Now copy this ROM.zip file on your device. And flash it through TWRP recovery. Now the ROM will be installed successfully without giving Error Executing Updater Binary In Zip error.
Method 2: By using Flashify app
We’ll use the Flashify app and install the latest TWRP custom recovery in this second method.
Downloads
Steps to Fix Error Executing Updater Binary In Zip
- Install the Flashify app from Google Play Store.
- Launch the app and give root permissions to the app.
- From the Flash tab, select the Recovery image option.
- Then click on the Download TWRP option.
- A list of TWRP recoveries will be shown. Just choose the latest one.
- Click on Yup to initiate the flashing of the latest TWRP recovery on your Android device.
- After the installation completes, boot into TWRP and flash the ROM.zip file. This time the zip file will be installed successfully without giving Error Executing Updater Binary In Zip error.
Method 3: Factory Reset
In this method, we’ll use TWRP recovery and perform a factory reset and wipe the Dalvik cache. Let’s get straight into it.
Steps to Fix Error Executing Updater Binary In Zip
- Boot your Android device into TWRP recovery.
- Click on the Wipe option.
- Then swipe right to start the factory reset process.
- After factory resetting your device, again select the Wipe option. And then, click on the Advanced Wipe option.
- On the next screen, select only the Dalvik cache partition.
- Note: Do NOT select system and data partitions.
- Then swipe right to initiate the wiping process.
- After the wiping completes, flash the ROM.zip file, and it’ll be installed without giving Error Executing Updater Binary In Zip error.
Conclusion
Finally! This is how you can solve Error Executing Updater Binary In Zip in TWRP while flashing custom ROM. If the above methods don’t work, please comment below.
Источник
Zip signature verification failed при прошивке twrp xiaomi
Boot — Загрузочное ядро.
Recovery — Рекавери ( установленное TWRP )
System — Система , установленная прошивка .
Образ System (system.img) — Образ системы в формате img. Не рекомендуется бэкапить, а тем более восстанавливать, бутлуп зачастую.
Data — Установленные приложения , загрузки , кроме фото и музыки , лежат во внутренней памяти .
Cache — Кэш ( остатки от программ , браузинга , кешированные файлы , по простому — мусор )
Internal Storage — Внутренняя память ( фото , музыка , загрузки , и т. д . )
Modem — Модем ( отвечает за связь , можно пробовать менять — для улучшения связи ).
Cust — Раздел, отвечающий за регионы.
EFS — IMEI, MAC-адреса, SN устройства (в основном бэкапится один раз и навсегда, пока телефон на руках,сохраняем в нескольких местах).
Persist — Различные датчики устройства, также имеет отношение к MI Аккаунту.
Splash — Загрузочное лого.
Vendor — так скажем драйвера , теперь вынесены отдельно
Vendor Image — образ Vendor
Обязательно перед бэкапом удаляем любые пароли , отпечатки ! Если не удалите при восстановлении не пустит в прошивку .
В TWRP выбрать Резервное коп-ние , появится меню
Для стандартного бэкапа достаточно system ( прошивка ), data ( установленные приложения , загрузки , кроме фото и музыки , лежат во внутренней памяти ) , boot (ядро ) , vendor( грубо — драйвера ). Можно выбрать куда сохранить , сжать , поставить пароль .
Всё выбрали — свайп и ждём .
Переход на кастом осуществляется без восстановления data , поэтому если нужно что-то сохранить с последующим восстановлением — пользуемся ® Titanium Backup ,®Migrate , MyBackup ,Super Backup : SMS & Contacts ,или любой другой программой .
Фото , и музыку можно просто на ПК . Если захотите вернутся — то бекап в TWRP
Установка новой прошивки обязательно на чисто .
Скачиваем нужную прошивку . Можно скинуть на флешку , или ПК ( потом перекинете в телефон ).
Идём в TWRP, делаем формат data (чтобы расшифровать data , по умолчанию зашифрована)после перезагрузка в рекавери, делаем полные вайпы — data , внутренняя память , обое кеши, ,опять перезагрузка. В меню Монтирование поставить галочки на system и vendor(примонтировать), это разрешение на их изменения, требуется при установке Magisk, и для правильной работа программ с root.
Теперь можно приступать к установке . Установить , выбор накопителя , находим свой файл прошивки , выбрать . Если нужен root (® Magisk — The Universal Systemless Interface ),или патчи — то жмём добавить . Файлы станут в очередь , прошьются все сразу.
Если нужна расшифровання data — до первого входа устанавливаем дешифратор  DecScript-Universal-v2.zip ( 1.4 КБ )
При установке кастомной прошивке — если нужны GApps(приложения Google) берём Здесь, выбрать ARM64 согласно версии android, пакет по усмотрению(состав пакета можно узнать нажав на зеленый квадрат возле названия. В некоторых прошивках могут уже быть встроенные, смотрим описание.
Можно установить новую и без форматирования, но это всё на ваше усмотрение. Делаем вайпы system,data, обое кеши и удаляем папки miui и android в файловом менеджере рекавери, или через ПК.
Обновить или установить новое можно в самом TWRP , идем в Установка , справа внизу нажать img (файлы TWRP и ядер идут в расширении img) , находим свой файл , выбрать, свайп . После установки перезагрузится в recovery , и настраиваем новое .
Так же и прошиваем ядро , только загрузка сразу в систему.
XDA
Устанавливается как обычный арк , внимательно читайте инструкцию . При включении обычный вайп data сотрёт всю внутреннюю память ,лучше выключить в утилите после бэкапа .tipatch-app-v1.4.apk ( 2.17 МБ )
Если после каких либо действий слетело TWRP , но остался root — можно использовать утилиту Flashify+Full+_for+root+users_+v1.9.2_Rus.zip ( 12.23 МБ )
Сообщение отредактировал vovcik3 — 09.12.19, 09:33
Источник
Several users over XDA forums and on our Facebook page have reported that an “error executing updater binary in zipping” error is creating problem while flashing custom ROM through recovery. Here’s how you can fix the Error Executing Updater Binary In zipping.
Well, it’s no doubt that we all love to use Android smartphone. In fact, Android is right now the most popular mobile operating system which is loved by millions of users all over the world. One of the most probable reasons behind the success of Android is its open-source nature. Since it’s based on Linux, we can actually enjoy lots of custom ROM on the operating system.
We have also shared one article in which we have discussed different types of custom ROMs that you can enjoy on your Android device. However, in order to install Custom ROM, you need to have a rooted Android smartphone.
Not only just rooted devices, you also need to have a custom recovery installed on your device. The well-known and popular recoveries like TWRP and CMW can help Android users in multiple ways. However, several Android users have reported to us about the “error executing updater binary in zipping” error while flashing custom ROM.
What Is Error Executing Updater Binary In zipping?
Several users over XDA forums and on our Facebook page have reported that an “error executing updater binary in zipping” error is creating problem while flashing custom ROM through recovery. The worst thing is, the error leaves no room rolling back because we usually wipe out everything before flashing custom ROM.
Some Android users also believe that the error occurred because they have been trying to flash a corrupted or wrong one. However, tHere’s nothing like that, in fact, the error mostly seen while flashing through TWRP recovery mode. So, if the same thing is creating problems for you, then let’s know how to fix the Error executing updater binary in zip Android error.
Important: All the information shared in the article are collected from the internet. Techviral doesn’t hold any responsibility if any damage happens. Therefore, follow it with your own risk.
Steps To Follow Before Flashing Custom Rom
Well, there are a few things that you should remember before you flash a new ROM. These things are pretty common and we are going to share the easiest method to fix the error. However, before you flash Custom ROM, make sure to create a complete android backup.
- Create a complete nandroid backup of your current ROM (That was running on your device)
- For creating the backup of your current ROM, head to the recovery and then select ‘Backup’ option.
- The backup option in recovery will create a backup of your whole Android system and will store it on your SD card.
Well, to be honest, the error executing updater binary in zip error is mostly caused because Android users fail to utilize the Advanced Wipe option correctly. Normally, users just use the ‘factory reset & the Dalvik cache’ option which triggers the error. So, if you are also facing the same error, then just follow the simple steps listed below.
- Go To Recovery
- On the Recovery, go to Wipe > Advanced Wipe (Important)
- Now under the Advanced Wipe, select Data, System, Cache & Dalvik Cache and then swipe to wipe all.
- Now select the ZIP file of your ROM and flash it as usual.
- You will now get the error executing updater binary in zip, but don’t panic!
- Now move to the reboot menu and then select reboot to recovery
- Once your device reboots in recovery, flash the ZIP file again Without wiping (Don’t wipe anything)
This will probably fix the error executing updater binary in zip error. Now you won’t get the error again. However, its worth noting that you might also get the error after following the tutorial because of several reasons. Maybe there’s something wrong with the ROM and you might need to download a fresh copy of the ZIP file.
If you have read the article, then most probably you are already getting the ‘error executing updater binary in zip error’ while flashing custom ROM. However, if the above tutorial failed to fix the error, then you might raise a question on the XDA-Developer forum.
So, what’s your opinion on this? If the tutorial helped you to fix the problem, then make sure to drop a comment below.
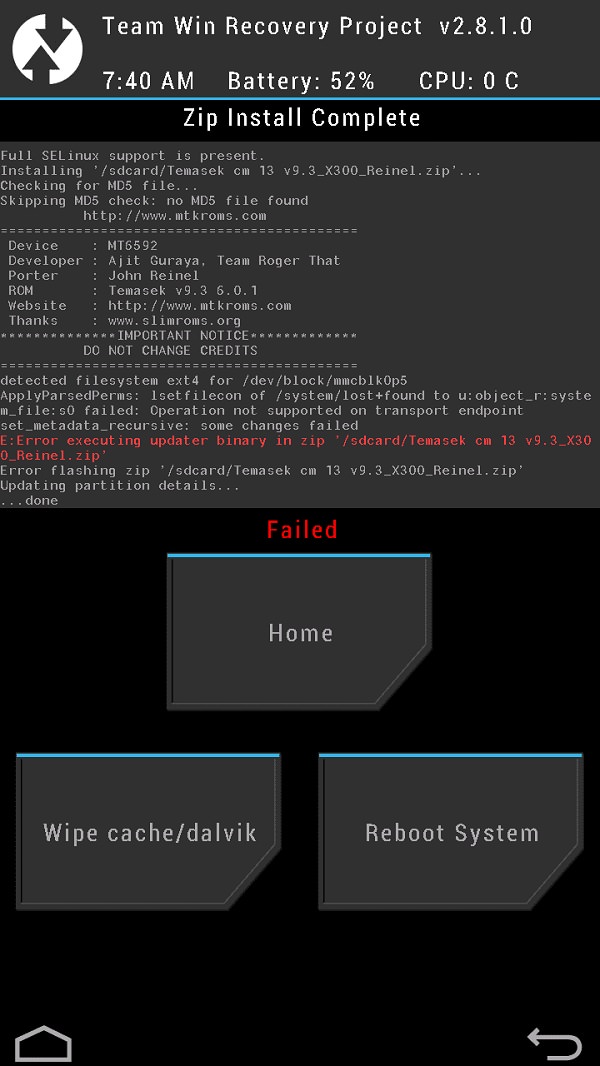
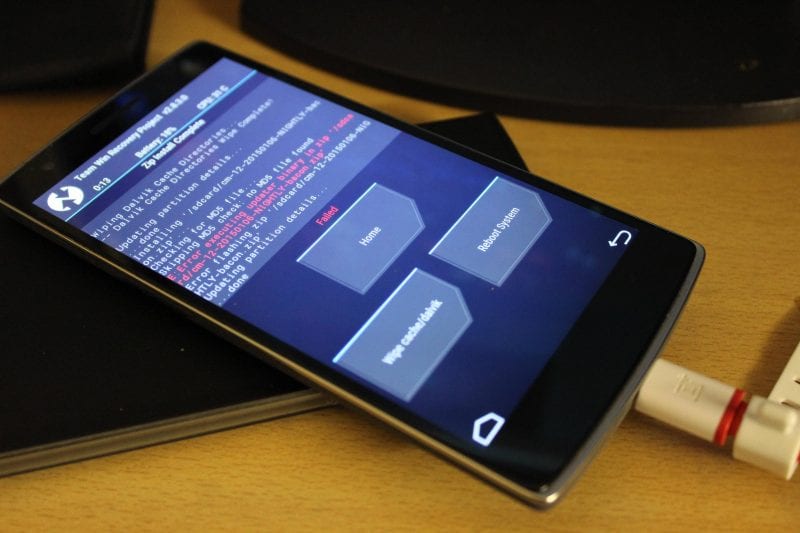
Many of us have their hobbies to flash different Rom(s) available one by one depending on the mood, same as I do. But recently while flashing Miui v6 on Xiaomi Redmi 1s, it gave me this “Error executing upda ter binary in zip” error in the recovery while flashing as shown in the given image. Now after this error you can’t boot back obviously as you wiped everything before the flashing.
Lots of people misinterprets thinking that it is encountered because of the Rom they had downloaded & flashed on their devices might be the wrong one, but its not like that. I’ve seen this error mostly with the Team Win Recoveries(TWRPs) , so let me help you with this thing step by step that how you can avoid this error and get your device flashed properly.
So lets begin,
What all we need before flashing any Rom?
1. A complete nandroid backup of the Rom that was running on the device.
2. You can backup your Rom in the recovery under the ‘backup’ option. It will create a backup of your whole system on your external SD card.
3. If you failed to create the backup of the Rom or you don’t have the backup and the error occurred, then at least you should have the zip file of any working custom Rom of your device in the storage (external/internal).
Now lets suppose ‘Rom1‘ as the stock Rom(or any working custom Rom of your device) and ‘Rom2‘ will be the Rom that you flashed and got the error.
Our common steps for flashing any custom Rom(s) are,
Step 1:- Go to recovery.
Step 2:- Go to Wipe>>Advanced wipe.
Step 3:- Check data, system, cache & dalvik cache and then swipe to wipe all.
Step 4:- Then go to install zip from SD card and browse the Rom and install it.
Step 5:- Reboot the device.
Same as the above steps I flashed the Rom on the device and encountered the error in the recovery. So what I did to flash the Rom2 correctly after the error was,
Step 1:- I flashed the Rom1 again by the same methods followed above.
Step 2:- Then without following Step 2 & Step 3 (that is not wiping the data & system from the Advanced wipe).
Step 3:- I just only did the factory reset & the dalvik cache wipe instead, from the Wipe menu.
Step 4:- After that flashed the Rom2 which gave me the updater binary error before and it got flashed completely without the error.
Step 5:- Then I rebooted the device and it booted on the system successfully.
Update: You can just only hit the “Factory Reset” before flashing the ROM to pass the error instead.
Also make sure that you are using the latest version of TWRP recovery available for your respective devices.
That’s it, if still the error stays then maybe the issue will be of the ROM only what you are flashing, but this method worked for me. As complete system wipe sometimes leads to the flashing error. Still you are getting the error again and again then stay relaxed and comment below I will work for you and find the solution for your device asap when I’ll get time.
Good luck. Stay connected to tecHulk.

A Tech Geek who loves to write about WordPress blogging, How-To’s, and fixing errors. He founded techulk with the sole purpose of providing visitors the exact information they need with simple and step-by-step working explanations.
This is a solution for you when you’re flashing a custom rom you randomly find on XDA and ended with
E:Error executing updater binary in zip.
So, what is the solution?
For example, I’m using ASUS Zenfone 5, and tried to flash this rom. Inside my phone, I already have TWRP recovery installed, so there should be no problem.

Usually when we’re installing custom rom, we’re asked to format cache, data, dalvik_cache, and system. It’s true, that if we’re flashing new ROM without formatting that partitions above, you will end with bootloop.
The solution is simple.
- After the flashing error, you should reboot back to your recovery.
- Now try to flash the ROM again WITHOUT formatting the partitions above.
- You should be able to flash until the end.
Wait, how can that be?
Here’s a illustration. Let’s say you’re eating a soup. When you’re still hungry and still want to eat, you will just add the soup to your bowl, without washing it right? Why? Because it is still the soup inside. You’re not making it dirty with anything.
The same with this thing. You’re not making it dirty with another ROM. You’re adding soup into your soup bowl. (That may be not exactly that, but well … )
Incoming Terms
- Error Flashing Zip Twrp
- Error Executing Updater Binary In Zip
- Solusi Error Executing Updater Binary In Zip
- Error Executing Updater Binary
- Error Executing Updater Binary In Zip Twrp
- Error Update Binary Twrp
- Error Update Binary In Zip
- Twrp Error Executing Updater Binary In Zip
- Error Executing Update Binary In Zip
- Error Executing Binary


Rinaldo Jonathan
Admin of this site.
Artis papan PCB. #zoneRinaldo #Controllerism
Studio Demon, Stage Angel, Sleepy Developer, Smoke free.
Kalkud SHS 2012, PCR G15.
View all posts by Rinaldo Jonathan
Архив 3 раза перекачал..
А помимо данного текста «E: Unable to open zip file.» никакой код ошибки не пишет, к примеру code 7 или 6? Если пишет то надо:
1. Иметь на ПК программу notepad ++ для редактирования текста в уникоде
2. Открыть архив с прошивкой не распаковывая его
3. Найти по пути META-INFcomgoogleandroid файл update-skript и открыть его используя notepad++
4. Удалить все первые строчки которые имеют что то наподобие данного текста проверки версии , у вас может конечно же отличаться
ui_print("lenovo debug WriteFullOTAPackage omit kitonw ...");getprop("ro.product.device") == "kiton" ||getprop("ro.product.device") == "kitonw" ||abort("Package expects build fingerprint of kiton or kitonw; this device has " + getprop("ro.product.device") + ".");getprop("ro.product.device") != "kitone" || abort("This package is for "omit kitonw and kiton" devices; this is a "" + getprop("ro.product.device") + "".");
5. Удалить их и сохранить
6. После того как закрыли редактор согласиться на изменение в архиве.
7. Закинуть получившийся архив с прошивкой в память телефона и попробовать установить заново, так же можно в рекавери отключить проверку подписи.
Отредактировал 13 ноября, 2014 master_lie
Tackle Error Executing Updater Binary In zip utilizing three basic ways. Fix Error Executing Updater Binary In zip through TWRP recuperation. Since Android is open-source, it is likely to
- alter the code,
- recompile,
- re-discharge,
it for various kinds of gadgets. Directly from the
- Operating framework
- the bit
- topic
- recuperation
- UI
each and everything can be effectively changed. Numerous outsider designers incorporate different custom ROMs and parts to experience a change in the appearance and execution of a gadget.
Contents
- 1 Stock firmware
- 2 Instructions to Fix Error Executing Updater Binary In Zip
- 3 Strategy 1: By Editing Updater-Script document
- 3.1 Downloads:
- 4 Technique:
- 5 Technique 2: By utilizing Flashify application
- 5.1 Downloads:
- 6 Procedure
- 7 Technique 3: By Factory Reset
Stock firmware
A shiny new Android gadget accompanies a preinstalled stock firmware. This stock ROM has restricted usefulness which can be improved uniquely by glimmering custom ROM. Along these lines, you can increase some additional highlights as well as improve your gadget execution. In any case, flashing any custom firmware is an unsafe procedure. A little botch during establishment can block your Android gadget. In this manner making it totally futile. For blazing any custom ROM or portion, you should have custom recuperation introduced on your gadget.
The two most well-known custom recuperations are ClockworkMod (CWM) and Team Win Recovery Project (TWRP). Both of these recuperations come stacked with highlights and are valuable for introducing outsider ROM or even stock Android picture. Anyway replacing the stock recuperation with custom voids your gadget guarantee. Once in awhile introducing a compress record through recuperation, a startling or undesirable mistake may happen, in this way bombing the blazing procedure.
On such occasions, it turns out to be extremely troublesome as you can’t restart your gadget due to cleaned parcels. The best way to escape this circumstance is to reestablish your past supported up ROM, or to streak any working ROM. Be that as it may, consider the possibility that you don’t have any working custom ROM or any reinforcement ROM. Try not to stress, as we at DroidThunder.com will manage you through our instructional exercise on the best way to fix blunder executing updater parallel in the zip.
When introducing certain custom ROMs. You can go over mistakes like Status 7 Error, Error: 7 or zip signature check fizzled. Error Executing Updater Binary in zipping and some more. For the most part, these mistakes are caused due to the updater content document which is available in your custom ROM. This record affirms your Android gadget model to check the similarity with the ROM. This fills in as a security system to avert glimmering against ROM on your gadget. In any case, some of the time you may experience these mistakes regardless of whether you have the right ROM for your gadget.

The explanation behind this is a code mistake in updater content made by the designer while arranging the ROM compress record. The answer to this issue is very straightforward yet at the same time numerous clients delay out when they experience such mistakes. You can fix these normal errors by utilizing our simple bit by bit instructional exercise is given below. To fix this issue, all you need is a PC and scarcely any product. That is it! You can even use your Android gadget in the event that you don’t have PC. Here in this text for fix error executing updater double in zip mistakes. We have recorded three techniques. Use any of the three strategies to take error executing updater parallel in zip mistake.
Strategy 1: By Editing Updater-Script document
Downloads:
Download WinRar.
Download Notepad++.
Technique:
Stage 1:
Download and introduce WinRar and Notepad++ on your PC.
Stage 2:
Copy the ROM compress document on your PC and fix it utilizing WinRar.


Stage 3:
After removing, you’ll discover Install, META-INF and System organizers alongside different documents.

Note: Files may contrast from appeared in the picture.
Stage 4:
Open the META-IN envelope.
Stage 5:
Then open the com organizer.

Stage 6:
Next, open the google organizer.
Stage 7:
Finally, open the android organizer.

Here, you’ll locate these two documents: update-paired and updater-content.
Stage 8:
Right mouse clicks on the updater-content document and select Edit with Notepad++ choice.

Stage 9:
Select the line beginning with ‘declare’ to the following semi-colon and erase it. Regularly this is the principal line or one of the primary lines at the highest point of the content record. Evacuate everything until the direction ‘mount’ is unmistakable.

Stage 10:
Now your first line will begin from the mount. Spare the record.
Stage 11:
Rezip/Re-pack every one of the records you’ve unfastened.

Note: Save it as .compress record and NOT .rar.
Stage 12:
Now duplicate this ROM.zip record on your gadget. Also, streak it through TWRP recuperation. Presently the ROM will be introduced effectively without giving Error Executing Updater Binary In Zip blunder.
Technique 2: By utilizing Flashify application
Downloads:
Download Flashify application.
Procedure
Stage 1:
Install the Flashify application from Google Play Store.

Stage 2:
Launch the application and give root permissions to the application.

Stage 3:
From the Flash tab, select Recovery picture choice.
Stage 4:
Then snap on the Download TWRP choice.

Stage 5:
A rundown of TWRP recovery will appear. Simply pick the most recent one.
Stage 6:
Click on Yup to start the glimmering of the most recent TWRP recuperation on your Android gadget.

After the establishment finishes, boot into TWRP and glimmer the ROM.zip document. This time the compressed document will be introduced effectively without giving Error Executing Updater Binary In Zip blunder.
Technique 3: By Factory Reset
Stage 1:
Boot your Android gadget into TWRP recuperation.
Stage 2:
Click on Wipe choice.

Stage 3:
Then swipe right to begin the industrial facility reset process.
Stage 4:
After the production line resetting your gadget, again select Wipe choice. And afterward, click on the Advanced Wipe alternative.
Stage 5: On the following screen, select just the dalvik store segment.
Note: Do not choose framework and information allotments.
Stage 6: Then swipe right to start the cleaning procedure.
After the cleaning finishes, streak the ROM.zip record and it’ll be introduced without giving Error Executing Updater Binary In Zip mistake.
Download Automatic Update Fix ZIP from our Downloads section. Click on this link to learn more.
OR you can try the manual method below which is very time consuming.
This is an issue that some Android users face when trying to flash a new custom ROM on their rooted Android smartphone. While flashing, the installation suddenly stops and you are presented with an error: E:Error executing updater binary in zip
> Solve Error Executing Updater Binary In Zip
So, what is the solution the error faced while executing the updater binary? Thankfully, the solution is very simple! The solution works for any Android smartphone and for any ROM.

> Solve Error Executing Updater Binary In Zip: Steps
If you are using TWRP:
- Advance Wipe > Wipe cache, data, system, dalvik partitions.
- Select ZIP file of your ROM and flash it.
- You will get
E:Error executing updater binary in zip(Don’t panic!) - Go to Reboot menu > Select Reboot to recovery.
- After rebooting in recovery, flash the ZIP file of the ROM again WITHOUT WIPING.
After doing the above steps, reboot your Android smartphone. Voila! Enjoy your new ROM. Sometimes, you will get the error despite following this tutorial. This could mean that your ROM was not downloaded properly.
I want to hear what your experiences are with this fix. Did it work for you?
Many of us have their hobbies to flash different Rom(s) available one by one depending on the mood, same as I do. But recently while flashing Miui v6 on Xiaomi Redmi 1s, it gave me this “Error executing updater binary in zip” error in the recovery while flashing as shown in the given image. Now after this error you can’t boot back obviously as you wiped everything before the flashing.
Lots of people misinterprets thinking that it is encountered because of the Rom they had downloaded & flashed on their devices might be the wrong one, but its not like that. I’ve seen this error mostly with the Team Win Recoveries(TWRPs) , so let me help you with this thing step by step that how you can avoid this error and get your device flashed properly.
So lets begin,
What all we need before flashing any Rom?
1. A complete nandroid backup of the Rom that was running on the device.
2. You can backup your Rom in the recovery under the ‘backup’ option. It will create a backup of your whole system on your external SD card.
3. If you failed to create the backup of the Rom or you don’t have the backup and the error occurred, then at least you should have the zip file of any working custom Rom of your device in the storage (external/internal).
Now lets suppose ‘Rom1‘ as the stock Rom(or any working custom Rom of your device) and ‘Rom2‘ will be the Rom that you flashed and got the error.
Our common steps for flashing any custom Rom(s) are,
Step 1:- Go to recovery.
Step 2:- Go to Wipe>>Advanced wipe.
Step 3:- Check data, system, cache & dalvik cache and then swipe to wipe all.
Step 4:- Then go to install zip from SD card and browse the Rom and install it.
Step 5:- Reboot the device.
Same as the above steps I flashed the Rom on the device and encountered the error in the recovery. So what I did to flash the Rom2 correctly after the error was,
Step 1:- I flashed the Rom1 again by the same methods followed above.
Step 2:- Then without following Step 2 & Step 3 (that is not wiping the data & system from the Advanced wipe).
Step 3:- I just only did the factory reset & the dalvik cache wipe instead, from the Wipe menu.
Step 4:- After that flashed the Rom2 which gave me the updater binary error before and it got flashed completely without the error.
Step 5:- Then I rebooted the device and it booted on the system successfully.
Update: You can just only hit the “Factory Reset” before flashing the ROM to pass the error instead.
Also make sure that you are using the latest version of TWRP recovery available for your respective devices.
That’s it, if still the error stays then maybe the issue will be of the ROM only what you are flashing, but this method worked for me. As complete system wipe sometimes leads to the flashing error. Still you are getting the error again and again then stay relaxed and comment below I will work for you and find the solution for your device asap when I’ll get time.
Good luck. Stay connected to tecHulk.
A Tech Geek who loves to write about WordPress blogging, How-To’s, and fixing errors. He founded techulk with the sole purpose of providing visitors the exact information they need with simple and step-by-step working explanations.
This tutorial is about Fix ‘Error Executing Updater Binary In Zip On Android’. Recently I updated this tutorial and will try my best so that you understand this guide. I hope you guys like this blog, Fix ‘Error Executing Updater Binary In Zip On Android’. If your answer is yes after reading the article, please share this article with your friends and family to support us.
Table of contents
Check Fix ‘Error Executing Updater Binary In Zip On Android’
Resolve error running Updater Binary In Zip using three simple strategies. Fix update process finished with status 7 error via TWRP recovery. Since Android is open source, it is possible to modify the code, recompile it and republish it for various types of devices. From the operating environment, the part, the theme, the recovery or the user interface, everything can be changed effortlessly. Some third-party developers compile different ROMs and custom parts to experience tweaking the look and feel of a device. A spic and span Android device accompanies the pre-installed stock firmware. This stock ROM has a restricted utility where you can simply work with a custom ROM.
How to fix error running updater binary in zip
While installing certain custom ROMs, you may encounter errors like Status Error 7, Error: 7 or zip signature verification failed, Error executing updater binary in Zip and many more. Generally, these errors are caused by the update script file that is present in your custom ROM. This file confirms the model of your Android device to check for ROM compatibility. This works as a security mechanism to prevent flashing incompatible ROMs on your device. But sometimes you may encounter these errors even if you have the correct ROM for your device.
The reason for this is a code error in the update script created by the developer when building the ROM zip file. The solution to this problem is quite simple, but still many users get stuck when they encounter these kinds of errors. You can fix these common errors using our easy step-by-step tutorial provided below. To fix this problem, all you need is a computer and some software. That’s it! You can even use your Android device if you don’t have a PC. Here in this guide to fix error running updater binary on zip errors, we have listed three methods. Please refer to any of the three methods to resolve the error executing the updater binary in the zip error.
Editing the Updater-Script file
In this method, we will edit and update the Updater-Script file present in the zip package file. Let’s go straight to that.
downloads
winrar
Notepad++
Steps to fix error running updater binary in zip
- Download and install WinRar and Notepad++ on your computer.
- Copy the ROM zip file to your computer and extract it using WinRar.
- After extracting, you will find the Install, META-INF and System folders along with other files.
- Open the META-IN folder.
- Then open the folder com.
- Next, open the Google folder.
- Finally, open the android folder.
- Here you will find these two files: update-binary and updater-script.
- Right-click the update script file and select the Edit with Notepad++ option.
- Select the line starting with ‘assert’ up to the next semicolon and delete it.
- Typically this is the first line or one of the first lines at the top of the text file.
- Delete everything until the ‘mount’ command is visible.
- Now your first line will start from mount. Save the file.
- Recompress/Recompress all the files you have uncompressed.
- Now copy this ROM.zip file to your device. And flash it via TWRP recovery. Now the ROM will install successfully without any error running the updater binary in Zip.
By using the Flashify app
In this second method, we will use the Flashify app and install the latest TWRP custom recovery.
downloads
flashify application
Steps to fix error running updater binary in zip
- Install the Flashify app from the Google Play Store.
- Launch the app and give root permissions to the app.
- On the Flash tab, select the Recovery Image option.
- Then click on the Download TWRP option.
- A list of TWRP recoveries will be displayed. Just pick the last one.
- Click Yes to start flashing the latest TWRP recovery on your Android device.
- After the installation is complete, boot TWRP and flash the ROM.zip file. This time, the zip file will install successfully without an error running the zipped updater binary.
Factory reset
In this method, we will use TWRP recovery and perform a factory reset and wipe Dalvik cache. Let’s go straight to that.
Steps to fix error running updater binary in zip
- Boot your Android device into TWRP recovery.
- Click on the Delete option.
- Then swipe right to start the factory reset process.
- After resetting your device to factory settings, select the Wipe option again. And then click Advanced Wipe option.
- On the next screen, select only the Dalvik cache partition.
- Then swipe right to start the cleaning process.
- After the cleanup is complete, flash the ROM.zip file and it will install without giving the Error executing zip binary updater error.
Final remarks: Fix ‘Error Executing Updater Binary In Zip On Android’
I hope you understand this article, Fix ‘Error Executing Updater Binary In Zip On Android’. If your answer is no, you can ask anything via the contact forum section related to this article. And if your answer is yes, please share this article with your friends and family to give us your support.
James Hogan
James Hogan is a senior staff writer at Bollyinside, where he has been covering various topics, including laptops, gaming gear, keyboards, storage, and more. During that period, they evaluated hundreds of laptops and thousands of accessories and built a collection of entirely too many mechanical keyboards for their own use.