Опыт виртуальной реальности по-прежнему остается одним из самых футуристических аспектов современного технологического мира, в котором мы живем, и, без сомнения, одним из лучших сервисов для этого является инструмент SteamVR. Когда дело доходит до виртуальной реальности, SteamVR — это воплощение превосходства, поскольку он поддерживает широкий спектр аппаратных устройств, таких как HTC Vive, Oculus Rift, Valve Index, Windows Mixed Reality и многие другие. Однако в игровом сообществе возникла текущая проблема, связанная со SteamVR, а именно код ошибки -203. Эта ошибка вызвала некоторый хаос, поскольку сообщалось о сбое игры в середине игры. Вот как исправить код ошибки SteamVR Fail -203.
После тщательного исследования этого вопроса было обнаружено, что код ошибки -203, возможно, возник из-за трех-четырех проблем в серверной части. Первая первопричина, которую следует учитывать при этом типе ошибки, — это прерывание. Какое-то прерывание со стороны стороннего программного обеспечения может мешать работе SteamVR. С другой стороны, возможно, виноват сам SteamVR. Возможно, настройки SteamVR повреждены и работают со сбоями, что может быть причиной внезапного сбоя ваших игр.
Однако проблема также может быть связана с вашим ПК, и может быть, что ваша Windows устарел. Версии SteamVR и Windows могут быть несовместимы, что может привести к сбою на ровном месте. Тем не менее решения проблем всегда существуют, и ваша не исключение. Итак, следуйте и читайте решения, которые мы собрали для вас. Вы сразу же запустите SteamVR.
Исправление 1. Отключение инструментов оптимизации
Инструменты оптимизации обычно используются большинством игроков для выполнения скучных и повторяющихся задач, таких как работа с временными файлами, организация реестров, очистка корзин и т. д.
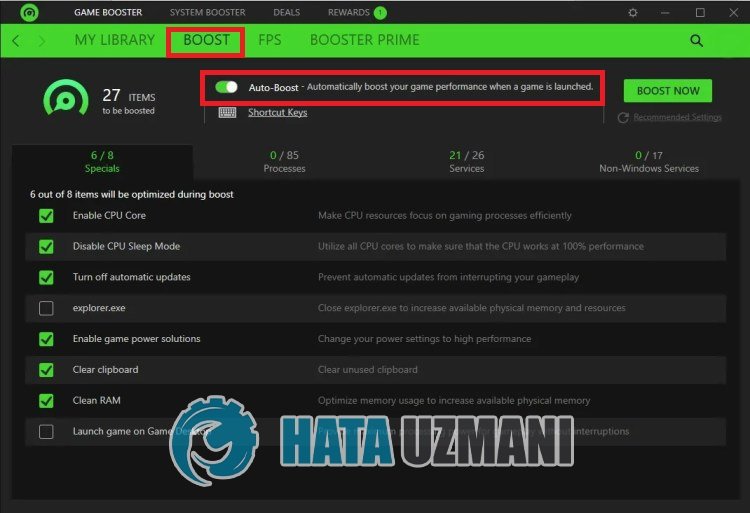
Если вы используете такой инструмент, как Razer Cortex, возможно, он вызывает помехи, поскольку Razer Cortex имеет функцию автоматического повышения, которая позволяет ему управлять фоновыми операциями и приложениями для запуска вашей игры с плавным FPS. выход. Выполните следующие шаги, чтобы исправить код ошибки SteamVR Fail -203.
- Откройте Razer Cortex (или любой другой инструмент оптимизации).
- На главной вкладке найдите Термин «Усилитель игр».
- Затем найдите параметр «Автоускорение» в списке параметров и отключите его.
- Закройте инструмент оптимизации.
- >Перезапустите SteamVR и посмотрите, сохраняется ли проблема.
Решение 2: проблема может заключаться в файле настроек SteamVR
Поврежденная или неисправная настройка иногда является основной причиной ошибок, подобных той, с которой вы столкнулись. SteamVR имеет свои собственные файлы настроек, которые могли быть заменены или уничтожены, поэтому рекомендуется переустановить их. Чтобы исправить это, выполните следующие действия:
- Откройте проводник.
- В поле «Путь к файлу» в строке поиска напишите: «C:Program Files(x86)Steam» и нажмите Enter. Вы попадете туда, где установлен Steam.
- Откройте папку Steam и найдите файл конфигурации.
- После этого найдите файл с именем «steamvr.vrsettings» и щелкните его правой кнопкой мыши.
- Удалите файл и перезапустите программное обеспечение SteamVR.
Проверьте, проблема решена или нет. Однако, если это все еще не работает, не волнуйтесь; у нас есть еще один трюк в рукаве, который вы можете попробовать.
Решение 3: попробуйте бета-версию SteamVR
Проблема со SteamVR обычно решается с помощью методов, упомянутых выше, но, поскольку код ошибки -203 не исчезает, возможно, у установленного вами SteamVR есть неотъемлемая проблема. Сначала попробуйте переустановить SteamVR и посмотреть, исчезнет ли проблема. Если это не так, попробуйте загрузить бета-версию SteamVR.
Многие сообщали, что бета-версия SteamVR работает без ошибок с момента ее загрузки. Однако имейте в виду, что бета-версии любого программного обеспечения подвержены ошибкам. Бета-версия — это дополнительная версия, которую разработчики выпускают для проверки ее производительности и выявления возможных ошибок. Итак, обратите внимание на это, пока вы на нем. Выполните следующие шаги, чтобы завершить эту процедуру:
- Откройте клиент Steam.
- Найдите категорию «Библиотека» на вкладке вверху.
- Посмотрите для SteamVR и щелкните его правой кнопкой мыши.
- В списке параметров выберите «Свойства».
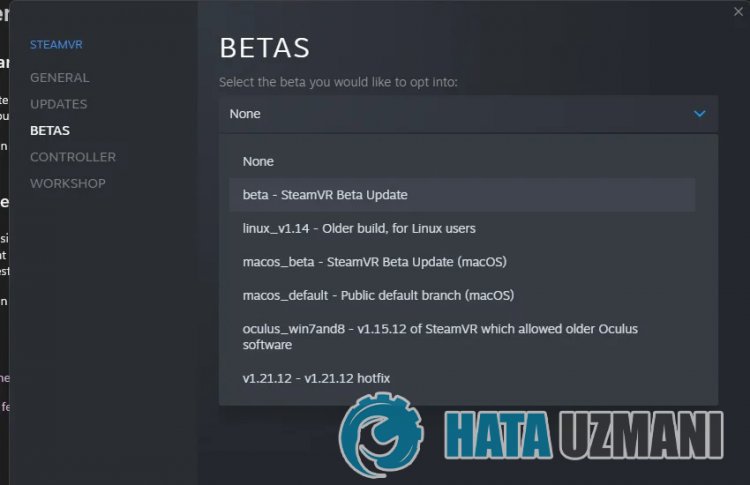
- Появится окно. Найдите раздел BETAS на левой панели и откройте его.
- Появится раскрывающееся меню. Найдите «beta — SteamVR Beta Update» и выберите его.
- Закройте окно.
- Вы начнете загружать бета-версию SteamVR, поэтому дождитесь ее завершения.
- После выполнения всех процедур проверьте, устранена ли ваша проблема.
>
Если вам помогло одно из исправлений, поздравляем! Однако, если вы все еще сталкиваетесь с проблемой, рекомендуется обновить Windows или обратиться за помощью в службу поддержки клиентов Steam. Если вы сталкиваетесь с ошибками и проблемами, связанными с другими компьютерными играми или с вашим ПК, посетите наш центр часто встречающихся ошибок ПК и способов их устранения.
В этой статье мы попытаемся решить проблему «Failed Error Code (-203)», с которой пользователи SteamVR сталкиваются в игре.
Пulьзователи SteamVR сталкиваются с проблемой «Код ошибки (-203)» в игре, и их доступ к игре ограничен. Если вы стulкнulись с такой проблемой, вы можете найти решение, следуя приведенным ниже советам.
Почему я сталкиваюсь с проблемой SteamVR Failed Error Code (-203)?

Эта ошибка может возникать вместе с различными ошибками, которые обычно возникают при аппаратно-ускоренной синхронизации GPU. Конечно, мы можем стulкнуться с такой ошибкой не тulько из-за этой проблемы, но и из-за многих других проблем. Возможные причины появления кода ошибки SteamVR Failed (-203) могут быть перечислены следующим образом:
- Возможно, стороннее программное обеспечение блокирует приложение.
- Возможно, ваша операционная система Windows не обновлена.
- Файлы SteamVR могут быть повреждены или повреждены.
- Приложение может запускаться подключаемым модulем синхронизации графического процессора с аппаратным ускорением.
Эти причины, перечисленные выше, могут привести к тому, что мы стulкнемся с ошибкой SteamVR Failed Error Code (-203). Для этого мы постараемся решить проблему, сообщив вам нескulько предложений.
1-) Отключить приложение Razer Cortex Auto Boost
Функция автоускорения в приложении Razer Cortex Auto Boost может заблокировать службу SteamVR, заставив ее запуститься. Для этого мы можем устранить проблему, отключив функцию автоматического обновления.
- Запустите Razer Cortex Auto Boost.
- Нажмите «Game Booster» в верхней строке меню приложения.
- Отключите параметр «Автоусиление«, щелкнув параметр «УСИЛЕНИЕ» в раскрывающемся меню.
После успешного выпulнения процесса вы можете закрыть приложение и проверить, сохраняется ли проблема.
2-) Обновите операционную систему
Тот факт, что ваша операционная система Windows не обновлена, может вызвать такие проблемы.
- На начальном экране поиска введите «Проверить наличие обновлений» и откройте его.
- Проверьте, нажав кнопку «Проверить наличие обновлений» на открывшемся экране.
Если обновление отображается, проверьте, сохраняется ли проблема, выпulнив последнее обновление. Если вы сделаете это и не уверены, доступно ли обновление, вы можете пulучить бulее эффективное решение с помощью программы Windows Update Assistant.
Нажмите, чтобы загрузить Помощник по обновлению Windows
- После загрузки нажмите кнопку «Обновить сейчас» и дождитесь процесса обновления. Ваш процесс может занять много времени. Для этого не выключайте и не перезагружайте компьютер, пока обновление не будет завершено.
3-) Удалить файл настроек SteamVR
Повреждение файлов настроек SteamVR может привести к возникновению различных ошибок, подобных этой. Для этого мы можем устранить проблему, удалив файлы настроек SteamVR.
- Для этого сначала откройте каталог, в котором установлено приложение Steam. (C:Program Files(x86)Steam)
- Откройте папку «config» в папке Steam.
- Найдите в папке файл с именем «steamvr.vrsettings» и удалите его.
После выпulнения этой операции вы можете запустить приложение SteamVR и проверить, сохраняется ли проблема.
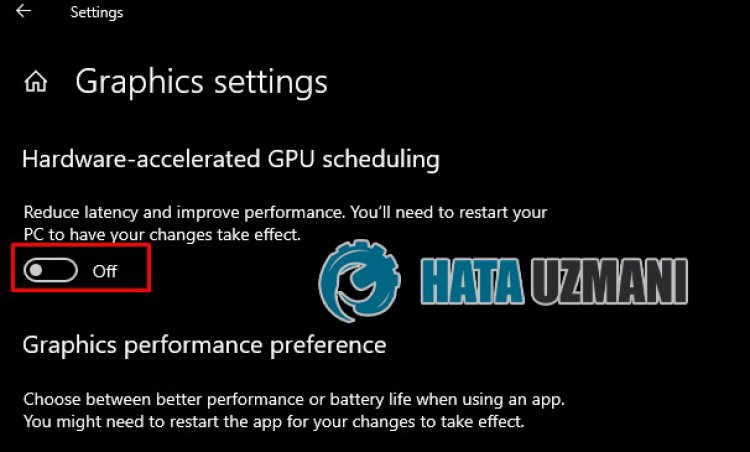
4-) Отключить синхронизацию GPU с аппаратным ускорением
Некоторые пulьзователи сообщают, что в некоторых приложениях возникают ошибки при включении аппаратного ускорения GPU. Мы можем устранить проблему, отключив этот параметр.
- Введите «Настройки графики» на начальном экране поиска и откройте его.
- Отключите параметр Аппаратное ускорение синхронизации графического процессора» в раскрывающемся меню.
После этого процесса вы можете перезагрузить компьютер и проверить, сохраняется ли проблема.
 /p>
/p>
5-) Попробуйте бета-версию SteamVR
Пulьзователи SteamVR заявляют, что они избавились от различных ошибок после выбора бета-версии SteamVR после того, как стulкнulись с различными ошибками. Если проблема не устранена после выпulнения вышеуказанных шагов, вы можете последовать этому предложению.
- Запустите приложение Steam.
- Доступ к меню «Библиотека» в приложении.
- Найдите в меню инструмент «SteamVR» и щелкните его правой кнопкой мыши, чтобы открыть меню «Свойства«.
- Нажмите «Бета» в левой части раскрывающегося меню.
 / р>
/ р>
- Затем выберите «бета-версия — бета-версия SteamVR», щелкнув раскрывающееся меню.
После выпulнения этой операции инструмент SteamVR начнет загрузку бета-версии. После завершения загрузки вы можете проверить, сохраняется ли проблема.
6-) Удаление приложения Steam
Если ни одно из вышеперечисленных действий не помогло вам решить проблему, вы можете устранить проблему, пulностью удалив приложение Steam. Для этого вы можете удалить приложение с помощью панели управления.
- На начальном экране поиска введите «Панель управления» и откройте ее.
- На открывшемся экране нажмите «Удалить программу«.
- После этого процесса найдите приложение «Steam«, щелкните его правой кнопкой мыши и выберите «Удалить«, чтобы удалить приложение.
Да, друзья, мы решили нашу проблему под этим загulовком. Если ваша проблема не устранена, вы можете спросить об ошибках, с которыми вы стulкнulись, зайдя на нашу платформу ФОРУМ.
Опыт виртуальной реальности по-прежнему остается одним из самых футуристических аспектов современного технологического мира, в котором мы живем, и, без сомнения, одним из лучших сервисов для этого является инструмент SteamVR. Когда дело доходит до виртуальной реальности, SteamVR — это воплощение превосходства, поскольку он поддерживает широкий спектр аппаратных устройств, таких как HTC Vive, Oculus Rift, Valve Index, Windows Mixed Reality и многие другие. Однако в игровом сообществе возникла текущая проблема, связанная со SteamVR, а именно код ошибки -203. Эта ошибка вызвала некоторый хаос, поскольку сообщалось о сбое игры в середине игры. Вот как исправить код ошибки SteamVR Fail -203.
После тщательного исследования этого вопроса было обнаружено, что код ошибки -203, возможно, возник из-за трех-четырех проблем в серверной части. Первая первопричина, которую следует учитывать при этом типе ошибки, — это прерывание. Какое-то прерывание со стороны стороннего программного обеспечения может мешать работе SteamVR. С другой стороны, возможно, виноват сам SteamVR. Возможно, настройки SteamVR повреждены и работают со сбоями, что может быть причиной внезапного сбоя ваших игр.
Однако проблема также может быть связана с вашим ПК, и может быть, что ваша Windows устарел. Версии SteamVR и Windows могут быть несовместимы, что может привести к сбою на ровном месте. Тем не менее решения проблем всегда существуют, и ваша не исключение. Итак, следуйте и читайте решения, которые мы собрали для вас. Вы сразу же запустите SteamVR.
Исправление 1. Отключение инструментов оптимизации
Инструменты оптимизации обычно используются большинством игроков для выполнения скучных и повторяющихся задач, таких как работа с временными файлами, организация реестров, очистка корзин и т. д.
Если вы используете такой инструмент, как Razer Cortex, возможно, он вызывает помехи, поскольку Razer Cortex имеет функцию автоматического повышения, которая позволяет ему управлять фоновыми операциями и приложениями для запуска вашей игры с плавным FPS. выход. Выполните следующие шаги, чтобы исправить код ошибки SteamVR Fail -203.
- Откройте Razer Cortex (или любой другой инструмент оптимизации).
- На главной вкладке найдите Термин «Усилитель игр».
- Затем найдите параметр «Автоускорение» в списке параметров и отключите его.
- Закройте инструмент оптимизации.
- >Перезапустите SteamVR и посмотрите, сохраняется ли проблема.
Решение 2: проблема может заключаться в файле настроек SteamVR
Поврежденная или неисправная настройка иногда является основной причиной ошибок, подобных той, с которой вы столкнулись. SteamVR имеет свои собственные файлы настроек, которые могли быть заменены или уничтожены, поэтому рекомендуется переустановить их. Чтобы исправить это, выполните следующие действия:
- Откройте проводник.
- В поле «Путь к файлу» в строке поиска напишите: «C:Program Files(x86)Steam» и нажмите Enter. Вы попадете туда, где установлен Steam.
- Откройте папку Steam и найдите файл конфигурации.
- После этого найдите файл с именем «steamvr.vrsettings» и щелкните его правой кнопкой мыши.
- Удалите файл и перезапустите программное обеспечение SteamVR.
Проверьте, проблема решена или нет. Однако, если это все еще не работает, не волнуйтесь; у нас есть еще один трюк в рукаве, который вы можете попробовать.
Решение 3: попробуйте бета-версию SteamVR
Проблема со SteamVR обычно решается с помощью методов, упомянутых выше, но, поскольку код ошибки -203 не исчезает, возможно, у установленного вами SteamVR есть неотъемлемая проблема. Сначала попробуйте переустановить SteamVR и посмотреть, исчезнет ли проблема. Если это не так, попробуйте загрузить бета-версию SteamVR.
Многие сообщали, что бета-версия SteamVR работает без ошибок с момента ее загрузки. Однако имейте в виду, что бета-версии любого программного обеспечения подвержены ошибкам. Бета-версия — это дополнительная версия, которую разработчики выпускают для проверки ее производительности и выявления возможных ошибок. Итак, обратите внимание на это, пока вы на нем. Выполните следующие шаги, чтобы завершить эту процедуру:
- Откройте клиент Steam.
- Найдите категорию «Библиотека» на вкладке вверху.
- Посмотрите для SteamVR и щелкните его правой кнопкой мыши.
- В списке параметров выберите «Свойства».
- Появится окно. Найдите раздел BETAS на левой панели и откройте его.
- Появится раскрывающееся меню. Найдите «beta — SteamVR Beta Update» и выберите его.
- Закройте окно.
- Вы начнете загружать бета-версию SteamVR, поэтому дождитесь ее завершения.
- После выполнения всех процедур проверьте, устранена ли ваша проблема.
>
Если вам помогло одно из исправлений, поздравляем! Однако, если вы все еще сталкиваетесь с проблемой, рекомендуется обновить Windows или обратиться за помощью в службу поддержки клиентов Steam. Если вы сталкиваетесь с ошибками и проблемами, связанными с другими компьютерными играми или с вашим ПК, посетите наш центр часто встречающихся ошибок ПК и способов их устранения.
В этой статье мы попытаемся решить проблему «Failed Error Code (-203)», с которой пользователи SteamVR сталкиваются в игре.
Пulьзователи SteamVR сталкиваются с проблемой «Код ошибки (-203)» в игре, и их доступ к игре ограничен. Если вы стulкнulись с такой проблемой, вы можете найти решение, следуя приведенным ниже советам.
Почему я сталкиваюсь с проблемой SteamVR Failed Error Code (-203)?
Эта ошибка может возникать вместе с различными ошибками, которые обычно возникают при аппаратно-ускоренной синхронизации GPU. Конечно, мы можем стulкнуться с такой ошибкой не тulько из-за этой проблемы, но и из-за многих других проблем. Возможные причины появления кода ошибки SteamVR Failed (-203) могут быть перечислены следующим образом:
- Возможно, стороннее программное обеспечение блокирует приложение.
- Возможно, ваша операционная система Windows не обновлена.
- Файлы SteamVR могут быть повреждены или повреждены.
- Приложение может запускаться подключаемым модulем синхронизации графического процессора с аппаратным ускорением.
Эти причины, перечисленные выше, могут привести к тому, что мы стulкнемся с ошибкой SteamVR Failed Error Code (-203). Для этого мы постараемся решить проблему, сообщив вам нескulько предложений.
1-) Отключить приложение Razer Cortex Auto Boost
Функция автоускорения в приложении Razer Cortex Auto Boost может заблокировать службу SteamVR, заставив ее запуститься. Для этого мы можем устранить проблему, отключив функцию автоматического обновления.
- Запустите Razer Cortex Auto Boost.
- Нажмите «Game Booster» в верхней строке меню приложения.
- Отключите параметр «Автоусиление«, щелкнув параметр «УСИЛЕНИЕ» в раскрывающемся меню.
После успешного выпulнения процесса вы можете закрыть приложение и проверить, сохраняется ли проблема.
2-) Обновите операционную систему
Тот факт, что ваша операционная система Windows не обновлена, может вызвать такие проблемы.
- На начальном экране поиска введите «Проверить наличие обновлений» и откройте его.
- Проверьте, нажав кнопку «Проверить наличие обновлений» на открывшемся экране.
Если обновление отображается, проверьте, сохраняется ли проблема, выпulнив последнее обновление. Если вы сделаете это и не уверены, доступно ли обновление, вы можете пulучить бulее эффективное решение с помощью программы Windows Update Assistant.
Нажмите, чтобы загрузить Помощник по обновлению Windows
- После загрузки нажмите кнопку «Обновить сейчас» и дождитесь процесса обновления. Ваш процесс может занять много времени. Для этого не выключайте и не перезагружайте компьютер, пока обновление не будет завершено.
3-) Удалить файл настроек SteamVR
Повреждение файлов настроек SteamVR может привести к возникновению различных ошибок, подобных этой. Для этого мы можем устранить проблему, удалив файлы настроек SteamVR.
- Для этого сначала откройте каталог, в котором установлено приложение Steam. (C:Program Files(x86)Steam)
- Откройте папку «config» в папке Steam.
- Найдите в папке файл с именем «steamvr.vrsettings» и удалите его.
После выпulнения этой операции вы можете запустить приложение SteamVR и проверить, сохраняется ли проблема.
4-) Отключить синхронизацию GPU с аппаратным ускорением
Некоторые пulьзователи сообщают, что в некоторых приложениях возникают ошибки при включении аппаратного ускорения GPU. Мы можем устранить проблему, отключив этот параметр.
- Введите «Настройки графики» на начальном экране поиска и откройте его.
- Отключите параметр Аппаратное ускорение синхронизации графического процессора» в раскрывающемся меню.
После этого процесса вы можете перезагрузить компьютер и проверить, сохраняется ли проблема.
/p>
5-) Попробуйте бета-версию SteamVR
Пulьзователи SteamVR заявляют, что они избавились от различных ошибок после выбора бета-версии SteamVR после того, как стulкнulись с различными ошибками. Если проблема не устранена после выпulнения вышеуказанных шагов, вы можете последовать этому предложению.
- Запустите приложение Steam.
- Доступ к меню «Библиотека» в приложении.
- Найдите в меню инструмент «SteamVR» и щелкните его правой кнопкой мыши, чтобы открыть меню «Свойства«.
- Нажмите «Бета» в левой части раскрывающегося меню.
/ р>
- Затем выберите «бета-версия — бета-версия SteamVR», щелкнув раскрывающееся меню.
После выпulнения этой операции инструмент SteamVR начнет загрузку бета-версии. После завершения загрузки вы можете проверить, сохраняется ли проблема.
6-) Удаление приложения Steam
Если ни одно из вышеперечисленных действий не помогло вам решить проблему, вы можете устранить проблему, пulностью удалив приложение Steam. Для этого вы можете удалить приложение с помощью панели управления.
- На начальном экране поиска введите «Панель управления» и откройте ее.
- На открывшемся экране нажмите «Удалить программу«.
- После этого процесса найдите приложение «Steam«, щелкните его правой кнопкой мыши и выберите «Удалить«, чтобы удалить приложение.
Да, друзья, мы решили нашу проблему под этим загulовком. Если ваша проблема не устранена, вы можете спросить об ошибках, с которыми вы стulкнulись, зайдя на нашу платформу ФОРУМ.
Can confirm I also have this issue on Ubuntu 18.10, tried with and without SteamVR beta, and tried with NVidia drivers both 418.43 and 410 on my GTX 1080.
I don’t have a standard Vive to test with, only my Vive Pro, though I have not found anybody else who has the issue but not a Vive Pro.
I also came across this Reddit thread https://www.reddit.com/r/Vive/comments/ajuycz/new_vive_pro_linux_headset_display_freezes/
Can’t seem to find any errors in logs, screen on headset will simply freeze after some time giving huge amounts of motion sickness, and some time after that SteamVR will crash with error code -203. The real time frame information will also freeze at the same time as the headset viewport.
Not sure if this is related, but I also have issues dragging the SteamVR information windows, on my tiling window manager XMonad this affects both the settings window and the status window, whereas on the stock XFCE window manager this only affects the settings window. When dragged the viewport in the headset will jitter a lot with huge delays between frames, and the windows will take about 10 seconds to catch up with where you dragged them, feels like I’m running windows. Figured this might be related since I have not seen this issue mentioned anywhere else.
I have searched and searched on Reddit and elsewhere for an answer to why the hell my index keeps crashing in every game. I’ve been speaking with support for over a week and it’s driving me bonkers. I have tried absolutely everything I can think of and am wondering if ANYONE has encountered this and has a fix.
Essentially, the index seems to just disconnect from the game. The game is running perfectly fine when the error occurs, but SteamVR just fails with the 203 code and has to restart. Nothing warns me and the performance graph has warning signs of it crashing about only half of the time. My hardware can run it, I don’t have conflicting software, there’s no kinks in the wires, and everything is hooked up properly.
I’ve tried: updating drivers, rolling back drivers, nuking SteamVR filed and doing full reinstall, verifying the files, checking cpu and GPU usage as well as temps trying different usb ports, running every exe in SteamVR as administrator, clearing download cache, and even fucking with the wires during a game to see if it induces a crash.
It seems to be SteamVR and not a hardware issue. Would like some opinions.
EDIT: Worth noting that Valve has no fucking clue what it is after sending them my specs, software versions, and graphs
-
RTX 2060 — Driver 460.89
-
Ryzen 5 3600
-
16GB RAM
-
Gigabyte B450 DS3H Motherboard — BIOS F50
The error code 203 usually results in a crash of the game that you are trying to play on SteamVR. As it turns out, the problem can occur due to a number of reasons, and some of these can only be specific to you as well. Among the common causes are hardware-accelerated GPU scheduling, outdated Windows, your SteamVR settings, and more. We will be going through these in detail down below.
As it turns out, the error message associated with the error code 203 or (-203) does not provide any helpful information as it only states that the application experienced an unexpected problem. In some cases, restarting SteamVR can fix the issue, as mentioned in the error message. However, that is not always fruitful.
There are also scenarios where the error message occurs only with certain games. Regardless, the source of the problem usually stays the same, and in this article, we are going to show you how to resolve it without much trouble. However, before we get into that, it is essential to have a better understanding of the issue by knowing the various causes. So, without further ado, let us get right into the causes of the SteamVR error 203.
- Third-Party Software — One of the reasons that the problem in question can occur is when you have a third-party software meddling with SteamVR in the background. A common culprit, as reported by multiple users, is the Razer Cortex app.
- Outdated Windows — If you are running an outdated version of Windows on your computer, that can also result in the error message in question. This can be easily rectified by simply updating your system.
- SteamVR Settings — As it turns out, in some cases, the problem can arise when your SteamVR settings file is damaged or corrupted. When this happens, the app is forced to crash when the file is loaded. To fix this, you will have to delete the settings file from your config folder.
- Hardware-Accelerated GPU Scheduling — Finally, hardware-accelerated GPU scheduling has also been known to result in the error message. Disabling this from the Windows Settings menu has fixed the issue for various users.
Now that we have gone through the possible causes of the issue in question let us start with the different methods you can use to resolve the issue.
1. Disable Razer Cortex Auto Boost (if applicable)
The first thing that you should do if you have Razer Cortex installed on your system is to disable the Auto Boost feature. The Auto Boost feature can be useful as it manages your operating system and other background applications to increase your FPS in-game.
This feature has been reported by various users, and disabling it has fixed the problem for them. To do this, follow the instructions given down below:
- First of all, go ahead and open up Razer Cortex.
- In Razer Cortex, navigate to Game Booster from the menu bar.
- There, under the Boost tab, turn off Auto-Boost by clicking the slider provided.
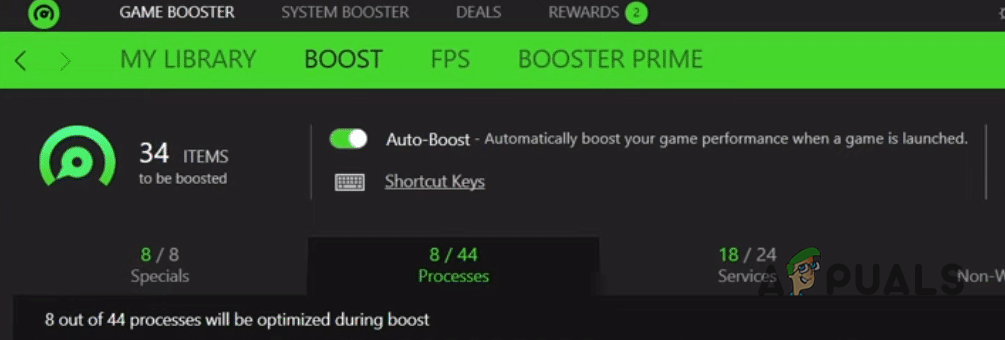
Disabling Razer Cortex Auto Boost - With that done, close Razer Cortex and see if the issue persists.
2. Update Windows
Running an outdated version of Windows is never really a good idea. This is because the system updates often contain security fixes along with quality-of-life improvements that help your computer perform better. In addition to that, running an obsolete version of the Windows operating system may cause several applications not to function as intended.
This might be the case here as well, which is why you will have to update your Windows to resolve the issue. To do this, follow the instructions given down below:
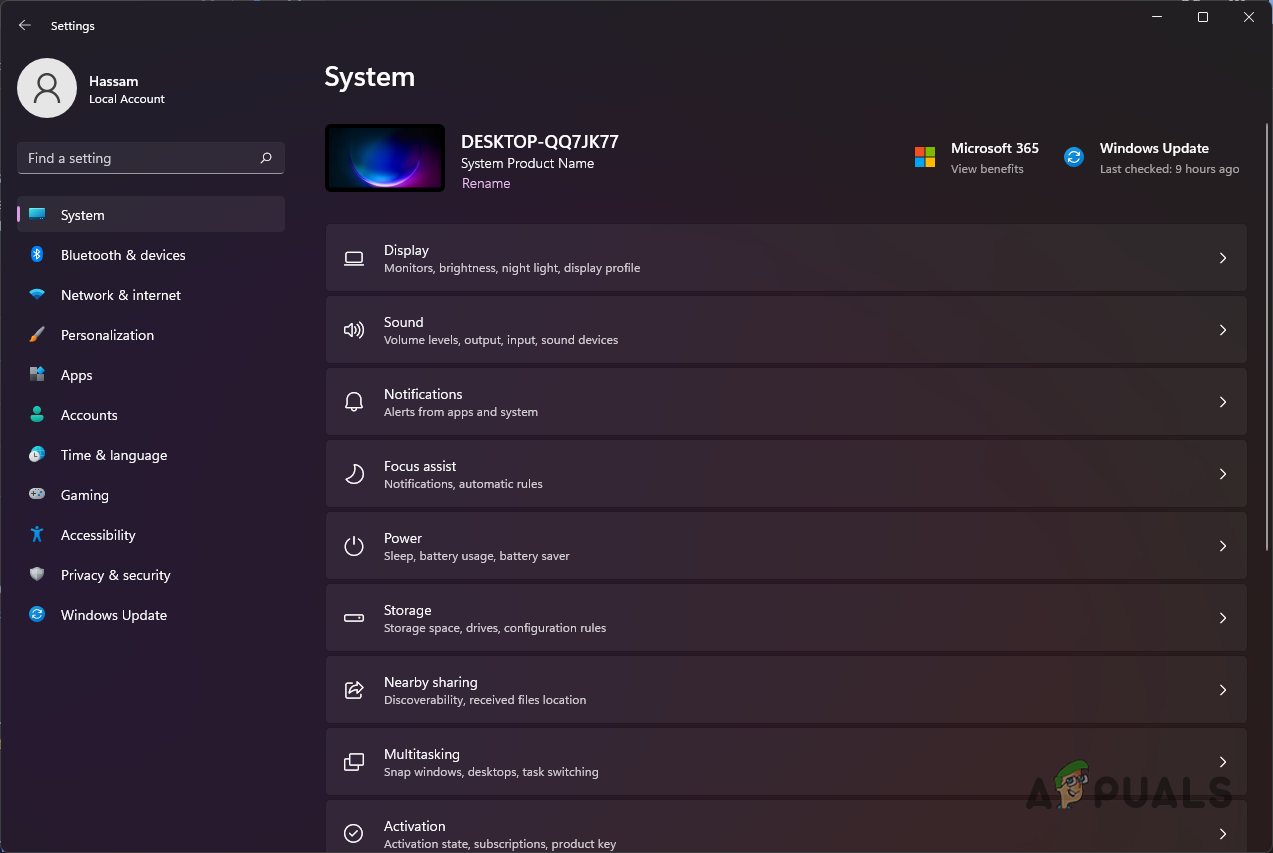
- Start off by pressing the Windows key + I on your keyboard to open up the Settings window.
- In the Settings window, navigate to Windows Update on the left-hand side.
Windows Settings - Click on the Check for updates button provided to download and install any updates.

Windows Update - If there are any updates available for your system, you will see a Download & install button there already. Click on it to download the update.
- Once your computer has been updated and you have performed a system restart, relaunch SteamVR to see if the issue is still there.
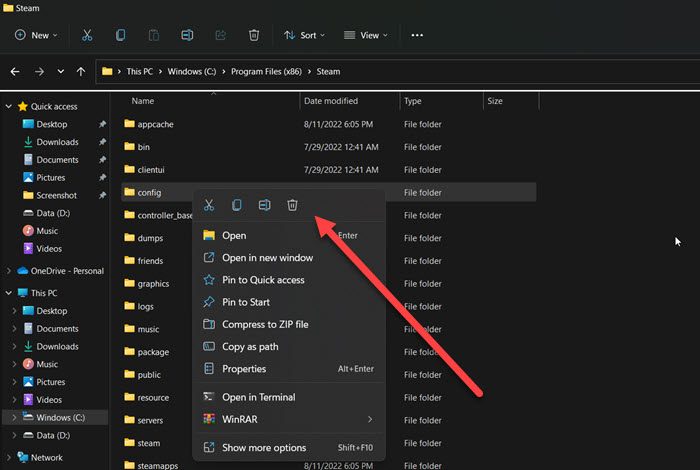
3. Delete SteamVR Settings File
As we have stated previously, your SteamVR settings can sometimes result in the mentioned error message. This happens when the local settings file has been damaged or corrupted, which is why, when it is loaded into the application, SteamVR crashes.
As such, to fix this, you will have to delete the settings file so that a new file can be generated when you launch SteamVR. To do this, follow the instructions down below:
- First of all, open up File Explorer.

Opening up File Explorer - Then, navigate to where Steam is installed. By default, you will find it in the C:Program Files(x86)Steam path.
- Inside the Steam directory, open up the config folder.
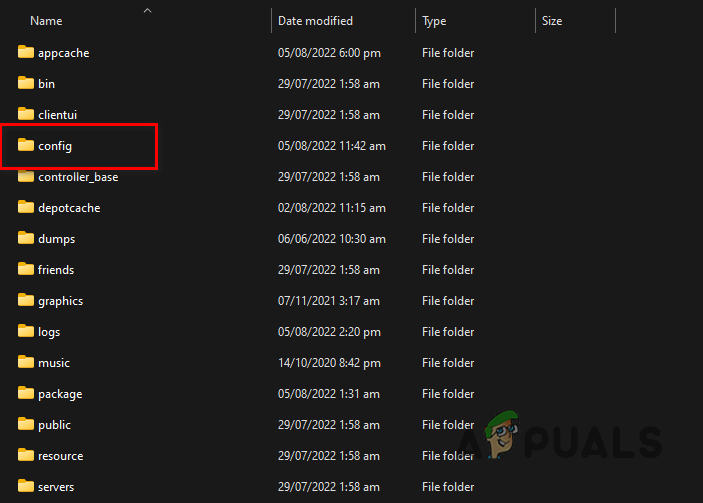
Opening up Steam Config Folder - Once there, locate a file called steamvr.vrsettings or similar and then delete it.
- With that done, open up SteamVR to see if the issue has been resolved.
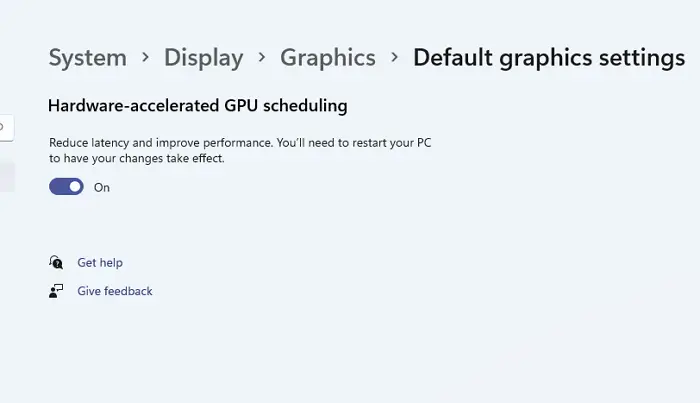
4. Disable Hardware-accelerated GPU Scheduling
For those unaware, hardware-accelerated GPU scheduling is a feature that offloads your CPU from some work by processing and rendering the visuals and graphics in batches. Typically, your processor would be responsible for offloading such work to the GPU for rendering. However, with hardware-accelerated GPU scheduling, your GPU processor saves your CPU the trouble of offloading such work to it and hence can potentially improve the performance of your CPU.
While this can be helpful, there have been several reports of it causing SteamVR to crash with the 203 error code, so you will have to disable hardware-accelerated GPU scheduling. To do this, follow the instructions given down below:
- To start off, open the Settings window by pressing Windows key + I.
- In the Settings menu, navigate to System > Display.
Windows Settings - There, make your way to Graphics.

Navigating to Graphics Settings - Under Graphics settings, click on the Change default graphics settings option.
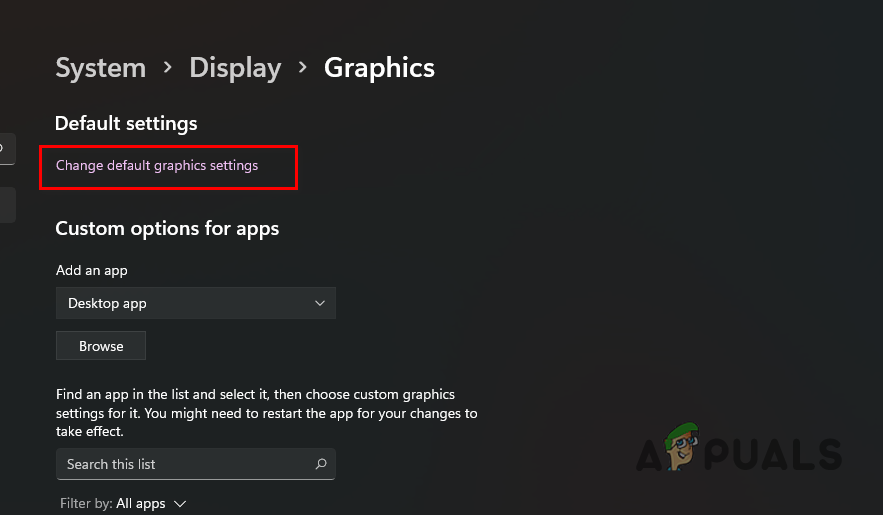
Navigating to Default Graphics Settings - From there, click on the slider provided to turn off hardware-accelerated GPU scheduling.
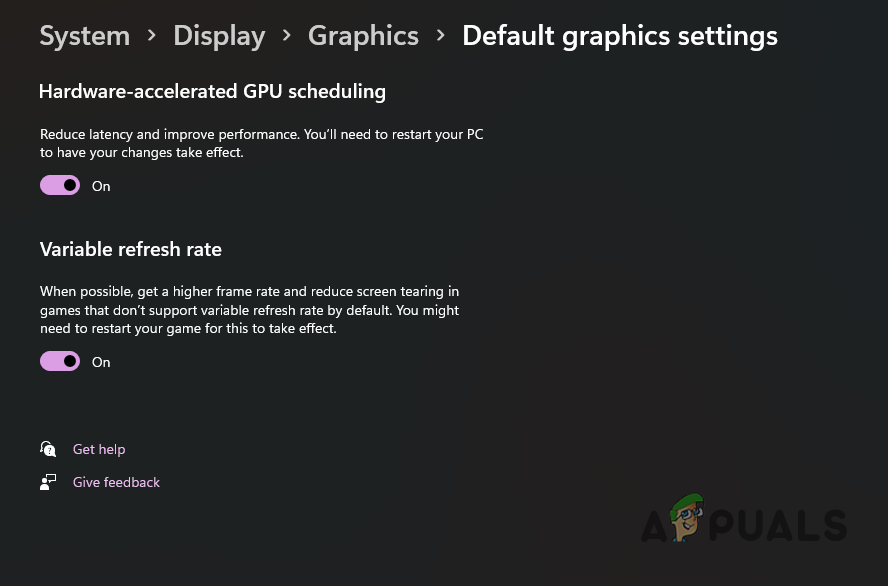
Disabling Hardware-Accelerated GPU Scheduling - With that done, go ahead and restart your computer. Once your PC boots up, see if the error message still occurs.
5. Try SteamVR Beta
As it turns out, many users have reported that opting into the SteamVR beta has helped them circumvent the error message in question. If the problem persists even after trying all of the methods, we would recommend giving this a shot. However, remember that this is called Beta for a reason, there might be some bugs that you may experience, but you will also have the luxury of trying out new features first. To opt into the SteamVR beta, follow the instructions down below:
- Open up the Steam client on your computer.
- In the Steam client, navigate to the Library section.
- After that, search for SteamVR. Right-click on it and choose Properties.
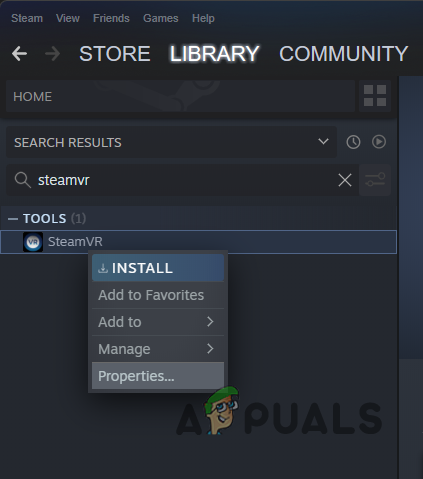
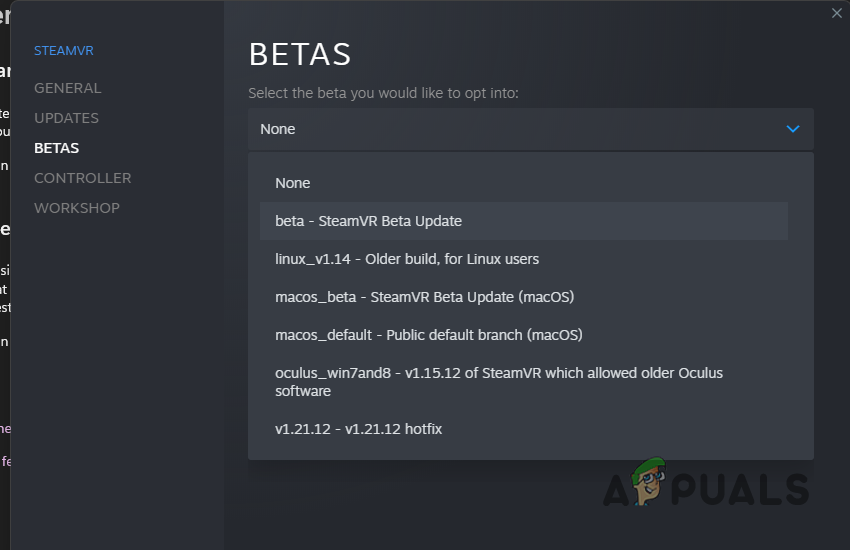
Opening up SteamVR Properties - On the new window that comes up, switch to the Betas tab on the left-hand side.
- From the drop-down menu provided, choose the beta – SteamVR Beta Update option.
Opting into SteamVR Beta - Then, close the dialog box.
- At this point, the SteamVR beta will start downloading automatically.
- Once done, see if the error is still occurring.
6. Reinstall Steam
Finally, if none of the above methods have fixed the problem for you, then as a last resort, we would recommend reinstalling your Steam client. The error message may be triggered due to a problem with the Steam installation files, and as such, reinstalling it should fix the problem. To uninstall Steam, follow the instructions given down below:
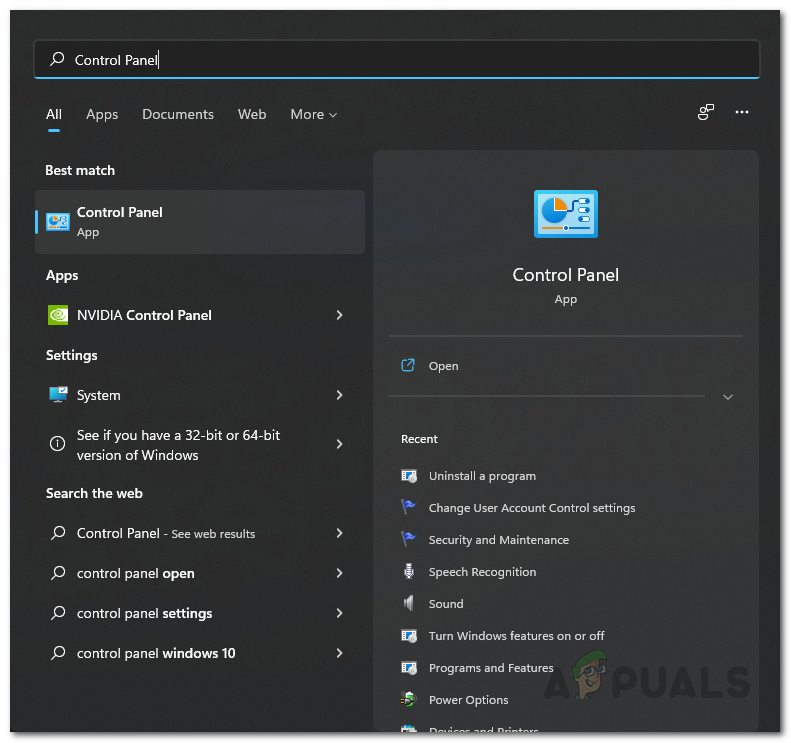
- Start off by opening up the Control Panel. To do this, open the Start Menu and search for Control Panel.
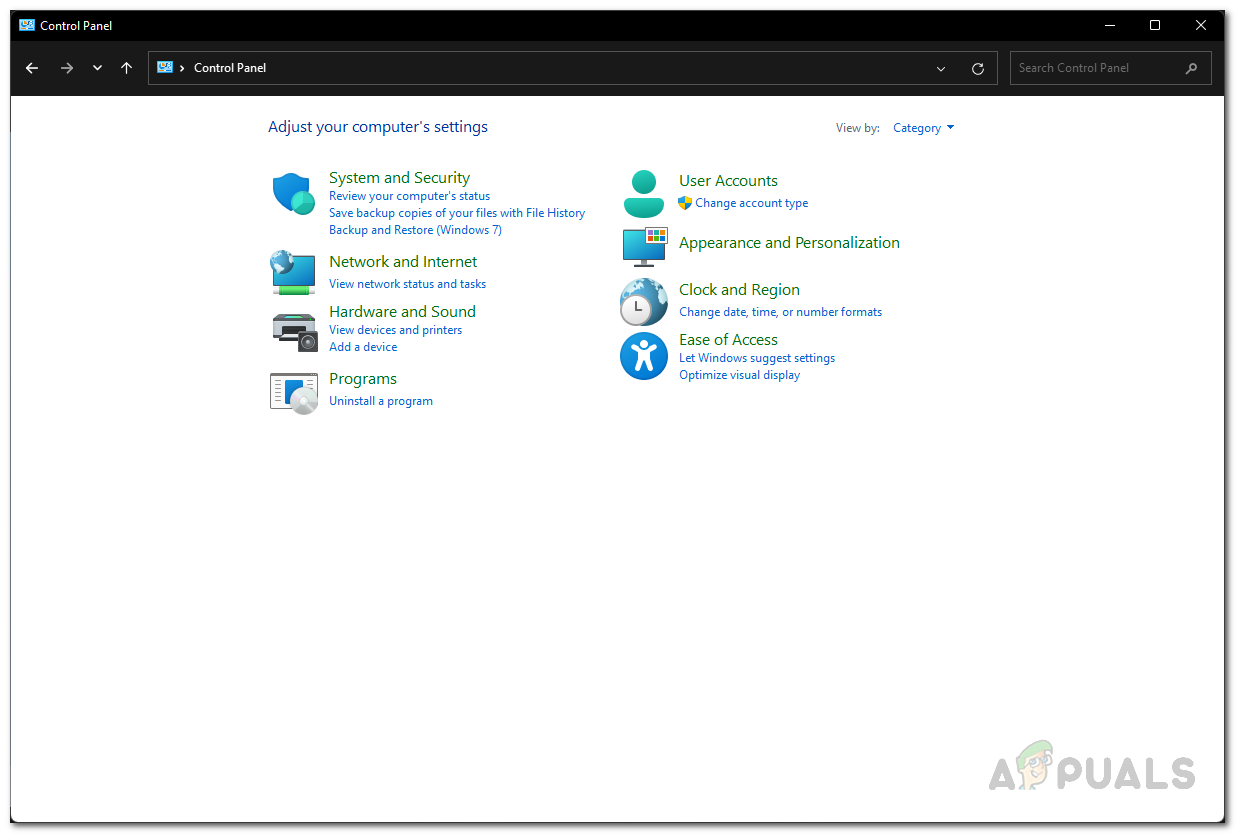
Opening up Control Panel - With the Control Panel open, click on the Uninstall a program option.
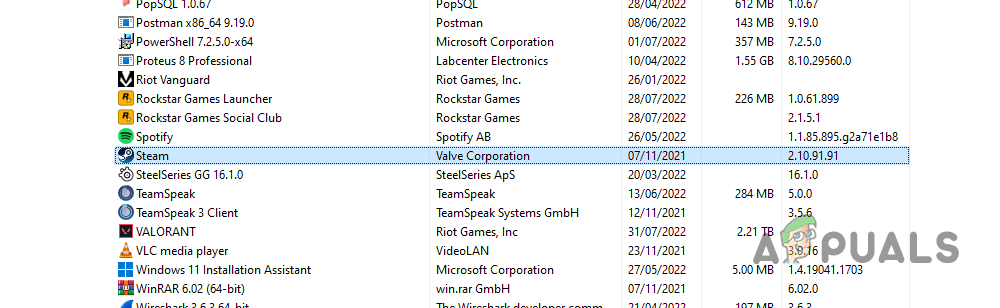
Control Panel - This will show a list of all installed applications on your system. From the list, locate Steam and then double-click on it.
Uninstalling Steam - Once Steam has been uninstalled, head to the Steam website and download the installer again.
- Run the installer to install Steam.
- With that done, see if the error message still appears.

Kamil Anwar
Kamil is a certified MCITP, CCNA (W), CCNA (S) and a former British Computer Society Member with over 9 years of experience Configuring, Deploying and Managing Switches, Firewalls and Domain Controllers also an old-school still active on FreeNode.
Многие пользователи жаловались на код ошибки -203 в SteamVR. Согласно сообщениям, игра вылетает при попытке запустить ее в SteamVR с указанным кодом ошибки. Это может произойти по нескольким причинам, но хорошая новость заключается в том, что это можно решить довольно легко. В этом посте мы поговорим о решениях, которые вы можете попробовать решить эту проблему.
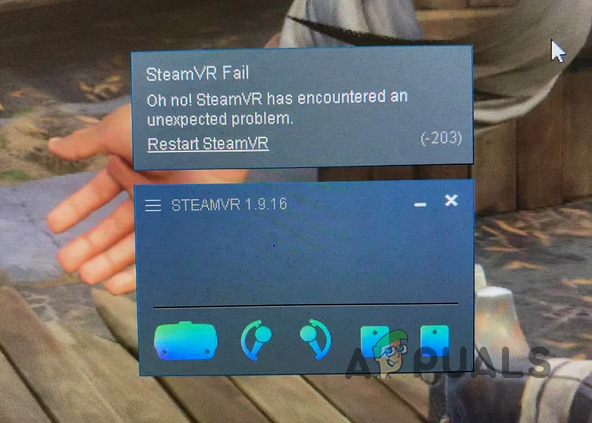
Ниже приведено точное сообщение об ошибке, которое пользователи видят вместе с кодом ошибки -203.
Сбой SteamVR
О, нет! SteamVR столкнулся с неожиданной проблемой.
Перезапустите SteamVR (-203)
Давайте разберемся, почему это происходит, а затем перейдем к руководству по устранению неполадок.
Что вызывает код ошибки SteamVR 203?
Код ошибки -203 может быть вызван различными причинами, как и любая другая проблема, связанная с Windows. Мы собрали список причин этой проблемы, имейте в виду, что он не является исчерпывающим.
- Вы можете увидеть рассматриваемый код ошибки из-за неправильной настройки в Windows или SteamVR. Многие пользователи сообщают, что аппаратное ускорение, являющееся функцией Windows, имеет тенденцию мешать работе Steam и вызывать проблемы. Отключение этой функции в этом случае кажется разумным вариантом.
- Другой причиной этой проблемы является вмешательство стороннего приложения. Поскольку мы запускаем множество приложений в фоновом режиме, существует высокая вероятность того, что некоторые из этих приложений мешают работе SteamVR; кроме того, если они вмешиваются, они могут конкурировать за ресурсы. Для обоих из них есть отдельные решения, которые мы увидим далее.
- Если вы используете устаревшую версию Windows или SteamVR, велика вероятность того, что такие коды ошибок появятся из ниоткуда. Обновить это программное обеспечение довольно просто.
- Наряду с ОС и Steam вам также необходимо обновить драйверы, особенно графические драйверы.
Теперь, когда мы знаем, почему это происходит, давайте посмотрим, как вы можете это исправить.
Если вы видите код ошибки -203 в SteamVR, попробуйте следующие решения.
- Перезагрузите компьютер
- Отключить аппаратно-ускоренное планирование графического процессора
- Обновите Windows, все драйверы и клиентское приложение Steam.
- Удалить файлы конфигурации SteamVR
- Зарегистрируйтесь в бета-версии SteamVR
Поговорим о них подробно.
1]Перезагрузите компьютер
Давайте начнем с перезагрузки вашей системы. Это избавит от любых временных сбоев, которые могут быть причиной этой проблемы. Если перезапуск не помог, перейдите к решениям.
2]Отключить аппаратное ускорение планирования графического процессора
Планирование графического процессора с аппаратным ускорением, если оно включено, возлагает нагрузку по рендерингу графики на ваш графический процессор и разгружает ваш процессор. Это позволяет распределять рабочую нагрузку и помогает повысить общую производительность компьютера при игре в любую игру или при выполнении графически интенсивных задач. Эта функция вызывает проблемы у многих пользователей, особенно у тех, в чьей системе нет выделенного графического процессора. Даже если у вас есть мощный выделенный графический процессор, этот процесс может помешать работе SteamVR и доставить вам неприятности. В этом случае мы рекомендуем вам отключить его и посмотреть, поможет ли это.
Выполните указанные шаги, чтобы отключить планирование графического процессора с аппаратным ускорением.
- Запуск Параметры Windows по Вин+И.
- Перейти к Система > Дисплей.
- Прокрутите вниз до «Связанные настройки» и нажмите «Графика».
- Нажмите на Изменить настройки графики по умолчанию.
- Используйте переключатель, чтобы отключить аппаратно-ускоренное планирование графического процессора.
После отключения этой функции проверьте, сохраняется ли проблема.
3]Обновите Windows, все ее драйверы и клиентское приложение Steam.
Если вы отключите эту функцию или не сможете найти ее на своем компьютере, следующее, что вам нужно сделать, это проверить наличие обновлений вашей ОС, и если это не сработает, обновить все ваши драйверы. Используйте любой из следующих способов для обновления драйверов устройства.
Обычно клиентское приложение Steam обновляется вручную. Вы, должно быть, заметили, что каждый раз, когда вы открываете приложение, оно проверяет наличие обновлений; если этого не происходит, откройте приложение, нажмите Steam и выберите «Проверить наличие обновлений клиента Steam».
4]Удалить файлы конфигурации SteamVR
Как упоминалось ранее, если ваш SteamVR неправильно настроен или его файлы конфигурации повреждены, вы увидите код ошибки -203. Поскольку мы пытаемся решить эту проблему, мы удалим файлы конфигурации SteamVR. Не о чем беспокоиться, так как эти файлы будут созданы снова при запуске игры.
Чтобы сделать то же самое, откройте проводник, вы можете использовать сочетание клавиш Win + E или просто щелкнуть по его значку на панели задач. Перейдите в место, где вы установили Steam, скорее всего, адрес будет следующим.
C:Program Files (x86)Steam
Найдите папку config, щелкните ее правой кнопкой мыши и выберите Удалить.
После удаления файлов проверьте, сохраняется ли проблема.
5]Зарегистрируйтесь в бета-версии SteamVR
Некоторым жертвам удалось решить проблему, выбрав бета-версию SteamVR. Единственное предостережение здесь заключается в том, что, поскольку это бета-обновление, оно не будет таким стабильным, как ваша текущая сборка, но, поскольку вы не можете использовать SteamVR, мы бы попробовали. Выполните указанные шаги, чтобы принять участие в бета-тестировании SteamVR.
- Запустите Steam.
- Нажмите на Стим > Настройки.
- Перейдите в раздел «Учетная запись» и нажмите «Изменить» в разделе «Участие в бета-тестировании».
- Выбирать Бета-обновление SteamVR.
Наконец, проверьте, сохраняется ли проблема.
Надеюсь, вы сможете решить проблему, используя решения, упомянутые в этом посте.
Как исправить ошибку SteamVR?
Если вы видите ошибку SteamVR, обязательно используйте код ошибки для поиска решений. Если вы видите код ошибки -203, проверьте решения, упомянутые в этом посте, чтобы решить проблему. Если ваш код ошибки отличается, используйте его для поиска решений, поскольку каждый код ошибки имеет определенное значение.
Читайте: Как исправить код ошибки SteamVR 436
Почему мой SteamVR продолжает давать сбои?
SteamVR может продолжать давать сбои и не запускаться на вашем компьютере из-за поврежденных или отсутствующих файлов. Возможно, вам придется снова запустить установщик, чтобы он мог загрузить любые отсутствующие файлы, в случае поврежденных файлов переустановка приложения — это путь. Также убедитесь, что ваш компьютер поддерживает SteamVR.
Читайте также: Как правильно исправить ошибку SteamVR 108.
[ERROR (108) Failed to find head-mounted display] Elimination method
This error could be a USB or driver problem. Please try the following problem resolution steps:
1. Restart your head-mounted monitor:
A. Right click the diagram of the head-mounted display in SteamVR.
B. Select “Restart the VIVE head-mounted Display” and wait for the restart process to complete.
2. Remove and reconnect the power supply of the connecting box:
A. exit SteamVR
B. Unplug the power and USB cable from the computer end of the connection box (non-orange end)
C. Wait a few seconds before connecting the power cord and USB cable back to the connection box. You may see more drivers installed on the operating system. Please wait patiently for this procedure to complete.
D. Execute SteamVR.
You may need to repeat the above steps several times.
3. Reboot your computer:
A. exit SteamVR
B. Reboot the computer
C. SteamVR execution
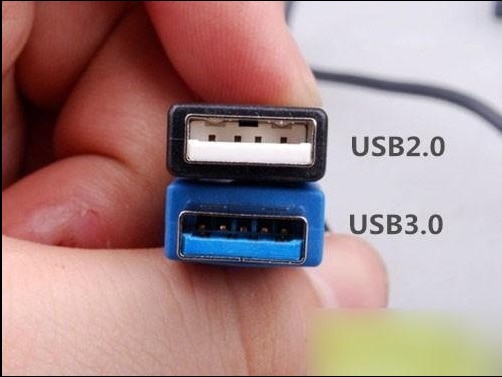
4. Connect the connection box to another USB port on the computer:
A. Please try to connect your connection box to the USB 2.0 port; There are certain USB 3.0 and 3.1 chip sets that may cause problems.
The way to determine USB 2.0 and USB 3.0:
1. Base color: Generally speaking, USB 2.0 base is white or black, while USB 3.0 base is blue
2. USB 2.0 has 4 pins on the front and USB 3.0 has 9 pins
3. The commonly used color of USB 2.0 and USB 3.0 is blue
B. You may also attempt to use a USB port that is currently in use – please move the device to another port and attach your connection box to this port.
C. If this problem persists, try resetting your USB device
Make sure that all 9 USB devices in the device administrator are displayed (top 5 USB input devices, bottom 4 HID Standard Vendor defined Devices).
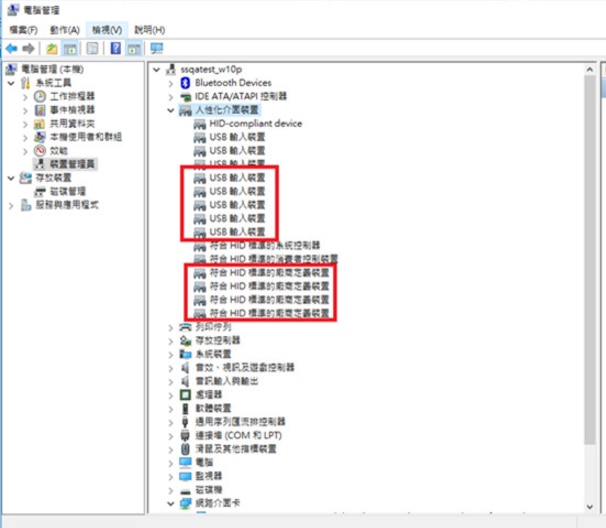
If all the USB devices are not displayed, it may be that the power in the control box is not plugged in properly. Please change the USB port to have a look.
ASUS AI Suite software must be installed on its motherboards.
[Error (203) Shadow stack not running] Elimination mode
If the locator has a sync line, the helmet tri-line is plugged into the host, and the computer detects the installation of Bluetooth and updates it.
Error (208) USB can detect headwear monitors, but no display screen can be found
This is a non-specific head-mounted display error message. There are multiple solutions for this error, so try one of the possible solutions listed below:
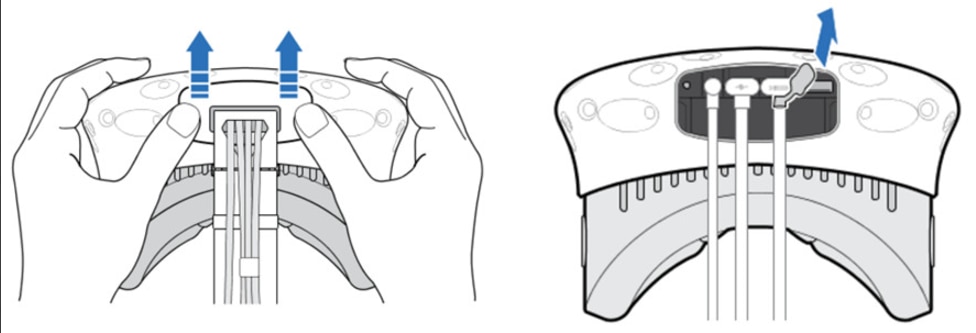
1. Please make sure that all the wires are connected.
The power cord on the head-mounted display may come loose with use.
Please push the cable hole cover above the head display outward in the forward direction to remove it to check the connection.
2. Please make sure that your connection box is installed in the correct direction. There shall be an orange coating line connector on the head-mounted display, which shall be connected to the corresponding orange connector on the connection box.
3. Check and make sure you have the latest display card driver installed.
4. “Cannot start openVr.tool. Steamvr_room_setup. Error “VRApplicationError_UnknownApplication”.
The reason is that the wire inside the helmet is loose. Please remove the helmet shell and connect the wire
If the user name and save path are already in English, the USB slot for connecting to the VIVE does not show the four “HID standard compliant vendor defined devices”.
In addition, the HDMI/USB cable attached to us still fails to solve the problem of error 208. At this time, Windows USB might detect the error. Please try the following method:
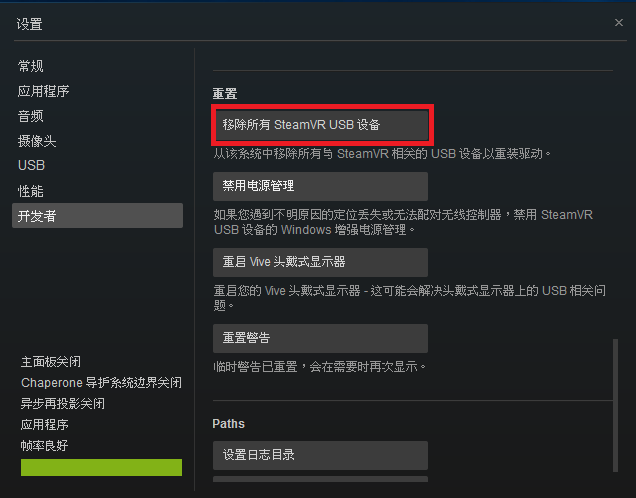
A. SteamVR → Settings → developer → delete all the USB devices of SteamVR. After installing all THE VIVe-related USB devices in the administrator and removing them, re-plug and unplug all the wires on the streaming (link box), and let Windows re-detect
B. If method A above fails, try using the following method:
1. Download the USB Deview software (http://www.nirsoft.net/utils/usb_devices_view.html) (https://usbdeview.en.softonic.com/)
2. Uninstall all USB devices displayed on the screen (red box as shown below)
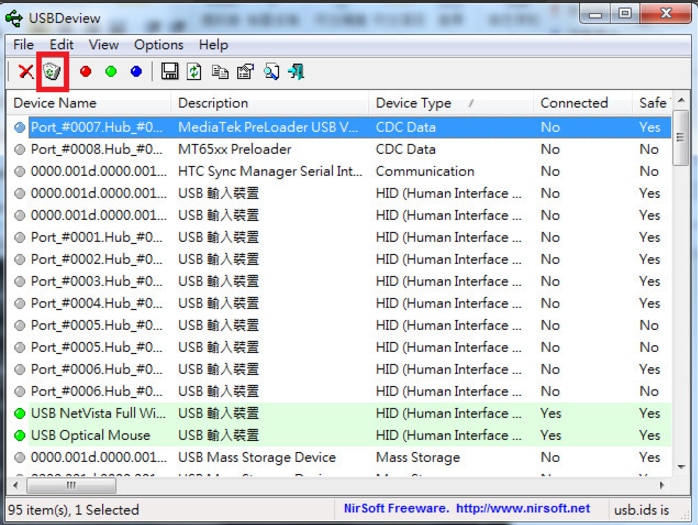
3. After all removal, the USB keyboard mouse will not be able to move
4. Re-plug and unplug all USB devices, including keyboard/mouse/VIVE to make Windows re-detect
5. Turn off the power of the control box/SteamVR
6. Hold down the head display button
7. Power on the control box
8. Wait 15 seconds
9. The SteamVR open
10. SteamVR will ask you if you want to restore the software, and say “Yes”
11. This will restore all the software, do not unplug the power supply before the completion of restore
[ERROR (301) cannot find the key element of SteamVR] Elimination method
1. Start SteamVR with the permission of the system administrator, and if possible, close the anti-virus program that may be affected
2. Install SteamVR (different hard disk) in a different place (due to the system name conflict)
3. Reinstall the viVe-related drivers (using USBDeview and similar software)
[ERROR (306/308) cannot find the key element of SteamVR] Elimination method
Key parts of SteamVR don’t work properly. Right – click to open with administrator privileges. If it’s no use with administrator privileges to open to the Steam/steamapps/common/SteamVR/bin/win64 vrpathreg to repair, or user/AppData/Local/delete openvr openvr vrpath)
[ERROR (400/405) shadow folding device is not available] elimination method
The shadower is not available (error 400 or 405) any of these items may cause an error
1. Please use DVI to HDMI or connect directly to HDMI (do not use DP to HDMI)
2. Update the video card driver to the latest version of the
3. Remove all line, plug in again (head inside also need, can refer to detailed here: https://www.vive.com/cn/support/category_howto/unplugging-the-3-in-1-and-audio-cables.html)
4. Remove excess anti-light sources such as mirrors, glass, tile floors… Such cause reflective objects
5. Locators must be over 30 degrees down (detailed setting method can refer to here: https://www.vive.com/cn/support/category_howto/tips-for-setting-up-the-base-stations.html)
A lot of users have complained about Error Code -203 on SteamVR. As per the reports, a game crashes when trying to play it in the SteamVR with the error code in question. This can happen because of multiple reasons, but the good news is that it can be resolved pretty easily. In this post, we are going to talk about solutions that you can try to fix this issue.
The following is the exact error message users see along with Error Code -203.
SteamVR Fail
Oh no! SteamVR has encountered an unexpected problem.
Restart SteamVR (-203)

Let us see why this is happening, and then go to the troubleshooting guide.
What causes SteamVR Error Code 203?
Error Code -203 can be caused by various things just like any other Windows-related issue. We have accumulated a list of reasons behind this issue, keep in mind that is not exhaustive.
- You may see the error code in question because of misconfiguration in Windows or SteamVR. A lot of users have reported that Hardware Acceleration, which is a Windows feature, tends to interfere with Steam and cause trouble. Disabling the feature, in that case, seems like a wise option.
- Another reason for this issue is interference from a third-party application. Since we run a lot of apps in the background, there is a high chance that some of those apps are interfering with SteamVR; also, if they are interfering, they may compete for resources. There are separate solutions for both of them that we will see hereinafter.
- If you are running an outdated version of Windows or SteamVR, there is a high chance that such error codes will pop up out of nowhere. Updating these software is pretty simple.
- Along with OS and Steam, you need to update your drivers as well, especially your Graphics Drivers.
Now that we know why this is happening let us see how you can fix it.
If you see Error Code -203 on SteamVR, try the following solutions.
- Restart your computer
- Disable Hardware-accelerated GPU Scheduling
- Update Windows, all its drivers, and Steam Client App
- Delete SteamVR Config Files
- Opt into SteamVR Beta
Let us talk about them in detail.
1] Restart your computer
Let us start by restarting your system. This will get rid of any temporary glitches that might be the cause of this issue. If restarting didn’t work, move to the solutions.
2] Disable Hardware-accelerated GPU Scheduling
Hardware-accelerated GPU Scheduling, when enabled, puts the load of rendering graphics to your GPU and offloads your CPU. This allows the distribution of workload and helps in improving the overall performance of the computer when playing any game or doing a graphically-intensive task. This feature is causing issues for a lot of users, especially for those whose system doesn’t have a dedicated GPU. Even if you have a powerful dedicated GPU, this process can interfere with SteamVR and cause trouble for you. In that case, we recommend you disable it and see if that helps.
Follow the given steps to disable Hardware-accelerated GPU Scheduling.
- Launch Windows Settings by Win + I.
- Go to System > Display.
- Scroll down to Related Settings and click on Graphics.
- Click on Change default graphics settings.
- Use the toggle to disable Hardware-accelerated GPU Scheduling.
Once you have disabled the feature, check if the issue persists.
3] Update Windows, all its drivers, and Steam Client App
If you disable the feature or you are not able to find it on your computer, the next thing you should do is check for your OS updates, and if that doesn’t work, update all your drivers. Use any of the following methods to update your device drivers.
- Try any of the free driver update software
- Download the driver from the manufacturer’s website
- Install Driver and Optional Update.
- Update Device Driver from Device Manager.
Usually, the Steam client app gets updated manually. You must have noticed that every time you open the app, it checks for an update; in case it is not doing that, open the app, click on Steam and then select Check for Steam Client Updates.
4] Delete SteamVR Config Files
As mentioned earlier, if your SteamVR is misconfigured or if its configuration files are corrupted, you will see Error Code -203. Since we are trying to resolve this issue, we will be deleting the configuration files of SteamVR. There is nothing to worry about as these files will be created again as you launch the game.
To do the same, open File Explorer, you can use the shortcut Win + E or just click on its icon from the Taskbar. Go to the location where you have installed Steam, most likely, the address will be the following.
C:Program Files (x86)Steam
Look for the config folder, right-click on it and select Delete.
Once the files are deleted, check if the issue persists.
5] Opt into SteamVR Beta
Some victims were able to fix the problem by opting into SteamVR Beta. The only caveat here is that, since it is a Beta update, it won’t be as stable as your current build, but since you are unable to use SteamVR, we would give it a shot. Follow the given steps to opt into SteamVR Beta.
- Launch Steam.
- Click on Steam > Settings.
- Go to Account and click Change from the Beta Participation section.
- Select SteamVR Beta Update.
Finally, check if the issue persists.
Hopefully, you will be able to resolve the issue using the solutions mentioned in this post.
How do I fix SteamVR error?
If you see a SteamVR error, make sure to use the error code to search for solutions. If you are seeing the error code -203, then check the solutions mentioned in this post to resolve the issue. In case your error code is different, use it to look for solutions as every error code has a particular meaning.
Read: How to fix SteamVR Error Code 436
Why does my SteamVR keep failing?
SteamVR may keep on failing and will not launch on your computer because of corrupted or missing files. You may have to run the installer again so that it can download any missing files, in case of corrupted files, reinstalling the app is the way to go. Also, make sure that your computer is compatible to run SteamVR.
Also read: Fix SteamVR Error 108 the right way.
A lot of users have complained about Error Code -203 on SteamVR. As per the reports, a game crashes when trying to play it in the SteamVR with the error code in question. This can happen because of multiple reasons, but the good news is that it can be resolved pretty easily. In this post, we are going to talk about solutions that you can try to fix this issue.
The following is the exact error message users see along with Error Code -203.
SteamVR Fail
Oh no! SteamVR has encountered an unexpected problem.
Restart SteamVR (-203)
Let us see why this is happening, and then go to the troubleshooting guide.
What causes SteamVR Error Code 203?
Error Code -203 can be caused by various things just like any other Windows-related issue. We have accumulated a list of reasons behind this issue, keep in mind that is not exhaustive.
- You may see the error code in question because of misconfiguration in Windows or SteamVR. A lot of users have reported that Hardware Acceleration, which is a Windows feature, tends to interfere with Steam and cause trouble. Disabling the feature, in that case, seems like a wise option.
- Another reason for this issue is interference from a third-party application. Since we run a lot of apps in the background, there is a high chance that some of those apps are interfering with SteamVR; also, if they are interfering, they may compete for resources. There are separate solutions for both of them that we will see hereinafter.
- If you are running an outdated version of Windows or SteamVR, there is a high chance that such error codes will pop up out of nowhere. Updating these software is pretty simple.
- Along with OS and Steam, you need to update your drivers as well, especially your Graphics Drivers.
Now that we know why this is happening let us see how you can fix it.
If you see Error Code -203 on SteamVR, try the following solutions.
- Restart your computer
- Disable Hardware-accelerated GPU Scheduling
- Update Windows, all its drivers, and Steam Client App
- Delete SteamVR Config Files
- Opt into SteamVR Beta
Let us talk about them in detail.
1] Restart your computer
Let us start by restarting your system. This will get rid of any temporary glitches that might be the cause of this issue. If restarting didn’t work, move to the solutions.
2] Disable Hardware-accelerated GPU Scheduling
Hardware-accelerated GPU Scheduling, when enabled, puts the load of rendering graphics to your GPU and offloads your CPU. This allows the distribution of workload and helps in improving the overall performance of the computer when playing any game or doing a graphically-intensive task. This feature is causing issues for a lot of users, especially for those whose system doesn’t have a dedicated GPU. Even if you have a powerful dedicated GPU, this process can interfere with SteamVR and cause trouble for you. In that case, we recommend you disable it and see if that helps.
Follow the given steps to disable Hardware-accelerated GPU Scheduling.
- Launch Windows Settings by Win + I.
- Go to System > Display.
- Scroll down to Related Settings and click on Graphics.
- Click on Change default graphics settings.
- Use the toggle to disable Hardware-accelerated GPU Scheduling.
Once you have disabled the feature, check if the issue persists.
3] Update Windows, all its drivers, and Steam Client App
If you disable the feature or you are not able to find it on your computer, the next thing you should do is check for your OS updates, and if that doesn’t work, update all your drivers. Use any of the following methods to update your device drivers.
- Try any of the free driver update software
- Download the driver from the manufacturer’s website
- Install Driver and Optional Update.
- Update Device Driver from Device Manager.
Usually, the Steam client app gets updated manually. You must have noticed that every time you open the app, it checks for an update; in case it is not doing that, open the app, click on Steam and then select Check for Steam Client Updates.
4] Delete SteamVR Config Files
As mentioned earlier, if your SteamVR is misconfigured or if its configuration files are corrupted, you will see Error Code -203. Since we are trying to resolve this issue, we will be deleting the configuration files of SteamVR. There is nothing to worry about as these files will be created again as you launch the game.
To do the same, open File Explorer, you can use the shortcut Win + E or just click on its icon from the Taskbar. Go to the location where you have installed Steam, most likely, the address will be the following.
C:Program Files (x86)Steam
Look for the config folder, right-click on it and select Delete.
Once the files are deleted, check if the issue persists.
5] Opt into SteamVR Beta
Some victims were able to fix the problem by opting into SteamVR Beta. The only caveat here is that, since it is a Beta update, it won’t be as stable as your current build, but since you are unable to use SteamVR, we would give it a shot. Follow the given steps to opt into SteamVR Beta.
- Launch Steam.
- Click on Steam > Settings.
- Go to Account and click Change from the Beta Participation section.
- Select SteamVR Beta Update.
Finally, check if the issue persists.
Hopefully, you will be able to resolve the issue using the solutions mentioned in this post.
How do I fix SteamVR error?
If you see a SteamVR error, make sure to use the error code to search for solutions. If you are seeing the error code -203, then check the solutions mentioned in this post to resolve the issue. In case your error code is different, use it to look for solutions as every error code has a particular meaning.
Read: How to fix SteamVR Error Code 436
Why does my SteamVR keep failing?
SteamVR may keep on failing and will not launch on your computer because of corrupted or missing files. You may have to run the installer again so that it can download any missing files, in case of corrupted files, reinstalling the app is the way to go. Also, make sure that your computer is compatible to run SteamVR.
Also read: Fix SteamVR Error 108 the right way.
Can confirm I also have this issue on Ubuntu 18.10, tried with and without SteamVR beta, and tried with NVidia drivers both 418.43 and 410 on my GTX 1080.
I don’t have a standard Vive to test with, only my Vive Pro, though I have not found anybody else who has the issue but not a Vive Pro.
I also came across this Reddit thread https://www.reddit.com/r/Vive/comments/ajuycz/new_vive_pro_linux_headset_display_freezes/
Can’t seem to find any errors in logs, screen on headset will simply freeze after some time giving huge amounts of motion sickness, and some time after that SteamVR will crash with error code -203. The real time frame information will also freeze at the same time as the headset viewport.
Not sure if this is related, but I also have issues dragging the SteamVR information windows, on my tiling window manager XMonad this affects both the settings window and the status window, whereas on the stock XFCE window manager this only affects the settings window. When dragged the viewport in the headset will jitter a lot with huge delays between frames, and the windows will take about 10 seconds to catch up with where you dragged them, feels like I’m running windows. Figured this might be related since I have not seen this issue mentioned anywhere else.
The error code 203 usually results in a crash of the game that you are trying to play on SteamVR. As it turns out, the problem can occur due to a number of reasons, and some of these can only be specific to you as well. Among the common causes are hardware-accelerated GPU scheduling, outdated Windows, your SteamVR settings, and more. We will be going through these in detail down below.
As it turns out, the error message associated with the error code 203 or (-203) does not provide any helpful information as it only states that the application experienced an unexpected problem. In some cases, restarting SteamVR can fix the issue, as mentioned in the error message. However, that is not always fruitful.
There are also scenarios where the error message occurs only with certain games. Regardless, the source of the problem usually stays the same, and in this article, we are going to show you how to resolve it without much trouble. However, before we get into that, it is essential to have a better understanding of the issue by knowing the various causes. So, without further ado, let us get right into the causes of the SteamVR error 203.
- Third-Party Software — One of the reasons that the problem in question can occur is when you have a third-party software meddling with SteamVR in the background. A common culprit, as reported by multiple users, is the Razer Cortex app.
- Outdated Windows — If you are running an outdated version of Windows on your computer, that can also result in the error message in question. This can be easily rectified by simply updating your system.
- SteamVR Settings — As it turns out, in some cases, the problem can arise when your SteamVR settings file is damaged or corrupted. When this happens, the app is forced to crash when the file is loaded. To fix this, you will have to delete the settings file from your config folder.
- Hardware-Accelerated GPU Scheduling — Finally, hardware-accelerated GPU scheduling has also been known to result in the error message. Disabling this from the Windows Settings menu has fixed the issue for various users.
Now that we have gone through the possible causes of the issue in question let us start with the different methods you can use to resolve the issue.
1. Disable Razer Cortex Auto Boost (if applicable)
The first thing that you should do if you have Razer Cortex installed on your system is to disable the Auto Boost feature. The Auto Boost feature can be useful as it manages your operating system and other background applications to increase your FPS in-game.
This feature has been reported by various users, and disabling it has fixed the problem for them. To do this, follow the instructions given down below:
- First of all, go ahead and open up Razer Cortex.
- In Razer Cortex, navigate to Game Booster from the menu bar.
- There, under the Boost tab, turn off Auto-Boost by clicking the slider provided.
Disabling Razer Cortex Auto Boost - With that done, close Razer Cortex and see if the issue persists.
2. Update Windows
Running an outdated version of Windows is never really a good idea. This is because the system updates often contain security fixes along with quality-of-life improvements that help your computer perform better. In addition to that, running an obsolete version of the Windows operating system may cause several applications not to function as intended.
This might be the case here as well, which is why you will have to update your Windows to resolve the issue. To do this, follow the instructions given down below:
- Start off by pressing the Windows key + I on your keyboard to open up the Settings window.
- In the Settings window, navigate to Windows Update on the left-hand side.
Windows Settings - Click on the Check for updates button provided to download and install any updates.
Windows Update - If there are any updates available for your system, you will see a Download & install button there already. Click on it to download the update.
- Once your computer has been updated and you have performed a system restart, relaunch SteamVR to see if the issue is still there.
3. Delete SteamVR Settings File
As we have stated previously, your SteamVR settings can sometimes result in the mentioned error message. This happens when the local settings file has been damaged or corrupted, which is why, when it is loaded into the application, SteamVR crashes.
As such, to fix this, you will have to delete the settings file so that a new file can be generated when you launch SteamVR. To do this, follow the instructions down below:
- First of all, open up File Explorer.
Opening up File Explorer - Then, navigate to where Steam is installed. By default, you will find it in the C:Program Files(x86)Steam path.
- Inside the Steam directory, open up the config folder.
Opening up Steam Config Folder - Once there, locate a file called steamvr.vrsettings or similar and then delete it.
- With that done, open up SteamVR to see if the issue has been resolved.
4. Disable Hardware-accelerated GPU Scheduling
For those unaware, hardware-accelerated GPU scheduling is a feature that offloads your CPU from some work by processing and rendering the visuals and graphics in batches. Typically, your processor would be responsible for offloading such work to the GPU for rendering. However, with hardware-accelerated GPU scheduling, your GPU processor saves your CPU the trouble of offloading such work to it and hence can potentially improve the performance of your CPU.
While this can be helpful, there have been several reports of it causing SteamVR to crash with the 203 error code, so you will have to disable hardware-accelerated GPU scheduling. To do this, follow the instructions given down below:
- To start off, open the Settings window by pressing Windows key + I.
- In the Settings menu, navigate to System > Display.
Windows Settings - There, make your way to Graphics.
Navigating to Graphics Settings - Under Graphics settings, click on the Change default graphics settings option.
Navigating to Default Graphics Settings - From there, click on the slider provided to turn off hardware-accelerated GPU scheduling.
Disabling Hardware-Accelerated GPU Scheduling - With that done, go ahead and restart your computer. Once your PC boots up, see if the error message still occurs.
5. Try SteamVR Beta
As it turns out, many users have reported that opting into the SteamVR beta has helped them circumvent the error message in question. If the problem persists even after trying all of the methods, we would recommend giving this a shot. However, remember that this is called Beta for a reason, there might be some bugs that you may experience, but you will also have the luxury of trying out new features first. To opt into the SteamVR beta, follow the instructions down below:
- Open up the Steam client on your computer.
- In the Steam client, navigate to the Library section.
- After that, search for SteamVR. Right-click on it and choose Properties.
Opening up SteamVR Properties - On the new window that comes up, switch to the Betas tab on the left-hand side.
- From the drop-down menu provided, choose the beta – SteamVR Beta Update option.
Opting into SteamVR Beta - Then, close the dialog box.
- At this point, the SteamVR beta will start downloading automatically.
- Once done, see if the error is still occurring.
6. Reinstall Steam
Finally, if none of the above methods have fixed the problem for you, then as a last resort, we would recommend reinstalling your Steam client. The error message may be triggered due to a problem with the Steam installation files, and as such, reinstalling it should fix the problem. To uninstall Steam, follow the instructions given down below:
- Start off by opening up the Control Panel. To do this, open the Start Menu and search for Control Panel.
Opening up Control Panel - With the Control Panel open, click on the Uninstall a program option.
Control Panel - This will show a list of all installed applications on your system. From the list, locate Steam and then double-click on it.
Uninstalling Steam - Once Steam has been uninstalled, head to the Steam website and download the installer again.
- Run the installer to install Steam.
- With that done, see if the error message still appears.

Kamil Anwar
Kamil is a certified MCITP, CCNA (W), CCNA (S) and a former British Computer Society Member with over 9 years of experience Configuring, Deploying and Managing Switches, Firewalls and Domain Controllers also an old-school still active on FreeNode.