by Tashreef Shareef
Tashreef Shareef is a software developer turned tech writer. He discovered his interest in technology after reading a tech magazine accidentally. Now he writes about everything tech from… read more
Updated on March 3, 2022
- Synthetic Watchdog Timeout in Windows 10 usually occurs when playing video games or using the Hyper-X virtual machine.
- Outdated system drivers or buggy Windows update usually trigger this BSoD error.
- To resolve the error, update system drivers, install pending Windows updates and run the System File Checker tool.
- Check out more details to fix this blue screen of death error below

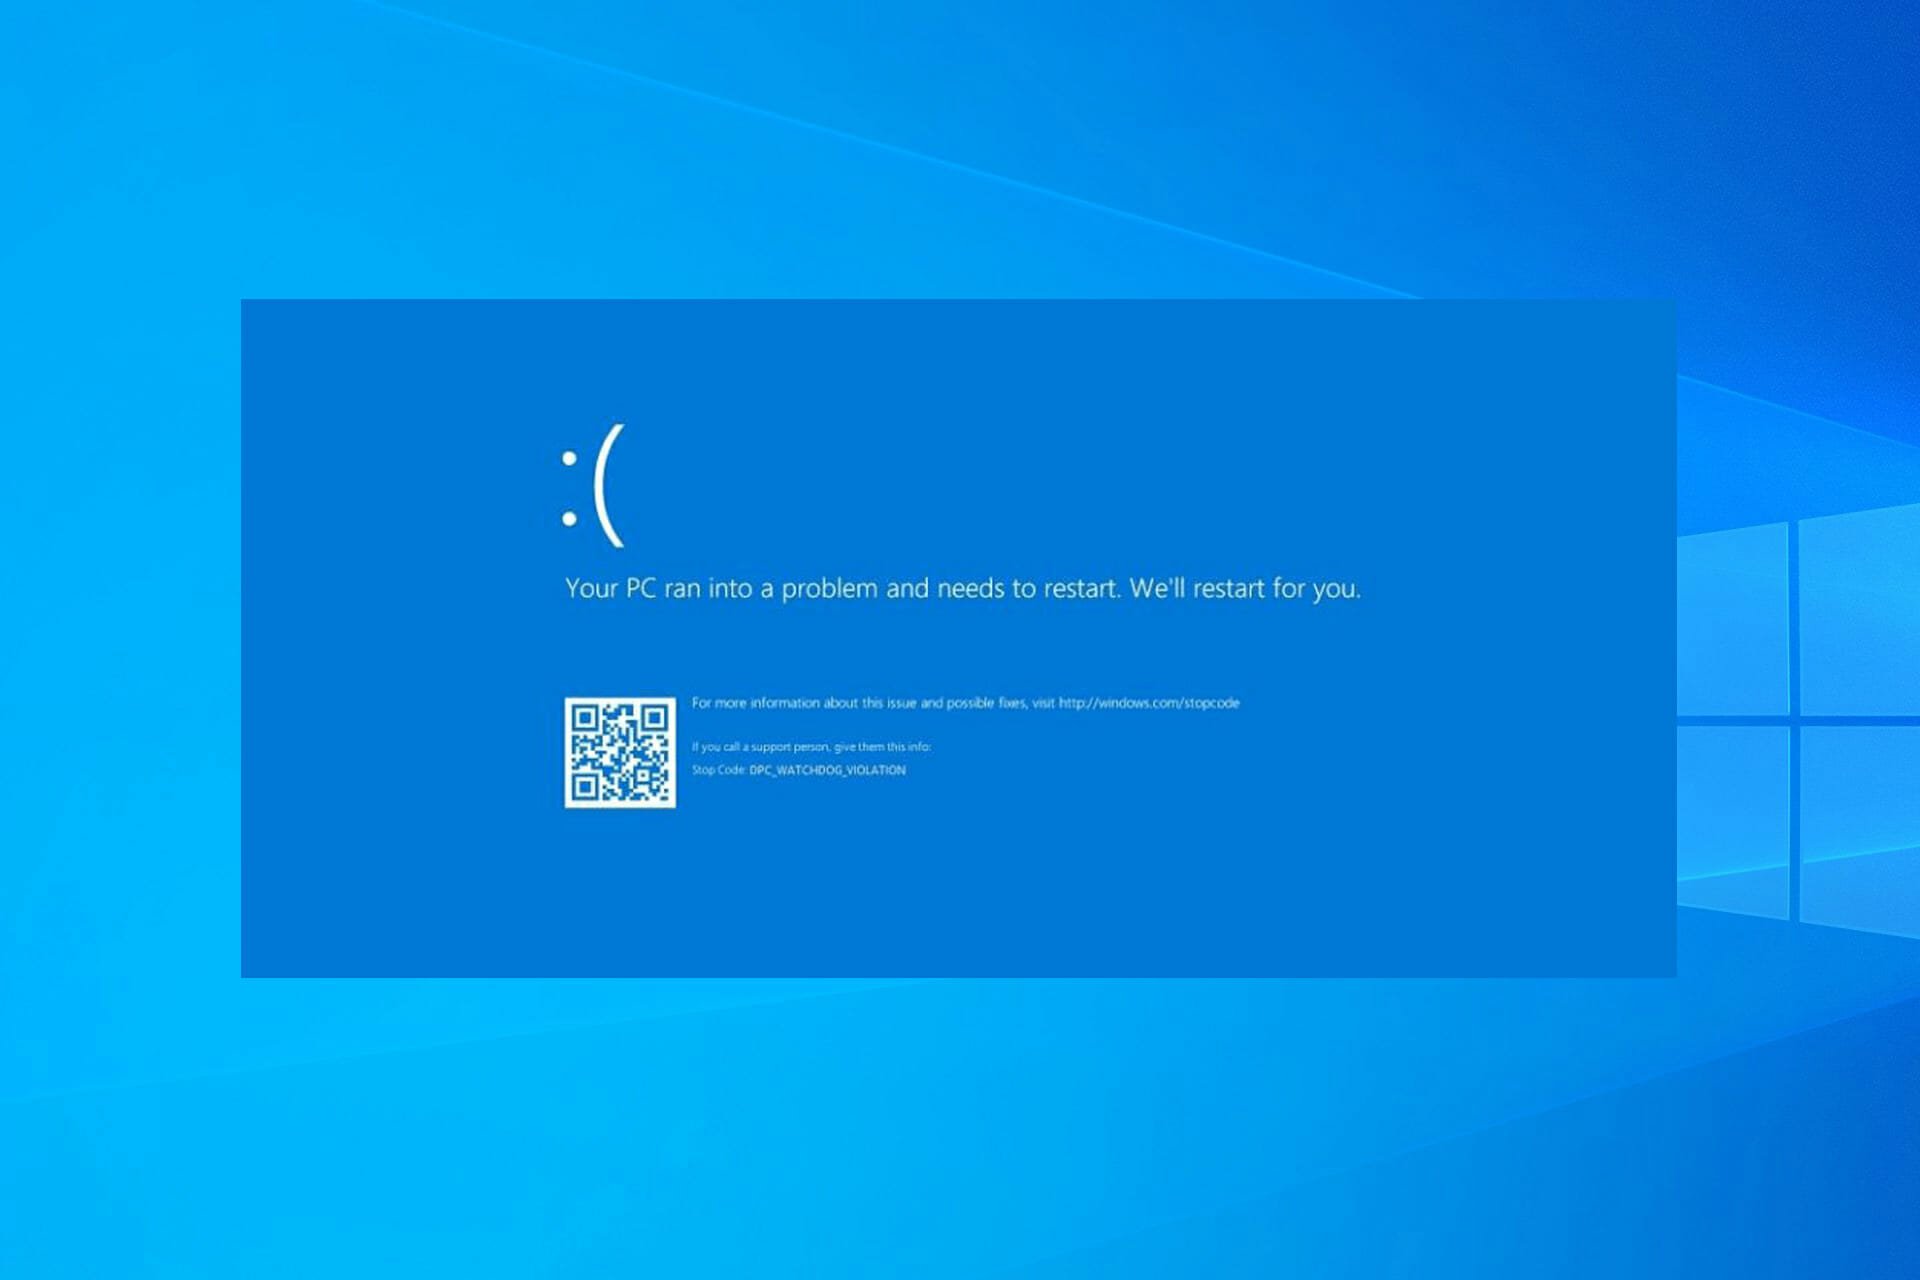
The Synthetic Watchdog Timeout BSOD error in Windows 10 frequently occurs when the system is idle or playing games. This error usually occurs when the specified processor is not processing interrupts.
This error is triggered when the processor is unable to continue the processing tasks because its resources are occupied, resulting in a deadlock. When the system is in the deadlock state, it will hang or freeze, resulting in a blue screen of death.
The error Synthetic Watchdog Timeout can occur due to a glitchy Windows update, outdated drivers, or even issues with the peripherals.
In this article, we have listed a few troubleshooting steps to help you determine the cause and fix the Synthetic Watchdog Timeout error in Windows 10.
How do I fix the Synthetic Watchdog Timeout error?
1. Update outdated drivers with Outbyte Driver Updater
Missing or outdated system drivers can trigger the blue screen of death error. To fix the problem, try updating the system drivers using Outbyte Driver Updater.
Outbyte Driver Updater is a popular Windows program that allows you to update all your drivers with one click and enjoy better gaming and overall system performance. With a huge database of drivers, you can fix missing and outdated drivers in no time.
With the included download manager, you can see the download progress of driver files. It automatically creates a backup and saves all of your drivers to a compressed zip file.
Key features of Outbyte Driver Updater:
- Huge database of over 18 million files
- Built-in download and driver backup solution
- Schedule manage to perform driver scan, update notifications, and backup
- Clean user interface
⇒ Get Outbyte Driver Updater
2. Install pending Windows updates
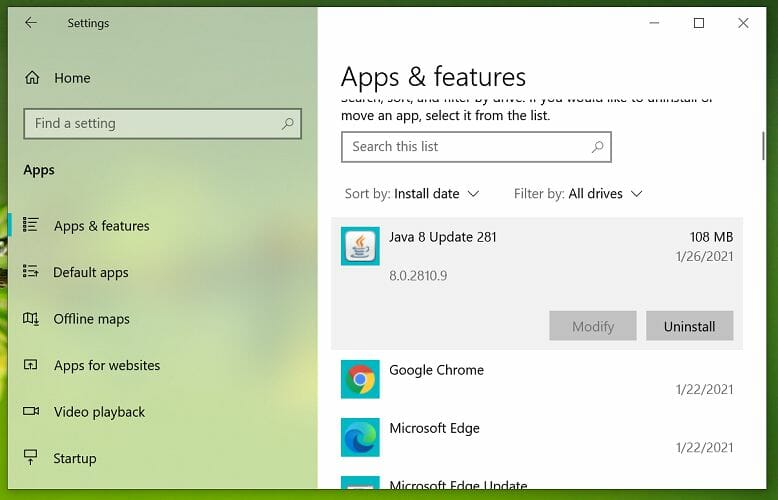
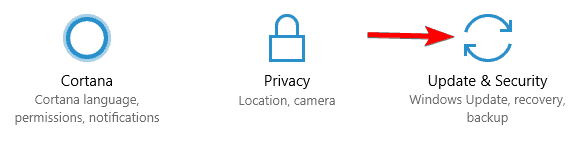
- Click on Start and select Settings.
- Go to Update & Security and choose Windows Update.
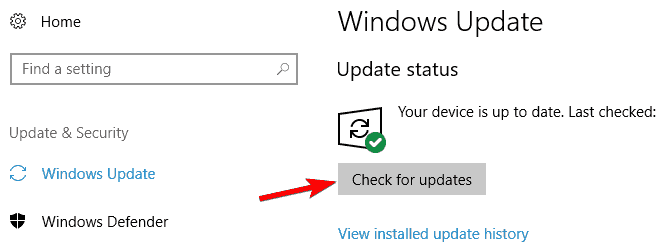
- Click on Check for updates and wait for the Windows to scan for an available update.
- Download all the feature KB update available for your system. Install the updates and reboot the computer.
After the restart, check if the Synthetic Watchdog Timeout Hyper-V error is resolved.
Several users have reported the error to have occurred due to an undisclosed bug in the OS that was fixed with a KB update. If you encounter an issue after installing a Windows update, try to install any KB update that is available.
3. Rollback to the previous version of Windows
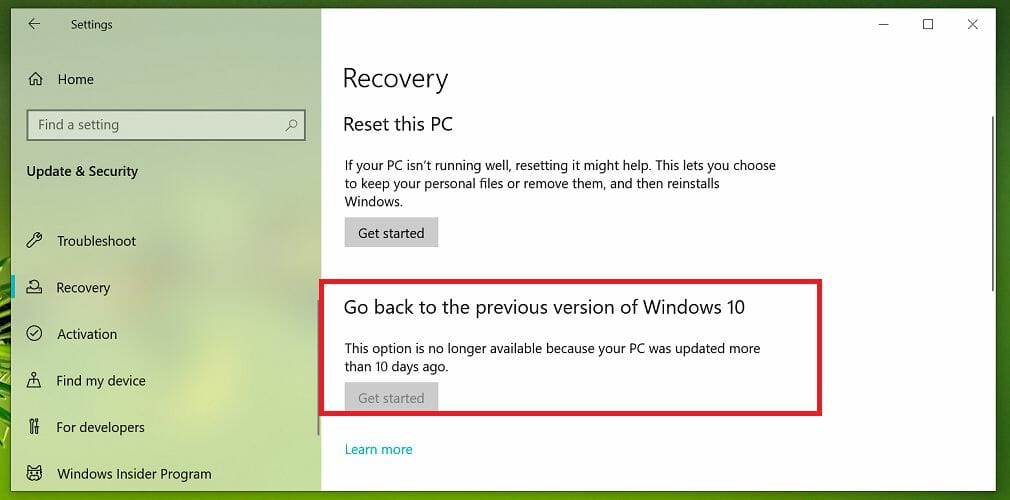
- Press the Windows key + I to open Settings.
- Go to Update & Security.
- Open the Recovery tab from the left pane.
- Scroll down to Go back to the previous version of Windows 10 section.
- Click the Get started button. Follow on-screen instructions to install the previous version of Windows 10.
If the error is triggered after installing a Windows update, you can back to the previous Windows within ten days of installing the update. After 10 days, the Get started button is greyed out, and you would have to rollback manually if required.
4. Repair Windows 10 image with DISM command
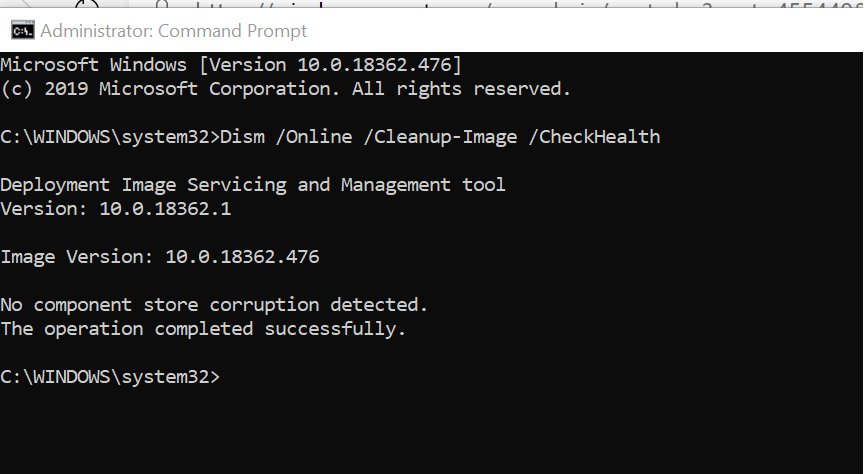
- Press the Windows key, and type cmd in search.
- Right-click on Command Prompt and select Run as Administrator.
- In the Command Prompt windows, type the following command and hit enter:
DISM /Online /Cleanup-Image /CheckHealth - Wait for the tool to complete the scan and verify any data corruption that requires fixing.
- Next, run the following command to run an advanced scan and repair problems automatically:
DISM /Online /Cleanup-Image /RestoreHealth - Wait for the tool to scan the system and apply the required fixes to resolve the issue.
If the tool is stuck at 20 or 40 percent, do not exit or turn off your computer, as it is a normal behavior. After a few minutes, the process will complete successfully.
If the issue persists, run the system file checker tool to scan the system files for corruption and repair them automatically.
Some PC issues are hard to tackle, especially when it comes to missing or corrupted system files and repositories of your Windows.
Be sure to use a dedicated tool, such as Fortect, which will scan and replace your broken files with their fresh versions from its repository.
Run System File Checker tool
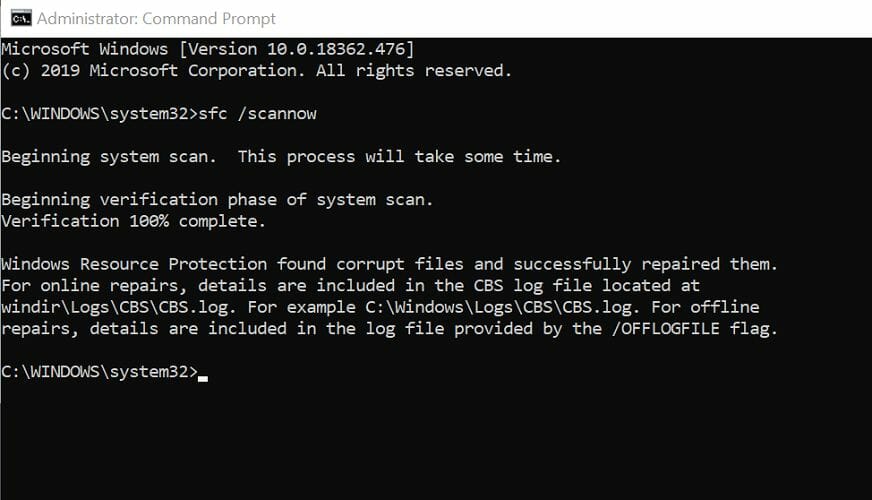
- Open the Command Prompt as Administrator.
- In the Command Prompt, enter the following command and hit enter:
Sfc /scannow - Wait for the system file checker to complete the scan. If any data corruption is found, proceed to apply the recommended fixes by following on-screen instructions.
Once the fix is applied, reboot the computer. After the restart, check if the Synthetic Watchdog Timeout Windows 10 error is resolved.
5. Update BIOS
Check bios version
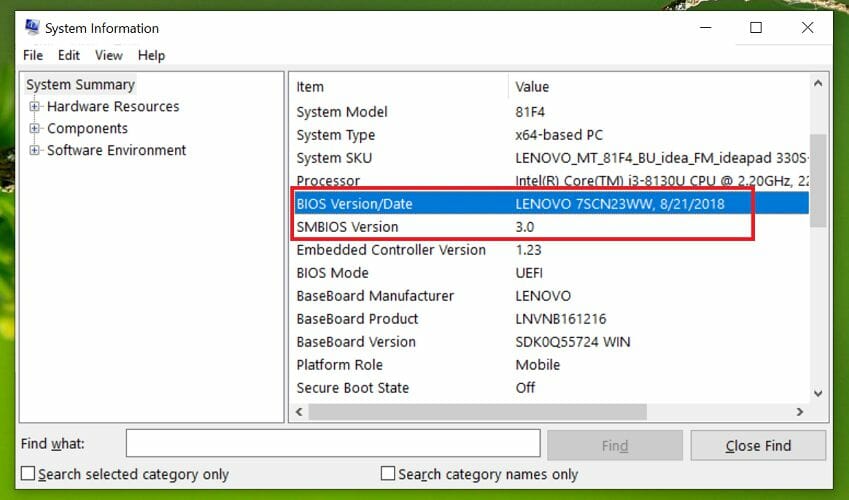
- Press the Windows key + R to open Run.
- Type msinfo32 and click OK to open System Information.
- Click the System Summary option.
- In the right pane, check your BIOS Version and Date field.
Start the update process
If you are using a laptop, you can download the latest BIOS version using the OEM system utility software.
Lenovo offers the Vantage utility to help users keep their systems up to date. You can also download the latest version of BIOS from the laptop’s OEM website.
For a custom-built PC, visit the motherboard manufacturer website to download the latest BIOS version for your system. You can refer to our detailed guide on how to update BIOS on Windows 10 for more details.
If updating the system BIOS did not fix the problem, check for hardware issues.
Consider using a third-party BSoD repair software to help you diagnose and fix the problem automatically.
6. Check for hardware issues
One of the common reasons for the blue screen of death error is faulty hardware or outdated driver.
If you had recently added a new piece of hardware to your computer, such as upgrading your RAM or adding a USB device, check if the device is triggering the error.
Remove the connected USB device and reboot the computer. After the restart, check if the blue screen of death error occurs.
If the issue persists, check for internal hardware issues. Faulty RAM slots are also a known cause of BSOD errors. Empty your primary or secondary RAM slot and reboot the computer to diagnose the problem.
- Clock watchdog timeout error on Windows 10 [Full Guide]
- Edge Photo: What is it & how to use it
- KB5027119 breaks printing in ProSeries, but there’s a fix
The Synthetic Watchdog Timeout error usually occurs due to a buggy Windows update or hardware issues. Follow all the steps in this article one by one to diagnose and fix the problem quickly.
![]()
Ошибка тайм-аута Clock Watchdog – одна из тех ужасных проблем BSOD, которые могут возникнуть в Windows 11 и других настольных платформах Microsoft (пользователи Windows 10 часто сталкивались с той же ошибкой тайм-аута Clock Watchdog).
Когда возникает эта проблема, появляется синий экран с сообщением об ошибке тайм-аута Clock Watchdog. Один из наших читателей пожаловался на то, что очень часто появляется синий экран с кодом ошибки Clock Watchdog Timeout, даже несколько раз в день.
Это обычно происходит в середине рабочего, а не сразу после загрузки его компьютера. Поскольку ошибка тайм-аута Clock Watchdog вызывает перезагрузку системы, это может стать серьезной проблемой, если происходит регулярно.
Если вы знакомы с ошибкой тайм-аута Clock Watchdog в Windows 11, вам следует выполнить некоторые действия по устранению неполадок, чтобы убедиться, что это больше не повторится.
Почему появляется ошибка BSOD?
BSOD означает синий экран смерти, который является одним из видов сбоя системы. Сбой системы с синим экраном возникает из-за внезапного завершения важного процесса или аппаратного сбоя. Когда появляются такие ошибки, Windows перезагружается.
Ошибки BSOD также известны как ошибки остановки, потому что они останавливают Windows. Все они имеют коды ошибок остановки (в противном случае – значения проверки), которые на них ссылаются. Код ошибки тайм-аута сторожевого таймера имеет контрольное значение 0x00000101.
Ошибка синего экрана тайм-аута Clock Watchdog является результатом того, что ЦП (центральный процессор) не отвечает или находится в тупиковой ситуации. Следовательно, процессор перестает обрабатывать прерывания.
В любом случае, проблема с тайм-аутом Clock Watchdog так же страшна, как и любая другая ошибка BSOD. Поскольку это может возникать по разным причинам, существует множество потенциальных исправлений. Вот как вы можете решить ошибку тайм-аута Clock Watchdog в Windows 11.
Как исправить ошибку тайм-аута Clock Watchdog в Windows 11?
1. Отключите ненужные USB-устройства от ПК.
Во-первых, рекомендуется отключить все лишние периферийные USB-устройства, подключенные к вашему ПК, например накопители или DVD-приводы.
Если ошибка тайм-аута часового сторожевого таймера после этого не возникает, возможно, причиной проблемы было одно из ранее подключенных устройств.
2. Запустите сканирование SFC.
- Чтобы открыть окно поиска, нажмите кнопку с увеличительным стеклом на панели задач .
- Введите cmd в поисковой утилите Windows 11.
- Выберите в командной строке параметр « Запуск от имени администратора» .

- Перед запуском сканирования системных файлов введите эту команду и нажмите Enter:
DISM.exe /Online /Cleanup-image /Restorehealth - Затем введите следующую команду системного файла в окне подсказки и нажмите Enter:
sfc /scannow

- Подождите, пока сканирование не будет завершено на 100 процентов и не отобразится сообщение о результате.
3. Обновите Windows 11
- Чтобы быстрее открыть настройки , нажмите сочетание клавиш Windows+ I.
- Затем щелкните вкладку Центр обновления Windows .

- Нажмите кнопку Проверить наличие обновлений на этой вкладке.
4. Отменить разгон ПК.

Выполняли ли вы какой-либо разгон системы с помощью специального инструмента? Если да, возможно, именно поэтому вам нужно исправить ошибку тайм-аута Clock Watchdog.
Итак, отмените любой разгон, восстановив настройки в своем программном обеспечении для разгона до значений по умолчанию.
5. Проверьте желтые индикаторы ошибок драйвера в диспетчере устройств.
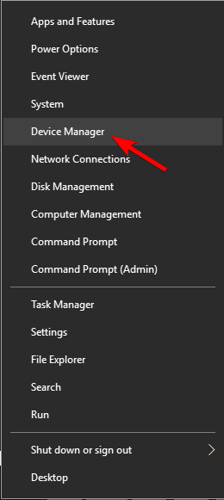
- Щелкните правой кнопкой мыши кнопку « Пуск» в Windows 11 на панели задач.
- Выберите в меню Диспетчер устройств .

- Теперь поищите устройства с желтыми восклицательными знаками рядом с ними, которые указывают на ошибки устройства.
- Щелкните правой кнопкой мыши устройство с желтым восклицательным знаком рядом с ним и выберите « Обновить драйвер» .

- После этого выберите опцию Автоматический поиск драйверов .

Также рекомендуется сканировать ваш компьютер с помощью надежного стороннего программного обеспечения для обновления драйверов. Стороннее средство обновления драйверов, такое как DriverFix, выведет список всех устройств вашего ПК с устаревшими драйверами и обновит их автоматически.
6. Запустите программу диагностики памяти Windows.
- Сначала щелкните значок увеличительного стекла на панели задач.
- Введите ключевое слово Windows Memory Diagnostic в текстовое поле средства поиска.
- Щелкните Диагностика памяти Windows, чтобы открыть ее окно.
- Выберите вариант « Перезагрузить сейчас и проверьте наличие проблем» .

- После этого Windows перезагрузится. Подождите, пока средство диагностики памяти Windows сделает свое дело.
- При перезагрузке Windows должен появиться результат диагностики памяти Windows. Однако если это не так, щелкните правой кнопкой мыши « Пуск» и выберите « Просмотр событий» .

- Выберите Журналы Windows и системы на средства просмотра событий окна.
- Нажмите кнопку « Найти» в правой части окна просмотра событий .

- Введите MemoryDiagnostic в поле ” Найти” .
- Нажмите кнопку ” Найти далее” .

- После этого вы можете просмотреть результат MemoryDiagnostic на вкладке « Общие » в нижней части средства просмотра событий.
Если диагностика памяти Windows выявляет проблему с оперативной памятью, возможно, вам потребуется заменить модуль памяти на вашем ПК.
7. Восстановите Windows 11 до более ранней даты.
- Во – первых, нажмите Windowsи Rклавиши и одновременно.
- Затем введите этот текст в поле Открыть и нажмите Enter:
rstrui - Установите переключатель « Выбрать другую точку восстановления », если этот параметр доступен.

- Щелкните Далее, чтобы продолжить.
- Установите флажок « Показать больше точек восстановления», если «Восстановление системы» отображает этот параметр.
- Выберите точку восстановления, которая откатит Windows 11 до времени, предшествующего ошибке тайм-аута Clock Watchdog на вашем настольном компьютере или ноутбуке. Также можно выбрать самую старую дату точки восстановления.

- Нажмите кнопку « Далее» , чтобы перейти к последнему шагу.
- Выберите вариант Готово, чтобы откатить Windows 11 до выбранной точки восстановления.
8. Обновите BIOS вашего ПК.

Если вы используете старый компьютер, для решения проблемы может потребоваться обновление BIOS (базовой системы ввода-вывода).
Чтобы обновить BIOS, вам необходимо загрузить для него последнюю версию прошивки. Наше руководство о том, как легко обновить BIOS, содержит полную информацию.
С кем я могу связаться, чтобы исправить ошибку тайм-аута Clock Watchdog?
Поскольку это ошибка Windows, вероятно, лучше всего обратиться в службу поддержки Microsoft. Вы можете сделать это через браузер, заполнив текстовое поле на странице « Обратиться в службу поддержки Microsoft». После этого нажмите кнопку « Получить справку» и выберите « Обратиться в службу поддержки».
Технические проблемы с BSOD могут быть тем, с чем также могут помочь службы поддержки производителя ПК. Производитель вашего ПК, скорее всего, также имеет службу поддержки для своих настольных компьютеров или ноутбуков. Посетите веб-сайт производителя вашего компьютера, чтобы узнать, как связаться со службой поддержки.
Однако применение предложенных выше решений может исправить ошибку тайм-аута Clock Watchdog для многих пользователей. Они не совсем гарантируют, что решат проблему для всех, но, тем не менее, попробовать их стоит.
Раздел поддержки на веб-сайте Microsoft также включает информативное средство устранения неполадок с синим экраном. Некоторые решения, предлагаемые средством устранения неполадок, могут помочь вам исправить ошибку тайм-аута Clock Watchdog. Так что проверьте эту страницу, прежде чем обращаться в службу поддержки.
Расскажите нам о своем опыте и решении, которое сработало для вас, в разделе комментариев ниже.
The SYNTHETIC_WATCHDOG_TIMEOUT is a bug on Windows 10/11, rendering your PC inaccessible by forcing it to restart repeatedly. The error results in a Blue Screen of Death (BSoD) and can cause immense damage to your system if not dealt with immediately. A BSOD due to a watchdog timer error on Windows 10/11 typically results in data loss. Any unsaved data will be gone, and other data stored on your PC might also get affected. However, you need not worry as this article will traverse through the most suitable solution to this error, and you will be able to resolve the problem. Moreover, we will further help you recover any data lost due to BSOD in three simple steps.
What causes the SYNTHETIC_WATCHDOG_TIMEOUT error?
If you face the synthetic watchdog timeout error with error code 0x000001CA, it is because the OS is not processing the timer ticks. The issue arises when the system-wide watchdog expires. A watchdog timer, also known as the computer operating properly or COP timer, is an electronic or logical component with the primary function to check on your system’s malfunctions and recover from them if need be.
Software on your device needs to signal the timer to restart its count regularly, and this process is fondly known as petting the Dog. This way, the Windows system always restores to a normal state if it’s malfunctioning due to any reason. However, if the petting stops for any reason, the watchdog becomes unable to restore the Windows to a normal state, and thus you face the synthetic watchdog timer error.
Fix the SYNTHETIC_WATCHDOG_TIMEOUT error on Windows 10/11
The watchdog timer error generally occurs while playing games or using a virtual machine on your Windows PC. A faulty or outdated driver or a bug in the Windows update initiates this problem causing BSOD on the Windows 10/11 OS. Let’s resolve this bug issue with the most suited solutions.
Fix 1: Update your Windows
With the reports of any major bug, Windows hastens to a Windows update release. If you haven’t updated your Windows for long, you should update it. The watchdog timer error might be persisting due to an outdated Windows OS version. Here’s how to do it.
Step 1: Click Start > Settings > Update and Security.

Step 2: Click Check for Updates.

Step 3: If there are pending updates shown, click Install Now and wait for the process to complete.
Fix 2: Update Drivers on Windows 10/11
Drivers are another reason behind the appearance of the BSOD error on your PC. An outdated or faulty driver interferes with the communication of different components with OS, apart from other issues. You can update the drivers as explained below.
Step 1: Search for Device Manager in the search bar on your desktop.

Step 2: Locate the device you want to update and expand it by clicking the arrow in front of it.
Step 3: Right-click the items in the expanded list and choose Update Driver.

Repeat the process for each driver you want to update.
Fix 3: Run Windows Memory Diagnostics
If there is a memory mismatch between your Windows PC and any programs or the OS itself, the BSOD error appears. You can check the status of your system’s memory with the help of the in-built Windows Memory Diagnostics app.
Step 1: Type memory in the search box and select Run as Administrator under the Windows Memory Diagnostics.

Caution: Before implementing Step 2, save any unsaved files on your PC.
Step 2: In the new pop-up window, choose the first option out of the two: Restart now and check for problems (Recommended).

Step 3: Your will restart, and any existing issue with the memory will be identified and resolved.
Fix 4: Disconnect any external hardware from your PC
Sometimes the BSOD is caused not due to error or malfunction of internal components of your PC, but due to external or peripheral devices. The peripheral devices develop a fault and cause an interruption in the critical functions of Windows OS and related processing elements. To rule out the possibility, perform the following steps on your PC.
Step 1: Disconnect all the connected devices like mouse, keyboard, etc.
Step 2: Press Ctrl +Alt + Delete and use the up-down arrow keys to select the Shutdown button. Press Enter.

Step 3: Again, use the arrow keys to select Restart from the options and hit Enter.
Let the restart complete and see if BSOD appears.
Fix 5: Run the chkdsk command to repair drive issues.
The storage drive develops issues like bad sectors, file system errors, etc., over a prolonged usage span. Running the chkdsk command on your Windows 10/ 11 will identify and repair all the errors related to your system drive.
Step1: Open Command Prompt on your Windows PC.
Note: For Command Prompt on Windows 10, search cmd in the search box. You might find Windows Terminal on Windows 11 instead of Command Prompt. To initiate Command Prompt, click Windows Terminal > Open Settings and change Default Profile to Command Prompt.
Step 2: Insert command Chkdsk C: /f /r /x and hit Enter.

Step 3: The search and repair of drive issues will commence. Do not interrupt the process.
Fix 6: Update BIOS
Updating BIOS is a critical operation, and you should opt for it with utmost caution. Any wrong step would render your Windows PC unbootable. Although, if you do it correctly, the BSOD error caused due to the SYNTHETIC_WATCHDOG_TIMER bug issue would be resolved.
Check your BIOS version
Step 1: Press Windows + R and type msinfo32 in the Run tab. Hit Enter.

Step 2: Locate BIOS Version/Date and note down the BIOS version.

Step 3: Locate the Baseboard Manufacturer and check the manufacturer.

Update BIOS
Step 1: Go to the support page of the motherboard manufacturer’s website.
Step 2: Find the Downloads for your motherboard model and download the latest BIOS version.
Step 3: Extract the BIOS update file downloaded on your Windows PC and locate the readme file.
Step 4: Read the instructions given in the readme file and copy the file to a blank USB thumb drive.
Step 5: Restart your PC and press the key mentioned at the bottom of the boot screen to enter the BIOS setup. (Generally, you need to press either of the F10, F2, F12, F1 or DEL keys, depending on your system manufacturer)
Step 6: Open the BIOS/UEFI firmware update (or BIOS flashing tool) and select the update file on the thumb drive to update the BIOS on your PC.

How to recover data lost due to BSOD on Windows 10/11?
BSOD being a critical system error is potentially harmful to your system and its data. Moreover, if the error occurred while you had some unsaved data on your PC, it won’t be saved. As a result, you will lose all the unsaved data, and your existing data might also bear the wrath of BSOD. However, we understand your trouble. Therefore, we will give you a globally trusted data recovery solution. You can use Stellar Data Recovery Professional for Windows to regain any lost data in its original form and full integrity. It is an easy-to-use DIY software with a simple UI. The effective algorithms of this data recovery tool can retrieve data even from a crashed or non-booting Windows PC. Moreover, it securely recovers the lost or deleted data without affecting the data stored on your PC. It is loaded with multiple useful features to help you in any data loss situation.

Conclusion
The watchdog timer is a least noticed yet most important part of a computer system. It safeguards your data by continuously working in the background to help your system cope with minor and major glitches happening throughout the work period. The SYNTHETIC_WATCHDOG_TIMEOUT error results in a malfunction in the timer putting the entire computer system and data stored on it at high risk. The methods discussed above are fully capable of resolving this error and bringing back your computer within the ambit of secure operation. We hope you have resolved the BSOD error caused by the Synthetic watchdog timeout issue and are able to recover the permanently deleted files due to the problem of BSOD.
FAQ
1. What is stop code CLOCK_WATCHDOG_TIMEOUT?
If you face the CLOCK_WATCHDOG_TIMEOUT error on your Windows PC, it will cause a BSOD error. Your system cannot handle the issue behind this error and will go for a repeated restart. The BSOD and repeated restart may cause other system errors apart from severe data loss. If you are facing the issue, immediately take these preliminary steps:
- Unplug all peripheral devices
- Update the drivers
- Install the latest Windows update
- Scan your Windows PC using a good antivirus tool
- Finally, recover your lost data using good data recovery software
2. What is a Windows stop code error?
Whenever your OS encounters an issue beyond its repairing capabilities, it simply crashes. In most cases, you will experience a repeated restart and the appearance of a Blue Screen of Death displaying an error message. Each error has a unique code that starts with 0x and is followed by eight digits. So, for example, if you face the SYNTHETIC_WATCHDOG_TIMEOUT error, you’ll see the error code 0x000001CA. The stop code errors can be avoided by updating the system and drivers regularly and taking precautions while attaching any external device to your Windows PC.
3. Can I upgrade my Windows 10 PC to Windows 11 free?
The Windows 11 update is free for all existing Windows 10 users. However, you can upgrade to Windows 11 only if you have the latest updated version of Windows 10 and meet the System Requirements.
by Tashreef Shareef
Tashreef Shareef is a software developer turned tech writer. He discovered his interest in technology after reading a tech magazine accidentally. Now he writes about everything tech from… read more
Updated on March 3, 2022
- Synthetic Watchdog Timeout in Windows 10 usually occurs when playing video games or using the Hyper-X virtual machine.
- Outdated system drivers or buggy Windows update usually trigger this BSoD error.
- To resolve the error, update system drivers, install pending Windows updates and run the System File Checker tool.
- Check out more details to fix this blue screen of death error below
The Synthetic Watchdog Timeout BSOD error in Windows 10 frequently occurs when the system is idle or playing games. This error usually occurs when the specified processor is not processing interrupts.
This error is triggered when the processor is unable to continue the processing tasks because its resources are occupied, resulting in a deadlock. When the system is in the deadlock state, it will hang or freeze, resulting in a blue screen of death.
The error Synthetic Watchdog Timeout can occur due to a glitchy Windows update, outdated drivers, or even issues with the peripherals.
In this article, we have listed a few troubleshooting steps to help you determine the cause and fix the Synthetic Watchdog Timeout error in Windows 10.
How do I fix the Synthetic Watchdog Timeout error?
1. Update outdated drivers with DriverFix
Missing or outdated system drivers can trigger the blue screen of death error. To fix the problem, try updating the system drivers using DriverFix.
DriverFix is a popular Windows program that allows you to update all your drivers with one click and enjoy better gaming and overall system performance. With a huge database of drivers, you can fix missing and outdated drivers in no time.
With the included download manager, you can see the download progress of driver files. It automatically creates a backup and saves all of your drivers to a compressed zip file.
Key features of DriverFix:
- Huge database of over 18 million files
- Built-in download and driver backup solution
- Schedule manage to perform driver scan, update notifications, and backup
- Clean user interface
⇒ Get DriverFix
2. Install pending Windows updates
- Click on Start and select Settings.
- Go to Update & Security and choose Windows Update.
- Click on Check for updates and wait for the Windows to scan for an available update.
- Download all the feature KB update available for your system. Install the updates and reboot the computer.
After the restart, check if the Synthetic Watchdog Timeout Hyper-V error is resolved.
Several users have reported the error to have occurred due to an undisclosed bug in the OS that was fixed with a KB update. If you encounter an issue after installing a Windows update, try to install any KB update that is available.
3. Rollback to the previous version of Windows
- Press the Windows key + I to open Settings.
- Go to Update & Security.
- Open the Recovery tab from the left pane.
- Scroll down to Go back to the previous version of Windows 10 section.
- Click the Get started button. Follow on-screen instructions to install the previous version of Windows 10.
If the error is triggered after installing a Windows update, you can back to the previous Windows within ten days of installing the update. After 10 days, the Get started button is greyed out, and you would have to rollback manually if required.
4. Repair Windows 10 image with DISM command
- Press the Windows key, and type cmd in search.
- Right-click on Command Prompt and select Run as Administrator.
- In the Command Prompt windows, type the following command and hit enter:
DISM /Online /Cleanup-Image /CheckHealth - Wait for the tool to complete the scan and verify any data corruption that requires fixing.
- Next, run the following command to run an advanced scan and repair problems automatically:
DISM /Online /Cleanup-Image /RestoreHealth - Wait for the tool to scan the system and apply the required fixes to resolve the issue.
If the tool is stuck at 20 or 40 percent, do not exit or turn off your computer, as it is a normal behavior. After a few minutes, the process will complete successfully.
If the issue persists, run the system file checker tool to scan the system files for corruption and repair them automatically.
Some PC issues are hard to tackle, especially when it comes to corrupted repositories or missing Windows files. If you are having troubles fixing an error, your system may be partially broken.
We recommend installing Restoro, a tool that will scan your machine and identify what the fault is.
Click here to download and start repairing.
Run System File Checker tool
- Open the Command Prompt as Administrator.
- In the Command Prompt, enter the following command and hit enter:
Sfc /scannow - Wait for the system file checker to complete the scan. If any data corruption is found, proceed to apply the recommended fixes by following on-screen instructions.
Once the fix is applied, reboot the computer. After the restart, check if the Synthetic Watchdog Timeout Windows 10 error is resolved.
5. Update BIOS
Check bios version
- Press the Windows key + R to open Run.
- Type msinfo32 and click OK to open System Information.
- Click the System Summary option.
- In the right pane, check your BIOS Version and Date field.
Start the update process
If you are using a laptop, you can download the latest BIOS version using the OEM system utility software.
Lenovo offers the Vantage utility to help users keep their systems up to date. You can also download the latest version of BIOS from the laptop’s OEM website.
For a custom-built PC, visit the motherboard manufacturer website to download the latest BIOS version for your system. You can refer to our detailed guide on how to update BIOS on Windows 10 for more details.
If updating the system BIOS did not fix the problem, check for hardware issues.
Consider using a third-party BSoD repair software to help you diagnose and fix the problem automatically.
6. Check for hardware issues
One of the common reasons for the blue screen of death error is faulty hardware or outdated driver.
If you had recently added a new piece of hardware to your computer, such as upgrading your RAM or adding a USB device, check if the device is triggering the error.
Remove the connected USB device and reboot the computer. After the restart, check if the blue screen of death error occurs.
If the issue persists, check for internal hardware issues. Faulty RAM slots are also a known cause of BSOD errors. Empty your primary or secondary RAM slot and reboot the computer to diagnose the problem.
- Clock watchdog timeout error on Windows 10 [Full Guide]
- Driver PNP Watchdog: 9 Easy Fixes For Windows
- KB5022358: Everything you need to know about this Beta Channel build
- KB5022360 will upgrade your Windows 11 to version 22H2
The Synthetic Watchdog Timeout error usually occurs due to a buggy Windows update or hardware issues. Follow all the steps in this article one by one to diagnose and fix the problem quickly.
![]()
Newsletter
The SYNTHETIC_WATCHDOG_TIMEOUT is a bug on Windows 10/11, rendering your PC inaccessible by forcing it to restart repeatedly. The error results in a Blue Screen of Death (BSoD) and can cause immense damage to your system if not dealt with immediately. A BSOD due to a watchdog timer error on Windows 10/11 typically results in data loss. Any unsaved data will be gone, and other data stored on your PC might also get affected. However, you need not worry as this article will traverse through the most suitable solution to this error, and you will be able to resolve the problem. Moreover, we will further help you recover any data lost due to BSOD in three simple steps.
What causes the SYNTHETIC_WATCHDOG_TIMEOUT error?
If you face the synthetic watchdog timeout error with error code 0x000001CA, it is because the OS is not processing the timer ticks. The issue arises when the system-wide watchdog expires. A watchdog timer, also known as the computer operating properly or COP timer, is an electronic or logical component with the primary function to check on your system’s malfunctions and recover from them if need be.
Software on your device needs to signal the timer to restart its count regularly, and this process is fondly known as petting the Dog. This way, the Windows system always restores to a normal state if it’s malfunctioning due to any reason. However, if the petting stops for any reason, the watchdog becomes unable to restore the Windows to a normal state, and thus you face the synthetic watchdog timer error.
Fix the SYNTHETIC_WATCHDOG_TIMEOUT error on Windows 10/11
The watchdog timer error generally occurs while playing games or using a virtual machine on your Windows PC. A faulty or outdated driver or a bug in the Windows update initiates this problem causing BSOD on the Windows 10/11 OS. Let’s resolve this bug issue with the most suited solutions.
Fix 1: Update your Windows
With the reports of any major bug, Windows hastens to a Windows update release. If you haven’t updated your Windows for long, you should update it. The watchdog timer error might be persisting due to an outdated Windows OS version. Here’s how to do it.
Step 1: Click Start > Settings > Update and Security.
Step 2: Click Check for Updates.
Step 3: If there are pending updates shown, click Install Now and wait for the process to complete.
Fix 2: Update Drivers on Windows 10/11
Drivers are another reason behind the appearance of the BSOD error on your PC. An outdated or faulty driver interferes with the communication of different components with OS, apart from other issues. You can update the drivers as explained below.
Step 1: Search for Device Manager in the search bar on your desktop.
Step 2: Locate the device you want to update and expand it by clicking the arrow in front of it.
Step 3: Right-click the items in the expanded list and choose Update Driver.
Repeat the process for each driver you want to update.
Fix 3: Run Windows Memory Diagnostics
If there is a memory mismatch between your Windows PC and any programs or the OS itself, the BSOD error appears. You can check the status of your system’s memory with the help of the in-built Windows Memory Diagnostics app.
Step 1: Type memory in the search box and select Run as Administrator under the Windows Memory Diagnostics.
Caution: Before implementing Step 2, save any unsaved files on your PC.
Step 2: In the new pop-up window, choose the first option out of the two: Restart now and check for problems (Recommended).
Step 3: Your will restart, and any existing issue with the memory will be identified and resolved.
Fix 4: Disconnect any external hardware from your PC
Sometimes the BSOD is caused not due to error or malfunction of internal components of your PC, but due to external or peripheral devices. The peripheral devices develop a fault and cause an interruption in the critical functions of Windows OS and related processing elements. To rule out the possibility, perform the following steps on your PC.
Step 1: Disconnect all the connected devices like mouse, keyboard, etc.
Step 2: Press Ctrl +Alt + Delete and use the up-down arrow keys to select the Shutdown button. Press Enter.
Step 3: Again, use the arrow keys to select Restart from the options and hit Enter.
Let the restart complete and see if BSOD appears.
Fix 5: Run the chkdsk command to repair drive issues.
The storage drive develops issues like bad sectors, file system errors, etc., over a prolonged usage span. Running the chkdsk command on your Windows 10/ 11 will identify and repair all the errors related to your system drive.
Step1: Open Command Prompt on your Windows PC.
Note: For Command Prompt on Windows 10, search cmd in the search box. You might find Windows Terminal on Windows 11 instead of Command Prompt. To initiate Command Prompt, click Windows Terminal > Open Settings and change Default Profile to Command Prompt.
Step 2: Insert command Chkdsk C: /f /r /x and hit Enter.
Step 3: The search and repair of drive issues will commence. Do not interrupt the process.
Fix 6: Update BIOS
Updating BIOS is a critical operation, and you should opt for it with utmost caution. Any wrong step would render your Windows PC unbootable. Although, if you do it correctly, the BSOD error caused due to the SYNTHETIC_WATCHDOG_TIMER bug issue would be resolved.
Check your BIOS version
Step 1: Press Windows + R and type msinfo32 in the Run tab. Hit Enter.
Step 2: Locate BIOS Version/Date and note down the BIOS version.
Step 3: Locate the Baseboard Manufacturer and check the manufacturer.
Update BIOS
Step 1: Go to the support page of the motherboard manufacturer’s website.
Step 2: Find the Downloads for your motherboard model and download the latest BIOS version.
Step 3: Extract the BIOS update file downloaded on your Windows PC and locate the readme file.
Step 4: Read the instructions given in the readme file and copy the file to a blank USB thumb drive.
Step 5: Restart your PC and press the key mentioned at the bottom of the boot screen to enter the BIOS setup. (Generally, you need to press either of the F10, F2, F12, F1 or DEL keys, depending on your system manufacturer)
Step 6: Open the BIOS/UEFI firmware update (or BIOS flashing tool) and select the update file on the thumb drive to update the BIOS on your PC.
How to recover data lost due to BSOD on Windows 10/11?
BSOD being a critical system error is potentially harmful to your system and its data. Moreover, if the error occurred while you had some unsaved data on your PC, it won’t be saved. As a result, you will lose all the unsaved data, and your existing data might also bear the wrath of BSOD. However, we understand your trouble. Therefore, we will give you a globally trusted data recovery solution. You can use Stellar Data Recovery Professional for Windows to regain any lost data in its original form and full integrity. It is an easy-to-use DIY software with a simple UI. The effective algorithms of this data recovery tool can retrieve data even from a crashed or non-booting Windows PC. Moreover, it securely recovers the lost or deleted data without affecting the data stored on your PC. It is loaded with multiple useful features to help you in any data loss situation.
Conclusion
The watchdog timer is a least noticed yet most important part of a computer system. It safeguards your data by continuously working in the background to help your system cope with minor and major glitches happening throughout the work period. The SYNTHETIC_WATCHDOG_TIMEOUT error results in a malfunction in the timer putting the entire computer system and data stored on it at high risk. The methods discussed above are fully capable of resolving this error and bringing back your computer within the ambit of secure operation. We hope you have resolved the BSOD error caused by the Synthetic watchdog timeout issue and are able to recover the permanently deleted files due to the problem of BSOD.
FAQ
1. What is stop code CLOCK_WATCHDOG_TIMEOUT?
If you face the CLOCK_WATCHDOG_TIMEOUT error on your Windows PC, it will cause a BSOD error. Your system cannot handle the issue behind this error and will go for a repeated restart. The BSOD and repeated restart may cause other system errors apart from severe data loss. If you are facing the issue, immediately take these preliminary steps:
- Unplug all peripheral devices
- Update the drivers
- Install the latest Windows update
- Scan your Windows PC using a good antivirus tool
- Finally, recover your lost data using good data recovery software
2. What is a Windows stop code error?
Whenever your OS encounters an issue beyond its repairing capabilities, it simply crashes. In most cases, you will experience a repeated restart and the appearance of a Blue Screen of Death displaying an error message. Each error has a unique code that starts with 0x and is followed by eight digits. So, for example, if you face the SYNTHETIC_WATCHDOG_TIMEOUT error, you’ll see the error code 0x000001CA. The stop code errors can be avoided by updating the system and drivers regularly and taking precautions while attaching any external device to your Windows PC.
3. Can I upgrade my Windows 10 PC to Windows 11 free?
The Windows 11 update is free for all existing Windows 10 users. However, you can upgrade to Windows 11 only if you have the latest updated version of Windows 10 and meet the System Requirements.
Updating your drivers is a fast way to fix Clock Watchdog Timeout errors.
by Milan Stanojevic
Milan has been enthusiastic about technology ever since his childhood days, and this led him to take interest in all PC-related technologies. He’s a PC enthusiast and he… read more
Updated on October 26, 2022
Reviewed by
Vlad Turiceanu

Passionate about technology, Windows, and everything that has a power button, he spent most of his time developing new skills and learning more about the tech world. Coming… read more
- The Clock Watchdog Timeout error can be caused by outdated or broken drivers.
- Here’s a solid lead to start your troubleshooting process.
- Don’t forget to check your CPU and GPU for signs of overclocking!
XINSTALL BY CLICKING THE DOWNLOAD FILE
This software will repair common computer errors, protect you from file loss, malware, hardware failure and optimize your PC for maximum performance. Fix PC issues and remove viruses now in 3 easy steps:
- Download Restoro PC Repair Tool that comes with Patented Technologies (patent available here).
- Click Start Scan to find Windows issues that could be causing PC problems.
- Click Repair All to fix issues affecting your computer’s security and performance
- Restoro has been downloaded by 0 readers this month.
Clock Watchdog Timeout is among the most serious errors you’ll ever encounter on a Windows PC, but it can stretch even beyond this platform.
While Blue Screen of Death errors are rare, they can be quite problematic, therefore it’s important to know how to deal with them.
Clock_watchdog_timeout is a pretty common BSOD error. And speaking of errors, these are some common problems that users reported:
- Clock Watchdog Timeout Overclock – This error usually occurs after you overclock your hardware. If your hardware is overclocked, remove the overclock settings and check if that solves the issue.
- Clock_watchdog_timeout Ryzen – Many users reported this error with Ryzen CPUs. It seems that the issue was caused by a problematic update, but after removing it, the problem was completely resolved.
- Clock Watchdog Timeout PC Building Simulator – This usually indicated an issue at the CPU level.
- Clock Watchdog Timeout Bluestacks – You should make sure that virtualization is enabled and reinstall the emulator from scratch.
- Clock_watchdog_timeout Windows 8.1, Windows 7 – Just like any other error, the blue screen Clock watchdog timeout isn’t exclusive to Windows 10. Even if you’re not using Windows 10, you should be able to fix the problem with one of our solutions.
- Clock watchdog timeout RAM, GPU – Many users reported that their RAM or GPU was the cause of this error. Check if your RAM is compatible with your motherboard.
- Clock watchdog timeout HP, Lenovo, Intel, AMD – This BSoD Clock Watchdog Timeout can appear on almost any device, and users reported it with both Intel and AMD processors on HP and Lenovo.
First thing first. What is a clock watchdog? Simply put, it’s a timer and one that works in your favor. Whenever you launch a program, the system will automatically set this timer to measure the time elapsed until the program reacts.
If the program fails to respond in due time, the system will acknowledge the software malfunction and contain the possible damage.
- Why do I get Clock Watchdog Timeout?
- How can I fix the CLOCK_WATCHDOG_TIMEOUT error?
- 1. Update your drivers
- 2. Update your BIOS
- 3. Disable C1-6 in BIOS
- 4. Remove problematic applications
- 5. Reset BIOS
- 6. Remove the overclocking settings
- 7. Update your SSD firmware and disable LPM
- 8. Disable C1E and Intel Speedstep in BIOS
- 9. Manually set RAM and turn off Asus Turbo in BIOS
- 10. Unplug your DVD drive during Windows 10 installation
- 11. Clean your computer case and check for faulty hardware
- 12. Install the latest updates
- 13. Remove the problematic updates
Why do I get Clock Watchdog Timeout?
This is a Blue Screen error, and as such, it can appear on any operating system, even the latest and freshest. In fact, users reported the Clock Watchdog Timeout error in Windows 11 as well.
Clock Watchdog Timeout can be caused by hardware. If you’re getting this or maybe Win32k power watchdog timeout error, be sure to check the hardware and remove overclock settings.
Needless to say, there can be plenty of other reasons behind this uncomfortable BSoD, including outdated drivers and firmware, corrupted or incomplete sys / DLL files, malware infection, and more.
Here’s an interesting thought. Can GPU cause Clock Watchdog Timeout? Without a doubt. Most of the time, it’s a direct indicator that something is wrong with your processor, making it impossible to process clock interrupts.
Your RAM memory, GPU, or in some cases CPU can be the cause for Synthetic_watchdog_timeout blue screen error, so be sure to check them.
How can I fix the CLOCK_WATCHDOG_TIMEOUT error?
1. Update your drivers
1. Right-click the Windows button on your taskbar and select Device Manager from the list that opens.
2. Browse through the list and identify the component you want to update the driver for.
3. Click on it to expand the section.
4. Right-click the driver and select Update driver from the drop-down menu (in our example we update the graphics driver as it’s usually the one responsible for this BSOD).
5. Choose whether you want to automatically or manually install your driver.
Blue Screen of Death errors are often caused by outdated or buggy drivers, and you can easily fix this issue by downloading and installing the latest drivers.
Bear in mind that you might have to update all drivers on your PC in order to fix this error and keep your Windows 10 PC stable.
If updating the drivers by using Device Manager is not fixing the problem, you will need to visit the manufacturer’s website and download the correct driver.
Downloading drivers manually isn’t the best way to update your drivers, but you can use dedicated, third-party software to update all your drivers with just a single click.
Various errors are the result of a malfunctioning driver. When this is the case, you may need to update or reinstall completely this specific component. As the process is not straight-forward to complete, we recommend using an automated tool for the job. Here’s how to do it:
- Download and install DriverFix.
- Launch the app.
- Wait for the software to detect all your faulty drivers.
- You will now be presented with a list of all the drivers that have issues, and you just need to select the ones you’d liked fixed.
- Wait for DriverFix to download and install the newest drivers.
- Restart your PC for the changes to take effect.

DriverFix
Keep your Windows safe from any type of errors caused by corrupted drivers, by installing and using DriverFix today!
Disclaimer: this program needs to be upgraded from the free version in order to perform some specific actions.
2. Update your BIOS
BIOS update is an advanced procedure that installs new firmware for your motherboard, thus unlocking new features.
Users reported that you can fix the CLOCK_WATCHDOG_TIMEOUT Blue Screen of Death error by updating your BIOS. Be sure to take a closer look at our guide to see how to update BIOS on Windows 10.
Flashing your BIOS can be potentially dangerous if you don’t do it properly, so be extra careful.
3. Disable C1-6 in BIOS
A few users reported that they managed to fix this error by disabling certain settings in BIOS. According to them, disabling the C1-6 in BIOS fixed the BSOD error, so be sure to try that.
To see how to access BIOS and how to find and disable these settings, we strongly suggest that you check your motherboard manual.
4. Remove problematic applications
Third-party applications can often cause these types of errors. In order to fix the CLOCK WATCHDOG TIMEOUT error, you’ll have to find and remove the problematic application from your PC.
Antivirus is the usual suspect, therefore it’s advised that you temporarily remove it. Most antivirus companies have these tools available for download on their website free of charge:
- How to Uninstall Norton Antivirus on Windows 10
- How to uninstall McAfee
If you’re using any antivirus solution and you want to completely remove it from your PC, be sure to check out some awesome uninstaller software.
In addition to antivirus, many users reported that Asus AI Suite can cause this error to appear, therefore we advise you to remove this tool from your PC.
If removing the antivirus solves the problem, you might want to consider switching to different antivirus software. have a look at these best antivirus for Windows 10 PC today and pick the ideal one.
5. Reset BIOS
Some PC issues are hard to tackle, especially when it comes to corrupted repositories or missing Windows files. If you are having troubles fixing an error, your system may be partially broken.
We recommend installing Restoro, a tool that will scan your machine and identify what the fault is.
Click here to download and start repairing.
As we previously mentioned, certain BIOS settings can trigger the CLOCK WATCHDOG TIMEOUT, and the simplest way to fix these issues is to reset your BIOS.
Resetting BIOS will set all settings to the default value, thus fixing this error.
6. Remove the overclocking settings
Overclocking your hardware can give you better performance, but overclocking comes with certain risks as well.
Sometimes, your PC cannot handle certain overclock settings, and you’ll get a BSoD error such as CLOCK WATCHDOG TIMEOUT.
In a worst-case scenario, overclocking can burn and permanently damage your hardware components if you’re not careful. Therefore, we urge you to be extra cautious while overclocking your PC.
If your PC is overclocked, we advise you to remove overclock settings and check if that fixes the error.
7. Update your SSD firmware and disable LPM
CLOCK_WATCHDOG_TIMEOUT error can be caused by outdated SSD firmware, therefore if you’re using SSD, we advise that you update your firmware.
Updating firmware on your SSD can be risky, therefore you need to be extra careful and back up your files.
In addition to updating your firmware, a few users are suggesting disabling LPM, so you might want to do that as well.
8. Disable C1E and Intel Speedstep in BIOS

A few users reported that the CLOCK WATCHDOG TIMEOUT error is caused by certain settings in BIOS, therefore we advise you to disable them.
According to users, C1E and Intel Speedstep caused this error to appear, therefore if you have these settings enabled in BIOS we advise you to disable them and check if that fixes the problem.
9. Manually set RAM and turn off Asus Turbo in BIOS
Sometimes this error can be caused if you don’t manually set the speed of your RAM in BIOS. To see how to do that check your motherboard manual for instructions.
In addition to setting RAM speed, users also suggest disabling the Asus Turbo feature, so you might want to do that as well.
- Pdc_watchdog_timeout BSOD error [Completely Fixed]
- How to fix Clock interrupt was not received [FULL GUIDE]
- Werfault.exe Error on Windows 10: How to Fix & Main Causes
10. Unplug your DVD drive during Windows 10 installation
Several users complained that they cannot install Windows 10 due to the CLOCK WATCHDOG TIMEOUT BSOD error.
Apparently, you can fix this problem by unplugging your SATA DVD drive during the Windows 10 installation process.
After you disconnect your DVD drive, you should be able to install Windows 10 normally.
If your DVD drive is missing in Windows 10, don’t wait another minute and get it back.
11. Clean your computer case and check for faulty hardware
Many BSoD errors can be caused by hardware failure, and to fix this error you need to check if your hardware is working properly. Using a dedicated BSoD repair tool can also help.
A few users reported that a faulty motherboard can cause this error, but a few users reported that a faulty CPU or graphics card can cause this error as well, so be sure to check them first.
If your hardware is working properly, be sure to clean your computer case from dust. Sometimes dust can clog your fans or even your slots, therefore it’s advised to clean your PC with pressurized air.
12. Install the latest updates
- Open the Settings app. You can do that quickly by using Windows Key + I shortcut.
- When Settings app opens, navigate to Update & Security section.
- Now click on Check for updates button.
If you’re getting the CLOCK WATCHDOG TIMEOUT error on your PC, the problem might be the missing updates.
This process is automated and Windows will usually download the necessary updates in the background.
However, bugs can occur once in a while, which can cause you to skip certain updates. To fix this issue, it’s advised to check manually for updates by following the steps above.
Even if the Windows Update button is missing, you’ll still be able to get around it. After installing the updates, check if the problem still persists.
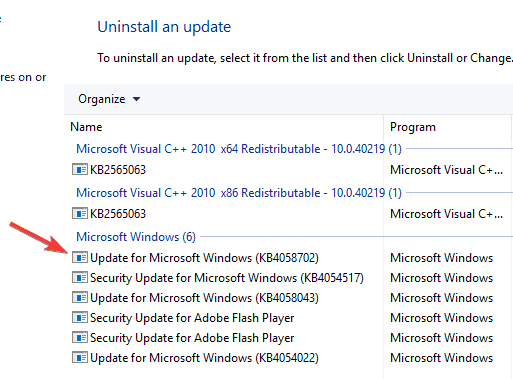
13. Remove the problematic updates
- Open the Settings app and navigate to Update & Security section.
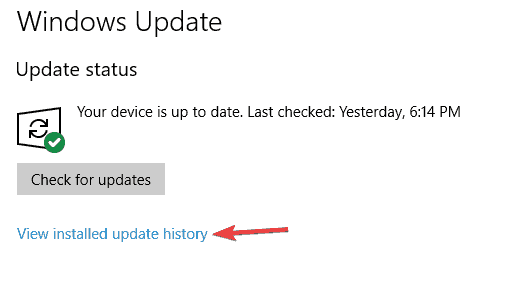
- Now select View installed update history.
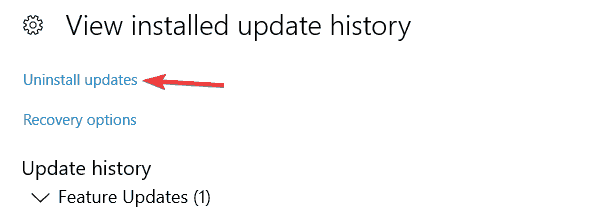
- Now you should see the names of recent updates. Memorize or write down the last few updates since they are the most likely cause of this issue. Click on Uninstall updates.
- Now double click the update that you want to remove and follow the instructions on the screen.
Many Ryzen owners reported a CLOCK WATCHDOG TIMEOUT error on their PC. It seems that this issue is caused by a problematic update, and in order to fix the problem, you need to find it.
If removing the update solves the problem, you need to prevent that update from installing again. Windows 10 will automatically install the missing updates, which will cause the issue to reappear.
To prevent this update from installing again, be sure to check our guide on how to block automatic Windows updates.
CLOCK WATCHDOG TIMEOUT is one problematic error, and it’s mostly caused by outdated firmware or your BIOS settings, but you can easily fix this error by using one of our solutions.
If you have any other suggestions or questions, don’t hesitate to leave them in the comments section below and we’ll be sure to check them out.
Still having issues? Fix them with this tool:
SPONSORED
If the advices above haven’t solved your issue, your PC may experience deeper Windows problems. We recommend downloading this PC Repair tool (rated Great on TrustPilot.com) to easily address them. After installation, simply click the Start Scan button and then press on Repair All.
![]()
Newsletter
Updating your drivers is a fast way to fix Clock Watchdog Timeout errors.
by Milan Stanojevic
Milan has been enthusiastic about technology ever since his childhood days, and this led him to take interest in all PC-related technologies. He’s a PC enthusiast and he… read more
Updated on October 26, 2022
Reviewed by
Vlad Turiceanu
Passionate about technology, Windows, and everything that has a power button, he spent most of his time developing new skills and learning more about the tech world. Coming… read more
- The Clock Watchdog Timeout error can be caused by outdated or broken drivers.
- Here’s a solid lead to start your troubleshooting process.
- Don’t forget to check your CPU and GPU for signs of overclocking!
XINSTALL BY CLICKING THE DOWNLOAD FILE
This software will repair common computer errors, protect you from file loss, malware, hardware failure and optimize your PC for maximum performance. Fix PC issues and remove viruses now in 3 easy steps:
- Download Restoro PC Repair Tool that comes with Patented Technologies (patent available here).
- Click Start Scan to find Windows issues that could be causing PC problems.
- Click Repair All to fix issues affecting your computer’s security and performance
- Restoro has been downloaded by 0 readers this month.
Clock Watchdog Timeout is among the most serious errors you’ll ever encounter on a Windows PC, but it can stretch even beyond this platform.
While Blue Screen of Death errors are rare, they can be quite problematic, therefore it’s important to know how to deal with them.
Clock_watchdog_timeout is a pretty common BSOD error. And speaking of errors, these are some common problems that users reported:
- Clock Watchdog Timeout Overclock – This error usually occurs after you overclock your hardware. If your hardware is overclocked, remove the overclock settings and check if that solves the issue.
- Clock_watchdog_timeout Ryzen – Many users reported this error with Ryzen CPUs. It seems that the issue was caused by a problematic update, but after removing it, the problem was completely resolved.
- Clock Watchdog Timeout PC Building Simulator – This usually indicated an issue at the CPU level.
- Clock Watchdog Timeout Bluestacks – You should make sure that virtualization is enabled and reinstall the emulator from scratch.
- Clock_watchdog_timeout Windows 8.1, Windows 7 – Just like any other error, the blue screen Clock watchdog timeout isn’t exclusive to Windows 10. Even if you’re not using Windows 10, you should be able to fix the problem with one of our solutions.
- Clock watchdog timeout RAM, GPU – Many users reported that their RAM or GPU was the cause of this error. Check if your RAM is compatible with your motherboard.
- Clock watchdog timeout HP, Lenovo, Intel, AMD – This BSoD Clock Watchdog Timeout can appear on almost any device, and users reported it with both Intel and AMD processors on HP and Lenovo.
First thing first. What is a clock watchdog? Simply put, it’s a timer and one that works in your favor. Whenever you launch a program, the system will automatically set this timer to measure the time elapsed until the program reacts.
If the program fails to respond in due time, the system will acknowledge the software malfunction and contain the possible damage.
- Why do I get Clock Watchdog Timeout?
- How can I fix the CLOCK_WATCHDOG_TIMEOUT error?
- 1. Update your drivers
- 2. Update your BIOS
- 3. Disable C1-6 in BIOS
- 4. Remove problematic applications
- 5. Reset BIOS
- 6. Remove the overclocking settings
- 7. Update your SSD firmware and disable LPM
- 8. Disable C1E and Intel Speedstep in BIOS
- 9. Manually set RAM and turn off Asus Turbo in BIOS
- 10. Unplug your DVD drive during Windows 10 installation
- 11. Clean your computer case and check for faulty hardware
- 12. Install the latest updates
- 13. Remove the problematic updates
Why do I get Clock Watchdog Timeout?
This is a Blue Screen error, and as such, it can appear on any operating system, even the latest and freshest. In fact, users reported the Clock Watchdog Timeout error in Windows 11 as well.
Clock Watchdog Timeout can be caused by hardware. If you’re getting this or maybe Win32k power watchdog timeout error, be sure to check the hardware and remove overclock settings.
Needless to say, there can be plenty of other reasons behind this uncomfortable BSoD, including outdated drivers and firmware, corrupted or incomplete sys / DLL files, malware infection, and more.
Here’s an interesting thought. Can GPU cause Clock Watchdog Timeout? Without a doubt. Most of the time, it’s a direct indicator that something is wrong with your processor, making it impossible to process clock interrupts.
Your RAM memory, GPU, or in some cases CPU can be the cause for Synthetic_watchdog_timeout blue screen error, so be sure to check them.
How can I fix the CLOCK_WATCHDOG_TIMEOUT error?
1. Update your drivers
1. Right-click the Windows button on your taskbar and select Device Manager from the list that opens.
2. Browse through the list and identify the component you want to update the driver for.
3. Click on it to expand the section.
4. Right-click the driver and select Update driver from the drop-down menu (in our example we update the graphics driver as it’s usually the one responsible for this BSOD).
5. Choose whether you want to automatically or manually install your driver.
Blue Screen of Death errors are often caused by outdated or buggy drivers, and you can easily fix this issue by downloading and installing the latest drivers.
Bear in mind that you might have to update all drivers on your PC in order to fix this error and keep your Windows 10 PC stable.
If updating the drivers by using Device Manager is not fixing the problem, you will need to visit the manufacturer’s website and download the correct driver.
Downloading drivers manually isn’t the best way to update your drivers, but you can use dedicated, third-party software to update all your drivers with just a single click.
Various errors are the result of a malfunctioning driver. When this is the case, you may need to update or reinstall completely this specific component. As the process is not straight-forward to complete, we recommend using an automated tool for the job. Here’s how to do it:
- Download and install DriverFix.
- Launch the app.
- Wait for the software to detect all your faulty drivers.
- You will now be presented with a list of all the drivers that have issues, and you just need to select the ones you’d liked fixed.
- Wait for DriverFix to download and install the newest drivers.
- Restart your PC for the changes to take effect.
DriverFix
Keep your Windows safe from any type of errors caused by corrupted drivers, by installing and using DriverFix today!
Disclaimer: this program needs to be upgraded from the free version in order to perform some specific actions.
2. Update your BIOS
BIOS update is an advanced procedure that installs new firmware for your motherboard, thus unlocking new features.
Users reported that you can fix the CLOCK_WATCHDOG_TIMEOUT Blue Screen of Death error by updating your BIOS. Be sure to take a closer look at our guide to see how to update BIOS on Windows 10.
Flashing your BIOS can be potentially dangerous if you don’t do it properly, so be extra careful.
3. Disable C1-6 in BIOS
A few users reported that they managed to fix this error by disabling certain settings in BIOS. According to them, disabling the C1-6 in BIOS fixed the BSOD error, so be sure to try that.
To see how to access BIOS and how to find and disable these settings, we strongly suggest that you check your motherboard manual.
4. Remove problematic applications
Third-party applications can often cause these types of errors. In order to fix the CLOCK WATCHDOG TIMEOUT error, you’ll have to find and remove the problematic application from your PC.
Antivirus is the usual suspect, therefore it’s advised that you temporarily remove it. Most antivirus companies have these tools available for download on their website free of charge:
- How to Uninstall Norton Antivirus on Windows 10
- How to uninstall McAfee
If you’re using any antivirus solution and you want to completely remove it from your PC, be sure to check out some awesome uninstaller software.
In addition to antivirus, many users reported that Asus AI Suite can cause this error to appear, therefore we advise you to remove this tool from your PC.
If removing the antivirus solves the problem, you might want to consider switching to different antivirus software. have a look at these best antivirus for Windows 10 PC today and pick the ideal one.
5. Reset BIOS
Some PC issues are hard to tackle, especially when it comes to corrupted repositories or missing Windows files. If you are having troubles fixing an error, your system may be partially broken.
We recommend installing Restoro, a tool that will scan your machine and identify what the fault is.
Click here to download and start repairing.
As we previously mentioned, certain BIOS settings can trigger the CLOCK WATCHDOG TIMEOUT, and the simplest way to fix these issues is to reset your BIOS.
Resetting BIOS will set all settings to the default value, thus fixing this error.
6. Remove the overclocking settings
Overclocking your hardware can give you better performance, but overclocking comes with certain risks as well.
Sometimes, your PC cannot handle certain overclock settings, and you’ll get a BSoD error such as CLOCK WATCHDOG TIMEOUT.
In a worst-case scenario, overclocking can burn and permanently damage your hardware components if you’re not careful. Therefore, we urge you to be extra cautious while overclocking your PC.
If your PC is overclocked, we advise you to remove overclock settings and check if that fixes the error.
7. Update your SSD firmware and disable LPM
CLOCK_WATCHDOG_TIMEOUT error can be caused by outdated SSD firmware, therefore if you’re using SSD, we advise that you update your firmware.
Updating firmware on your SSD can be risky, therefore you need to be extra careful and back up your files.
In addition to updating your firmware, a few users are suggesting disabling LPM, so you might want to do that as well.
8. Disable C1E and Intel Speedstep in BIOS
A few users reported that the CLOCK WATCHDOG TIMEOUT error is caused by certain settings in BIOS, therefore we advise you to disable them.
According to users, C1E and Intel Speedstep caused this error to appear, therefore if you have these settings enabled in BIOS we advise you to disable them and check if that fixes the problem.
9. Manually set RAM and turn off Asus Turbo in BIOS
Sometimes this error can be caused if you don’t manually set the speed of your RAM in BIOS. To see how to do that check your motherboard manual for instructions.
In addition to setting RAM speed, users also suggest disabling the Asus Turbo feature, so you might want to do that as well.
- Pdc_watchdog_timeout BSOD error [Completely Fixed]
- How to fix Clock interrupt was not received [FULL GUIDE]
- Werfault.exe Error on Windows 10: How to Fix & Main Causes
- Fix: Windows Cannot Access the Specified Device, Path or File
10. Unplug your DVD drive during Windows 10 installation
Several users complained that they cannot install Windows 10 due to the CLOCK WATCHDOG TIMEOUT BSOD error.
Apparently, you can fix this problem by unplugging your SATA DVD drive during the Windows 10 installation process.
After you disconnect your DVD drive, you should be able to install Windows 10 normally.
If your DVD drive is missing in Windows 10, don’t wait another minute and get it back.
11. Clean your computer case and check for faulty hardware
Many BSoD errors can be caused by hardware failure, and to fix this error you need to check if your hardware is working properly. Using a dedicated BSoD repair tool can also help.
A few users reported that a faulty motherboard can cause this error, but a few users reported that a faulty CPU or graphics card can cause this error as well, so be sure to check them first.
If your hardware is working properly, be sure to clean your computer case from dust. Sometimes dust can clog your fans or even your slots, therefore it’s advised to clean your PC with pressurized air.
12. Install the latest updates
- Open the Settings app. You can do that quickly by using Windows Key + I shortcut.
- When Settings app opens, navigate to Update & Security section.
- Now click on Check for updates button.
If you’re getting the CLOCK WATCHDOG TIMEOUT error on your PC, the problem might be the missing updates.
This process is automated and Windows will usually download the necessary updates in the background.
However, bugs can occur once in a while, which can cause you to skip certain updates. To fix this issue, it’s advised to check manually for updates by following the steps above.
Even if the Windows Update button is missing, you’ll still be able to get around it. After installing the updates, check if the problem still persists.
13. Remove the problematic updates
- Open the Settings app and navigate to Update & Security section.
- Now select View installed update history.
- Now you should see the names of recent updates. Memorize or write down the last few updates since they are the most likely cause of this issue. Click on Uninstall updates.
- Now double click the update that you want to remove and follow the instructions on the screen.
Many Ryzen owners reported a CLOCK WATCHDOG TIMEOUT error on their PC. It seems that this issue is caused by a problematic update, and in order to fix the problem, you need to find it.
If removing the update solves the problem, you need to prevent that update from installing again. Windows 10 will automatically install the missing updates, which will cause the issue to reappear.
To prevent this update from installing again, be sure to check our guide on how to block automatic Windows updates.
CLOCK WATCHDOG TIMEOUT is one problematic error, and it’s mostly caused by outdated firmware or your BIOS settings, but you can easily fix this error by using one of our solutions.
If you have any other suggestions or questions, don’t hesitate to leave them in the comments section below and we’ll be sure to check them out.
Still having issues? Fix them with this tool:
SPONSORED
If the advices above haven’t solved your issue, your PC may experience deeper Windows problems. We recommend downloading this PC Repair tool (rated Great on TrustPilot.com) to easily address them. After installation, simply click the Start Scan button and then press on Repair All.
![]()
Newsletter
Ошибка тайм-аута Clock Watchdog — одна из тех ужасных проблем BSOD, которые могут возникнуть в Windows 11 и других настольных платформах Microsoft (пользователи Windows 10 часто сталкивались с той же ошибкой тайм-аута Clock Watchdog).
Когда возникает эта проблема, появляется синий экран с сообщением об ошибке тайм-аута Clock Watchdog. Один из наших читателей пожаловался на то, что очень часто появляется синий экран с кодом ошибки Clock Watchdog Timeout, даже несколько раз в день.
Это обычно происходит в середине рабочего, а не сразу после загрузки его компьютера. Поскольку ошибка тайм-аута Clock Watchdog вызывает перезагрузку системы, это может стать серьезной проблемой, если происходит регулярно.
Если вы знакомы с ошибкой тайм-аута Clock Watchdog в Windows 11, вам следует выполнить некоторые действия по устранению неполадок, чтобы убедиться, что это больше не повторится.
Почему появляется ошибка BSOD?
BSOD означает синий экран смерти, который является одним из видов сбоя системы. Сбой системы с синим экраном возникает из-за внезапного завершения важного процесса или аппаратного сбоя. Когда появляются такие ошибки, Windows перезагружается.
Ошибки BSOD также известны как ошибки остановки, потому что они останавливают Windows. Все они имеют коды ошибок остановки (в противном случае — значения проверки), которые на них ссылаются. Код ошибки тайм-аута сторожевого таймера имеет контрольное значение 0x00000101.
Ошибка синего экрана тайм-аута Clock Watchdog является результатом того, что ЦП (центральный процессор) не отвечает или находится в тупиковой ситуации. Следовательно, процессор перестает обрабатывать прерывания.
В любом случае, проблема с тайм-аутом Clock Watchdog так же страшна, как и любая другая ошибка BSOD. Поскольку это может возникать по разным причинам, существует множество потенциальных исправлений. Вот как вы можете решить ошибку тайм-аута Clock Watchdog в Windows 11.
Как исправить ошибку тайм-аута Clock Watchdog в Windows 11?
1. Отключите ненужные USB-устройства от ПК.
Во-первых, рекомендуется отключить все лишние периферийные USB-устройства, подключенные к вашему ПК, например накопители или DVD-приводы.
Если ошибка тайм-аута часового сторожевого таймера после этого не возникает, возможно, причиной проблемы было одно из ранее подключенных устройств.
2. Запустите сканирование SFC.
- Чтобы открыть окно поиска, нажмите кнопку с увеличительным стеклом на панели задач .
- Введите cmd в поисковой утилите Windows 11.
- Выберите в командной строке параметр « Запуск от имени администратора» .

- Перед запуском сканирования системных файлов введите эту команду и нажмите Enter:
DISM.exe /Online /Cleanup-image /Restorehealth - Затем введите следующую команду системного файла в окне подсказки и нажмите Enter:
sfc /scannow

- Подождите, пока сканирование не будет завершено на 100 процентов и не отобразится сообщение о результате.
3. Обновите Windows 11
- Чтобы быстрее открыть настройки , нажмите сочетание клавиш Windows+ I.
- Затем щелкните вкладку Центр обновления Windows .

- Нажмите кнопку Проверить наличие обновлений на этой вкладке.
4. Отменить разгон ПК.

Выполняли ли вы какой-либо разгон системы с помощью специального инструмента? Если да, возможно, именно поэтому вам нужно исправить ошибку тайм-аута Clock Watchdog.
Итак, отмените любой разгон, восстановив настройки в своем программном обеспечении для разгона до значений по умолчанию.
5. Проверьте желтые индикаторы ошибок драйвера в диспетчере устройств.
- Щелкните правой кнопкой мыши кнопку « Пуск» в Windows 11 на панели задач.
- Выберите в меню Диспетчер устройств .

- Теперь поищите устройства с желтыми восклицательными знаками рядом с ними, которые указывают на ошибки устройства.
- Щелкните правой кнопкой мыши устройство с желтым восклицательным знаком рядом с ним и выберите « Обновить драйвер» .

- После этого выберите опцию Автоматический поиск драйверов .

Также рекомендуется сканировать ваш компьютер с помощью надежного стороннего программного обеспечения для обновления драйверов. Стороннее средство обновления драйверов, такое как DriverFix, выведет список всех устройств вашего ПК с устаревшими драйверами и обновит их автоматически.
6. Запустите программу диагностики памяти Windows.
- Сначала щелкните значок увеличительного стекла на панели задач.
- Введите ключевое слово Windows Memory Diagnostic в текстовое поле средства поиска.
- Щелкните Диагностика памяти Windows, чтобы открыть ее окно.
- Выберите вариант « Перезагрузить сейчас и проверьте наличие проблем» .

- После этого Windows перезагрузится. Подождите, пока средство диагностики памяти Windows сделает свое дело.
- При перезагрузке Windows должен появиться результат диагностики памяти Windows. Однако если это не так, щелкните правой кнопкой мыши « Пуск» и выберите « Просмотр событий» .

- Выберите Журналы Windows и системы на средства просмотра событий окна.
- Нажмите кнопку « Найти» в правой части окна просмотра событий .

- Введите MemoryDiagnostic в поле » Найти» .
- Нажмите кнопку » Найти далее» .

- После этого вы можете просмотреть результат MemoryDiagnostic на вкладке « Общие » в нижней части средства просмотра событий.
Если диагностика памяти Windows выявляет проблему с оперативной памятью, возможно, вам потребуется заменить модуль памяти на вашем ПК.
7. Восстановите Windows 11 до более ранней даты.
- Во — первых, нажмите Windowsи Rклавиши и одновременно.
- Затем введите этот текст в поле Открыть и нажмите Enter:
rstrui - Установите переключатель « Выбрать другую точку восстановления », если этот параметр доступен.

- Щелкните Далее, чтобы продолжить.
- Установите флажок « Показать больше точек восстановления», если «Восстановление системы» отображает этот параметр.
- Выберите точку восстановления, которая откатит Windows 11 до времени, предшествующего ошибке тайм-аута Clock Watchdog на вашем настольном компьютере или ноутбуке. Также можно выбрать самую старую дату точки восстановления.

- Нажмите кнопку « Далее» , чтобы перейти к последнему шагу.
- Выберите вариант Готово, чтобы откатить Windows 11 до выбранной точки восстановления.
8. Обновите BIOS вашего ПК.

Если вы используете старый компьютер, для решения проблемы может потребоваться обновление BIOS (базовой системы ввода-вывода).
Чтобы обновить BIOS, вам необходимо загрузить для него последнюю версию прошивки. Наше руководство о том, как легко обновить BIOS, содержит полную информацию.
С кем я могу связаться, чтобы исправить ошибку тайм-аута Clock Watchdog?
Поскольку это ошибка Windows, вероятно, лучше всего обратиться в службу поддержки Microsoft. Вы можете сделать это через браузер, заполнив текстовое поле на странице « Обратиться в службу поддержки Microsoft». После этого нажмите кнопку « Получить справку» и выберите « Обратиться в службу поддержки».
Технические проблемы с BSOD могут быть тем, с чем также могут помочь службы поддержки производителя ПК. Производитель вашего ПК, скорее всего, также имеет службу поддержки для своих настольных компьютеров или ноутбуков. Посетите веб-сайт производителя вашего компьютера, чтобы узнать, как связаться со службой поддержки.
Однако применение предложенных выше решений может исправить ошибку тайм-аута Clock Watchdog для многих пользователей. Они не совсем гарантируют, что решат проблему для всех, но, тем не менее, попробовать их стоит.
Раздел поддержки на веб-сайте Microsoft также включает информативное средство устранения неполадок с синим экраном. Некоторые решения, предлагаемые средством устранения неполадок, могут помочь вам исправить ошибку тайм-аута Clock Watchdog. Так что проверьте эту страницу, прежде чем обращаться в службу поддержки.
Расскажите нам о своем опыте и решении, которое сработало для вас, в разделе комментариев ниже.

Во время работы на ПК с Виндовс 10 юзеры могут столкнуться с появлением синего экрана (BSOD). Неполадка указывает на системную ошибку. Одной из них может стать clock watchdog timeout. После ее появления все важные данные на устройстве могут исчезнуть, а открытые файлы в этот момент повредиться. О том, как исправить clock watchdog timeout в ОС Windows 10, далее пойдет речь.
Причина ошибки clock watchdog timeout на Windows 10
Исправление проблемы относится к сложным задачам, так как clock watchdog timeout появляется по разным причинам, выявить которые с первого раза не всегда удается. Ошибка означает, что время ожидания контроля какого-либо действия истекло. То есть ожидаемое системой прерывание не было отправлено с ядра процессора за выделенный промежуток времени.
Чаще всего проблема носит аппаратный характер, выделяют несколько возможных причин появления такой ошибки:
- разгон системы (оверлокинг);
- неправильная работа разделов памяти гаджета;
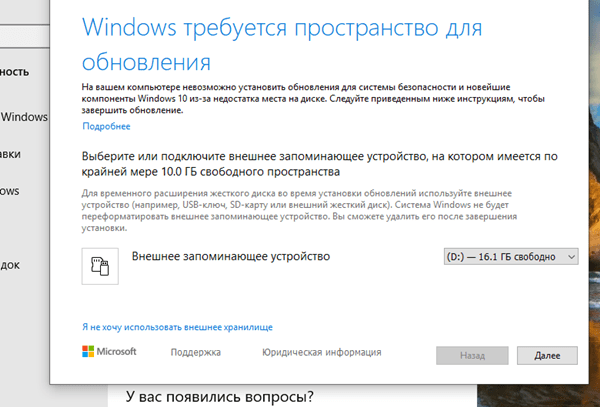
- неисправности графической карты;
- устаревшие драйверы;
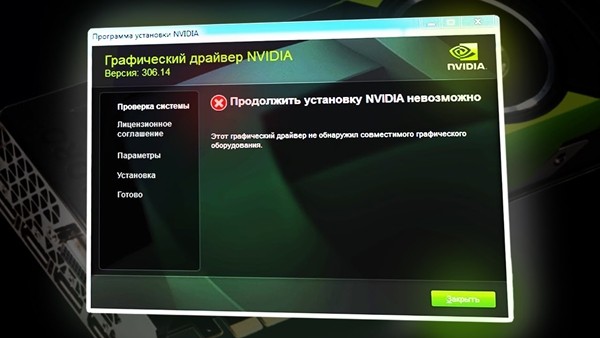
- проникновение вирусных ПО;
- некорректная работа HDD;
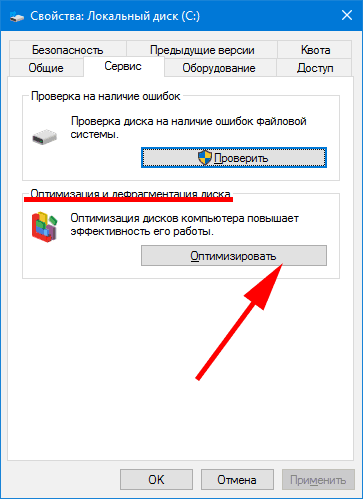
- нарушение целостности файлов системы;
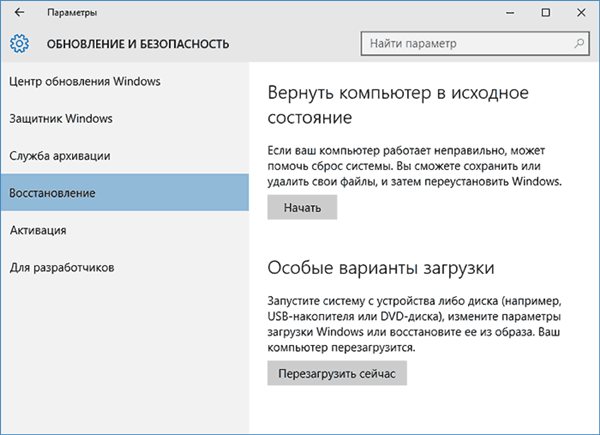
- установка проблемного софта.
Установить причину появления BSOD с такой ошибкой рядовому пользователю достаточно сложно.
Устранить проблему самостоятельно можно, выбрав один из предложенных ниже способов.
Как исправить ошибку?
Избавиться от синего экрана БСОД можно перезагрузкой ПК и выполнением одного из предложенных способов. В этом случае можно потерять часть данных с устройства. Причин появления clock watchdog timeout несколько, рассмотрим подробнее каждый из них и варианты решения проблемы.
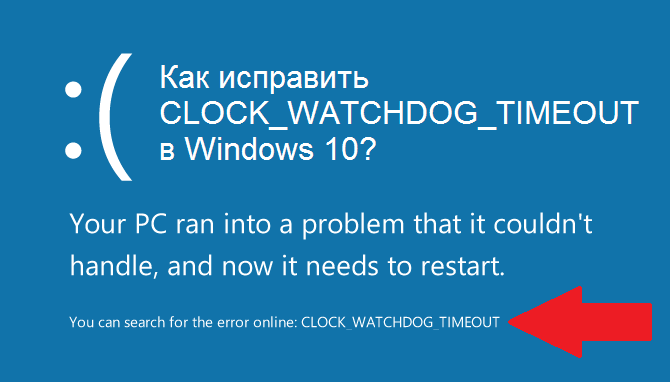
Откат недавно обновленного драйвера устройства
Устаревшие или недавно обновленные драйверы могут повлиять на нестабильность в работе системы и вызвать появление ошибки. Для ее устранения компоненты можно обновить или переустановить, также выполнить откат.
Для выполнения процедуры нужно следовать алгоритму:
- Кликнуть ПКМ по значку «Пуск».
- Выбрать из списка «Диспетчер устройств».
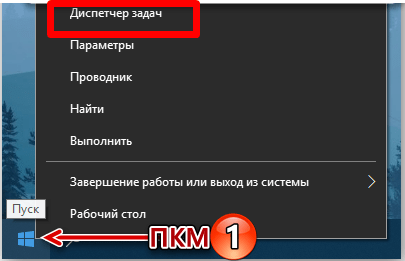
- Выбрать устройство со значком, который показывает отсутствие драйвера. Нажать на него.
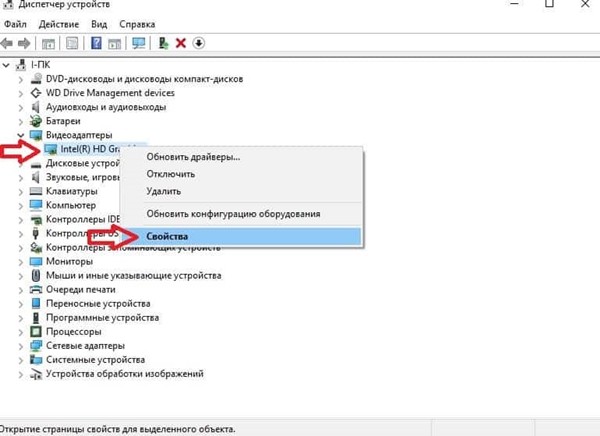
- Перейти во вкладку «Драйвер».
- Во вкладке появится меню, где можно делать откат, отключение или удаление компонента.
- Выбрать нужный параметр.

Автоматическая установка драйверов система выполняет не всегда, поэтому юзеру придется посетить официальный сайт разработчика, скачать требуемый файл для установки новых драйверов.
Запуск средства диагностики памяти Windows
В «десятке» предусмотрено встроенное средство проверки оперативной памяти, с помощью которого можно провести диагностику.
Для запуска утилиты потребуется выполнить следующее:
- Нажать комбинацию клавиш: «Win + R».

- В окне «Выполнить» ввести команду: mdsched.

- В открывшемся окне выбрать рекомендованный режим.
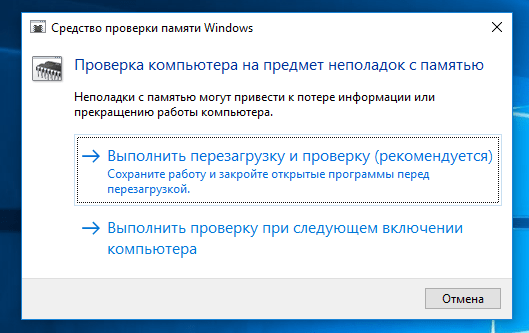
После перезагрузки компьютер запустится в среде средства диагностики памяти Виндовса. Софт выполнит несколько проходов для обнаружения ошибок. Интерфейс средства достаточно прост и понятен, поэтому сложностей возникнуть не должно. После остановки проверки система выдаст результаты об ошибках и коды остановки, которые будут отображены в журнале событий.
Отключение нового оборудования
Если перед возникновением ошибки пользователь подключил к цифровой технике какое-либо оборудование, это могло стать причиной неполадки. Владельцу ПК придется отключить новое устройство (флеш-накопитель, видеокарту, SSD). Чтобы выявить источник проблемы, нужно отсоединять устройства поочередно.

При подключении нового устройства ошибка может быть вызвана отсутствием необходимого драйвера для его нормальной работы. После обнаружения девайса, вызвавшего сбой, юзеру понадобится проверить, установлен ли на него драйвер, совместим ли он с ОС.
Устранение неполадок в состоянии чистой загрузки
Исправить текущую ошибку можно вручную, используя чистую загрузку операционки. В этом режиме ОС запустится с минимальными настройками. Гаджет использует при загрузке выбранные драйверы и утилиты для запуска.
Порядок действий следующий:
- Нажать на клавиатуре комбинацию клавиш: «Win + R».
- Ввести в строку: msconfig.

- Во вкладке «Общие» поставить маркер рядом с надписью «Выборочный запуск».
- Убрать галочку с первого пункта, поставить отметку рядом с загрузкой системных служб.
- Нажать «Ok».

- Перейти во вкладку «Службы», поставить отметку возле пункта «Не отображать службы «Майкрософт».
- Тапнуть по кнопке «Отключить все».
- Подтвердить действие.
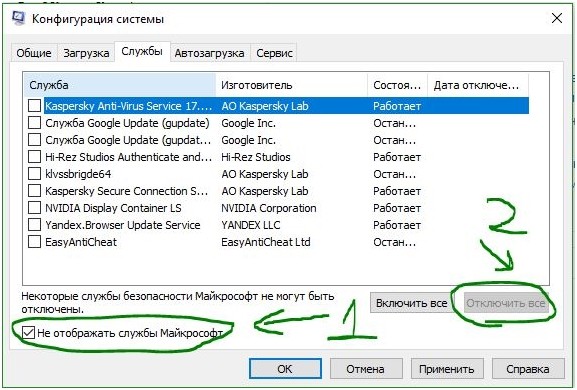
Такой способ помогает выявить проблемы с производительностью ПК.
Обновление BIOS
Синий экран с ошибкой clock watchdog timeout может появиться из-за устаревшей версии базовой системы ввода-вывода ПК. Обновление БИОС материнской платы ПК или ноутбука является стандартным решением для устранения сбоя. Операция исключает проблемы, связанные с ПО и устройствами.
Чтобы понять, какая версия БИОС установлена на устройстве, нужно следовать инструкции:
- Нажать комбинацию клавиш: «Win + R».
- Ввести значение в строку окна: msinfo32. Нажать «Ok».

- В окне «Сведения о системе» найти информацию о БИОС, записать в текстовый файл и сохранить.
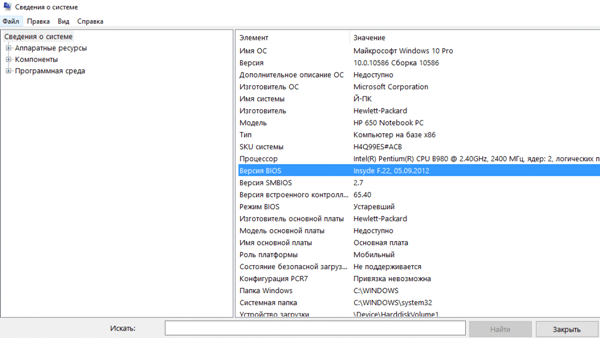
- Перейти на официальный сайт разработчика установленной материнской платы, зайти в раздел загрузок и скачать обновленный БИОС.
- Перезагрузить компьютер.
После выполнения всех пунктов пользователю нужно проверить, исчезла ли проблема. Такой метод рекомендуется использовать только продвинутым пользователям, так как любые изменения в базовой системе ввода-вывода ПК могут привести к серьезным проблемам. Все этапы нужно выполнять согласно инструкции производителя платы для точного процесса обновления.
Программисты и опытные пользователи могут использовать один из предложенных способов для выявления причин появления неполадки и ее исправления. Новичкам желательно отказаться от оверлокинга и начать проверку со сброса к первоначальным настройкам БИОС. Если ни один из методов не помог, остается вариант восстановления системы с помощью установочного диска.
Что нужно знать о коде проверки ошибок 0x000001ca и способах его устранения (01.30.23)
Мы все любим Windows, но никогда не бывает весело, когда ваш компьютер внезапно зависает во время серьезного проекта или увлекательной видеоигры. Еще хуже, когда у вас случаются случайные отключения.
Возможно, вы оказались лицом к лицу с пустым экраном и ошибкой при чтении «SYNTHETIC_WATCHDOG_TIMEOUT». Если вы никогда раньше не сталкивались с кодом проверки ошибок 0x000001ca, возможно, вы не знаете точных шагов для решения проблемы.
Согласно отзывам, найденным на официальном форуме Microsoft и других технических форумах, эта проблема продолжает беспокоить некоторых пользователей. . Каждый раз, когда в Windows 10 создается .dmp, возникают случайные зависания и сбои ПК, которые случаются почти каждую неделю. В большинстве случаев кажется, что они не понимают сути проблемы.
Что такое код проверки ошибок 0x000001CA?
Если вы были в описанной выше ситуации, вы, вероятно, спрашивали себя: «Что такое код проверки ошибок 0x000001CA?» и «Какие шаги мне нужно предпринять для устранения этой ошибки?» Согласно Microsoft, код проверки ошибок 0x000001CA показывает, что система приостановлена и поэтому не может обрабатывать тики таймера. Обычно эта проблема возникает, когда истек срок действия общесистемного сторожевого таймера.
Совет для профессионалов: просканируйте свой компьютер на предмет проблем с производительностью, ненужных файлов, вредоносных приложений и угроз безопасности
, которые могут вызвать системные проблемы или низкая производительность.
Бесплатное сканирование для ПК, проблемы с загрузкой 3.145.873Совместимость с: Windows 10, Windows 7, Windows 8
Специальное предложение. Об Outbyte, инструкции по удалению, лицензионное соглашение, политика конфиденциальности.
В следующем разделе мы познакомим вас с рядом стратегий устранения неполадок, которые помогут вам разобраться в проблеме и решить ее.
Что Код проверки на ошибку 0x000001CA
Каким бы раздражающим это ни было, код проверки на ошибку 0x000001CA может быть устранен. Но прежде чем пытаться исправить это, отсоедините все периферийные устройства, подключенные к вашему ПК, такие как принтеры, флэш-накопители и USB-адаптеры WiFi. Также важно убедиться, что вы в последнее время не вносили никаких изменений в свое оборудование или программное обеспечение: например, устанавливали новый антивирус, добавляли новое оборудование или даже заменяли карту VGA. Эти изменения могут показаться нормальными, но они могут быть причиной сбоя вашего компьютера. Вдобавок к этому установите все доступные обновления Windows.
Поскольку большинство сбоев и зависаний имеют аналогичные исправления, лучший способ устранить ошибку SYNTHETIC_WATCHDOG_TIMEOUT и аналогичные проблемы — попробовать решения изложены ниже. Возможно, вам не придется пробовать каждый из них — просто постепенно переходите к тому, который решает проблему.
Шаг 1. Сканируйте свой компьютер на наличие вредоносных программ.
Существует высокая вероятность того, что ваш компьютер заражен вредоносным ПО, связанным с NTOSKRNL.exe, которое приводит к перезагрузке системы. Чтобы убедиться, что вредоносное ПО не является причиной проблемы, используйте новейший антивирусный инструмент для сканирования системы.
Шаг 2. Удалите сторонние программы
Несовместимые программы в вашей системе также могут вызывать ошибки. , особенно те, которые влияют на системные файлы. Иногда антивирусная программа вмешивается в системные процессы, вызывая случайные сбои.
Чтобы убедиться, что эти несовместимые программы или антивирусные программы не вызывают ошибку, удалите их (что касается вашего антивируса, отключите это) и проверьте, устранена ли проблема. Если виноват ваш антивирус, обратитесь к поставщику за дальнейшими инструкциями или переключитесь на другую антивирусную программу.
Шаг 3. Установите настройки BIOS по умолчанию
Есть разные способы попасть на панель настроек BIOS, в зависимости от ПК, который вы используете. Как правило, вы будете следовать этому процессу:
Завершив настройку, перезагрузите компьютер, как обычно, и посмотрите, решит ли данное исправление проблему. Если проблема не исчезнет, вам может потребоваться обновить BIOS, но после того, как вы попробуете следующие стратегии. Не пытайтесь ничего, кроме вашего понимания, использовать с BIOS.
Шаг 4. Обновите драйверы устройств
Следующим шагом в устранении проблемы с кодом проверки ошибок 0x000001CA является обновление устаревших драйверов. Неисправные, поврежденные или устаревшие системные драйверы могут вызвать ошибку. Убедитесь, что на вашем устройстве установлены правильные драйверы, а если нет, обновите их в следующем порядке:
Для обновления драйвера необходимо посетить веб-сайт производителя устройства, чтобы проверить наличие последней версии. Убедитесь, что выбранные вами драйверы совместимы с вашей версией Windows 10. Вы также можете попробовать обновить Windows 10, чтобы получить необходимые обновления драйверов.
Шаг 5. Выполните проверку ОЗУ
Есть большая вероятность, что Проблема SYNTHETIC_WATCHDOG_TIMEOUT вызвана сбоями в вашей аппаратной памяти. Итак, запустите проверку ОЗУ, чтобы узнать, можете ли вы решить проблему. Чтобы выполнить задачу, выполните следующие действия:
Шаг 6. Запустите системный файл. Проверка (SFC)
Иногда проблема SYNTHETIC_WATCHDOG_TIMEOUT может возникать из-за потери или повреждения системных файлов. Вы можете решить проблему, запустив встроенный SFC.
Сканирование системы начнется немедленно. Когда проверка завершится, перезагрузите компьютер и проверьте, нормально ли он работает.
Шаг 7. Обновите системную BIOS
Если вы не решили проблему с помощью любого из вышеперечисленных решений, подумайте об обновлении BIOS. Чаще всего обновление BIOS является последним средством решения проблем с компьютером. Вы можете спросить, почему. Если вы установите неправильные обновления BIOS, ваш компьютер перестанет загружаться. На данный момент ваша машина просто бесполезна, поэтому важно соблюдать особую осторожность при обновлении BIOS. Кроме того, не следует выключать компьютер во время обновления BIOS.
Код проверки на ошибку 0x000001ca не должен вас утомлять
Код проверки на ошибку 0x000001ca определенно является тревожной проблемой, которая может сбить с толку даже самого организованного компьютерщика. Но вы согласитесь со мной, что независимо от устройства или операционной системы, с которой вы работаете, некоторые ошибки неизбежны. Итак, вы не можете отказаться от своего компьютера из-за кода проверки ошибок 0x000001CA.
Надеюсь, приведенные выше советы о том, как исправить код проверки ошибок 0x000001CA, помогли вам устранить проблему. Возможно, лучший способ избежать сбоев системы — оптимизировать компьютер для максимальной производительности. Как вы узнали ранее, такие ошибки могут вызывать ненужные файлы или нестабильная система.
Вот и все! Сообщите нам, удалось ли вам решить проблему, поделившись своим опытом в разделе комментариев. Кроме того, поделитесь этим руководством, чтобы помочь другим пользователям решить ту же проблему.
YouTube видео: Что нужно знать о коде проверки ошибок 0x000001ca и способах его устранения
01, 2023
There is a good discussion of the problem here
https://www.stellarinfo.com/article/solved-synthetic-watchdog-timeout-bsod-error-on-windows.php
do not download anything from that web site, just read for informaton
I have seen that watchdog problem before many times and it was fixed by driver updates. The synthetic one is new to me. From what I have read it is related to virtualization or gaming.
Are you running VirtualBox or Hypervisoin apps on you system?
If not then go into bios and turn off that AMD virtualization.
Hyper-v is disabled buy default in windows 10/11. Did you enable it?
Your system has PCIe expansion do you have one of the approved graphics boards?

You might want to go to the AMD or NVidia support site to get the latest (if any) drivers. I suspect only windows 10 will be available.
6350
7450
NVidia
If you have the built in chipset that use the AMD CPU for graphics you might consider a GT 1030 or whatever fits in the power supply rating of your system.
Since this happens randomly, it might actually be a heat problem. Be sure to use an aid duster and ensure the fans are operating. If you suspect overheating then I recommend tthrottle.
There are probably other temp control apps available but I have used that on a dozen system to control both CPU and GPU temps
If you do NOT have an AMD or NVidia graphics adapter then it is likely the CPU overheating
I am a volunteer and I do not work for, nor represent, HP
If you think this reply was helpful, please mark it as so or as a solution.. Thank You!
Попадание в синий экран смерти Windows никогда не вызывает приятных ощущений. Это простая системная ошибка? Или ошибка синего экрана — признак чего-то более серьезного?
Ошибка тайм-аута Clock Watchdog — одно из тех загадочных сообщений о сбое на синем экране. Если у вас возникла ошибка тайм-аута часового сторожевого таймера, вот как вы должны это исправить.
Что такое ошибка тайм-аута сторожевого таймера?
Ошибка CLOCK_WATCHDOG_TIMEOUT связана с аппаратным обеспечением вашей системы и, в частности, указывает на проблему взаимодействия системы и процессора.
Когда вы просите свой компьютер что-то сделать, операционная система сообщает процессору, «прерывая» его, чтобы сообщить ему, что происходит. Это процесс системного уровня, известный как «системное прерывание», и это совершенно нормальная функция Windows. Однако, если система слишком долго работает на фазе прерывания, известной как уровень запроса прерывания (IRQL), вы столкнетесь с ошибкой синего экрана.
При этом может появиться несколько сообщений об ошибках с синим экраном, и ошибка тайм-аута сторожевого таймера является одной из самых распространенных. Часы относятся к ЦП, а сторожевой таймер — это процесс, отслеживающий прерывание.
Вы можете довольно легко исправить ошибку тайм-аута сторожевого таймера, но это зависит от того, какой бит оборудования вызывает ошибку. Большинство исправлений связано с проверкой вашего оборудования и драйверов, так как это компоненты, пытающиеся взаимодействовать с вашим процессором.
Вот список наиболее распространенных исправлений этой проблемы.
1. Перезагрузите систему.
Самое простое и простое решение — перезагрузить систему. Ошибка тайм-аута сторожевого таймера не обязательно свидетельствует о сбое вашей системы. Это может быть ошибка, которую можно решить с помощью быстрого и легкого перезапуска.
2. Проверьте и переустановите свое оборудование.
Ваше второе исправление — это то, которое может исправить многие проблемы Windows, а именно переустановку вашего системного оборудования. Если в корпусе вашего ПК что-то ослабло, это может вызвать системные ошибки. Это может означать ослабленный кабель, неподходящий диск, невыполненную оперативную память или что-то еще между ними. В следующем видео объясняется, как переустановить оборудование и проверить, все ли в безопасности:
[youtube https://www.youtube.com/watch?v=DLxNPBQBfT8&w=560&h=315]
Очистите свой компьютер
Пока вы там, почистите свой компьютер. Скопление пыли убьет ваше оборудование. Это одна из худших вещей для вашего компьютера, и со временем она накапливается. Помните, ваш компьютер похож на любое другое оборудование, которое у вас есть. Позаботьтесь о нем, и он прослужит дольше.
3. Обновите Windows 10.
Затем проверьте, есть ли ожидающие обновления Windows 10. Ожидающее обновление Windows 10 может содержать исправление ошибки, которого ожидает ваша система.
Нажмите Клавиша Windows + I, затем отправляйтесь в Обновление и безопасность> Центр обновления Windows. Если есть обновления, скачайте и установите их.
4. Обновите драйверы.
Обновление системных драйверов почти во всех списках исправлений ошибок Windows bluescreen. Для этого есть веская причина. Если системный драйвер поврежден или содержит ошибки, это может привести к тому, что соответствующее оборудование будет выдавать сообщения об ошибках, такие как ошибка тайм-аута сторожевого таймера.
Не всегда ясно, является ли ошибка драйвера причиной проблемы. Windows 10 автоматически обновляет драйверы, но все может проскользнуть через сеть. Проверить драйверы на наличие ошибок можно вручную через диспетчер устройств.
Тип Диспетчер устройств в строке поиска меню «Пуск» и выберите «Лучшее совпадение». Проверьте список на наличие желтых индикаторов ошибок. Если таковых нет, маловероятно, что причиной проблемы является драйвер. Однако, если вы хотите перепроверить, вы можете попытаться обновить каждый драйвер вручную.
Например, разверните Дисковый привод раздел, затем щелкните правой кнопкой мыши драйвер для вашего SSD и выберите Обновить драйвер. Выбрать Автоматический поиск обновленного программного обеспечения драйвера чтобы позволить Windows автоматизировать процесс обновления за вас.
5. Удалите новое программное обеспечение.
Вы недавно устанавливали какие-либо новые приложения? Возникла ли ошибка тайм-аута сторожевого таймера после установки нового программного обеспечения? Если это так, вам следует удалить новое программное обеспечение, перезагрузить систему и проверить, сохраняется ли ошибка.
Ввод программы в строке поиска меню «Пуск» и выберите «Лучшее совпадение». Переключите Сортировать по раскрывающееся меню для Дата установки, отсортировав список программ по дате установки. Удалите все недавно установленные программы, затем перезагрузите систему.
6. Запустите SFC и CHKDSK.
Файловая система Windows работает хорошо. До тех пор, пока этого не произойдет и не начнут появляться ошибки. Один из способов исправить ошибки, связанные с системными файлами, — это исправить их с помощью встроенной в Windows проверки системных файлов (SFC). Этот интегрированный системный инструмент автоматически сканирует и исправляет ошибки.
Перед запуском команды SFC важно убедиться, что она работает правильно. Для этого мы используем инструмент обслуживания образов развертывания и управления ими, или DISM.
Как и SFC, DISM — это интегрированная утилита Windows с широким набором функций. В этом случае Команда DISM Restorehealth гарантирует, что наше следующее исправление будет работать правильно.
Выполните следующие шаги.
-
Тип Командная строка (администратор) в строке поиска меню Пуск, затем щелкните правой кнопкой мыши и выберите Запустить от имени администратора , чтобы открыть командную строку с повышенными привилегиями.
-
Введите следующую команду и нажмите Enter: DISM / онлайн / очистка-образ / восстановление здоровья
-
Подождите, пока команда завершится. В зависимости от состояния вашей системы процесс может занять до 20 минут. Иногда кажется, что процесс застревает, но дождитесь его завершения.
-
Когда процесс завершится, введите sfc / scannow и нажмите Enter.
CHKDSK — еще один системный инструмент Windows, который проверяет структуру файлов. В отличие от SFC, CHKDSK сканирует весь ваш диск на наличие ошибок, тогда как SFC сканирует ваши системные файлы Windows в частности. Как и SFC, запустите сканирование CHKDSK из командной строки починить вашу машину.
-
Тип командная строка в строке поиска меню Пуск, затем щелкните правой кнопкой мыши наиболее подходящий вариант и выберите Запустить от имени администратора. (Или нажмите Клавиша Windows + X, затем выберите Командная строка (администратор) из меню.)
-
Затем введите chkdsk / r и нажмите Enter. Команда просканирует вашу систему на наличие ошибок и исправит любые проблемы в процессе.
7. Запустите средство диагностики памяти Windows 10.
[youtube https://www.youtube.com/watch?v=PLr_sYeH30k&w=560&h=315]
Вы можете использовать встроенную диагностику памяти Windows, чтобы проверить, не является ли ваша RAM причиной ошибки. Программа диагностики памяти Windows сканирует вашу оперативную память, выявляя ошибки, которые могут привести к сбою системы. Вы не можете запустить его в Windows. Вам необходимо запустить инструмент, а затем перезапустить систему, чтобы позволить инструменту сканировать вашу оперативную память.
Тип Диагностика памяти Windows в строку поиска меню «Пуск» и выберите «Лучшее совпадение».
Теперь вы можете настроить инструмент на немедленный запуск или запуск при следующем перезапуске системы. Когда вы пытаетесь исправить ошибку синего экрана, немедленно запустите инструмент, но сначала сохраните всю работу.
Диагностика памяти Windows запустится автоматически после перезагрузки.
Однако файл журнала не отображается после того, как вы снова загрузитесь в Windows 10. Нажмите Клавиша Windows + X и выберите Просмотрщик событий из меню питания. В средстве просмотра событий выберите Средство просмотра событий (локальное)> Журналы Windows> Система.
Затем в правом столбце выберите найти и введите ПамятьДиагностика в коробку. Ударил Найти следующее. Результаты вашей диагностики отобразятся в нижней части окна.
Оттуда вам нужно исследовать любые конкретные ошибки, которые выдает диагностика памяти Windows.
8. Удалите настройки разгона.
Если вы разогнали оборудование вашей системы, чтобы выжать дополнительную производительность, вы можете столкнуться с ошибкой тайм-аута сторожевого таймера. Учитывая характер разгона вашей системы, в этом руководстве нет конкретных инструкций. Это потому, что разгон уникален для вашего оборудования, и вам придется откатить вашу систему, используя определенные приложения или системные настройки.
Итак, если вы разогнали свою систему и столкнулись с ошибкой тайм-аута сторожевого таймера, рассмотрите возможность возврата к стандартной настройке.
Вы устранили ошибку тайм-аута сторожевого таймера Windows 10
Ошибки синего экрана Windows никогда не приносят удовольствия. К счастью, некоторые из них легко решить, и ошибка тайм-аута сторожевого таймера является одной из них. Выполните шаги из этого списка, и ваша система мгновенно вернется к нормальной работе.
| title | description | keywords | ms.date | topic_type | ms.topic | api_name | api_type | ||
|---|---|---|---|---|---|---|---|---|---|
|
Bug Check 0x1CA SYNTHETIC_WATCHDOG_TIMEOUT |
The SYNTHETIC_WATCHDOG_TIMEOUT bug check has a value of 0x000001CA. A system wide watchdog has expired. This indicates that the system is hung and not processing timer ticks. |
|
01/29/2021 |
apiref |
reference |
SYNTHETIC_WATCHDOG_TIMEOUT |
NA |
Bug Check 0x1CA: SYNTHETIC_WATCHDOG_TIMEOUT
The SYNTHETIC_WATCHDOG_TIMEOUT bug check has a value of 0x000001CA. A system wide watchdog has expired. This indicates that the system is hung and not processing timer ticks.
[!IMPORTANT]
This article is for programmers. If you’re a customer who has received a blue screen error code while using your computer, see Troubleshoot blue screen errors.
SYNTHETIC_WATCHDOG_TIMEOUT Parameters
| Parameter | Description |
|---|---|
| 1 | The time since the watchdog was last reset, in interrupt time. |
| 2 | The current interrupt time. |
| 3 | The current QPC timestamp. |
| 4 | The index of the clock processor. |
Cause
A system wide watchdog has expired. This indicates that the system is hung and not processing timer ticks.
Resolution
The !analyze debugger extension displays information about the bug check and can be helpful in determining the root cause. For more information about WinDbg and !analyze, see Using the !analyze extension and !analyze.
See Also
Bug Check Code Reference