Contents
1. The package could not be installed. The theme is missing the style.css stylesheet
2. Theme Installation Errors
3. 4 | Installing and Updating Salient Visual Composer (Bundled with Theme)
4. 1 | Troubleshooting the Salient Theme (Website not working correctly)
5. Updating Your Theme and Plugins
6. How to update theme Manually via FTP
7. Size of images in lightbox . Images getting cut
8. How to Translate the theme
9. Comments not showing on Pages
10. Create Landing Page (Remove Header / Footer per page )
11. Two Minute Theme Update.
12. Increasing Memory Limit To PHP
13. Missing «Read More» button in Ascend Skinâ€
14. Increase Nectar Love value manually
15. Move Secondary Menu Social Media Icons to Left
16. Change color of Nectar Slider Heading and sub heading
17. Make init.js changes in Child Theme .
18. “Lightbox to open an embed file”
19. Make button open lightbox
20. Portfolio Size and Order
21. Mobile Menu hidden by WordPress Toolbar
22. mobile full width, but keep the desktop in the boxed mode
23. “Sticky Mobile Menuâ€
24. Howto: Make logo big or small
25. how to make the color of the hover on the thumbnails different from the global link color
26. Remove thin bottom border on transparent header
27. Change Team Member Size
28. Move Third level menu to left instead of right
29. Map marker icon not showing
30. Changing content in portfolio thumbnail hover
31. Hide Portfolio Arrows / Squares / Title
32. Mobile Drop Down , Change word not arrow as link
33. Nectar Slider Arrows Color and Background Change
34. Hide responsive secondary menu In Mobile/Tablet
35. Remove WooCommerce Add to Cart — Amount Function
36. Change order of Portfolio categories title’s
37. Howto: Add Custom image sizes ?. Change Responsive Behavior of images
38. Change Slide Out Widget Icon
39. Hide Mega Menu Column Title in Mobile Menu
40. Adjust Nectar Slider Text with CSS
41. Change the numbers of columns in the recent projects slider from 3 to 6 items
42. Parallax Bug on Chrome and (bit older version of) Firefox”
43. Add Phone-Number/Email in secondary menu with icon
44. Nectar Slider: Semi Transparent Background for Heading
45. Hide Portfolio Thumbnail Title or date
46. Make Header Nav Menu Look like a Button
47. OpenGraph loaded twice, when WordPress Jetpack Publicize feature in useâ€
48. Remove slide count in Home slider next/prev arrows
49. Decrease the vertical spacing or leading between all 3 elements in the nectar slider- the large text, the sub text and the button
50. How to Create Mouse Based Parallax ?.
51. Navigation gains bottom margin on page scroll
52. Advancing nectar slide at end of video [Hack]
53. Removing Author, Date, Tags, and Comments on Blog Titles
54. Nectar Flexible Slider Height Cropping Image in Responsive Screen Sizes.
55. Fonts Used in Theme Demos , Screenshots of Typography Panel
56. strange icons on iOS
57. Change logo url link via JS code Globally.
58. Add TEXT Next to Hamburger Menu Icon
59. Corporate Demo — Contact Form
60. Anchor Links not Working
61. Twitter Share Count API Closed
62. Visual Composer template is reordering elements
63. Change hamburger icon to envelope mail icon in main menu .
64. Changing Theme Texts Using Loco Translate Plugin .
65. Add Text to Footer Right .
66. Clear Cache
67. Make Nectar Slider Button open lightbox link or video
68. Typography Section options.txt files For Salient Theme Demos.
69. limit the Search Function to Just Display Products Only.
70. Install your Theme
71. Downloading Your Theme
72. Firefox Padding Top and Bottom Not Appearing on Columns
73. Importing the Theme Demos ( Make Theme Look Like Demo )
74. Adding your Google Map API Key
75. Activate and Save Permalinks
76. Change Woocommerce Products per Page.
77. Home Page Setup
78. Adding your Google Analytics Tracking Code
79. Getting Started — First Steps
80. Google Page Insights Shows Errors/Warnings
81. Install Recommended Plugin
82. Center Copyright Text In Footer
83. Woocommerce Payment Gateway Not Showing ( BrainTree / Amazon )
84. Hiding Rows on Mobile / Desktop in Visual Composer
85. Add Down Arrow in FullScreen Page Rows Option [JS hack]
86. Forms , Checkboxes Not Appearing Correctly
87. Transparent Header Not Showing on All Pages
88. Quick Notification Bar
89. Make Masonry Blog height Uneven (Not Fixed)
90. Header Logo Not Showing | Cant Change Demo Logo
91. Troubleshooting Video Backgrounds
92. W3 Performance Setup
93. Change Order of Portfolio Items or Portfolio Categories
94. Cloudflare Rocket Loader Conflict with WPBakery Page Builder
95. Add Different Mobile Logo (CSS)
96. Loading Icons mind font when using shortcodes in footer
97. Add a Custom Font
98. Change Mobile Column Order
99. Make Column Link Open Lightbox
100. Nectar Slider CSS Classes
101. Add Different Mobile Logo (CSS)
102. Add html5 sound to Salient
103. Salient Theme Sensei Support .
104. FontAwesome Plugin Conflict , Child Theme Override
105. Salient Mega Menus
106. Add Different Logo on Particular Page
107. Masonry Image Gallery
108. Hosting Google fonts locally
1. The package could not be installed. The theme is missing the style.css stylesheet
A common issue that can occur with users new to installing WordPress
themes is a «Broken theme and/or stylesheets missing� error message
being displayed when trying to upload or activate the theme. This error
message does not mean that the theme you have purchased is broken, it
simply means it has been uploaded incorrectly. Luckily, there is a very easy fix. Please follow the steps below to rectify this issue or watch the screencast.
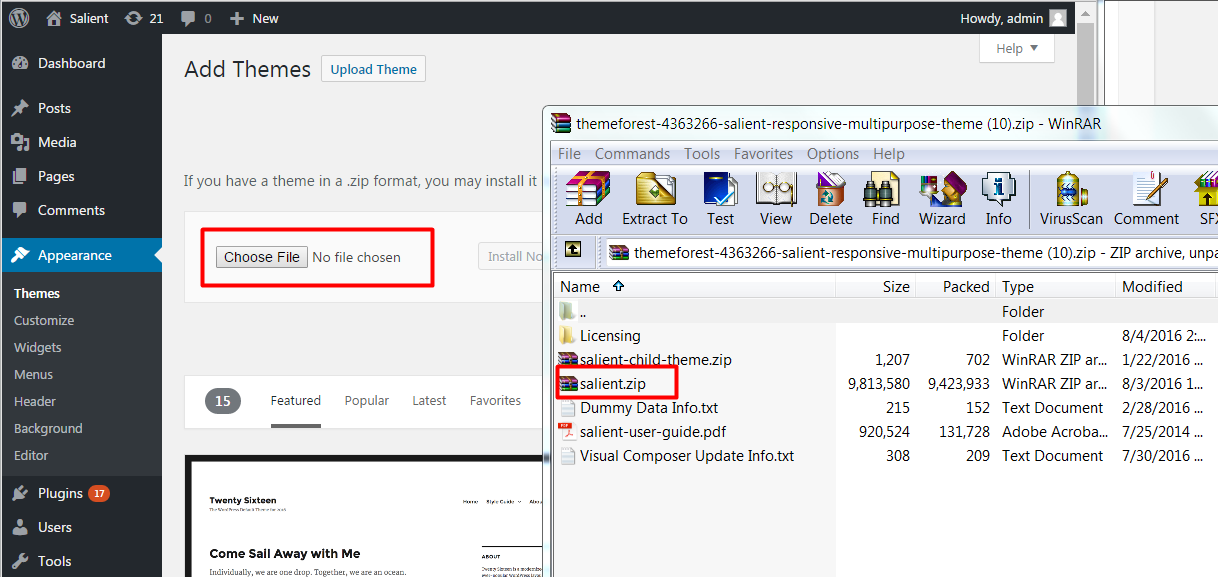
After you’ve downloaded the main theme archive from ThemeForest you’ll see the following items inside:
- salient.zip The actual files that you will need to upload into your WordPress setup
- salient-user-guide.pdf Documentation files
- salient-child-theme.zip An installable child theme. Learn more about this here
- Licensing (folder) Contains the general item license.
There are two main ways in which you can install Salient into your WordPress setup.
- 1. Through the WordPress admin dashboard
- 2. Uploading through FTP (file transfer protocol)
Method #1
Using The WordPress Dashboard
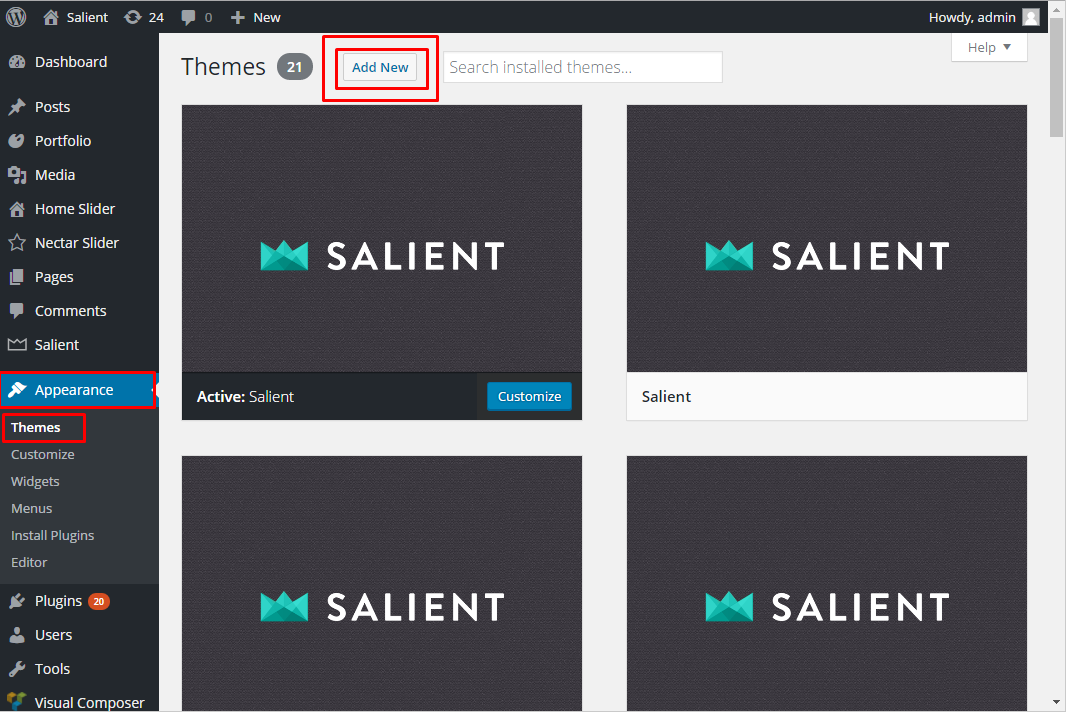
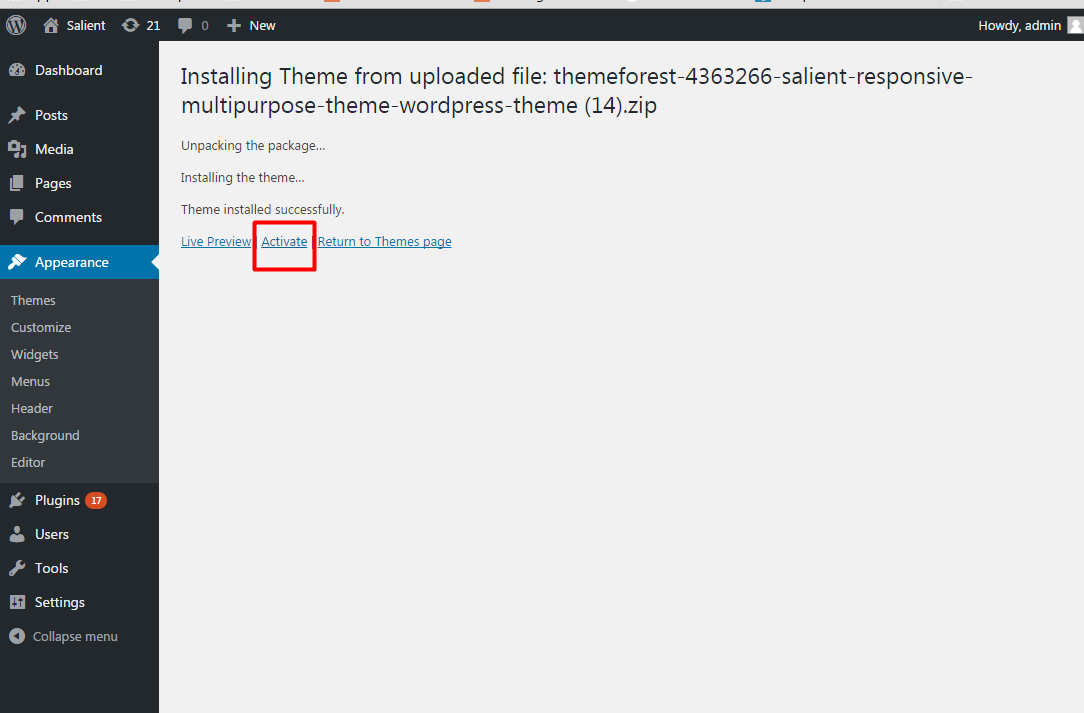
- Step 1. Head over to Appearance > Themes in your WordPress dashboard
- Step 2. Click Install Themes followed by the Upload button
- Step 3. Locate the salient.zip file you extracted from the ThemeForest download archive and click the Install Now button
- Step 4. Once you’ve installed the theme you will be greeted with a welcome page, as shown on the right. It will list all the available Salient plugins you can install, only two of which are required. The required plugins are the Salient WPBakery Page Builder and the Salient Core. If you already have another version of the WPBakery page builder active, deactivate it first. The other plugins Salient offers in the install plugins section are optional. You can read more about each one in the plugin installation section of the documentation.
- Step 5. You’re now ready to use Salient, begin importing demos if you wish or you start configuring the theme options and creating content!
Troubleshooting Possible Errors
If you encounter the message “Are you sure you want to do this? Please try again.” or “The link you followed has expired” when attempting to install, this is most likely occurring because your server has a low maximum file size upload/low maximum execution time set in the PHP settings. You must increase the following PHP settings to be greater than 29M (Any reputable hosting company will assist you with this quickly & hassle free):
- upload_max_filesize – greater than 29M
- post_max_size – greater than 29M
- max_execution_time – greater than 100
or you can upload the theme through FTP instead to bypass this all together.
Method #2
Uploading through FTP
- Step 1. Uncompress the salient.zip file from your ThemeForest download onto your computer
- Step 2. upload the extracted salient folder to /wp-content/themes/ on your server
- Follow steps 4 and 5 from the Using The WordPress Admin Dashboard from above
2. Theme Installation Errors
The Salient theme should install without any errors, although on some occasions people encounter errors so here are the most common errors and the solutions:
The package could not be installed. The theme is missing the style.css stylesheet.
One of the most common reasons people have issues is because they try uploading the Full zip that includes sample data, documentation…etc which displays the “The package could not be installed. The theme is missing the style.css stylesheet.” error. Please make sure you are uploading only the installable theme which is called Salient.zip. When you download the theme from your ThemeForest downloads it will give you 2 choices one is to download the full zip which you will need to extract to locate the theme and the other one is just the installable theme. Please pay close attention to this.
Are you sure you want to do this?
This error typically happens for one of two reasons:
- a. Your server’s memory limit to PHP is too low (most common).
- b. You are trying to upload the Full zip file and not just the installable theme (please refer to the guide on installing your theme).
- c. The upload limit on your server isn’t large enough and you must update your PHP.INI file to increase the upload_max_filesize value or contact your webhost to fix it.
White Screen Of Death or PHP Error Notice
A “white screen of death” happens when there is a PHP error on the site but WP_Debug isn’t enabled on the server. So the first thing to do would be to enable WP_Debug so you can read what the actual error is and thus fix the problem.
This usually happens when your WordPress installation isn’t up to date (always keep WordPress up to date) or when a 3rd party plugin is creating a conflict. I would recommend always disabling all plugins and updating WordPress before switching to a new theme.
3. 4 | Installing and Updating Salient Visual Composer (Bundled with Theme)
Please Note that Salient VC 4.7.4 ++ requires PHP 5.4 or higher to be running on your server. Please contact your hosting provider to ensure your php version is latest.
There are two methods to Install/Update.
A) Update your Theme via : https://themenectar.ticksy.com/article/3218 .
After that Install/update from the Appearance -> Install Plugins Menu as can be seen below .

B) Without Theme Update ( only Salient version 5.5 or higher) .
- Go to your Downloads page in your ThemeForest profile.
- Locate the Download button next to Salient and click it. Upon clicking the Download button, a dropdown should appear.
- Select Installable WordPress file only from the dropdown to begin downloading a .zip file of Salient itself.
- Once you have downloaded this .zip file to your computer, uncompress it by double-clicking on it. This will reveal an unzipped version of the Salient theme.
- Inside the Salient Theme Folder there is a /plugins folder which contains the js_composer_salient.zip, uncompress it by double-clicking on it. This will reveal an unzipped version of the Salient Visual Composer Plugin .
- Connect to your server via FTP and navigate to your /wp-content/plugins/js_composer_salient directory.
- Drag and drop the uncompressed version of Salient Visual Composer into this directory and ensure that all old files are overwritten.
4. 1 | Troubleshooting the Salient Theme (Website not working correctly)
Please be sure to follow each step precisely and if the issue still exist add/create your WP login details as well as FTP details in the comments.
Also be sure to let us know the specific page url where the issue can be found and how we would be able to recreate it.
Please follow these steps to Troubleshoot your Theme :
1: Make sure your WordPress Installation is updated to the latest version . See: How To Update .
2: Make sure you are running the Latest Version of the Theme. See: How To Update Theme and Plugin .
- Also See ChangeLog to Find Out the Latest Version of the Theme and Details about Bug Fixes.
3: Make sure you have the Latest Version of Visual Composer . If you just updated your theme you will need to delete and install the bundled Visual Composer plugin again as it has new code in it.
4: Switch to the Parent Salient Theme if you are using a Child Theme . A Working Child theme is Provided in the Download Package available at Themeforest Download Section .
5: If you are using Third Party Plugins other then the ones recommended by Salient its possible the issue is due to a CSS or JS Plugin File conflicting with the Theme Files. 7/10 times the issue is due to a Plugin .
- You can simply Deactivate all of them and Activate One at a Time and Check if the issue occurs with that plugin active . Same with other plugins .
- If a conflict is found please contact the Plugin Developer as we cannot help resolve conflicts with 3rd party plugins as per Themeforest Guidelines.
- However if it is a popular plugin let us know the details so we can look into adding support for it in future Theme Updates .
6: Caching and Minification :
- Simply Deactivating the Plugin will not clear the plugin cache . Be sure to turn off all Caching and Minification in the Plugin Settings Page.
- We Recommend using Better WP Minify for Minification and W3Total Cache for caching .
Please be sure to follow each step precisely and if the issue still exist add/create your WP login details as well as FTP details in the comments.
Also be sure to let us know the specific page url where the issue can be found and how we would be able to recreate it.
5. Updating Your Theme and Plugins
Updating the Theme :
Please view our New Guide: http://themenectar.com/docs/salient/updating-salient/ .
Updating Plugins
Updating plugins works in a similar fashion, but each one is a little different. We have provided detailed instructions below on how you can ensure that all of your plugins are always up to date. This is very important as it will not only give you access to the latest features provided by each plugin, but it will also keep your site secure from potential threats.
Visual Composer
When an update for Visual Composer is available, Salient will display a prompt in the dashboard requesting that you update to the latest version. This will replace the existing versions with the ones bundled with your current version of Salient. If you don’t see an update that should be available, you may need to update Salient Theme itself. Please see Details VC update guide: https://themenectar.ticksy.com/article/5182/
Contact Form 7
Since these plugins are managed via the WordPress Plugin Repository you will be notified when an update is available, which you can download and install whenever you choose. WordPress will handle the update process for these plugins.
6. How to update theme Manually via FTP
Please follow these steps to upload the theme folder manually via ftp:
- Download the latest theme zip from the Downloads Section on Themeforest
- Extract the latest theme zip on your local computer
- Connect to your server via FTP (see tutorial on FTP)
- Go to «wp-content > themes» folder
- Before you replace any files or folder on your server, we recommend to download a copy of the current theme folder to your local drive for backup
- Replace entire theme folder
See screenshot: http://prntscr.com/3lj0co
7. Size of images in lightbox . Images getting cut
Hey !
Simply change your «large» image size in settings > media to 1280×720 and it should work alright
Cheers
8. How to Translate the theme
See Relevant url : http://themenectar.com/docs/salient/translations/
Translation Basics
The section covers the steps in creating a .po file that contains the set of translated strings. If you’re already fimilar with creating a .po file, skip to the Recommended Toolssection.
Setting The WordPress installation language
Head over to the WordPress admin panel > Settings > General tab and ensure that your desired language is selected from the “Site Language” dropdown. This step is essential for ensuring the correct language file you’ll be creating gets called on your site.

Location of Theme Language Files
By default, Salient will load language files from the lang directory, which is located in the root of the theme folder. Once you’ve created your .po/.mo files for your desired language code, you can store them in this directory.
If you’d like to keep your .po/.mo files in a child theme to ensure they don’t get removed during theme updates, you can create a directory called “lang” within your Salient child theme and keep them there instead. When going this route, you’ll also need to add the following snippet into your Salient child theme functions.php file:
<span class="border-top"></span><span class="border-right"></span><span class="border-bottom"></span><span class="border-left"></span>
add_action('after_setup_theme', 'child_lang_setup');
function child_lang_setup(){ load_child_theme_textdomain('salient', get_stylesheet_directory() . '/lang');
}

Translation Process
Salient includes three files in the lang directory to assist with translation.
- default.po/default.mo – language files with no assigned language that can be opened in a program/through a plugin of your choosing to quickly start editing the strings. Once the translations have been made, simply rename both files to the WordPress locale you’re using. For example French would named “fr_FR.po” and “fr_FR.mo”. You can find a complete list of locale codes here.
- nectar_salient_strings.pot – This is the main template file that can be used to generate new po/mo files. It has all the translation strings left empty. When you use one of the recommended tools for translating listed below, you can use this file to automatically create the .po/.mo files in your chosen locale so you don’t need to manually name them or find out what your locale code is.
Recommended Tools
WPML
WPML makes it easy to build multilingual sites and run them. It’s powerful enough for corporate sites, yet simple for blogs.
- Translate pages, posts, custom types, taxonomy, menus and theme’s texts.
- WPML comes with state-of-the-art translation management. You can turn ordinary WordPress users into Translators. Translators can access only specific translation jobs which Editors assign to them.
- WPML frees you from the hassle of editing PO files and uploading MO files. You can translate texts in other plugins and in Admin screens directly from the String Translation interface.
![]()
The WPML team has written a comprehensive guide on integration with Salient. If you’re new to the plugin, or stuck on something we recommend giving it a read through.
Official WPML Guide
If you’re looking for extra assistance with for your site solution or are in need of developing customized components – WPML also has a list of official contractors.
WPML Contractors List
Loco Translate (Free)
Loco Translate provides in-browser editing of WordPress translation files.
- Built-in translation editor within WordPress admin
- Extraction of translatable strings from your source code
- Native MO file compilation without the need for Gettext on your system
Download Loco Translate
![]()
Poedit (Free)
Poedit is a program you can download for free to translate outside of WordPress. Because of this, it’s slightly more labor intensive than one of the WP plugins above, but still a great option. Poedit is intentionally spartan so that the focus is on the translation you’re working on. Just you and the translation, no distractions.
Download Poedit
9. Comments not showing on Pages
By default there’s no option for the comment field on static pages, but adding it in is simple.
If you’d like to handle it in a cleaner, update-proof fashion, you can use the «nectar_hook_after_content» hook.
Here’s an example that you can add into your child theme functions.php:
add_action('nectar_hook_after_content', 'salient_child_page_comments', 10);
function salient_child_page_comments() {
    if( is_page() ) {
        comments_template();
    }
}
1) Add the code to page.php via Apperance -> Editor .

<div class="comments-section"> <?php comments_template(); ?> </div>
2) Turn on the checkbox option in the page quick edit mode :
 .
.
Cheers
10. Create Landing Page (Remove Header / Footer per page )
You need to find the Page id of the page you want to remove the Header and footer . Here is how to find it: http://quadroideas.com/find-page-id-wordpress/ .
Also see: https://support.woothemes.com/hc/en-us/articles/203105957-Customizing-your-theme-with-Firebug
Add this into the Custom CSS box located in your Salient Options panel:
For header:
.page-id-645 #header-space , .page-id-645 #header-outer {

display:none;

}
For Secondary Header:
.page-id-645 #header-secondary-outer {
    display: none;
}
For Footer:
.page-id-645 #footer-outer{

display:none;

}
11. Two Minute Theme Update.
Updating the Salient Theme is incredibly simple and as long as you’ve made all of your changes to your site using a child theme, you won’t have to worry about anything being overwritten.
2 Minute Method using «Easy Theme and Plugins Update» Plugin :
- Go to Plugins -> Add New Menu in WP Backend Dashboard and Install «Easy Theme and Plugins Update» Plugin . See screenshot:

2. Go to Appearance -> Themes and Press the «Add New» Button . See screenshot:
3. A. Press the Upload Theme button and Then Choose «Yes» in the Upgrade existing theme? Dropdown menu box.
3. B. Choose the Latest Theme version zip that you have downloaded from the Themeforest Download Section .
- Go to your Downloads page in your ThemeForest profile.
- Locate the Download button next to Salient and click it. Upon clicking the Download button, a dropdown should appear.
- Select Installable WordPress file only from the dropdown to begin downloading a .zip file of Salient itself.
3. C. Press the Install Now button after having selected the Salient Theme .zip File . Be sure to Select «Yes» in the Upgrade existing theme? Dropdown menu box.
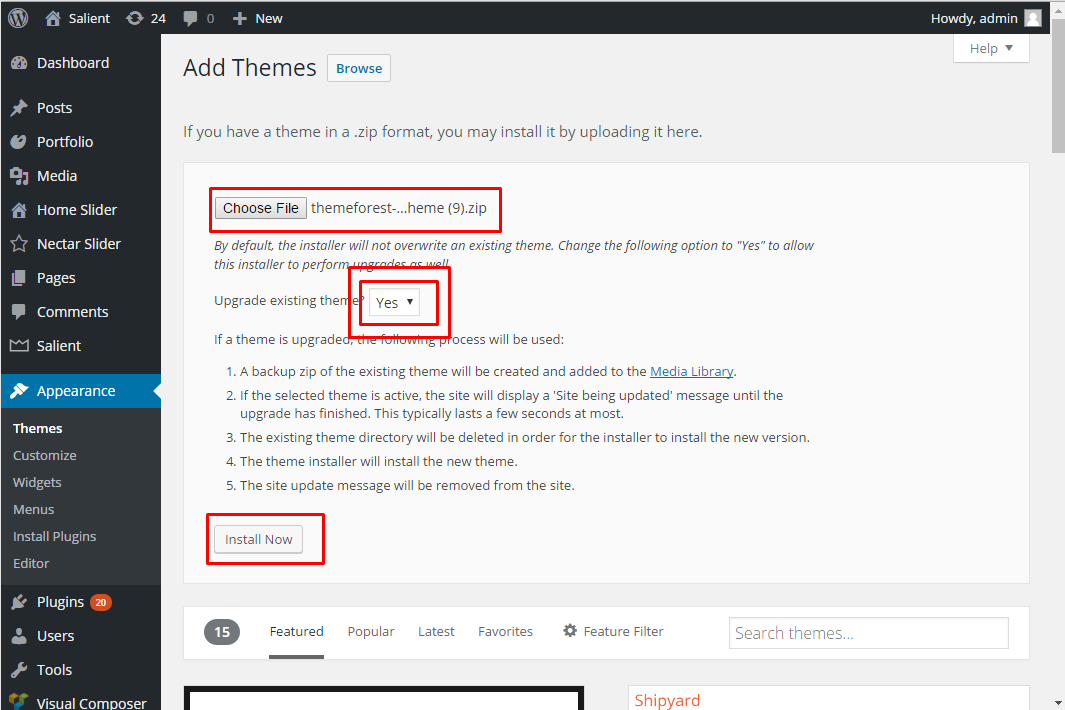
3. D. Activate the Theme .
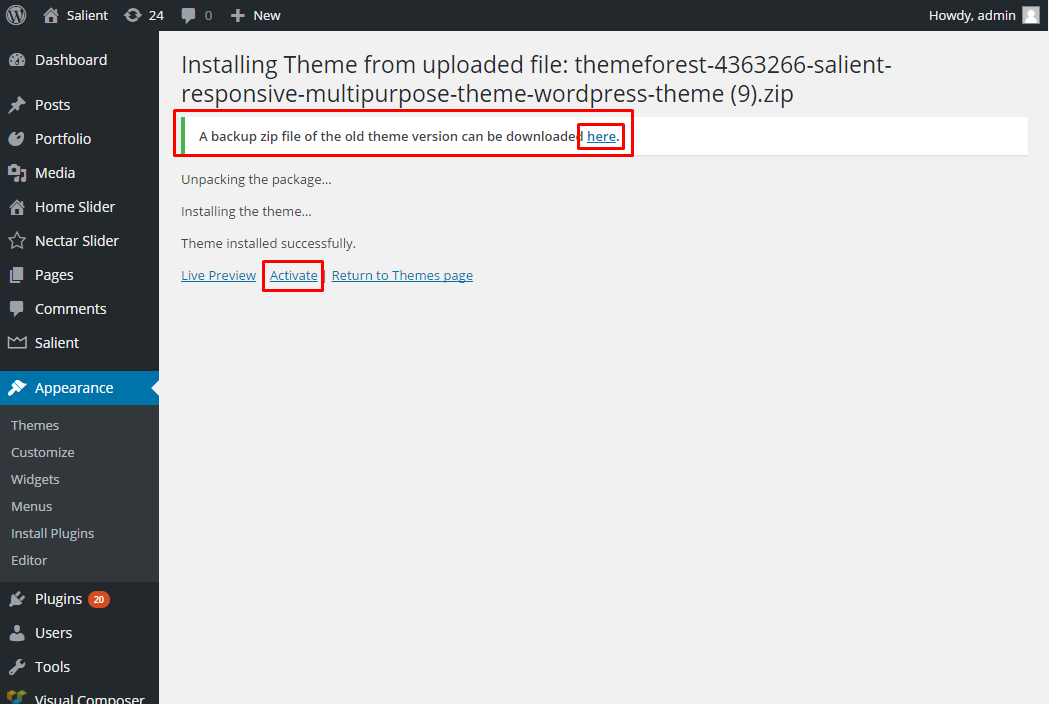
Your Theme is now Updated .
To Update the Visual Composer Plugin follow this guide: https://themenectar.ticksy.com/article/5182/
Cheers
12. Increasing Memory Limit To PHP
Some servers (shared hosting planes usually) have a very low limit to PHP by default which can cause a blank screen (white screen of death) or an error on your site. Luckily increasing the memory limit to PHP is very simple and can be done with a small tweak in your wp-config.php file.
Have a look below at how to increase your memory limit or read the documentation on the WordPress CODEX.
Increasing the Memory Limit
Open your wp-config.php file via FTP and add the following code right before it says “That’s all, stop editing! Happy blogging”:
define( 'WP_MEMORY_LIMIT', '128M' );
You can alter the 128MB to the value you want. I personally use 256MB on my localhost but 128MB should work pretty well for most live sites.

Note: Altering your wp-config.php file may not work if your host does not allow for increasing the PHP memory limit. If that is the case, please contact your host to increase the PHP memory limit for you.
Godaddy Users
Some of the Godaddy services actually include a setting in the c panel to alter the memory limit and editing the wp-config.php file won’t do anything so please make sure to check your admin panel first.
13. Missing «Read More» button in Ascend Skinâ€
The ascend skin actually hides that on purpose for a different look — if you want it back in add this into the custom css box located in your Salient Options panel:
html .ascend #search-results .result span.bottom-line, html .ascend .masonry-blog-item span.bottom-line, html .ascend .masonry-blog-item .more-link {
    display: block!important;
}
14. Increase Nectar Love value manually
Add this code to function.php press save button . Once updated remove the code:
/* update_post_meta(post_id, '_nectar_love',value) */
update_post_meta(1851, '_nectar_love',60);
For more info on the function: http://codex.wordpress.org/Function_Reference/update_post_meta
15. Move Secondary Menu Social Media Icons to Left
Add this into the Custom CSS box located in your Salient Options panel :
@media only screen and (min-width:1000px){
 body #header-secondary-outer #social {
  float: right !important;
}
16. Change color of Nectar Slider Heading and sub heading
Add this into the Custom CSS box located in your Salient Options panel Or on the Visual Composer Css button so the css shows on that page only:
/* Heading for all slides*/
body .swiper-slide .content h2 {
    color: #ff0 !important;
}
/* Sub heading for all slides*/
body .swiper-slide .content p {
    color: #ff0 !important;
}


/* Heading for first slide */
body .swiper-slide:nth-child(1) .content h2 {
    color: #ff0 !important;
}
/* Sub heading  for first slide */
body .swiper-slide:nth-child(1) .content p {
    color: #ff0 !important;
}


/* Heading for nth slide */
body .swiper-slide:nth-child(n) .content h2 {
    color: #ff0 !important;
}
/* Sub heading  for nth slide */
body .swiper-slide:nth-child(n) .content p {
    color: #ff0 !important;
}
17. Make init.js changes in Child Theme .
Please see ticket: http://themenectar.ticksy.com/ticket/136919/
18. “Lightbox to open an embed file”
You’d need to do an inline content lightbox by adding an id onto your div like this (just add this on the same page as your link in the text editor)
<script type="text/javascript" src="http://Myserver.com/blah.js"></script>
<div id="lightbox-content" style="width:600px; height:500px;">
  <object width="600" height="500" style="display:none;">
     <param name="host_url" value="http://Myserver.com" />
     <param name="name" value="ABC/XYZ"/>
   </object>
</div>
And then using a link like this:
<a href="#lightbox-content"> link </a>
Your could also hide the initial div from displaying outside of the lightbox with css
#lightbox-content {
  display: none;
}
Cheers
19. Make button open lightbox
The correct HTML to add a button with an icon that links to a video would be:
<a class="nectar_video_lightbox nectar-button small accent-color regular-button magnific-popup" target="_blank" href="https://www.youtube.com/watch?v=yarB1NCyqfs" data-color-override="false" data-hover-color-override="false" data-hover-text-color-override="#fff" style="visibility: visible;" rel="prettyPhoto"><span>Test Span</span> </a>
Cheers
20. Portfolio Size and Order
1. Make sure you’re using the Fullwidth masonry style .
2. Make sure your images meet the size requirements as stated in the Masonry Sizing section of the User guide : http://themenectar.com/docs/salient.pdf
3 And last — if you want to order your items without changing the date, use this plugin: http://wordpress.org/plugins/intuitive-custom-post-order/
21. Mobile Menu hidden by WordPress Toolbar
Try adding this into the custom css box located in your Salient Options panel:
@media only screen and (max-width: 690px) { #wpadminbar { position: fixed!important; } }
Cheers
22. mobile full width, but keep the desktop in the boxed mode
Add this into the Custom CSS box located in your Salient Options panel (Make Sure there are no red cross in the Box) :
@media only screen and (max-width: 690px) {
    #boxed {
        width: 100%!important;
    }
}
Thanks
23. “Sticky Mobile Menuâ€
add this into your custom css box located in the Salient options panel:
@media only screen and (min-width : 1px) and (max-width : 1000px) {
   body #header-space {
      height: 56px!important;
      display: block!important;
   }
   body #header-outer {
        position: fixed !important;
   }
   #mobile-menu {
     position: fixed!important;
     top: 52px!important;
     width: 100%!important;
   }
}
Note: Might be incompatible with some smartphones .
24. Howto: Make logo big or small
Add this into the Custom CSS box located in your Salient Options panel:
/* Desktop greater then 1000px */
@media only screen
and (min-width : 1000px) {

    body header#top #logo img {
        height: 50px!important;
        margin-top: -8px !important;

    }
}


/* Desktop */
@media only screen
and (min-width : 1px) and (max-width : 1000px) {

    body header#top #logo img {
        height: 37px!important;
        margin-top: -6px !important;

    }
}


/* iPad */
@media only screen and (min-device-width: 481px) and (max-device-width: 1025px) {

    body header#top #logo img {
        height: 54px!important;
        margin-top: -12px;

    }
}


/* iPad landscape  */
@media only screen and (min-device-width: 481px) and (max-device-width: 1025px) and (orientation:landscape) {
    body header#top #logo img {
        height: 54px!important;
        margin-top: -12px !important;

    }
}
/* Mobile */
@media only screen and (max-width: 470px) {
    body header#top #logo img {
        height: 54px!important;
        margin-top: -12px;

    }
}
Change height and top values according to the height and placement of your logo.
25. how to make the color of the hover on the thumbnails different from the global link color
Please see the comment by nectar in this thread: http://themenectar.ticksy.com/ticket/155205/ .
26. Remove thin bottom border on transparent header
Add this into the Custom CSS box located in your Salient Options panel :
body #header-outer[data-transparent-header="true"].transparent {
    border: none !important;
}
27. Change Team Member Size
Add this into the Custom CSS box located in your Salient Options panel :
#ajax-content-wrap .team-member img {
    height: 206px;
}
28. Move Third level menu to left instead of right
Add this into the Custom CSS box located in your Salient Options panel:
body .sf-menu li li ul {
    left: -16em!important;
}
body .icon-angle-right:before{content:"f104" !important;}
29. Map marker icon not showing
No Additional plugin is needed. Please make sure you’ve activated location #1 and entered your lat/lng for that as well — just adding a lat/lng to the map center point won’t add a marker.
30. Changing content in portfolio thumbnail hover
Try making the edit in the shortcode-processing.php file located in the nectar/tinymce directory. Just run a search for «//Portfolio» to end up at the right place
31. Hide Portfolio Arrows / Squares / Title
For Whole Section including the title:
.single-portfolio .project-title .container {
    display: none !important;
}
For All Three:
#portfolio-nav {
   display: none!important;
}
For Arrows Only:
#portfolio-nav ul.controls { display: none; }
For Square Only:
#portfolio-nav li#all-items {
    display: none;
}
For Title Only:
.single-portfolio div.row div.col.section-title h1 {
    visibility: hidden;
}
32. Mobile Drop Down , Change word not arrow as link
The mod would indeed take place in the init.js file – this section:
 $('#mobile-menu .container ul li:has(">ul") > a .sf-sub-indicator').click(function(){
    $(this).parent().parent().toggleClass('open');
    $(this).parent().parent().find('> ul').stop(true,true).slideToggle();
    return false;
});
would become:
$('#mobile-menu .container ul li:has(">ul") > a').click(function(){
    $(this).parent().toggleClass('open');
    $(this).parent().find('> ul').stop(true,true).slideToggle();
    return false;
});
Cheers
33. Nectar Slider Arrows Color and Background Change
1:To Change arrow color:
.swiper-container .slider-prev > i {  color: red; }
.swiper-container .slider-next > i { color: red; }
2:To change background color:
.swiper-container a.slider-prev:hover, .swiper-container a.slider-next:hover {
    background-color: rgba(0,0,0,0.8);
}
.swiper-container a.slider-prev, .swiper-container a.slider-next {
    background-color: rgba(0,0,0,0.2);
}<p>Cheers</p>
34. Hide responsive secondary menu In Mobile/Tablet
You can remove the secondary nav in ipad and mobile view using below custom css:
@media only screen and (min-width : 1px) and (max-width : 1000px) {
    #header-secondary-outer ul.sf-menu {
        display:none !important;
    }
}
If you want to remove the whole secondary menu including social icons use this:
@media only screen and (min-width : 1px) and (max-width : 1000px) {
    #header-secondary-outer {
        display:none !important;
    }
}
For mobile only:
@media only screen and (max-width: 470px) {
    #header-secondary-outer {
        display:none !important;
    }
 }
35. Remove WooCommerce Add to Cart — Amount Function
To remove this:http://ticksy_attachments.s3.amazonaws.com/8206310… .
Add this into the Custom CSS box located in your Salient Options panel:
.quantity input[type=number] {
    -moz-appearance: textfield;
     margin: 0;
}
Cheers
36. Change order of Portfolio categories title’s
Q: I have a few portfolio categories and I would like to order them in the horizontal menu in a specific order rather than using the default alphabetical attributes.
Anwser: Use this plugin: https://wordpress.org/plugins/taxonomy-terms-order…
37. Howto: Add Custom image sizes ?. Change Responsive Behavior of images
By default all images inherit responsive behavior — if you want to use fixed dimensions, either do so by adding a class to your image e.g.
img src="" />
and then add this into the Custom CSS box located in your Salient Options panel:
.my-size { width: 400px!important; height: 300px!important; }
OR remove these lines from the style.css to clear the responsive behavior for all images:
.main-content img {
    height: auto;
    max-width: 100%;
}
.row .col img {
    height: auto;
    margin-bottom: 15px;
    max-width: 100%;
    width: auto;
}
Cheers
38. Change Slide Out Widget Icon
.slide-out-widget-area-toggle i:before {
    content: 'f0e0';
    font-family: 'FontAwesome';
    top: 6px !important;
    position: relative;
    font-size: 22px !important;
}


.slide-out-widget-area-toggle span i.lines {
    display: none !important;
}
.slide-out-widget-area-toggle span i.lines-button.x2:before {
    content: 'f0e0';
    font-family: 'FontAwesome';
    top: 6px !important;
    position: relative;
    color:#fff !important;
    font-size: 22px !important;
}


.slide-out-widget-area-toggle i:before {
    font-style: normal;
}


header#top .span_9 > .slide-out-widget-area-toggle i {
    line-height: 25px;
}
39. Hide Mega Menu Column Title in Mobile Menu
Add this into the Custom CSS box located in your Salient Options panel (Make Sure there are no red cross in the Box) :
#mobile-menu ul >li > ul.sub-menu> li.menu-item-has-children> a { display: none; } #mobile-menu ul >li > ul> li> a ~ul { display: inline-block !important; }
Cheers
40. Adjust Nectar Slider Text with CSS
Using the Extra Class Field in the Nectar Slider «Edit Slide» Page you can target individual slides :

Use the extra class name selector to target individual slides.
body #ajax-content-wrap .nectar-slider-wrap .swiper-slide.home_slider .content h2 { }
Add this into the Custom CSS box located in your Salient Options panel and adjust values accordingly:
@media only screen and (max-width : 1000px) {
    body #ajax-content-wrap .nectar-slider-wrap div.swiper-slide .content h2 {
        font-size: 24px!important;
        line-height: 51px!important;
        margin-bottom: 6px;
        letter-spacing: -0.5px;
    }

    body #ajax-content-wrap .nectar-slider-wrap div.swiper-slide .content p span {
        font-size: 15px!important;
        line-height: 20px!important;
        padding-bottom: 7px;
    }
    body #ajax-content-wrap .nectar-slider-wrap div.swiper-slide .content p {
        font-size: 15px!important;
        line-height: 20px!important;
        padding-bottom: 7px;
    }
    body #ajax-content-wrap .nectar-slider-wrap div.swiper-slide .button a {
        font-size: 15px!important;
        padding: 2px 7px !important;
    }


    body #ajax-content-wrap .nectar-slider-wrap .swiper-slide .content {
        margin-top: 10px !important;
        top: 30px !important;
    }
}
/* For Mobile*/
@media only screen and (max-width : 690px) {
    body #ajax-content-wrap .nectar-slider-wrap div.swiper-slide .content h2 {
        font-size: 24px!important;
        line-height: 51px!important;
        margin-bottom: 6px;
        letter-spacing: -0.5px;
    }

    body #ajax-content-wrap .nectar-slider-wrap div.swiper-slide .content p span {
        font-size: 15px!important;
        line-height: 20px!important;
        padding-bottom: 7px;
    }
    body #ajax-content-wrap .nectar-slider-wrap div.swiper-slide .content p {
        font-size: 15px!important;
        line-height: 20px!important;
        padding-bottom: 7px;
    }
    body #ajax-content-wrap .nectar-slider-wrap div.swiper-slide .button a {
        font-size: 15px!important;
        padding: 2px 7px !important;
    }


    body #ajax-content-wrap .nectar-slider-wrap .swiper-slide .content {
        margin-top: 10px !important;
        top: 30px !important;
    }
}
41. Change the numbers of columns in the recent projects slider from 3 to 6 items
Open up the init.js file and change this:
 $('.carousel:not(".clients")').each(function(){
        var $that = $(this);
        var maxCols = ($(this).parents('.carousel-wrap').attr('data-full-width') == 'true') ? 'auto' : 3 ;
to this:
 $('.carousel:not(".clients")').each(function(){
        var $that = $(this);
        var maxCols = ($(this).parents('.carousel-wrap').attr('data-full-width') == 'true') ? 'auto' : 6 ;
42. Parallax Bug on Chrome and (bit older version of) Firefox”
What you’re seeing is a browser level bug that exists in webkit. If you check a current Firefox version or IE10 you’ll notice what you’ve created works fine. Essentially you can’t have a parallax nectar slider close to a parallax full width section. You can have as many parallax full width sections touching as you want, but the Nectar Slider uses a different method for animation (css3 based) and that causes glitches when in view of the old way the other sections use. The solution is either to simply get more distance between the two so that by the time you scroll to your parallax fullwidth section, the Nectar Slider is out of view or to disable the parallax on one of the two sections.
Thanks
43. Add Phone-Number/Email in secondary menu with icon
Please add the span html inside the secondary menu text as :
<span class='icon-phone'></span>0437 445 352
As can be seen in this screenshot: http://prntscr.com/47l3c0 .
For Email :
<span class='icon-envelope'></span>
And then add this to custom css:
body span.icon-phone {
    background: none;
    height: 10px;
    line-height: 10px;
    font-size: 26px !important;
}
body span.icon-envelope {
    background: none;
    height: 10px;
    line-height: 10px;
    font-size: 26px !important;
}
This might also help write up Custom CSS: https://support.woothemes.com/hc/en-us/articles/203105957-Customizing-your-theme-with-Firebug .
Thanks
44. Nectar Slider: Semi Transparent Background for Heading
.swiper-slide .content h2 {
        padding: 4px 0px;
	display: inline;
	position: relative;
	left: 10px;
	background: none repeat scroll 0 0 rgba(0, 0, 0, 0.5);
	box-shadow: 10px 0 0 rgba(0, 0, 0, 0.5), -10px 0 0 rgba(0, 0, 0, 0.5);
	-moz-box-shadow: 10px 0 0 rgba(0, 0, 0, 0.5), -10px 0 0 rgba(0, 0, 0, 0.5);
	-webkit-box-shadow: 10px 0 0 rgba(0, 0, 0, 0.5), -10px 0 0 rgba(0, 0, 0, 0.5);
	-o-box-shadow: 10px 0 0 rgba(0, 0, 0, 0.5), -10px 0 0 rgba(0, 0, 0, 0.5);
	line-height: 45px;
}
45. Hide Portfolio Thumbnail Title or date
Add this into the Custom CSS box located in your Salient Options panel :
/* hide title and date */
body .portfolio-items .col .work-info .vert-center {
    display: none;
}
/* hide title only */
body .portfolio-items .col .work-item.style-3 h3 {
    display: none;
}
/* hide date only*/
body .portfolio-items .col .work-info .vert-center p {
    display: none;
}<p>Cheers</p>
46. Make Header Nav Menu Look like a Button
Please see our New Doc Article : http://themenectar.com/docs/salient/header-button-links/ .
Cheer
47. OpenGraph loaded twice, when WordPress Jetpack Publicize feature in useâ€
add the following code in the themes functions.php
add_filter( ‘jetpack_enable_open_graph’, ‘__return_false’ );
before this code at the end of the file:
add_action( ‘wp_head’, ‘add_opengraph’, 5 );
48. Remove slide count in Home slider next/prev arrows
Add this into the Custom CSS box located in your Salient Options panel :
.swiper-container .slider-prev, .swiper-container .slider-next {
   width:50px !important;
}<p>.swiper-container .slider-next .slide-count,.swiper-container .slider-prev .slide-count{
    display:none;
}</p><p>Cheers</p>
49. Decrease the vertical spacing or leading between all 3 elements in the nectar slider- the large text, the sub text and the button
Add this into the Custom CSS box located in your Salient Options panel:
<p>#boxed .swiper-slide .content h2 {
    line-height: 30px;
}
.nectar-slider-wrap[data-full-width="false"] .swiper-slide .content h2 {
    line-height: 40px;
}
.swiper-slide .content p {
    padding-bottom: 0px;
}
</p>
Cheers
50. How to Create Mouse Based Parallax ?.
Please see https://www.youtube.com/watch?v=NIgi-YyspcE .
Cheers
51. Navigation gains bottom margin on page scroll
Add this into the Custom CSS box located in your Salient Options panel:
.sf-menu ul {
    top: 50px!important;
}
.small-nav .sf-menu ul {
    top: 45px!important;
}
52. Advancing nectar slide at end of video [Hack]
The following code is outputted below the slider in a raw JS block:
Hope this helps someone!
53. Removing Author, Date, Tags, and Comments on Blog Titles
/* For Blog page */
body .meta-author {
    display: none !important;
}
body .meta-category {
    display: none !important;
}
body .meta-comment-count {
    display: none !important;
}
/* For Blog Single Pages */
body #single-below-header {
    display: none !important;
}
/* hide date and love on masonry blog */
body #post-area.masonry article.post .post-meta {
    display: none!important;
}
article.post .content-inner {
    border-bottom: none;
}
54. Nectar Flexible Slider Height Cropping Image in Responsive Screen Sizes.
Please see Updated Doc here : http://themenectar.com/docs/salient/nectar-slider-plugin/ .
55. Fonts Used in Theme Demos , Screenshots of Typography Panel
Agency Demo

Ascend Demo

56. strange icons on iOS
Please check your .htaccess file in the wp-content folder and check if it has any below security code that is blocking specific ttf filetype .
Order deny,allow
 Deny from all
 <Files ~ ".(xml|css|jpe?g|png|gif|js|svg)$">
 Allow from all
 </Files>
57. Change logo url link via JS code Globally.
Add this JS code in the Google Anlaytics Section :

<script type='text/javascript'>
jQuery( document ).ready(function() {
 jQuery('a#logo').attr('href','http://yourwebsite.co');
});
</script>
If you wish to open the Link in a new Page use below code instead:
<script type="text/javascript">
jQuery( document ).ready(function() {
 jQuery('a#logo').attr('href','http://yourwebsite.co').attr('target', "_blank");
});
</script>
58. Add TEXT Next to Hamburger Menu Icon
Theme Version 8.5+
Add this into the Custom CSS box located in your Salient Options panel (Make Sure there are no red cross in the Box) :
.slide-out-widget-area-toggle:not(.slide-out-hover-icon-effect) a:after {
    content: "MENU";
    font-size: 25px !important;
    position: relative;
    left: -81px !important;
    top: -22px !important;
    color:#000 !important;
}
Add this into the Custom CSS box located in your Salient Options panel (Make Sure there are no red cross in the Box) :
/* add the text as a pseudo css element */
.slide-out-widget-area-toggle:not(.slide-out-hover-icon-effect) a span:after{
    content: "MENU";
    font-size: 25px !important;
    position: relative;
    left: -81px !important;
    text-decoration: none;
    transition: color 0.2s linear;
    -moz-transition: color 0.2s linear;
    -webkit-transition: color 0.2s linear;
    top: 1px !important;
    opacity: 0.75;
}
/* adjust for Mobile/Tablet devices  */
@media only screen and (max-width: 1000px) and (min-width: 1px) {
    .slide-out-widget-area-toggle a span:after {
        font-size: 15px !important;
        left: -51px !important;
        top: -6px !important;
    }
}
/* increase width of icon to house the extra text */
header#top nav ul .slide-out-widget-area-toggle a {
    margin-left: 65px !important;
}
/* Adjust colors for light and Dark header if Permanent transparent selected  */
.midnightHeader.light .slide-out-widget-area-toggle a span:after {
    color: #fff;
}
.midnightHeader.dark .slide-out-widget-area-toggle a span:after {
    color: #333;
}
/* color and opacity when header is resized */
.small-nav .slide-out-widget-area-toggle a span:after {
    color: #999 !important;
    opacity: 1 !important;
}
.small-nav .slide-out-widget-area-toggle a:hover span:after {
    color: #2ac4ea !important;
}
Best.
59. Corporate Demo — Contact Form
A common question that’s asked about some of the demo contact form setups is how to make some of the fields display in columns. For this, you need to use actual HTML columns. Below you will find an example snippet you can copy/paste and modify as needed into the Contact Form 7 form creation editor. If you don’t already have that plugin installed, make sure to read over the Installing Plugins chapter.
<div class="row">
  <div class="col span_4">
  <label for="your-name">Name</label>
    [text* your-name] </p>
  </div>
  <div class="col span_4">
  <label for="your-email">Email</label>
    [email* your-email] </p>
  </div>
  <div class="col span_4">
  <label for="your-subject">Subject</label>
     [text your-subject] </p>
  </div>
</div>
<label for="your-message">Message</label>
    [textarea your-message]
<p><br/>[submit "Send Message"]</p>


60. Anchor Links not Working
Salient Theme: 7.x
How to solve: Browser shows undesired positioning of anchor links if/when returning from ‘other’ site pages.
Steps:
- Go to Salient Options panel > General Settings > Functionality
Check One Page Scroll Support (Animated Anchor Links) [On] - Go to Salient Options panel > Page Transitions
Select Animated Transition Method [Standard]
Check Disable Fade Out On Click [On] - Go to WP Admin: Appearance > Menus
Each custom link must use full url path. i.e. http://example.com/#anchor
For more information on setting up Anchor links see:
61. Twitter Share Count API Closed
Here is the official link: https://blog.twitter.com/2015/hard-decisions-for-a-sustainable-platform .
For the other counts to Please Update Theme .
Cheers
62. Visual Composer template is reordering elements
Hey Guys,
When we add a new portfolio item, we start by enabling «Full Width Portfolio Item Layout» and checkoff «Hide Featured Image/Video on Single Project Page?» under «Project Configuration».
Now if we load in the template it orders the elements backwards in the Visual Composer.
The reason why, is that we didn’t choose the «Page Builder» on the blue button in top.
But should the Visual Composer panel be visible before we select the «Page Builder»?
On the attached screenshot you can see how the Visual Composer is visible before selecting the «Page Builder».
Best.
63. Change hamburger icon to envelope mail icon in main menu .
Add this into the Custom CSS box located in your Salient Options panel (Make Sure there are no red cross in the Box) :
#header-outer.transparent header#top nav ul .slide-out-widget-area-toggle a i.lines-button.x2:after {
    content: "f0e0";
    position: absolute;
    font-family: FontAwesome;
    font-size: 20px !important;
    line-height: 24px !important;
    font-style: normal;
}
#header-outer.transparent header#top nav ul .slide-out-widget-area-toggle a i.lines {
    display: none !important;
}
header#top .span_9 > .slide-out-widget-area-toggle i:before {
    content: "f0e0" !important;
    position: absolute;
    font-family: FontAwesome;
    font-size: 20px !important;
    line-height: 24px !important;
    font-style: normal;
}
#header-outer[data-full-width="true"] .slide-out-widget-area-toggle .open > span {
    -webkit-transform: none !important;
    transform: none !important;
}
Best
64. Changing Theme Texts Using Loco Translate Plugin .
You can view the Updated Documentation Article here: http://themenectar.com/docs/salient/translations/ .
Please see: https://localise.biz/help/wordpress/translate-plugin/beginners
Below are the Steps to Install Loco Translate Plugin to change or edit Theme Texts Like «View Larger» Button Text in Portfolio as well as «Read More» in Blog etc .
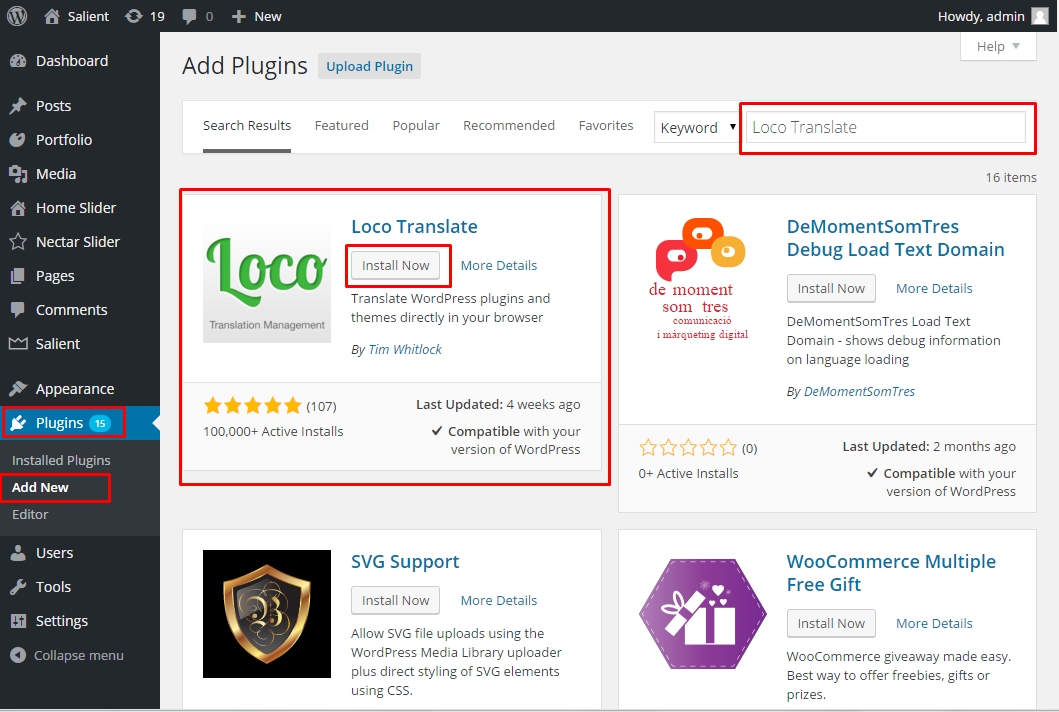
1: Install Loco Translate Plugin from the Dashboard .
- Plugins -> Add New .
- Search for Loco Translate .
- Install and Activate Plugin
2: After Activating the Plugin ,
- Goto Loco Translate -> Manage Translations .
- Click on «New Language» Link .
- Choose the desired Language from the Dropdown Menu .
- Press «Start Translating» Button .
- Search For the String Text you want to Translate by choosing the Text from the List.
- Select it and Add the Translation .
- Press Save Button .
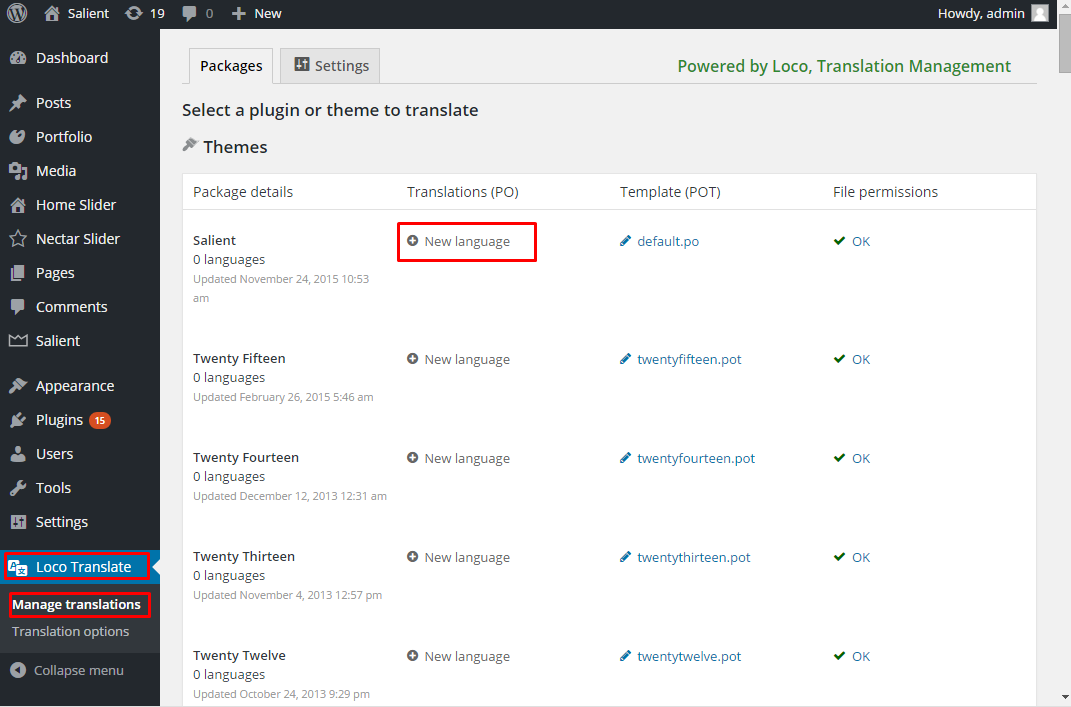
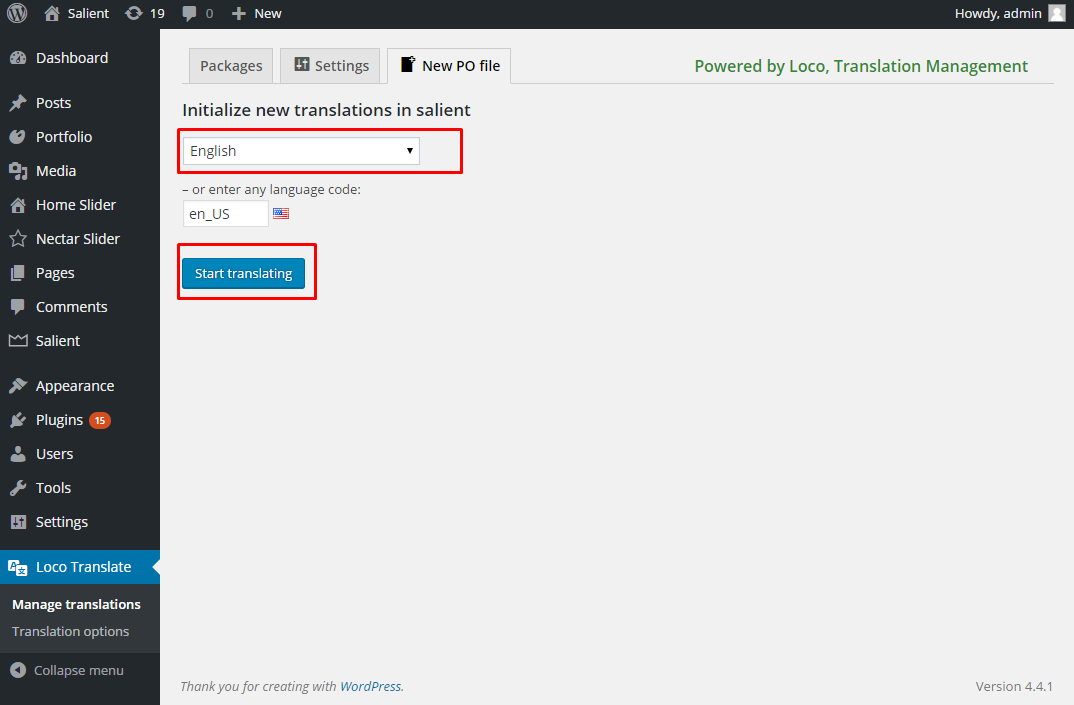
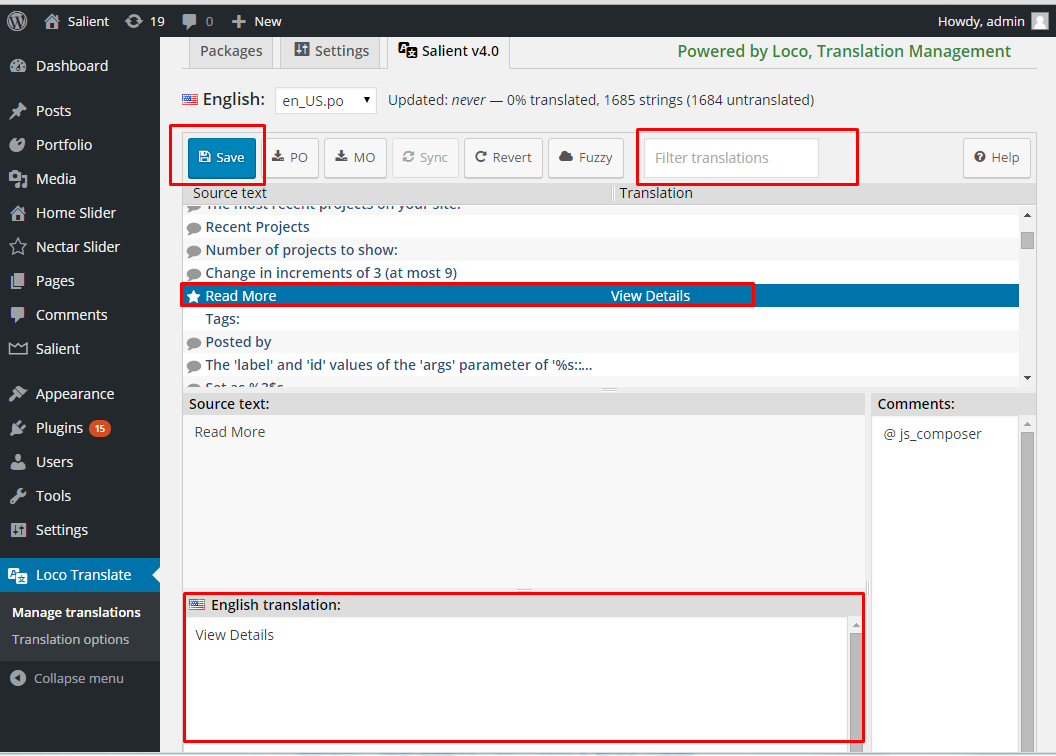
Cheers
65. Add Text to Footer Right .
Hey Again,
Add this text in the copyright section in Options Panel: http://prntscr.com/9y6qim
<span style='float:right;'> Test text </span>
Also add this into the Custom CSS box located in your Salient Options panel (Make Sure there are no red cross in the Box) :
#copyright .span_5 {
    width: 100% !important;
}
Best.
66. Clear Cache
Clear Your WordPress Site Cache
WordPress is fairly database intensive so it’s highly recommended to host your WordPress site with a webhost that provides built-in caching tools or to use a 3rd party Caching plugin. While caching will greatly speed up your site it can also cause some headaches when making updates and/or changes to the site. Below is a list of all the various guides explaining how to clear your site cache. Of course you should only have 1 method of caching on your WordPress site so look for the one you are using below (and if you don’t know ask your webhost or developer) then follow the instructions to clear your cache
Hosting Cache
Some of the best managed WordPress hosts include built-in caching functions and they can be cleared/flushed easily. Below are some screenshots showing how to clear the cache for these popular hosting sites, if your’s isn’t one of them you’ll need to look up directions on their hosting site.
WPEngine
The button to clear your cache in Media temple is located in it’s own admin panel at the top of the WordPress dashboard.

Visit WPEngine
Godaddy
To clear your Godaddy cache you’ll want to use the “Flush Cache” link located in the WordPress admin bar.

Visit Godaddy
Site Ground
Site ground uses “SuperCacher” for their caching and it has it’s own admin panel so you can quickly clear all the cache as well as enable AutoFlush and Dynamic Flush.

Visit Site Ground
Media Temple
Media Temple has built-in cache as well and it can be cleared via the WordPress dashboard admin bar.

Visit Media Temple
Caching Plugins
Below are some screenshots showing how to clear the cache for the 3 most popular WordPress plugins:
WP Super Cache

W3 Total Cache

Better WP Minify Cache

Common CDN’s
Below are links to the support URL’s showing you how to clear your cache for some of the most widely used CDN’s by WordPress sites.
- CloudFlare
- MaxCDN
Important: Clear Your Browser Cache
It is useless to clear your site cache if you don’t clear your browser cache, so make sure to check out the guide below explaining how to do so.
Clearing the browser cache is extremely simple and every browser out there has a tutorial on how to clear the cache for that specific browser. Below are the links to the guides for the most popular web browsers:
- Chrome: Clearing Your Cache
- Safari: Clearing Your Cache
- Firefox: Clearing Your Cache
- Internet Explorer: Clearing Your Cache
67. Make Nectar Slider Button open lightbox link or video
Add in the lightbox extra class here :

and the JS in here

For 1st Button use this code:
jQuery( document ).ready(function() {

jQuery(".lightbox .button:first-child a").attr("rel","prettyphoto");

});
For 2nd Button use this code
jQuery( document ).ready(function() {

jQuery(".lightbox .button:last-child a").attr("rel","prettyphoto");

});
68. Typography Section options.txt files For Salient Theme Demos.
One Common Issue that users report is the fonts and text responsive behavior ie Text or button getting too small when window is resized.
The Easiest way to fix that is to use the Font sizes used in the Theme demos.
Simply import the below codes in the Salient Theme Options Panel -> Import/Export Section : See screenshot: http://prntscr.com/a3o149 .
Note : The below code would only overwrite the Typography Section in Salient Theme Options Panel so you can import it on a existing site.
Corporate Demo Typography Section Theme Settings .
Frostwave Demo Typography Section Theme Settings .
One Page Demo Typography Section Theme Settings .
Ecommerce Demo Typography Section Theme Settings .
Clean All Purpose Typography Section Theme Settings .
Blog Creative Typography Section Theme Settings .
Ascend Typography Section Theme Settings .
Agency Section Theme Settings .
69. limit the Search Function to Just Display Products Only.
Add this to your child theme functions.php .
function searchfilter($query) {

    if ($query->is_search && !is_admin() ) {
        $query->set('post_type',array('product'));
    }

return $query;
}

add_filter('pre_get_posts','searchfilter');
Thanks
70. Install your Theme
Now that you have purchased this Amazing theme, it’s time to install it in WordPress!
Install Via WP Dashboard
If you have already downloaded the theme after you purchased it, Download Your Theme and then Log into your WordPress website and browse to Appearance > Themes

Then click on the option to upload theme.

Next browse for the zipped theme file you downloaded from ThemeForest (make sure you have downloaded the “Installable WordPress File Only ” Zip as this is what you would upload, if you downloaded the «All Files & Documentation» Zip be sure to extract it and locate the theme which is salient.zip .
Install Via FTP
Your second installation option is to upload the theme via FTP. For this method first log into your site via FTP and browse to your folder located at wp-content/themes. Unzip the theme file you downloaded from Themeforest and upload only the extracted salient.zip folder to your server.
Next log into your WordPress site and navigate to Appearance > Themes to activate the Salient Theme.
71. Downloading Your Theme
Congratulations! You just purchased our Salient Responsive Multipurpose WordPress theme on ThemeForest.
- Go to your Downloads page in your ThemeForest profile.
- Locate the Download button next to Salient and click it. Upon clicking the Download button, a dropdown should appear.
- Select Installable WordPress file only from the dropdown to begin downloading a .zip file of Salient itself.

72. Firefox Padding Top and Bottom Not Appearing on Columns
Firefox has a bug which causes the top and bottom padding to not work if the padding is using percentage values.
Add this into the Custom CSS box located in your Salient Options panel (Make Sure there are no red cross in the Box) :
/*Firefox Padding Issue, workaround is to use viewport width parameter*/
.wpb_row .span_12 > .col.padding-1-percent, .column-inner.padding-1-percent { padding: 1vw; }
.wpb_row .span_12 > .col.padding-2-percent, .column-inner.padding-2-percent { padding: 2vw; }
.wpb_row .span_12 > .col.padding-3-percent, .column-inner.padding-3-percent { padding: 3vw; }
.wpb_row .span_12 > .col.padding-4-percent, .column-inner.padding-4-percent { padding: 4vw; }
.wpb_row .span_12 > .col.padding-5-percent, .column-inner.padding-5-percent { padding: 5vw; }
.wpb_row .span_12 > .col.padding-6-percent, .column-inner.padding-6-percent { padding: 6vw; }
.wpb_row .span_12 > .col.padding-7-percent, .column-inner.padding-7-percent { padding: 7vw; }
.wpb_row .span_12 > .col.padding-8-percent, .column-inner.padding-8-percent { padding: 8vw; }
.wpb_row .span_12 > .col.padding-9-percent, .column-inner.padding-9-percent { padding: 9vw; }
.wpb_row .span_12 > .col.padding-10-percent, .column-inner.padding-10-percent { padding: 10vw; }
.wpb_row .span_12 > .col.padding-11-percent, .column-inner.padding-11-percent { padding: 11vw; }
.wpb_row .span_12 > .col.padding-12-percent, .column-inner.padding-12-percent { padding: 12vw; }
.wpb_row .span_12 > .col.padding-13-percent, .column-inner.padding-13-percent { padding: 13vw; }
.wpb_row .span_12 > .col.padding-14-percent, .column-inner.padding-14-percent { padding: 14vw; }
.wpb_row .span_12 > .col.padding-15-percent, .column-inner.padding-15-percent { padding: 15vw; }
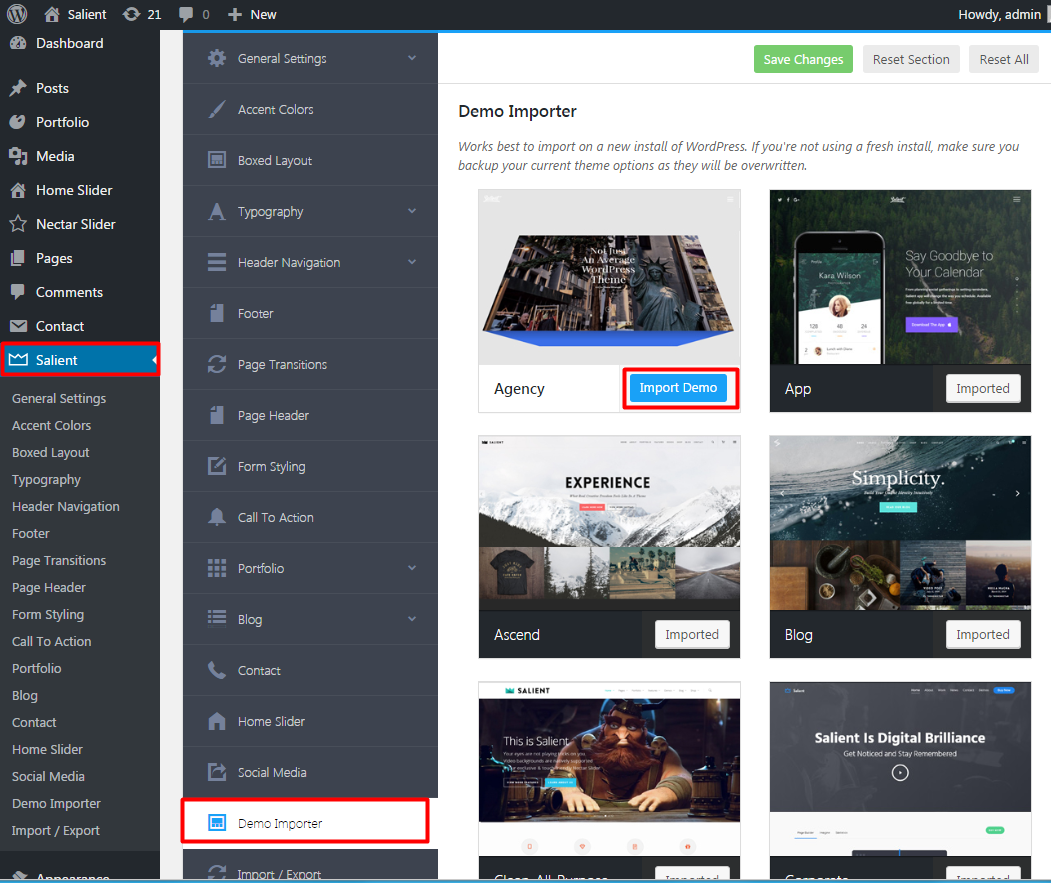
73. Importing the Theme Demos ( Make Theme Look Like Demo )
1. Importing the Demo Content on a Fresh Install
Salient Theme Version 7.x and later introduced a New One Click Demo Import Option available in Salient Theme Options Panel -> Demo Importer Section which lets you Import the Demo Content as well as that Particular Demo Theme Options Panel Settings .
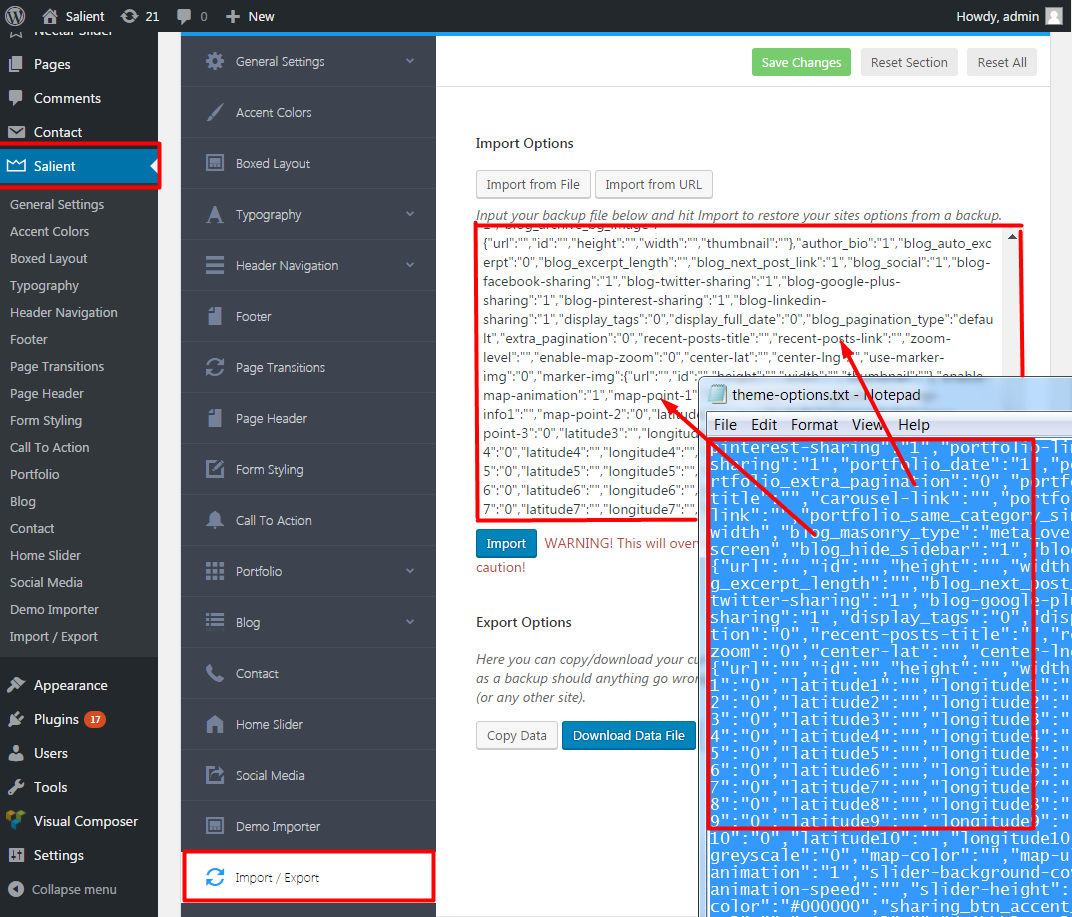
2. Importing the Demo Theme Options Settings Manually ( theme-options.txt )
First locate the theme-options.txt file in «salientnectarredux-frameworkextensionswbc_importerdemo-data» folder .
- Navigate to Salient > Demo Importer to begin the import process.
- Open the Text File and copy the contents of it
- Click on the Import from File Option and then Paste in the contents in the Field.
- Press the Blue Import Button [ WARNING! This will overwrite all existing option values, please proceed with caution! ]
3. Importing the Demo Content Manually ( content.xml )
First locate the content.xml file in «salientnectarredux-frameworkextensionswbc_importerdemo-data» folder .
Navigate to Tools > Import to begin the import process.
Click on the WordPress option If you haven’t already, you will be prompted to install the WordPress Importer free WordPress plugin. Just install it like you would any other plugin, and after you activate it return to this screen.
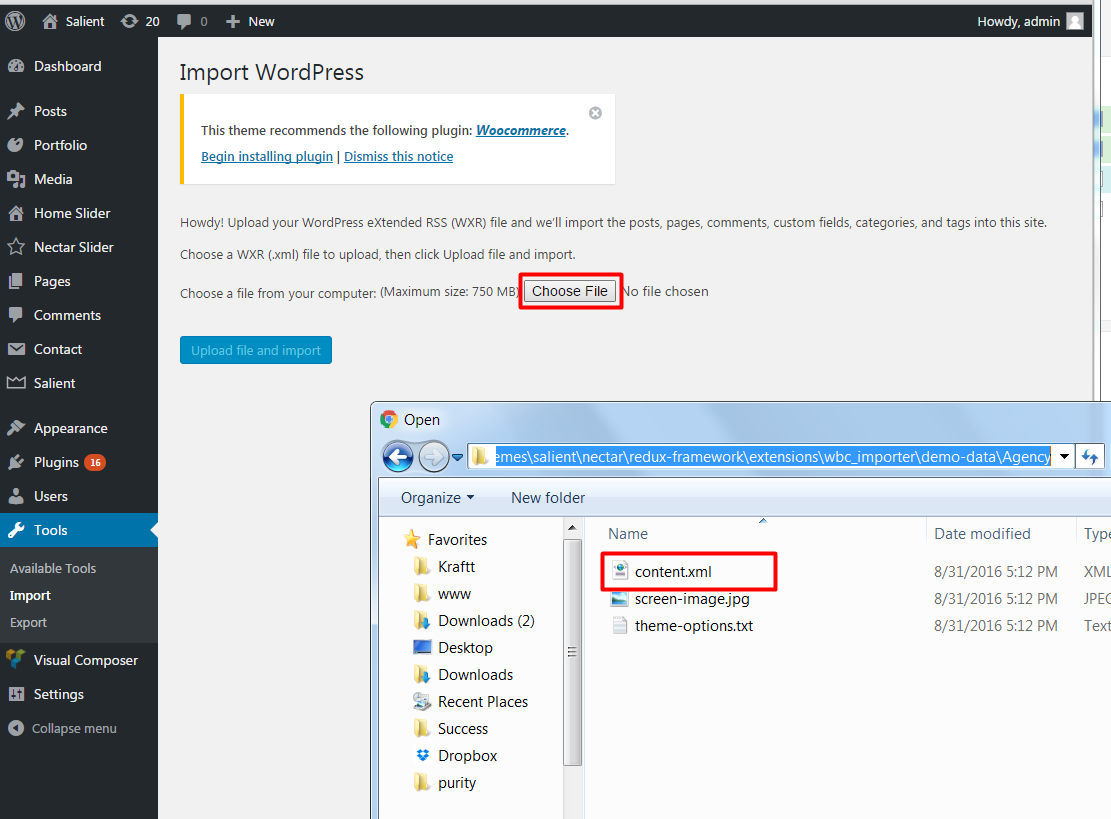
Press the Upload File and Import Button and you will get to this screen :
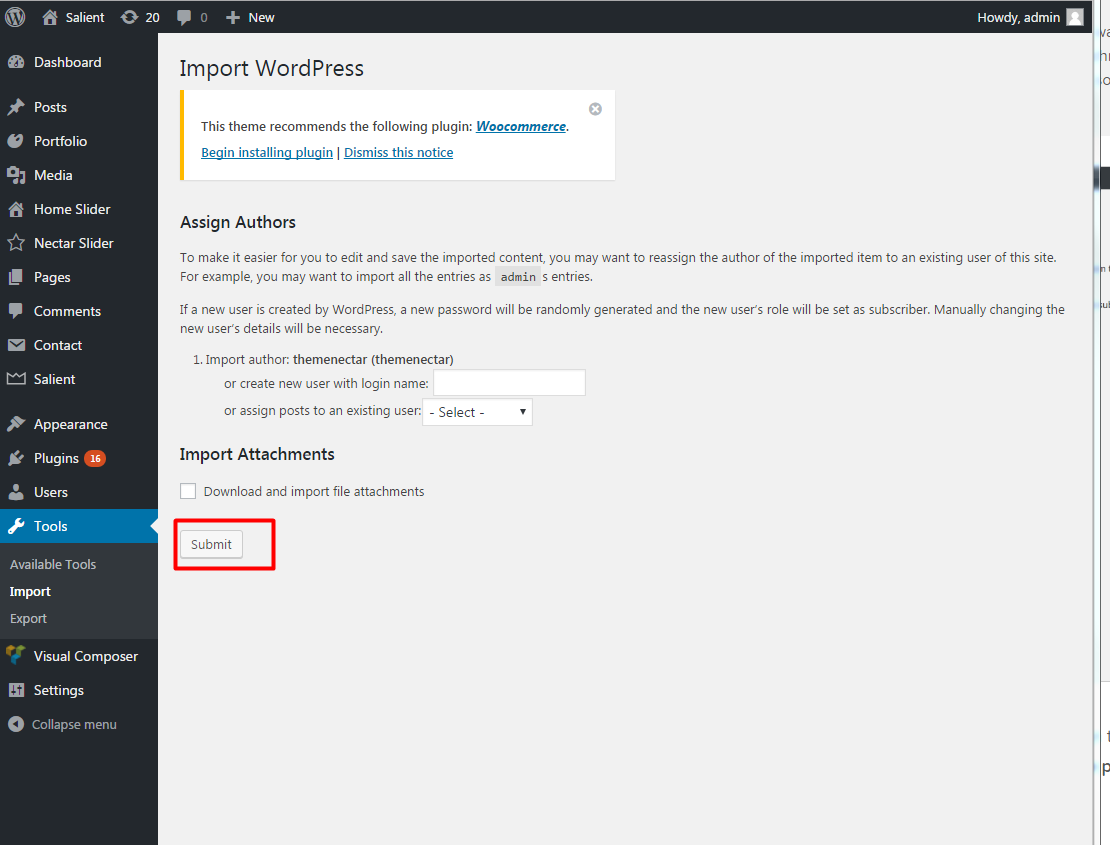
Choose the Appropriate Options and Press Submit .
Note: The Demo Importer works best to import on a new fresh install of WordPress. If you’re not using a fresh install, make sure you backup your current theme options as they will be overwritten.
74. Adding your Google Map API Key
In order to use Google maps you need to generate an API key — please see the official documentation for more information.
Once you have the API Key you need to add in to Salient Theme Options Panel -> General Settings -> CSS/Script Related -> Google Maps API Key field

75. Activate and Save Permalinks
After installing and activating the recommended plugins for this theme, go to your Navigate to Settings> Permalink settings. This is where you can change your permalink structure. After selecting the format you would like to use, click the save button.
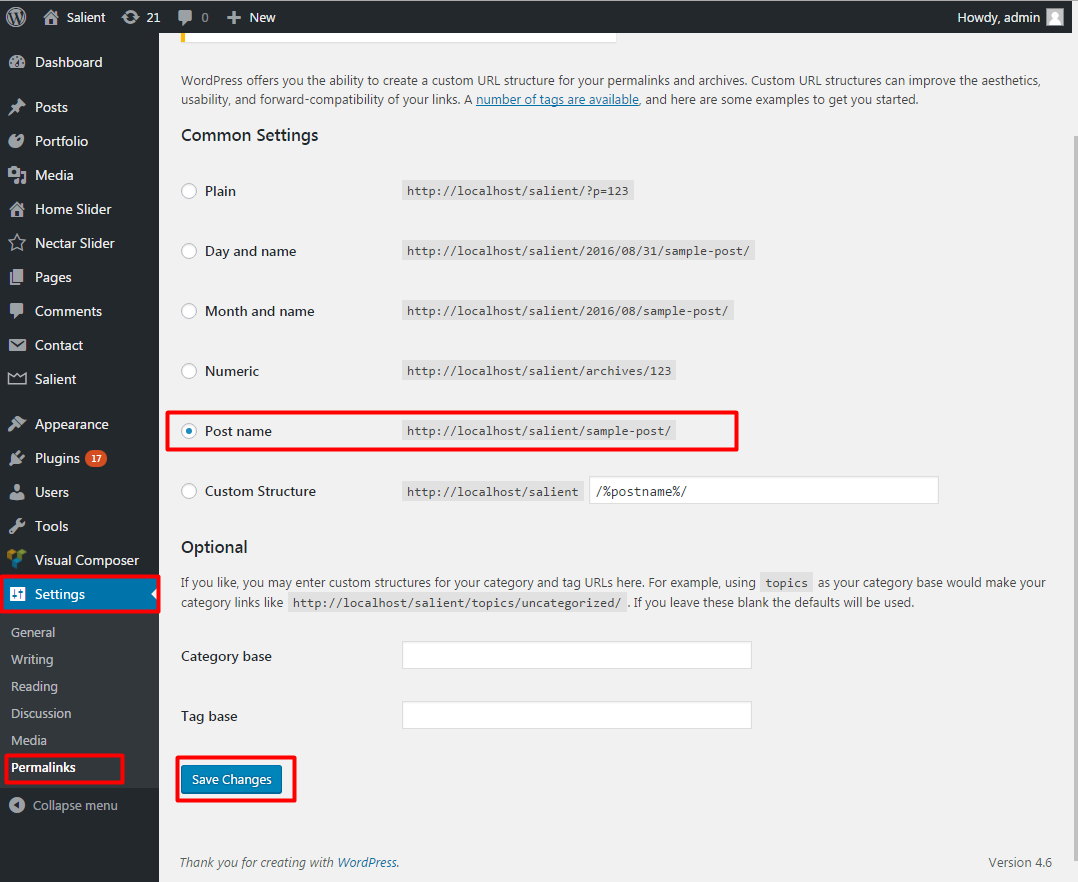
This step is to prevent any 404 errors on custom post type pages.
Depending on which plugins you have activated, you might see additional permalink options. For example if the WooCommerce plugin active you would see WooCommerce permalink settings .
76. Change Woocommerce Products per Page.
Add this to the Child Theme Functions.php .
add_action( 'after_setup_theme', 'change_parent_products_per_page', 10 );

function change_parent_products_per_page() {
   //chnge how many products are displayed per page
    add_filter( 'loop_shop_per_page', create_function( '$cols', 'return 24;' ), 20 );
}
Best.
77. Home Page Setup
By default the homepage will look like a blog (this is how WordPress is intended to work). If you have imported one of the Theme Demos select the desired page or if you want a custom homepage you can create it using the salient page builder then go to Settings > Reading and you can define your homepage here.
Make sure you have created and published your homepage page prior. If you don’t have any pages or all your pages are currently drafts then you won’t be able to see the settings in the screenshot below.

78. Adding your Google Analytics Tracking Code
1. Locate your tracking code:
Your tracking code is located in Google Analytics under the “Admin” panel. Make sure you are copying the Tracking Code and NOT the user id.

2. Paste into the Custom JS code field
Next paste the code into the Custom JS code field located at Salient Theme Options Panel -> General Settings -> CSS/Script Related tab.

79. Getting Started — First Steps
Please Follow These Steps if you have just Purchased the Theme and Need help Getting Started .
-
Download Your Theme
-
Install your Theme
-
Theme Installation Errors
-
-
Install Recommended Plugin
-
Activate and Save Permalinks
-
Importing the Theme Demos ( Make Theme Look Like Demo )
-
Adding your Google Analytics Tracking Code
-
Adding your Google Map API Key
-
Homepage Setup
80. Google Page Insights Shows Errors/Warnings
Most of the errors you will see in any page speed checker including Google Page Insights have to do with the server and/or usage of the theme and not with the theme itself. Things such as compressing and resizing images is something that needs to be done by the user as well as minifying and caching are things required on the server end. You’ll need to setup your site and server correctly to archive a good score. if you notice an error coming strictly from the theme let us know so we can fix it!
Important Notice: Google PageSpeed Insights is generally acknowledged as broken and even sometimes suggesting fixes that are not needed or have already been fixed by its own PageSpeed module. We recommend instead using more reputable speed checkers such as gtmetrix or webpagetest.
81. Install Recommended Plugin
Once you have installed and activated Salient Theme you will be prompted to install recommended plugins. Just click the link to begin installing plugins.
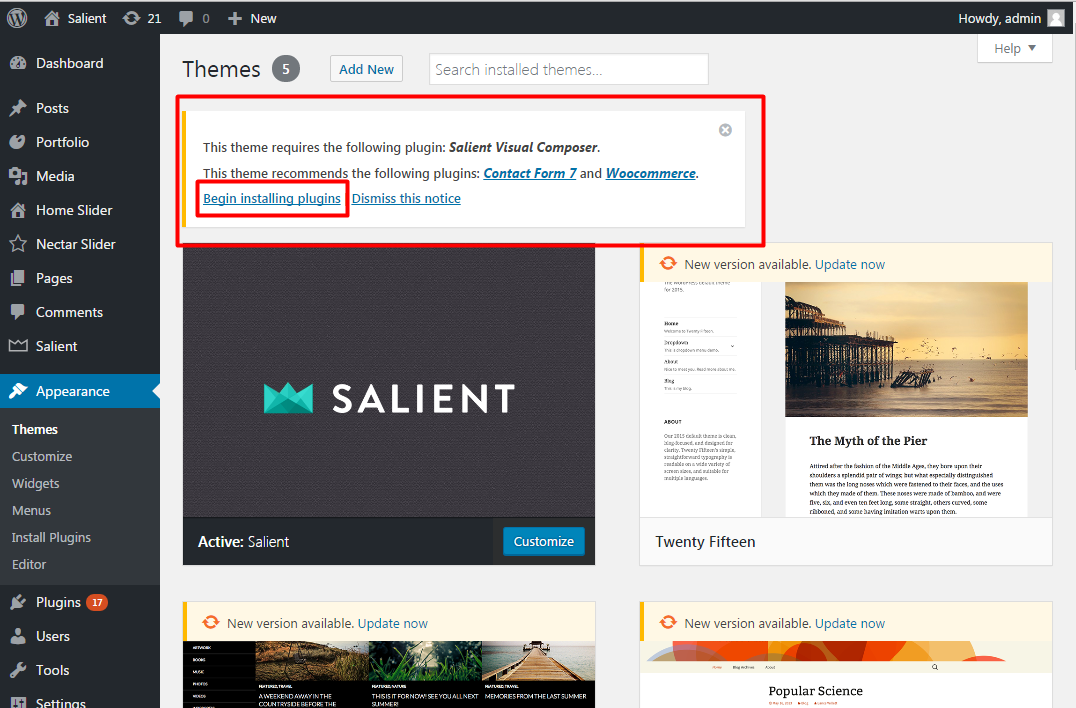 Next, check boxes to select all the plugins you want to install, select the bulk action of install from the dropdown box and then click the button to apply.
 Installation can take a couple minutes depending on your host. You should see a success confirmation for each plugin as it is installed. After you have installed all the plugins, return to the plugin installer.
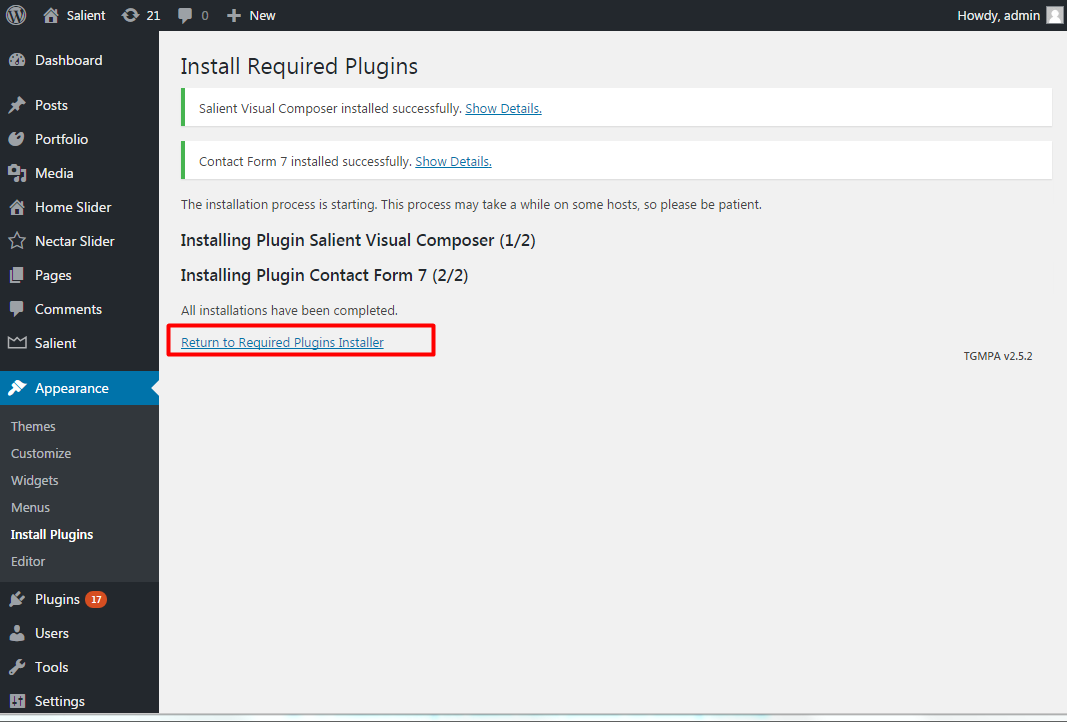
Select the plugins you installed, and apply the bulk action to activate.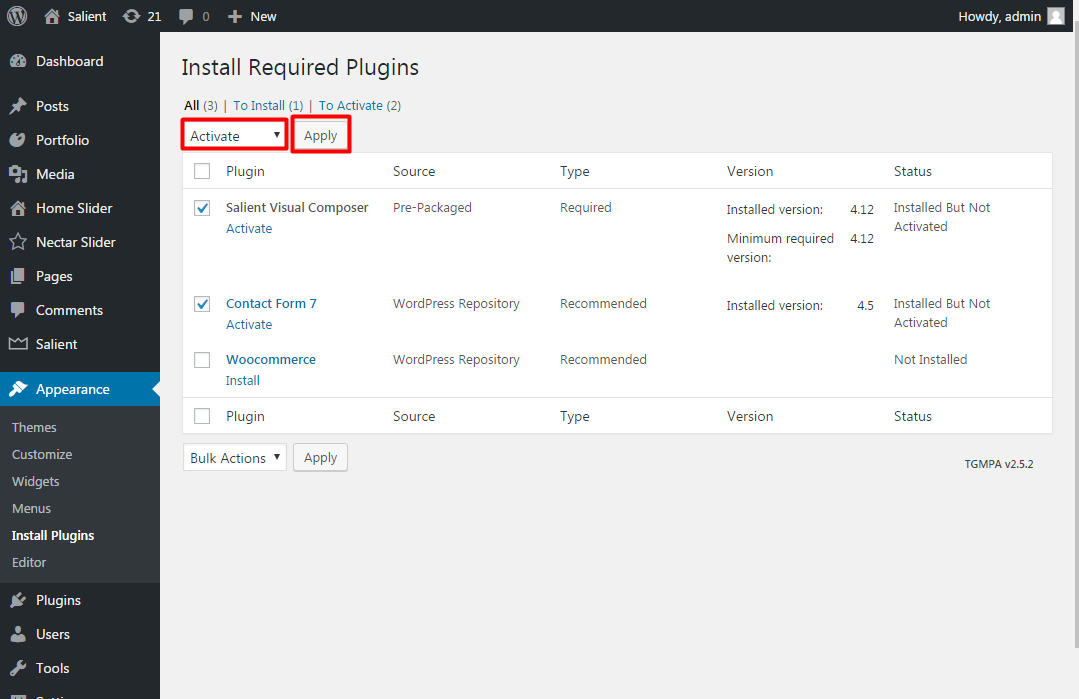 You should then see a confirmation notice that you plugins were activated successfully.
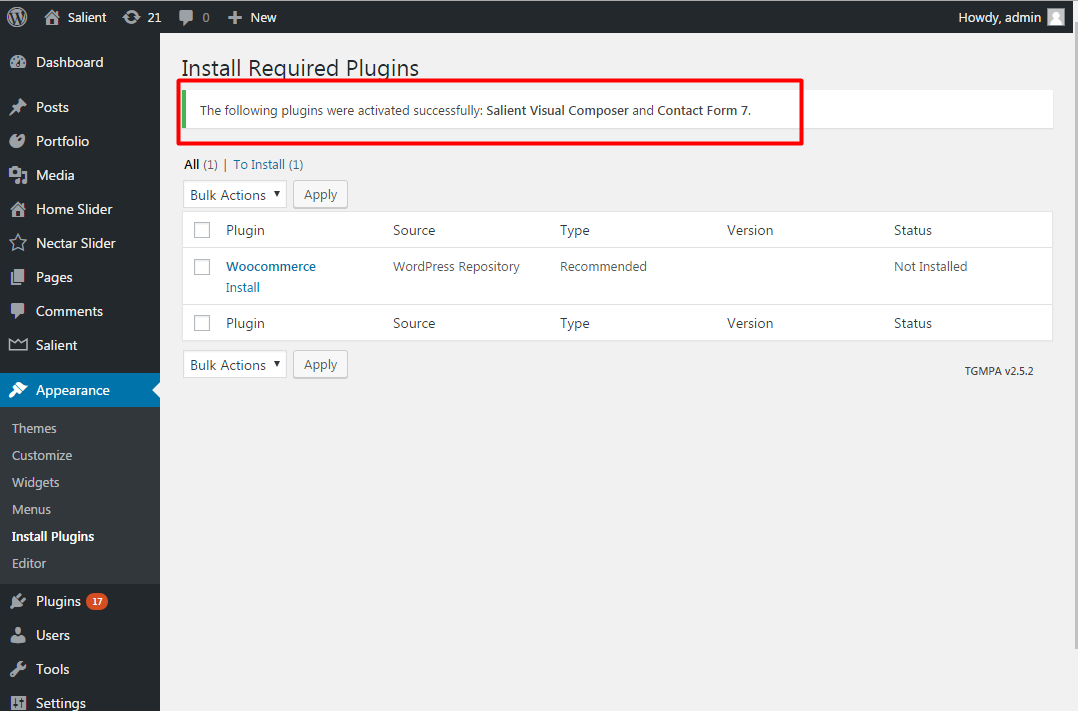
Errors While Installing Recommended Plugins?
99% of errors when installing recommended plugins are due to strict server permissions not allowing the plugins to be saved in your wp-content/plugins/ folder. You’ll need to either fix up permissions on your server or you can always install the plugins manually as described below :
Manually Install Salient Visual Composer
- Download the Installable WordPress file from ThemeForest .
- Extract the zip file and locate the zipped js_composer_salient plugin within the plugins folder
- Now install the plugin via WordPress (Plugins > Add New > Upload Plugin > browse for the salient/plugins/js_composer_salient zip file > Install & activate)
82. Center Copyright Text In Footer
Add this into the Custom CSS box located in your Salient Options panel (Make Sure there are no red cross in the Box) :
#footer-outer div#copyright .col.span_5 {
    left: 50%;
}

#footer-outer .div#copyright col.span_7 {
    float: right;
}

#footer-outer div#copyright .col {
    width: auto !important;
}

#footer-outer #copyright p {
    -ms-transform: translateX(-50%);
    transform: translateX(-50%);
    -webkit-transform: translateX(-50%);
}
Thanks
83. Woocommerce Payment Gateway Not Showing ( BrainTree / Amazon )
Add this into the Custom CSS box located in your Salient Options panel (Make Sure there are no red cross in the Box) :
/* show any Iframe added by Payment Gateway as theme has inline style that hides the iframes by default */
.woocommerce-checkout iframe {
    opacity: 1 !important;
}
.woocommerce .payment_methods iframe {
    opacity: 1 !important;
}
.wc-braintree-hosted-field iframe {
    opacity: 1!important;
}
84. Hiding Rows on Mobile / Desktop in Visual Composer
By default, the Salient Page Builder does not allow you to hide the Rows Using the Responsive Options Tab like the VC Columns. You can however use any of these 4 classes and add them to the Row Extra Class Field to hide that row:
Note: This is just a hack and should be avoided if possible .
vc_hidden-lg vc_hidden-md vc_hidden-sm vc_hidden-xs
| Classes | Screen Size | Icons |
| vc_hidden-lg | Large Screen |  |
| vc_hidden-md | Medium Screen |  |
| vc_hidden-sm | Small Screen |  |
| vc_hidden-xs | Extra Small Screen |  |

It works in the same way the Column VC » Responsive Options» Work :

85. Add Down Arrow in FullScreen Page Rows Option [JS hack]
Note: The Below Code is just a hack and is provided AS IS for Experienced Developers. Kindly do not ask related questions in the Support Ticket regarding its Implementation as Theme customization is not provided as Theme Support.
Add this to the Google Analytics Section in Salient Theme Options Panel -> CSS’/Script Related :
<script type='text/javascript'>
jQuery( document ).ready(function() {
 jQuery('.full-page-inner').append('<a href="#" class="slider-down-arrow-full" style="transform: translateY(0px); opacity: 1;"><i class="icon-salient-down-arrow icon-default-style">  </i></a>');
jQuery('body').on('click','.full-page-inner a.slider-down-arrow-full',function(){
    jQuery.fn.fullpage.moveSectionDown();
console.log('clicked');
});
});
</script>
And add this into the Custom CSS box located in your Salient Options panel (Make Sure there are no red cross in the Box) :
/*Apply Fullscreen page row css copied from Nectar Slider down arrow*/
.full-page-inner .slider-down-arrow-full {
    height: 60px;
    width: 60px;
    display: block;
    margin: 0 auto;
    position: absolute;
    bottom: 30px;
    z-index: 100;
    left: 50%;
    margin-left: -30px;
}
.full-page-inner .slider-down-arrow-full i.icon-default-style[class^="icon-"] {
    height: 60px!important;
    width: 60px;
    font-size: 20px!important;
    line-height: 60px!important;
    animation: 3.4s ease-in-out infinite fadebottom;
    -webkit-animation: 3.4s ease-in-out infinite fadebottom;
}
86. Forms , Checkboxes Not Appearing Correctly
Salient Theme Uses the Select2 JS Library to Enable Fancy Select/Checkbox/Radio Styling . If for some reason the Option is conflicting with Third Party Plugins . You can turn it off in Salient Theme Options Panel — > Form Styling Tab :

Cheers
87. Transparent Header Not Showing on All Pages
To have the Header Always be Transparent you will have to Turn on the «Header Permanent Transparent» Option in Salient Theme Options Panel -> Header Navigation -> Transparency Tab:

Cheers
88. Quick Notification Bar
As of Salient 10.5 a New Option has been added :

Add this to the Google Analytics Section :
<script type='text/javascript'>
jQuery( document ).ready(function() {
jQuery('#header-outer').prepend('<div class="custom-notify">In celebration of the upcoming holiday, our offices will be closed this Friday.</div>');
});
</script>
Add this into the Custom CSS box located in your Salient Options panel (Make Sure there are no red cross in the Box) :
/* Notification Bar */
.custom-notify{
    top: 0px;
    background-color: #cda34a !important;
    width: 100%;
    color: #fff;
    text-align: center;
    padding: 4px;
    transform: translateY(-100%);
}
@media only screen and (max-width: 1000px) and (min-width: 1px ) {
    #header-outer {
        padding-top: 0px!important;
    }
    #header-outer .container {
        padding-top: 10px!important;
    }
    .custom-notify {
        transform: translateY(0%) !important;
    }
}
89. Make Masonry Blog height Uneven (Not Fixed)
If your Images are not Sized the Same and you dont want to size them Manually add this into the Custom CSS box located in your Salient Options panel (Make Sure there are no red cross in the Box) :
/* Make the Masonry Blog height Uneven (Not Fixed) */
#post-area.masonry.classic_enhanced article.post.large_featured, #post-area.masonry.classic_enhanced article.post.regular .article-content-wrap, #post-area.masonry.classic_enhanced article.post.regular.format-standard.has-post-thumbnail, #post-area.masonry.classic_enhanced article.post.regular.format-video.has-post-thumbnail, #post-area.masonry.classic_enhanced article.post.regular.format-audio.has-post-thumbnail {
    height: auto!important;
}
90. Header Logo Not Showing | Cant Change Demo Logo
There are Two Places where the Logos are to be Added .
1) Salient Theme Options Panel -> Header Navigation -> Logo & General Styling Tab:

2: Salient Theme Options Panel -> Header Navigation -> Transparency Tab:

Note: Make sure you add in the Retina Logos as Well or you the Logo would be Missing on Mobile or Tablets that use a Retina Screen .
91. Troubleshooting Video Backgrounds
See updated Docs here : http://themenectar.com/docs/salient/page-builder-row/#video-background .
If you can’t get your video backgrounds to load make sure you’ve covered these two
items before panicking:
1. Ensure that your server is capable of parsing video files. Some servers require
you to add the media types supported in the .htaccess file in order for them to parse
the files. Open up your .htaccess file located in the root of your WordPress install and
add this in:
AddType video/mp4 .mp4
AddType video/mp4 .m4v
AddType video/ogg .ogv
AddType video/webm .webm
AddType video/webm .webmv
2. Ensure that your videos are correctly encoded for web playback. If you’ve added
the media types to your server and are still running into difficulty, please run your
videos through these converters:
http://video.online-convert.com/convert-to-mp4
http://video.online-convert.com/convert-to-webm
92. W3 Performance Setup
Salient Optimization Guide : http://themenectar.com/docs/salient/performance-optimization-guide/
W3 Total Cache
General Settings
In the “General Settings” tab of your W3TC plugin panel, ensure these settings are checked.
Fun fact: Enabling gzip(HTTP) compression can reduce the size of the transferred response by up to 90%, which can significantly reduce the amount of time to download the theme files, reduce data usage for the client, and improve the time to first render of your pages. This means that by simply telling your server to use this feature, all theme assets will be drastically reduced in size.
Browser Cache
There are many different types of caching offered in W3TC, but in this guide we’re going to focus on the simplest and the only one used on the demos: browser caching. This will allow the theme assets to be cached on your users computer after initially downloaded, to save your server from having to serve them more than once. The result significant performance increases.
If you would like a quick overview on what caching is and the various types please check this resource.
In the “Browser Cache” tab of your W3TC plugin panel, ensure these settings are checked.
Minifcation Settings
In the “Minification” tab of your W3TC plugin panel, ensure these settings are checked.
Note: If you encounter issues with your server loading or writing to the minfied files you can always deactivate the minfication features for CSS/JS assets and still keep W3 Total Cache active
Revised Post .
Dated May 20, 2020
93. Change Order of Portfolio Items or Portfolio Categories
Simply use this plugin: https://wordpress.org/plugins/post-types-order/ .
Cheers
94. Cloudflare Rocket Loader Conflict with WPBakery Page Builder
The «rocker loader» feature when enabled from cloudflare is known to cause issues with WPBakery — Please disable that by following this : https://help.mediavine.com/en/articles/450233-cloudflare-rocket-loader-conflict .
Thanks
95. Add Different Mobile Logo (CSS)
/* Add custom mobile logo */
@media only screen and (max-width: 1000px) {
    body header#top #logo img {
        visibility:hidden !important;
    }
    body header#top #logo:before {
        content: '';
        position: absolute;
        width: 100%;
        height: 100%;
        background: url(http://yoursite.co/wp-content/uploads/2017/05/Logo.png) no-repeat;
        background-size: 50px;
    }
}
96. Loading Icons mind font when using shortcodes in footer
Add to Child Theme «functions.php «file :
<?php
add_action( 'wp_enqueue_scripts', 'salient_child_enqueue_styles');
function salient_child_enqueue_styles() {

    wp_enqueue_style( 'parent-style', get_template_directory_uri() . '/style.css', array('font-awesome'));
    if ( is_rtl() )
           wp_enqueue_style(  'salient-rtl',  get_template_directory_uri(). '/rtl.css', array(), '1', 'screen' );

    /* load iconsmind library on every page to make it accessible for footer button icon */
    wp_register_style('iconsmind', get_template_directory_uri() . '/css/iconsmind.css', '', '7.6');
    wp_enqueue_style('iconsmind');
}
?>
97. Add a Custom Font
How To Make the Custom Font Show Up in The Typography Section of Salient Theme Options Panel ?.
We can add Custom Fonts in several ways :
- http://www.wpbeginner.com/wp-themes/how-add-google-web-fonts-wordpress-themes/
- http://www.wpbeginner.com/plugins/how-to-add-awesome-typography-in-wordpress-with-typekit/ .
- @font-face https://premium.wpmudev.org/blog/custom-fonts-css/
— The Below example uses the @font-face method and the fonts are included in a Child Theme .
Step 1:
@font-face CSS methods are included in the Salient Theme Options Panel -> General Settings -> Custom CSS Box to import the relevant font files .
@font-face {
    font-family: 'Proxima Nova Light';
    src: url("/wp-content/themes/salient-child/fonts/ProximaNova-Light.woff") format("woff"),
        url("/wp-content/themes/salient-child/fonts/ProximaNova-Light.otf") format("opentype"),
        url("/wp-content/themes/salient-child/fonts/ProximaNova-Light.ttf") format("truetype");
    font-weight: 300;
    font-style: normal;
}
@font-face {
    font-family: 'Proxima Nova LightIt';
    src: url("/wp-content/themes/salient-child/fonts/ProximaNova-LightIt.woff") format("woff"),
        url("/wp-content/themes/salient-child/fonts/ProximaNova-LightIt.otf") format("opentype"),
        url("/wp-content/themes/salient-child/fonts/ProximaNova-LightIt.ttf") format("truetype");
    font-weight: 300;
    font-style: italic;
}
@font-face {
    font-family: 'Proxima Nova Regular';
    src: url("/wp-content/themes/salient-child/fonts/ProximaNova-Regular.woff") format("woff"),
        url("/wp-content/themes/salient-child/fonts/ProximaNova-Regular.otf") format("opentype"),
        url("/wp-content/themes/salient-child/fonts/ProximaNova-Regular.ttf") format("truetype");
    font-weight: normal;
    font-style: normal;
}
@font-face {
    font-family: 'Proxima Nova RegularIt';
    src: url("/wp-content/themes/salient-child/fonts/ProximaNova-RegularIt.woff") format("woff"),
        url("/wp-content/themes/salient-child/fonts/ProximaNova-RegularIt.otf") format("opentype"),
        url("/wp-content/themes/salient-child/fonts/ProximaNova-RegularIt.ttf") format("truetype");
    font-weight: normal;
    font-style: italic;
}
@font-face {
    font-family: 'Proxima Nova Semibold';
    src: url("/wp-content/themes/salient-child/fonts/ProximaNova-Semibold.woff") format("woff"),
        url("/wp-content/themes/salient-child/fonts/ProximaNova-Semibold.otf") format("opentype"),
        url("/wp-content/themes/salient-child/fonts/ProximaNova-Semibold.ttf") format("truetype");
    font-weight: 600;
    font-style: normal;
}
@font-face {
    font-family: 'Proxima Nova SemiboldIt';
    src: url("/wp-content/themes/salient-child/fonts/ProximaNova-SemiboldIt.woff") format("woff"),
        url("/wp-content/themes/salient-child/fonts/ProximaNova-SemiboldIt.otf") format("opentype"),
        url("/wp-content/themes/salient-child/fonts/ProximaNova-SemiboldIt.ttf") format("truetype");
    font-weight: 600;
    font-style: italic;
}
@font-face {
    font-family: 'Proxima Nova Bold';
    src: url("/wp-content/themes/salient-child/fonts/ProximaNova-Bold.woff") format("woff"),
        url("/wp-content/themes/salient-child/fonts/ProximaNova-Bold.otf") format("opentype"),
        url("/wp-content/themes/salient-child/fonts/ProximaNova-Bold.ttf") format("truetype");
    font-weight: bold;
    font-style: normal;
}
@font-face {
    font-family: 'Proxima Nova BoldIt';
    src: url("/wp-content/themes/salient-child/fonts/ProximaNova-BoldIt.woff") format("woff"),
        url("/wp-content/themes/salient-child/fonts/ProximaNova-BoldIt.otf") format("opentype"),
        url("/wp-content/themes/salient-child/fonts/ProximaNova-BoldIt.ttf") format("truetype");
    font-weight: bold;
    font-style: italic;
}
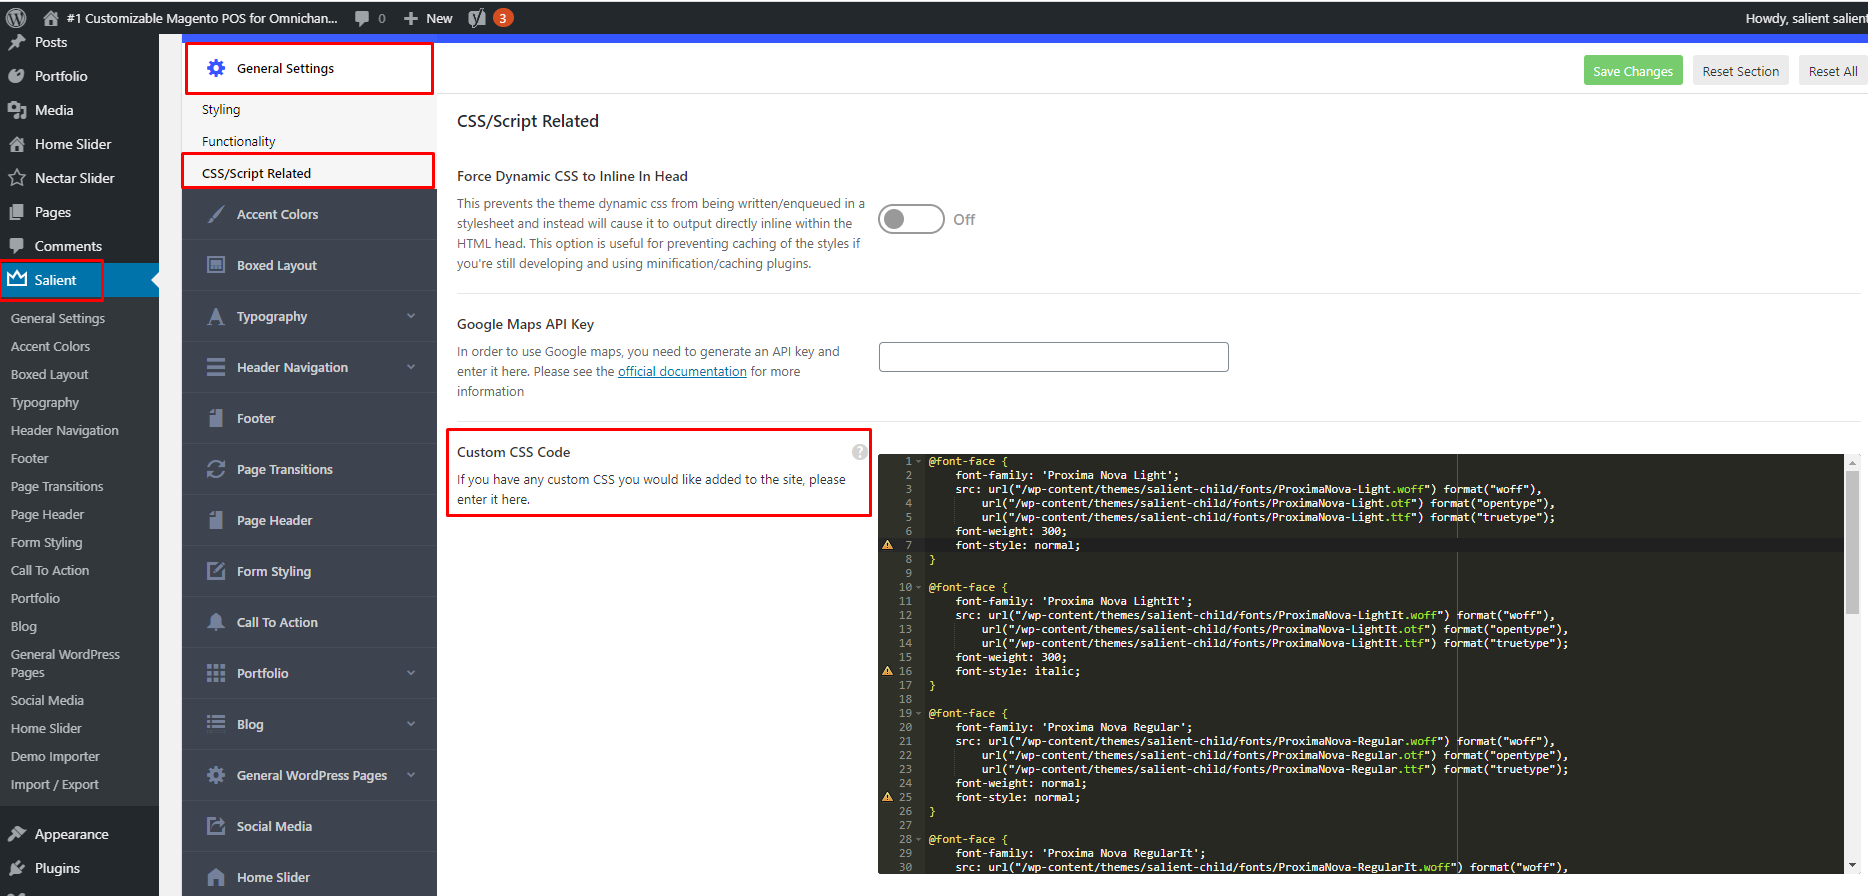
Step 2:
Add PHP Code using Code Snippets Plugin for the Salient Theme Options -> Typography Section Fields.
function salient_redux_custom_fonts() {
    return array(
        'Custom Fonts' => array(
            'Proxima Nova Light' => 'Proxima Nova Light',
            'Proxima Nova LightIt' => 'Proxima Nova LightIt',
            'Proxima Nova Regular' => 'Proxima Nova Regular',
            'Proxima Nova RegularIt' => 'Proxima Nova RegularIt',
            'Proxima Nova Semibold' => 'Proxima Nova Semibold',
            'Proxima Nova SemiboldIt' => 'Proxima Nova SemiboldIt',
            'Proxima Nova Bold' => 'Proxima Nova Bold',
            'Proxima Nova BoldIt' => 'Proxima Nova BoldIt'
        )
    );
}
add_filter( "redux/salient_redux/field/typography/custom_fonts", "salient_redux_custom_fonts" );

Conclusion:
You should be able to now select the Custom Fonts from the Typography Section in the Salient Theme Options.

Adds Salient compatibility to https://wordpress.org/plugins/custom-typekit-fonts/ plugin
Add PHP Code using Code Snippets Plugin
// Adds Salient compatibility to https://wordpress.org/plugins/custom-typekit-fonts/ plugin
function salient_redux_typekit_fonts() {

    $kit_info = get_option( 'custom-typekit-fonts' );
    if (!empty($kit_info)):
        foreach ($kit_info['custom-typekit-font-details'] as $fontName):
            $fonts_typekit['Typekit Fonts'][$fontName['fallback']]= $fontName;
        endforeach;
    endif;
      return $fonts_typekit;
}
add_filter( "redux/salient_redux/field/typography/custom_fonts", "salient_redux_typekit_fonts" );
Revised Post.
Date: Dec 7, 2022
98. Change Mobile Column Order
For Salient Version 12 or below:
As of Salient 12 the Column Position can be changed in the Row Settings :

For Salient Version 11 or below:
Using the «Alternating Split Section » As Example : http://prntscr.com/g0j8fe and the layout : http://prntscr.com/g0ja3j
1: Rearrange the columns as would best work on Mobile that is image,text,image,text :
http://prntscr.com/g0jasq .
1: Add a extra class reverse-row

2: Add this custom css to reverse it in desktop only.

/*reverse row in desktop*/
@media only screen and (min-width: 1001px) {
 .reverse-row >.col.span_12 {
flex-direction: row-reverse !important;
  }
}
Thanks
99. Make Column Link Open Lightbox

Step 2: Add the Javascript code in Salient Theme Options Panel -> General Settings -> CSS/Script Related Section .
For Video :
<script type="text/javascript">
jQuery( document ).ready(function() {
jQuery(".lightbox-column a.column-link").attr("rel","prettyphoto").addClass("nectar_video_lightbox");
});
</script>
For Image :
<script type="text/javascript">
jQuery( document ).ready(function() {
jQuery(".lightbox-column a.column-link").attr("rel","prettyphoto");
});
</script>

100. Nectar Slider CSS Classes
The nectar slider has a few CSS classes you can add for different effects/behavior. A nifty one we created as a bonus is called «static». What it does is make it so the caption / buttons move at the same speed as the background in a parallax slider. By default it moves slightly faster, but this might always be desired if you for example are trying to make the text look like it’s on an object rather than in front of it.The class to use is called «static».
Another one similar to that is called «caption-no-fade». It will also stop the parallax effect on the caption content, but in addition it will stop the opacity fade as you scroll down as well. This will in turn make the entire slide move together. The other possible css classes are «external-button-1» and «external-button-2».
Their names are pretty self explanatory, but adding either of them or both of them will
cause the button(s) for your slide to open in a new window if you want your link to be
external.
In summary, here’s a go-to list of all the Nectar Slider classses that come by
default:
• static
• caption-no-fade
• external-button-1
• external-button-2
101. Add Different Mobile Logo (CSS)
/* Add custom mobile logo */
@media only screen and (max-width: 1000px) {
    body header#top #logo img {
        visibility:hidden !important;
    }
    body header#top #logo:before {
        content: '';
        position: absolute;
        width: 100%;
        height: 100%;
        background: url(http://yoursite.co/wp-content/uploads/2017/05/Logo.png) no-repeat;
        background-size: 50px;
    }
}
102. Add html5 sound to Salient
Add this into the Custom CSS box located in your Salient Options panel (All custom css provided is tested in the Live Browser so it will work as intended . If you cant see any changes make sure there is no red cross in the Custom CSS Box as that syntax error would cause all css below it to not show up on the Frontend):
/*add sound close icon*/
li#nectar-user-account.none .icon-salient-m-user:before {
    content: "e099" !important;
}
Add this to the Custom JS Box :
<audio controls="" volume="0.5" autoplay="" loop="" id="muzyka">
<source src="https://tomgacz.pl/wp-content/uploads/2020/02/Creative-Showcase-Portfolio-Theme-_8211-Just-another-WordPress-site.mp3" type="audio/mpeg">
Your browser does not support the audio element.
</audio>
<script>
  var audio = document.getElementById("muzyka");
  audio.volume = 0.3;
</script>
<script>
var audio = document.getElementById('muzyka');
    var btn = document.getElementById('nectar-user-account');
btn.classList.add("selected");

    btn.addEventListener('click', function (e)
{
    e = e || window.event;
    audio.muted = !audio.muted;

         if (btn.className == "selected") {
             btn.classList.add("none");
  } else {
    btn.classList.replace("none","selected");

  }

    e.preventDefault();
}, false);</script>
103. Salient Theme Sensei Support .
The Below Code add Sensei Plugin Support to the Salient Theme .
Reference URL: https://docs.woocommerce.com/document/sensei-and-theme-compatibility/
Add this to your Child Theme functions.php or using the Code Snippets Plugin:
For Fullwidth Page :
global $woothemes_sensei;
remove_action( 'sensei_before_main_content', array( $woothemes_sensei->frontend, 'sensei_output_content_wrapper' ), 10 );
remove_action( 'sensei_after_main_content', array( $woothemes_sensei->frontend, 'sensei_output_content_wrapper_end' ), 10 );
add_action('sensei_before_main_content', 'my_theme_wrapper_start', 10);
add_action('sensei_after_main_content', 'my_theme_wrapper_end', 10);
function my_theme_wrapper_start() {
  echo '<div class="container-wrap"><div class="container main-content"><div class="row">';
}
function my_theme_wrapper_end() {
  echo '</div><!--/row--></div><!--/container--></div><!--/container-wrap-->';

}
add_action( 'after_setup_theme', 'declare_sensei_support' );
function declare_sensei_support() {
    add_theme_support( 'sensei' );
}
For Page With Sidebar :
global $woothemes_sensei;
remove_action( 'sensei_before_main_content', array( $woothemes_sensei->frontend, 'sensei_output_content_wrapper' ), 10 );
remove_action( 'sensei_after_main_content', array( $woothemes_sensei->frontend, 'sensei_output_content_wrapper_end' ), 10 );
add_action('sensei_before_main_content', 'my_theme_wrapper_start', 10);
add_action('sensei_after_main_content', 'my_theme_wrapper_end', 10);
function my_theme_wrapper_start() {
  echo '<div class="container-wrap"><div class="container main-content"><div class="row">';
      echo '<div id="post-area" class="col span_9"> <div class="posts-container">';

}
function my_theme_wrapper_end() {
    echo '</div><!--/posts container--></div><!--/span_9--></div><!--/row--></div><!--/container--></div><!--/container-wrap-->';
    echo '<div id="sidebar" class="col span_3 col_last">';
    get_sidebar();
    echo '</div><!--/span_3-->';

}
add_action( 'after_setup_theme', 'declare_sensei_support' );
function declare_sensei_support() {
    add_theme_support( 'sensei' );
}
Best.
104. FontAwesome Plugin Conflict , Child Theme Override
Please add this to your child Theme Functions.php :
wp_enqueue_style('font-awesome-salient', get_template_directory_uri() . '/css/font-awesome.min.css');
So the Child Theme Code Looks Like This:
add_action( 'wp_enqueue_scripts', 'salient_child_enqueue_styles');
function salient_child_enqueue_styles() {
   wp_enqueue_style('font-awesome-salient', get_template_directory_uri() . '/css/font-awesome.min.css');

 wp_enqueue_style( 'parent-style', get_template_directory_uri() . '/style.css', array('font-awesome'));
    if ( is_rtl() )
           wp_enqueue_style(  'salient-rtl',  get_template_directory_uri(). '/rtl.css', array(), '1', 'screen' );
}
Thanks
105. Salient Mega Menus
View the Latest Salient v13 Doc here: http://themenectar.com/docs/salient/salient-menu-options/
Mega Menus
If you would like to use a mega menu, please head to the Appearance > Menus tab
in your admin section and make sure that «CSS Classes» are turned on in your screen
options tab in the upper right hand corner of your screen. Once the box for them is
checked, you’ll see an input field for «CSS Classes (optional)» in each of your menu
items. See screenshot below :
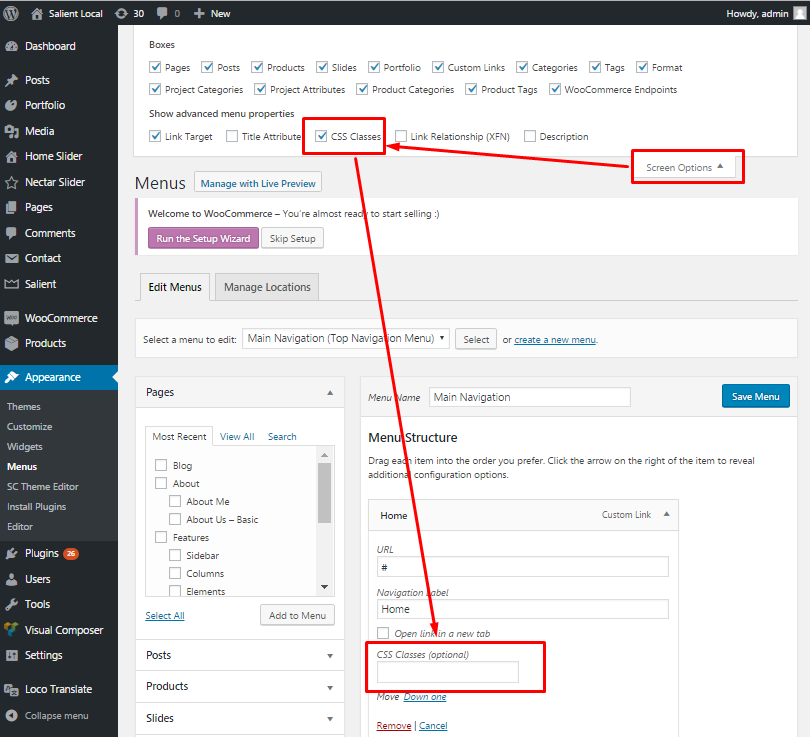
All you have to enter in that box to make an item the mega menu holder, is
«megamenu». By default it will be a three column mega menu until you add the
second class which can be any of the following:
• columns-3
• columns-4
• columns-5
• columns-6
So for example, if you wanted a 4 column mega menu, all you would need to type
into your css class box would be » megamenu columns-4″ without the quotes of
course.

Also To Make it work the Menu needs to be in 3 Levels . Simply Drag the Menu to the Right to so its like below screenshot :

You will get a menu like this :

Bes.t
106. Add Different Logo on Particular Page
The easiest way is to the change the Img url for the Page that needs a Different Logo . The Page id is used to target that particular page logo only .
Place this JS script in the Google Analytics Section in Salient Theme Options Panel

<script type="text/javascript">
jQuery( document ).ready(function() {
   setTimeout(function(){
jQuery('.page-id-6385 #logo img').attr('src','http://www.yourdomain.co.za/wp-content/uploads/2018/03/logo-hr-light-tur.png').attr('srcset','http://www.yourdomain.co.za/wp-content/uploads/2018/03/logo-hr-light-tur.png 1x, http://www.yourdomain.co.za/wp-content/uploads/2018/03/logo-hr-light-tur.png 2x');},500);
});
</script>
107. Masonry Image Gallery
See Latest Article : http://themenectar.com/docs/salient/galleries/ .
Follow these steps :
1: Add a Image Gallery VC Element to the Page.
2: Choose Image Grid Style in the «Image Gallery Settings» VC Options Popup.
3: Click on the ‘+’ sign to add the Images

4: Select the Image you want and set the Image URL and select Masonry Sizing Option for individual Images .
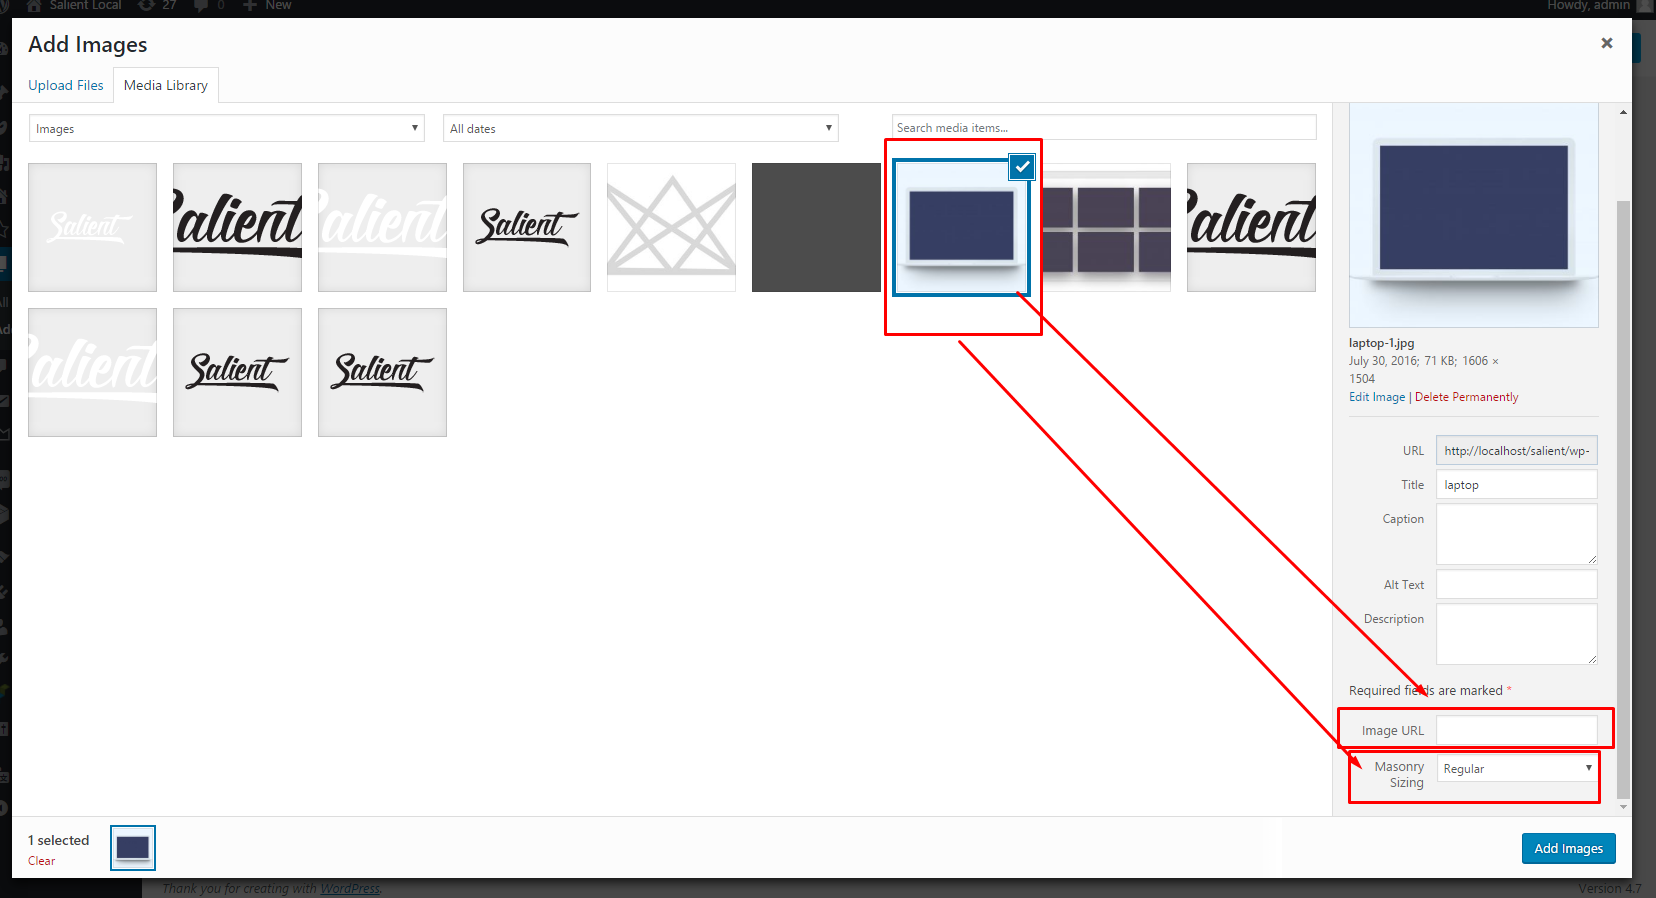
5: Press Add Images when you have added multiple Images.
Make sure to select the «Image Grid Style» in the Dropdown field named «Gallery Type» . Only then would the step 4 options show up .
Also you need to be updated to Salient Theme Version 7.6+ as it has these Options .
Cheers
108. Hosting Google fonts locally
If you would like to keep using the available Google fonts within the Typography options, but need to host them locally to comply with GDPR, we recommend using the Local Google Fonts plugin.
The plugin will automatically detect which fonts you’re loading through the theme options, download them, and load them locally. It’s simple to use and by far the easiest option to get Google fonts compliant with GDPR.
We’ve tested the plugin for full compatibility with Salient.

j***s@gmail.com
2022-06-08
2022-06-16
Hi there from Germany,
Tried to translate the 3d flipbook plugin (Pro) with loco translate.
unfortunatly I don´t get any strings to translate… Loco is giving me an Error: «Translation set not known in 3D FlipBook»
Looks like it is 3d Flipbook related,… am I right?
Existing support tickets forwarding to the Documentation don´t help
All the best from Germany
Jörg
Replies
j***s@gmail.com
2022-06-15
2022-06-15
Hi there,
Could figure it out on my own,… I wrongly tried to set up the language first in the Pro Version, but in the additional installed and activated free Version I could manage the language files easely. Which also works for the Pro Version than.
Thx Jörg
Log In to leave a comment
© iberezansky All rights reserved
Hi,
Is there a know issue with Loco Translate? On all my DIVI web sites I get an Error when I want to change a text in Loco Translate:
Error: Translation set not known in Divi
So what ever I change, disappears when I update DIVI. Worked normally for many years, but not anymore.
Any idea how to solve this? Elegantthemes (Divi) does not help me, they advised me to contact you instead of trying to solve the problem…
Thanks
-
This topic was modified 1 year, 7 months ago by
xonnext.
The page I need help with: [log in to see the link]
Public Ticket #3013818
Error: Translation set not known in Salient
Closed
Comments

eydagharire started the conversation
March 30, 2022 at 6:18pm
I use Loco for translation whin I am in the theme translation its this is what is say
Error: Translation set not known in Salient
 7,530
7,530
Tahir replied
March 30, 2022 at 6:24pm
Hey Again,
Please set the file in here: https://themenectar.com/docs/salient/translations/#:~:text=Specify%20%E2%80%9Clang/nectar_salient_strings.pot%E2%80%9D%20(without%20quotes)%20for%20the%20template%20file
Thanks
ThemeNectar Support Team
Sign in to reply …
- This topic has 4 replies, 2 voices, and was last updated 1 year, 8 months ago by
vako.
Viewing 5 posts — 1 through 5 (of 5 total)
-
Author
Posts
-
October 19, 2021 at 10:02 pm
#64728
Hello!
I get this message from Loco Translate: Error: Translation set not known in Ashe Pro.
As I could see here in the forum, quite a few people have this problem with Loco Translate. Unfortunately, I could not find any hint for a solution. Instead, it was always necessary to log into the respective back office. It would be nice and probably easier if you could at least get a hint here on how to solve the problem myself next time.
Anyway, I guess to solve it I have to install Temporary Login Without Password Plugin (done).
Thanks for your help.
HarryOctober 19, 2021 at 10:10 pm
#64730
This reply has been marked as private.
October 20, 2021 at 1:59 pm
#64732
vako
Keymaster
WP Royal Team
Hi Harry,
To translate theme untranslated strings, please try to use 3rd party plugin Loco Translate for it: https://www.youtube.com/watch?v=7LtyVjw46r8
IF the instructions above could not help, please share string names you want to translte and their definitions too in your preferred language. Of course, we will need a login URL in this case.
Kind Regards
October 20, 2021 at 5:23 pm
#64735
Hi!
Thanks for your reply. This is what I tried to do: Translate with Loco Translate. However, as described, I received an error message.
I have now created a completely new language file with Loco and translate everything I need myself. It’s more work, but at least it works.
Regards
HarryOctober 20, 2021 at 6:26 pm
#64736
Keymaster
WP Royal Team
Hi Harry,
We are glad that you were able to found out the solution by yourself.
If you need any help please let us know, we will do our best to help.
Kind Regards
-
Author
Posts
Viewing 5 posts — 1 through 5 (of 5 total)
- You must be logged in to reply to this topic.