Работа некоторого программного обеспечения зависит от вспомогательных утилит и приложений. Поэтому пользователи желают быстрее решить проблему, когда не работает уже установленная Java. Ошибки могут возникнуть и раньше, когда не устанавливается приложение Java на компьютер с ОС Windows. Разберемся в каждой проблеме и узнаем, что делать.
Чтобы ответить на вопрос, что делать, если модуль Джава не скачивается на компьютер, важно понять, почему установщик не выполняет функций по загрузке библиотек.
Загружаемый на компьютер файл не содержит требующихся компонентов, а просто скачивает необходимые файлы из виртуальных библиотек через интернет. Важно проверить работу файрволов, антивирусов и браузеров. Такое ПО блокирует фоновую загрузку Java.
Решение проблемы достигается двумя вариантами: настройка приложений или скачивание полноценного установщика с нашего и официального сайта Джава. Обновите антивирус, просмотрите параметры блокировок.
Ошибки при установке
Если файл скачался, а Java не устанавливается на Windows 7, 8, 10 или XP, то проблема глубже.
Способы решения проблемы:
- Очистить компьютер от мусора, освободив при этом реестр. Удобнее провести процедуру через CCleaner.

- Полностью очистить папки по следующим адресам: «C:ProgramFilesJava» и «C:ProgramFilesCommon FilesJava». Какой-то из файлов мог быть запущен, поэтому не удалился на предыдущем этапе.
- Ошибка установки, возникающая после очистки реестра, говорит о том, что на Windows не обновлены компоненты ОС. Даже устаревший браузер от Microsoft может доставлять массу неприятностей при установке других программ.
С остальными ошибками Джава на Виндовс стоит познакомиться поближе.
Error Java Installer
Если не запускается установщик программы Java, обратите внимание на подключение к интернету. Лучше продолжить процесс в автономном режиме, скачав исполняемый файл с соответствующей пометкой.
Когда установленная Джава не открывается, то используется программа Windowsfix. ПО помогает в устранении сотен ошибок, включая те, что встречаются на Java.
Ошибка 1603
Ошибка Java с пометкой Error Code: 1603 появляется в процессе установки обновления. Причина до сих пор не выявлена разработчиками.
Предлагаются следующие способы решения:
- Переустановка приложения с удалением. Предполагается, что сбой и ошибка 1603 возникают из-за некорректной загрузки ПО на компьютер. Поэтому сотрите информацию об утилите, очистите операционную систему от следов Джавы и скачайте файл для автономной установки программы.
- Отключение отображения контента Джава. Проблема исправления ошибки с кодом 1603 может крыться в использовании утилиты при работе с браузерами. Перед установкой снимите флажок в панели управления приложения на вкладке «Безопасность».
После переустановки приложения верните флажок на место.
Ошибка 1618
Чтобы исправить ошибку Java 1618, воспользуйтесь следующей инструкцией:
- На системном диске должно быть достаточно места, чтобы исполняемый файл без труда устанавливал программу. Вес Джавы – 158 Мб.
- Скачайте пакет для автономной установки ПО.
- Папку, где до этого хранилась Джава, нужно очистить вручную.
- Удалите ненужные файлы в реестре, используя CCleaner.
- Отключите антивирусы.
- Установка программы начинается заново.
Причина ошибки 1618 при установке Java на компьютер разработчиками не выяснена.
Unable to install Java
Разработчики программ из Microsoft знают, что делать с ошибкой Unable to install Java. Они рекомендуют: «Компоненты файлов с расширением .jar блокируются системой или антивирусом. Для решения проблемы установка проводится в безопасном режиме».
Java Destination Folder
Ошибка папки назначения Destination Folder возникает на 32-разрядных версиях ОС Windows. Для решения проблемы создается новая папка в следующей директории: «C:Program Files (x86)». Если есть какое-то содержание, то его нужно удалить.

Для начала убедитесь, что при установке не возникало неполадок и системных сообщений.
Как запустить программу Java, если возникают ошибки:
- Перезапустите браузер для активации новой версии программы. Иногда после обновления приложение Джава запускается только после перезагрузки ПК.
- Разрешите выполнять функции среды Java в используемом браузере. Работа с указанными программами может быть выключена и на панели управления приложением.
- Подключаемый модуль Джава должен быть активирован на запускаемом браузере. Если программа не открывает видео или игры, проверьте не только ее настройки, но и, например, Оперы или Chrome.
Приложение работает постоянно, но в фоновом режиме. Иными словами, вопрос, как открыть программу Java на компьютере, не имеет ответа. Главное – настроить взаимодействие с браузерами.
Загрузка…
HI Gentlemen,
I have a serious Java installation problem. First I installed JDK7 several times, but I had to return to JDK6 because JDelevoper and the integrated Weblogic Server do not recognize JDK7 (a reported bug). To do so, unfortunately I went to regedit and deleted many entries concerning JDK7 and also JDK6. Now the system is unstable: I can not install JDK6 because it feels that it is already installed. All directories are removed, to say. Can anyone help me? Or must I perform a brand new Windows7 Pro Installation?
Thank you very much, kind regards:
Miklos HERBOLY
Java(TM) Development Kit 6 Update 30
This software has already been installed on your computer. Would you like to reinstall it?
When I say Yes, I get the following:
Error 1723. There is a problem with this Windows Installer package. A DLL required for this install to complete could not be run. Contact your support personnel or package vendor.
Since I am alone in my company as a freelance, I can not contacet anyone.
Edited by: mh**** on Oct 3, 2012 9:18 AM
-
September 7th, 2013, 01:53 AM
#1

Junior Member

 Unable to reinstall Java
I uninstalled java (latest version) because I wanted to reinstall it outside the programs folder. I downloaded the installer and ran it…but it gave me an error message about some java files not having been removed correctly. I searched my C drive for things with java in the title, deleted a few, ran it again, same message. I used a restore point from before I uninstalled it, but now java doesn’t work on my computer. I’m stuck with no java because I can’t reinstall it. I can’t download the unstaller from java’s website because it requires that I have a functioning version of java. Any ideas about how I can fix this?
-
 Related threads:
-
September 7th, 2013, 02:59 AM
#2
Super Moderator
Re: Unable to reinstall Java
I have no experience with the Java SDK on a Windows system, so I may be completely wrong, and there’s no guarantee this will solve your problem or even help in any way. Take my suggestion at your own risk (but nothing I’ve suggested seems dangerous or irreversible):
Based on my Linux experience, it seems you should be able to unzip the Java SDK distribution into a folder of your choice, preserving the file structure, and set a few environment variables to point to that folder or the /bin folder inside that folder. You could try that approach to reinstall Java to a new location, OR since you already had Java installed, you may be able to recover to the previous install by unzipping the distribution to where it was before you tried to move it.
-
September 7th, 2013, 07:29 AM
#3
Re: Unable to reinstall Java
 Originally Posted by Aboogie1

…but it gave me an error message…
Copy paste the full text of the error message exactly as it appears so we can see what the complaint is.
Backup your system before you continue to work on this, just to be safe…
See if you can determine the folder where java was installed previously and delete the whole folder and try a fresh install again, or post the error for more help.
If you cannot open .JAR JAVA files on a Windows 10, 8 or 7 based computer, with error «Unable to install Java. There are errors in the following switches: filename.jar. Check that the commands are valid and try again«, continue reading below.
The error «There are errors in the following switches» while trying to open a JAVA .JAR file usually occurs because of multiple installed versions of Java on the PC, or because the the .jar association has been hijacked.

This tutorial contains instructions to fix the following Java error while trying to open a .jar file:
«Java Installation Not Completed.
Unable to install Java. There are error in the following switches: ‘C:Users…file.jar’;.
Check that the commands are valid and try again.»
- Related article: Java Installation Not Completed – Unable to install Java in JAVA JNLP files.
How to FIX: Unable to Open Java JAR Files – There are errors in the following switches: ‘file.jar’.
Method 1. Uninstall and re-Install JAVA on your system.
The first step, to resolve problems with JAVA, is to uninstall all installed versions of Java and to re-install the correct and most recent version of JAVA on your PC. To do that:
1. Download and run the Java Uninstall tool.
2. Choose Agree at the first screen. *
* Note: If prompted that «There is only one up-to-date Java version detected. Are you sure to continue?» click Yes.

3. Select all the installed Java versions and click Next.
![image_thumb[37]](https://www.repairwin.com/wp-content/uploads/2020/12/image_thumb37_thumb.png "image_thumb[37]")
4. Click Yes again to clean the cache
![image_thumb[43]](https://www.repairwin.com/wp-content/uploads/2020/12/image_thumb43_thumb.png "image_thumb[43]")
5. When the uninstall is completed, click the Get Java button or navigate to Java Download page to download and install the latest Java version. *
* Note: If you use 32-bit and 64-bit browsers, you will need to install both 32-bit and 64-bit Java in order to have the Java plug-in for both browsers. You can download both Java versions from here.
![image_thumb[44]](https://www.repairwin.com/wp-content/uploads/2020/12/image_thumb44_thumb.png "image_thumb[44]")
6. After installing Java on your system, try to open the JAR file again and if you still face the same error, apply the instructions at method-2 below.
Method 2. Set «Java Platform SE Binary» as the Default program to Open .JAR files.
1. Right-click on the .jar file and choose Open with… -> Choose another app

2. Check Always use this app to open .jar files and click More apps.

3. Scroll down and click Look for another app in this PC.

4. Now navigate to the folder where JAVA is installed.
- For 64-bit versions of Java navigate to C:Program FilesJavajre_versionbin
- For 32-bit versions of Java navigate to C:Program Files(x86)Javajre_versionbin
5. Select the «javaw.exe» application (Java Platform SE Binary) and click Open.

6. Now, the jar file should open without problem, but If you still face the sane error, follow the instructions on method-3 below.
Method 3. Repair Invalid Java files Association with Jarfix.
1. Download the Jarfix.exe tool from here.
2. Double-click to run the Jarfix tool to restore the .jar file association.

That’s all folks! Did it work for you?
Please leave a comment in the comment section below or even better: like and share this blog post in the social networks to help spread the word about this solution.
If this article was useful for you, please consider supporting us by making a donation. Even $1 can a make a huge difference for us.

Java is a computer language with few implementation stumbling blocks. As a result, it is a popular choice among developers. On the other hand, users must have it installed on their Mac, Windows, or another operating system. Use programs that are built on it.
Installing Java updates in Windows 10. The report “Java install did not complete Error Code: 1603” displays. It is one of the most widespread errors. Malware authors frequently make use of Java weaknesses and vulnerabilities. It is critical to install updates to keep the system secure from potential assaults.
The causes of “Java install did not complete Error Code: 1603” could be various. Antivirus software, web browsers, and other Java-based apps prevent updates from being installed. It prohibits it from being updated, among other things.
This message informs you that you are unable to install the required updates. Suppose a Windows user attempts to update Java when an older version is already installed. They may obtain this error number. The correct Java version should be used according to the user’s Windows operating system.
What is Java error 1603?
The error “Fatal error during installation” is a Windows Installer (MSI) issue. This error usually signifies that “something the installation expected wasn’t available.” Also, “something the installer didn’t expect exists.”
The number 1603 is thrown for a variety of reasons. I will give and then show you how to solve the problem in Java.
Possible Reasons for a Java Error 1603
When the installation starts, Java is already installed.
When you install the JRE-7uxx-windowsxx.exe and the target computer runs Java in a browser, this happens frequently.
The traces of a prior Java installation can be found.
By default, when Java is installed, it tries to delete earlier updates from the same family. Java 7 Update 71, for example, will uninstall Java 7 Update 67 but not Java 6 or Java 8.
The Java Update failed to finish. Previous upgrades aren’t always totally removed. When the updated version tries to install, it may encounter a 1603 error. A stray registry key is sometimes the only trace.
You’re attempting to run an online Java executable.
If you’re going to deploy the EXE, make sure you only install the offline version. If your install file’s name contains the letters “iftw,” you can be sure. Iftw is an acronym for “Install From The Web.” It is a pretty small file.
First and foremost, the Ask Toolbar is typically included in the online version. It’s far worse than any 1603 error you’ll ever come across. Simply use the Java packages from the PDQ Deploy Package Library to get the offline file. Also, use the Java packages from the PDQ Deploy Package Library.
There is a missing installation file.
If you’re installing Java 7 using the extracted MSI, you’ll need files like data1.cab. (Java 8 does not require a separate.cab file.) When deploying Java, an antivirus solution may remove the bundled files, resulting in a 1603 error from the installer.
Methods to fix Java Update Error: 1603

Solve “Java update did not complete Error Code: 1603” by following any of the methods given below.
- Make sure that you are installing the correct version of Java
- Install The Java as administrator
- Turn off Antivirus
- Close programs that run Java
- Task Manager Fix
- Disable Java content
- Uninstall the previous version of Java
- Run Program Install and Uninstall Troubleshooter
- Delete KB2918614 Windows Update
- Don’t install Java with LogMeIn
1. Make sure that you are installing the correct version of Java
Make sure you’re using the correct Java version for your operating system. If you have a 64-bit computer, you need to download 64-bit Java rather than 32-bit Java. Follow these procedures if you’re not sure what version of Windows you’re running.
- Press the Cortana taskbar button in Windows 10.
- In the search area, type in the keyword system.
- Then, to open the window just below, click About your PC.

- Scroll to the System type specification, which indicates whether the platform is 64-bit or 32-bit.
- Make sure you’re not installing 64-bit Java on a 32-bit system first. If you are, this is most likely why Java will not install.
You can choose to download the 32-bit version of Windows x86 Offline. By performing the following tests, you can decide if your system is 32-bit or 64-bit. Another item to consider is if your Java SDK is 32-bit or 64-bit.
If you try to upgrade Java with a 32-bit version to replace a 64-bit Java SDK or the other way around, you may encounter a 64-bit and 32-bit conflict. Install 64-bit Java to replace an old 64-bit version, or update 32-bit Java to the most recent 32-bit version.
2. Install and Run Java as administrator
Installation difficulties can be resolved by installing software as an administrator. As a result, you need to install the most recent Java version as an administrator.
- Install Java by right-clicking it.
- Select the option to run as administrator.

- Begin the setup process and follow the on-screen prompts.
You should no longer get the Java error 1603. However, if the issue persists, attempt the third option.
3. Turn off Antivirus
Another approach is to test your antivirus software. I said that McAfee VirusScan Enterprise has a feature called “Access Protection.” The option to block the installation of browser assistance objects and shell extensions is part of Access Protection. It falls under the heading of “Common Standard Protection.”
The sign explains that enabling this option will prevent Java installation. Because security software frequently blocks Java, your antivirus could be the source of Java error 1603. As a result, to add Java, you should temporarily disable security software:
- Open Task management by right-clicking the taskbar.
- Select your security software from the Startup tab.
- To turn off antivirus, click the Disable option.

- Restart your computer and try again to reinstall Java.
Alternatively, reboot after temporarily removing the antivirus software from the Windows starting. The Task Manager’s Startup tab shows how you may disable antivirus software.
- To prevent the software from starting, press the Disable button.
- After restarting Windows, install Java.
4. Close programs that run Java
Before installing Java, make sure all other programs are closed. When you try to install the latest version, there may be programs that execute Java.
You must close the browser and any other Java-enabled apps after using the Java installation. If you don’t, you can get a Java error 1603.
After downloading the Java installer, close your browser. All other program windows on the taskbar should be closed.
Also, see if there are any third-party program icons in your system tray (notification area). If this is the case, close the programs in the system tray.
5. Task Manager Fix
I have also found that the java error code 1603 error message can also be solved using task manager.
- The Offline Installer is available for download.
- Activate Task Manager.
- All non-system processes, as well as the whole Explorer process tree, should be terminated.
- Start the Task Manager again by pressing Ctrl-Alt-Del.
- Start the Offline Installer by running a file.
- Check To See If JAVA Is Now Installed And Functioning Properly.

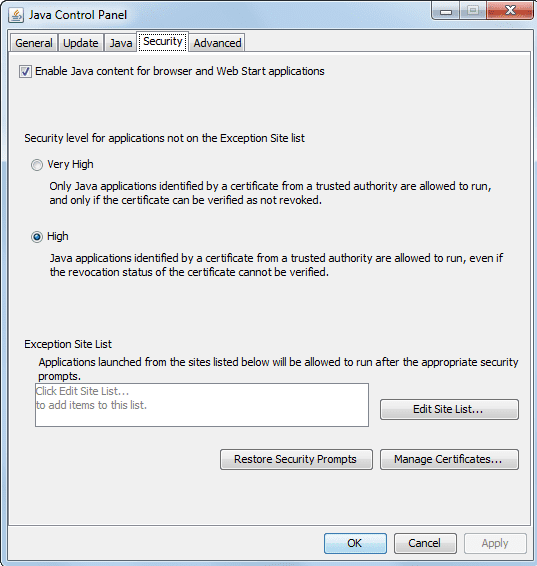
6. Disable/Enable Java content
Before installing, this approach blocks Java content in the browser.

- Shut Down The Installer When You Get The 1603 Error.
- In the Java Control Panel, locate and
- “Enable Java Content” in the Web Browser should be unchecked.
- Select the Security tab (uncheck) in the Java Control Panel.
- Uncheck the option Enable Java Content In The Browser.
- To Verify The Modifications, Select Apply And Then OK.
- Java must be reinstalled, and Java content must be enabled again in the browser.
- The Offline Installer Package can be downloaded and installed.
- If you need to use Java content in the browser, after the installation is complete, re-enable “Enable Java content” in the browser.
7. Uninstall the previous version of Java
Error Code 1603 may be resolved by uninstalling an older version of Java. You can download the Java uninstall programs from the official website. Then start the installer and copy the on-screen instructions.
You can also manually use the Control Panel, which requires you to uninstall it as a regular program and then reinstall it.
8. Run Program Install and Uninstall Troubleshooter
A program installation troubleshooter is not included with Windows. The Program Install and Uninstall troubleshooter is still available for download.
That troubleshooter may be able to help you fix Java problem 1603. By clicking the Download option, you may install the troubleshooter on Windows 10. Then, to launch the window, go to the location where you saved the installer. Double-click MicrosoftProgram Install and Uninstall.meta.diagcab.
- From Microsoft’s official website, download and install the “Program Install and Uninstall troubleshooter.”
- To open the Troubleshooter, double-click the MicrosoftProgram Install and Uninstall.meta.diagcab file.
- In the new window, click Next and follow the on-screen instructions.
9. Delete KB2918614 Windows Update
For many Windows 10 users, Windows Update KB2918614 appears to generate Java installation and update difficulties. As a result, deleting this update may assist in resolving the issue.
- Using the Windows key + R, open the Run dialogue box. In the Run box that opens up, type appwiz.cpl and click OK.
- When the Programs in Features box displays, click the View installed updates option in the left panel.
- You’ll see a list of updates that have been installed. Look for the code KB2918614.
- Click the Uninstall button next to the KB2918614 Windows update.
- Once the uninstallation is finished, restart your personal computer to see if the Java issue 1603 has been resolved.
Windows may reinstall the KB2918614 update. Disable automatic updates to stop this from happening.
10. Don’t install Java with LogMeIn
When LogMeIn users attempted to install Java remotely. They received the Java error message 1603. The LogMeIn remote desktop software can cause an installation error.
So, if you’re using LogMeIn to install Java. Uninstall it and install Java on your PC without using remote desktop software. Check out other LogMeIn alternatives if you require remote desktop software to install Java.
Conclusion
There are a few options for resolving Java problem 1603. I hope that these suggestions from my list helped resolve Java problem 1603.
Multiple users have recently reported on facing issues while trying to install or update Java in their Windows. Installation errors are quite common for windows, and there can be many causes of this issue. In this article, I have discussed why you are unable to install Java and what you can do to fix it.
Why Am I Unable To Install Java?
Contents
- 1 Why Am I Unable To Install Java?
- 2 Fix Java Update Failed Issue
- 2.1 Solution 1: Restart PC
- 2.2 Solution 2: Disable Firewall
- 2.3 Solution 3: Uninstall The Old Java Version And Install The New Java Package
- 2.4 Solution 4: Update Windows
- 2.5 Solution 5: Disable Java Content For Browser
- 3 Wrapping Up
Generally, it is hard to pinpoint one specific cause of this issue, but there are some commonly known causes that can trigger it. The first place to check is whether your system meets the basic requirement for installing that Java version.
Other than system specifications, the Windows Firewall can also affect the installation of Java. Insufficient disk space and using unsupported browsers can also be the issue. Whatever the case may be, below I have discussed some troubleshooting methods that you can follow for fixing this issue.
Fix Java Update Failed Issue
Java update failure is nothing to be afraid of. By simply following the troubleshooting procedure mentioned below, you should be able to fix it.
Solution 1: Restart PC
The first thing you can try is to restart your PC. Restarting is known for fixing various minor bugs and errors, including the bug that is preventing Java from installing. Restart the PC before downloading the Java installer and then try installing it.
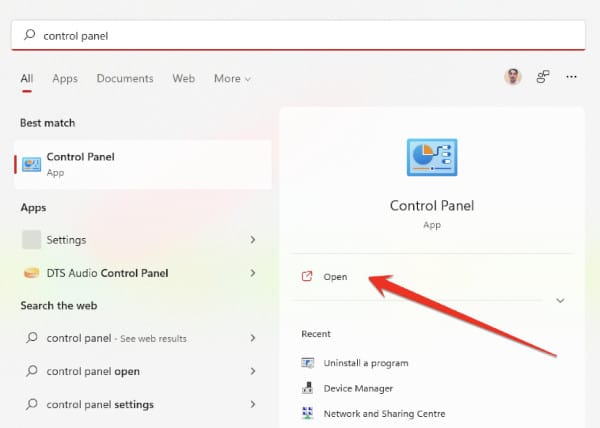
Solution 2: Disable Firewall
Try disabling the Windows Firewall and see whether you are able to install Java. Windows Firewall is important for protecting your PC. However, it can sometimes become overprotective and stop essentials programs that are not a threat. This may be one of those cases.
- Type Control Panel in the Start menu and select the top result.
- Change the View by option to small icons.
- Locate and click on the Windows Defender Firewall option. This will open the Windows 10 Firewall settings.
- In the Windows Defender Firewall settings click on the Turn Windows Defender Firewall on or off option.
- Check the Turn off Windows Defender Firewall (not recommended) option for private if you are facing issues connecting with home or office network. Check it in Public if you are facing trouble connecting to public hotspots.
- Click on OK to save the changes.
Check whether now you can install or update Java. If no, then enable the Windows Firewall by following the above steps and checking the Turn on Windows Defender Firewall option for private and public networks.
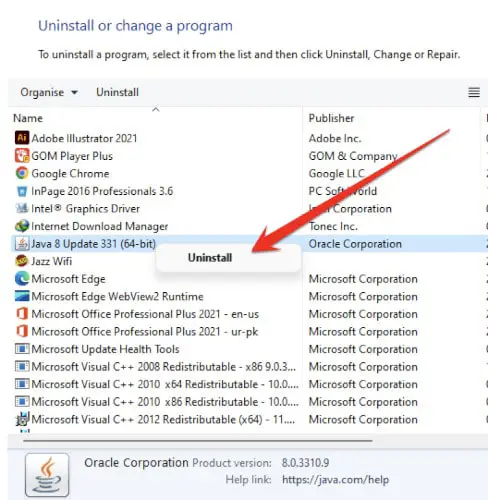
Solution 3: Uninstall The Old Java Version And Install The New Java Package
If you are trying to update Java by installing a newer package, you should first uninstall the old one, to do it, follow the steps given below:
- Press the Windows + R keys to open the Run utility.
- Type appwiz.cpl and press Enter to open the Programs and Features panel.
- Locate the Java package among the other listed apps and right-click on it.
- Select the Uninstall option.
- Follow the on-screen instructions to complete the process.
Now, download the latest Java package from the official website and try installing it.
Solution 4: Update Windows
Outdated operating systems are known to conflict with newer apps and games. If you are using outdated Windows, you should update it to the latest version. Windows update fixes bugs, adds security patches, and provides newer features. To update your Windows 10, follow the steps given below:
- Type Check for updates in the Start menu and select the top result.
- Click on the Check for updates option and wait for Windows 10 to finish checking.
- If any update is available, Windows should start downloading it automatically. After the download is complete, install it and restart your PC.
Solution 5: Disable Java Content For Browser
If the above solutions don’t work, you can try disabling the Java content for the browser feature and try re-installing it. To disable the Java content for the browser, follow the steps given below:
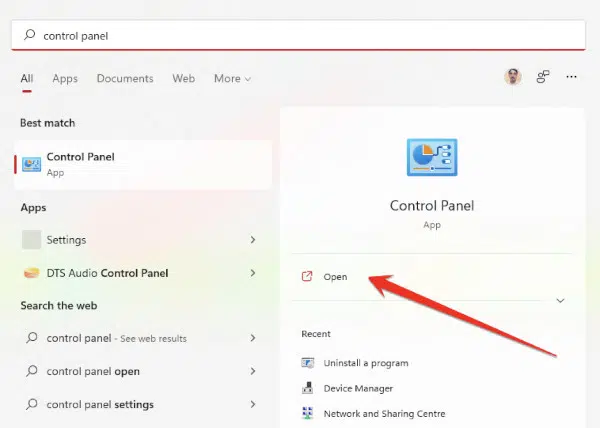
- Type control panel in the Windows search menu and select the top result.
- Change the View By settings to Small icons.
- Click on the Java option. This will open the Java control panel.
- Select the Security tab.
- Uncheck the Enable Java content in the browser box and click on Apply and OK to save the changes.
Now, reinstall the Java package and check whether this fixes the issue.
Wrapping Up
So, there you have it. Now you know how to fix the unable to install Java issue. Follow the steps given above and you should be able to fix this issue. If you have any questions regarding this article, ask them in the comment section below.
Note:- Please Read Full.
I am unable to install java SE 8 which I tried, The installer is unpacked and the installation goes on until it is mid-way, then a message is displayed that the installation files are corrupted. So, I tried to install it with new setup, Which didn’t quite work out either. I tried microsoft support on which I found a troubleshooter which didn’t work either.I also tried installing Java SE 7, again the same problem was faced by me.
![]()
ziMtyth
96813 silver badges31 bronze badges
asked Aug 20, 2017 at 14:02
3
Because you said the files were corrupted and you didn’t specify from where you did get them I suggest you to follow this:
First of all: Install Java even if you already have it (it contains the JVM) download java.
Then go here and choose which SE you want to install. I suggest you to install JDK 8.
download java SE
![]()
Dorian Gray
2,8811 gold badge9 silver badges25 bronze badges
answered Aug 20, 2017 at 14:14
DetchKingDetchKing
1851 silver badge12 bronze badges
3
Windows 10 and Windows 11 users encountering the “Java Not Found” error when attempting to play Magic online against their friends are reporting that the issue occurred after having taken out the Java Environment.
Java is a software program that helps run many of the programs on your computer. Without it, many of the files you try to open will give you an error message indicating that Java cannot be installed.
If you are sure that Java is installed and you still cannot open certain files, a solution may be available for you.
What is the Cause of the “Unable to Install Java” Error?
This is a common error that people see when trying to install Java. It means that the installation process was not completed successfully, and you will need to try again.
There can be several reasons why this might happen, but some of the most common ones are:
- Corrupted / Improperly installed Java Environment: Java is a programming language that enables developers to create robust, high-performance applications. Java is used by millions of developers and billions of devices worldwide.
However, problems can occur if Java is not installed correctly or if there are errors in the Java environment. It depends on the context, one typical instance that will result in this problem is an inconsistency with the Java installation. In this case, you will need to reinstall the Java environment.
- Removing remnants from the old Java installation: If you are experiencing the “Java Not Found” Error in XMage on Windows 10, there may be remnants of the old Java installation that need to be removed.
In some circumstances, the standard of service you’re trying to obtain might suffer because of a conflict created by remnants of an obsolete Java installation conflicting with the XMage endeavors to install the latest update.
If the scenario applies, you should be able to solve the issue by removing the remnant files before you try the Java Environment installation again.
- Broken Java Environment variable: When attempting to start up the XMage program on a computer with Windows 10 installed, an error message pops up reading “Broken Java Environment variable. Java not found.”
This error is preventing users from being able to access the program and causes a lot of frustration. A few possible solutions have been suggested online, but none of them seem to be working for everyone.
Some people have had luck deleting the Java files and then reinstalling them, while others have had to change some settings in their computer’s Registry.
If you face this issue, you need to follow my given methods below to easily fix this issue.
Method 1: Uninstall And Reinstall Java
If you see the “Unable to install Java, there are errors in the following switches” error on your computer, the Java installation process was not successful. You can fix this problem by uninstalling Java and then reinstalling it.
To uninstall Java, you need to follow these steps:
- First you have to click on the Window button from the taskbar main and then type the search bar main Control Panel.
- Now you need to simply open the Control Panel to continue the JavaScript software uninstallation process.
- After opening the Control Panel you have to click on the “Programs” option.
- After going to the Programs section, you have to left-click on the Java program with the mouse, and then click on the “Uninstall” option.
- You need to restart your computer after completing this uninstallation process.
- Now in the second step you have to re-install the Java software in your computer. All you have to do is launch the process by double-clicking on the Java software you have downloaded. If you have deleted the Java software, you can re-download it from the Java website.
- Run the Java installer and complete the installation process.
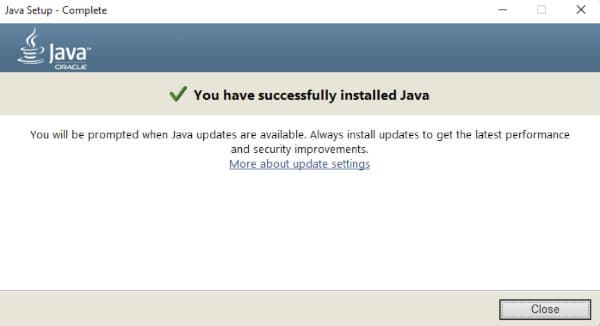
- Once the software is installed, you need to close this notification and check your computer for the error that this error has been fixed. If not, follow the additional methods below.
Method 2: Remove Remnants From the Old Java Installation
Unfortunately, you may also encounter the “Java Not Found” error in those cases when your computer contains an older version of Java with remnants from the last Java software. These remnants are handled by the XMage program. When you try to install Java, and there are errors in the following switches, it may be necessary to remove remnants from an old Java installation.
A number of users that shared the same issue have confirmed that they were able to solve it after they used an elevated Command Prompt to find any leftover Java files, along with the main executables, and then launched XMage again.
If you face the following issue then you need to follow these steps:
- First of all you need to press the Windows+R button to open the Run dialog box.
- In the Windows Run dialog box you need to type “cmd” and press enter from the keyboard.
- Once the Command Prompt is open, type the following command:
where java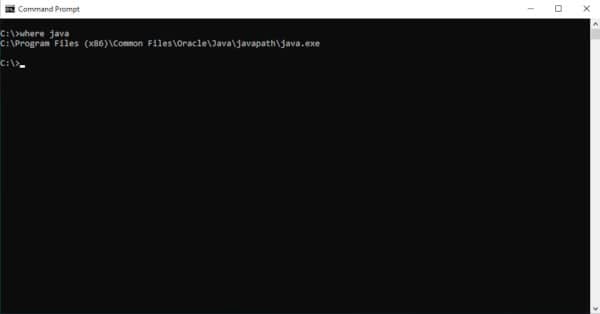
- Make sure the java.exe executable is found by the computer.
- Once your computer reboots, run the XMage application once again.
The program will then make your Java Environment reinstallation the primary function and ask you to accept it. When you do, the Java Environment installation will begin automatically. If the issue persists even after following all the guidelines above, continue below for the next possible solution.
Method 3: Fix The Java Environment Variable
An environment variable is a named entity used to store information that can be accessed by a program. The Java programming language provides several environment variables that are useful when developing programs. These variables are accessible from within your program and from the command line.
The most important Java environment variable is JAVA_HOME. This variable stores the location of your Java installation. When you run a Java program, the Java interpreter looks for the class files in the locations specified by the JAVA_HOME environment variable.
If you don’t set the JAVA_HOME environment variable, the interpreter looks for class files in the current directory.
Here is another solution that can help you to fix this issue easily. If you’re getting errors while trying to install Java, the problem may be with your Java environment variable. This variable tells your computer where to find Java installations, and if it’s not set up correctly, you may get errors.
To fix the issue you need to follow these steps:
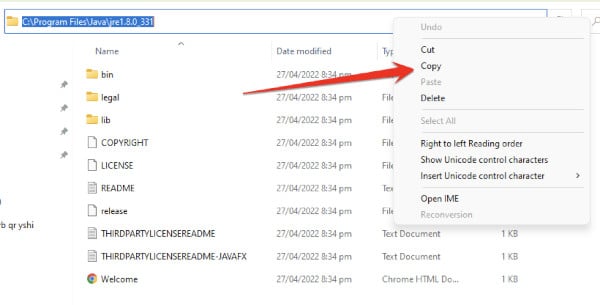
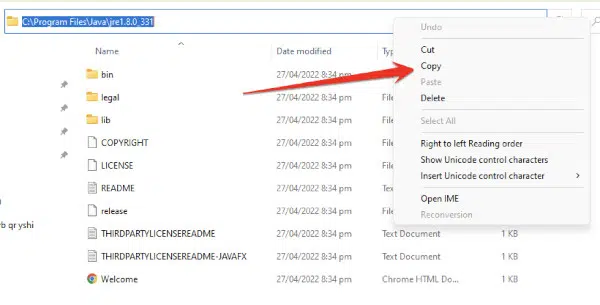
- All you have to do is open the Windows File Explorer, and go through the Java installation path.
- You can also trace the location of Java software from this address. The path to the Java directory will vary depending on the version of Java you have installed.
C:Program Files (x86)Javajre1.8.0_331- Next to the address bar, right-click on the dropdown menu and then choose Copy from the context menu that appears.
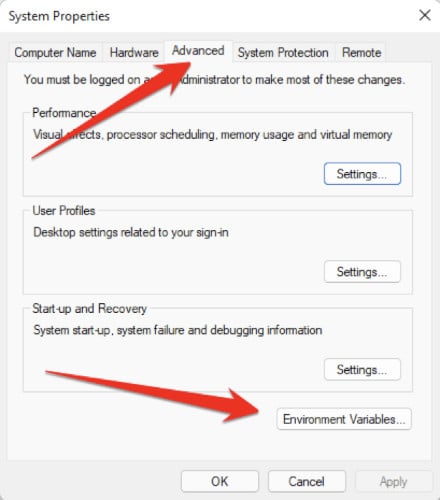
- After you have directly copied the infotainment system database location to the clipboard, press Windows+R to open a Run dialog box.
- Type the following command in the Run diaglog box.
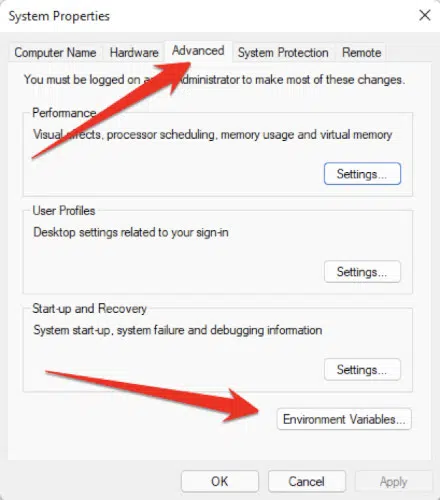
sysdm.cpl- Once you reach the Environment Variables tab, click on the Advanced tab in the pop-up menu.
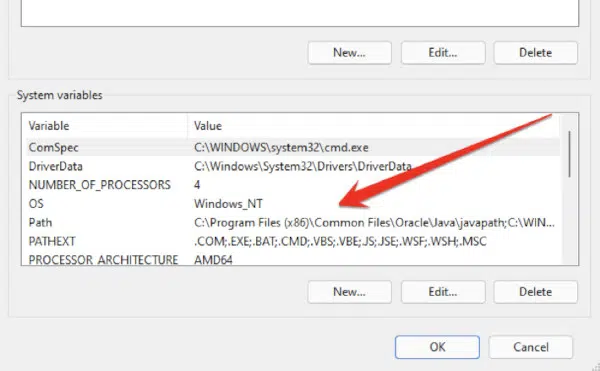
- When you’re done with the Environment Variables window, go to System variables.
- Select the Path option and click the Edit button.
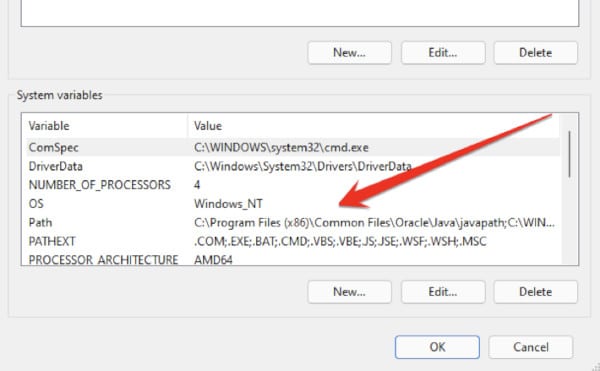
- Look for an environment variable that mentions Java.
- Change the location to the Java path you have identified earlier.
- Restart your computer and see if the problem is resolved from the startup of the Xmage program.
Frequently Asked Questions
Why Does It Keep Saying That Java Is Not Installed?
There are a few reasons why Java may not be installed on your computer. The most common reason is that your computer does not have Java installed.
Java is a programming language that is used to create websites and apps. If you are trying to use a website or app that requires Java, and Java is not installed on your computer, you will see a message that says “Java is not installed.”
Another reason you may see this message is if the version of Java on your computer is outdated. In order to use websites and apps that require Java, you will need to have the most up-to-date version of Java installed on your computer.
Finally, if you have recently uninstalled Java from your computer, you may see this message until you reinstall it.
How Do I Fix Java Runtime Environment Not Found?
If you’re getting the error message “Java Runtime Environment not found”, it means that Java isn’t installed on your computer or that it’s not set up properly.
Here are a few things you can try:
- In the Java Control Panel, click on the Java tab.
- Click View to display the Java Runtime Environment Settings.
- Verify that the latest Java Runtime version is enabled by checking the Enabled box.
- Click OK to save settings.
How Do I Reinstall Java Runtime?
If you are having problems with Java Runtime, you may need to reinstall it. To do this, you will need to uninstall the old version of Java Runtime and then install the new version.
To uninstall Java Runtime, follow these steps:
- Open the Control Panel.
- Click on Programs and Features.
- Find Java Runtime in the list of programs and click on Uninstall.
- Follow the instructions to uninstall Java Runtime.
To install the new version of Java Runtime, follow these steps:
- Go to java.com and download the latest version of Java Runtime.
- Follow the instructions to install Java Runtime.
How Do You Fix An Environment Variable?
If you’re having trouble with an environment variable, the best way to fix it is to find out where it’s defined and change its value there. To do this, you can use the command line or a text editor.
To use the command line, follow these steps:
- Open a terminal and type “env” followed by the name of the variable you want to change. This will show you all of the places where the variable is defined.
- To change the value of a variable, open one of the files that’s listed and change the value on the right-hand side.
- Be sure to save the file when you’re done.
If you’re using a text editor like TextMate or Sublime Text, follow these steps:
- Open up the .bash_profile file in your home directory.
- Change the environment variables.
- This file contains all of your user settings and preferences.
How Do I Check If The Java Environment Variable Is Set In Windows?
Follow these stesp:
- Open a command window by pressing Windows+R, typing “cmd”, and pressing Enter.
- Enter the following command:
echo %JAVA_HOME%This should output the path to your Java installation folder. If it doesn’t, your JAVA_HOME variable was not set correctly.
Here is another method:
To check if the Java environment variable is set in Windows, follow these steps:
- Open the Command Prompt and type the following command:
java -version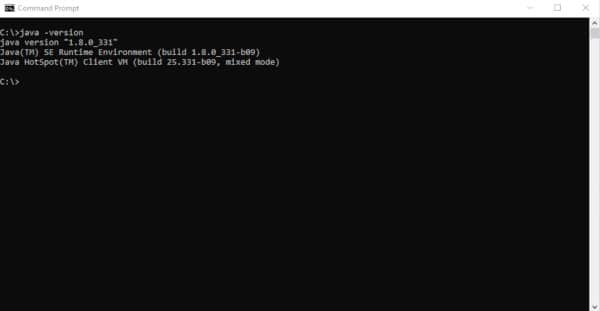
If the Java environment variable is set, you will see the Java version number displayed. If the Java environment variable is not set, you will see an error message.
Can I Remove Old Java Updates From My Computer?
Yes, you can remove old Java updates from your computer. Java updates are cumulative, so each new update includes all the security fixes and improvements from previous updates. If you don’t need a particular older Java update, you can safely uninstall it.
To uninstall an old Java update:
- Open the Control Panel and click Programs.
- Select Programs and Features.
- Scroll down to the Java program, right-click and selct Uninstall.
- Follow the prompts to uninstall the update. Once the update is removed, you will be prompted to reboot your computer.
Final Thoughts
I hope this article will help you to fix the “Unable To Install Java There Are Errors In The Following Switches” Java application error in your Windows PC. In this article, I try my best to talk about some best and most authentic methods that can help you to fix this issue.
If you like this article or these methods will help you to solve this issue then please share this article with your friends on social media. Thanks for reading.
Работа некоторого программного обеспечения зависит от вспомогательных утилит и приложений. Поэтому пользователи желают быстрее решить проблему, когда не работает уже установленная Java. Ошибки могут возникнуть и раньше, когда не устанавливается приложение Java на компьютер с ОС Windows. Разберемся в каждой проблеме и узнаем, что делать.
- Почему Java не скачивается
-
Ошибки при установке
- Error Java Installer
- Ошибка 1603
- Ошибка 1618
- Unable to install Java
- Java Destination Folder
- Не запускается Java
Чтобы ответить на вопрос, что делать, если модуль Джава не скачивается на компьютер, важно понять, почему установщик не выполняет функций по загрузке библиотек.
Загружаемый на компьютер файл не содержит требующихся компонентов, а просто скачивает необходимые файлы из виртуальных библиотек через интернет. Важно проверить работу файрволов, антивирусов и браузеров. Такое ПО блокирует фоновую загрузку Java.
Решение проблемы достигается двумя вариантами: настройка приложений или скачивание полноценного установщика с нашего и официального сайта Джава. Обновите антивирус, просмотрите параметры блокировок.
Ошибки при установке
Если файл скачался, а Java не устанавливается на Windows 7, 8, 10 или XP, то проблема глубже.
Способы решения проблемы:
- Очистить компьютер от мусора, освободив при этом реестр. Удобнее провести процедуру через CCleaner.
- Полностью очистить папки по следующим адресам: «C:ProgramFilesJava» и «C:ProgramFilesCommon FilesJava». Какой-то из файлов мог быть запущен, поэтому не удалился на предыдущем этапе.
- Ошибка установки, возникающая после очистки реестра, говорит о том, что на Windows не обновлены компоненты ОС. Даже устаревший браузер от Microsoft может доставлять массу неприятностей при установке других программ.
С остальными ошибками Джава на Виндовс стоит познакомиться поближе.
Error Java Installer
Если не запускается установщик программы Java, обратите внимание на подключение к интернету. Лучше продолжить процесс в автономном режиме, скачав исполняемый файл с соответствующей пометкой.
Когда установленная Джава не открывается, то используется программа Windowsfix. ПО помогает в устранении сотен ошибок, включая те, что встречаются на Java.
Ошибка 1603
Ошибка Java с пометкой Error Code: 1603 появляется в процессе установки обновления. Причина до сих пор не выявлена разработчиками.
Предлагаются следующие способы решения:
- Переустановка приложения с удалением. Предполагается, что сбой и ошибка 1603 возникают из-за некорректной загрузки ПО на компьютер. Поэтому сотрите информацию об утилите, очистите операционную систему от следов Джавы и скачайте файл для автономной установки программы.
- Отключение отображения контента Джава. Проблема исправления ошибки с кодом 1603 может крыться в использовании утилиты при работе с браузерами. Перед установкой снимите флажок в панели управления приложения на вкладке «Безопасность».
После переустановки приложения верните флажок на место.
Ошибка 1618
Чтобы исправить ошибку Java 1618, воспользуйтесь следующей инструкцией:
- На системном диске должно быть достаточно места, чтобы исполняемый файл без труда устанавливал программу. Вес Джавы – 158 Мб.
- Скачайте пакет для автономной установки ПО.
- Папку, где до этого хранилась Джава, нужно очистить вручную.
- Удалите ненужные файлы в реестре, используя CCleaner.
- Отключите антивирусы.
- Установка программы начинается заново.
Причина ошибки 1618 при установке Java на компьютер разработчиками не выяснена.
Unable to install Java
Разработчики программ из Microsoft знают, что делать с ошибкой Unable to install Java. Они рекомендуют: «Компоненты файлов с расширением .jar блокируются системой или антивирусом. Для решения проблемы установка проводится в безопасном режиме».
Java Destination Folder
Ошибка папки назначения Destination Folder возникает на 32-разрядных версиях ОС Windows. Для решения проблемы создается новая папка в следующей директории: «C:Program Files (x86)». Если есть какое-то содержание, то его нужно удалить.
Не запускается Java
Для начала убедитесь, что при установке не возникало неполадок и системных сообщений.
Как запустить программу Java, если возникают ошибки:
- Перезапустите браузер для активации новой версии программы. Иногда после обновления приложение Джава запускается только после перезагрузки ПК.
- Разрешите выполнять функции среды Java в используемом браузере. Работа с указанными программами может быть выключена и на панели управления приложением.
- Подключаемый модуль Джава должен быть активирован на запускаемом браузере. Если программа не открывает видео или игры, проверьте не только ее настройки, но и, например, Оперы или Chrome.
Приложение работает постоянно, но в фоновом режиме. Иными словами, вопрос, как открыть программу Java на компьютере, не имеет ответа. Главное – настроить взаимодействие с браузерами.
Multiple users have recently reported on facing issues while trying to install or update Java in their Windows. Installation errors are quite common for windows, and there can be many causes of this issue. In this article, I have discussed why you are unable to install Java and what you can do to fix it.
Why Am I Unable To Install Java?
Generally, it is hard to pinpoint one specific cause of this issue, but there are some commonly known causes that can trigger it. The first place to check is whether your system meets the basic requirement for installing that Java version.
Other than system specifications, the Windows Firewall can also affect the installation of Java. Insufficient disk space and using unsupported browsers can also be the issue. Whatever the case may be, below I have discussed some troubleshooting methods that you can follow for fixing this issue.
Fix Java Update Failed Issue
Java update failure is nothing to be afraid of. By simply following the troubleshooting procedure mentioned below, you should be able to fix it.
Solution 1: Restart PC
The first thing you can try is to restart your PC. Restarting is known for fixing various minor bugs and errors, including the bug that is preventing Java from installing. Restart the PC before downloading the Java installer and then try installing it.
Solution 2: Disable Firewall
Try disabling the Windows Firewall and see whether you are able to install Java. Windows Firewall is important for protecting your PC. However, it can sometimes become overprotective and stop essentials programs that are not a threat. This may be one of those cases.
- Type Control Panel in the Start menu and select the top result.
- Change the View by option to small icons.
- Locate and click on the Windows Defender Firewall option. This will open the Windows 10 Firewall settings.
- In the Windows Defender Firewall settings click on the Turn Windows Defender Firewall on or off option.
- Check the Turn off Windows Defender Firewall (not recommended) option for private if you are facing issues connecting with home or office network. Check it in Public if you are facing trouble connecting to public hotspots.
- Click on OK to save the changes.
Check whether now you can install or update Java. If no, then enable the Windows Firewall by following the above steps and checking the Turn on Windows Defender Firewall option for private and public networks.
Solution 3: Uninstall The Old Java Version And Install The New Java Package
If you are trying to update Java by installing a newer package, you should first uninstall the old one, to do it, follow the steps given below:
- Press the Windows + R keys to open the Run utility.
- Type appwiz.cpl and press Enter to open the Programs and Features panel.
- Locate the Java package among the other listed apps and right-click on it.
- Select the Uninstall option.
- Follow the on-screen instructions to complete the process.
Now, download the latest Java package from the official website and try installing it.
Solution 4: Update Windows
Outdated operating systems are known to conflict with newer apps and games. If you are using outdated Windows, you should update it to the latest version. Windows update fixes bugs, adds security patches, and provides newer features. To update your Windows 10, follow the steps given below:
- Type Check for updates in the Start menu and select the top result.
- Click on the Check for updates option and wait for Windows 10 to finish checking.
- If any update is available, Windows should start downloading it automatically. After the download is complete, install it and restart your PC.
Solution 5: Disable Java Content For Browser
If the above solutions don’t work, you can try disabling the Java content for the browser feature and try re-installing it. To disable the Java content for the browser, follow the steps given below:
- Type control panel in the Windows search menu and select the top result.
- Change the View By settings to Small icons.
- Click on the Java option. This will open the Java control panel.
- Select the Security tab.
- Uncheck the Enable Java content in the browser box and click on Apply and OK to save the changes.
Now, reinstall the Java package and check whether this fixes the issue.
Wrapping Up
So, there you have it. Now you know how to fix the unable to install Java issue. Follow the steps given above and you should be able to fix this issue. If you have any questions regarding this article, ask them in the comment section below.
-
September 7th, 2013, 01:53 AM
#1
Junior Member
Unable to reinstall Java
I uninstalled java (latest version) because I wanted to reinstall it outside the programs folder. I downloaded the installer and ran it…but it gave me an error message about some java files not having been removed correctly. I searched my C drive for things with java in the title, deleted a few, ran it again, same message. I used a restore point from before I uninstalled it, but now java doesn’t work on my computer. I’m stuck with no java because I can’t reinstall it. I can’t download the unstaller from java’s website because it requires that I have a functioning version of java. Any ideas about how I can fix this?
-
Related threads:
-
September 7th, 2013, 02:59 AM
#2
Super Moderator
Re: Unable to reinstall Java
I have no experience with the Java SDK on a Windows system, so I may be completely wrong, and there’s no guarantee this will solve your problem or even help in any way. Take my suggestion at your own risk (but nothing I’ve suggested seems dangerous or irreversible):
Based on my Linux experience, it seems you should be able to unzip the Java SDK distribution into a folder of your choice, preserving the file structure, and set a few environment variables to point to that folder or the /bin folder inside that folder. You could try that approach to reinstall Java to a new location, OR since you already had Java installed, you may be able to recover to the previous install by unzipping the distribution to where it was before you tried to move it.
-
September 7th, 2013, 07:29 AM
#3
Re: Unable to reinstall Java
Originally Posted by Aboogie1
…but it gave me an error message…
Copy paste the full text of the error message exactly as it appears so we can see what the complaint is.
Backup your system before you continue to work on this, just to be safe…
See if you can determine the folder where java was installed previously and delete the whole folder and try a fresh install again, or post the error for more help.
Windows 10 and Windows 11 users encountering the “Java Not Found” error when attempting to play Magic online against their friends are reporting that the issue occurred after having taken out the Java Environment.
Java is a software program that helps run many of the programs on your computer. Without it, many of the files you try to open will give you an error message indicating that Java cannot be installed.
If you are sure that Java is installed and you still cannot open certain files, a solution may be available for you.
What is the Cause of the “Unable to Install Java” Error?
This is a common error that people see when trying to install Java. It means that the installation process was not completed successfully, and you will need to try again.
There can be several reasons why this might happen, but some of the most common ones are:
- Corrupted / Improperly installed Java Environment: Java is a programming language that enables developers to create robust, high-performance applications. Java is used by millions of developers and billions of devices worldwide.
However, problems can occur if Java is not installed correctly or if there are errors in the Java environment. It depends on the context, one typical instance that will result in this problem is an inconsistency with the Java installation. In this case, you will need to reinstall the Java environment.
- Removing remnants from the old Java installation: If you are experiencing the “Java Not Found” Error in XMage on Windows 10, there may be remnants of the old Java installation that need to be removed.
In some circumstances, the standard of service you’re trying to obtain might suffer because of a conflict created by remnants of an obsolete Java installation conflicting with the XMage endeavors to install the latest update.
If the scenario applies, you should be able to solve the issue by removing the remnant files before you try the Java Environment installation again.
- Broken Java Environment variable: When attempting to start up the XMage program on a computer with Windows 10 installed, an error message pops up reading “Broken Java Environment variable. Java not found.”
This error is preventing users from being able to access the program and causes a lot of frustration. A few possible solutions have been suggested online, but none of them seem to be working for everyone.
Some people have had luck deleting the Java files and then reinstalling them, while others have had to change some settings in their computer’s Registry.
If you face this issue, you need to follow my given methods below to easily fix this issue.
Method 1: Uninstall And Reinstall Java
If you see the “Unable to install Java, there are errors in the following switches” error on your computer, the Java installation process was not successful. You can fix this problem by uninstalling Java and then reinstalling it.
To uninstall Java, you need to follow these steps:
- First you have to click on the Window button from the taskbar main and then type the search bar main Control Panel.
- Now you need to simply open the Control Panel to continue the JavaScript software uninstallation process.
- After opening the Control Panel you have to click on the “Programs” option.
- After going to the Programs section, you have to left-click on the Java program with the mouse, and then click on the “Uninstall” option.

- You need to restart your computer after completing this uninstallation process.
- Now in the second step you have to re-install the Java software in your computer. All you have to do is launch the process by double-clicking on the Java software you have downloaded. If you have deleted the Java software, you can re-download it from the Java website.
- Run the Java installer and complete the installation process.

- Once the software is installed, you need to close this notification and check your computer for the error that this error has been fixed. If not, follow the additional methods below.
Method 2: Remove Remnants From the Old Java Installation
Unfortunately, you may also encounter the “Java Not Found” error in those cases when your computer contains an older version of Java with remnants from the last Java software. These remnants are handled by the XMage program. When you try to install Java, and there are errors in the following switches, it may be necessary to remove remnants from an old Java installation.
A number of users that shared the same issue have confirmed that they were able to solve it after they used an elevated Command Prompt to find any leftover Java files, along with the main executables, and then launched XMage again.
If you face the following issue then you need to follow these steps:
- First of all you need to press the Windows+R button to open the Run dialog box.
- In the Windows Run dialog box you need to type “cmd” and press enter from the keyboard.
- Once the Command Prompt is open, type the following command:
where java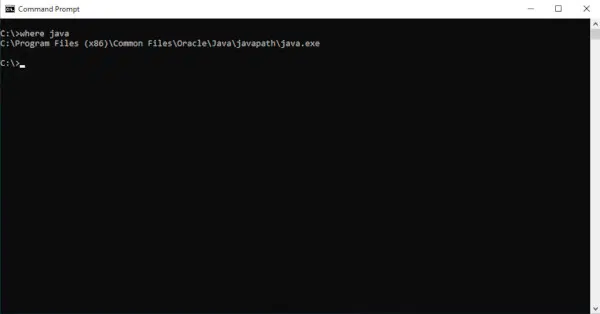
- Make sure the java.exe executable is found by the computer.
- Once your computer reboots, run the XMage application once again.
The program will then make your Java Environment reinstallation the primary function and ask you to accept it. When you do, the Java Environment installation will begin automatically. If the issue persists even after following all the guidelines above, continue below for the next possible solution.
Method 3: Fix The Java Environment Variable
An environment variable is a named entity used to store information that can be accessed by a program. The Java programming language provides several environment variables that are useful when developing programs. These variables are accessible from within your program and from the command line.
The most important Java environment variable is JAVA_HOME. This variable stores the location of your Java installation. When you run a Java program, the Java interpreter looks for the class files in the locations specified by the JAVA_HOME environment variable.
If you don’t set the JAVA_HOME environment variable, the interpreter looks for class files in the current directory.
Here is another solution that can help you to fix this issue easily. If you’re getting errors while trying to install Java, the problem may be with your Java environment variable. This variable tells your computer where to find Java installations, and if it’s not set up correctly, you may get errors.
To fix the issue you need to follow these steps:
- All you have to do is open the Windows File Explorer, and go through the Java installation path.
- You can also trace the location of Java software from this address. The path to the Java directory will vary depending on the version of Java you have installed.
C:Program Files (x86)Javajre1.8.0_331- Next to the address bar, right-click on the dropdown menu and then choose Copy from the context menu that appears.
- After you have directly copied the infotainment system database location to the clipboard, press Windows+R to open a Run dialog box.
- Type the following command in the Run diaglog box.
sysdm.cpl- Once you reach the Environment Variables tab, click on the Advanced tab in the pop-up menu.
- When you’re done with the Environment Variables window, go to System variables.
- Select the Path option and click the Edit button.
- Look for an environment variable that mentions Java.
- Change the location to the Java path you have identified earlier.
- Restart your computer and see if the problem is resolved from the startup of the Xmage program.
Frequently Asked Questions
Why Does It Keep Saying That Java Is Not Installed?
There are a few reasons why Java may not be installed on your computer. The most common reason is that your computer does not have Java installed.
Java is a programming language that is used to create websites and apps. If you are trying to use a website or app that requires Java, and Java is not installed on your computer, you will see a message that says “Java is not installed.”
Another reason you may see this message is if the version of Java on your computer is outdated. In order to use websites and apps that require Java, you will need to have the most up-to-date version of Java installed on your computer.
Finally, if you have recently uninstalled Java from your computer, you may see this message until you reinstall it.
How Do I Fix Java Runtime Environment Not Found?
If you’re getting the error message “Java Runtime Environment not found”, it means that Java isn’t installed on your computer or that it’s not set up properly.
Here are a few things you can try:
- In the Java Control Panel, click on the Java tab.
- Click View to display the Java Runtime Environment Settings.
- Verify that the latest Java Runtime version is enabled by checking the Enabled box.
- Click OK to save settings.
How Do I Reinstall Java Runtime?
If you are having problems with Java Runtime, you may need to reinstall it. To do this, you will need to uninstall the old version of Java Runtime and then install the new version.
To uninstall Java Runtime, follow these steps:
- Open the Control Panel.
- Click on Programs and Features.
- Find Java Runtime in the list of programs and click on Uninstall.
- Follow the instructions to uninstall Java Runtime.
To install the new version of Java Runtime, follow these steps:
- Go to java.com and download the latest version of Java Runtime.
- Follow the instructions to install Java Runtime.
How Do You Fix An Environment Variable?
If you’re having trouble with an environment variable, the best way to fix it is to find out where it’s defined and change its value there. To do this, you can use the command line or a text editor.
To use the command line, follow these steps:
- Open a terminal and type “env” followed by the name of the variable you want to change. This will show you all of the places where the variable is defined.
- To change the value of a variable, open one of the files that’s listed and change the value on the right-hand side.
- Be sure to save the file when you’re done.
If you’re using a text editor like TextMate or Sublime Text, follow these steps:
- Open up the .bash_profile file in your home directory.
- Change the environment variables.
- This file contains all of your user settings and preferences.
How Do I Check If The Java Environment Variable Is Set In Windows?
Follow these stesp:
- Open a command window by pressing Windows+R, typing “cmd”, and pressing Enter.
- Enter the following command:
echo %JAVA_HOME%This should output the path to your Java installation folder. If it doesn’t, your JAVA_HOME variable was not set correctly.
Here is another method:
To check if the Java environment variable is set in Windows, follow these steps:
- Open the Command Prompt and type the following command:
java -version
If the Java environment variable is set, you will see the Java version number displayed. If the Java environment variable is not set, you will see an error message.
Can I Remove Old Java Updates From My Computer?
Yes, you can remove old Java updates from your computer. Java updates are cumulative, so each new update includes all the security fixes and improvements from previous updates. If you don’t need a particular older Java update, you can safely uninstall it.
To uninstall an old Java update:
- Open the Control Panel and click Programs.
- Select Programs and Features.
- Scroll down to the Java program, right-click and selct Uninstall.
- Follow the prompts to uninstall the update. Once the update is removed, you will be prompted to reboot your computer.
Final Thoughts
I hope this article will help you to fix the “Unable To Install Java There Are Errors In The Following Switches” Java application error in your Windows PC. In this article, I try my best to talk about some best and most authentic methods that can help you to fix this issue.
If you like this article or these methods will help you to solve this issue then please share this article with your friends on social media. Thanks for reading.