Ошибки возникают в Валоранте периодически. Многие могут не встретиться с ними за все время игры, а другие будут часто получать вылеты клиента. Здесь многое зависит от компьютера и установленных там программ. Иногда, одновременно работающие программы могут мешать друг другу, конфликтовать или записывать свои данные в одно место. Многое зависит и от антивируса и интернета. Те антивирусы, которые настроены слишком параноидально, могут не блокировать саму игру, но рубят некоторые процессы или ограничивают связь с сетью.
Первыми действиями, которые должны совершаться при возникновении ошибок, должны быть следующие:
- Полностью закройте клиент и античит, запустите их снова;
- Перезагрузка компьютера;
- Выключите роутер из розетки и подключите обратно через минуту;
- Отключите антивирус и фаерволл.
В большинстве случаев этих действий оказывается достаточно, чтобы избавиться от сбоев. Для решения других проблем уже потребуются более конкретные действия. Но не надо забывать, что вы всегда можете написать в техподдержку и обрисовать им свою ситуацию. У них собрана статистика по всем случаям, так что решение они смогут подсказать.

Согласно коду, данные сбой относится к клиенту игры. Даже техподдержка первым делом скажет перезапустить его. Если бы это помогло, то вы бы явно не искали ответ на этот вопрос. В некоторых случаях помогает переустановка клиента, но это не всегда так.
Вас нужно удалить одну из папок, в которых содержатся данные клиента, точнее, всю папку. Она находится по адресу Жесткий диск / Program Data / Riot Games /. На месте жесткого диска стоит буква харда, на котором у вас установлена операционная система. По умолчанию это буква С.
Проблемы может вызвать и то, что нужная папка находится в скрытых документах. Обычно люди не включают отображение скрытого, потому что это системные папки и данные. Для включения отображения сделайте следкющее:
- Откройте проводник на панели задач.
- Выберите Вид > Параметры > Изменить параметры папок и поиска.
- На вкладке Вид в разделе Дополнительные параметры выберите Показывать скрытые файлы, папки и диски и нажмите ОК.
Теперь удаляйте папку и пробуйте запустить клиент. Он может потребовать переустановки, если так, то установите заново. Все старые данные удалены, так что все должно запуститься без проблем, ведь битые файлы были удалены и заменены на новые.
Ошибка val 9 в Валоранте возникает сравнительно редко и проблема кроется во временных файлах и работе Riot Vanguard. Для того, чтобы избавиться от проблемы нам необходимо удалить все проблемные файлы и именно к этому мы сейчас и приступаем.
Данное решение тестировалось на большом количестве человек, а так же освещалось иностранными авторами, поэтому вы можете не переживать о действиях описанных ниже. Также помните, что вы просматриваете лишь файлы связанные с игрой и системе навредить не можете.
Ошибка val 9 — решение
Для исправление ошибки нам необходимо закрыть игру и открыть папку со временными файлами валорант. Данные файлы находятся по адресу:
- C:Users*тут имя вашего пользователя пк*AppDataLocalVALORANTSaved (Помните что вам нужно искать файл на своём системном диске. В 90% случаев это диск C, но у вас может быть и другой).
Важно! Если вы никогда не открывали системные файлы, то, с большой вероятностью, данная папку будет скрыта у вас. Чтобы сделать её видимой необходимо перейди на вкладку вид и нажать на параметры, а там выбрать единственный доступный пункт. В открывшемся окне выбираем вкладку Вид, проматываем список в самый низ и активируем пункт Показывать скрытые файлы, папки и диски. Не забудьте сохранить.
Теперь открываем папку и выполняем следующие действия:
- Полностью удаляем содержимое папки Logs
- Удаляем содержимое папки Crashes
- Перезагружаем компьютер
После включения компьютера вы можете просто зайти в валорант и ошибка val 9 вас больше не заденет. Если вдруг ошибка 9 не станет для вас единственной, то обратитесь в раздел гайды на нашем сайте.
Ошибка Val 9 в Valorant является не совсем однозначной. У кого-то она появляется каждый раз, а у других – чередуется с множеством прочих ошибок. У части пользователей ошибка появляется из-за недоступности серверов и переключение на другой регион их спасает. Часть игроков месяцами не могут войти в игру, хотя это редкость. Можно сделать вывод, что причиной может быть, как внешняя неполадка, так и сбой со стороны пользователя.
Как исправить ошибку VAL 9 в Valorant?
Стоит попробовать следующие решения, о которых писали в разных ветках Reddit. Пока это все, что действительно работает. А типичные способы исправления может и могут сработать, но шансы невелики.
Что нужно сделать:
- Установить VPN и переключиться на другой регион. Так как ошибка часто появляется из-за технических работ, вам остается только переждать сбои на другом сервере. Потом все будет работать нормально. По крайней мере, на это есть хорошие шансы.
- Запустить игру с подключением к мобильной точке доступа. Нужно попытаться войти в игру и в этот момент переключиться на Wi-Fi, который вы раздаете с телефона (разумеется, с подключением к мобильной сети). Как только Valorant будет запущен, можно вернуться к своей стационарной сети.
- Жесткая переустановка. Важно не только удалить Valorant, но и очистить все файлы игры, которые хранятся на компьютере. Только после этого нужно начать установку заново.
Если ничего не работает, остается только обратиться в техническую поддержку Valorant. Возможно, ваш аккаунт или IP-адрес оказался в бане по нелепой случайности и саппорт вам поможет.
Ошибка val 9 в Валоранте возникает сравнительно редко и проблема кроется во временных файлах и работе Riot Vanguard. Для того, чтобы избавиться от проблемы нам необходимо удалить все проблемные файлы и именно к этому мы сейчас и приступаем.
Данное решение тестировалось на большом количестве человек, а так же освещалось иностранными авторами, поэтому вы можете не переживать о действиях описанных ниже. Также помните, что вы просматриваете лишь файлы связанные с игрой и системе навредить не можете.
Для исправление ошибки нам необходимо закрыть игру и открыть папку со временными файлами валорант. Данные файлы находятся по адресу:
- C:Users*тут имя вашего пользователя пк*AppDataLocalVALORANTSaved (Помните что вам нужно искать файл на своём системном диске. В 90% случаев это диск C, но у вас может быть и другой).
Важно! Если вы никогда не открывали системные файлы, то, с большой вероятностью, данная папку будет скрыта у вас. Чтобы сделать её видимой необходимо перейди на вкладку вид и нажать на параметры, а там выбрать единственный доступный пункт. В открывшемся окне выбираем вкладку Вид, проматываем список в самый низ и активируем пункт Показывать скрытые файлы, папки и диски. Не забудьте сохранить.
Теперь открываем папку и выполняем следующие действия:
- Полностью удаляем содержимое папки Logs
- Удаляем содержимое папки Crashes
- Перезагружаем компьютер
После включения компьютера вы можете просто зайти в валорант и ошибка val 9 вас больше не заденет. Если вдруг ошибка 9 не станет для вас единственной, то обратитесь в раздел гайды на нашем сайте.
Ошибки возникают в Валоранте периодически. Многие могут не встретиться с ними за все время игры, а другие будут часто получать вылеты клиента. Здесь многое зависит от компьютера и установленных там программ. Иногда, одновременно работающие программы могут мешать друг другу, конфликтовать или записывать свои данные в одно место. Многое зависит и от антивируса и интернета. Те антивирусы, которые настроены слишком параноидально, могут не блокировать саму игру, но рубят некоторые процессы или ограничивают связь с сетью.
Первыми действиями, которые должны совершаться при возникновении ошибок, должны быть следующие:
- Полностью закройте клиент и античит, запустите их снова;
- Перезагрузка компьютера;
- Выключите роутер из розетки и подключите обратно через минуту;
- Отключите антивирус и фаерволл.
В большинстве случаев этих действий оказывается достаточно, чтобы избавиться от сбоев. Для решения других проблем уже потребуются более конкретные действия. Но не надо забывать, что вы всегда можете написать в техподдержку и обрисовать им свою ситуацию. У них собрана статистика по всем случаям, так что решение они смогут подсказать.
Согласно коду, данные сбой относится к клиенту игры. Даже техподдержка первым делом скажет перезапустить его. Если бы это помогло, то вы бы явно не искали ответ на этот вопрос. В некоторых случаях помогает переустановка клиента, но это не всегда так.
Вас нужно удалить одну из папок, в которых содержатся данные клиента, точнее, всю папку. Она находится по адресу Жесткий диск / Program Data / Riot Games /. На месте жесткого диска стоит буква харда, на котором у вас установлена операционная система. По умолчанию это буква С.
Проблемы может вызвать и то, что нужная папка находится в скрытых документах. Обычно люди не включают отображение скрытого, потому что это системные папки и данные. Для включения отображения сделайте следкющее:
- Откройте проводник на панели задач.
- Выберите Вид > Параметры > Изменить параметры папок и поиска.
- На вкладке Вид в разделе Дополнительные параметры выберите Показывать скрытые файлы, папки и диски и нажмите ОК.
Теперь удаляйте папку и пробуйте запустить клиент. Он может потребовать переустановки, если так, то установите заново. Все старые данные удалены, так что все должно запуститься без проблем, ведь битые файлы были удалены и заменены на новые.
- Гайды
val 9 valorant

Валорант набирает популярность среди игроков. Чем больше людей подключается, тем большее количество ошибок и сбоев в игре выявляется. Здесь все зависит от оборудования пользователя, сети и самой игры. Невозможно оптимизировать игру для тысяч различных конфигураций железа и операционных систем. Разработчики стараются, каждый из отправленных отчетов об ошибке проясняет ситуацию, но в данный момент игроки вынуждены сами решить проблемы, это относится и к ошибке van 9 valorant.
Проверка сети
Само описание проблемы при сбое очень краткое, как и способ решения: «Возникла проблема с клиентом Riot. Перезагрузите клиент Riot». В общем-то, это все, что разработчики сообщают игрокам. Если бы ошибка устранялась этим способом во всех случаях, то и искать решения проблемы не потребовалось бы.
Ошибка возникает не только из-за сбоя клиента, но также из-за его невозможности подключится к серверам. Так что сначала зайдите на официальный сайт или канал игры в одной из социальных сетей и проверьте, что не ведутся никакие работы. Сервера в вашем регионе должны быть доступны. Если это так, то стоит переходить к следующему пункту.
Проверьте своё интернет-соединение. Перейдите на любой сайт для замеров скорости и проверки потерь, выберите там регион, наиболее приближенный к размещению серверв, и запустите тест. Если соединение не показывает потерь, огромного пинга или малой скорости, то проблема не в этом. А если показывает, то тут поможет только техподдержка провайдера.
Последняя причина возникновения проблем с соединением – это антивирус и фаерволл. Отключите их полностью и попробуйте подключиться еще раз. Лучше сделать именно так, а не добавлять в исключения. Если проблема решится, то можно потом и добавить или поставить полное игнорирование папки игры и выдать ей наибольшие права.
Клиент игры
В случае если сбой val 9 valorant оказался не связан с сетью, то здесь уже остается думать только на клиент игры. Для начала просто перезапустите его несколько раз и перезагрузите компьютер. Если это не помогло, то найдите место, в которое установлена игра и полностью удалите папку. После этого скачайте одну из программ для очистки реестра и удаления остатков программ, например, CCleaner. Очистите с его помощью компьютер и удалите игру.
Если все это не помогло, то остаются только два радикальных метода: переустановка системы и установка ни чистую винду новой игры или обращение в техподдержку. Последний способ не самый быстрый, зато они вам помогут.
Valorant gamers cannot connect to the server as every time they try to do the same, they are met with Error Code VAL 9 in Valorant. The error code implies some network issue on your end or the server’s end. As for the former, we can try to fix the problem, but for the latter, there is nothing you can do other than keep checking the server status. In this post, we are going to talk about this error code and see what you can do to resolve it.
There was an error connecting to the platform. Please restart your game client. Error Code: VAL 9

If you see Error Code VAL 9 in Valorant and are unable to connect to its server, try the following suggestions to fix this issue.
- Check Server Status
- Restart your devices
- Repair Valorant Game Files
- Check VGC Service
- Delete Riot Games Folder
- Troubleshoot in Clean Boot
- Reinstall the game
Let us talk about them in detail.
1] Check Server Status
The first thing you should do is check if there is anything that can be done to fix this problem. If there is a server-side issue or if the server is under maintenance there is nothing you can do other than wait for them to troubleshoot the problem. To check the server status, either go to status.riotgames.com or use one of the down detectors. If the server is up and running, move to the next solution.
2] Restart your devices
If you are seeing the error code courtesy of a temporary glitch, then the first thing you need to do is restart your computer and network devices and see if that helps. So, go ahead and restart your system and then see if the issue persists. If the issue is not resolved, restart your router and see if that helps.
3] Repair Valorant Game Files
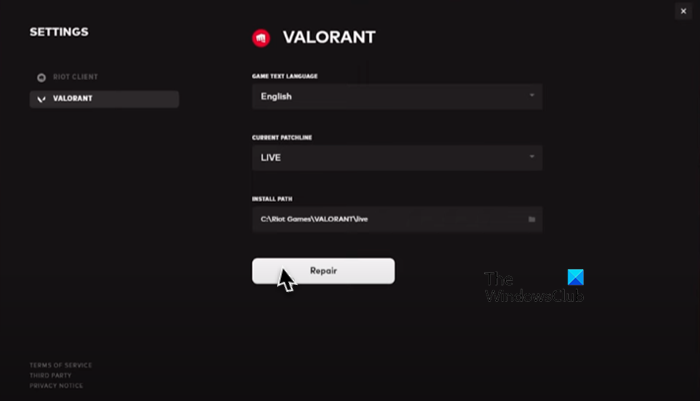
You may see the error code in question if your system files got corrupted. This is pretty common as the game is always downloading files, which may sometimes get corrupted. To scan and repair your Valorant files, we need to use Riot Game Launcher. Follow the prescribed steps to do the same.
- Open Riot Games Client app.
- Click on your Profile icon.
- Go to Settings and then select Valorant.
- Finally, click on Repair.
This may take some time as it will scan all your game files and repair the corrupted ones. Once the process is completed, restart your game and try connecting to the server. Hopefully, this will do the job for you.
4] Check VGC Service
When you install Valorant on your system, VGC Service gets added to the Windows Services Manager. During the installation, this service is configured the way it should be, however, because of some reason, it can get misconfigured. That is why we need to check it and see if there is any configuration required.
First of all, launch Services by searching it out from the Start Menu. Look for VGC Service, right-click on it and select Properties. The Startup type of the service should be Automatic, if it’s anything different, set it to Automatic and click on Start. This way your service will get enabled and hopefully, the game will connect to the server.
In case the service is configured correctly, there is no harm in restarting it. To do the same, just right-click on the service and select Restart. Once it’s done, open Valorant and see if the issue persists.
5] Delete Riot Games Folder
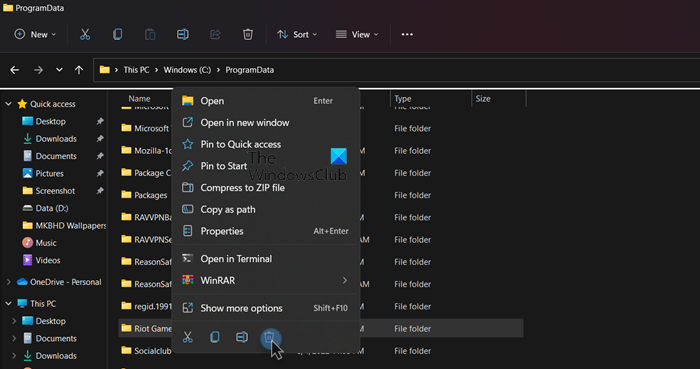
If the Riot Games folder on your computer is corrupted, during the launch process, you will see all kinds of error codes. That is why we need to remove the folder from your computer and allow the Riot Games Client app to reinstall it. But before that, need to make the hidden files and folder visible. To do the same, open File Explorer and click on View > Show > Hidden files (the option can be found on the top border of the window).
Now, go to the following address in File Explorer.
C:ProgramData
Then, create a backup of Riot Games, just copy the folder and paste it somewhere else if something goes south. Now, right-click on the Riot Games folder and select Delete.
After deleting the folder, launch Riot Games Client app, it will create a new folder at the same location and this time, the folder won’t be corrupted. Finally, you can launch the game and start playing.
6] Troubleshoot in Clean Boot
There are various third-party apps that can interfere with your game and cause trouble, we would recommend you perform Clean Boot, just make sure to enable VGC service along with Microsoft services when doing the same. You can then manually enable processes to boil down the potential culprit. Finally, delete the troublemaker and your issue will be resolved.
7] Reinstall the game
If nothing works, your last resort is to reinstall the game as the newly installed one won’t have corrupted files. This should be your last option as we all know how big Valorant is.
Hopefully, these solutions will do the job for you.
Read: Fix VALORANT DirectX Runtime error
How do I fix error in Valorant Val?
There are various Valorant Val errors that users are constantly seeing. So, if you get an error code, use it to look for solutions, we have a lot of posts on different Valorant error codes such as Val 5, Van 9001, error code 19, error code 1 and 12, etc. So, click on the search option, type your error code and find its solutions.
Read: Fix VALORANT connection error codes VAN 135, 68, 81
What is Bannable in Valorant?
There are some things that can ban you from Valorant. According to Valorant, behavior that’s disruptive, abusive, or discriminatory can ban you from the game. And it is not that difficult to not get banned on the platform, all you have to do is adhere to good behavior, and that is probably it.
That’s it!
Also Read: Valorant Download or Update Stuck at 0.1 kb/s or at 0%, 95%, 100%.
Valorant gamers cannot connect to the server as every time they try to do the same, they are met with Error Code VAL 9 in Valorant. The error code implies some network issue on your end or the server’s end. As for the former, we can try to fix the problem, but for the latter, there is nothing you can do other than keep checking the server status. In this post, we are going to talk about this error code and see what you can do to resolve it.
There was an error connecting to the platform. Please restart your game client. Error Code: VAL 9
If you see Error Code VAL 9 in Valorant and are unable to connect to its server, try the following suggestions to fix this issue.
- Check Server Status
- Restart your devices
- Repair Valorant Game Files
- Check VGC Service
- Delete Riot Games Folder
- Troubleshoot in Clean Boot
- Reinstall the game
Let us talk about them in detail.
1] Check Server Status
The first thing you should do is check if there is anything that can be done to fix this problem. If there is a server-side issue or if the server is under maintenance there is nothing you can do other than wait for them to troubleshoot the problem. To check the server status, either go to status.riotgames.com or use one of the down detectors. If the server is up and running, move to the next solution.
2] Restart your devices
If you are seeing the error code courtesy of a temporary glitch, then the first thing you need to do is restart your computer and network devices and see if that helps. So, go ahead and restart your system and then see if the issue persists. If the issue is not resolved, restart your router and see if that helps.
3] Repair Valorant Game Files
You may see the error code in question if your system files got corrupted. This is pretty common as the game is always downloading files, which may sometimes get corrupted. To scan and repair your Valorant files, we need to use Riot Game Launcher. Follow the prescribed steps to do the same.
- Open Riot Games Client app.
- Click on your Profile icon.
- Go to Settings and then select Valorant.
- Finally, click on Repair.
This may take some time as it will scan all your game files and repair the corrupted ones. Once the process is completed, restart your game and try connecting to the server. Hopefully, this will do the job for you.
4] Check VGC Service
When you install Valorant on your system, VGC Service gets added to the Windows Services Manager. During the installation, this service is configured the way it should be, however, because of some reason, it can get misconfigured. That is why we need to check it and see if there is any configuration required.
First of all, launch Services by searching it out from the Start Menu. Look for VGC Service, right-click on it and select Properties. The Startup type of the service should be Automatic, if it’s anything different, set it to Automatic and click on Start. This way your service will get enabled and hopefully, the game will connect to the server.
In case the service is configured correctly, there is no harm in restarting it. To do the same, just right-click on the service and select Restart. Once it’s done, open Valorant and see if the issue persists.
5] Delete Riot Games Folder
If the Riot Games folder on your computer is corrupted, during the launch process, you will see all kinds of error codes. That is why we need to remove the folder from your computer and allow the Riot Games Client app to reinstall it. But before that, need to make the hidden files and folder visible. To do the same, open File Explorer and click on View > Show > Hidden files (the option can be found on the top border of the window).
Now, go to the following address in File Explorer.
C:ProgramData
Then, create a backup of Riot Games, just copy the folder and paste it somewhere else if something goes south. Now, right-click on the Riot Games folder and select Delete.
After deleting the folder, launch Riot Games Client app, it will create a new folder at the same location and this time, the folder won’t be corrupted. Finally, you can launch the game and start playing.
6] Troubleshoot in Clean Boot
There are various third-party apps that can interfere with your game and cause trouble, we would recommend you perform Clean Boot, just make sure to enable VGC service along with Microsoft services when doing the same. You can then manually enable processes to boil down the potential culprit. Finally, delete the troublemaker and your issue will be resolved.
7] Reinstall the game
If nothing works, your last resort is to reinstall the game as the newly installed one won’t have corrupted files. This should be your last option as we all know how big Valorant is.
Hopefully, these solutions will do the job for you.
Read: Fix VALORANT DirectX Runtime error
How do I fix error in Valorant Val?
There are various Valorant Val errors that users are constantly seeing. So, if you get an error code, use it to look for solutions, we have a lot of posts on different Valorant error codes such as Val 5, Van 9001, error code 19, error code 1 and 12, etc. So, click on the search option, type your error code and find its solutions.
Read: Fix VALORANT connection error codes VAN 135, 68, 81
What is Bannable in Valorant?
There are some things that can ban you from Valorant. According to Valorant, behavior that’s disruptive, abusive, or discriminatory can ban you from the game. And it is not that difficult to not get banned on the platform, all you have to do is adhere to good behavior, and that is probably it.
That’s it!
Also Read: Valorant Download or Update Stuck at 0.1 kb/s or at 0%, 95%, 100%.
Ошибка Val 9 в Valorant является не совсем однозначной. У кого-то она появляется каждый раз, а у других – чередуется с множеством прочих ошибок. У части пользователей ошибка появляется из-за недоступности серверов и переключение на другой регион их спасает. Часть игроков месяцами не могут войти в игру, хотя это редкость. Можно сделать вывод, что причиной может быть, как внешняя неполадка, так и сбой со стороны пользователя.
Как исправить ошибку VAL 9 в Valorant?
Стоит попробовать следующие решения, о которых писали в разных ветках Reddit. Пока это все, что действительно работает. А типичные способы исправления может и могут сработать, но шансы невелики.
Что нужно сделать:
- Установить VPN и переключиться на другой регион. Так как ошибка часто появляется из-за технических работ, вам остается только переждать сбои на другом сервере. Потом все будет работать нормально. По крайней мере, на это есть хорошие шансы.
- Запустить игру с подключением к мобильной точке доступа. Нужно попытаться войти в игру и в этот момент переключиться на Wi-Fi, который вы раздаете с телефона (разумеется, с подключением к мобильной сети). Как только Valorant будет запущен, можно вернуться к своей стационарной сети.
- Жесткая переустановка. Важно не только удалить Valorant, но и очистить все файлы игры, которые хранятся на компьютере. Только после этого нужно начать установку заново.
Если ничего не работает, остается только обратиться в техническую поддержку Valorant. Возможно, ваш аккаунт или IP-адрес оказался в бане по нелепой случайности и саппорт вам поможет.
Игроки Valorant не могут подключиться к серверу, так как каждый раз, когда они пытаются сделать то же самое, они встречают код ошибки VAL 9 в Valorant. Код ошибки указывает на проблему с сетью на вашей стороне или на стороне сервера. Что касается первого, мы можем попытаться решить проблему, но для второго вы ничего не можете сделать, кроме как продолжать проверять состояние сервера. В этом посте мы поговорим об этом коде ошибки и посмотрим, что вы можете сделать для его устранения.
Произошла ошибка при подключении к платформе. Пожалуйста, перезапустите игровой клиент. Код ошибки: ВАЛ 9
Если вы видите код ошибки VAL 9 в Valorant и не можете подключиться к его серверу, попробуйте следующие предложения, чтобы решить эту проблему.
- Проверить статус сервера
- Перезагрузите свои устройства
- Восстановить файлы игры Valorant
- Проверьте сервис VGC
- Удалить папку Riot Games
- Устранение неполадок в чистой загрузке
- Переустановите игру
Поговорим о них подробно.
1]Проверить статус сервера
Первое, что вы должны сделать, это проверить, можно ли что-нибудь сделать, чтобы решить эту проблему. Если есть проблема на стороне сервера или если сервер находится на обслуживании, вы ничего не можете сделать, кроме как ждать, пока они устранят проблему. Чтобы проверить состояние сервера, перейдите на status.riotgames.com или используйте один из детекторов падения. Если сервер запущен и работает, перейдите к следующему решению.
2]Перезагрузите свои устройства
Если вы видите код ошибки из-за временного сбоя, то первое, что вам нужно сделать, это перезагрузить компьютер и сетевые устройства и посмотреть, поможет ли это. Итак, продолжайте и перезагрузите систему, а затем посмотрите, сохраняется ли проблема. Если проблема не решена, перезагрузите маршрутизатор и посмотрите, поможет ли это.
3]Восстановить файлы игры Valorant
Вы можете увидеть соответствующий код ошибки, если ваши системные файлы были повреждены. Это довольно распространено, так как игра всегда загружает файлы, которые иногда могут быть повреждены. Чтобы сканировать и восстанавливать ваши файлы Valorant, нам нужно использовать Riot Game Launcher. Выполните предписанные шаги, чтобы сделать то же самое.
- Откройте клиентское приложение Riot Games.
- Нажмите на значок своего профиля.
- Перейдите в «Настройки» и выберите «Valorant».
- Наконец, нажмите «Восстановить».
Это может занять некоторое время, так как он просканирует все ваши игровые файлы и восстановит поврежденные. После завершения процесса перезапустите игру и попробуйте подключиться к серверу. Надеюсь, это поможет вам.
4]Проверьте службу VGC
Когда вы устанавливаете Valorant в своей системе, служба VGC добавляется в диспетчер служб Windows. Во время установки эта служба настраивается так, как должна быть, однако по какой-то причине она может быть неправильно настроена. Вот почему нам нужно проверить его и посмотреть, требуется ли какая-либо конфигурация.
Прежде всего, запустите Службы, выполнив поиск в меню «Пуск». Найдите службу VGC, щелкните ее правой кнопкой мыши и выберите «Свойства». Тип запуска службы должен быть автоматическим, если он отличается, установите для него значение «Автоматически» и нажмите «Пуск». Таким образом, ваш сервис будет включен, и, надеюсь, игра подключится к серверу.
В случае, если служба настроена правильно, ее перезапуск не повредит. Чтобы сделать то же самое, просто щелкните правой кнопкой мыши службу и выберите «Перезапустить». Как только это будет сделано, откройте Valorant и посмотрите, сохраняется ли проблема.
5]Удалить папку Riot Games
Если папка Riot Games на вашем компьютере повреждена, в процессе запуска вы увидите всевозможные коды ошибок. Вот почему нам нужно удалить папку с вашего компьютера и разрешить приложению Riot Games Client переустановить ее. Но перед этим нужно сделать видимыми скрытые файлы и папку. Чтобы сделать то же самое, откройте проводник и нажмите Вид > Показать > Скрытые файлы (опцию можно найти на верхней границе окна).
Теперь перейдите по следующему адресу в проводнике.
C:ПрограммДата
Затем создайте резервную копию Riot Games, просто скопируйте папку и вставьте ее в другое место, если что-то пойдет не так. Теперь щелкните правой кнопкой мыши папку Riot Games и выберите «Удалить».
После удаления папки запустите клиентское приложение Riot Games, оно создаст новую папку в том же месте, и на этот раз папка не будет повреждена. Наконец, вы можете запустить игру и начать играть.
6]Устранение неполадок в чистой загрузке
Существуют различные сторонние приложения, которые могут мешать вашей игре и вызывать проблемы, мы рекомендуем вам выполнить чистую загрузку, просто не забудьте включить службу VGC вместе со службами Microsoft, когда делаете то же самое. Затем вы можете вручную включить процессы, чтобы выявить потенциального виновника. Наконец, удалите нарушителя спокойствия, и ваша проблема будет решена.
7]Переустановите игру
Если ничего не работает, в крайнем случае переустановите игру, так как только что установленная не будет иметь поврежденных файлов. Это должен быть ваш последний вариант, поскольку мы все знаем, насколько велика Valorant.
Надеюсь, эти решения помогут вам.
Читать: исправить ошибку VALORANT DirectX Runtime
Как исправить ошибку в Valorant Val?
Существуют различные ошибки Valorant Val, которые пользователи постоянно видят. Итак, если вы получили код ошибки, используйте его для поиска решений, у нас есть много сообщений о различных кодах ошибок Valorant, таких как Val 5, Van 9001, код ошибки 19, код ошибки 1 и 12 и т. д. Итак, нажмите в опции поиска введите код ошибки и найдите ее решения.
Читайте: исправить коды ошибок подключения VALORANT VAN 135, 68, 81
Что такое банабельность в Valorant?
Есть некоторые вещи, которые могут забанить вас в Valorant. Согласно Valorant, разрушительное, оскорбительное или дискриминационное поведение может привести к запрету на участие в игре. И не так уж сложно не получить бан на платформе, все, что вам нужно сделать, это придерживаться хорошего поведения, и это, пожалуй, все.
Вот и все!
Читайте также: Загрузка или обновление Valorant зависает на скорости 0,1 кбит/с или на 0%, 95%, 100%.
Перейти к контенту

В Valorant можно встретить большое количество разнообразных ошибок, некоторые из которых даже не позволяют открывать игровой процесс. Яркий тому пример — 9 ошибка, которая появляется достаточно часто. Она гласит о том, что у пользователя возникла проблема с подключением к клиенту Riot. Почему же это произошло? Как исправить? Вариантов действительно много:
- Перезапуск игры и Riot Games. Это первое, что можно и нужно сделать. Необходимо перезапустить Riot Games и Valorant, используя диспетчер задач. Там сначала нужно найти процессор Riot.exe, а затем Valorant.exe. Каждый из них потом нужно открыть, используя стандартную инструкцию и получить результат в виде полностью рабочей игры.
- Удаление клиента Riot и его установка вновь. Это следующее, что должен сделать пользователь для игры в Valorant. Понадобится, используя Ccleaner или встроенные возможности Windows, удалить с компьютера клиент Riot, а потом уже установить его на компьютер с полного нуля. Так удастся получить желаемый результат в виде рабочей игры.
- Перезагрузка. Это еще одно максимально банальное, но рациональное решение, к которому стоит присмотреться. Понадобится перезагрузить свое устройство, нажав на соответствующую клавишу и обзавестись результатом.
- Удаление Riot Vanguard. Античит Riot Games настолько силен, что может сломать работу даже основного клиента. Поэтому логично удалить с компьютера соответствующую программу, а затем установить ее вновь. Работа компьютера, а в частности Valorant, должна наладиться!
Этот перечень способов и должен быть использован каждым, кто желает избавиться от девятой ошибки. К слову, они могут помочь даже в тех случаях, когда появляется любая ошибка, начиная от 8, а заканчивая 21.
Если же по каким-либо причинам упомянутое решение помочь не смогло, то в этом случае остается писать в техническую поддержку Riot Games. В своем письме нужно указать то, какие способы уже были использованы. В основном, ответ будет получен за несколько часов. Бывает , что процесс затягивается на несколько суток, но такое происходит из-за загруженности системы, не более того.
С девятой ошибкой встречается абсолютное большинство игроков. Она говорит о том, что произошел какой-то сбой с клиентом компании Riot. Сразу же нужно сказать, что любая ошибка, начиная от 8, а заканчивая 21, имеет одинаковую причину.

Их можно решить с помощью следующих способов:
- Закрытие игры на компьютере. Первое, что нужно сделать. Для этого понадобится вызвать диспетчер задач, используя клавиши Ctrl+Alt+Delete, а затем перейти в графу с процессами. Там нужно найти сначала Valorant.exe, а затем Riot.exe, закрыв их в поочередном режиме. Все максимально просто. Далее останется открыть утилиту для игры вновь, а затем и сам Valorant.
- Перезапуск компьютера. Иногда такая проблема исправляется, если пользователь просто перезагружает свой компьютер. Такое банальное действие занимает буквально несколько секунд, а вот результат порадует всех, без исключения.
- Удаление утилиты и ее установка вновь. Это еще одна вещь, которую стоит выполнить. Понадобится полностью удалить с компьютера Riot Games лаунчер, а затем установить его вновь. Это занимает минимальное количество времени, а вот результат в виде исправленной ошибки точно желает увидеть каждый! К слову, удалить саму программу можно самыми разными способами, один из которых связан с использованием программы Ccleaner. Подобный инструмент есть и в операционной системе изначально: он доступен в панели управления.
- Проверка подключения к интернету. Иногда такая проблема появляется из-за того, что на компьютере отсутствует подключение ко всемирной паутине. Поэтому, получив его в свое распоряжение вновь, пользователь может нормализовать работу игры на все 100%.
- Обращение в поддержку пользователей. Это последнее, что нужно сделать, если все упомянутые ранее решения не помогли. Понадобится написать в компанию Riot Games письмо с просьбой решить возникшую проблему. Это делается достаточно быстро, в особенности, если начать использовать их официальный сайт — https://support-valorant.riotgames.com/.
Все эти способы и должны быть использованы для решения возникшей проблемы на все 100%.
Several Valorant players report that they see the ‘Error Code Val 9’ every time they attempt to connect online. This problem doesn’t allow them to play online since the issue occurs every time the game tries to connect to the online servers.

After investigating this issue thoroughly, it turns out that several different scenarios might directly or indirectly cause this type of problem. Here’s a short list of culprits that might be causing this error code when the game tries to connect to the online servers:
- Underlying server issue – As it turns out, this problem can occur due to a server-side issue beyond your control. Before doing anything else, take some time to investigate if any underlying server issue is currently causing issues for players in your area.
- Corrupted game files – If you started to experience this problem immediately after a system interruption triggered a critical system crash, you might face this problem due to some file corruption affecting Valorant. To fix this issue, tricker an integrity check on Riot. If this doesn’t work, reinstall the game and see if the problem is fixed.
- Missing Windows feature update – If you haven’t updated your Windows build in a while, you might experience this problem due to a missing infrastructure Windows update. To fix this issue, access the Windows Update component and install every pending Windows update until you bring your system up to date.
- VGC service is disabled – As it turns out, you might experience this problem because a critical component that allows the game to connect online (the VGC service) is forcibly disabled by a system optimization suite. In this case, you can fix the issue by manually re-enabling the VGC service.
- VGC service is incorrectly configured – According to some affected users, you can expect to deal with this problem if the main VGC service is not correctly configured and programmed to remain disabled even when it’s called into action by the main game. In this case, you can fix this issue by reconfiguring the behavior of the VGC service.
- Corrupted cached data inside the Vanguard folder – As it turns out, this problem can also occur due to some corruption affecting the Vanguard cache folder. In this case, you can fix the issue by deleting the Vanguard cache folder forcing the game to re-create it from scratch.
- Conflicting game metadata – Valorant will accumulate data in a metadata folder over time. This data might inhibit the game’s ability to connect with the game server as the folder grows. Several users dealing with this problem have confirmed that they manage to fix the issue by deleting the components of the metadata folder.
- Missing Visual C++ dependencies – According to many affected users, you can expect to deal with the issue in a scenario where the game is missing an essential Visual C++ redist package that it needs to run the multiplayer component. You can fix this issue by installing every missing Visual C++ dependency from a one-click installer.
- Missing DirectX dependencies – As it turns out, you can expect to deal with this particular issue because of a missing legacy DirectX dependency that the game still uses. This dependency is present on Windows 10, but it’s entirely optional on Windows 11.
- Conflicting 3rd party service – Certain 3rd party services are known to cause this type of problem, mainly if they’re using the IPV6 protocol. To pinpoint the issue, achieve a clean boot state and see if the problem is now fixed.
Now that we went over every potential scenario that might be causing this problem, here’s a list of confirmed methods that other affected users have successfully used to fix this problem and play Valorant online:
1. Check the server status of Riot
As it turns out, this issue may arise due to a server-side fault totally out of your control. Take some time to consider whether there is a server issue at the root that is now affecting players in your area before taking any more action.
You should begin this troubleshooting approach by ensuring that Valoran’s servers are not currently down or undergoing maintenance because error code 9 is most suggestive of a widespread server issue.
Fortunately, Riot maintains a directory where you can check the status of each Valorant server to see if the error code 9 is now occurring across the board or is just affecting your computer.
Open your preferred browser and go to Riot Games’ status page if you think a server issue may be the root of your Valorant problem.
Choose your favorite language after entering, then click on Valorant from the list of Riot games.

Before selecting Continue, choose the location and language you’re connecting from while on Valorant’s status page.
Next, a list of all the issues the server is experiencing should appear. Check for any indication of a connectivity problem; if so, your only option is to switch the server from which you’re connecting.

The only workable solution is to wait for the developers to address the problem on their end if every server you try to connect to gets the same error code.
On the other hand, proceed to the next option below if the abovementioned examination did not uncover any underlying server issues.
2. Verifying the Valorant game files
This issue might be brought on by a file corruption affecting Valorant if you first saw it right after a system interruption that resulted in a critical system crash. Tricker an integrity check on Riot to resolve this problem.
To do this, launch the Riot client and click on your Profile icon in the top-right corner of the screen.
From the Settings menu, select Valorant from the menu on the left, then move over to the right-hand side menu and click on Repair.

Wait until the operation is complete, then restart your PC and launch the game once the next startup is done to see if the problem is now fixed.
3. Update Windows to the latest build
A missing infrastructure Windows update may cause this issue if you haven’t updated your Windows build in a while. Access the Windows Update component and install each pending Windows update until your system is up to date to resolve this problem.
Before attempting any of the other likely options below, install all pending updates first and see if the problem goes away on its own.
The procedures listed below should cure the problem if it results from a known defect because Microsoft has already released a hotfix for every version of Windows 11 (including the N version).
Follow these instructions to install each and every impending Windows update:
- Windows Update can be started by using the Run dialog box. Press Windows + R on your keyboard simultaneously to do this. Thus, the Run dialog box will show up.
- Next, enter the text “ms-settings:windowsupdate” in the box. The Windows Update area of the Settings app will then be displayed to you.

Access the Windows Update component Note: If you haven’t changed the UAC settings, you can receive a prompt asking for your permission to continue. Clicking Yes will indicate your agreement with this.
- Select Check for Updates from the option on the right after launching the Windows Update pane.

Checking for updates - Select Install Now to start a local installation after the update has finished downloading.
- Check to see if the problem has been fixed by restarting your computer.
If the problem is not fixed yet, move down to the following method below.
4. Force-start the VGC service
You might encounter this issue because a system optimization suite has forcibly deactivated the VGC service, a crucial component that enables the game to connect online. In this situation, manually re-enabling the VGC service will resolve the problem.
Several affected users have confirmed that the problem stopped occurring once they re-enabled the VGC service via the Services screen,
Follow the instructions below to re-enable the VGC service via the Service screen:
- To bring up the Run dialog box, press Windows key + R. Enter “services.msc” into the text field to launch the Services panel.

Access the Services screen - Click Yes to grant admin access when the UAC (User Account Control) prompts you.
- After entering the Services page, find the VGC service by scrolling down the list of currently running Services.
- Next, right-click on the VGC service and choose Enable from the context menu that just appeared.
- Once the VGC service has been enabled, reboot your PC and see if the problem is now fixed.
If you’re still experiencing the ‘Error Code Val 9‘ error, move down to the next method below.
5. Edit the VGC service
Some impacted users claim that if the primary VGC service is not properly configured and programmed to stay off even when the primary game activates, you can expect to deal with this issue. In this situation, changing the VGC service’s behavior will solve the problem.
This is a frequent occurrence if you also use third-party resource optimizers like SystemCare, Piriform, WinOptimizer, etc.
In most cases, the third-party utility changes the VGC service’s default behavior to conserve system resources. Although most programs don’t have this issue, Vanguard Riot works differently and has its main service set to Automatic.
If this situation seems to apply to you, take the steps below to visit the Services tab and change the VGS service’s default startup type in order to resolve the Valorant launch error:
- To bring up the Run dialog box, press Windows key + R. Enter “services.msc” into the text field to launch the Services panel.
Access the Services screen - Click Yes to grant admin access when the UAC (User Account Control) prompts you.
- After entering the Services page, find the VGC service by scrolling down the list of currently running Services.
- After successfully locating it, right-click on it and select Properties from the context menu that just appeared.

Access the VGS service - Select the General tab from the menu at the top of the Properties screen for the VGC service.
- After that, click Start to force the service to start if the Startup type is not already set to Automatic.

Changing the Status type of the service - After making sure the VGS service is running, launch Valorant once more using the standard procedure to determine if the issue has been resolved.
Continue to the method below in the event that the issue is still not resolved.
6. Delete the Riot Vanguard folder via CMD
The Vanguard Anti-Cheat engine’s inconsistency may also be connected to this problem. Reinstalling each Riot Vanguard dependent should be the next step if this situation applies to ensure that error number 9 is not the result of file corruption.
The anti-cheat engine can be uninstalled via the GUI option. However, we advise performing the task from an elevated Command Prompt to be sure you have the required permissions.
Before making Valorant reload the anti-cheat engine from scratch, use the steps listed below to temporarily deactivate it from an elevated Command Prompt:
- Make sure Valorant, its launcher, and any related background processes are shut off first.
- To launch the Run dialog box, press Windows key + R. Enter “cmd” into the text field, then press Ctrl + Shift + Enter to launch an elevated Command Prompt.

Open a CMD window - Click Yes to grant admin access when the UAC (User Account Control) window appears.
- To remove the Vanguard anti-cheat installation and its associated dependencies, enter the following commands into the elevated Command Prompt and press Enter after each one.
sc remove VGC
sc remove vgk
- Proceed to shut the elevated Command Prompts once both instructions have been successfully executed (and you have seen a success message for each Command).
- To find the Riot Vanguard folder, open File Explorer and select Program Files (on your OS system). You need to remove a few leftover files from this folder before reinstalling the anti-cheat engine.
- After you’ve found the suitable spot, use the context menu that is just displayed to select Delete when you right-click on the Riot Vanguard folder.

Deleting the Vanguard folder Note: If the system won’t let you delete the folder, it probably means that some anti-cheat engine programs are already running. To resolve this problem, launch Task Manager by pressing Ctrl + Shift + Esc, then go to the Processes tab, and turn off the Vanguard Tray notification service.
- Restart your computer after erasing the Vanguard folder, then launch Valorant once more following the conclusion of the subsequent startup.
Note: Open the launcher with administrative privileges by right-clicking on it and selecting “Run as Administrator” to make sure the installer has the required permissions. - If this occurs, Valorant will instantly recognize that the Vanguard Riot Anti-Cheat engine is missing and will download and reinstall the most recent version.
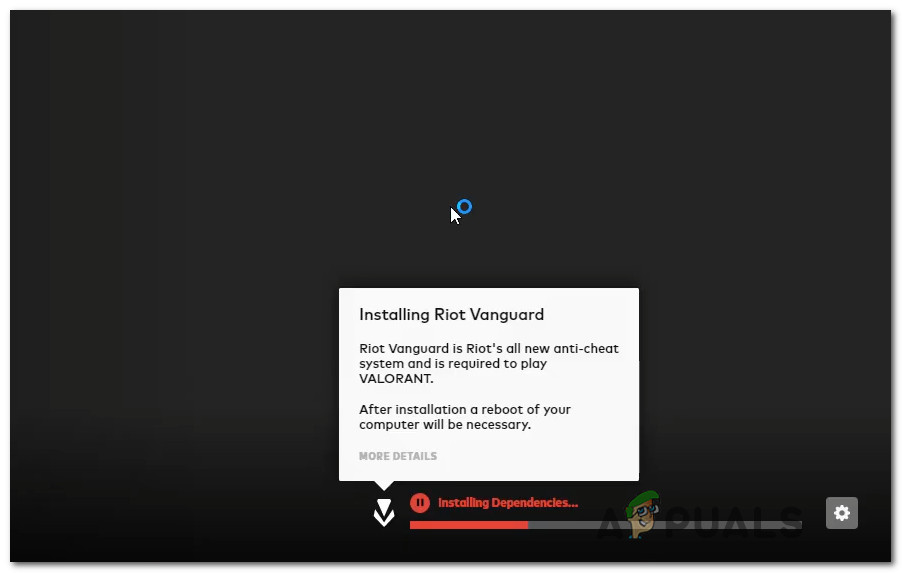
Installing Vanguard engine - After this procedure, restart your computer one last time to see if the issue is still present.
Continue to the next possible Repair below if the error still appears at Valorant’s initial starting screen.
7. Delete the metadata
The metadata folder in Valorant will fill up with information over time. As the folder expands, this information may make it more difficult for the game to connect to the game server. Several people who are experiencing this issue have reported that they were able to resolve it by deleting the metadata folder of Valiant.
This method will only be applicable if you are experiencing this issue because of corruption affecting the metadata folder of Valorant.
If you haven’t tried fixing the ‘Error Code Val 9’ error by clearing the metadata folder yet, follow the instructions below for specific instructions on how to do this:
- Press Windows key + E to open up File Explorer.
Note: This Command works on both Windows 10 and Windows 11. - Next, use the ribbon menu at the top to click on View and the Show drop-down menu, and ensure that Hidden Items are checked.

Access the Hidden items menu - Now that the hidden items are visible access the ProgramData menu and look for the Riot Games folder.
- Once you discover the Riot Games folder, right-click on it and choose Delete from the context menu that just appeared.
- After the folder has been deleted, reboot your PC and see if the ‘Error Code Val 9’ error is fixed once the next startup is complete.
8. Reinstall Valorant
If none of the methods above have proven successful in your case, you should troubleshoot against a potential corruption issue that affects the local installation.
Since there are a lot of moving parts that might ultimately cause this problem, our recommendation is to reinstall Valorant to get rid of any game corruption that might produce the issue.
Follow the steps below for specific instructions on how to do this:
- Press Windows key + R to open up a Run dialog box. Next, type ‘appwiz.cpl’ and press Ctrl + Shift + Enter to open up the Programs and Features menu with admin access.

Open up the Programs and Features menu. - At the User Account Control (UAC), click on Yes to grant admin access.
- Once inside, click Yes to grant admin access to the Programs and Features menu, select programs, and locate your Valorant installation.
- After you locate the Valorant installation, right-click on it and choose Uninstall from the context menu.
- Once the uninstallation is complete, reboot your PC and see if the ‘Error Code Val 9’ is now fixed.
9. Install the missing DirectX dependencies
As it turns out, this specific problem is caused by a missing legacy DirectX dependency that the game still depends on. Windows 10 has this reliance, but Windows 11 makes it completely optional.
Many people appear to be interested in this solution, especially those who have not yet upgraded to Windows 11. (which supports the latest DirectX version natively).
Note: The most recent version of this file is available on the Microsoft page.
However, before you install DirectX, it is advised that you delete the file D3DCompiler 43.dll from the system’s folder after making a backup copy of it. Inconsistencies in the file system caused by the DirectX dependencies will be resolved as a result.
If you don’t know how to install DirectX, you need follow these steps:
- Access the disk that Windows is installed on using File Explorer.
- Next, open the System32 folder in the Windows folder.

Accessing the System 32 folder - Next, look for the D3DCompiler43.dll file and copy and paste it somewhere else to make a backup of it.
- After doing so, select Delete from the context menu of the right-clicked file.

Delete the problematic D3D compiler - Next, open your usual browser and navigate to the Microsoft download page to access the file.
- To download the file, click the Download option while you are on the page.

Download the End User web installer - After downloading the file, double-click the program to start the installation process.

Agreeing with the EULA - Please restart your computer once the installation is finished, then check to see whether the issue still occurs when it boots up.
If you’re still dealing with the same ‘Error Code Val 9‘ when you launch Valorant, move down to the next method below.
10. Install the missing Visual C++ dependencies
Many customers who have encountered the problem claim that you should be prepared to cope with it if the game lacks a crucial Visual C++ redist package required for the multiplayer component to function. You can resolve this problem by adding all of the missing Visual C++ dependencies by using a one-click installer.
Many people claim that the faulty or missing Visual C++ Redist packages on your system may be the root of this error.
Installing all the missing Visual C++ Redist Packages is the first thing you may attempt. From the Microsoft website, you may download them.
The procedures you must take are listed below in case you are unsure of how to obtain and install the Visual C++ Redist packages:
- Launch whichever browser you choose, and go to the Microsoft download page to access the Visual C++ Redist Packages.
- Download both the x86 and x64 bit files after entering this page.

Download missing Visual Studio dependencies - Click on the downloaded files to launch the installer. If there is an Install option, select it and then follow the on-screen instructions. If not, choose Repair and let the installer swap out any unhealthy dependencies for any damaged Visual C++ versions.

Modifying the Visual++ package - After finishing, repeat the procedure for the other files.
- Open Valorant when your computer has restarted and check to see if the issue has been resolved.
If the issue persists after completing the steps above or you already have the necessary Visual C++ dependencies, consider the following possible solution below.
11. Disable unnecessary 3rd party services
Certain third-party services, especially those that employ the IPV6 protocol, are known to cause this issue. To identify the problem, do a clean boot state and check to see if the issue is resolved.
You can check if this theory is accurate by launching your machine in clean boot mode and observing whether the BSOD crash still occurs.
If not, you will need to carefully remove each component from third parties until you locate the problematic part.
If it doesn’t, you’ll have to cautiously take each component away from other people until you locate the problematic one.
If this holds true, you ought to be able to fix the issue by doing a clean boot to check for software conflicts and locate the troublesome service or process. The success of this measure was demonstrated by many of the impacted consumers. The effectiveness of this intervention was established for many of the affected Valorant players.
Note: Always remember that by achieving a clean boot state, your computer will start up without any third-party services, apps, or starting things that might be to blame for the formation of this issue.
To get this clean boot state, you must complete the following steps:
- Hold the Windows key + R key to launch the Run dialog box.
- The System Configuration window will open once you type “msconfig” into the text field and press Enter.

Accessing the Msconfig interface Note: Choose Yes when the User Account Control (UAC) asks you to provide admin access.
- Select the Services tab from the ribbon bar of the System Configuration menu. Then select Hide all Microsoft services from the list of options.

Access all the Microsoft service Note: Services This will prevent you from accidentally deactivating any Microsoft services that your operating system depends on.
- Select Open Task Manager from the drop-down menu on the Startup tab once you have taken care of all required services.
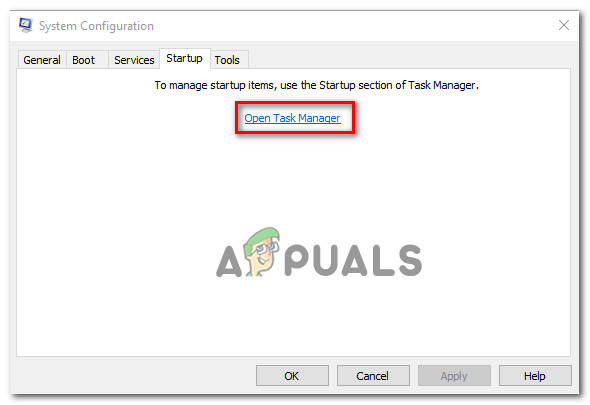
Opening Task Manager - You’ll be taken directly to Task Manager’s Startup tab after the previous action.
- Once you’ve logged in, select each external startup service separately and select the Disable option at the bottom of the page to prevent them from starting when the system restarts.

Disabling the startup programs Note: Keep doing this until there are no more startup services to start up with the system.
You are ready to polish the boot if you’ve made it this far in the article. To take advantage of this status, all you have to do now is restart your computer. - When you restart your computer, just the services that your operating system requires will run. Check to see if the issue with Valorant is still ongoing.
- Reverse engineer the preceding steps to ensure that your next computer starting is routine and that third-party services, processes, and startup items are allowed to execute, regardless of the result.
If the problem still persists after establishing a clean boot state, move on to the next solution.
Валорант набирает популярность среди игроков. Чем больше людей подключается, тем большее количество ошибок и сбоев в игре выявляется. Здесь все зависит от оборудования пользователя, сети и самой игры. Невозможно оптимизировать игру для тысяч различных конфигураций железа и операционных систем. Разработчики стараются, каждый из отправленных отчетов об ошибке проясняет ситуацию, но в данный момент игроки вынуждены сами решить проблемы, это относится и к ошибке van 9 valorant.
Проверка сети
Само описание проблемы при сбое очень краткое, как и способ решения: «Возникла проблема с клиентом Riot. Перезагрузите клиент Riot». В общем-то, это все, что разработчики сообщают игрокам. Если бы ошибка устранялась этим способом во всех случаях, то и искать решения проблемы не потребовалось бы.
Ошибка возникает не только из-за сбоя клиента, но также из-за его невозможности подключится к серверам. Так что сначала зайдите на официальный сайт или канал игры в одной из социальных сетей и проверьте, что не ведутся никакие работы. Сервера в вашем регионе должны быть доступны. Если это так, то стоит переходить к следующему пункту.
Проверьте своё интернет-соединение. Перейдите на любой сайт для замеров скорости и проверки потерь, выберите там регион, наиболее приближенный к размещению серверв, и запустите тест. Если соединение не показывает потерь, огромного пинга или малой скорости, то проблема не в этом. А если показывает, то тут поможет только техподдержка провайдера.
Последняя причина возникновения проблем с соединением – это антивирус и фаерволл. Отключите их полностью и попробуйте подключиться еще раз. Лучше сделать именно так, а не добавлять в исключения. Если проблема решится, то можно потом и добавить или поставить полное игнорирование папки игры и выдать ей наибольшие права.
Клиент игры
В случае если сбой val 9 valorant оказался не связан с сетью, то здесь уже остается думать только на клиент игры. Для начала просто перезапустите его несколько раз и перезагрузите компьютер. Если это не помогло, то найдите место, в которое установлена игра и полностью удалите папку. После этого скачайте одну из программ для очистки реестра и удаления остатков программ, например, CCleaner. Очистите с его помощью компьютер и удалите игру.
Если все это не помогло, то остаются только два радикальных метода: переустановка системы и установка ни чистую винду новой игры или обращение в техподдержку. Последний способ не самый быстрый, зато они вам помогут.