-
Partition Wizard
-
Partition Manager
- 3 Ways to Fix «AMD-V Is Disabled in the BIOS» Error
3 Ways to Fix «AMD-V Is Disabled in the BIOS» Error [Partition Manager]
By Linda | Follow |
Last Updated August 04, 2021
Why will you get the error «AMD-V is disabled in the BIOS» when running a VM in VirtualBox? How to solve this problem? In this post, MiniTool Partition Wizard will offer 3 ways to help you fix this issue.
When you try to run a virtual system in VirtualBox, you may get error «AMD-V is disabled in the BIOS».
In general, VM software will require the CPU to help complete the VM virtualization process, because virtualization done by the software can be a slow process. Using the CPU to help in this task can greatly improve the virtual machine performance.
AMD-V, short for AMD Virtualization, is the virtualization extension provided by AMD CPUs. In some BIOS versions, AMD-V is also called AMD SVM. If this technology is disabled, VM won’t open.
Tip: If you are using an Intel CPU, you will get the error «VT-x Is Disabled in the BIOS».
The possible reasons of this error are as follows:
- As the error indicates, AMD-V is not enabled in BIOS.
- Microsoft Hyper-V is interfering with the AMD-V technology.
- BIOS version doesn’t support so many CPU cores.
To fix this error, you can try the following methods.
Fix 1. Enable AMD-V from the BIOS settings
AMD-V or AMD SVM has been enabled by default. But when the error «AMD-V is disabled in the BIOS» occurs, it’s very likely that this feature is disabled for some unknown reasons. Then, you can enable it again to solve the problem.
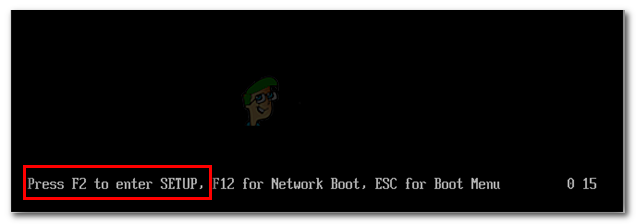
- Restart your laptop/desktop. Then, on the boot screen, press the BIOS key (F2, F4, F8, F10, F12, or the Del key) to enter into BIOS mode. The BIOS key may vary depending on computer models. But you can follow the on-screen instructions or search it online.
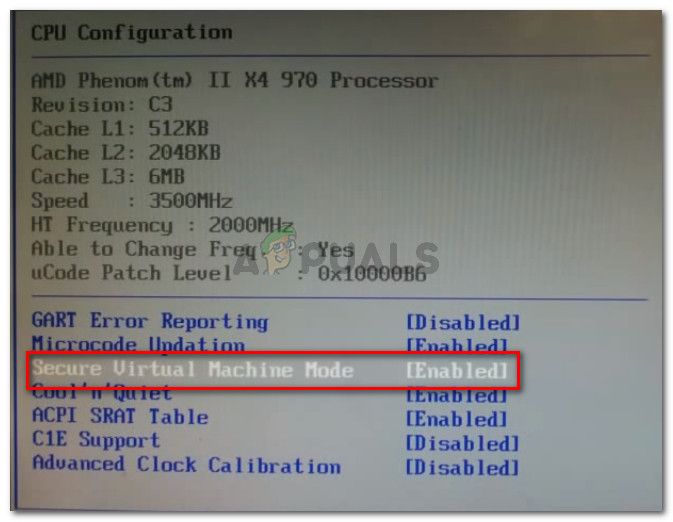
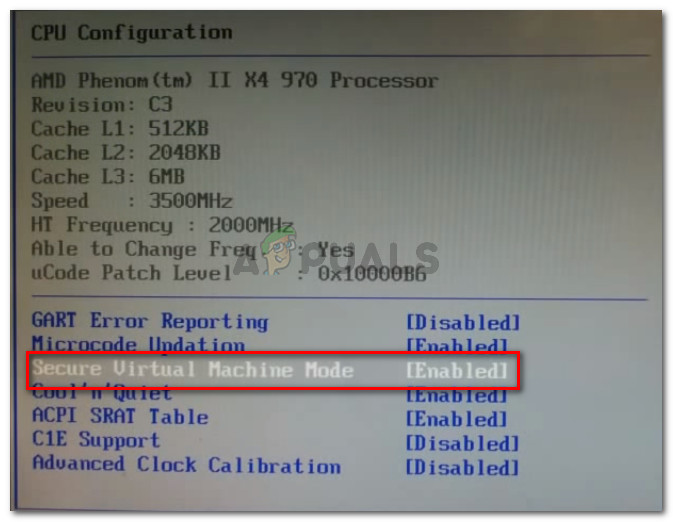
- In the BIOS interface, navigate to Advanced > CPU Configuration. In this tab, make sure the AMD-V or AMD SVM is enabled. The specific path and the virtualization technology name may vary depending on different BIOS versions.
- Press F10 to save the changes and then exit from BIOS.
Fix 2. Disable Windows Hyper-V
Microsoft Hyper-V is Microsoft’s own virtualization technology that is automatically enabled on most of the recent Windows versions. However, enabling Microsoft Hyper-V may turn off AMD-V technology automatically. In this case, you’ll need to disable the Microsoft Hyper-V. Here is the guide:
- Press Windows key + R to open the Run
- Type «cpl» into the Run box and press Enter.
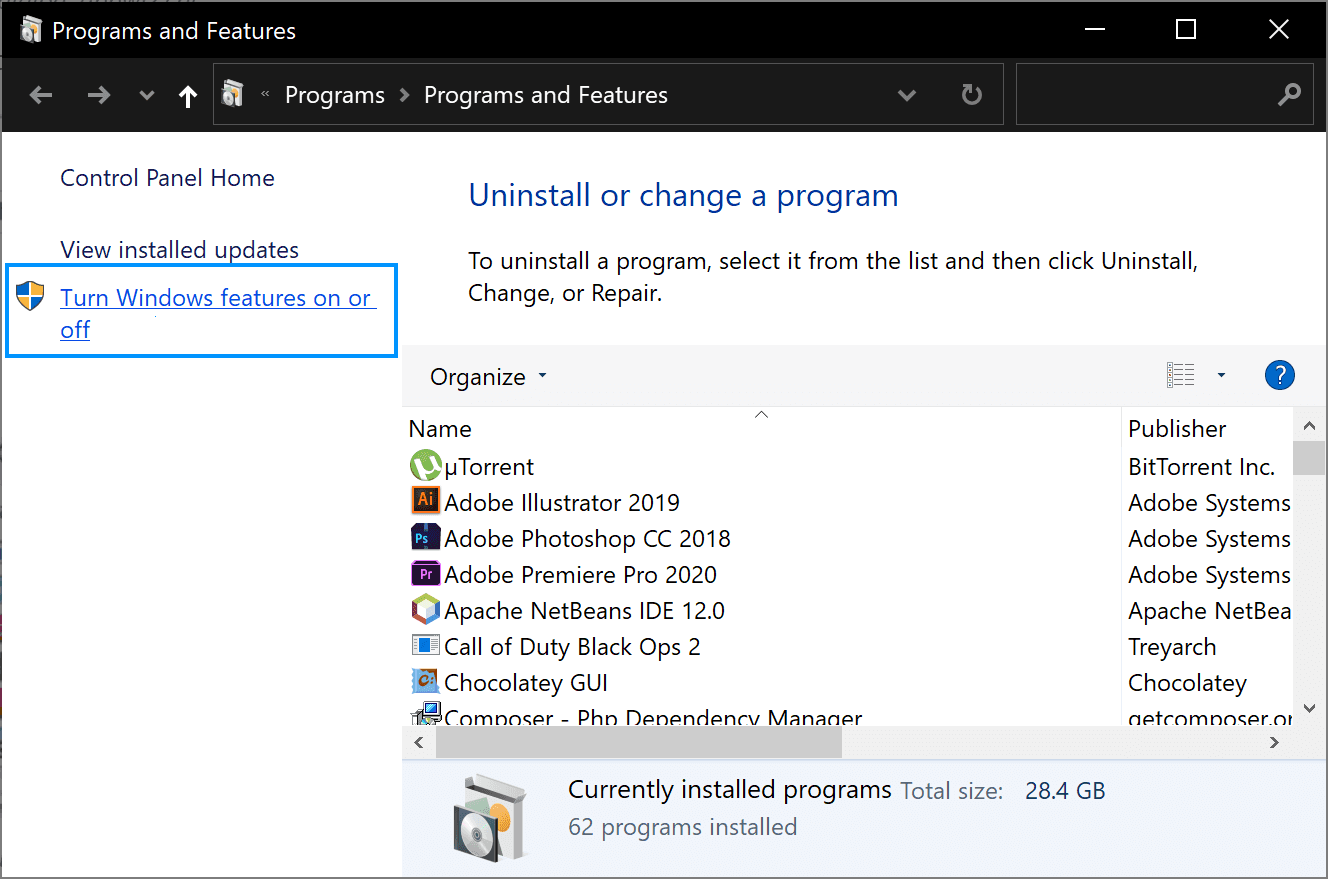
- In the Programs and Features window, click Turn Windows features on or off on the left side of the panel.
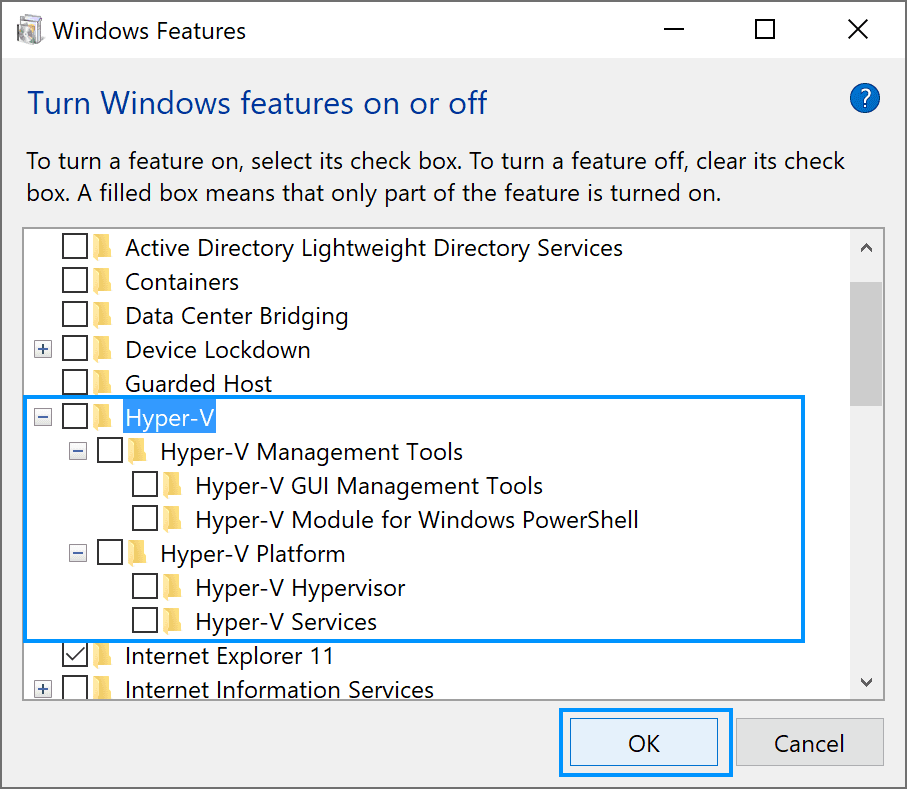
- On the Windows Featureswindow, uncheck Hyper-V and click OK.
Disable Hyper-V In Windows 10 & 8: Learn Practical Ways
Fix 3. Change the Number of CPU Cores to 1
If the VM VirtualBox is forced to create a virtual machine with more than 1 CPU core, it will require hardware virtualizations. However, if the AMD-V technology is not supported by your current configuration, the virtualization procedure will not complete successfully and you will get the error «AMD-V is disabled in the BIOS».
In this case, you can solve the error by changing the number of CPU cores to 1. Here is the guide:
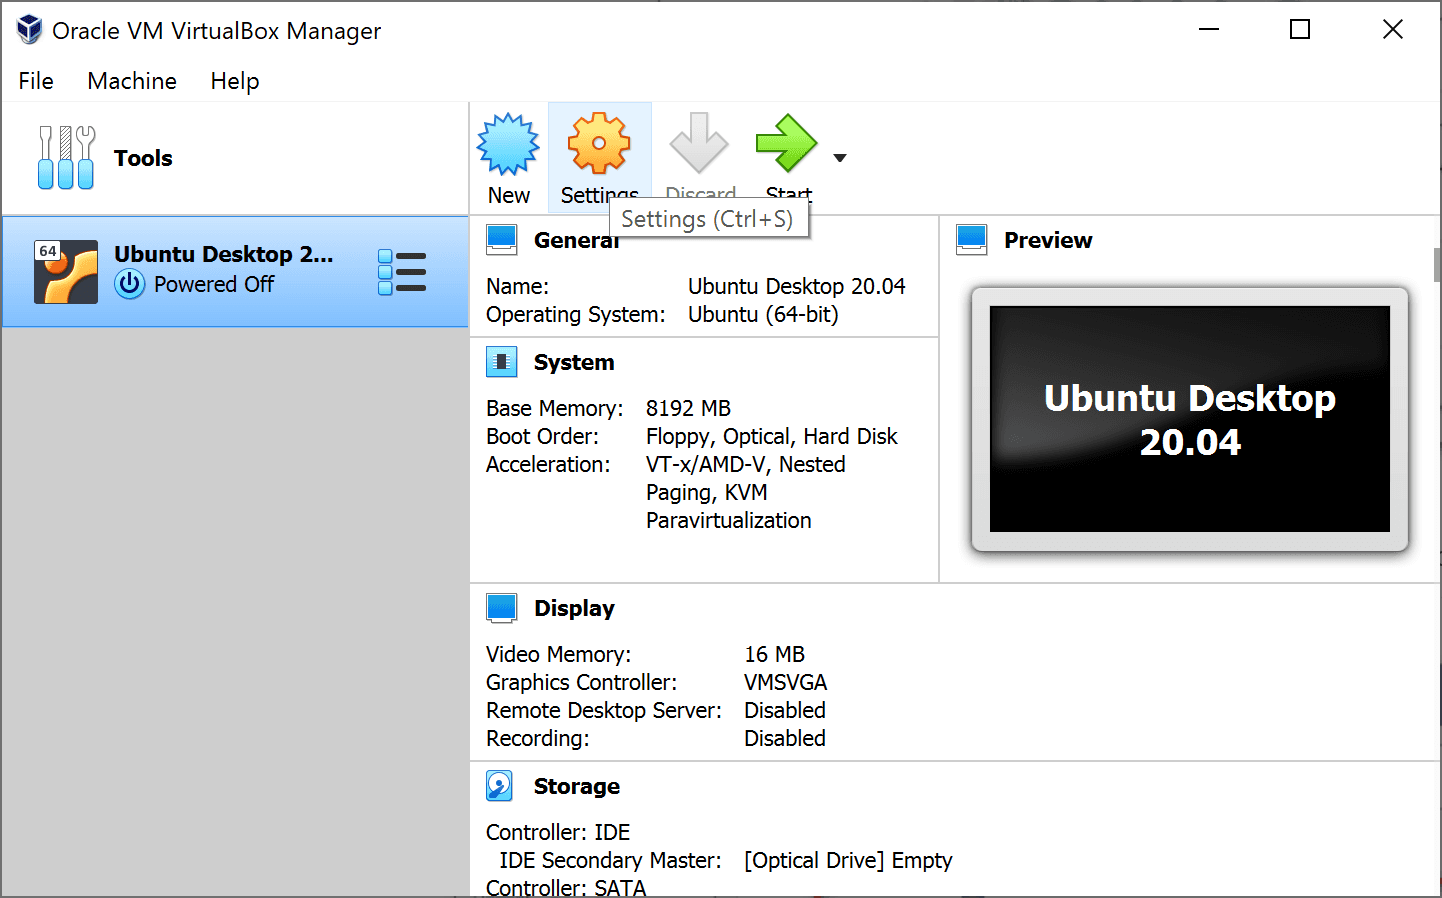
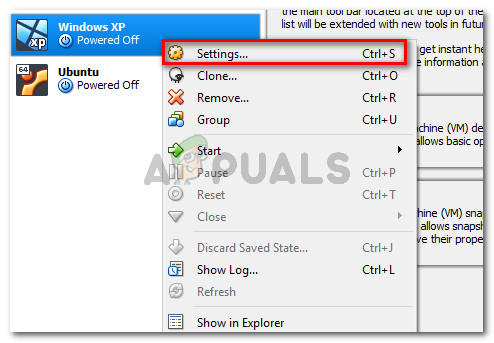
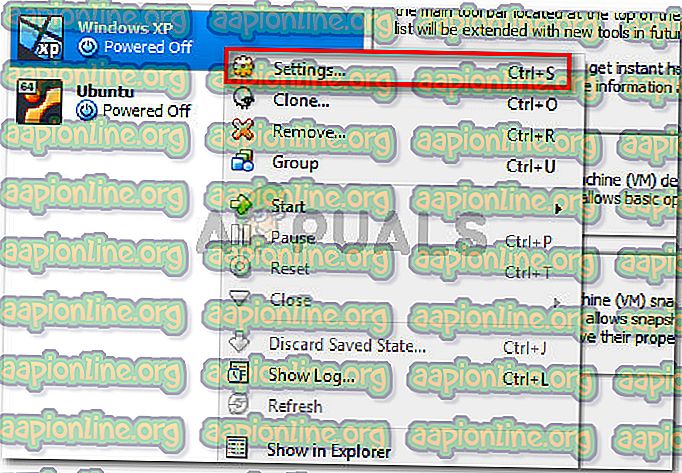
- Open Oracle VM VirtualBox, right-click on the machine that is displaying the error and then click on Settings.
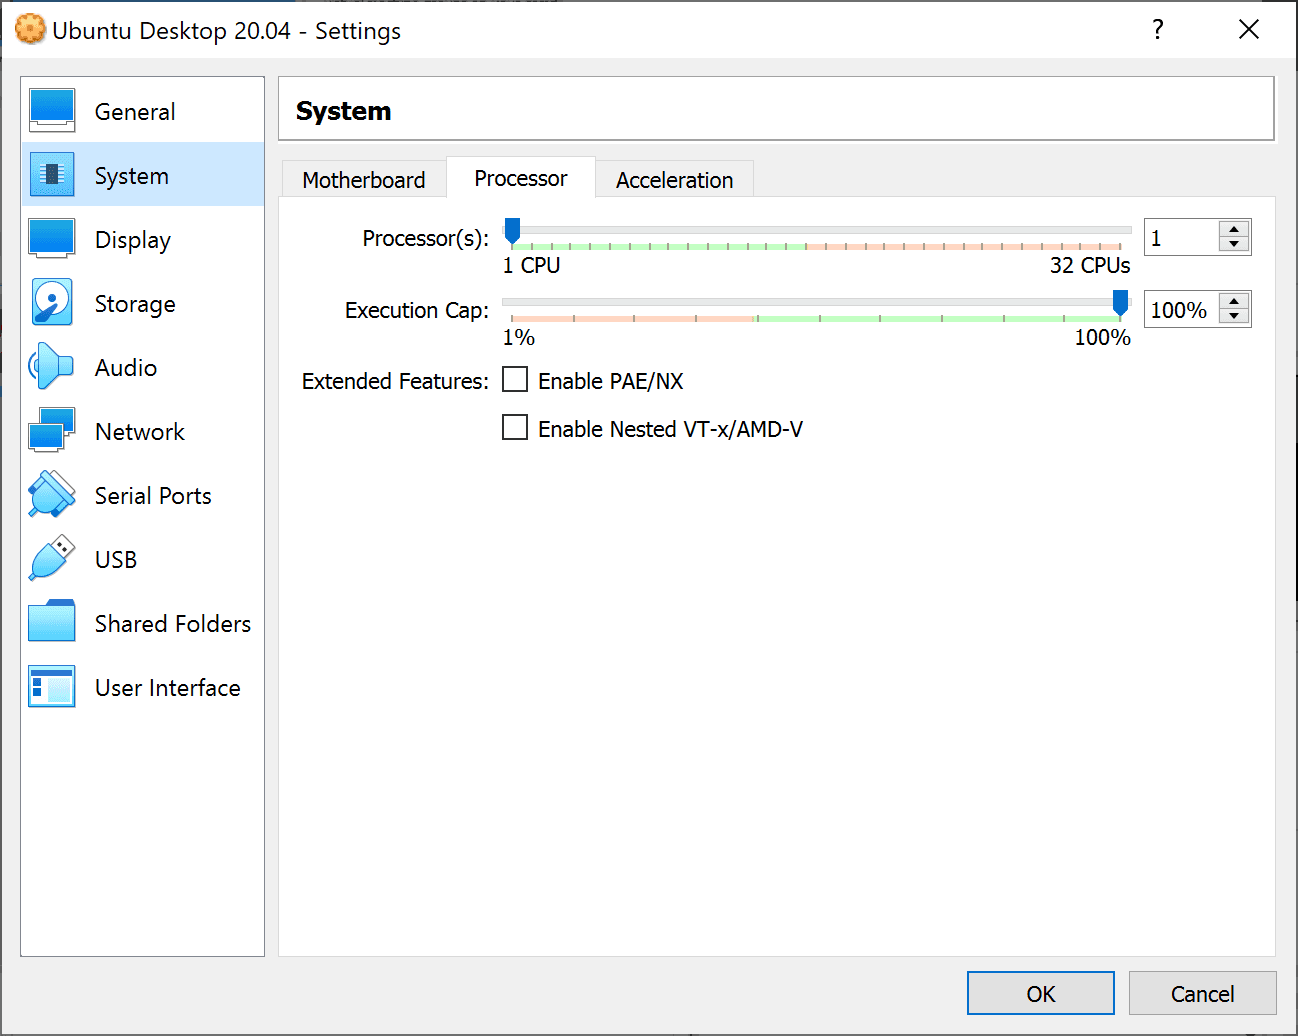
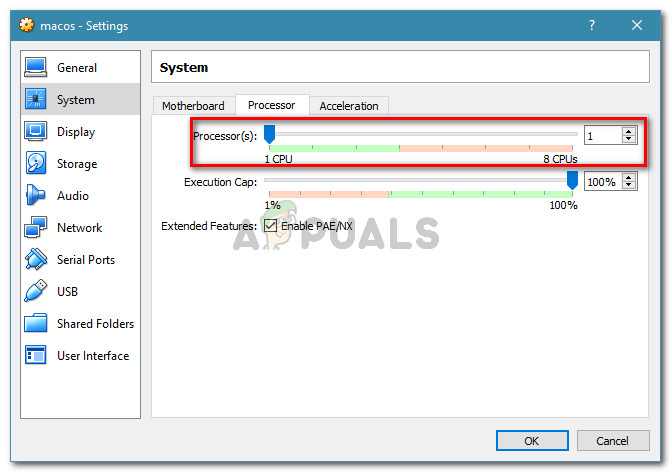
- In the Settings of your virtual machine, go to the System > Processortab, drag the slider associated with Processor(s) to 1 CPU and click OK to save.
- Close the settings menu and restart your virtual machine.
About The Author

Position: Columnist
Author Linda has been working as an editor at MiniTool for 1 year. As a fresh man in IT field, she is curious about computer knowledge and learns it crazily. Maybe due to this point, her articles are simple and easy to understand. Even people who do not understand computer can gain something.
By the way, her special focuses are data recovery, partition management, disk clone, and OS migration.
- Partition Wizard
- Partition Manager
- 3 Ways to Fix «AMD-V Is Disabled in the BIOS» Error
3 Ways to Fix «AMD-V Is Disabled in the BIOS» Error [Partition Manager]
By Linda | Follow |
Last Updated August 04, 2021
Why will you get the error «AMD-V is disabled in the BIOS» when running a VM in VirtualBox? How to solve this problem? In this post, MiniTool Partition Wizard will offer 3 ways to help you fix this issue.
When you try to run a virtual system in VirtualBox, you may get error «AMD-V is disabled in the BIOS».
In general, VM software will require the CPU to help complete the VM virtualization process, because virtualization done by the software can be a slow process. Using the CPU to help in this task can greatly improve the virtual machine performance.
AMD-V, short for AMD Virtualization, is the virtualization extension provided by AMD CPUs. In some BIOS versions, AMD-V is also called AMD SVM. If this technology is disabled, VM won’t open.
Tip: If you are using an Intel CPU, you will get the error «VT-x Is Disabled in the BIOS».
The possible reasons of this error are as follows:
- As the error indicates, AMD-V is not enabled in BIOS.
- Microsoft Hyper-V is interfering with the AMD-V technology.
- BIOS version doesn’t support so many CPU cores.
To fix this error, you can try the following methods.
Fix 1. Enable AMD-V from the BIOS settings
AMD-V or AMD SVM has been enabled by default. But when the error «AMD-V is disabled in the BIOS» occurs, it’s very likely that this feature is disabled for some unknown reasons. Then, you can enable it again to solve the problem.
- Restart your laptop/desktop. Then, on the boot screen, press the BIOS key (F2, F4, F8, F10, F12, or the Del key) to enter into BIOS mode. The BIOS key may vary depending on computer models. But you can follow the on-screen instructions or search it online.
- In the BIOS interface, navigate to Advanced > CPU Configuration. In this tab, make sure the AMD-V or AMD SVM is enabled. The specific path and the virtualization technology name may vary depending on different BIOS versions.
- Press F10 to save the changes and then exit from BIOS.
Fix 2. Disable Windows Hyper-V
Microsoft Hyper-V is Microsoft’s own virtualization technology that is automatically enabled on most of the recent Windows versions. However, enabling Microsoft Hyper-V may turn off AMD-V technology automatically. In this case, you’ll need to disable the Microsoft Hyper-V. Here is the guide:
- Press Windows key + R to open the Run
- Type «cpl» into the Run box and press Enter.
- In the Programs and Features window, click Turn Windows features on or off on the left side of the panel.
- On the Windows Featureswindow, uncheck Hyper-V and click OK.
Disable Hyper-V In Windows 10 & 8: Learn Practical Ways
Fix 3. Change the Number of CPU Cores to 1
If the VM VirtualBox is forced to create a virtual machine with more than 1 CPU core, it will require hardware virtualizations. However, if the AMD-V technology is not supported by your current configuration, the virtualization procedure will not complete successfully and you will get the error «AMD-V is disabled in the BIOS».
In this case, you can solve the error by changing the number of CPU cores to 1. Here is the guide:
- Open Oracle VM VirtualBox, right-click on the machine that is displaying the error and then click on Settings.
- In the Settings of your virtual machine, go to the System > Processortab, drag the slider associated with Processor(s) to 1 CPU and click OK to save.
- Close the settings menu and restart your virtual machine.
About The Author
Position: Columnist
Author Linda has been working as an editor at MiniTool for 1 year. As a fresh man in IT field, she is curious about computer knowledge and learns it crazily. Maybe due to this point, her articles are simple and easy to understand. Even people who do not understand computer can gain something.
By the way, her special focuses are data recovery, partition management, disk clone, and OS migration.
Содержание
- 1 Что вызывает отключение AMD-V в ошибке BIOS?
- 2 Способ 1. Включение AMD-V из настроек BIOS
- 3 Способ 2: отключение Windows Hyper-V
- 4 Способ 3: изменение количества ядер процессора на 1
- 5 Способ 4. Изменение версии на Windows 7 или Windows 2003 (если применимо)
Несколько пользователей сообщают о получении AMD-V отключена в BIOS (или ОС хоста) (VERR_SVM_DISABLED) ошибка сообщение при попытке запустить виртуальную машину с помощью VM VirtualBox. Хотя эта конкретная проблема чаще всего сообщается в Windows 7, Windows 8 и Windows 10, существует несколько сообщений о ее возникновении в дистрибутивах Linux.
 AMD-V отключен в BIOS (VER_SVM_DISABLED)
Замечания: Если вы получаете VT-X недоступен — VERR_VMX_NO_VMX ошибка, следуйте этому руководству по устранению неполадок (Вот) вместо
Что вызывает отключение AMD-V в ошибке BIOS?
Мы исследовали проблему, просмотрев различные пользовательские отчеты. Из того, что мы смогли собрать, есть несколько сценариев, которые приведут к появлению этой конкретной проблемы. Вот список распространенных виновников, которые удалось выявить нескольким другим пострадавшим пользователям:
- AMD-V отключен в настройках BIOS — По сути, VERR_SVM_DISABLE Код ошибки говорит вам, что ваш компьютер поддерживает AMD-V, но настройки BIOS хоста в настоящее время отключают его.
- Microsoft Hyper-V мешает технологии AMD-V — Если Hyper-V включен, это автоматически означает, что встроенная технология виртуализации была отключена. В этом случае вам необходимо отключить его, чтобы разрешить использование AMD-V.
- Версия BIOS не поддерживает столько ядер процессора — Как оказалось, эта проблема может быть выброшена VM VirtualBox, если программное обеспечение вынуждено создавать виртуальную машину с более чем одним ядром ЦП. Для этого требуется виртуализация оборудования и будет выдано сообщение об ошибке, если функция отключена или недоступна.
- VM VirtualBox Bug — Существует несколько сообщений об этой ошибке на компьютерах, поддерживающих технологию аппаратной виртуализации. В этом случае проблему обычно можно решить, изменив некоторые параметры, относящиеся к виртуальной машине.
Если вы в настоящее время пытаетесь устранить это конкретное сообщение об ошибке, эта статья предоставит вам несколько руководств по устранению неполадок. Ниже представлен набор методов, которые другие пользователи в аналогичной ситуации успешно использовали для решения проблемы.
Имейте в виду, что приведенные ниже возможные исправления упорядочены по эффективности и серьезности, поэтому следуйте им, пока не наткнетесь на метод, эффективный для решения проблемы.
Способ 1. Включение AMD-V из настроек BIOS
AMD-V является переименованным товарным знаком для Sрежим виртуальной машины ecure (SVM). Причина номер один, почему AMD-V отключена в BIOS (или ОС хоста) (VERR_SVM_DISABLED) ошибка происходит потому, что технология AMD-V отключена в настройках BIOS.
Даже если на большинстве компьютеров этот параметр включен по умолчанию, вмешательство третьей стороны или изменение вручную могут означать, что он отключен на вашем компьютере.
К счастью, вы можете снова включить AMD-V, открыв настройки BIOS и повторно включив режим защищенной виртуальной машины в настройках CPU.
Но имейте в виду, что шаги входа в BIOS будут отличаться в зависимости от производителя вашей материнской платы. Чтобы получить доступ к вашему BIOS, вам нужно будет нажать кнопку «Настройка» во время начальной процедуры запуска. Как правило, ключ настройки является одним из Клавиши F (F2, F4, F8, F10, F12) или Ключ Del (для машин Del). Если вы не можете обнаружить ключ установки самостоятельно, во время начальной процедуры запуска следите за любыми упоминаниями о нем или ищите конкретные шаги в соответствии с производителем вашей материнской платы.
 Нажмите кнопку BIOS во время процедуры запуска
После успешного входа в BIOS найдите запись с именем «Режим защищенной виртуальной машины» и убедитесь, что она включена. На самой популярной версии BIOS ее можно найти в Дополнительно> Конфигурация процессора. Как только вы доберетесь туда, убедитесь, что Безопасный режим виртуальной машины является Включено, затем сохраните конфигурацию и выйдите из BIOS.
 Убедитесь, что режим защищенной виртуальной машины включен
Замечания: Точное местоположение этой записи может отличаться в зависимости от модели вашей материнской платы. Если Безопасный режим виртуальной машины не для вас, ищите конкретные шаги в соответствии с вашим производителем. На материнской плате Acer вы можете снова включить AMD-V, установив AMD IOMMU в Включено (вы можете найти его внутри Технология виртуализации AMD I / O меню).
Имейте в виду, что для того, чтобы изменение вступило в силу, перезагрузка компьютера не достаточно. Вам нужно выполнить холодную загрузку. Это означает, что вам необходимо полностью выключить компьютер, а затем дать ему загрузиться с нуля.
После завершения следующего запуска откройте виртуальную машину, которая показывала вам сообщение внутри VM VirtualBox, и посмотрите, решена ли проблема. Если вы все еще видите AMD-V отключена в BIOS (или ОС хоста) (VERR_SVM_DISABLED) ошибка, перейти к следующему способу ниже.
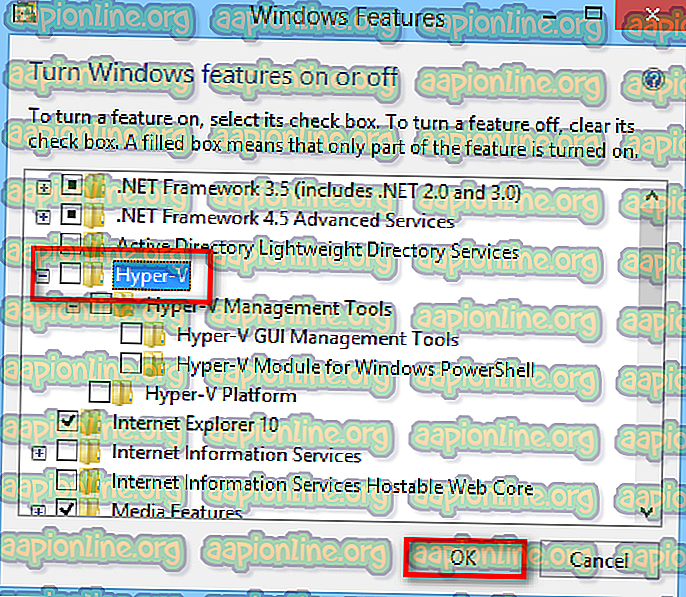
Способ 2: отключение Windows Hyper-V
Несколько пользователей сталкиваются с AMD-V отключена в BIOS (или ОС хоста) (VERR_SVM_DISABLED) ошибка удалось решить проблему, отключив Функция Microsoft Hyper-V от Добавить / удалить функции Windows экран.
Microsoft Hyper-V — это собственная технология виртуализации Microsoft, которая автоматически включается в большинстве последних версий Windows. Это создает проблему, потому что всякий раз, когда Hyper-V включен, встроенная аппаратная технология отключается (в данном случае (AMD-V)). Поскольку для виртуальной машины VM VirtualBox требуется AMD-V или VT-X, вы получите сообщение об ошибке вместо фактической виртуальной машины.
К счастью, вы можете легко устранить эту проблему, выполнив ряд простых инструкций, которые помогут вам отключить технологию Microsoft Hyper-V. Вот что вам нужно сделать:
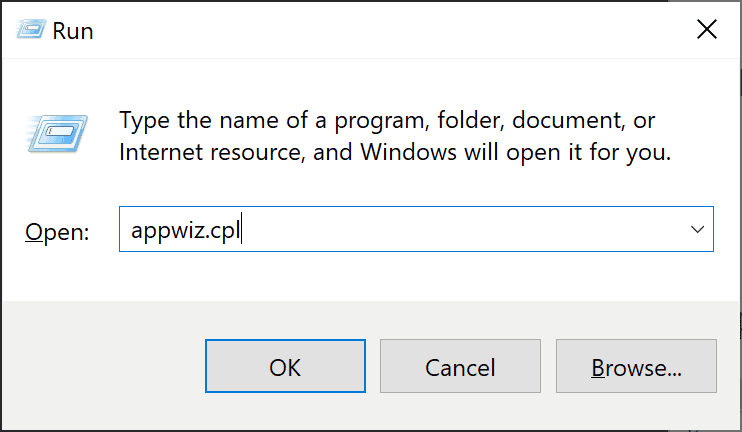
- Нажмите Windows ключ + R открыть Бежать диалоговое окно. Затем введите «appwiz.cplИ нажмите Войти открыть Программы и особенности.
 Диалог запуска: appwiz.cpl
 - внутри Программы и особенности, используйте правое меню, чтобы нажать на Включить или отключить функции Windows.
 В разделе «Программы и компоненты» нажмите «Включить или отключить компоненты Windows».
 - На экране «Функции Windows» найдите запись Hyper-V и убедитесь, что связанный с ней флажок отключен. Затем нажмите Хорошо сохранить изменения.
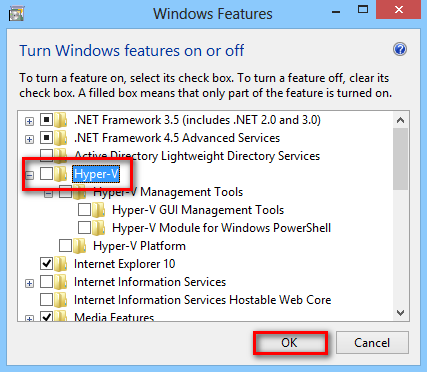 Снимите флажок, связанный с Hyper-V
 - Перезагрузите компьютер и проверьте, устранена ли ошибка при следующем запуске.
Если вы все еще сталкиваетесь с AMD-V отключен в BIOS (или ОС хоста) (VERR_SVM_DISABLED) при включении вашей виртуальной машины переходите к следующему способу ниже.
Способ 3: изменение количества ядер процессора на 1
Если вы использовали описанные выше методы, чтобы убедиться, что ваша машина отвечает всем требованиям для виртуализации оборудования, и проблема все еще возникает, вполне вероятно, что идентификатор технологии AMD-V не поддерживается вашей текущей конфигурацией.
К счастью, вы можете исправить ошибку, выполнив несколько очень простых инструкций. Но сначала давайте рассмотрим причину проблемы. Даже если вы не настроили параметры виртуальной машины, отображающие ошибку, настройки по умолчанию могут создать проблему.
Что происходит, программное обеспечение назначает более 1 ЦП в настройках системы, что вынуждает систему использовать аппаратную виртуализацию для запуска виртуального хоста. Однако, если ваша машина не поддерживает его (у вас есть четырехъядерный процессор AMD или что-то подобное), процедура не будет завершена успешно, и вы увидите AMD-V отключена в BIOS (или ОС хоста) (VERR_SVM_DISABLED) ошибка сообщение вместо
К счастью, вы можете исправить эту проблему, изменив число назначенных процессоров на 1. Это, скорее всего, решит проблему раз и навсегда. Вот что вам нужно сделать:
- открыто Oracle VM VirtualBox, щелкните правой кнопкой мыши на машине, которая отображает ошибку, а затем нажмите на настройки.
 Щелкните правой кнопкой мыши на зараженном компьютере и выберите «Настройки».
 - в настройки вашей виртуальной машины, перейдите на вкладку Система (используя левое подменю) и получите доступ к процессор Вкладка. Затем перетащите ползунок, связанный с процессором (-ами), на 1 процессор и щелкните Хорошо сохранить.
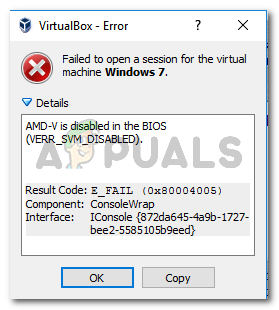
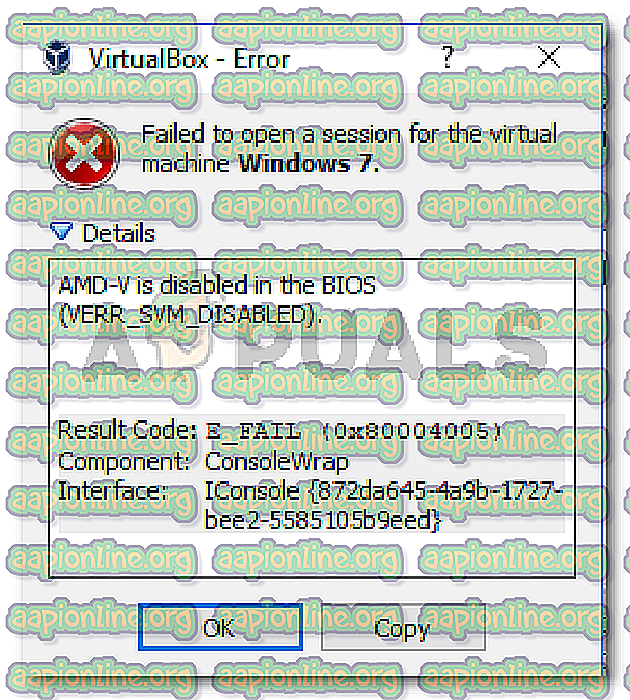
Learn how to solve this exception when trying to launch a virtual machine for first time on computers with AMD processors.
With virtual machines you will face regular problems on new computers. For example, recently i switched from an Intel Core i7 to an AMD Ryzen 9 3950x. Everything worked exceptionally until i tried to boot some virtual machines using Virtual Box:r
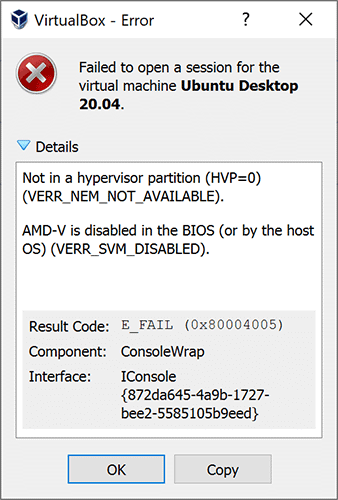
Not in a hypervisor partition (HVP=0) (VERR_NEM_NOT_AVAILABLE).
AMD-V is disabled in the BIOS (or by the host OS) (VERR_SVM_DISABLED).

Result Code:
E_FAIL (0x80004005)
Component:
ConsoleWrap
Interface:
IConsole {872da645-4a9b-1727-bee2-5585105b9eed}
This problem usually appears because of the following reasons:
- Virtualization (AMD-V) is disabled from BIOS settings.
- If Microsoft Hyper-V is enabled, it automatically means that the built-in virtualization technology was turned off.
- BIOS version doesn’t support many CPU cores. If – As it turns out, the issue might get thrown by VM VirtualBox if the software is forced to create a virtual machine with more than 1 CPU core. In order to do this, it requires hardware virtualizations and will throw the error if the feature is disabled or unavailable.
A. Enable Secure Virtual Machine Mode on the BIOS
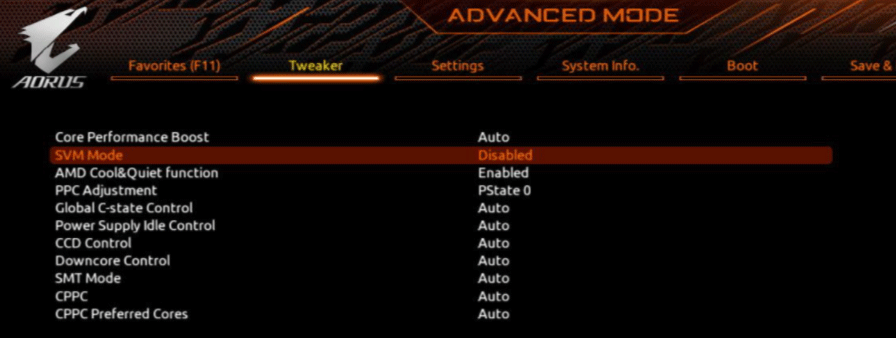
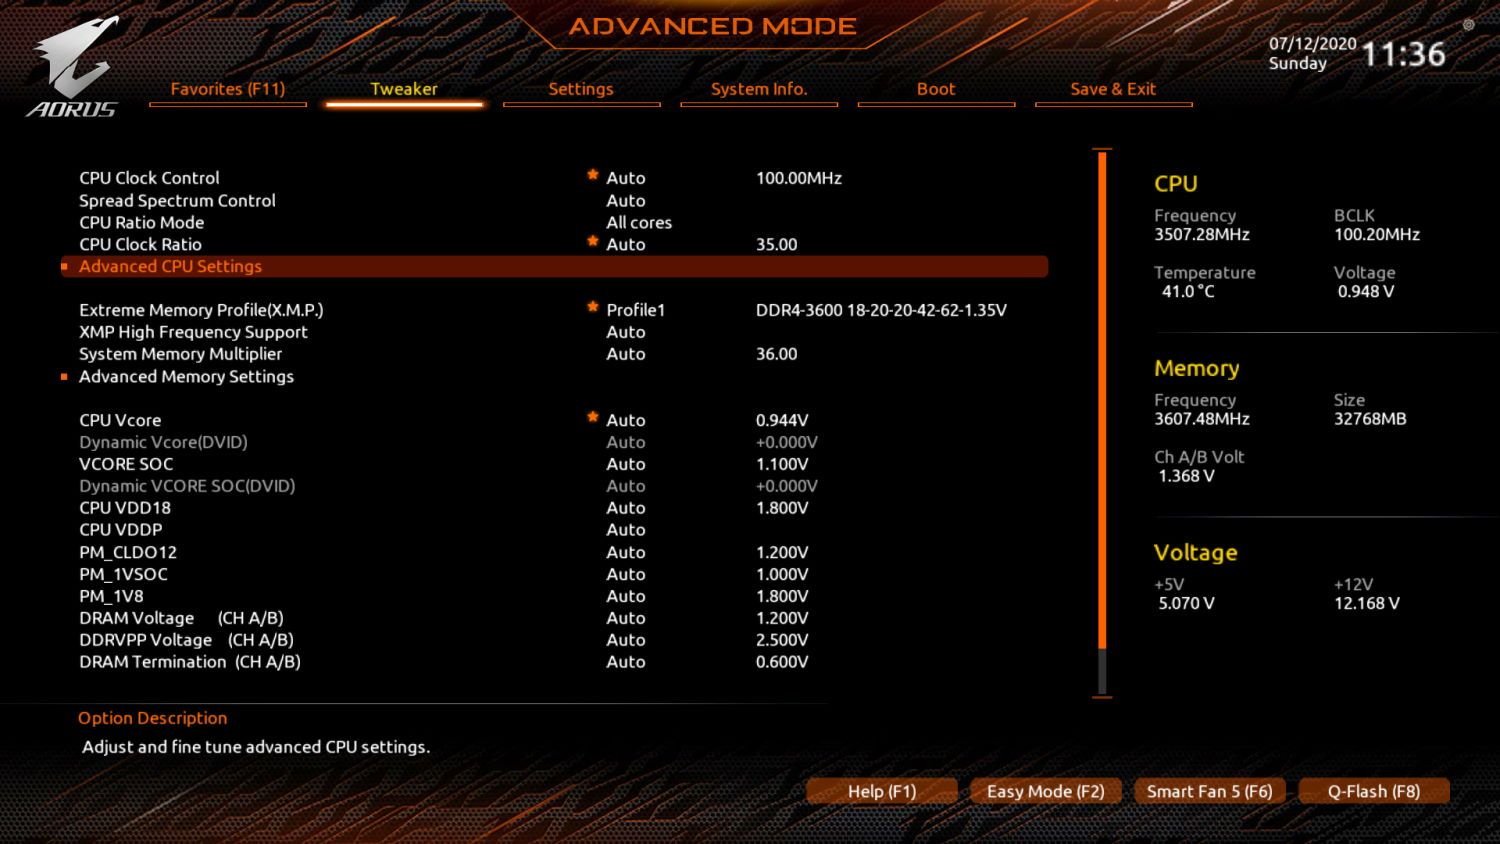
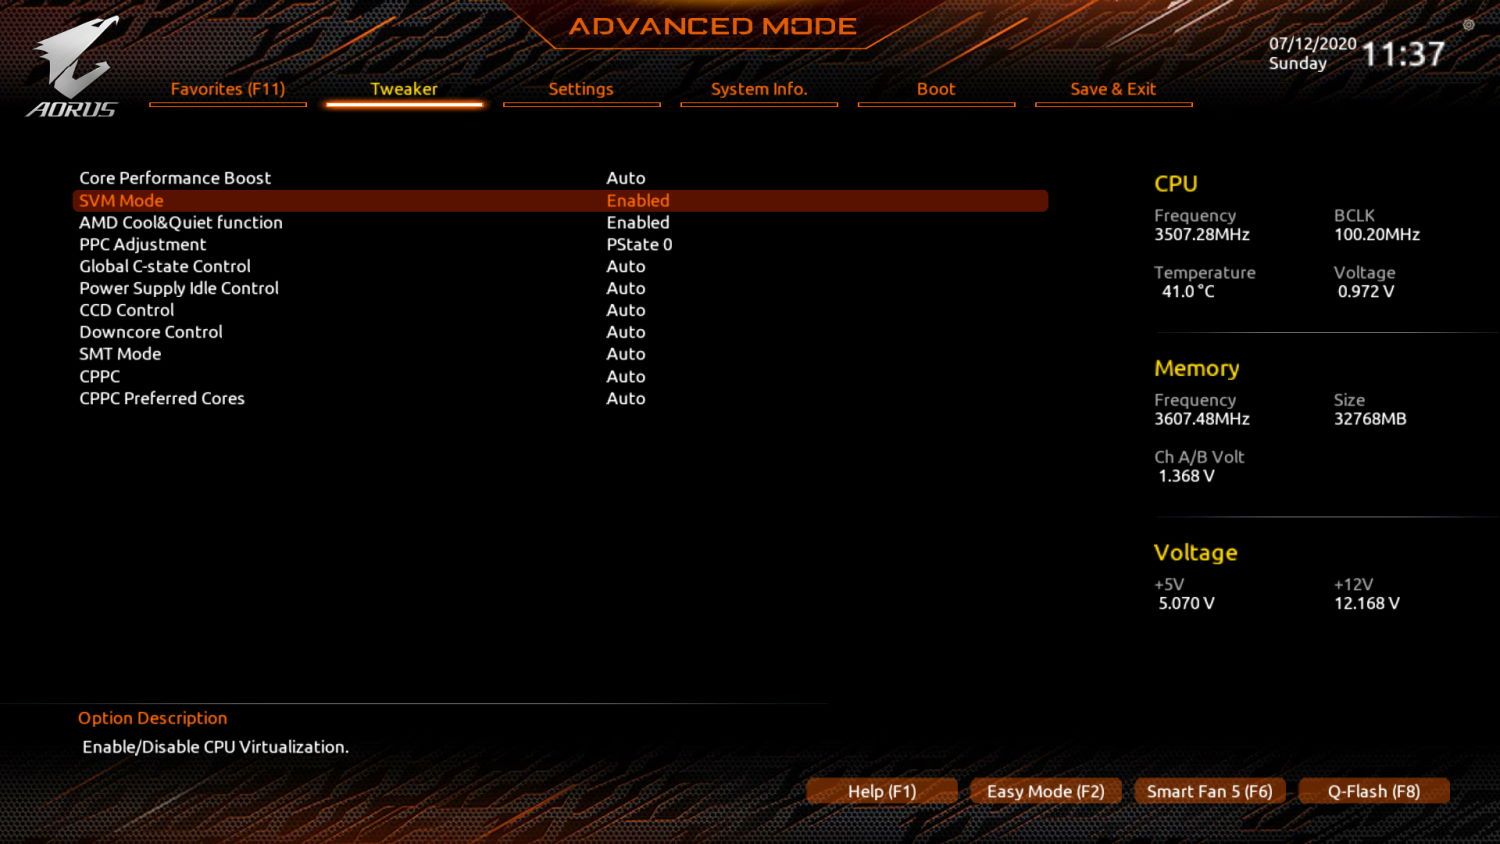
Basically the VERR_SVM_DISABLE error code is telling you that your PC does support AMD-V, but it’s disabled on the BIOS. You may simply boot your computer and start the bios. In board that support AMD processors, you will find this option as Secure Virtual Machine Mode. For example, in our AORUS x570 board we may find this option on the advanced mode, under the Tweak tab, search for the Advanced CPU settings:
And then search for the Secure Virtual Machine Mode option and enable it:
Save changes and reboot the computer, in most of the cases, the virtualization will work immediately, specially on brand new computers. If you try to start your virtual machine and it still fails, proceed with the next possible solution.
B. Disable Windows Hyper-V
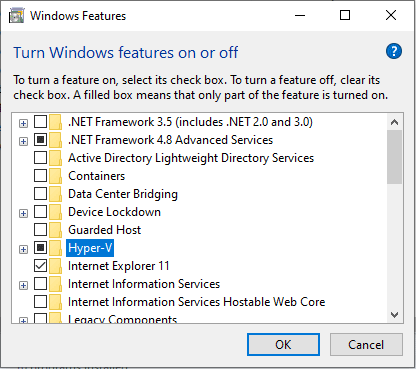
Many users found the solution of this problem by simply disabling the Microsoft Hyper V Feature of Windows 10. To do this, you will have to open the appwiz.cpl executable through the run dialog box (Windows key + R):
Then click on Turn Windows Features on or off on the left side of the control panel home:
Finally search for Hyper-V on the list:
Click on OK and restart your computer, this should solve the problem when you try to start the machine again. If it doesn’t work, you can continue with the next option.
C. Change number of CPU cores to 1
If after both of the mentioned solutions, the virtualization still fails, is very likely that the AMD-V technology is not supported by the current configuration of your virtual machine. Many users report that, when the software assigns more than 1 CPU in the System settings, which forces the system to use hardware virtualization in order to start the virtual host, this exception appears. Therefore, you will have to limit the amount of processors. Go to the settings of the virtual machine:
And decrease the number of processors to 1:
Close the settings and restart your virtual machine. It should boot up without the AMD-V is disabled in the BIOS.
Happy virtualization ❤️!
Привет, счастливые обладатели процессора AMD Ryzen. Я счастливый обладатель Gigabyte x470 aorus ultra gaming и AMD Ryzen 3600 и на примере этих комплектующих я покажу, как включить поддержку AMD-V в BIOS.
Если вы используете одну из систем виртуализации, к примеру Virtualbox, Vagrant или разрабатываете на Android Studio, то эти программы не заработают без включения AMD-V, либо заработают медленно.
К примеру, при запуске Vagrant будет вот такая ошибка:
Stderr: VBoxManage.exe: error: Not in a hypervisor partition (HVP=0) (VERR_NEM_NOT_AVAILABLE).
VBoxManage.exe: error: AMD-V is disabled in the BIOS (or by the host OS) (VERR_SVM_DISABLED)
VBoxManage.exe: error: Details: code E_FAIL (0x80004005), component ConsoleWrap, interface IConsole

При настройке Virtualbox вы увидите текст:
Функция аппаратной виртуализации включена для данной машины, но не поддерживается вашим хостом. Для обеспечения работоспособности машины она должна быть включена.

Все говорит о том, что нам нужно включить AMD-V, но как это сделать?
Для начала зайдите в BIOS (нажмите F2 или DEL при начале загрузки)
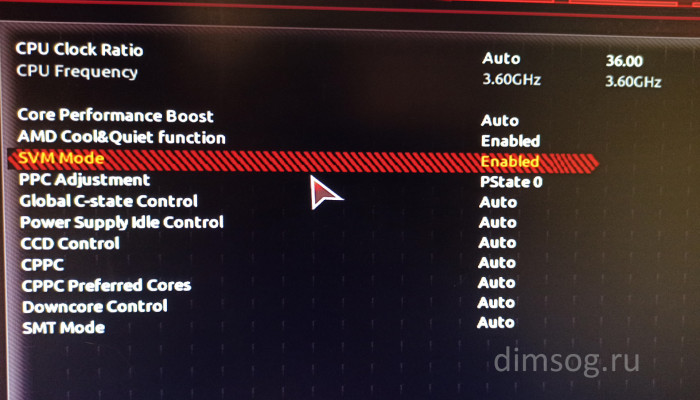
Далее смотрите скриншоты, возможно ваш BIOS будет немного отличаться, но на всех платах Gigabyte это действие будет одинаково. Вам нужно найти SVM Mode.


SVM Mode должен быть Enabled. SVM Mode это и есть AMD-V. Не забудьте сохранить настройки.
Почему такое странное название? Все просто SVM расшифровывается как Secure Virtual Machine, что в переводе на русский — защищенная виртуальная машина. Кто привык к процессорам от Intel, сейчас находятся в небольшом шоке
AMD-V is disabled in the BIOS (VERR_SVM_DISABLED)
I just found a work-around for an error which stopped my VirtualBox clients from booting after I had ugraded the host OS to Ubuntu 14.04):
PROBLEM: After upgrading to Ubuntu 14.04 LTS my Windows XP clients in VirtualBox could not boot anymore and showed the following error: AMD-V is disabled in the BIOS (oy by the host OS) (VERR_SVM_DISABLED)
Host: AMD Phenom(tm) 9850 Quad-Core Processor × 4
Host OS: Ubuntu 14.04 LTS, 64-bit
Client OS: Windows XP, 32-bit
VitrualBox: 4.3.10_Ubuntu r93012
SOLUTION/WORK AROUND: Any change the guest OS settings seems to do the trick: General > Basic > Version: from «Windows XP (32-bit)» to «Windows 2003 (32-bit)» or «Windows 7 (32-bit)»
Hope that helps some of you, too!
- carbonfoil
- Posts: 1
- Joined: 18. Jul 2014, 15:55
Re: AMD-V is disabled in the BIOS (VERR_SVM_DISABLED
![]() by mpack » 18. Jul 2014, 17:40
by mpack » 18. Jul 2014, 17:40
I’m afraid that is not a fix. The fact that it worked for you is probably accidental.
VT-x/AMD-v is required to run any 64bit guest, or any guest which uses multiple cores, likewise if you explicitly enable the VT-x/AMD-v option yourself in the VM settings (this is likely to be what you undid by selecting a different settings template).
If you get that error message then pay attention to what it’s telling you: your PC does support AMD-v, but your host’s BIOS is currently disabling it. So, the true fix is to boot into your hosts BIOS config feature and enable AMD-v support.
If the error was instead VERR_VMX_NO_VMX (or similar, that’s from memory) then that’s different. It means that your host PC doesn’t support VT-x/AMD-v at all, hence you can’t use any of the guest features mentioned in my second paragraph.
- mpack
- Site Moderator
- Posts: 37874
- Joined: 4. Sep 2008, 17:09
- Primary OS: MS Windows 10
- VBox Version: PUEL
- Guest OSses: Mostly XP
Re: AMD-V is disabled in the BIOS (VERR_SVM_DISABLED)
![]() by Nickname666 » 11. Dec 2019, 21:35
by Nickname666 » 11. Dec 2019, 21:35
If its only a setting in the BIOS, as you so expertly assert, then how could this problem appear over a reboot?
A Virtual Box setup that has been working for months. I saw notices that Manjaro Linux required an update.
I did the update, then reboot the computer.
After the reboot, the previously working virtual box now gives this error message.
I was litterally running the VB right up to the time of the update. After update and reboot, I now get this error msg.
Nothing changed in the BIOS during the reboot. Never even hit the DEL button to enter BIOS (or really UEFI settings).
So, why am I getting this error if its only cause is from the BIOS?
And, yes, the msg is (this is copy and paste)
AMD-V is disabled in the BIOS (or by the host OS) (VERR_SVM_DISABLED).
- Nickname666
- Posts: 1
- Joined: 11. Dec 2019, 21:28
Re: AMD-V is disabled in the BIOS (VERR_SVM_DISABLED)
![]() by socratis » 12. Dec 2019, 08:11
by socratis » 12. Dec 2019, 08:11
scottgus1 wrote:Let the dead sleep.
There have been a lot of changes since 2014. Drastic/dramatic ones. This thread is no longer current, locking it.
Do NOT send me Personal Messages (PMs) for troubleshooting, they are simply deleted.
Do NOT reply with the «QUOTE» button, please use the «POST REPLY«, at the bottom of the form.
If you obfuscate any information requested, I will obfuscate my response. These are virtual UUIDs, not real ones.
- socratis
- Site Moderator
- Posts: 27689
- Joined: 22. Oct 2010, 11:03
- Location: Greece
- Primary OS: Mac OS X other
- VBox Version: PUEL
- Guest OSses: Win(*>98), Linux*, OSX>10.5
Return to VirtualBox on Linux Hosts
Who is online
Users browsing this forum: No registered users and 17 guests
Several users report getting the AMD-V is disabled in the BIOS (or by the host OS) (VERR_SVM_DISABLED) error message when trying to start a virtual machine using VM VirtualBox. Although this particular issue is mostly reported on Windows 7, Windows 8 and Windows 10, there are several reports of it occurring on Linux distributions.
Note: If you’re getting the VT-X is not available – VERR_VMX_NO_VMX error, follow this troubleshooting guide (here) instead.
What is causing the AMD-V is disabled in the BIOS error?
We investigated the issue by looking at various user reports. From what we were able to gather, there are several scenarios that will trigger the apparition of this particular issue. Here’s a list with common culprits that several other affected users have managed to identify:
- AMD-V is disabled from BIOS settings – In essence, the VERR_SVM_DISABLE error code is telling you that your PC does support AMD-V, but the host’s BIOS settings are currently disabling it.
- Microsoft Hyper-V is interfering with the AMD-V technology – If Hyper-V is enabled, it automatically means that the built-in virtualization technology was turned off. In this case, you’ll need to disable it on order to allow AMD-V to pe used.
- BIOS version doesn’t support this many CPU cores – As it turns out, the issue might get thrown by VM VirtualBox if the software is forced to create a virtual machine with more than 1 CPU core. In order to do this, it requires hardware virtualizations and will throw the error if the feature is disabled or unavailable.
- VM VirtualBox Bug – There are several reports of this error getting thrown on machines capable of supporting the hardware virtualization technology. In this case, the issue can typically be resolved by modifying some virtual-machine specific settings.
If you’re currently struggling to resolve this particular error message, this article will provide you with several troubleshooting guides. Below you have a collection of methods that other users in a similar situation have successfully used to get the issue resolved.
Keep in mind that the potential fixes below are ordered by efficiency and severity, so please follow them in order until you stumble upon a method that is effective in getting the issue resolved.
Method 1: Enabling AMD-V from the BIOS settings
AMD-V is the renamed trademark for Secure Virtual Machine Mode (SVM). The number one reason why the AMD-V is disabled in the BIOS (or by the host OS) (VERR_SVM_DISABLED) error occurs is because the AMD-V technology is disabled from your BIOS Settings.
Even though on most machines this option is enabled by default, a 3rd party interference or a manual modification might mean that it’s disabled on your computer.
Luckily, you can re-enable AMD-V by accessing your BIOS settings and re-enabling Secure Virtual Machine mode from the CPU Configuration settings.
But keep in mind that the steps of entering the BIOS will be different depending on your motherboard manufacturer. To access your BIOS, you will have to press the Setup key during the initial startup procedure. Typically, the setup key is either one of the F keys (F2, F4, F8, F10, F12) or the Del key (for Del machines). If you are unable to discover the Setup key yourself, keep an eye out during the initial startup procedure for any mention of it or search for specific steps according to your motherboard manufacturer.
Once you successfully enter your BIOS, look for an entry named Secure Virtual Machine Mode and make sure that it’s enabled. On the most popular BIOS version, it can be found in Advanced > CPU Configuration. Once you get there, make sure that Secure Virtual Machine Mode is Enabled, then save the configuration and exit your BIOS.
Note: The exact location of this entry might vary according to your motherboard model. If Secure Virtual Machine Mode isn’t there for you, search for specific steps according to your manufacturer. On an Acer motherboard, you can re-enable AMD-V by setting AMD IOMMU to Enabled (you can find it inside the AMD I/O Virtualization Technology menu).
Keep in mind that in order for the change to be enforced, a machine restart is not enough. You’ll need to perform a cold boot. This means that you’ll need to power off your machine completely and then allow it to boot up from scratch.
Once the next startup is complete, open the virtual machine that was showing you the message inside VM VirtualBox and see if the issue is resolved. If you are still seeing the AMD-V is disabled in the BIOS (or by the host OS) (VERR_SVM_DISABLED) error, move down to the next method below.
Method 2: Disabling Windows Hyper-V
Several users encountering the AMD-V is disabled in the BIOS (or by the host OS) (VERR_SVM_DISABLED) error have managed to resolve the issue by disabling the Microsoft Hyper-V feature from the Add/Remove Windows features screen.
Microsoft Hyper-V is Microsoft’s own virtualization technology that is automatically enabled on most of the recent Windows version. This creates a problem because whenever Hyper-V is enabled, the built-in hardware technology is turned off (in this case (AMD-V). Since VM VirtualBox needs AMD-V or VT-X in order to run a virtual machine, you will get an error message instead of the actual VM.
Luckily, you can easily rectify this issue by following a set of simple instructions that will help you disable the Microsoft Hyper-V technology. Here’s what you need to do:
- Press Windows key + R to open up a Run dialog box. Then, type “appwiz.cpl” and press Enter to open up Programs and Features.

Run dialog: appwiz.cpl - Inside Programs and Features, use the right-hand menu to click on Turn Windows features On or Off.
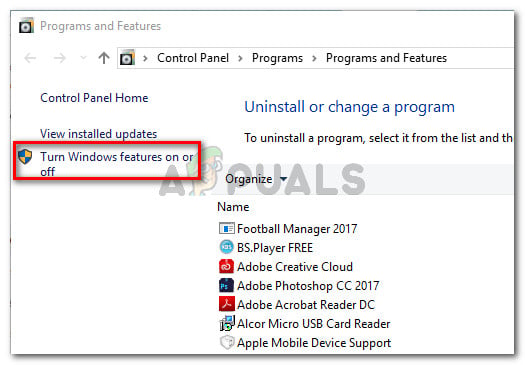
In Programs and Features, click on Turn Windows Features On or Off - In the Windows Features screen, look for a Hyper-V entry and make sure that the box associated with it is disabled. Then, click Ok to save the changes.

Uncheck the box associated with Hyper-V - Restart your machine and see if the error is resolved at the next startup.
If you’re still encountering the AMD-V is disabled in the BIOS (or by the host OS) (VERR_SVM_DISABLED) when powering up your virtual machine, move down to the next method below.
Method 3: Changing the number of CPU cores to 1
If you have used the methods above to ensure that your machine has all the requirements to achieve hardware virtualization and the issue is still occurring, it’s very likely that the AMD-V technology id not supported by your current configuration.
Luckily, you can still fix the error with a few very simple steps of instructions. But first, let’s go over what’s causing the problem – Even if you haven’t customized the virtual machine settings that are displaying the error, the default settings might create the issue.
What happens is, the software assigns more than 1 CPU in the System settings, which forces the system to use hardware virtualization in order to start the virtual host. However, if your machine does not support it (you have a Quad-core AMD or something similar), the procedure will not complete successfully and you’ll see the AMD-V is disabled in the BIOS (or by the host OS) (VERR_SVM_DISABLED) error message instead.
Luckily, you can rectify this issue by changing the number of assigned CPUs to 1. This will most likely resolve the issue once and for all. Here’s what you need to do:
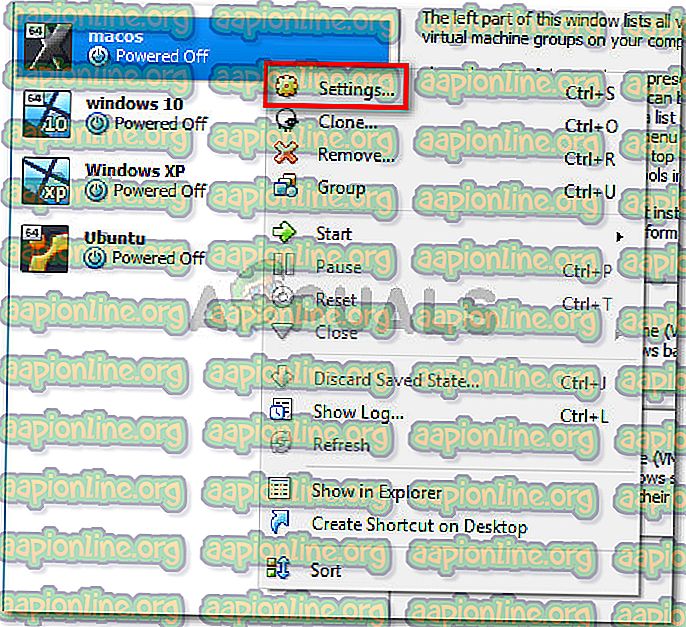
- Open Oracle VM VirtualBox, right-click on the machine that is displaying the error and then click on Settings.
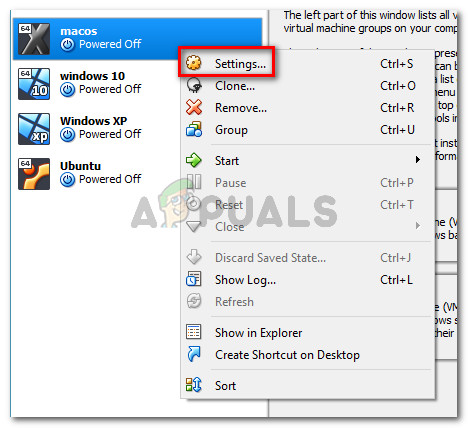
Right-click on the affected machine and click on Settings - In the Settings of your virtual machine, go to the System tab (using the left-hand submenu) and access the Processor tab. Next, drag the slider associated with Processor(s) to 1 CPU and click OK to save.
Go to System > Processor and set the Processor slider to 1 CPU - Close the settings menu and restart your virtual machine. It should boot up without the AMD-V is disabled in the BIOS (or by the host OS) (VERR_SVM_DISABLED) error.
Method 4: Changing the Version to Windows 7 or Windows 2003 (if applicable)
Several Ubuntu (Linux) users that where using VM VirtualBox to run Windows XP or Windows 10 were also getting the AMD-V is disabled in the BIOS (or by the host OS) (VERR_SVM_DISABLED) error. The way they managed to resolve the issue is by changing the Guest OS settings so that the specified version is set to Windows 2003 or Windows 7.
Although there’s no explanation why this fix is successful, it seems to have helped a lot of users to regain the normal functionality of their virtual machines. Here’s a quick guide on changing the specified Version of your Virtual machine:
- Open VM VirtualBox, right-click on the machine that is displaying the error and choose Settings.
Right-click on affected machine and click Settings - In the Settings menu, go to the General submenu and then click on the Basic tab. Next, change the Version using the drop-down menu to either Windows 2003 or Windows 7 and hit Ok to save the changes.
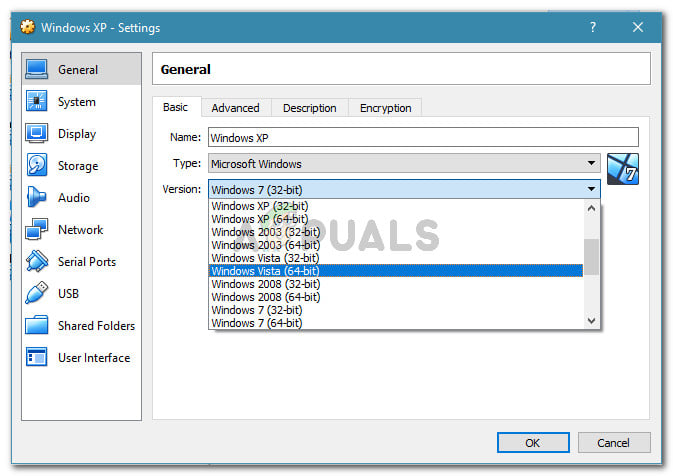
Changing the image version to Windows 7 or Windows 2003 - Start the virtual machine again and see if the boot procedure is successful without the AMD-V is disabled in the BIOS (or by the host OS) (VERR_SVM_DISABLED) error
- Печать
Страницы: [1] Вниз

Тема: Проблема с VirtualBOX (Прочитано 22062 раз)
0 Пользователей и 1 Гость просматривают эту тему.

lBoxerl
Хочу на виртуалке запустить win 8.1, выделил 2 гб оперативы, указал 2 CPU. Оно меня посылает и говорит:
Не удалось открыть сессию для виртуальной машины win.
AMD-V is disabled in the BIOS (or by the host OS). (VERR_SVM_DISABLED).
Код ошибки: NS_ERROR_FAILURE (0x80004005)
Компонент: Console
Интерфейс: IConsole {8ab7c520-2442-4b66-8d74-4ff1e195d2b6}
До тех пор, пока мы упорны и терпеливы, мы можем получить все, что нам угодно.
serega3907
Хочу на виртуалке запустить win 8.1, выделил 2 гб оперативы, указал 2 CPU. Оно меня посылает и говорит:
Не удалось открыть сессию для виртуальной машины win.
AMD-V is disabled in the BIOS (or by the host OS). (VERR_SVM_DISABLED).
Код ошибки: NS_ERROR_FAILURE (0x80004005)
Компонент: Console
Интерфейс: IConsole {8ab7c520-2442-4b66-8d74-4ff1e195d2b6}
в bios ходили? смотрели? — не ходили 
lBoxerl
Не ходили:) вижу что нужно в биос, не знаю что смотреть:)
Нужно найти и включить, что-то на подобе «AMD-V»?)
До тех пор, пока мы упорны и терпеливы, мы можем получить все, что нам угодно.
serega3907
lBoxerl,
а смотреть нужно AMD-V
lBoxerl
Virtualization — Enabled
и все решено:)
До тех пор, пока мы упорны и терпеливы, мы можем получить все, что нам угодно.
Haksus1
поидее если бы два ядра не выделяли, то оно б и так запустилось.
Ядра тут не причём, и с одним ядром выдаёт ошибку, а решение в BIOSе, нужно разрешить виртуальную машину AMD SVM=Enabled.
«Человек! Официант! Почки один раз царице.»
filin26
народ — у меня похожая проблемма!
только сначало биос требовало включить, включил!
затем hyper-v (вин 10 про у меня)
включил и его — так комп врубаться перестал
пока что-то одно не вырубиш — загрузка останавливается при появлении логотипа вин…
мож кто знает что делать?
- Печать
Страницы: [1] Вверх
Learn how to solve this exception when trying to launch a virtual machine for first time on computers with AMD processors.
With virtual machines you will face regular problems on new computers. For example, recently i switched from an Intel Core i7 to an AMD Ryzen 9 3950x. Everything worked exceptionally until i tried to boot some virtual machines using Virtual Box:r
Not in a hypervisor partition (HVP=0) (VERR_NEM_NOT_AVAILABLE).
AMD-V is disabled in the BIOS (or by the host OS) (VERR_SVM_DISABLED).

Result Code:
E_FAIL (0x80004005)
Component:
ConsoleWrap
Interface:
IConsole {872da645-4a9b-1727-bee2-5585105b9eed}
This problem usually appears because of the following reasons:
- Virtualization (AMD-V) is disabled from BIOS settings.
- If Microsoft Hyper-V is enabled, it automatically means that the built-in virtualization technology was turned off.
- BIOS version doesn’t support many CPU cores. If – As it turns out, the issue might get thrown by VM VirtualBox if the software is forced to create a virtual machine with more than 1 CPU core. In order to do this, it requires hardware virtualizations and will throw the error if the feature is disabled or unavailable.
A. Enable Secure Virtual Machine Mode on the BIOS
Basically the VERR_SVM_DISABLE error code is telling you that your PC does support AMD-V, but it’s disabled on the BIOS. You may simply boot your computer and start the bios. In board that support AMD processors, you will find this option as Secure Virtual Machine Mode. For example, in our AORUS x570 board we may find this option on the advanced mode, under the Tweak tab, search for the Advanced CPU settings:
And then search for the Secure Virtual Machine Mode option and enable it:
Save changes and reboot the computer, in most of the cases, the virtualization will work immediately, specially on brand new computers. If you try to start your virtual machine and it still fails, proceed with the next possible solution.
B. Disable Windows Hyper-V
Many users found the solution of this problem by simply disabling the Microsoft Hyper V Feature of Windows 10. To do this, you will have to open the appwiz.cpl executable through the run dialog box (Windows key + R):
Then click on Turn Windows Features on or off on the left side of the control panel home:
Finally search for Hyper-V on the list:
Click on OK and restart your computer, this should solve the problem when you try to start the machine again. If it doesn’t work, you can continue with the next option.
C. Change number of CPU cores to 1
If after both of the mentioned solutions, the virtualization still fails, is very likely that the AMD-V technology is not supported by the current configuration of your virtual machine. Many users report that, when the software assigns more than 1 CPU in the System settings, which forces the system to use hardware virtualization in order to start the virtual host, this exception appears. Therefore, you will have to limit the amount of processors. Go to the settings of the virtual machine:
And decrease the number of processors to 1:
Close the settings and restart your virtual machine. It should boot up without the AMD-V is disabled in the BIOS.
Happy virtualization ❤️!
СОВЕТУЕМ: Нажмите здесь, чтобы исправить ошибки Windows и оптимизировать производительность системы
Несколько пользователей сообщают, что сообщение AMD-V отключено в BIOS (или в операционной системе хоста) (VERR_SVM_DISABLED) при попытке запустить виртуальную машину с помощью VM VirtualBox . Хотя эта конкретная проблема чаще всего сообщается в Windows 7, Windows 8 и Windows 10, существует несколько сообщений о ее возникновении в дистрибутивах Linux.
AMD-V отключен в BIOS (VER_SVM_DISABLED)
Примечание. Если VT-X недоступен — ошибка VERR_VMX_NO_VMX, следуйте этому руководству по устранению неполадок ( здесь ).
Что вызывает отключение AMD-V в ошибке BIOS?
Мы исследовали проблему, просмотрев различные пользовательские отчеты. Из того, что мы смогли собрать, есть несколько сценариев, которые приведут к появлению этой конкретной проблемы. Вот список распространенных виновников, которые удалось выявить нескольким другим пострадавшим пользователям:
- AMD-V отключен в настройках BIOS. По сути, код ошибки VERR_SVM_DISABLE говорит о том, что ваш компьютер поддерживает AMD-V, но настройки BIOS хоста в настоящее время отключают его.
- Microsoft Hyper-V вмешивается в технологию AMD-V — если Hyper-V включен, это автоматически означает, что встроенная технология виртуализации была отключена. В этом случае вам необходимо отключить его, чтобы разрешить использование AMD-V.
- Версия BIOS не поддерживает такое количество ядер ЦП. Как оказалось, эта проблема может возникнуть из-за VM VirtualBox, если программное обеспечение вынуждено создавать виртуальную машину с более чем одним ядром ЦП. Для этого требуется виртуализация оборудования и будет выдано сообщение об ошибке, если функция отключена или недоступна.
- Ошибка VM VirtualBox. Существует несколько сообщений об этой ошибке, возникающей на компьютерах, поддерживающих технологию аппаратной виртуализации. В этом случае проблему обычно можно решить, изменив некоторые параметры, относящиеся к виртуальной машине.
Если вы в настоящее время пытаетесь устранить это конкретное сообщение об ошибке, эта статья предоставит вам несколько руководств по устранению неполадок. Ниже представлен набор методов, которые другие пользователи в аналогичной ситуации успешно использовали для решения проблемы.
Имейте в виду, что приведенные ниже возможные исправления упорядочены по эффективности и серьезности, поэтому следуйте им, пока не наткнетесь на метод, эффективный для решения проблемы.
Способ 1. Включение AMD-V из настроек BIOS
AMD-V является переименованным товарным знаком для режима SECURURE Virtual Machine (SVM) . Причина номер один, по которой AMD-V отключается в BIOS (или ОС хоста) (VERR_SVM_DISABLED), связана с тем, что технология AMD-V отключена в настройках BIOS.
Даже если на большинстве компьютеров этот параметр включен по умолчанию, вмешательство третьей стороны или изменение вручную могут означать, что он отключен на вашем компьютере.
К счастью, вы можете снова включить AMD-V, открыв настройки BIOS и повторно включив режим защищенной виртуальной машины в настройках CPU.
Но имейте в виду, что шаги входа в BIOS будут отличаться в зависимости от производителя вашей материнской платы. Чтобы получить доступ к вашему BIOS, вам нужно будет нажать кнопку «Настройка» во время начальной процедуры запуска. Как правило, ключом настройки является либо клавиша F (F2, F4, F8, F10, F12), либо клавиша Del (для машин Del). Если вы не можете обнаружить ключ установки самостоятельно, во время начальной процедуры запуска следите за любыми упоминаниями о нем или ищите конкретные шаги в соответствии с производителем вашей материнской платы.

Нажмите кнопку BIOS во время процедуры запуска
После того, как вы успешно войдете в свой BIOS, найдите запись с именем Secure Virtual Machine Mode и убедитесь, что она включена. В самой популярной версии BIOS ее можно найти в « Advanced»> «CPU Configuration» . После этого убедитесь, что включен режим Secure Virtual Machine, затем сохраните конфигурацию и выйдите из BIOS.

Убедитесь, что режим защищенной виртуальной машины включен
Примечание . Точное местоположение этой записи может отличаться в зависимости от модели материнской платы. Если безопасный режим виртуальной машины не подходит для вас, найдите конкретные шаги в соответствии с вашим производителем. На материнской плате Acer вы можете снова включить AMD-V, установив для AMD IOMMU значение « Включено» (вы можете найти его в меню технологии виртуализации AMD I / O ).
Имейте в виду, что для того, чтобы изменение вступило в силу, перезагрузка компьютера не достаточно. Вам нужно будет выполнить холодную загрузку. Это означает, что вам необходимо полностью выключить компьютер, а затем дать ему загрузиться с нуля.
После завершения следующего запуска откройте виртуальную машину, которая показывала вам сообщение внутри VM VirtualBox, и посмотрите, решена ли проблема. Если вы все еще видите, что AMD-V отключена в BIOS (или в операционной системе хоста) (VERR_SVM_DISABLED), перейдите к следующему способу ниже.
Способ 2: отключение Windows Hyper-V
Некоторым пользователям, сталкивающимся с AMD-V, отключена ошибка BIOS (или операционной системы хоста) (VERR_SVM_DISABLED), чтобы решить эту проблему, отключив функцию Microsoft Hyper-V на экране « Установка и удаление компонентов Windows» .
Microsoft Hyper-V — это собственная технология виртуализации Microsoft, которая автоматически включается в большинстве последних версий Windows. Это создает проблему, потому что всякий раз, когда Hyper-V включен, встроенная аппаратная технология отключается (в данном случае (AMD-V)). Поскольку для виртуальной машины VM VirtualBox требуется AMD-V или VT-X, вы получите сообщение об ошибке вместо фактической виртуальной машины.
К счастью, вы можете легко устранить эту проблему, выполнив ряд простых инструкций, которые помогут вам отключить технологию Microsoft Hyper-V. Вот что вам нужно сделать:
- Нажмите клавишу Windows + R, чтобы открыть диалоговое окно « Выполнить ». Затем введите « appwiz.cpl » и нажмите Enter, чтобы открыть « Программы и компоненты» .
 Диалог запуска: appwiz.cpl
 - В разделе « Программы и компоненты» в правом меню выберите « Включить или отключить функции Windows» .
 В разделе «Программы и компоненты» нажмите «Включить или отключить компоненты Windows».
 - На экране «Функции Windows» найдите запись Hyper-V и убедитесь, что связанный с ней флажок отключен. Затем нажмите Ok, чтобы сохранить изменения.
 Снимите флажок, связанный с Hyper-V
 - Перезагрузите компьютер и проверьте, устранена ли ошибка при следующем запуске.
Если вы все еще сталкиваетесь с тем, что AMD-V отключен в BIOS (или операционной системой хоста) (VERR_SVM_DISABLED) при включении питания вашей виртуальной машины, перейдите к следующему способу ниже.
Способ 3: изменение количества ядер процессора на 1
Если вы использовали описанные выше методы, чтобы убедиться, что на вашем компьютере есть все требования для виртуализации оборудования, и проблема все еще возникает, вполне вероятно, что идентификатор технологии AMD-V не поддерживается вашей текущей конфигурацией.
К счастью, вы можете исправить ошибку, выполнив несколько очень простых инструкций. Но сначала давайте разберемся, что является причиной проблемы. Даже если вы не настроили параметры виртуальной машины, отображающие ошибку, настройки по умолчанию могут создать проблему.
Что происходит, программное обеспечение назначает более 1 ЦП в настройках системы, что вынуждает систему использовать аппаратную виртуализацию для запуска виртуального хоста. Однако, если ваша машина не поддерживает его (у вас есть четырехъядерный процессор AMD или что-то подобное), процедура не будет завершена успешно, и вы увидите, что AMD-V отключен в BIOS (или операционной системой хоста) ( VERR_SVM_DISABLED) сообщение об ошибке вместо.
К счастью, вы можете исправить эту проблему, изменив число назначенных процессоров на 1. Это, скорее всего, решит проблему раз и навсегда. Вот что вам нужно сделать:
- Откройте Oracle VM VirtualBox, щелкните правой кнопкой мыши на компьютере, на котором отображается ошибка, а затем нажмите « Настройки» .
 Щелкните правой кнопкой мыши на зараженном компьютере и выберите «Настройки».
 - В настройках вашей виртуальной машины перейдите на вкладку «Система» (используя левое подменю) и перейдите на вкладку « Процессор ». Затем перетащите ползунок, связанный с процессором (-ами), на 1 процессор и нажмите « ОК» для сохранения.
 Перейдите в Система> Процессор и установите ползунок Процессор в 1 CPU
 - Закройте меню настроек и перезапустите вашу виртуальную машину. Он должен загрузиться без отключения AMD-V в BIOS (или ОС хоста) (VERR_SVM_DISABLED) с ошибкой.
Способ 4. Изменение версии на Windows 7 или Windows 2003 (если применимо)
Некоторые пользователи Ubuntu (Linux), которые при использовании VM VirtualBox для запуска Windows XP или Windows 10 также получали AMD-V, отключены в BIOS (или операционной системой хоста) (VERR_SVM_DISABLED). Им удалось решить проблему, изменив настройки гостевой ОС, чтобы указанная версия была установлена на Windows 2003 или Windows 7.
Хотя нет объяснения, почему это исправление прошло успешно, похоже, что оно помогло многим пользователям восстановить нормальную функциональность своих виртуальных машин. Вот краткое руководство по изменению указанной версии вашей виртуальной машины:
- Откройте VM VirtualBox, щелкните правой кнопкой мыши на компьютере, на котором отображается ошибка, и выберите « Настройки» .
 Щелкните правой кнопкой мыши на зараженном компьютере и выберите «Настройки».
 - В меню «Настройки» перейдите в подменю «Общие» и нажмите вкладку «Основные». Затем измените версию с помощью раскрывающегося меню на Windows 2003 или Windows 7 и нажмите « ОК», чтобы сохранить изменения.
 Изменение версии образа на Windows 7 или Windows 2003
 - Снова запустите виртуальную машину и проверьте, успешно ли выполнена процедура загрузки, если AMD-V не отключена в BIOS (или в операционной системе хоста) (VERR_SVM_DISABLED).
Привет, счастливые обладатели процессора AMD Ryzen. Я счастливый обладатель Gigabyte x470 aorus ultra gaming и AMD Ryzen 3600 и на примере этих комплектующих я покажу, как включить поддержку AMD-V в BIOS.
Если вы используете одну из систем виртуализации, к примеру Virtualbox, Vagrant или разрабатываете на Android Studio, то эти программы не заработают без включения AMD-V, либо заработают медленно.
К примеру, при запуске Vagrant будет вот такая ошибка:
Stderr: VBoxManage.exe: error: Not in a hypervisor partition (HVP=0) (VERR_NEM_NOT_AVAILABLE).
VBoxManage.exe: error: AMD-V is disabled in the BIOS (or by the host OS) (VERR_SVM_DISABLED)
VBoxManage.exe: error: Details: code E_FAIL (0x80004005), component ConsoleWrap, interface IConsole
При настройке Virtualbox вы увидите текст:
Функция аппаратной виртуализации включена для данной машины, но не поддерживается вашим хостом. Для обеспечения работоспособности машины она должна быть включена.
Все говорит о том, что нам нужно включить AMD-V, но как это сделать?
Для начала зайдите в BIOS (нажмите F2 или DEL при начале загрузки)
Далее смотрите скриншоты, возможно ваш BIOS будет немного отличаться, но на всех платах Gigabyte это действие будет одинаково. Вам нужно найти SVM Mode.
SVM Mode должен быть Enabled. SVM Mode это и есть AMD-V. Не забудьте сохранить настройки.
Почему такое странное название? Все просто SVM расшифровывается как Secure Virtual Machine, что в переводе на русский — защищенная виртуальная машина. Кто привык к процессорам от Intel, сейчас находятся в небольшом шоке 