 Некоторые пользователи, решившие проверить или отредактировать файл hosts в Windows могут обнаружить, что его нет в папке C:WindowsSystem32driversetc а иногда о том, что файл hosts не существует может сообщить и какой-то антивирус или утилита для удаления вредоносных программ.
В этой инструкции подробно о том, что можно сделать в ситуации, когда файла hosts нет в стандартной папке, как это исправить и обязательно ли это делать.
Расположение файла hosts и возможность его изменения

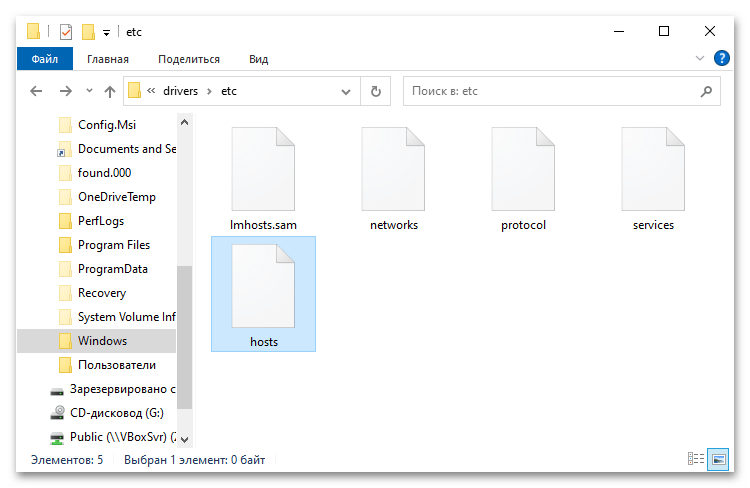
Прежде чем приступить, рекомендую зайти в Папку C:WindowsSystem32driversetc, открыть параметры проводника (сделать это можно в меню Проводника) и включить показ как скрытых, так и защищенных системных файлов — это две отдельные отметки, показаны на скриншоте ниже.

Если после включения отображения скрытых и системных файлов файл hosts всё так же не наблюдается в указанной папке, имеет смысл проверить, а не было ли изменено его стандартное расположение.
Папка, в которой находится файл hosts прописывается в реестре и может быть изменена. Чтобы проверить, не в этом ли причина отсутствия этого файла, выполните следующие шаги:
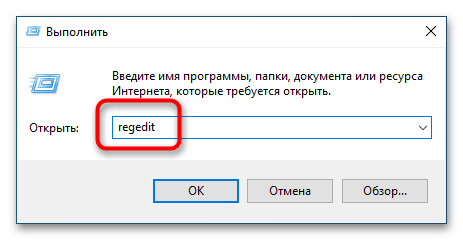
- Нажмите правой кнопкой мыши по кнопке «Пуск», выберите пункт «Выполнить», введите regedit и нажмите Enter.
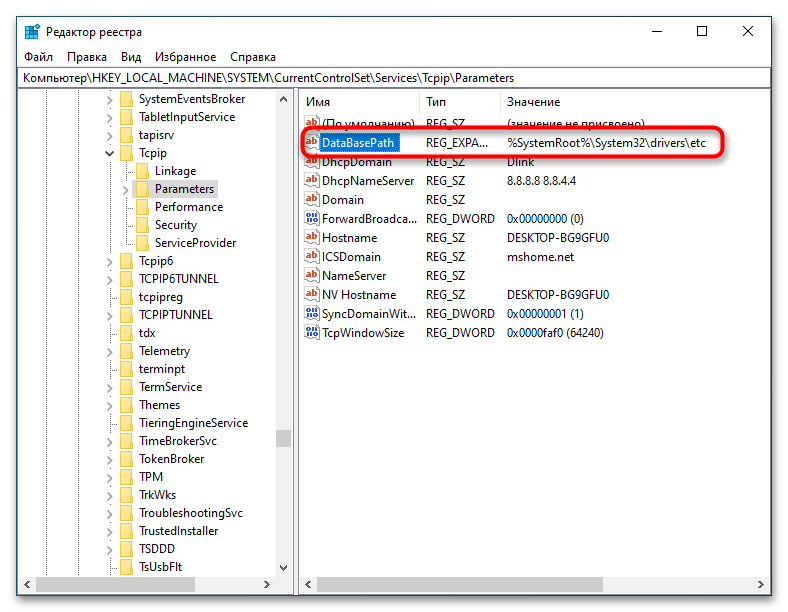
- В открывшемся редакторе реестра перейдите к разделу
HKEY_LOCAL_MACHINESYSTEMCurrentControlSetServicesTcpipParameters
- В правой панели редактора реестра обратите внимание на значение параметра DataBasePath, по умолчанию там должно быть прописано
%SystemRoot%System32driversetc

- Если значение отличается, вы можете заглянуть в указанную по факту папку и посмотреть, имеется ли файл hosts там. Если в пути используются ссылки на папки вида %SystemRoot% и вы не знаете, что это за путь, можно дважды нажать по параметру DataBasePath, скопировать этот путь, а затем вставить в адресную строку проводника.
- При желании вы можете изменить значение параметра, равно как и место хранения файла hosts на стандартное: дважды нажмите по параметру DataBasePath, введите значение %SystemRoot%System32driversetc и сохраните настройки.

- Если значение параметра не было изменено, значит hosts должен располагаться в стандартной папке, но по какой-то причине был удален или не был создан, об этом поговорим далее.
Обратите внимание, если путь к месту расположения файла hosts был изменен, при этом вы лично его не меняли, а речь идет о «чистой» (не какой-либо «сборке») Windows, возможно, это расположение было изменено какими-то сторонними программами, не всегда полезными. Может иметь смысл проверить компьютер специальными средствами удаления вредоносных программ и инструментами, такими как Dr.Web CureIt!
Восстановление файла hosts
Если пути к месту хранения файла hosts не менялись, но его в нужном расположении нет, то следует учитывать два момента:
- В общем случае отсутствие файла hosts никак не влияет на работу вашей Windows 11/10 — по умолчанию этот файл пустой и содержит лишь комментарии, которые не используются в работе. То есть функционально нет разницы (при условии, что вы не планируете вносить собственные записи в файл): будете ли вы восстанавливать стандартный файл hosts или решите этого не делать.
- Вы легко можете восстановить этот файл: файл hosts это простой текстовый файл в кодировке UTF-8 и без расширения.
Чтобы восстановить файл, вы можете (привожу упрощенный вариант для начинающих пользователей):
- Открыть «Блокнот» (например, используя поиск в панели задач) или другой простой текстовый редактор.
- При желании вставить следующий стандартный код файла hosts (он не функционален, поэтому совершенно не обязателен).
# Copyright (c) 1993-2009 Microsoft Corp.
#
# This is a sample HOSTS file used by Microsoft TCP/IP for Windows.
#
# This file contains the mappings of IP addresses to host names. Each
# entry should be kept on an individual line. The IP address should
# be placed in the first column followed by the corresponding host name.
# The IP address and the host name should be separated by at least one
# space.
#
# Additionally, comments (such as these) may be inserted on individual
# lines or following the machine name denoted by a '#' symbol.
#
# For example:
#
#      102.54.94.97     rhino.acme.com          # source server
#       38.25.63.10     x.acme.com              # x client host

# localhost name resolution is handled within DNS itself.
#	127.0.0.1       localhost
#	::1             localhost
- В меню Блокнота выбрать «Файл» — «Сохранить» и сохранить его с именем hosts и без расширения, лучше всего — на рабочий стол (сохранить сразу в нужную папку, не запустив блокнот от имени Администратора не получится). Для сохранения без расширения в поле «Тип файла» выберите «Все файлы», введите имя файла hosts (без .txt), кодировка – UTF-8.

- Перенести файл с рабочего стола в папку C:WindowsSystem32driversetc — для этого вы должны иметь права администратора на компьютере, при переносе появится соответствующий запрос.
На этом всё: файл будет в нужном расположении и исправно работать, при условии, что в реестре для его расположения указана стандартная папка. Подробнее про редактирование файла hosts в Windows 11 и изменение файла hosts в предыдущих версиях Windows.
Файл «hosts» — это небольшой текстовый документ без расширения, в котором хранятся сопоставления доменного имени и его IP-адреса. Раньше он играл ключевую роль в преобразовании цифровых адресов интернет-ресурсов в понятные буквенные адреса, ныне он считается устаревшим, а все его функции выполняет служба DNS. Сегодня файл используется в основном для перенаправления URL адресов, чаще всего для ограничения доступа к некоторым ресурсам в глобальной сети.
Расположение файла «hosts»
В Windows 10 по умолчанию файл «hosts» располагается в системном каталоге C:windowssystem32driversetc, однако может статься, что вы его там не обнаружите. Основных причин тому две: либо он был удален, либо перемещен администратором.
Найти перемещенный файл «hosts» можно с помощью штатного поиска Windows или уточнив путь к нему в системном реестре.
- Откройте «Редактор реестра», для чего вызовите нажатием Win + R окошко быстрого выполнения команд, введите в него команду
regeditи нажмите Enter. - Разверните ветку
HKLMSYSTEMCurrentControlSetservicesTcpipParameters, найдите справа параметр с именем «DataBasePath» и посмотрите его значение. Это и будет путь к «hosts».
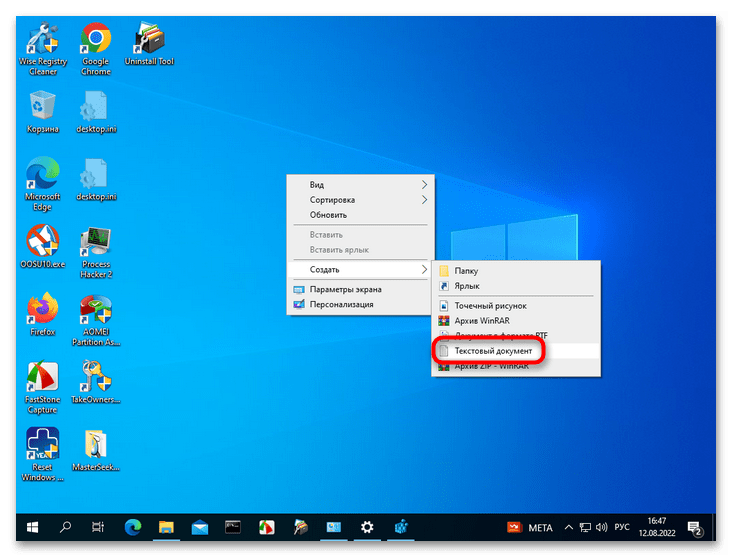
Как создать файл «hosts»
Если «hosts» отсутствует, создайте его вручную. Сделать это можно с помощью любого текстового редактора, хотя бы того же «Блокнота». Наличие прав администратора является обязательным условием.
- Создайте на рабочем столе простой текстовый файл и назовите «hosts».
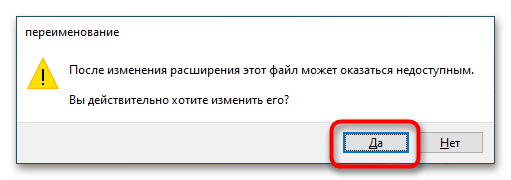
- Удалите у него расширение TXT и нажмите клавишу ввода. Появится диалоговое окошко с предупреждением, что переименованный файл может оказаться недоступным. Нажмите в нем «Да».
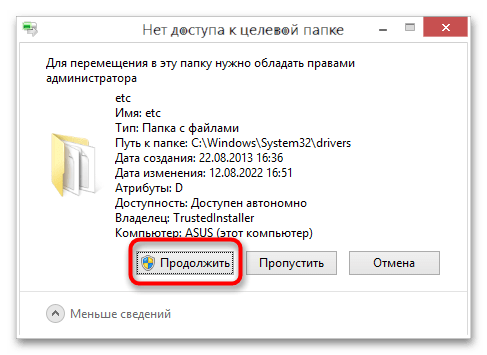
- Перейдите в «Проводнике» в расположение
C:windowssystem32driversetcи скопируйте в него созданный файл «hosts». Если появится диалоговое окно «Нет доступа к целевой папке», нажмите «Продолжить», чтобы выполнить процедуру копирования.
Создать файл непосредственно в папке «etc», так как она является системной защищенной, нельзя. Создавать в ней можно только каталоги, а что же касается записанных по умолчанию в «hosts» данных, то это комментарии, без которых вполне можно обойтись.
Читайте также: Как редактировать файл «hosts» в Windows 10
Еще статьи по данной теме:
Помогла ли Вам статья?
A Hosts file is a file that contains specific IP addresses and domain names. It is used for testing purposes to override a DNS (Domain Name System) so that a web browser can be redirected to a specific IP address. For some users, the Hosts file is not working properly on their Windows 11/10 systems. If such a thing is happening to you, you can try the solutions explained in this article to fix the problem.

Why Hosts file is not working?
There could be many reasons for which the Hosts file is not working on your Windows computer. You might be using the wrong format in your Hosts file. Apart from that, permission issues of the Hosts file are also one of the causes. If you have configured Proxy on your Windows 11/10 computer, it might be bypassing the Hosts file. We have explained the solutions to deal with this problem below in this article.
Before you try the solutions mentioned below, make sure that you are using the correct format in the Hosts file to redirect websites in your web browser. The Hosts file will not work if you have added the websites in the wrong format. The correct format is as follows:
IP Address www.abcd.com
There is a space between the IP address and the domain name. You can also separate the IP address and the domain name with Tab if separating them with space is not working.
Also, the same IP address should not be on different lines. If you want to add multiple entries for the same IP address, you can add all these entries in the same line by separating them with space.
If you have used the right format but still the Hosts file is not working, try the solutions mentioned below:
- Flush your DNS cache
- Reset your NetBios cache
- Check the encoding format of the Hosts file
- Check for permission issues
- Reset the Hosts file
- Disable Proxy
- Create a new Hosts file
- Flush Socket Pools in Chrome
- Disable DoH in Firefox
Let’s see all these fixes in detail.
1] Flush your DNS cache
The changes made to the Hosts file should take effect immediately. But this is not happening. Hence, flushing the DNS cache can fix the problem. To do so, you have to execute the following command in an elevated Command prompt.
ipconfig /flushdns
David brings to our attention his experience:
His Hosts file was being protected by his anti-virus, Webroot SecureAnywhere. He found out when Windows told him it was being used by another process WRSVC when he tried to save it. He turned off anti-virus protection before editing the Hosts file, and then ran ipconfig /flushdns.
So you might want to disable your security software temporarily before you carry out our suggestions.
2] Reset NetBios cache
If flushing the DNS cache did not fix your problem, resetting the NetBios cache may help. Open the Command Prompt as an administrator, type the following command, and hit Enter.
nbtstat -R
Now, check if the issue persists.
3] Check the encoding format of the Hosts file
The Hosts file should have any one of the following encoding formats:
- ANSI
- UTF-8
Check what the encoding format of your Hosts file has. To do so, right-click on the Hosts file and select “Open with > Notepad.” If the Notepad option is not there, open Notepad and then press the Ctrl + O keys. Now, select the Hosts file to open it. Go to “File > Save As.” Notepad will show you the same encoding format used for the Hosts file.
Alternatively, you can also use Firefox to view the encoding format of the Hosts file. The steps to do so are as follows:

- Open Firefox.
- Press the Ctrl + T keys to open a new tab.
- Press the Ctrl + O keys and select the Hosts file to open it in Firefox.
- When the Hosts file opens up in Firefox, press the Ctrl + I keys to view the encoding format.

If the encoding format is other than those mentioned above, you can change it by using Notepad. Open the file in Notepad and go to “File > Save As.” Select UTF-8 or ANSI encoding format in the drop-down. Write its name under inverted commas, as “hosts” and click Save. You will get a confirmation message to replace the existing file. Click Yes.
If this does not work, create a new Hosts file. We have explained this method later in this article.
4] Check for permission issues
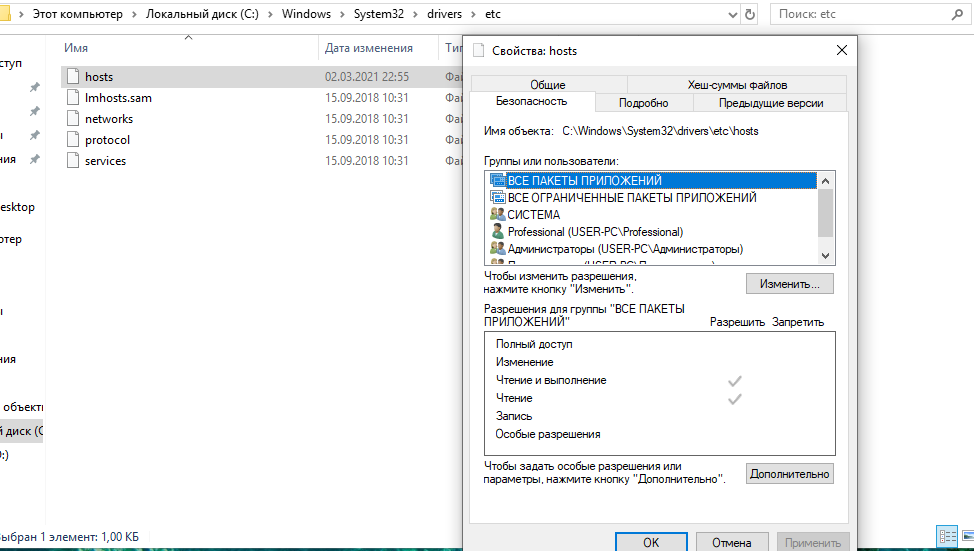
The problem might be occurring due to permission issues. The Hosts file should have both Read and Read & execute permissions. To check this, follow the steps listed below:

- Right-click on the Hosts file and select Properties.
- When the Properties window appears, select the Security tab.
- Select Users in the Groups or user names box.
- Both Read and Read & execute permissions should have check marks under the Allow column. If not, allow these two permissions to the Hosts file by clicking on the Edit button.
5] Reset the Hosts file
If the issue still persists, reset the Hosts file back to default. Resetting the Hosts file to default can fix the connectivity issues.
6] Disable Proxy

If Proxy is enabled on your computer, it might be bypassing the Hosts file due to which the Hosts file is not working. The solution is to disable the Proxy. Open your Windows 11/10 Settings and turn off both Automatic proxy setup and Manual proxy setup settings.
7] Create a new Hosts file
Create a new Hosts file and replace the existing one with that. Before you create a new Hosts file, we suggest you perform the following steps and see if the issue is fixed.
- Go to the default location where the Hosts file is located.
- Copy the Hosts file and paste it to another location.
- Delete the Hosts file from the original location.
- Now, go to the location where you copied the Hosts file and move it to the original location.
The above steps solved the problem of some users. Maybe these steps solve your problem too. If this does not help, create a new Hosts file. To do so, go through the following steps:
- Open the default location of the Hosts file.
- Right-click on the Hosts file and select Rename.
- Name it as Hosts.old and hit Enter. You should sign in to your computer as an administrator to rename the Hosts file.
- Now, open Notepad.
- Go to “File > Save As.”
- In the File name field, type hosts under the inverted commas.
- Make sure that the encoding format is set to either UTF-8 or ANSI.
- Now, click Save.
- Move this Hosts file to the default location on the C drive (if you have saved it on another location).
8] Flush Socket Pools in Chrome

The connectivity issues in Chrome can also be resolved by flushing the Socket Pools. If clearing the DNS cache on your Windows device does not fix the problem, you can also try flushing the Socket Pools in Chrome. To do so, open Chrome, then open a new tab. Now, copy the following address, paste it into the address bar of Chrome, and hit Enter.
chrome://net-internals/#sockets
Click on the Flush socket pools button.
9] Disable DoH in Firefox
DoH stands for DNS over HTTPS. It is a protocol that passes the DNS queries through an HTTPS encrypted session. If privacy is your main concern, you can enable this setting in Firefox. When you type the address of a particular website, your web browser sends a request over the internet to look up the IP address of that website. If this connection is not encrypted, the web address can easily be seen by third parties. If DoH is enabled, the request is sent to the DoH-compatible DNS server by using the encrypted HTTPS connection.

The DoH can be slower than traditional DNS queries. If DoH is enabled in Firefox, you might be experiencing the issue due to it. You can check this by disabling it. The steps for the same are as follows:
- Open Firefox.
- Click on the three horizontal lines on the top right side and select Settings.
- Select the General category from the left side.
- Scroll down and locate the Network Settings section. Click on the Settings button under this section.
- The Connection Settings window will appear.
- Scroll down and uncheck the Enable DNS over HTTPS checkbox.
- Click OK to save the changes.
Read: SysMate Hosts File Walker lets you manage Windows Hosts file easily.
How do I open Hosts file in Windows 11?
You can open Hosts file in Windows 11 by using text editor software. Notepad has a default text editor software in Windows. You can use it or you can install Notepad++ for the same. To open a Hosts file in Notepad, first, open Notepad as an administrator, press the Ctrl + O keys, and select the Hosts file to open it.
Hope this helps.
Read next: SwitchHosts is a Hosts file switcher for changing Windows Hosts file easily.
все проще
выходишь из опенсервера, не гасишь, а именно выходишь
правой кнопкой по иконке
«запуск от Администратора» — запускаешь
1. Открыть cmd.exe (win + r)
2. Выполнить там команду:
attrib.exe -s -r -h -a C:Windowssystem32driversetchostsЕсли это не помогло, значит у вас скорее всего запущено антивирусное ПО, которое блокирует файл самостоятельно. В этом случаем можно в настройках ПО добавить исполняемый файл openserver в доверенные.
Спасибо тоже была проблема!
——————————————————————
1. Открыть cmd.exe (win + r)
2. Выполнить там команду:
attrib.exe -s -r -h -a C:Windowssystem32driversetchosts
в моем случае установил navicat premium, key не сработал, удалил программу, после опен не запускался, открыл «hosts» , вижу все строки коментированы,а в конце ->
127.0.0.1 activate.navicat.com
а сам файл в properties -> read only
исправил то и другое, заработало
— это потому, что каждый проэкт стоит под 127.0.0.1 , опен хочет прописать, а файл read only.
Мне нужен был автозапуск. Вот мое решение:
Добавить права на файл hosts на изменение (на скрине их нет, но надеюсь вы поймете где ставитьс)
В моём случае Kaspersky Internet Security защищал файл от изменений. Я просто добавил приложение OpenServer.exe в доверенные. Никаких прав на ярлык и флагов на hosts не понадобилось.
У меня блокировал protect браузера, поставил галочку доверять приложению и все заработало.
Спасибо, помогло!
В моём случае антивирус добавил файл на карантин и закрыл доступ.
блокировал антивирус др. веб
Помогло следующее: идем в настройки антивируса др. веб> «превентивная защита»> «поведенческий анализ»> выбираем вкладку «доступ приложений»> жмем плюс и выбираем «Open Server.exe» и ставим галочку напротив «Файл HOSTS».