Решаем проблемы за Гейба.
Valve и баги. Баги и Valve. Компания Гейба Ньюэлла регулярно выпускает обновления для CS:GO, Dota 2 и даже TF2, но ошибок в играх от этого меньше не становится.
Одна из частых ошибок, с которой сталкиваются игроки в Кс Го – «Система VAC не смогла проверить вашу игровую сессию». Рассказываем что делать для исправления.

Как исправить ошибку
Есть сразу несколько способов решения с ошибкой VAC в Кс Го. Если первый способ не сработает, переходите к следующим.
- Очистка кэша загрузки
- Проверка целостности кэша
- Перезагрузка ПК и другие способы
Как очистить кэш загрузки
- Перейдите в настройки Steam. Для этого в левом верхнем углу Стима кликните на пункт меню «Steam» и перейдите в Настройки
- Откройте вкладку «Загрузки»
- Выберите пункт «Очистить кэш загрузки»
- Готово, в большинстве случаев очистка кэша загрузки помогает с ошибкой Вак в Кс Го

Все консольные команды Кс Го – смена рук, настройки графики, сервера и другие полезности
Как проверить целостность кэша
Если предыдущий способ не помог, то стоит попробовать проверить целостность кэша Кс Го. Вот как это делается:
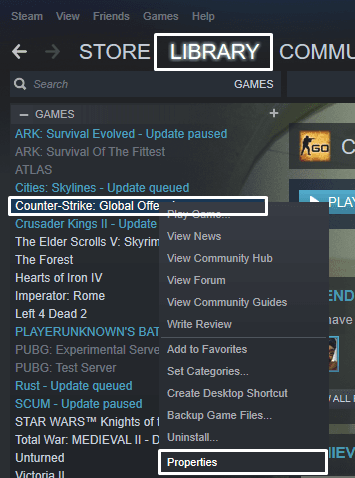
- В библиотеке в Steam найдите CS:GO
- Зайдите в «Свойства» игры – нажмите ПКМ по Кс Го в списке
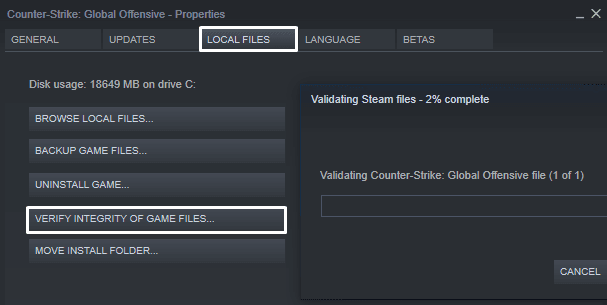
- Нам нужна вкладка меню под названием «Локальные файлы»
- Кликните на кнопку «Проверить целостность файлов игры…»
- Самое время проверить наличие ошибки в Кс Го

Перезагрузка ПК и другие способы
Если два предыдущих способа не помогли решить проблему с VAC-ошибкой, попробуйте следующие решения
- Перезагрузите ПК
- Выйдите из аккаунта Steam и войдите обратно
- Добавьте CS:GO или весь Steam в исключения своего антивируса
Помогли ли способы исправить ошибку «Система VAC не смогла проверить вашу игровую сессию»? Делитесь результатами (и если знаете – другими советами) в комментариях.
Как выдать себе оружие в Кс Го
Все виды оружия в Кс Го. Актуальный список с фото и названиями
Сейчас мы разберем еще одну ошибку в CS:GO, которую пользователи могут встретить на своем компе.
Содержание
- Как устранить ошибку связанную с VAC проверкой
- Способ №1: Перезапуск клиента STEAM
- Способ №2: Переустановка CS:GO
- Способ №3: Ручной запуск Сервисов Steam
- Способ №4: Активация DEP
- Способ №5: Очистка кэша загрузки
- Способ №6: Соответствие вашего региона
- Способ №7: Проверка фаерволов и антивирусов
- Способ №8: Перезапуск роутера
- Способ №9: обновление нужных файлов проверки
- Способ №10: проверка целостности файлов
- Что такое VAC в STEAM
Сейчас мы разберем практически все нюансы, которые помогут нам исправить данную проблему. Начнем с самых простых и легких.
ПОЛЕЗНЫЕ СТАТЬИ: Лагает кс го и Не запускается игра!
Способы исправления ошибки связанные с ВАК проверкой в кс го:
Способ №1: Перезапуск клиента STEAM
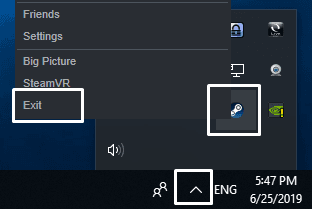
Бывает такое, что банально клиент не успел запустить проверку файлов. Ну, или вариантом также может быть то, что оно запустилось некорректно. В таком случае достаточно будет полностью перезапустить Стим и программа сама перезапустит нужный модуль для проверки файлов. Только выйти нужно полностью. Не просто закрыть, а именно Выйти.
Чтобы выйти и з стима, то в трее системы нужно нажать правой кнопкой мыши и выбрать соответствующий пункт: 
После этого запустить заново (от имени Администратора системы Windows).
Учитывайте то, что может быть Стим заблокировал полностью данный аккаунт. В таком случае ни один из перечисляемых способом не поможет. И лучшим решением будет — зарегистрировать новый аккаунт.
РЕКОМЕНДУЕМ ПОЧИТАТЬ: Проблемы с микрофоном и правильная его настройка!
Способ №2: Переустановка CS:GO
Такой способ может помочь в связи с тем, что были нарушены файлы игры, или же заблокированы системой после чего они не могут корректно пройти проверку. Соответственно, лучшим решением будет полностью снести кс го и установить его заново. Перед началом сохраните свой конфиг и ваши настройки.
Инструкцию по переустановке мы разместили в отдельной статье касательно проблем запуска кс го
Способ №3: Ручной запуск Сервисов Steam
Так как система не смогла выполнить проверки каких-то файлов самостоятельно, то сейчас разберем один из методов ручной запуск сервиса. Для этого запускаем строку Выполнить (нажатием клавиш win+r) и прописываем следующие строки:
«E:SteambinSteamService.exe» /repair
Причем выполнение этой команды производим именно с таким синтаксисом. То есть, адрес стима может меняться в зависимости от того, куда вы его установили. В моем случае у меня диск Е, в вашем это может быть и С и D. Также сама папка стим может находиться не в корне диска (сразу). Как только вы запустите сервис, то будет произведена повторная проверка нужных файлов системой безопасности VAC. Скорость будет зависеть от мощности компьютера. В среднем вы на 2-10 секунды увидите вот такое окно:
После чего повторно перезапускаете клиент и пробуйте запустить игру.
ЧИТАЙТЕ ТАКЖЕ: Убираем отдачу во время стрельбы!
Способ №4: Активация DEP
VAC очень сильно взаимодействует с системой работы процессоров, потому необходимо будет провести его проверку и сделать необходимые шаги, которые помогут вам исправить ситуацию.
Полностью весь этап мы изложили в статье касательно пробемы запуска CS:GO по причине VAC-блокировке.
Способ №5: Очистка кэша загрузки
В определенных случаях клиент может закешировать нужные файлы, которые должны были пройти проверку. Для того, чтобы программа смогла заново наполнить свежий кеш, то необходимо очистить старый. Переходим в настройки Стима:
Далее открываем пукнт «Загрузки» и нажимаем кнопку очистки кэша:
Способ №6: Соответствие вашего региона
Вы знаете, что во всех странах мира есть свои ограничения, правила и нюансы касательно того, в каком регионе вы проживаете. Платформа в обязательном порядке привязана ко времени и вашего места расположения. Соответственно, необходимо проверить корректность вашего времени на компьютере, а также выставленного региона. Все должно совпадать с реальными данными. После правильной выставленной даты и времени необходимо перезапустить Стим.
ЧИТАЙТЕ ТАКЖЕ: Переключаем язык в кс го!
Способ №7: Проверка фаерволов и антивирусов
На вашем комьютере могут стоять запрещенные программы или антивирусы блокирующие определенные порты или трафик интернета. Потому и выбивает ошибку «Система VAC не смогла проверить вашу игровую сессию в CS:GO»
Для исправления проблемы необходимо:
- Временно отключить все антивирусы и фаерволы запущенные с системой;
- Отключить Брандмауэр Виндовс;
- Выключить читы или дополнительные программы для игры;
- Перезагрузить компьютер и запустить заново стим.
Способ №8: Перезапуск роутера
В связи с тем, что все компьютеры вашей внутренней сети находятся под одним внешним айпи адресом, то не исключена временная блокировка. Может быть такое, что один из участников получаемых услуг в вашей сети делает мощную файловую нагрузку на сеть. Потому система может временно остановить подачу сигнала и коннекта со Steam серверами. При перезагрузке вы можете получить новый внутренний адрес, что поможет вам заново повторить VAC проверку файлов
ЧИТАЙТЕ ТАКЖЕ: Как говорить и общаться в кс го!
Способ №9: обновление нужных файлов проверки
Главными файлами в платформе, которые отвечают VAC проверку — clientregistry.blob, Steam.dll и SteamUI.dll.
- Нужно выключить полностью Стим и через поиск Виндовса (win+s) найти эти файлы. Желательно уточните место где вы собираетесь их искать. Так как поиск по всему компьютеру и локальным дискам будет только лишняя трата времени;
- Удалите их полностью с компьютера;
- Заново запустите стим и пускай система сама попробует скачать их заново.
Такое решение проблемы в частых случаях помогает. Так как не всегда понятно как система проверки VAC работает.
Способ №10: проверка целостности файлов
Последним и неплохим решением будет проверить целостность файлов всей игры. Может быть такое, что они попросту слетели или удалились какой-то вашей отдельной программой. В платформе есть специальная кнопка, которая может сама в автоматическом режиме сделать всю необходимую работу.
Как это сделать мы описали в статье по проверки файлов
Также мы подготовили для вас видеоматериал, который поможет вам наглядно посмотреть, как ребята избавляются от данной проблемы:
Что такое VAC в STEAM
VAC — стандартная система защиты от вирусов и запрещенного софта (читов) в платформе Steam. Разработчики компании VALVE стараются (к сожалению не так успешно, но все же) бороться с игроками, которые используют сторонние программы, которые создают преимущество против соперников. Большинство сторонних платформ (faceit, esea и другие) стараются дополнительно подключать свои программы, которые проверяют использование читов на их серверах.
ЧИТАЙТЕ ТАКЖЕ: Параметры запуска кс го!
Часто можно встретить такую ошибку «.Система VAC не смогла проверить вашу игровую сессию в CS:GO» (“VAC was unable to verify the game session“ — английская версия ошибки) . Это напрямую связано с тем, что CS:GO разделен частями — так называемыми компонентами. При установке игры система делает свои личные подписи каждому компоненту. И каждый запуск VAC сверяет свои подписи, проставленные ранее, в соответствии. Если что-то не сходится или не соответствует алгоритму данной программы, то она блокирует и запрещает запуск. Таким образом усложняет и создает трудности нечестным игрокам. В другом случае все игроки бы могли использовать и менять полностью все параметры и тонкости игры под свой вкус и лад. Создавая большие проблемы честным игрокам, которые хотят насладиться нашим любимым шутером.
Такая ошибка может появляться не только потому, что вы используете сторонний софт или запрещенные модули. А просто получился банальный сбой в сверке файлов. Самой банальной причиной — изменения и сбой по настройкам операционной системы. Такое может случаться по различным причинам связанными с обновлениями, конфликтом с другим ПО или сбоев кластеров на винчестере (если у вас HDD). У VAC системы есть доступ практически ко всем файлом игрового пространства STAEM. Потому проблемой даже может стать фактически ошибка при загрузке файла из интернета при обновлении. Какую-то часть файла скачало, но получила ошибку. И защита ВАК вас остановит.
БУДЕТ ПОЛЕЗНЫМ: Как правильно стрелять. Тренировка стрельбы
Важно понимать, что это на блокировка вашего аккаунта. Просто есть небольшой сбой, который мы сейчас вместе с вами исправим. Некоторые игроки получают именно VAC-ban — это другое. То есть фактически эта ошибка говорит о том, что есть какие-то файлы, которые мешают вам пройти проверку. Сейчас разберемся какие. А может и не разберемся, но точно исправим проблему.
Подписывайтесь на нас в социальных сетях (ВК, Телеграмм)!
И будьте в теме Киберспорта вместе с GOCSGO.NET
You’re not on VACation yet..
If you’re reading this, you’ve probably received the following error: «Matchmaking Failed — VAC was unable to verify your game session». We’ve got some good news, and some even better news for you. The good news? You haven’t been VAC banned! The better news? There’s an easy fix that works in 2019!
As of a recent Windows 10 update (September 2019), it may be necessary to run Steam and CS:GO as administrator until Steam resolve the conflict. Please try this before and after running the below three fixes.
To do this: close Steam, run Steam as administrator (right click > «Run as administrator»), then opening CS:GO as administrator (right click > «Run as administrator»).
Fix #1, which is outlined below, works for about 95% of people, so chances are it will work and solve your error. In the unlikely case that it doesn’t, we’ve provided some other fixes that definitely will!
Fix #1: Verify Integrity of Game Files and Restart PC
To perform this fix, open up Steam, go to Library, right click Counter Strike: Global Offensive, and then click «Properties»:
After opening up the properties window, head to «Local Files» and click «Verify Integrity of Game Files»:
Wait for this to complete, and then restart your computer.
After completing the above, your CS:GO should be working fine, and the «Matchmaking Failed — VAC was unable to verify your game session» error should be gone. If, however, it’s still occurring, continue reading Fix #2 below.
Fix #2: Repair the Steam Service
Repairing the Steam service is recommended by Valve here. To do this, all you need to do is:
Close Steam. Do this by right clicking Steam in your System Tray (bottom right hand corner) and clicking «Exit»:
Open your Start Menu, search for «Run» and open the file named «Run»:

Enter the following into the text box and press «OK»:
«C:Program Files (x86)SteambinSteamService.exe» /repair
An empty terminal should then pop up. Wait for this to close and re-open Steam — your issue should be fixed.
If your error isn’t fixed, continue reading for Fix #3.
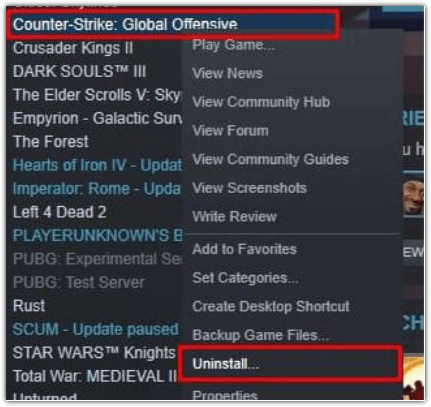
Fix #3: Completely Reinstall CS:GO
If the two fixes outlined above haven’t worked, your issue is likely one that won’t be resolved by changing a setting or restarting your computer. Whilst we recommend you search the web to see if there is anything else that might work for you, chances are, you’re going to save time by reinstalling CS:GO. Reinstalling the game will get the issue fixed quickly, and will save you having to try lots of different fixes (that probably won’t work).
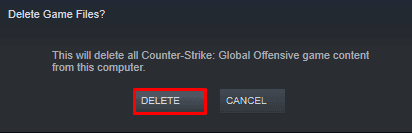
To reinstall CS:GO completely, go to your Library in Steam, right click «Counter-Strike: Global Offensive» and click «Uninstall»:

On the window that pops up, click «Delete»:
Then you’ll need to reinstall CS:GO. You can do this at https://store.steampowered.com/app/730/CounterStrike_Global_Offensive/. After reinstalling CS:GO, the «Matchmaking Failed — VAC was unable to verify your game session» error should be fixed!
If you’re still experiencing issues after trying all of the above three fixes, send us a Tweet @Total_CSGO and we’ll do our best to help!
If you play Roblox and you’re experiencing issues with your game, check out these Roblox error guides for help.
VAC, also known as Valve Anti Cheat, is a method used in Valve’s online games to detect players who try to alter the game’s local files to get unfair advantage and prevent them from using the online mode. However, sometimes the valve anti cheat system can accidentally target innocent players. In this article you will learn how to fix ‘vac was unable to verify’ error in Counter Strike: Global Offesnive.
Why Am I Getting The Error Message
One thing must be made clear – if your steam account has a vac ban, there is no way to bypass it. At the moment vac bans cannot be appealed and are permanent. If your account gets VAC banned, you will no longer be able to trade CS:GO (CS2) skins as well.
If you are not banned by the vac system and still receive the error message in steam games, do not panic. This only means that the vac system failed to communicate with your account to see if the anti cheat is working. It is still unclear what causes this error to happen, but there are a couple methods that you can use fix this problem.
How to Fix VAC Error Message
If you tried to reinstall Counter Strike: Global Offensive, you would still receive the ‘vac was unable to verify game session error’. That is because reinstallation simply loads up the same files. Here are 6 simple solutions you can try to fix ‘vac unable to verify your game session’ error in Counter Strike: Global Offensive:
-
Reboot Your Computer
There might be a process running in the background, which doesn’t allow VAC verify your game. In some situations manually giving your computer a full reboot can fix this problem. In order to perform a safe reboot, follow these steps:
- Close all applications and windows.
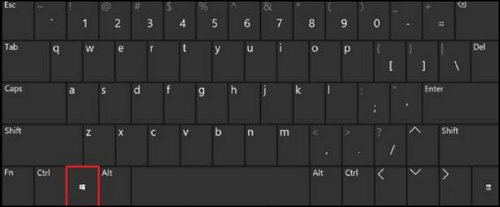
- Press the windows key or the icon on the bottom left of your screen.
- Click the power icon, choose restart and wait for the computer to reboot.
- When the computer is on again, start steam client and launch Counter Strike: Global Offensive to see if the error message appears again.
If this issue persists even after restarting your computer, you might have to do a full reboot. To do it safely simply follow these steps:
- Close all applications and shut down the operating system.
- Unplug your computer from the power source (if you’re using a laptop remove the battery).
- Wait for a couple of minutes.
- Plug the power back in and turn on the computer.
Fully removing the power from your computer should allow it to reinitialize its configuration parameters, which in turn fixes the ‘vac unable to verify your game session’ error.
-
Restart Steam
In some cases simply restarting the steam client can help fix the problem. To fully restart your steam client follow these steps:
- Click the steam tab and select exit steam from the drop down menu.
- launch steam client again.
- Click on the steam tab again and select go offline.
- Click restart in offline mode.
- Click the steam tab and select go online.
- Click restart and go online
If you followed these steps, it should fix the ‘vac unable to verify your game session’ error.
-
Re-log To Steam
Logging out of steam client can remove some of the altered configuration files, which might be causing the ‘vac was unable to verify your game session’ error. To re-log to your steam account, simply do this:
- Open the steam client
- Click on your profile name and select log out
- Enter your credendtials and log in
This should allow vac to verify your game session next time you try to play online.
-
Verify The Integrity Of Game Files
One reason for the vac error to happen can be some type of integrity issue with the game files. To fix this problem you simply need to verify the integrity of game files for Counter Strike: Global Offensive:
- Open steam client library and find csgo
- Right click on csgo and select properties
- In the properties window go to local files tab and select verify integrity of game files
- Launch csgo and try to start an online game
This simple method often works for all games which have this vac issue. In most cases verifying integrity of game files fixes the issue.
-
Run Steam Client With Admin Priviliges
It’s possible that steam might not have some important priviliges it requires to let vac verify your game session. In order to fix this issue, you can run steam with administrator prviliges, granting it all the neccessary access:
- Find the steam directory on your computer.
- Right click on steam.exe and select properties.
- In the properties window select ‘run this program as an administrator’, then click apply and the OK button.
- Repeat this process for GameOverlayUI.exe.
If there were any priviliges missing for the steam client, this method should fix the issue.
-
Repair Steam Files
In some cases your steam files might be corrupted and preventing vac from veryfing your game session. To repair the corrupted steam files, follow these steps:
- Go to ‘C:Program Files (x86)SteamSteamAppscommonCounter-Strike Global Offensivecsgomapsworkshop’ and delete everything in the folder.
- Do the same for ‘C:Program Files (x86)SteamSteamAppscommonCounter-Strike Global Offensivecsgomapsgraphsworkshop’.
- Launch steam client and wait for it to download the files you just deleted.
- Try to start the game and join a match.
If the vac error message was caused by corrupted steam files, repairing those files should let you play online again without any issues.
In Conclusion
Although you cannot appeal when you are vac banned, there is a number of methods that you can try to fix ‘vac was unable to verify your game session’ error. If this has happened to you, try one of the methods mentioned above to help you with your problem. You might find the solution that will allow you to jump back into matchmaking without any problems.
If you want more tips on how to fix your CS:GO client or learn to play better, be sure to check out the rest of the Skinsmonkey blog. In addition, be sure to check out the rest of the Skinsmonkey website, where you can also make money by selling CS:GO (CS2) skins and even get CS:GO (cs2) skins for free with the Skinsmonkey giveaways!

A true gaming enthusiast, especially Counter-Strike: Global Offensive and Rust. At SkinsMonkey, he is involved in creating game guides based on his own experience.
CS: GO has recently grown in popularity, with the number of players increasing daily. The game’s popularity has skyrocketed since it became free to play. Recently, some players have been having a lot of trouble with a very common issue in the game. When they start the game, they get an error saying, » VAC was unable to verify your session.» Some players believed the error was due to a VAC ban, while others thought the culprit was hidden on the backend.
VAC, or Valve Anti-Cheat, is the game’s built-in cheat detection mechanism that detects and punishes hackers and cheaters. When you get verify game session error, it is most likely because some files are found corrupt, preventing VAC from verifying the game’s source. If you are experiencing the problem and unsure how to resolve it, this article has covered you.
| Workable Solutions | Step-by-step Troubleshooting |
|---|---|
| Fix 1. Reboot Your Computer | Some apps and processes (such as disc indexing) on your computer are responsible…Full steps |
| Fix 2. Run the Game as an Admin | Running the game as an administrator prevents the game from crashing due to a lack…Full steps |
| Fix 3. Restart PC | To fix this, startup Steam, navigate to the Library, right-click Counter-Strike…Full steps |
| Fix 4. Repair the Steam Client | Another reason for this error may be that your Steam client could be corrupted…Full steps |
| Fix 5. Completely Reinstall CS: GO | If none of the above fixes work, your problem is likely not one that can be solved…Full steps |
«VAC was Unable to Verify Your Game Session» Error
To fix this problem, you must first understand how VAC works.
This software works with Steam to track down players who attempt to enter a game session while using a hack or cheat software. This suspicious attempt not only detects an unallowed program or script running alongside the game but also detects abnormal changes to the game files. When the software detects unfair play, the user is immediately banned.
As a result, the error message «VAC was unable to verify your game session» appears on the screen. This indicates that VAC, an anti-cheat program, could not verify your game session. Usually, it’s because a third-party program or script tried to alter the game processing or Tempered game files, which caused problems in your game verification.
Perform Some Preliminary Checks
Perform some preliminary checks if you still need to do so.
- Leave your game session, restart it, and try again to matchmake.
- Relaunch the Steam client.
- After logging out, re-enter your Steam.
- Restart your Windows computer.
- Disable Windows Defender or any other antivirus software you use, or allow the Steam client and directory folders.
- If you’ve been using a VPN, now is the time to disconnect.
If none of these steps work, it’s time to look for another easy solution.
Fix 1. Reboot Your Computer
Some apps and processes (such as disc indexing) on your computer are responsible for accessing your game files, causing VAC to fail to verify the files. This can be resolved by rebooting your computer. Take the following steps:
Step 1. Close all applications and windows.
Step 2. Press the Windows key on your keyboard, or click the icon in the lower-left corner of your screen.
Step 3. When the Start menu appears, click the Power icon. Then press the Restart button.
Step 4. After restarting your game, check to see if the error has been resolved.
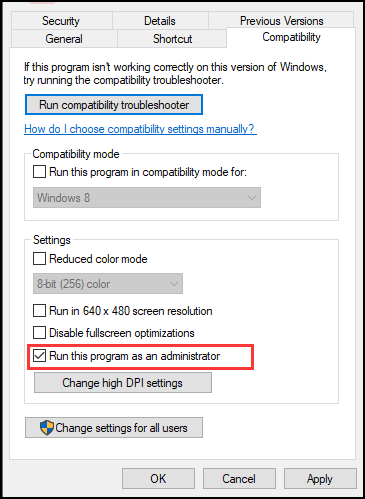
Fix 2. Run the Game as an Admin
Running the game as an administrator prevents the game from crashing due to a lack of permissions. Here’s how to go about it:
Step 1. Right-click the.exe shortcut file for the game on your device.
Step 2. Select Properties.
Step 3. Go to the Compatibility tab.
Step 4. Check the box Run this program with administrative privileges.
Step 5. To save the changes, click «OK».
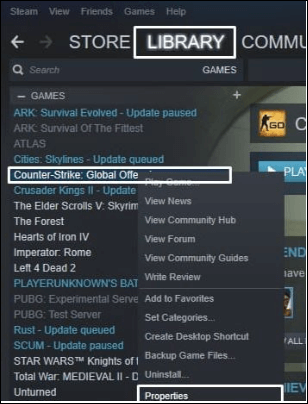
Fix 3. Verify Integrity of Game Files and Restart PC
To fix this, startup Steam, navigate to the Library, right-click Counter-Strike: Global Offensive, and then select «Properties».
Step 1. After you’ve opened the properties window, navigate to «Local Files» and click the «Verify Integrity of Game Files» button.
Step 2. CS: GO’s Local Files tab has a button for «Verifying the Integrity of Game Files».
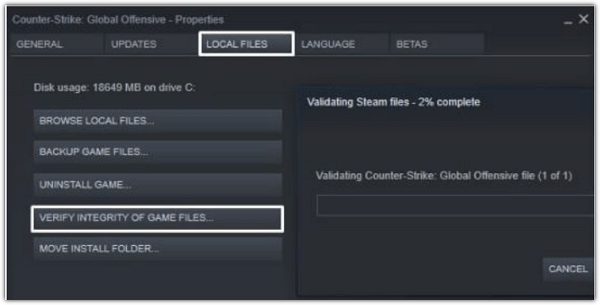
Step 3. Allow this to finish before restarting your computer.
After completing the steps outlined above, your CS: GO should be operational, and you should no longer receive «Matchmaking Failed — VAC was unable to verify your game session» errors.
Hope these fixes have worked to solve your current problems, and if you like the provided solutions please share this guide to help more people around you!
Fix 4. Repair the Steam Client
Another reason for this error may be that your Steam client could be corrupted or contain malicious files. Here’s what you need to do:
Step 1. On your screen, click the Start button.

Step 2. Click on Command Prompt in the Power User menu that appears (Admin).
Step 3. When the UAC prompt appears, select ‘Yes.’
Step 4. Copy and paste the following line. Then press Enter: «C:Program Files (x86)SteambinSteamService.exe»/repair.
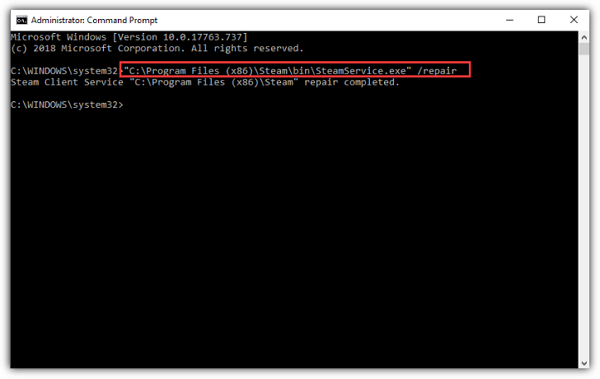
Step 5. Wait for the process to complete. It’ll take some time.
Step 6. Restart your computer after closing Command Prompt. Check if the ‘VAC was unable to verify the game session’ error has been resolved.
Fix 5. Completely Reinstall CS: GO
If none of the above fixes work, your problem is likely not one that can be solved by changing a setting or restarting your computer. While we recommend you search the web to see if anything else might work, reinstalling CS: will save you time. Reinstalling the game will resolve the issue quickly and save you from having to try a variety of fixes (which are unlikely to work).
Step 1. To completely reinstall Counter-Strike: Global Offensive, go to your Steam Library, right-click «Counter-Strike: Global Offensive,» and select «Uninstall»:
Step 2. Click «Delete» in the window that appears.
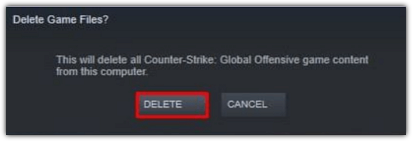
Then you’ll have to reinstall CS: GO.
Final Words
Through this article, we hope you have found a solution to the CS: GO «VAC was unable to verify your game session» error. By putting all the solutions in one place, we made it easy for you to fix the CS: GO error in a matter of a few minutes only.