На чтение 6 мин. Просмотров 6.3k. Опубликовано 03.09.2019
Последовательный порт может быть полезен, но некоторые пользователи сообщают, что Невозможно открыть последовательный порт на своем ПК. Это может быть большой проблемой, и в сегодняшней статье мы покажем вам, как исправить эту ошибку.
Проблемы с последовательным портом могут быть довольно раздражающими, особенно если вы склонны часто использовать последовательный порт. Говоря о таких проблемах, вот некоторые связанные с ними проблемы, о которых сообщили пользователи:
- Невозможно открыть соединение с com1 Windows 10, com3 . Эта проблема может иногда возникать, если у вас нет необходимых драйверов. Чтобы исправить это, обязательно обновите драйвер последовательного порта и проверьте, решает ли это вашу проблему.
- Замазка не может открыть последовательный порт Windows 10 . Иногда эта проблема может возникать из-за определенных служб Windows. Это не главная проблема, и вы можете исправить ее, отключив эти службы.
- Невозможно открыть последовательный порт. Доступ к com1 запрещен . Эта проблема может возникать из-за глюков с последовательным портом. Чтобы устранить проблему, временно отключите последовательный порт и проверьте, помогает ли это.
- Невозможно открыть com-win win code code 5, 123, 32 . Это некоторые распространенные проблемы, которые могут возникнуть с последовательным портом, но большинство из них можно исправить с помощью одного из наших решений.
Содержание
- Не удается открыть сообщение последовательного порта в Windows 10, как это исправить?
- Решение 1. Убедитесь, что у вас есть необходимые драйверы
- Решение 2. Убедитесь, что порт не открыт/отсоедините кабель
- Решение 3. Остановите службу факсов и сканирования Windows
- Решение 4. Отключите последовательный порт в диспетчере устройств
- Решение 5. Попробуйте использовать другой кабель
- Решение 6 – Перезагрузите устройство
- Решение 7. Переустановите драйвер последовательного порта
- Решение 8. Убедитесь, что система обновлена
Не удается открыть сообщение последовательного порта в Windows 10, как это исправить?
- Убедитесь, что у вас есть необходимые драйверы
- Убедитесь, что порт не открыт/отсоедините кабель
- Остановите службу факсов и сканирования Windows .
- Отключите последовательный порт в диспетчере устройств
- Попробуйте использовать другой кабель
- Перезагрузите устройство
- Переустановите драйвер последовательного порта
- Убедитесь, что система обновлена
Решение 1. Убедитесь, что у вас есть необходимые драйверы
Если вы получаете сообщение Невозможно открыть последовательный порт , возможно, проблема связана с вашими драйверами. Чтобы устранить эту проблему, рекомендуется обновить драйвер последовательного порта. Для этого посетите веб-сайт производителя вашей материнской платы и загрузите последние версии драйверов.
Если вы находите этот процесс утомительным или сложным, вы всегда можете использовать сторонние инструменты, такие как TweakBit Driver Updater , для автоматического обновления всех ваших драйверов всего за пару кликов. Это защитит ваш компьютер от загрузки и установки неправильной версии драйвера, что может привести к серьезным неисправностям.
- Загрузите программу обновления драйверов Tweakbit
Отказ от ответственности: некоторые функции этого инструмента не бесплатны
- ЧИТАЙТЕ ТАКЖЕ: Порт используется, пожалуйста, подождите. Вот как вы можете исправить эту ошибку
Решение 2. Убедитесь, что порт не открыт/отсоедините кабель
Иногда сообщение Невозможно открыть последовательный порт может появляться, если порт уже открыт. Чтобы решить эту проблему, пользователи предлагают отсоединить кабель от другого устройства и попытаться подключиться снова.
Это простой обходной путь, но несколько пользователей сообщили, что он работает для них, поэтому не стесняйтесь попробовать.
Решение 3. Остановите службу факсов и сканирования Windows
Несколько пользователей сообщили, что Невозможно открыть последовательный порт при попытке использовать последовательный порт. Оказывается, проблема заключалась в службе факса и сканирования Windows. Чтобы решить эту проблему, вам просто нужно остановить службу факсов и сканирования Windows. Для этого просто выполните следующие действия:
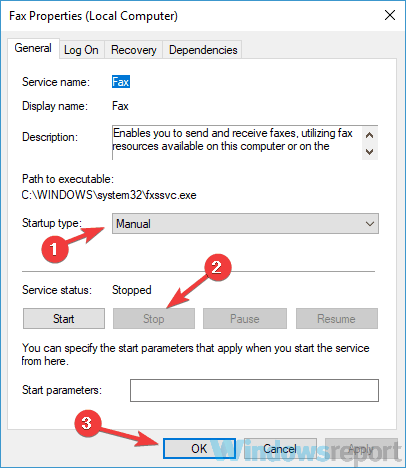
- Нажмите Windows Key + R , чтобы открыть диалоговое окно Выполнить . Введите services.msc и нажмите Enter или нажмите ОК .

- Когда откроется окно Службы , найдите службу Windows Fax and Scan и дважды щелкните ее, чтобы открыть ее свойства. Если эта служба недоступна, попробуйте изменить настройки службы Факс .
- Установите для Тип запуска значение Вручную и нажмите кнопку Стоп , чтобы остановить службу. Теперь нажмите Применить и ОК , чтобы сохранить изменения.

После этого убедитесь, что проблема все еще существует. Помните, что это всего лишь обходной путь, поэтому вам, возможно, придется повторять его каждый раз, когда вы хотите использовать последовательный порт на вашем ПК.
Решение 4. Отключите последовательный порт в диспетчере устройств
Если вы продолжаете получать сообщение Невозможно открыть последовательный порт на вашем ПК, проблема может быть связана с драйвером последовательного порта. Обычно это происходит из-за временного сбоя, и для решения проблемы рекомендуется временно отключить последовательный порт.Это довольно просто, и вы можете сделать это, выполнив следующие действия:
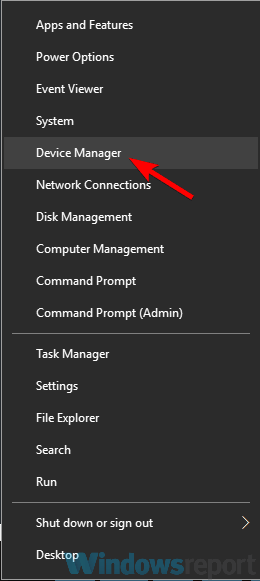
- Нажмите Windows Key + X и выберите Диспетчер устройств из списка.

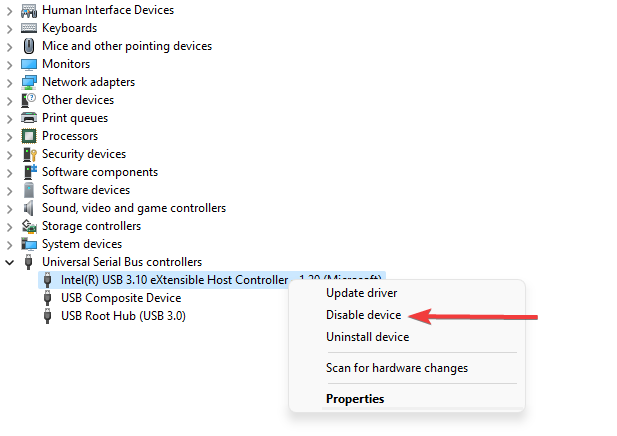
- Когда откроется Диспетчер устройств , найдите последовательный порт, щелкните его правой кнопкой мыши и выберите в меню Отключить устройство . Когда появится диалоговое окно подтверждения, нажмите Да .

- Подождите пару секунд, а затем включите последовательный порт.
После этого проверьте, решена ли проблема. Если это решение работает для вас, имейте в виду, что вам придется повторять его каждый раз, когда вы хотите использовать свой последовательный порт.
- ЧИТАЙТЕ ТАКЖЕ: что делать, если служба отчетов об ошибках продолжает перезапускаться
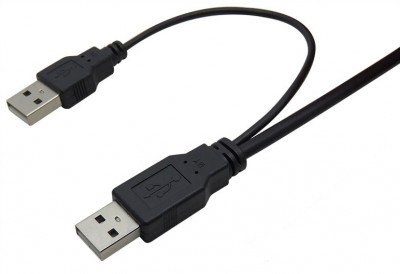
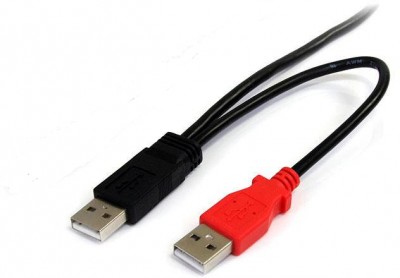
Решение 5. Попробуйте использовать другой кабель
Иногда ошибка Невозможно открыть последовательный порт может появиться, если ваш кабель не работает. Обязательно проверьте, правильно ли подключен кабель. Кроме того, проверьте на наличие видимых повреждений. Если ваш кабель кажется исправным, попробуйте заменить его и проверьте, не возникает ли проблема с другим кабелем.
Решение 6 – Перезагрузите устройство
Если Невозможно открыть последовательный порт продолжает появляться, возможно, вы можете решить проблему, перезапустив свои устройства. Просто перезагрузите устройство, к которому вы пытаетесь подключиться, и проверьте, решает ли это проблему. Кроме того, вы можете перезагрузить компьютер и посмотреть, решит ли это проблему.
Решение 7. Переустановите драйвер последовательного порта
Как мы уже упоминали, иногда проблемы с вашим последовательным портом могут быть вызваны вашими драйверами. Если вы продолжаете получать сообщение Невозможно открыть последовательный порт , вы можете решить проблему, просто переустановив драйвер последовательного порта. Это довольно просто сделать, и вы можете сделать это, выполнив следующие действия:
- Откройте Диспетчер устройств .
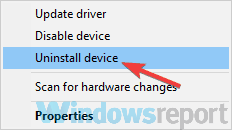
- Найдите свой последовательный порт, щелкните его правой кнопкой мыши и выберите Удалить устройство .

- Теперь нажмите Удалить , чтобы подтвердить.

- После удаления устройства перезагрузите компьютер.
После перезагрузки компьютера Windows должна установить драйвер по умолчанию, и проблема с ним будет полностью решена.
Решение 8. Убедитесь, что система обновлена
В некоторых случаях может появиться сообщение Невозможно открыть последовательный порт , если ваша система не устарела. Устаревшая система может привести к различным проблемам совместимости, и лучший способ избежать этих проблем – обновить вашу систему.
Этот процесс довольно прост в Windows 10, и по большей части Windows устанавливает обновления самостоятельно. Однако вы всегда можете проверить наличие обновлений самостоятельно, выполнив следующие действия:
- Откройте приложение Настройки и перейдите в раздел Обновление и безопасность .
- Теперь нажмите кнопку Проверить обновления на правой панели.

Если доступны какие-либо обновления, они будут автоматически загружены в фоновом режиме и установлены, как только вы перезагрузите компьютер. Как только ваша система обновится, убедитесь, что проблема все еще существует.
Невозможно открыть сообщение последовательного порта может быть проблемой для многих пользователей, которые часто используют последовательный порт, но вы должны быть в состоянии решить эту проблему, используя одно из наших решений.
Driver updates are a vital fix which can help with this issue
by Milan Stanojevic
Milan has been enthusiastic about technology ever since his childhood days, and this led him to take interest in all PC-related technologies. He’s a PC enthusiast and he… read more
Updated on September 14, 2022
Reviewed by
Vlad Turiceanu

Passionate about technology, Windows, and everything that has a power button, he spent most of his time developing new skills and learning more about the tech world. Coming… read more
- Serial ports are the interface between a PC and devices that don’t support a Bluetooth connection.
- Driver errors or physical damage can cause your serial ports to become unresponsive.
- In most cases, reinstallation or updates of your drivers should resolve this problem.
XINSTALL BY CLICKING THE DOWNLOAD FILE
This software will repair common computer errors, protect you from file loss, malware, hardware failure and optimize your PC for maximum performance. Fix PC issues and remove viruses now in 3 easy steps:
- Download Restoro PC Repair Tool that comes with Patented Technologies (patent available here).
- Click Start Scan to find Windows issues that could be causing PC problems.
- Click Repair All to fix issues affecting your computer’s security and performance
- Restoro has been downloaded by 0 readers this month.
If you are unable to open a serial port, you are in good company, and in this guide, we will be telling you all you should know.
A serial port can be helpful, but some users reported being unable to open serial port error messages on their PCs. This can be a big problem, and in today’s article, we’ll show you how to fix this error.
By the end of this article, you should have successfully fixed all problems with your serial port. Some of the solutions may be relevant to COM ports on Windows.
Why is serial port not working?
Here are the top reasons you should have in mind:
- Incorrect communication settings – For the devices to work together correctly, they must be configured with the same communication settings.
- Wrong serial cable – If you use the incorrect serial cable, you will be unable to connect.
- Software conflicts – A software driver might make a serial port unusable. This driver can stop working if it is improperly installed or incompatible with a serial port.
- Faulty wiring – This may cause issues when a control system is connected to a device.
Some variations of serial port problems that users have faced include:
- Unable to open serial port access is denied – In most cases, Access Denied occurs when another program is utilizing the port.
- Failed to open serial port Betaflight – Though it’s not a true USB interface, the flight controller communicates with your computer through a USB connection.
- COM port not detected Windows 10 – Your PC will display the warning unable to open serial port if the COM port isn’t recognized.
- Unable to open connection to com1 – This problem may sometimes arise if you don’t have the proper drivers.
- Unable to open a connection to com1 Windows 10, com3 – This issue can sometimes appear if you don’t have the necessary drivers. To fix it, be sure to update the serial port driver and check if that solves your problem.
- Putty unable to open serial port Windows 10 – Sometimes, this issue can occur due to certain Windows services. This isn’t a major problem, and you can fix it by disabling those services.
- Unable to open serial port com1 access is denied – This issue can appear due to glitches with a serial port. Temporarily disable the serial port and check if that helps.
- Unable to open com port win error code 5, 123, 3 – These are some common problems that can appear with a serial port, but you should be able to fix most of them with one of our above tips.
Now, let us show you how to resolve this error on your Windows PC.
How do I fix unable to open serial port?
1. Make sure that you have the necessary drivers
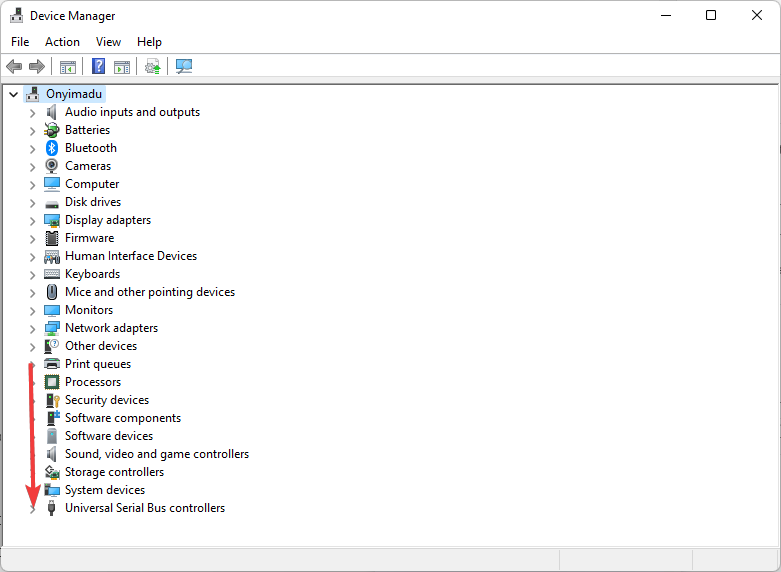
- Right-click the Start menu and select Device Manager.

- Expand the Universal Serial Bus controller category.
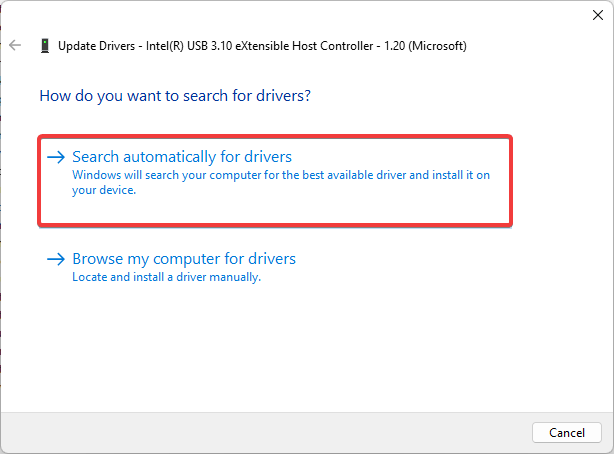
- Right-click on your driver and choose Update driver.

- Lastly, click on Search automatically for drivers.
If you’re getting the Unable to open serial port message, perhaps the problem is related to your drivers. To fix this issue, we recommend updating your serial port driver.
To do that, you can visit your motherboard manufacturer’s website and download the latest drivers. Of course, you can always use a third-party tool if you find this process tedious or complex.
DriverFix will provide a detailed report of all of your current and obsolete device drivers. In addition, it updates the most recent device drivers from the complete database regularly.
DriverFix is the best choice when updating all your drivers automatically, with just a couple of clicks.
It will keep your computer safe from downloading and installing the wrong driver version, which can cause severe malfunctions and ease the process.

DriverFix
Keep all drivers up to date to avoid incompatibility issues.
2. Verify that the port isn’t open/disconnect the cable
Sometimes the Unable to open serial port message can appear if the port is already open. To fix this problem, users are suggesting disconnecting the cable from the other device and trying to connect again.

This is a simple workaround, but several users reported it worked for them, so feel free to try it out.
3. Stop the Windows Fax and Scan service
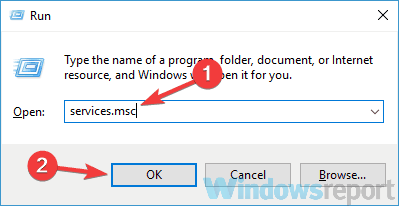
- Press Windows Key + R keyboard shortcut to open the Run dialog.
- Enter services.msc and press Enter or click OK.
- When the Services window opens, locate Windows Fax and Scan service and double-click it to open its properties (If this service isn’t available, try changing the settings of the Fax service).
- Set the Startup type to Manual and click the Stop button to stop the service. Now click Apply and OK to save changes.
Several users reported that when they were unable to open a serial port while trying to use the serial port, it turned out that the problem was the Windows Fax and Scan service.
To fix this problem, you need to stop Windows Fax and Scan service. After doing that, check if the problem is still there.
Remember that this is just a workaround, so you might have to repeat it whenever you want to use a serial port on your PC.
4. Disable the serial port in Device Manager
- Press Windows Key + X and choose Device Manager from the list.
- When Device Manager opens, locate the serial port, right-click it, and choose Disable device from the menu.
- When the confirmation dialog appears, click Yes.
- Wait for a couple of moments, and then enable the serial port.
Some PC issues are hard to tackle, especially when it comes to corrupted repositories or missing Windows files. If you are having troubles fixing an error, your system may be partially broken.
We recommend installing Restoro, a tool that will scan your machine and identify what the fault is.
Click here to download and start repairing.
If you keep getting an unable to open serial port message on your PC, the issue might be related to the serial port driver.
A temporary glitch usually causes this, and to fix the problem; we recommend disabling the serial port temporarily.
After doing that, check if the problem is resolved. If this solution works for you, remember that you’ll have to repeat it every time you want to use your serial port.
5. Try using a different cable
Sometimes, an unable to open serial port error can appear if your USB cable isn’t working. Be sure to check if your cable is connected correctly. In addition, check for any visible damage.

If your cable seems in order, try replacing it and check if the problem appears with a different cable.
6. Restart the device
If an Unable to open serial port keeps appearing, perhaps you can fix the problem by restarting your devices.
Restart the device you’re trying to connect to and check if that solves the problem. Alternatively, you can restart your PC and see if that solves the issue.
7. Reinstall the serial port driver
- Open Device Manager.
- Locate your serial port, right-click it, and choose Uninstall device.
- Now click Uninstall to confirm.
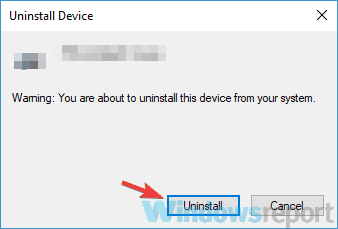
- Once the device is uninstalled, restart your PC.
As we already mentioned, sometimes issues with your serial port can be caused by your drivers.
If you keep getting Unable to open serial port message, you might be able to fix the problem simply by reinstalling the serial port driver.
After your computer restarts, Windows should install the default driver, and the problem will be completely resolved.
8. Make sure that the system is up to date
- Open the Settings app and go to the Update & Security section.

- Now click the Check for updates button in the right pane.
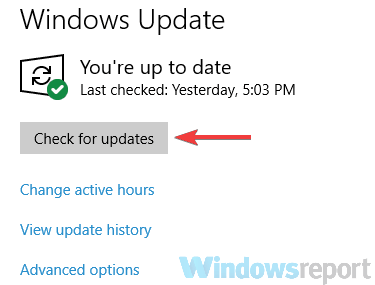
- If any updates are available, they will be downloaded automatically in the background and installed as soon as you restart your PC.
Sometimes, an unable to open serial port message can appear if your system isn’t out of date.
An outdated system can lead to various compatibility issues, and the best way to avoid these issues is to update your system.
This process is relatively straightforward in Windows 10, and for the most part, Windows installs the updates on its own. Once your system is updated, check if the problem is still there.
- Fix: Critical Error Start Menu Isn’t Working on a Windows PC
- Windows Update Error 0x80070424: 7 Simple Solutions to Apply
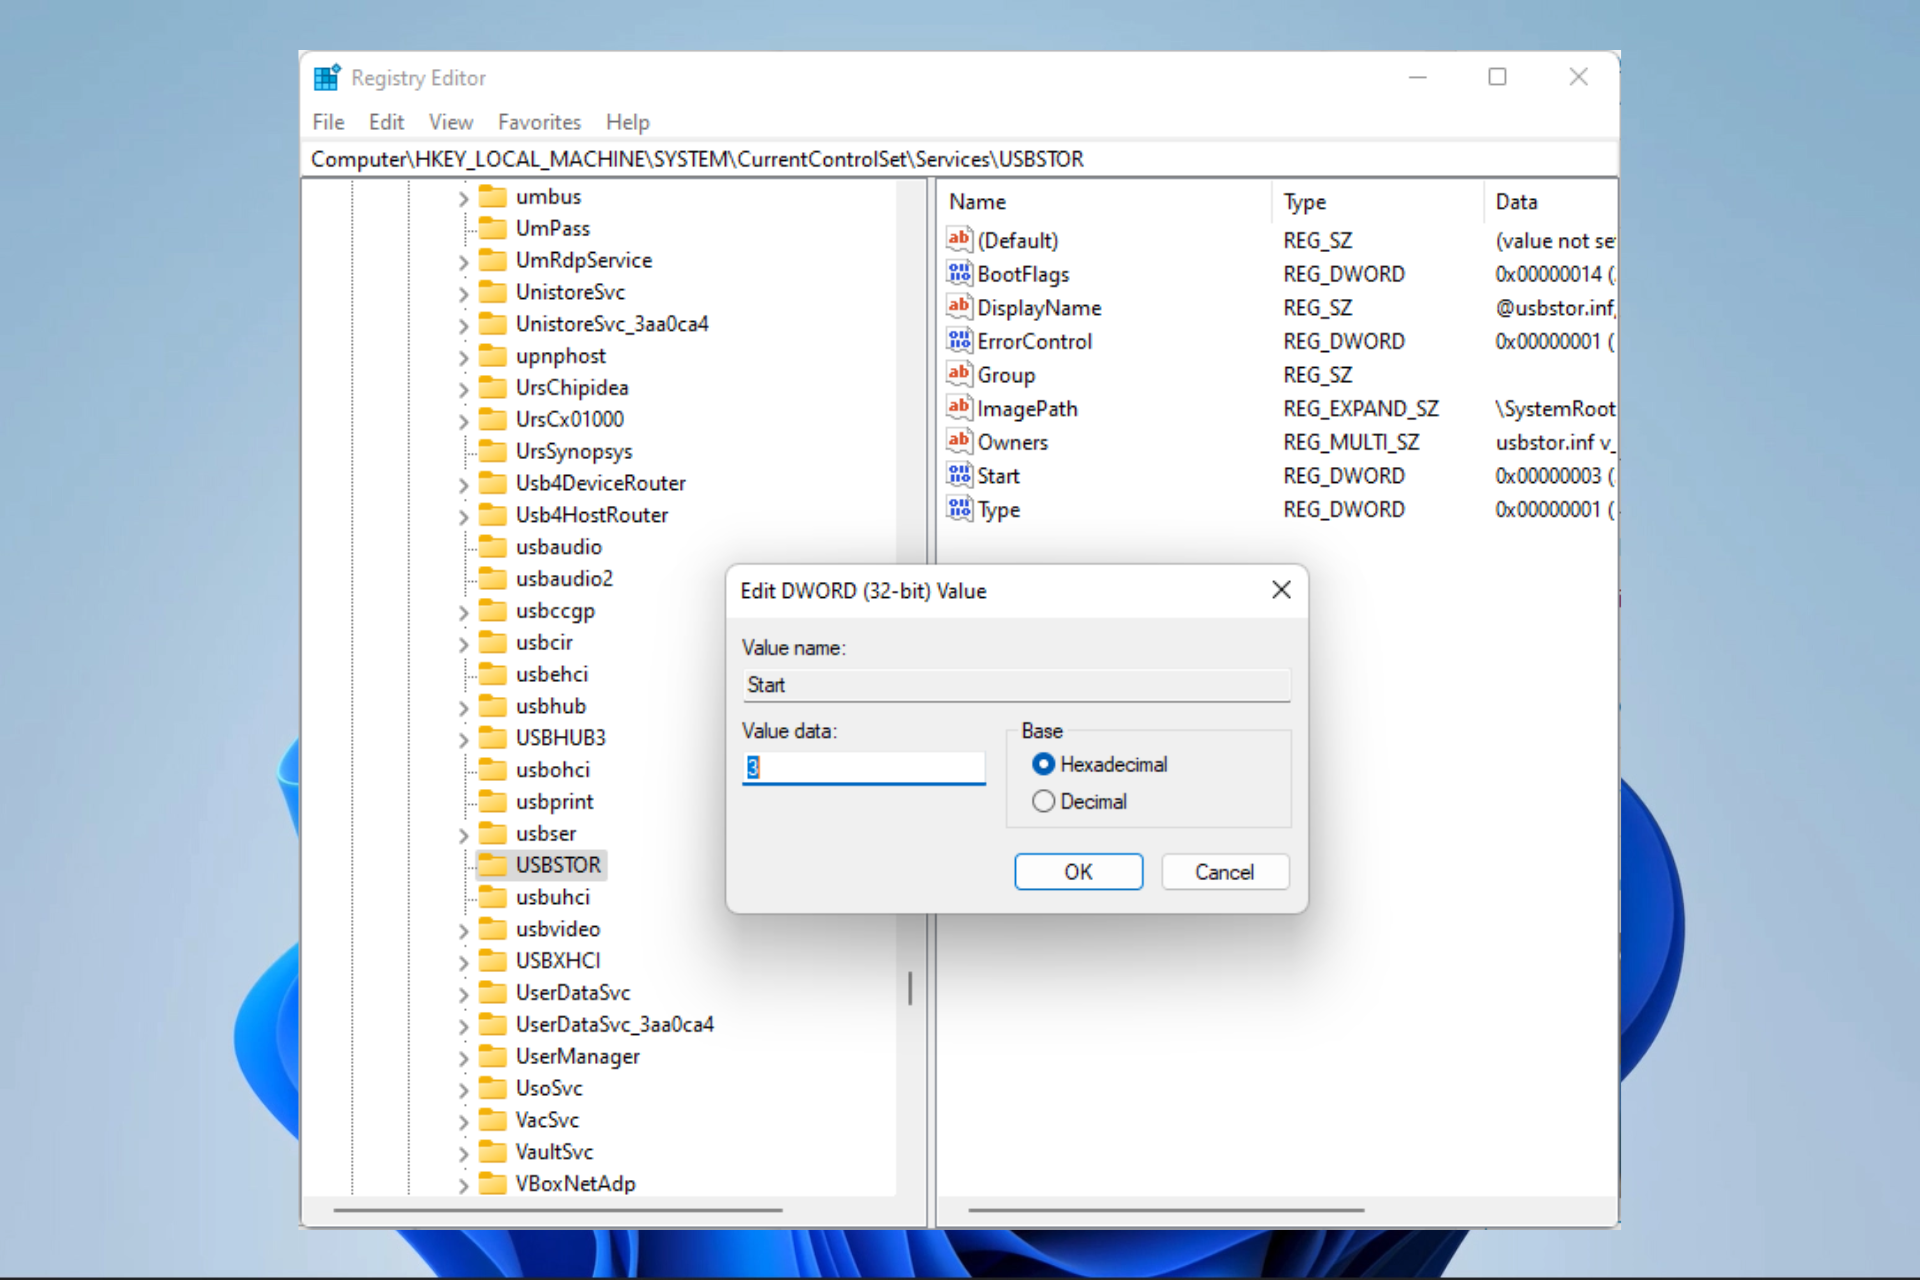
How to enable COM port in Windows 10?
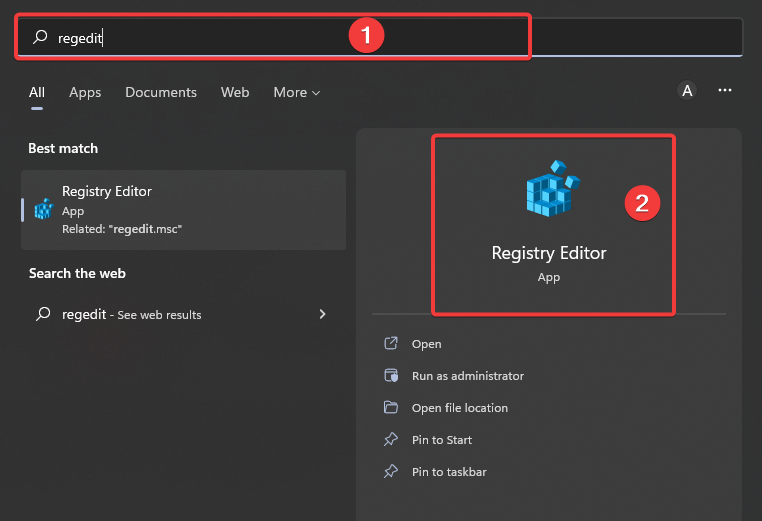
- Click the Windows key, enter regedit and select the Registry Editor app.
- Navigate to the part below:
ComputerHKEY_LOCAL_MACHINESYSTEMCurrentControlSetServicesUSBSTOR - On the right pane, double-click on Start.
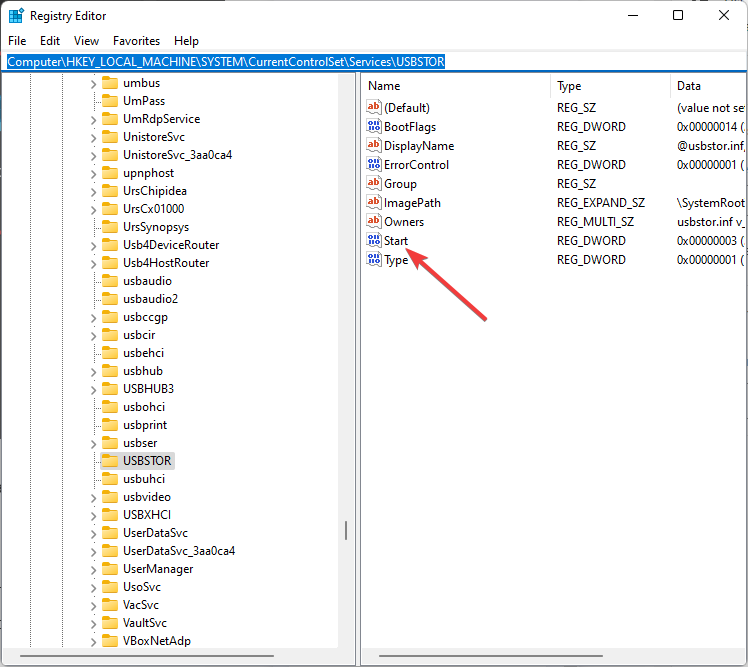
- Change the Value data to 4 and click OK.
Getting the Unable to open serial port message can be a problem for many users that use the serial port frequently, but you should be able to fix this problem using one of our solutions.
Remember that we have not made these solutions in any particular order, so you should try what seems most appropriate for your situation.
Let us know which one worked for you in the comments area below.
Still having issues? Fix them with this tool:
SPONSORED
If the advices above haven’t solved your issue, your PC may experience deeper Windows problems. We recommend downloading this PC Repair tool (rated Great on TrustPilot.com) to easily address them. After installation, simply click the Start Scan button and then press on Repair All.
![]()
Newsletter
Driver updates are a vital fix which can help with this issue
by Milan Stanojevic
Milan has been enthusiastic about technology ever since his childhood days, and this led him to take interest in all PC-related technologies. He’s a PC enthusiast and he… read more
Updated on September 14, 2022
Reviewed by
Vlad Turiceanu
Passionate about technology, Windows, and everything that has a power button, he spent most of his time developing new skills and learning more about the tech world. Coming… read more
- Serial ports are the interface between a PC and devices that don’t support a Bluetooth connection.
- Driver errors or physical damage can cause your serial ports to become unresponsive.
- In most cases, reinstallation or updates of your drivers should resolve this problem.
XINSTALL BY CLICKING THE DOWNLOAD FILE
This software will repair common computer errors, protect you from file loss, malware, hardware failure and optimize your PC for maximum performance. Fix PC issues and remove viruses now in 3 easy steps:
- Download Restoro PC Repair Tool that comes with Patented Technologies (patent available here).
- Click Start Scan to find Windows issues that could be causing PC problems.
- Click Repair All to fix issues affecting your computer’s security and performance
- Restoro has been downloaded by 0 readers this month.
If you are unable to open a serial port, you are in good company, and in this guide, we will be telling you all you should know.
A serial port can be helpful, but some users reported being unable to open serial port error messages on their PCs. This can be a big problem, and in today’s article, we’ll show you how to fix this error.
By the end of this article, you should have successfully fixed all problems with your serial port. Some of the solutions may be relevant to COM ports on Windows.
Why is serial port not working?
Here are the top reasons you should have in mind:
- Incorrect communication settings – For the devices to work together correctly, they must be configured with the same communication settings.
- Wrong serial cable – If you use the incorrect serial cable, you will be unable to connect.
- Software conflicts – A software driver might make a serial port unusable. This driver can stop working if it is improperly installed or incompatible with a serial port.
- Faulty wiring – This may cause issues when a control system is connected to a device.
Some variations of serial port problems that users have faced include:
- Unable to open serial port access is denied – In most cases, Access Denied occurs when another program is utilizing the port.
- Failed to open serial port Betaflight – Though it’s not a true USB interface, the flight controller communicates with your computer through a USB connection.
- COM port not detected Windows 10 – Your PC will display the warning unable to open serial port if the COM port isn’t recognized.
- Unable to open connection to com1 – This problem may sometimes arise if you don’t have the proper drivers.
- Unable to open a connection to com1 Windows 10, com3 – This issue can sometimes appear if you don’t have the necessary drivers. To fix it, be sure to update the serial port driver and check if that solves your problem.
- Putty unable to open serial port Windows 10 – Sometimes, this issue can occur due to certain Windows services. This isn’t a major problem, and you can fix it by disabling those services.
- Unable to open serial port com1 access is denied – This issue can appear due to glitches with a serial port. Temporarily disable the serial port and check if that helps.
- Unable to open com port win error code 5, 123, 3 – These are some common problems that can appear with a serial port, but you should be able to fix most of them with one of our above tips.
Now, let us show you how to resolve this error on your Windows PC.
How do I fix unable to open serial port?
1. Make sure that you have the necessary drivers
- Right-click the Start menu and select Device Manager.
- Expand the Universal Serial Bus controller category.
- Right-click on your driver and choose Update driver.
- Lastly, click on Search automatically for drivers.
If you’re getting the Unable to open serial port message, perhaps the problem is related to your drivers. To fix this issue, we recommend updating your serial port driver.
To do that, you can visit your motherboard manufacturer’s website and download the latest drivers. Of course, you can always use a third-party tool if you find this process tedious or complex.
DriverFix will provide a detailed report of all of your current and obsolete device drivers. In addition, it updates the most recent device drivers from the complete database regularly.
DriverFix is the best choice when updating all your drivers automatically, with just a couple of clicks.
It will keep your computer safe from downloading and installing the wrong driver version, which can cause severe malfunctions and ease the process.
DriverFix
Keep all drivers up to date to avoid incompatibility issues.
2. Verify that the port isn’t open/disconnect the cable
Sometimes the Unable to open serial port message can appear if the port is already open. To fix this problem, users are suggesting disconnecting the cable from the other device and trying to connect again.
This is a simple workaround, but several users reported it worked for them, so feel free to try it out.
3. Stop the Windows Fax and Scan service
- Press Windows Key + R keyboard shortcut to open the Run dialog.
- Enter services.msc and press Enter or click OK.
- When the Services window opens, locate Windows Fax and Scan service and double-click it to open its properties (If this service isn’t available, try changing the settings of the Fax service).
- Set the Startup type to Manual and click the Stop button to stop the service. Now click Apply and OK to save changes.
Several users reported that when they were unable to open a serial port while trying to use the serial port, it turned out that the problem was the Windows Fax and Scan service.
To fix this problem, you need to stop Windows Fax and Scan service. After doing that, check if the problem is still there.
Remember that this is just a workaround, so you might have to repeat it whenever you want to use a serial port on your PC.
4. Disable the serial port in Device Manager
- Press Windows Key + X and choose Device Manager from the list.
- When Device Manager opens, locate the serial port, right-click it, and choose Disable device from the menu.
- When the confirmation dialog appears, click Yes.
- Wait for a couple of moments, and then enable the serial port.
Some PC issues are hard to tackle, especially when it comes to corrupted repositories or missing Windows files. If you are having troubles fixing an error, your system may be partially broken.
We recommend installing Restoro, a tool that will scan your machine and identify what the fault is.
Click here to download and start repairing.
If you keep getting an unable to open serial port message on your PC, the issue might be related to the serial port driver.
A temporary glitch usually causes this, and to fix the problem; we recommend disabling the serial port temporarily.
After doing that, check if the problem is resolved. If this solution works for you, remember that you’ll have to repeat it every time you want to use your serial port.
5. Try using a different cable
Sometimes, an unable to open serial port error can appear if your USB cable isn’t working. Be sure to check if your cable is connected correctly. In addition, check for any visible damage.
If your cable seems in order, try replacing it and check if the problem appears with a different cable.
6. Restart the device
If an Unable to open serial port keeps appearing, perhaps you can fix the problem by restarting your devices.
Restart the device you’re trying to connect to and check if that solves the problem. Alternatively, you can restart your PC and see if that solves the issue.
7. Reinstall the serial port driver
- Open Device Manager.
- Locate your serial port, right-click it, and choose Uninstall device.
- Now click Uninstall to confirm.
- Once the device is uninstalled, restart your PC.
As we already mentioned, sometimes issues with your serial port can be caused by your drivers.
If you keep getting Unable to open serial port message, you might be able to fix the problem simply by reinstalling the serial port driver.
After your computer restarts, Windows should install the default driver, and the problem will be completely resolved.
8. Make sure that the system is up to date
- Open the Settings app and go to the Update & Security section.
- Now click the Check for updates button in the right pane.
- If any updates are available, they will be downloaded automatically in the background and installed as soon as you restart your PC.
Sometimes, an unable to open serial port message can appear if your system isn’t out of date.
An outdated system can lead to various compatibility issues, and the best way to avoid these issues is to update your system.
This process is relatively straightforward in Windows 10, and for the most part, Windows installs the updates on its own. Once your system is updated, check if the problem is still there.
- Fix: Critical Error Start Menu Isn’t Working on a Windows PC
- Windows Update Error 0x80070424: 7 Simple Solutions to Apply
- Esent Error [Event ID 455] On Windows: Quick Fix
- The Windows Cryptographic Service Provider Reported An Error
- Windows Error Code 0xc0000185: 5 Solutions to Fix this Issue
How to enable COM port in Windows 10?
- Click the Windows key, enter regedit and select the Registry Editor app.
- Navigate to the part below:
ComputerHKEY_LOCAL_MACHINESYSTEMCurrentControlSetServicesUSBSTOR - On the right pane, double-click on Start.
- Change the Value data to 4 and click OK.
Getting the Unable to open serial port message can be a problem for many users that use the serial port frequently, but you should be able to fix this problem using one of our solutions.
Remember that we have not made these solutions in any particular order, so you should try what seems most appropriate for your situation.
Let us know which one worked for you in the comments area below.
Still having issues? Fix them with this tool:
SPONSORED
If the advices above haven’t solved your issue, your PC may experience deeper Windows problems. We recommend downloading this PC Repair tool (rated Great on TrustPilot.com) to easily address them. After installation, simply click the Start Scan button and then press on Repair All.
![]()
Newsletter
|
|||
| 1ctube
06.04.19 — 13:01 |
Здравствуйте. Подключаем ККМ к 1С, и при тесте устройства получаем ошибку: Тест успешно выполнен. Ошибка открытия КОМ порта. Как его открыть? А возможно это из-за того, что в 1С указана скорость 115200, а в диспетчере устройств нахожу COM1 и на вкладку параметры порта указано 9600 в графе бит в секунду? |
||
| Garykom
1 — 06.04.19 — 13:08 |
>Как его открыть Скорее всего никак, для вас. «Наймите специалиста»© |
||
| 1ctube
2 — 06.04.19 — 13:12 |
(1) Хотелось бы самим получить опыт. Вы уже сталкивались с такой проблемой? Если да, то можете подсказать как устранить выше описанную ошибку? |
||
| Garykom
3 — 06.04.19 — 13:20 |
Очень просто, но для этого надо обладать некоторыми знаниями, опытом и навыками. Например тупой вопрос а драйвер от ККТ стоит? Через тест драйвера ККТ видится, подключается и работает? Понимаете что описанных вами сведений (вы в курсе сколько разных версий/конф 1С существуют и разных ККТ драйверов и прочих мелочей) недостаточно чтобы решить траблу. |
||
| Garykom
4 — 06.04.19 — 13:21 |
Тест драйвера не из 1С а нативный от производителя ККТ. |
||
| Garykom
5 — 06.04.19 — 13:23 |
«Ошибка открытия КОМ порта» чаще всего означает что порт уже открыт другим приложением. Далее сами подумайте что это значит. |
||
| 1ctube
6 — 06.04.19 — 14:01 |
(3) Драйвер от ККМ стоит, при подключении через утилиту я вижу что сама ККМ определилась(в сервисной утилите устройства). Подлкючаем к ПК через интерфейсный кабель по C0M — порту. Конфигурация 1С БП 3.0 (5) Хм, тогда нужно думаю надо посмотреть какие приложения занимают этот порт |
||
| hhhh
7 — 06.04.19 — 14:08 |
(6) наверно, забыли утилиту драйвера выключить. Вот она и занимает порт. |
||
| 1ctube
8 — 06.04.19 — 14:14 |
(7) Хм, возможно. Спасибо, посмотрим |
||
| Kigo_Kigo
9 — 06.04.19 — 14:27 |
а вы точно тот ком порт указываете, на котором висит ККМ? сделайте поиск оборудования можно сменить номер ком порта |
||
|
Kigo_Kigo 10 — 06.04.19 — 14:28 |
Скорости заявленные в свойствах компорта и в тесте драйвера не связаны, ккм работает по скорости в тесте драйвера ККМ |
| |
|
TurboConf — расширение возможностей Конфигуратора 1С |
ВНИМАНИЕ! Если вы потеряли окно ввода сообщения, нажмите Ctrl-F5 или Ctrl-R или кнопку «Обновить» в браузере.
Тема не обновлялась длительное время, и была помечена как архивная. Добавление сообщений невозможно.
Но вы можете создать новую ветку и вам обязательно ответят!
Каждый час на Волшебном форуме бывает более 2000 человек.
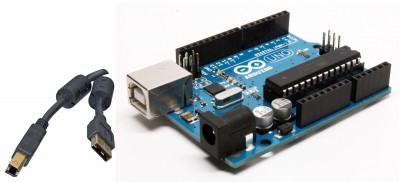
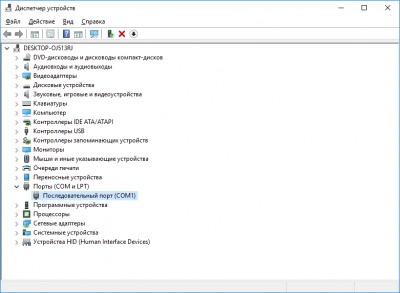
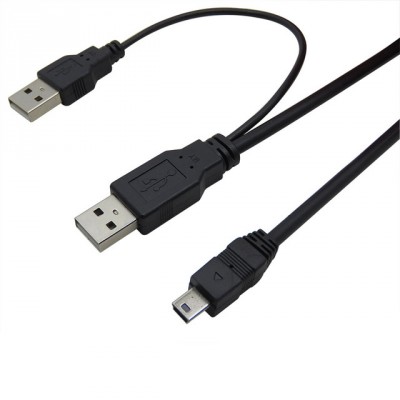
Сначала проверьте последовательные порты. Загрузите Windows, но не подключайте плату Arduino или ESP8266. На рабочем столе щелкните правой кнопкой мыши (ПКМ) по ярлыку Этот компьютер (Компьютер). В меню выберите Свойства. В окне Система щелкните по ссылке Диспетчер устройств. В окне Диспетчер устройств откройте Порты (COM и LPT). Должен присутствовать последовательный порт COM1.
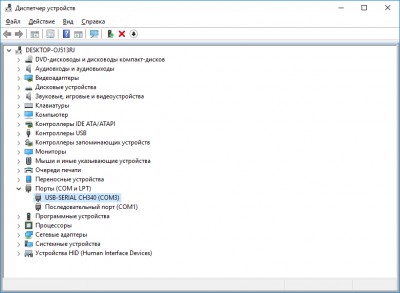
Теперь воткните в USB порт кабель от Arduino или ESP8266. В диспетчере устройств должен появиться дополнительный COM порт. Я подключил NodeMCU v3 и появился дополнительный порт COM3.
Если порт определился, но никаких сообщений в монитор порта не выводится, то проверьте скорость порта. В настройках Arduino IDE выставьте скорость порта ту, которая прописана в скетче. В окне монитора порта нажмите кнопку Очистить вывод. После этого монитор порта должен заработать.
Если ничего не изменилось и присутствует только порт COM1, то значит у вас проблемы с последовательным портом.
В этом случае при запуске скетча в окне выдается сообщение «Порт недоступен», «Ошибка подключения последовательного порта», «Порт не найден» и т.п. После этого начинаются пляски с бубном — отключаются и снова подключаются кабели, перезагружается компьютер. Иногда это помогает, иногда — нет.
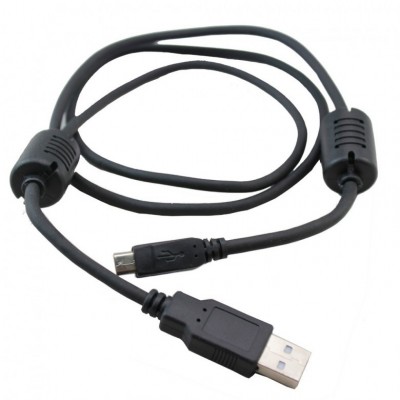
Вероятная причина ошибки порта — помехи при передаче данных по USB кабелю. Как это не банально, но чаще всего причина в некачественном кабеле. Не экономьте, купите качественный кабель, не используйте дешевые поделки, тем более кабели от зарядных устройств. В них жилы для передачи данных могут быть выполнены некачественно или вообще отсутствовать.
Вторая вероятная причина — слаботочный USB порт. Замените ненадёжный кабель и не используйте разбитые USB разъёмы.
По второй причине — недостаточно тока для питания Arduino или ESP8266. USB порт в материнской плате компьютера может быть запитан от источника с малым выходным током. Попробуйте самое простое — подключить Arduino к другому порту в надежде на то, он запитан от более мощного источника. Такое возможно, если USB портов несколько. Кардинальное решение — подключить Arduino или ESP8266 через USB хаб (USB — разветвитель) с внешним блоком питания с выходным током не менее 2 — 3 А.
Радиолюбители, умеющие паять, могут поступить проще — подпаять короткими проводами к разъему USB в параллель еще один разъем USB, в который завести от основного разъема два провода питания GND и +5В. Или купите такой кабель, если есть такая возможность. Такой прием используют фирмы, когда питания от одного разъема USB не хватает, например для питания жесткого диска, подключенного к порту USB (USB HDD). Таким образом устройство получит дополнительное питание от другого порта USB.
Ещё одно причина нехватки питания для портов USB — подключение к роутеру по Wi-Fi. Wi-Fi адаптер потребляет значительный ток и нагружает шину питания портов USB. В связи с этим отключите Wi-Fi адаптер и подключите компьютер к роутеру кабелем. Иногда это сразу может решить проблему.
Предпочтительно использовать компьютер с подключением клавиатуры и мыши к портам PS/2. Клавиатура и мышь с подключением по USB будут дополнительно нагружать шину +5В USB и питания для Arduino или Node MCU может не хватить. Отключите на время принтер, подключенный по USB, смартфон, подключенный по USB и другие устройства, подключенные к портам USB, без которых можно обойтись, так как они потребляют ток по шинам USB. Кроме того, они могут просто влиять на порты USB и вызывать сбои системы.
По возможности используйте десктоп с достаточно мощным блоком питания, который обеспечивает с запасом ток по шине +5В. Некоторые дешёвые материнские платы при подключении двух-трёх USB устройств уже начинают давать сбои.
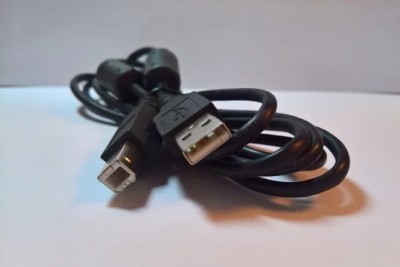
Используйте короткий USB кабель, насколько это возможно. Это уменьшит помехи при передаче данных.
Не используйте USB удлинители, подключайте Arduino или ESP8266 непосредственно к USB портам компьютера на задней стенке системного блока. Не используйте USB разъёмы на передней панели системного блока или USB порты картридера. Они подключаются к материнской плате кабелями. Это увеличивает помехи при передаче данных.
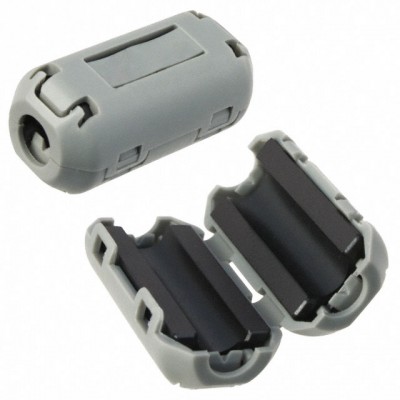
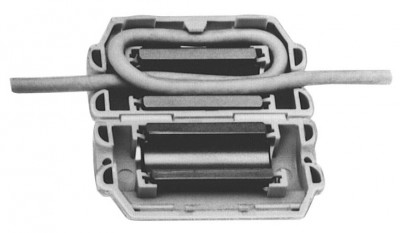
Самый действенный способ снизить помехи это использовать USB кабель с ферритовыми фильтрами — цилиндрическими утолщениями из ферритовых колец на концах кабелей.
Фильтры бывают съемными, они надеваются на кабель и защелкиваются.
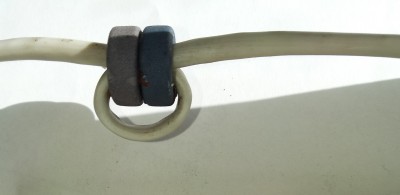
Можно изготовить фильтр самостоятельно. Возьмите ферритовое кольцо диаметром около 20 мм, притупите острые кромки наждачной бумагой, сделайте один виток кабеля вокруг сердечника и зафиксируйте кольцо на кабеле с помощью скотча или термоусадочной трубки.
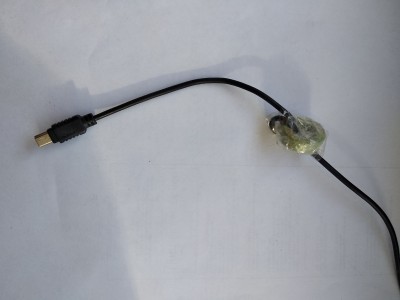
Если использовать кольца небольшого диаметра, то никакой фиксации не понадобится. Например, я использовал два кольца, снятые с неисправной материнской платы. Только придется разрезать кабель и затем спаять его снова или припаять новый USB разъем.
Бывают ситуации, когда Arduino работает нормально, а при подключении ESP8266 появляются ошибки и скетч не работает. Такое может быть из-за того, что Wi-Fi передатчик модуля потребляет довольно значительный ток и для нормальной работы просто не хватает тока. Подключите ESP8266 через USB хаб с внешним блоком питания с выходным током 2-2.5-3 А. Также используйте для подключения короткие кабели с ферритовыми фильтрами на концах.
Желательно использовать Micro-USB или Mini-USB кабель с двумя USB разъемами на конце. Отвод с USB разъемом служит для подачи дополнительного питания. Радиолюбители могут без труда подпаять дополнительный USB разъем сами.
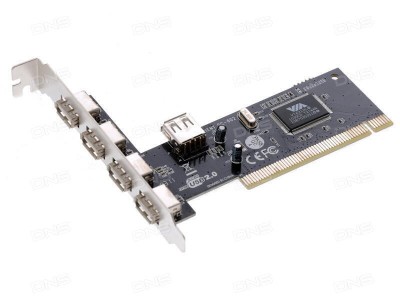
Если USB порты на материнской плате слабы по токам питания, то можно попробовать дополнительно подключить в PCI разъем контроллер USB. Подключите к этому контроллеру USB-мышь и USB-клавиатуру. К USB портам на материнской плате подключайте только Arduino или NodeMCU v3. К PCI разъему подводится более мощное питание. Один из таких контроллеров показан на фото:
Пробуйте подключаться к разным USB разъёмам компьютера, если их несколько, или разным разъёмам USB хаба.
Если ваш компьютер имеет порты USB2.0 и USB3.0, то пробуйте подключаться к тем и другим. Скорее всего лучшие результаты получите при подключении к USB2.0. Драйвер USB3.0 может работать некорректно.
Windows иногда просто не может определить порт. Проверьте контакты блока питания USB хаба в розетке сети. Если блок питания болтается, то о надёжной работе USB портов не может быть и речи.
Подключайте плату Arduino или ESP8266 в USB разъём после полной загрузки Windows.
При переключениях в другие порты номер порта может измениться. Проверяйте номер порта. В верхнем меню Arduino IDE выберите Сервис (Tools) -> Последовательный порт (Serial Port). Рядом с портом COM1 должен быть дополнительный порт. Поставьте галку, чтобы активировать его.
Работу COM порта и загрузку скетча визуально можно проверить по миганию светодиодов RX и TX на плате Arduino или по частому миганию светодиода рядом с Wi-Fi антенной на плате ESP8266 (NodeMCU v3).
Несмотря на все ухищрения, Windows 10 не открывает COM порт для Node MCU v3 (ESP-12E). Иногда подключает порт и тут же сбрасывает его и так без конца.
Подключил Node MCU v3 (ESP8266) через USB хаб с внешним блоком питания к компьютеру с Windows XP SP3. Установил драйвер ch341ser.exe и Arduino IDE 1.6.5. COM порт определяется и работает. В Windows XP COM порты определяются более надёжно. Проверил это на двух компьютерах с Windows XP с Intel и AMD процессорами.
Однако некоторые скетчи уже не используют приложения Win32 и при компиляции выдаётся ошибка. В этом случае потребуется как минимум 64-разрядная Windows 7.
COM порты виртуальные и, как в любой программе, возможен сбой при определении порта.
Семипортовые USB хабы (разветвители), как пишут в интернете, имеют две микросхемы по 4 порта. Последний порт первой микросхемы используется для подключения второй микросхемы. В итоге получается 3+4 порта. Можно попробовать подключать Arduino или Node MCU в разные порты хаба.
В Windows откройте Диспетчер устройств, раскройте Порты (COM и LPT). Не закрывайте это окно. Начинайте пробовать разные кабели, разные порты и разные варианты подключения оборудования и, как только порт надёжно определится в Диспетчере устройств, запомните эту конфигурацию оборудования.
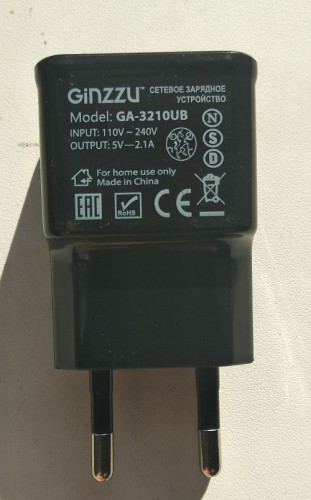
И последнее и, может быть, самое главное. Большинство бестрансформаторных блоков питания (зарядных устройств), выполненных в корпусе-вилке, не обеспечивают заявленных характеристик. Например, у зарядного устройства 5V 2.1А, показанного ниже, при токе 0,9 А напряжение на выходе падает до 3,8 В. Сомневаюсь в том, что такой блок питания вообще может отдать в нагрузку ток 2А.
При подозрениях на проблему с питанием используйте трансформаторный блок питания. По габаритам он будет намного больше, зато надежно обеспечит расчетные ток и напряжение.
Рекомендации по блоку питания (из книги «Неисправности вашего ZX SPECTRUM» С.-Петербург, 1991):
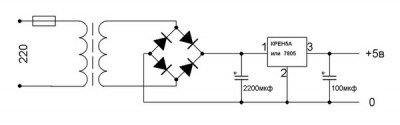
«Советуем Вам выбрать самую простую, но и самую надежную схему: трансформатор — диодный мост — конденсатор фильтра — микросхема КР142ЕН5А в стандартном включении — блокировочный конденсатор.
Не стремитесь к чрезмерной миниатюризации! Трансформатор должен иметь мощность не менее 15 Вт, провод вторичной обмотки диаметр не менее 0,7 мм и напряжение на вторичной обмотке под нагрузкой 7-8 Ом должно быть 9-10 В.
Диодный мост подойдет любой из серий КЦ402, КЦ405. Конденсатор фильтра должен быть не менее 4000 мкФ, а рабочее напряжение — не ниже 16 В. На выходе ЕН5А поставьте блокировочный конденсатор 100-200 мкФ на 10-16 В. После сборки БП проконтролируйте напряжение на входе ЕН5А при подключенной нагрузке 5 Ом — должно быть 10,5-11 В.
Если это не так — отмотайте или домотайте несколько витков вторичной обмотки трансформатора. Затем проконтролируйте под нагрузкой 5 Ом напряжение на выходном разъеме БП — должно быть 4,9 — 5,1 В. При низком напряжении придется взять более толстый провод для подсоединения разъема.
При окончательной проверке БП посмотрите на осциллографе переменную составляющую напряжения на пределе 10 мВ (под нагрузкой 5 Ом) — заметных отклонений от прямой линии не должно быть.
В случае неудачи емкость фильтрующего конденсатора нужно увеличить.
Наконец, позамыкайте выход БП накоротко и убедитесь, что ЕН5А не выходит из строя.»
Вместо диодного моста КЦ можно применть более компактный диодный мост DB157S.
Некоторые экземпляры ЕН5А имеют на выходе напряжение чуть меньше 5 В. Для регулировки выходного напряжения соберите блок питания по схеме:
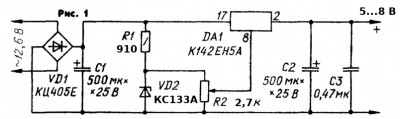
Номиналы резисторов R1 и R2 вы можете рассчитать сами. Например, после мостика на конденсаторе фильтра под нагрузкой у вас получилось напряжение 15 В. Напряжение на стабилитроне составит 3-3,3 В. Значит на резисторе R1 должно упасть 15 — 3 = 12 В. Ток стабилитрона КС133А 10 мА, т. е. 0,01 А. По закону Ома R = V/I. R = 12/0.01= 1200 Ом = 1,2 кОм. Также можно попробовать стабилитрон КС119А (напряжение стабилизации 1,9 В). Резистор R2 можно взять сопротивлением раза в три больше, чем R1, чтобы не так сильно шунтировал стабилитрон. R2 будет 3 — 3,6 кОм. Мощность рассеивания тоже рассчитывается по закону Ома. Резистор 0,25 Вт будет с большим запасом по мощности рассеивания. Для регулировки напряжения удобно использовать подстроечный многооборотный резистор СП5-3 или аналогичный.
Аккуратнее с регулировкой напряжения, а то выведите из строя само устройство. Вначале для проверки блока питания подключите нагрузку — резистор 5 Ом 5 Вт. Ток нагрузки будет 1 А. Резистором R2 установите напряжение на выходе + 5,0 ÷ 5,25 В.
Для повышения напряжения на выходе есть более простой вариант — включить в разрыв между выводом ЕН5А и общим проводом диод Д9Б. Так сделано в блоке питания для компьютера Специалист — М (ж. «Моделист-конструктор» № 4, 1991 г.)
Если вы хотите получить выходной ток 2 А, то вместо моста КЦ используйте четыре диода КД202. Также можно соединить «этажеркой» в параллель два мостика КЦ405, спаяв одноименные выводы между собой. Тогда вторичную обмотку выберите с проводом потолще. ЕН5А прикрепите к радиатору достаточных габаритов. О расчете трансформатора блока питания можно прочитать на странице Простейший расчет силового трансформатора. Сейчас проще подобрать трансформатор из готовых, например в ЧИП и ДИП. При этом учтите то, что входное напряжение КР142ЕН5А должно быть в диапазоне 7,5В < Vвх < 15В.
Если описанные меры не помогают и виртуальный COM порт не появляется или в Диспетчере устройств Windows строка виртуального порта все-таки появляется, помеченная желтым знаком вопроса (восклицательным знаком), то скорее всего проблема с драйвером CH340. Щелкнув по строке правой кнопкой мыши и выбрав Свойства, можно увидеть сообщение о том, что драйвер не подписан цифровой подписью. Попробуйте скачать другие версии драйвера CH340 (с разной длиной файла) и по очереди устанавливать их, удаляя старые версии.
Например, мне для Node MCU v.3 в Windows 7 максимальной подошел драйвер driver_ch340_341_arduino.exe (235 kb). Плата Node MCU v.3 подключена к контроллеру USB, который установлен в PCI разъем материнской платы.
На этом же ресурсе https://myrobot.ru/ можно скачать драйвер CH340 (480 kb) для Windows, Mac OS и Linux.
Если есть подозрения на глюки системы, то тогда можно попробовать переустановить систему Windows.
Если все описанные меры не дали надежного результата, то скорее всего ваш системный блок имеет слаботочные порты USB и маломощный блок питания. Тут может помочь замена материнской платы и блока питания на более мощные, т.е по сути нужен новый системный блок.
Резюме
Чтобы устранить ошибки последовательного порта —
► используйте для питания Arduino или ESP8266 USB порты с достаточным выходным током или USB хаб с внешним блоком питания.
► используйте для подключения короткие USB кабели с ферритовыми фильтрами около разъемов.
► попробуйте разные версии драйвера CH340, если не поможет — тогда другую версию Windows.
► используйте качественный кабель со всеми сигнальными жилами, а не кабель от зарядного устройства.
Последнее редактирование 20 ноября 2022 г.
Использованные ресурсы
https://wm-help.net/lib/b/book/1248084587/4
https://masterpaiki.ru/top-10-samyih-chastyih-neispravnostey-zhk-monitorov.html
https://www.dns-shop.ru/product/3a24983fdab4526f/usb-razvetvitel-ginzzu-gr-487ua/opinion/
https://kiloom.ru/spravochnik-radiodetalej/microsxema/k142en5a-k142en5b-k142en5v-k142en5g-kr142en5a-kr142en5b-kr142en5v-kr142en5g.html
Как исправить Невозможно открыть сообщение об ошибке последовательного порта
Последовательный порт может быть полезен, но некоторые пользователи сообщают, что Невозможно открыть последовательный порт на своем ПК. Это может быть большой проблемой, и в сегодняшней статье мы покажем вам, как исправить эту ошибку.
Проблемы с последовательным портом могут быть довольно раздражающими, особенно если вы склонны часто использовать последовательный порт. Говоря о таких проблемах, вот некоторые связанные с ними проблемы, о которых сообщили пользователи:
- Невозможно открыть соединение с com1 Windows 10, com3 . Эта проблема может иногда возникать, если у вас нет необходимых драйверов. Чтобы исправить это, обязательно обновите драйвер последовательного порта и проверьте, решает ли это вашу проблему.
- Замазка не может открыть последовательный порт Windows 10 . Иногда эта проблема может возникать из-за определенных служб Windows. Это не главная проблема, и вы можете исправить ее, отключив эти службы.
- Невозможно открыть последовательный порт. Доступ к com1 запрещен . Эта проблема может возникать из-за глюков с последовательным портом. Чтобы устранить проблему, временно отключите последовательный порт и проверьте, помогает ли это.
- Невозможно открыть com-win win code code 5, 123, 32 . Это некоторые распространенные проблемы, которые могут возникнуть с последовательным портом, но большинство из них можно исправить с помощью одного из наших решений.
Не удается открыть сообщение последовательного порта в Windows 10, как это исправить?
- Убедитесь, что у вас есть необходимые драйверы
- Убедитесь, что порт не открыт/отсоедините кабель
- Остановите службу факсов и сканирования Windows .
- Отключите последовательный порт в диспетчере устройств
- Попробуйте использовать другой кабель
- Перезагрузите устройство
- Переустановите драйвер последовательного порта
- Убедитесь, что система обновлена
Решение 1. Убедитесь, что у вас есть необходимые драйверы
Если вы получаете сообщение Невозможно открыть последовательный порт , возможно, проблема связана с вашими драйверами. Чтобы устранить эту проблему, рекомендуется обновить драйвер последовательного порта. Для этого посетите веб-сайт производителя вашей материнской платы и загрузите последние версии драйверов.
Если вы находите этот процесс утомительным или сложным, вы всегда можете использовать сторонние инструменты, такие как TweakBit Driver Updater , для автоматического обновления всех ваших драйверов всего за пару кликов. Это защитит ваш компьютер от загрузки и установки неправильной версии драйвера, что может привести к серьезным неисправностям.
- Загрузите программу обновления драйверов Tweakbit
Отказ от ответственности: некоторые функции этого инструмента не бесплатны
- ЧИТАЙТЕ ТАКЖЕ: Порт используется, пожалуйста, подождите. Вот как вы можете исправить эту ошибку
Решение 2. Убедитесь, что порт не открыт/отсоедините кабель
Иногда сообщение Невозможно открыть последовательный порт может появляться, если порт уже открыт. Чтобы решить эту проблему, пользователи предлагают отсоединить кабель от другого устройства и попытаться подключиться снова.
Это простой обходной путь, но несколько пользователей сообщили, что он работает для них, поэтому не стесняйтесь попробовать.
Решение 3. Остановите службу факсов и сканирования Windows
Несколько пользователей сообщили, что Невозможно открыть последовательный порт при попытке использовать последовательный порт. Оказывается, проблема заключалась в службе факса и сканирования Windows. Чтобы решить эту проблему, вам просто нужно остановить службу факсов и сканирования Windows. Для этого просто выполните следующие действия:
- Нажмите Windows Key + R , чтобы открыть диалоговое окно Выполнить . Введите services.msc и нажмите Enter или нажмите ОК .

- Когда откроется окно Службы , найдите службу Windows Fax and Scan и дважды щелкните ее, чтобы открыть ее свойства. Если эта служба недоступна, попробуйте изменить настройки службы Факс .
- Установите для Тип запуска значение Вручную и нажмите кнопку Стоп , чтобы остановить службу. Теперь нажмите Применить и ОК , чтобы сохранить изменения.
После этого убедитесь, что проблема все еще существует. Помните, что это всего лишь обходной путь, поэтому вам, возможно, придется повторять его каждый раз, когда вы хотите использовать последовательный порт на вашем ПК.
Решение 4. Отключите последовательный порт в диспетчере устройств
Если вы продолжаете получать сообщение Невозможно открыть последовательный порт на вашем ПК, проблема может быть связана с драйвером последовательного порта. Обычно это происходит из-за временного сбоя, и для решения проблемы рекомендуется временно отключить последовательный порт.Это довольно просто, и вы можете сделать это, выполнив следующие действия:
- Нажмите Windows Key + X и выберите Диспетчер устройств из списка.
- Когда откроется Диспетчер устройств , найдите последовательный порт, щелкните его правой кнопкой мыши и выберите в меню Отключить устройство . Когда появится диалоговое окно подтверждения, нажмите Да .
- Подождите пару секунд, а затем включите последовательный порт.
После этого проверьте, решена ли проблема. Если это решение работает для вас, имейте в виду, что вам придется повторять его каждый раз, когда вы хотите использовать свой последовательный порт.
- ЧИТАЙТЕ ТАКЖЕ: что делать, если служба отчетов об ошибках продолжает перезапускаться
Решение 5. Попробуйте использовать другой кабель
Иногда ошибка Невозможно открыть последовательный порт может появиться, если ваш кабель не работает. Обязательно проверьте, правильно ли подключен кабель. Кроме того, проверьте на наличие видимых повреждений. Если ваш кабель кажется исправным, попробуйте заменить его и проверьте, не возникает ли проблема с другим кабелем.
Решение 6 – Перезагрузите устройство
Если Невозможно открыть последовательный порт продолжает появляться, возможно, вы можете решить проблему, перезапустив свои устройства. Просто перезагрузите устройство, к которому вы пытаетесь подключиться, и проверьте, решает ли это проблему. Кроме того, вы можете перезагрузить компьютер и посмотреть, решит ли это проблему.
Решение 7. Переустановите драйвер последовательного порта
Как мы уже упоминали, иногда проблемы с вашим последовательным портом могут быть вызваны вашими драйверами. Если вы продолжаете получать сообщение Невозможно открыть последовательный порт , вы можете решить проблему, просто переустановив драйвер последовательного порта. Это довольно просто сделать, и вы можете сделать это, выполнив следующие действия:
- Откройте Диспетчер устройств .
- Найдите свой последовательный порт, щелкните его правой кнопкой мыши и выберите Удалить устройство .
- Теперь нажмите Удалить , чтобы подтвердить.
- После удаления устройства перезагрузите компьютер.
После перезагрузки компьютера Windows должна установить драйвер по умолчанию, и проблема с ним будет полностью решена.
Решение 8. Убедитесь, что система обновлена
В некоторых случаях может появиться сообщение Невозможно открыть последовательный порт , если ваша система не устарела. Устаревшая система может привести к различным проблемам совместимости, и лучший способ избежать этих проблем – обновить вашу систему.
Этот процесс довольно прост в Windows 10, и по большей части Windows устанавливает обновления самостоятельно. Однако вы всегда можете проверить наличие обновлений самостоятельно, выполнив следующие действия:
- Откройте приложение Настройки и перейдите в раздел Обновление и безопасность .
- Теперь нажмите кнопку Проверить обновления на правой панели.
Если доступны какие-либо обновления, они будут автоматически загружены в фоновом режиме и установлены, как только вы перезагрузите компьютер. Как только ваша система обновится, убедитесь, что проблема все еще существует.
Невозможно открыть сообщение последовательного порта может быть проблемой для многих пользователей, которые часто используют последовательный порт, но вы должны быть в состоянии решить эту проблему, используя одно из наших решений.
Источник
Arduino.ru
Регистрация новых пользователей и создание новых тем теперь только на новом форуме https://forum.arduino.ru
forum.arduino.ru
Ошибка открытия последовательного порта «COM3»

Во первых извените но на схеме допустил одну ошибку, нарисовал, что резистор подключается к Pin9, а на самом деле использовал Pin8.
Ну а во вторых: После того как моя плата (после неудавшейся заливки скетча) простояла подключенная к УСБ порту длительное время я заметил, что микросхема mege328 начала греться, не придется ли тогда менять этот контроллер и если да то как его перепрошить?

Переткни шнур, не поможет — перезагрузись и пропробуй снова
И перетыкал шнур и перезагружался, даже просто выключал комп и немного погодя включал обратно все равно не хочет заливать программу в ардуино и выдает сообщение об ошибке какое я привел выше
Значить, порт падох. Или СН340
Что это CH340 и можно ли его заменить
Вообще на своей плате Arduino UNO я не нашол микросхемы CH340, а к светодиодам TX и RX дорожки подводятся от mega16U2
Вполне может быть.
И что тогда моей плате пришол конец, ее больше нельзя будет востановить
Приветствую всех форумчан!
У моей платы Arduino ONU что то случилось с преобразователем интерфейса USB и теперь на плату я не могу загрузить новый скетчь ардуино. Но вот в книге Джереми Блум «Изучаем ARDUINO» в описании устройства плат я прочитал, цитирую: «Если у вас есть программатор, то можно удалить загрузчик из своего контроллера ATmega и программировать его с помощью внешнего программатора.». Это что можно значит достать из платы микроконтроллер ATmega328 и в другой монтажной плате через разъем внутрисхемного программирования ISP прошить его программой созданной в Arduino_IDE, но только как это можно сделать и какую программу использовать для прошивки.
Источник
8 Easy Ways to Fix Unable to Open Serial Port
Driver updates are a vital fix which can help with this issue

- Serial ports are the interface between a PC and devices that don’t support a Bluetooth connection.
- Driver errors or physical damage can cause your serial ports to become unresponsive.
- In most cases, reinstallation or updates of your drivers should resolve this problem.
- Download Restoro PC Repair Tool that comes with Patented Technologies (patent available here) .
- Click Start Scan to find Windows issues that could be causing PC problems.
- Click Repair All to fix issues affecting your computer’s security and performance
- Restoro has been downloaded by 0 readers this month.
If you are unable to open a serial port, you are in good company, and in this guide, we will be telling you all you should know.
A serial port can be helpful, but some users reported being unable to open serial port error messages on their PCs. This can be a big problem, and in today’s article, we’ll show you how to fix this error.
By the end of this article, you should have successfully fixed all problems with your serial port. Some of the solutions may be relevant to COM ports on Windows.
Why is serial port not working?
Here are the top reasons you should have in mind:
- Incorrect communication settings – For the devices to work together correctly, they must be configured with the same communication settings.
- Wrong serial cable – If you use the incorrect serial cable, you will be unable to connect.
- Software conflicts – A software driver might make a serial port unusable. This driver can stop working if it is improperly installed or incompatible with a serial port.
- Faulty wiring – This may cause issues when a control system is connected to a device.
Some variations of serial port problems that users have faced include:
- Unable to open serial port access is denied – In most cases, Access Denied occurs when another program is utilizing the port.
- Failed to open serial port Betaflight – Though it’s not a true USB interface, the flight controller communicates with your computer through a USB connection.
- COM port not detected Windows 10 – Your PC will display the warning unable to open serial port if the COM port isn’t recognized.
- Unable to open connection to com1 – This problem may sometimes arise if you don’t have the proper drivers.
- Unable to open a connection to com1 Windows 10, com3 – This issue can sometimes appear if you don’t have the necessary drivers. To fix it, be sure to update the serial port driver and check if that solves your problem.
- Putty unable to open serial port Windows 10 – Sometimes, this issue can occur due to certain Windows services. This isn’t a major problem, and you can fix it by disabling those services.
- Unable to open serial port com1 access is denied – This issue can appear due to glitches with a serial port. Temporarily disable the serial port and check if that helps.
- Unable to open com port win error code 5, 123, 3 – These are some common problems that can appear with a serial port, but you should be able to fix most of them with one of our above tips.
Now, let us show you how to resolve this error on your Windows PC.
How do I fix unable to open serial port?
1. Make sure that you have the necessary drivers
- Right-click the Start menu and select Device Manager.
- Expand the Universal Serial Bus controller category.
- Right-click on your driver and choose Update driver.
- Lastly, click on Search automatically for drivers.
If you’re getting the Unable to open serial port message, perhaps the problem is related to your drivers. To fix this issue, we recommend updating your serial port driver.
To do that, you can visit your motherboard manufacturer’s website and download the latest drivers. Of course, you can always use a third-party tool if you find this process tedious or complex.
DriverFix will provide a detailed report of all of your current and obsolete device drivers. In addition, it updates the most recent device drivers from the complete database regularly.
DriverFix is the best choice when updating all your drivers automatically, with just a couple of clicks.
It will keep your computer safe from downloading and installing the wrong driver version, which can cause severe malfunctions and ease the process.
DriverFix
Keep all drivers up to date to avoid incompatibility issues.
2. Verify that the port isn’t open/disconnect the cable
Sometimes the Unable to open serial port message can appear if the port is already open. To fix this problem, users are suggesting disconnecting the cable from the other device and trying to connect again.
This is a simple workaround, but several users reported it worked for them, so feel free to try it out.
3. Stop the Windows Fax and Scan service
- Press Windows Key + R keyboard shortcut to open the Run dialog.
- Enter services.msc and press Enter or click OK.
- When the Services window opens, locate Windows Fax and Scan service and double-click it to open its properties (If this service isn’t available, try changing the settings of the Fax service).
- Set the Startup type to Manual and click the Stop button to stop the service. Now click Apply and OK to save changes.
Several users reported that when they were unable to open a serial port while trying to use the serial port, it turned out that the problem was the Windows Fax and Scan service.
To fix this problem, you need to stop Windows Fax and Scan service. After doing that, check if the problem is still there.
Remember that this is just a workaround, so you might have to repeat it whenever you want to use a serial port on your PC.
4. Disable the serial port in Device Manager
- Press Windows Key + X and choose Device Manager from the list.
- When Device Manager opens, locate the serial port, right-click it, and choose Disable device from the menu.
- When the confirmation dialog appears, click Yes.
- Wait for a couple of moments, and then enable the serial port.
Expert tip:
SPONSORED
Some PC issues are hard to tackle, especially when it comes to corrupted repositories or missing Windows files. If you are having troubles fixing an error, your system may be partially broken.
We recommend installing Restoro, a tool that will scan your machine and identify what the fault is.
Click here to download and start repairing.
If you keep getting an unable to open serial port message on your PC, the issue might be related to the serial port driver.
A temporary glitch usually causes this, and to fix the problem; we recommend disabling the serial port temporarily.
After doing that, check if the problem is resolved. If this solution works for you, remember that you’ll have to repeat it every time you want to use your serial port.
5. Try using a different cable
Sometimes, an unable to open serial port error can appear if your USB cable isn’t working. Be sure to check if your cable is connected correctly. In addition, check for any visible damage.
If your cable seems in order, try replacing it and check if the problem appears with a different cable.
6. Restart the device
If an Unable to open serial port keeps appearing, perhaps you can fix the problem by restarting your devices.
Restart the device you’re trying to connect to and check if that solves the problem. Alternatively, you can restart your PC and see if that solves the issue.
7. Reinstall the serial port driver
- Open Device Manager.
- Locate your serial port, right-click it, and choose Uninstall device.
- Now click Uninstall to confirm.
- Once the device is uninstalled, restart your PC.
As we already mentioned, sometimes issues with your serial port can be caused by your drivers.
If you keep getting Unable to open serial port message, you might be able to fix the problem simply by reinstalling the serial port driver.
After your computer restarts, Windows should install the default driver, and the problem will be completely resolved.
8. Make sure that the system is up to date
- Open the Settings app and go to the Update & Security section.
- Now click the Check for updates button in the right pane.
- If any updates are available, they will be downloaded automatically in the background and installed as soon as you restart your PC.
Sometimes, an unable to open serial port message can appear if your system isn’t out of date.
An outdated system can lead to various compatibility issues, and the best way to avoid these issues is to update your system.
This process is relatively straightforward in Windows 10, and for the most part, Windows installs the updates on its own. Once your system is updated, check if the problem is still there.
Read more about this topic
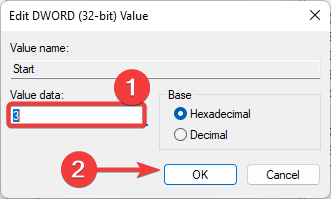
How to enable COM port in Windows 10?
- Click the Windows key, enter regedit and select the Registry Editor app.
- Navigate to the part below:
ComputerHKEY_LOCAL_MACHINESYSTEMCurrentControlSetServicesUSBSTOR - On the right pane, double-click on Start.
- Change the Value data to 4 and click OK.
Getting the Unable to open serial port message can be a problem for many users that use the serial port frequently, but you should be able to fix this problem using one of our solutions.
Remember that we have not made these solutions in any particular order, so you should try what seems most appropriate for your situation.
Let us know which one worked for you in the comments area below.
Still having issues? Fix them with this tool:
Источник
Offline
Зарегистрирован: 01.12.2016
Приветствую всех.
У меня возникла возможно аппаратная неисправность платы Arduino UNO. Я написал программу и собрал на монтажной плате схему управления двигателем постоянного тока, по схеме представленой на рис.
Сначала все нормально работало, но потом возможно случайно каратнул кратковременно один из выводов двигателя на вывод базы транзистора (до или после резистора) потому что я замечал кратковременное срабатывание двигателя в тот момент когда он должен быть выключен. И после этого при попытке открыть «монитор порта» выходит сообщение «Ошибка открытия последовательного порта «COM3″ (Port busy)», и при попытке загрузить другую программу тоже ни чего не работает, выходит сообщение об ошибке. Подскажите что-то произошло с USB портом на плате arduino, хотя в диспечере устройств видно «Arduino Uno (COM3)». Неужели моя плата сломалась окончательно или чтото еще можно сделать и как мне провести проверку и поиск неисправности?
//——Полное сообщение об ошибке———
Arduino: 1.6.9 (Windows 7), Плата:»Arduino/Genuino Uno»
Скетч использует 2 298 байт (7%) памяти устройства. Всего доступно 32 256 байт.
Глобальные переменные используют 232 байт (11%) динамической памяти, оставляя 1 816 байт для локальных переменных. Максимум: 2 048 байт.
Ошибка открытия последовательного порта «COM3» (Port busy)
avrdude: stk500_recv(): programmer is not responding
avrdude: stk500_getsync() attempt 1 of 10: not in sync: resp=0x7b
avrdude: stk500_recv(): programmer is not responding
avrdude: stk500_getsync() attempt 2 of 10: not in sync: resp=0x7b
avrdude: stk500_recv(): programmer is not responding
avrdude: stk500_getsync() attempt 3 of 10: not in sync: resp=0x7b
avrdude: stk500_recv(): programmer is not responding
avrdude: stk500_getsync() attempt 4 of 10: not in sync: resp=0x7b
avrdude: stk500_recv(): programmer is not responding
avrdude: stk500_getsync() attempt 5 of 10: not in sync: resp=0x7b
avrdude: stk500_recv(): programmer is not responding
avrdude: stk500_getsync() attempt 6 of 10: not in sync: resp=0x7b
avrdude: stk500_recv(): programmer is not responding
avrdude: stk500_getsync() attempt 7 of 10: not in sync: resp=0x7b
avrdude: ser_send(): write error: sorry no info avail
processing.app.SerialException: Ошибка открытия последовательного порта «COM3»
at processing.app.Serial.<init>(Serial.java:125)
at processing.app.Serial.<init>(Serial.java:66)
at processing.app.SerialMonitor$3.<init>(SerialMonitor.java:93)
at processing.app.SerialMonitor.open(SerialMonitor.java:93)
at processing.app.AbstractMonitor.resume(AbstractMonitor.java:110)
at processing.app.Editor.resumeOrCloseSerialMonitor(Editor.java:2459)
at processing.app.Editor.access$2900(Editor.java:90)
at processing.app.Editor$DefaultExportHandler.run(Editor.java:2437)
at java.lang.Thread.run(Thread.java:745)
Caused by: jssc.SerialPortException: Port name — COM3; Method name — openPort(); Exception type — Port not found.
at jssc.SerialPort.openPort(SerialPort.java:167)
at processing.app.Serial.<init>(Serial.java:114)
… 8 more
Ошибка открытия последовательного порта «COM3»
//————————————————————————————————-
dervansson
- Регистрация
- 12.07.2020
- Сообщения
- 7
- Реакции
- -1
- Баллы
- 21
- Город
- Moscow
- Имя
- Юрий
- #1
Здравствуйте, коллеги. Извините, что я такой молодой обращаюсь к вам за вспоможением: имею станок 3018, плата woodpecker cnc v 3.1, подключаю его к ПК с ОС Linux Mint Ulyana с установленным на него bCNC. Суть проблемы: при попытке открыть последовательный порт получаю ошибку [Errno 13] could not open port (далее — номер порта: перепробовал все): [Errno 13] Permission denied: (номер порта). Признаюсь честно: уровень владения техническим английским у меня крайне низок, поэтому я испытываю некоторые проблемы с поиском информации.
Подскажите, что делать?
P.S.: Виндоус не предлагать
extrimus

- Регистрация
- 29.03.2019
- Сообщения
- 5 894
- Реакции
- 5 217
- Баллы
- 250
- Возраст
- 56
- Адрес
- Россия
- Город
- Иваново
- Имя
- Андрей
- Плата
- Woodpecker 3.2
- Прошивка
- GBRL 1.1f
SnakeKVC
- Регистрация
- 27.12.2019
- Сообщения
- 5 017
- Реакции
- 4 288
- Баллы
- 138
- Возраст
- 45
- Адрес
- от верблюда
- Город
- Самара
- Имя
- Андрей
- Отчество
- Евгеньевич
- Станок
- 3018 Upgraded
- Плата
- Woodpecker v3.4
- Прошивка
- 1.1f
OlegK

OlegK
Младший ненаучный сотрудник
- Регистрация
- 11.06.2019
- Сообщения
- 2 492
- Реакции
- 4 414
- Баллы
- 188
- Город
- Печора
- Имя
- Олег
- Станок
- CNC3018C
- Прошивка
- 1.1f
- #4
Permission denied = Доступ запрещён.
Может тут инфа поможет.
dervansson
- Регистрация
- 12.07.2020
- Сообщения
- 7
- Реакции
- -1
- Баллы
- 21
- Город
- Moscow
- Имя
- Юрий
- 03.10.2020
- Последнее редактирование: 03.10.2020
- #5
Последнее редактирование: 03.10.2020
Спасибо, буду читать.
Ваши сообщения автоматически объединены: 03.10.2020
Что-то там всё про программирование на пайтон…
Пользователь под которым Вы работаете в системе не имеет прав на работу с портами.
Ищите в гугле решение проблемы для своего дистрибутива.
А вот это помогло! Спасибо за совет!
Содержание
- Putty настройка подключения через COM порт
- Номер порта
- Настройка Putty
- Заказать создание и поддержку безопасной IT-инфраструктуры любой сложности
- How to Fix: Unable to open serial port error message
- November 2022 Update:
- Try using another cable.
- Hyperterminal
- FIX: Unable to open serial port
- How do I fix a serial port that doesn’t open in Windows 10?
- 1. Make sure that you have the necessary drivers
- DriverFix
- 2. Verify that the port isn’t open/disconnect the cable
- 3. Stop the Windows Fax and Scan service
- 4. Disable the serial port in Device Manager
- 5. Try using a different cable
- 6. Restart the device
- 7. Reinstall the serial port driver
- 8. Make sure that the system is up to date
- Как исправить: Невозможно открыть сообщение об ошибке последовательного порта
- Ноябрьское обновление 2022:
- Попробуйте использовать другой кабель.
- Гипертерминал
- Putty unable to open serial port windows 10
Putty настройка подключения через COM порт
Меня часто спрашивают, как настроить подключение через COM (RS-232) порт в Putty.
Это делается очень просто. Сначала узнаем в диспетчере устройств номер нужного нам COM порта.
Для этого вызываем диспетчер устройств: Win + R->mmc devmgmt.msc->Enter
и находим номер, нужного нам, порта.
Номер порта

в моем случае это COM3
Теперь запускаем Putty и настраиваем его.
Настройка Putty

Connection type: Serial — последовательное подключение.
Serial line: COM3 — номер COM порта.
Speed: 9600 скорость передачи информации.
И нажимаем Open (хотя можно сначала сохранить, чтобы каждый раз не вводить).
Если все сделано правильно — поздравляю. Мы подключились.
Заказать создание и поддержку безопасной IT-инфраструктуры любой сложности
Быть уверенным в своей IT-инфраструктуре — это быть уверенным в завтрашнем дне.
Источник
How to Fix: Unable to open serial port error message
Update: Stop getting error messages and slow down your system with our optimization tool. Get it now at this link
A serial port may be useful, but some users have reported that the serial port message cannot be opened on their PC. This can be a big problem, and in today’s article we will show you how to solve it.

Problems with a serial port can be very annoying, especially if you tend to use the serial port frequently. When we talk about these types of problems, here are some related problems that have been reported by users:
Windows may try to assign it to a COM port already in use. It seems that Windows sometimes gets an inconsistency in the registry of what has already been assigned.

To see if this is the problem (and if possible solve it), try changing the assigned COM port.
November 2022 Update:

Note that Windows marks some of them as (in use), but does not consider them exhaustive, for the same reason that this problem may exist!
Try switching it to a few different unused COM ports and see if it has an effect. If not, we will dive deeper to see what Windows is reporting.
And don’t forget to unplug the power cord after the change to recharge the driver and see all the results.
Try using another cable.
I noticed that using an older USB cable sometimes leads to a poor connection of the card. It would be moody if it worked sometimes and not differently. The problem was solved with a new or even different cable.
Hyperterminal
If you enter “Hyperterminal” in the Windows Start menu, right-click after the call and select “Run as administrator”. It should help you access the serial port.
Also check which COM port it uses. To do this, follow these steps:
1. press the window+R button
Now check which port is assigned to the USE serial converter and use it in the spatula.

CCNA, Web Developer, PC Troubleshooter
I am a computer enthusiast and a practicing IT Professional. I have years of experience behind me in computer programming, hardware troubleshooting and repair. I specialise in Web Development and Database Design. I also have a CCNA certification for Network Design and Troubleshooting.
Источник
FIX: Unable to open serial port


A serial port can be useful, but some users reported Unable to open serial port error messages on their PC. This can be a big problem, and in today’s article, we’ll show you how to fix this error.
Problems with a serial port can be quite annoying, especially if you tend to use the serial port frequently.
How do I fix a serial port that doesn’t open in Windows 10?
1. Make sure that you have the necessary drivers

If you’re getting the Unable to open serial port message, perhaps the problem is related to your drivers. To fix this issue, it’s advised to update your serial port driver.
To do that, you can visit your motherboard manufacturer’s website and download the latest drivers. If you find this process a bit tedious or complex, you can always use a third-party tool.
DriverFix simply is the best choice when it comes to updating all your drivers automatically, with just a couple of clicks.

It will keep your computer safe from downloading and installing the wrong driver version, which can cause serious malfunctions and ease the process.
DriverFix
Are you unable to open serial port? Update your audio drivers to the latest version by using DriverFix!
2. Verify that the port isn’t open/disconnect the cable
Sometimes Unable to open serial port message can appear if the port is already open. To fix this problem, users are suggesting to disconnect the cable from the other device and try to connect again.
This is a simple workaround, but several users reported that it worked for them, so feel free to try it out.
3. Stop the Windows Fax and Scan service
Several users reported Unable to open serial port message while trying to use the serial port. It turns out that the problem was Windows Fax and Scan service.
To fix this problem, you just need to stop Windows Fax and Scan service. After doing that, check if the problem is still there.
Bear in mind that this is just a workaround, so you might have to repeat it every time you want to use a serial port on your PC.
4. Disable the serial port in Device Manager
If you keep getting Unable to open serial port message on your PC, the issue might be related to the serial port driver.
This is usually caused by a temporary glitch, and in order to fix the problem, it’s advised to disable the serial port temporarily.
Expert Tip: Some PC issues are hard to tackle, especially when it comes to corrupted repositories or missing Windows files. If you are having troubles fixing an error, your system may be partially broken. We recommend installing Restoro, a tool that will scan your machine and identify what the fault is.
Click here to download and start repairing.
After doing that, check if the problem is resolved. If this solution works for you, bear in mind that you’ll have to repeat it every time you want to use your serial port.
5. Try using a different cable
Sometimes, the Unable to open serial port error can appear if your USB cable isn’t working. Be sure to check if your cable is properly connected. In addition, check for any visible damage.
If your cable seems to be in order, try replacing it and check if the problem appears with a different cable.
6. Restart the device

If Unable to open serial port keeps appearing, perhaps you can fix the problem by restarting your devices.
Simply restart the device you’re trying to connect to and check if that solves the problem. Alternatively, you can restart your PC and see if that solves the issue.
7. Reinstall the serial port driver
As we already mentioned, sometimes issues with your serial port can be caused by your drivers.
If you keep getting Unable to open serial port message, you might be able to fix the problem simply by reinstalling the serial port driver.
After your computer restarts, Windows should install the default driver and the problem will be completely resolved.
8. Make sure that the system is up to date
In some cases Unable to open serial port message can appear if your system isn’t out of date.
An outdated system can lead to various compatibility issues, and the best way to avoid these issues is to update your system.
This process is quite straightforward in Windows 10, and for the most part, Windows installs the updates on its own. Once your system is up to date, check if the problem is still there.
Getting the Unable to open serial port message can be a problem for many users that use the serial port frequently, but you should be able to fix this problem using one of our solutions.
Speaking of these kinds of problems, here are some related issues that users reported:
Let us know which one worked for you in the comments area below.
Restoro has been downloaded by 0 readers this month.
Источник
Как исправить: Невозможно открыть сообщение об ошибке последовательного порта
Обновление: Перестаньте получать сообщения об ошибках и замедляйте работу своей системы с помощью нашего инструмента оптимизации. Получите это сейчас на эту ссылку
Последовательный порт может быть полезен, но некоторые пользователи сообщают, что сообщение последовательного порта не может быть открыто на их ПК. Это может быть большой проблемой, и в сегодняшней статье мы покажем вам, как ее решить.
Проблемы с последовательным портом может быть очень раздражающим, особенно если вы часто используете последовательный порт. Когда мы говорим об этих типах проблем, вот некоторые связанные проблемы, о которых сообщили пользователи:
Windows может попытаться назначить его COM-порту, который уже используется. Кажется, что Windows иногда получает несоответствие в реестре того, что уже было назначено.
Чтобы увидеть, если это проблема (и, если возможно, решить ее), попробуйте изменить назначенный COM-порт.
Ноябрьское обновление 2022:
Обратите внимание, что Windows помечает некоторые из них как (используемые), но не считает их исчерпывающими по той же причине, по которой эта проблема может существовать!
Попробуйте переключить его на несколько разных неиспользуемых COM-портов и посмотрите, окажет ли это влияние. Если нет, мы углубимся в изучение того, что сообщает Windows.
И не забудьте отключить шнур питания после замены, чтобы подзарядить драйвер и увидеть все результаты.
Попробуйте использовать другой кабель.
Я заметил, что использование старого USB-кабеля иногда приводит к плохому соединению карты. Было бы капризно, если бы это работало иногда, а не иначе. Проблема была решена с новым или даже другим кабелем.
Гипертерминал
Если вы введете «Hyperterminal» в меню «Пуск» Windows, щелкните правой кнопкой мыши после вызова и выберите «Запуск от имени администратора». Это должно помочь вам получить доступ к последовательному порту.
Также проверьте, какой COM-порт он использует. Для этого выполните следующие действия:
1. нажмите окно + кнопку R
2. введите devmgmt.msc
Теперь проверьте, какой порт назначен последовательному преобразователю USE, и используйте его в шпателе.
CCNA, веб-разработчик, ПК для устранения неполадок
Я компьютерный энтузиаст и практикующий ИТ-специалист. У меня за плечами многолетний опыт работы в области компьютерного программирования, устранения неисправностей и ремонта оборудования. Я специализируюсь на веб-разработке и дизайне баз данных. У меня также есть сертификат CCNA для проектирования сетей и устранения неполадок.
Источник
Putty unable to open serial port windows 10
In my project..(outside of everything else).. I have an Arduino connected to the RPi via USB. (using this as my ‘serial comm connection between the two)..
I believe it is enumerated as ttyamc0 (when I disconnect it.. TTYAMC0) is no longer.. when I connect it populates again under TTYAMC0..
I have my Arduino set up to just loop through sending «data. » over and over to ensure I pick up anything being sent.
** (in the end, I have a Flash App with XML Socket connection to PORT: 7777, and installed SOCAT to also listen on port: 7777 and pass the data on from incoming TTYAMC0. I know this all works, because I have done it successfully before, hence trying to rebuild and get back to that state of the project)
However.. to TEST things. (like I have done in the past).. In installed Putty on my RPi (disclaimer, I’m very much a noob, and there may have been a better way, but I have to work with what I know and feel comfortable with)..
I set up two entries in my Putty install to check the data is coming in at a base level first:
RAW:
• Connection Type: RAW
• Host Name: 127.0.0.1
• Port: 7777
• Close Window on Exit: NEVER
When I try this connection.. it connects fine. and actually SHOWS the ‘data. data. data. » coming on the console..
SERIAL:
• Connection Type: SERIAL
• Serial Line: TTYACM0
• Speed: 9600
• Close Window on Exit: NEVER
However.. when I try the SERIAL connection. I keep getting an error from Putty saying: UNABLE TO OPEN SERIAL PORT
Since this is more or less bypassing SOCAT. I’m going to assume SOCAT install/configuration is not the issue (at least yet).. since I’m using Putty to connect and check on things?
Last time around.. it just worked.. so I’m not sure if missed a step? Or where to go from here to trouble shoot things?
How can I find out what is going on with my serial port? and figure out why PUTTY will NOT connected to it?
I find it a bit odd.. that at the 127.0.0.1 RAW connection is ‘working’..and I’m seeing the data from the Arduino come in. (makes me think SOCAT ‘is’ working? But I’m confused as to why the PUTTY connection wont connect to the SERIAL PORT?
So if I’m wrong.. and it IS working (because there IS data being sent/found at 127.0.0.1:7777 (which is where the localhost/flash app reside..and my FLASH XML Socket connection checks for incoming data. then.. I think I’m just dealing with the final step which is the Flash Security stuff? (Adobe Flash Security Policy Server stuff. which I tackled before)..
I am just leery about not being able to connect to TTYACM0 usb/serial port to see the same incoming data?
Side note: SECURITY is a non-issue for this particular project.. Its a stand alone, not connected to anything, single purpose project
So opening up ports with WILD/DANGEROUS permissions (or no restrictions) is fine here.. just an FYI.
I believe I have already added the www-data to the dial out group as well..
Источник
Driver updates are a vital fix which can help with this issue
by Milan Stanojevic
Milan has been enthusiastic about technology ever since his childhood days, and this led him to take interest in all PC-related technologies. He’s a PC enthusiast and he… read more
Updated on June 16, 2023
Reviewed by
Vlad Turiceanu

Passionate about technology, Windows, and everything that has a power button, he spent most of his time developing new skills and learning more about the tech world. Coming… read more
- Serial ports are the interface between a PC and devices that don’t support a Bluetooth connection.
- Driver errors or physical damage can cause your serial ports to become unresponsive.
- In most cases, reinstallation or updates of your drivers should resolve this problem.
XINSTALL BY CLICKING THE DOWNLOAD FILE
Fortect is a tool that does not simply cleans up your PC, but has a repository with several millions of Windows System files stored in their initial version. When your PC encounters a problem, Fortect will fix it for you, by replacing bad files with fresh versions. To fix your current PC issue, here are the steps you need to take:
- Download Fortect and install it on your PC.
- Start the tool’s scanning process to look for corrupt files that are the source of your problem
- Right-click on Start Repair so the tool could start the fixing algorythm
- Fortect has been downloaded by 0 readers this month.
If you are unable to open a serial port, you are in good company, and in this guide, we will be telling you all you should know.
A serial port can be helpful, but some users reported being unable to open serial port error messages on their PCs. This can be a big problem, and in today’s article, we’ll show you how to fix this error.
By the end of this article, you should have successfully fixed all problems with your serial port. Some of the solutions may be relevant to COM ports on Windows.
Why is serial port not working?
Here are the top reasons you should have in mind:
- Incorrect communication settings – For the devices to work together correctly, they must be configured with the same communication settings.
- Wrong serial cable – If you use the incorrect serial cable, you will be unable to connect.
- Software conflicts – A software driver might make a serial port unusable. This driver can stop working if it is improperly installed or incompatible with a serial port.
- Faulty wiring – This may cause issues when a control system is connected to a device.
Some variations of serial port problems that users have faced include:
- Unable to open serial port access is denied – In most cases, Access Denied occurs when another program is utilizing the port.
- Failed to open serial port Betaflight – Though it’s not a true USB interface, the flight controller communicates with your computer through a USB connection.
- COM port not detected Windows 10 – Your PC will display the warning unable to open serial port if the COM port isn’t recognized.
- Unable to open connection to com1 – This problem may sometimes arise if you don’t have the proper drivers.
- Unable to open a connection to com1 Windows 10, com3 – This issue can sometimes appear if you don’t have the necessary drivers. To fix it, be sure to update the serial port driver and check if that solves your problem.
- Putty unable to open serial port Windows 10 – Sometimes, this issue can occur due to certain Windows services. This isn’t a major problem, and you can fix it by disabling those services.
- Unable to open serial port com1 access is denied – This issue can appear due to glitches with a serial port. Temporarily disable the serial port and check if that helps.
- Unable to open com port win error code 5, 123, 3 – These are some common problems that can appear with a serial port, but you should be able to fix most of them with one of our above tips.
Now, let us show you how to resolve this error on your Windows PC.
How do I fix unable to open serial port?
1. Make sure that you have the necessary drivers
- Right-click the Start menu and select Device Manager.
- Expand the Universal Serial Bus controller category.
- Right-click on your driver and choose Update driver.
- Lastly, click on Search automatically for drivers.
If you’re getting the Unable to open serial port message, perhaps the problem is related to your drivers. To fix this issue, we recommend updating your serial port driver.
To do that, you can visit your motherboard manufacturer’s website and download the latest drivers. Of course, you can always use a third-party tool if you find this process tedious or complex.
Outbyte Driver Updater will provide a detailed report of all of your current and obsolete device drivers. In addition, it updates the most recent device drivers from the complete database regularly.
Outbyte Driver Updater is the best choice when updating all your drivers automatically, with just a couple of clicks.
It will keep your computer safe from downloading and installing the wrong driver version, which can cause severe malfunctions and ease the process.

Outbyte Driver Updater
Keep all drivers up to date to avoid incompatibility issues.
2. Verify that the port isn’t open/disconnect the cable
Sometimes the Unable to open serial port message can appear if the port is already open. To fix this problem, users are suggesting disconnecting the cable from the other device and trying to connect again.
This is a simple workaround, but several users reported it worked for them, so feel free to try it out.
3. Stop the Windows Fax and Scan service
- Press Windows Key + R keyboard shortcut to open the Run dialog.
- Enter services.msc and press Enter or click OK.
- When the Services window opens, locate Windows Fax and Scan service and double-click it to open its properties (If this service isn’t available, try changing the settings of the Fax service).
- Set the Startup type to Manual and click the Stop button to stop the service. Now click Apply and OK to save changes.
Several users reported that when they were unable to open a serial port while trying to use the serial port, it turned out that the problem was the Windows Fax and Scan service.
To fix this problem, you need to stop Windows Fax and Scan service. After doing that, check if the problem is still there.
Remember that this is just a workaround, so you might have to repeat it whenever you want to use a serial port on your PC.
4. Disable the serial port in Device Manager
- Press Windows Key + X and choose Device Manager from the list.
- When Device Manager opens, locate the serial port, right-click it, and choose Disable device from the menu.
- When the confirmation dialog appears, click Yes.
- Wait for a couple of moments, and then enable the serial port.
Some PC issues are hard to tackle, especially when it comes to missing or corrupted system files and repositories of your Windows.
Be sure to use a dedicated tool, such as Fortect, which will scan and replace your broken files with their fresh versions from its repository.
If you keep getting an unable to open serial port message on your PC, the issue might be related to the serial port driver.
A temporary glitch usually causes this, and to fix the problem; we recommend disabling the serial port temporarily.
After doing that, check if the problem is resolved. If this solution works for you, remember that you’ll have to repeat it every time you want to use your serial port.
5. Try using a different cable
Sometimes, an unable to open serial port error can appear if your USB cable isn’t working. Be sure to check if your cable is connected correctly. In addition, check for any visible damage.
If your cable seems in order, try replacing it and check if the problem appears with a different cable.
6. Restart the device
If an Unable to open serial port keeps appearing, perhaps you can fix the problem by restarting your devices.
Restart the device you’re trying to connect to and check if that solves the problem. Alternatively, you can restart your PC and see if that solves the issue.
7. Reinstall the serial port driver
- Open Device Manager.
- Locate your serial port, right-click it, and choose Uninstall device.
- Now click Uninstall to confirm.
- Once the device is uninstalled, restart your PC.
As we already mentioned, sometimes issues with your serial port can be caused by your drivers.
If you keep getting Unable to open serial port message, you might be able to fix the problem simply by reinstalling the serial port driver.
After your computer restarts, Windows should install the default driver, and the problem will be completely resolved.
8. Make sure that the system is up to date
- Open the Settings app and go to the Update & Security section.
- Now click the Check for updates button in the right pane.
- If any updates are available, they will be downloaded automatically in the background and installed as soon as you restart your PC.
Sometimes, an unable to open serial port message can appear if your system isn’t out of date.
An outdated system can lead to various compatibility issues, and the best way to avoid these issues is to update your system.
This process is relatively straightforward in Windows 10, and for the most part, Windows installs the updates on its own. Once your system is updated, check if the problem is still there.
- Fix: Page Fault in Nonpaged Area on Windows 10
- Bindflt.sys Blue Screen: How to Fix It in 5 Steps
- Fix: A Service Installation Section in this INF is Invalid
- 8018000a Enrollment Error: Best Ways to Fix it
- Windows is Scrolling By Itself: 8 Ways to Fix This
How to enable COM port in Windows 10?
- Click the Windows key, enter regedit and select the Registry Editor app.
- Navigate to the part below:
ComputerHKEY_LOCAL_MACHINESYSTEMCurrentControlSetServicesUSBSTOR - On the right pane, double-click on Start.
- Change the Value data to 4 and click OK.
Getting the Unable to open serial port message can be a problem for many users that use the serial port frequently, but you should be able to fix this problem using one of our solutions.
Remember that we have not made these solutions in any particular order, so you should try what seems most appropriate for your situation.
Let us know which one worked for you in the comments area below.
Still experiencing issues?
SPONSORED
If the above suggestions have not solved your problem, your computer may experience more severe Windows troubles. We suggest choosing an all-in-one solution like Fortect to fix problems efficiently. After installation, just click the View&Fix button and then press Start Repair.
![]()
На чтение 6 мин. Просмотров 7.3k. Опубликовано 03.09.2019
Последовательный порт может быть полезен, но некоторые пользователи сообщают, что Невозможно открыть последовательный порт на своем ПК. Это может быть большой проблемой, и в сегодняшней статье мы покажем вам, как исправить эту ошибку.
Проблемы с последовательным портом могут быть довольно раздражающими, особенно если вы склонны часто использовать последовательный порт. Говоря о таких проблемах, вот некоторые связанные с ними проблемы, о которых сообщили пользователи:
- Невозможно открыть соединение с com1 Windows 10, com3 . Эта проблема может иногда возникать, если у вас нет необходимых драйверов. Чтобы исправить это, обязательно обновите драйвер последовательного порта и проверьте, решает ли это вашу проблему.
- Замазка не может открыть последовательный порт Windows 10 . Иногда эта проблема может возникать из-за определенных служб Windows. Это не главная проблема, и вы можете исправить ее, отключив эти службы.
- Невозможно открыть последовательный порт. Доступ к com1 запрещен . Эта проблема может возникать из-за глюков с последовательным портом. Чтобы устранить проблему, временно отключите последовательный порт и проверьте, помогает ли это.
- Невозможно открыть com-win win code code 5, 123, 32 . Это некоторые распространенные проблемы, которые могут возникнуть с последовательным портом, но большинство из них можно исправить с помощью одного из наших решений.
Содержание
- Не удается открыть сообщение последовательного порта в Windows 10, как это исправить?
- Решение 1. Убедитесь, что у вас есть необходимые драйверы
- Решение 2. Убедитесь, что порт не открыт/отсоедините кабель
- Решение 3. Остановите службу факсов и сканирования Windows
- Решение 4. Отключите последовательный порт в диспетчере устройств
- Решение 5. Попробуйте использовать другой кабель
- Решение 6 – Перезагрузите устройство
- Решение 7. Переустановите драйвер последовательного порта
- Решение 8. Убедитесь, что система обновлена
Не удается открыть сообщение последовательного порта в Windows 10, как это исправить?
- Убедитесь, что у вас есть необходимые драйверы
- Убедитесь, что порт не открыт/отсоедините кабель
- Остановите службу факсов и сканирования Windows .
- Отключите последовательный порт в диспетчере устройств
- Попробуйте использовать другой кабель
- Перезагрузите устройство
- Переустановите драйвер последовательного порта
- Убедитесь, что система обновлена
Решение 1. Убедитесь, что у вас есть необходимые драйверы
Если вы получаете сообщение Невозможно открыть последовательный порт , возможно, проблема связана с вашими драйверами. Чтобы устранить эту проблему, рекомендуется обновить драйвер последовательного порта. Для этого посетите веб-сайт производителя вашей материнской платы и загрузите последние версии драйверов.
Если вы находите этот процесс утомительным или сложным, вы всегда можете использовать сторонние инструменты, такие как TweakBit Driver Updater , для автоматического обновления всех ваших драйверов всего за пару кликов. Это защитит ваш компьютер от загрузки и установки неправильной версии драйвера, что может привести к серьезным неисправностям.
- Загрузите программу обновления драйверов Tweakbit
Отказ от ответственности: некоторые функции этого инструмента не бесплатны
- ЧИТАЙТЕ ТАКЖЕ: Порт используется, пожалуйста, подождите. Вот как вы можете исправить эту ошибку
Решение 2. Убедитесь, что порт не открыт/отсоедините кабель
Иногда сообщение Невозможно открыть последовательный порт может появляться, если порт уже открыт. Чтобы решить эту проблему, пользователи предлагают отсоединить кабель от другого устройства и попытаться подключиться снова.
Это простой обходной путь, но несколько пользователей сообщили, что он работает для них, поэтому не стесняйтесь попробовать.
Решение 3. Остановите службу факсов и сканирования Windows
Несколько пользователей сообщили, что Невозможно открыть последовательный порт при попытке использовать последовательный порт. Оказывается, проблема заключалась в службе факса и сканирования Windows. Чтобы решить эту проблему, вам просто нужно остановить службу факсов и сканирования Windows. Для этого просто выполните следующие действия:
-
Нажмите Windows Key + R , чтобы открыть диалоговое окно Выполнить . Введите services.msc и нажмите Enter или нажмите ОК .
- Когда откроется окно Службы , найдите службу Windows Fax and Scan и дважды щелкните ее, чтобы открыть ее свойства. Если эта служба недоступна, попробуйте изменить настройки службы Факс .
-
Установите для Тип запуска значение Вручную и нажмите кнопку Стоп , чтобы остановить службу. Теперь нажмите Применить и ОК , чтобы сохранить изменения.
После этого убедитесь, что проблема все еще существует. Помните, что это всего лишь обходной путь, поэтому вам, возможно, придется повторять его каждый раз, когда вы хотите использовать последовательный порт на вашем ПК.
Решение 4. Отключите последовательный порт в диспетчере устройств
Если вы продолжаете получать сообщение Невозможно открыть последовательный порт на вашем ПК, проблема может быть связана с драйвером последовательного порта. Обычно это происходит из-за временного сбоя, и для решения проблемы рекомендуется временно отключить последовательный порт.Это довольно просто, и вы можете сделать это, выполнив следующие действия:
-
Нажмите Windows Key + X и выберите Диспетчер устройств из списка.
-
Когда откроется Диспетчер устройств , найдите последовательный порт, щелкните его правой кнопкой мыши и выберите в меню Отключить устройство . Когда появится диалоговое окно подтверждения, нажмите Да .
- Подождите пару секунд, а затем включите последовательный порт.
После этого проверьте, решена ли проблема. Если это решение работает для вас, имейте в виду, что вам придется повторять его каждый раз, когда вы хотите использовать свой последовательный порт.
- ЧИТАЙТЕ ТАКЖЕ: что делать, если служба отчетов об ошибках продолжает перезапускаться
Решение 5. Попробуйте использовать другой кабель
Иногда ошибка Невозможно открыть последовательный порт может появиться, если ваш кабель не работает. Обязательно проверьте, правильно ли подключен кабель. Кроме того, проверьте на наличие видимых повреждений. Если ваш кабель кажется исправным, попробуйте заменить его и проверьте, не возникает ли проблема с другим кабелем.
Решение 6 – Перезагрузите устройство
Если Невозможно открыть последовательный порт продолжает появляться, возможно, вы можете решить проблему, перезапустив свои устройства. Просто перезагрузите устройство, к которому вы пытаетесь подключиться, и проверьте, решает ли это проблему. Кроме того, вы можете перезагрузить компьютер и посмотреть, решит ли это проблему.
Решение 7. Переустановите драйвер последовательного порта
Как мы уже упоминали, иногда проблемы с вашим последовательным портом могут быть вызваны вашими драйверами. Если вы продолжаете получать сообщение Невозможно открыть последовательный порт , вы можете решить проблему, просто переустановив драйвер последовательного порта. Это довольно просто сделать, и вы можете сделать это, выполнив следующие действия:
- Откройте Диспетчер устройств .
-
Найдите свой последовательный порт, щелкните его правой кнопкой мыши и выберите Удалить устройство .
-
Теперь нажмите Удалить , чтобы подтвердить.
- После удаления устройства перезагрузите компьютер.
После перезагрузки компьютера Windows должна установить драйвер по умолчанию, и проблема с ним будет полностью решена.
Решение 8. Убедитесь, что система обновлена
В некоторых случаях может появиться сообщение Невозможно открыть последовательный порт , если ваша система не устарела. Устаревшая система может привести к различным проблемам совместимости, и лучший способ избежать этих проблем – обновить вашу систему.
Этот процесс довольно прост в Windows 10, и по большей части Windows устанавливает обновления самостоятельно. Однако вы всегда можете проверить наличие обновлений самостоятельно, выполнив следующие действия:
- Откройте приложение Настройки и перейдите в раздел Обновление и безопасность .
-
Теперь нажмите кнопку Проверить обновления на правой панели.
Если доступны какие-либо обновления, они будут автоматически загружены в фоновом режиме и установлены, как только вы перезагрузите компьютер. Как только ваша система обновится, убедитесь, что проблема все еще существует.
Невозможно открыть сообщение последовательного порта может быть проблемой для многих пользователей, которые часто используют последовательный порт, но вы должны быть в состоянии решить эту проблему, используя одно из наших решений.
dervansson
- Регистрация
- 12.07.2020
- Сообщения
- 7
- Реакции
- -1
- Баллы
- 21
- Город
-
Moscow
- Имя
-
Юрий
-
#1
Здравствуйте, коллеги. Извините, что я такой молодой обращаюсь к вам за вспоможением: имею станок 3018, плата woodpecker cnc v 3.1, подключаю его к ПК с ОС Linux Mint Ulyana с установленным на него bCNC. Суть проблемы: при попытке открыть последовательный порт получаю ошибку [Errno 13] could not open port (далее — номер порта: перепробовал все): [Errno 13] Permission denied: (номер порта). Признаюсь честно: уровень владения техническим английским у меня крайне низок, поэтому я испытываю некоторые проблемы с поиском информации.
Подскажите, что делать?
P.S.: Виндоус не предлагать
extrimus
- Регистрация
- 29.03.2019
- Сообщения
- 5 905
- Реакции
- 5 256
- Баллы
- 250
- Возраст
- 56
- Адрес
-
Россия
- Город
-
Иваново
- Имя
-
Андрей
- Плата
-
Woodpecker 3.2
- Прошивка
-
GBRL 1.1f
SnakeKVC
- Регистрация
- 27.12.2019
- Сообщения
- 5 306
- Реакции
- 4 868
- Баллы
- 138
- Возраст
- 45
- Адрес
-
от верблюда
- Город
-
Самара
- Имя
-
Андрей
- Отчество
-
Евгеньевич
- Станок
-
3018 Upgraded
- Плата
-
Woodpecker v3.4
- Прошивка
-
1.1f
OlegK
OlegK
Младший ненаучный сотрудник
- Регистрация
- 11.06.2019
- Сообщения
- 2 694
- Реакции
- 5 034
- Баллы
- 188
- Город
-
Печора
- Имя
-
Олег
- Станок
-
CNC3018C
- Прошивка
-
1.1f
-
#4
Permission denied = Доступ запрещён.
Может тут инфа поможет.
dervansson
- Регистрация
- 12.07.2020
- Сообщения
- 7
- Реакции
- -1
- Баллы
- 21
- Город
-
Moscow
- Имя
-
Юрий
-
03.10.2020
-
Последнее редактирование: 03.10.2020
-
#5
Последнее редактирование: 03.10.2020
Спасибо, буду читать.
Ваши сообщения автоматически объединены: 03.10.2020
Что-то там всё про программирование на пайтон…
Пользователь под которым Вы работаете в системе не имеет прав на работу с портами.
Ищите в гугле решение проблемы для своего дистрибутива.
А вот это помогло! Спасибо за совет!
I’ve got an idea. Your board isn’t being recognized. Try unplugging the arduino and see if Com 1 is still there. Sometimes it can recognize mice and other devices as Com 1 or 2 instead of your arduino.
On some of my development machines after everything settled out my devices will show up on Com 4 and 5 when I am working on two at a time.
If this is not the case go into the device manager and see if you can see the board listed.
I would also wonder if you have your sensor hooked to digital pins 0 and 1. These pins are used for your serial line on usb. So if you have anything such as a sensor hooked to them it may be generating data keeping the line busy instead of it being able to negotiate.
I had this happen when setting up hc-05 for the first time. I realized I had to keep the chip off while flashing or I would end up with errors or Com busy.
Please provide your pinout and basic information about the Com ports available on the ide. Also consider that you will need to specify the correct board as it will default to an uno.
Programmer not in sync issues generally occur because the board is recognized but cannot be written to for one reason or another.
- the board has something plugged into digital 1 and 0 which are serial i/o pins
- the board programmer is busy running your last batch of code
- usb error
So
- try a different cord
- try unplugging potential wiring issues and see if it can be written to without anything on it
- try holding down reset on the board until the board when you try to write to it until just after it finishes compiling to clear any potential programing issues
In my experience mega have a tendency to suffer from the last one.