Когда в картридже Kyocera заканчивается тонер, то на дисплее принтера (или компьютера) незамедлительно всплывает соответствующее сообщение. Кроме того, полностью блокируется работа печатающего устройства. У некоторых МФУ даже сканер перестает нормально функционировать. Выйти из ситуации можно тремя способами:
- Купить оригинальный картридж для принтера Kyocera. Это самый правильный и простой вариант. Замените старый картридж новым, и ошибка сбросится автоматически после перезагрузки аппарата. Тем не менее, оригинальный картридж очень дорогой, поэтому этот способ не каждому придется по карману.
- Купить совместимый картридж для принтера Kyocera. Аналоговый расходник во много крат дешевле оригинальной версии. Его использование обойдется Вам значительно дешевле. Однако во время установки могут возникнуть трудности с определением неоригинального картриджа.
- Заправить картридж для принтера Kyocera. Это самый бюджетный вариант. К тому же пополнить расходник не только выгодно, но и практично. Ведь сделать это можно сразу же по окончанию тонера в картридже. Но установка перезаправленного картриджа в принтер не снимет его блокировку.
С первым пунктом все ясно. Заказали оригинальный картридж соответствующей модели, изъяли старый расходник, установили новое изделие, перезагрузили принтер и можно снова печатать. Со вторым и третьим пунктами все не так однозначно. Но сложностей минимум. Просто помимо тех действий, которые были указаны выше, после установки перезаправленного или неоригинального расходного материала нужно нажать определенную комбинацию клавиш на панели управления принтера.
Как уже было сказано, чтобы избавиться от ошибки «Установлен неоригинальный картридж», нужно нажать на определенные кнопки, расположенные на панели управления принтера. Как правило, следует одновременно зажать на 3 секунды кнопки выбора и сброса печати. Однако у некоторых моделей функциональное назначение клавиш может значительно отличаться. Поэтому мы добавили таблицу, в которой указано, какими клавишами нужно сбрасывать ошибку установки совместимых и перезаправленных картриджей для некоторых моделей оргтехники Kyocera:
|
Модели Kyocera |
Кнопки для сброса ошибки (одновременно зажать на 3 секунды) |
Изображение панели управления МФУ Kyocera |
|
FS-118mfp |
[Enter] и [Stop/Clear, красную] |
 |
|
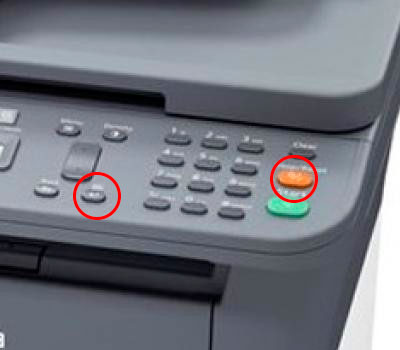
FS-1020mfp |
[Выбор режима печати] и [Стоп/Сброс, красную] |
|
|
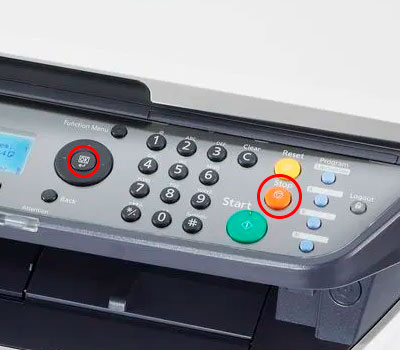
FS-1025mfp FS-1120mfp FS-1125mfp FS-1320mfp FS-1325mfp |
[Ок] и [Stop/Reset, красную] |
|
|
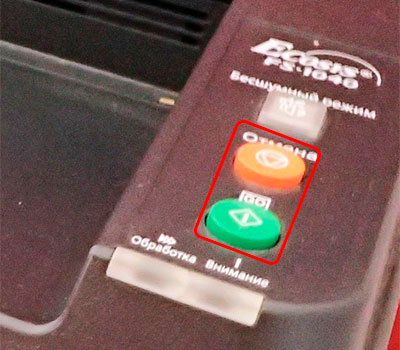
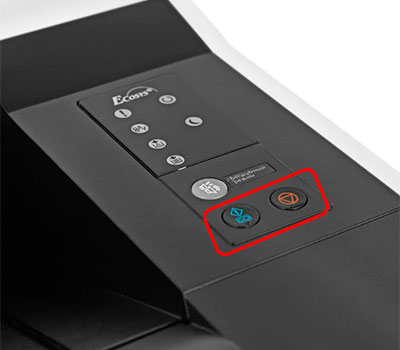
FS-1040 FS-1041 FS-1060dn FS-1061dn |
[GO, зеленую] и [Отмена, красную] |
|
|
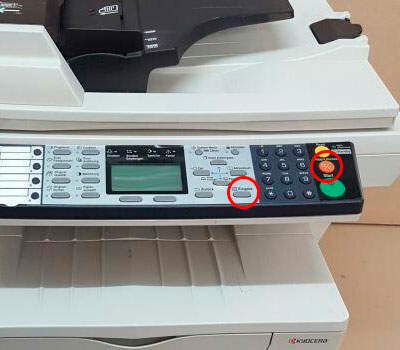
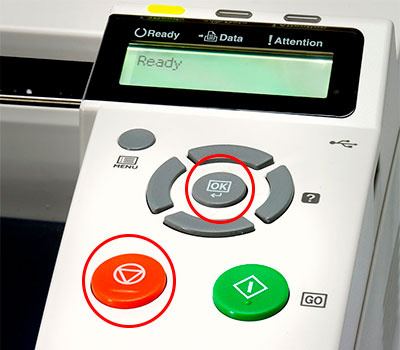
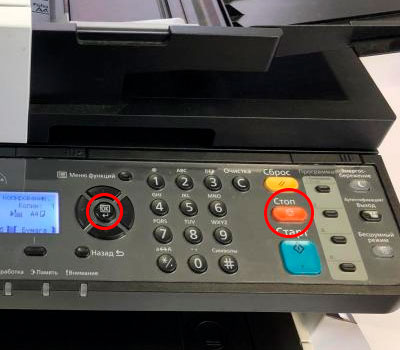
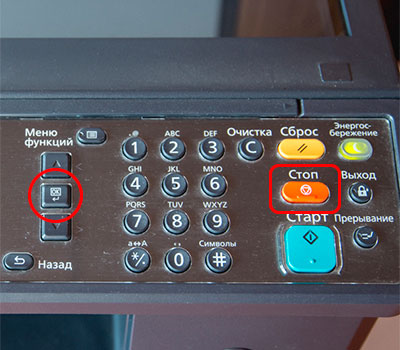
FS-1030mfp FS-1130mfp FS-1035mfp FS-1135mfp ECOSYS M2030dn ECOSYS M2035dn ECOSYS M2530dn ECOSYS M2535dn |
[Ok] и [Stop, красную] |
|
|
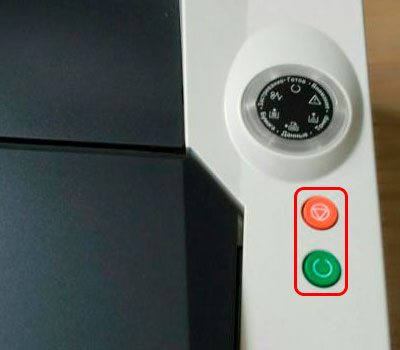
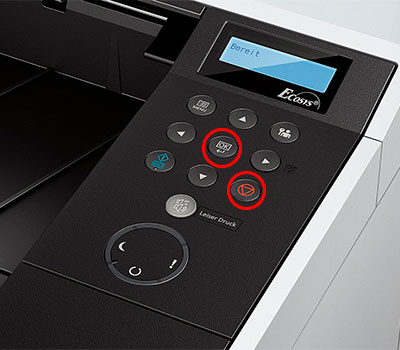
FS-1100 FS-1110 FS-1120d FS-1300d FS-1320d FS-1320dn ECOSYS P2035d |
[Зеленую, с изображением неполного круга] и [Красную, с изображением треугольника в круге] |
|
|
FS-1370dn ECOSYS P2135dn |
[Ok] и [Красную, с изображением треугольника в круге] |
|
|
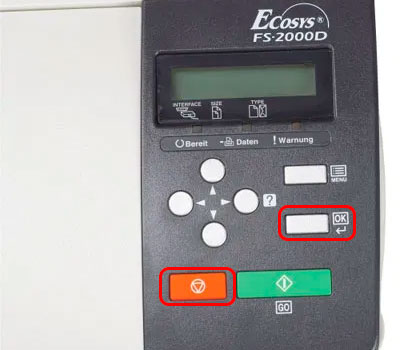
FS-2000d |
[Ok] и [Красную, с изображением треугольника в круге] |
|
|
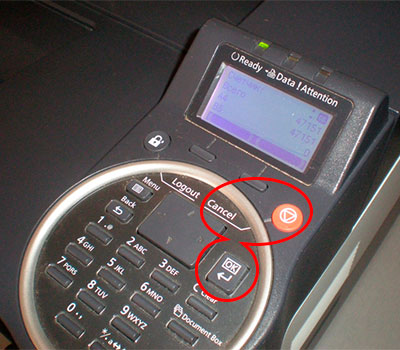
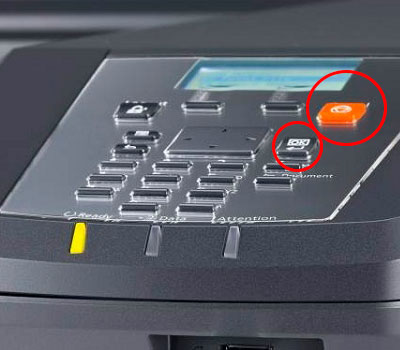
FS-2100d FS-2100dn FS-4100dn FS-4200dn FS-4300dn ECOSYS P3045dn ECOSYS P3050dn ECOSYS P3055dn ECOSYS P3060dn ECOSYS P4040dn |
[Ok] и [Cancel, красную] |
|
|
FS-C8600dn FS-C8650dn |
[Ок] и [Отмена, красную] |
|
|
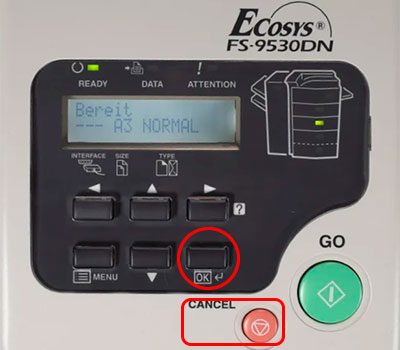
FS-9130dn FS-9530dn |
[Ok] и [Cancel, красную] |
|
|
ECOSYS P2040dn ECOSYS P2040dw ECOSYS P5021cdn ECOSYS P5021cdw ECOSYS P5026cdn ECOSYS P5026cdw |
[Ok] и [Красную, с изображением треугольника в круге] |
|
|
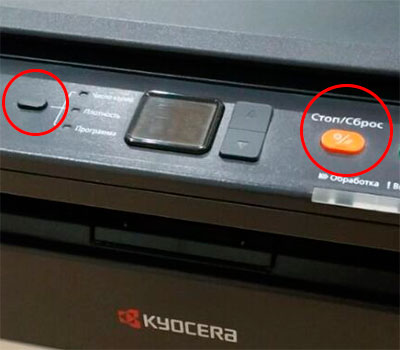
ECOSYS M2040dn ECOSYS M2135dn ECOSYS M2540dn ECOSYS M2540dw ECOSYS M2635dn ECOSYS M2635dw |
[Ок] и [Стоп, красную] |
|
|
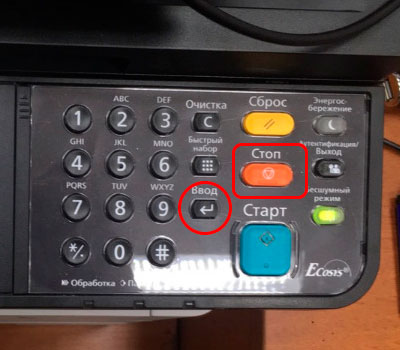
ECOSYS M2235dn ECOSYS M2735dn ECOSYS M2835dw ECOSYS P2335d ECOSYS P2335dn ECOSYS P2335dw |
[Ввод] и [Стоп] или на сенсорной панели нажать «Далее» -> «Продолжить» -> «Закрыть» |
|
|
ECOSYS P2235dn ECOSYS P2235dw |
[GO, зеленую] и [Красную, с изображением треугольника в круге] |
|
|
TASKalfa 1800 |
[Ок] и [Стоп, красную] |
|
|
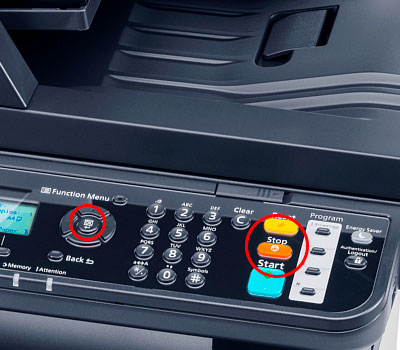
ECOSYS M3040dn ECOSYS M3145dn ECOSYS M3540dn ECOSYS M3645dn ECOSYS M5521cdn ECOSYS M5521cdw ECOSYS M6030cdn ECOSYS M6530cdn TASKalfa1801 TASKalfa 2201 |
[Ок] и [Стоп, красную] |
|
|
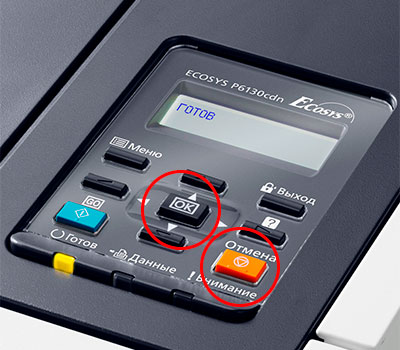
ECOSYS P6130cdn ECOSYS P6230cdn |
[Ok] и [Cancel, красную] |
|
|
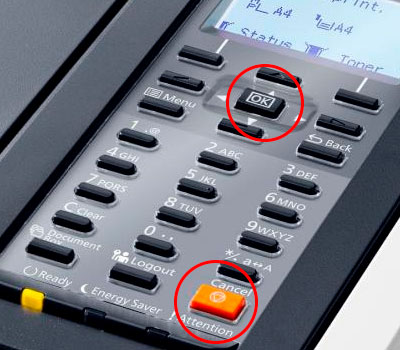
ECOSYS P6035cdn ECOSYS P6235cdn ECOSYS P7040cdn ECOSYS P7240cdn |
[Ok] и [Cancel, красную] |
|
|
ECOSYS M2640idw ECOSYS M2735dw ECOSYS M3040idn ECOSYS M3145idn ECOSYS M3540idn ECOSYS M3550idn ECOSYS M3560idn ECOSYS M3645idn ECOSYS M3655idn ECOSYS M3660idn ECOSYS M4125idn ECOSYS M4132idn ECOSYS M6035cidn ECOSYS M6230cidn ECOSYS M6235cidn ECOSYS M6535cidn ECOSYS M6630cidn ECOSYS M6635cidn ECOSYS M8124cidn ECOSYS M8130cidn ECOSYS P8060cdn FS-6525mfp FS-6530mfp FS-C8520mfp FS-C8525mfp TASKalfa 306ci TASKalfa 307ci TASKalfa 356ci TASKalfa 406ci TASKalfa 2552ci TASKalfa 3011i TASKalfa 3212i TASKalfa 3511i TASKalfa 4002i TASKalfa 5002i TASKalfa 5052ci TASKalfa 6002i TASKalfa 6052ci TASKalfa 7002i TASKalfa 7052ci TASKalfa 8002i TASKalfa 8052ci TASKalfa 9002i |
На сенсорной панели нажать «Далее» -> «Продолжить» -> «Закрыть» |
Внимание:
- После выключения и обратного включения принтера ошибка снова появится, после чего произойдет блокировка устройства. Чтобы избавиться от нее, повторно осуществите процедуру с нажатием комбинации кнопок, соответствующей Вашей модели принтера.
- Установка перезаправленного картриджа в принтер Kyocera, и нажатие соответствующей комбинации кнопок, может не сбросить ошибку. Дело в том, что система посчитает чип старым (либо такое может быть в случае, если версия прошивки чипа не совпадает с версией прошивки принтера). В этом случае избавиться от проблемы поможет покупка и установка нового чипа Kyocera.
- Если Вы установили перезаправленный картридж в принтер Kyocera, ошибка не убралась, а переквалифицировалась в «Добавьте тонер» или «В картридже нет тонера», это указывает на то, что расходник был неправильно заправлен. Обратитесь в сервисный центр либо замените картридж новым изделием.
Заказать картриджи для принтеров Kyocera как оригинального, так и аналогового образца можно в нашем интернет-магазине. Здесь представлен огромный выбор расходников для оргтехники Kyocera по самым лояльным расценкам. Качество продукции соответствует всем международным нормам и стандартам качества. Решение заказать картридж для принтера Kyocera у нас является верным. Мы гарантируем это.
Ваше Имя:
Ваш вопрос:
Внимание: HTML не поддерживается! Используйте обычный текст.
Оценка:
Плохо
Хорошо
Введите код, указанный на картинке:

Здравствуй, дорогой друг!
Сегодня расскажем как сбросить ошибку «установлен неоригинальный картридж с тонером» или «тонер отсутствует» в принтерах KYOCERA.
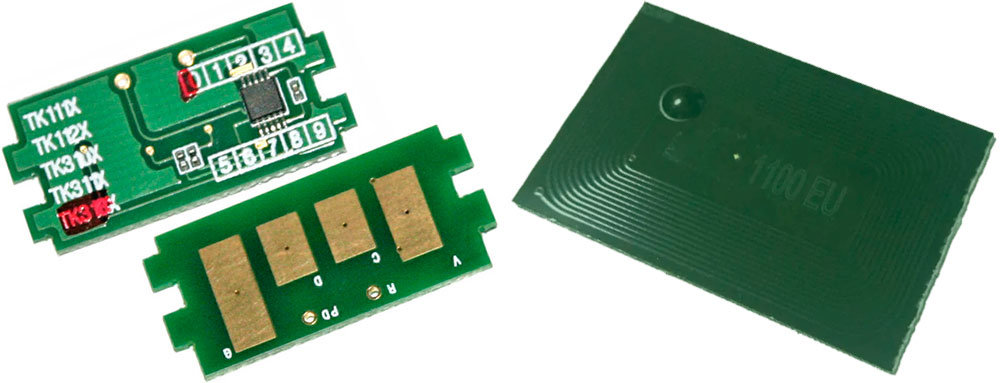
В KYOCERA на картриджах установлены чипы.
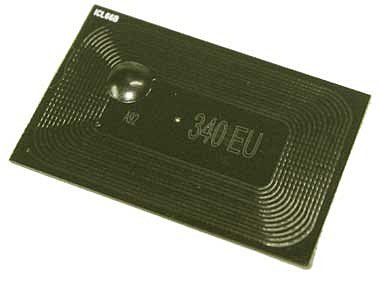
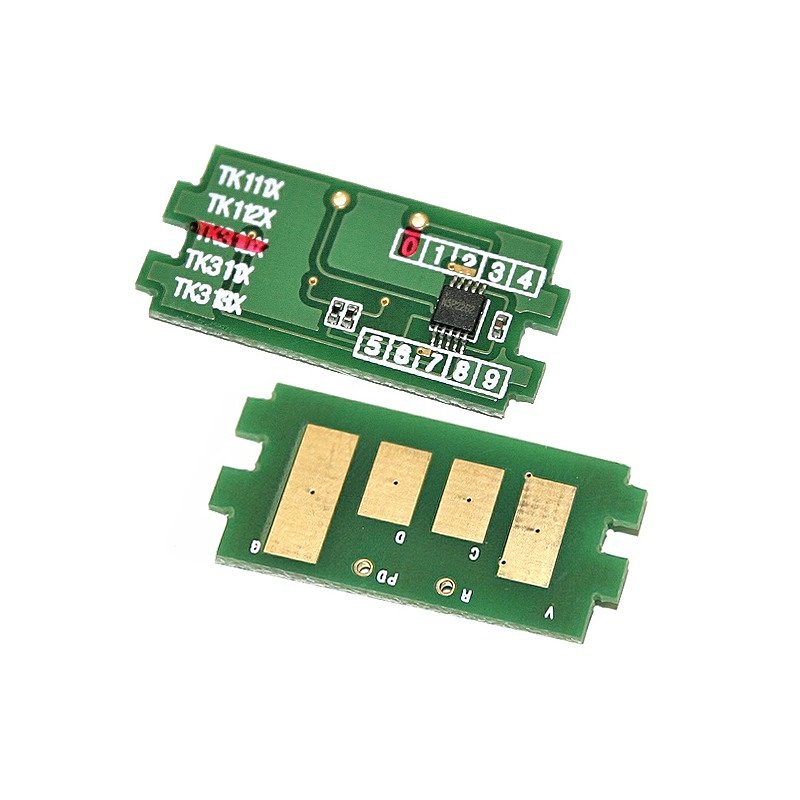
Они считывают информацию о наличии тонера. Как только тонер заканчивается, печать блокируется. Как правило после заправки принтер выдает ошибку. Это говорит о том что ресурс чипа исчерпан или версия прошивки не поддерживается.
Чип после заправки можно не менять, а продолжать печатать сбросив ошибку. Ниже приведена таблица в которой указаны комбинации для сброса. Удерживайте зажатые клавиши не менее 3 секунд.
| FS-1020MFP |
Клавиша выбора режима + [Стоп/Сброс]. |
|
FS-1025MFP |
[Стоп/Сброс] + [OK] |
|
FS-1040 |
[GO] + [Отмена] |
|
FS-1030MFP |
[OK] + [Стоп] |
|
FS-1100 |
Красная и зеленая кнопки на корпусе |
|
FS-2100D |
[OK] + [Отмена] |
| ECOSYS M2135dn M2040dn M2635dn M2635dw M2540dn M2540dw |
[OK] и [Стоп] |
Сброс делается после заправки картриджа и после каждого отключения устройства. Если принтер находится постоянно во включенном состоянии, ошибка не появляется.
Мы старались объяснить как можно понятнее.
Go в комментарии задавать вопросы и делиться опытом!

Сброс информации об установленном неоригинальном тонер-картридже Kyocera
Новые модели принтеров и МФУ Kyocera (выпущенные после 2013 года) при использовании неоригинальных картриджей без чипа или заправке картриджей блокируются: — блокируется функция печати — появляется уведомление на дисплее об ошибке и/или красная световая индикация Тем не менее производитель, компания Kyocera, допускает работу с устройством и информация о сбросе ошибки указана в инструкции по эксплуатации. Необходимо выполнить одновременное нажатие на две кнопки и удержание в течение 3-4 секунд — до момента исчезновения надписи предупреждающей надписи на устройствах с экраном и/или появления зеленой индикации предупреждающих диодов.
В большинстве случаев для сброса информации об ошибке необходимо нажать кнопки [Сброс] (оранжевая) и [Ок] за исключением моделей серии Aquarius:

Сброс информации в МФУ Kyocera FS-1020mfp — кнопка [Стоп/Сброс] и кнопка выбора

Сброс информации в МФУ Kyocera FS-1025mfp, Kyocera FS-1120mfp — кнопки [Стоп/Сброс] и [OK]

Сброс информации в МФУ Kyocera FS-118MFP

Сброс информации FS-2000D

Сброс информации в принтерах Kyocera FS-1040, Kyocera FS-1060DN — кнопки [GO] и [Отмена]
Расположение кнопок в зависимости от модели устройства Kyocera:

Сброс информации в МФУ Kyocera M3040DN, M3540DN

Сброс информации в МФУ Kyocera M2030DN, M2035DN, M2535DN

Сброс информации в принтерах Kyocera FS-2100DN, FS-4100DN, FS-4200DN

Сброс информации в Ecosys P2035d, FS-1120D, FS-1320dn, FS-1110

Сброс информации в FS-1370dn, P2135dn


Сброс информации в M5021cdn/M5021cdw

Сброс информации в M5026cdn/M5026cdw


Информация взята с сайта:
29 лет на рынке расходных
материалов и офисной техники
-


Премьер дилер по продажам МФУ Toshiba e-Studio в г. Рязань
Авторизованный сервисный центр по ремонту и техническому обслуживанию МФУ Toshiba e-Studio
-

Авторизованный дилер по продажам документ-систем SHARP в Российской Федерации
-

Авторизованный сервисный центр по ремонту и техническому обслуживанию LED-плоттеров
и инженерных систем TERIOPRINT (Seiko I Infotec)
29 лет на рынке расходных
материалов и офисной техники
-
Премьер дилер по продажам МФУ Toshiba e-Studio в г. Рязань
Авторизованный сервисный центр по ремонту и техническому обслуживанию МФУ Toshiba e-Studio
-
Авторизованный дилер по продажам документ-систем SHARP в Российской Федерации
-
Авторизованный сервисный центр по ремонту и техническому обслуживанию LED-плоттеров
и инженерных систем TERIOPRINT (Seiko I Infotec)


 Привет всем, есть 2 картриджа, оригинал и от cactus, закончились оба, заправили, пишет что вставлен неоригинальный картридж, нажал на дисплее принять и после этого он выбрасывает заново меню что вставлен неоригинальный картридж, самое интересное что есть новые чипы 2шт. оба тоже не хотят определяться, по сути то же самое что и без чипа, что то не нашел поиском в инете такую проблему, приложил видео.
- Вложения
-
[ Воспроизвести файл QuickTime ]
VID-20191223-WA0063.mp4 [ 6.18 МБ | Просмотров: 3911 ]
-

it-service89
- Увидел чернила
-
![]()
-
- Kyocera 1035 «бледная» печать
srMax в форуме Принтеры, МФУ, факсы, копиры формата A4
- 2
- 13541
srMax

Пт янв 23, 2015 2:49 pm
- Kyocera 1035 «бледная» печать
-
- [SCANNER ERROR] Lamp Error Kyocera FS-1016
мастерчип в форуме Принтеры, МФУ, факсы, копиры формата A4
- 3
- 6431
Усатый Полосатый
Вс окт 28, 2018 11:08 pm
- [SCANNER ERROR] Lamp Error Kyocera FS-1016
-
- Kyocera FS-1120d индикатор «Нет бумаги»
vs-dos в форуме Принтеры, МФУ, факсы, копиры формата A4
- 11
- 14579
СТРОНЦИЙ
Вт ноя 02, 2021 2:24 pm
- Kyocera FS-1120d индикатор «Нет бумаги»
-
- Kyocera Ecosys M2635dn «поворот» изображения
Искатель в форуме Принтеры, МФУ, факсы, копиры формата A4
- 10
- 5742
MatrixAgent
Ср апр 08, 2020 5:18 am
- Kyocera Ecosys M2635dn «поворот» изображения
-
- Стирание вала ведущей шестерни в «печке» Kyocera M2035dn
Грецкий орех в форуме Принтеры, МФУ, факсы, копиры формата A4
- 12
- 2898
СТРОНЦИЙ
Пн дек 13, 2021 3:35 pm
- Стирание вала ведущей шестерни в «печке» Kyocera M2035dn
Вернуться в Принтеры, МФУ, копиры формата A3
Кто сейчас на форуме
Сейчас этот форум просматривают: нет зарегистрированных пользователей и гости: 21
Дата публикации: 08.02.2021
0
11773
Сброс счетчика или ошибки чипа на Kyocera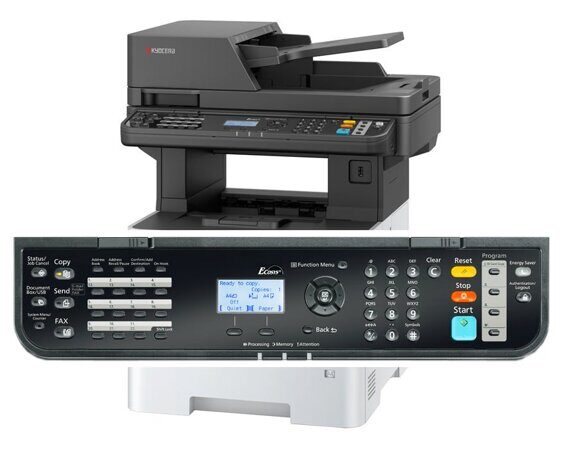
На большинстве картриджей разных компаний установленны чипы (микросхемы), которые служат для учета напечатанных страниц.
Некоторые устройства, когда заканчивается тонера в картридже, просто сигнализируют лампочкой или сообщением «тонер закончился», «замените картридж», но дают при этом печатать дальше.
Но есть и такие модели, где производители принтеров, намеренно устанавливают чипы, которые блокируют устройства, тем самым подталкивая вас купить оригинальный картридж.
Вариантов решения проблем с такими принтерами, несколько:
1. Купить новый картридж (оригинальный или совместимый)
2. Прошить аппарат, если это технически возможно и забыть про замену чипов.
3. Заправить картридж с заменой чипа
4. Сбросить ошибку (в основном только для Kyocera)
Как сбросить ошибку E-0001 на Kyocera мы ответим ниже.
Красная светодиодная индикация или ошибка E-0001 на Kyocera говорят нам о том, что тонер в картридже закончился (а точнее чип на картридже посчитал, что тонер закончился).
В большинстве случаев, сброс счетчика страниц происходит одновременным нажатием кнопок «OK» и «Стоп/Сброс»(оранжевая) на несколько секунд (3-4)
Разберем сброс счетчика страниц Kyocera на нескольких основных моделях:
1. Сброс счетчика страниц на Kyocera FS-2000D
2. Сброс счетчика страниц на Kyocera Ecosys P2035d

3. Сброс ошибки чипа на МФУ Kyocera FS-1125MFP

4. Сброс информации в МФУ Kyocera FS-1020MFP

5. Сброс счетчика информации на МФУ Kyocera 3140

6. Сброс ошибки чипа в МФУ Kyocera FS-1135MFP

Хотя в данных примерах далеко не все устройства приведены, но общий смысл должен быть понятен.
Есть еще некоторые модели, которые требуют дополнительного ввода ключа. В МФУ Kyocera M3145dn/M3645dn и некоторых других моделях, при включении аппарата появляется ошибка «Неоригинальный картридж с тонером». Нажимаем «Далее» и видим что от нас требуют ввести ключ, сам ключ указан в скобках (цифра). Вводим ту цифру, которая указана, жмем «OK» и МФУ продолжает работу.
Если у вас возникли проблемы со сбросом счетчика страниц или ошибки «Неоригинальный картридж с тонером» напишите нам указав модель вашего устройства и точную проблему или позвоните по контактным телефонам мы Вам поможем.
На чтение 6 мин Просмотров 9к. Опубликовано 01.12.2020
Во всех новых печатающих устройствах Kyocera на тонер-картриджах установлены чипы. Данные чипы позволяют пользователю контролировать остаток тонера, а также стимулируют к покупке новых картриджей. В этой статье описаны способы, как обойти блокировку на принтерах и МФУ компании Kyocera после заправки картриджа.
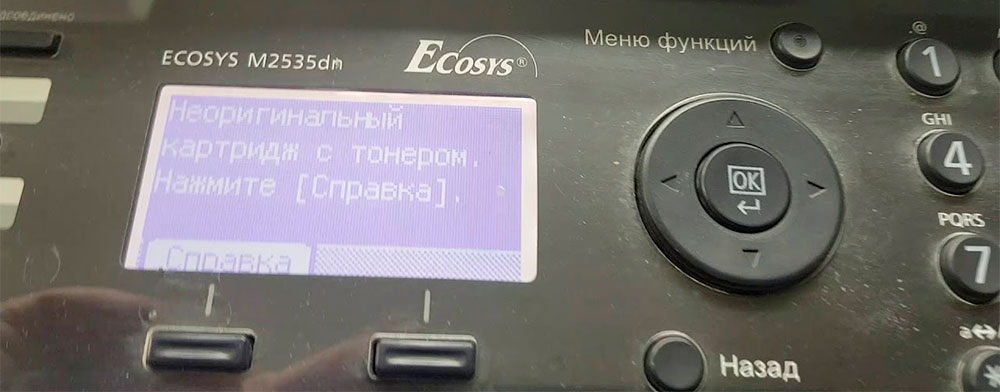
После заправки тонер-картриджа Kyocera, Ваше печатающее устройство, скорее всего выдаст сообщение: «Установлен неоригинальный картридж с тонером» или «Тонер отсутствует«. И тут большинство пользователей впадают в ступор)))
 |
Поскольку не хотят прочитать, что же написано в Справке аппарата, которую он любезно показывает совместно с ошибкой. |
А ведь Ваш аппарат Kyocera пытается Вам рассказать, что же необходимо сделать для дальнейшей работы устройства.
Для того, чтобы продолжить использовать заправленные картриджи, в большинстве случаев, необходимо на панели аппарата зажать одновременно две клавиши [СТОП] и [ОК] и подержать 3-5секунд.

Но не все советы одинаково полезны )))
На некоторых аппаратах используется другая комбинация клавиш. Найдите в списке Ваше печатающее устройство и выполните соответствующие инструкции.
Зажать красную и зеленую кнопки на корпусе принтера на 3 секунды или дольше.
Если нужно использовать установленный в настоящее время контейнер с тонером, одновременно нажмите и удерживайте клавиши [OK] и [Стоп] в течение минимум 3 с.
Внимание!!! Если после установки заправленного картриджа, аппарат выдает сообщение: «Добавьте тонер», это означает, что ваш картридж заправлен неправильно !
Можете смело предъявлять претензии заправщику, либо, как вариант, положение спасет новый картридж Kyocera TK-1200.
Внимание: у цветных принтеров и мфу Kyocera нет возможности сброса сообщения при помощи кнопок. Необходимо обязательно при заправке картриджа менять чип!
Столкнулся с бедой — принтер Kyocera FS-4200dn пишет — замените тонер. Клавиатура при этом не работает (не дает ничего нажать), только справка открывается, в которой описано, как заменить картридж. Пробовал поставить другой — ни помогло.
В поисковиках нашел варианты решений:
1. Очистить бункер отработанного тонера — не помогло
2. Заменить картридж — не помогло
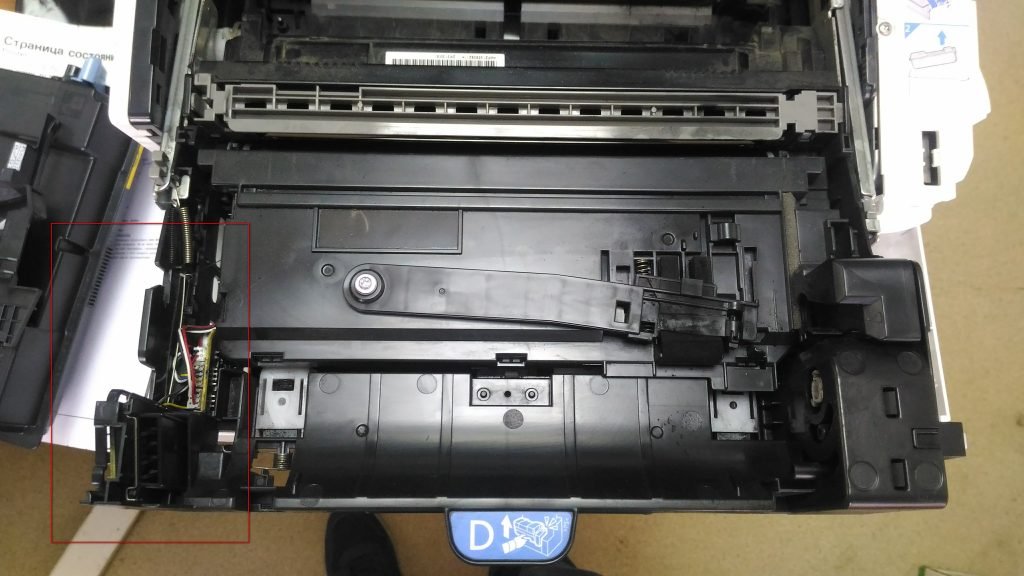
Полез разбирать и смотреть, оказало датчик под узлом проявки засыпало тонером, и он как то не правильно себя вел. Очистил — все работает. Рассмотрим, что было сделано.
Исправляем ошибку Kyocera FS-4200 замените тонер
Выключаем принтер !
Внимание, разборку Вы осуществляете на свой страх и риск. Автор ответственности за испорченное имущество ответственности не несет. Статья носит ознакомительный характер и ни в коем случае не побуждает Вас лезть туда, куда вы не знаете. Если Вы не уверены в своих действиях — обратитесь в сертифицированный сервисный центр!
Открываем переднюю крышку и выкатываем DrumUnit
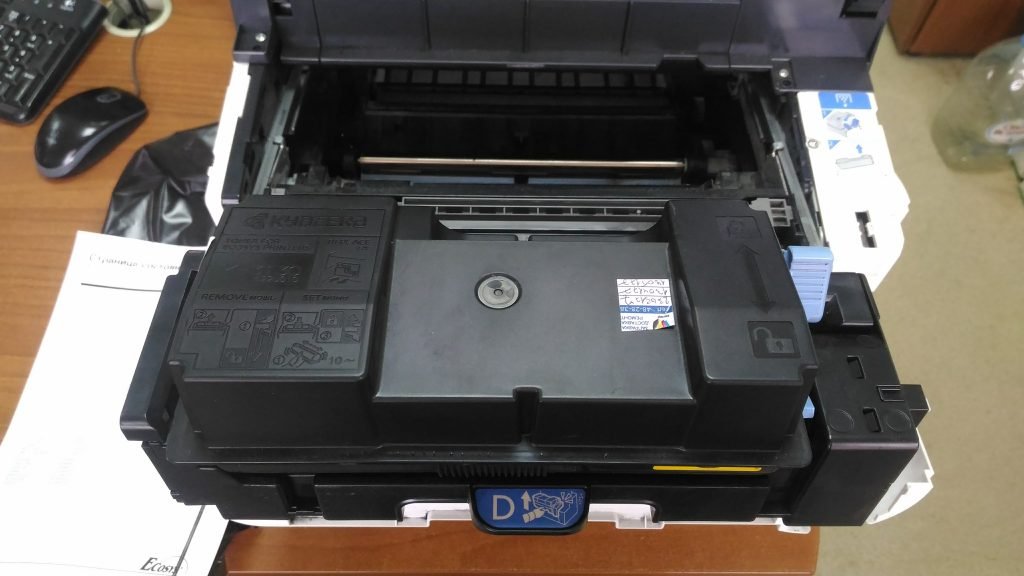
Далее необходимо снять защитную крышку слева, для этого поднимаем ее где указывает стрелочка и отодвигаем ее от себя:
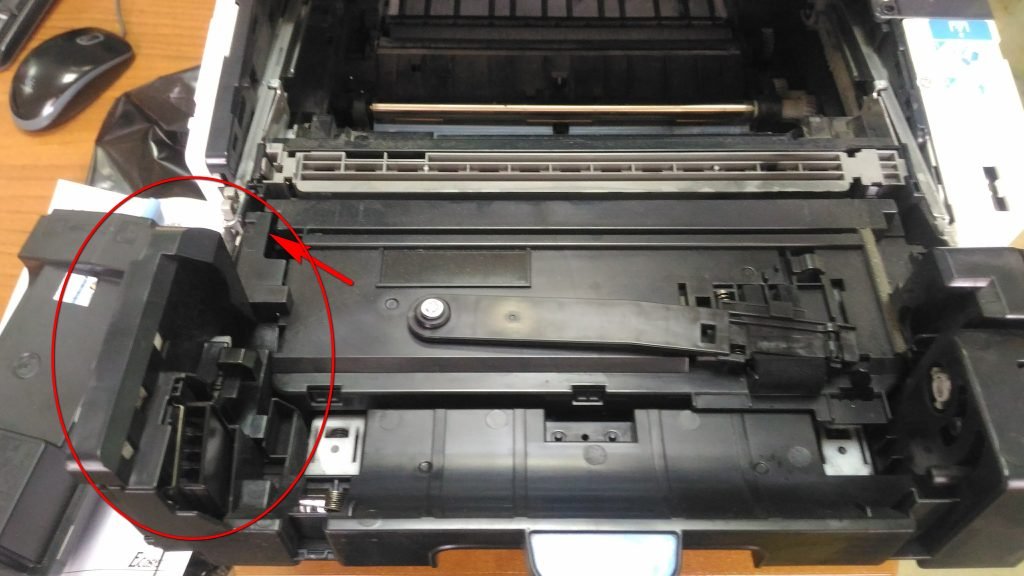
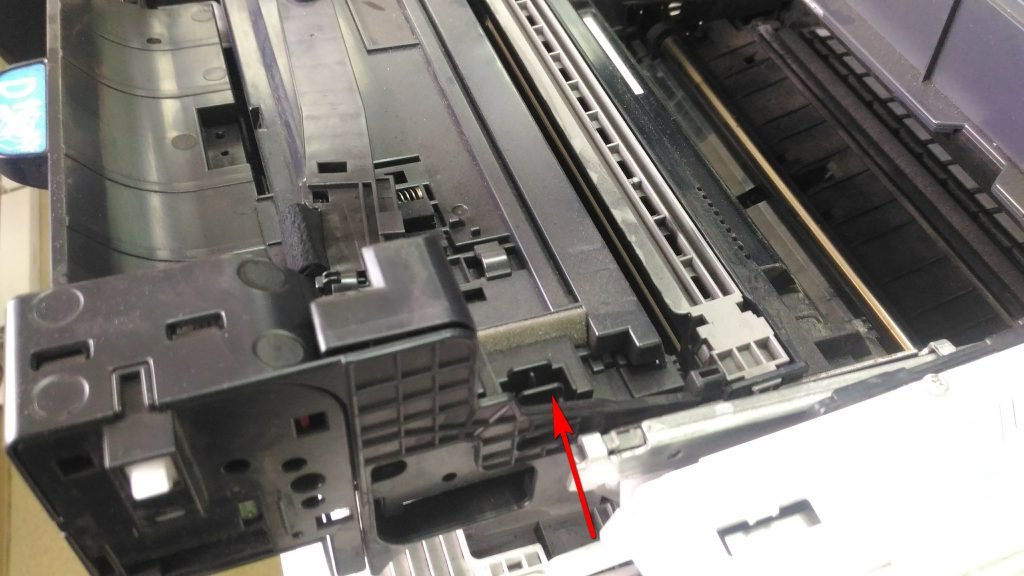
У Вас должно получиться вот так. Сразу можно отключить провод, идущий к узлу проявки, это самый ближний разъем к Вам:
Теперь смотрим на правую сторону. Чтобы достать узел проявки из DrumUnit, необходимо надавить на защелку, которая отмечена стрелкой и потянуть его вверх.
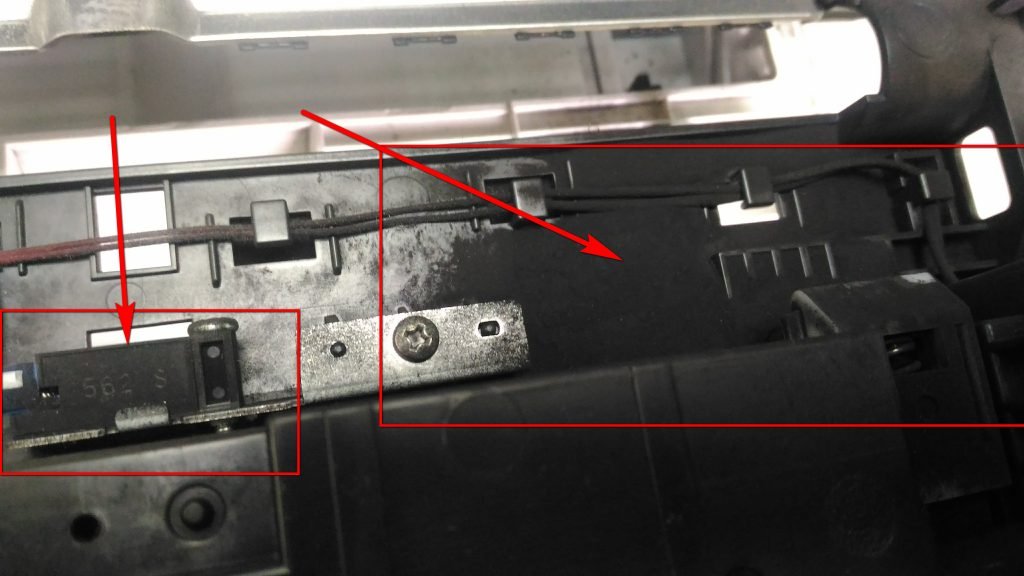
После снятия узла проявки я увидел вот такое. То ли пользователи так ставили картридж в него, то ли это минус конструкции, что он просыпается, но это совсем не порядок. Слева видим датчик тонера (как я понял), который тоже весь в нем (это я уже с него немного сдул, так он был такой же, как и справа.
Чистим все это дело и собираем обратно (в обратной последовательности), ставим картридж на место и включаем принтер.
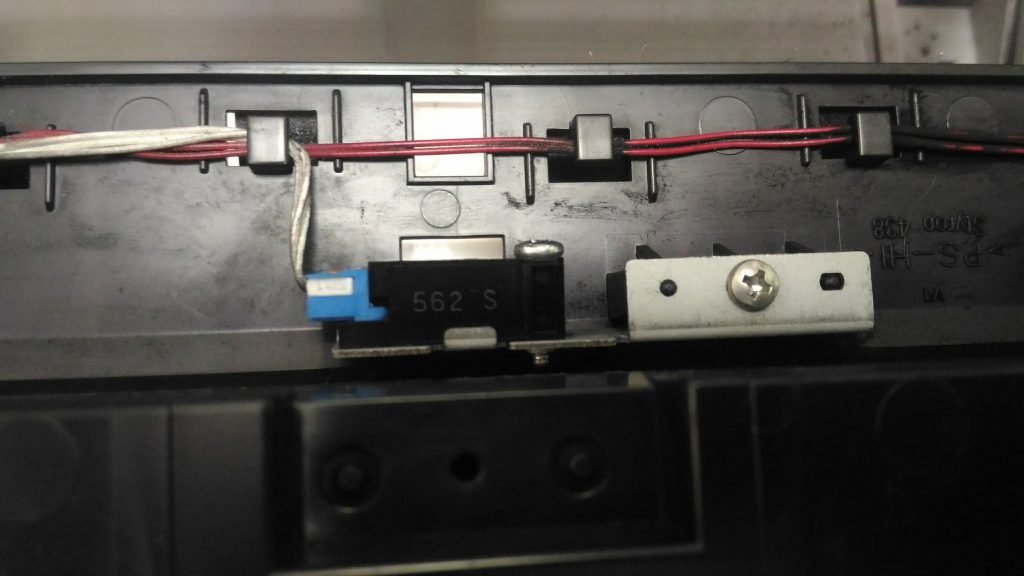
После сборки обратно, принтер добавил себе тонера и радостно сказал «Готов к печати«.
Новые модели принтеров и МФУ Kyocera (выпущенные после 2013 года) при использовании неоригинальных картриджей без чипа или заправке картриджей блокируются:
— блокируется функция печати
— появляется уведомление на дисплее об ошибке и/или красная световая индикация
Тем не менее производитель, компания Kyocera, допускает работу с устройством и информация о сбросе ошибки указана в инструкции по эксплуатации. Необходимо выполнить одновременное нажатие на две кнопки и удержание в течение 3-4 секунд — до момента исчезновения надписи предупреждающей надписи на устройствах с экраном и/или появления зеленой индикации предупреждающих диодов.
В большинстве случаев для сброса информации об ошибке необходимо нажать кнопки [Сброс] (оранжевая) и [Ок] за исключением моделей серии Aquarius:

Сброс информации в МФУ Kyocera FS-1020mfp — кнопка [Стоп/Сброс] и кнопка выбора

Сброс информации в МФУ Kyocera FS-1025mfp, Kyocera FS-1120mfp — кнопки [Стоп/Сброс] и [OK]

Сброс информации в МФУ Kyocera FS-118MFP

Сброс информации FS-2000D

Сброс информации в принтерах Kyocera FS-1040, Kyocera FS-1060DN — кнопки [GO] и [Отмена]
Расположение кнопок в зависимости от модели устройства Kyocera:

Сброс информации в МФУ Kyocera M3040DN, M3540DN

Сброс информации в МФУ Kyocera M2030DN, M2035DN, M2535DN

Сброс информации в принтерах Kyocera FS-2100DN, FS-4100DN, FS-4200DN

Сброс информации в Ecosys P2035d, FS-1120D, FS-1320dn, FS-1110

Сброс информации в FS-1370dn, P2135dn


Сброс информации в P3045dn /P3050dn /P3055dn /P3060dn/ P4040DN


Сброс информации в P5021cdn/P5021cdw
Сброс информации в P5026cdn/P5026cdw
Сброс информации в МФУ Kyocera M5521cdn/ M5521cdw

Сброс информации в МФУ Kyocera M6030cdn/M6530cdn

Сброс информации в TASKalfa 1800

Другие устройства Kyocera
В остальных устройствах: выпускавшихся ранее, новых цветных или серии TASKalfa информация носит предупреждающий характер, работа принтера или МФУ не блокируются.
| FS-1020MFP | Если вы хотите использовать картридж с тонером, установленный на данный момент, одновременно нажмите Клавиша выбора режима и [Стоп/Сброс] и удерживайте не менее 3 секунд. |
| Если вы хотите использовать картридж с тонером, установленный на данный момент, одновременно нажмите [Стоп/Сброс] и [OK] и удерживайте не менее 3 секунд. | |
| Если вы хотите использовать картридж с тонером, установленный на данный момент, одновременно нажмите клавиши [GO] и [Отмена] и удерживайте не менее 3 секунд. | |
| Если требуется использовать установленный сейчас картридж с тонером, нажмите клавишу [OK] и клавишу [Стоп] одновременно и удерживайте их 3 секунды или дольше. | |
| Если вы хотите использовать установленный контейнер с тонером, одновременно удерживайте кнопки [OK] и [Отмена] на протяжении как минимум 3 секунд. | |
| ECOSYS M2135dn ECOSYS M2040dn ECOSYS M2635dn ECOSYS M2635dw ECOSYS M2540dn ECOSYS M2540dw |
Если нужно использовать установленный в настоящее время контейнер с тонером, одновременно нажмите и удерживайте клавиши [OK] и [Стоп] в течение минимум 3 с. |
| Если требуется использовать установленный сейчас картридж с тонером, нажмите клавишу [OK] и клавишу [Стоп] одновременно и удерживайте их 3 секунды или дольше. | |
Не секрет, что большинство лазерных картриджей Kyocera (Киосера) имеют чип — специальную микросхему, позволяющую пользователю на дисплее принтера или МФУ (многофункционального устройства) контролировать остаток тонера.
Когда тонер заканчивается, принтер или МФУ выдаёт ошибку о недостаточном количестве для дальнейшей работы. Для возобновления работы устройства, владельцу необходимо принять решение: заправить картридж или приобрести новый.
Представим, что пользователь посетил сервисный цент и заправил картридж. Затем, принеся домой или в офис, вставил картридж в печатающее устройство. И, увы, увидел новую ошибку в работе принтера: «Неоригинальный картридж с тонером».

Ошибка появилась из-за чипа. Да-да, той самой микросхемы описанной выше. Ведь помимо контроля тонера, чип «запрещает» принтеру повторно использовать картридж. Сделано это производителями намеренно с одной целью — стимулировать владельца аппарата к приобретению нового картриджа.
К счастью, есть методы обхода блокировки для разных моделей Kyocera (Киосера). Перезаправленным картриджем можно будет пользоваться. Причем, перезаправлять картриджи вы сможете многократно.
Чтобы МФУ Kyocera (Киосера) снова могло распознать картридж, используйте сочетание клавиш [СТОП] и [ОК].
Зажмите клавиши одновременно и удерживайте от 3 до 5 секунд. После чего на дисплее увидите надпись: «Готов к копированию». Это хороший знак, ведь на принтере снова можно печатать.
Данный метод подходит большинству моделей печатающих устройств Киосера. Однако на некоторых моделях такая комбинация окажется неэффективной.
В табличке ниже, я прописал модели аппаратов, для которых требуется другое сочетание. Выберите модель аппарата из списка, а затем нажмите нужные клавиши на своём принтере. И ваш аппарат напишет долгожданное:» Готов к копированию», вместо» Неоригинальный картридж с тонером».
Устранение ошибки «Установлен неоригинальный картридж с тонером» для других моделей Kyocera.
Kyocera ECOSYS P2335d

Одновременно нажмите на кнопки [OK] и [Стоп] и подождите не менее 3 секунд.
Kyocera ECOSYS M2535dn/ M2530dn/ M2035dn/ M2030dn

Избавиться от ошибки «Установлен неоригинальный картридж с тонером» поможет одновременное зажатие [OK] и [Стоп] и удержание не менее 3 секунд.
Kyocera ECOSYS M2540dw/ M2540dn/ M2635dw/ M2635dn/ M2040dn/ M2135dn/ M3540DN/ M3040DN

Удерживайте не менее 3 секунд зажатые клавиши [OK] и [Стоп].
Kyocera FS-4300DN/ FS-4200DN/ FS-4100DN/ FS-2100DN/ FS-2100D

Устраните ошибку «Установлен неоригинальный картридж с тонером» самостоятельно: удержите [OK] + [Отмена] на время не менее 3 секунд.
Kyocera FS-1320D/ FS-1120D/ FS-1300D/ FS-1110/ FS-1100

А для этих моделей, следует на 3-4 секунды зажать красную и зеленую клавиши на панели принтера.
Kyocera FS-1135MFP/ FS-1035MFP/ FS-1130MFP/ FS-1030MFP

Удерживайте [OK] + [Стоп] одновременно чуть больше 3 секунд.
Kyocera FS-1061DN/ FS-1060DN/ FS-1041/ FS-1040

Комбинация [Отмена] и [GO], зажатая не менее 3 секунд, позволит устранить ошибку принтера «Установлен неоригинальный картридж с тонером».
Kyocera FS-1325MFP/ FS-1320MFP/ FS-1125MFP/ FS-1120MFP/ FS-1025MFP

Для устранения ошибки, воспользуйтесь клавишами [Стоп/Сброс] и [OK]. Зажмите их не менее чем за 3 секунды.
Kyocera FS-1020MFP

Удерживайте кнопку [Стоп/Сброс] и «Выбор режима» 3-5 секунд.
02.04.2020 г.
- Code: C0030
- Description: FAX PWB system error
- Causes: The FAX processing cannot be continued due to the FAX firmware error.
- Remedy: 1 Resetting the main power The FAX PWB does not operate properly. Turn off the power switch and unplug the power plug. After 5s passes, reconnect the power plug and turn on the power switch.
2 Firmware upgrade The firmware is faulty. Reinstall the FAX firmware.
3 Replacing the FAX PWB The FAX PWB is faulty. Replace the FAX PWB.
- Code: C0060
- Description: Engine PWB communication error
- Causes: Error was detected at the initial communication of the Engine PWB
- Remedy: 1 Resetting the main power The Engine PWB does not operate properly. Turn off the power switch and unplug the power plug. After 5s passes, reconnect the power plug and turn on the power switch.
2 Checking the connection The connector is not properly connected. Clean the connector (YC12) terminal on the Engine PWB and re-insert the connector
3 Replacing the Engine PWB The Engine PWB is faulty. Replace the Engine PWB.
- Code: C0070
- Description: FAX PWB incompatible detection error
- Causes: Abnormal detection of FAX control PWB incompatibility in the initial communication with the FAX control PWB, any normal communication command is not transmitted.
- Remedy: 1 Checking the FAX PWB The incompatible FAX PWB is installed. Install the FAX PWB for the applicable model.
2 Firmware upgrade The FAX firmware is faulty. Reinstall the FAX firmware.
3 Replacing the main PWB The main PWB is faulty. Replace the main PWB.
- Code: C0100
- Description: Backup memory device error
- Causes: An abnormal status is output from the flash memory.
- Remedy: 1 Resetting the main power The flash memory does not operate properly. Turn off the power switch and unplug the power plug. After 5s passes, reconnect the power plug and turn on the power switch.
2 Checking the main PWB The connector or the FFC is not connected properly. Or, the wire, FFC, the PWB is faulty. Clean the terminal of the connectors on the main PWB, reconnect the connector of the wire, and reconnect the FFC terminal. If the wire or the FFC is faulty, repair or replace them. If not resolved, replace the main PWB.
- Code: C0120
- Description: MAC address data error
- Causes: The MAC address data is incorrect.
- Remedy: 1 Resetting the main power The flash memory does not operate properly. Turn off the power switch and unplug the power plug. After 5s passes, reconnect the power plug and turn on the power switch.
2 Checking the MAC address The MAC address is incorrect. Replace the main PWB when the MAC address is not indicated on the network status page.
- Code: C0130
- Description: Backup memory reading/writing error
- Causes: The reading or writing into the flash memory is unavailable.
- Remedy: 1 Resetting the main power The flash memory does not operate properly. Turn off the power switch and unplug the power plug. After 5s passes, reconnect the power plug and turn on the power switch.
2 Checking the main PWB The connector or the FFC is not connected properly. Or, the wire, FFC, the PWB is faulty. Clean the terminal of the connectors on the main PWB, reconnect the connector of the wire, and reconnect the FFC terminal. If the wire or the FFC is faulty, repair or replace them. If not resolved, replace the main PWB.
- Code: C0140
- Description: Backup memory data error
- Causes: The flash memory data read at the initial start-up is faulty
- Remedy: 1 Resetting the main power The flash memory does not operate properly. Turn off the power switch and unplug the power plug. After 5s passes, reconnect the power plug and turn on the power switch.
2 Checking the main PWB The connector or the FFC is not connected properly. Or, the wire, FFC, the PWB is faulty. Clean the terminal of the connectors on the main PWB, reconnect the connector of the wire, and reconnect the FFC terminal. If the wire or the FFC is faulty, repair or replace them. If not resolved, replace the main PWB.
- Code: C0150
- Description: Engine EEPROM reading / writing error
- Causes: 1. Continuous five times detection of no response from the device for 5ms or more on reading / writing.
2. Data read twice do not match continuous 8 times.
3. Writing data and reading data do not match continuous 8 times. - Remedy: 1 Resetting the main power The EEPROM on the Engine PWB does not operate properly. Turn off the power switch and unplug the power plug. After 5s passes, reconnect the power plug and turn on the power switch.
2 Checking the EEPROM on the Engine PWB The EEPROM is not properly attached. Reattach the EEPROM on the Engine PWB.
3 Replacing the EEPROM The EEPROM is faulty. 1. Print Maintenance Report at U000 beforehand. 2. Replace the EEPROM on the Engine PWB. C0180 appears when turning the power on. Execute U004 at that state. 3. Then, print Maintenance Report at U000. Compare the setting values with Maintenance Report printed before and change the different values. (Target maintenance mode: U051, U065, U067, U100, U101, U161, etc.)
4. Check the output image and adjust the image at U410, etc. if necessary. 4 Replacing the Engine PWB The Engine PWB is faulty. Replace the Engine PWB.
- Code: C0160
- Description: EEPROM data error
- Causes: The data read from the EEPROM is judged as abnormal.
- Remedy: 1 Resetting the main power The EEPROM on the Engine PWB does not operate properly. Turn off the power switch and unplug the power plug. After 5s passes, reconnect the power plug and turn on the power switch.
2 Executing U021 The storage data in the EEPROM on the Engine PWB is faulty. Execute U021.
3 Replacing the EEPROM The EEPROM is faulty. 1. Print Maintenance Report at U000 beforehand. 2. Replace the EEPROM on the Engine PWB. C0180 appears when turning the power on. Execute U004 at that state. 3. Then, print Maintenance Report at U000. Compare the setting values with Maintenance Report printed before and change the different values. (Target maintenance mode: U051, U065, U067, U100, U101, U161, etc.) 4. Check the output image and adjust the image at U410, etc. if necessary.
4 Replacing the Engine PWB The Engine PWB is faulty. Replace the Engine PWB.
- Code: C0170
- Description: Charger count error
- Causes: 1. Errors are detected in both backup memory of the Engine PWB charge counter and main PWB charge counter.
2. Main PWB counter data and Engine PWB counter date are faulty - Remedy: 1 Replacing the main PWB The main PWB is faulty. Replace the main PWB and execute U004
2 Replacing the EEPROM on the Engine PWB The EEPROM is faulty. 1. Print Maintenance Report at U000 beforehand. 2. Replace the EEPROM on the Engine PWB. C0180 appears when turning the power on. Execute U004 at that state. 3. Then, print Maintenance Report at U000. Compare the setting values with Maintenance Report printed before and change the different values. (Target maintenance mode: U051, U065, U067, U100, U101, U161, etc.) 4. Check the output image and adjust the image at U410, etc. if necessary.
3 Replacing the Engine PWB The Engine PWB is faulty. Replace the Engine PWB.
- Code: C0180
- Description: Machine serial number mismatch
- Causes: The machine serial Nos. in the main PWB and the EEPROM on the Engine PWB mismatch when turning the power on.
- Remedy: 1 Checking the machine serial No. of the main PWB The main PWB for the different main unit is installed. Check the machine serial Nos of MAIN and Engine at U004, and install the correct main PWB if the MAIN No. differs.
2 Checking the machine serial No. in the EEPROM on the Engine PWB The EEPROM for the different main unit is installed. Check the machine serial Nos of MAIN and Engine at U004, and install the correct EEPROM on the Engine PWB if the Engine machine serial No. differs.
3 Replacing the main PWB The main PWB is faulty. When the MAIN machine serial No. differs at U004, replace the main PWB and execute U004.
4 Checking the EEPROM on the Engine PWB The EEPROM is faulty. If the machine serial number on the Engine PWB is different at U004, reattach the EEPROM. If not repaired, replace the EEPROM on the Engine PWB. 1. Print Maintenance Report at U000 beforehand. 2. Replace the EEPROM on the Engine PWB. C0180 appears when turning the power on. Execute U004 at that state. 3. Then, print Maintenance Report at U000. Compare the setting values with Maintenance Report printed before and change the different values. (Target maintenance mode: U051, U065, U067, U100, U101, U161, etc.) 4. Check the output image and adjust the image at U410, etc. if necessary.
5 Replacing the Engine PWB The Engine PWB is faulty. Replace the Engine PWB.
- Code: C0190
- Description: Backup memory device error (Engine)
- Causes: Data from the main unit IC cannot be read out at power-up
- Remedy: 1 Resetting the main power The IC in the Engine PWB does not operate normally Turn off the power switch and unplug the power plug. After 5s passes, reconnect the power plug and turn on the power switch.
2 Replacing the Engine PWB The Engine PWB is faulty. Replace the Engine PWB.
- Code: C0500
- Description: Drive lock detected by the Engine firmware
- Causes: During the Engine steady state control, the main motor drive continued 60 minutes or more (except during the maintenance mode)
- Remedy: 1 Resetting the main power The firmware in the Engine PWB does not operate normally Turn off the power switch and unplug the power plug. After 5s passes, reconnect the power plug and turn on the power switch.
2 Replacing the Engine PWB The Engine PWB is faulty. Replace the Engine PWB.
- Code: C0510
- Description: High-voltage remote control error
- Causes: Only the high-voltage remote signal turns on while the drum is stopped
- Remedy: 1 Resetting the main power The firmware in the Engine PWB does not operate normally Turn off the power switch and unplug the power plug. After 5s passes, reconnect the power plug and turn on the power switch.
2 Replacing the Engine PWB The Engine PWB is faulty. Replace the Engine PWB.
- Code: C0520
- Description: Developer control error
- Causes: The developer bias off is detected during the main charge bias off
- Remedy: 1 Resetting the main power The firmware in the Engine PWB does not operate normally Turn off the power switch and unplug the power plug. After 5s passes, reconnect the power plug and turn on the power switch.
2 Replacing the Engine PWB The Engine PWB is faulty. Replace the Engine PWB.
- Code: C0530
- Description: Backup task error
- Causes: No operation 30s or more when monitoring the backup task operation
- Remedy: 1 Resetting the main power The firmware in the Engine PWB does not operate normally Turn off the power switch and unplug the power plug. After 5s passes, reconnect the power plug and turn on the power switch.
2 Replacing the Engine PWB The Engine PWB is faulty. Replace the Engine PWB.
- Code: C0540
- Description: Engine firmware unexpected control detection
- Causes: Eject switching solenoid turned on over the specified time
- Remedy: 1 Resetting the main power The firmware in the Engine PWB does not operate normally Turn off the power switch and unplug the power plug. After 5s passes, reconnect the power plug and turn on the power switch.
2 Replacing the Engine PWB The Engine PWB is faulty. Replace the Engine PWB.
- Code: C0800
- Description: Image processing error
- Causes: The print sequence jam (J010x) is detected 2 times continuously.
- Remedy: 1 Checking the image data The image data is faulty. When this issue occurs only when handling the certain image data, check if the image data is faulty.
2 Checking the situation The printing operation of the certain file is faulty. Acquire the job’s log if the phenomenon can be reproduced by specifying the job when the error was detected.
3 Checking the main PWB The connector or the FFC is not connected properly. Or, the wire, FFC, the PWB is faulty. Clean the terminal of the connectors on the main PWB, reconnect the connector of the wire, and reconnect the FFC terminal. If the wire or the FFC is faulty, repair or replace them. If not resolved, replace the main PWB.
- Code: C0830
- Description: FAX PWB flash program area checksum error
- Causes: The program stored in the flash memory on the FAX PWB is broken so it cannot perform.
- Remedy: 1 Resetting the main power The FAX PWB is not connected properly. Turn off the power switch and pull out the power plug. After passing 5s, reattach the FAX PWB and reinsert the power plug. Then, turn on the power switch.
2 Firmware upgrade The firmware is faulty. Reinstall the FAX firmware.
3 Initializing the fax The data in the FAX PWB is faulty. Execute U600 to initialize the FAX.
4 Replacing the FAX PWB The FAX PWB is faulty. Replace the FAX PWB.
- Code: C0840
- Description: RTC error
- Causes: • Not communicated with RTC correctly. • RTC data is inconsistent with empty battery.
- Remedy: 1 Setting time and date (RTC) Time and date (RTC) are erased Set Date and Time (RTC) from System Menu
2 Replacing the main PWB The main PWB is faulty, or the backup battery runs out. Replacing the main PWB [
- Code: C0870
- Description: PC FAX Image data transmission error
- Causes: Data was not properly transmitted even if the specified times of retry were made when the large volume data is transmitted between the FAX PWB and the main PWB.
- Remedy: 1 Resetting the main power The FAX PWB does not operate properly. Turn off the power switch and pull out the power plug. After passing 5s, reattach the FAX PWB and reinsert the power plug. Then, turn on the power switch.
2 Initializing the fax The data in the FAX PWB is faulty. Execute U600 to initialize the FAX.
3 Firmware upgrade The FAX firmware is faulty. Upgrade the fax firmware to the latest version.
4 Replacing the FAX PWB The FAX PWB is faulty. Replace the FAX PWB.
5 Replacing the main PWB The main PWB is faulty. Replace the main PWB.
- Code: C0920
- Description: FAX file system error
- Causes: The backup data could not be stored since the file system of the flash memory is faulty.
- Remedy: 1 Resetting the main power The FAX PWB does not operate properly. Turn off the power switch and pull out the power plug. After passing 5s, reattach the FAX PWB and reinsert the power plug. Then, turn on the power switch.
2 Initializing the fax FAX control values are incorrect Execute U600 to initialize the FAX.
3 Reconnecting the FAX PWB The FAX PWB is not connected properly. Reinstall FAX PWB to Main PWB.
4 Firmware upgrade The firmware is faulty. Reinstall the FAX firmware.
5 Replacing the FAX PWB The FAX PWB is faulty. Replace the FAX PWB.
- Code: C0980
- Description: 24V power interruption detection
- Causes: • 24V power shutoff signal is detected 1s continuously. • Other service call error occurs after 24V power shutoff signal is lowered, and then 24V power is recovered.
- Remedy: 1 Resetting the main power The firmware in the Engine PWB does not operate normally Turn off the power switch and unplug the power plug. After 5s passes, reconnect the power plug and turn on the power switch.
2 Checking the connection The connector is not connected properly, or the wire is faulty. Clean the terminal of the following wire connectors and reconnect the connectors. If there is no continuity, replace the wire. • Low voltage PWB — Engine PWB
3 Replacing the low voltage PWB The low voltage PWB is faulty. When the +24V generation from the low voltage PWB is not stable, and it lowers, replace the low voltage PWB.
4 Replacing the Engine PWB The Engine PWB is faulty. Replace the Engine PWB.
- Code: C1010
- Description: Lift motor 1 error
- Causes: • Cassette 1 lift motor over-current is detected 5 times continuously. • Lift sensor on is not detected 5 times continuously when passing 15s after cassette 1 is loaded.
- Remedy: 1 Checking the lift plate The lift plate does not operate properly. Repair or replace the lift plate when it does not move vertically.
2 Checking the connection The connector is not connected properly, or the wire is faulty. Clean the terminal of the following wire connectors and reconnect the connectors. If there is no continuity, replace the wire. • Lift motor — Engine PWB (YC18) • Lift sensor — Engine PWB (YC19)
3 Checking the lift motor The lift motor is faulty. Check the lift motor operation, and replace it if necessary.
4 Checking the lift sensor The lift sensor is not properly attached, or it is faulty. Reattach PF lift upper limit sensor. If not repaired, replace it.
5 Firmware upgrade The firmware is not the latest version. Upgrade the Engine firmware to the latest version
6 Replacing the Engine PWB The Engine PWB is faulty. Replace the Engine PWB.
- Code: C1020
- Description: PF lift motor 1 error Object: 500-sheet paper feeder, 500-sheetx2 paper feeder
- Causes: The PF lift sensor 1 on is not detected 5 times continuously when passing 15s after loading cassette 2.
- Remedy: 1 Checking the lift plate The lift plate does not operate properly. Repair or replace the lift plate when it does not move vertically.
2 Checking the connection The connector is not connected properly, or the wire is faulty. Clean the terminal of the following wire connectors and reconnect the connectors. If there is no continuity, replace the wire. • PF lift moor 1 — PF PWB (YC4) • PF upper limit sensor 1 — PF PWB (YC3)
3 Checking PF lift motor 1 PF lift motor 1 is faulty. Check the operation of lift motor 1, and replace it if necessary.
4 Checking PF lift sensor 1 PF lift sensor 1 is not properly attached, or it is faulty. Reattach PF lift sensor 1. If not repaired, replace it.
5 PF firmware upgrade The PF firmware is not the latest version. Upgrade the PF firmware to the latest version.
6 Replacing the PF PWB The PF PWB is faulty. Replace the PF PWB.
- Code: C1030
- Description: PF lift motor 2 error Object: 500-sheetx2 paper feeder
- Causes: The PF lift sensor 2 on is not detected 5 times continuously when passing 15s after loading cassette 3.
- Remedy: 1 Checking the lift plate The lift plate does not operate properly. Repair or replace the lift plate when it does not move vertically.
2 Checking the connection The connector is not connected properly, or the wire is faulty. Clean the terminal of the following wire connectors and reconnect the connectors. If there is no continuity, replace the wire. • PF lift moor 2 — PF PWB (YC6) • PF upper limit sensor 2 — PF PWB (YC5)
3 Checking PF lift motor 2 PF lift motor 2 is faulty. Check the operation of lift motor 2, and replace it if necessary.
4 Checking PF lift sensor 2 PF lift sensor 2 is not properly attached, or it is faulty. Reattach PF lift sensor 2. If not repaired, replace it.
5 PF firmware upgrade The PF firmware is not the latest version. Upgrade the PF firmware to the latest version.
6 Replacing the PF PWB The PF PWB is faulty. Replace the PF PWB.
- Code: C1800
- Description: Paper Feeder communication error Object: 500-sheet paper feeder, 500-sheetx2 paper feeder
- Causes: The communication error was detected 10 times continuously.
- Remedy: 1 Checking the connection The connector is not connected properly, or the wire is faulty. Clean the terminal of the following wire connectors and reconnect the connectors. If there is no continuity, replace the wire. • Engine PWB (YC6) — PF PWB (YC1)
2 Firmware upgrade The firmware is not the latest version. Upgrade the Engine firmware and PF firmware to the latest version
3 Replacing the PF PWB The PF PWB is faulty. Replace the PF PWB.
4 Replacing the Engine PWB The Engine PWB is faulty. Replace the Engine PWB.
- Code: C1900
- Description: Paper Feeder EEPROM error Object: 500-sheet paper feeder, 500-sheetx2 paper feeder For internal count
- Causes: The writing data and the reading data mismatch 4 times continuously when writing.
- Remedy: 1 Checking the connection The connector is not connected properly, or the wire is faulty. Clean the terminal of the following wire connectors and reconnect the connectors. If there is no continuity, replace the wire. • Engine PWB (YC6) — PF PWB (YC1)
2 Firmware upgrade The firmware is not the latest version. Upgrade the Engine firmware and PF firmware to the latest version
3 Replacing the PF PWB The PF PWB is faulty. Replace the PF PWB.
4 Replacing the Engine PWB The Engine PWB is faulty. Replace the Engine PWB.
- Code: C2000
- Description: Main motor steady state error
- Causes: The main motor steady state off is detected 1s continuously after becoming the steady state
- Remedy: 1 Checking the main motor The main motor drive is faulty Execute U030 [Main] and check the main motor operation. Check if the gear rotates or load is heavy in excess
2 Checking the connection The connector is not connected properly, or the wire is faulty. Clean the terminal of the following wire connectors and reconnect the connectors. If there is no continuity, replace the wire. • Main motor — Engine PWB (YC24)
3 Firmware upgrade The firmware is not the latest version. Upgrade the Engine firmware to the latest version
4 Replacing the main motor The main motor is faulty. Replace the main motor.
5 Replacing the Engine PWB The Engine PWB is faulty. Replace the Engine PWB.
- Code: C2010
- Description: Main motor startup error
- Causes: The main motor is not in the steady state within 3s after start-up
- Remedy: 1 Checking the main motor The main motor drive is faulty Execute U030 [Main] and check the main motor operation. Check if the gear rotates or load is heavy in excess
2 Checking the connection The connector is not connected properly, or the wire is faulty. Clean the terminal of the following wire connectors and reconnect the connectors. If there is no continuity, replace the wire. • Main motor — Engine PWB (YC24)
3 Firmware upgrade The firmware is not the latest version. Upgrade the Engine firmware to the latest version
4 Replacing the main motor The main motor is faulty. Replace the main motor.
5 Replacing the Engine PWB The Engine PWB is faulty. Replace the Engine PWB.
- Code: C2101
- Description: Developer motor steady state error
- Causes: Developer motor steady state off is detected 1s continuously after the steady state
- Remedy: 1 Checking the developer motor The developer motor drive is faulty. Execute U030 [DLP] and check the developer motor operation. Check if the gears in the drive unit rotate and there is heavy load in excess.
2 Checking the connection The connector is not connected properly, or the wire is faulty. Clean the terminal of the following wire connectors and reconnect the connectors. If there is no continuity, replace the wire. • Developer motor — Engine PWB (YC25)
3 Firmware upgrade The firmware is not the latest version. Upgrade the Engine firmware to the latest version
4 Replacing the developer motor The developer motor is faulty. Replace the developer motor.
5 Replacing the Engine PWB The Engine PWB is faulty. Replace the Engine PWB.
- Code: C2111
- Description: Developer motor start-up error
- Causes: Developer motor is not in the steady state within 3s after start-up
- Remedy: 1 Checking the developer motor The developer motor drive is faulty. Execute U030 [DLP] and check the developer motor operation. Check if the gears in the drive unit rotate and there is heavy load in excess.
2 Checking the connection The connector is not connected properly, or the wire is faulty. Clean the terminal of the following wire connectors and reconnect the connectors. If there is no continuity, replace the wire. • Developer motor — Engine PWB (YC25)
3 Firmware upgrade The firmware is not the latest version. Upgrade the Engine firmware to the latest version
4 Replacing the developer motor The developer motor is faulty. Replace the developer motor.
5 Replacing the Engine PWB The Engine PWB is faulty. Replace the Engine PWB.
- Code: C2300
- Description: Fuser motor steady state error
- Causes: The fuser motor steady state off is detected 1s continuously after becoming steady state
- Remedy: 1 Checking the fuser motor The fuser motor drive is faulty Execute U030 [Fuser] and check the fuser motor operation. Check if the gears in the drive unit rotate and there is heavy load in excess.
2 Checking the connection The connector is not connected properly, or the wire is faulty. Clean the terminal of the following wire connectors and reconnect the connectors. If there is no continuity, replace the wire. • Fuser motor — Engine PWB(YC24)
3 Firmware upgrade The firmware is not the latest version. Upgrade the Engine firmware to the latest version
4 Replacing the fuser motor The fuser motor is faulty. Replace the fuser motor.
5 Replacing the Engine PWB The Engine PWB is faulty. Replace the Engine PWB.
- Code: C2310
- Description: Fuser motor start-up error
- Causes: The fuser motor is not in the steady state within 3s after start-up
- Remedy: 1 Checking the fuser motor The fuser motor drive is faulty Execute U030 [Fuser] and check the fuser motor operation. Check if the gears in the drive unit rotate and there is heavy load in excess.
2 Checking the connection The connector is not connected properly, or the wire is faulty. Clean the terminal of the following wire connectors and reconnect the connectors. If there is no continuity, replace the wire. • Fuser motor — Engine PWB(YC24)
3 Firmware upgrade The firmware is not the latest version. Upgrade the Engine firmware to the latest version
4 Replacing the fuser motor The fuser motor is faulty. Replace the fuser motor.
5 Replacing the Engine PWB The Engine PWB is faulty. Replace the Engine PWB.
- Code: C2600
- Description: PF motor error Object: 500-sheet paper feeder, 500-sheetx2 paper feeder
- Causes: An error signal was detected 2s continuously during the PF motor drive
- Remedy: 1 Checking the connection The connector is not connected properly, or the wire is faulty. Clean the terminal of the following wire connectors and reconnect the connectors. If there is no continuity, replace the wire. • PF motor — PFPWB (YC2)
2 Firmware upgrade The firmware is not the latest version. Upgrade the PF firmware to the latest version.
3 Checking the PF motor The PF motor is faulty Replace the PF motor
4 Replacing the PF PWB The PF PWB is faulty. Replace the PF PWB.
- Code: C3100
- Description: Carriage error Object: CCD model
- Causes: The home position sensor is off and does not turn on when passing the specified time at initialization and it does not turn on at retry once.
- Remedy: 1 Unlocking the primary mirror unit The primary mirror unit is not unlocked. Unlock the primary mirror unit.
2 Checking the scanner and scanner wire A load is applied to the scanner movement. Move the mirror unit manually. If there is heavy load in excess, clean the scanner wire, wire drum, scanner rail, etc.
3 Checking the connection The connector is not connected properly, or the wire is faulty. Clean the terminal of the following wire connectors and reconnect the connectors. If there is no continuity, replace the wire.• Scanner motor — Engine PWB
4 Checking the scanner motor and the belt tension. The scanner motor or belt tension is faulty Reattach the scanner motor and adjust the belt tension. If not repaired, replace the scanner motor.
5 Checking the home position sensor The home position sensor is faulty. Reattach the home position sensor. If not repaired, replace it.
6 Firmware upgrade The firmware is not the latest version. Upgrade the Engine firmware to the latest version
7 Replacing the Engine PWB The Engine PWB is faulty. Replace the Engine PWB.
- Code: C3100
- Description: Carriage error Object: CIS model
- Causes: The home position sensor is off and does not turn on when passing the specified time at initialization and it does not turn on at retry once.
- Remedy: 1 Checking the scanner and ISU shaft A load is applied to the scanner movement. Move the mirror unit manually. If there is heavy load in excess, check the drive belt and clean the ISU shaft.
2 Checking the connection The connector is not connected properly, or the wire is faulty. Clean the terminal of the wire connectors and reconnect the connectors. If there is no continuity, replace the wire. • Scanner motor — Engine PWB
3 Checking the scanner motor The scanner motor is faulty. Reattach the scanner motor. If not repaired, replace it.
4 Checking the home position sensor The home position sensor is faulty. Reattach the home position sensor. If not repaired, replace it.
5 Firmware upgrade The firmware is not the latest version. Upgrade the Engine firmware to the latest version 6 Replacing the Engine PWB The Engine PWB is faulty. Replace the Engine PWB.
- Code: C3200
- Description: LED error Object: CCD model
- Causes: The white reference data retrieved by lighting the lamp at the initial operation is at the specified value or less.
- Remedy: 1 Checking the LED lamp The LED lamp does not light. Check if the LED lamp lights. If it does not light, replace the lamp unit and execute U411 [Table].
2 Checking the connection FFC is not connected properly. Or it is faulty. Clean the FFC terminals of the following FFC and reconnect them. If the FFC terminal is deformed or broken, replace the FFC. • LED drive PWB — Main PWB (YC3003)
3 Replacing the lens unit The CCD PWB is faulty. Replace the lens unit and execute U411.
4 Firmware upgrade The firmware is not the latest version. Upgrade the Engine firmware to the latest version
5 Replacing the Engine PWB The Engine PWB is faulty. Replace the Engine PWB.
- Code: C3200
- Description: CISerror Object: CIS model
- Causes: • The white reference data retrieved by lighting the lamp at the initial operation is lower than the specified value. • The white reference data retrieved by lighting the lamp at the auto table adjustment is lower than the specified value.
- Remedy: 1 Checking the CIS lamp The CIS lamp does not light Check if the CIS lamp turns on. If not, replace the lamp unit and execute U411 [Table]
2 Checking the connection FFC is not connected properly. Or it is faulty. Clean the FFC terminals of the following FFC and reconnect them. If the FFC terminal is deformed or broken, replace the FFC. • CIS PWB — Main PWB (YC3001)
3 Firmware upgrade The firmware is not the latest version. Upgrade the Engine firmware to the latest version
4 Replacing the Engine PWB The Engine PWB is faulty. Replace the Engine PWB.
- Code: C3300
- Description: CCD AGC error Object: CCD model For internal count
- Causes: The white reference data after adjustment is not within the target range
- Remedy: 1 Cleaning the backside of the contact glass The white reference sheet is dirty. Clean the white reference sheet at the backside of the contact glass.
2 Checking the LED lamp The LED lamp is broken. Check if the LED lamp lights. If it does not light, replace the lamp unit and execute U411 [Table].
3 Checking the connection FFC is not connected properly. Or it is faulty. Clean the FFC terminals of the following FFC and reconnect them. If the FFC terminal is deformed or broken, replace the FFC. • LED drive PWB — Main PWB (YC3003)
4 Replacing the lens unit The CCD PWB is faulty. Replace the lens unit and execute U411.
5 Firmware upgrade The firmware is not the latest version. Upgrade the Engine firmware to the latest version
6 Replacing the Engine PWB The Engine PWB is faulty. Replace the Engine PWB.
- Code: C3300
- Description: CIS AGC error Object: CIS model For internal count
- Causes: The white reference data after adjustment is not within the target range
- Remedy: 1 Cleaning the backside of the contact glass The white reference sheet is dirty. Clean the white reference sheet at the backside of the contact glass.
2 Checking the CIS lamp The CIS lamp does not light Check if the CIS lamp turns on. If not, replace the lamp unit and execute U411 [Table]
3 Checking the connection FFC is not connected properly. Or it is faulty. Clean the FFC terminals of the following FFC and reconnect them. If the FFC terminal is deformed or broken, replace the FFC. • CIS PWB — Main PWB (YC3001)
4 Firmware upgrade The firmware is not the latest version. Upgrade the Engine firmware to the latest version
5 Replacing the Engine PWB The Engine PWB is faulty. Replace the Engine PWB.
- Code: C3500
- Description: Scanner AISC communication error
- Causes: Readback values are different 4 times continuously during communication between the scanner and ASIC
- Remedy: 1 Checking the connection FFC is not connected properly. Or it is faulty. Clean the FFC terminals of the following FFC and reconnect them. If the FFC terminal is deformed or broken, replace the FFC. • Main PWB (YC26) — Engine PWB (YC3)
2 Firmware upgrade The firmware is not the latest version. Upgrade the main firmware and the Engine firmware to the latest version.
3 Replacing the Engine PWB The Engine PWB is faulty. Replace the Engine PWB.
4 Replacing the main PWB The main PWB is faulty. Replace the main PWB.
- Code: C3600
- Description: Scanner sequence error
- Causes: • Mail box buffer overflow is detected. • Software sequence error is detected.
- Remedy: 1 Executing U021 The memory operation is faulty. Execute U021 and initialize the backup data
2 Checking the connection FFC is not connected properly. Or it is faulty. Clean the FFC terminals of the following FFC and reconnect them. If the FFC terminal is deformed or broken, replace the FFC. • Main PWB (YC26) — Engine PWB (YC3)
3 Firmware upgrade The firmware is not the latest version. Upgrade the main firmware and the Engine firmware to the latest version.
4 Replacing the Engine PWB The Engine PWB is faulty. Replace the Engine PWB.
5 Replacing the main PWB The main PWB is faulty. Replace the main PWB.
- Code: C4001
- Description: Polygon motor synchronization error
- Causes: The polygon motor does not become steady state when passing 10s after starting the drive
- Remedy: 1 Checking the connection The connector is not connected properly, or the wire is faulty. Clean the terminal of the following wire connectors and reconnect the connectors. If there is no continuity, replace the wire. • Polygon motor — Engine PWB(YC23)
2 Checking the polygon motor The polygon motor does not rotate properly. Check the rotation sound of the polygon motor, and reattach or replace the LSU if it does not rotate properly.
3 Firmware upgrade The firmware is not the latest version. Upgrade the Engine firmware to the latest version
4 Replacing the Engine PWB The Engine PWB is faulty. Replace the Engine PWB.
- Code: C4011
- Description: Polygon motor steady-state error
- Causes: Steady state off is detected 1s continuously after the polygon motor is in the steady state
- Remedy: 1 Checking the connection The connector is not connected properly, or the wire is faulty. Clean the terminal of the following wire connectors and reconnect the connectors. If there is no continuity, replace the wire. • Polygon motor — Engine PWB(YC23)
2 Checking the polygon motor The polygon motor does not rotate properly. Check the rotation sound of the polygon motor, and reattach or replace the LSU if it does not rotate properly.
3 Firmware upgrade The firmware is not the latest version. Upgrade the Engine firmware to the latest version
4 Replacing the Engine PWB The Engine PWB is faulty. Replace the Engine PWB.
- Code: C4101
- Description: BD initialization error
- Causes: BD is not detected within 1s after the polygon motor is in the steady state
- Remedy: 1 Checking the connection The connector is not connected properly, or the wire is faulty. Clean the terminal of the following wire connectors and reconnect the connectors. If there is no continuity, replace the wire. • APC PWB(YC1) — Main PWB(YC24) • Main PWB(YC26) — Engine PWB(YC3)
2 Checking the LSU The APC PWB does not operate normally Reattach or replace the LSU
3 Firmware upgrade The firmware is not the latest version. Upgrade the main firmware and the Engine firmware to the latest version.
4 Replacing the Engine PWB The Engine PWB is faulty. Replace the Engine PWB.
5 Replacing the main PWB The main PWB is faulty. Replace the main PWB.
- Code: C5101
- Description: Main high-voltage error
- Causes: When measuring the rush-in current by changing the Vpp in 3 steps at the Vpp adjustment, the difference between zero current value and the third step current value is 5 or less.
- Remedy: 1 Checking the drum unit and the developer unit The drum or the drum screw does not rotate properly due to the excessive load. Check if the drum or drum screw rotates by manually and if not, replace the drum unit.
2 Checking the main motor The main motor is faulty. Replace the main motor.
3 Checking the main charger unit Since foreign objects adhere to the main charger highvoltage contact, it is deformed or damaged, proper current does not flow. Check the main charger unit high voltage contact. Clean it if foreign objects adhere. Replace the main charger unit if deformed or damaged and clear the main charger roller counter at U930.
4 Checking the connection FFC is not connected properly. Or it is faulty. Clean the FFC terminals of the following FFC and reconnect them. If the FFC terminal is deformed or broken, replace the FFC. • high voltage PWB — Engine PWB (YC10)
5 Checking the high-voltage PWB The high-voltage PWB is faulty. Replace the high-voltage PWB.
6 Firmware upgrade The firmware is not the latest version. Upgrade the Engine firmware to the latest version
7 Replacing the Engine PWB The Engine PWB is faulty. Replace the Engine PWB.
- Code: C6000
- Description: Fuser main heater broken wire
- Causes: 1. The fuser thermopile does not detect 100°C/212°F within 20s after starting warm-up.
2. During warm-up, the temperature detected by the fuser thermistor does reach the edge ready temperature within 60s after detecting 100°C/212°F. - Remedy: 1 Reinstalling the fuser unit There are foreign objects in the drawer contact terminal of the fuser unit Clean the drawer connector terminal of the fuser unit. Check if the pin of the drawer connector is not bent, and replace the fuser unit if it is bent. If it is normal, reinstall the fuser unit so that the drawer connector is securely connected.
2 Checking the connection The connector is not connected properly, or the wire is faulty. Clean the wire connector terminal and reconnect it. If there is no continuity, replace the wire. • Fuser heater — Low-voltage PWB (YC4) • Thermal cutout — Low-voltage PWB (TB3) • Fuser thermopile — Engine PWB (YC13)
3 Replacing the fuser thermopile The fuser thermopile does not detect temperature correctly Replace the fuser thermopile.
4 Replacing the fuser unit The fuser heater, thermal cutout or others is faulty Replace the fuser unit.
5 Replacing the low voltage PWB The low voltage PWB is faulty. Replace the low voltage PWB.
6 Firmware upgrade The firmware is not the latest version. Upgrade the Engine firmware to the latest version
7 Replacing the Engine PWB The Engine PWB is faulty. Replace the Engine PWB.
- Code: C6020
- Description: Fuser thermopile error
- Causes: The fuser thermopile detects high temperature 1s continuously
- Remedy: 1 Checking the connection The connector is not connected properly, or the wire is faulty. Clean the terminal of the following wire connectors and reconnect the connectors. If there is no continuity, replace the wire. • Fuser thermopile — Engine PWB (YC13)
2 Replacing the fuser thermopile The fuser thermopile does not detect temperature correctly Replace the fuser thermopile.
3 Replacing the low voltage PWB The low voltage PWB is faulty. Replace the low voltage PWB.
4 Firmware upgrade The firmware is not the latest version. Upgrade the Engine firmware to the latest version
5 Replacing the Engine PWB The Engine PWB is faulty. Replace the Engine PWB.
- Code: C6030
- Description: Fuser thermopile wire break detection
- Causes: 1. During warm-up, the fuser thermopile detected the abnormal outer temperature output value for 1s.
2. During warm-up, the fuser thermopile detected the abnormal target output value for 1s. - Remedy: 1 Checking the connection The connector is not connected properly, or the wire is faulty. Clean the terminal of the following wire connectors and reconnect the connectors. If there is no continuity, replace the wire. • Fuser thermopile — Engine PWB (YC13)
2 Replacing the fuser thermopile The fuser thermopile is faulty Replace the fuser thermopile.
3 Firmware upgrade The firmware is not the latest version. Upgrade the Engine firmware to the latest version
4 Replacing the Engine PWB The Engine PWB is faulty. Replace the Engine PWB.
- Code: C6050
- Description: Fuser thermopile low temperature error
- Causes: The fuser thermopile detected 100°C/212°F or less 1s continuously during printing
- Remedy: 1 Checking the connection The connector is not connected properly, or the wire is faulty. Clean the terminal of the following wire connectors and reconnect the connectors. If there is no continuity, replace the wire. • Fuser thermopile — Engine PWB (YC13)
2 Replacing the fuser thermopile The fuser thermopile does not detect temperature correctly Replace the fuser thermopile.
3 Replacing the low voltage PWB The low voltage PWB is faulty. Replace the low voltage PWB.
4 Firmware upgrade The firmware is not the latest version. Upgrade the Engine firmware to the latest version
5 Replacing the Engine PWB The Engine PWB is faulty. Replace the Engine PWB.
- Code: C6200
- Description: Broken fuser sub heater
- Causes: 1. During warm-up, the temperature detected by the fuser thermistor does not reach 100°C/212°F within 60s after starting warm-up.
2. During warm-up, the temperature detected by the fuser thermistor does not reach the edge ready temperature within 60s after detecting 100°C/212°F. - Remedy: 1 Reinstalling the fuser unit There are foreign objects in the drawer contact terminal of the fuser unit Clean the drawer connector terminal of the fuser unit. Check if the pin of the drawer connector is not bent, and replace the fuser unit if it is bent. If it is normal, reinstall the fuser unit so that the drawer connector is securely connected.
2 Checking the connection The connector is not connected properly, or the wire is faulty. Clean the wire connector terminal and reconnect it. If there is no continuity, replace the wire. • Fuser heater — Low-voltage PWB (YC4) • Thermal cutout — Low-voltage PWB (TB3) • Fuser thermistor — Engine PWB (YC13)
3 Replacing the fuser unit The fuser sub heater, fuser thermistor, or others is faulty Replace the fuser unit.
4 Replacing the low voltage PWB The low voltage PWB is faulty. Replace the low voltage PWB.
5 Firmware upgrade The firmware is not the latest version. Upgrade the Engine firmware to the latest version
6 Replacing the Engine PWB The Engine PWB is faulty. Replace the Engine PWB.
- Code: C6220
- Description: Fuser thermistor high temperature error
- Causes: The fuser thermistor detected high temperature 1s continuously
- Remedy: 1 Reinstalling the fuser unit There are foreign objects in the drawer contact terminal of the fuser unit Clean the drawer connector terminal of the fuser unit. Check if the pin of the drawer connector is not bent, and replace the fuser unit if it is bent. If it is normal, reinstall the fuser unit so that the drawer connector is securely connected.
2 Checking the connection The connector is not connected properly, or the wire is faulty. Clean the wire connector terminal and reconnect it. If there is no continuity, replace the wire. • Fuser heater — Low-voltage PWB (YC4) • Thermal cutout — Low-voltage PWB (TB3) • Fuser thermistor — Engine PWB (YC13)
3 Replacing the fuser unit The fuser thermistor does not detect temperature correctly Replace the fuser unit.
4 Replacing the low voltage PWB The low voltage PWB is faulty. Replace the low voltage PWB.
5 Firmware upgrade The firmware is not the latest version. Upgrade the Engine firmware to the latest version
6 Replacing the Engine PWB The Engine PWB is faulty. Replace the Engine PWB.
- Code: C6230
- Description: Broken fuser thermistor detection
- Causes: The fuser thermistor detects 42°C/108°F or less while the fuser thermopile detects 100°C/212°F or more during warmup
- Remedy: 1 Reinstalling the fuser unit There are foreign objects in the drawer contact terminal of the fuser unit Clean the drawer connector terminal of the fuser unit. Check if the pin of the drawer connector is not bent, and replace the fuser unit if it is bent. If it is normal, reinstall the fuser unit so that the drawer connector is securely connected.
2 Checking the connection The connector is not connected properly, or the wire is faulty. Clean the wire connector terminal and reconnect it. If there is no continuity, replace the wire. • Fuser heater — Low-voltage PWB (YC4) • Thermal cutout — Low-voltage PWB (TB3) • Fuser thermistor — Engine PWB (YC13)
3 Replacing the fuser unit The fuser thermistor is faulty Replace the fuser unit.
4 Firmware upgrade The firmware is not the latest version. Upgrade the Engine firmware to the latest version
5 Replacing the Engine PWB The Engine PWB is faulty. Replace the Engine PWB.
- Code: C6250
- Description: Fuser thermistor low temperature error
- Causes: The fuser thermistor detected 60 degree C or less 1s continuously during printing
- Remedy: 1 Reinstalling the fuser unit There are foreign objects in the drawer contact terminal of the fuser unit Clean the drawer connector terminal of the fuser unit. Check if the pin of the drawer connector is not bent, and replace the fuser unit if it is bent. If it is normal, reinstall the fuser unit so that the drawer connector is securely connected.
2 Checking the connection The connector is not connected properly, or the wire is faulty. Clean the wire connector terminal and reconnect it. If there is no continuity, replace the wire. • Fuser heater — Low-voltage PWB (YC4) • Thermal cutout — Low-voltage PWB (TB3) • Fuser thermistor — Engine PWB (YC13)
3 Replacing the fuser unit The fuser thermistor is faulty Replace the fuser unit.
4 Replacing the low voltage PWB The low voltage PWB is faulty. Replace the low voltage PWB.
5 Firmware upgrade The firmware is not the latest version. Upgrade the Engine firmware to the latest version
6 Replacing the Engine PWB The Engine PWB is faulty. Replace the Engine PWB.
- Code: C6400
- Description: Zero-cross signal error
- Causes: No zero-cross signal continued 3s during the heater control
- Remedy: 1 Checking the connection The connector is not connected properly, or the wire is faulty. Clean the terminal of the following wire connectors and reconnect the connectors. If there is no continuity, replace the wire. • Engine PWB (YC14) — Low-voltage PWB (YC8)
2 Replacing the low voltage PWB The low voltage PWB is faulty. Replace the low voltage PWB.
3 Firmware upgrade The firmware is not the latest version. Upgrade the Engine firmware to the latest version
4 Replacing the Engine PWB The Engine PWB is faulty. Replace the Engine PWB.
- Code: C6610
- Description: Pressure release error
- Causes: 1. The fuser pressure release sensor changing from on to off is not detected when passing 10s after starting the fuser pressure decrease.
2. The fuser pressure release sensor changing from off to on is not detected when passing 10s after starting the fuser pressure increase. - Remedy: 1 Reinstalling the fuser unit There are foreign objects in the drawer contact terminal of the fuser unit Clean the drawer connector terminal of the fuser unit. Check if the pin of the drawer connector is not bent, and replace the fuser unit if it is bent. If it is normal, reinstall the fuser unit so that the drawer connector is securely connected.
2 Checking the connection The connector is not connected properly, or the wire is faulty. Clean the wire connector terminal and reconnect it. If there is no continuity, replace the wire. • Engine PWB (YC21) — Fuser pressure release motor • Engine PWB (YC13) — Fuser pressure release sensor
3 Replacing the fuser unit The fuser unit is faulty at the fuser pressure release mechanism or the fuser pressure release sensor . Replace the fuser unit.
- Code: C6650
- Description: Fuser thermopile EEPROM error
- Causes: 1. Access to the thermopile EEPROM is not available.
2. During scanning, no response from the device is detected 5ms or more 5 times continuously. - Remedy: 1 Checking the connection The connector is not connected properly, or the wire is faulty. Clean the terminal of the following wire connectors and reconnect the connectors. If there is no continuity, replace the wire. • Fuser thermopile — Engine PWB(YC13)
2 Replacing the fuser thermopile The fuser thermopile does not detect temperature correctly Replace the fuser thermopile.
3 Firmware upgrade The firmware is not the latest version. Upgrade the Engine firmware to the latest version
4 Replacing the Engine PWB The Engine PWB is faulty. Replace the Engine PWB.
- Code: C7200
- Description: Inner thermistor broken (developer)
- Causes: The input sampling value of the sensor is at the reference value or more.
- Remedy: 1 Reinstalling the developer unit The developer unit is not properly installed. Reinstall developer unit so that the connector connects securely.
2 Checking the connection The connector is not connected properly, or the wire is faulty. Clean the terminal of the following wire connectors and reconnect the connectors. If there is no continuity, replace the wire. • Developer relay PWB — Engine PWB (YC8)
3 Developer unit replacement The sensor on the developer PWB is faulty Replace the developer unit.
4 Firmware upgrade The firmware is not the latest version. Upgrade the Engine firmware to the latest version
5 Replacing the Engine PWB The Engine PWB is faulty. Replace the Engine PWB.
- Code: C7210
- Description: Inner thermistor short-circuited (developer)
- Causes: The sensor input sampling value is at the reference value or less
- Remedy: 1 Reinstalling the developer unit The developer unit is not properly installed. Reinstall developer unit so that the connector connects securely.
2 Checking the connection The connector is not connected properly, or the wire is faulty. Clean the terminal of the following wire connectors and reconnect the connectors. If there is no continuity, replace the wire. • Developer relay PWB — Engine PWB (YC8)
3 Developer unit replacement The sensor on the developer PWB is faulty Replace the developer unit.
4 Firmware upgrade The firmware is not the latest version. Upgrade the Engine firmware to the latest version 5 Replacing the Engine PWB The Engine PWB is faulty. Replace the Engine PWB.
- Code: C7800
- Description: Outer thermistor broken
- Causes: The input sampling value of the sensor is at the reference value or more.
- Remedy: 1 Checking the connection The connector is not connected properly, or the wire is faulty. Clean the terminal of the wire connectors and reconnect the connectors. If there is no continuity, replace the wire. • Temperature/humidity sensor — Engine PWB (YC9)
2 Replacing the temperature/ humidity sensor The temperature/humidity sensor is faulty. Replace the temperature/humidity sensor.
3 Firmware upgrade The firmware is not the latest version. Upgrade the Engine firmware to the latest version
4 Replacing the Engine PWB The Engine PWB is faulty. Replace the Engine PWB.
- Code: C7810
- Description: Outer thermistor short-circuited
- Causes: The sensor input sampling value is at the reference value or less
- Remedy: 1 Checking the connection The connector is not connected properly, or the wire is faulty. Clean the terminal of the wire connectors and reconnect the connectors. If there is no continuity, replace the wire. • Temperature/humidity sensor — Engine PWB (YC9)
2 Replacing the temperature/ humidity sensor The temperature/humidity sensor is faulty. Replace the temperature/humidity sensor.
3 Firmware upgrade The firmware is not the latest version. Upgrade the Engine firmware to the latest version
4 Replacing the Engine PWB The Engine PWB is faulty. Replace the Engine PWB.
- Code: C8030
- Description: DF tray upper limit detection error Object: 500-sheet document finisher
- Causes: The DF tray upper limit sensor on is detected when the DF tray motor is in ascending operation
- Remedy: 1 Checking the connection The connector is not connected properly, or the wire is faulty. Clean the terminal of the following wire connectors and reconnect the connectors. If there is no continuity, replace the wire. • DF tray upper limit sensor — DFPWB (CN5) • Paper level sensor 1, 2 — DFPWB (CN6)
2 Replacing the sensor The Dr tray upper limit sensor, paper level sensor 1 or 2 is faulty Replace the DF tray upper limit sensor or paper level sensor.
3 Firmware upgrade The firmware is not the latest version. Upgrade the DP firmware to the latest version.
4 Replacing the DF PWB The DF PWB is faulty. Replace the DF PWB.
- Code: C8040
- Description: DF belt error Object: 500-sheet document finisher
- Causes: The DF belt sensor on or off cannot be detected when passing the specified time after the DF belt solenoid turns on
- Remedy: 1 Checking the connection The connector is not connected properly, or the wire is faulty. Clean the wire connector terminal and reconnect it. If there is no continuity, replace the wire. • DF belt sensor — DF PWB (CN10) • DF belt solenoid — DF PWB (CN21)
2 Replacing the DF belt sensor DF belt sensor is faulty Replace DF belt sensor
3 Replacing the DF belt solenoid DF belt solenoid is faulty Replace DF belt solenoid
4 Firmware upgrade The firmware is not the latest version. Upgrade the DP firmware to the latest version.
5 Replacing the DF PWB The DF PWB is faulty. Replace the DF PWB.
- Code: C8140
- Description: Dr tray motor error Object: 500-sheet document finisher
- Causes: During the DF tray motor drive, the DF tray lower limit sensor, paper level sensor 1 and 2 on is not detected within 10s.
- Remedy: 1 Checking the connection The connector is not connected properly, or the wire is faulty. Clean the terminal of the following wire connectors and reconnect the connectors. If there is no continuity, replace the wire. • DF tray motor — DF PWB (CN15) • DF tray lower limit sensor — DF PWB (CN5) • Paper level sensor1, 2 — DF PWB (CN6)
2 Replacing the DF tray motor The DF tray motor is faulty. Replace the DF tray motor.
3 Replacing the sensor The DF tray lower limit sensor, paper level sensor 1 or 2 is faulty Replace the DF tray lower limit sensor or paper level sensor.
4 Firmware upgrade The firmware is not the latest version. Upgrade the DP firmware to the latest version.
5 Replacing the DF PWB The DF PWB is faulty. Replace the DF PWB.
- Code: C8210
- Description: DF staple error Object: 500-sheet document finisher
- Causes: JAM7013 and 7023 was detected twice
- Remedy: 1 Checking the connection The connector is not connected properly, or the wire is faulty. Clean the terminal of the wire connectors and reconnect the connectors. If there is no continuity, replace the wire. • DF staple unit — DF PWB
2 Checking the staple Check if the upper BF registration guide shifts manually, and reattach it if it does not smoothly shift. Check if the lower BF registration guide shifts manually, and reattach it if it does not smoothly shift.
3 Replacing the DF staple unit The DF staple unit is faulty. Replace the DF staple unit.
4 Firmware upgrade The firmware is not the latest version. Upgrade the DP firmware to the latest version.
5 Replacing the DF PWB The DF PWB is faulty. Replace the DF PWB.
- Code: C8320
- Description: DF adjuster motor 2 error Object: 500-sheet document finisher
- Causes: The DF adjusting sensor 2 on or off cannot be detected when passing the specified time after the DF adjusting motor 2 turns on
- Remedy: 1 Checking the connection The connector is not connected properly, or the wire is faulty. Clean the terminal of the following wire connectors and reconnect the connectors. If there is no continuity, replace the wire. • DF adjusting motor 2 — DFPWB (CN18) • DF adjusting sensor
2 — DFPWB (CN7) 2 Replacing DF adjusting motor 2 DF adjusting motor 2 is faulty Replace DF adjusting motor 2
3 Replacing the DF adjusting sensor 2 DF adjusting sensor 2 is faulty Replace DF adjusting sensor 2
4 Firmware upgrade The firmware is not the latest version. Upgrade the DP firmware to the latest version.
5 Replacing the DF PWB The DF PWB is faulty. Replace the DF PWB.
- Code: C8330
- Description: DF adjuster motor 1error Object: 500-sheet document finisher
- Causes: The DF adjusting sensor 1 on or off cannot be detected when passing the specified time after the DF adjusting motor 1 turns on
- Remedy: 1 Checking the connection The connector is not connected properly, or the wire is faulty. Clean the terminal of the following wire connectors and reconnect the connectors. If there is no continuity, replace the wire.• DF adjusting motor 1 — DFPWB(CN18) • DF adjusting sensor 1 — DFPWB(CN7)
2 Replacing DF adjusting motor 1 DF adjusting motor 1 is faulty Replace DF adjusting motor 1
3 Replacing the DF adjusting sensor 1 DF adjusting sensor 1 is faulty Replace DF adjusting sensor 1
4 Firmware upgrade The firmware is not the latest version. Upgrade the DP firmware to the latest version.
5 Replacing the DF PWB The DF PWB is faulty. Replace the DF PWB.
- Code: C8350
- Description: DF roller motor error Object: 500-sheet document finisher
- Causes: The DF roller sensor on or off cannot be detected when passing the specified time after the DF roller motor turns on
- Remedy: 1 Checking the connection The connector is not connected properly, or the wire is faulty. Clean the terminal of the following wire connectors and reconnect the connectors. If there is no continuity, replace the wire. • DF roller motor — DF PWB (CN20) • DF roller sensor — DF PWB (CN11)
2 Replacing the DF roller sensor DF roller sensor is faulty Replace DF roller sensor
3 Replacing the DF roller motor The DF roller motor is faulty Replace DF roller motor 4 Firmware upgrade The firmware is not the latest version. Upgrade the DP firmware to the latest version. 5 Replacing the DF PWB The DF PWB is faulty. Replace the DF PWB.
- Code: C8360
- Description: DF slide motor error Object: 500-sheet document finisher
- Causes: The DF slide sensor on or off cannot be detected when passing the specified time after the DF slide motor turns on
- Remedy: 1 Checking the connection The connector is not connected properly, or the wire is faulty. Clean the terminal of the following wire connectors and reconnect the connectors. If there is no continuity, replace the wire. • DF slide motor — DF PWB(CN14) • DF slide sensor — DF PWB(CN22)
2 Replacing the DF slide sensor The DF slide sensor is faulty. Replace the DF slide sensor
3 Replacing the DF slide motor The DF slide motor is faulty. Replace the DF slide motor
4 Firmware upgrade The firmware is not the latest version. Upgrade the DP firmware to the latest version.
5 Replacing the DF PWB The DF PWB is faulty. Replace the DF PWB.
- Code: C8460
- Description: EEPROM error Object: 500-sheet document finisher
- Causes: EEPROM read/write is not available
- Remedy: 1 Firmware upgrade The firmware is not the latest version. Upgrade the DP firmware to the latest version.
2 Replacing the DF PWB The DF PWB is faulty. Replace the DF PWB.
- Code: C8800
- Description: Document finisher communication error Object: 500-sheet document finisher
- Causes: The communication error was detected 10 times continuously.
- Remedy: 1 Checking the connection The connector is not connected properly, or the wire is faulty. Clean the wire connector terminal and reconnect it. If there is no continuity, replace the wire. • Engine PWB (YC5) — DF relay PWB (YC2) • DF relay PWB (YC3) — DF PWB (CN1)
2 Firmware upgrade The firmware is not the latest version. Upgrade the DP firmware to the latest version.
3 Replacing the DF relay PWB The DF relay PWB is faulty Replace the DF relay PWB.
4 Replacing the DF PWB The DF PWB is faulty. Replace the DF PWB.
5 Firmware upgrade The firmware is not the latest version. Upgrade the Engine firmware to the latest version
6 Replacing the Engine PWB The Engine PWB is faulty. Replace the Engine PWB.
- Code: C8830
- Description: Relay conveying unit communication error Object: 500-sheet document finisher + relay conveying unit
- Causes: The communication error was detected 10 times continuously.
- Remedy: 1 Checking the connection The connector is not connected properly, or the wire is faulty. Clean the terminal of the following wire connectors and reconnect the connectors. If there is no continuity, replace the wire. • Engine PWB (YC5) — DF relay PWB (YC2) • DF relay PWB (YC4) — BR PWB (YC5)
2 Firmware upgrade The firmware is not the latest version. Upgrade the BR firmware to the latest version.
3 Replacing the BR PWB The BR PWB is faulty. Replace the BR PWB.
4 Replacing the DF relay PWB The DF relay PWB is faulty Replace the DF relay PWB.
5 Firmware upgrade The firmware is not the latest version. Upgrade the Engine firmware to the latest version
6 Replacing the Engine PWB The Engine PWB is faulty. Replace the Engine PWB.
- Code: C8990
- Description: Finisher setup error Object: 500-sheet document finisher + relay conveying unit
- Causes: 1. Communication error occurs with either the finisher or relay conveying unit.
2. Communication error occurs while installation of the relay conveying unit is detected - Remedy: 1 Checking the connection The connector is not connected properly, or the wire is faulty. Clean the wire connector terminal and reconnect it. If there is no continuity, replace the wire. • DF PWB (CN1) — DF relay PWB (YC3) • DF relay PWB (YC4) — BR PWB (YC5)
2 Firmware upgrade The firmware is not the latest version. Upgrade the DP firmware to the latest version.
3 Replacing the DF PWB The DF PWB is faulty. Replace the DF PWB.
4 Replacing the BR PWB The BR PWB is faulty. Replace the BR PWB.
- Code: C9000
- Description: DP communication error Object: Document processor
- Causes: The communication error was detected 10 times continuously.
- Remedy: 1 Firmware upgrade The main unit firmware and the document processor firmware mismatch Upgrade the main unit firmware and the document processor firmware to the latest version.
2 Checking the connection The connector is not connected properly, or the wire is faulty. Clean the terminal of the following wire connectors and reconnect the connectors. If there is no continuity, replace the wire. • DP PWB (YC2) — Engine PWB (YC4)
3 Replacing the DP PWB The DP PWB is faulty. Replace the DP PWB.
4 Replacing the Engine PWB The Engine PWB is faulty. Replace the Engine PWB.
- Code: C9060
- Description: DP EEPROM error Object: Document processor
- Causes: The writing data and the reading data into the EEPROM mismatch.
- Remedy: 1 Checking the EEPROM The EEPROM is not properly installed. Reattach the EEPROM on the DP PWB.
2 Replacing the DP PWB The DP PWB is faulty. Replace the DP PWB.
3 Replacing the EEPROM The EEPROM is faulty. Replace the EEPROM on the DP PWB, then execute U411.
- Code: C9180
- Description: DP feed-shift motor error Object: Document processor
- Causes: 1. The DP feed-shift motor home position cannot be detected even driving it for one round.
2. The DP feed-shift motor home position cannot be detected even after retrying the detection for 3 times. - Remedy: 1 Checking the connection The connector is not connected properly, or the wire is faulty. Clean the terminal of the following wire connectors and reconnect the connectors. If there is no continuity, replace the wire. • DP feed-shift motor — DP PWB (YC7) • DP feed-shift sensor — DP PWB (YC4) • DP PWB (YC2) — Engine PWB (YC18)
2 Replacing the DP feed-shift sensor The DP feed-shift sensor is faulty. Replce the DP feed-shift sensor.
3 Replacing the DP feed-shift motor The DP feed-shift motor is faulty. Replace the DP feed-shift motor.
4 Replacing the DP PWB The DP PWB is faulty. Replace the DP PWB.
5 Replacing the Engine PWB The Engine PWB is faulty. Replace the Engine PWB.
- Code: F000
- Description: Main unit CPU communication error (Controller — Panel)
- Causes: The panel cannot be detected since the CPU communication between the main PWB and the operation panel main PWB is unavailable.
- Remedy: 1 Resetting the main power The communication between the main PWB and the operation panel main PWB is faulty. Turn off the power switch and pull out the power plug. After passing 5s, reinsert the power plug and turn on the power switch.
2 Checking the connection The connector is not connected properly. Or, the wire or the SATA cable is faulty. Clean the wire, the terminal of SATA cable connector and reconnect them. If there is no continuity, replace the wire. • Main PWB — Operation panel PWB
3 Executing U021 The backup RAM data is faulty. Execute U021 to initialize the backup RAM data.
4 Replacing the main PWB The main PWB is faulty. Replace the main PWB.
5 Replacing the operation panel main PWB The operation panel main PWB is faulty. Replace the panel main PWB.
- Code: F010
- Description: Program read error
- Causes: Data corruption is detected at the program read
- Remedy: 1 Resetting the main power The communication between the main PWB and the operation panel main PWB is faulty. Turn off the power switch and pull out the power plug. After passing 5s, reinsert the power plug and turn on the power switch.
2 Executing U021 The backup RAM data is faulty. Execute U021 to initialize the backup RAM data.
3 Replacing the main PWB The main PWB is faulty. Replace the main PWB.
- Code: F020
- Description: System memory error (RAM reading/writing error or CPU memory error)
- Causes: The error appears during the reading/writing check of the RAM for the CPU when the main unit starts up.
- Remedy: 1 Resetting the main power The communication between the main PWB and the operation panel main PWB is faulty. Turn off the power switch and pull out the power plug. After passing 5s, reinsert the power plug and turn on the power switch.
2 Executing U021 The backup RAM data is faulty. Execute U021 to initialize the backup RAM data.
3 Checking the main PWB The connector or the FFC is not connected properly. Or, the wire, FFC, the PWB is faulty. Clean the terminal of the connectors on the main PWB, reconnect the connector of the wire, and reconnect the FFC terminal. If the wire or the FFC is faulty, repair or replace them. If not resolved, replace the main PWB.
- Code: F040
- Description: Communication error between the main unit CPU (Communication error between the controller and Engine)
- Causes: There is an error in the communication between the main PWB and the Engine PWB.
- Remedy: 1 Resetting the main power There is an error in the communication between the main PWB and the Engine PWB. Turn off the power switch and pull out the power plug. After passing 5s, reinsert the power plug and turn on the power switch.
2 Checking the connection The connector is not connected properly, or the wire is faulty. Clean the terminal of the following wire connectors and reconnect the connectors. If there is no continuity, replace the wire. • Engine PWB (YC3) — Main PWB (YC26)
3 Firmware upgrade The firmware is not the latest version. Upgrade the main firmware and the Engine firmware to the latest version.
4 Replacing the main PWB The main PWB is faulty. Replace the main PWB.
5 Replacing the Engine PWB The Engine PWB is faulty. Replace the Engine PWB.
- Code: F050
- Description: Engine program error
- Causes: The Engine program cannot start up.
- Remedy: 1 Firmware upgrade The firmware is not the latest version. Upgrade the Engine firmware to the latest version
2 Resetting the main power The Engine firmware checksum is faulty. Turn off the power switch and pull out the power plug. After passing 5s, reinsert the power plug and turn on the power switch.
3 Checking the EEPROM The EEPROM is not properly attached. Reattach the EEPROM.
4 Checking the Engine PWB The connector or the FFC is not connected properly. Or, the wire, FFC, the PWB is faulty. Clean the terminal of the connectors on the Engine PWB, reconnect the connector of the wire, and reconnect the FFC terminal. If the wire or the FFC is faulty, repair or replace it. If not resolved, replace the Engine PWB.
- Code: F052
- Description: Panel Engine program error
- Causes: The panel program cannot start up.
- Remedy: 1 Firmware upgrade The firmware is not the latest version. Upgrade the panel firmware to the latest version.
2 Resetting the main power The panel RAM checksum is faulty. Turn off the power switch and pull out the power plug. After passing 5s, reinsert the power plug and turn on the power switch.
3 Checking the connection The connector is not connected properly, or the wire is faulty. Clean the terminal of the connectors on the operation panel PWB, reconnect the connector of the wire. If there is no continuity, replace the wire.
4 Replacing the operation panel main PWB The operation panel main PWB is faulty. Replace the panel main PWB.
- Code: F12X
- Description: Abnormality detecting in a Scan control section
- Causes:
- Remedy: (1) Check the harness between Scan/DP<=>Main boards, and the connection state of a connector, and perform an operation check. (2) Initialize SSD and perform an operation check. * (3) U021 Controller backup initialization is carried out and an operation check is performed. (4) Exchange a Scan/DP board and perform an operation check. (5) Exchange a Main board and perform an operation check. (6) Get USBLOG and contact service headquarters. * Only SSD standard model
- Code: F14X
- Description: Abnormality detecting in a FAX control part
- Causes:
- Remedy: (1) Check the harness between FAX<=>Main boards, and the connection state of a connector, and perform an operation check. (2) Initialize SSD and perform an operation check. * (3) U021 Controller backup initialization is carried out and an operation check is performed. (4) Perform a deed operation check for DIMM Clear by U671. * Notes(Since it disappears when received data remain, cautions are required.) (5) Exchange FAX_DIMM and perform an operation check. * Notes (6) Exchange a FAX board and perform an operation check. (7) Exchange a Main board and perform an operation check. (8) Get USBLOG and contact service headquarters. * Only SSD standard model * Note Only model which has Flash for FAX data in a Main board
- Code: F15X
- Description: Abnormality detecting in an authentication device control section
- Causes:
- Remedy: (1) Check the harness between authentication device <=>Main boards, and the connection situation of a connector, and perform an operation check. (2) Initialize SSD and perform an operation check. * (3) Carry out U021 Main backup initialization and perform an operation check. (4) Exchange a Main board and perform an operation check. (5) Exchange SSD and perform an operation check. * (6) Get USBLOG and contact service headquarters. * Only SSD standard model
- Code: F17X
- Description: Abnormality detecting in a printer data control part
- Causes:
- Remedy: (1) Initialize SSD and perform an operation check. * (2) Carry out U021 Main backup initialization and perform an operation check. (3) Exchange a Main board and perform an operation check. (4) Exchange SSD and perform an operation check. * (5) Get USBLOG and contact service headquarters. * Only SSD standard model
- Code: F18X
- Description: Abnormality detecting in a Video control section
- Causes:
- Remedy: (1) Check the harness between Engine<=>Main boards, and the connection state of a connector, and perform an operation check. (2) Initialize SSD and perform an operation check. * (3) U021 Controller backup initialization is carried out and an operation check is performed. (4) Exchange an Engine board and perform an operation check. (5) Exchange a Main board and perform an operation check. (6) Get USBLOG and contact service headquarters. * Only SSD standard model
- Code: F1DX
- Description: Abnormality detecting of the image memory Management Department
- Causes: * Poor arrangement of F1D4:Random Access Memory(1) Confirmation of U340(2) Initialization of a set point (U021)
- Remedy: (1) Initialize SSD and perform an operation check. * (2) Carry out U021 Main backup initialization and perform an operation check. (3) Exchange a Main board and perform an operation check. (4) Exchange SSD and perform an operation check. * (5) Get USBLOG and contact service headquarters. * Only SSD standard model
- Code: F21X, F22X, F23X
- Description: Abnormality detecting in an image-processing part
- Causes: * F248 is the abnormalities of a printer process.In recurring by specific printer data, please give me cooperation at acquisition of capture data and USBLOG.
- Remedy: (1) Check contact of a DDR memory and perform an operation check. (2) Initialize SSD and perform an operation check. * (3) Carry out U021 Main backup initialization and perform an operation check. (4) Exchange a Main board and perform an operation check. (5) Exchange SSD and perform an operation check. * (6) Get USBLOG and contact service headquarters. * Only SSD standard model
- Code: F24X
- Description: Abnormality detecting in the system Management Department
- Causes: * F248 is the abnormalities of a printer process.In recurring by specific printer data, please give me cooperation at acquisition of capture data and USBLOG.
- Remedy: (1) Check contact of a DDR memory and perform an operation check. (2) Initialize SSD and perform an operation check. * (3) Carry out U021 Main backup initialization and perform an operation check. (4) Exchange a Main board and perform an operation check. (5) Exchange SSD and perform an operation check.* (6) Get USBLOG and contact service headquarters. * Only SSD standard model
- Code: F25X
- Description: Abnormality detecting in a network management department
- Causes: [Main body to External network] Ethernet connector * It may occur according to a visitor’s networkenvironment.
- Remedy: (1) Initialize SSD and perform an operation check. * (2) Carry out U021 Main backup initialization and perform an operation check. (3) Exchange a Main board and perform an operation check. (4) Get USBLOG and packet capture and contact service headquarters. * Only SSD standard model
- Code: F26X … F2AX
- Description: Abnormality detecting in the system Management Department
- Causes:
- Remedy: (1) Initialize SSD and perform an operation check. * (2) Carry out U021 Main backup initialization and perform an operation check. (3) Exchange a Main board and perform an operation check. (4) Exchange SSD and perform an operation check. * (5) Get USBLOG and contact service headquarters. * Only SSD standard model
- Code: F2BX … F32X
- Description: Abnormality detecting in a network control part
- Causes: [Main body to External network] Ethernet connector
- Remedy: (1) Initialize SSD and perform an operation check. * (2) Carry out U021 Main backup initialization and perform an operation check. (3) Exchange a Main board and perform an operation check. 4) Get USBLOG and contact service headquarters. (Depending on an analysis result, it is packet capture acquisition) * Only SSD standard model
- Code: F33X
- Description: Abnormality detecting in the Scan Management Department
- Causes:
- Remedy: (1) Check the harness between Scan/DP<=>Main boards, and the connection state of a connector, and perform an operation check. (2) Initialize SSD and perform an operation check. * (3) U021 Controller backup initialization is carried out and an operation check is performed. (4) Exchange a Scan/DP board and perform an operation check. (5) Exchange a Main board and perform an operation check. (6) Get USBLOG and contact service headquarters. * Only SSD standard model
- Code: F34X
- Description: Abnormality detecting in the Panel Management Department
- Causes:
- Remedy: (1) Check the harness between Panel<=>Main boards, and the connection state of a connector, and perform an operation check. * Notes (2) Initialize SSD and perform an operation check. * (3) U021 Controller backup initialization is carried out and an operation check is performed. (4) Exchange a Panel board and perform an operation check. * Notes (5) Exchange a Main board and perform an operation check. (6) Get USBLOG and contact service headquarters. * Only SSD standard model * Note : A Dual Core CPU model and HyPAS model
- Code: F35X
- Description: Abnormality detecting in the printing controlling Management Department
- Causes:
- Remedy: (1) Initialize SSD and perform an operation check. * (2) Carry out U021 Main backup initialization and perform an operation check. (3) Exchange a Main board and perform an operation check. (4) Exchange SSD and perform an operation check. * (5) Get USBLOG and contact service headquarters. * Only SSD standard model
- Code: F37X
- Description: Abnormality detecting in the FAX Management Department
- Causes:
- Remedy: (1) Initialize SSD and perform an operation check. * (2) Carry out U021 Main backup initialization and perform an operation check. (3) Perform a deed operation check for DIMM Clear by U671.(Since it disappears when received data remain, cautions are required.) * notes (4) Exchange FAX_DIMM and perform an operation check. * Notes (5) Exchange a Main board and perform an operation check. (6) Exchange SSD and perform an operation check. * (7) Get USBLOG and contact service headquarters. * Only SSD standard model * Note Only model which has Flash for FAX data in a Main board
- Code: F38X
- Description: Abnormality detecting in the authentication authorized Management Department
- Causes:
- Remedy: (1) Initialize SSD and perform an operation check. * (2) Carry out U021 Main backup initialization and perform an operation check. (3) Exchange a Main board and perform an operation check. (4) Exchange SSD and perform an operation check. * (5) Get USBLOG and contact service headquarters. * Only SSD standard model
- Code: F3AX … F45X
- Description: Abnormality detecting in the Entity Management Department
- Causes:
- Remedy: (1) Initialize SSD and perform an operation check. * (2) Carry out U021 Main backup initialization and perform an operation check. (3) Exchange a Main board and perform an operation check. (4) Exchange SSD and perform an operation check. * (5) Get USBLOG and contact service headquarters. * Only SSD standard model
- Code: F46X
- Description: Abnormality detecting of a printer rendering part
- Causes: * F46F is the abnormalities of a printer process.In recurring by specific printer data, please give me cooperation at acquisition of capture data and USBLOG.
- Remedy: (1) Exchange boards and perform an operation check. (2) the acquisition wish of USBLOG — carry out(Depending on the (2) case, it is print capture data acquisition) * Only SSD standard model
- Code: F47X
- Description: Abnormality detecting of an image editing processing part
- Causes:
- Remedy: (1) Initialize SSD and perform an operation check. * (2) Carry out U021 Main backup initialization and perform an operation check. (3) Exchange a Main board and perform an operation check. (4) Exchange SSD and perform an operation check. * (5) Get USBLOG and contact service headquarters. * Only SSD standard model
- Code: F4DX
- Description: Abnormality detecting in the Entity Management Department
- Causes:
- Remedy: (1) Initialize SSD and perform an operation check. * (2) Carry out U021 Main backup initialization and perform an operation check. (3) Exchange a Main board and perform an operation check. (4) Exchange SSD and perform an operation check. * (5) Get USBLOG and contact service headquarters. * Only SSD standard model
- Code: F50X
- Description: Abnormality detecting in the FAX Management Department
- Causes: Since the USB log immediately after occurrence is needed for analysis, please give me cooperation of acquisition.
- Remedy: (1) Initialize SSD and perform an operation check. * (2) Carry out U021 Main backup initialization and perform an operation check. (3) Exchange a Main board and perform an operation check. (4) Exchange SSD and perform an operation check. * (5) Get USBLOG and contact service headquarters. * Only SSD standard model
- Code: F52X … F57X
- Description: Abnormality detecting in a JOB execution part
- Causes: Since the USB log immediately after occurrence is needed for analysis, please give me cooperation of acquisition.
- Remedy: (1) Initialize SSD and perform an operation check. * (2) Carry out U021 Main backup initialization and perform an operation check. (3) Exchange a Main board and perform an operation check. (4) Exchange SSD and perform an operation check. * (5) Get USBLOG and contact service headquarters. * Only SSD standard model
- Code: F63X
- Description: Abnormality detecting in a device control section
- Causes:
- Remedy: (1) Initialize SSD and perform an operation check. * (2) Carry out U021 Main backup initialization and perform an operation check. (3) Exchange a Main board and perform an operation check. (4) Exchange SSD and perform an operation check. * (5) Get USBLOG and contact service headquarters. * Only SSD standard model
- Code: F68X
- Description: Abnormality detecting in a storage device control section
- Causes: * F684 is the overwrite error at the time of an SSD security kit.
- Remedy: (1) Initialize SSD and perform an operation check. * (2) Carry out U021 Main backup initialization and perform an operation check. (3) Exchange a Main board and perform an operation check. (4) Exchange SSD and perform an operation check. * (5) Get USBLOG and contact service headquarters. * Only SSD standard model
- Code: F80X
- Description: Abnormality detecting in the Data Access Platform Service
- Causes: Since the USB log immediately after occurrence is needed for analysis, please give me cooperation of acquisition.
- Remedy: (1) Initialize SSD and perform an operation check. * (2) Carry out U021 Main backup initialization and perform an operation check. (3) Exchange a Main board and perform an operation check. (4) Exchange SSD and perform an operation check. * (5) Get USBLOG and contact service headquarters. * Only SSD standard model
- Code: F90X
- Description: Abnormality detecting in the extension application service part
- Causes: Since the USB log immediately after occurrence is needed for analysis, please give me cooperation of acquisition.
- Remedy: (1) Initialize SSD and perform an operation check. * (2) Carry out U021 Main backup initialization and perform an operation check. (3) Exchange a Main board and perform an operation check. (4) Exchange SSD and perform an operation check. * (5) Get USBLOG and contact service headquarters. * Only SSD standard model
- Code: F93X
- Description: Abnormality detecting in the extension application management part
- Causes: Since the USB log immediately after occurrence is needed for analysis, please give me cooperation of acquisition.
- Remedy: (1) Initialize SSD and perform an operation check. * (2) Carry out U021 Main backup initialization and perform an operation check. (3) Exchange a Main board and perform an operation check. (4) Exchange SSD and perform an operation check. * (5) Get USBLOG and contact service headquarters. * Only SSD standard model
- Code: F9FX
- Description: Abnormality detecting in the extension application various service part
- Causes: Since the USB log immediately after occurrence is needed for analysis, please give me cooperation of acquisition.
- Remedy: (1) Initialize SSD and perform an operation check. * (2) Carry out U021 Main backup initialization and perform an operation check. (3) Exchange a Main board and perform an operation check. (4) Exchange SSD and perform an operation check. * (5) Get USBLOG and contact service headquarters. * Only SSD standard model
- Code: FC0X
- Description: Abnormality detecting in system application
- Causes: Since the USB log immediately after occurrence is needed for analysis, please give me cooperation of acquisition.
- Remedy: (1) Initialize SSD and perform an operation check. * (2) Carry out U021 Main backup initialization and perform an operation check. (3) Exchange a Main board and perform an operation check. (4) Exchange SSD and perform an operation check. * (5) Get USBLOG and contact service headquarters. * Only SSD standard model
- Code: FC5X
- Description: Abnormality detecting in Copy application
- Causes: Since the USB log immediately after occurrence is needed for analysis, please give me cooperation of acquisition.
- Remedy: (1) Initialize SSD and perform an operation check. * (2) Carry out U021 Main backup initialization and perform an operation check. (3) Exchange a Main board and perform an operation check. (4) Exchange SSD and perform an operation check. * (5) Get USBLOG and contact service headquarters. * Only SSD standard model
- Code: FCAX
- Description: Abnormality detecting in Print application
- Causes: Since the USB log immediately after occurrence is needed for analysis, please give me cooperation of acquisition.
- Remedy: (1) Initialize SSD and perform an operation check. * (2) Carry out U021 Main backup initialization and perform an operation check. (3) Exchange a Main board and perform an operation check. (4) Exchange SSD and perform an operation check. * (5) Get USBLOG and contact service headquarters. * Only SSD standard model
- Code: FCFX
- Description: Abnormality detecting in Send application
- Causes: Since the USB log immediately after occurrence is needed for analysis, please give me cooperation of acquisition.
- Remedy: (1) Initialize SSD and perform an operation check. * (2) Carry out U021 Main backup initialization and perform an operation check. (3) Exchange a Main board and perform an operation check. (4) Exchange SSD and perform an operation check. * (5) Get USBLOG and contact service headquarters. * Only SSD standard model
- Code: FD4X
- Description: Abnormality detecting in Box application
- Causes: Since the USB log immediately after occurrence is needed for analysis, please give me cooperation of acquisition.
- Remedy: (1) Initialize SSD and perform an operation check. * (2) Carry out U021 Main backup initialization and perform an operation check. (3) Exchange a Main board and perform an operation check. (4) Exchange SSD and perform an operation check. * (5) Get USBLOG and contact service headquarters. * Only SSD standard model
- Code: FD9X
- Description: Abnormality detecting in FAX application
- Causes: Since the USB log immediately after occurrence is needed for analysis, please give me cooperation of acquisition.
- Remedy: (1) Initialize SSD and perform an operation check. * (2) Carry out U021 Main backup initialization and perform an operation check. (3) Exchange a Main board and perform an operation check. (4) Exchange SSD and perform an operation check. * (5) Get USBLOG and contact service headquarters. * Only SSD standard model
- Code: FDEX
- Description: Abnormality detecting in maintenance application
- Causes: Since the USB log immediately after occurrence is needed for analysis, please give me cooperation of acquisition.
- Remedy: (1) Initialize SSD and perform an operation check. * (2) Carry out U021 Main backup initialization and perform an operation check. (3) Exchange a Main board and perform an operation check. (4) Exchange SSD and perform an operation check. * (5) Get USBLOG and contact service headquarters. * Only SSD standard model
- Code: FE3X
- Description: Abnormality detecting in a authentication/ authorization part
- Causes: Since the USB log immediately after occurrence is needed for analysis, please give me cooperation of acquisition.
- Remedy: (1) Initialize SSD and perform an operation check. * (2) Carry out U021 Main backup initialization and perform an operation check. (3) Exchange a Main board and perform an operation check. (4) Exchange SSD and perform an operation check. * (5) Get USBLOG and contact service headquarters. * Only SSD standard model
- Code: FF5X
- Description: Abnormality detecting in the Application Entity Management Department
- Causes: Since the USB log immediately after occurrence is needed for analysis, please give me cooperation of acquisition.
- Remedy: (1) Initialize SSD and perform an operation check. * (2) Carry out U021 Main backup initialization and perform an operation check. (3) Exchange a Main board and perform an operation check. (4) Exchange SSD and perform an operation check. * (5) Get USBLOG and contact service headquarters. * Only SSD standard model
- Code: FF7X
- Description: Abnormality detecting in a report creation part
- Causes: Since the USB log immediately after occurrence is needed for analysis, please give me cooperation of acquisition. [Controller problem] Resolution is only power off / On.
- Remedy: (1) Initialize SSD and perform an operation check. * (2) Carry out U021 Main backup initialization and perform an operation check. (3) Exchange a Main board and perform an operation check. (4) Exchange SSD and perform an operation check. * (5) Get USBLOG and contact service headquarters. * Only SSD standard model
-
-
Kyocera 1035 «бледная» печать
srMax в форуме Принтеры, МФУ, факсы, копиры формата A4
- 2
- 14004
srMax
Пт янв 23, 2015 2:49 pm
-
Kyocera 1035 «бледная» печать
-
-
[SCANNER ERROR] Lamp Error Kyocera FS-1016
мастерчип в форуме Принтеры, МФУ, факсы, копиры формата A4
- 3
- 6662
Усатый Полосатый
Вс окт 28, 2018 11:08 pm
-
[SCANNER ERROR] Lamp Error Kyocera FS-1016
-
-
Kyocera FS-1120d индикатор «Нет бумаги»
vs-dos в форуме Принтеры, МФУ, факсы, копиры формата A4
- 11
- 15192
СТРОНЦИЙ
Вт ноя 02, 2021 2:24 pm
-
Kyocera FS-1120d индикатор «Нет бумаги»
-
-
Kyocera Ecosys M2635dn «поворот» изображения
Искатель в форуме Принтеры, МФУ, факсы, копиры формата A4
- 10
- 6147
MatrixAgent
Ср апр 08, 2020 5:18 am
-
Kyocera Ecosys M2635dn «поворот» изображения
-
-
Kyocera taskalfa 3501 «открыта крышка основного блока»
Юрий Яраскин в форуме Принтеры, МФУ, копиры формата A3
- 3
- 2925
Goldwater
Пт сен 10, 2021 1:31 pm
-
Kyocera taskalfa 3501 «открыта крышка основного блока»
Вернуться в Принтеры, МФУ, копиры формата A3
Кто сейчас на форуме
Сейчас этот форум просматривают: нет зарегистрированных пользователей и гости: 5
Причина неработоспособности любого принтера может крыться либо в программных, либо в аппаратных неисправностях. Некоторые виды неполадок можно устранить самостоятельно без помощи специалистов. Рассмотрим основные причины отказа печати принтеров Kyocera и приведем рекомендации по решению проблем.
Пользователи, не имеющие опыта в работе с принтером, могут расценить типичный случай отказа печати принтера и попробовать самостоятельно решить проблему.
В картриджах закончились чернила
Если операция печати выполняется с компьютера, то на экране будет показано соответствующее сообщение. Не заметить окончание чернил в картриджах можно в случае, если выполняется операция по копированию документов (примениться к МФУ Kyocera) либо при сбоях драйвера устройства.

Если тонер в чернильницах подходит к концу, то соответствующая информация отображается на лицевой панели принтера в виде мигающего индикатора «Внимание». Обычно в таких случаях устройство продолжает свою работу, но при программном сбое печать может быть остановлена.
Если же индикатор «Внимание» на лицевой панели горит непрерывно, это означает полное окончание чернил в картриджах. Печать может быть продолжена только после замены или дозаправки чернильниц.
Отсутствие связи компьютера с принтером
Для возможности отправки документа на печать требуется, что между принтером и компьютером была установлена физическая связь. Это можно сделать по одному из информационных интерфейсов (например, USB) либо путем соединения по проводной или беспроводной сети.
В подавляющем большинстве случаев принтер соединяется с компьютером посредством USB-кабеля. Проверить наличие соединения просто — достаточно отключить и заново подключить кабель к USB-порту. Из динамиков компьютера при этом будет слышан характерный звук отключения/подключения нового устройства. Если звук не издается, можно попробовать перезагрузить принтер и/или компьютер. Также следует осмотреть сам USB-кабель на наличие физических повреждений. Если они присутствуют — кабель следует заменить.

Ошибки картриджей
Со всеми современными принтерами возникают ошибки, связанные с картриджами. В большинстве случаев они возникают после транспортировки устройства. Решение — извлечение и установки картриджа на свое место. Делается это следующим образом (на примере МФУ Kyocera FS-1040):
- Выключите принтер.
- В передней части корпуса принтера присутствует откидная крышка. Откройте ее.
- Под крышкой в левой части установлен сам картридж. Извлеките его.
- На всякий случай осмотрите переднюю часть чернильницы. Если на ее контактах присутствуют загрязнения — удалите их мягким безворсовым материалом. В случае с высохшими чернилами — смочите материал в воде и протрите им контакты.
- Установите картридж на свое место, плотно задвинув его до щелчка.
- Включите принтер и подождите около 5-10 секунд, чтобы он смог инициализировать картридж.
Если проблема заключалась в картридже, данная процедура должна помочь в ее решении.

Замятие бумаги
Застревание бумаги внутри принтера — обычное дело в работе с печатающими машинами. Не составляют исключения и устройства Kyocera. Механизм протяжки бумаги состоит из нескольких вращающихся валов. При затруднении движения любого из них печать не будет выполняться. При замятии бумаги на лицевой панели принтера также будет выведено соответствующее сообщение.
В наиболее оптимистичных случаях для извлечения бумаги не требуется разборка принтера. Она обычно застревает прямо на входе. Если же замятие произошло внутри корпуса принтера, то устройство придется разбирать.
Использование неподходящей бумаги
Ошибочно полагать, что принтер способен печатать на любой бумаге. При использовании неподходящей по техническим характеристикам бумаги в работе печатающей машины могут возникнуть различные неполадки, вплоть до полного отказа. Если проблемы с принтером возникли после загрузки в него очередной стопки листов, следует убедиться, поддерживает ли их устройство.
Требования к бумаге можно найти в руководстве пользователя к печатающей машине. Его можно скачать на официальном сайте производителя Kyocera и на NoDevice.

Неисправности драйвера
Неполадки программного характера — довольно частая причина неработоспособности принтеров. Решение — переустановка драйвера устройства. Выполняя процедуру переустановки, всегда рекомендуется сначала удалять программное обеспечение, уже установленное на компьютере. Для этого:
- Перейдите в раздел «Устройства и принтеры», который можно найти в «Панели управления Windows».
- Среди отобразившихся на экране значков найдите имеющийся принтер Kyocera.
- Вызовите контекстное меню принтера, кликнув по его значку правой кнопкой мыши.
- Из выпадающего меню выберите пункт «Удалить устройство», согласитесь на удаление в диалоговом окне.
- Драйвер будет удален.
Далее остается установить драйвер заново. Если его нет на компьютере или на диске:
- Перейдите на сайт https://www.kyoceradocumentsolutions.ru.
- В верхней части страницы откройте раздел «Обслуживание / поддержка».
- В левой части страницы найдите и перейдите в подраздел «Центр поддержки».
- Выберите в выпадающем меню «Категория продукции» пункт «Печать».
- В выпадающем списке «Устройство» укажите модель имеющегося принтера Kyocera, которая должна быть указана на корпусе устройства.
- Нажмите на кнопку «Поиск».
- Снизу отобразятся доступные для скачивания драйверы.
- Скачайте драйвер, подходящей для установленной на компьютере операционной системы.
- Запустите установщик и следуйте инструкциям на экране.
Переустановка драйвера также поможет устранить программные неисправности самого принтера, т.к. данный процесс сбросит сохраненные в устройстве настройки.
Для автоматического поиска и установки драйверов можно использоваться программу DriverHub.
Troubleshooting > Responding to Messages
The send error displayed on the screen are as follows.
Error
Code
Failed to send the e-mail.
1101
Failed to send via FTP.
Failed to send via SMB.
Failed to send via SMB.
1102
Failed to send the e-mail.
Failed to send via FTP.
Failed to send via SMB.
1103
Failed to send via FTP.
Failed to send the e-mail.
1104
Message
Check the host name of the SMTP server on the
Command Center RX.
Check the host name of FTP.
Check the host name of SMB.
Check the SMB settings.
•
If the sender is a domain user, specify the domain name.
•
•
Check the following on the Command Center RX.
•
•
•
Check the FTP settings.
•
If the sender is a domain user, specify the domain name.
•
•
Check the SMB settings.
•
If the sender is a domain user, specify the domain name.
•
•
Check the FTP settings.
•
•
Check the e-mail address.
If the address is rejected by the domain, you cannot send
the email.
Corrective Actions
Login user name and login password
NOTE
Host name
Path
SMTP login user name and login password
POP3 login user name and login password
E-mail size limit
Login user name and login password
NOTE
Path
Folder share permissions of the recipient
Login user name and login password
NOTE
Path
Folder share permissions of the recipient
Path
Folder share permissions of the recipient
NOTE
11-22
Reference
Page
2-45
5-18
5-16
5-16
2-45
5-18
5-16
5-18
5-14