by Tashreef Shareef
Tashreef Shareef is a software developer turned tech writer. He discovered his interest in technology after reading a tech magazine accidentally. Now he writes about everything tech from… read more
Updated on August 26, 2020
XINSTALL BY CLICKING THE DOWNLOAD FILE
This software will simplify the process by both searching and updating your drivers to prevent various malfunctions and enhance your PC stability. Check all your drivers now in 3 easy steps:
- Download Outbyte Driver Updater.
- Launch it on your PC to find all the problematic drivers.
- Afterward, Click Update & Apply Selected to get the latest driver versions.
- OutByte Driver Updater has been downloaded by 0 readers this month.
When you try to print a document on a PostScript printer, only a portion of the document may be printed. On your computer, you may see the insufficient memory printer error as well.
This error occurs if the printer does not have enough memory to complete the print job. To resolve this issue, you may have to add more physical memory to the printer.
In this article, we explore a few workarounds that can help you resolve the insufficient memory printer error without adding additional physical memory.
What to do if I get insufficient memory printer error?
1. Change the TrueType Font Download option

- Press the Windows Key + R to open Run.
- Type control and click OK to open the Control Panel.
- Click on Hardware and Sound.
- Click Devices and Printers.
- Right-click on your printer and select Properties.
- Click on Printing Preferences.
- Next, click on Layout and then click Advanced.
- Double-click PostScript Options.
- Click on TrueType Font Download Options.
- In the True Type Font Download Option box, click Automatic.
- If the Automatic option is already selected, select the Outline or Bitmap option.
- Save the changes and close the Printer Properties dialog box.
- Close the Control Panel and check for any improvements.
Looking for a new printer for the office? Check out this article for the best that money can buy.
2. Reset the printer to factory settings
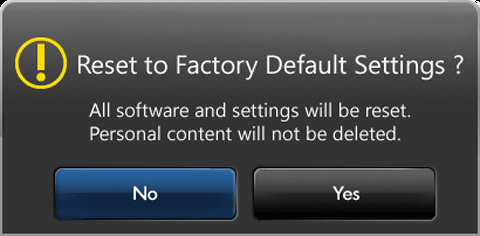
- For HP printers, from the Home screen on the Printer Control Panel, swipe until the Setup menu displays.
- Select the Setup icon.
- Scroll down and select the Service menu.
- Scroll down and select Restore Defaults.
- Select OK to confirm the action.
- The printer will reset to factory default and restart.
2.1 Setup the printer
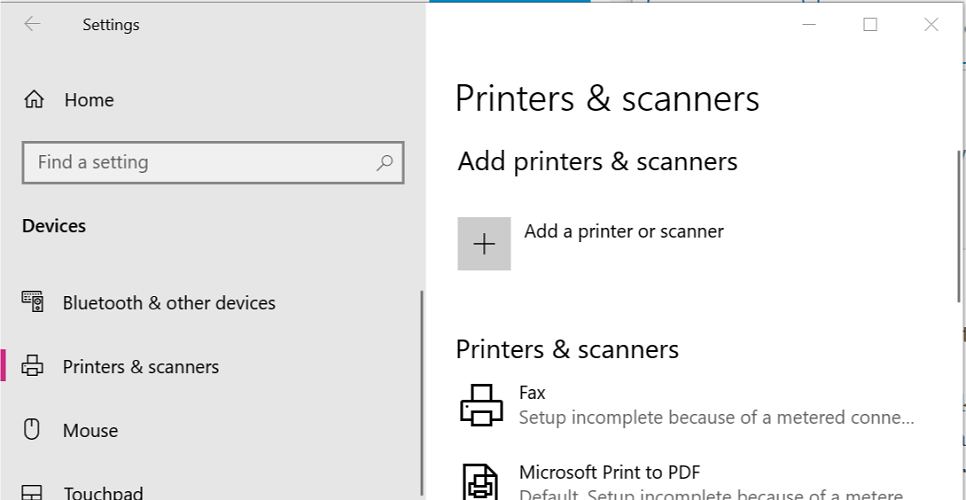
- Click on Start and select Settings.
- Click on Devices.
- From the left pane, click on Printers and Scanners.
- Click on Add a printer and scanner.
- Proceed with the on-screen instructions to complete the setup process.
- Give a printing job and check if the error is resolved.
3. Change the printer driver
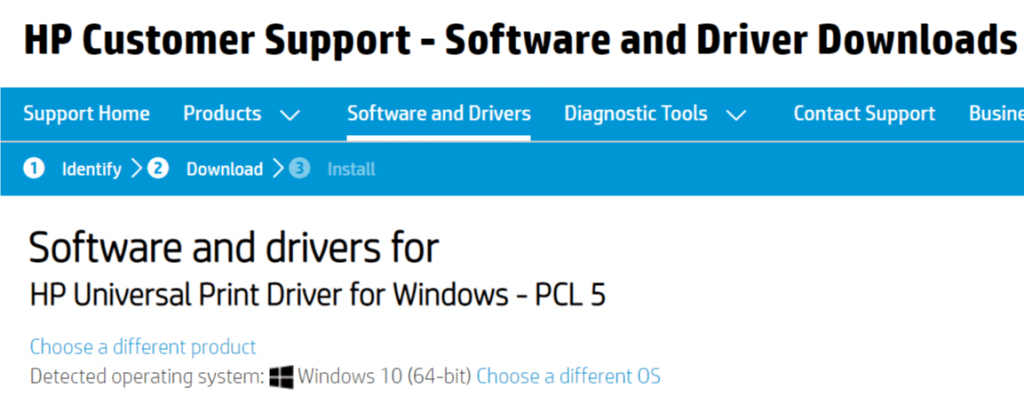
- Go to the HP Printer driver and software section and download PCL5 / HP Universal Print Driver for Windows.
- Install the drivers and check for any improvements.
If your printer is using a PCL6 driver, you may want to use PostScript or PCL5 drivers. Several users have reported that changing the printer driver has resolved the issue.
4. Uninstall and reinstall printer drivers
4.1 Remove the printer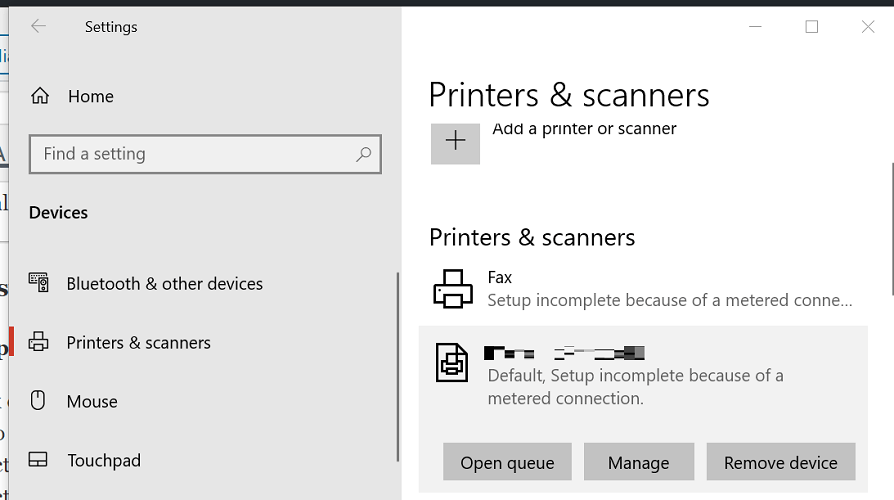
- Click on Start and select Settings.
- Go to Devices.
- Select the Printers and Scanners tab from the left pane.
- Select your printer from the list of devices and click the Remove Device button.
4.2 Uninstall printer software

- Click on Start and select Settings.
- Go to Apps.
- Search for your printer name or app.
- Select the printer software and click on Uninstall. You may have to confirm the action by clicking on Yes.
Note: This method works best when you perform a complete uninstall. That being said, a good third-party uninstaler will help you get rid of any residual data left over from uninstalls.
4.3. Remove drivers from Printer Server Properties
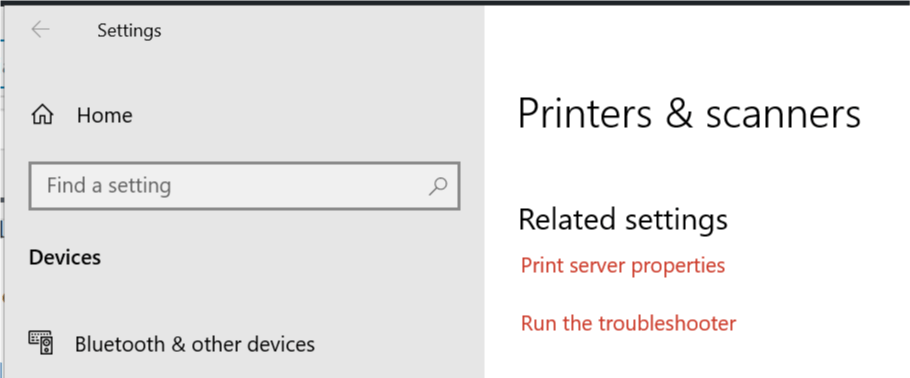
- Click on Start and select Settings.
- Go to Devices.
- Scroll down to the Related settings section.
- Click on Printer server properties.
- In the new window, select the Drivers tab.
- Select the printer you want to remove from the list and click the Remove button.
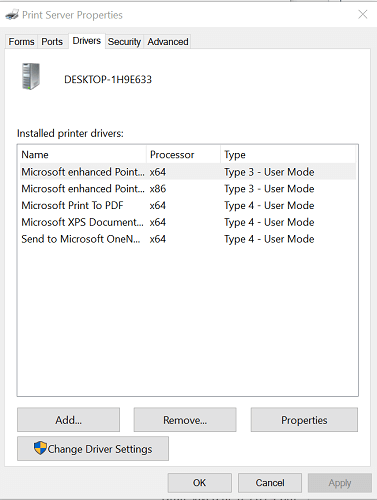
- In the Remove Driver And Package box, select Remove driver and driver package option.
- Click OK to proceed.
- Click Delete to confirm the action.
4.4 Install the printer and driver
- Download the latest version of drivers for your printer from the manufacturer’s website.
- Install the driver and check for any improvements.
The insufficient printer memory error can be resolved by resetting the printer to factory default. However, if the issue persists, try using universal printer drivers or reinstalling the printer.
Let us know which of the methods listed above worked for you by leaving us a message in teh comments section below.
![]()
-
#1
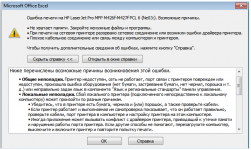
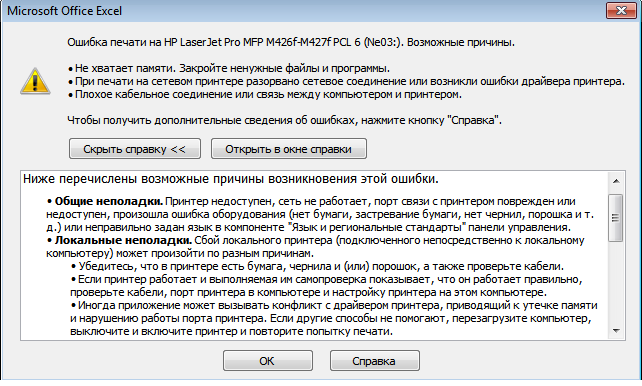
Здравствуйте. При печати из Excel в Microsoft Home and Business 2019 возникает ошибка:
«Ошибка печати на HP LaserJet Pro MFP M426f-427f
Возможные причины:
Не хватает памяти. Закройте не нужные файлы и программы.
При печати на сетевом принтере разорвано сетевое соединение или возникли ошибки драйвера принтера.
Плохое кабельное соединение или связь между компьютером и принтером.»
Скриншот прилагаю.
Если закрыть все экземпляры Excel и снова открыть то печать идет без проблем.
Памяти хватает (по крайней мере в диспетчере задач память не забита), сетевое соединение с МФУ в порядке (из других программ печать идет), МФУ подключено к компьютеру по сети.
В чем может быть причина?
Система Windows 10 Pro 64-bit.
-
27082021.png
31,4 КБ
· Просмотры: 5
-
#2
Хм.. интересно.
1. А принтер нормально пингуется, не перетоптан ли патчкорд ?
2. Попробуйте удалить принтер, с удалением текущего драйвера.
Попробуйте установить базовый драйвер:
HP LaserJet Pro MFP M426f-M427f PCL-6 V4 Print Driver (no installer)
HP LaserJet Pro MFP M426f-M427f Printer Series v3 PCL 6 Print Driver (no installer)
-
#3
1. Пингуется нормально. С подключением всё хорошо.
2. Удалил принтер, установил базовые драйверы. Всё работает, но дело в том что эта ошибка уходила, если закрыть все окна Excel и снова открыть документ. То есть понять, что проблема решилась не могу.
Последнее редактирование модератором: 27.08.2021
-
#4
Интересно какой event id у ошибки и Source
-
#5
попробуйте восстановить пакет MS Office
-
#6
Удалить порт принтера и создать заново, именно через ip адрес, не WSD или прочую х. Возможно какие то ненужные протоколы включены в МФУ
-
#7
Удалить порт принтера и создать заново, именно через ip адрес, не WSD или прочую х. Возможно какие то ненужные протоколы включены в МФУ
Порт через ip работает, не через WSD
-
#8
Всем доброго дня!
Та же беда. Два принтера выдают такую же ошибку. Оба принтера подключены локально. Windows11 x64. Закрытие всех документов помогает
-
#1
Здравствуйте. При печати из Excel в Microsoft Home and Business 2019 возникает ошибка:
«Ошибка печати на HP LaserJet Pro MFP M426f-427f
Возможные причины:
Не хватает памяти. Закройте не нужные файлы и программы.
При печати на сетевом принтере разорвано сетевое соединение или возникли ошибки драйвера принтера.
Плохое кабельное соединение или связь между компьютером и принтером.»
Скриншот прилагаю.
Если закрыть все экземпляры Excel и снова открыть то печать идет без проблем.
Памяти хватает (по крайней мере в диспетчере задач память не забита), сетевое соединение с МФУ в порядке (из других программ печать идет), МФУ подключено к компьютеру по сети.
В чем может быть причина?
Система Windows 10 Pro 64-bit.
-
27082021.png
31,4 КБ
· Просмотры: 3
-
#2
Хм.. интересно.
1. А принтер нормально пингуется, не перетоптан ли патчкорд ?
2. Попробуйте удалить принтер, с удалением текущего драйвера.
Попробуйте установить базовый драйвер:
HP LaserJet Pro MFP M426f-M427f PCL-6 V4 Print Driver (no installer)
HP LaserJet Pro MFP M426f-M427f Printer Series v3 PCL 6 Print Driver (no installer)
-
#3
1. Пингуется нормально. С подключением всё хорошо.
2. Удалил принтер, установил базовые драйверы. Всё работает, но дело в том что эта ошибка уходила, если закрыть все окна Excel и снова открыть документ. То есть понять, что проблема решилась не могу.
Последнее редактирование модератором: 27.08.2021
-
#4
Интересно какой event id у ошибки и Source
-
#5
попробуйте восстановить пакет MS Office
-
#6
Удалить порт принтера и создать заново, именно через ip адрес, не WSD или прочую х. Возможно какие то ненужные протоколы включены в МФУ
-
#7
Удалить порт принтера и создать заново, именно через ip адрес, не WSD или прочую х. Возможно какие то ненужные протоколы включены в МФУ
Порт через ip работает, не через WSD
by Tashreef Shareef
Tashreef Shareef is a software developer turned tech writer. He discovered his interest in technology after reading a tech magazine accidentally. Now he writes about everything tech from… read more
Updated on August 26, 2020
XINSTALL BY CLICKING THE DOWNLOAD FILE
This software will keep your drivers up and running, thus keeping you safe from common computer errors and hardware failure. Check all your drivers now in 3 easy steps:
- Download DriverFix (verified download file).
- Click Start Scan to find all problematic drivers.
- Click Update Drivers to get new versions and avoid system malfunctionings.
- DriverFix has been downloaded by 0 readers this month.
When you try to print a document on a PostScript printer, only a portion of the document may be printed. On your computer, you may see the insufficient memory printer error as well.
This error occurs if the printer does not have enough memory to complete the print job. To resolve this issue, you may have to add more physical memory to the printer.
In this article, we explore a few workarounds that can help you resolve the insufficient memory printer error without adding additional physical memory.
What to do if I get insufficient memory printer error?
1. Change the TrueType Font Download option
- Press the Windows Key + R to open Run.
- Type control and click OK to open the Control Panel.
- Click on Hardware and Sound.
- Click Devices and Printers.
- Right-click on your printer and select Properties.
- Click on Printing Preferences.
- Next, click on Layout and then click Advanced.
- Double-click PostScript Options.
- Click on TrueType Font Download Options.
- In the True Type Font Download Option box, click Automatic.
- If the Automatic option is already selected, select the Outline or Bitmap option.
- Save the changes and close the Printer Properties dialog box.
- Close the Control Panel and check for any improvements.
Looking for a new printer for the office? Check out this article for the best that money can buy.
2. Reset the printer to factory settings
- For HP printers, from the Home screen on the Printer Control Panel, swipe until the Setup menu displays.
- Select the Setup icon.
- Scroll down and select the Service menu.
- Scroll down and select Restore Defaults.
- Select OK to confirm the action.
- The printer will reset to factory default and restart.
2.1 Setup the printer
- Click on Start and select Settings.
- Click on Devices.
- From the left pane, click on Printers and Scanners.
- Click on Add a printer and scanner.
- Proceed with the on-screen instructions to complete the setup process.
- Give a printing job and check if the error is resolved.
3. Change the printer driver
- Go to the HP Printer driver and software section and download PCL5 / HP Universal Print Driver for Windows.
- Install the drivers and check for any improvements.
If your printer is using a PCL6 driver, you may want to use PostScript or PCL5 drivers. Several users have reported that changing the printer driver has resolved the issue.
4. Uninstall and reinstall printer drivers
4.1 Remove the printer
- Click on Start and select Settings.
- Go to Devices.
- Select the Printers and Scanners tab from the left pane.
- Select your printer from the list of devices and click the Remove Device button.
4.2 Uninstall printer software
- Click on Start and select Settings.
- Go to Apps.
- Search for your printer name or app.
- Select the printer software and click on Uninstall. You may have to confirm the action by clicking on Yes.
Note: This method works best when you perform a complete uninstall. That being said, a good third-party uninstaler will help you get rid of any residual data left over from uninstalls.
4.3. Remove drivers from Printer Server Properties
- Click on Start and select Settings.
- Go to Devices.
- Scroll down to the Related settings section.
- Click on Printer server properties.
- In the new window, select the Drivers tab.
- Select the printer you want to remove from the list and click the Remove button.
- In the Remove Driver And Package box, select Remove driver and driver package option.
- Click OK to proceed.
- Click Delete to confirm the action.
4.4 Install the printer and driver
- Download the latest version of drivers for your printer from the manufacturer’s website.
- Install the driver and check for any improvements.
The insufficient printer memory error can be resolved by resetting the printer to factory default. However, if the issue persists, try using universal printer drivers or reinstalling the printer.
Let us know which of the methods listed above worked for you by leaving us a message in teh comments section below.
![]()
Newsletter
Если вы столкнулись с ошибкой Недостаточно памяти в Microsoft Excel, вы не одиноки.
Большое количество пользователей задавали вопросы на форумах Microsoft, касающиеся этой проблемы.
Эта ошибка возникает, когда вы пытаетесь заполнить или скопировать различные формулы в очень большой области листа или если лист очень большой.
Полученное в этом случае сообщение об ошибке будет отображаться в разных форматах:
Недостаточно памяти.
Недостаточно системных ресурсов для отображения полностью.
В сегодняшней статье мы обсудим причины появления этой ошибки, а также способы ее предотвращения. Читай дальше, чтобы узнать больше.
Вот что мы знаем об этой проблеме Microsoft Excel
Почему эта ошибка возникает в Microsoft Excel?

Как мы упоминали выше, эта досадная ошибка появляется на вашем экране, если вы пытаетесь скопировать большой объем данных на листах Excel или добавляете формулы на большое количество листов одновременно.
Конкретная причина возникновения этой ошибки скрыта в том, как был создан Microsoft Excel.
Каждый экземпляр Excel ограничен 2 ГБ ( гигабайтами ) памяти, а также 32 760 исходными ячейками, когда вы используете опцию умного заполнения.
В зависимости от конкретного действия, которое вы пытаетесь выполнить, оба или одно из этих ограничений приведут к появлению вышеупомянутой ошибки.
Excel говорит, что не может получить ваш аккаунт прямо сейчас? Попробуйте эти решения
Вот как вы можете избежать появления этого сообщения об ошибке
1. Выполняйте отбор клеток постепенно

Если вы выбираете только часть всего диапазона, вам нужно заполнить, а затем сделать то же самое для следующего раздела ячеек.
Чтобы убедиться, что ограничения не достигнуты, вы можете выбрать только последний ряд ранее заполненного раздела при переходе ко второму, третьему и т. Д. Сегменту.
Вы можете повторять этот процесс до тех пор, пока не достигнете конца своего выбора.
2. Разделите файл Excel на разные рабочие книги.

Еще один хороший вариант — разбить большой файл Excel на отдельные книги, а затем открыть каждую из них в разных экземплярах Excel.
Этот метод позволит вам избежать ограничения в 2 ГБ. Каждая рабочая тетрадь будет использовать 2 ГБ памяти.
Вывод
В сегодняшнем руководстве с практическими рекомендациями мы говорили о лучших методах применения, если вы работаете с большим файлом MS Excel, и вас ограничивают ограничения памяти или ячеек.
Пожалуйста, не стесняйтесь сообщить нам, оказалось ли это руководство полезным в вашем случае. Вы можете сделать это, используя раздел комментариев ниже.
ЧИТАЙТЕ ТАКЖЕ:
- Как остановить Excel от изменения чисел на даты
- 4 лучших программы конвертации файлов Excel в JSON для ПК [FRESH LIST]
- Мой принтер не может печатать файлы Excel [ГАРАНТИЙНОЕ ИСПРАВЛЕНИЕ]
Последнее обновление Ноя 12, 2021
Чтобы исправить различные проблемы с ПК, мы рекомендуем DriverFix: это программное обеспечение будет поддерживать ваши драйверы в рабочем состоянии, тем самым защищая вас от распространенных компьютерных ошибок и сбоев оборудования. Проверьте все свои драйверы сейчас за 3 простых шага:
- Загрузите DriverFix (проверенный файл загрузки).
- Нажмите «Начать сканирование», чтобы найти все проблемные драйверы.
- Нажмите «Обновить драйверы», чтобы получить новые версии и избежать сбоев в работе системы.
- DriverFix в этом месяце скачали 502 786 читателей.
Если вы работаете в организации, на вашем компьютере, скорее всего, установлена последняя версия пакета Microsoft Office или Office 365. Даже если вы этого не сделаете, маловероятно, что вы никогда раньше не слышали о Microsoft Excel.
Однако это не делает Excel защищенным от случайных ошибок. Так будет в случае сообщения об ошибке, о котором сообщают пользователи, которое выглядит примерно так: Недостаточно памяти. Недостаточно системных ресурсов для полного отображения.
1 Проверьте содержимое таблицы
Вот основные причины появления сообщений об ошибках нехватки памяти:
- Вставка строки или столбца
- Выполнение расчетов
- Копирование и вставка
- Сортировка
- Открытие или закрытие книги
- Запуск VBA
Если вы выполняете какое-либо из действий, упомянутых выше, и получаете сообщение об ошибке, проверьте, что именно не так. В этом случае попробуйте сделать следующее:
- Перепроверьте формулы
- Перепроверьте расчеты
- Избегайте использования лишних форм
- Избегайте использования сложных сводных таблиц
- Старайтесь не использовать макросы и сложные диаграммы с большим количеством точек данных.
2 Проверьте свои надстройки Excel
Если вы считаете, что надстройка Excel вызывает ошибку, попробуйте отключить ее, а затем проверьте, появляется ли ошибка снова.
- Щелкните Файл
- Перейти к параметрам
- Выберите надстройки
- Нажмите Go кнопку
- Выберите надстройки, которые вы хотите отключить или удалить.
- Снимите флажок напротив соответствующей надстройки.
- Нажмите ОК.
3 Проверьте Excel или установите последние обновления
- Щелкните правой кнопкой мыши кнопку Пуск
- Во всплывающем меню выберите «Приложения и функции».
- Выберите Microsoft Excel и выберите Изменить.
В зависимости от того, является ли ваша копия Office «нажми и работай» или установлена на основе MSI, следующие шаги могут немного отличаться.
3.1. Нажми и работай
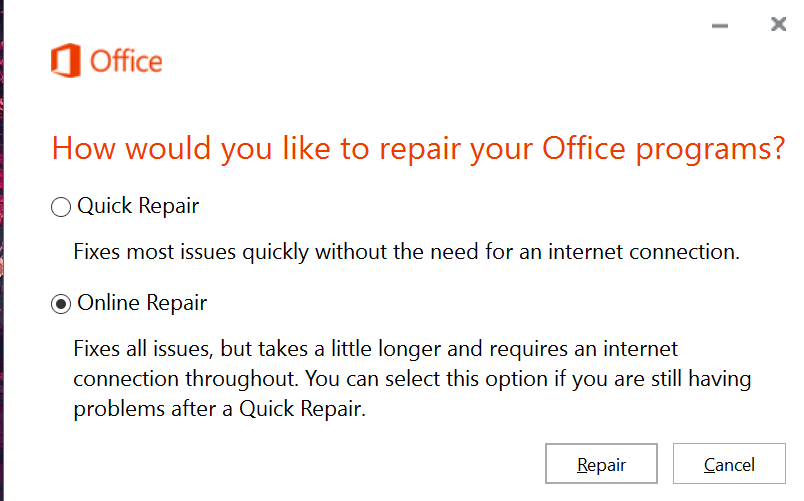
Появится окно с названием Как вы хотите восстановить свои программы Office.
- Выберите Online Repair
- Выберите «Восстановить», чтобы убедиться, что все исправлено.
- Вариант быстрого восстановления работает быстрее, но он только обнаруживает, а затем заменяет поврежденные файлы
3.2. На базе MSI
- В разделе “Изменить установку” выберите ” Восстановить”.
- Нажмите ” Продолжить”.
- Следуйте данной инструкции, чтобы завершить процесс
4 Отключите антивирус
Антивирусное программное обеспечение обычно запускается в фоновом режиме, проверяя ваш файл Excel по мере его создания. Обычно это приводит к нехватке памяти в Excel и, как следствие, выдаче сообщения об ошибке.
Отключите антивирусную программу и посмотрите, продолжает ли Excel обнаруживать эту ошибку. Помните, что каждая антивирусная программа отключается по-разному, поэтому дополнительную информацию можно найти в документации на веб-сайте разработчика.
Источник записи: windowsreport.com

Недавно на работе обновили всю печатающую технику на HP LaserJet Pro MFP M125rnw. После чего начались проблемы с печатью некоторых документов Microsoft Office.
При попытки печати некоторых докуметов MS Excel на МФУ HP LaserJet M125rnw, выдаёт такую ошибку:
Ошибка печати на HP LaserJet Pro MFP M125rnw
Возможные причины:
- Не хватает памяти. Закройте не нужные файлы и программы.
- При печати на сетевом принтере разорвано сетевое соединение или возникли ошибки драйвера принтера.
- Плохое кабельное соединение или связь между компьютером и принтером.
Что страно, при печати документов из MS Word никакие сообщения не выводятся. Документы отправляются на печать, без всяких уведомлений, но не распечатываются.
Решение проблемы:
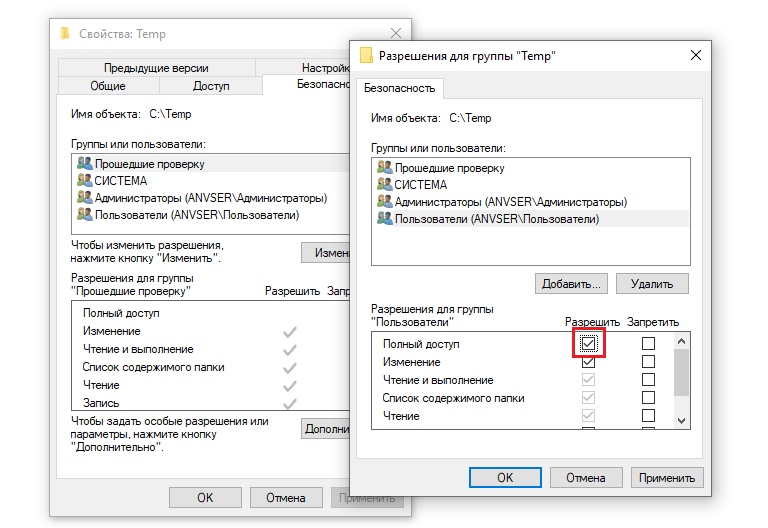
Для папок Temp и Tmp, во вкладке безопасность, необходимо предоставить полный доступ всем пользователям.
Папка Temp по умолчание находится по пути «C:UsersВаша учётная записьAppDataLocalTemp»
В служебных программах или заданиях, загружаемых в устройство, иногда могут содержаться ресурсы (например, шрифты, макрокоманды или шаблоны). Ресурсы, помеченные как постоянные, остаются в памяти устройства до выключения питания.
Воспользуйтесь следующими рекомендациями, если требуется пометить те или иные ресурсы как постоянные с помощью языка описания страниц (PDL). Техническую информацию см. в разделе справочника по PCL или PS, посвященном языку PDL.
-
Помечайте ресурсы как постоянные только в том случае, если их действительно необходимо сохранять в памяти устройства, пока оно включено.
-
Постоянные ресурсы следует передавать на устройство только в начале задания печати, а не во время выполнения печати.
Примечание.
Чрезмерное использование постоянных ресурсов или их загрузка во время выполнения печати может негативно повлиять на производительность устройства или на его возможность печатать сложные страницы.
Some users are experiencing issues with Microsoft Excel. When they try to print from Excel, nothing happens. Whereas, some users have reported that a small window appears and disappears immediately after giving the print command to Excel. If you cannot print from Excel, the suggestions provided in this post may help you fix printing problems in Microsoft Excel.

Fix Excel printing problems of Windows 11/10
If you cannot print from Excel but Word can or maybe you see a Not enough memory error message then here are some suggestions to help you fix Excel printing problems. Before you proceed, make sure that you are using the latest version of Microsoft Office. You can also try to update Office manually and see if it fixes the problem. If the problem persists, try the solutions provided below.
- Try to print via Microsoft XPS Document writer
- Update your printer driver
- Edit permissions in the Registry Editor
- Troubleshoot Excel in Safe Mode
- Remove and add your printer again
- Repair Office
Let’s see all these solutions in detail.
1] Try to print via Microsoft XPS Document Writer
Before printing a spreadsheet, Excel shows us an option to select the printer. If you are unable to print from Excel via your default printer, try to print via Microsoft XPS Document Writer. The steps to do this are as follows:
- Launch Microsoft Excel and open your spreadsheet.
- Go to “File > Print.”
- Click on the Printer drop-down and select Microsoft XPS Document Writer.
- This will save your Excel spreadsheet in the XPS format.
Now, open the saved file. You should be able to print it.
2] Update your printer driver
You might be experiencing printing issues with Excel due to the corrupted or outdated printer driver. We suggest you update your printer driver and see what happens.

You have the following choices when it comes to updating the printer driver.
- Open the Windows Optional Update page and update your printer driver from there (if any update is available).
- Visit the official website of your printer manufacturer and download the latest version of your Printer driver. Now, double-click on the installer file to install the printer driver manually.
3] Edit permissions in the Registry Editor
Windows Registry is a hierarchical database that stores the Windows settings and configurations. Any mistake while modifying the Windows Registry can lead to serious damage to the system. Therefore, before you proceed, we recommend you create a System Restore Point and backup Windows Registry.
Follow the instructions carefully.
Press the Win + R keys. This will open the Run command box. Type regedit and click OK. Click Yes in the UAC prompt.

When the Registry Editor appears on your screen, go to the following path. Simply copy the path given below and paste it into the address bar of the Registry Editor. After that, press Enter.
ComputerHKEY_CURRENT_USERSoftwareMicrosoftWindows NTCurrentVersionWindows
Right-click on the Windows key and select Permissions. The Permissions dialog box will appear. Now, click on the Allow checkbox next to the Full Control option. Click Apply and then click OK.
4] Troubleshoot Excel in Safe Mode
If the problem still persists, there might be a problematic add-in. To confirm this, launch Excel in Safe Mode and print your spreadsheet. If you are able to print your spreadsheet in the Safe Mode, an add-in is causing the problem.
Now, close Excel and open it again in the normal mode. Start disabling all the COM add-ins one by one and print your spreadsheet every time you disable an add-in. This will let you know which add-in is causing the problem. According to the feedback of affected users, the Acrobat PDFMaker Office Com add-in was causing the problem. If you have installed such an add-in, disable it and then see if you can print the spreadsheet. If yes, remove that add-in.

The following steps will help you disable COM Add-ins in Excel:
- Open your spreadsheet in Excel.
- Go to “File > Options > Add-Ins.”
- Select COM Add-ins in the drop-down at the bottom and click GO.
- The COM Add-ins dialog box will appear. Now, simply uncheck the checkbox to disable a particular add-in.
- Click OK.
Read: Fix Excel keeps flickering on Windows 11/10.
5] Remove and add your printer again
Sometimes, removing and adding the printer again fixes the printer-related issues. Completely remove or uninstall your printer and then add it again. Check if this helps. You can completely remove a printer from your Windows 11/10 machine via:
- Settings
- The Control Panel
- Print Server Properties
- The Command Prompt
- The Registry Editor
6] Repair Office
If nothing helps you, repair Microsoft Office. Sometimes, the problem occurs due to corrupted Office files. If this is the case with you, repairing Microsoft Office will fix the problem. First, run a Quick Repair. If this does not fix the problem, run an Online Office Repair.
Read: Microsoft Excel displays High CPU usage.
Fix Excel printing problems in Windows 11/10
Above, we have seen the solutions to fix the problem when Excel does not print on receiving the print command from the user. Now, let’s see some common printing problems that you may experience in Microsoft Excel. Sometimes, when we print a spreadsheet from Excel, we do not get the desired printout. Some of you might have experienced such a problem. Such types of problems occur when the print settings are incorrectly configured before printing a spreadsheet.
Here are some tweaks that you can do to avoid some common printing problems in Microsoft Excel.
- Fit your spreadsheet on one page
- Set the print area in Excel
- Configure print settings before printing the spreadsheet
1] Fit your spreadsheet on one page

Some of you might have experienced that despite configuring the correct page settings, Excel prints a spreadsheet on more than one page. This problem can be fixed by changing the scaling in Excel. If you want to print all the rows or columns on one page in Excel, you have to change the No Scaling option in Excel to Fit all rows on one page and Fit all columns on one page option respectively.
2] Set the print area in Excel
If you want to print selected cells in your spreadsheet, you can set the print area for the same. The steps to set the print area are as follows:

- Open Excel.
- Open your worksheet in Excel.
- Select the range of cells that you want to print.
- Go to “Print Layout > Print Area > Set Print Area.”
Now, when you give the print command to Excel, it will print only the selected cells on a page. You can extend the print area by adding more cells to it. If the cells that you want to add are adjacent to the existing print area, Excel will print them on the same page (if space is available). If the selected cells that you want to add are not adjacent to the existing print area, Excel will print them on another page, no matter whether the space is available on the existing print area or not.
To add cells to the existing print area, follow the steps below:

- Select the range of cells that you want to add to the existing print area.
- Go to “Page Layout > Print Area > Add to Print Area.”
To clear the print area, go to “Page Layout > Print Area > Clear Print Area.”
3] Configure print settings before printing the spreadsheet
You can configure the print settings before printing your spreadsheet. To do so, go to “File > Print” or simply press the Ctrl + P keys. There you will see different print settings. You can change the page orientation (landscape or portrait), select your paper size such as Letter, Legal, A4, A3, etc., change page margins, etc. Every time you make a change to the print settings, Excel will show you the print preview in the preview window.
Why can I print from Word but not from Excel?
If you are able to print from Word but not from Excel, there might be a problematic add-in in Excel. You can confirm this by opening Excel in the Safe Mode. If you will be able to print in the Safe Mode, one of the add-ins is the culprit. Now, disable add-ins installed in Excel one by one. Print your spreadsheet every time you disable an add-in. This will help you identify the problematic add-in.
Other solutions that you can try are removing and adding the printer again, updating your printer driver, etc.
Why won’t Excel print all the columns?
To print all the columns on one page in Excel, you have to configure the page settings before printing your spreadsheet. The steps for the same are as follows:

- Open your spreadsheet in Excel.
- Go to “File > Print.”
- By default, the page setup is set to No Scaling. You have to change this option. Click on it and select Fit all columns on one page.
After that, you will be able to print all the columns on one page in Excel.
Print preview is not available because Microsoft Excel could not connect to the selected printer
If you see the “Print preview is not available because Microsoft Excel could not connect to the selected printer” error message while printing a spreadsheet from Excel, make sure that your computer is running on the latest version of the Windows operating system. Open Windows 11/10 Settings and check for updates. If updates are available, download and install them.
We also suggest you update Microsoft Office manually and see if it helps. If the problem persists, repair Microsoft Office.
Cannot print from Excel, Not enough memory
Some of you might have seen the “Not enough memory” error message while printing a spreadsheet in Microsoft Excel. The error message is self-explanatory. When the printer from which you are printing the jobs does not have enough memory, you will see this error. However, there are other causes too that trigger this error. To fix this issue, you can try the following fixes.
- Copy the data from your spreadsheet to a new spreadsheet
- Change your default printer
- Update your printer driver
- Print in Draft Mode
- Save your Excel file in ODS format
- Reset your printer memory
- Clear print spooler
- Repair Office
Let’s see all these fixes in detail.
1] Copy the data from your spreadsheet to a new spreadsheet
This method has fixed the issue of some users. You can also try this. Copy the data from your spreadsheet to a new spreadsheet and see if it helps.
2] Change your default printer
If the problem still persists, change your default printer. You can set any virtual printer as a default printer, such as Microsoft Print to PDF, Microsoft XPS Document Writer, etc.
3] Update your printer driver
Sometimes the problem persists due to the outdated or malfunctioned printer driver. If this is the case with you, updating the printer driver will solve your problem. To do so, follow the steps written below:
- Open the Device Manager.
- Expand the Print queues node.
- Right-click on your printer driver and select Update driver.
- Select the “Search automatically for drivers” option. Let Windows install the latest version of your printer driver.
If this does not work, visit the official website of your printer manufacturer and download the latest version of your printer driver from there. Now, run the installer file to install the latest version of your printer driver manually.
4] Print in Draft Mode
For some users, printing the spreadsheet in the Draft mode fixed their problem. You can also try this and see if it helps. To do so, you have to change the Fast mode to Draft mode. By default, the print quality is set to Fast mode. Open your print quality settings and change the Fast mode to Draft mode.
5] Save your Excel file in ODS format
Another effective solution to fix this problem is to save the Excel spreadsheet in ODS (OpenDocument Spreadsheet) format. The steps to do this are as follows:

- Launch Microsoft Excel and open your spreadsheet.
- Go to “File > Save As.”
- Click on the Save as type drop-down menu and select OpenDocument Spreadsheet.
- Click Save.
Now, open the ODS file and print it. The problem should not appear this time.
6] Reset your printer memory
If your printer is running low on memory, resetting its memory will help fix the issue. Resetting the printer memory will clear the print jobs in the queue. To do so, follow the steps given below:
- Disconnect your printer from your computer.
- Turn off your printer.
- Disconnect the power cable of your printer and wait for a few minutes.
- Connect the power cables again and turn on your printer.
- Connect your printer to your computer.
If the above method did not help, cold reset your printer. The method to cold reset printers is different for the printers of different brands. Therefore, you have to refer to the user manual of your printer to know the correct way to cold reset your printer.
7] Clear the Print Spooler
In Windows, Print Spooler is a service that stores the printing jobs temporarily. If Excel is showing the “Not enough memory” message while printing a spreadsheet, clearing the Print Spooler may fix the problem. The steps to clear the Print Spooler are as follows:
- Press the Win + R keys to launch the Run command box.
- Type services.msc and click OK. This will launch the Services Management window.
- Scroll down and locate the Print Spooler service.
- Once you find it, right-click on it and select Stop.
- Open the File Explorer and go to the “C:WindowsSystem32spool” path. Simply copy this path and paste it into the address bar of the File Explorer. After that, hit Enter.
- Open the PRINTERS folder and delete all the files inside it. Do not delete the PRINTERS folder.
- Return to the Services Management window and right-click on the Print Spooler service.
- Select Start.
8] Repair Office
Check if you are getting the same error message in other Office apps, like Word. If not, some of the Excel files may be corrupted. To fix this problem, run an online repair for Microsoft Office.
Hope this helps.
Read next: Excel freezing, crashing, or not responding.