Этот материал написан посетителем сайта, и за него начислено вознаграждение.
На моем десктопном компьютере установлен SSD Crucial MX-200 500Gb, на котором установлена операционная система и игры.

Где-то месяц назад игры стали ужасно лагать, зависали до 5 секунд, играть стало не возможно, компьютер иногда зависал намертво и сам перезапускался. Я начал искать причину, логично, что в первую очередь решил проверить состояние SSD Crucial MX-200 по его SMART.
рекомендации
3060 дешевле 30тр в Ситилинке
3070 Gigabyte Gaming за 50 тр с началом
<b>13900K</b> в Регарде по СТАРОМУ курсу 62
3070 Gainward Phantom дешевле 50 тр
10 видов <b>4070 Ti</b> в Ситилинке — все до 100 тр
13700K дешевле 40 тр в Регарде
MSI 3050 за 25 тр в Ситилинке
13600K дешевле 30 тр в Регарде
4080 почти за 100тр — дешевле чем по курсу 60
12900K за 40тр с началом в Ситилинке
RTX 4090 за 140 тр в Регарде
Компьютеры от 10 тр в Ситилинке
3060 Ti Gigabyte дешевле 40 тр в Регарде
3070 дешевле 50 тр в Ситилинке
-7% на 4080 Gigabyte Gaming
И обнаружил, что атрибут SMART-a 199 UltraDMA CRC Error Count (количество ошибок, возникших во время передачи данных по кабелю от материнской платы до дискретного контроллера диска) буквально за два дня вырос более чем на 2000 ошибок.

Спустя два дня

Это вполне объясняло подобное поведение компьютера.
Естественно, что в первую очередь под подозрение попал кабель SATA, но нет, если бы это было так, то я не стал бы писать статью.
Были перепробованы все кабеля SATA которые у меня только есть, для проверки также поменян кабель SATA с HDD, который у меня стоит на компьютере в качестве хранилища, кстати на нем этот атрибут равен нулю, то есть не возникло ни одной ошибки. Переподключал кабель SATA в разные порты на материнской плате, но и это ничего не дало.
После этого SSD был установлен в ноутбук, где при тех же играх и нагрузке данный атрибут SMART-a не увеличился ни на единицу, и ноутбук работал отлично.
Контроллер материнской платы компьютера я тоже исключил, так как установив на HDD стоящий в компьютере операционную систему и игры, и погоняв его с теми же нагрузками, увидел, что атрибут UltraDMA CRC Error Count не увеличился, так и остался равным нулю.
Что же тогда еще остается?
Отступление:
При замене кабелей SATA на SSD, один кабель SATA я приобрел в магазине, на всякий случай, так как думать уже не знал на что. Когда я его покупал, оговорился о данной проблеме. И от продавцов узнал для себя удивительную вещь: они авторитетно заявили, что возможно у меня стоит кабель SATA 2 и не обеспечивает необходимую пропускную способность, и нужно купить у них кабель SATA 3, и даже показали кабель на котором стоит клеймо SATA 3 (может я этого не знаю). Я возразил, сказал, что такого быть не может, что у них у всех 7 pin , и одинаковые медные проводники, и электрический сигнал распространяется одинаково. пропускная способность зависит от контроллера материнской платы и от контролера жесткого диска, а не от 7 медных проводников, которыми они соединены. И на вопрос чем они физически отличаются, внятно объяснить мне не смогли.
Что думаете вы по этому поводу напишите в комментариях.
Но я все-таки купил у них этот кабель SATA 3. Ну как вы и подумали проблему это не решило.
Дальше я принялся ковырять блок питания. По замерам мультиметра, и по данным проги «AIDA» все напряжения были в норме. Но при измерении осциллографом пульсаций по питанию, в большей мере меня интересовало питание 5 В. которым питался SSD , было выявлено наличие провалов в осциллограмме с 5 до 4,5 В.


 https://disk.yandex.ru/i/v3nlN_OmffD_hw
Расположение их по шкале времени имело случайный характер. Но казалось бы, и 4,5 В. достаточно, так как в SSD стоят свои преобразователи в более низкие напряжения. Но я все же в качестве диагностики попытался уменьшить эти пульсации и подключил прямо к разъему MOLEX к шине 5 в. электролитический конденсатор на 4000 мкФ.


И наконец это решило проблему, осциллограмма выровнялась, провалы пропали, атрибут 199 UltraDMA CRC Error Count больше не увеличивается, компьютер летает, игры не лагают. Теперь выберу время, разберу блок питания и займусь им.
Надеюсь, мой случай окажется вам интересен и полезен.
Этот материал написан посетителем сайта, и за него начислено вознаграждение.
Привет. Столкнулся с проблемой на своем компьютере. Он у меня начал постоянно зависать, либо самопроизвольно перезагружаться. Хочу рассказать вам в чем была причина.
Работал себе, работал компьютер, и тут бац — и начались какие-то чудеса – очень часто стал намертво виснуть или самопроизвольно перезагружаться.
Я очень быстро выявил закономерность – зависания происходят в момент интенсивного чтения или записи на жесткий диск. Кроме того, я несколько раз замечал, что при копировании больших файлов, скорость копирования на несколько секунд падает на ноль.
Открыв логи, я обнаружил, целый ворох предупреждений, связанных с жестким диском, что подтвердило мои предположения, что виновником не стабильной работы был жесткий диск.
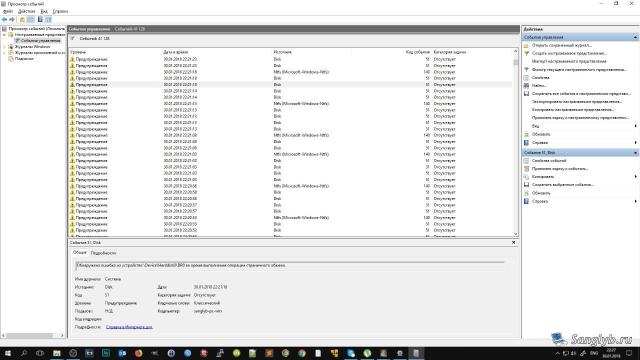
Посмотрев SMART, обнаружилась ошибка Ultra DMA CRC. Эта ошибка говорит о том, что контрольная сумма CRC не подтверждается контроллером, т.е. данные искажаются. Причин этому может быть несколько. Самая распространенная – повреждение SATA провода, либо отошедший от разъема провод на жестком диске или материнской плате. Менее распространенные, но всё же часто встречающиеся – неисправный контроллер на диске или материнке.
Как вам должно быть понятно из вышенаписанного – в этой ситуации нужно первым делом проверить провод и соединения, и желательно провод заменить.
В моем случае помогла простая замена SATA кабеля.
Как известно SMART не сбрасывается, без перепрошивки, поэтому в показаниях SMART ошибка осталась, но диск начал работать заметно быстрее, стабильнее и главное компьютер больше не виснет и не перезагружается, ни при каких нагрузках на диск.
Если вам не поможет замена кабеля, то можно попробовать подключить винчестер к другому контроллеру. На современных материнских платах, довольно часто производитель ставит дополнительный SATA контроллер, например, какой-нибудь Marvell.
Как правило SATA порты которые управляются дополнительным контроллером покрашены другим цветом, например – 6 черных разъемов и 2 серых, черные будут на другом контроллере.
Соответственно, вы можете попробовать подключить диск к другому набору разъемов и проверить его работоспособность.
Если и это не поможет, то нужно проверять диск на другом компьютере, но практически наверняка – конец контроллеру на диске, и диск нужно менять, ну или менять на нем контроллер.
Вышенаписанное – очевидные вещи, но написать о них меня побудило то, что из-за ошибок чтения и записи на НЕ системный диск – Windows зависал, что меня изначально ввело в заблуждение. Я думал, что что-то случилось с материнкой или блоком питания. Но оказалось все гораздо проще.
Содержание
- Как устранить ошибки Ultra DMA CRC Error
- Основные характеристики жесткого диска
- Технология S.M.A.R.T
- Атрибут: 199 (С7) UltraDMA CRC Error Count
- Блог SerZh’a
- Вы здесь
- Счетчик ошибок Ultra DMA CRC Error
- How to Fix ‘Interface CRC Error Count’ inside HD Tune
- What is Ultra DMA CRC Error Count?
- Method 1: Running the brand-specific diagnostic tool
- Method 2: Fix the Incompatibility between Samsung SSD and SATA Controller (if applicable)
- Method 3: Replace the power and SATA cable
- Method 4: Backup your HDD data
- A. Backing up the files on your HDD via Command Prompt
- B. Backing up the files on your HDD via an Imaging 3rd party software
- Method 5: Send your HDD for replacement or order a replacement
Как устранить ошибки Ultra DMA CRC Error
Одним из важнейших компонентов любого компьютерного устройства является жесткий диск, другие названия: винчестер, винт, хард, HDD и т.д. Он служит для хранения разных данных пользователя, включая документы, музыку, фотографии, а также программные продукты и файлы операционной системы. Данный узел является энергонезависимым, т.е. отключение питания не приводит к исчезновению данных.
Информация, хранящаяся на жестком диске, бывает порой ценнее самого компьютера и чтобы не потерять ее (причины утраты данных на HDD и способы восстановления), необходимо контролировать состояние винчестера. В данной статье рассматриваются причины возникновения одной из наиболее часто встречающейся проблемы в работе HDD и пути для ее устранения.
Рассмотрим характеристики винчестера, по которому оценивается устройство, а также встроенные инструментарии для контроля над состоянием его работоспособности.
Основные характеристики жесткого диска
Накопители выпускаются в разных стандартных размерах, измеримых в дюймах, так для стационарных компьютеров это значение равно 3.5 дюйма, а для ноутбуков 2.5.
Взаимодействие диска с материнской платой выполняется через интерфейс, в настоящее время в ПК используется интерфейс SATA разных версий, отличающихся скоростью передачи данных (SATA/300 – 3 Гбит/сек, SATA/600 – до 6 Гбит/сек и т.д.).
Важной характеристикой устройства является показатель емкости, определяющий максимальное количество данных, хранящихся на диске.
Чем больше скорость вращения жёсткого диска, тем быстрее возможен доступ к информации. Она составляет 5400 или 7200 об/мин (реже 10 000 или 15 0000 об/мин, но это уже специализированные HDD).
Данный узел имеет встроенную память, которая служит для ускорения его работы и устранения разницы в скоростях чтения/записи и воспроизведения. Она характеризуется объемом буфера.
Время произвольного доступа зависит от позиционирования и положения головки в начале и конце сеанса определенного участка пластины.
Надежность работы, ударостойкость, уровень шума также являются оценочными характеристиками накопителя.
Ни один другой компонент компьютера не имеет такой уникальной возможности самоанализа на наличие ошибок и статистики работы, как винчестер. Произвести оценку состояния жесткого диска и предсказать время выхода его из строя можно с помощью специальной встроенного инструмента самодиагностики.
Технология S.M.A.R.T
Инструментарий, с помощью которого можно контролировать работоспособность винчестера, получил название S.M.A.R.T, что означает самомониторинг, анализ и отчет — от заглавных букв английского варианта «Self-Monitoring, Analysis and Reporting Technology».
С учетом того, что винчестер является одним из слабых мест компьютерного устройства, возможность вовремя отслеживать изменение состояния его функционирования, позволяет быстро выявить и устранить неисправности, экономя владельцу время и деньги.
Винчестер может находиться в двух состояниях: S.M.A.R.T. Good и S.M.A.R.T. Bad. Первый вариант свидетельствует о нормальной работе устройства, второй о том, что диск находится в критическом положении. Так как переход в состояние «bad» происходит постепенно, мониторя S.M.A.R.T. можно увидеть ухудшение параметров и успеть перенести информацию на другой накопитель.
Тестирование жесткого диска выполняют специальными утилитами, которые демонстрируют атрибуты S.M.A.R.T., характеризующие состояние его «здоровья». В зависимости от модели и производителя, атрибуты имеют определенные названия (ID) и номер (NUMBER).
Примерами программ, с помощью которых можно увидеть значения S.M.A.R.T и протестировать винчестер, являются следующие: CrystalDiskInfo (бесплатная), HDDScan (бесплатная), HD Tune(бесплатная только в старой версии), Hard DiskSentinel (бесплатная только для DOS), а также Victoria (бесплатная), MHDD (бесплатная под DOS).
Вот как выглядит картинка тестирования жесткого диска с помощью программы S.M.A.R.T. в HDDScan 3.3.
- Value — показатель состояния диска во время работы. Может изменяться, уменьшаясь или увеличиваясь, или быть неизменным. Его сравнивают с атрибутом Threshold: чем меньше, тем хуже «здоровье» HDD.
- Worst — самое низкое значение, которого может достичь Value в процессе всего жизненного цикла винчестера, его также сравнивают Threshold.
- Threshold — показатель критического состояния атрибута Value: норма, если он больше чем Threshold, меньший указывает на проблему. Утилиты, оценивающие состояние диска, судят по этому атрибуту.
- RAW — один из самых важных в оценке. Объективно определить состояние HDD можно по этому показателю.
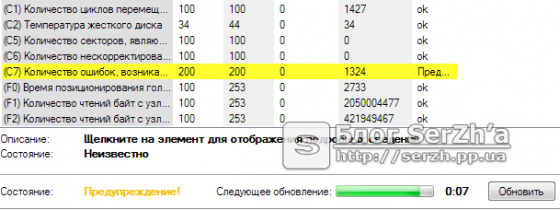
Атрибут: 199 (С7) UltraDMA CRC Error Count
Данный атрибут относится к накапливающему типу и содержит количество ошибок, которые возникают во время передачи по интерфейсному кабелю от материнской платы или дискретного контроллера к контроллеру диска.
Например, если при запуске утилиты, отображающей атрибуты S.M.A.R.T, напротив строки (C7) Ultra DMA CRC Error Count счетчик показывает значение 1234, это говорит о проблемах с HDD.
По статистике, чаще всего увеличение значения этого атрибута возникает вследствие некачественной передачи данных по интерфейсу, что приводит к автоматическому переключению режимов работы канала, на котором находится HDD, и резкому падению скорости чтения/записи.
Другой причиной может быть разгон шины PCI/PCI-E компьютерного устройства, а также нарушение контакта в SATA-разъёме на диске или на материнской плате (контроллере). В некоторых случаях растущий атрибут появляется из-за несовместимости жесткого диска и SATA-контроллера.
Устранить ошибку S.M.A.R.T UltraDMA CRC Error Count можно путем выполнения ряда следующих действий:
- замены интерфейсного кабеля SATA;
- выполнения сброса разгона шины PCI/PCI-E компьютера к заводским установкам;
- обновления BIOS материнской платы;
- очищения с помощью спирта или обыкновенной стирки (резинового ластика) контактов на разъеме жесткого диска или материнки;
- переключения SATA-кабеля на другой разъем;
- замены блока питания жесткого диска;
- проверки материнки на предмет «вздутых» конденсаторов и, при необходимости, выполнения их замены;
- замены термопасты южного моста материнки;
- замены чипсета материнской платы;
- установления перемычки на жестком диске и переключить режим работы контроллера в SATA I;
- обновления драйвера чипсета материнской платы.
Впрочем, самостоятельно делать все вышеуказанные процедуры необязательно (если нет желания), всегда можно обратиться за компьютерной помощью к специалистам.
Необходимо иметь в виду, что хорошие атрибуты S.M.A.R.T не всегда дают полную и достоверную картину отличного состояния диска, однако плохие значения точно свидетельствуют о проблемах в HDD.
Гарантировано обезопасить себя от потери ценных данных, хранящихся на жестком диске, можно только с помощью периодического резервного копирования на съемный накопитель или другой диск, тогда как тестирование винчестера на предмет обнаружения ошибок в атрибутах поможет предотвратить его внезапный выход из строя.
Источник
Блог SerZh’a
мир электронных мыслей
Вы здесь
Счетчик ошибок Ultra DMA CRC Error
Одним из самых узких мест в компьютере до сих пор остается жесткий диск. Я не говорю о твердотельных накопителях SSD, у них тоже есть свои плюсы и минусы. Сегодня речь пойдет о жестких дисках, принцип работы которых был разработан еще в прошлом веке.
Принцип до сих пор остался прежним, изменяется только технология изготовления пластин и электроники, которая контролирует все процессы, происходящие на жестком диске.Показателем здоровья жесткого диска является таблица SMART.
S.M.A.R.T. (от английского self-monitoring, analysis and reporting technology ) — технология самоконтроля, анализа и отчётности) — технология оценки состояния жёсткого диска встроенной аппаратурой самодиагностики, а также механизм предсказания времени выхода его из строя.
Жесткий диск я купил 1,5 года назад. Хотелось поменять свой тихоходный системный диск Hitachi 500Gb, на что-то пошустрей. Выбор был невелик — Western Digital Caviar Black 1Tb SATAIII или Seagate Barracuda (ST1000DM003) 1Tb SATAIII. Выбор пал в пользу последнего. Это был первый жесткий диск на рынке с терабайтной пластиной, что сразу снимало несколько проблем: нагрев, шум, энергопотребление. Максимальная скорость чтения в HD Tune переваливала за 200 Мб/сек, когда Hitachi показывал максимум 85. Вдобавок, Seagate был в полтора раза тоньше своих собратьев!
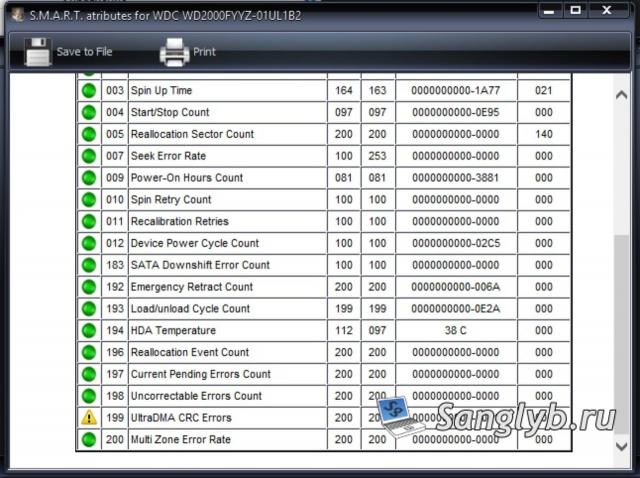
Все работало хорошо до последнего дня. Компьютер начал грузиться дольше, чем обычно. Перед загрузкой Windows каждый раз начинал запускать ScanDisk, проверяя жесткий диск на ошибки. Меня насторожило странное поведение компьютера и я решил проверить его на вирусы, загрузившись с LiveCD. Вирусов не было, поэтому я решил посмотреть на SMART дисков, чтобы удостовериться, что там все в порядке. Оказалось это не так. Напротив строки (C7) Ultra DMA CRC Error Count подсвечивалось предупреждение желтым цветом и счетчик показывал значение 1234.
В моей практике было несколько случаев, связанным с увеличением этого счетчика, но все решалось элементарной заменой интерфейсного кабеля. В данном случае это не помогло. В интернете описано много возможных путей решения этой проблемы, которые сводятся к следующему:
- Замена интерфейсного кабеля SATA (желательно с защелками);
- Возможный разгон шины PCI/PCI-E компьютера (сброс на заводские установки);
- Обновление BIOS материнской платы;
- Плохой контакт на разъеме жесткого диска или материнской платы (очистка контактов от окисления с помощью спирта или ластика);
- Переключение SATA кабеля на другой разъем;
- Нестабильное питание жесткого диска (замена блока питания);
- Перегрев южного моста материнской платы (замена термопасты);
- Деградация чипсета материнской платы;
- Несовместимость чипсета и контроллера жесткого диска;
- Смена режима работы контроллера (установка перемычек на жестком диске и переключение в режим SATA I)
- Обновление драйверов чипсета материнской платы
(C7) Ultra DMA CRC Error Count — содержит количество ошибок, возникших по передаче по интерфейсному кабелю в режиме Ultra DMA (или его эмуляции винчестерами SATA) от материнской платы или дискретного контроллера контроллеру диска.
Счётчик каждый раз увеличивался, когда я начинал на него записывать крупные массивы данных. Но самое интересное, что на этом компьютере у меня стоит второй жесткий диск — Western Digital Green 2Tb и когда я начинаю на него сбрасывать огромные файлы — никаких ошибок нет! Я решил поставить свой старый жесткий диск Hitachi с теми же кабелями и в тот же разъем, где были проблемы у Seagate — никаких ошибок нет.
Дальше я начал проверять все методом исключения и первое что я сделал – проверил Seagate на другом компьютере. О Чудо. Ни одной ошибки при записи! Значит, проблема с материнской платой и она все-таки деградировала за время работы?
Пока решил не делать поспешных выводов, а вытянуть материнскую плату из корпуса и хорошо все просмотреть. Внешний осмотр ничего не дал, никаких изменений я не заметил в плане вздувшихся конденсаторов или механических повреждений. Решил не отчаиваться, а попробовать прозвонить конденсаторы прибором, который я купил для ремонтов БП:
Прибор позволяет проверять электролитические конденсаторы на синусоидальном переменном токе без выпаивания из схемы. Это экономит уйму времени при ремонтах.
И мне повезло. Я нашел два конденсатора 1000mkF x 10v в районе чипсета, которые показывали обрыв. Стоят они в фильтрах стабилизаторов питания 5V. Поставил новые конденсаторы, подключил жесткий диск к материнской плате и попробовал запись на диск. Счетчик ошибок замер на значении 1340 и больше не увеличивался при любой нагрузке.
Можно сделать вывод, что по линии 5V шли сильные искажения питания, которые не давали нормально работать паре южный мост – контроллер винчестера. В свою очередь котроллер Seagate оказался очень чувствителен к таким искажениям и не мог правильно сравнивать контрольные суммы. Это привело к увеличению счетчика Ultra DMA CRC Error Count.
Если вы уже все испробовали не сдавайтесь, возможно у вас на материнской плате найдется тоже конденсатор подлежащий замене.
Источник
How to Fix ‘Interface CRC Error Count’ inside HD Tune
Some Windows users are reporting that they always end up seeing a warning (Ultra DMA CRC Error Count) when analyzing their HDD using the HD Tune utility. While some affected users are seeing this with used hard drivers, others are reporting this issue with brand new HDDs.
 Interface CRC Error Count inside HD Tune
What is Ultra DMA CRC Error Count?
This is a S.M.A.R.T. (Self-Monitoring, Analysis, and Reporting Technology) parameter that indicates the total quantity of CRC errors during UltraDMA mode. The raw value of this attribute indicates the number of errors found during data transfer in UltraDMA mode by ICRC (Interface CRC).
But keep in mind that this parameter is considered informational by most hardware vendors. Although the degradation of this parameter can be regarded as an indicator of an aging drive with potential electromechanical problems, it does NOT directly indicate imminent driver failure.
To get the complete picture of the health of your HDD, you need to pay attention to other parameters and the overall drive health.
After investigating this issue thoroughly, it turns out that there are several different underlying causes that might end up produce this particular error code:
- Generic False Positive – Keep in mind that a warning thrown around by the HD Tune utility does not necessarily mean that your HDD is failing. This utility uses generic aggregated from every manufacturer, so concerning data from one manufacturer might not be concerning for another. To get a more accurate result, you will need to run the brand-specific diagnostic tool and see if the same kind of warning occurs.
- Incompatibility between Samsung SSD and SATA Controller – If you’re encountering this issue with an SSD, chances are it’s due to a conflict between your solid-state drive and the Microsoft or AMD SATA controller driver. To fix this incompatibility, you’ll need to use Registry Editor to disable NCQ (Native Command Queue).
- Faulty SATA Cable or SATA port – As it turns out, you can also expect to encounter this type of issue if you’re dealing with a faulty SATA port or a non-congruent SATA cable. In this case, you can identify the culprit by testing the HDD on a different machine and replacing the current SATA cable.
- Failing HDD or SSD – Under certain circumstances, you can expect to see this error warning in the early stages of a failing drive. In this case, the only thing you can do is back up your data before the drive breaks up for good and start looking for a replacement.
Now that you know the very potential scenario that might cause this error code, here’s a list of methods that will help you identify and resolve the Ultra DMA CRC Error Count error:
Method 1: Running the brand-specific diagnostic tool
Keep in mind that the HD Tune Utility is a 3rd party tool that will ‘judge’ the heath of an HDD solely by comparing them against a set of generic values.
Because of this, it’s highly recommended to avoid making a decision based on HD Tune Utility alone and instead run the brand-specific diagnostic tool – The official testing tools are specifically designed for their brand products.
Depending on your HDD manufacturer, install and scan your hard drive with the proprietary diagnostic utility. To make matters easier for you, we’ve made a list of the most popular brand-specific diagnostic tools:
Note: If your HDD manufacturer is not included in the list above, search online for specific steps on your brand-specific diagnostic tool, then install and run it to see if the Ultra DMA CRC Error Count is still off.
If the manufacturer-specific diagnostic tool doesn’t raise any concerns in relation to the value of Ultra DMA CRC Error Count, then you can safely ignore the warning thrown by HD Tune.
However, if the warning is also displayed in the manufacturer-specific analysis tool, move down to the next potential fix below.
Method 2: Fix the Incompatibility between Samsung SSD and SATA Controller (if applicable)
As it turns out, the Ultra DMA CRC Error Count error is not restricted to an HDD and can also occur if you’re using an SSD.
But if you’re seeing this error with a Samsung SSD, there’s a high chance that the issue has nothing to do with a bad cable or solid-state health – It’s most likely due to an incompatibility between your Samsung SSD and your chipset Sata controller.
If you find yourself in this particular scenario, you can fix the issue and prevent this warning from appearing by disabling NCQ (Native Command Queue) in your SATA driver.
Note: This will not affect the functionality of your SATA drive.
If this scenario is applicable, the instructions below to fix the incompatibility between your Samsung SSD and the Sata Controller:
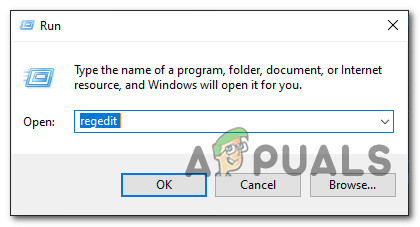
- Press Windows key + R to open up a Run dialog box. Next, inside the text box, type ‘regedit’, then press Ctrl + Shift + Enter to open up the Registry Editor with admin access. When you’re prompted by the UAC (User Account Control), click Yes to grant administrative access.
 Opening Regedit
 - Once you’re inside the Registry Editor, use the left-hand menu to navigate to the following locations, depending on if you’re using a Microsoft SATA Controller driver or a AMD SATA Controller driver:
Note: You can either navigate here manually or you can paste the location directly into the navigation bar
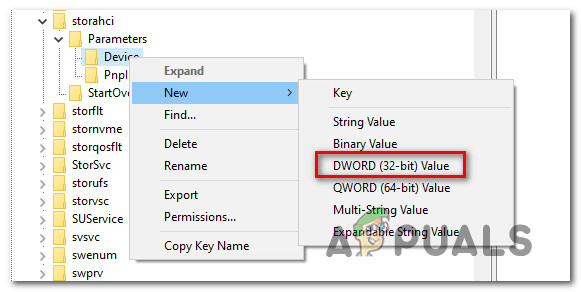 Creating a new Dword value inside the Device menu
If the same issue is still occurring even after following the instructions above or this scenario was not applicable, move down to the next potential fix below.
Method 3: Replace the power and SATA cable
As several affected users have confirmed, this particular issue can also be associated with a faulty SATA cable or a faulty SATA port. Because of this, the Ultra DMA CRC Error Count error can also be a symptom of a non-congruent cable.
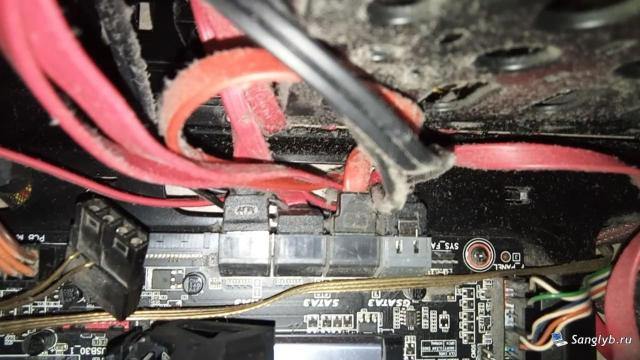
To test this theory, you can connect your HDD to a different computer (or at least use a different SATA port + cable) if you don’t have a second machine to do some testing on.
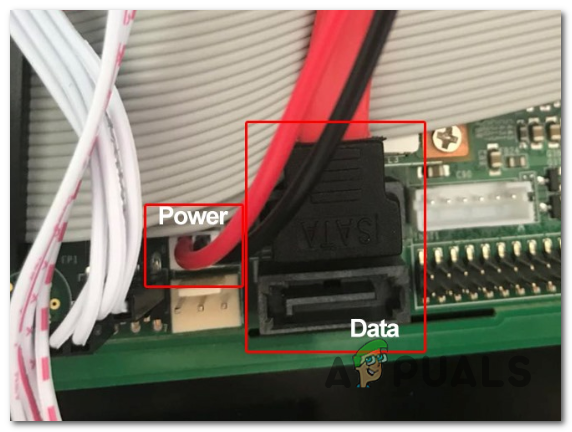 Example of a SATA Port on the motherboard
After you replaced the SATA port, repeat the scan inside HD Tune utility and see if the Ultra DMA CRC Error Count error is still occurring – If the issue has stopped occurring, consider taking your motherboard to an IT technician to investigate for loose pins.
On the other hand, if the issue doesn’t occur while you use a different SATA cable, you’ve just managed to identify your culprit.
In case you’ve eliminated both the SATA cable and the SATA port from the list of culprits, move down to the next potential fix below as the issue is definitely occurring due to a failing drive.
Method 4: Backup your HDD data
If you’ve previously made sure that you were right to concern yourself with the Ultra DMA CRC Error Count error, the first thing you should do is backup your data to ensure that you’re not losing anything in case the drive goes bad.
If you’re looking to back up your HDD data while you figure out which replacement to get, keep in mind that you have two ways forward – You can either backup your HDD using the built-in feature or you can use a 3rd party utility.
A. Backing up the files on your HDD via Command Prompt
If you’re comfortable with using an elevated CMD terminal, you can create a backup and save it on external storage without the need to install a 3rd party software.
But keep in mind that depending on your preferred approach, you might need to insert or plugin-compatible installation media.
If you’re comfortable with this approach, here are the instructions for backup your files from an Elevated Command prompt.
B. Backing up the files on your HDD via an Imaging 3rd party software
On the other hand, if you’re comfortable with trusting a 3rd party utility with your HDD backup, you’ll have a lot of extra features that are simply not available when creating a regular backup via Command Prompt.
You can use a 3rd party backup software to either clone or create an image of your HDD and save it externally or on the cloud. Here’s a list of the best cloning & imaging software that you should consider using.
Method 5: Send your HDD for replacement or order a replacement
If you’ve made sure that the Ultra DMA CRC Error Count warning you’re seeing is genuine and you have successfully backed up your HDD data in advance, the only thing you can do right now is to look for a replacement.
Of course, if your HDD is still protected by the warranty, you should send it in for repair right away.
But if the warranty has expired or you have the option to return it still, our recommendation is to stay away from the legacy HDD (Hard Disk Drive) and go for SSD (Solid State Drive) instead.
Although SSD is still more expensive than traditional HDD, there are much less prone to break and the speed is incomparable in favor of SSD (10x more writing and reading speeds).
If you’re in the market for an SSD, here’s our advanced guide to buying the best solid-state drive for your needs.
Источник
by Milan Stanojevic
Milan has been enthusiastic about technology ever since his childhood days, and this led him to take interest in all PC-related technologies. He’s a PC enthusiast and he… read more
Updated on May 26, 2022
- Driver verifier DMA violation error can be serious and cause instability issues and crashes.
- In most cases, these issues are caused by outdated or corrupted drivers, so be sure to update or reinstall them.
- Another cause for this problem can be your SSD firmware or BIOS, so you might need to update both.
- In case you’re getting a Driver verifier DMA violation error on your HP or Dell computer, make sure that your hardware is working properly.
XINSTALL BY CLICKING THE DOWNLOAD FILE
This software will keep your drivers up and running, thus keeping you safe from common computer errors and hardware failure. Check all your drivers now in 3 easy steps:
- Download DriverFix (verified download file).
- Click Start Scan to find all problematic drivers.
- Click Update Drivers to get new versions and avoid system malfunctionings.
- DriverFix has been downloaded by 0 readers this month.
BSoD errors are one of the most serious errors that you can encounter, and it’s common for these errors to crash Windows 10 and restart your PC in order to prevent damage.
These types of errors can be serious, therefore today we’re going to show you how to fix DRIVER VERIFIER DMA VIOLATION error.
What’s the cause for Driver Verifier Dma Violation error?
This issue is similar to Driver Verifier Detected Violation, and it’s caused by your drivers, so updating them would be the best thing to do if you want to fix the issue.
Driver Violation error can also appear if you install new drivers, so sometimes you need to roll back to the older version, or even use the default drivers.
Driver Verifier Iomanager Violation and similar errors can be caused by your hardware, therefore we suggest that you check your hardware and ensure that it’s working properly.
How can I fix DRIVER VERIFIER DMA VIOLATION BSoD error?
- Update your drivers
- Run the Hardware Troubleshooter
- Run the SFC scan
- Run DISM
- Update your SSD firmware
- Update your BIOS
- Perform System Restore
- Reset Windows 10
- Check for faulty hardware
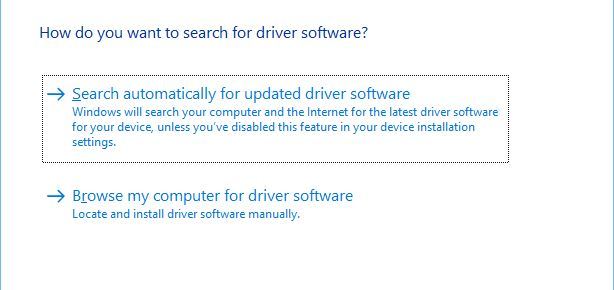
1. Update your drivers
- Press Windows Key + X on your keyboard to open Power User Menu and choose Device Manager from the list.
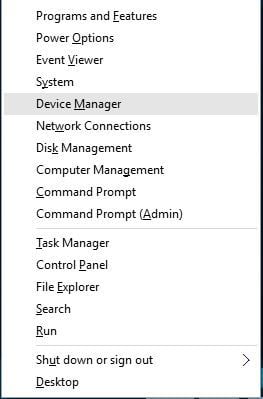
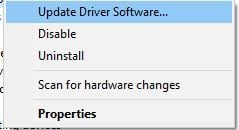
- When Device Manager opens, locate the driver you wish to update, right-click it and choose Update Driver Software.
- Select Search automatically for updated driver software. Windows 10 will now download and install the best driver for your PC.
Every PC requires drivers in order to work properly with hardware, and if your drivers are outdated or just not compatible with Windows 10, you’ll probably Driver verifier DMAerror.
Many users tend to download their drivers manually since Device Manager doesn’t always download the latest drivers.
To download drivers manually you just need to visit your hardware manufacturer’s website and download the latest drivers for your device.
However, there’s a faster and better way to update your drivers. With third-party driver updater software, you can automatically update your drivers easily and safe.
Various errors are the result of a malfunctioning driver. When this is the case, you may need to update or reinstall completely this specific component. As the process is not straight-forward to complete, we recommend using an automated tool for the job. Here’s how to do it:
- Download and install DriverFix.
- Launch the app.
- Wait for the software to detect all your faulty drivers.
- You will now be presented with a list of all the drivers that have issues, and you just need to select the ones you’d liked fixed.
- Wait for DriverFix to download and install the newest drivers.
- Restart your PC for the changes to take effect.

DriverFix
Keep your Windows safe from any type of errors caused by corrupted drivers, by installing and using DriverFix today!
Disclaimer: this program needs to be upgraded from the free version in order to perform some specific actions.
2. Run the SFC scan
- Right-click on the Start Menu button, and open Command Prompt (Admin).
- Enter the following line and press Enter:
sfc/scannow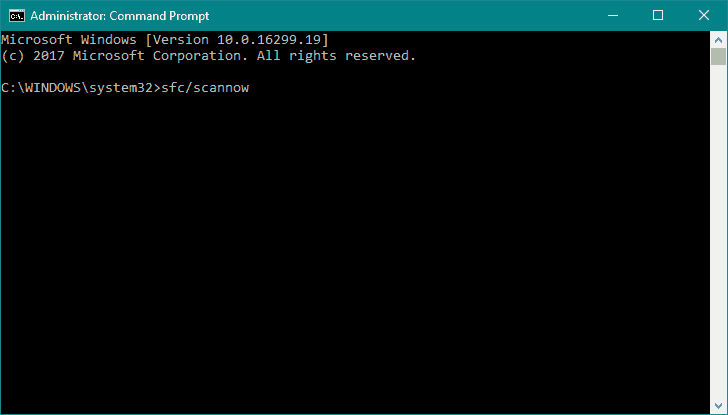
- Wait until the process is done (it may take a while).
- If the solution is found, it will automatically be applied.
- Now, close the Command Prompt and restart your computer.
If Windows 10’s troubleshooter didn’t get the job done, let’s try another one. The SFC scan is a command-line tool that scans the system and searches for potential issues.
So, it can be useful when dealing with the DRIVER VERIFIER DMA VIOLATION error.
3. Run DISM
- Right-click Start and open Command Prompt (Admin).
- Paste the following command and press Enter:
DISM /Online /Cleanup-Image /RestoreHealth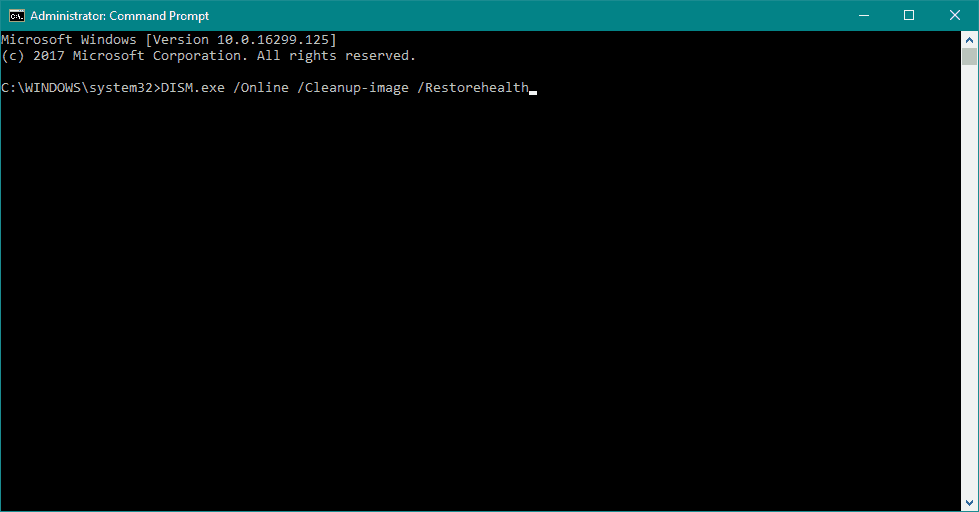
- Wait until the scan is finished.
- Restart your computer and try updating again.
And the third troubleshooter we’re going to use is DISM. This tool is perhaps the most powerful out of three, as it reloads the Windows 10 system image.
- With the Windows installation media
- Insert your Windows installation media.
- Right-click the Start menu and, from the menu, choose the Command Prompt (Admin).
- In the command line, type the following commands and press Enter after each:
dism /online /cleanup-image /scanhealth
dism /online /cleanup-image /restorehealth - Now, type the following command and press Enter:
DISM /Online /Cleanup-Image /RestoreHealth /source:WIM:X:SourcesInstall.wim:1 /LimitAccess - Make sure to change an X value with the letter of the mounted drive with Windows 10 installation.
- After the procedure is finished, restart your computer.
4. Update your SSD firmware
If you have Windows 10 installed on your SSD, we suggest that you update your SSD firmware.
Outdated firmware can sometimes cause DRIVER VERIFIER DMA error and other BSoD errors, so be sure that you update it.
Some PC issues are hard to tackle, especially when it comes to corrupted repositories or missing Windows files. If you are having troubles fixing an error, your system may be partially broken.
We recommend installing Restoro, a tool that will scan your machine and identify what the fault is.
Click here to download and start repairing.
We have to mention that updating SSD firmware is a somewhat risky procedure, and if you don’t perform it properly you can cause permanent damage to your SSD and lose all your files, so be extra careful if you decide to update your SSD firmware.
5. Update your BIOS
Sometimes outdated BIOS can cause Blue Screen of Death errors to appear, and if your BIOS is outdated we advise that you upgrade it to a newer version.
Upgrading BIOS brings new features and allows your motherboard to work with different hardware, but bear in mind that BIOS update is an advanced procedure, therefore be extra careful if you decide to do it because you can cause irreversible damage to your motherboard.
Before you decide to update your BIOS, be sure to check your motherboard manual for detailed instructions.
6. Run the Hardware Troubleshooter
- Open the Settings app and go to Update & Security section.
- Select Troubleshoot from the menu on the left.
- Select BSOD from the right pane and click Run the troubleshooter.
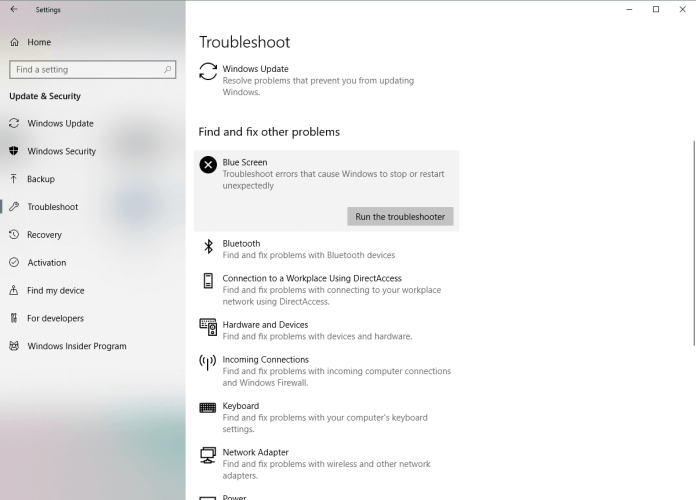
- Follow the instructions on the screen to complete the troubleshooter.
Note: This solution works only if you have a Windows 10 version 1806 or earlier version. After that, the BSoD troubleshooter was removed.
If updating your drivers didn’t resolve the issue, let’s try with Windows 10’s own troubleshooting tools. The first tool we’re going to use is the unified troubleshooter from the Settings page.
This tool can resolve various kinds of issues, including the Windows stop code Driver verifier DMA violation error.
- FIX: DPC Watchdog Violation BSOD error in Windows 10
- FIX: CRITICAL_STRUCTURE_CORRUPTION in Windows 10/11
- Fix: Critical Error Start Menu Isn’t Working on a Windows PC
- Windows Update Error 0x80070424: 7 Simple Solutions to Apply
- Esent Error [Event ID 455] On Windows: Quick Fix
- The Windows Cryptographic Service Provider Reported An Error
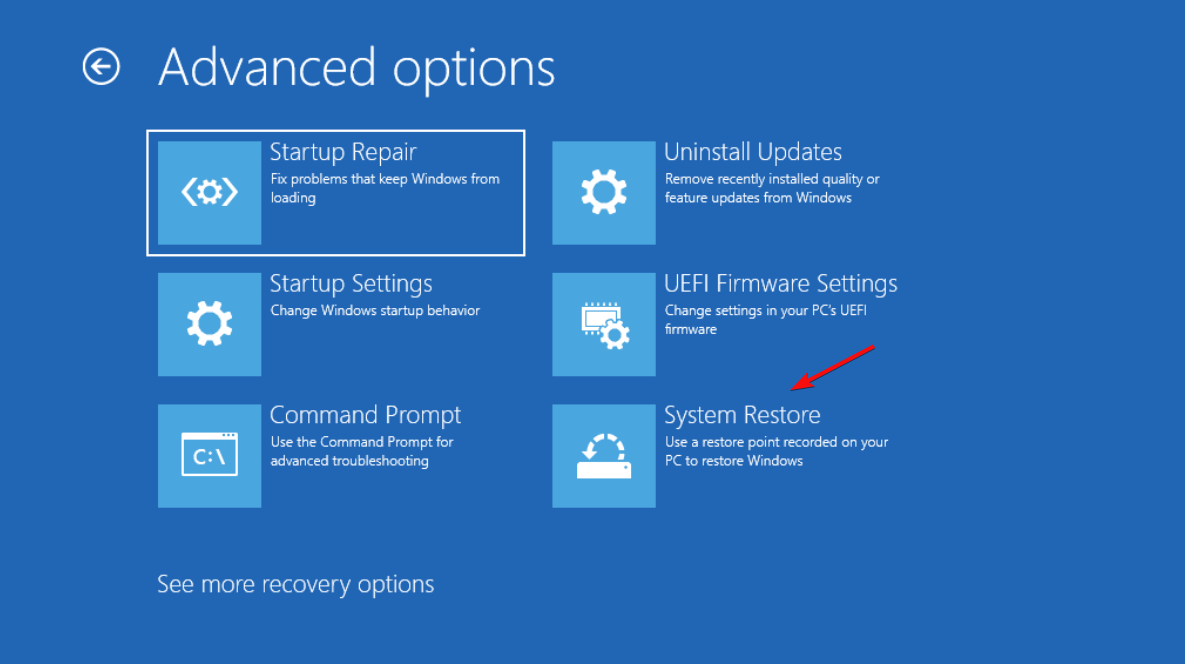
7. Perform System Restore
- Restart your computer few times during the boot sequence to start Automatic Repair.
- Select Troubleshoot and go to Advanced options. Now select System Restore.
- Select your username and enter your password.
- Select Choose a different restore point and click Next.
- Choose a restore point you wish to return to and click Next.
- Wait for the process to finish.
Windows stop code DRIVER VERIFIER DMA VIOLATION can be caused by certain third-party software, but you can easily fix it by performing a System Restore.
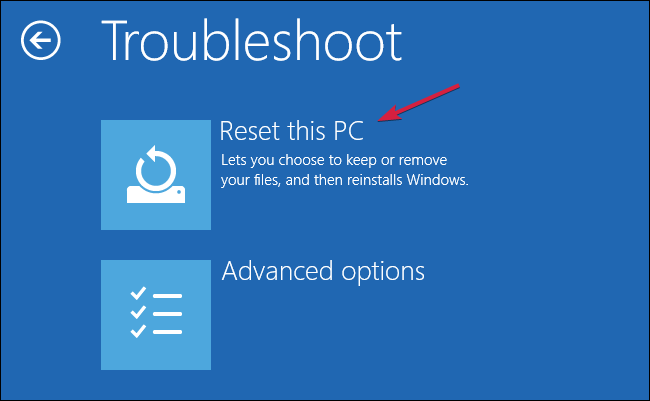
8. Reset Windows 10
- Start Automatic Repair by restarting your computer a few times during the boot.
- Choose Troubleshoot and select Reset this PC. Go to Remove everything. You might get asked to insert Windows 10 installation media, so be sure to have a bootable USB flash drive ready.
- Select Only the drive where Windows is installed and select Just remove my files and click the Reset button.
- Follow the instructions on the screen and complete the reset.
If System Restore didn’t fix the problem, you might have to perform Windows 10 reset.
Before you start resetting your PC, we strongly suggest that you create a backup for your important files since this procedure will delete all files from your C partition.
You might also need a bootable USB flash drive with Windows 10 in order to complete this step, so be sure to create one. To perform Windows 10 reset, do the following:
9. Check for faulty hardware
Hardware issues are a common cause for BSoD errors, therefore we strongly advise you to check if your hardware is working properly.
Several users reported that DRIVER VERIFIER DMA VIOLATION error was fixed after replacing the faulty RAM, so be sure to check your RAM first.
If RAM is not the problem, check if all other hardware components are working properly.
Blue Screen of Death errors such as DRIVER VERIFIER DMA VIOLATION can create many problems, but you can easily fix this error by using one of our solutions.
Still having issues? Fix them with this tool:
SPONSORED
If the advices above haven’t solved your issue, your PC may experience deeper Windows problems. We recommend downloading this PC Repair tool (rated Great on TrustPilot.com) to easily address them. After installation, simply click the Start Scan button and then press on Repair All.
![]()
Newsletter
by Milan Stanojevic
Milan has been enthusiastic about technology ever since his childhood days, and this led him to take interest in all PC-related technologies. He’s a PC enthusiast and he… read more
Updated on May 26, 2022
- Driver verifier DMA violation error can be serious and cause instability issues and crashes.
- In most cases, these issues are caused by outdated or corrupted drivers, so be sure to update or reinstall them.
- Another cause for this problem can be your SSD firmware or BIOS, so you might need to update both.
- In case you’re getting a Driver verifier DMA violation error on your HP or Dell computer, make sure that your hardware is working properly.
XINSTALL BY CLICKING THE DOWNLOAD FILE
This software will keep your drivers up and running, thus keeping you safe from common computer errors and hardware failure. Check all your drivers now in 3 easy steps:
- Download DriverFix (verified download file).
- Click Start Scan to find all problematic drivers.
- Click Update Drivers to get new versions and avoid system malfunctionings.
- DriverFix has been downloaded by 0 readers this month.
BSoD errors are one of the most serious errors that you can encounter, and it’s common for these errors to crash Windows 10 and restart your PC in order to prevent damage.
These types of errors can be serious, therefore today we’re going to show you how to fix DRIVER VERIFIER DMA VIOLATION error.
What’s the cause for Driver Verifier Dma Violation error?
This issue is similar to Driver Verifier Detected Violation, and it’s caused by your drivers, so updating them would be the best thing to do if you want to fix the issue.
Driver Violation error can also appear if you install new drivers, so sometimes you need to roll back to the older version, or even use the default drivers.
Driver Verifier Iomanager Violation and similar errors can be caused by your hardware, therefore we suggest that you check your hardware and ensure that it’s working properly.
How can I fix DRIVER VERIFIER DMA VIOLATION BSoD error?
- Update your drivers
- Run the Hardware Troubleshooter
- Run the SFC scan
- Run DISM
- Update your SSD firmware
- Update your BIOS
- Perform System Restore
- Reset Windows 10
- Check for faulty hardware
1. Update your drivers
- Press Windows Key + X on your keyboard to open Power User Menu and choose Device Manager from the list.
- When Device Manager opens, locate the driver you wish to update, right-click it and choose Update Driver Software.
- Select Search automatically for updated driver software. Windows 10 will now download and install the best driver for your PC.
Every PC requires drivers in order to work properly with hardware, and if your drivers are outdated or just not compatible with Windows 10, you’ll probably Driver verifier DMAerror.
Many users tend to download their drivers manually since Device Manager doesn’t always download the latest drivers.
To download drivers manually you just need to visit your hardware manufacturer’s website and download the latest drivers for your device.
However, there’s a faster and better way to update your drivers. With third-party driver updater software, you can automatically update your drivers easily and safe.
Various errors are the result of a malfunctioning driver. When this is the case, you may need to update or reinstall completely this specific component. As the process is not straight-forward to complete, we recommend using an automated tool for the job. Here’s how to do it:
- Download and install DriverFix.
- Launch the app.
- Wait for the software to detect all your faulty drivers.
- You will now be presented with a list of all the drivers that have issues, and you just need to select the ones you’d liked fixed.
- Wait for DriverFix to download and install the newest drivers.
- Restart your PC for the changes to take effect.
DriverFix
Keep your Windows safe from any type of errors caused by corrupted drivers, by installing and using DriverFix today!
Disclaimer: this program needs to be upgraded from the free version in order to perform some specific actions.
2. Run the SFC scan
- Right-click on the Start Menu button, and open Command Prompt (Admin).
- Enter the following line and press Enter:
sfc/scannow - Wait until the process is done (it may take a while).
- If the solution is found, it will automatically be applied.
- Now, close the Command Prompt and restart your computer.
If Windows 10’s troubleshooter didn’t get the job done, let’s try another one. The SFC scan is a command-line tool that scans the system and searches for potential issues.
So, it can be useful when dealing with the DRIVER VERIFIER DMA VIOLATION error.
3. Run DISM
- Right-click Start and open Command Prompt (Admin).
- Paste the following command and press Enter:
DISM /Online /Cleanup-Image /RestoreHealth - Wait until the scan is finished.
- Restart your computer and try updating again.
And the third troubleshooter we’re going to use is DISM. This tool is perhaps the most powerful out of three, as it reloads the Windows 10 system image.
- With the Windows installation media
- Insert your Windows installation media.
- Right-click the Start menu and, from the menu, choose the Command Prompt (Admin).
- In the command line, type the following commands and press Enter after each:
dism /online /cleanup-image /scanhealth
dism /online /cleanup-image /restorehealth - Now, type the following command and press Enter:
DISM /Online /Cleanup-Image /RestoreHealth /source:WIM:X:SourcesInstall.wim:1 /LimitAccess - Make sure to change an X value with the letter of the mounted drive with Windows 10 installation.
- After the procedure is finished, restart your computer.
4. Update your SSD firmware
If you have Windows 10 installed on your SSD, we suggest that you update your SSD firmware.
Outdated firmware can sometimes cause DRIVER VERIFIER DMA error and other BSoD errors, so be sure that you update it.
Some PC issues are hard to tackle, especially when it comes to corrupted repositories or missing Windows files. If you are having troubles fixing an error, your system may be partially broken.
We recommend installing Restoro, a tool that will scan your machine and identify what the fault is.
Click here to download and start repairing.
We have to mention that updating SSD firmware is a somewhat risky procedure, and if you don’t perform it properly you can cause permanent damage to your SSD and lose all your files, so be extra careful if you decide to update your SSD firmware.
5. Update your BIOS
Sometimes outdated BIOS can cause Blue Screen of Death errors to appear, and if your BIOS is outdated we advise that you upgrade it to a newer version.
Upgrading BIOS brings new features and allows your motherboard to work with different hardware, but bear in mind that BIOS update is an advanced procedure, therefore be extra careful if you decide to do it because you can cause irreversible damage to your motherboard.
Before you decide to update your BIOS, be sure to check your motherboard manual for detailed instructions.
6. Run the Hardware Troubleshooter
- Open the Settings app and go to Update & Security section.
- Select Troubleshoot from the menu on the left.
- Select BSOD from the right pane and click Run the troubleshooter.
- Follow the instructions on the screen to complete the troubleshooter.
Note: This solution works only if you have a Windows 10 version 1806 or earlier version. After that, the BSoD troubleshooter was removed.
If updating your drivers didn’t resolve the issue, let’s try with Windows 10’s own troubleshooting tools. The first tool we’re going to use is the unified troubleshooter from the Settings page.
This tool can resolve various kinds of issues, including the Windows stop code Driver verifier DMA violation error.
- FIX: DPC Watchdog Violation BSOD error in Windows 10
- FIX: CRITICAL_STRUCTURE_CORRUPTION in Windows 10/11
- Fix: Critical Error Start Menu Isn’t Working on a Windows PC
- Windows Update Error 0x80070424: 7 Simple Solutions to Apply
- Esent Error [Event ID 455] On Windows: Quick Fix
7. Perform System Restore
- Restart your computer few times during the boot sequence to start Automatic Repair.
- Select Troubleshoot and go to Advanced options. Now select System Restore.
- Select your username and enter your password.
- Select Choose a different restore point and click Next.
- Choose a restore point you wish to return to and click Next.
- Wait for the process to finish.
Windows stop code DRIVER VERIFIER DMA VIOLATION can be caused by certain third-party software, but you can easily fix it by performing a System Restore.
8. Reset Windows 10
- Start Automatic Repair by restarting your computer a few times during the boot.
- Choose Troubleshoot and select Reset this PC. Go to Remove everything. You might get asked to insert Windows 10 installation media, so be sure to have a bootable USB flash drive ready.
- Select Only the drive where Windows is installed and select Just remove my files and click the Reset button.
- Follow the instructions on the screen and complete the reset.
If System Restore didn’t fix the problem, you might have to perform Windows 10 reset.
Before you start resetting your PC, we strongly suggest that you create a backup for your important files since this procedure will delete all files from your C partition.
You might also need a bootable USB flash drive with Windows 10 in order to complete this step, so be sure to create one. To perform Windows 10 reset, do the following:
9. Check for faulty hardware
Hardware issues are a common cause for BSoD errors, therefore we strongly advise you to check if your hardware is working properly.
Several users reported that DRIVER VERIFIER DMA VIOLATION error was fixed after replacing the faulty RAM, so be sure to check your RAM first.
If RAM is not the problem, check if all other hardware components are working properly.
Blue Screen of Death errors such as DRIVER VERIFIER DMA VIOLATION can create many problems, but you can easily fix this error by using one of our solutions.
Still having issues? Fix them with this tool:
SPONSORED
If the advices above haven’t solved your issue, your PC may experience deeper Windows problems. We recommend downloading this PC Repair tool (rated Great on TrustPilot.com) to easily address them. After installation, simply click the Start Scan button and then press on Repair All.
![]()
Newsletter
Skip to content
- ТВикинариум
- Форум
- Поддержка
- PRO
- Войти
Ошибки передачи данных через DMA

Цитата: Александр от 19.01.2023, 12:12Всем привет 🖐
Из сети вычитал, что этот [simple_tooltip content=’199 (С7) UltraDMA CRC Error Count’]атрибут[/simple_tooltip] указывает на ошибки передачи данных по кабелю от платы к диску.
Так вот, при чтении SMART [simple_tooltip content=’WD Red Plus WD20EFRX’]жёсткого диска[/simple_tooltip] этот показатель со временем у меня растёт.
Значит ли это, что у меня имеются проблемы с SATA кабелем и его желательно заменить? Или можно не беспокоится по этому поводу и пользоваться дальше, не думая об этом?
Пробовал его перетыкать, и на вид с ним проблем нет, но меня настораживает этот момент.
Всем привет 🖐
Из сети вычитал, что этот атрибут указывает на ошибки передачи данных по кабелю от платы к диску.
Так вот, при чтении SMART жёсткого диска этот показатель со временем у меня растёт.
Значит ли это, что у меня имеются проблемы с SATA кабелем и его желательно заменить? Или можно не беспокоится по этому поводу и пользоваться дальше, не думая об этом?
Пробовал его перетыкать, и на вид с ним проблем нет, но меня настораживает этот момент.

Цитата: Mikhail от 19.01.2023, 12:25Добрый🖐.
Желательно осмотреть накопитель на предмет окисления и т.д., сменить провод и понаблюдать, так как смарт не очищается, просто наблюдай за ростом того что зафиксировано, растет, значит плохо, не исключены конечно глюки т.д.
Добрый🖐.
Желательно осмотреть накопитель на предмет окисления и т.д., сменить провод и понаблюдать, так как смарт не очищается, просто наблюдай за ростом того что зафиксировано, растет, значит плохо, не исключены конечно глюки т.д.

Цитата: 𝐓𝐇𝐎𝐑𝐭𝐢𝐤 от 20.01.2023, 02:47Привет. Да, это значение должно быть все время статичным, лучше заменить кабель (выбирай с защелками) и проследить, чтоб он в системнике ничем не задевался и ни во что не упирался, кабель не скручивай, не укладывай там какими-нибудь резинками/стяжками и т.д.
Привет. Да, это значение должно быть все время статичным, лучше заменить кабель (выбирай с защелками) и проследить, чтоб он в системнике ничем не задевался и ни во что не упирался, кабель не скручивай, не укладывай там какими-нибудь резинками/стяжками и т.д.
Цитата: Adler от 20.01.2023, 07:09Приветствую.
Не понимаю почему вообще возникает вопрос менять кабель или нет? Однозначно — МЕНЯТЬ. Это нужно первым делом делать при любых «непонятках» в работе дисков, особенно HDD. Это вообще расходный материал.
Еще стоит обратить внимание на разъем питания, т.к. сбои в питании так же могут приводить к ошибкам в передачи данных. Тоже если есть свободные другие можно не глядя переключить на другой. Ну или если он уже «улыбается» и других нет, то подключить через переходник Molex-Sata.
Еще желательно посмотреть на состояние контактов на плате электроники со стороны гермоблока (хотя на самом деле он не гермо-). Там они в зависимости от фирмы и модели HDD часто окисляются, что тоже может приводить к сбоям. Им можно почистить обычным канцелярским ластиком аля тёрка.
Приветствую.
Не понимаю почему вообще возникает вопрос менять кабель или нет? Однозначно — МЕНЯТЬ. Это нужно первым делом делать при любых «непонятках» в работе дисков, особенно HDD. Это вообще расходный материал.
Еще стоит обратить внимание на разъем питания, т.к. сбои в питании так же могут приводить к ошибкам в передачи данных. Тоже если есть свободные другие можно не глядя переключить на другой. Ну или если он уже «улыбается» и других нет, то подключить через переходник Molex-Sata.
Еще желательно посмотреть на состояние контактов на плате электроники со стороны гермоблока (хотя на самом деле он не гермо-). Там они в зависимости от фирмы и модели HDD часто окисляются, что тоже может приводить к сбоям. Им можно почистить обычным канцелярским ластиком аля тёрка.
Этот материал написан посетителем сайта, и за него начислено вознаграждение.
На моем десктопном компьютере установлен SSD Crucial MX-200 500Gb, на котором установлена операционная система и игры.
Где-то месяц назад игры стали ужасно лагать, зависали до 5 секунд, играть стало не возможно, компьютер иногда зависал намертво и сам перезапускался. Я начал искать причину, логично, что в первую очередь решил проверить состояние SSD Crucial MX-200 по его SMART.
рекомендации
RTX 3070 за копейки в Регарде — смотри
-50% на Xiaomi Redmi 10C 3/64Gb
MSI Ventus 4060 Ti на 5000р дешевле 3060 Ti
4080 Gigabyte Gaming — цена в рублях идет вниз
На порядок упала цена Samsung S22 Ultra
-200000 на DJ Mavic 3 в Ситилинке
iPhone 14 Pro Max — цена в рублях пошла вниз
-35% на 65″ TV Hisense 4K Ultra HD = 35 тр
— 60000р на iPad Pro 12.9 — смотри цену
13900K в Регарде дешевле чем при курсе 60
-30% от первоначальных цен 4060 Ti — пора брать
-19000р на MSI 4090 — цены в рублях идут вниз
— 18 000р на новейшую RTX 4060 Ti
RTX 3070 за 40 с началом = надо брать
И обнаружил, что атрибут SMART-a 199 UltraDMA CRC Error Count (количество ошибок, возникших во время передачи данных по кабелю от материнской платы до дискретного контроллера диска) буквально за два дня вырос более чем на 2000 ошибок.
Спустя два дня
Это вполне объясняло подобное поведение компьютера.
Естественно, что в первую очередь под подозрение попал кабель SATA, но нет, если бы это было так, то я не стал бы писать статью.
Были перепробованы все кабеля SATA которые у меня только есть, для проверки также поменян кабель SATA с HDD, который у меня стоит на компьютере в качестве хранилища, кстати на нем этот атрибут равен нулю, то есть не возникло ни одной ошибки. Переподключал кабель SATA в разные порты на материнской плате, но и это ничего не дало.
После этого SSD был установлен в ноутбук, где при тех же играх и нагрузке данный атрибут SMART-a не увеличился ни на единицу, и ноутбук работал отлично.
Контроллер материнской платы компьютера я тоже исключил, так как установив на HDD стоящий в компьютере операционную систему и игры, и погоняв его с теми же нагрузками, увидел, что атрибут UltraDMA CRC Error Count не увеличился, так и остался равным нулю.
Что же тогда еще остается?
Отступление:
При замене кабелей SATA на SSD, один кабель SATA я приобрел в магазине, на всякий случай, так как думать уже не знал на что. Когда я его покупал, оговорился о данной проблеме. И от продавцов узнал для себя удивительную вещь: они авторитетно заявили, что возможно у меня стоит кабель SATA 2 и не обеспечивает необходимую пропускную способность, и нужно купить у них кабель SATA 3, и даже показали кабель на котором стоит клеймо SATA 3 (может я этого не знаю). Я возразил, сказал, что такого быть не может, что у них у всех 7 pin , и одинаковые медные проводники, и электрический сигнал распространяется одинаково. пропускная способность зависит от контроллера материнской платы и от контролера жесткого диска, а не от 7 медных проводников, которыми они соединены. И на вопрос чем они физически отличаются, внятно объяснить мне не смогли.
Что думаете вы по этому поводу напишите в комментариях.
Но я все-таки купил у них этот кабель SATA 3. Ну как вы и подумали проблему это не решило.
Дальше я принялся ковырять блок питания. По замерам мультиметра, и по данным проги «AIDA» все напряжения были в норме. Но при измерении осциллографом пульсаций по питанию, в большей мере меня интересовало питание 5 В. которым питался SSD , было выявлено наличие провалов в осциллограмме с 5 до 4,5 В.
https://disk.yandex.ru/i/v3nlN_OmffD_hw
Расположение их по шкале времени имело случайный характер. Но казалось бы, и 4,5 В. достаточно, так как в SSD стоят свои преобразователи в более низкие напряжения. Но я все же в качестве диагностики попытался уменьшить эти пульсации и подключил прямо к разъему MOLEX к шине 5 в. электролитический конденсатор на 4000 мкФ.
И наконец это решило проблему, осциллограмма выровнялась, провалы пропали, атрибут 199 UltraDMA CRC Error Count больше не увеличивается, компьютер летает, игры не лагают. Теперь выберу время, разберу блок питания и займусь им.
Надеюсь, мой случай окажется вам интересен и полезен.
Этот материал написан посетителем сайта, и за него начислено вознаграждение.
Появляются ошибки DMA на новом и старом hdd wd blue на 1тб.
Менял sata провод, подозрения на материнку (Если такое вообще возможно)
мать Asus M2N-E SLI
-
Вопрос заданболее двух лет назад
-
466 просмотров
Пригласить эксперта
Так никто вас ничего не подскажет
Диагностика только заменой комплектующих
А как вы проверяете ошибки дма просто в марте смотрите?
Так если проблема в шлейфах то они в марте останутся, надо смотреть растут они или нет
Да, контроллер на материнке или отдельно может такие проблемы создавать
-
Показать ещё
Загружается…
Сбер
•
Ростов-на-Дону
от 170 000 ₽
25 июн. 2023, в 03:49
15000 руб./за проект
25 июн. 2023, в 03:19
4500 руб./за проект
25 июн. 2023, в 02:28
10000 руб./за проект
Минуточку внимания
Here how to fix the DRIVER VERIFIER DMA VIOLATION error
by Milan Stanojevic
Milan has been enthusiastic about technology ever since his childhood days, and this led him to take interest in all PC-related technologies. He’s a PC enthusiast and he… read more
Updated on May 17, 2023
Reviewed by
Alex Serban

After moving away from the corporate work-style, Alex has found rewards in a lifestyle of constant analysis, team coordination and pestering his colleagues. Holding an MCSA Windows Server… read more
- Driver verifier DMA violation error can be serious and cause instability issues and crashes.
- In most cases, these issues are caused by outdated or corrupted drivers, so be sure to update or reinstall them.
- Another cause for this problem can be your SSD firmware or BIOS, so you might need to update both.
- In case you’re getting a Driver verifier DMA violation error on your HP or Dell computer, make sure that your hardware is working properly.
XINSTALL BY CLICKING THE DOWNLOAD FILE
This software will simplify the process by both searching and updating your drivers to prevent various malfunctions and enhance your PC stability. Check all your drivers now in 3 easy steps:
- Download Outbyte Driver Updater.
- Launch it on your PC to find all the problematic drivers.
- Afterward, Click Update & Apply Selected to get the latest driver versions.
- OutByte Driver Updater has been downloaded by 0 readers this month.
BSoD errors are one of the most serious errors that you can encounter, and it’s common for these errors to crash Windows 10 & 11 and restart your PC to prevent damage.
These types of errors can be serious; therefore, today we’re going to show you how to fix DRIVER VERIFIER DMA VIOLATION error.
What causes the DRIVER VERIFIER DMA VIOLATION error?
There are many causes for the DRIVER DMA VIOLATION error, but we will highlight the most important here:
- Old or corrupt drivers – This issue is similar to Driver Verifier Detected Violation, and it’s caused by old or corrupt drivers, so updating them would be the best thing to do if you want to fix the issue.
- Incompatible driver – Driver Violation error can also appear if you install new drivers that are not compatible with your system. Consider rolling back to the older version, or using the default drivers.
- Hardware issues – Driver Verifier Iomanager Violation and similar errors can be caused by your hardware; therefore, we suggest that you check the components and ensure that they are working properly.
- Corrupted system files – If the system files are corrupted, this may trigger the blue screen DRIVER VERIFIER DMA VIOLATION.
Now that we know the reasons behind the DRIVER VERIFIER DMA VIOLATION stop code let’s apply the solutions below to fix it.
How do I fix the DRIVER VERIFIER DMA VIOLATION BSoD error?
- What causes the DRIVER VERIFIER DMA VIOLATION error?
- How do I fix the DRIVER VERIFIER DMA VIOLATION BSoD error?
- 1. Update your drivers
- 2. Run SFC and DISM scans
- 3. Update your SSD firmware
- 4. Update your BIOS
- 5. Perform System Restore
- 6. Reset Windows 10
- 7. Check for faulty hardware
- How do I fix the DRIVER VERIFIER DMA VIOLATION error on Windows 11?
1. Update your drivers
- Press Windows key + X on your keyboard to open the Power User menu and choose Device Manager from the list.
- When Device Manager opens, locate the driver you wish to update, right-click it and choose Update Driver Software.
- Select Search automatically for updated driver software. Windows 10 will now download and install the best driver for your PC.
Every PC requires drivers in order to work properly with hardware, and if your drivers are outdated or just not compatible with Windows 10, you’ll probably encounter the Driver Verifier DMA error.
Many users tend to download their drivers manually since Device Manager doesn’t always download the latest drivers.
However, there’s a faster and better way to update your drivers. With third-party driver updater software, you can automatically update your drivers easily and safely.
Sometimes, malfunctioning drivers can cause multiple system errors. If this happens to your PC, you may need to update or reinstall certain drivers entirely. As the process is not quite straightforward, we recommend using a reliable driver updater for the job.
Here’s how to do it:
- Download and install Outbyte Driver Updater.
- Launch the software.
- Wait for the app to detect all faulty drivers.
- Now, it will show you all the malfunctioning drivers listed to select the ones to Update or Ignore.
- Click on Update & Apply Selected to download and install the newest versions.
- Restart your PC to ensure the applied changes.

Outbyte Driver Updater
Secure your Windows PC with Outbyte from various errors caused by problematic drivers.
Disclaimer: this program needs to be upgraded from the free version in order to perform some specific actions.
2. Run SFC and DISM scans
- Click the Start button, type cmd, and select Run as administrator to open Command Prompt with full privileges.
- Enter the following line and press Enter:
sfc/scannow - Wait until the process is done, then type or paste the following command and press Enter to start a DISM scan:
DISM /Online /Cleanup-Image /RestoreHealth - If the solution is found, it will automatically be applied.
- Now, close the Command Prompt and restart your computer.
The System File Checker and DISM scans will help you fix all the problems with the system files and disk issues.
- Bugcheck 0x0000012B: How to Fix This BSoD
- Stop Error Code 0x0000008E: How to Fix it
- 0x000000ED BSOD: Unmountable Boot Volume [Error Fix]
3. Update your SSD firmware

NOTE
Updating SSD firmware can be risky, and if you don’t perform it properly you can cause permanent damage to your SSD and lose all your files, so be extra careful.
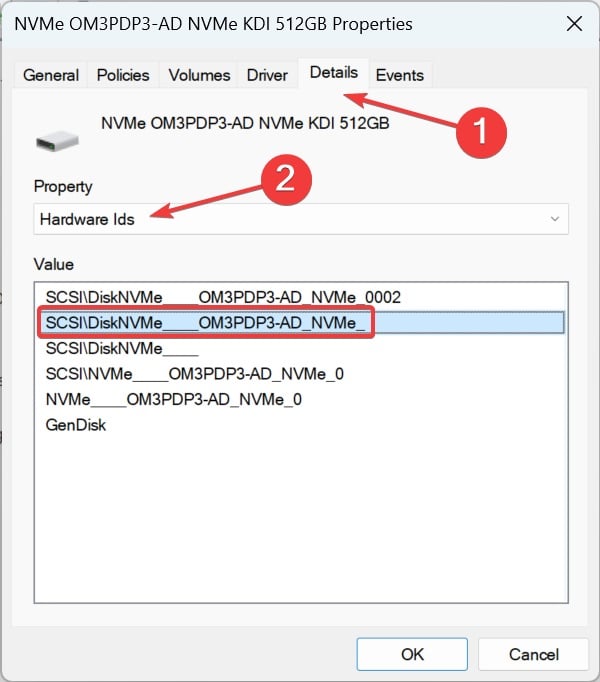
- Right-click the Start button and select Device Manager.
- Expand Disk drives, right-click on the SSD, and choose Properties.
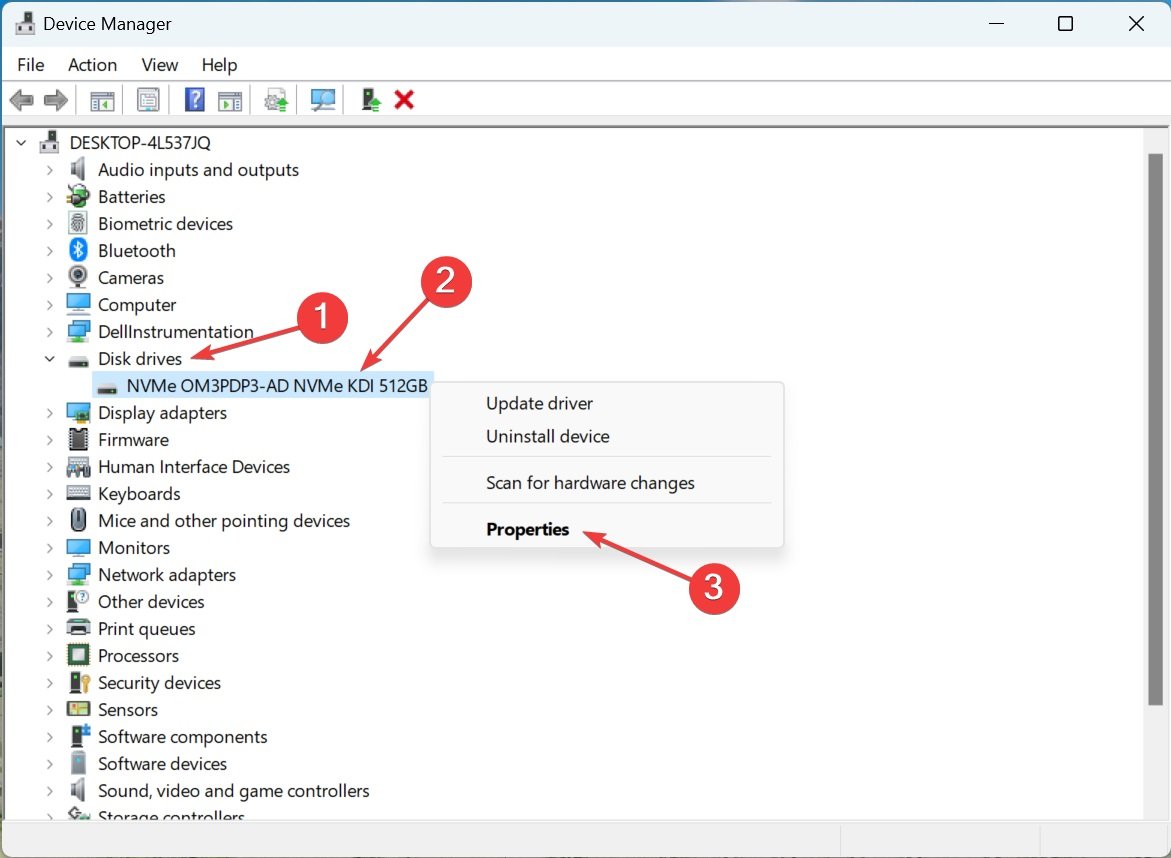
- Head to the Details tab, choose Hardware Ids from the dropdown menu, and note the one for the SSD.
- Now, search for the Hardware ID using Google or another search engine and open the firmware update webpage on the manufacturer’s website.
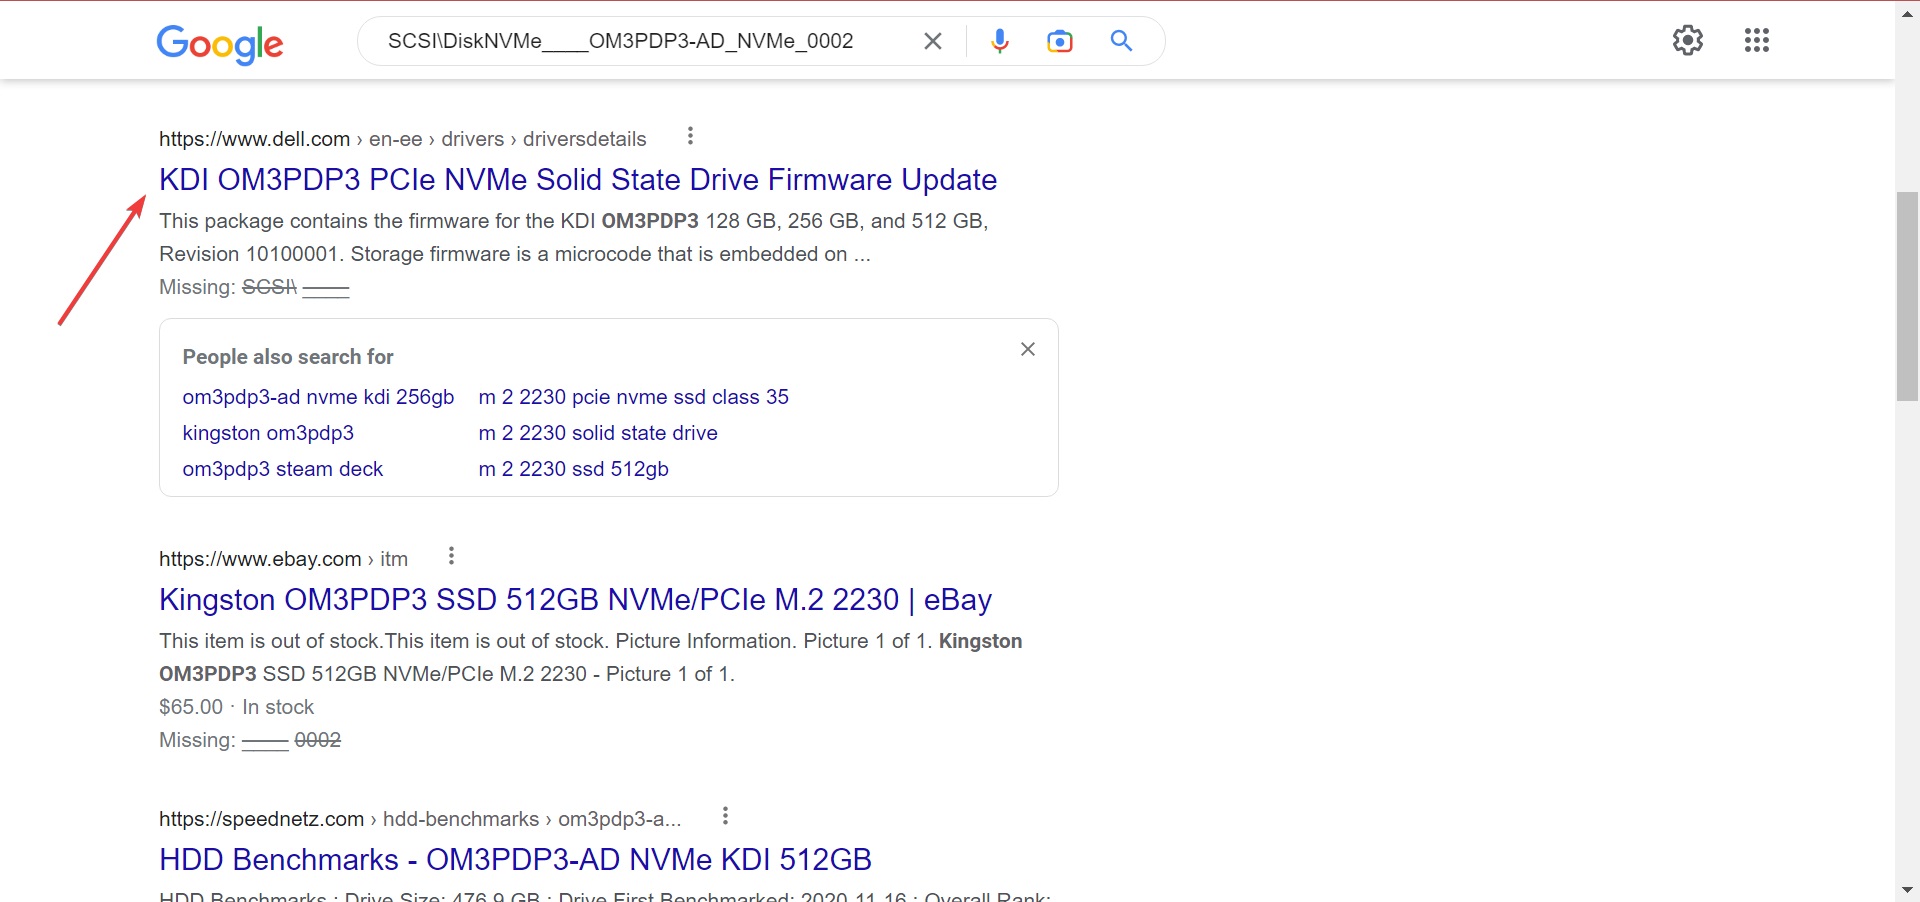
- Download the firmware and run the setup to complete the installation process. Since we are running a Dell computer, we went to its official website. In your case, it might be different depending on the manufacturer.
After downloading and installing the firmware update, check if it can fix the dead SSD. For many users, it did the trick, and we recommend you update the SSD firmware.
If you have Windows 10 installed on your SSD, we suggest that you update your SSD firmware.
Outdated firmware can sometimes cause DRIVER VERIFIER DMA errors and other BSoD errors, so be sure that you update it.
4. Update your BIOS
- Download the newest BIOS version from your motherboard manufacturer’s website and copy it onto a USB flash drive.
- Open the Start Menu and click the Power button.
- Hold the Shift key and choose the Restart option.
- You should see several options available. Choose Troubleshoot.

- Now select Advanced options and select UEFI Firmware Settings.
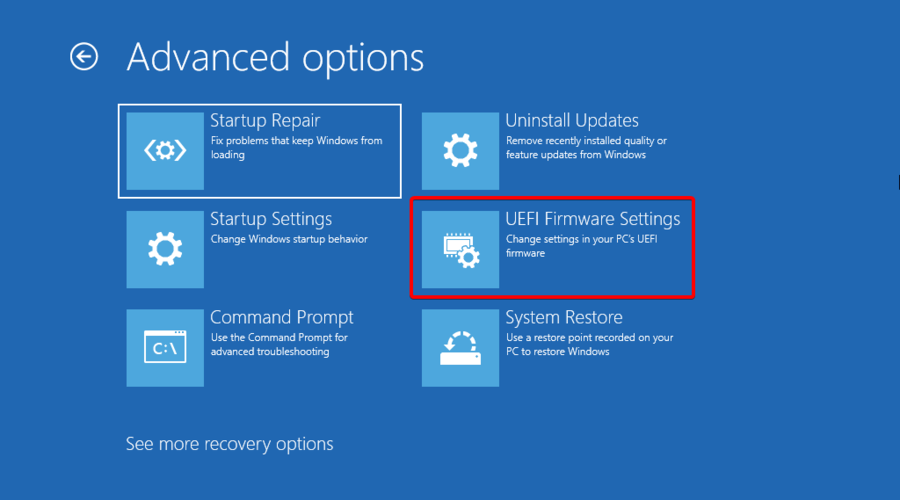
- Hit the Restart button and your computer will now boot to BIOS.
- Now, look for the BIOS update option and select it.
- Finally, choose the BIOS update file from your USB flash drive and wait while your BIOS updates.
Sometimes outdated BIOS can cause Blue Screen of Death errors to appear, and if your BIOS is outdated, we advise that you upgrade it to a newer version.
For more information, we also have a complete guide on how to update your BIOS on Windows 10.
5. Perform System Restore
- Restart your computer few times during the boot sequence to start Automatic Repair.
- Select Troubleshoot and go to Advanced options. Now select System Restore.
- Select your username and enter your password.
- Select Choose a different restore point and click Next.
- Choose a restore point you wish to return to and click Next.
- Wait for the process to finish.
Windows stop code DRIVER VERIFIER DMA VIOLATION can be caused by certain third-party software, but you can easily fix it by performing a System Restore.
6. Reset Windows 10
- Start Automatic Repair by restarting your computer a few times during the boot.
- Choose Troubleshoot and select Reset this PC.
- Go to Remove everything. You might get asked to insert Windows 10 installation media, so be sure to have a bootable USB flash drive ready.
- Select Only the drive where Windows is installed and select Just remove my files and click the Reset button.
- Follow the instructions on the screen and complete the reset.
If System Restore didn’t fix the problem, you might have to perform Windows 10 reset.
Before you start resetting your PC, we strongly suggest that you create a backup for your important files since this procedure will delete all files from your C partition.
You might also need a bootable USB flash drive with Windows 10 in order to complete this step, so be sure to create one. To perform Windows 10 reset, do the following:
7. Check for faulty hardware
Hardware issues are a common cause for BSoD errors. Therefore we strongly advise you to check if your hardware is working properly.
Several users reported that DRIVER VERIFIER DMA VIOLATION error was fixed after replacing the faulty RAM, so be sure to check your RAM first.
If RAM is not the problem, check if all other hardware components are working properly.
How do I fix the DRIVER VERIFIER DMA VIOLATION error on Windows 11?
Luckily, Windows 11 is not so different from the older version, so all the solutions from our guide also work on the new OS.
Blue Screen of Death errors such as DRIVER VERIFIER DMA VIOLATION can create many problems, but you can easily fix this error using one of our solutions.
Still experiencing troubles? Fix them with this tool:
SPONSORED
Some driver-related issues can be solved faster by using a tailored driver solution. If you’re still having problems with your drivers, simply install OutByte Driver Updater and get it up and running immediately. Thus, let it update all drivers and fix other PC issues in no time!
![]()