I no longer know what to do to be able to play the hevc files from my sony α7S III on my pc. Recorded in 4k 100fps.
Neither windows 10 with the hevc plugin nor premier pro can open them. I do not know what to do.
——————
System Information
——————
Time of this report: 12/10/2020, 17:14:25
Machine name: WIN10-PRO
Machine Id: {0DC2BCFC-DA1F-4B33-8348-902562963346}
Operating System: Windows 10 Pro 64-bit (10.0, Build 19042) (19041.vb_release.191206-1406)
Language: Spanish (Regional Setting: Spanish)
System Manufacturer: Gigabyte Technology Co., Ltd.
System Model: X58A-UD3R
BIOS: Award Modular BIOS v6.00PG (type: BIOS)
Processor: Intel(R) Core(TM) i7 CPU X 980 @ 3.33GHz (12 CPUs), ~3.3GHz
Memory: 24576MB RAM
Available OS Memory: 24574MB RAM
Page File: 6818MB used, 21724MB available
Windows Dir: C:Windows
DirectX Version: DirectX 12
DX Setup Parameters: Not found
User DPI Setting: 96 DPI (100 percent)
System DPI Setting: 96 DPI (100 percent)
DWM DPI Scaling: Disabled
Miracast: Available, with HDCP
Microsoft Graphics Hybrid: Not Supported
DirectX Database Version: 1.0.8
DxDiag Version: 10.00.19041.0546 64bit Unicode
—————
Display Devices
—————
Card name: NVIDIA GeForce GTX 1050 Ti
Manufacturer: NVIDIA
Chip type: GeForce GTX 1050 Ti
DAC type: Integrated RAMDAC
Device Type: Full Device (POST)
Device Key: EnumPCIVEN_10DE&DEV_1C82&SUBSYS_8C961462&REV_A1
Device Status: 0180200A [DN_DRIVER_LOADED|DN_STARTED|DN_DISABLEABLE|DN_NT_ENUMERATOR|DN_NT_DRIVER]
Device Problem Code: No Problem
Driver Problem Code: Unknown
Display Memory: 16305 MB
Dedicated Memory: 4018 MB
Shared Memory: 12287 MB
Current Mode: 1920 x 1200 (32 bit) (59Hz)
HDR Support: Not Supported
Display Topology: Extend
Display Color Space: DXGI_COLOR_SPACE_RGB_FULL_G22_NONE_P709
Color Primaries: Red(0.639648,0.331055), Green(0.314453,0.618164), Blue(0.152344,0.071289), White Point(0.313477,0.329102)
Display Luminance: Min Luminance = 0.500000, Max Luminance = 270.000000, MaxFullFrameLuminance = 270.000000
Monitor Name: Generic PnP Monitor
Monitor Model: EV2436W
Monitor Id: ENC2385
Native Mode: 1920 x 1200(p) (59.950Hz)
Output Type: DVI
Часть 2: Как преобразовать HEVC в формат, совместимый с Premiere Pro
Если вам по-прежнему не удается импортировать HEVC в Premiere Pro, вы можете преобразовать HEVC в совместимый формат. Конвертер WidsMob — это универсальный конвертер HEVC в нужный видеокодек, частоту кадров и многое другое. Это также позволяет вам масштабировать видео до 1080P или 4K. Кроме того, есть некоторые расширенные функции для редактирования видео, такие как обрезка, объединение и добавление водяных знаков.
- Конвертируйте HEVC в MPEG4, MKV и другие видео для Premiere Pro.
- Настройте частоту кадров, битрейт, частоту дискретизации, громкость звука и многое другое.
- Предоставьте возможность редактирования, вырежьте нужную часть и объедините видеоклипы.
- Увеличьте разрешение видео, удалите шумы и отрегулируйте контрастность и яркость.
Загрузка Windows
Mac Скачать
Шаг 1: После того, как вы установили программу на свой компьютер, вы можете перейти к Конвертировать меню и импортируйте файлы HEVC, щелкнув Добавить файл вариант или перетащите HEVC с iPhone в программу. После этого вы можете предварительно просмотреть видео в программе.

Шаг 2: Выберите MP4 H.264, AVI, MOV, MPEG-2 и другие совместимые видеоформаты из Профиль меню. Кроме того, вы можете выбрать Устройство возможность выбрать оптимальный файл MP4. Он также позволяет вам настроить частоту кадров, битрейт и другие параметры Premiere Pro.

Шаг 3: Он позволяет вырезать нужную часть из видео, объединять различные сегменты, добавлять водяные знаки в файлы HEVC, применять видео фильтры и даже добавлять титры к видео. Предварительно просмотрите отредактированное видео HEVC для Premiere Pro перед экспортом файла.

Шаг 4: Выберите папку назначения, нажав кнопку папки. После этого вы можете нажать на Конвертировать кнопку, чтобы экспортировать файл HEVC, совместимый с Adobe Premiere Pro. После преобразования файла вы можете импортировать видео в Premiere Pro для дальнейшего редактирования.

Загрузка Windows
Mac Скачать
Часть 3: 3 метода исправления HEVC, не работающего с Premiere Pro
Метод 1. Невозможно плавно отредактировать HEVC с помощью Premiere Pro.
Цель создания прокси-сервера — создать копию исходного видео с низким разрешением, которую впоследствии можно будет использовать в процессе редактирования. Это обеспечит более плавную процедуру редактирования Premiere Pro HEVC. Когда вы закончите редактирование и будете готовы к экспорту, просто замените прокси-файл исходным.
Шаг 1: Начните создание нового проекта, а затем выберите Настройки загрузки таб. Затем установите флажок «Вставить» и выберите Создать прокси вариант из раскрывающегося меню. После этого вы можете либо выбрать существующую настройку прокси-сервера, либо создать новую и установить место назначения прокси.

Шаг 2: Добавьте отснятый материал в формате HEVC в Медиа Браузер вариант, щелкнув Добавить кнопка. После этого Adobe Media Encoder сразу же приступит к созданию прокси-файла для вашего фильма. Этот процесс займет некоторое время, чтобы кодировать ваши видео HEVC в эквивалент с более низким разрешением.
Шаг 3: Перейдите к монитору программы и щелкните + кнопку в правом нижнем углу. Затем найдите и перетащите Переключить прокси в панель кнопок. Когда вы нажмете и выделите кнопку синим цветом, ваш проект начнет редактирование с использованием прокси-файла, а не исходного видео HEVC.

Шаг 4: После завершения изменения и готовности к экспорту вы должны вернуться к исходному файлу HEVC.
Метод 2. Зеленый экран для HEVC на исходном мониторе
Перед добавлением видео HEVC в эпизод в Premiere Pro вы можете просмотреть их в Исходный монитор опцию, установите точки редактирования и выделите другие критические кадры. Для облегчения редактирования основной клип можно разделить на неограниченное количество подклипов, каждый из которых имеет свой собственный In и Вне точки. Вы можете наблюдать за звуком как с комплексной формой волны и точно управлять им, используя дискретизированные данные.
В разделе Лента панели, вы можете добавлять клипы в эпизод, перетаскивая их туда или используя Вставить Или затирать в Исходный монитор меню. Вы можете автоматически расположить клипы в последовательности, соответствующей тому порядку, в котором они появляются в Проекты под застройку панели.

Метод 3. Видео в формате HEVC с различной частотой кадров
Некоторые видеоролики HEVC были сняты с переменной частотой кадров, что предотвращает их импорт в Premiere Pro или приводит к рассинхронизации видео и звука.
Хотя Premiere Pro CC 2018 и последующие версии будут включать Сохранить синхронизацию звука функция для решения этой проблемы, она не может учитывать все возможные версии программ, операционные системы и конфигурации оборудования, а H.265 часто плохо работает на большинстве ПК и устройств.
В результате идеальный подход — преобразовать записи VFR в видео с постоянной частотой кадров (CFR). Конечно, вы также можете выбрать Плеер HEVC или используйте WidsMob Converter для преобразования HEVC в Premiere Pro.


New Here
,
/t5/premiere-pro-discussions/premiere-pro-hevc-codec/td-p/9901422
Jun 12, 2018
Jun 12, 2018
Copy link to clipboard
Copied
Hi all,
When i launched the Premiere Pro, prompt that the file requires the HEVC codec, how to get this codec?
Please help
thanks
Feb
Community guidelines
Be kind and respectful, give credit to the original source of content, and search for duplicates before posting.
Learn more


5
Replies
5

Engaged
,
/t5/premiere-pro-discussions/premiere-pro-hevc-codec/m-p/9901423#M155324
Jun 12, 2018
Jun 12, 2018
Copy link to clipboard
Copied
I think you mean for a export.
Go over the ADOBE Media Encoder.
Greetings
Charles Waldorf
Community guidelines
Be kind and respectful, give credit to the original source of content, and search for duplicates before posting.
Learn more
New Here
,
/t5/premiere-pro-discussions/premiere-pro-hevc-codec/m-p/9901424#M155325
Jun 13, 2018
Jun 13, 2018
Copy link to clipboard
Copied
In Response To Waldorf & Statler
Hi Charles.
Then what’s next? i need to install first then ?
Please advise
thanks
Feb
Community guidelines
Be kind and respectful, give credit to the original source of content, and search for duplicates before posting.
Learn more
Engaged
,
/t5/premiere-pro-discussions/premiere-pro-hevc-codec/m-p/9901426#M155327
Jun 13, 2018
Jun 13, 2018
Copy link to clipboard
Copied
In Response To ms_f38429129
Yes File>Export>Media Encoder
And there you can change to HEVC Rendering
Greetings
Community guidelines
Be kind and respectful, give credit to the original source of content, and search for duplicates before posting.
Learn more

![]()
Community Expert
,
/t5/premiere-pro-discussions/premiere-pro-hevc-codec/m-p/9901425#M155326
Jun 13, 2018
Jun 13, 2018
Copy link to clipboard
Copied
Hello, could you clarify, is it when you open the file?
Media encoder is used to export a video, when you hit the «queue» button on File>Export>Media.
Community guidelines
Be kind and respectful, give credit to the original source of content, and search for duplicates before posting.
Learn more

LEGEND
,
/t5/premiere-pro-discussions/premiere-pro-hevc-codec/m-p/9901427#M155328
Jun 13, 2018
Jun 13, 2018
Copy link to clipboard
Copied
LATEST
That prompt also offers the option to install. Choose to do so.
Community guidelines
Be kind and respectful, give credit to the original source of content, and search for duplicates before posting.
Learn more
![]()
![]()
[Updated] This article is updated to introudce the other two possible solutions in details to help you fix the HEVC/H.265 video ‘Codec Missing or Unavailable’ on Premiere Pro 2020/2019/2018. Keep on reading to find detailed solutions.
H.265 will surely become the mainstream video codec soon. Nowadays H.265 is widely used to shoot 4K recordings by many professional cameras such as iPhone 8, DJI Phantom/Mavic drone, Canon XF 705, Samsung NX1, Sony PMW-F55, Panasonic Lumix DMC-GH4, BlackMagic Ursa, etc. Have some H.265 videos and want to edit them in Adobe Premiere but only found can’t work with H.265 file in Adobe Premiere Pro CS4/CS5/CS3/CS6/CC:
«I know that Premiere is h.265 compatible, but apparently not with DJIs version. It won’t import. Any work arounds?»
«I decided to give a trial a shot of adobe premiere pro, I have never used it before (coming from sony vegas). But it won’t import any of my h265 files that were recorded from my drone footage (DJI). These are the raw files from the drone, have not been transcoded or touched. When I try to import them it says «unsuported format or damaged file». I can import h264 recorded footage from the same drone without issue. Any ideas?»
It is officially stated that H.265 is supported by Adobe Premiere. Why so many people are encounter problems when working with H.265 files in Premiere Pro? Read on to find the reasons and the solutions.
- • Possible Reasons and Quick Fixes for H.265 Doesn’t work with Premiere Pro
- • Top 3 Practical Solutions to Fix the HEVC/H.265 video ‘Codec Missing or Unavailable’ on Premiere Pro
Possible Reasons and Quick Fixes for H.265 Doesn’t work with Premiere Pro
Note: If you’re using a trial version of Adobe Premiere Pro CC, it is no surprise that you see ‘codec missing or unavailable’ error. This is because trial version doesn’t recognize HEVC files. Only licensed Adobe Creative Cloud members can use HEVC codec. What’s more, the latest Premiere Pro 2020 is hard to read H.265/HEVC 10-bit Videos shot in Dlog-M according to a growing mass of user reports. This is actually a known issue caused by long-GOP codec. The common ways to fix it out is upgrading your PC/graphics card and transcoding the long-Gop souce video to lossless ProRes or CinForm.
1. Premiere Pro supports h.265 files but the P4P h.265 files are not recognized by any of the Adobe apps such as Premiere Pro CS5/CS4. Get the latest version of Adobe Premiere Pro CC.
2. Adobe is ALWAYS slow on this stuff. Lightroom won’t have the lens corrections in there for 2-3 months, also. You can try DaVinci Resolve.
3. What’s the format of your HEVC video, MOV format or MP4? The reports are only accepting MP4 not MOV formats. If you shot h.265 in MOV, you can go into the folder where your files are from and edit the name of the file by changing the extension from a .MOV file to a .MP4 extension and accept the change of extension and then drag and drop into Premiere.
4. When you first try to import HEVC video to Premiere Pro, you need to install the HEVC codec, and by clicking «Ok», it will do it automatically and then import the video just fine.
5. You can solve the issue by converting h265 from P4P to Prorres HQ with DJI TRANSCODING TOOLS. https://dl.djicdn.com/downloads/inspire_1/DJI_Transcoding_Tool_v0.9.2.dmg
6. As stated above, use .mp4 and have an updated version of Premiere. If you have the CC license, it should be up to date already. Older CS versions don’t support H.265. Keep in mind that 4K H.265 footage requires a ridiculous amount of processing power if you want to edit it in its original format, so you might want to create proxies of the clips before you start editing. Unless you have a very high-end PC.
7. Adobe first started support HEVC in CC2015 so any earlier versions don’t have the codec. When you first try and import a H265 file a message should appear telling you that you need to license the codec . The license is part of Premiere Pro CC but not automatically turned on for every user unless they use it. WHY? there is actually a license fee that Adobe manage for you and it gets activated with your first Import or Export. You need to be connected to the internet for the first time you use it and once you do that you don’t need to be connected to license again unless you re-install or there is a major update. Adobe is always «tweaking» playback with CPU/GPU support. H265 playback is decent in Premiere Pro CC 2017. Lots of people use it as a .265 player — BUT, Encoding takes a longtime.
Top 3 Practical Solutions to Fix the HEVC/H.265 video ‘Codec Missing or Unavailable’ in Premiere
Transcode HEVC/H.265 to Premiere supported MOV H264, MP4, ProRes…
— 100% Working Solution to Fix Can’t Import 4K HEVC/H.265 footage into Premiere Pro
HEVC is a non-performant format that is difficult to edit with and requires much computing power to process. So, it isn’t a bad idea to convert HEVC to a lossless codec like ProRes or a more popular format like H.264 MP4. To do this, you can turn to the easy-to-use yet powerful video encoder and decoder — EaseFab Video Converter (available for both Windows and Mac users). Apart from changing file format, VideoProc can also convert your VFR videos to constant frame rate. This converter works fast while keeping high quality. Free download and install EaseFab Video Converter and you’ll be able to convert HEVC to Adobe Premiere Pro accepted format with constant framerate in 3 simple steps.
EaseFab Video Converter — The One-click Way to Convert HEVC to Adobe Premiere Pro Supported Format.
• Accept HEVC videos from GoPro, DJI, iPhone, Canon camera, etc.
• Output media in file formats natively supported by Adobe Premiere Pro.
• Convert video in 3 simple steps. GPU Hardware acceleration makes it super fast.
• Easy editing experience: cut, crop, merge, add effects…
Tutorial: How to Decode HEVC/H.265 to Premiere Supported Codec/Format?
The below guide takes Video Converter for Windows screenshots for example.
Step 1. Download and launch EaseFab Video Converter on Windows PC or Mac. Click Add Video to import target HEVC files. Dragging and droppping works too. (Note: batch conversion is supported, so you can several mov videos to the program to convert at a time.)
Step 2. Click the Profile bar at the bottom. Choose a format preset that Premiere Pro can support. And MOV (encoded by H264) from Editing Software category is recommended since the output MOV H.264 files can preserve image quality with the smallest file size. You can also choose MPEG-2 or WMV as the output file.
If you want to preserve the highest image quality, you can also select Final Cut Pro (Apple ProRes 422 encoded MOV file) as the output. The Apple ProRes files can make your editing process simpler and less resource-intensive but it typically need ten times as much storage.
Editor’s Note: H.264 is really optimized to be a delivery codec while ProRes is optimized to be an editing codec. That said, if you just need to do a simple edit and your computer has the power to edit H.264 you can get away with it no problem, but if you plan to do a heavy edit with lots of transitions and effects and color grading you will be best served by ProRes.
Step 3. Hit Convert and it will begin fast video decoding, conversion and processing your HEVC/H.265 video files at one go.
After the conversion is complete, get the resulted files via clicking the Open button and then you can import the result files to Adobe Premiere Pro CC 2020 or lower version without any trouble.
Download and install HEVC codec for Adobe Premiere Pro
Step 1. Open Adobe Premiere Pro and enter your license.
Step 2. Import your HEVC-encoded video into Adobe Premiere Pro, and then you may receive a prompt as shown in the picture. (Some users might not get this message.)

Step 3. Click OK to perform HEVC codec installing.
Step 4. Restart your computer.
Once done, Adobe Premiere Pro should be able to import your HEVC footage without popping up codec missing error. However, not everyone can install HEVC codec successfully.
«Yeah I got that popup and pressed OK, but I got some error. It says ‘The importer reported a generic error’.»
«So I clicked OK and got a message saying the codec was missing.»
And, the import error may still persist even if you have managed to install HEVC codec. What’s more, installing new codec may cause new problems. It may lead to codec conflict and failure of reading some files.
Upgrade your Adobe Premiere Pro
Adobe Premiere Pro extends the support for HEVC files with the release of Adobe Premiere Pro CC 2015.1, but doesn’t support QuickTime (MOV) wrapped HEVC files until the arrival of Adobe Premiere Pro CC 2018 (12.0.1). Therefore, if you need to import HEVC files in MOV format, may be from your iPhone, into Adobe Premiere Pro, make sure you’re using version 12.0.1 or later. Below are the steps to upgrade Premiere Pro to the latest version.
Step 1. Save your work and close your Adobe apps, or you will receive a warning to close.
Step 2. Open Adobe Creative Cloud desktop app, click Apps tab, and then you will see those installed Adobe apps including Adobe Premiere Pro CC. When there’re available update versions, you’ll see Update buttons next to the apps.
Step 3. Click Update next to Adobe Premiere Pro CC. If you want to update all apps, you should click Update All.
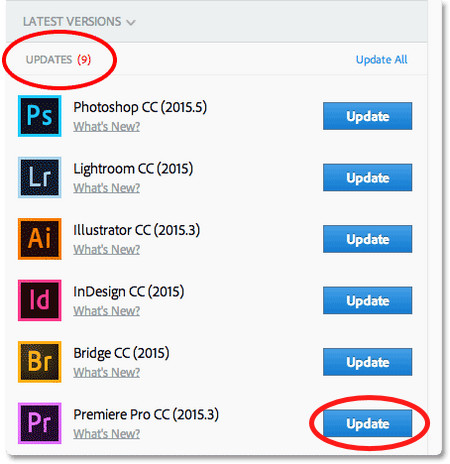
Step 4. Set Advanced Options.
▪ Select or deselect Import previous settings and preferences. If this option is checked, settings and preferences of your previous version will be moved to the new version.
▪ Select or deselect Remove old versions. If this option is checked, your previous version will be removed.
Step 5. After finishing all settings, click Update to start upgrading Premiere Pro CC to the most recent version.
If you fail to update Adobe Premiere Pro CC, see if the solutions to troubleshoot Creative Cloud download and install issues can help you.
 (99 votes, average: 5.00 out of 5)
![]() Loading…
Loading…
Still having trouble working with HEVC files in Premiere after installing the HEVC codec? Your source HEVC video probably has a .mov wrapper. Actually, it’s an known issue that even the most recent Adobe Premiere Pro CC doesn’t support HEVC media in an MOV container. In this article, we explain a workaround to get Premiere recognizing HEVC MOV files correctly.
Adobe Premiere Pro CC now features support for HEVC (also known as H.265) files. To use this feature, you need to install HEVC codec for Premiere on your system. When you import HEVC footage into Premiere Pro (for instance, the Mac version), a Window will pop up asking you to install HEVC codec: “HEVC Codec must be installed to use this feature. Click OK to install now.” All you need to do is clicking “OK” and the HEVC H.265 codec will be installed immediately. Very simple and direct.

Mac based Adobe Premiere when first time importing HEVC video

Windows based Adobe Premiere when first time importing HEVC video
Adobe Premiere will handle most HEVC content after installing HEVC codec as it requires, but not for all cases. For example, it has issues dealing with HEVC .mov recordings taken with Apple iOS 11 devices. Let’s see a user problems below:
1. Premiere has HEVC codec installed, but still won’t import iPhone HEVC clips
“Hey all, I’m starting a project in Premiere Pro CC 2017. I can import Samsung NX1 4K H.265 footage into it without a glitch, but I have no luck to load HEVC clips taken with my iPhone 8. I’ve already installed HEVC codec for Premiere as required. What am I missing? Can anyone help please? I would really appreciate any help. Thanks.”
2.Can’t import HEVC-videos to Premiere Pro (2018)
Hi!
Is it just me that can’t import videos from my iPhone to Premiere Pro CC (2018)? It probably has something to do with the new codec in IOS11 (HEVC).
“Code missing or unavailable”.
Note: 2018.08.05 Test Adobe Premiere Pro CC 2018(12.1.2) Support HEVC Videos, The problem still exists.
How to install or update HEVC codec on Windows? You can check out the latest videos, but I hope you also know the following official customer service instructions.

Premiere Pro CC supports HEVC H.265 media with resolutions up to 8192×4320. Unfortunately this is not the case with the HEVC MOV video from the iPhone 8 and other Apple devices running iOS 11. Users who load Apple HEVC MOV clips to Premiere must take steps to convert them to ProRes (Mac) or DNxHD (Windows) format before start editing. Here’s a way to do this.
Part 1: How to transcode HEVC H.265 files for use in Adobe Premiere on Mac?
Part 2: How to transcode HEVC H.265 files for use in Adobe Premiere on Windows?
Video Converter (It is available for Mac and Windows, simply download the proper version depending on your computer’s OS.)

Part 1: How to transcode HEVC H.265 files for use in Adobe Premiere on Mac?
Step 1: Import HEVC files
Start up Video Converter for Mac and click “Add File” to load HEVC H.265 videos that you need to convert into this program. This converter supports batch conversion, so you can import a bundle of HEVC files into it to do conversion at a time.

Step 2: Click “Profile” to select output format
For Mac based Premiere, we would recommend choosing “Final Cut Pro” > “Apple ProRes 422 (*.mov)” as output format. The ProRes 422 codec will ensure a good balance between file size and file quality.

Tips:
1. This converter only outputs Apple ProRes files up to 1080p. If your source HEVC video is 4K and you want to keep its original quality, you can select “4K Video” > “4K H.264/MPEG-4 AVC Video (*.mp4)” as target format for use in Premiere. To select 4K H.264 as output, please make sure your computer has enough power to handle 4K H.264.

2. If necessary, you can click “Settings” button to modify video and audio parameters like encoder, resolution, frame rate, bitrate, aspect ratio, sample rate, and audio channels. You can also “Enable 3D Settings” to add 3D effect to your source media.

Step 3: Start file conversion
Click “Convert” to start transcoding HEVC H.265 media for Premiere on Mac. As soon as the conversion is complete, click “Open Folder” to get the generated files for editing in Premiere Pro on your Mac with optimum performance.
Part 2: How to transcode HEVC H.265 files for use in Adobe Premiere on Windows?
Step 1: Import HEVC files
Start up Video Converter for Windows and click “Add File” to load HEVC H.265 videos that you need to convert into this program. This converter supports batch conversion, so you can import a bundle of HEVC files into it to do conversion at a time.

Step 2: Click “Profile” to select output format
For Windows based Premiere, we would recommend choosing “Avid Media Composer” > “Avid DNxHD 1080p(*.mov)” as output format.

Tips:
1. This converter only outputs DNxHD files up to 1080p. If your source HEVC video is 4K and you want to keep its original quality, you can select “4K Video” > “4K H.264/MPEG-4 AVC Video (*.mp4)” as target format for use in Premiere. To select 4K H.264 as output, please make sure your computer has enough power to handle 4K H.264.

2. If necessary, you can click “Settings” button to modify video and audio parameters like encoder, resolution, frame rate, bitrate, aspect ratio, sample rate, and audio channels. You can also “Enable 3D Settings” to add 3D effect to your source media.

Step 3: Start file conversion
Click “Convert” to start transcoding HEVC H.265 media for Premiere on Windows. As soon as the conversion is complete, click “Open Folder” to get the generated files for editing in Premiere Pro on your Windows PC with optimum performance.
That’s all. Hope this post will help those who are having issues working with HEVC footage in Adobe Premiere even with HEVC codec installed.
Also read
Edit iPad Pro HEVC videos in FCP X
Premiere Pro CC cannot output to HEVC H.265
How can I export ProRes video from Photoshop CC?
GoPro Hero 6 HEVC H.265 and Adobe Premiere workflow
Часть 2: Как преобразовать HEVC в формат, совместимый с Premiere Pro
Если вам по-прежнему не удается импортировать HEVC в Premiere Pro, вы можете преобразовать HEVC в совместимый формат. Конвертер WidsMob — это универсальный конвертер HEVC в нужный видеокодек, частоту кадров и многое другое. Это также позволяет вам масштабировать видео до 1080P или 4K. Кроме того, есть некоторые расширенные функции для редактирования видео, такие как обрезка, объединение и добавление водяных знаков.
- Конвертируйте HEVC в MPEG4, MKV и другие видео для Premiere Pro.
- Настройте частоту кадров, битрейт, частоту дискретизации, громкость звука и многое другое.
- Предоставьте возможность редактирования, вырежьте нужную часть и объедините видеоклипы.
- Увеличьте разрешение видео, удалите шумы и отрегулируйте контрастность и яркость.
Загрузка Windows Mac Скачать
Шаг 1: После того, как вы установили программу на свой компьютер, вы можете перейти к Конвертировать меню и импортируйте файлы HEVC, щелкнув Добавить файл вариант или перетащите HEVC с iPhone в программу. После этого вы можете предварительно просмотреть видео в программе.
Шаг 2: Выберите MP4 H.264, AVI, MOV, MPEG-2 и другие совместимые видеоформаты из Профиль меню. Кроме того, вы можете выбрать Устройство возможность выбрать оптимальный файл MP4. Он также позволяет вам настроить частоту кадров, битрейт и другие параметры Premiere Pro.
Шаг 3: Он позволяет вырезать нужную часть из видео, объединять различные сегменты, добавлять водяные знаки в файлы HEVC, применять видео фильтры и даже добавлять титры к видео. Предварительно просмотрите отредактированное видео HEVC для Premiere Pro перед экспортом файла.
Шаг 4: Выберите папку назначения, нажав кнопку папки. После этого вы можете нажать на Конвертировать кнопку, чтобы экспортировать файл HEVC, совместимый с Adobe Premiere Pro. После преобразования файла вы можете импортировать видео в Premiere Pro для дальнейшего редактирования.
Загрузка Windows Mac Скачать
Часть 3: 3 метода исправления HEVC, не работающего с Premiere Pro
Метод 1. Невозможно плавно отредактировать HEVC с помощью Premiere Pro.
Цель создания прокси-сервера — создать копию исходного видео с низким разрешением, которую впоследствии можно будет использовать в процессе редактирования. Это обеспечит более плавную процедуру редактирования Premiere Pro HEVC. Когда вы закончите редактирование и будете готовы к экспорту, просто замените прокси-файл исходным.
Шаг 1: Начните создание нового проекта, а затем выберите Настройки загрузки таб. Затем установите флажок «Вставить» и выберите Создать прокси вариант из раскрывающегося меню. После этого вы можете либо выбрать существующую настройку прокси-сервера, либо создать новую и установить место назначения прокси.
Шаг 2: Добавьте отснятый материал в формате HEVC в Медиа Браузер вариант, щелкнув Добавить кнопка. После этого Adobe Media Encoder сразу же приступит к созданию прокси-файла для вашего фильма. Этот процесс займет некоторое время, чтобы кодировать ваши видео HEVC в эквивалент с более низким разрешением.
Шаг 3: Перейдите к монитору программы и щелкните + кнопку в правом нижнем углу. Затем найдите и перетащите Переключить прокси в панель кнопок. Когда вы нажмете и выделите кнопку синим цветом, ваш проект начнет редактирование с использованием прокси-файла, а не исходного видео HEVC.
Шаг 4: После завершения изменения и готовности к экспорту вы должны вернуться к исходному файлу HEVC.
Метод 2. Зеленый экран для HEVC на исходном мониторе
Перед добавлением видео HEVC в эпизод в Premiere Pro вы можете просмотреть их в Исходный монитор опцию, установите точки редактирования и выделите другие критические кадры. Для облегчения редактирования основной клип можно разделить на неограниченное количество подклипов, каждый из которых имеет свой собственный In и Вне точки. Вы можете наблюдать за звуком как с комплексной формой волны и точно управлять им, используя дискретизированные данные.
В разделе Лента панели, вы можете добавлять клипы в эпизод, перетаскивая их туда или используя Вставить Или затирать в Исходный монитор меню. Вы можете автоматически расположить клипы в последовательности, соответствующей тому порядку, в котором они появляются в Проекты под застройку панели.
Метод 3. Видео в формате HEVC с различной частотой кадров
Некоторые видеоролики HEVC были сняты с переменной частотой кадров, что предотвращает их импорт в Premiere Pro или приводит к рассинхронизации видео и звука.
Хотя Premiere Pro CC 2018 и последующие версии будут включать Сохранить синхронизацию звука функция для решения этой проблемы, она не может учитывать все возможные версии программ, операционные системы и конфигурации оборудования, а H.265 часто плохо работает на большинстве ПК и устройств.
В результате идеальный подход — преобразовать записи VFR в видео с постоянной частотой кадров (CFR). Конечно, вы также можете выбрать Плеер HEVC или используйте WidsMob Converter для преобразования HEVC в Premiere Pro.
Hello,
I have the same problem with importing a video file from my DJI Mavic Pro 2 into PP cc2020 version 14.3.1 build 45 Windows 10 PRO version 1909.
One file (dji_0033.mp4 ) created in standard mode, will import in PP without problems

The file dji_0045, gives an error during import ( the importer reported a generic error); the main difference : this file was created in DLOG-M mode.


I have tried every guideline found in this forum (disabled accelerated encoding, cleared cache, moved file to another directory), it does not import. Next I tried the same imports in PP CC 2018, no problem at all with both and many other H.265 files even in DLOG-M.
Thanks for you help
Jos
[Updated] This article is updated to introudce the other two possible solutions in details to help you fix the HEVC/H.265 video ‘Codec Missing or Unavailable’ on Premiere Pro 2020/2019/2018. Keep on reading to find detailed solutions.
H.265 will surely become the mainstream video codec soon. Nowadays H.265 is widely used to shoot 4K recordings by many professional cameras such as iPhone 8, DJI Phantom/Mavic drone, Canon XF 705, Samsung NX1, Sony PMW-F55, Panasonic Lumix DMC-GH4, BlackMagic Ursa, etc. Have some H.265 videos and want to edit them in Adobe Premiere but only found can’t work with H.265 file in Adobe Premiere Pro CS4/CS5/CS3/CS6/CC:
«I know that Premiere is h.265 compatible, but apparently not with DJIs version. It won’t import. Any work arounds?»
«I decided to give a trial a shot of adobe premiere pro, I have never used it before (coming from sony vegas). But it won’t import any of my h265 files that were recorded from my drone footage (DJI). These are the raw files from the drone, have not been transcoded or touched. When I try to import them it says «unsuported format or damaged file». I can import h264 recorded footage from the same drone without issue. Any ideas?»
It is officially stated that H.265 is supported by Adobe Premiere. Why so many people are encounter problems when working with H.265 files in Premiere Pro? Read on to find the reasons and the solutions.
- • Possible Reasons and Quick Fixes for H.265 Doesn’t work with Premiere Pro
- • Top 3 Practical Solutions to Fix the HEVC/H.265 video ‘Codec Missing or Unavailable’ on Premiere Pro
Possible Reasons and Quick Fixes for H.265 Doesn’t work with Premiere Pro
Note: If you’re using a trial version of Adobe Premiere Pro CC, it is no surprise that you see ‘codec missing or unavailable’ error. This is because trial version doesn’t recognize HEVC files. Only licensed Adobe Creative Cloud members can use HEVC codec. What’s more, the latest Premiere Pro 2020 is hard to read H.265/HEVC 10-bit Videos shot in Dlog-M according to a growing mass of user reports. This is actually a known issue caused by long-GOP codec. The common ways to fix it out is upgrading your PC/graphics card and transcoding the long-Gop souce video to lossless ProRes or CinForm.
1. Premiere Pro supports h.265 files but the P4P h.265 files are not recognized by any of the Adobe apps such as Premiere Pro CS5/CS4. Get the latest version of Adobe Premiere Pro CC.
2. Adobe is ALWAYS slow on this stuff. Lightroom won’t have the lens corrections in there for 2-3 months, also. You can try DaVinci Resolve.
3. What’s the format of your HEVC video, MOV format or MP4? The reports are only accepting MP4 not MOV formats. If you shot h.265 in MOV, you can go into the folder where your files are from and edit the name of the file by changing the extension from a .MOV file to a .MP4 extension and accept the change of extension and then drag and drop into Premiere.
4. When you first try to import HEVC video to Premiere Pro, you need to install the HEVC codec, and by clicking «Ok», it will do it automatically and then import the video just fine.
5. You can solve the issue by converting h265 from P4P to Prorres HQ with DJI TRANSCODING TOOLS. https://dl.djicdn.com/downloads/inspire_1/DJI_Transcoding_Tool_v0.9.2.dmg
6. As stated above, use .mp4 and have an updated version of Premiere. If you have the CC license, it should be up to date already. Older CS versions don’t support H.265. Keep in mind that 4K H.265 footage requires a ridiculous amount of processing power if you want to edit it in its original format, so you might want to create proxies of the clips before you start editing. Unless you have a very high-end PC.
7. Adobe first started support HEVC in CC2015 so any earlier versions don’t have the codec. When you first try and import a H265 file a message should appear telling you that you need to license the codec . The license is part of Premiere Pro CC but not automatically turned on for every user unless they use it. WHY? there is actually a license fee that Adobe manage for you and it gets activated with your first Import or Export. You need to be connected to the internet for the first time you use it and once you do that you don’t need to be connected to license again unless you re-install or there is a major update. Adobe is always «tweaking» playback with CPU/GPU support. H265 playback is decent in Premiere Pro CC 2017. Lots of people use it as a .265 player — BUT, Encoding takes a longtime.
Top 3 Practical Solutions to Fix the HEVC/H.265 video ‘Codec Missing or Unavailable’ in Premiere
Transcode HEVC/H.265 to Premiere supported MOV H264, MP4, ProRes…
— 100% Working Solution to Fix Can’t Import 4K HEVC/H.265 footage into Premiere Pro
HEVC is a non-performant format that is difficult to edit with and requires much computing power to process. So, it isn’t a bad idea to convert HEVC to a lossless codec like ProRes or a more popular format like H.264 MP4. To do this, you can turn to the easy-to-use yet powerful video encoder and decoder — EaseFab Video Converter (available for both Windows and Mac users). Apart from changing file format, VideoProc can also convert your VFR videos to constant frame rate. This converter works fast while keeping high quality. Free download and install EaseFab Video Converter and you’ll be able to convert HEVC to Adobe Premiere Pro accepted format with constant framerate in 3 simple steps.
EaseFab Video Converter — The One-click Way to Convert HEVC to Adobe Premiere Pro Supported Format.
• Accept HEVC videos from GoPro, DJI, iPhone, Canon camera, etc.
• Output media in file formats natively supported by Adobe Premiere Pro.
• Convert video in 3 simple steps. GPU Hardware acceleration makes it super fast.
• Easy editing experience: cut, crop, merge, add effects…
Tutorial: How to Decode HEVC/H.265 to Premiere Supported Codec/Format?
The below guide takes Video Converter for Windows screenshots for example.
Step 1. Download and launch EaseFab Video Converter on Windows PC or Mac. Click Add Video to import target HEVC files. Dragging and droppping works too. (Note: batch conversion is supported, so you can several mov videos to the program to convert at a time.)
Step 2. Click the Profile bar at the bottom. Choose a format preset that Premiere Pro can support. And MOV (encoded by H264) from Editing Software category is recommended since the output MOV H.264 files can preserve image quality with the smallest file size. You can also choose MPEG-2 or WMV as the output file.
If you want to preserve the highest image quality, you can also select Final Cut Pro (Apple ProRes 422 encoded MOV file) as the output. The Apple ProRes files can make your editing process simpler and less resource-intensive but it typically need ten times as much storage.
Editor’s Note: H.264 is really optimized to be a delivery codec while ProRes is optimized to be an editing codec. That said, if you just need to do a simple edit and your computer has the power to edit H.264 you can get away with it no problem, but if you plan to do a heavy edit with lots of transitions and effects and color grading you will be best served by ProRes.
Step 3. Hit Convert and it will begin fast video decoding, conversion and processing your HEVC/H.265 video files at one go.
After the conversion is complete, get the resulted files via clicking the Open button and then you can import the result files to Adobe Premiere Pro CC 2020 or lower version without any trouble.
Download and install HEVC codec for Adobe Premiere Pro
Step 1. Open Adobe Premiere Pro and enter your license.
Step 2. Import your HEVC-encoded video into Adobe Premiere Pro, and then you may receive a prompt as shown in the picture. (Some users might not get this message.)
Step 3. Click OK to perform HEVC codec installing.
Step 4. Restart your computer.
Once done, Adobe Premiere Pro should be able to import your HEVC footage without popping up codec missing error. However, not everyone can install HEVC codec successfully.
«Yeah I got that popup and pressed OK, but I got some error. It says ‘The importer reported a generic error’.»
«So I clicked OK and got a message saying the codec was missing.»
And, the import error may still persist even if you have managed to install HEVC codec. What’s more, installing new codec may cause new problems. It may lead to codec conflict and failure of reading some files.
Upgrade your Adobe Premiere Pro
Adobe Premiere Pro extends the support for HEVC files with the release of Adobe Premiere Pro CC 2015.1, but doesn’t support QuickTime (MOV) wrapped HEVC files until the arrival of Adobe Premiere Pro CC 2018 (12.0.1). Therefore, if you need to import HEVC files in MOV format, may be from your iPhone, into Adobe Premiere Pro, make sure you’re using version 12.0.1 or later. Below are the steps to upgrade Premiere Pro to the latest version.
Step 1. Save your work and close your Adobe apps, or you will receive a warning to close.
Step 2. Open Adobe Creative Cloud desktop app, click Apps tab, and then you will see those installed Adobe apps including Adobe Premiere Pro CC. When there’re available update versions, you’ll see Update buttons next to the apps.
Step 3. Click Update next to Adobe Premiere Pro CC. If you want to update all apps, you should click Update All.
Step 4. Set Advanced Options.
▪ Select or deselect Import previous settings and preferences. If this option is checked, settings and preferences of your previous version will be moved to the new version.
▪ Select or deselect Remove old versions. If this option is checked, your previous version will be removed.
Step 5. After finishing all settings, click Update to start upgrading Premiere Pro CC to the most recent version.
If you fail to update Adobe Premiere Pro CC, see if the solutions to troubleshoot Creative Cloud download and install issues can help you.