There are many reasons you might receive the “Render Job failed” error when rendering your videos in Davinci Resolve.
However, some of them are more common than others, therefore I’ve gathered the most common ones in this article.
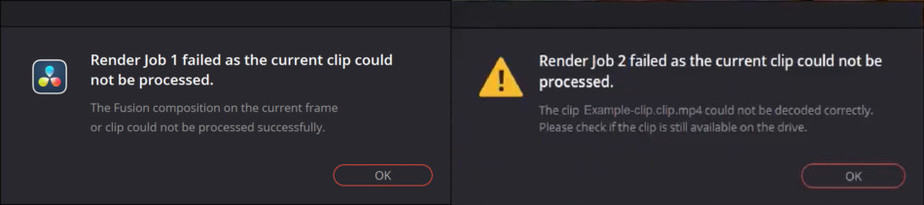
I’ve seen there are two types of errors that occur for most people. The first one is related to rendering fusion composition & the second is a video file that could not be decoded correctly.
However, the solutions shared in this article will work on both error types.
Anyways, let’s solve this problem of yours!
1. Export Rendered Cache Files
This one is actually quite genius, and solved the problem immediately when I was facing this problem.
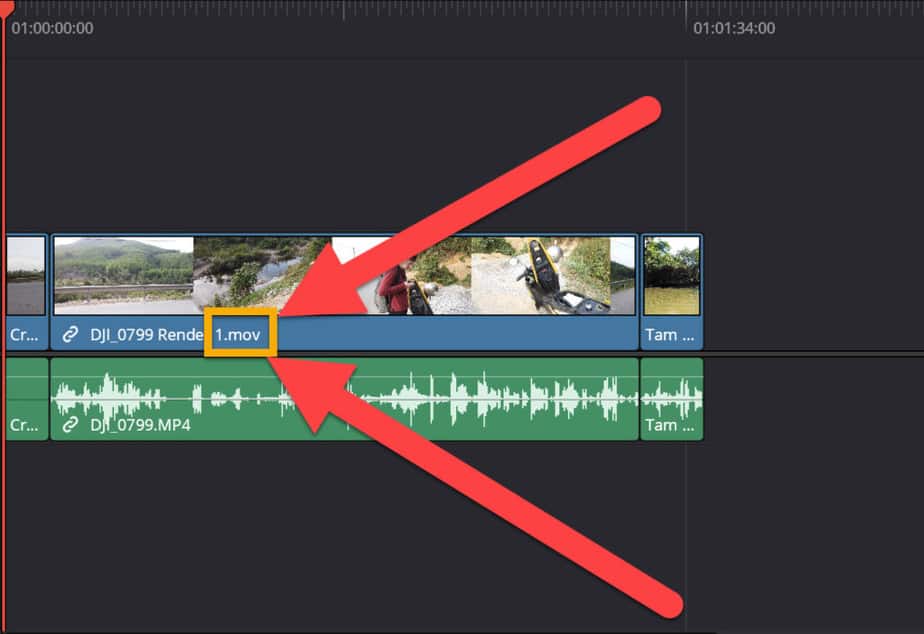
So let’s get to it! Here’s a picture of the two most normal errors to experience:
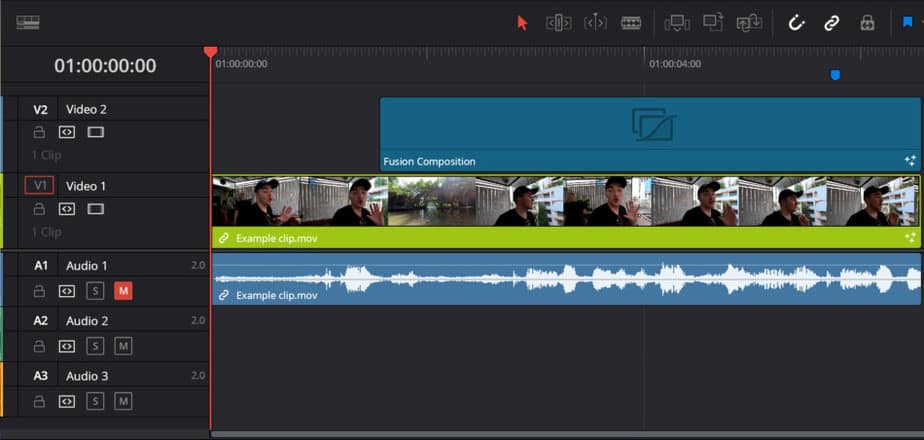
Here you can see my timeline, just a normal clip and a fusion composition which are causing this error:
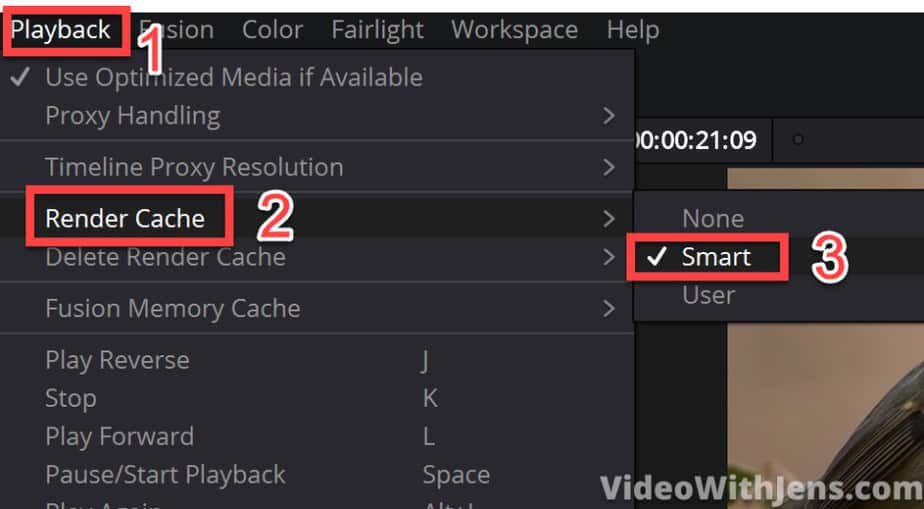
The first thing you want to do is open “Playback > Render Cache > Smart“:
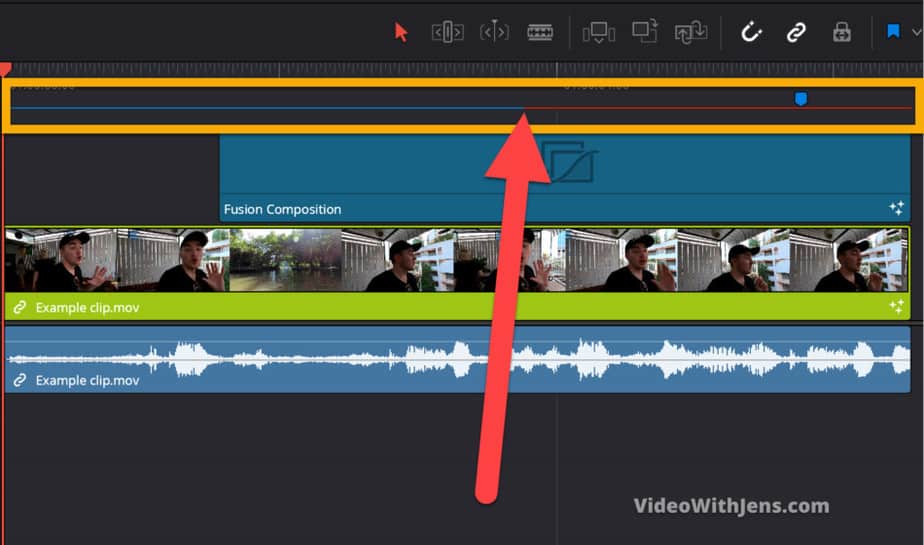
Once that is done you will see a red line, which is slowly turning blue above your clips in the timeline. Let it finish rendering before moving on. At least it should render the clip which is causing you problems (if you know which it is).
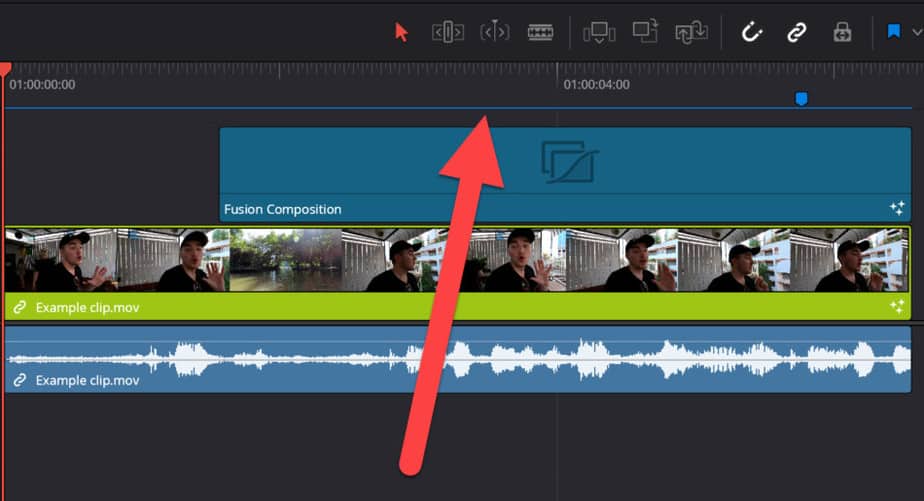
Once it’s done it will be totally blue like this:
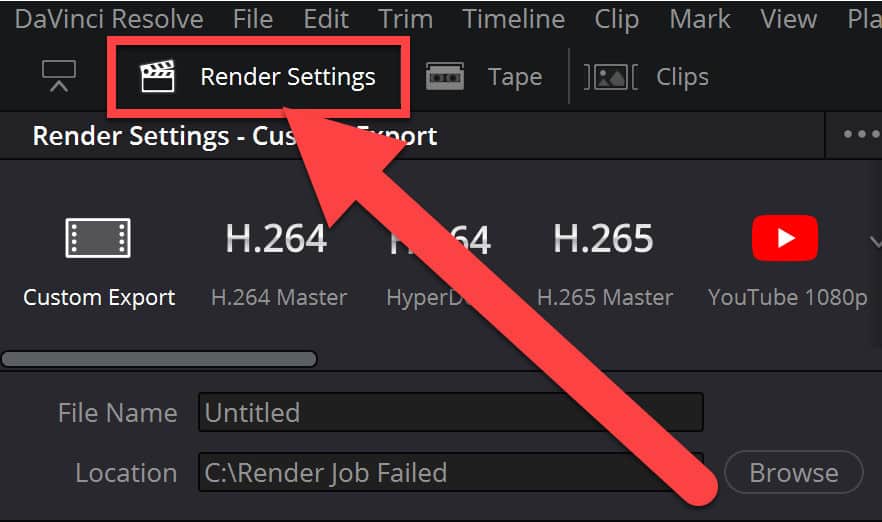
Now, go to the “Deliver” page:
Go to the “Render Settings” window:
Now we are getting into more uncommon territory for a lot of people.
Go ahead and open the “Advanced Settings“:
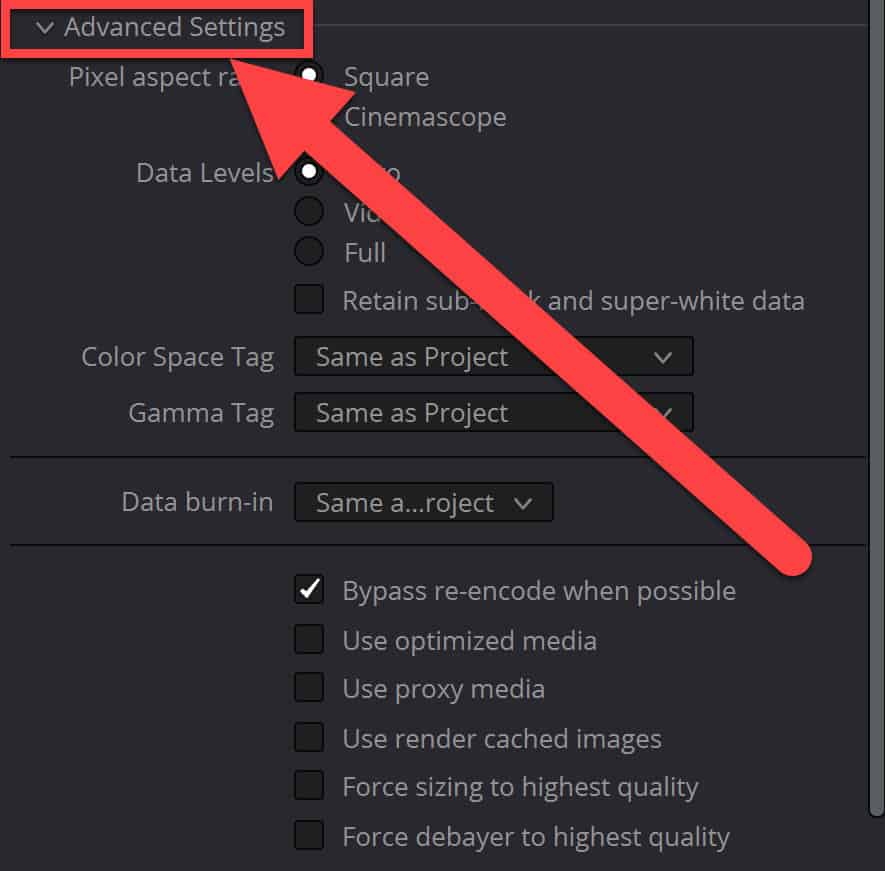
AND finally, we have found the golden nugget!
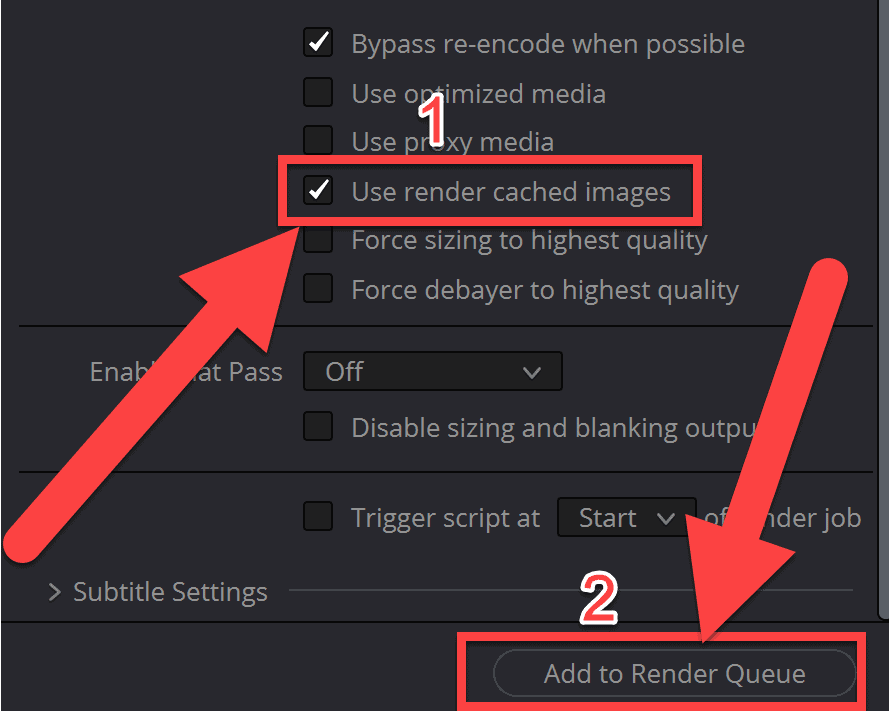
Now you want to tick off the box next to “Use render cached images“. What this does, is use the cached files we created when that red line turned blue. So it basically renders how the timeline memory created of your timeline and in that memory, all the files worked, thus they work in the rendered file as well!
So tick off the box next to “Use render cached images” and hit “Add to Render Queue“:
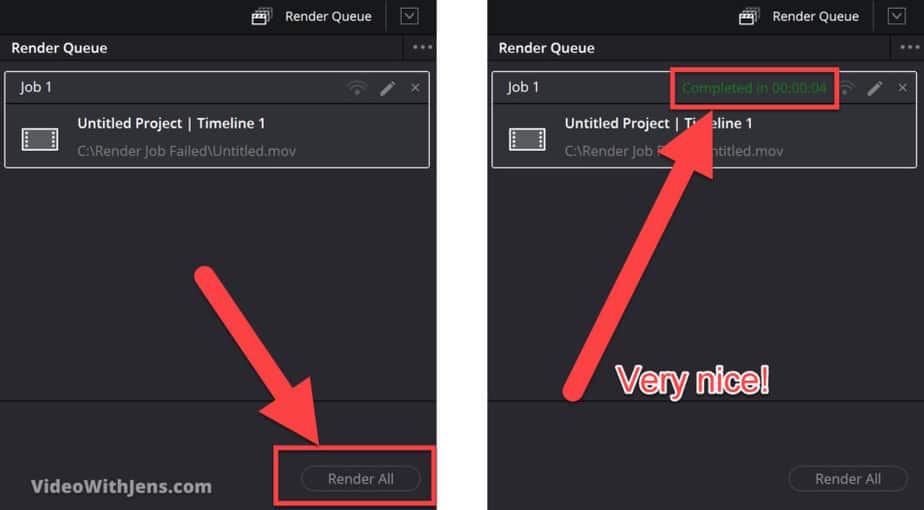
Now head over to the “Render Queue” and start the render job! Hopefully, once it’s done, it looks like the picture below:
2. Copy the Timeline and Create a New Project
This one is very easy, which is the reason I’m placing it as number two on the list!
If it doesn’t work, no big deal just proceed to the next method.
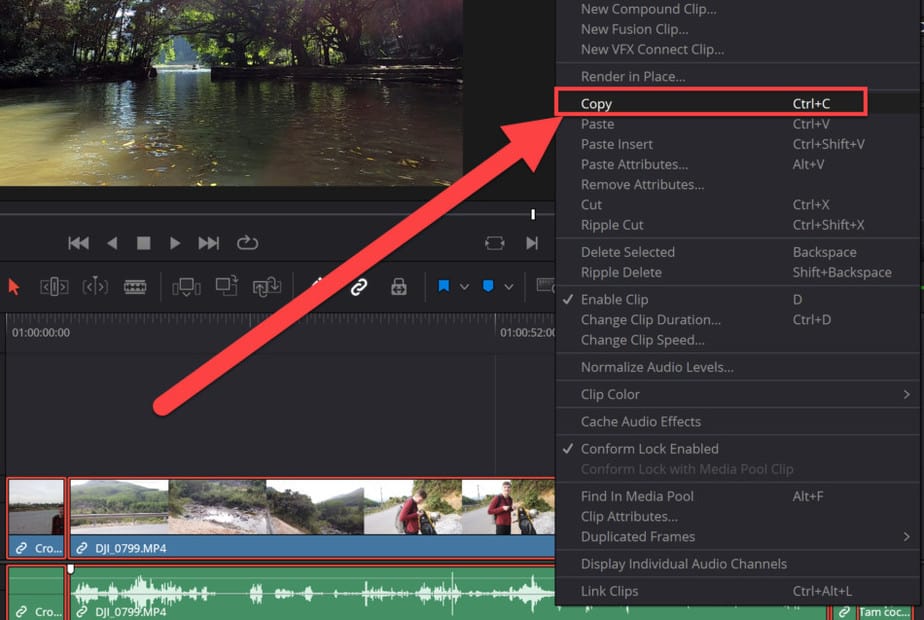
So we are not going to copy the timeline as it sounds. Instead, we are going to copy all the clips in the timeline.
You can do this by simply pressing “CTRL+A” or “Cmd+A”(on a Mac), then press “CTRL+C” or “Cmd+C”(on a Mac) to copy.
If you are not the shortcut kind of person, you can select all your clips by dragging over them and then right-click a clip > Copy.
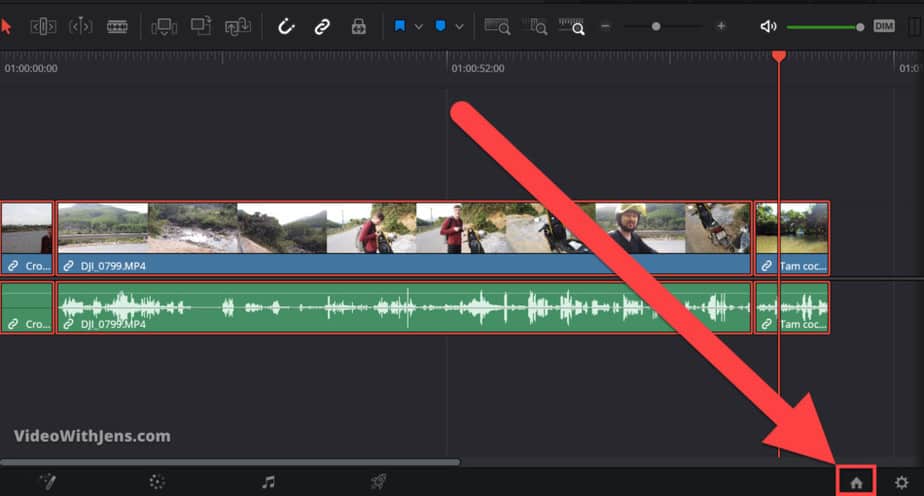
Next, save your current project.
Then, click on this house icon in the bottom right-hand corner:
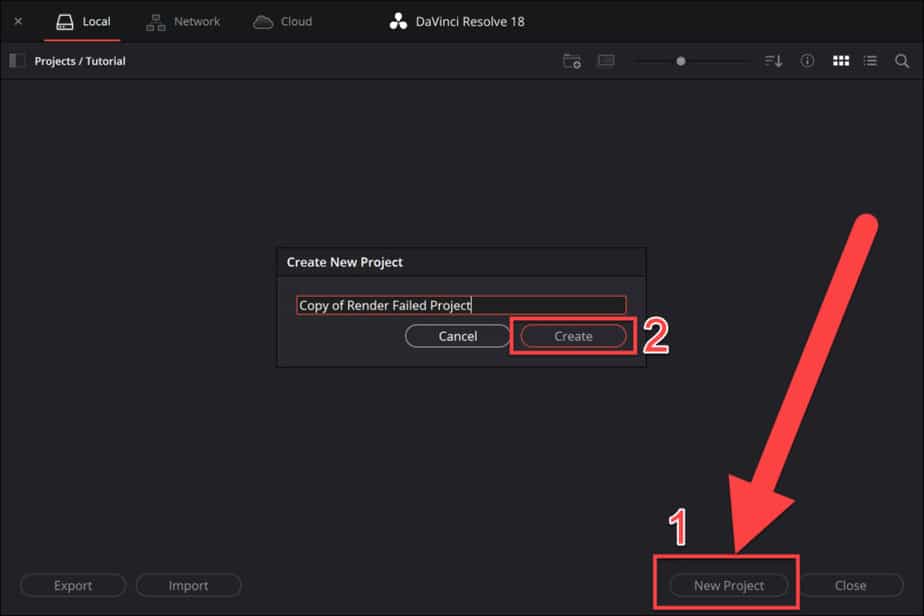
In this window go ahead and click on “New Project“, then call it whatever you want and click on “Create“:
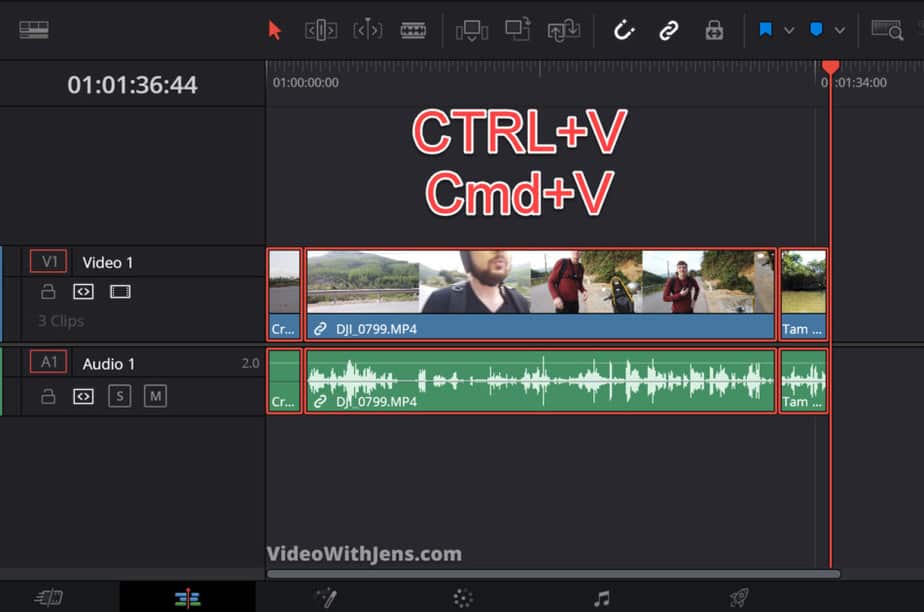
Inside your new project, click once on the timeline and then press “CTRL+V” or “Cmd+V” (on a Mac).
For those who don’t like shortcuts: Right-click on the timeline and click on “Paste“.
Once you’ve done this, go ahead and try to render!
If it didn’t work. We have other methods which has worked for a bunch of people:
3. Convert Your Videos to DNxHR
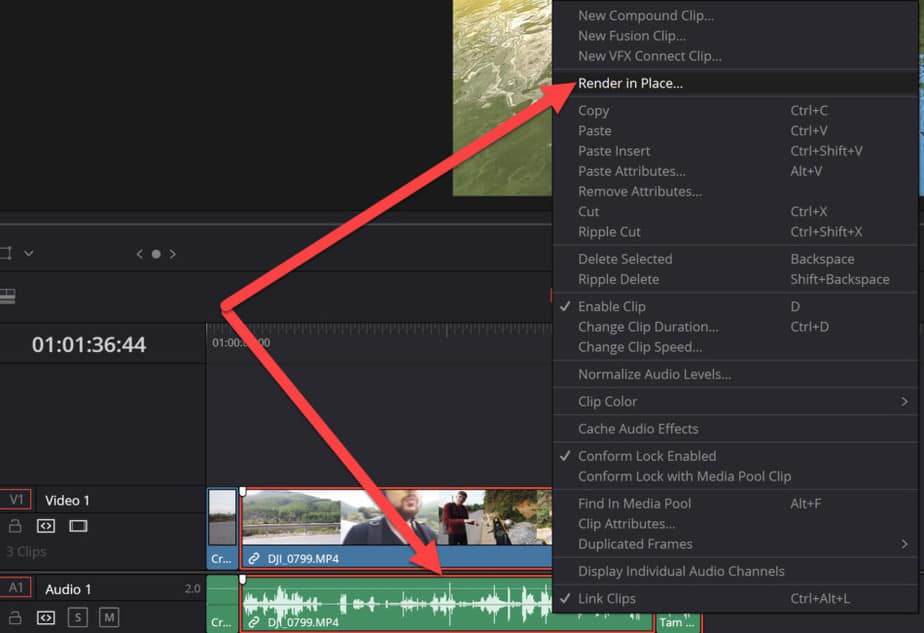
- Select the clips in your timeline.
- Right-click and click on “Render in Place…“
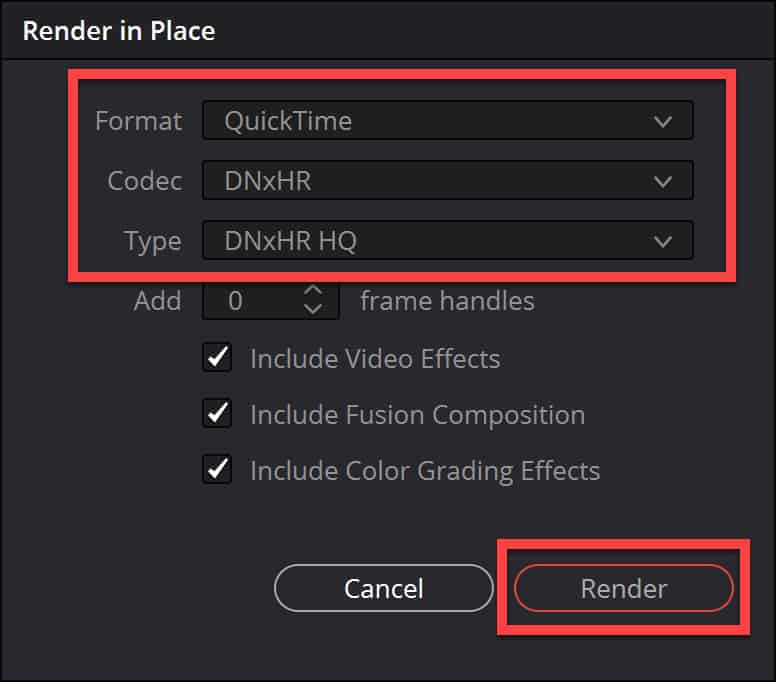
- Set “Format” to “QuickTime“.
- Set “Codec” to “DNxHR” and “Type” to “DNxHR HQ“.
- Click on “Render“.
This solution seems to have worked for some people as well.
If you’re having the fusion composition error, this solution most likely will not work. (All the others work for both errors).
However, let’s go into a bit more in detail on how to do it and some consequences of doing this.
The consequence of converting to the DNxHR codec is that the file size is HUGE. If you are used to handling such as .MP4 and .MOV.
Why is this?
We’ll not go too much into detail on this, however, DNxHR is utilizing something called intraframe compression. These are ALOT less compressed than a .MP4 which is normally paired with an H.264 codec which usually compresses the video a lot.
So by converting your video to DNxHR, it will be a lot less compressed, then it’s a lot easier on your computer when playing it back as well and gives you a better experience while editing.
Here’s how much larger your files will get:
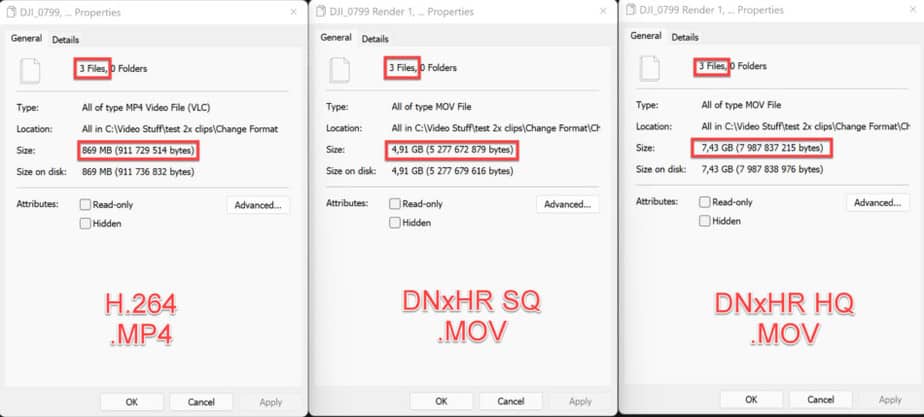
You can see it’s quite a lot, but if you have enough disk space, you can just delete it afterward, as you will still have your original footage.
It’s worth a shot! However, you could try the other solutions first.
Here’s a more detailed description of how to do it:
First, select the clips in your timeline, or if you know which clip is causing the error select that one.
Then click on “Render in Place…“
Next, you want to change the following:
- Format – QuickTime
- Codec – DNxHR
- Type – DNxHR HQ
If you want a bit smaller file size you could try changing to DNxHR ‘SQ’ instead of ‘HQ’. As the only difference is that HQ is of higher quality. That said people who have solved this error used ‘HQ’…
Choose one of them, and then click on “Render“:
The rendering takes a little bit of time.
Once it’s done you can see that you have now both your old format and new format in your “Media Pool“:
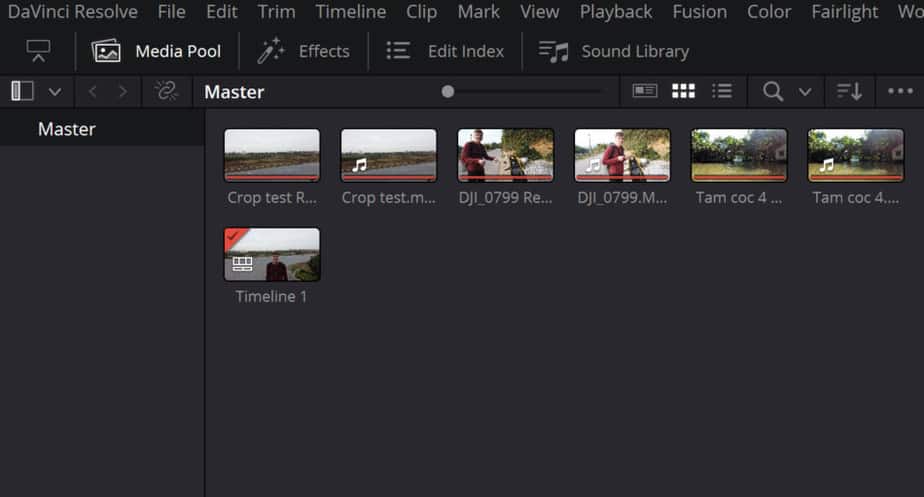
And you don’t have to add the new files to the timeline, as they will have swapped places as part of the render process! You can see in the picture below that it has changed from .mp4 to .mov.
.mov is representing the QuickTime format:
Next, go ahead and render your project! Fingers crossed…
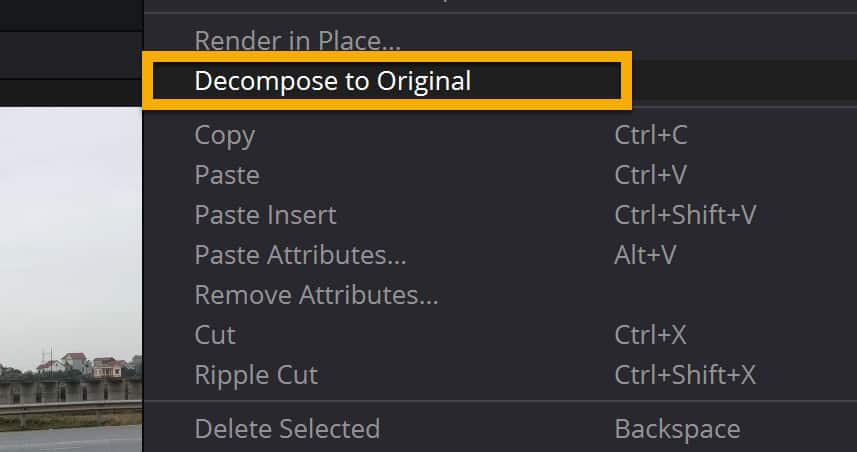
If you want to swap the clips in the timeline back to the original files, “select the clips > right-click > Decompose to Original”: (You will still have them on your computer and in the media pool.)
4. Change Workspace Options
This is the option almost everyone suggests. And my least favorite solution to the problem, which is why it’s the last on the list…
This solution does work, and most of these errors will get solved by using it. The problem with doing this you will render out your project even if there is an error, and then it will be included in your final product.
However, after experimenting a little bit with this solution, I’ve found that sometimes the error is just in the render faze, and I could not see any negative impact on the exported file.
So without further ado, here’s solution number 4:
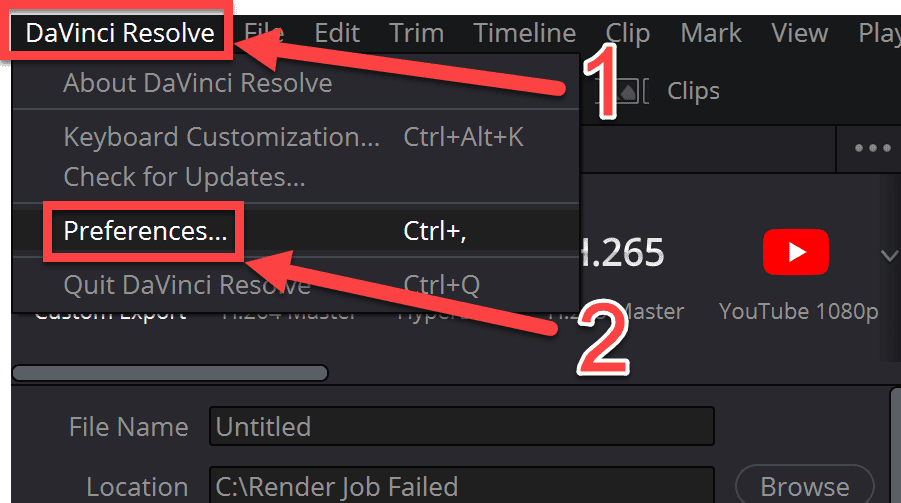
Click on “Davinci Resolve” in the left-hand top corner of Davinci Resolve. Then click on “Preferences…“.
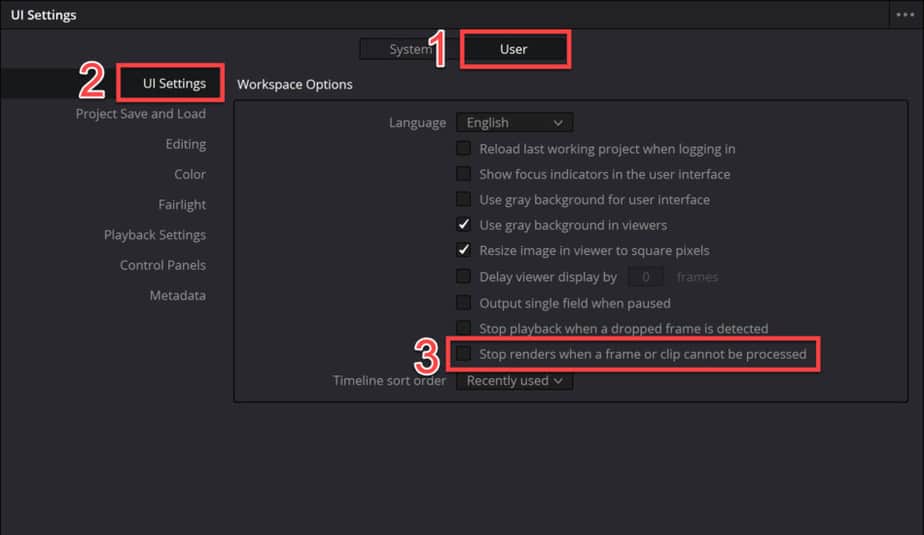
Then in the window that pops up, click on “User“, then “UI Settings“.
Next, uncheck the option called “Stop renders when a frame or clip cannot be processed“.
Watch the picture below:
Once you have done this go ahead and click on “Save“, located in the lower right-hand corner of the window:

That’s it!
Now you can go ahead and try to render your video again.
Afterward, watch through your video if there are any errors, etc. A common one to watch out for is this:

There’s a big chance you have seen this one inside Davinci Resolve. However, it’s actually possible to render this one into your final product as well.
That’s it and I really hope one of these solutions solved your problem!
If you are facing problems with the “Add to Render Queue” button turning gray, check out this article.
Best regards,
Your friend, Jens.
There are many reasons you might receive the “Render Job failed” error when rendering your videos in Davinci Resolve.
However, some of them are more common than others, therefore I’ve gathered the most common ones in this article.
I’ve seen there are two types of errors that occur for most people. The first one is related to rendering fusion composition & the second is a video file that could not be decoded correctly.
However, the solutions shared in this article will work on both error types.
Anyways, let’s solve this problem of yours!
1. Export Rendered Cache Files
This one is actually quite genius, and solved the problem immediately when I was facing this problem.
So let’s get to it! Here’s a picture of the two most normal errors to experience:
Here you can see my timeline, just a normal clip and a fusion composition which are causing this error:
The first thing you want to do is open “Playback > Render Cache > Smart“:
Once that is done you will see a red line, which is slowly turning blue above your clips in the timeline. Let it finish rendering before moving on. At least it should render the clip which is causing you problems (if you know which it is).
Once it’s done it will be totally blue like this:
Now, go to the “Deliver” page:
![]()
Go to the “Render Settings” window:
Now we are getting into more uncommon territory for a lot of people.
Go ahead and open the “Advanced Settings“:
AND finally, we have found the golden nugget!
Now you want to tick off the box next to “Use render cached images“. What this does, is use the cached files we created when that red line turned blue. So it basically renders how the timeline memory created of your timeline and in that memory, all the files worked, thus they work in the rendered file as well!
So tick off the box next to “Use render cached images” and hit “Add to Render Queue“:
Now head over to the “Render Queue” and start the render job! Hopefully, once it’s done, it looks like the picture below:
2. Copy the Timeline and Create a New Project
This one is very easy, which is the reason I’m placing it as number two on the list!
If it doesn’t work, no big deal just proceed to the next method.
So we are not going to copy the timeline as it sounds. Instead, we are going to copy all the clips in the timeline.
You can do this by simply pressing “CTRL+A” or “Cmd+A”(on a Mac), then press “CTRL+C” or “Cmd+C”(on a Mac) to copy.
If you are not the shortcut kind of person, you can select all your clips by dragging over them and then right-click a clip > Copy.
Next, save your current project.
Then, click on this house icon in the bottom right-hand corner:
In this window go ahead and click on “New Project“, then call it whatever you want and click on “Create“:
Inside your new project, click once on the timeline and then press “CTRL+V” or “Cmd+V” (on a Mac).
For those who don’t like shortcuts: Right-click on the timeline and click on “Paste“.
Once you’ve done this, go ahead and try to render!
If it didn’t work. We have other methods which has worked for a bunch of people:
3. Convert Your Videos to DNxHR
- Select the clips in your timeline.
- Right-click and click on “Render in Place…“
- Set “Format” to “QuickTime“.
- Set “Codec” to “DNxHR” and “Type” to “DNxHR HQ“.
- Click on “Render“.
This solution seems to have worked for some people as well.
If you’re having the fusion composition error, this solution most likely will not work. (All the others work for both errors).
However, let’s go into a bit more in detail on how to do it and some consequences of doing this.
The consequence of converting to the DNxHR codec is that the file size is HUGE. If you are used to handling such as .MP4 and .MOV.
Why is this?
We’ll not go too much into detail on this, however, DNxHR is utilizing something called intraframe compression. These are ALOT less compressed than a .MP4 which is normally paired with an H.264 codec which usually compresses the video a lot.
So by converting your video to DNxHR, it will be a lot less compressed, then it’s a lot easier on your computer when playing it back as well and gives you a better experience while editing.
Here’s how much larger your files will get:
You can see it’s quite a lot, but if you have enough disk space, you can just delete it afterward, as you will still have your original footage.
It’s worth a shot! However, you could try the other solutions first.
Here’s a more detailed description of how to do it:
First, select the clips in your timeline, or if you know which clip is causing the error select that one.
Then click on “Render in Place…“
Next, you want to change the following:
- Format – QuickTime
- Codec – DNxHR
- Type – DNxHR HQ
If you want a bit smaller file size you could try changing to DNxHR ‘SQ’ instead of ‘HQ’. As the only difference is that HQ is of higher quality. That said people who have solved this error used ‘HQ’…
Choose one of them, and then click on “Render“:
The rendering takes a little bit of time.
Once it’s done you can see that you have now both your old format and new format in your “Media Pool“:
And you don’t have to add the new files to the timeline, as they will have swapped places as part of the render process! You can see in the picture below that it has changed from .mp4 to .mov.
.mov is representing the QuickTime format:
Next, go ahead and render your project! Fingers crossed…
If you want to swap the clips in the timeline back to the original files, “select the clips > right-click > Decompose to Original”: (You will still have them on your computer and in the media pool.)
4. Change Workspace Options
This is the option almost everyone suggests. And my least favorite solution to the problem, which is why it’s the last on the list…
This solution does work, and most of these errors will get solved by using it. The problem with doing this you will render out your project even if there is an error, and then it will be included in your final product.
However, after experimenting a little bit with this solution, I’ve found that sometimes the error is just in the render faze, and I could not see any negative impact on the exported file.
So without further ado, here’s solution number 4:
Click on “Davinci Resolve” in the left-hand top corner of Davinci Resolve. Then click on “Preferences…“.
Then in the window that pops up, click on “User“, then “UI Settings“.
Next, uncheck the option called “Stop renders when a frame or clip cannot be processed“.
Watch the picture below:
Once you have done this go ahead and click on “Save“, located in the lower right-hand corner of the window:
That’s it!
Now you can go ahead and try to render your video again.
Afterward, watch through your video if there are any errors, etc. A common one to watch out for is this:
There’s a big chance you have seen this one inside Davinci Resolve. However, it’s actually possible to render this one into your final product as well.
That’s it and I really hope one of these solutions solved your problem!
If you are facing problems with the “Add to Render Queue” button turning gray, check out this article.
Best regards,
Your friend, Jens.
You have worked hard on your edit in DaVinci Resolve, and 20 minutes into an hour-long render it crashes! Other times when you watch back your final render one of the effects has a glitch. There are few things as frustrating as a render crash or glitch in your final render. It’s something every video editor has experienced at some point. A render crash in DaVinci Resolve can be caused by a number of things so the first step to fixing it is determining the cause.
Most of the time when you have a rendering issue in Resolve it falls in one of these categories: hardware problem, software problem, or a mistake by the user. This can be a very wide subject so we will focus on some of the more common problems and fixes.
Part 1: Smart Fixes for Common DaVinci Resolve Render Crashes
Hardware Fixes
One of the first things to consider is your hardware. Is it up to the task of what you are trying to render? Make sure that your system meets at least the minimum system requirements for DaVinci Resolve. Intensive visual effects in Fusion and complex color grades can be extremely taxing on your computer, so make sure it is up to the task. This is especially important when working in higher resolutions like 4K.
Sometimes multiple GPUs can cause a problem. Check your GPU settings are correct. Disabling 1 GPU may be required, especially if it is an onboard GPU. It is important to note that DaVinci Resolve does support and use multiple GPUs in the correct configuration but this is only available in the paid Studio version.
This leads us to another important point. You may have a very high-end computer with a great GPU but if you are using the free version, DaVinci Resolve does not utilize all this capacity since the free version has limitations.
The next step is to ensure all your drivers for your system and especially your GPU is up to date. GPU drivers are regularly updated to deal with new versions of operating systems and software, so if you have done any updates it is key to ensure your drivers are up to date.
Software Fixes
If your render keeps getting stuck on a certain frame in your project and you can’t figure out why try changing these settings:
- Go to Preferences > User > UI.
- Deselect Stop renders when a frame or clip cannot be processed.
- And then also deselect Stop playback when a dropped frame is detected.
While this may work it is not really a fix, but more of a workaround. You will still need to determine what is the actual cause of the render crash as this simply bypasses the problem. But it may save you in a critical situation. Work out why that frame is causing the crash. It often helps to monitor your system resources while performing a render to see if something like your CPU or memory is maxed out when the crash happens.
If it is a resource problem you can try reducing the render speed in your render settings on the delivery page.
- Go to the File tab. The render speed always defaults to the maximum.
- We recommend adjusting the Render Speed setting to 75 or even 50. This will not affect the quality of your render but will help reduce the load on your computer.
- Turn off Updates during Render by clicking on Minimal from the menu in the viewer (the 3 dots next to the viewer, top right). This turns off live updates in the viewer as the render progresses.
Sometimes the problem is with a particular clip that has heavy effects or color grading on it. If that is the case the best solution is often to render that clip on its own to a format that is easy to edit like ProRes or DNxHR, then reimport the rendered clip to use in your project. This saves DaVinci Resolve from the complex render of the clip while trying to render audio, color, and everything else as well.
It is important to know that render crashes in DaVinci Resolve are often system and project-specific. Reasons can be wide-ranging and difficult to determine at times. Your best way to avoid them is to ensure your system, software and drivers are up to specifications and up to date as this will avoid most of the common problems.
Part 2: Quick Fixes for DaVinci Resolve 17 Render Glitches
Sometimes it is not a render crash that is the problem but rather a glitch in the rendered file. This mostly happens with fast-moving motion graphics when exported to H.264/H.265. Below are a few potential solutions.
- Render to a different file type first, e.g., ProRes or DNxHR. These files are larger but are better suited to editing and less likely to cause these glitches.
- Don’t use automatic keyframes when rendering to H.264/H.265. Instead, change it to 1 or 0. This often fixes the problem.
- Update DaVinci Resolve. Each new version generally fixes a bunch of bugs in the software, so it is worth checking if your problem has been addressed within an update.
Render crashes are frustrating for any editor but a systematic approach to finding the reason for the crash will help you solve it. Common problems are typically associated with hardware, software or user error. Making sure your system is up to spec and up to date is one of the best ways to avoid these problems.
If you are looking for more information on working with DaVinci Resolve, check out our tutorial article on rendering. Learn more about how to achieve smooth playback in DaVinci Resolve as well.


- Login
- Register
- FAQ
- Search
- It is currently Mon Jan 30, 2023 11:54 am
- Print view
V18.0.2 — Render jobs are not complete message
- Message
panos_mts
- Posts: 839
- Joined: Mon Oct 21, 2019 3:18 pm
- Real Name: Panagiotis Vellios
![]() Wed Sep 07, 2022 8:34 am
Wed Sep 07, 2022 8:34 am
If you have a clip without any nodes in the color page (by deleting the default node), when you render it the following message appears
- RenderBug.png (11.14 KiB) Viewed 2008 times
If you click «Continue Renders» DaVinci crashes after few seconds.
I never had this problem with previous versions. I reverted to 18.0.1 and can’t reproduce it there, so it must be a new bug.
Jim Simon
- Posts: 23755
- Joined: Fri Dec 23, 2016 1:47 am
![]() Wed Sep 07, 2022 3:36 pm
Wed Sep 07, 2022 3:36 pm
Duplicated in Studio 18.0.2 on Windows 10.
Nevyn72
- Posts: 1
- Joined: Thu Sep 08, 2022 12:34 pm
- Real Name: John Belmer
![]() Thu Sep 08, 2022 12:39 pm
Thu Sep 08, 2022 12:39 pm
I had the same problem. But thanks of Panos I now also have a solution for this problem.
Thank you. I hope this bug is fixed in the next version though, very annoying.
Thank you

Dave Edwards
- Posts: 82
- Joined: Fri May 03, 2019 2:48 pm
- Real Name: Dave Edwards
![]() Thu Sep 08, 2022 2:35 pm
Thu Sep 08, 2022 2:35 pm
Confirmed: I’m having the same problem.
Main: 2xXeon X5550@2.9Gz; Win 10 Pro 64bit; 48Gb RAM; SSD/HDD; Quadro M4000;
Reserve: i7 920@2.9Gz; Win 10 Pro 64bit; 12Gb RAM; SSD/HDD; Quadro M4000;
Both: Speed Editor; Decklink Mini Monitor 4K; Soundblaster Z; DVR 18.1 Studio, Micro Panel.
WesKane
- Posts: 15
- Joined: Tue Oct 10, 2017 9:19 pm
![]() Thu Sep 08, 2022 4:56 pm
Thu Sep 08, 2022 4:56 pm
I had the same issue with 18.0.2.
Reverted to 18.0.1 and exporting is fine.
![]() Thu Sep 08, 2022 5:51 pm
Thu Sep 08, 2022 5:51 pm
Why are you deleting the default node? I’m not saying it should crash — just curious because without the node connecting source to output I’m not sure what resolve would do?
Time Traveller
Resolve Studio 18.1.2 | Fusion Studio 18.1.2 | Win 11 Pro (22H2) | i9-7940x, P4000 (517.40, 8GB VRAM), 64GB RAM, M.2 boot, SSD scratch, RAID10 data | (laptop) 16″ MacBook Pro M1 MAX, 32 GPU cores, 64 GB RAM, 2 TB SSD, Ventura 13.2
![]() Thu Sep 08, 2022 7:14 pm
Thu Sep 08, 2022 7:14 pm
Panos have a read of Peter Chamberlain’s response in this post to this problem.https://forum.blackmagicdesign.com/viewtopic.php?f=21&t=167122
Resolve Studio 18.1.2 Build 6
Dell XPS 8700 i7-4790 4 core, 24GB RAM, 2 x Samsung Evo SSDs, GTX1060/6GB (528.02 Studio driver), Win10 Home (22H2), Speed Editor, Faderport 1, Eizo ColorEdge CS230 + BenQ GW2270, Canon C100mk2, Atomos Ninja 2.

Lindkold
- Posts: 91
- Joined: Fri Jul 21, 2017 5:56 pm
- Real Name: Tony Lindkold
![]() Thu Sep 08, 2022 8:18 pm
Thu Sep 08, 2022 8:18 pm
SOLVED:
I had the same issue,
My last clip — which was actually a 3rd party text effect (MotionVFX) — obviously wasn’t color graded so it didn’t have node. After adding a node everything was fine.
Definitely a new bug.
![]() Fri Sep 09, 2022 12:04 am
Fri Sep 09, 2022 12:04 am
Even if a clip isn’t graded it should have a default node connecting source to output — maybe this isn’t happening in 18.0.2?
Time Traveller
Resolve Studio 18.1.2 | Fusion Studio 18.1.2 | Win 11 Pro (22H2) | i9-7940x, P4000 (517.40, 8GB VRAM), 64GB RAM, M.2 boot, SSD scratch, RAID10 data | (laptop) 16″ MacBook Pro M1 MAX, 32 GPU cores, 64 GB RAM, 2 TB SSD, Ventura 13.2
![]() Fri Sep 09, 2022 2:28 am
Fri Sep 09, 2022 2:28 am
Thanks Panos. I’m still new in Resolve and i have just known about clip that has no node in color page.
So, for temporary solution, we should not delete default node of clip?
Begin using Resolve in Mon May 02, 2022.
Home : (Laptop) Resolve 18.1.2 (Ryzen 7 4000 series, Nvidia GTX 1650, 40GbRAM)
Office : (PC) Resolve 18.1.2 (i7 Gen 10, Nvidia RTX 3060, 16Gb RAM)
Uli Plank
- Posts: 16468
- Joined: Fri Feb 08, 2013 2:48 am
- Location: Germany and Indonesia
![]() Fri Sep 09, 2022 7:06 am
Fri Sep 09, 2022 7:06 am
No, you shouldn’t. Why would you want to do that?
If you have touched any dials and want things cleaned up, reset it, or delete it and call up a new one.
Problem solved.
Don’t approach DR with your preconceptions from another NLE.
Many features are better, some worse, most are different.
Resolve Studio 18.1.2, MacOS 12.6.2
MacBook M1 Pro, 16 GPU cores, 32 GB RAM
and
iMac 2017, Radeon 580, 32 GB RAM
Speed Editor
![]() Fri Sep 09, 2022 7:37 am
Fri Sep 09, 2022 7:37 am
Uli Plank wrote:No, you shouldn’t. Why would you want to do that?
If you have touched any dials and want things cleaned up, reset it, or delete it and call up a new one.
Problem solved.
You’re right Uli.
Hi, may be the error message should be «Hi, you clip [name of clip n position] doesn’t have any node ext…» ![]()
Begin using Resolve in Mon May 02, 2022.
Home : (Laptop) Resolve 18.1.2 (Ryzen 7 4000 series, Nvidia GTX 1650, 40GbRAM)
Office : (PC) Resolve 18.1.2 (i7 Gen 10, Nvidia RTX 3060, 16Gb RAM)
Uli Plank
- Posts: 16468
- Joined: Fri Feb 08, 2013 2:48 am
- Location: Germany and Indonesia
![]() Fri Sep 09, 2022 7:43 am
Fri Sep 09, 2022 7:43 am
Sure. In a perfect world I’d like a few other error messages too…
Don’t approach DR with your preconceptions from another NLE.
Many features are better, some worse, most are different.
Resolve Studio 18.1.2, MacOS 12.6.2
MacBook M1 Pro, 16 GPU cores, 32 GB RAM
and
iMac 2017, Radeon 580, 32 GB RAM
Speed Editor
evgenypluzhnikov
- Posts: 1
- Joined: Tue Feb 15, 2022 9:10 am
- Real Name: Evgeny Pluzhnikov
![]() Tue Sep 13, 2022 10:30 pm
Tue Sep 13, 2022 10:30 pm
I had the same problem.
Just created a new timeline and put my timeline in it ( Because I had a lot clips ![]() ). And it worked
). And it worked
Return to DaVinci Resolve
Who is online
Users browsing this forum: Bing [Bot], panos_mts, roger.magnusson and 108 guests
Когда дело доходит до монтажа или цветкора внутри DaVinci Resolve, требуется довольно мощный компьютер.
Опытный колорист Алекс Джордан из Learn Color Grading предлагает несколько полезных советов для тех кто хочет выжить максимум из своего не самого мощного компьютера, при этом комфортно работать в DaVinci Resolve.
Первым шагом в улучшении производительности воспроизведения Resolve является изменение оптимизированных параметров мультимедиа и кэша рендеринга. Для этого перейдите на панель Settings. На вкладке « Master Settings Tab » найдите раздел, « Optimized Media» и «Render Cache».
Если вы пользователь Windows, измените оба на DNxHR SQ. Если вы используете старый Mac, вам нужно использовать ProRes 422 LT.

После этого просмотрите раскрывающееся меню Render Cache и убедитесь, что установлен флажок «Enable background caching after ___ second» (Включить фоновое кэширование через _ секунды)». Также измените временной интервал на 1 секунду. После того, как вы внесли все изменения, нажмите ОК.
Затем в меню « Playback» убедитесь, что «Use optimized media if available«, включено. В том же меню измените настройку Render Cache с «None» на «User».

Как объяснено, эти три шага подготовят Resolve для оптимизации ваших кадров. Однако это не говорит программному обеспечению о том, что нужно начинать оптимизировать ваши клипы. Вы должны сделать это вручную, щелкнув правой кнопкой мыши по файлу и выбрав « Render Cache Color Output».
Как только вы это сделаете, вам придется подождать, пока программа отобразит оптимизированный носитель. После того, как процесс будет завершен, вы увидите, что процесс очистки и воспроизведения будет намного более плавным, практически без пропущенных кадров.
Несмотря на то, что у вас могут быть оптимизированные медиафайлы, вы заметите, что когда вы начнете добавлять видеоэффекты и цветовые узлы, ваша временная шкала снова замедлится. Это происходит на всех машинах — старых или новых. Чтобы это исправить, щелкните правой кнопкой мыши на своем клипе и выберите «Render Cache Color Output».

Если вы выберете эту опцию, в верхней части вашего видео появится красная полоса, которая постепенно изменит цвет на синий. Как только вся полоса станет синей, вы сможете добавлять столько эффектов и настроек изображения, сколько пожелаете, не влияя на производительность воспроизведения.
Важно отметить, что этот пятиэтапный процесс чрезвычайно эффективен — даже до такой степени, что процесс редактирования на старом ноутбуке становится простым. Фактически, для всего урока Алекс использует ноутбук Sony VAIO 2013 года, оснащенный 2,9 ГГц процессором Intel Core i7-3520M, графическим процессором GeForce GTX640M LE 1 ГБ и 12 ГБ оперативной памяти.
Какой бы старой машины ни была машина, всегда есть шаги, которые вы можете предпринять в качестве редактора, чтобы убедиться, что ваше программное обеспечение для редактирования оптимизировано для вашей системы.
Касаем проблемы «Your gpu memory is full», как оказалось об этом на русском особо ничего нет. Какие нашёл решения.
«Таким образом, если у вас заканчивается память GPU, вам нужно уменьшить обработку, запрашиваемую GPU, или уменьшить разрешение, или и то, и другое. В качестве альтернативы получите один графический процессор с большим объемом памяти. Сейчас есть несколько номеров с 16 ГБ или больше.»
И вот
«вы также можете зайти в панель предпочтений (advanced configuration) в NeatVideo и уменьшить использование GPU или попросить «только CPU» или … вы должны протестировать различные параметры, чтобы дать Davinci Resolve больше GPU VRAM.»
Обычно когда такая ситуация возникал например в after effects (была проблема при рендере) не хватало оперативной памяти, то приходилось дробить проект на 2 и более частей. Плюс отключать все что «сжирает» видеопамять.
Насколько понял проблема старая и возникает далеко не у всех, первые упоминания датируются 2017 годом.
вот еще решение
Также уроки по DaVinci Resolve можно найти в разделе тут
Подписывайтесь в социальных сетях:telegram вконтакте instagram facebook
По вопросам размещения рекламы писать сюда, стать автором сюда, сделать донат сюда
Купить настоящие подставки apple box для дома и работы можно тут
Также по теме:
КАК СТАТЬ ЛУЧШИМ КОЛОРИСТОМ? ИНТЕРВЬЮ ИЗВЕСТНОГО КОЛОРИСТА И РЕЖИССЕРА-МОНТАЖА АЛЕКСАНДРА ВЕРХОЛЯКА
ЭКСКЛЮЗИВНОЕ ИНТЕРВЬЮ ДИРЕКТОРА BLACKMAGIC DESIGN В ЕВРОПЕ
КАК ОСВЕТИТЬ БЛЕСТЯЩИЕ ПРЕДМЕТЫ. ДЕЛИМСЯ СЕКРЕТАМИ
Если вы нашли ошибку, пожалуйста, выделите фрагмент текста и нажмите Ctrl+Enter.
The following two tabs change content below.
- Bio
- Latest Posts

Фильммейкер, главный редактор, технический писатель
По вопросам статей и материалов писать сюда http://news.fidller.com/about-contact/
Наш магазин оборудования — http://fidller.com/
UPDATE:
In case anyone has a similar problem in the future.
I did some Tests to determine the origin of this issue.
First I wanted to make sure that the original video file that I´m trying to edit is not corrupted. So I rendered it on my old PC that I still have here. It rendered just fine.
Now that I knew that the issue does not come from the file I´m left with either a Software or a Hardware Problem on my new PC.
Next I installed Resolve on a clean windows partition that I still had on the new PC and that I had not touched for a few months (I guess a virtual machine would have worked as well, but this was more efficient). It rendered just fine.
Now I knew that it is not a Hardware Issue.
I suspected the AMD GPU Driver might be at fault, so I upgraded it to the newest version on the clean Windows partition. The render started to crash.
OK, so it is a GPU driver issue. I downgraded the driver again a few times until it started to render without crashing. I found that the AMD GPU Driver Version 21.10.2 is the last stable Version where the render works.
I downgraded the AMD GPU driver to that Version on my primary system and tested again.
The render process was completed without crashing.
If Anybody knows why the current AMD Drivers make Resolve crash during render, or how I can fix that. Please let me know!
Hello there,
I created an account just to post this, because I´m all out of ideas.
I´m trying to render a video with DaVinci, however it always crashes at the exact same point during the render process.
Not only does DaVinci crash, but also the AMD GPU driver times out.
My system:
CPU: Ryzen 5900X
GPU: Sapphire Nitro 6800XT
RAM: 16GB
Attached are my render settings and Screenshots that show how the crash looks (Unresponsive white screen) and the driver Timeout error that is displayed.
Can please anybody try to help me with this?
If more information is required, I´m glad to provide it.
Thank you.


You have worked hard on your edit in DaVinci Resolve, and 20 minutes into an hour-long render it crashes! Other times when you watch back your final render one of the effects has a glitch. There are few things as frustrating as a render crash or glitch in your final render. It’s something every video editor has experienced at some point. A render crash in DaVinci Resolve can be caused by a number of things so the first step to fixing it is determining the cause.
Most of the time when you have a rendering issue in Resolve it falls in one of these categories: hardware problem, software problem, or a mistake by the user. This can be a very wide subject so we will focus on some of the more common problems and fixes.
Part 1: Smart Fixes for Common DaVinci Resolve Render Crashes
Hardware Fixes
One of the first things to consider is your hardware. Is it up to the task of what you are trying to render? Make sure that your system meets at least the minimum system requirements for DaVinci Resolve. Intensive visual effects in Fusion and complex color grades can be extremely taxing on your computer, so make sure it is up to the task. This is especially important when working in higher resolutions like 4K.
Sometimes multiple GPUs can cause a problem. Check your GPU settings are correct. Disabling 1 GPU may be required, especially if it is an onboard GPU. It is important to note that DaVinci Resolve does support and use multiple GPUs in the correct configuration but this is only available in the paid Studio version.
This leads us to another important point. You may have a very high-end computer with a great GPU but if you are using the free version, DaVinci Resolve does not utilize all this capacity since the free version has limitations.
The next step is to ensure all your drivers for your system and especially your GPU is up to date. GPU drivers are regularly updated to deal with new versions of operating systems and software, so if you have done any updates it is key to ensure your drivers are up to date.
Software Fixes
If your render keeps getting stuck on a certain frame in your project and you can’t figure out why try changing these settings:
- Go to Preferences > User > UI.
- Deselect Stop renders when a frame or clip cannot be processed.
- And then also deselect Stop playback when a dropped frame is detected.
While this may work it is not really a fix, but more of a workaround. You will still need to determine what is the actual cause of the render crash as this simply bypasses the problem. But it may save you in a critical situation. Work out why that frame is causing the crash. It often helps to monitor your system resources while performing a render to see if something like your CPU or memory is maxed out when the crash happens.
If it is a resource problem you can try reducing the render speed in your render settings on the delivery page.
- Go to the File tab. The render speed always defaults to the maximum.
- We recommend adjusting the Render Speed setting to 75 or even 50. This will not affect the quality of your render but will help reduce the load on your computer.
- Turn off Updates during Render by clicking on Minimal from the menu in the viewer (the 3 dots next to the viewer, top right). This turns off live updates in the viewer as the render progresses.
Sometimes the problem is with a particular clip that has heavy effects or color grading on it. If that is the case the best solution is often to render that clip on its own to a format that is easy to edit like ProRes or DNxHR, then reimport the rendered clip to use in your project. This saves DaVinci Resolve from the complex render of the clip while trying to render audio, color, and everything else as well.
It is important to know that render crashes in DaVinci Resolve are often system and project-specific. Reasons can be wide-ranging and difficult to determine at times. Your best way to avoid them is to ensure your system, software and drivers are up to specifications and up to date as this will avoid most of the common problems.
Part 2: Quick Fixes for DaVinci Resolve 17 Render Glitches
Sometimes it is not a render crash that is the problem but rather a glitch in the rendered file. This mostly happens with fast-moving motion graphics when exported to H.264/H.265. Below are a few potential solutions.
- Render to a different file type first, e.g., ProRes or DNxHR. These files are larger but are better suited to editing and less likely to cause these glitches.
- Don’t use automatic keyframes when rendering to H.264/H.265. Instead, change it to 1 or 0. This often fixes the problem.
- Update DaVinci Resolve. Each new version generally fixes a bunch of bugs in the software, so it is worth checking if your problem has been addressed within an update.
Render crashes are frustrating for any editor but a systematic approach to finding the reason for the crash will help you solve it. Common problems are typically associated with hardware, software or user error. Making sure your system is up to spec and up to date is one of the best ways to avoid these problems.
If you are looking for more information on working with DaVinci Resolve, check out our tutorial article on rendering. Learn more about how to achieve smooth playback in DaVinci Resolve as well.
As a video editor, the last thing you want to deal with is a rendering problem in DaVinci Resolve. After hours of hard work, you expect your video to render flawlessly, but instead, you get error messages or the program freezes. Don’t worry; you’re not alone.
DaVinci Resolve users encounter rendering issues more often than they would like. In this blog post, we’ll explore the reasons why DaVinci Resolve is not rendering and how to fix them.
Insufficient Disk Space
When you render a video, DaVinci Resolve creates a new file that is usually much larger than the original project file. If your computer’s hard drive doesn’t have enough space to store the rendered file, the render process may stop or fail. To fix this issue, you need to free up some space on your hard drive. Here are some tips:
- Delete unnecessary files or programs from your computer to make space.
- Move large files or folders to an external hard drive.
- Save the rendered files to an external hard drive or a cloud storage service like Dropbox, Google Drive, or OneDrive.
Incorrect Render Settings
Render settings are critical to ensuring that your video output is of the desired quality and meets the project’s specifications. If the render settings are incorrect, you may encounter errors, failed renders, or poor quality output. Here are some tips to avoid this issue:
- Double-check the project settings and make sure they match the render settings.
- Ensure that the output file format and codec are compatible with the software or platform where you’ll be using the video.
- Set the output resolution, frame rate, and bit rate to match the project settings.
- Select the appropriate render settings for your output device or platform (e.g., YouTube, Vimeo, Facebook, etc.).
GPU or CPU Overload
DaVinci Resolve uses your computer’s GPU and CPU to process video data, and if these components are overloaded, the render process may fail or slow down significantly. Here are some tips to avoid this issue:
- Close unnecessary programs or browser tabs that may be consuming system resources.
- Check the system requirements for DaVinci Resolve and ensure that your computer meets them.
- Upgrade your computer’s hardware if it’s too old or doesn’t meet the system requirements.
- Reduce the complexity of the project by removing unnecessary effects, color grading, or audio tracks.
Corrupted Media Files
Corrupted or damaged media files can cause rendering issues in DaVinci Resolve. If a media file is corrupted, DaVinci Resolve may not be able to render it correctly. Here are some tips to fix this issue:
- Try importing the media files into a different video editing program and see if they work. If they do, export the files from that program and import them into DaVinci Resolve.
- Use a file recovery tool to recover the corrupted or damaged files.
- If the media files are irreparably damaged, you may need to replace them with new files.
Outdated DaVinci Resolve Version
Using an outdated version of DaVinci Resolve can cause compatibility issues with your computer’s hardware or operating system. Here are some tips to avoid this issue:
- Check for updates regularly and install them as soon as they’re available.
- Make sure that your computer meets the minimum system requirements for the latest version of DaVinci Resolve.
- If you encounter issues with the latest version of DaVinci Resolve, try rolling back to a previous version that worked without issues.
Incompatible Plug-Ins or Effects
DaVinci Resolve supports a wide range of plug-ins and effects, but not all of them are compatible with every version of the software. If you’re experiencing rendering issues, try disabling any plug-ins or effects you’ve added to the project and see if that resolves the issue. Here are some tips:
- Remove any plug-ins or effects that you’re not using.
- Check the compatibility of third-party plug-ins or effects with the version of DaVinci Resolve you’re using.
- Use built-in effects and transitions instead of third-party plug-ins to avoid compatibility issues.
Project File Corruption
Project file corruption is a rare but serious issue that can cause rendering problems in DaVinci Resolve. If the project file is corrupted, DaVinci Resolve may not be able to render the project properly. Here are some tips to fix this issue:
- Try creating a new project and importing the media files and timelines from the corrupted project.
- Use DaVinci Resolve’s backup feature to restore a previous version of the project file.
- If none of the above solutions work, you may need to create a new project from scratch and rebuild the timeline manually.
Insufficient RAM
Insufficient RAM can cause DaVinci Resolve to crash or fail to render properly. When rendering video, DaVinci Resolve uses a lot of memory, so it’s important to have enough RAM to handle the process. Here are some tips to avoid this issue:
- Close unnecessary programs or browser tabs to free up system memory.
- Upgrade your computer’s RAM if it’s too old or doesn’t meet the system requirements.
- Render the project in smaller sections to reduce the memory load.
Anti-Virus Software Interference
Anti-virus software can sometimes interfere with DaVinci Resolve’s rendering process, causing it to fail or slow down. Here are some tips to fix this issue:
- Temporarily disable your anti-virus software while rendering your project.
- Add DaVinci Resolve to the list of exceptions in your anti-virus software to allow it to run without interference.
- Use a different anti-virus software that doesn’t interfere with DaVinci Resolve.
Conclusion
In summary, there are many reasons why DaVinci Resolve may fail to render, from insufficient disk space to anti-virus software interference. By following the tips provided in this blog post, you can identify and fix these issues, and successfully render your video projects in DaVinci Resolve.
Remember to always double-check your render settings, keep your software up-to-date, and optimize your system to ensure smooth and efficient rendering.
With the right approach, DaVinci Resolve can help you create professional-quality videos that meet your needs and exceed your expectations.
DaVinci Resolve 18 keeps crashing while rendering. I´m out of ideas. Please help
UPDATE:
In case anyone has a similar problem in the future.
I did some Tests to determine the origin of this issue.
First I wanted to make sure that the original video file that I´m trying to edit is not corrupted. So I rendered it on my old PC that I still have here. It rendered just fine.
Now that I knew that the issue does not come from the file I´m left with either a Software or a Hardware Problem on my new PC.
Next I installed Resolve on a clean windows partition that I still had on the new PC and that I had not touched for a few months (I guess a virtual machine would have worked as well, but this was more efficient). It rendered just fine.
Now I knew that it is not a Hardware Issue.
I suspected the AMD GPU Driver might be at fault, so I upgraded it to the newest version on the clean Windows partition. The render started to crash.
OK, so it is a GPU driver issue. I downgraded the driver again a few times until it started to render without crashing. I found that the AMD GPU Driver Version 21.10.2 is the last stable Version where the render works.
I downgraded the AMD GPU driver to that Version on my primary system and tested again.
The render process was completed without crashing.
If Anybody knows why the current AMD Drivers make Resolve crash during render, or how I can fix that. Please let me know!
Hello there,
I created an account just to post this, because I´m all out of ideas.
I´m trying to render a video with DaVinci, however it always crashes at the exact same point during the render process.
Not only does DaVinci crash, but also the AMD GPU driver times out.
My system:
CPU: Ryzen 5900X
GPU: Sapphire Nitro 6800XT
RAM: 16GB
Attached are my render settings and Screenshots that show how the crash looks (Unresponsive white screen) and the driver Timeout error that is displayed.
Can please anybody try to help me with this?
If more information is required, I´m glad to provide it.
Thank you.