⭐️ ПРИВЕТСТВУЕМ НА HOSTING-MINECRAFT.RU⭐️
✔️ Если у Вас при входе на сервер возникает ошибка «Не удалось проверить имя пользователя», то это свидетельствует лишь о том, что у Вас пиратский клиент игры.
Чтобы на сервере разрешить вход пираткам, нужно в «server.properties» произвести изменения в одной строчке.
Подробный ответ находится — ЗДЕСЬ

❗️❗️ КАК ЗАКАЗАТЬ СЕРВЕР МАЙНКРАФТ СМОТРИТЕ — ЗДЕСЬ ❗️❗️
ПРОМО-КОД НА СКИДКУ 15%: ready-steady-go
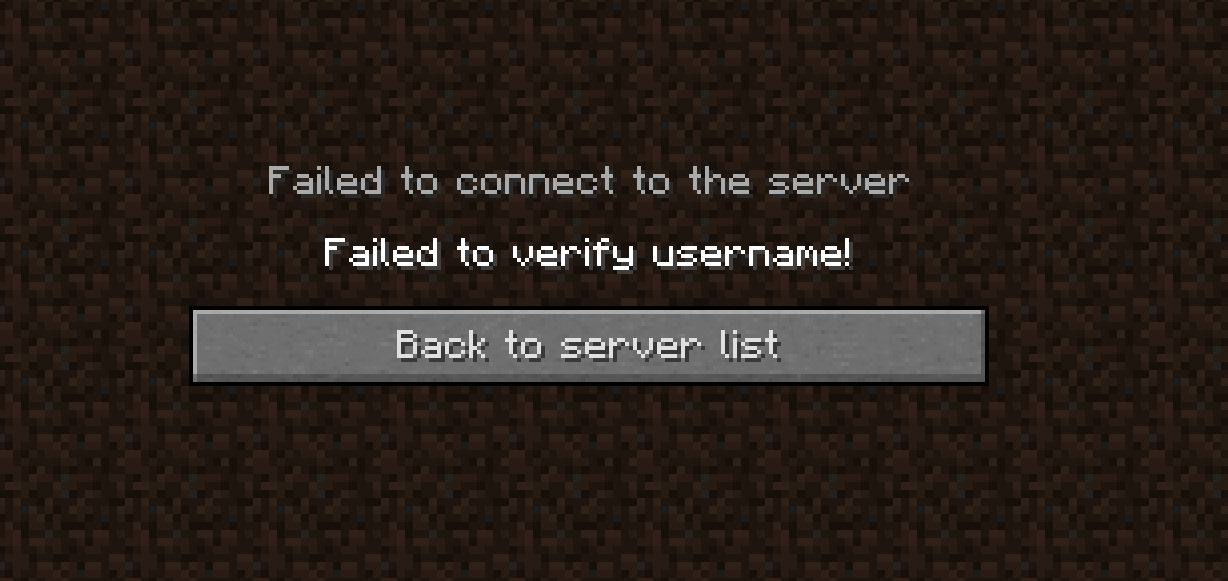
При начальной настройке сервера вы можете столкнуться с ошибкой «Не удалось проверить имя пользователя» («Failed to verify username»), которая появляется при подключении к серверу. Эта ошибка указывает на то, что сервер не смог найти лицензионный аккаунт игрока, который пытается подключиться. При этом, если использовать лицензионную версию игры, зайти на сервер удастся.

Причина возникновения ошибки
По умолчанию все новые сервера Minecraft требуют от всех подключающихся к ним игроков иметь лицензионную версию игры. Это позволяет использовать официальную систему скинов и защитить игроков от использования их аккаунтов на сервере третьими лицами. Однако не все администраторы хотят ограничивать доступ к своим серверам для игроков без лицензии майнкрафт. В таких случаях нужно предпринять ещё несколько шагов для настройки сервера.
Решение — Отключаем проверку лицензии
Чтобы решить эту проблему, давайте отключим проверку лицензии на сервере Minecraft Java Edition.
Прежде, чем продолжить
Отключение возможностей на сервере, связанных с использованием лицензионной версии Minecraft, создаёт угрозу безопасности. Поэтому рекомендуем проработать план по дальнейшей настройке сервера.
Есть несколько деталей, на которые следует обратить внимание:
-
После отключения проверки лицензии на сервере станет недоступна авторизация через сервера Microsoft, поэтому для безопасности следует установить и настроить дополнительный плагин для авторизации, если его ещё нет.
-
Если до этого на сервер заходили люди, имеющие официальную версию игры, их данные будут утеряны. Это происходит из-за того, что для хранения последних при отключенной проверке лицензии используются другие UUID.
-
После отключения проверки лицензии перестанет работать стандартный «белый список» и система банов, поэтому для ограничения доступа к серверу нужно будет использовать сторонние плагины.
-
После отключения проверки лицензии перестанут отображаться скины у игроков, не использующих сторонние лаунчеры, добавляющие свои системы скинов в игру. Для отображения скинов используйте сторонние плагины.
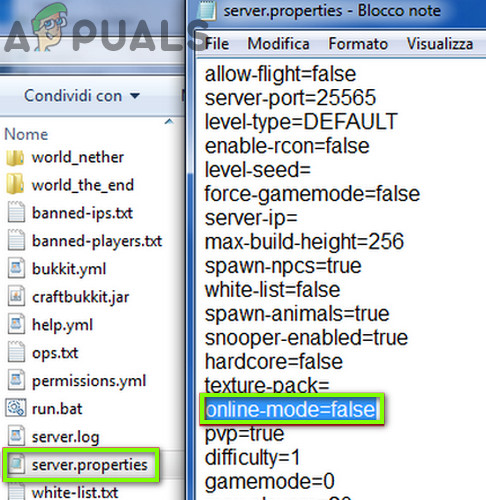
Отключаем проверку лицензии
За все возможности, связанные с лицензионными аккаунтами, отвечает всего один параметр в файле server.properties — online-mode. Давайте изменим его:
-
Перейдите в корневую папку сервера. Это папка, в которой находится ядро.
-
В корневой папке сервера найдите файл
server.properties.
Если вы работаете с сервером на вашем компьютере, расширения файлов могут быть скрыты, и тогда файл будет называться просто server. В панели на нашем хостинге расширения файлов отображаются всегда, и проблем с этим возникнуть не должно.
-
Откройте файл с помощью любого текстового редактора. В Windows для этого можно использовать даже «Блокнот», а в нашей панели можно просто кликнуть по файлу левой кнопкой мыши.
-
Найдите в этом файле следующую строку:
- Замените в найденной строке
trueнаfalse. Должно получиться так:
- Сохраните файл и перезапустите сервер.
-
Partition Wizard
-
Partition Manager
- 5 Ways to Fix Failed to Verify Username Error on Minecraft
By Linda | Follow |
Last Updated November 02, 2022
Are you playing Minecraft? Have you ever encountered error «Failed to verify username Minecraft«? In this post, MiniTool Partition Wizard offers you 5 ways to fix this issue. You can try them one by one.
Failed to Verify Username Minecraft
Minecraft is a sandbox game developed by Microsoft’s Mojang Studios. In the game, players can interact with blocks in a 3D world. Features in the game include exploring the world, collecting resources, synthesizing items, and survival adventures.
The game allows players to run a multiplayer game mode through the server. However, some people report that they have encountered error «Failed to connect to the server. Failed to very username» when logging into the server.
Why does the Minecraft failed to verify username error occur? The most common reasons are as follows:
- The server is down.
- You are running the cracked version.
- Outdated Java and other reasons.
If You Can’t Connect to Minecraft Server, How to Fix it?
How to Solve Failed to Verify Username Minecraft Error
Fix 1. Log out and Back in
Sometimes, this error may be temporary and many people report that this error disappears after they log out and back in the game. This method is simple that I recommend you to try it first.
- Close your game.
- Log off your account from your launcher.
- You will then be asked to type in your email and password again, please do.
- Once logged in, you can then start your game and join the server.
Fix 2. Check the Server
If the above method doesn’t work, please check the server status on Mojang website. If the server is down, what you should do is to wait until the server is back online.
How to Fix the Friends Can’t Connect to Minecraft Server Issue?
Fix 3. Activate the Cracked Version
The cracked version cannot authenticate with most Minecraft servers. If you are using the cracked version, please activate it.
If the server is online still and you are using the official version, you can then try the following methods.
Fix 3. Edit the Hosts File
You may encounter the failed to verify username issue if the Minecraft entries in the Hosts file are not properly configured. In this case, removing the Minecraft entries from the Hosts file may solve the problem.
- Close Minecraft.
- Open Notepad and click File > Open.
- Navigate to C: WindowsSystem32driversetc.
- Change the file type dropdownto All Files and double-click on the Hosts
- Expand the Editmenu and select Find.
- Search for Minecraft(or Mojang) and delete all the entries related to it. These entries are usually located at the bottom of the file and look like website addresses.
- Save the file and close it.
- Open the Minecraft and login to the server again.
Fix 4. Update Minecraft and Java to their Latest Releases
One of possible reasons why you get the Minecraft failed to verify username error is that the Minecraft and Java is out of date. You can update them to their latest versions.
- Open the Minecraft and click on the Optionsbutton near the username.
- Click on the Force Updatebutton and let the update process complete.
- Click Windows, type Configure Javaand launch Configure Java.
- Steer to the Updatetab and click on the Update Now If an update is available, apply the Java update.
If possible, you can also try adding the game into the whitelist of the Firewall.
Fix 5. Change the Server Mode to Offline
If you are using a custom Minecraft server, changing the server mode to offline may solve the problem. But please note that switching into the offline mode may reset your progress to defaults.
- Stop the Minecraft server and then completely exit it.
- Navigate to the installation directory of the server (the folder where the Server.jar file is located).
- Choose the Propertiesfile and open it with Notepad.
- Expand Editand click Find.
- Aearch for online-mode and change its value to false.
- Launch game and login to the server again to see whether the issue is solved.
About The Author

Position: Columnist
Author Linda has been working as an editor at MiniTool for 1 year. As a fresh man in IT field, she is curious about computer knowledge and learns it crazily. Maybe due to this point, her articles are simple and easy to understand. Even people who do not understand computer can gain something.
By the way, her special focuses are data recovery, partition management, disk clone, and OS migration.
«Minecraft» представляет собой одну из наиболее востребованных игр в мире. Тут можно создавать свои приключения и миры. Однако в отдельных случаях у геймеров появляется уведомление о том, что не удалось проверить имя пользователя в игре «Minecraft Aternos». Существуют самые разные причины появления этой проблемы. В зависимости от этого требуется искать и пути решения.
Описание проблемы
Появление ошибки с ником пользователя говорит о том, что сервер Aternos не смог установить соединение с серверами Mojang, которые отвечают за аутентификацию геймеров. Это связано с рядом факторов:
- Наблюдается перегрузка ресурсов. Также они могут быть недоступны из-за DDoS-атак или технических работ.
- Отсутствует обновление сервера Aternos до последнего варианта софта. Также причина может заключаться в применении несовместимых модов или плагинов.
- Применяется пиратская версия приложения, которая не поддерживается сервером. Также это касается использования модов.
- Геймер указал неправильное имя пользователя или пароль при входе в игру.

Как решить ее
При появлении ошибки можно сделать следующее:
- Оценить статус серверов Mojang на портале https://status.mojang.com/. При наличии красного или желтого цвета это означает, что они недоступны или наблюдается перегрузка. В такой ситуации требуется дождаться восстановления работы.

- Проверить используемую версию софта и сравнить ее с вариантом Aternos. В случае несовпадения требуется поменять приложение. Это можно сделать через настройки лаунчера. Также допустимо загрузить нужный вариант с официального портала.

- Проверить использование лицензионной версии приложения и правильность введения логина и пароля при входе. Если информация утеряна, можно использовать функцию восстановления.

- Оценить наличие доступа к интернету для работы игрового софта и лаунчера. Это нужно сделать в настройках антивирусного софта или брандмауэра. При использовании прокси или VPN их следует отключить.
- Перезагрузить игровое приложение и лаунчер. Затем можно пробовать снова подключаться к ресурсу.

Ошибка с именем пользователя в «Майнкрафт» в Aternos часто связана с различными факторами. В зависимости от этого требуется подбирать метод решения проблемы.
Нашли опечатку? Выделите текст и нажмите Ctrl + Enter
Поделись с друзьями:
Твитнуть
Поделиться
Поделиться
Отправить
Класснуть
Вотсапнуть
Запинить
При попытке подключения к серверам Манйкрафта, стала появляться ошибка: Не удалось проверить имя пользователя Minecraft (Failed to verify username!). Попробуем разобраться чем вызван сбой, а ниже дадим рекомендации как исправить её и какой лаунчер для запуска лучше использовать.

Failed to verify username!
Содержание
- 1 Проблемы ошибки входа
- 2 Решения ошибки
- 2.1 Обновляем библиотеки игры
- 2.2 Устанавливаем лаунчер Mojang
- 3 Выводы
Проблемы ошибки входа
Если при попытке войти на свервер у вас появляется бесконечная загрузка или ошибка «Не удалось проверить имя пользователя» это вызвано тремя основными причинами:
- Не лицензионная версия Майнкрафта.
- Неправильный ник в подаче заявки.
- Сбой при использовании лаунчера.
- Скачана не последняя версия игры(отсутствуют нужные библиотеки.
Если у вас не установлена лицензионная версия игры – поиграть на сервере у вас не получится. Тут выход один – найти другой подходящий сервер.
Решения ошибки
Первое, что стоит проверить – введенный никнейм в заявке. Если набирали вручную, могли ошибиться на несколько символов. На будущее при создании регистрации просто копируйте ник, особенно если в нем много символов и цифр.
Обновляем библиотеки игры
В игре должны быть обновлены необходимые библиотеки и файлы, т.к. перед запуском игры на сервере все файлы сверяются. Все способы победить ошибку «Failed to download file» мы подробно расписали тут: Failed to connect to libraries minecraft.net – простое решение. При сбоях обновления листайте статью в самый низ и читайте раздел «Загружаем обновления вручную».
Устанавливаем лаунчер Mojang
Установите лаунчер Mojang, для этого следуйте простой инструкции:
- Загружаем Mojang Installer по ссылке.
- Идем в папку «загрузки» и кликаем правой кнопкой мыши по файлу MinecraftInstaller.msi и выбираем «Запуск от имени администратора».
- Авторизуемся через Mojang и пробуем зайти на сервер.
Выводы
Как видим основных причин ошибки «Не удалось проверить имя пользователя» в Minecraft несколько: ошибка в никнейме, блокировка нелицензионной версии игры владельцами сервера или устаревшие библиотеки. Для лицензии пробуйте советы выше. Если пользуетесь крякнутой версией – обойти защиту будет трудно. Оставляйте комментарии получилось ли запустить игру и пишите комментарии что бы мы вышли в топ. Так же сообщите если хотите играть на серверах без лицензии, мы подберем для вас рабочие лайфхаки.
Оценка статьи:

 (6 оценок, среднее: 3,00 из 5)
![]() Загрузка…
Загрузка…
Самое читаемое:

17.03.2022
Как установить дополнительные виджеты на экран телефона Андроид
Если у Вас возникли сложности с тем, чтобы добавить виджеты приложений на смартфон, то это пошаговое руководство…
Далее

17.03.2022
Как очистить кэш телеграмма на телефоне Андроид
Люди, которые активно используют мессенджеры, зачастую не догадываются о том, что в их мобильных гаджетах…
Далее

17.03.2022
Как скопировать ссылку на свой телеграмм Андроид
Любой из пользователей мессенджера Телеграм в тот или иной момент времени задавался вопросом, как узнать, где…
Далее

02.03.2022
Ошибка 104101 в Zoom – как исправить
Содержание1 Ошибка 104101 в Zoom – как исправить1.1 Причины ошибки1.2 Смена параметров брандмауэра Windows1.2.1 Отключение…
Далее
Minecraft launcher may show ‘failed to verify username’ if the launcher itself or the Java edition of your system is outdated. Moreover, hindrance from the antivirus/firewall or conflicting applications (like Hamachi) may also cause the issue at hand.
Before proceeding with the troubleshooting process, check the status of the Minecraft servers (especially, the auth server) if they are up and running. Moreover, performing a reboot of your PC/local server may do the trick for you. Additionally, make sure only one server instance is running on the machine. Also, it is worth mentioning that cracked versions cannot authenticate with the Minecraft server and thus show the ‘failed to verify username’ message.
Solution 1: Edit the Hosts File
You may encounter the failed to verify username issue if the Minecraft entries in the Hosts file of your system are not properly configured. In this context, removing the Minecraft entries from the Hosts file may solve the problem.
- Exit the Minecraft launcher and end the related processes in the Task Manager.
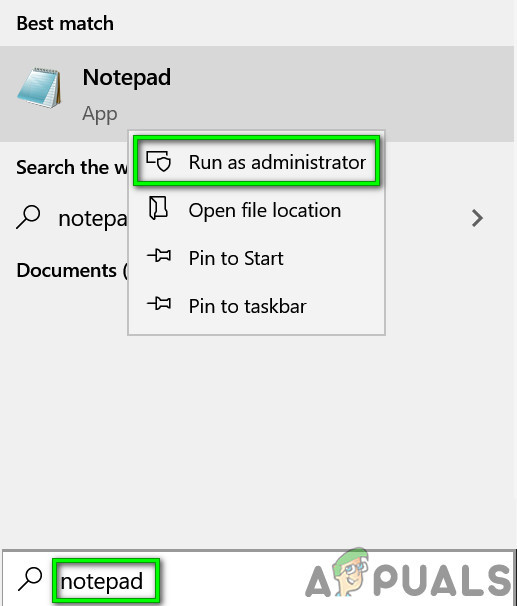
- Now click Windows, type: Notepad and right-click on Notepad. Then select Run as Administrator.
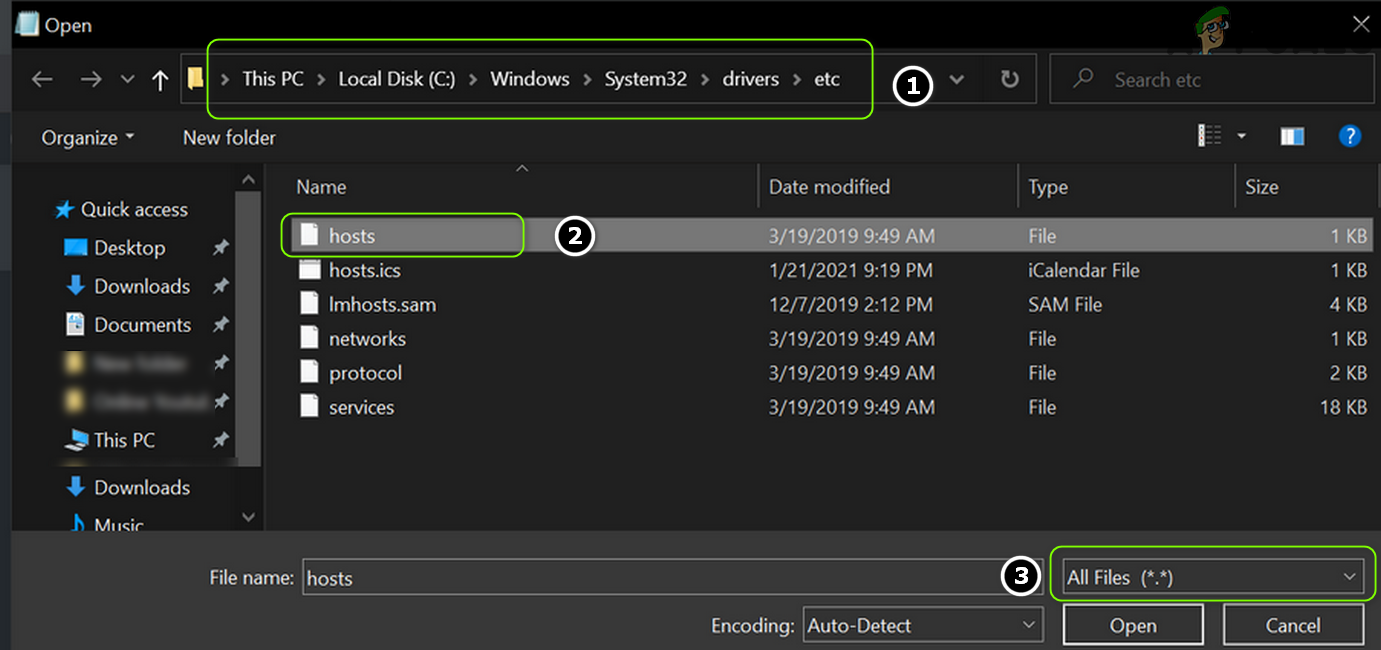
Open Notepad As Administrator - Then expand File and select Open.
- Now navigate to the following path (copy-paste the address):
WindowsSystem32driversetc
- Then change the file type dropdown to All Files and double-click on the Hosts file.
Open the Hosts File in the Notepad - Now expand the Edit menu and select Find.
- Then search for Minecraft (or Mojang) and delete all the entries related to it.
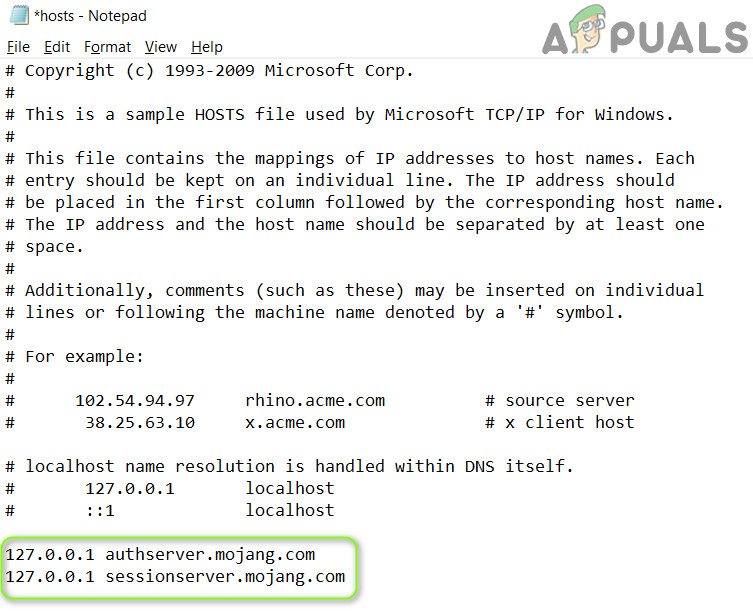
Delete Mojang Entries from the Hosts File - Now save the file and close it.
- Then open the Minecraft launcher and check if it is clear of the ‘failed to verify username’ issue.
Solution 2: Update the Minecraft Launcher and Java to their Latest Releases
You may encounter the failed to verify username issue in Minecraft if its launcher or the Java installation of your system is outdated. In this case, updating the launcher and the Java installation to their latest releases may solve the problem.
- Open the Minecraft launcher and near the username, click on the Options button.
- Then click on the Force Update button and let the update process complete (if it updates).
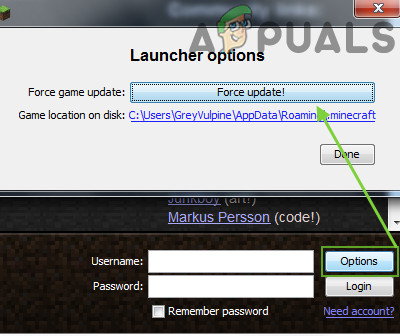
Force Update the Minecraft Launcher - Now reboot your PC and upon reboot, check if the username issue is resolved.
- If not, download the official Minecraft launcher and install it as an administrator (without removing the previous installation).
- Once installed, check if the username issue is resolved.
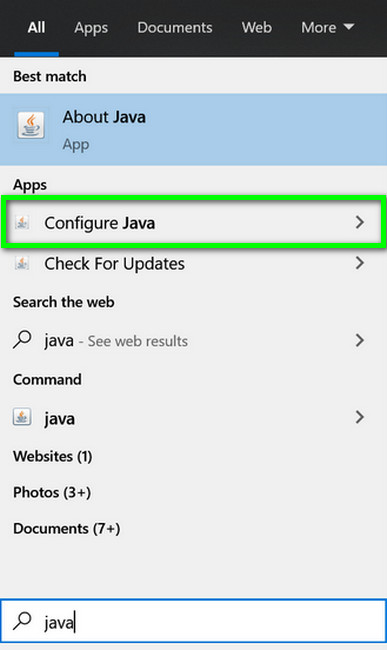
- If the issue persists, click Windows, type: Configure Java and launch Configure Java.
Open Configure Java - Now steer to the Update tab and click on the Update Now button (near the bottom corner of the window).
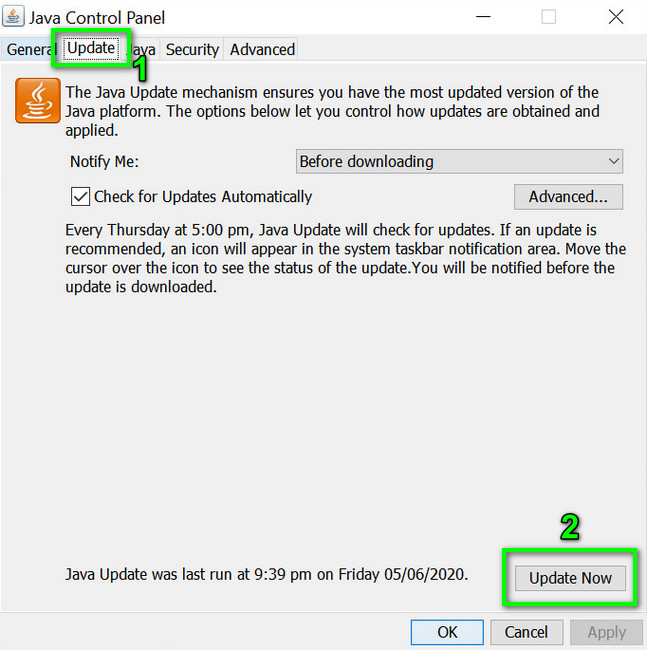
Click Update Java in the Update Tab - If an update is available, apply the Java update. Now repeat the same to the other versions of Java (if you have more than one installation of Java).
- After updating Java, check if the Minecraft is clear of the failed to verify username issue.
Solution 3: Create More Storage on the System Drive
The failed to verify username issue may emerge if the drive on which Minecraft is installed is nearly full (which may force the OS to prioritize different essential system operations over the Minecraft processes and thus cause the issue). In this scenario, deleting the temp/unnecessary files of the drive may solve the problem.
- Firstly, delete all the unnecessary files on the system drive (if its storage capacity is nearly full) and then perform a disk cleanup of the drive.
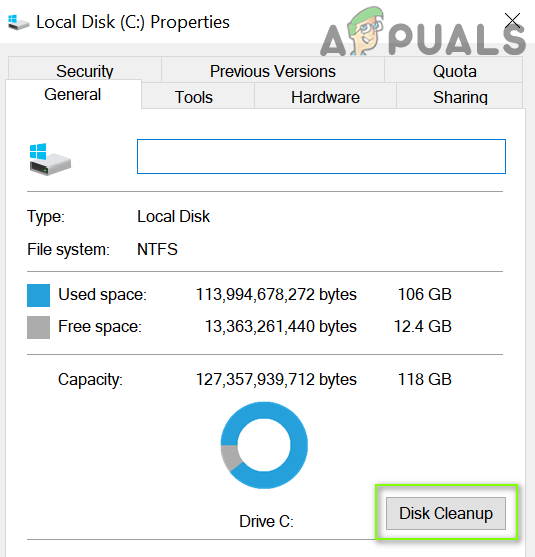
Click Disk Cleanup in the System Drive’s Properties - Now launch Minecraft and check if it is operating fine.
Solution 4: Log out and Log Back into the Minecraft Launcher
A temporary glitch between your Minecraft launcher and its server may cause the ‘failed to verify username’ issue. In this scenario, logging out and logging back into the launcher may solve the problem.
- Exit the Minecraft launcher (as well as any 3rd party launcher like Lunar client, if using) and make sure no process related to it is running in the Task Manager.
- Then open the Minecraft launcher and Quit Game (if applicable).
- Now click on the username (near the top right corner) and select Log out.
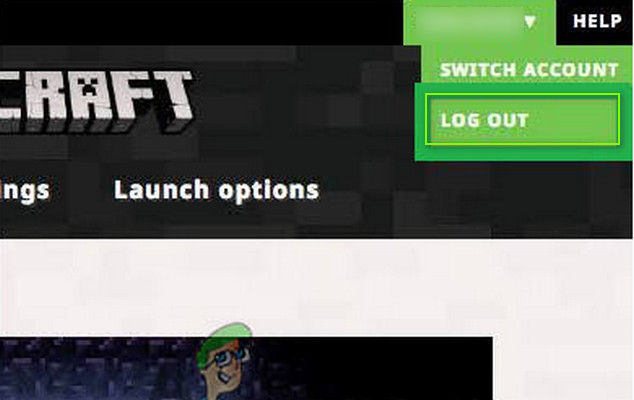
Log Out of the Minecraft Launcher - Then exit the Minecraft launcher and end the Minecraft-related processes in the Task Manager.
- Now launch a web browser and steer to the Minecraft website.
- Then log in using your Minecraft credentials and after that, open the Minecraft launcher.
- Now log in using your Minecraft credentials and check if the ‘failed to verify username’ issue is resolved. If so, then you may use the 3rd party launcher (if being used).
- If the issue persists, log out of the Minecraft (and any 3rd party client) and close any of the related processes in the Task Manager.
- Then launch a web browser and steer to the Minecraft website.
- Now click on Login and open the link of Forgot Password.

Click on the Forgot Your Password Link on the Mojang Website - Then, enter your email (registered with Minecraft) and click on Request Password Reset.
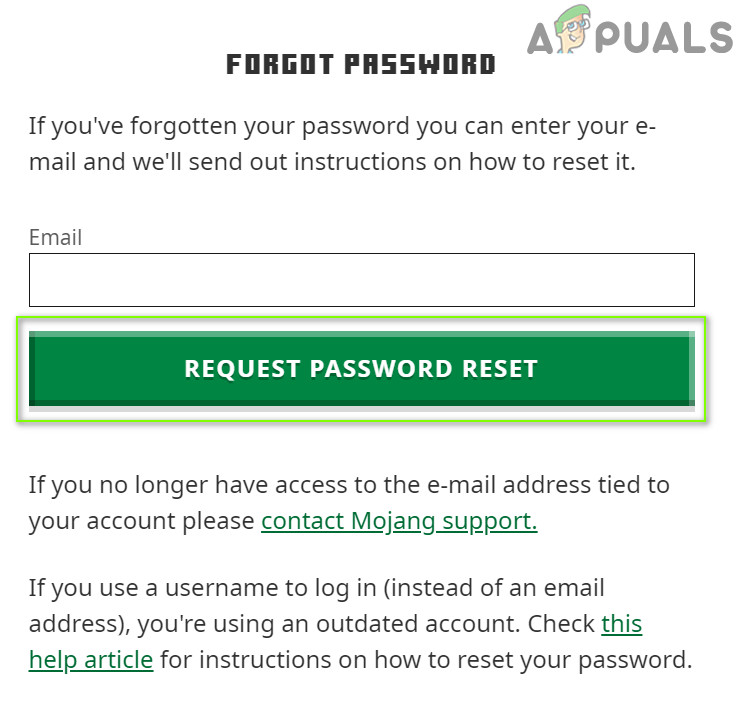
Request Password Reset on the Minecraft Website - Now follow the instructions in the email to reset your password and once the password reset is completed, open the Minecraft launcher.
- Then log in using your credentials and check if the username issue is resolved.
If the issue persists, then check if your username has space at the end (login to the Minecraft website, double-click on your user’s name, and check if space is highlighted with the name), if so, then you may have to contact the Minecraft support to remove the trailing space.
Solution 5: Allow the Connection to Minecraft in the Antivirus/Firewall Settings
You may fail to verify the username in Minecraft if the antivirus/firewall of your system (Kaspersky is reported to cause the issue at hand) is blocking access to a resource essential for the operation of Minecraft. In this context, allowing the Minecraft connection in the antivirus/Firewall settings may solve the problem. Before proceeding, check if you can access the Minecraft Session Server (a white page means it is OK).
Warning: Advance with extreme caution and at your own risk as editing the antivirus/Firewall settings is a proficient task and if not done properly, you may expose your system/data to threats.
- Temporarily disable antivirus and Firewall of your system.
- Then check if the username issue is resolved.
Add Minecraft to Trusted Applications of the Firewall
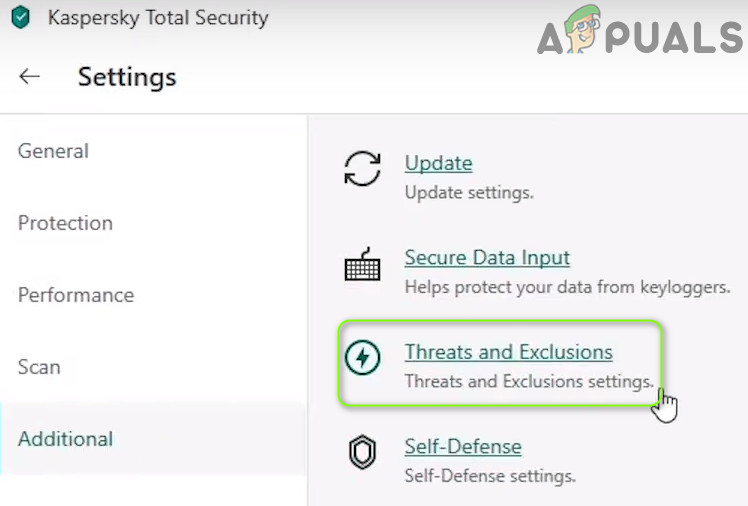
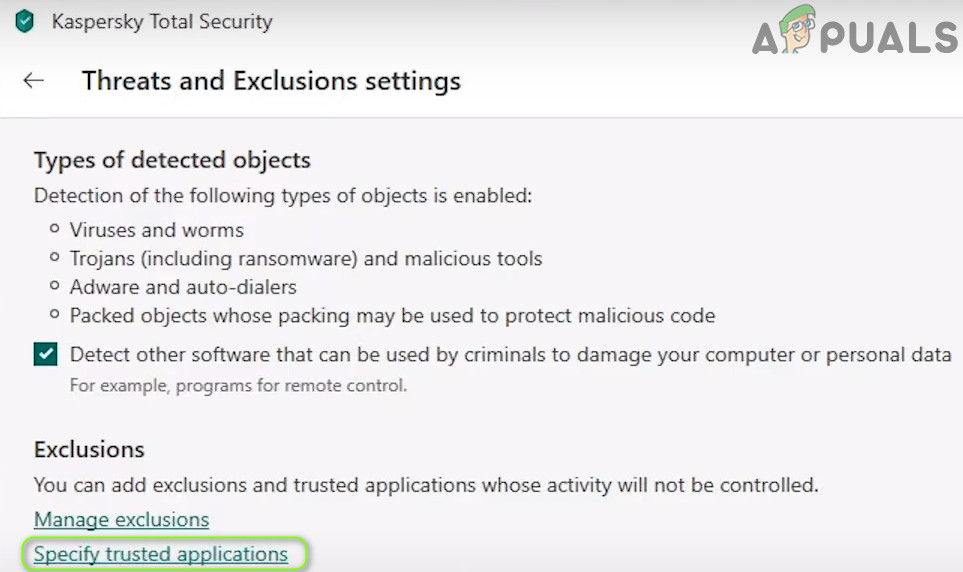
If the issue was resolved after temporarily disabling the antivirus/firewall, then you may add Minecraft in the trusted applications of the antivirus/firewall to allow the connection to Minecraft. For elucidation, we will go through the process for Kaspersky.
- Launch Kaspersky and open its settings.
- Now, in the left pane, steer to the Additional tab, and in the right pane, open Threats and Exclusions.
Open Threats and Exclusions in the Kaspersky Settings - Then click on Specify Trusted Applications (in the Exclusions section) and click on Add.
Open Specify Trusted Applications in Threats and Exclusions Settings of Kaspersky - Now select Minecraft in the applications’ list or click on Browse and select Minecraft (i.e., Minecraft.exe) in its installation directory.
- Then checkmark all the options (e.g., Do Not Scan Files Before Opening, etc.) and click on Add.
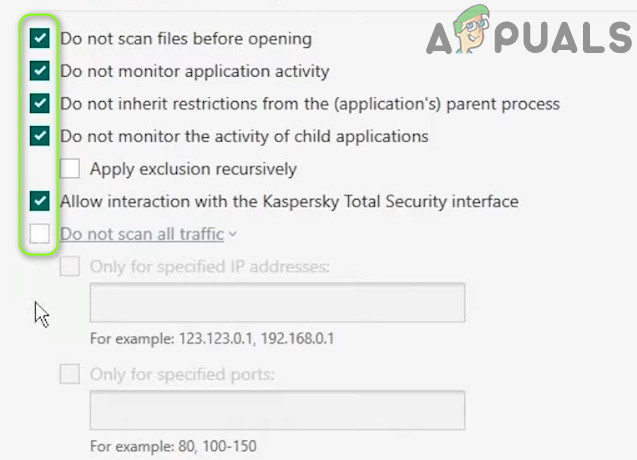
Enable All the Exclusions of the Application in Kaspersky - Now save your changes and repeat the same for the following applications (if applicable):
- java.web start launcher
- MinecraftServer.exe
- Java (TM) Platform SE binary (usually located at, c:program filesjavajre7binjavaw.exe)
- Any other Java installation
- Then open the Minecraft launcher and check if it is clear of the verification issue.
Allow the Inbound / Outbound Connection
If the issue persists, you may have to create the inbound/outbound rules to allow the connection to the server. For illustration, we will discuss the process for the Windows Defender Firewall.
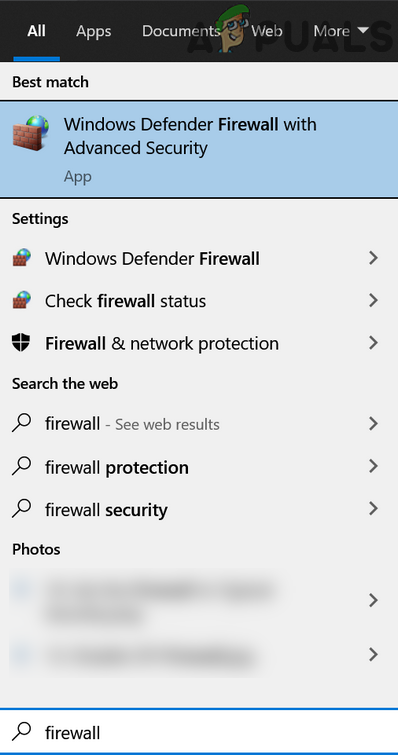
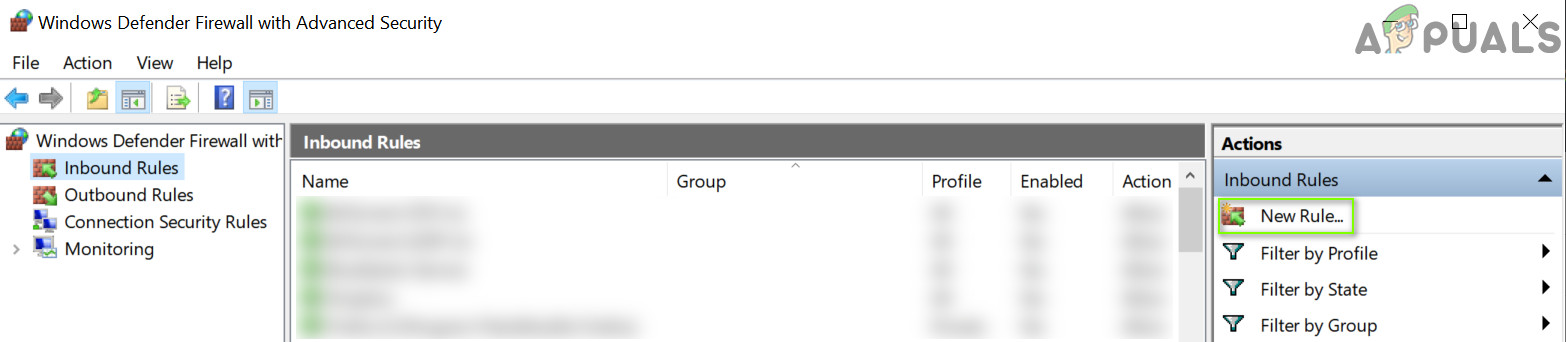
- Click Windows, type: Firewall, and select Windows Defender Firewall with Advanced Security.
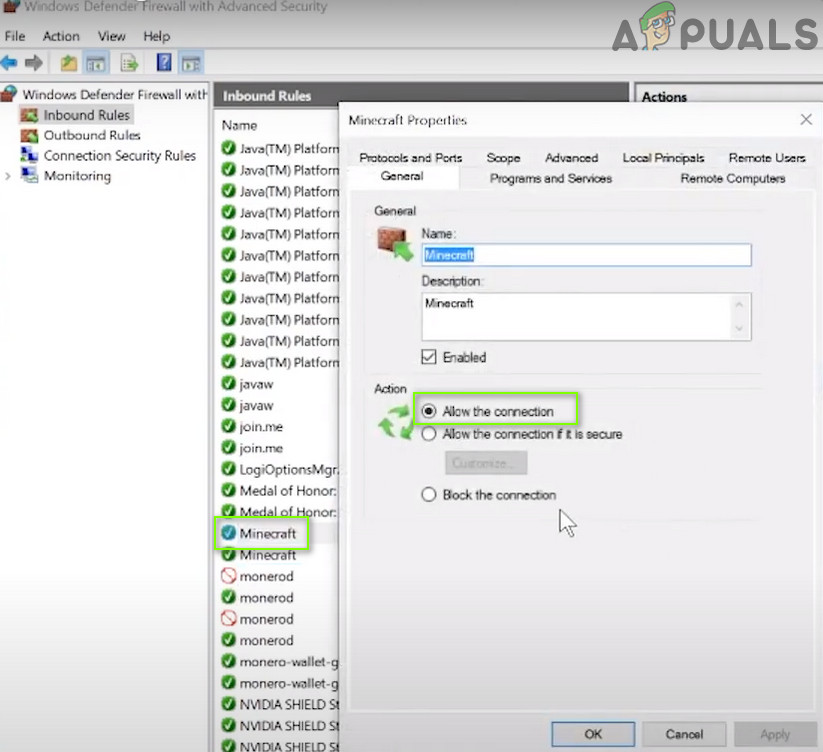
Open Windows Defender Firewall - Now make sure no inbound and outbound rule is blocking access to Minecraft (or your local server) and is set to Allow the Connection.
Allow the Minecraft Connection Through the Windows Defender Firewall - Then, in the Inbound tab, click on New Rule and select Program.
Create a New Inbound Rule - Now, click on Browse (in front of This Program Path) and steer to the installation directory of Minecraft.
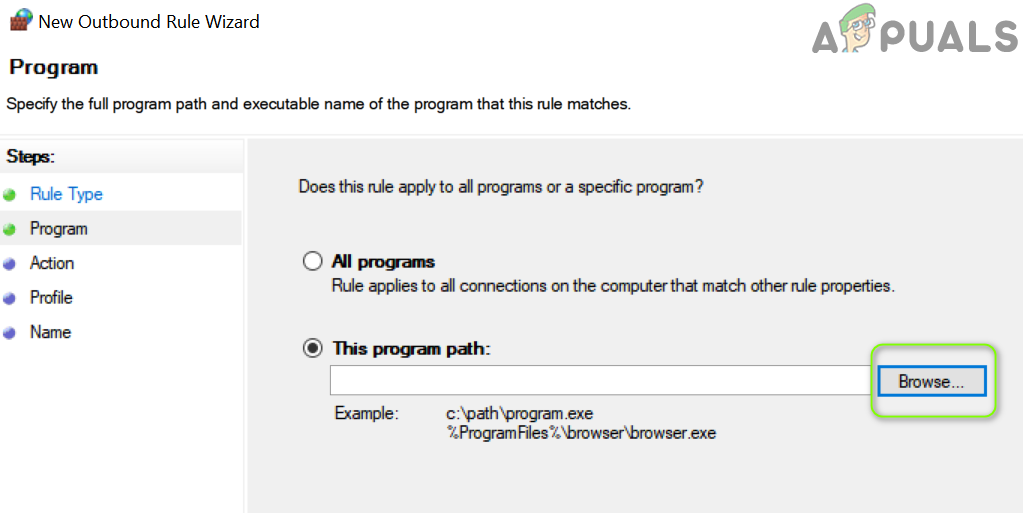
Open Browse and Steer to The Installation Directory of Minecraft - Then double-click on Minecraft.exe and click on Next.
- Now select Allow the Connection and choose all the three profiles (i.e., Domain, Private, and Public, etc.).
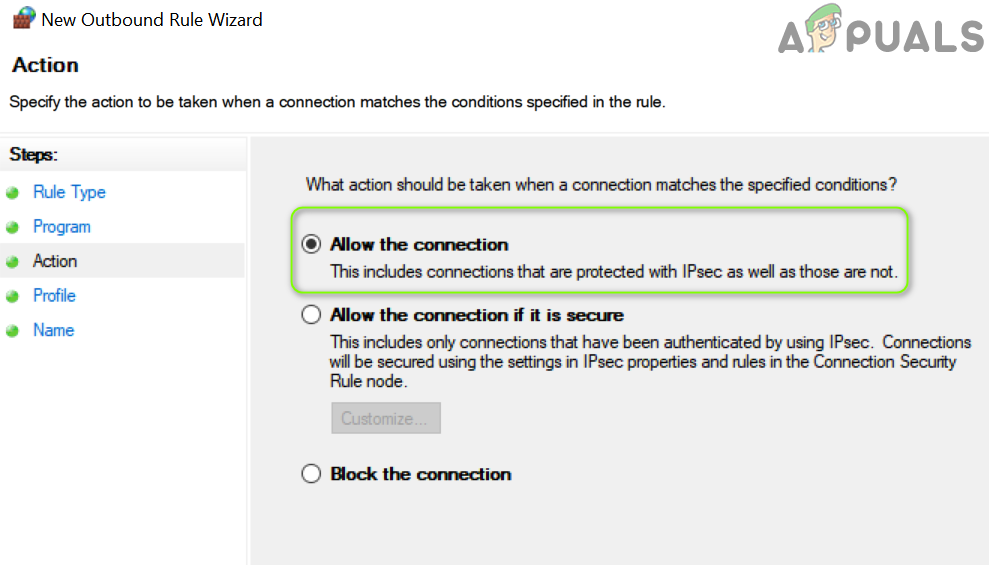
Select Allow The Connection in New Rule Window - Then name the rule as per your easiness and click on Next.
- Now repeat the same for the Minecraft server and Java installation.
- Then repeat the same steps to create the outbound rules for Minecraft.
- Now reboot your PC and check if the username issue is resolved.
If that did not do the trick, then make sure the required ports are properly forwarded in the (system and router) firewall. Also, it will be a good idea to check if the parental filters are not blocking the Minecraft connection and thus causing the issue.
Solution 6: Disable/Remove the Conflicting Applications
You may encounter the failed to verify username issue if the conflicting applications (Hamachi server and Relevant Knowledge are reported to create the issue) are hindering the operation of Minecraft. In this context, disabling/removing the conflicting applications may solve the problem.
- Clean boot your PC (do not disable Minecraft-related processes/services) and check if you can log in to Minecraft.
- If so, then enable the processes/services one by one till the problematic one is found.
- Once found, either disable that process/service at the system startup or completely remove it (if not essential).
Hamachi server and Relevant Knowledge are reported to cause the issue at hand. If you have Hamachi, then disable/enable it when using Minecraft (or uninstall it), whereas, it will be better to uninstall Relevant Knowledge in Apps & Features.
Solution 7: Change the Server Mode to Offline
If none of the solutions so far did the trick for you (and you are using a custom Minecraft server), then changing the server mode to offline may solve the problem. But before proceeding, make sure the server application (e.g., Craftbukkit) is updated to its latest version. Also, if a whitelist is active on the server, then check if whitelisting (or pardoning yourself) solves the problem.
Warning: Proceed at your own risk as setting the server mode as offline may expose your server to hacked accounts and hacking attempts. Also, switching into the offline mode may reset everyone’s progress to defaults.
- Firstly, make sure to stop the Minecraft server (execute “/stop” in the server console) and then completely exit it.

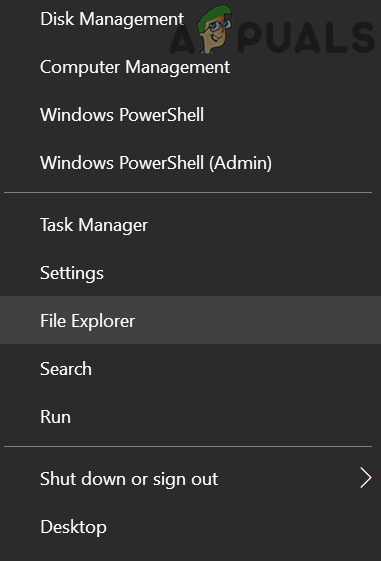
Stop the Minecraft Server - Then right-click Windows and open File Explorer.
Open the File Explorer - Now navigate to the installation directory of the server (the folder where the Server.jar file is located), usually, Documents/Minecraft.
- Then right-click on Server.Properties file and select Open With>> Notepad.
- Now expand Edit and click Find.
- Then search for online-mode and change its value to false (so it looks like online-mode=false).
Set Online-Mode to False in Server.Properties of Minecraft - Now save your changes and launch/start the server to check if it is clear of the failed to verify username issue. If so, then you may set up a whitelist on the server (to avoid security concerns).
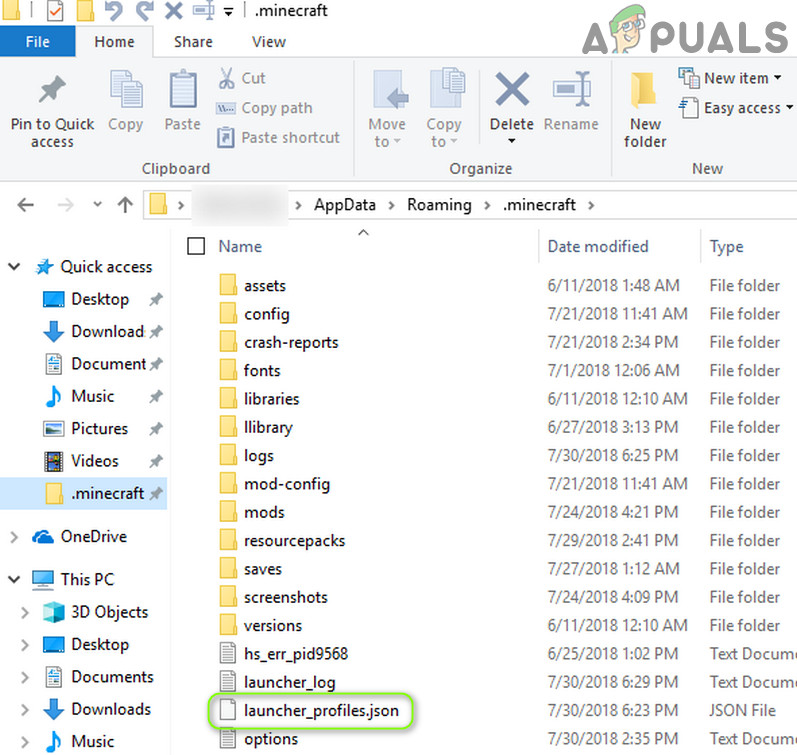
If the issue persists, then check if disabling IPv6 (or setting the IPv4 in the startup batch of your server) on all the network adapters resolves the issue. If the issue persists and you are using a Lunar client, then setting the “displayName” in the launcher_profiles.json (open with Notepad) in the Lunar folder of %appdata% directory file to your username resolves the issue. If not, check if deleting the mentioned launcher_profiles.json resolves the issue.
Last modified on Aug 18, 2022 in
Server Errors
By ApexHosting
-
Facebook
-
Twitter
-
Youtube
Overview
You may have tried to join your Minecraft server and been rejected due to the error “Failed to verify username” or “Invalid Session”. This issue occurs because the client’s launcher failed to authenticate with Mojang’s session servers, especially if you recently changed your username. Luckily, you can fix this error with just a few steps.
You may also be running a non-premium version of Minecraft. If you did not pay for Minecraft, you will not be allowed to join most servers due to the server running in online mode. However, it can be changed to offline mode fairly easily to allow non-premium players to join.
Validating Session
- Close the Minecraft application.
- Log off of your account from your Minecraft launcher

- You will then be asked to type in your email and password again, please do.
- Once logged back in, you can then start your game and join the server!
Allow Non-Premium Players
- Navigate to your Apex Server Panel, then stop the server.
- To the left of the panel click
Config Filesand then clickServer Settings. - Locate
Online Modeand set it to disabled, then click save.
- Head back to the Game Panel dashboard and turn the server back on. It should now let you join.
Common Issues
After restarting the launcher, players still can’t join
If you are using premium Minecraft and have already followed the steps on to resolve the error and still cannot join, try restarting the server.
Related Content
Connection Refused
How to edit config files
Control Panel basics