Your version of Eclipse is 64-bit, based on the paths and filenames.
However, the version of Java that it’s picking up is 32-bit, as indicated by where it is coming from, on this line:
-vm C:Program Files (x86)Javajre7binjavaw.exe
Program Files (x86) is the folder where 64-bit Windows places 32-bit programs.
Program Files is the folder where 64-bit Windows places 64-bit programs.
This can happen when a system has more than one JVM installed, as is often the case on Windows 64-bit (for example, the JRE download page uses the bit-ness of the browser to determine what bit-ness download to offer you, and many people use(d) 32-bit browsers even though they run 64-bit Windows).
The best way to fix this, assuming you do in fact have 64-bit JRE or JDK on your system, is to specify in eclipse.ini exactly which JVM you want it to use. The instructions are detailed in the Eclipse wiki page, but basically you have to specify the -vm option in the ini file — make sure to read the wiki page carefully as the format is very specific.
Specifying the JVM path in eclipse.ini is strongly recommended because doing so isolates Eclipse from any potential changes to your system PATH that some program installers might make (I’m talking to you, Oracle!).
Another option would be to download and use 32-bit Eclipse instead of 64-bit, but it’s still strongly recommended to specify the path to the JVM in eclipse.ini.
Left for historical reference:
To check your version of Java, run
java -version
in a console (command prompt). On Windows 7 with 64-bit Java 6 I get:
  java version "1.6.0_27"
  Java(TM) SE Runtime Environment (build 1.6.0_27-b07)
  Java HotSpot(TM) 64-Bit Server VM (build 20.2-b06, mixed mode)
Note the 3rd line, which shows that this is a 64-bit version.
On a 32-bit version you’ll get something like:
Java HotSpot(TM) Client VM (build 20.1-b02, mixed mode, sharing)
If you are on a 64-bit machine, then you can install the 64-bit JDK and uninstall the 32-bit one. For instance on Windows 10, just go to Settings and under Apps, you will find Java. Click on it and you will find all the different versions. Now you can select which one to uninstall.
После некоторых манипуляций с установленными JVM, при запуске Eclipse, появляется окно с ошибкой , текст которой начинается с «Java was Started but Returned Exit Code=13». Решения проблемы нашёл в заметке http://www.ashout.com/fix-java-started-returned-exit-code13-eclipse/ большое спасибо автору. У себя оставлю перевод.
Если вы получили ошибку “Java was Started but Returned Exit Code=13” во время установки Eclipse, то здесь вы поймете как решить её. Даже я столкнулся с этой проблемой в процессе установки Eclipse на операционной системе Windows. После поиска в Google я понял что многие сталкиваются с аналогичной проблемой в Eclipse. Если вы один из них, то здесь есть решение этой ошибки.
Причина ошибки “Java was Started but Returned Exit Code=13”

Прежде чем приступить к решению, давай те узнаем почему возникает эта ошибка. Если вы знаете почему возникает проблема, вы можете легко её решить.
Причина 1: Основная причина возникновения проблемы это установка разных версий 64 bit или 32 bit программного обеспечения. Это может быть Eclipse или Java.
Причина 2: Ошибка конфигурации в файле Eclipse.ini.
Причина 3: Специальные символы (#, !, @) в директории установки Eclipse.
Причина 4: Вы можете использовать последнюю версию Eclipse, но неправильную или не поддерживаемую версию Java Virtual Machine (JVM).
Выше описаны основные причины возникновения ошибки «Exit code =13» в Eclipse. Теперь мы узнаем как её решить.
Как решить «Java was Started but Returned Exit Code=13 Error» в Eclipse
Решение для причины 1: Проверьте версию операционной системы в которой вы работаете. Для проверки откройте окно «Компьютер» нажав клавиши Win+E или найдя его на рабочем столе или в кнопке пуск.

Теперь в левой панели найдите «Мой компьютер» выделите его и нажмите правой кнопкой мыши. В выпадающем меню выберите «Свойства». Когда вы нажмете на «Свойства», вы увидите окно системных свойств. В этом окне посмотрите свойство «Тип системы».
В «Тип системы» вы увидите какая у вас система 64-х разрядная или 32-х разрядная. То что вам и нужно было узнать.
Теперь вы знаете в какой операционной системе вы работаете.
После того как вы узнали какая операционная система, вы должны убедиться что скачали соответствующую версию Eclipse, а также Java.
Если вы закачали 32-х разрадную версию Java или Eclipse (на 64-х разрядной системе), вы получите ошибку «Exit code=13 error».
Пожалуйста дважды проверьте версию того, что вы закачали. Потому что во время установки не появится какая-либо ошибка несоответствия версии. Установка пройдёт гладко.
В моём случае я скачал 32-х разрядную версию Java и получил эту ошибку.
Решение для причины 2: Возможно вы сделали ошибочную конфигурацию файла Eclipse.ini, который можно найти в каталоге Eclipse. Вы можете посмотреть это официальное руководство если нужно.
Отметим несколько важных правил для настройки -VM опций.
- -VM опция и его значение ней (путь) должны быть на разных строках
- Значение должно указывать полный абсолютный или относительный путь к выполняемым файлам Java(к каталогу bin), не к домашней директории Java.
- -VM Опция должна быть до -VMARGS, так как все значения после -VMARGS передаются непосредственно в JVM.
Вы может использовать этот снимок с экрана для моей рабочей конфигурации Eclipse.ini.

Решение для причины 3: У вас могут использоваться специальные символы #, !, @ в установочном каталоге Eclipse. Если ваш каталог с установленной Eclipse содержит специальные символы, тогда появится эта ошибка. Поэтому убедитесь что вы не используете специальные символы.
Пример
До исправления специальных симврлов
C:# IDEeclipse 3.7
После исправления специальных символов в адресе
C:IDEeclipse 3.7
и решения проблемы.
Решение для причины 4: Может быть вы используете последнюю версию Eclipse и не поддерживаемую версию Java.

Для проверки версии Java нужно открыть командную строку нажав win+R и введя cmd и нажмите Enter. Теперь в консоле введите java -version, что бы узнать версию Java.
Теперь определите поддерживает ли Eclipse данную версию или нет.
Вы можете открыть каталог “readme” в каталоге Eclipse и открыть readme_eclipse.html что бы посмотреть какие версии поддерживаются.
Я рекомендую вам скачать последнюю версию Java и Eclipse.
Надеюсь вы решили проблему «Java was Started but Returned Exit Code=13 Error» в Eclipse после этой заметки. Дайте знать почему у вас возникла эта ошибка в комментариях.
I looked at all the other places and I can’t figure out how to do it.
How do you type java -version into the console. Because all I get back is that java is not recognized as a command.
I went on the java site and I got the version 1.7.0_45
so I did this
C:Program Files (x86)Javajdk1.7.0_45binjavaw.exe
instead of
C:Program Files (x86)Javajre7binjavaw.exe
it didn’t work either
«C:Program Files (x86)Javajre7binjava.exe» -1.7.0_45
It also didn’t work.
I’ve downloaded the most recent android sdk of October 30th from the official site.
Help?
-startup
plugins/org.eclipse.equinox.launcher_1.3.0.v20120522-1813.jar
--launcher.library
plugins/org.eclipse.equinox.launcher.win32.win32.x86_64_1.1.200.v20120913-144807
-product
com.android.ide.eclipse.adt.package.product
--launcher.XXMaxPermSize
256M
-showsplash
com.android.ide.eclipse.adt.package.product
--launcher.XXMaxPermSize
256m
--launcher.defaultAction
openFile
-vm C:Program Files (x86)Javajre7binjavaw.exe
-vmargs
-Dosgi.requiredJavaVersion=1.6
-Xms40
-Xmx768m
-Declipse.buildId=v22.3.0-887826
-XX:MaxPermSize=512M
![]()
cmd
11.6k7 gold badges50 silver badges61 bronze badges
asked Dec 24, 2013 at 15:59
1
The problem is that you are trying to start a 64 bit version of Eclipse with a 32 bit version of Java. You can download it from here
Start Eclipse with a 64 bit JVM and the problem will go away.
To do so:
eclipse.exe -vm c:pathto64bitbinjavaw.exe
You can also update the the first two lines in your eclipse.ini file to use the 64 bit java by default by doing the following:
-vm
c:pathto64bitbinjavaw.exe
Also, you can also download a 32 bit version of Eclipse for use with 32 bit Java. The key is that the bitness is the same.
answered Dec 24, 2013 at 16:27
![]()
cmdcmd
11.6k7 gold badges50 silver badges61 bronze badges
1
You need Java in your bin path — or put in the full pathname.
The easiest way to make sure you have the path correct is to navigate to the folder containing the java exe (i.e. use the cd command in the cmd window, use dir to confirm you are in the correct folder) and then type java -version and java.exe -version there.
By navigating to the folder you have confirmed that you are going to the right location.
answered Dec 24, 2013 at 16:02
Tim BTim B
40.7k16 gold badges82 silver badges128 bronze badges
1
Eclipse is one of the best IDEs for Java and Android developers. There are many issues with Eclipse if it is not configured properly. One of the most common errors with Eclipse IDE is of the java exit code 13. It is common to get an error like Java was started but returned exit code=13.
For programming help you can checkout AssignmentOverflow.com
This Eclipse error is one of the most frustrating bugs to solve if you don’t know the correct method. Here I have enlisted some possible solutions for this error. You have to try all of them one by one.
If you want to hire a java developer, you can make use of online java test.
Method 1:
You may get this error if the versions of java and eclipse do not match. If you have installed 64 bit java jdk on your machine and 32 bit Eclipse IDE or vice versa, then you may get this error.
So, ensure that you have installed both the softwares with their correct versions. If you installed different versions, you will have to uninstall the softwares and install them again with the same version.
Method 2:
There are cases when you want to keep both the 32 bit version and the 64 bit version installed in your machine due to compatibility issue.
When this is the scenario, you need to correctly mention the path of the system variables in the Environment Variable Settings. You have to select either 32 bit or 64 bit in both the softwares i.e., Eclipse and Java JDK.
Suppose you select 32 bit versions, you need to go to the C drive in the JDK Folder of 32 bit version. Once you do that, you can copy the path and set it in the Environment Variable section. You won’t get the same error again.
Method 3:
Another solution to this error is by copying the Eclipse folder in the C:/Program Files folder. For some this may work. However, if it does not work, you should try putting the Eclipse Folder in the C:/Program Files (x86) folder.
We hope that at least one of the above methods will work in your system. You may have to try all the three methods. One of them will surely solve your error message “java was started but returned exit code 13”.
Method 4:
There are a lot of compatibility issues with Java 1.8 and higher versions. So, if you are not able to solve the error with the above methods, you can degrade to java 1.7 or lower version and check if the error is solved or not.
Method 5:
If you have 32 bit and 64 bit versions installed at the same time, you need to set the Eclipse to one version of Java JDK. It should be explicitly set by the user, otherwise the default version of Java will be used which may cause this Error Code 13.
The solution to this the manipulation of the eclipse.ini file. The eclipse.ini is located in the Eclipse folder. Open that file with notepad editor in windows.
You need to add the following code before the line that includes -vmargs in the eclipse.ini file.
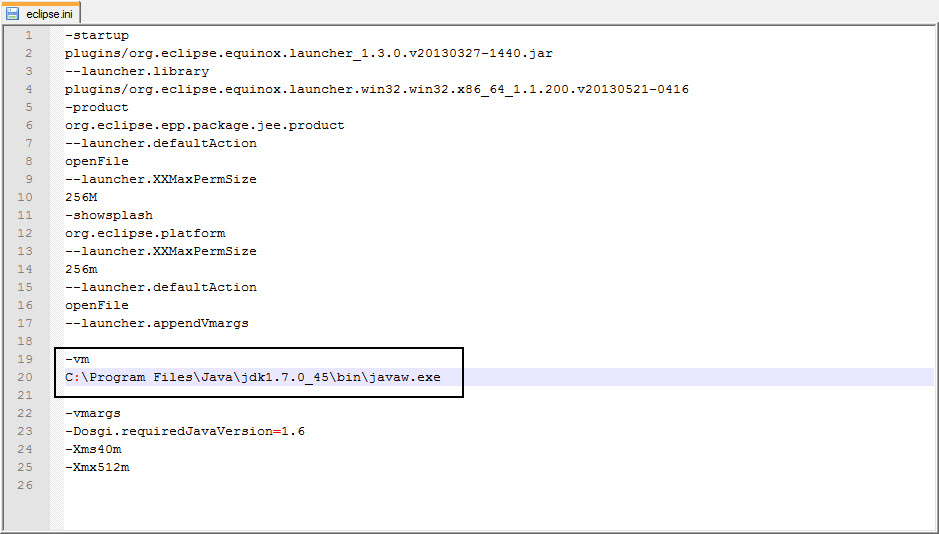
-vm
C:Program FilesJavajdk1.7.0_40-64binjavaw.exe
The second line may be different depending upon version of the java jdk installed in your machine. If you have a 32 bit JDK version, it may be found in Program Files(x86).
Few important points to remember while configuring eclipse.ini file:
1. The Java File’s Path must be Relative Path or Absolute Path. It should not just point to the Java Home Folder.
2. The -vm option and its path should be on a separate line.
3. The -vm option should be before -vmargs option.
Here is the screenshot of an eclipse.ini file.
Comment below if you are getting any difficulty to solve Java was started but returned exit code=13 error in eclipse. I will try to help you.
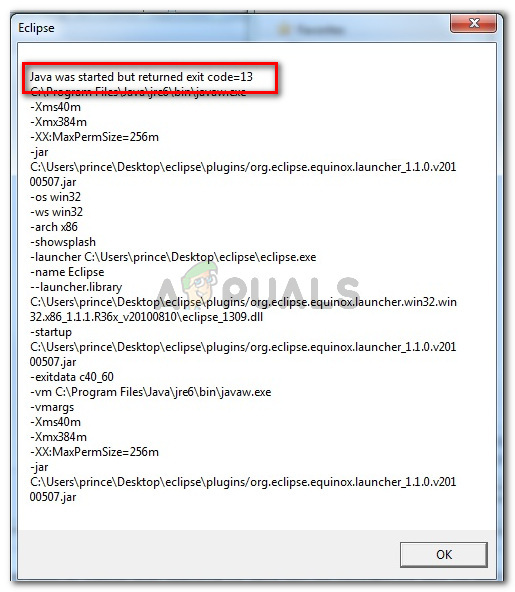
Some users are getting the Java Was Started but Returned Exit Code=13 Eclipse error when trying to run Eclipse. The issue is reported to occur with Windows 7, Windows 8, Windows 10 (32 and 64 bit).
What is causing the ‘Java was started but returned exit code =12’ error?
We investigated this particular issue by looking at various user reports. Based on what we gathered, there are several fairly common scenarios that are known to trigger this particular error message:
- An incompatible Eclipse or Java version is installed – This is the most common reason why this error message is occurring. It’s likely that likely that you’ve installed a 64-bit version of Eclipse or Java while your computer only supports 32-bit (or vice-versa).
- Eclipse includes special characters in the installation directory – Several users have managed to resolve this error message after removing the special characters (#$%^) from the installation directory.
- The computer is using an unsupported version of JVM (Java Virtual Machine) – Even if you ensure that you’re using the latest version of Eclipse, it’s possible that you’re seeing this error because you’re running an unsupported version of JVM.
- The Java Environment Path Variable is incorrectly set – Some users have managed to resolve the issue after discovering that the issue was caused by an incorrectly set Java Environment PATH variable.
If you’re struggling to resolve this particular error message, this article will provide you with a list of quality troubleshooting steps. Below you have a collection of methods that other users in a similar situation have used to get the issue resolved.
For the best results, follow the methods below in order that they are presented until you encounter a fix that is effective in getting fixing the problem in your particular scenario
Method 1: Using the correct combination of Eclipse – JDK
Eclipse and JDK (Java Development Kit) are very picky when it comes to working with one another. Keep in mind that there are only several working combinations of OS, JDK and Eclipse bitness. If you happen to use an unsupported combination, of Operating System, JDK and Eclipse, you will get the Java Was Started but Returned Exit Code=13 Eclipse error message.
Below we’ve compiled a list of working combinations. Use them for reference to verify whether is issue occurs due to an unsupported combination:
- 32-bit OS, 32-bit JDK, 32-bit Eclipse (32-bit only)
- 64-bit OS, 64-bit JDK, 64-bit Eclipse (64-bit only)
- 64-bit OS, 32-bit JDK, 32-bit Eclipse
If you have a different setup, uninstall the unsupported component and then install an appropriate one until you are able to open Eclipse without encountering the error message.
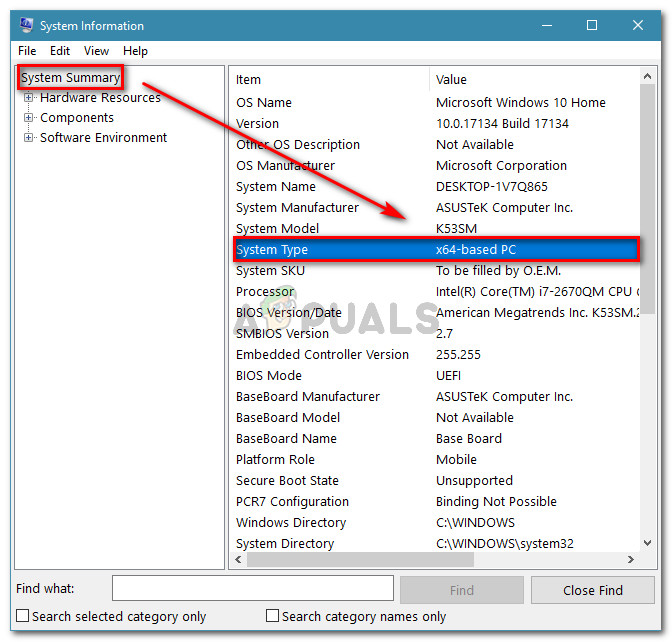
Note: In the event that you don’t know the bit architecture of your operating system, press Windows key + R to open up a Run dialog box. Then, type “msinfo32” and press Enter to open the System Information screen. In the System Information screen, go to System Summary and check up the System Type from the right pane. That’s where you’ll find your OS architecture.
If this method wasn’t applicable, move down to the next method below.
Method 2: Removing special characters from the Eclipse directory path
You might also be encountering the issue because the installation directory contains special characters. Several users who were in a similar situation have managed to get the issue resolved after eliminating the special characters (@#$%^&*()+) from the directory name.
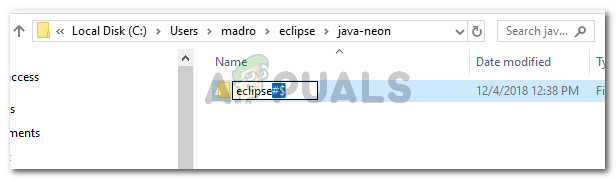
By default, you should be able to find Eclipse in C:IDEeclipse or in C:Users*YourUsername*eclipse. However, if you installed in a custom location, you might have mistakenly added a special character that is creating the issue.
You can remedy the issue by navigating to the location of the Eclipse installation manually and removing any special character that might end up creating the error message.
Note: Certain users have reported that they started getting a different error after removing the special characters from the Eclipse installation directory. This is most likely occurring because there are other dependencies that were relying on that particular location and they no longer function properly due to the change. In this case, you can resolve the problem entirely by reinstalling Eclipse.
If this method didn’t allow you to resolve the Java Was Started by Returned Exit Code=13 Eclipse error, move down to the next method below.
Method 3: Removing the broken System PATH variable
As it turns out Java 8 and a few other Java updates have the potential to mess up the environment variables, triggering the Java Was Started but Returned Exit Code=13 Eclipse error message.
If you only started to get this error message after installing Java (or a Java update), follow the steps below to remove the broken System variable PATH:
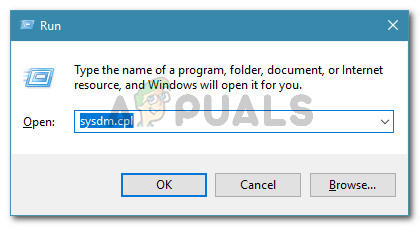
- Press Windows key + R to open up a Run dialog box. Then, type “sysdm.cpl” and press Enter to open System Properties.
Run dialog: sysdm.cpl - In the System Properties window, go to the Advanced tab and click on Environment Variables.
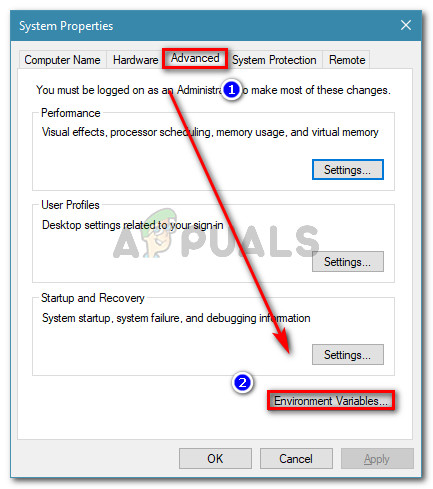
Go to the Advanced tab in System Properties and click on Environment Variables - Inside the Environment Variables window, go to System variables, select Path and click on Edit.
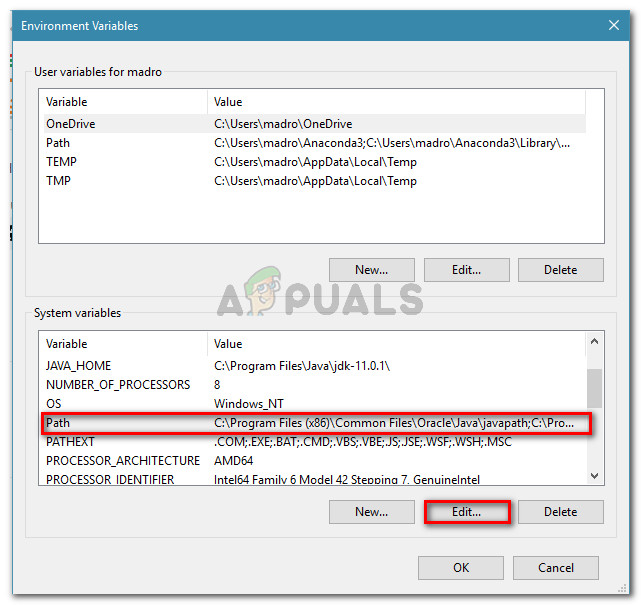
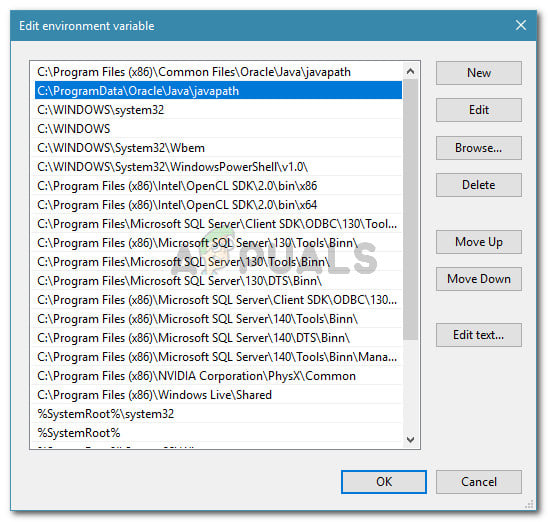
Edit the Path variable - In the Edit environment variable window, look for an environment variable mentioning Java. Once you see it, click on it once to select it and then click Delete.
Deleting the Java PATH environment variable - Restart your computer and see if you are able to start Eclipse at the next startup without encountering the error message.
If you’re still encountering the same error message, move down to the next method below.
Method 4: Reinstalling the JAVA JDK
If you’ve come this far without a result, you can probably resolve the issue by clean installing the latest JAVA JDK version. Several users finding themselves in a similar situation have reported that the Java Was Started but Returned Exit Code=13 Eclipse error was finally resolved after they uninstalled their current JDK and they installed the latest version available.
Here’s a quick guide on how to do this:
- Press Windows key + R to open up a Run dialog box. Then, type “appwiz.cpl” and press Enter to open Programs and Features.
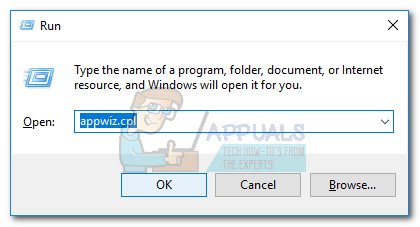
Run dialog: appwiz.cpl - Inside Programs and features, scroll down through the application list and right-click > Uninstall Java Development Kit along with any updates.
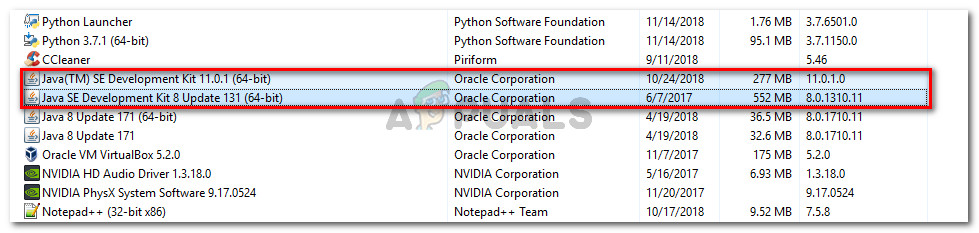
Uninstalling Java Development Kit - Visit this link (here) and download the latest version of the JDK according to your OS version and bit-architecture.
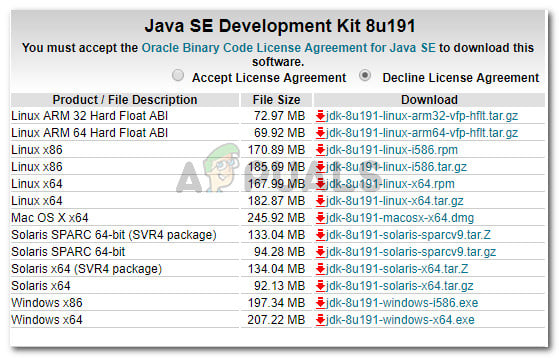
Installing the latest JDK - Open the installer and complete the installation by following the on-screen prompts. Once the process is complete, restart your computer.
- See if the error message has been resolved by opening Eclipse at the next system startup.

Kevin Arrows
Kevin Arrows is a highly experienced and knowledgeable technology specialist with over a decade of industry experience. He holds a Microsoft Certified Technology Specialist (MCTS) certification and has a deep passion for staying up-to-date on the latest tech developments. Kevin has written extensively on a wide range of tech-related topics, showcasing his expertise and knowledge in areas such as software development, cybersecurity, and cloud computing. His contributions to the tech field have been widely recognized and respected by his peers, and he is highly regarded for his ability to explain complex technical concepts in a clear and concise manner.