Нередко возникает необходимость в установке двух принципиально разных операционных систем на один компьютер: Windows и Linux. Разумеется, подобное «соседство» будет связано с некоторыми неудобствами. Для установки, как правило, используют специальную программу GRUB. Но к сожалению, при её использовании можно столкнуться с рядом ошибок. В этой статье разберёмся с тем, как исправить ошибки загрузчика GRUB. Давайте же начнём. Поехали!

Для начала давайте определимся с тем, что из себя представляет эта программа. GRUB — представляет собой системный загрузчик, устанавливающийся непосредственно с Линукса и записывающий все данные на первый раздел диска (MBR).
Сам rescue mode является отличительной чертой GRUB 2 от его предыдущей версии. Этот режим запускается, если программе-загрузчику не удалось найти файл «grub.cfg» либо не удалось передать управление в kernel (ядро). В итоге не удаётся найти загрузочные файлы и запустить операционную систему. Именно тогда и возникает ошибка.

Следуйте инструкциям ниже, чтобы узнать, как решить проблему с GRUB
Способ 1
Что делать в случае ошибки unknown filesystem grub-rescue? Перед вами окно, в котором можно использовать только 4 команды, их вполне достаточно, чтобы исправить все проблемы и успешно загрузиться:
- ls — позволяет вывести всё содержимое;
- set — применяется для установки переменных;
- unset — очищает переменную;
- insmod — необходима для загрузки модулей.
Также можно сделать доступным ряд других команд. Сделать их доступными можно, загрузив модуль «normal». Для этого пропишите:
insmod normal
После этого станут доступны:
- dump — для очистки памяти;
- exit — команда выхода из загрузчика;
- chainloader — необходима, чтобы указать последующей команде boot передать управление цепочечному загрузчику;
- kfreebsd — несколько команд, позволяющих загрузить ядро FreeBSD, его модули;
- rmmod — позволяет выгрузить указанный модуль ядра;
- multiboot.
Первым делом нужно отыскать модули, чтобы загрузить их. Для этого введите:
ls
Результатом выполнения команды будет следующее:
(hd0) (hd0,msdos3) (hd0,msdos2) (hd0,msdos1) (hd1) (hd1,msdos2) (hd1,msdos1)
Из этого можно сделать вывод, что загрузчик не может определить файловые системы дисков, поэтому определяет их как msdos. Теперь необходимо угадать видимые диски. В конкретном примере перед вами два диска: hd0 (с тремя разделами) и hd1 (с двумя разделами). Допустим, вы знаете, что Linux инсталлирован на диск, который имеет три раздела. В таком случае вам нужен диск с индексом «0».
GRUB даёт названия разделам в обратном порядке. В связи с этим, неясно как трактовать запись: «(hd0,msdos3)». Ведь можно посчитать это как первым разделом, так и третьим. К счастью, из этой ситуации можно выйти при помощи такого синтаксиса команды: «(hd0,1)». Обратите внимание, что в программе-загрузчике GRUB отсчёт дисков идёт с 0, а разделов с 1.
Допустим, что Линукс хранится в первом разделе, тогда он будет обозначаться (hd0,1). В этом случае команда, которую необходимо прописать, будет иметь вид:
set prefix=(hd0,1)/boot/grub
set root=(hd0,1)
Теперь модули могут быть загружены. Использовать их можно только после загрузки.
После того как вы выбрали нужный диск, проверьте содержится ли там то, что нужно. Для этого пропишите:
ls /boot/grub
В результате выполнения на экране появится список md файлов.
Далее, пропишите:
insmod ext2
insmod normal
normal
После этого загрузчик будет переведён в режим полной функциональности. Затем автоматически будут найдены разделы с операционной системой, и откроется меню программы.
Теперь остаётся загрузить Linux. Делается это при помощи команды:
grub-install /dev/sda

Способ 2
Всё сильно упрощается, если использовать Live CD – загрузочный диск с системой Linux. Он может быть записан на флешке, на внешнем винчестере или на обычном диске – это неважно, главное, чтобы с него можно было загрузить компьютер.
После загрузки Linux стандартным способом устанавливается бесплатная утилита Boot Repair. Она предназначена именно для устранения ошибок загрузки с помощью загрузчика Grub и очень проста в использовании – достаточно кликнуть по кнопке.
Заметим, что иметь Live CD для линуксоида всегда полезно и даже необходимо. Это зачастую избавляет от множества проблем, так как позволяет загрузить полноценную систему с внешнего носителя и использовать весь её инструментарий. Скачать такой диск с любой версией Linux не представляет сложностей, в комплекте обычно идёт инструкция по записи его на флешку.
После выполнения всех этих действий ошибка будет устранена. Пишите в комментариях была ли полезна для вас эта статья и задавайте любые интересующие вопросы по рассмотренной теме.
Любите экспериментировать? Наверняка вы когда-либо пытались произвести какие-то действия со своей Linux-системой, причем не так важно какие были цели: изучение и познание новых возможностей или же какая-то более конкретная цель, в виде исправления той или иной ошибки. В любом случае, при работе с дистрибутивами Linux, для загрузки которых, в большинстве случаев, и используется Grub, с последним могут возникать неприятные проблемы, ввиду которых дальнейшая эксплуатация системы просто-напросто невозможна. В этой статье вы узнаете, что делать, если не загружается Linux. Как вести себя в подобной ситуации и какие действия производить, чтобы починить загрузчик Grub. Пожалуй, начнем.
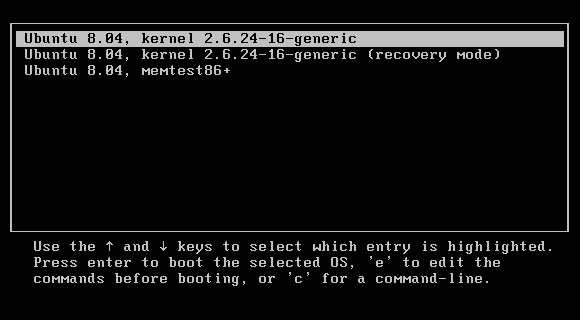
Grub (или GRand Unified Bootloader) — загрузчик операционных систем с открытым исходным кодом. Распространяется он под лицензией GNU GPL, в полностью свободном виде. С помощью этого замечательного лоадера можно сделать много всего — основная же функция не ограничивается загрузкой лишь одной операционной системы. Вы можете иметь куда больше операционных систем на своем ПК, загружая любую из них с помощью Grub. На скриншоте выше вы можете видеть как примерно Grub выглядит. Кстати говоря, если вы захотите установить Ubuntu 18.04 рядом с Windows, вам определенно понадобится помощь Grub.
Grub используется в большинстве дистрибутивов Linux в качестве загрузчика по-умолчанию. Разумеется и с ним иногда возникают проблемы. Этим самые проблемы чреваты полным отказом операционной системы. Поэтому для починки Grub нам понадобятся дополнительные инструменты. Какие именно — узнаете далее.
От чего могут возникнуть проблемы
Одна из самых распространенных причин — это неправильный порядок установки двух операционных систем (Linux и Windows). Допустим, если вы захотите установить две этих операционных системы на свой ПК — вам непременно стоит знать правильную последовательность:
- Сначала устанавливаем Windows
- И только потом уже Linux
Если, например, сделать наоборот, то как раз-таки Grub будет поврежден; система будет грузиться напрямую в Windows, а дистрибутив Linux останется недоступным.
Grub может сломаться и по другим причинам. Например, из-за попыток ручного изменения параметров запуска (при недостатке опыта), в таком случае нужно будет либо вручную убирать лишнее, либо полностью переустанавливать Grub.
Восстановление Grub с помощью LiveCD/USB
Для этого способа нам понадобится флешка с дистрибутивом Linux на борту. Подойдет любой: от Ubuntu, Arch или даже Linux Mint. Здесь нужен только терминал, поэтому подойдет даже версия без графической оболочки.
Как создать LiveCD/USB
Само собой, нам понадобится носитель, на который мы временно (а может и нет) запишем систему. Сохраните все важные файлы, которые были на этом носителе, после чего (имеется ввиду на другом ПК, желательно под управлением Windows) запишите загруженный образ дистрибутива на носитель. В качестве примера мы будем использовать дистрибутив Ubuntu.
Идем на официальную страницу загрузки. Загружаем любую понравившуюся версию (лучше взять новейшую для десктопа), после чего записываем ее на USB/CD.
С помощью Rufus:
Последняя версия приложения доступна на официальном сайте. Сразу после загрузки и запуска/установки мы увидим такое окно:
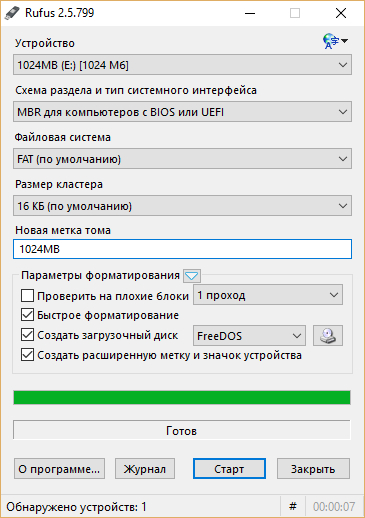
Вставляем носитель, выбираем его в соответствующем меню. Далее выбираем нужную схему раздела и тип системного интерфейса, и после уже открываем файловый менеджер с помощью этой кнопки:
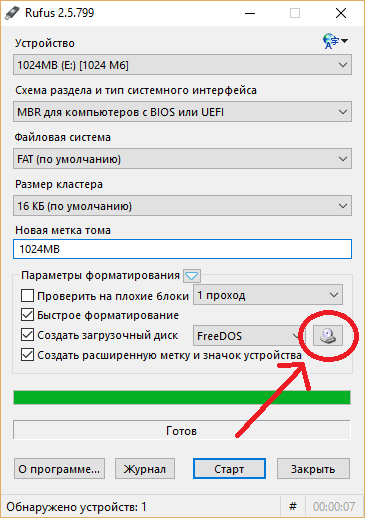
Находим загруженный образ через менеджер, после чего жмем «Старт».
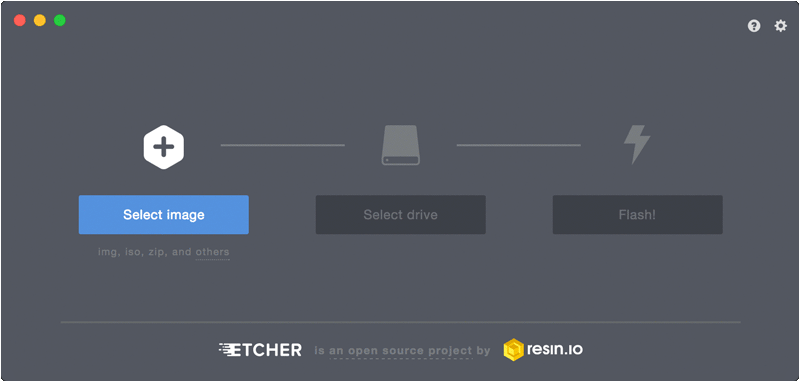
С помощью Etcher:
Опять же, идем на официальный сайт, где скачиваем последнюю версию утилиты. Далее делаем все так, как показано на этой гифке:
Ну а теперь, собственно, можно переходить к восстановлению Grub. Вставляем флешку в наш ПК (где сломан загрузчик), после чего перезагружаем его с этой самой флешки. Как только мы войдем в лайв-систему, сразу открываем терминал, после чего проделываем следующие действия:
Открываем таблицу разделов с помощью команды:
sudo fdisk -l
Примерно такая таблица будет выведена на экран:
/dev/sda1 27 7683 66999082+ 83 Linux
/dev/sda2 * 8450 13995 45430855 7 HPFS/NTFS
/dev/sda3 11885 16574 6503497 5 Extended
По этой таблице мы видим, что Linux, в нашем случае, расположен на разделе /dev/sda1.
С помощью следующей команды мы смонтируем этот раздел в /mnt:
sudo mount /dev/sda1 /mnt
Теперь, для записи grub в MBR, нужно ввести следующую команду:
sudo grub-install --root-directory=/mnt /dev/sda
Если нужно только восстановить MBR диска (после переустановки Windows, к примеру), то этих действий будет вполне достаточно.
Если же необходимо обновить и меню grub (после установки Windows), то нужно выполнить еще и эту команду:
sudo update-grub --output=/mnt/boot/grub/grub.cfg
Вот и все, восстановление закончено!
Восстановление с помощью chroot
Помимо вышеописанного способа, при восстановлении Grub с помощью LiveCD можно использовать и этот. Тут мы будем использовать утилиту chroot.
Здесь нам, опять же, понадобится таблица разделов. Вводим уже известную команду:
sudo fdisk -l
В выводе снова будет эта таблица. Теперь нам надо присмотреться к ней еще внимательнее.
/dev/sda1 27 7683 66999082+ 83 Linux
/dev/sda2 * 8450 13995 45430855 7 HPFS/NTFS
/dev/sda3 11885 16574 6503497 5 Extended
В этом способе нам необходимо примонтировать системный, а также нескольких других важных разделов. Для этого вводим эти команды:
sudo mount /dev/sda1 /mnt
sudo mount --bind /dev /mnt/dev
sudo mount --bind /proc /mnt/proc
sudo mount --bind /sys  /mnt/sys
Обратите внимание, что если если разделы /boot или /var находятся отдельно, то Вам нужно будет примонтировать их в /mnt/boot и /mnt/var.
Далее мы переходим в окружающую среду chroot с помощью команды:
sudo chroot /mnt
И теперь, наконец-таки переустанавливаем Grub с помощью следующей команды:
grub-install /dev/sda
Если вы на этом этапе получаете какие-то сообщения об ошибках, то попробуйте использовать эти команды:
grub-install --recheck /dev/sda
или:
grub-install --recheck --no-floppy /dev/sda
Если все прошло успешно, выходим из chroot, используя команду:
exit
Далее нужно отмонтировать все разделы. Для этого вводим в терминал:
sudo umount /mnt/dev
sudo umount /mnt/proc
sudo umount /mnt/sys
sudo umount /mnt
В случае, если вы монтировали раздел /boot введите команду:
sudo umount /mnt/boot
Теперь перезагружаем систему с помощью:
sudo reboot
Можно также обновить меню Grub, используя команду:
sudo update-grub
Восстановление Grub в rescue mode
Если по каким-то причинам у вас нет доступа к LiveCD/USB-носителю, а также к компьютеру, с помощью которого этот самый носитель можно было бы сделать, то этот способ для вас.
Само восстановление проходит таким образом: сначала мы подгружаем все модули, чтобы открыть доступ ко всей функциональной части Grub, после чего запуститься с нужного раздела. Надо понимать, что Grub состоит из двух частей:
Одна из этих частей (первая) записана в MBR диска. В ней присутствует базовый функционал и ничего больше (консоль в rescue mode).
Стало быть, нам нужно определить, в каком разделе находится вторая часть Grub (находится в каталоге /boot/grub), и после чего подгрузить все недостающие модули. А вот уже после этого мы сможем запустить загрузчик с нужного раздела. В rescue mode есть всего четыре команды:
 ls
set
unset
insmod
Для начала вводим следующую команду:
ls
В выводе будет что-то подобное:
(hd0) (hd0,msdos3) (hd0,msdos2) (hd0,msdos1) (hd1) (hd1,msdos2) (hd1,msdos1)
В некоторых случаях Grub неправильно опеределяет файловые системы находящиеся на разделах дисков. В данном примере загрузчик показывает их как msdos. Мы должны попытаться угадать диски, которые видим. В примере доступно два диска. Диск с индексом 0 содержащий три раздела, и диск с индексом 1 содержащий два раздела. Если вы знаете структуру своих дисков, определить нужный труда не составит.
В загрузчике Grub разделы нумеруются в обратном исчислении. Не очень ясно какой именно из разделов назван, к примеру (hd0,msdos3). Чтобы было более понятно, можно использовать вид (hd0,1). Если в грабе отсчет дисков идет с 0, а разделов с 1, то можно определить, что операционная система установлена в первый раздел первого раздела — (hd0,1). Используем следующую команду:
set prefix=(hd0,1)/boot/grub
set root=(hd0,1)
С помощью этих команд мы приказываем системе использовать какой-то конкретный диск, для выполнения всех остальных операций (в нашем случае, это диск (hd0,1)). Чтобы проверить есть ли на данном диске загрузчик, введем эту команду:
ls /boot/grub
Если в выводе будет список файлов и папок, значит мы все сделали правильно. Теперь можно загрузить все необходимые модули. Для этого выполним команды:
insmod ext2
insmod normal
normal
После выполнения команд Grub загрузится в полнофункциональном режиме. Будут найдены все операционные системы, которые установлены на компьютере, после чего будет показано стандартное меню загрузки.
Чтобы закрепить результат (и не проделывать все то же самое после перезапуска ПК), нужно зайти в терминал своего дистрибутива Linux, где с root правами выполнить следующую команду:
grub-install /dev/sdX
sdX — диск, на который должен быть установлен Grub.
Если операционная система расположена на разделе с файловой системой btrfs, то нам необходимо выполнить следующие команды:
set prefix=(hd0,1)/@/boot/grub
set root=(hd0,1)
И подгрузить модули:
insmod btrfs
insmod normal
Ну и теперь запустить GRUB:
normal
Восстановление Grub с помощью утилиты Boot repair
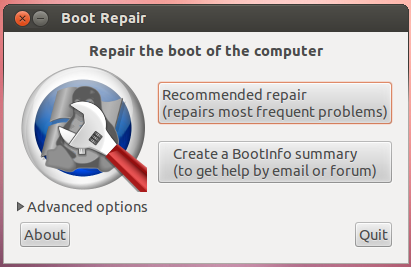
С помощью этой замечательной утилиты вы сможете восстановить загрузчик всего в пару кликов. Как видно из скриншота, утилита имеет собственный GUI, ее использование не вызовет трудностей.
Чтобы установить boot repair, вы можете воспользоваться одним из приведенных способов:
- Запись и установка специального образа диска Boot Repair (и дальнейшая загрузка с него)
- Установка Boot repair из PPA-репозитория в LiveCD/USB дистрибутиве.
Если с первым способом все понятно: нужно просто скачать и записать образ с помощью соответствующих инструментов. То во втором уже нужно знать конкретные команды, которые выглядят следующим образом:
sudo add-apt-repository ppa:yannubuntu/boot-repair
sudo apt-get update && sudo apt-get install -y boot-repair
В утилите будет доступно два варианта на выбор:
Recommended repair исправляет большую часть известных ошибок, которые могли бы возникнуть при запуске. С его помощью вы сможете пофиксить и загрузчик Grub.
Create a BootInfo summary создает Boot-Info-Script – скрипт, который позволяет диагностировать большинство проблем при загрузке.
Здесь же есть и Advanced options. Он включает в себя варианты для восстановления и настройки загрузчика Grub2 (загрузка по-умолчанию, опции загрузки ядра, отображение или скрытие GRUB при загрузке, удаление GRUB). С помощью этих же инструментов, вы можете восстановить MBR и т.д.
Вам обязательно стоит заглянуть на официальный сайт Boot Repair. Там вы сможете найти более подробную информацию обо всех возможностях и особенностях программы. Там же будет доступна информация о выходе новых версий: фиксах и улучшениях самой утилиты, а также многом и многом другом.
Выводы
Вот мы и рассмотрели несколько вариантов исправления загрузчика Grub. Стоит сказать, что некоторые из них могут показаться сложными или даже невыполнимыми. Это не так, каждый из рассмотренных способов нашел подтверждение в виде сотен и тысяч актов исправления загрузчика Grub в опенсорсном сообществе. Кстати говоря, какой из способов выбрать — решать только вам, любой из них достаточно эффективен, чтобы попасть в этот материал.
Возможно вас заинтересуют и другие похожие материалы про починку загрузчика Grub2. Например, в этом материале вы узнаете, как починить GRUB2 если Ubuntu не хочет загружаться. Там более подробно рассказывается, как фиксить груб с помощью утилиты Boot Repair, возможно вам стоит заглянуть туда, если вы не поняли что-то из этого материала. Что же, ну а на сегодня это все. Надеюсь, что данный материал помог вам разобраться в ошибках. Что, в свою очередь, поможет вам их решить.
The objective of this article is to list problems and errors that may occur in certain situations when using the GRUB Legacy bootloader. All these solutions have been acquired through the cooperation of users on the Gentoo Forums.
Starting notes
Acknowledgements
Many thanks to Earthwings, penetrode, loyaltonone, pilla, airhead, nephros, yamakawa and all the others for the suggestions on the original thread.
Disclaimer warning
The examples provided are just examples. Be sure to change partition numbers and the like according to the specific systems specs. Follow the solutions provided by this document at the readers own risk.
GRUB loading, please wait…
Situation
GRUB loading stage 1.5
GRUB loading, please wait...
After this message, the system stops. If attempting to boot the system using a GRUB floppy, the problem disappears.
Solution
According to The_Bell, changing the boot order in the BIOS can solve the problem.
Tell the BIOS to not boot from the floppy first.
[1] took hard disks off the system one-by-one until found out the problem was caused by the SiI3512A SATA RAID-controller.
penetrode wrote that this may also be due to bad CFLAGS settings. Although the current GRUB ebuild filters out-fstack-protector, it can’t hurt to recompile GRUB with clean CFLAGS if nothing else helps.
root #CFLAGS="-O2 -march=i686 -fomit-frame-pointer -pipe" emerge grub:0 --ask
This problem appeared on a dell r320 server, caused by having serial and terminal options in grub.conf, problem disappeared after removing those options.
FILE grub.confoptions to remove
#serial --unit=1 --speed=19200
#terminal --timeout=10 serial
GRUB Error 12
Situation
12 : Invalid device requested.
This error is returned if the device strings syntax is correct but other than that, an error occurred that isn’t defined by any other error.
Solution
When GRUB was installed in the boot record using the interactive commands, were the two lines below executed in the GRUB prompt?
grub>root (hd0,0)
grub>setup (hd0)
(hd0,0) must be replaced with the boot partition and (hd0) with the HDD that was chosen. Remember that (hd0) will install the bootloader in the Master Boot Record of the first hard disk, the primary master.
GRUB error 15
Situation
This error can occur in two different stages of the GRUB configuration, either during the initial configuration (installing GRUB in the master boot record) or after booting the system and attempting to launch Linux (or any other entry).
Initial configuration:
grub>root (hd0,0)
Filesystem type is xfs, partition type 0x83
grub>setup (hd0)
 Checking if "/boot/grub/stage1" exists... no
 Checking if "/grub/stage1" exists... no

Error 15: File not found
Booting an entry:
Booting 'Gentoo Linux'

root (hd0,0)
Filesystem type is ext2fs, partition type 0x83
kernel (hd0,0)/boot/kernel-2.4.20 root=/dev/sda3 vga=792

Error 15: File not found
Press any key to continue...
Solution — Initial configuration
This error is returned if the specified file name cannot be found, but everything else (like the disk/partition info) is OK.
Frequently, the error notes a missing kernel image file. Make sure that the file it is referring to exists on the boot partition.
To find out the exact name of the kernel, boot from the installation cd, mount the root and (if applicable) boot partition. Next, chroot into the Gentoo system and do a listing of the available files to see what kernel images there are available:
This will list all the kernels that there are on the boot partition. If the kernel is missing make sure to have compiled a kernel (using genkernel or manually):
root #cd /usr/src/linux/
root #make menuconfig
root #make
And that it has been copied to the boot partition:
root #cp /usr/src/linux/arch/i386/boot/bzImage /boot
Verify that the name of the kernel is exactly the same as the one mentioned in the grub.conf file. Also make sure that the kernel line in the grub.conf file is referring to that partition (either explicitly or implicitly).
Another reported mistake is to have the BIOS ignore the disk on which the kernel or GRUB stages reside. Also, the partition on which GRUB stores its stages should not use a software RAID-5 (or other striping technology) configuration.
Solution — Booting an entry
First, verify that the root and setup lines that were used are correct.
If it is certain they are valid, then there is the possibility of using a flawed GRUB version (0.93.20031222). Upgrade the Portage tree or mask this version of GRUB:
root #echo "=sys-boot/grub-0.93.20031222" >> /etc/portage/package.mask
root #emerge --ask sys-boot/grub:0
Another option is using the grub-install script as is recommended by the GRUB authors. The --root-directory option is needed if there is a separate boot partition, otherwise it should be left out.
root #grub-install --root-directory=/boot /dev/sda
When all this fails, the boot partition may be corrupt. Check the partition for errors:
GRUB error 17
Situation
root (hd0,0)
filesystem type unknown partition type 0x7

Error 17 : Cannot mount selected partition
Solution
This error is returned if the partition requested exists, but the filesystem type cannot be recognized by GRUB.
Be sure to check the root(x,y) settings in grub.conf.
Also, when trying to boot Windows, make sure that the grub.conf file has the root (hdX,Y) (or rootnoverify (hdX,Y) ) and chainloader (hdX,Y)+1 in it.
GRUB error 18
Situation
kernel (hd1,4)/bzImage root=/dev/sdb7

Error 18: Selected cylinder exceeds max supported by BIOS
Solution
This error is returned when a read is attempted at a linear block address beyond the end of the BIOS translated area. This generally happens if the disk is larger than the BIOS can handle (512 MB for (E)IDE disks on older machines or larger than 8 GB in general).
Try an update for the BIOS and/or move the boot partition to the front (or at least into the appropriate range).
GRUB GRUB GRUB GRUB GRUB …
Situation
GRUB GRUB GRUB GRUB GRUB GRUB GRUB GRUB GRUB GRUB GRUB GRUB GRUB GRUB GRUB
  GRUB GRUB GRUB GRUB GRUB GRUB GRUB GRUB GRUB GRUB GRUB GRUB GRUB GRUB GRUB
...
Solution
According to airhead this can be caused by having the BIOS detect the disks automatically. Try to set the BIOS entry to User Type HDD.
Another possibility is that Grub was installed on the MBR and then reinstalled (for instance due to hard disk changes) but using the wrong setup and root commands.
Probing devices to guess BIOS drives. This may take a long time
Situation
While trying to install GRUB, it hangs after displaying the following line:
root #grub
Probing devices to guess BIOS drives. This may take a long time.
Solution
One reported cause was an exotic configuration of disk devices, like ultra/non-ultra DMA disks on one cable.
When installing GRUB, it just hangs
Situation
When installing GRUB, it hangs:
At this stage, the installation stops.
Solution
If there is no floppy drive, was the --no-floppy switch used?
Uncompressing Linux… Ok, booting the kernel
Situation
The system hangs after displaying the following line:
Uncompressing Linux... Ok, booting the kernel.
Solution
Strictly speaking, this is no GRUB error. One possible cause is that ACPI is not working correctly but is enabled in the kernel. Try to disable it in the BIOS or in the kernel. Another possible cause is that the kernel has been compressed to a format it does not support for decompression, such as LZO requiring LZO_DECOMPRESS.
GRUB just shows a GRUB prompt
Situation
When booting the system, a GRUB prompt appears instead of a list of entries that were defined in the grub.conf file.
Solution
Mount the boot partition and verify if the grub/grub.conf file exists.
root #mount /dev/sda1 /mnt/gentoo/boot
root #cat /mnt/gentoo/boot/grub/grub.conf
Also make sure that the menu.lst symbolic link exists:
root #ls -l /mnt/gentoo/boot/grub/menu.lst
lrwxrwxrwx 1 root root 9 Mar 7 14:00 /mnt/gentoo/boot/grub/menu.lst -> grub.conf
If not, recreate the symbolic link:
root #cd /mnt/gentoo/boot/grub
root #ln -snf grub.conf menu.lst
If this is the case, reinstall GRUB:
(chroot) #grub-install --root-directory=/boot /dev/sda
Could not find device for /boot/boot: not found or not a block device
Situation
When running grub-install during the GRUB installation, the following error appears:
root #grub-install --root-directory=/boot /dev/sda
Could not find device for /boot/boot: not found or not a block device
Solution
Check that the following wasn’t forgotten:
root #grep -v rootfs /proc/mounts > /etc/mtab
Situation
After hitting the Enter (Return) key at the GRUB menu during the system boot, the system reboots.
Solution
Try disabling framebuffer support in the kernel. If this does not help, disable APM and ACPI.
Situation
After hitting Enter (Return) at the GRUB menu during system boot, the screen blanks out, but the system is responsive (for instance, the numlock LED is switchable).
Solution
Turn off framebuffer (typically remove vga=XYZ from grub.conf) and check the processor architecture in the kernel config.
Missing GRUB image
Situation
When booting the system, the spiffy Gentoo splash screen is not seen.
Solution
First of all check if the splash screen file that is being are referred to in grub.conf really exists. If that is the case, go and check the GRUB ebuild. Maybe the patch for the splash image is commented out in the version that is being used.
Failing To boot Windows from a second hard drive
Situation
After selecting the Windows entry, the system refuses to boot without any clear reason as to why.
Solution
cyrillic provides information that it is possible to «map» the disks in a different order by changing grub.conf‘s Windows entry like so:
FILE grub.confMapping disks
title Windows XP
  map (hd0) (hd1)
  map (hd1) (hd0)
  chainloader (hd1,0)+1
GRUB segfaults when trying to install
Situation
The situation described below is only relevant for grub-0.95.x at the moment of installing GRUB at the boot sector.
grub>root (hd0,0)
grub>setup (hd0)
Segmentation fault
Solution
This is a known bug related to this problem and has been fixed in grub-0.96. It is also known that grub-0.94-r1 and grub-0.94-r2 should work correctly. If that fails too, try to emerge grub-static which is currently stable on amd64 and unstable on x86 and (~x86). Check out bug #79378 for additional information.
This page is based on a document formerly found on our main website gentoo.org.
The following people contributed to the original document: Hartwig Brandl, Ioannis Aslanidis
They are listed here because wiki history does not allow for any external attribution. If you edit the wiki article, please do not add yourself here; your contributions are recorded on each article’s associated history page.
What Is GRUB
GRUB or GNU GRUB is short for GRand Unified Bootloader. It is a boot loader used on multi-OS computers that provides users the choice to choose which operating system to boot from on the computer. Different operating systems may need varying boot loaders. For example, NTLDR is the boot loader for Windows NT operating systems, and LILO is the boot loader for Linux. As for GRUB, it is the boot loader for Windows and Linux and is generally used on computers that are with both Windows and Linux installations.
Here’s a quick view of common GRUB loading errors and corresponding solutions. Jump to the part you’re most interested:
| Workable Solutions | Step-by-step Troubleshooting |
|---|---|
| Fix 1. GRUB Loading Error 15 | boot from the Live CD, and mount/boot depending on your partition…Full steps |
| Fix 2. GRUB Loading Error 17 | use a distribution CD or Live CD to set up Grub as sudo grub > root (hd0,0) > setup (hd0) exit…Full steps |
| Fix 3. GRUB Loading Error 21 | Boot the computer from the Ubuntu installation disc > Run Command Prompt as an administrator…Full steps |
| Fix 4. GRUB Loading Error 22 | Restart the computer and press «F8» until you see the options, go back to the menu…Full steps |
Common GRUB Loading Errors
However, it’s not without a problem while using GRUB. Many users have the experience of encountering the GRUB loading error during the computer startup. There are two versions of GRUB, and if you’re using Stage 1.5 or Stage 2.0, you’ll probably encounter grub loading error 15, 17, 21, or 22.
GRUB loading error 15
File not found. This error is displayed when the specified file name cannot be found.
GRUB loading error 17
Cannot mount selected partition. This error is displayed when the partition requested exists, but the file system type is not be recognized by GRUB.
GRUB loading error 21
The selected disk does not exist. This error is displayed if the disk is not recognized by the BIOS in the system.
GRUB loading error 22
No such partition. This error is displayed if a requested partition isn’t on the selected disk.
What Causes GRUB Loading Error 15, 17, 21, 22
When you install Windows and Linux on a computer, you need to configure GRUB correctly to boot from one of the operating systems successfully. Or you may encounter GRUB loading errors, like error 15, 17, 21, and 22. The common GRUB loading errors might be caused by:
- Improper configuration of GRUB
- The wrong installation location of GRUB
- Accidental deletion of GRUB
- The corruption of MBR
How to Fix GRUB Loading Error 15, 17, 21, 22
The solutions differ based on the error you are faced with. Specify the error message you encounter and carry out the corresponding solution.
Fix GRUB Loading Error 15
Make sure the kernel exists. To find out what the exact kernel name is, boot from the Live CD, and mount /boot depending on your partition and then do the following: cd /boot | ls
Fix GRUB Loading Error 17
Make sure your root(x,y) settings are right in your Grub.conf. You could use a distribution CD or Live CD to set up Grub as shown below. (h0,0) means the first hard drive and the first partition on that drive.
sudo grub
root (hd0,0)
setup (hd0) exit
Fix GRUB Loading Error 21
Step 1. Boot the computer from the Ubuntu installation disc.
Step 2. Run Command Prompt as an administrator.
Step 3. Enter the following command:
$sudo -s
#grub
grub> find /boot/grub/stage1 (then cmd will return something like «hd0,0»)
grub> root (hd0,0)
grub> setup (hd0)
grub> quit
Fix GRUB Loading Error 22
Step 1. Restart the computer and press «F8» until you see the options.
Step 2. Go back to the menu where you can choose the operating system.
Step 3. Choose «Microsoft Windows Recovery Console». (You may need your Windows installation disc to access the recovery console.)
Step 4. If you are asked to choose the system drive, enter the number in front of the system drive listed.
Step 5. Enter the account password as required. Run the command fixmbr and enter «y» to confirm the operation.
Step 6. Enter «exit» and restart the computer.
How to Recover Data Lost After Fixing GRUB Loading Error
Applies to: Restore all lost files and data after fixing GRUB loading error in Windows 10/8/7.
Applying the fix for a specific grub loading error in Windows may cause data loss. For example, some operations would format the disk partition or delete hard drive contents. So it’s necessary to learn how to recover data after getting rid of the grub loading error on your computer.
Reliable EaseUS Data Recovery Wizard — EaseUS Data Recovery Wizard specializes in file recovery on all Windows operating systems. It allows you to recover data lost due to the GRUB loading error effectively in only a few simple clicks.
See how to recover the accidentally deleted or formatted hard disk data while fixing GRUB loading error on your computer with ease:
Step 1. Run EaseUS Data Recovery Wizard. Choose the drive where you lost files and start scanning. This software allows you to recover lost data from all devices, including HDD, SSD, USB drive, SD card, pen drive, camera, etc.

Step 2. Browse the full scan results. You can choose the file type you need by clicking on the file type filter. EaseUS data recovery software supports 1000+ file types like photos, videos, documents, emails, audio files, and many more.

Step 3. Select the files you want to preview. Click «Recover» and set a storage location to save the recovered data.

Besides, you can also apply this data recovery software to recover files and data lost on the desktop, laptop, internal hard drive, external hard drive, removable USB flash disk, pen drive, memory card, and many more storage devices.
The Bottom Line
GRUB loading errors always occur on computers with dual OS, and each error code is informative since it indicates what the possible cause is. Apply the solutions provided to cope with the issue and use EaseUS Data Recovery Wizard to retrieve the data when data loss happens.
When you boot your computer, you might find that your computer is stuck in Grub Loading Error 15, 17, 21, or 22. Do you know what they are, the causes of these GRUB Load Errors, and how to fix them to make your computer go back to normal? This MiniTool article shows you the answers.
What Is GRUB Loading Error?
GRUB, which is also known as GNU GRUB, stands for GNU GRand Unified Bootloader. It is a boot loader package from the GNU Project. It provides you a choice to boot one of multiple operating systems installed on a computer or choose a specific kernel configuration available on a particular operating system’s partitions.
It is similar to NTLDR or BOOTMGR on Windows. But, it supports both Windows and Linux kernels and has more features. You need to configure GRUB properly when using your computer. If not, you might encounter different kinds of GRUB errors like Grub Loading Error 15, 17, 21, 22….
Tip: If you encounter the BOOTMGR is missing issue, you can refer to this article to solve it: 11 Solutions to «BOOTMGR Is Missing» Error in Windows 10/8/7; If you are facing NTLDR is missing issue, you can read this post to get the solutions: 10 Solutions to Fix NTLDR Is Missing in Windows 10/8/7.
Now, we will introduce these common GRUB Loading Errors in the following content.
Common Grub Loading Errors
Usually, there are no error codes in Grub Stage 1. You might just receive the error message saying Hard Disk Error, Floppy Error, Read Error, or Geom Error. The GRUB loading error code always appears in Grub Stage 1.5 or Stage 2.0.
There are 4 common GRUB Loading Errors:
- Grub Loading Error 15: File not found. This GRUB Loading Error always appears when a specified file name cannot be found by the system.
- Grub Loading Error 17: Cannot mount selected partition. This GRUB Loading Error always appears when the required partition exists, but the type of file system is not recognized by GRUB.
- Grub Loading Error 21: Selected disk does not exist. This GRUB Loading Error always appears when the disk is not recognized by the BIOS in the system.
- Grub Loading Error 22: No such partition. This GRUB Loading Error always appears when a required partition is not on the selected disk.
Top Reasons for GRUB Loading Errors
Why do the GRUB Loading Errors occur when you boot your computer? Here, we collect some reasons and show them as follows:
- The configuration of GRUB is improper.
- GRUB is installed in a wrong location.
- GRUB is deleted by mistake.
- mbr is corrupted.
Now, you know what GRUB is, the common GRUB Loading Error codes, and the top main causes of these errors. Then, if you are bothered by the GRUB Loading Error, you must want to get rid of it immediately because you still need to use your computer to deal with your work. Keep reading to get the solutions.
How to Fix GRUB Loading Errors?
Focusing on these 4 GRUB Loading Errors, we will introduce 4 different solutions. You just need to select a suitable solution according to the error code you receive.
How to Fix GRUB Loading Errors?
- How to fix GRUB Loading Error 15?
- How to fix GRUB Loading Error 17?
- How to fix GRUB Loading Error 21/22?
How to Fix GRUB Loading Error 15?
If you are bothered by Grub Loading Error 15, you need to make sure that the kernel file exists on your computer. Here, you need to shut down your PC and then boot it from the live CD. Then, you can mount /boot on your partition and then do the following: cd /boot | ls to check the exact name of the kernel file.
It is quite possible that the kernel file is missing from your computer. If so, you can still use the live CD to perform a system reinstallation to get rid of the issue.
How to Fix GRUB Loading Error 17?
If you are facing Grub Loading Error 17, you need to make sure that your root(x,y) settings are right in your Grub.conf. You still need to use a live CD to set up Grub as follows:
1. Boot your computer from a live CD.
2. Execute this command: sudo fdisk –l.
3. You are likely to get the following results:
Disk /dev/sdb: 500.1 GB, 500107862016 bytes
255 heads, 63 sectors/track, 60801 cylinders, total 976773168 sectors
Units = sectors of 1 * 512 = 512 bytes
Sector size (logical/physical): 512 bytes / 4096 bytes
I/O size (minimum/optimal): 4096 bytes / 4096 bytes
Disk identifier: 0x62ff371f
Device Boot Start End Blocks Id System
/dev/sdb1 2048 206847 102400 7 HPFS/NTFS/exFAT
/dev/sdb2 206848 174082047 86937600 7 HPFS/NTFS/exFAT
/dev/sdb3 174082110 976771071 401344481 f W95 Ext’d (LBA)
…
Partition table entries are not in disk order.
The cause of the problem appears on the last line: Partition table entries are not in disk order.
4. You can fix the problem by executing the following command: sudo fdisk /dev/hda. hda means the whole hard disk.
5. If you are an expert, you can select x and press Enter. If you are not an expert, just skip to the next step.
6. Select f and press Enter to fix the partition order.
7. Select w and press Enter to write table to disk.
8. Then, you need to finalize these command one by one in GRUB:
sudo grub
root (hd0,1)
setup (hd0)
quit
Here, (h0, 1) stands for the first hard drive and the second partition on that drive.
Of course, the above hd0,1 and hd0 are just examples. You need to know which hard disk houses your OS and then replace the numbers according to your actual situations.
When all these steps are done, you can restart your computer to check whether it can work as normal.
How to Fix GRUB Loading Error 21/22?
If you are bothered by GRUB Loading Error 21/22, you can follow these steps to fix the problem.
- Boot your computer from the live CD.
- Open a terminal and then run sudo grub. This can lead you to a GRUB command line.
- Run find /boot/grub/stage1.
- Then, run root (hd0, 1). Here, (h0, 1) stands for the first hard drive and the second partition on that drive. You can replace these two numbers according to your own situation.
- Next, run setup (hd0).
- At last, run quit to complete the operation.
After these 6 steps, you still need to reboot your computer to see whether the GRUB Loading Error 21 or GRUB Loading Error 22 is disappeared.
Click to Tweet
If You Lose Your Data Due to GRUB Loading Errors
After the GRUB Loading Errors are solved, you can use your computer as usual. However, you may find that some important files are missing from your device by accident due to the error. In a situation like this, you can use a professional data recovery software to get back your data. Here, we suggest using MiniTool Power Data Recovery.
This free file recovery tool is specially designed to rescue your lost and deleted files from your computer hard drives, SD cards, memory cards, pen drives, CDs, DVDs, and more. It has 4 recovery modules that are designed for different situations.
For example, if you want to recover data from a partition on the hard drive, you can use the This PC module. But, if you have repartitioned the hard drive after missing files, you’d better use the Hard Disk Drive module because it enables you to scan the entire drive at once.
This software is designed for Windows computers. However, if your computer is dual-boot (Windows and Linux), you can choose to recover your Linux data under Windows.
MiniTool Power Data Recovery has a trial edition and you can use it to scan the drive that has saved your lost files and then check whether it can find the files you want to restore. If you are interested in it, you can press the following button to download and then install it on your computer to have a try.
Free Download
After installing MiniTool Power Data Recovery on your device, you can use these steps to retrieve your data.
1. Open this software and you will enter the This PC interface directly.
2. Suppose that you want to recover data from a partition, you can just stay at this recovery module. Then, you need to select the target partition and press Scan to start the scanning process.

3. The whole scanning process will last for a while. To make sure that you can get the best data recovery effect, you need to wait until the whole process ends. Then, this software will show you the scan results by path.
Here, you can click each path and unfold the folders in it to find your needed files. However, you may find that it is not easy and fast to find the target items using this method. If so, you can use other features of this software to perform a quick search.
For example:
- Type: The Type feature can enable the software to show the scan results by type. You must know which type of data you want to recover. So, you can select that type to find your needed files quickly.
- Show Lost Files: After scanning, this software will show you all the data on the drive including existing and deleted files. If you only need to restore the deleted files, you can use this feature to make the software only show you the lost files. This can narrow down the search range.
- Find: If you still remember the name of the file you want to recover, you can use this feature to directly locate that file. However, if the name of the file is damaged, you will be unable to use this method to find your data.
- Preview: This feature enables you to preview up to 70 types of files. So, if you are not sure whether it is the file you want to restore, you can just preview it to make a confirmation.

4. You are not allowed to use this trial edition to recover the scanned files. However, you can update this software to a full edition and then recover your needed files without limits. If you are a personal user, the Personal Ultimate edition can fully meet your need and you can even enjoy a lifetime free update.
Here, you need to know that you should not select the files’ original path to save these data. Otherwise, the deleted files will be overwritten and become unrecoverable.
Click to Tweet
Bottom Line
Now, you should know what GRUB is, the GRUB Loading Errors you may encounter when booting your PC, and how to get rid of these errors. At the same time, we also recommend a data recovery software for recovering your lost and deleted files that are caused by these GRUB Loading Errors. We hope this article is helpful to you.
Should you have any related issues, you can contact us via [email protected] or let us know in the comment.
GRUB Loading Error FAQ
What is a GRUB Loading Error?
A GRUB Loading Error always happens when you boot the computer. It can be caused by improper GRUB configuration, a wrong location of GRUS, missing GRUB, corrupted MBR, etc.
How do I fix grub loading errors?
There are different kinds of GRUB Loading Errors like GRUB Loading Error 15, 17, 21, and 22. This current article shows you the corresponding solutions. You can scroll up to find them.
How to fix Error No Such Partition Grub Rescue?